


AUDIO VIDEO
AUTO-HIFI
This product meets the essential requirements laid down by EEC Directive 89/336
and has been built in accordance with European standards EN50013, EN50020.
Dieses Produkt entspricht den Mindestanforderungen laut EU-Richtlinie 89/336 und
wurde gemäß den Normen EN50013, EN50020.
Se produit répond aux critères minima prévus par la directive 89/336/CEE et il a été
construit conformément aux normes EN50013, EN50020.
R
AUDIO VIDEO
R
AUTO-HIFI
Stereo Car Radio with Autosreverse Cassette
Player and AM / FM band Radio.
Questo prodotto soddisfa i requisiti minimi previsti dalla direttiva 89/336/CEE ed é
stato costruito in conformitá alle norme EN50013, EN50020.
Este producto cumple con todos los requisitos dispuestos por la directiva 89/336/EEC
y ha sido fabricado conformemente con las normas EN50013, EN50020.
is a registered Trademark of Roadstar S.A. - Switzerland All rights reserved
R
AUDIO VIDEO
RC-631G
Instruction manual
Bedienungsanleitung
Manuel d’instructions
Manuale d’istruzioni
Manual de instrucciones
Manual de instruções
INDEX
English Page 1
Deutsch Seite 5
Français Page 9
Italiano Pagina 13
Español Página 17
Portuguès Pagina 21
Fig.
Fig.
RC-631G
• Your new unit was manufactured and assembled
under strict ROADSTAR quality control.
Thank-you for purchasing our product for your music
enjoyment.
Before operating the unit, please read this instruction
manual carefully. Keep it also handy for further future
references.
• Ihr neues Gerät wurde unter Beachtung der strengen
ROADSTAR-Qualitätsvorschriften gefertigt.
Wir danken Ihnen für den Kauf unseres Produktes
und wünschen Ihnen optimalen Hörgenuss. Bitte
lesen Sie diese Bedienungsanleitung durch, und
heben Sie sie auf, um jederzeit darin nachschlagen
zu können.
• Votre nouvel appareil a été fabriqué et monté en
étant soumis aux nombreaux tests ROADSTAR. Nous
espérons que cet appareil vous donnera entière satisfaction.
Avant de vous donner à ces activités, veuillez lire
attentivement ce manuel d’instructions. Conservezle à portée de main à fin de référence ultérieure.
• Ihr neues Gerät wurde unter Beachtung der strengen
ROADSTAR-Qualitätsvorschriften gefertigt.
Wir danken Ihnen für den Kauf unseres Produktes
und wünschen Ihnen optimalen Hörgenuss. Bitte
lesen Sie diese Bedienungsanleitung durch, und
heben Sie sie auf, um jederzeit darin nachschlagen
zu können.
• Il vostro nuovo apparecchio é stato prodotto ed
assemblato sotto lo stretto controllo di qualitá
ROADSTAR.
Vi ringraziamo di aver acquistato un nostro prodotto
per il vostro piacere d’ascolto.
Prima di procedere all'utilizzo dell'apparecchio,
leggete attentamente il manuale d’istruzioni e
tenetelo sempre a portata di mano per futuri
riferimenti.
• Seu novo aparelho foi construido e montado sob o
estrito controle de qualidade da ROADSTAR.
Agradecemos por ter comprado nosso produto para
a sua diversão.
Antes de usar esta unidade é necessário ler com
atençâo este manual de instruções pare que possa
ser usada apropriadamente; mantenha o manual
ao seu alcance para outras informações.

12
EnglishEnglish
W ARNINGS
The exclamation point within the triangle is a warning sign alerting the user of important instructions accompanying the
product.
The lightening flash with arrowhead symbol within the triangle
is a warning sign alerting the user of “dangerous voltage” inside
the unit.
To reduce the risk of electric shock, do not remove the cover. No
CAUTION
RISK OF ELECTRIC
user serviceable parts inside the unit. Refer all servicing to
SHOCK
DO NOT OPEN
qualified personnel.
This unit must not be exposed to moisture or rain.
This unit should be positioned so that it is properly ventilated.
Do not expose this unit to direct sunlight or heat radiating
sources.
Correct Disposal of This Product
(Waste Electrical & Electronic Equipment)
This marking shown on the product or its literature, indicates that it should not
be disposed with other household wastes at the end of its working life. To prevent
possible harm to the environment or human health from uncontrolled waste
disposal, please separate this from other types of wastes and recycle it
responsibly to promote the sustainable reuse of material resources.
Household users should contact either the retailer where they purchased this
product, or their local government office, for details of where and how they
can take this item for environmentally safe recycling.
Business users should contact their supplier and check the terms and conditions
of the purchase contract. This product should not be mixed with other commercial
wastes for disposal.
RC-631G Stereo Car Radio with Autoreverse Cassette Player.
INSTRUCTION MANUAL
Please read this instruction manual carefully and familiarize yourself with your new Radio
Cassette before using it for the first time. Please retain this manual for future reference.
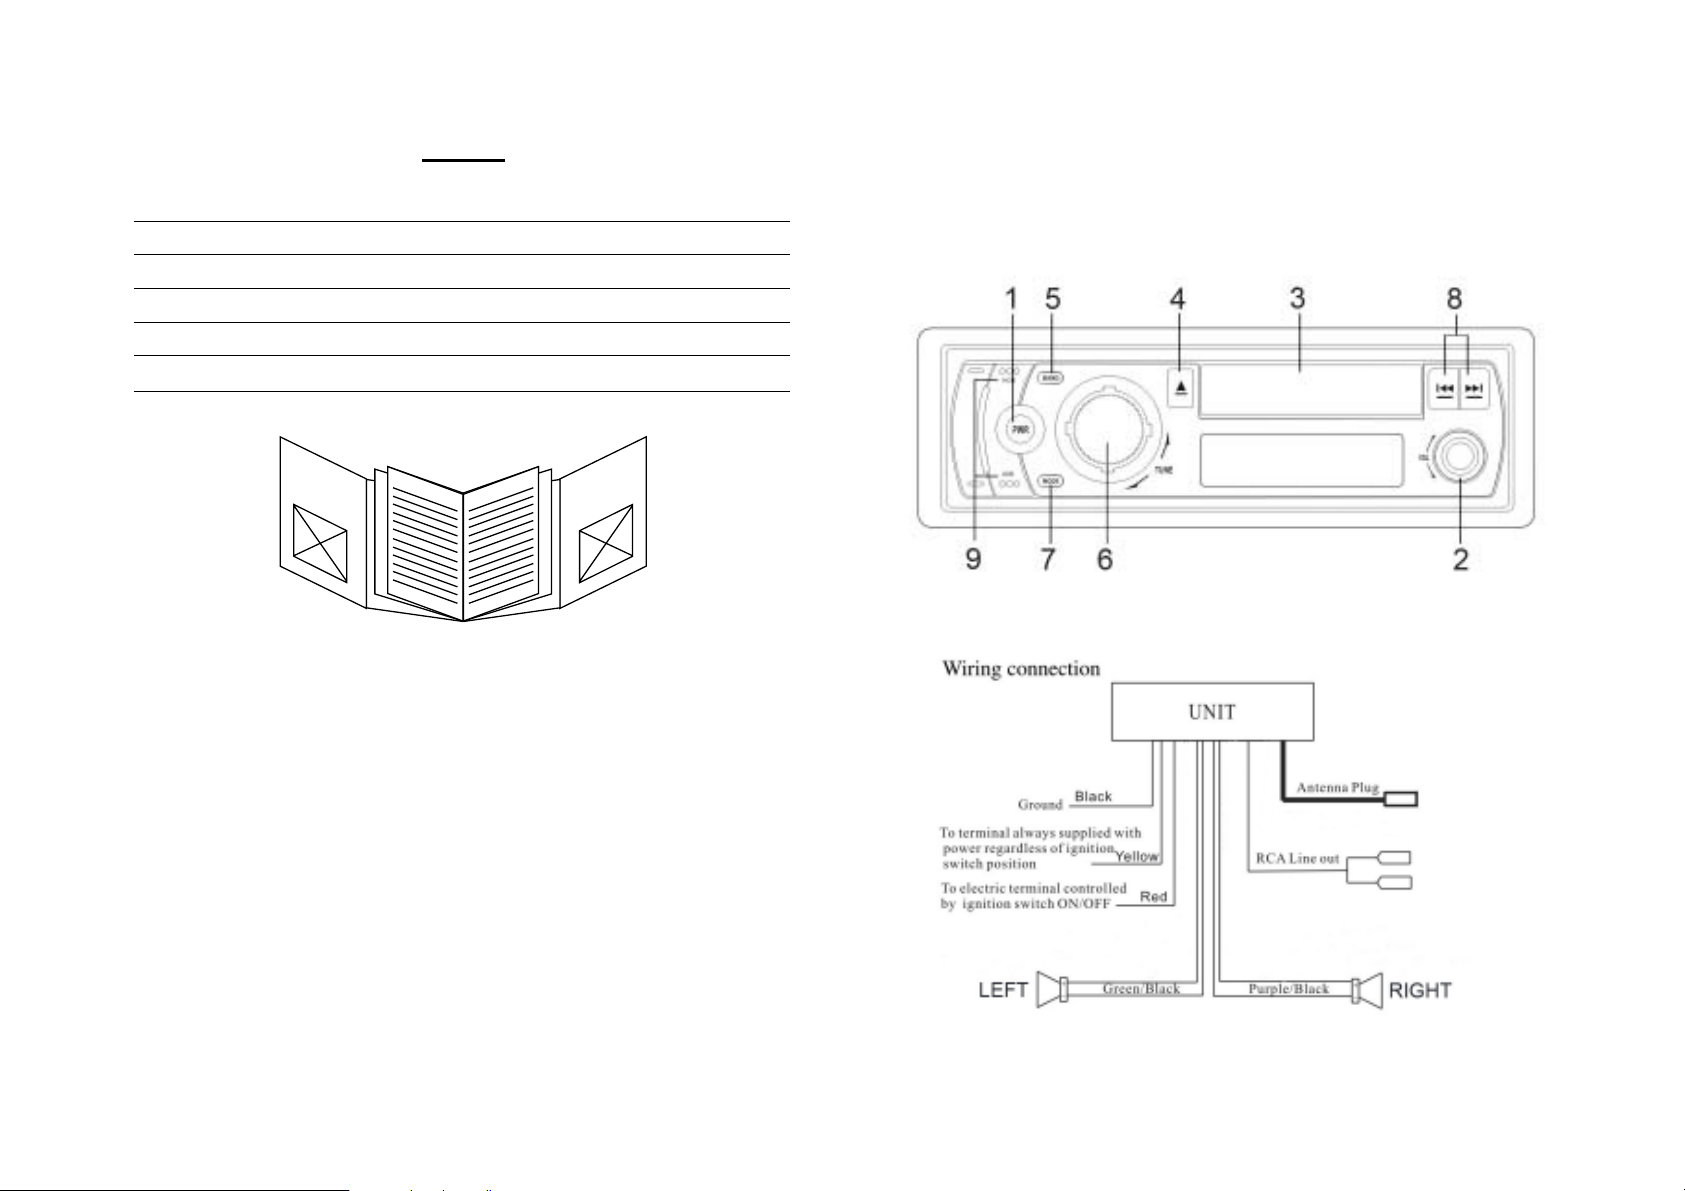
LOCATIONS OF CONTROLS & OPERATING INSTRUCTION
1. POWER ON/OFF BUTTON
Press this button to turn the power supply on or off.
2. VOLUME CONTROL
Rotate this knob to increase or decrease the volume level.
3. CASSETTE TAPE DOOR
In RADIO mode, insert a cassette into this slot, the tape playback starts automatically.
4. EJECT KEY
In TAPE mode, push this key to fully to stop tape playback and release cassette tape.
The car radio cassette player will automatically go into radio mode.
5. BAND SELECTOR BUTTON
Each press for AM / FM reception. The character of band which has been selected
will be visible on the display indicating the status of tuning.
6. TUNING CONTROL
Rotate this control at radio mode to select your desired radio broadcasting station
within AM/FM. While the frequency appears on the display.
7. MODE BUTTON
Each press for Tape, Radio or Clock function.
8. FAST FORWARD / REVERSE BUTTON
For fast-forward, push in the button (>>) which indicates the same direction of the lighted
tape direction indicator. For rewind, push the button (<<) with the arrow marks in the opposite
direction of that shown by the tape direction indicator. At the end or tape in either fast forward
or rewind, the unit will automatically select play mode. To release either fast forward or
rewind button from the lock position, push in the other button approximately half-way . During
tape play, pushing both fast forward and rewind buttons simultaneously will change the
direction of tape travel.
9. CLOCK DISPLAY AND SETTING BUTTON
Time setting:
With time appeared on the LCD display, press the H and M button at the same time to
adjust hour and minute.

34
EnglishEnglish
INSTALLATION
PRECAUTIONS
• Avoid installing the unit where it would be subject to high temperatures, such as from
direct sunlight or hot air from the heater, or where it would be subject to dust, dirt or
excessive vibration.
• Use only the supplied mounting hardware for a safe and secure installation.
• Be sure to remove the front panel before installing the unit.
MOUNTING EXAMPLE
Installation in the dashboard
PRECAUTIONS AND MAINTENANCE
• This unit is designed for negative ground 13.2V DC operation only. The equipment can
be used safely, if the negative terminal of the battery is connected to the vehicle metal
work.
• If the car interior is extremely hot, as after being parked under the sun, do not use the
player until the car has been driven for a while to cool off the interior.
• Take care of your tape cassette to preserve the quality of the recordings. Do not allow
them to be exposed to direct sunlight. Store them in a place protected from dirt and dust
and avoid handing with greasy or oily hands. Also, keep it away from magnets and
motors of the permanent magnet type.
• It is not advisable to use cassette tapes longer than C-60 (30 minutes per side) in
automobile players, since the tape is too thin and tends to become easily entangled.
Always remove cartridge from your tape player as soon as play if finished.
• The capstan and tape head should be cleaned about once every six months with a soft
cloth or cotton wool swab moistened with alcohol. This will serve to maintain the richness
and clarity of sound and prevent loss of volume. Do not use a screwdriver, or ferrous
metal rod, in carrying out the above cleaning. See illustration.
• A loosely wound cassette tape will get damaged. Prior to using such tape, tighten it in a
manner as guided by Fig. 2. A carelessly would cassette tape will cause unnecessary
pressure on the tape resulting in the cassette springing out while the tape is running.
For prevention, rewind the tape through fast forwarding or rewinding.
Maintenance
FUSE REPLACEMENT
If the fuse blows, check the power connecton and replace the fuse. If the fuse blows again
after the replacement, there may be an internal malfunction. In this case, consult your
nearest repairing centre.
Warning
Use the specified amperage fuse for each lead. Use of a higher amperage fuse may cause
serious damage.
SPECIFICA TIONS
FM TUNER
Frequency Range 87.5 - 108.5 MHz
Usable Sensitivity (Mono) better than 15dBuV
I.Frequency 10.7MHz
Stereo Separation > 24 dB
MW TUNER
Frequency Range 520 - 1640KHz
Usable Sensitivity better than 30 dBuV at S/N 20dB
I.Frequency 455KHz
TAPE SECTION
Tape Speed 4.75cm/sec.
Wow & Flutter < 0.35% WRMS
S/N Ratio > 40dB
Channel Separation > 35dB
GENERAL
Power Supply Voltage 13.2V DC,Negative Ground
Max Current Consumption 3A
Max Output Power 2 x 7 Watts (4 Ohm)
Note: Specifications and the design are subject to possible modification without notice
due to improvement.
Fig. 1
Fig. 2
 Loading...