

Page 1

SUPER SLIM PORTABLE CD PLAYER
WITH 50” ANTI-SHOCK PROTECTION AND
ANTI-ROLLING
PCD-5451
Instruction manual
Bedienungsanleitung
Manuel d’instructions
Manuale d’istruzioni
Manual de instrucciones
Manual de instruções
R
AUDIO VIDEO
Page 2
English Page 1
Deutsch Seite 9
Français Page 17
Italiano Pagina 25
Español Página 3 3
Português Pagina 4 1
INDEX
PCD-5451
Fig
.
Fig.
• Ihr neues Gerät wurde unter Beachtung der strengen
ROADSTAR-Qualitätsvorschriften gefertigt.
Wir danken Ihnen für den Kauf unseres Produktes
und wünschen Ihnen optimalen Hörgenuss. Bitte
lesen Sie diese Bedienungsanleitung durch, und
heben Sie sie auf, um jederzeit darin nachschlagen
zu können.
• Il vostro nuovo apparecchio è stato prodotto ed
assemblato sotto lo stretto controllo di qualitá
ROADSTAR.
Vi ringraziamo di aver acquistato un nostro prodotto
per il vostro piacere d’ascolto.
Prima di procedere all'utilizzo dell'apparecchio,
leggete attentamente il manuale d’istruzioni e
tenetelo sempre a portata di mano per futuri
riferimenti.
• Seu novo aparelho foi construido e montado sob o
estrito controle de qualidade da ROADSTAR.
Agradecemos por ter comprado nosso produto para
a sua diversão.
Antes de usar esta unidade é necessário ler com
atençâo este manual de instruções pare que possa
ser usada apropriadamente; mantenha o manual
ao seu alcance para outras informações.
• Your new unit was manufactured and assembled under strict ROADSTAR quality control.
Thank-you for purchasing our product for your music
enjoyment.
Before operating the unit, please read this instruction
manual carefully. Keep it also handy for further future
references.
• Votre nouvel appareil a été fabriqué et monté en
étant soumis aux nombreaux tests ROADSTAR. Nous
espérons que cet appareil vous donnera entière satisfaction.
Avant de vous adonner à ces activités, veuillez lire
attentivement ce manuel d’instructions. Conservezle à portée de main à fin de référence ultérieure.
• Vuestro nuevo sistema ha sido construido según las
normas estrictas de control de calidad ROADSTAR.
Le felicitamos y le damos las gracias por su elección
de este aparado. Por favor leer el manual antes de
poner en funcionamiento el equipo y guardar esta
documentación en case de que se necesite
nuevamente.
Page 3

EnglishEnglish
12
The exclamation point within the triangle is a warning sign alerting the user of important instructions accompanying the
product.
The lightening flash with arrowhead symbol within the triangle
is a warning sign alerting the user of “dangerous voltage” inside
the unit.
To reduce the risk of electric shock, do not remove the cover. No
user serviceable parts inside the unit. Refer all servicing to
qualified personnel.
This unit employs a laser. Only a qualified service person should
remove the cover or attempt to service this device, due to
possible eye injury.
Invisible laser radiation when the unit is opened or interlocks
defeated. Avoid exposure to laser beam. Use of controls,
adjustments or procedures other than those specified herein
may result in hazardous radiation exposure.
This unit must not be exposed to moisture or rain.
Do not expose this unit to direct sunlight or heat radiating sources.
Make sure all batteries are inserted according to the proper
polarity. Do not mix old batteries with new ones.
If the unit is not used for a long period of time (more than 1
month), remove all batteries from their compartment to avoid
possible leaking.
CAUTION
RISKOF ELECTRIC
SHOCK
DONOT OPEN
LASER PRODUCT
CLASS 1
- +
- +
WARNINGS
PCD-5451
Portable CD Player with Digital Anti-shock System (50 seconds buffer) and
Anti-Rolling.
TABLE OF CONTENTS
• Functions and Controls
• Power Supply
• Connections
• Earphones with volume control
• CD Playback
• Locating a Particular Track or Point of the Track
• Repeat Playback
• Intro
• Random
• Programmed Playback
• Special Functions
• Maintenance
• Specifications
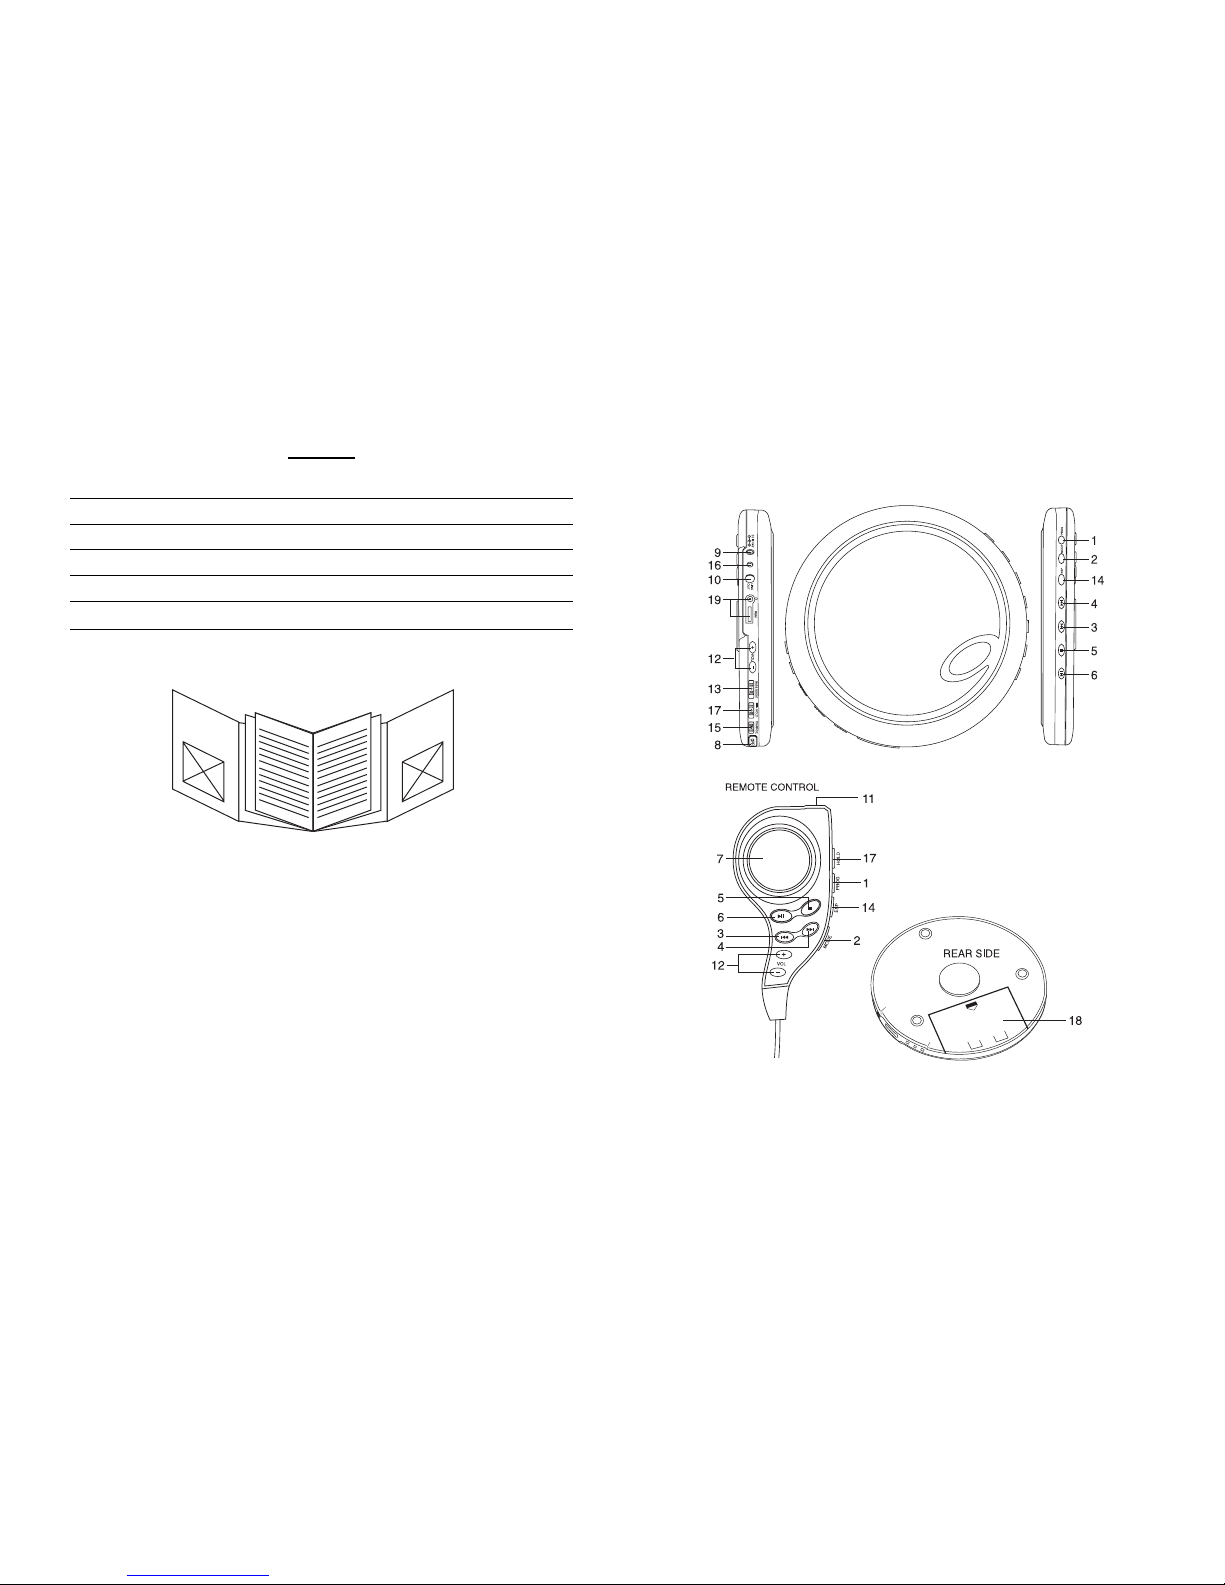
FUNCTIONS AND CONTROLS
1. PROGRAM button
2. PLAY MODE button
3. SKIP/SEARCH backward button
4. SKIP/SEARCH forward button
5. STOP button (Auto Power Off)
6. PLAY/PAUSE button (Auto Power On)
7. LCD display
8. CD Door Open button
9. DC 4.5 V INPUT socket
10. LINE-OUT socket
11. HEADPHONE socket
12. VOLUME control knob
13. DYNAMIC BASS BOOST switch
14. ANTI-SHOCK button
15. CHARGE switch
16. CHARGE indicator
17. HOLD button
18. BATTERY Compartment
19. REMOTE CONTROL socket
ATTENTION!
Extended listening at high volumes can cause damages to
hearing.
Page 4

EnglishEnglish
34
POWER SUPPLY
Use with rechargeable batteries
1. Disconnect the AC/DC adaptor from the wall outlet if it is being connected to the unit.
2. Open the battery compartment door, located on the bottom of the unit, by sliding the door
and lift it up. (Do not remove the battery door).
3. Insert the supplied 2 x 1.2V /Ni-MH (Rectangular type) batteries, following the correct
polarity, as indicated on the unit.
4. Close the battery compartment door.
5. Insert the DC plug, at the end of the AC/DC adaptor cord, into the DC 4,5 V INPUT socket
located on the back of the unit.
6. Connect the AC/DC adaptor into a 230V ~ 50Hz AC power outlet.
7. Move the CHARGE SWITCH (15) to ON to start recharging function. The red CHARGE
indicator (16) will light indicating that the rechargeable batteries are being charged.
8. After 15 hours of charging unplug the AC/DC adaptor from the wall outlet.
Use with AC/DC adaptor (included)
1. Insert the DC plug, at the end of the AC/DC adaptor cord, into the DC 4,5 V INPUT socket
located on the back of the unit.
2. Connect the AC/DC adaptor into a 230V ~ 50Hz AC power outlet.
Notes:
• Use only the supplied AC/DC adaptor. Using other types of adaptor may damage the
unit.
• Make sure that the AC/DC adaptor matches with your household voltage before
connecting it into the wall outlet.
• When not using AC power, disconnect the AC/DC adaptor from the wall outlet.
• Do not touch the AC/DC adaptor with wet hands.
Cautions:
• DO NOT charge continuously for 24 hours or more, otherwise it will deteriorate the
performance of the rechargeable batteries.
Notes:
• If the rechargeable batteries are being charged for the first time, it will take approximately
15 hours to be fully charged.
• If the operating time decreases drastically even when the rechargeable batteries are
properly recharged, purchase a new set of rechargeable batteries.
CONNECTIONS
External Audio System
Connect the stereo connection cable into the LINE OUT jack (10) of the unit and the CD/AUX
of the audio system. (Do not connect it to the amplifier phono jack.)
Note: Always switch off the power before making any connections between the CD player
and other audio system.
• If the CD player interference with the TV or radio reception, move the CD player away
from TV set or radio receiver.
EARPHONES
Connect the stereo earphones (included) to the Phones jack (11).
CD PLAYBACK
1. Connect the earphones (included) or optional headphones into the Phones jack.
2. Press the Door Open button (8) to open the CD compartment door.
3. Insert a disc with the label side facing up.
4. Close the CD compartment door until a click is heard.
5. Set the VOLUME control to minimum.
6. Press the PLAY/PAUSE ( >II ) button (6), the unit power will turn on automatically and
starts playback. The total number of tracks and playing time appears on the display.
During playback, the track number and the elapsed playing time will be displayed.
7. Adjust the VOLUME control to your desired listening level.
8. To stop playback temporarily , press the PLA Y/PAUSE ( >II ) button (6) once. The elapsed
time and track number will flash on the display. Press the PLAY/PAUSE ( >II ) button
again to resume playback.
9. To stop playback, press the STOP (5) button once.
10. To turn the unit off, press the STOP (5) twice.
Notes:
• When the CD door is accidentally opened during playback, "OPEN" will appear on the display.
• Wait until the disc is fully stopped before pressing the OPEN button.
• This unit can play 3" (8cm) single CDs without an adaptor.
Page 5

EnglishEnglish
56
LOCATING A P ARTICULAR TRACK OR POINT OF THE TRACK
1. Press the BACKWARD (I<<) button once to go back to the beginning of the current track.
2. Press the BACKWARD(I<<) button repeatedly to go back to previous tracks.
3. Press the FOWARD (>>I) button repeatedly to go to next tracks.
4. Press and hold either FORWARD (>>I) or BACKWARD (I<<) button to search backwards
or forwards, at high speed, a particular point of track.
Note: Low level audio will be heard during the search process to assist in locating the
correct point in the track.
REPEAT PLA YBACK
1. Press the PLAY/PAUSE button (6).
2. To repeat the same track, press the CD Mode button (2) once. The indicator
(
<>1) will appear on the display and starts single repeat playback until STOP button (5)
is pressed.
3. To repeat the entire CD, press the CD PLAY Mode button (2) twice during playback.
The indicator (
<> ALL ) will appear on the display, and all tracks will be repeated.
To cancel the repeat mode, simply press the STOP button (5). The indicator disappears
from the display.
INTRO PLA Y
1. Press the PLAY/PAUSE button (6) and after 3 seconds the STOP button (5).
2. Press the MODE button (2) 3 times to enter the Intro mode,
'INT' flashes on the display.
3. Press the PLAY/PAUSE button, CD will play the first 10 seconds of each track on the CD.
4. Press MODE button (2) twice to cancel Intro playback and resume normal playback.
5. Power is turned off automatically after 25 seconds, when all tracks have been played.
RANDOM PLAY
1. Press the PLAY/PAUSE button (6).
2. Press the MODE button (2) 4 times to enter the Random mode, 'RAND' appears on the
display and CD will start playback in randomly order
3. Press SKIP button to go to next Random track, .
Note: If the Random mode is selected during the playback, the function will commence
once the current track is ended.
4. Press the CD Mode button (2) once to return to the Normal Playback mode.
PROGRAMMED PLAYBACK
1. Press the PLAY/PAUSE button (6) and after 3 seconds the STOP button (5).
2. Press the PROGRAM button (1). The track number and 'PGM' will flash on the display
indicating the first selection.
3. Press BACKWARD (I<<) or FORWARD (>>I) button to select the desired track to be
programmed. The track number which will be programmed will flash on the display.
4. Press the PROGRAM button (1) button to enter the track into memory.
5. Repeat the steps 2 and 4 to program up to 20 tracks.
6. Press PLAY/PAUSE (>II) button (6) once to start programmed playback.
7. To cancel programmed playback, press the STOP button (5) twice.
Note: Programmes can be set in Stop mode only.
During program playback, if you wish to repeat the entire programmed playback,
press the MODE button repeatedly until the (
<> ALL ) indicator appears on the
display.
SPECIAL FUNCTIONS
Dynamic Bass Boost
Set the BASS BOOST switch (13) to “ ON ” position to enjoy a more powerful Bass sound.
Note: Since Bass Boost performance will change depending on the volume level, sound
maybe distorted due to high volume is set. Lower the volume level until the sound
quality is improved.
Auto Power Off
When the unit is stopped (standby mode) for approximately 30 seconds, the Auto Power Off
function will activated and turn the unit off automatically.
Anti-shock Function
• If in use, the player is likely to receive shocks or vibrations (i.e. whilst walking or in a
moving vehicle), press the ANTI-SHOCK button (14) to provide uninterrupted playback.
• When the button is pressed, the display will show (
[ASP ) and the function is initialised.
When (
[||| ASP) appears on the display, the data buffer is full.
• Should the player receive shocks for more than 50 seconds continuously, the sound
can mute for a very short while and will resume once the player has stabilised from the
shock.
Page 6

EnglishEnglish
78
SPECIFICATIONS
Audio
D/A conversion 1-bit DAC four times oversampling
Frequency response 20-20,000Hz
Anti-shock 50 seconds memory
Wow and flutter Below measurable limits
No. of channels 2 channels (stereo)
Output level Line output: 0.6V rms (47KΩ )
Headphone: 20mW (32Ω)
Bass Boost effect (100Hz) + 6 dB
General
Power requirements -2 x 1.2V/Ni-MH Battery (Rectangular type)
- DC in 4,5V jack accepts AC power adaptor
(centre positive)
Power consumption 0.8W (DC 3V)
Dimension Approx. 132 (W) x 19 (H) x 136 (D) mm
Weight (without batteries) 200 g.
Note: Specifications and the design are subject to possible modifications without notice
due to improvement.
Notes:
• When using the Anti-shock function, the disc will rotate faster than normal playback and
memory is active. Only use the ANTI-SHOCK function when necessary to preserve the
battery life.
• The Anti-shock function will not correct the errors arising from the use of defective
scratched or dirty discs.
HOLD switch
This unit is equipped with a HOLD switch to disable the operating controls. Select HOLD
switch (17) to "ON".
MAINTENANCE
Cleaning the unit
Wipe the outside surface of the unit with a soft cloth moistened with water and mild soap.
Handling CDs
Your CD player has been especially designed for the reproduction of compact discs bearing
the CD mark. No other discs should be loaded into the player.
Always place the disc in tray with the label facing up.
Although compact discs are impervious to wear during play, damage to the surface of a disc
through improper handling will result in playback irregularities.
To preserve your compact discs, please handle them with care.
Although minute dust particles and fingerprints should have no effect on playback, you
should keep the serface of the recorded side of your discs clean by wiping the disc with a
clean, dry, lint-free soft cloth with straight movements from the centre outwards.
Never use record cleaners, record sprays, antistatic sprays, liquids nor chemical based
liquids to clean the surface of a disc. They may in fact irreparably damage the disc's plastic
surface.
Always return the disc to its protective plastic case when not using it. Avoid exposing discs
to direct sunlight, excessive temperatures or high humidity for extended periods of time. Do
not write on the label side of the disc with a ball/point pen as this may scratch the disc.
 Loading...