

INDEX
English Page 1
Deutsch Seite 7
SLIM PORTABLE CD PLAYER WITH LCD
DISPLAY
PCD-435CD
Instruction manual
Bedienungsanleitung
• Your new unit was manufactured and assembled under strict ROADSTAR quality control.
Thank-you for purchasing our product for your music
enjoyment.
Before operating the unit, please read this instruction
manual carefully. Keep it also handy for further future
references.
• Ihr neues Gerät wurde unter Beachtung der strengen
ROADSTAR-Qualitätsvorschriften gefertigt.
Wir danken Ihnen für den Kauf unseres Produktes und
wünschen Ihnen optimalen Hörgenuss. Bitte lesen Sie
diese Bedienungsanleitung durch, und heben Sie sie
auf, um jederzeit darin nachschlagen zu können.
(10)
(9)
Battery Compartment
(7)
(6)
(5)
(2)
(12)
(11)
www.roadstar.com
Roadstar management SA, via Passeggiata 7 CH 6883 Novazzano (Switzerland)
(8)
(3/4)
(1)
EnglishEnglish
WARNINGS
The exclamation point within the triangle is a warning sign alerting the user of important instructions accompanying the
product.
The lightening flash with arrowhead symbol within the triangle
is a warning sign alerting the user of “dangerous voltage” inside
the unit.
To reduce the risk of electric shock, do not remove the cover. No
user serviceable parts inside the unit. Refer all servicing to
qualified personnel.
This unit employs a laser. Only a qualified service person should
remove the cover or attempt to service this device, due to
possible eye injury.
Invisible laser radiation when the unit is opened or interlocks
defeated. Avoid exposure to laser beam. Use of controls,
adjustments or procedures other than those specified herein
may result in hazardous radiation exposure.
This unit must not be exposed to moisture or rain.
Do not expose this unit to direct sunlight or heat radiating sources.
Make sure all batteries are inserted according to the proper
polarity. Do not mix old batteries with new ones.
If the unit is not used for a long period of time (more than 1
month), remove all batteries from their compartment to avoid
possible leaking.
ATTENTION!
Extended listening at high volumes can cause damages to hearing.
1 2
PCD-1900
PortableAudio CD with LCD display.
TABLE OF CONTENTS
• Functions and Controls
• Power Supply
• Connections
• Earphones
• CD Playback
• Locating a Particular Track or Point of the Track
• Repeat Playback
• Intro play
• Random play
• Programmed Playback
• Auto Power Off
• Maintenance
• Specifications
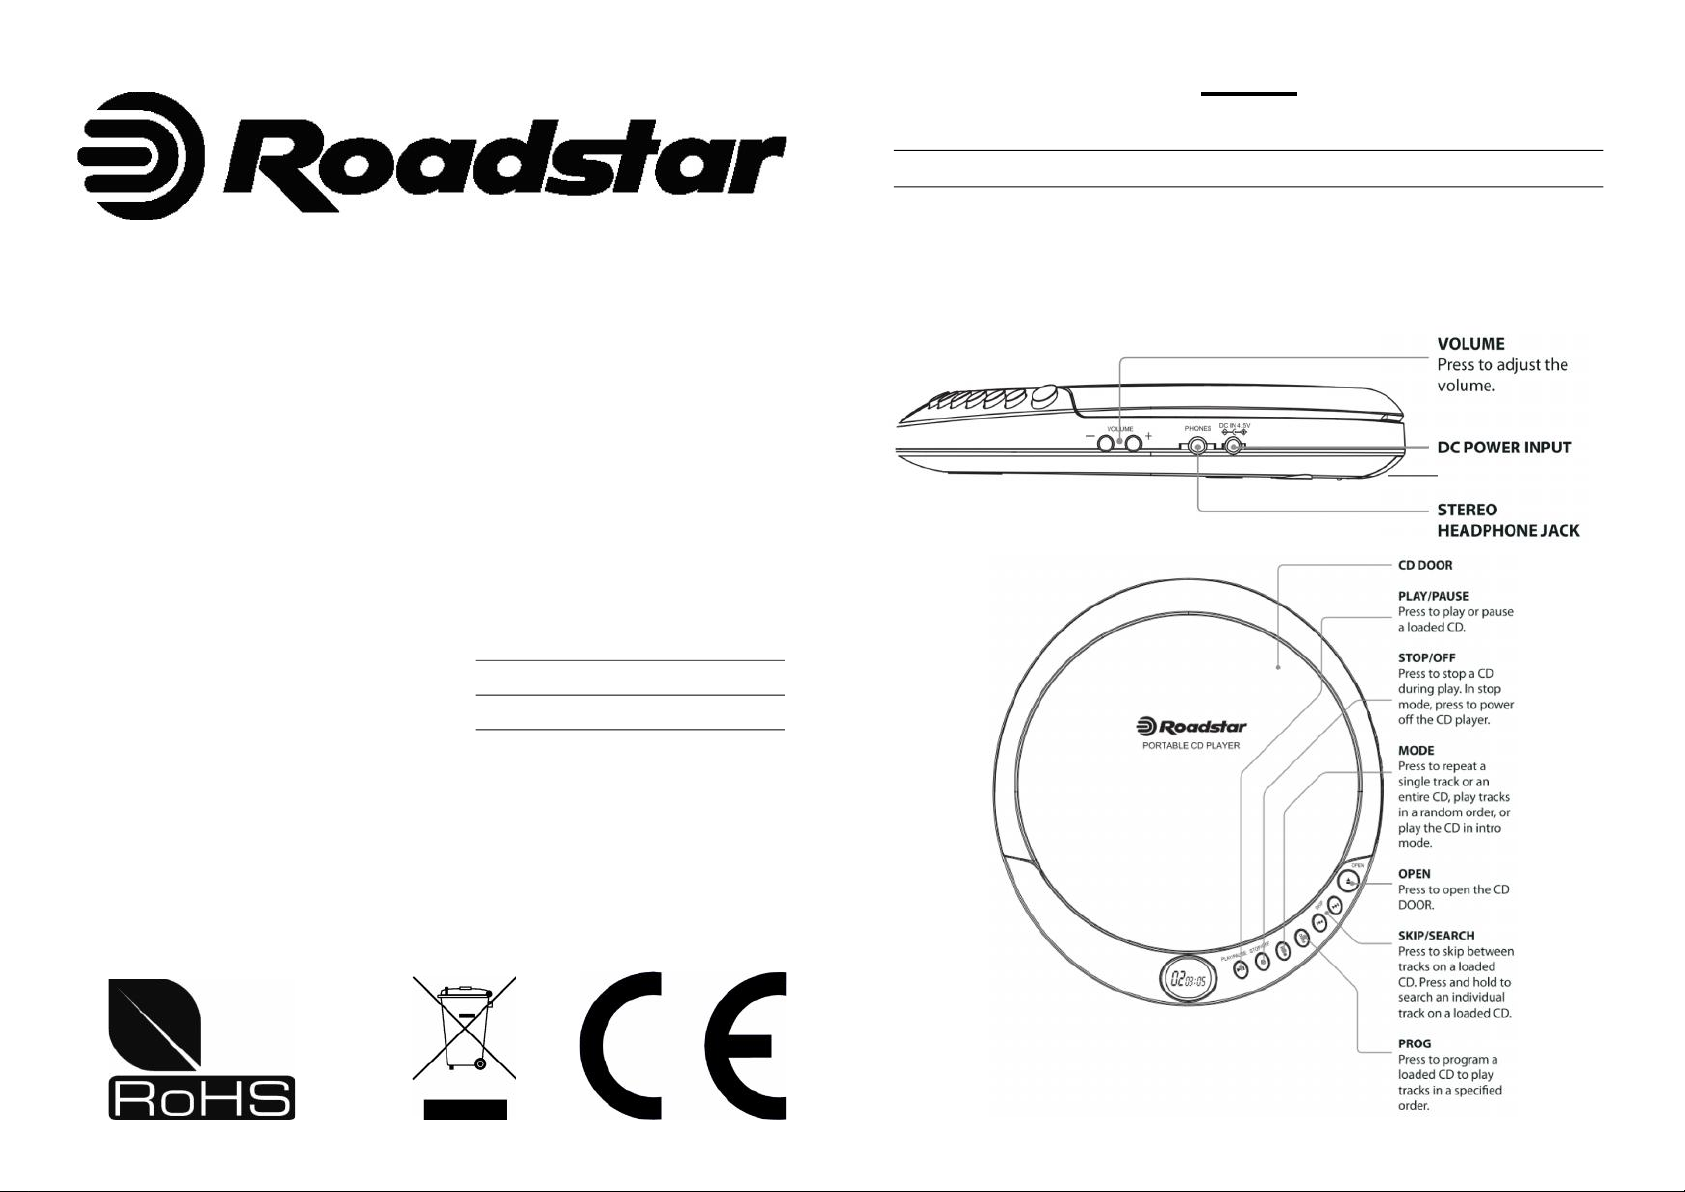
FUNCTIONS AND CONTROLS
1. PROGRAM button
2. MODE button
3. SKIP/SEARCH backward button
4. SKIP/SEARCH forward button
5. STOP button (Auto Power Off)
6. PLAY/PAUSE button (Auto Power On)
7. CD DOOR
8. CD Door Open button
9. DC 4,5V EXTERNAL INPUT
10. VOLUME control knob
11. HEADPHONE socket
12. BATTERY compartment
POWER SUPPLY
Use with regular batteries
1. Open the battery compartment door (12) , located in the disc compartment. (Do not remove
the battery door).
2. Insert 2 x 1.5V /UM-3/AA size alkaline batteries, following the correct polarity, as indicated in
EnglishEnglish
3 4
the battery compartment.
3. Close the battery compartment door.
Note: If the symbol “ “ flashes in the display, batteries are weak and ought to be replaced.
EARPHONES
Connect the stereo earphones (included) to the Phones jack (11).
CD PLAYBACK
1. Connect the earphones (included) or optional headphones into the Phones jack.
2. Press the Door Open button (8) to open the CD compartment door.
3. Insert a disc with the label side facing up.
4. Close the CD compartment door until a click is heard.
5. Set the VOLUME control (10) to minimum.
6. Press the PLAY/PAUSE ( >II ) button (6), the unit power will turn on automatically and start
playback.
The total number of tracks and total playing time appear on the display. Playback starts.
During playback, the actual track and the elapsed time appear.
7. Adjust the VOLUME control to your desired listening level.
8. To stop playback temporarily, press the PLAY/PAUSE ( >II ) button (6) once. The elapsed time
and track number will flash on the display. Press the PLAY/PAUSE ( >II ) button again to
resume playback.
9. To stop playback, press the STOP (5) button once.
10. To turn the unit off, press the STOP (5) twice.
Notes:
• When the CD door is accidentally opened during playback, " " will appear on the
display.
• Wait until the disc is fully stopped before pressing the OPEN button.
• This unit can play 3" (8cm) single CDs without an adaptor.
4. Press and hold either +SKIP/SEARCH () or - SKIP/SEARCH ( ) button to search
backwards or forwards, at high speed, a particular point of track.
Note: Low level audio will be heard during the search process to assist in locating the correct
point in the track.
REPEAT PLAYBACK
1. Press the PLAY/PAUSE button (6).
2. To repeat the same track, press the MODE button (2) once. The” 1” indicator will appear
on the display. The CD will start single repeat playback until STOP button (5) is pressed.
3. To repeat the entire disc, press the MODE button (2) twice. The “ ALL” indicator will
appear on the display.
INTRO PLAY
1. Press the PLAY/PAUSE button (6) and after 5 seconds the STOP button (5).
2. Press the MODE button (2) three times to enter the Intro mode, 'INTRO' appears on the
display.
3. Press the PLAY/PAUSE button, CD will play the first 10 seconds of each track on the CD.
4. Press MODE button (2) once more to cancel Intro playback and resume normal playback.
5. Power is turned off automatically after 30 seconds, when all tracks have been played.
RANDOM PLAY
1. Press the PLAY/PAUSE button (6) and after 5 seconds the STOP button (5).
2. Press the MODE button (2) to enter the Random mode. “RND” flashes on the display
3. Press PLAY/PAUSE button (6) to start playback in Random order.
4. Press SKIP Forward () button (4) to go to next Random track.
5. Press the MODE button once more to return to the Normal Playback mode.
PROGRAMMED PLAYBACK
LOCATING A PARTICULAR TRACK OR POINT OF THE TRACK
1. Press the - SKIP/SEARCH ( ) (3) button once to go back to the beginning of the current
track.
2. Press the - SKIP/SEARCH ( ) (3) button repeatedly to go back to previous tracks.
3. Press the +SKIP/SEARCH () (4) button repeatedly to go to next tracks.
1. Press the PLAY/PAUSE button (6) and after 5 seconds the STOP button (5).
2. Press the PROGRAM button (1). The track number and the program number will appear and
“PROG” will flash on the display indicating the first selection.
3. Press - SKIP/SEARCH ( ) or +SKIP/SEARCH () button to select the desired track to be
programmed. The track number which will be programmed will appears on the display.
4. Press once the PROGRAM button (1) to enter the track into memory.

EnglishEnglish
5 6
5. Repeat the steps 3 and 4 to program up to 20 tracks.
6. Press PLAY/PAUSE (>II) button (6) once to start programmed playback.
7. To cancel programmed playback, press the STOP button (5) twice.
Note: Programming can set only in Stop mode.
During program playback, if you wish to repeat the entire programmed playback, press
the MODE button (2) repeatedly until the “ ALL” indicator appears on the display.
AUTO POWER OFF
When the unit is stopped (standby mode) for approximately 30 seconds, the Auto Power Off
function will activated and turn the unit off automatically.
MAINTENANCE
Cleaning the unit
Wipe the outside surface of the unit with a soft cloth moistened with water and mild soap.
Handling CDs
Your CD player has been especially designed for the reproduction of compact discs bearing the
CD mark. No other discs should be loaded into the player.
Always place the disc in tray with the label facing up.
Although compact discs are impervious to wear during play, damage to the surface of a disc
through improper handling will result in playback irregularities.
To preserve your compact discs, please handle them with care.
Although minute dust particles and fingerprints should have no effect on playback, you should keep
the serface of the recorded side of your discs clean by wiping the disc with a clean, dry, lint-free
soft cloth with straight movements from the centre outwards.
Never use record cleaners, record sprays, antistatic sprays, liquids nor chemical based liquids to
clean the surface of a disc. They may in fact irreparably damage the disc's plastic surface.
Always return the disc to its protective plastic case when not using it. Avoid exposing discs to direct
sunlight, excessive temperatures or high humidity for extended periods of time. Do not write on
the label side of the disc with a ball/point pen as this may scratch the disc.
IMPORTANT
Since movement of the CD mechanism and the sensitive circuitry may cause interference to a
radio tuner nearby switch this unit off while operating other radio devices.
This product utilizes a laser
Danger - Invisible laser radiation when opened and interlock failed or defeated. Avoid direct
exposure to the beam.
Caution - Use of controls, adjustments, or procedures not listed in this manual may result in
hazardous radiation exposure.
SPECIFICATIONS
Audio
D/A conversion 1-bit DAC , 8 times oversampling
Frequency response 20-20,000Hz
Wow and flutter Below measurable limits
No. of channels 2 channels (stereo)
Headphone: 20mW (32Ohm)
General
Power requirements -2 x LR6 / UM-3 / “AA” alkaline battery
Power consumption 0.8W (DC 3V)
Dimension Approx. 135(W) X 24(H) X 148(D)
Weight 245 g.
Specifications and the design are subject to possible modifications without notice.
Concerning Compact Discs
Only compact discs identified with this mark can be used with this
player.
Correct Disposal of This Product
(Waste Electrical & Electronic Equipment)
This marking shown on the product or its literature, indicates that it should not be
disposed with other household wastes at the end of its working life. To prevent possible
harm to the environment or human health from uncontrolled waste disposal, please
separate this from other types of wastes and recycle it responsibly to promote the
sustainable reuse of material resources.
Household users should contact either the retailer where they purchased this product,
or their local government office, for details of where and how they can take this item
for environmentally safe recycling.
Business users should contact their supplier and check the terms and conditions
of the purchase contract. This product should not be mixed with other commercial
wastes for disposal.

DeutschDeutsch
SICHERHEITSHINWEISE
Das Ausrufezeichen im Dreieck weist den Benutzer auf wichtige
Bedienungs- und Wartungsanweisungen (Service) in diesem
Handbuch hin, die unbedingt zu befolgen sind.
Das Blitzsymbol im Dreieck weist den Benutzer auf “gefährliche
Spannungen” an einigen freiliegenden Bauteilen im Innem des
Gerätes hin.
Um die Gefahr elektrischer Schläge auszuschliessen, Gehäuse
auf keinen Fall abnehmen. Im Innern befinden sich keine vom
Benutzer selbst instandsetz-baren Teile. Reparaturen dürfen nur
von einer autorisierten Fachwerkstatt durchgeführt werden.
Dieses Gerät funktioniert mit einem Laserstrahl. Da Gefahr von
Augenschäden besteht, darf nur qualifiziertes Personal den
Deckel des Gerätes öffnen, entfernen oder reparieren.
Dunkelstrahlung bei geöffneten Geräten und defektem
Verschluss. Bedienung oder Regulierung der technischen
Bestandteile oder sonstige nicht spezifierte Prozeduren an
diesem Gerät können zur Aussetzung gefährlicher Laserstrahlen
führen.
Setzen Sie das Gerät weder Feuchtigkeit noch Regen aus.
Setzen Sie das Gerät weder direkter Sonneneinstrahlung noch
Wärmequellen aus.
Beim Einlegen der Batterien achten Sie auf die richtige Polarität.
Vermischen Sie keine neuen Batterien mit alten oder entladenen
Batterien.
Bei längerer Nichtbenutzung des Geräts (mehr als einen Monat)
nehen Sie die Batterien heraus, um Auslaufen zu vermeiden.
ACHTUNG!
Längeres Hören bei hoher Lautstärke kann Gehörschäden
verursachen.
Korrekte Entsorgung dieses Produkts (Elektromüll)
Die Kennzeichnung auf dem Produkt bzw. auf der dazugehörigen Literatur gibt an,
dass es nach seiner Lebensdauer nicht zusammen mit dem normalen HaushaltsmüIl
entsorgt werden darf. Entsorgen Sie dieses Gerat bitte getrennt von anderen Abfallen,
um der Umwelt bzw. der menschlichen Gesundheit nicht durch unkontrollierte
Müllbeseitigung zu schaden. Recyceln Sie das Gerät, um die nachhaltige
Wiederverwertung von stofflichen Ressourcen zu fördern.
Private Nutzer sollten den Händler, bei dem das Produkt gekauft wurde, oder die
zuständigen Behörden kontaktieren, um in Erfahrung zu bringen, wie sie das Gerät
auf umweltfreundliche Weise recyceln können.
Gewerbliche Nutzer sollten sich an Ihren Lieferanten wenden und die Bedingungen
des Verkaufsvertrags konsultieren. Dieses Produkt darf nicht zusammen mit anderem
Gewerbemüll entsorgt werden.
7 8
PCD-435CD
Tragbarer Audio-CD-Spieler mit LCD-Anzeige.
INHALTSVERZEICHNIS
• Bedienungselemente
• Stromversorgung
• Anschlüsse
• Hörerbuchse
• CD-Wiedergabe
• Auffinden eines bestimmten Titels oder einer Titelstelle
• Wiederholte Wiedergabe
• Anspielen
• Zufällige Titelfolge
• Programmierte Wiedergabe
• Automatisches Ausschalten
• Wartung
• Technische Daten
BEDIENUNGSELEMENTE
1. PROGRAMM-Taste
2. MODE-Taste
3. SPRUNG/SUCH-Taste rückwärts
4. SPRUNG/SUCH-Taste vorwärts
5. STOP-Taste (Autom. Aus)
6. WIEDERGABE/PAUSE-Taste (Autom. Ein)
7. CD-FACH
8. CD-FACH ÖFFNUNGS-Taste
9. EXT. 4,5V EINGANG
10. LAUTSTÄRKE-Regler
11. KOPFHÖRER-Buchse
12. Batteriefach
STROMVERSORGUNG
Betrieb mit normalen Batterien
1. Öffnen Sie den Batteriefachdeckel, der sich im CD-Fach befindet. (Entfernen Sie den
Batteriedeckel nicht.)
2. Setzen Sie 2 x 1.5V-Alkaline-Batterien Größe UM-3/AA entsprechend der richtigen, in dem

DeutschDeutsch
9 10
Batteriefach angezeigten, Polarität ein.
3. Schließen Sie den Batteriefachdeckel.
Hinweis: Wenn das Symbol “ “ auf dem Display blinkt, sind die Batterien schwach
und sollten ersetzt werden.
OHRHÖRER
Schließen Sie die Stereo-Ohrhörer (mitgeliefert) an die Hörerbuchse (11) an.
CD-WIEDERGABE
1. Schließen Sie die Ohrhörer (mitgeliefert) oder wenn Sie möchten Kopfhörer, an die
Hörerbuchse an.
2. Drücken Sie die Tür-Offen-Taste (8), um die CD-Fach-Tür zu öffnen.
4. Schließen Sie die CD-Fachklappe, bis sie einrastet und Sie ein “Klick” hören.
5. Stellen Sie den LAUTSTÄRKE-Regler (10) auf das Minimum.
6. Drücken Sie die WIEDERGABE/PAUSE-Taste (>II)(6). Das Gerät wird automatisch
eingeschaltet und die Wiedergabe startet.
Auf dem Display erscheinen die Gesamtanzahl der Titel und die totale Wiedergabezeit.
7. Stellen Sie mit dem LAUTSTÄRKE-Regler den gewünschten Hörpegel ein.
8. Um die Wiedergabe zeitweilig zu stoppen, drücken Sie einmal die WIEDERGABE/
PAUSE-Taste (>II). Die Titelnummer und die verlaufende Wiedergabezeit blinken auf
dem Display. Drücken Sie erneut die WIEDERGABE/PAUSE-Taste (>II), um die
Wiedergabe fortzusetzen.
9. Um die Wiedergabe zu stoppen, drücken Sie einmal die STOP-Taste (5).
10. Um das Gerät auszuschalten, drücken Sie zweimal die STOP-Taste (5).
Hinweise:
• Wenn die CD-Klappe während der Wiedergabe versehentlich geöffnet wird, erscheint
" " auf dem Display.
• Bevor Sie die ÖFFNUNGS-Taste drücken, warten Sie, bis die CD vollständig stoppt.
• Dieses Gerät kann 3" (6cm) CD-Singles ohne Adapter wiedergeben.
AUFFINDEN EINES BESTIMMTEN TITELS ODER EINER TITELSTELLE
1. Drücken Sie die RÜCKWÄRTS-()(- SKIP/SEARCH)-Taste (3) einmal, um an den
Anfang des laufenden Titel zurückzukehren.
2. Drücken Sie die RÜCKWÄRTS-( )-Taste (3) mehrmals, um zum vorherigen Titel
zurückzukehren.
3. Drücken Sie die VORWÄRTS-()(+SKIP/SEARCH)-Taste(4)mehrmals, um zu den folgenden
Titeln zu springen.
4. Halten Sie die VORWÄRTS-()- oder die RÜCKWÄRTS-( )-Taste gedrückt, um schnell
eine bestimmte Titelstelle vorwärts oder rückwärts aufzusuchen.
Hinweis: Während des Suchlaufs hören Sie einen niedrigeren Audio-Pegel, was Ihnen
erleichtert, die richtige Titelstelle zu finden.
WIEDERHOLTE WIEDERGABE
1. Drücken Sie die PLAY/PAUSE-Taste (>II)(6).
2. Um denselben Titel zu wiederholen, drücken Sie einmal die MODE-Taste (2). Auf dem
Display erscheint die Anzeige 1. Beginnt die wiederholte Wiedergabe bis der STOPTaste (5) gedrückt wird.
3. Um die gesamte CD zu wiederholen, drücken Sie zweimal die MODE-Taste (2). Auf dem
Display erscheint die Anzeige ALL und alle Titel werden wieder gespielt.
ANSPIELEN (INTRO SCAN)
1. Drücken Sie die PLAY/PAUSE-Taste (>II)(6) und nach 5 Sek. die STOP-Taste (5).
2. Drücken Sie die MODE-Taste dreimal, um den Anspiel-Modus zu aktivieren.
Auf dem Display erscheint ‘INTRO’.
3. Drücken Sie die WIEDERGABE/PAUSE-Taste. Es werden die ersten 10 Sekunden jedes
Titels auf der CD angespielt.
4. Drücken Sie die MODE-Taste noch einmal, um den Anspiel-Modus zu löschen, und um
zum normalen Wiedergabe-Modus zurückzukehren.
5. Das Gerät wird sich nach 30 Sek. automatisch ausschalten, wenn alle Titel abgespielt
sind.
ZUFÄLLIGE TITELFOLGE (RANDOM)
1. Drücken Sie die PLAY/PAUSE-Taste (>II)(6) und nach 5 Sek. die STOP-Taste (5).
2. Drücken Sie die MODE-Taste (2), um den Zufallsmodus zu aktivieren. Auf dem Display blinkt
“RDM”.
3. Drücken Sie die PLAY/PAUSE-Taste (6), startet die Wiedergabe der CD in zufälliger
Reihenfolge.
4. Drücken Sie die SPRUNG/SUCH-Taste vorwärts, um am nächsten zufälligen Titel zu gehen.
5. Drücken Sie erneut die MODE-Taste, um zum Normalen Wiedergabe-Modus
zurückzukehren.

DeutschDeutsch
11 12
PROGRAMMIERTE WIEDERGABE
1. Drücken Sie die PLAY/PAUSE-Taste (>II)(6) und nach 5 Sek. die STOP-Taste (5).
2. Drücken Sie die PROGRAMM-Taste (1) einmal. Auf dem Display erscheint die Titelnummer,
die Programmnummer und “PROG” blinkt.
3. Drücken Sie die VORWÄRTS-()(+SKIP/SEARCH)- oder die RÜCKWÄRTS-()(-SKIP/
SEARCH)-Taste, um den gewünschten Titel zu wählen, der programmiert werden soll.
Die Titelnummer, die programmiert wird, erscheint auf dem Display.
4. Drücken Sie die PROGRAMM-Taste (1), um den Titel zu speichern.
5. Wiederholen Sie die Schritte 3 bis 4, um bis zu 20 Titel zu speichern.
6. Drücken Sie die WIEDERGABE/PAUSE-Taste (>II) (6) einmal, um die programmierte
Wiedergabe zu starten.
7. Um die programmierte Wiedergabe zu löschen, drücken Sie die STOP-Taste (5) zweimal.
Hinweis: Programmierung ist nur möglich im Stop-Modus.
Wenn Sie während der programmierten Wiedergabe das Programm
wiederholen möchten, drücken Sie mehrmals die MODE-Taste (2), bis die
Anzeige ALL auf dem Display erscheint.
AUTOMATISCHES AUSSCHALTEN
Automatisches Ausschalten
Wenn das Gerät ca. 30 Sekunden lang stoppt (Standby-Modus), wird die Automatische
Ausschalt-Funktion aktiviert und das Gerät wird automatisch ausgeschaltet.
sollten Sie die bespielte Oberfläche Ihrer Discs sauber halten. Wischen Sie die Disc mit einem
sauberen, trockenen, fusselfreien und weichen Tuch ab, wobei Sie mit geraden Bewegungen von
der Mitte nach außen vorgehen.
Verwenden Sie niemals Plattenreiniger, Plattensprays, Antistatik-Sprays, Flüssigkeiten
oder chemische Flüssigkeiten, um die Oberfläche der Disc zu reinigen. Der Plastiküberzug
könnte ernsthaft beschädigt werden.
WICHTIG
Die Bewegung des CD-Mechanismus und der empfindliche Stromkreis können
Störungen bei einem nahestehenden Radio oder Tuner hervorrufen. Schalten Sie dieses
Gerät aus, wenn Sie andere Radios verwenden.
Dieses Gerät verwendet einen Laser
Gefahr - Unsichtbare Laserstrahlung beim Öffnen und wenn das Schließsystem versagt
oder beschädigt ist. Vermeiden Sie es, sich der direkten Strahlung auszusetzen.
Vorsicht - Die Benutzung von Bedienelementen, das Vornehmen von Regulierungen
oder Einstellungen, die nicht in dieser Bedienungsanleitung aufgeführt sind,
könnten Sie einer gefährlichen Strahlung aussetzen.
Bezüglich der Compact Discs
Nur Compact Discs mit dieser Marke dürfen mit diesem
CD-Spieler wiedergegeben werden.
WARTUNG
Reinigen des Gerätes
Wischen Sie das Gerätegehäuse mit einem weichen Tuch ab, das mit einer milden
Seifenwasserlösung angefeuchtet ist.
Umgang mit den CDs
Ihr CD-Spieler wurde speziell entwickelt, um Compact Discs mit der Marke CD wiederzugeben.
Es sollten keine anderen Discs ins Gerät eingelegt werden.
Legen Sie die Disc immer mit der beschrifteten Seite nach oben ein.
Auch wenn die Compact Discs während der Wiedergabe keiner Abnutzung unterliegen, könnten
durch unsachgemäßen Umgang hervorgerufene Schäden zu einer unregelmäßigen
Wiedergabequalität führen.
Um den guten Zustand Ihrer Compact Discs zu bewahren, gehen Sie bitte sorgfältig mit ihnen um.
Obwohl kleinste Staubteilchen und Fingerabdrücke keinen Einfluß auf die Wiedergabe haben,
TECHNISCHE DATEN
Audio
D/A-Wandelung 1-Bit DAC, 8-fach Oversampling
Frequenzgang 20-20,000Hz
Gleichlaufschwankungen Nicht meßbar
Kanalanzahl 2 Kanäle (Stereo)
Stromversorgung - 2 x UM-3 / “AA”-Alkaline-Batterien
Stromverbrauch 0.8W (DC 3V)
Abmessungen Ca. 135(B) X 24(H) X 148(T) mm
Gewicht 245 g.
Änderung vorbehalten.
 Loading...