

Page 1
Correc t Dis posal of Thi s Pro duct
(Waste Electr ical & Elect ronic Equ ipment)
This marking shown on the product or its literature, indicates
that it should not be disposed with other household wastes
at the end of its working life. To prevent possible harm to
the environment or human health from uncontrolled waste
disposal, please separate this from other types of wastes
and recycle it responsibly to promote the sustainable reuse
of material resources.
Household users should contact either the retailer where they
purchased this product, or their local government office, for
details of where and how they can take this item for
environmentally safe recycling.
Business users should contact their supplier and check the
terms and conditions of the purchase contract. This product
should not be mixed with other commercial wastesfor disposal.
Korrekte Ents orgung di eses Pro dukts (Elektromüll )
Die Kennzeichnung auf dem Produkt bzw. auf der
dazugehörigen Literatur gibt an, dass es nach seiner
Lebensdauer nicht zusammen mit dem normalen
HaushaltsmüIl entsorgt werden darf. Entsorgen Sie dieses
Gerat bitte getrennt von anderen Abfallen, um der Umwelt
bzw. der menschlichen Gesundheit nicht durch unkontrollierte
Müllbeseitigung zu schaden. Recyceln Sie das Gerät, um die
nachhaltige Wiederverwertung von stofflichen Ressourcen zu
fördern.
Private Nutzer sollten den Händler, bei dem das Produkt
gekauft wurde, oder die zuständigen Behörden kontaktieren,
um in Erfahrung zu bringen, wie sie das Gerät auf
umweltfreundliche Weise recyceln können.
Gewerbliche Nutzer sollten sich an Ihren Lieferanten wenden
und die Bedingungen des Verkaufsvertrags konsultieren.
Dieses Produkt darf nicht zusammen mit anderem
Commen t éliminer ce p roduit -
(déchets d'équi pements électriqu es et élec troniques)
Ce symbole sur le produit ou sa documentation indique qu'il
ne doit pas être éliminé en fin de vie avec les autres déchets
ménagers. L'élimination incontrôlée des déchets pouvant
porter préjudice a l'environnement ou a la santé humaine,
veuillez le séparer des autres types de déchets et le recycler
de façon responsable. Vous favoriserez ainsi la réutilisation
durable des ressources matérielles.
Lesparticulierssontinvitesa contacter le distributeur leur ayant
vendu le produit ou a se renseigner auprès de leur mairie pour
savoir ou et comment ils peuvent se débarrasser de ce produit
afin qu'il soit recyclé en respectant l'environnement.
Les entreprises sont invitées a contacter leurs fournisseurs
et a consulter les conditions de leur contrat de vente. Ce
produit ne doit pas être éliminé avec les autres déchets
commerciaux.
Corretto smaltime nto del prodotto - (rif iuti ele ttrici e d
elettronici)
II marchio riportato sul prodotto e sulla sua documentazione
indica che il prodotto non deve essere smaltito con altri rifiuti
domestici al termine del ciclo di vita. Per evitare eventuali
danni all'ambiente o alla salute causati dall'inopportuno
smaltimento dei rifiuti, si invita l'utente a separare questo
prodottoda altri tipi di rifiutiediriciclarlo in manieraresponsabile
per favorire il riutilizzo sostenibile delle risorse materiali.
Gli utenti domestici sono invitati a contattare il rivenditore
presso il quale e stato acquistato il prodotto o l'ufficio locale
preposto per tutte le informazioni relative alla raccolta
differenziata e al riciclaggio per questo tipo di prodotto.
Gli utenti aziendali sono invitati a contattare il proprio fornitore
e verificare i termini e le condizioni del contratto di acquisto.
Questo prodotto non deve essere smaltito unitamente ad altri
rifiuti commerciali.
Eliminac ión co rrecta de este produc to -
(material electri co y e lectrónico de descarte)
La presencia de esta marca en el producto o en el materiál
informativo que lo acompaña, indica que al finalizar su vida
útil no deberá eliminarse junto con otros residuos domésticos.
Para evitar los posibles daños al medio ambiente o a la salud
humanequerepresenta la eliminaciónincontroladade residuos,
separe este producto de otros tipos de residuos y reciclelo
correctamente para promover la reutilización sostenible de
recursos materiales.
Los usuarios particulares pued en contactar con el
establecimiento donde adquirieron el producto, o con las
autoridades locales pertinentes, para informarse sobre cómo
y dónde pueden lIevario para que sea sometido a un reciclaje
ecológico y seguro.
Los usuarios comerciales pueden contactar con su proveedor
y consultar las condiciones del contrato de compra. Este
produco no debe eliminarse mezclado con otros residuos
comerciales.
PORTABLE FM-STEREO RADIO WITH
CD/CD-R/CD-RW/MP3 PLAYER AND USB
PORT.
CDR-7000U
Instructionmanual
Bedienungsanleitung
Manueld’instructions
Manualed’istruzioni
Manualdeinstrucciones
is a registered Trademark of Roadstar S.A. - Switzerland All rights reserved
Page 2
EnglishEnglish
1 2
WARNINGS
The exclamation point within the triangle is a warning sign alerting
the user of important instructions accompanying the
product.
The lightening flash with arrowhead symbol within the triangle is a
warning sign alerting the user of “dangerous voltage” inside the unit.
To reduce the risk of electric shock, do not remove the cover. No
user serviceable parts inside the unit. Refer all servicing to
qualified personnel.
This unit employs a laser. Only a qualified service person should
remove the cover or attempt to service this device, due to
possible eye injury.
Invisible laser radiation when the unit is opened or interlocks defeated. Avoid exposure to laser beam. Use of controls,
adjustments or procedures other than those specified herein may
result in hazardous radiation exposure.
This unit operates on 230V ~ 50Hz. If the unit is not used for a long
period of time, remove the plug from the AC mains.
This unit must not be exposed to moisture or rain.
The power switch in this unit is mounted on the secondary
circuit and does not disconnect the whole unit from the mains in
OFF position.
Ensure all connections are properly made before operating the unit.
This unit should be positioned so that it is properly ventilated. Avoid
placing it, for example, close to curtains, on the carpet or in a builtin installation such as a bookcase.
RCR-7000U
Portable stereo radio with front drawer CD Player and full function remote
control.
INSTRUCTION MANUAL
Please read this instruction manual carefully and familiarize yourself with your new Radio Cassette
before using it for the first time. Please retain this manual for future reference.
Do not expose this unit to direct sunlight or heat radiating sources.
Page 3
EnglishEnglish
3 4
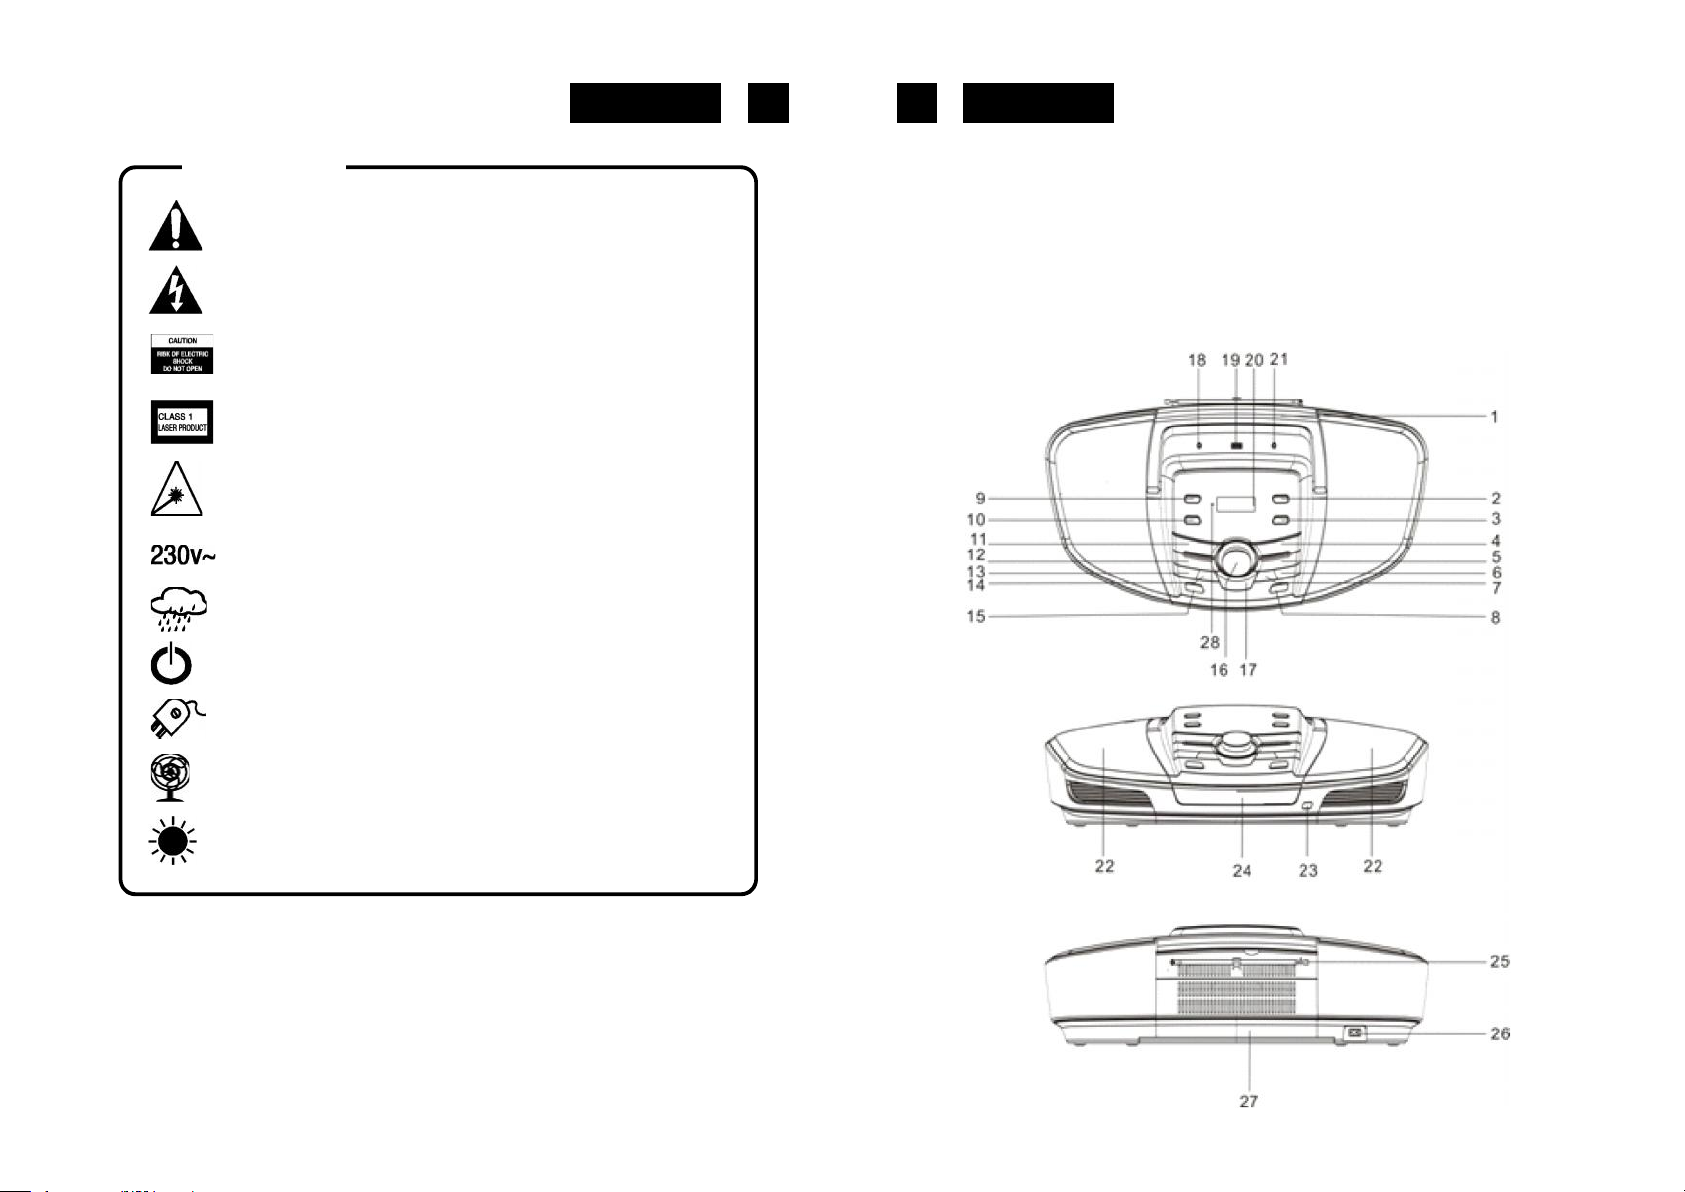
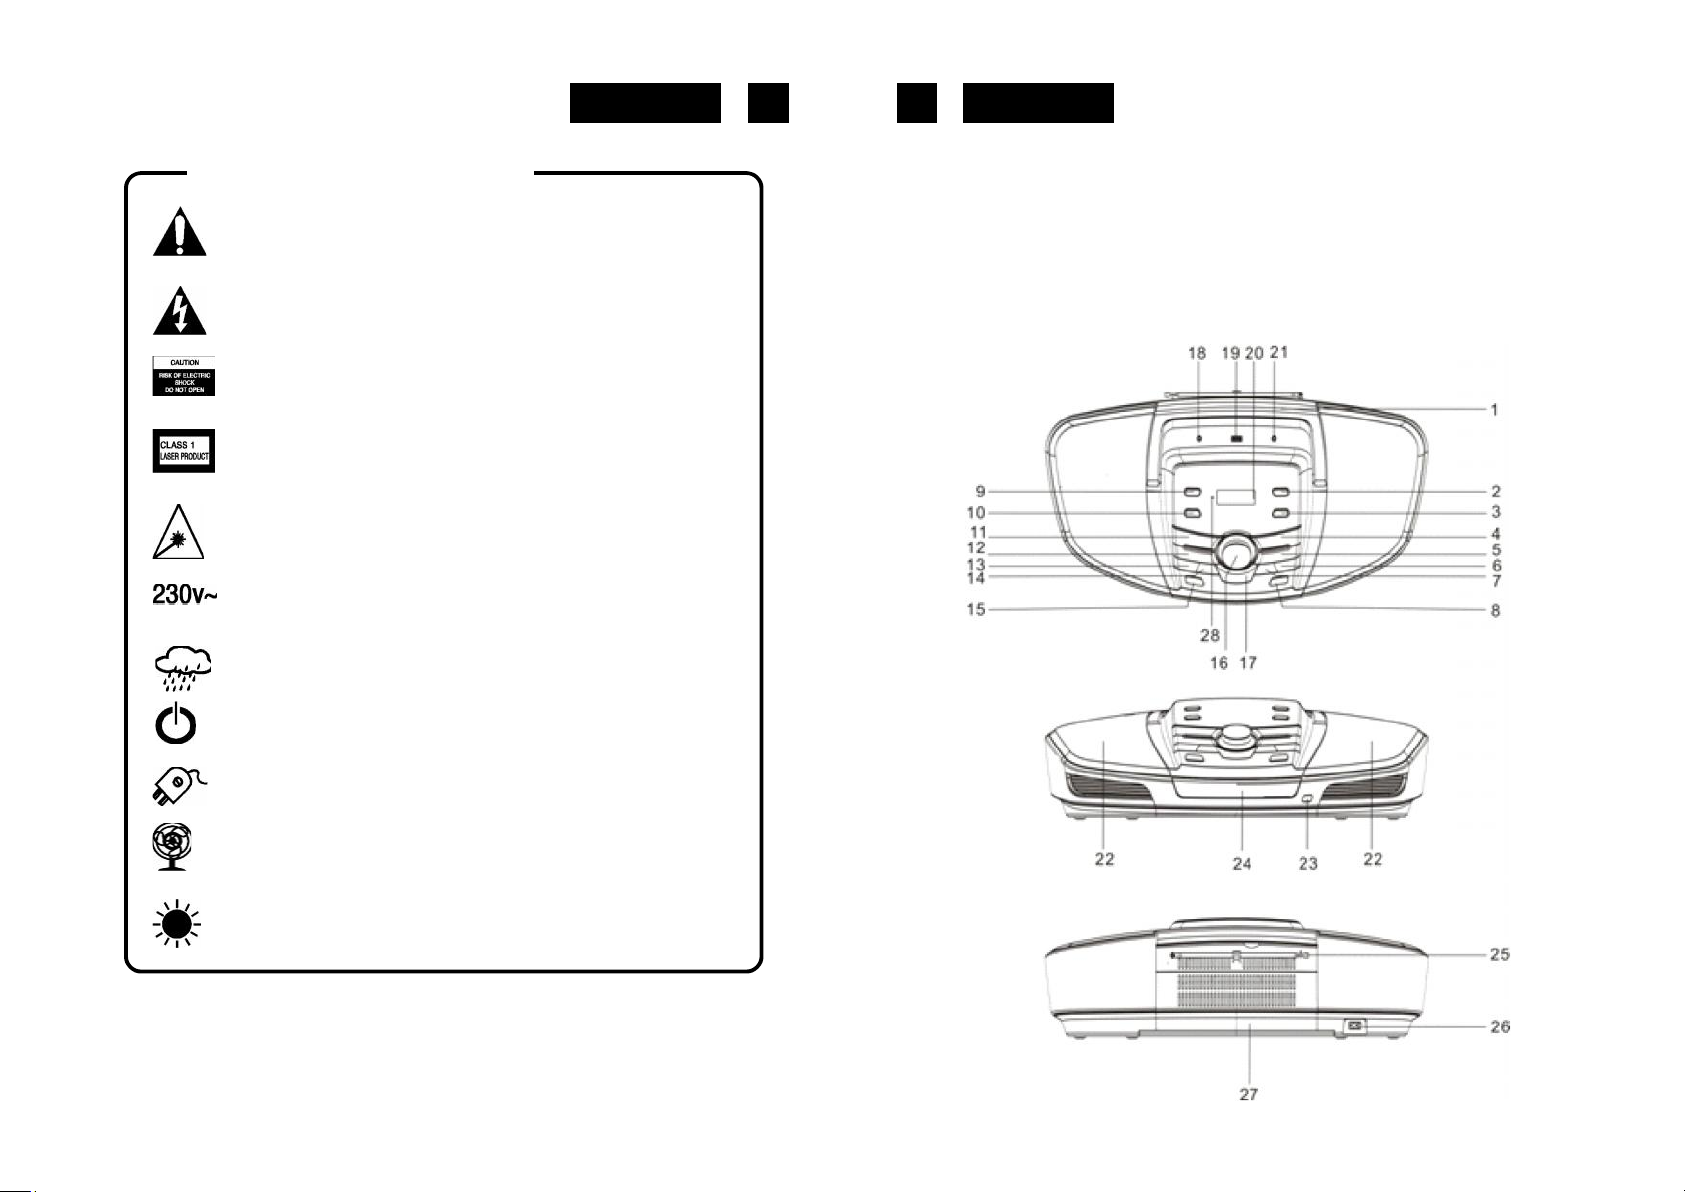
LOCATION OF CONTROLS
1. HANDLE
2. TIMER BUTTON
3. SET/ID3 BUTTON
4 MO/ST./ BUTTON
5 CD PLAY/PAUSE BUTTON
6. CD SKIP UP / TUNING+ BUTTON
7. CD SKIP BACK / TUNING- BUTTON
OPEN/CLOSE BUTTON
8.
9. SLEEP BUTTON
10. MEMORY BUTTON
11. EQ BUTTON
12. FUNCTION BUTTON
13. FOLD./10/M- BUTTON
14. FOLD./10/M+ BUTTON
15. STANDBY BUTTON
16. VOLUME BUTTON
17. PROG./P-MODE BUTTON
18. PHONES JACK
19. USB PORT
20. LCD
21. AUX IN JACK
22. SPEAKERS
23. REMOTE SENSOR
24. FRONT LOADING CD DOOR
25. FM TELESCOPIC ANTENNA
26. AC SOCKET
27. BATTERY COMPARTMENT
DISPLAY
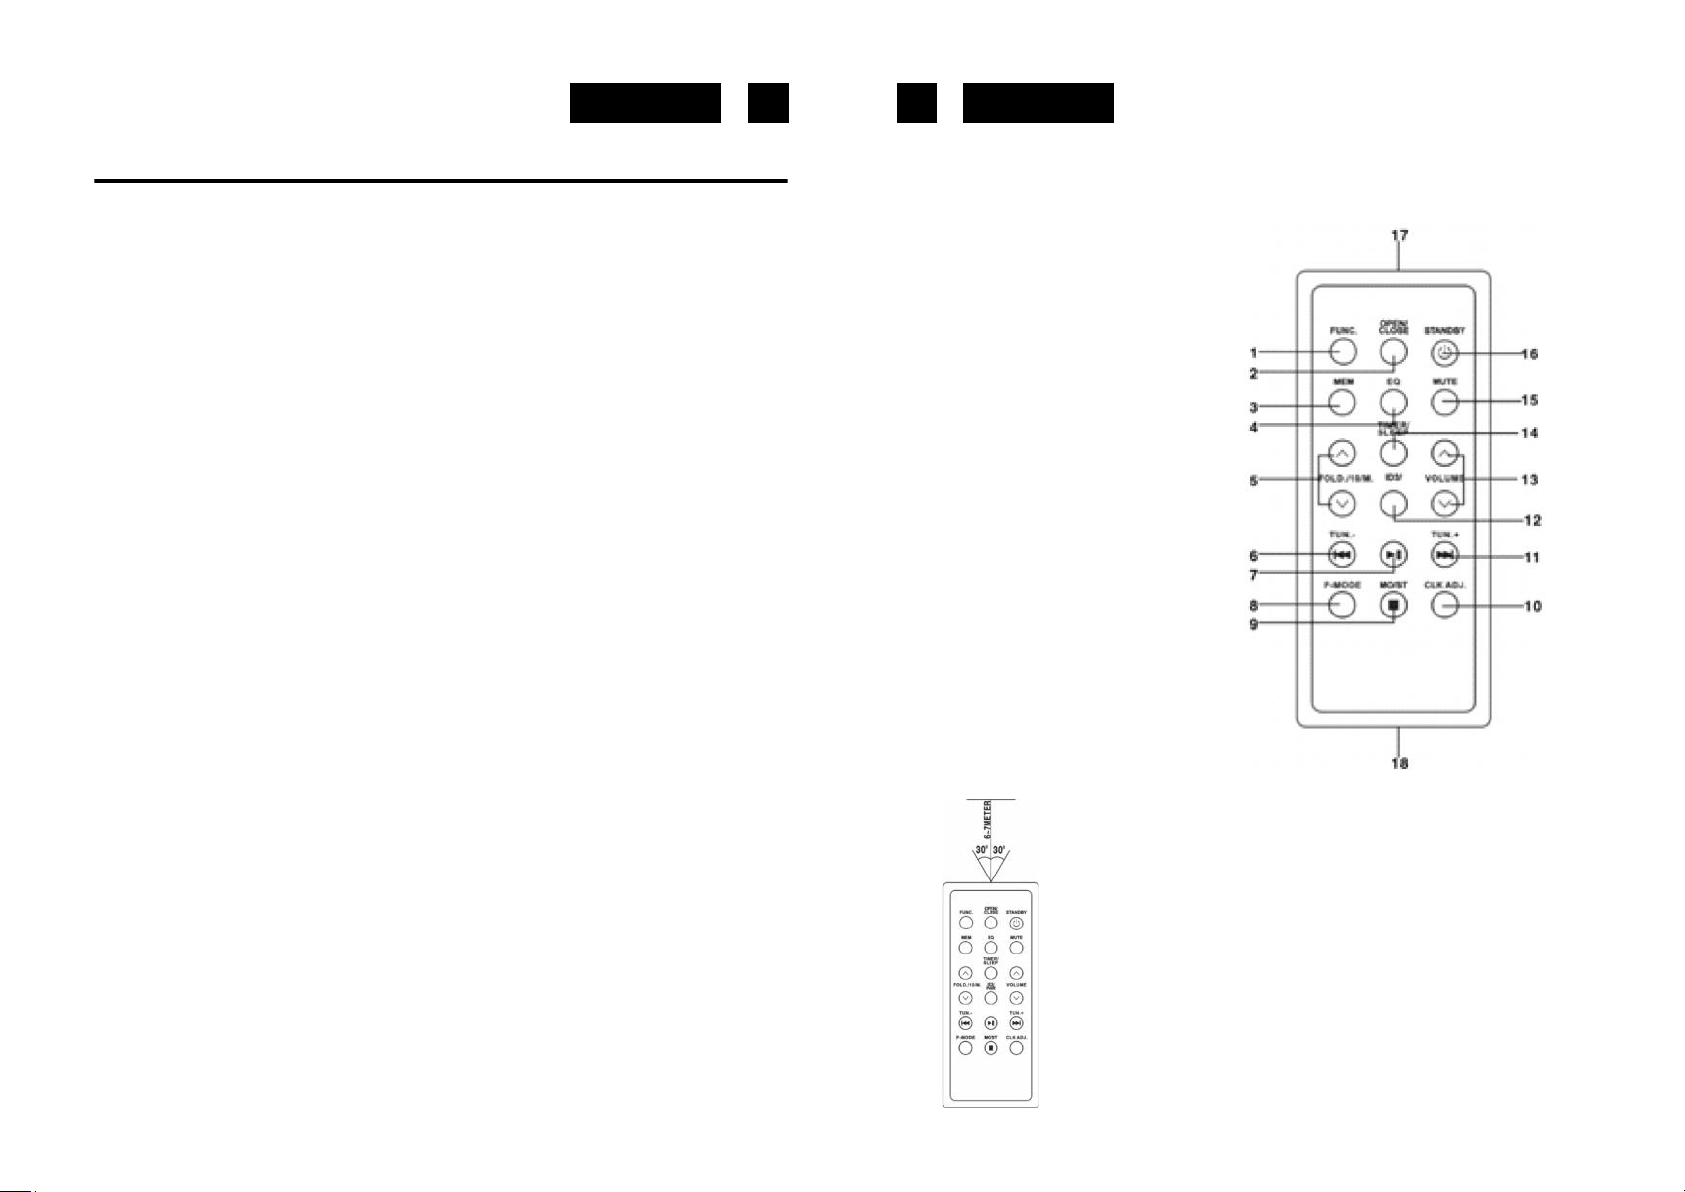
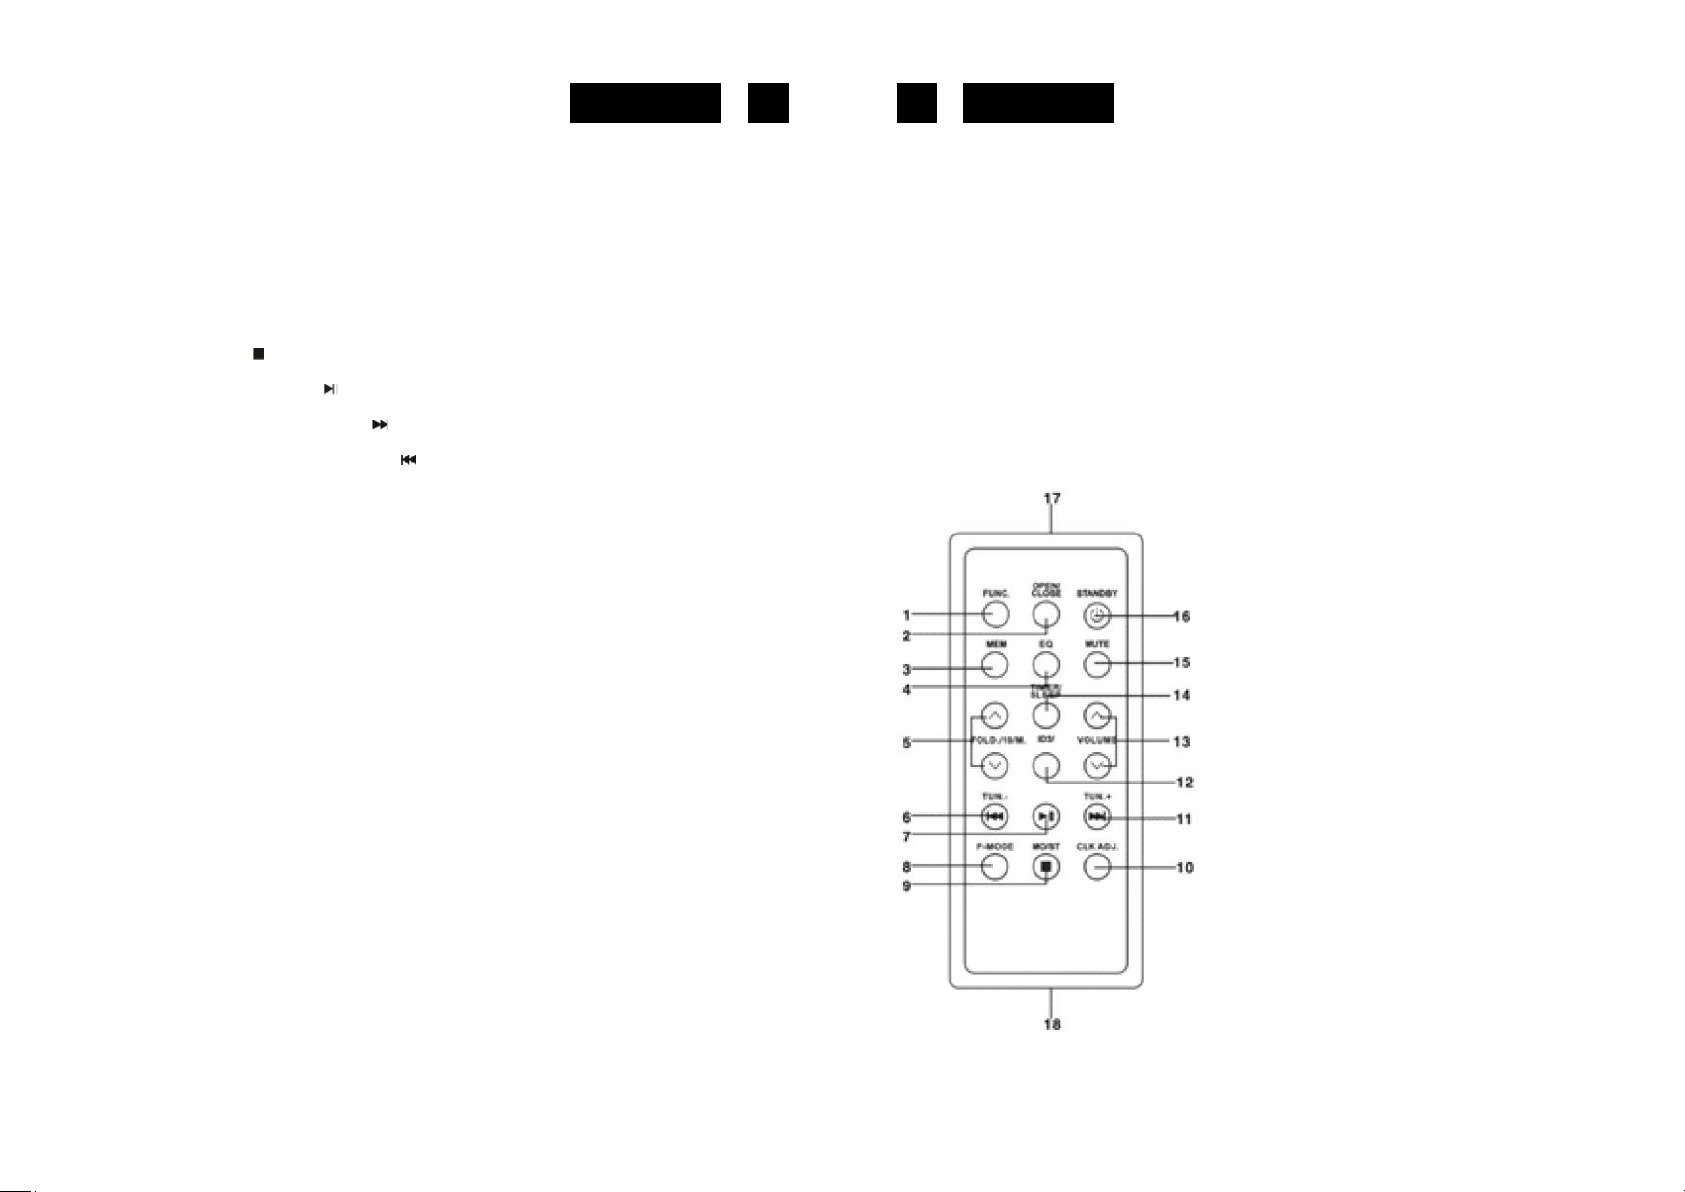
REMOTE CONTROL
1. FUNCTION KEY
2. OPEN/CLOSE KEY
3. MEMORY KEY
4. EQ KEY
5. FOLD./10/M. UP/DOWN KEY
6. CD B-SKIP DOWN/TUN.- KEY
7. CD PLAY/PAUSE KEY
8. P-MODE KEY
9. STOP/MO/ST. KEY
10. CLK ADJ. KEY
11. CD F-SKIP UP/TUN.+ KEY
12. ID3 KEY
13. VOLUME UP/DOWN KEY
14. TIMER/SLEEP KEY
15. MUTE KEY
16. STANDBY KEY
17. REMOTE SENSER
18. BATTERY COMPARTMENT
Note: Please pull battery protector before using.
To operate the unit with the remote control, point the remote
handset at the remote sensor on the front panel and press the a
appropriate button on the remote handset.The remote works
best within a range of 6 ~ 7 meters from the front panel and on
an angle of 30 degrees. Bright sunlight or room light conditions
can interfere with the remote control. If the remote operation is
unsatisfactory or stops working entirely, first try replacing the
remote batteries, then try reducing the room lighting conditions.
Page 4
EnglishEnglish
5 6
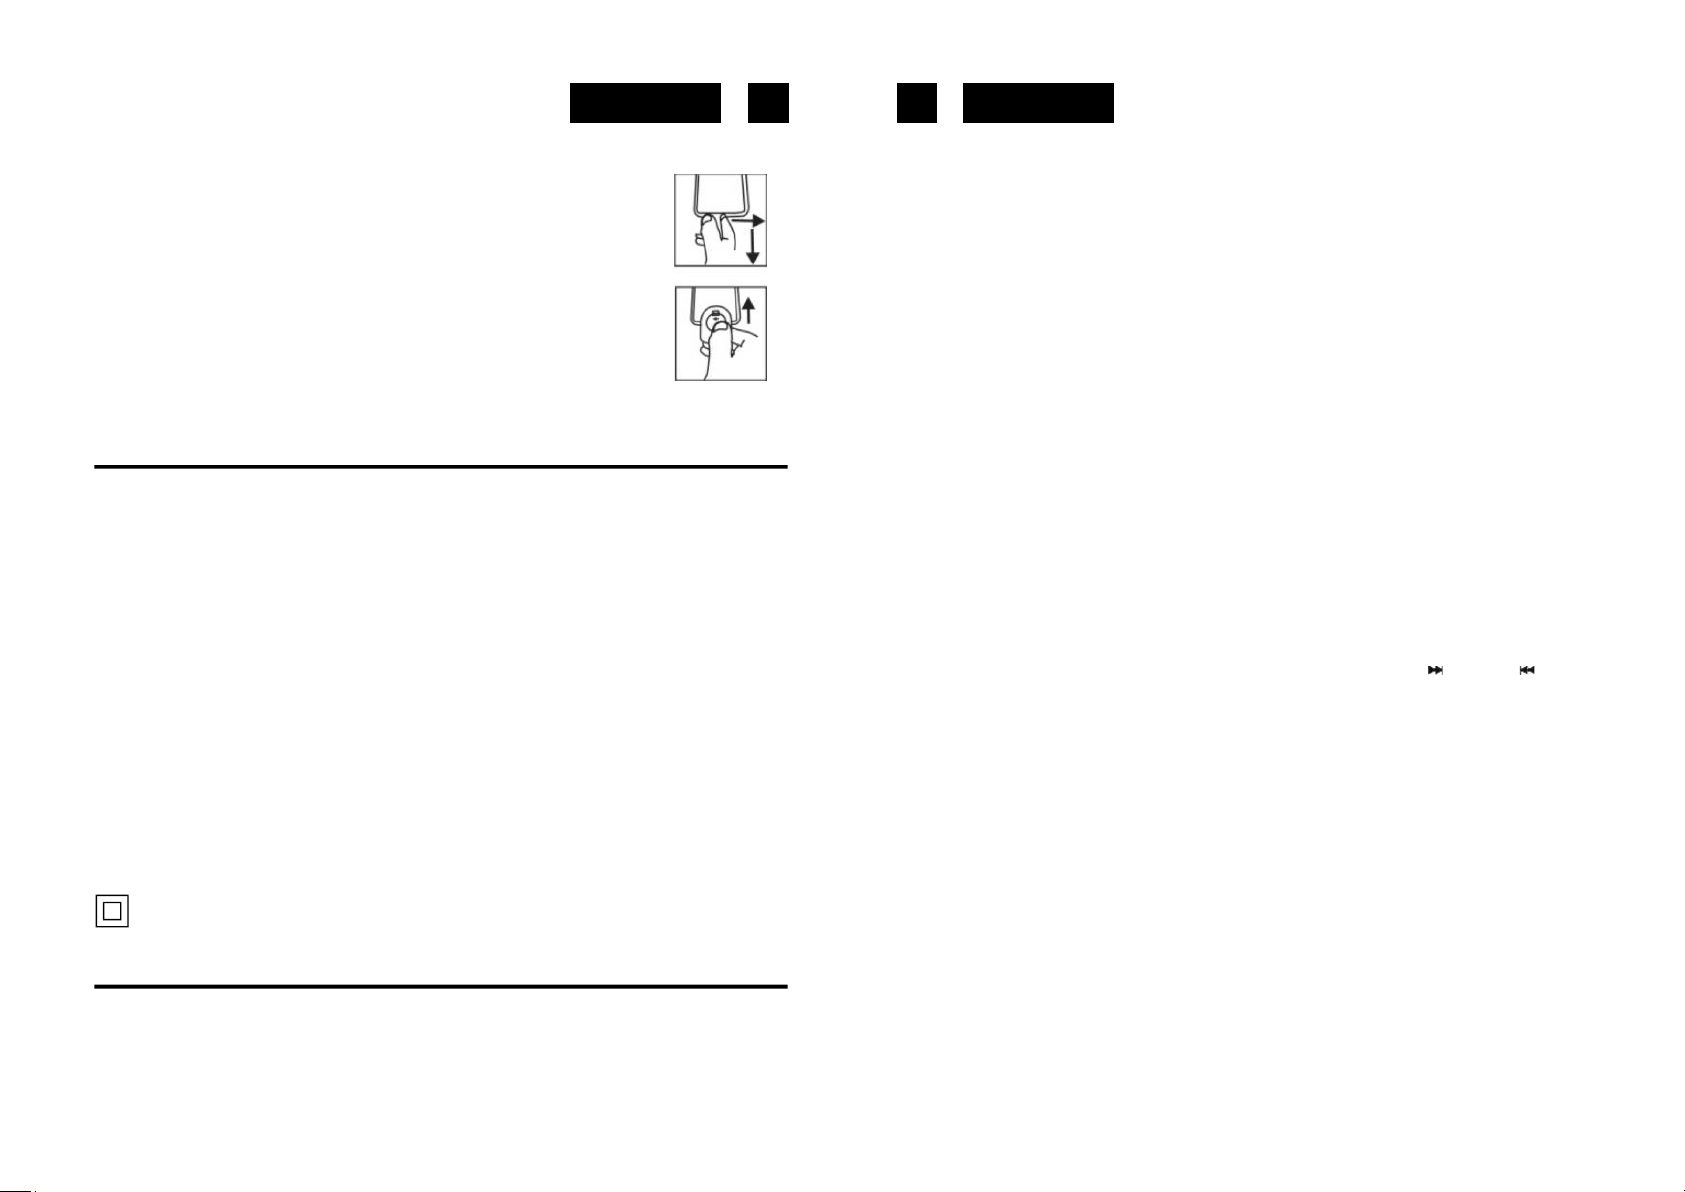
LITHIUM BATTERY INSTALLATION OF REMOTE CONTROL
l The remote control includes one CR2025(3V) lithium battery.
l To replace the battery, gently push the clasp to the right direction
accordingly to the instruction and then pull out the battery compartment.
Take the drained battery out and install a new lithium battery (CR-2025)
in the compartment with the positive polarity upward. Then push the
compartment back to its position with a “click” sound indicating installation
finished
CONNECTING TO POWER
Before switching on make sure that the voltage of your electricity supply is the same as that
indicated on the rating plate.
For your own safety read the following instructions carefully before attempting to connect this
unit to the mains.
MAINS (AC) OPERATION
This unit is designed to operate on AC 230V 50Hz current only. Connecting it to other power
sources may damage the unit.
CAUTION
To prevent electric shock disconnect from the mains before removing cover. No user serviceable
parts inside. Refer servicing to qualified service personnel.
SAFETY PRECAUTION
Do not allow this unit to be exposed to rain or moisture.
Mains Supply: 230V 50Hz - AC only
This symbol means that this unit is double insulated. An earth connection is not required.
Connect the plug to a mains power inlet 230V AC ~ 50 Hz.
MAIN UNIT BATTERY POWER
To install batteries:
• Open the battery compartment (on the back of the panel) by pushing down on the two
tabs at the upper edge of the compartment cover. Pull the cover away from the back
panel.
Switching On the Unit
l After connecting the power, the display will show AM 0:00. Remain this mode , the unit
would turn of automatically after 15 minutes. Press STANDBY button to turn on the unit
and press STANDBY button again to play.
l ESD hints-The product maybe reset or not reset to operation of control due to
electrostatic discharge, just switch off and reconnect again.
l Setting the Time
Note: Please make sure that all connections have been ready.
1. In standby mode the LCD display will flash 0:00. Press the SET/ID3 button, the display will
show the RTC 12 hours or the RTC 24 hours version. Press SKIP UP /DOWN button
on unit or on remote to choose for the 12 or 24 hour version. Press the SET/ID3 button to
confirm.
2. After confirm the hours system, the Hour digits will flash, press the or button on unit or on
remote repeatedly to set the clock to the correct Hour, press the SET/ID3 button to confirm.
Then the minute digits will flash, press the or button on unit on remote repeatedly to set
the clock to the correct Minutes, press the SET/ID3 button again to confirm.
Waking up the music (Radio/CD/USB)
You can set the timer to wake up the Radio, CD/MP3 or USB.
POWER SUPPLY
Remove the stereo carefully from the box, retaining the packaging for future use.
AC POWER OPERATION
1. After setting the time in standby mode, press and hold the TIMER button on unit or press
TIMER key on remote control to set the desired wake up time.
2. Enter the desired hour with the or button, press the TIMER button on unit or on remote
control to confirm. Enter the desired minutes with the or button, press the TIMER button
on unit or on remote control to confirm. Then choose the desired wake up mode (RADIO/
CD/USB) by or button and press TIMER button on unit or on remote control to confirm.
Page 5
EnglishEnglish
7 8
3. To the pre-set time, the desired wake up mode will turn on automatically.
Sleep To Music Timer
You can set the sleep timer to automatically turn off the unit during playback after a set
period of time (10, 20, 30… up to 90 minutes).
1)During operation, press the SLEEP button on unit or on remote control repeatedly to
select the desired sleep time from 90 minutes to 10 minutes, then stop pressing when the
desired sleep time come up, after about 5 seconds the sleep time will be automatically set
and the “SLEEP” indicator show on the display.
2)The RADIO or CD/MP3 or USB or AUX player will continue playing until the sleep timer
counts down to “00” and then turn off automatically.
Note: If you are falling asleep to CD/USB/AUX, the sound will stop when the disc ends,
even if a longer sleep time was selected.
Turning on the unit
Press the STANDBY button on unit or remote control, then press the FUNCTION button on unit
or remote control to choose FM / CD / USB / AUX model.
VOLUME ADJUSTING
Rotate the VOLUME button on unit or remote control to increase or decrease volume.
Press MUTE button on remote control to turn off the sound. Press again to turn on.
EQ FUNCTION
This unit has a built-in equalizer system, Press EQ button on unit or remote control while
playing to select different music style (sound tone): FLA, JAZZ, ROC, CLASS and POP.
ID3 System
HEADPHONE JACK
For private listening, insert a 3.5mm headphone (not included) into the HEADPHONE jack. The
SPEAKER output would be automatically cut off.
CAUTION: LISTENING AT A HIGH VOLUME OVER A LONG PERIOD IS NOT GOOD FOR
YOUR EARS.
RADIO OPERATION
TUNING RADIO STATIONS
1.Press the FUNCTION button on unit or remote control to select the desired wave band:
FM .
2.Tune to desired station by pressing the TUN+/ or TUN-/ , the display will show the
band frequency. Example: FM 97.10 MHz
3.Extend FM TELESCOPIC ANTENNA to its full length if you are listening to FM
broadcasting. Gently rock the unit back and forth to get the best reception when you are
listening to FM program, or place the unit in an open location.
Note: The radio function is initially set at STEREO mode, if the broadcasting program is too
noisy when you are listening to FM stereo station, press MO./ST./ button on unit or
press MO./ST./ key on remote to switch to MONO FM.
4.To turn off the radio, press the FUNCTION button to switch to other functions or press
STANDBY button to turn off the unit.
RADIO STATION MEMORY OPERATION
You may pre-store 20 (FM ) radio stations in memory for your preference controlled by
remote handset, so as you can listen to your desired station directly and quickly, no need to
tuning and search for again.
1.Press FUNCTION button to FM mode.
When plays a MP3 file, press the SET/ID3 button on the unit or ID3 key on remote control, it
will show “ID3 ON”, if the MP3 file is”ID3" format, it will automatically search the information
of “TITLE NAME” “ARTIST NAME” and “ALBUM NAME” and show on the display. Press the
SET/ID3 button on the unit or ID3 key on remote control again to back to normal display.
2.Press MEMORY button on unit or press MEM/PROG./P-MODE key on remote, “P01 “ will
flash on the display. Then press the “TUN+/ “or “ TUN-/ “ button to select the first
desired station.
3.Press the FOLD./10/M+ or FOLD./10/M- button unit or - MEM/FOLD./10 + on remote to
choose the desired sequence you want to store, then press MEMORY button on unit or
press -MEM/PROG./P-MODE+ key on remote again to enter.
4.Search another station, repeat steps (2) & (3) until all desired stations stored. Up to 20
stations can be programmed.
Page 6
EnglishEnglish
9 10
5.Press the FOLD./10/M+ or FOLD./10/M- on unit or MEM/FOLD./10 UP/DOWN button on
remote to listen to the stored station directly.
CD/MP3 OPERATION
Discs for Playback
This system can playback all digital audio CD/MP3, finalized digital audio CD-Recordable
(CD-R) discs, finalized digital audio CD-Rewritable (CD-RW) discs and CD-DA format
digital audio CD/CD-R/CD-RW discs.
LOADING A DISC
1.Press the FUNCTION button on unit or remote control to select “CD” mode.
2.Press the OPEN/CLOSE button to open the CD door, “OPEN” will be shown on the
display.
3.Place an audio CD/MP3 DISC into the tray with the front side facing up.
4.Close the CD door.
The display will show a flashing “ — READING — “, then the total number of tracks would
be shown and the playback will start from track.
5.To remove the CD, press OPEN/CLOSE to open CD door, the display will show “OPEN “.
Hold the CD by its edges, and take it out carefully.
Note:
- Make sure the disc is stopped before opening the CD DOOR.
- To ensure good system performance; wait until the unit completely reads the disc before
proceeding.
- If no disc loaded into the tray, or the disc is unreadable, the display will show “NO DISC”.
PLAYING A DISC
1.The playback starts from track 1 automatically when reading the disc.
To pause playback, press button on unit or on remote. The current playing time will
flash on the display.
To resume playback, press button on unit or on remote again.
SELECTING A DESIRED TRACK/PASSAGE
To select a desired track
Press the TUN+/ or TUN-/ button on unit or remote respectively in stop mode or
during playing until the desired track appears on the display. Press the button on unit or
on remote to start play.
To search for a particular passage during playback (track scanning at high speed)
Press and hold the TUN+/ or TUN-/ button on unit or on remote to scan the current
playing track at high speed until desired point (passage) appears, then release the button for
normal playback mode. Playback will start again from this point.
To select a song which track number exceeds 10
To select a song/track which number exceeds 10, Press the FOLD./10/M- or FOLD./10/M+
button on unit or -MEM/FOLD./10+ button on the remote control each time to skip backward
or forward 10 tracks, then press the TUN+/ or TUN-/ button on unit or on
remote to select desired track. For example: to select the 17th track from the 1st track,
press FOLD./10/M+ button on unit or press MEM/FOLD./10 UP(12) key on remote, and
then press the SKIP UP button on unit or on remote six times immediately.
To select a desired folder (for MP3 disc that contains more than one folder)
To select a desired folder during playback, press and hold the FOLD./10/M+ or FOLD./10/Mbutton on unit or -MEM/FOLD./10+ button on the remote control to next /previous folder.
PROGRAMING TRACKS
Programming tracks of disc are possible when playback is stopped. Up to CD 20 tracks /
MP3 99 tracks can be stored in the memory in any order.
In stop mode, press the PROG./P-MODE button on unit or press MEM/PROG./PMODE key on remote to enter program setting, the display will flash PROG and
P01 001.
Press the TUN+/ button on unit or on remote to select the first desired track to be
programmed. (example: track 2)
Press the PROG./P-MODE button on unit or press MEM/PROG./P-MODE key on
remote to enter. The display would flash PROG and P02 002.
2.To stop playback, press MO/ST./ button on unit or on remote, the total number of
tracks.
Repeat steps 2 & 3 to store other desired tracks until all tracks programmed.
Press the button on unit or on remote to start playback from the first programmed
Page 7
EnglishEnglish
11 12
track. The display will show 001 and the “ PROG “ indicator will light up on LCD
display.
Press the MO/ST./ button on unit or on remote to stop program playback.
To clear the program, you may
1.Press MO/ST./ button on unit or on remote when the disc stopped, and
2.Open the CD compartment lid, the program will be erased.
REPEAT
You can play one track or all tracks on the disc repeatedly.
To Repeat a Single Track
1.Press PROG./P-MODE button on unit or press MEM/PROG./P-MODE key on remote control
during play, the display will show a flashing “ “ and the current track will be played over
an over again till you press the MO/ST./ button on unit or on remote.
2.To cancel repeat play, press PROG./P-MODE button on unit or press MEM/PROG./P-MODE
key on remote control until “ “ disappears from the display.
To repeat all the Tracks
1.Press PROG./P-MODE button on unit or press MEM/PROG./P-MODE key on remote
control until the “ ALL” shows steady on the display, all tracks on the disc will be
played over and over again till you press the MO/ST./ button on unit or on remote.
2.To cancel repeat play, press the PROG./P-MODE button on unit or press MEM/PROG./PMODE key on remote control until “ ALL” disappears from the display.
To repeat the folder (only for MP3 disc which contains more than one folder)
1.Press the PROG./P-MODE button on unit or press MEM/PROG./P-MODE key on remote
control until “ DIR “ show steady on the display, the current folder will be repeated
over and over again till you press the MO/ST./ button on unit or on remote.
2.To cancel repeat play, press the PROG./P-MODE button on unit or press MEM/PROG./PMODE key on remote control until “ DIR “ and the local folder disappear from the
display.
RANDOM PLAY
Press the PROG./P-MODE button on unit or press MEM/PROG./P-MODE key on remote
control in play mode till the “RAN” shows steady on the display, the random play will start
from next track automatically, until all tracks are played over and then it will stop. Press the
PROG./P-MODE button on unit or press MEM/PROG./P-MODE key on remote control again
until the “RAN” disappears from the display to cancel.
USB OPERATION
1. Press the FUNCTION button on unit or on remote to select “USB” mode.
2. Connect the USB to the USB INPUT. The LCD will show the total number of tracks stored
in the USB. The playback stars from track 1 automatically after reading the USB.
3. Press the MO/ST./ button on unit or on remote to stop playing. The display will show total
number of USB and STOP.
4. Proceed repeat play (repeat 1- repeat folder - repeat all)/program play/skip up and back
operation as the same described in above “CD/MP3 OPERATION”.
CAUTION:
4 Do not use any USB extension cable for connecting the USB bar which may cause
harmful interference
AUX OPERATION
1.Press the FUNCTION button to select “AUX” mode.
2.Insert the AUX line plug into the AUX IN jack(Ö3.5mm) on the player, music from the
device would be amplified and exported from the speakers.
3. Adjust the volume of the main unit to your desired level.
4. Press PLAY of the external audio source (eg. MP3 player) to start playback.
MAINTENANCE AND CARE
• Electronic products of this kind should never be subjected to extreme temperatures or high
humidity. For instance, this set should not be placed in bathing areas or around stoves and
radiators.
• If necessary, clean the unit with a piece of cloth dampened with water only (Be sure the AC
Power Cord is disconnected form the Mains). Never use a polish or a strong detergent as
this will damage the finish of the cabinet.
• This equipment has been designed and manufactured to meet the highest international
Page 8

EnglishEnglish
1413
standards, but like any electrical apparatus which is operated at mains voltage, care must
be taken if you are to obtain the best results and safety is to be assured. This is particularly
important with audio equipment.
DO . . . Read the operating instructions before you attempt to use the equipment.
DO . . . Ensure that all electrical connections (including the mains plug, extension on leads
and interconnections between pieces of equipment) are properly made and in
accordance with the manufacturer’s instructions. Check that the mains fuse rating
is correct.
DO . . . Always consult your dealer if you are ever in doubt about the installation, operation
or safety of your equipment. He is the best person to advise you.
DON’T . . . Obstruct the necessary all-round ventilation - especially DON’T stand the set
close to curtains or on soft furnishing such as carpets. Overheating can cause
unnecessary damage and shorten the life of the set.
• Remember that to obtain the best performance and lasting satisfaction from your
equipment, have it regularly maintained by a reliable service organization. Ensure that it is
correctly used by all the family.
ABOVE ALL:-
• Never let children push anything into holes or slots in the case - this could result in an
electric shock;
• Never guess or take chances with electrical equipment of any kind - it is better to be safe
than sorry!
IMPORTANT
SPECIFICATIONS
GENERAL
Power Requirement ………………………… AC 230V~50Hz
DC 12V UM-1/D x 8pcs
Power consumption ………………………….……40 Watts
Weight……………………………………………... 3.5 kg
Dimensions……………………………………….. 513 (L) x 287(W) x 162 (H) mm
Operation temperature…………………………… + 5°C - + 35° C
RECEIVER SECTION
Receiving Bands………………………………… FM ONLY
Frequency Range……………………………… FM 87.5 – 108 MHz
COMPACT DISC SECTION
Optical Pickup……………………………….…… 3-Beam Laser
Frequency Response ………………………… 100Hz – 16KHz
AUDIO SECTION
Power output …………………………………… 8W x 2 (RMS)
ACCESSORIES
Since movement of the CD mechanism and the sensitive circuitry may cause interference to a
radio tuner nearby switch this unit off while operating other radio devices.
This product utilizes a laser
Danger - Invisible laser radiation when opened and interlock failed or defeated. Avoid direct
exposure to the beam.
Caution - Use of controls, adjustments, or procedures not listed in this manual may result in
hazardous radiation exposure.
Most records, compact discs, audio and video cassettes, radio and television broadcasts contain
material which is the subject of copyright. It is unlawful to record such material in any form
whatsoever, whether on disc or tape, without the permission of the copyright owner concerned.
Any person who makes a recording of such material without the consent of the copyright owner
infringes copyright and may be liable, to pay substantial damages to the copyright owner, and in
some cases to criminal prosecution.
Instruction Booklet ………………………………1
Remote Handset………………………………… 1
AC Cord ………………………………………… 1
Specifications are subject to change for continuous improvement, we reserve the rights to
modification without prior notice.
Page 9
DeutschDeutsch
15 16
SICHERHEITSHINWEISE
Das Ausrufszeichen im Dreieck weist den Benutzer auf wichtige
Bedienungs- und Wartungsanweisungen (Service) in diesem
Handbuch hin, die unbedingt zu befolgen sind.
Das Blitzsymbol im Dreieck weist den Benutzer auf “gefährliche
Spannungen” an einigen freiliegenden Bauteilen im Innem des
Gerätes hin.
Um die Gefahr elektrischer Schläge auszuschliessen, Gehäuse auf
keinen Fall abnehmen. Im Innem befinden sich keine vom Benutzer
selbst instandsetz-baren Teile. Reparaturen dürfen nur von einer
autorisierten Fachwerkstatt durchgeführt werden.
Diese Apparat benützt einen Laserstrahl. da Gefahr Augenschädern
besteht, darf nur qualifiziertes Personal den Deckel des Gerätes
aufheben, entfernen oder reparieren.
Dunkelstrahlung bei geöffneten Geräten und defektem Verschluss.
Bedienung oder Regulierung der technischen Eigenschaften oder
sonstige nicht spezifierte Prozeduren auf dieser manuellen Betriebsart
können zur Ausetzung gefährlicher Laserstrahlen führen.
Dieses Gerät ist für 230V ~ 50Hz Netzspannung ausgelegt. Bei
längerer Nichtbenutzung des Geräts ziehen Sie den Stecker aus der
Steckdose.
Setzen Sie das Gerät weder Feuchtigkeit noch Regen aus.
Der EIN-Schalter dieses Geräts ist an den Sekundärschaltkreis angeschlossen. Seine Abschaltung unterbricht die Hauptstromzufuhr des
Geräts nichts.
CDR-7000U
Tragbarer Stereo-Radio mit Frontlader CD und Fernbedienung.
BEDIENUNGSANLEITUNG
Bitte lesen Sie aufmerksam diese Bedienungsanleitung, um sich mit Ihrem neuen Radiorekorder
vertraut zu machen, bevor Sie ihn zum ersten Mal in Betrieb nehmen. Bitte bewahren Sie diese
Anleitung auf, um später jederzeit nachschlagen zu können.
Schalten Sie das System erst dann ein, wenn Sie alle Verbindungen
genau geprüft haben.
Stellen Sie das Gerät so auf, dass immer eine ungestörte
Frischluftzufuhr sichergestellt ist. Es ist zum beispiel keinesfalls auf
Teppiche und in der Nähe von Gardinen zu stellen oder in Bücherregale
einzubauen.
Setzen Sie das Gerät weder direkter Sonneneinstrahlung noch
Wärmequellen aus
Page 10
DeutschDeutsch
17 18
LAGE DER BEDIENUNGSELEMENTE
VORDERSEITE
1.GRIFF
2.TASTE TIMER
3.TASTE SET/ID3
4.TASTE MO/ST./
5.TASTE CD PLAY/PAUSE
6.TASTE CD SKIP UP / TUNING+
7. TASTE CD SKIP BACK / TUNING -
8. TASTE OPEN/CLOSE
9. TASTE SLEEP
10.SPEICHER TASTE
11. TASTE EQ
12. TASTE FUNKTION
13. TASTE FOLD./10/M-
14. TASTE FOLD./10/M+
15. TASTE STANDBY
16. TASTE VOLUME
17. TASTE PROG./P-MODE
18.KOPFHÖRER-ANSCHLUSS
19.USB ANSCHLUSS
20.LCD DISPLAY
21.AUX IN-ANSCHLUSS
22.LAUTSPRECHER
23.FERNBEDIENUNGSSENSOR
24.EINLEGEFACH CD
25.TELESKOPANTENNE FM
26. AC-ANSCHLUSS
27.BATTERIEFACH
FERNBEDIENUNG:
HAUPTFUNKTIONEN:
1. FUNKTIONS-TASTE
2. TASTE OPEN/CLOSE
3. SPEICHER-TASTE
4. TASTE EQ
5. TASTE FOLD./10/M. UP/DOWN
6. TASTE CD B-SKIP DOWN/TUN.-
7. TASTE CD PLAY/PAUSE
8. TASTE P-MODE
9. TASTE STOP/MO/ST.
10. TASTE CLK ADJ.
11. TASTE CD F-SKIP UP/TUN.+
12. TASTE ID3
13. TASTE VOLUME UP/DOWN
14. TASTE TIMER/SLEEP
15. TASTE MUTE
16. TASTE STANDBY
17. FERNBEDIENUNGSSENSOR
18. BATTERIEFACH
Page 11

DeutschDeutsch
19 20
Anmerkung: Entfernen Sie vor Gebrauch den Batterieschutz.
Um das Gerät mit der Fernbedienung zu bedienen, richten Sie
die Fernbedienung auf den Fernbedienungssensor an der
Vorderseite und drücken Sie die entsprechende Taste auf der
Fernbedienung. Die optimale Funktion der Fernbedienung ist in
einem Abstand von ca. 6 bis 7 m von der Vorderseite und in
einem Winkel von 30 Grad gegeben. Direkte Sonneneinstrahlung
oder eine übermäßig beleuchtete Umgebung können die
Funktionalität der Fernbedienung beeinflussen. Wenn die
Fernbedienung nicht richtig funktioniert oder nicht mehr
funktioniert, wechseln Sie die Batterien der Fernbedienung aus
oder versuchen Sie, die Helligkeit der Umgebung zu verringern.
EINLEGEN EINER LITHIUM-BATTERIE IN DIE FERNBEDIENUNG
Die Fernbedienung ist mit einer Lithium-Batterie CR2025
(3V) ausgestattet.
Um die Batterie zu ersetzen, schieben Sie
Verriegelung vorsichtig in die vorgesehene Richtung,
wie in der Anleitung dargestellt, und ziehen Sie das
Batteriefach hervor.
Entfernen Sie die alte Batterie aus dem Fach und legen Sie eine neue Lithium-Batterie (CR-
2025) mit dem Pluspol nach oben ein. Bringen Sie das Batteriefach in seine Ausgangslage,
ein “Klick” Geräusch zeigt an, dass das Fach richtig positioniert worden ist.
STROMVERSORGUNG
Dieses Gerät wurde entwickelt, um mit AC/DC betrieben zu werden.
AC BETRIEB
Stecken Sie das Ende des Kabels in die AC-Buchse am Gerät und den Stecker in die
Steckdose. Die Batterien werden automatisch getrennt. Für die Version mit
Doppelspannung ist es wichtig sicherzustellen, dass der AC SPANNUNGSWÄHLER AC auf
den Spannungswert der lokalen Stromversorgung eingestellt ist.
ACHTUNG:
Entfernen Sie Batterien wenn diese verbraucht sind oder wenn zu erwarten ist, dass das
Gerät für eine lange Zeit nicht verwendet wird. Batterien enthalten chemische Substanzen
und müssen ordnungsgemäß entsorgt werden.
HAUPTFUNKTIONEN
Inbetriebnahme des Geräts
Nach dem Anschluss an die Stromversorgung wird am Display 0.00 angezeigt. Wenn man
in diesem Modus bleibt, wird sich das Gerät automatisch nach 15 Minuten ausschalten.
Drücken Sie die STANDBY-Taste, um das Gerät einzuschalten, drücken Sie nochmals die
STANDBY-Taste um auf die Funktionen des Geräts zuzugreifen.
Hinweise von EDS – Das Reset könnte beim Gerät nicht funktionieren oder einige
Funktionen könnten aufgrund elektrostatischer Entladungen zurückgesetzt werden, in
diesem Fall ist es ausreichend, das Gerät aus-und wieder einzuschalten.
Einstellen der Uhrzeit
Hinweis: Stellen Sie sicher, dass alle Anschlüsse korrekt durchgeführt wurden
1. Im Standby-Modus wird am LCD-Display 00.00 blinken. Drücken Sie die Taste SET/ID3,
das Display wird die Version RTC 12-Stunden anzeigen oder RTC 24 Stunden. Drücken Sie
die SKIP UP / DOWN-Taste am Gerät oder auf der Fernbedienung, um die 12 oder 24
Stunden Version zu wählen. Drücken Sie die SET/ID3 taste um zu bestätigen.
2.Nach der Bestätigung der Uhrzeit werden auf dem Display die Ziffern der Uhrzeit
aufblinken, drücken Sie die Taste oder die Taste auf dem Gerät oder auf der
Fernbedienung, um die 12 Stunden oder 24 Stunden Version auszuwählen. Drücken Sie die
Taste SET/ID3 zur Bestätigung.
An diesem Punkt wird auf dem Display die Minutenanzeige blinken, drücken Sie die Taste
oder auf dem Gerät oder auf der Fernbedienung, um die Minuten einzustellen, und drücken
Sie dann erneut die Taste SET/ID3 um den eingegebenen Wert zu bestätigen.
DC BETRIEB
Öffnen Sie die ABDECKUNG DES BATTERIEFACHS. Legen Sie 8 Batterien vom Typ UM-1
/ D (nicht enthalten) in das Batteriefach ein. Beachten Sie die im Batteriefach angegebene
Markierung der Polarität.
Wecker mit Musik (Radio/CD/USB)
Sie können den Timer einstellen, um sich zu den Klängen von Radio, CD-/ MP3-Player oder
USB aufwecken zu lassen.
1. Nachdem Sie die Zeit im Standby Modus eingestellt haben, halten Sie die TIMER Taste
am Gerät gedrückt oder drücken Sie die Taste TIMER auf der Fernbedienung, um die
Page 12

DeutschDeutsch
21 22
gewünschte Weckzeit einzustellen.
2. Geben Sie die gewünschte Stunde durch Drücken der Taste oderein, drücken Sie die
TIMER-Taste am Gerät oder auf der Fernbedienung um zu bestätigen. Geben Sie die
gewünschten Minuten mit der Taste oder ein, drücken Sie die TIMER-Taste am Gerät
oder auf der Fernbedienung um zu bestätigen. Dann wählen Sie den gewünschten
Alarmmodus (Radio / CD / USB) mit den Tasten oder und drücken Sie die TIMERTaste am Gerät oder auf der Fernbedienung, um zu bestätigen.
3. Wenn die voreingestellte Uhrzeit erreicht ist, wird sich automatisch der gewünschte
Weckmodus einschalten.
Sleep-Timer
1.Sie können den Sleep-Timer einstellen, um das Gerät während der Wiedergabe nach
einer bestimmten Zeit (10, 20, 30 ... bis 90 Minuten) auszuschalten
2.Während der Inbetriebnahme drücken Sie die SLEEP-Taste am Gerät oder auf der
Fernbedienung, um die gewünschte Abschaltzeit von 90 Minuten bis 10 Minuten zu wählen,
bis zum Erscheinen der gewünschten Abschaltzeit, nach ca. 5 Sekunden wird automatisch
die Abschaltzeit eingestellt und auf dem Display wird die Anzeige “SLEEP”erscheinen.
3. Radio, CD/MP3 Player, USB oder AUX bleiben in Betrieb, bis der Sleep-Timer den Wert
“00”erreicht hat, dann schalten sie sich automatisch aus.
Hinweis: Wenn die Abschaltung für CD / USB / AUX geplant ist, wird der Ton nur stoppen,
wenn die Disc geendet hat, auch wenn eine längere Abschaltzeit ausgewählt worden ist.
Einschalten des Geräts
Drücken Sie die STANDBY-Taste am Gerät oder auf der Fernbedienung, und drücken Sie
dann die Taste FUNCTION am Gerät oder auf der Fernbedienung, um den Modus FM
(UKW) / CD / USB / AUX zu wählen.
LAUTSTÄRKE REGELUNG
Betätigen Sie die VOLUME-Regelung auf dem Gerät oder auf der Fernbedienung um die
Lautstärke zu erhöhen oder zu verringern.
Drücken Sie die MUTE-Taste auf der Fernbedienung, um den Ton auszuschalten. Drücken
Sie sie erneut, um fortzufahren.
Wiedergabe die EQ-Taste am Gerät oder auf der Fernbedienung, um die verschiedenen
Musikstile (Klangschattierungen) zu wählen: FLA, JAZZ, ROC, CLASS und Pop.
ID3 System
Wenn Sie eine MP3-Datei abspielen und die Taste SET/ID3 auf dem Gerät oder die ID3Taste auf der Fernbedienung betätigen, wird “ID3 ON” aufscheinen, wenn die MP3-Datei im
Format “ID3” ist, wird diese Funktion automatisch Informationen über “TITEL” “KÜNSTLER”
und “ALBUM” suchen, die auf dem Display angezeigt werden. Drücken Sie erneut die SET/
ID3 Taste auf dem Gerät oder die ID3-Taste auf der Fernbedienung, um zur normalen
Anzeige zurückzukehren.
KOPFHÖRER ANSCHLUSS
Für das Hören mit Kopfhörern schliessen Sie 3,5-mm-Kopfhörer (nicht im Lieferumfang
enthalten) an den entsprechenden Anschluss an.
Der LAUTSPRECHER Ausgang wird automatisch gestoppt.
WARNUNG: DAS HÖREN MIT HOHER LAUTSTÄRKE über einen langen Zeitraum kann zu
Hörschäden führen
RADIO-BETRIEB
EINSTELLEN DER RADIOSENDER
1 Drücken Sie die FUNCTION-Taste am Gerät oder auf der Fernbedienung, um den
gewünschten Wellenbereich zu wählen: UKW (FM)
Stellen Sie den gewünschten Sender ein, indem Sie die Tasten TUN+ / oder TUN-/
gedrückt halten. Am Display wird der Wellenbereich aufscheinen, z. B:
FM 97.10 MHz
2 Beim Hören von UKW-Sendern sollten Sie die TELESKOP ANTENNE in ihrer ganzen
Länge ausziehen. Wenn Sie UKW-Programme hören, bewegen Sie das Gerät sanft vor
und zurück, um einen besseren Empfang zu bekommen, oder stellen Sie das Gerät an
einen offenen Platz.
Hinweis: Die Radio-Funktion ist auf STEREO-Modus voreingestellt, wenn während des
Spielens eines Stereo-UKW-Senders zu starke Störungen auftreten, drücken Sie die Taste
MO / ST /am Gerät oder die Taste MO / ST / auf der Fernbedienung, um auf UKW MONO
zu wechseln.
EQ FUNKTION
Dieses Gerät verfügt über einen eingebauten Equalizer, drücken Sie während der
Um andere Funktionen zu wählen, drücken Sie die Taste FUNCTION, um das Gerät
auszuschalten, drücken Sie die Taste STANDBY.
Page 13

DeutschDeutsch
23 24
RADIO-BETRIEB MIT GESPEICHERTEN RADIOSENDERN
1.Sie können bis zu 20 Radiosender (UKW) mit der Fernbedienung speichern und somit auf
den gewünschten Sender direkt und schnell, ohne aufwendige Handgriffe, zugreifen.
2.Drücken Sie Im UKW-Modus die Taste FUNCTION
3.Drücken Sie die MEM / PROG. / P-MODE-Taste auf der Fernbedienung, auf der Anzeige
wird “P01” blinken. Dann drücken Sie die TUN+ / oder TUN-/ Taste, um den ersten
gewünschten Sender zu wählen.
4.Drücken Sie die Taste FOLD./10/M+ oder FOLD./10/M- am Gerät oder auf der
Fernbedienung, um die Sequenz, die Sie speichern möchten, auszuwählen, und drücken
Sie dann die MEMORY-Taste am Gerät oder drücken Sie erneut die Taste -MEM / PROG. /
P-MODE+ auf der Fernbedienung.
5.Um andere Sender zu suchen, wiederholen Sie die Schritte (2) und (3) bis alle
gewünschten Sender gespeichert sind. Sie können bis zu 20 Sender speichern.
6.Drücken Sie die Taste FOLD./10/M+ oder FOLD./10/M- auf dem Gerät oder MEM/FOLD./
10 UP/DOWN auf der Fernbedienung, um direkt den gespeicherten Sender zu hören.
CD/MP3 BETRIEB
Abspielbare Discs
Dieses System kann alle Digital-Audio CD/MP3 Formate, digitale Audio-beschreibbare CDs
(CD-R), Digital-Audio wiederbeschreibbare CDs (CD-RW) und digitale Audioformate CD-DA
CD / CD-R / CD -RW wiedergeben.
LESEN DER DISCS
1.Um den Modus “CD” zu wählen, drücken Sie die Taste FUNCTION am Gerät oder auf der
Fernbedienung
2.Um das CD-Fach zu öffnen, drücken Sie die Taste OPEN / CLOSE, am Display
erscheint die Anzeige “OPEN”.
3.Legen Sie eine Audio Disc CD/MP3 mit der Vorderseite nach oben ein.
4.Schliessen Sie das CD Fach. Auf dem Display wird die Anzeige
— READING —blinken, dann wird die gesamte Anzahl der Tracks angezeigt werden und
die Wiedergabe des 1. Tracks wird gestartet. Um die CD zu entfernen, drücken Sie die
Taste OPEN / CLOSE um das CD Fach zu öffnen, auf dem Display wird die Anzeige
“OPEN” erscheinen. Fassen Sie die CD an den Rändern an und legen Sie sie vorsichtig
wieder in die Schutzhülle zurück.
Hinweis:
Vor dem Öffnen des CD-FACHS ist dafür zu sorgen, dass die CD gestoppt worden ist.
Um eine gute Leistung des Gerätes zu gewährleisten, sollte man warten, bis das Gerät die
CD vollständig gelesen hat, bevor man fortfährt.
Wenn keine Disc im Gerät vorhanden oder die Disc nicht lesbar ist, wird am Display “NO
DISC”angezeigt.
WIEDERGABE EINER DISC
1. Für eine Pause der Wiedergabe drücken Sie die Taste auf dem Gerät oder auf der
Fernbedienung. Am Display wird die Zeit der bisherigen Spielzeit blinken. Um die
Wiedergabe fortzusetzen, drücken Sie erneut die Taste auf dem Gerät oder auf der
Fernbedienung.
2. Um die Wiedergabe zu beenden, drücken Sie die MO / ST. / auf dem Gerät oder auf
der Fernbedienung, am Display wird die Gesamtzahl der gespielten Titel blinken.
WAHL EINES TRACKS / EINER PASSAGE
Um einen Track auszuwählen
Im Stop-Modus oder während der Wiedergabe drücken Sie die Tasten TUN+/ oder TUN-/ auf
dem Gerät oder auf der Fernbedienung, bis am Display der gewünschte Titel angezeigt
wird. Drücken Sie die Taste auf dem Gerät oder auf der Fernbedienung, um die Wiedergabe
zu starten.
Um nach einem bestimmten Passage während der Wiedergabe zu suchen (Scanning mit
hoher Geschwindigkeit)
Um den Track mit mit hoher Geschwindigkeitzu durchsuchen, lassen Sie auf dem Gerät
oder auf der Fernbedienung die TUN + / oder TUN-/ Taste gedrückt, bis die gewünschte
Stelle (Passage) erreicht ist, dann lassen Sie die Taste aus, um in den Modus der normalen
Wiedergabe zu gelangen. Die Wiedergabe wird an dieser Stelle fortgesetzt.
Um einen Titel bei mehr als 10 Tracks auszuwählen
Um ein Musikstück bei mehr als 10 Tracks auszuwählen, drücken Sie FOLD./10/M- oder
FOLD./10/M+ Taste auf dem Gerät oder die MEM/FOLD./10+ auf der Fernbedienung, um 10
Tracks nach vor oder nach hinten springen zu können, dann drücken Sie die TUN +/ Taste
oder TUN-/Taste auf dem Gerät oder auf der Fernbedienung, um den gewünschten Titel zu
wählen. Zum Beispiel: Um den 17. Track aus dem ersten Musikstück auszuwählen, drücken
Sie die Taste FOLD./10/M+ am Gerät oder die MEM/FOLD./10 UP (12) Taste auf der
Page 14

DeutschDeutsch
25 25
Fernbedienung, und drücken Sie anschliessend sechs Mal in rascher Folge die SKIP UPTaste am Gerät oder auf der Fernbedienung
Um einen Ordner zu wählen (für MP3-CDs, die mehr als einen Ordner haben)
Während der Wiedergabe drücken und halten Sie die Taste FOLD./10/M+ oder FOLD./10/M-
auf dem Gerät oder die Taste -MEM/FOLD./10 + auf der Fernbedienung, um den nächsten/
vorherigen Ordner auszuwählen.
Programmierung von Songs
Die Programmierung von Songs einer Disc ist nur möglich, wenn die Wiedergabe nicht aktiv
ist. Im Speicher können in beliebiger Reihenfolge bis zu 20 CD Titel/ 99 MP3-Songs
gespeichert werden.
1. Im Stop-Modus drücken Sie die Taste PROG. / P-MODE-Taste am Gerät oder drücken
Sie die MEM / PROG. / P-MODE-Taste auf der Fernbedienung, um auf die
Einstellungen des Programms zugreifen, auf dem Display wird PROG und P01 001
blinken.
2. Drücken Sie die Taste TUN/ + auf dem Gerät oder auf der Fernbedienung um den 1.
zu programmierenden Song auszuwählen. (Beispiel: Track 2)
3. Drücken Sie die Taste PROG. / P-MODE auf dem Gerät oder MEM / PROG. / P-MODE auf
der Fernbedienung um zu bestätigen. Auf dem Display müsste PROG und P02 002
blinken.
4. Wiederholen Sie die Vorgangsweise von Punkt 2 und 3 um weitere Songs zu speichern,
was bis zur maximal speicherbaren Anzahl von Songs möglich ist.
5. Drücken Sie die Taste auf dem Gerät oder auf der Fernbedienung um die Wiedergabe
des 1. Songs zu starten. Auf dem Display wird 001 aufscheinen und die Anzeige
“PROG”
6. Drücken Sie die Taste / MO / ST/ auf dem Gerät oder auf der Fernbedienung, um
die Wiedergabe des Programmas zu unterbrechen.
Um ein Programm zu löschen
1. Drücken Sie die Taste MO/ST./ auf dem Gerät oder auf der Fernbedienung nach
Beendigung der Wiedergabe der Disc.
2. Wenn Sie das CD Fach öffnen, wird das Programm gelöscht werden
WIEDERGABE
Es ist möglich einen Track oder alle Tracks einer CD wiederholt abzuspielen.
Um ein einzelnen Track zu wiederholen
1.Drücken Sie während der Wiedergabe die Taste PROG. / P-MODE auf dem Gerät oder
MEM / PROG. / P-MODE auf der Fernbedienung, auf dem Display wird das Symbol
erscheinen und der Track wird solange abgespielt werden, bis man die Taste MO / ST. /
auf dem Gerät oder auf der Fernebdienung wählt
2.Um die Wiederholung der Wiedergabe zu löschen, drücken Sie die Taste PROG. / PMODE auf dem Gerät oder MEM / PROG / P-MODE auf der Fernbedienung bis das
Symbol vom Display verschwunden ist.
Um alle Tracks zu wiederholen
1.Drücken Sie die Taste PROG. / P-MODE auf dem Gerät oder MEM / PROG. / P-MODE
auf der Fernbedienung bis auf dem Display dauerhaft das Symbol aufscheint, alle Tracks
werden solange abgespielt werden, bis man die Taste MO / ST. / auf dem Gerät oder
auf der Fernbedienung betätigt
2.Um die Wiederholung der Wiedergabe zu löschen, drücken Sie die Taste PROG. / PMODE auf dem Gerät oder MEM / PROG / P-MODE auf der Fernbedienung bis MEM /
PROG / P-MODE bis die Anzeige “ALL” vom Display verschwunden ist
Um den Inhalt eines Ordners wiederzugeben (nur für MP3Discs, die mehr als einen Ordner
enthalten)
1.Drücken Sie die Taste PROG. / P-MODE auf dem Gerät oder MEM / PROG. / P-MODE
auf der Fernbedienung, bis die Anzeige R” dauerhaft auf dem Display aufscheint, der
Inhalt des Ordner wird solange abgespielt werden, bis man die Taste MO / ST. auf dem
Gerät oder auf der Fernbedienung betätigt.
2.Um die Wiederholung der Wiedergabe zu löschen, drücken Sie die Taste PROG. / PMODE auf dem Gerät oder MEM / PROG / P-MODE auf der Fernbedienung bis das
Symbol vom Display verschwunden ist.
ZUFALLSWIEDERGABE
Drücke Sie im Wiedergabemodus die Taste PROG. / P-MODE-Taste am Gerät oder
drücken Sie die MEM / PROG. / P-MODE-Taste auf der Fernbedienung, bis das Wort “RAN”
dauerhaft auf dem Display zu sehen ist, die Zufallswiedergabe wird ab dem nächsten Titel
automatisch starten, bis alle Songs abgespielt sind und dann stoppen. Drücken Sie die
PROG / P-MODE-Taste am Gerät oder drücken Sie die MEM / PROG. / P-MODE-Taste auf
der Fernbedienung, bis das Wort “RAN” von der Anzeige verschwindet.
Page 15

DeutschDeutsch
2827
.USB BETRIEB
1.Drücken Sie die FUNKTIONS-Taste am Gerät oder auf der Fernbedienung, um den Modus
“USB” auszuwählen.
2.Verbinden Sie das USB-Kabel mit dem USB-Eingang. Das Display wird die Gesamtzahl
der auf dem USB-Laufwerk gespeicherten Titel anzeigen. Nach dem Lesen des USBLaufwerks wird automatisch die Wiedergabe ab Track 1 gestartet.
3.Drücken Sie die / MO / ST Taste am Gerät oder auf der Fernbedienung, um die
Wiedergabe zu stoppen. Am Display wird die Gesamtanzahl der gespielten USB Titel und
STOP angezeigt.
4.Wiederholfunktion (Repeat 1 – repeat folder – repeat all) / program play / skip up sind
identisch mit den für den Betrieb “CD/MP3 BETRIEB” beschriebenen.
ACHTUNG:
Verwenden Sie keine USB-Verlängerungskabel für den Anschluss der USB-Einheit,
weil es schädliche Störungen verursachen könnte.
AUX BETRIEB
Drücken Sie die Funktionstaste, um den Modus “AUX” zu wählen.
1. Stecken Sie den Stecker der AUX Leitung in den AUX IN-Anschluss
(Ö3.5mm) des Players, die vom Gerät wiedergegebene Musik wird verstärkt aus den
Lautsprechern wiedergegeben werden.
2. Stellen Sie die Lautstärke der Haupteinheit auf das gewünschte Niveau ein.
3. Um die Wiedergabe zu starten, drücken Sie die PLAY-Taste auf der externen
Audioquelle (zB MP3-Player)
WARTUNG COMPACT DISC
1. Verwenden Sie immer eine CD mit der auf der Seite abgebildeten Kennzeichnung.
2. Hinweis zum Umgang mit den CDs
Nehmen Sie die CD aus ihrer Hülle und legen Sie sie ein
Berühren Sie nicht die reflektierende bespielte Oberfläche
Fügen Sie keine Aufkleber hinzu und beschreiben Sie nicht die Oberfläche
Biegen Sie die CD nicht
3. Aufbewahrung
Bewahren Sie die CD in ihrer Hülle auf.
Setzen Sie die CD nicht direktem Sonnenlicht, hohen Temperaturen oder hoher
Luftfeuchtigkeit au
4.Reinigung einer CD
Entfernen Sie Schmutz, Staub und Fingerabdrücke mit einem weichen Tuch
Die CD von der Mitte zum Rand hin reinigen
Benützen Sie niemals Benzol, Verdünner, Reinigungsmittel, antistatische Flüssigkeiten oder
Sprays
Schließen Sie das CD-Fach, um eine Verschmutzung durch Staub zu verhindern
Berühren Sie die Linse nicht
WARTUNG UND PFLEGE
• Elektronische Produkte dieser Art sollten niemals extremen Temperaturen oder hoher
Feuchtigkeit ausgesetzt werden. Zum Beispiel sollte dieses Gerät nicht in Badezimmern
oder in der Nähe von Herden oder Heizungskörpern aufgestellt werden.
• Wenn es notwendig ist, reinigen Sie das Gerät mit einem feuchten Tuch (nur Wasser).
(Vergewissern Sie sich dabei, daß das AC-Netzkabel vom Netz abgetrennt ist). Verwenden
Sie niemals Politur oder starke Reinigungsmittel, die die Oberfläche des Gerätes beschädigen
könnten.
Diese Anlage wurde im Respekt der höchsten internationalen Standards entwickelt und
hergestellt. Trotzdem müssen beim Umgang mit allen elektrischen Geräten, die mit Strom
betrieben werden, bestimmte Vorsichtsmaßnahmen beachtet werden, um die beste
Funktionstüchtigkeit zu erreichen und Sicherheit zu garantieren. Das ist besonders wichtig
bei Audiogeräten.
JA . . . Lesen Sie die Bedienungsanleitung, bevor Sie die Anlage in Betrieb nehmen.
JA . . . Vergewissern Sie sich, daß alle elektrischen Anschlüsse (einschließlich des
Netzsteckers, der Verlängerungskabel und der Anschlüsse zwischen den
einzelnen Teilen des Gerätes) sachgemäß, entsprechend den
Herstelleranweisungen, ausgeführt worden sind. Beachten Sie die richtige
Stromsicherungsleistung.
JA . . . Wenn Sie Zweifel bei der Installation, dem Funktionieren oder den
Sicherheitsvorschriften Ihrer Anlage haben, wenden Sie sich immer an Ihren
Page 16

DeutschDeutsch
3029
Fachhändler. Er kann Sie am besten beraten.
NEIN . . . Versperren Sie nicht die notwendigen Belüftungsöffnungen - und vor allem, stellen
Sie das Gerät NICHT in die Nähe von Gardinen oder auf weiche Oberflächen, wie
Teppiche. Das Überhitzen könnte das Gerät unnötig beschädigen und seine
Lebensdauer verkürzen.
Denken Sie daran, wenn Sie Ihr Gerät lange mit der besten Funktionstüchtigkeit und zu
Ihrer vollen Zufriedenheit nutzen wollen, sollten Sie es regelmäßig von einem zuverlässigen
Kundendienstzentrum warten lassen. Vergewissern Sie sich, daß alle Familienmitglieder
das Gerät richtig benutzen.
VOR ALLEM:
• Achten Sie darauf, daß Kinder keine Gegenstände in die Öffnungen oder Schlitze des
Gehäuses werfen - dies könnte einen elektrischen Schlag hervorrufen;
• Versuchen Sie nicht das Gerät zu reparieren, und riskieren Sie niemals mit elektrischen
Geräten jeder Art - Lieber unverletzt sein, als besorgt!
WICHTIG
Die Bewegung des CD-Mechanismus und der empfindliche Stromkreis können Störungen bei
einem nahestehenden Radio oder Tuner hervorrufen. Schalten Sie dieses Gerät aus, wenn Sie
andere Radios verwenden.
Dieses Gerät verwendet einen Laser
Gefahr - Unsichtbare Laserstrahlung beim Öffnen und wenn das Schließsystem versagt oder
beschädigt ist. Vermeiden Sie es, sich der direkten Strahlung auszusetzen.
Vorsicht - Die Benutzung von Bedienelementen, das Vornehmen von Regulierungen oder
Einstellungen, die nicht in dieser Bedienungsanleitung aufgeführt sind, könnten Sie
einer gefährlichen Strahlung aussetzen.
ALLGEMEINE TECHNISCHE DATEN
Leistungsanforderungen ……………………… AC 230V~50Hz
DC 12V UM-1/D x 8pcs
Energieverbrauch………………………….…… 40 Watt
Gewicht…………………………………………….. 3.5 kg
Größe……………………………………….. 513 (L) x 287(W) x 162 (H) mm
Betriebstemperatur…………………………… + 5°C - + 35° C
ABSCHNITT RADIO
Empfangsband ………………………………… FM ONLY (nur UKW)
Frequenzbereich ……………………………… FM 87.5 – 108 MHz
ABSCHNITT COMPACT DISC
Optischer Pickup …………………………….…… 3-Beam Laser
Frequenzgang ………………………… 100Hz – 16KHz
ABSCHNITT AUDIO
Ausgangsleistung…………………………………… 8W x 2 (RMS)
ZUBEHÖR
Gebrauchsanweisung……………………………… 1
Bezüglich der Compact Discs
Nur Compact Discs mit dieser Marke dürfen mit diesem
CD-Spieler wiedergegeben werden.
Fernbedienung………………………………… 1
AC Kabel ………………………………………… 1
Technische Daten unterliegen aufgrund ständiger Verbesserungen Änderungsprozessen,
wobei sich der Hersteller das Recht vorbehält, diese Änderungen ohne Vorankündigungen
vorzunehmen.
Page 17

FrançaisFrançais
31 32
ATTENTION
Le symbole “point d’exclamation” à l’intérieur d’un triangle avertit
l’utilisateur que d’importantes instructions d’utilisation et de maintenance
sont contenues dans le mode d’emploi.
Le symbole “éclair” à l’intérieur d’un triangle sert à avertir l’utilisateur de
la présence du courant à l’intérieur du l’appareil qui pourrait constituer
un risque.
Afin de minimiser les risques, ne pas ouvrir le boîtier ni ôter le dos de
l’appareil. En case de panne, faites appel aux techniciens qualifiés
pour les réparations. L’appareil ne renferme aucune pièce reparable
par l’utilisateur.
Cet appareil utilise un rayon laser. Etant donné le danger que ceci
représente pour les yeux, seulement un technicien qualifié devrait
retirer le couvercle et réparer cet appareil.
Un rayonnement laser invisible est présent lorsque l’appareil est ouvert
ou le verrouillage de sécurité est inopérant. Eviter toute exposition
directe au rayon laser. L’utilisation des commandes, réglages ou
procédés autres que ceux stipulés dans le présent mode d’emploi sont
dangereux.
Cet appareil a été conçu pour une tension d’alimentation de 230V ~
50Hz. Débranchez la prise de courant quand on prévoit de ne pas
utiliser l’appareil pendant un certain temps.
L’unité ne doit pas être exposée à l’humidité ou à la pluie.
L’interrupteur d’allumage de cet appareil est monté sur des circuits
secondaires et il ne débranche pas l’appareil tout entier lorsqu’on l’éteint.
Mettez l’appareil sous tension seulement après avoir vérifié que tous
les raccordements soient corrects.
CDR-7000U
Radio stereo portable avec lecteur CD à chargement frontal et télécommande complète.
MODE D’EMPLOI
Veuillez lire attentivement ce mode d’emploi, afin de familiariser avec votre Nouvel Appareil
avant de l’utiliser pour la première fois. Veuillez s’il vous plaît garder ce mode d’emploi comme
référence pour le futur.
L’appareil doit être gardé dans un endroit suffisamment ventilé. Ne le
gardez jamais par exemple près des rideaux, sur un tapis ou dans des
meubles, tels qu’une b bliothèque.
L’appareil ne doit pas être exposée à la lumière directe du soleil ou à
des sources de chaleur.
Page 18

FrançaisFrançais
33 34
IDENTIFICATION DES COMMANDES
1. MANCHE
2. BOUTON TIMER
3. BOUTON SET/ID3
4. BOUTON MO/ST./
5. BOUTON CD PLAY/PAUSE
6. BOUTON CD SKIP UP / TUNING+
7. BOUTON CD SKIP BACK / TUNING -
8. BOUTON OPEN/CLOSE
9. BOUTON SLEEP
10. BOUTON MÉMOIRE
11. BOUTON EQ
12. BOUTON FONCTION
13. BOUTON FOLD./10/M-
14. BOUTON FOLD./10/M+
15. BOUTON STANDBY
16. BOUTON VOLUME
17. BOUTON PROG./P-MODE
18. PRISE POUR CASQUE
19. PORTE USB
20. ÉCRAN LCD
21. PRISE AUX IN
22. DIFFUSEURS
23. CAPTEUR DE TÉLÉCOMMANDE
24. PORTE DE LA CHARGE FRONTALE CD
25. ANTENNE TÉLÉSCOPIQUE FM
26. PRISE AC
27. COMPARTIMENT DES BATTERIES
7. BOUTON CD PLAY/PAUSE
8. BOUTON P-MODE
9. BOUTON STOP/MO/ST.
10. BOUTON CLK ADJ.
11. BOUTON CD F-SKIP UP/TUN.+
12. BOUTON ID3
13. BOUTON VOLUME UP/DOWN
14. BOUTON TIMER/SLEEP
15. BOUTON MUTE
16. BOUTON STANDBY
17. CAPTEUR DE TÉLÉCOMMANDE
18. COMPARTIMENT DES BATTERIES
Remarque : Avant l’utilisation, retirer la protection des batteries.
FONCTIONNEMENT DE LA TÉLÉCOMMANDE
Pour faire fonctionner l’appareil avec la télécommande, pointer
la télécommande vers le capteur de la télécommande, situé sur
le panneau frontal, et appuyer sur le bouton approprié de la
télécommande. La fonction optimale de la commande à distance
d’environ 6 ~ 7 mètres à partir du panneau frontal et avec un
angle de 30 degrés. La lumière directe du soleil ou le milieu ambiant trop lumineux peuvent
interférer avec la fonctionnalité de la télécommande. Si la télécommande ne fonctionne pas
correctement ou cesse de fonctionner, remplacer les piles de la télécommande, puis
essayer de réduire la luminosité du milieu.
INSTALLATION DES BATTERIES AU LITHIUM EN TÉLÉCOMMANDE
TÉLÉCOMMANDE
FONCTIONS PRINCIPALES :
1. BOUTON FONCTIONS
2. BOUTON OPEN/CLOSE
3. BOUTON MÉMOIRE
4. BOUTON EQ
5. BOUTON FOLD./10/M. UP/DOWN
6. BOUTON CD B-SKIP DOWN/TUN.-
La télécommande est équipée de la batterie au lithium CR2025 (3V).
Pour remplacer la batterie, pousser doucement le verrou dans la bonne
direction comme c’est indiqué dans les instructions, puis tirer le compartiment
de la batterie. Retirer l’ancienne batterie de son compartiment et installer une
nouvelle batterie au lithium (CR-2025) avec la polarité positive vers le haut.
Apporter le compartiment à sa position initiale, le son d’un « clic » indique que
le compartiment a été repositionné correctement.
Page 19

FrançaisFrançais
35 36
ALIMENTATION
Cet appareil a été conçu pour être utilisé avec l’alimentation AC / DC.
FONCTIONNEMENT AC
Brancher l’autre extrémité du cordon d’alimentation AC dans la prise située sur l’appareil et
la fiche dans la prise de courant domestique. Les batteries seront déconnectées
automatiquement. Pour la version à double tension, s’assurer que le sÉlecteur de tension
AC soit placé sur la valeur de la tension d’alimentation locale.
FONCTIONNEMENT DC
Ouvrir la Porte du compartiment des batteries. Installer 8 batteries de type UM-1 / D (non
incluses) dans le compartiment des batteries. Respecter les polarités indiquées dans le
compartiment des batteries.
ATTENTION :
Retirer les batteries si elles sont déchargées ou s’il est prévu que l’appareil ne sera pas
utilisé pendant une longue période de temps. Les batteries contiennent des substances
chimiques, elles doivent donc être recyclées correctement.
FONCTIONS DE BASE
Branchage de l’appareil
· Après avoir connecté l’alimentation, l’écran affichera AM 00:00. En restant dans ce
mode, l’appareil s’éteint automatiquement après 15 minutes. Appuyer sur le bouton
STANDBY pour brancher l’appareil, appuyer de nouveau sur le bouton STANDBY pour
le faire fonctionner.
· Conseils de EDS - Le dispositif pourrait ne pas se démarrer ou réinitialiser certaines
fonctions en raison de l’apparition de décharges électrostatiques, dans ce cas, il suffit
de redémarrer votre appareil
· Réglage de l’heure
Remarque : S’assurer que toutes les connexions ont été effectuées correctement
1. Dans le mode standby sur l’écran LCD clignote 00:00. Appuyer sur le bouton SET/ID3,
l’écran affichera la version RTC 12 heures ou la version RTC 24 heures. Appuyer sur la
touche SKIP UP / DOWN sur l’appareil ou sur la télécommande pour sélectionner la
version 12 ou 24 heures. Appuyer sur le bouton SET/ID3 pour confirmer.
2. Après avoir confirmé l’heure, sur l’écran clignoteront les chiffres de l’heure, appuyer sur le
bouton ou le bouton sur l’appareil ou sur la télécommande pour sélectionner la version 12
ou 24 heures. Appuyer sur le bouton SET/ID3 pour confirmer. À ce stade, sur l’écran
clignoteront les chiffres des minutes, appuyer sur le bouton ou sur l’appareil ou sur la
télécommande pour régler les minutes, après appuyer de nouveau sur le bouton SET/ID3
pour confirmer la valeur saisie.
Réveil musical (Radio/CD/USB)
On peut régler la minuterie pour se réveiller au son de la radio, du lecteur CD/MP3 ou USB.
1. Après avoir réglé l’heure en mode standby, appuyer et maintenir le bouton TIMER sur
l’appareil ou appuyer sur la touche TIMER de la télécommande pour régler l’heure de réveil
souhaitée.
2. Entrer l’heure souhaitée en appuyant sur le bouton ou , appuyer sur le bouton TIMER sur
l’appareil ou sur la télécommande pour confirmer. Entrer les minutes souhaitées à l’aide de
la touche ou, appuyer sur le bouton TIMER sur l’appareil ou sur la télécommande pour
confirmer. Ensuite, choisir le mode de réveil souhaité (RADIO / CD / USB), avec les touches
ou et appuyer sur la touche TIMER de l’appareil ou sur la télécommande pour confirmer
3. Quand l’heure programmée sonne, s’allumera automatiquement le mode de réveil
souhaité.
Minuterie de débranchage
1) Il est possible de régler la minuterie de débranchage pour éteindre automatiquement l’appareil
pendant la reproduction après une période de temps déterminée (10, 20, 30 ... jusqu’à 90
minutes).
2) Pendant le fonctionnement, appuyer sur la touche SLEEP de l’appareil ou sur la
télécommande pour sélectionner le temps de débranchage souhaité à partir de 90 minutes à
10 minutes, jusqu’à l’apparition de l’heure de débranchage souhaitée, après environ 5 secondes,
il sera automatiquement réglé le temps de débranchage, et sur l’écran s’allumera l’indication «
SLEEP ».
3) La radio, le CD/MP3 ou USB ou le lecteur AUX continueront de fonctionner jusqu’à ce que la
minuterie de débranchage n’arrivera pas à la valeur « 00 », puis ils s’éteindront automatiquement.
Remarque : Si le débranchage a été programmé pour les unités CD / USB / AUX, le son ne
s’arrêtera que lorsque le disque sera terminé, même si on a sélectionné un temps plus large.
Démarrage de l’appareil
Appuyer sur le bouton STANDBY sur l’appareil ou sur la télécommande, puis appuyer sur le
bouton FUNCTION de l’appareil ou sur la télécommande pour sélectionner le mode FM / CD /
USB / AUX.
Page 20

FrançaisFrançais
37 38
RÉGLAGE DU VOLUME
Tourner le bouton volume de l’appareil ou sur la télécommande pour augmenter ou diminuer le
volume.
Appuyer sur la touche MUTE de la télécommande pour couper le son. Appuyer à nouveau pour
réactiver.
FONCTION EQ
Cette unité dispose d’un égaliseur intégré, appuyer sur la touche EQ de l’appareil ou de la
télécommande pendant la reproduction pour sélectionner les différents styles musicaux
(nuances de son) : FLA, JAZZ, ROC, CLASS et POP.
Système ID3
Quand on reproduit un fichier MP3, appuyer sur la touche SET/ID3 de l’appareil ou sur la
touche ID3 sur la télécommande, on affichera « ID3 ON », si le fichier MP3 est du format « ID3
», l’outil va automatiquement rechercher les informations sur « TITRE » « ARTISTE » et «
ALBUM » qui seront affichées sur l’écran. Appuyer sur la touche SET/ID3 de l’appareil ou sur la
touche ID3 sur la télécommande pour revenir à l’affichage normal.
PRISE pour casque
Pour écouter au casque, brancher le casque de 3,5 mm (non fourni) à la prise spéciale. La
sortie SPEAKER sera automatiquement arrêtée.
ATTENTION : L’Écoute À fort volume durant une longue période de temps peut entraîner
des troubles auditifs
FONCTIONNEMENT À PARTIR DE LA RADIO
SYNTONISATION DE STATIONS RADIO
1. Appuyer sur la touche FUNCTION de l’appareil ou sur la télécommande pour sélectionner
la gamme d’onde souihatée : FM.
2.Syntoniser la station souhaitée en appuyant sur la touche TUN+ / ou TUN-/ l’écran
affichera la fréquence de la bande. Exemple : FM 97.10 MHz
3.Lors de l’écoute d’émissions FM, déployer l’antenne tÉlÉscopique FM sur toute sa longueur.
Lors de l’écoute de programmes FM, déplacer doucement l’appareil avant et en arrière pour
obtenir une meilleure réception, ou placer l’appareil dans un endroit ouvert.
Remarques : La fonction radio est préréglée en mode STEREO, si lors de l’écoute d’une
station FM stéréo, la réception est trop bruyante, appuyer sur la touche MO / ST /
de l’unité ou appuyer sur la touche MO / ST / sur la télécommande pour passer en FM
MONO.
1. Pour passer à d’autres fonctions, appuyer sur la touche FUNCTION, pour éteindre
l’appareil, appuyer sur la touche STANDBY.
FONCTIONNEMENT DE LA RADIO AVEC LES STATIONS SAUVEGARDÉES
1. On peut sauvegarder 20 stations de radio (FM) avec la télécommande, et donc, on pourra
écouter la station souhaitée directement et rapidement, sans la nécessité de prendre des
mesures.
2. En mode FM, appuyer sur la touche FONCTION
3. Appuyer sur le bouton MEM / PROG. / P-MODE de la télécommande, sur l’écran s’affichera
« P01 ». Ensuite, appuyer sur le bouton TUN+/ or TUN-/ pour sélectionner la première
station souhaitée.
4. Appuyer sur la touche FOLD./10/M + ou FOLD./10/M- sur l’appareil ou la touche MEM/
FOLD./10 + de la télécommande pour sélectionner la séquence souhaitée à sauvegarder,
puis appuyer sur la touche MEMORY de l’appareil ou appuyer de nouveau sur la touche -MEM
/ PROG. / + P-MODE + sur la télécommande pour confirmer.
5. Pour rechercher une autre station, répéter les étapes (2) et (3) jusqu’à ce que ne soient pas
stockées toutes les stations souhaitées. À programmer jusqu’à 20 stations.
6. Appuyer sur la touche FOLD./10/M + ou FOLD./10/M- de l’appareil ou MEM/FOLD./10 UP /
DOWN sur la télécommande pour écouter directement à la station préréglée.
FONCTIONNEMENT CD/MP3
Disques compatibles
Ce système peut lire tous les audios numériques CD/MP3, les audios numériques
enregistrables sur CD (CD-R), les audios numériques réinscriptibles CD (CD-RW) et les
audios numériques du format CD-DA CD / CD-R / CD-RW.
lecture des disques
1. Pour sélectionner le mode « CD », appuyer sur la touche FUNCTION de l’appareil ou sur
la télécommande
2. Pour ouvrir la porte du CD, appuyer sur la touche OPEN / CLOSE, l’écran affichera
l’inscription « OPEN ».
3. Insérer dans le logement un disque audio CD/MP3 avec la face antérieure tournée vers le
haut.
4. Fermer la porte de CD
Page 21

FrançaisFrançais
39 40
Sur l’écran clignotera l’affichage « — READING — », alors il sera affiché le nombre total de
pistes et commencera la reproduction de la première piste
Pour retirer le CD, appuyer sur la touche OPEN / CLOSE pour ouvrir la porte de CD, sur
l’écran clignotera l’affichage « OPEN ». Prendre le CD par ses bords et le placer dans son
étui
Remarque :
Avant l’ouverture de la PORTE CD, vérifier que le disque se soit arrêté
Pour assurer la bonne performance de l’appareil, avant de procéder, attendre jusqu’à ce que
l’appareil n’ait complètement lu le disque
Si aucun disque ne sera présent dans le logement, ou le disque n’est pas lisible, l’écran
affichera « NO DISC ».
LECTURE D’UN DISQUE
1. Pour interrompre la lecture, appuyer sur la touche
de l’appareil ou sur la télécommande. Sur l’écran clignotera la période de
reproduction passée. Pour reprendre la lecture, appuyer sur la touche
de
l’appareil ou sur la télécommande.
2. Pour arrêter la lecture, appuyer sur la touche MO / ST. / sur l’appareil ou sur la
télécommande, sur l’écran clignotera le nombre total de plages reproduites.
SÉlection d’une plage / PASSAGE
Pour sélectionner une plage
En mode d’arrêt ou pendant la lecture, appuyer et maintenir respectivement la touche TUN + /
ou TUN-/ sur l’appareil ou sur la télécommande jusqu’à ce que l’écran affiche la
plage souhaitée. Appuyer sur le bouton sur l’appareil ou sur la télécommande pour lancer la
lecture.
Pour rechercher un passage particulier pendant la lecture (balayage de la piste à grande
vitesse)
Pour effectuer le balayage de la plage en cours de lecture à haute vitesse, appuyer et
maintenir la touche TUN + / ou TUN-/ sur l’appareil ou sur la télécommande
jusqu’à ce qu’il n’y ait le point souhaité (de passage), puis relâcher le bouton pour le mode
de lecture normal. La lecture reprendra à partir de ce point.
Pour sélectionner une plage dont le numéro de pistes est supérieur à 10
Pour sélectionner une plage / piste dont le numéro est supérieur à 10, appuyer sur la
touche FOLD./10/M- ou FOLD./10/M + sur l’appareil ou la touche -MEM/FOLD./10 +
sur la télécommande pour sauter avant ou en arrière de 10 pistes, puis appuyer sur la
touche TUN + / TUN - / sur l’appareil ou sur la télécommande pour sélectionner la
plage souhaitée. Par exemple : Pour sélectionner la piste 17ème à partir de la 1ère plage,
appuyer sur la touche FOLD./10/M + sur l’appareil ou appuyer sur la touche MEM/FOLD./10
UP (12) sur la télécommande, puis appuyer six fois en succession rapide sur le bouton
SKIP UP sur l’appareil ou sur la télécommande
Pour sélectionner un dossier (pour les disques MP3 qui contiennent plus d’un
dossier)
Pendant la lecture, appuyer et maintenir le bouton FOLD./10/M + ou le bouton FOLD./10/Mde l’appareil ou le bouton -MEM/FOLD./10 + sur la télécommande pour sélectionner le
dossier suivant / précédent.
Programmation de plages
La programmation des pistes d’un disque n’est possible que si la lecture n’est pas active.
Dans la mémoire peuvent être stockées dans n’importe quel ordre jusqu’à 20 plages CD /
99 plages MP3.
1. En mode d’arrêt, appuyer sur la touche PROG. / P-MODE sur l’appareil ou appuyer sur le
bouton MEM / PROG. / P-MODE sur la télécommande pour accéder aux paramètres du
programme, sur l’écran l’affichage clignotera PROG et P01 001.
2. Appuyer sur la touche TUN / + de l’appareil ou sur la télécommande
pour sélectionner la première plage à programmer. (Exemple : Piste 2)
3. Appuyer sur la touche PROG. / P-MODE sur l’appareil ou appuyer sur la touche MEM /
PROG. / P-MODE de la télécommande pour confirmer. L’écran doit clignoter PROG et P02
002.
4. Répéter les étapes 2 et 3 pour mémoriser d’autres plages jusqu’à atteindre le nombre de
plages programmables.
5. Appuyer sur la touche de l’appareil ou de la télécommande pour
lancer la lecture à partir de la première plage programmée. Sur l’écran apparaîtront 001 et
l’afficheur « PROG »
6. Appuyer sur la touche / MO / ST/ de l’appareil ou sur la télécommande pour arrêter la
lecture du programme
Pour supprimer un programme
1. Appuyer sur la touche MO/.ST / ou de la télécommande une fois la lecture du disque
est terminée
2. En ouvrant le couvercle du compartiment de CD, le programme sera supprimé.
Page 22

FrançaisFrançais
41 42
RÉPÉTITION
Il est possible de reproduire à répétition une plage ou toutes les plages d’un disque.
Pour répéter une seule plage
1. Pendant la lecture, appuyer sur la touche PROG. / P-MODE sur l’appareil ou appuyer sur
le bouton MEM / PROG. / P-MODE de la télécommande, l’écran affichera un clignotement
du symbole et la piste en cours sera reproduite plusieurs fois jusqu’à ce que vous appuyez
sur la touche MO / ST. / sur l’appareil ou sur la télécommande.
2. Pour annuler la lecture répétée, appuyer sur la touche PROG. / P-MODE sur l’appareil ou
appuyer sur le bouton MEM / PROG. / P-MODE de la télécommande jusqu’à ce que le
symbole ait disparu de l’écran.
Pour répéter toutes les plages
1. Appuyer sur la touche PROG. / P-MODE sur l’appareil ou appuyer sur le bouton MEM /
PROG. / P-MODE de la télécommande jusqu’à ce que le mot sera
ALL stable sur l’écran, toutes les plages du disque seront lues de façon répétée jusqu’à ce
qu’on n’appuie pas sur la touche MO / ST. / sur l’appareil ou sur la télécommande.
2. Pour annuler la lecture répétée, appuyer sur la touche PROG. / P-MODE sur l’appareil ou
appuyer sur la touche MEM / PROG / P-MODE sur la télécommande jusqu’à ce que
l’inscription « ALL » ne disparaisse pas de l’écran.
Pour répéter un dossier (uniquement pour les disques MP3 qui contiennent plus
d’un dossier)
1. Appuyer sur la touche PROG. / P-MODE sur l’appareil ou appuyer sur la touche MEM /
PROG. / P-MODE sur la télécommande jusqu’à ce que l’inscription
« DIR » ne s’arrête pas régulièrement sur l’écran, le dossier en cours sera répété plusieurs
fois jusqu’à ce qu’on n’appuie sur la touche MO / ST. / sur l’appareil ou sur la
télécommande.
2. Pour annuler la lecture répétée, appuyer sur la touche PROG. / P-MODE sur l’appareil ou
sur la touche MEM / PROG / P-MODE sur la télécommande jusqu’à ce que l’inscription
« ALL » ne disparaisse pas de l’écran.
Reproduction casuelle
En mode de Lecture, appuyer sur la touche PROG. / P-MODE sur l’appareil ou appuyer sur
la touche MEM / PROG. / P-MODE sur la télécommande jusqu’à ce que le mot « RAN » ne
s’arrête pas de façon permanente sur l’écran, la lecture casuelle commencera
automatiquement à partir de la plage suivante, jusqu’à ce que toutes les plages ne soient
pas jouées et puis s’arrêtera. Appuyer sur la touche PROG / P-MODE sur l’appareil ou
appuyer sur la touche MEM / PROG. / P-MODE sur la télécommande jusqu’à ce que le mot
« RAN » ne disparaisse pas de l’écran.
FONCTIONNEMENT USB
1. Appuyer sur la touche FUNCTION de l’appareil ou sur la télécommande pour sélectionner le
mode « USB ».
2. Brancher le câble USB à l’entrée USB. L’écran affichera le nombre total de plages stockées
sur la clé USB. Après avoir lu la clé USB, commencera automatiquement la lecture à partir de
la plage 1.
3. Appuyer sur la touche / MO / ST sur l’appareil ou sur la télécommande pour arrêter la
lecture. L’écran affichera le nombre total de plages USB reproduites et STOP.
4. Répétition de la reproduction (repeat 1- repeat folder - repeat all) /program play/skip up sont
identiques à celles décrites pour l’opération « CD/MP3 OPERATION ».
ATTENTION:
Ne pas utiliser de câble de rallonge USB pour connecter la clé USB, car il peut provoquer des
interférences
FONCTIONNEMENT AUX
Appuyer sur la touche de fonction pour sélectionner le mode « AUX ».
1. Insérer la fiche de la ligne AUX dans la prise AUX IN (Ö3.5mm) du lecteur, la musique jouée
à partir du dispositif sera amplifiée et émise par les haut-parleurs.
2. Régler le volume de l’unité principale au niveau souhaité.
3. Pour démarrer la lecture, appuyer sur la touche PLAY de la source audio extérieure (par
exemple, un lecteur MP3)
ENTRETIEN COMPACT DISC
1. Utiliser toujours un disque compact avec l’étiquette figurant sur le côté.
2. Remarques sur la gestion des disques Retirer le disque de son boîtier et le charger
Ne pas toucher la surface enregistrée réfléchissante. Ne pas coller d’adhésifs ni écrire sur la
surface. Ne pas plier le disque.
3. Conservation Ranger le disque dans son boîtier. Ne pas exposer les disques à la lumière
directe du soleil ou à des températures élevées, une forte humidité ou lieux
4. Nettoyage d’un disque Enlever la saleté, la poussière et les empreintes des doigts avec un
chiffon doux Le disque doit être nettoyé à partir du centre vers le bord
Ne jamais utiliser de benzène, de diluants, de nettoyants ou anti-statiques liquides ou sprays
Fermer bien la porte du CD pour éviter qu’il ne soit contaminé par la poussière,
Ne pas toucher la lentille
Page 23

FrançaisFrançais
4443
ENTRETIEN
• Ne pas mettre les appareils électroniques de ce type dans un endroit extrêmement chaud
ou humide. Par exemple ne pas placer cet appareil près de zones de baignade où à
proximité de feux ou de radiateurs.
• Si nécessaire nettoyer l’appareil à l’aide d’un chiffon humidifié avec de l’eau seulement
(Vérifier que le cordon d’alimentation CC est débranché du réseau).
Ne jamais utiliser de produit de polissage ou de détergent qui risquent d’endommager la
surface du coffret. Cet appareil a été conçu et réalisé en conformité aux normes
internationales mais, comme pour tous les appareils électriques branchés à la tension de
réseau, il faut faire attention aussi bien pour obtenir les résultats les meilleurs que pour
des raisons de sécurité. Cela devient particulièrement important pour les appareillages
audio.
IL FAUT . . . Lire les instructions concernant le fonctionnement de cet appareil avant de
l’utiliser.
IL FAUT . . . Vérifier que toutes les connexions électriques ont été faites correctement et
qu’elles sont conformes aux instructions du fabriquant (compris la prise-secteur,
les câbles à rallonge et les connexions entre les différentes parties de l’appareil).
Vérifier que l’ampérage du fusible du réseau est correct.
IL FAUT . . . S’adresser à votre revendeur en cas de doutes à propos de l’installation, du
fonctionnement ou de la sûreté de votre appareil. C’est la personne la plus apte
à vous conseiller.
NE PAS . . . Obstruer les ouvertures de ventilation et, en particulier, NE PAS placer l’appareil
près des rideaux ou sur des surfaces souples tels que les tapis. Le surchauffage
peut endommager l’appareil et en compromettre sa durée.
Se rappeler qu’il faut s’adresser à des services d’entretien fiables pour que votre appareil
puisse délivrer toutes ses potentialités et puisse fonctionner pendant de nombreuses
années. S’assurer que tous les membres de la famille l’utilisent d’une façon correcte.
SPECIALEMENT:-
• Afin de réduire le risque de décharge électrique, faire attention à ce que les enfants
n’introduisent rien dans les trous et dans les fentes du coffret.
• Ne rien laisser au hazard et éviter de courir des risques avec les appareils électriques. Il
vaut mieux être en sécurité que de regretter quelque incident.
avec d’autres syntoniseurs radio à proximité, débrancher cet appareil en cas d’utilisation d’autres
dispositifs.
Cet appareil utilise un faisceau laser.
DANGER - Lorsqu’on ouvre le couvercle en cas de défaillance ou de cassure du
dispositif de synchronisation, des radiations laser invisibles se
produisent. éviter donc l’exposition directe aux faisceaux laser.
AVERTISSEMENT- L’utilisation des touches de commande, les rectifications ou les
procédures autres que celles spécifiées dans le mode d’emploi présent
peuvent entraîner une dangereuse exposition au radiations.
CARACTÉRISTIQUES
INFORMATIONS GÉNÉRALES
Exigences d’alimentation ………………………… AC 230V~50Hz
DC 12V UM-1/D x 8pcs
Consomation d’énergie ………………………….……40 Watt
Poids ……………………………………………... 3.5 kg
Dimensions ……………………………………….. 513 (L) x 287(W) x 162 (H) mm
Température de fonctionnement ………………………+ 5°C - + 35° C
SECTION DU RÉCEPTEUR
Bandes de réception ………………………………… FM ONLY
Gamme de fréquence s…………………………FM 87.5 – 108 MHz
SECTION COMPACT DISC
Capteur optique …………………………….…… 3-Beam Laser
Réponse en fréquence ………………………… 100Hz – 16KHz
SECTION AUDIO
Puissance de sortie……………………………………8W x 2 (RMS)
ACCESSOIRES
Livret d’instructions ………………………………1
Télécommande………………………………… 1
Câble AC ………………………………………… 1
IMPORTANT
Comme le mouvement du mécanisme du lecteur CD et des circuits sensibles peut interférer
Les spécifications sont sujettes à changement en raison de l’amélioration continue, le fabricant
se réserve le droit d’apporter des modifications sans préavis.
Page 24

ItalianoItaliano
45 46
ATTENZIONE
Il punto di esclamazione all’interno di un triangolo avverte l’utente che il libretto
d’istruzioni contiene delle importanti istruzioni per l’uso e la manutenzione.
Il simbolo del fulmine all’interno di un triangolo avverte l’utente della presenza di
una pericolosa tensione all’interno dell’apparecchio.
Per ridurre i rischi di scosse elettriche, non aprire l’apparecchio. L’apparecchio
non contiene parti riparabili dall’utente. In caso di guasto fare appello a tecnici
qualificati per le riparazioni.
Questo apparecchio utilizza un raggio laser. A causa del pericolo di danni alla
vista, solo personale qualificato può aprire l’apparecchio o tentare di ripararlo.
Radiazioni laser invisibili possono fuoriuscire ad apparecchio aperto on in caso
di guasto del dispositivo di sicurezza. Evitare l’esposizione diretta ai raggi laser.
L’uso di comandi, regolazioni o procedure non specificate in questo manuale
possono causare pericolose esposizioni alle radiazioni laser.
Questo apparecchio è stato progettato per funzionare a 230V ~ 50Hz. Se nonsi
intende utilizzare l’apparecchio per un lungo periodo di tempo, rimuovere la spina
dalla presa di corrente.
Non esporre l’apparecchio alla pioggia o all’umidità.
L’interruttore di alimentazione di questo apparecchio è montato sul circuito
secondario e non disconnette completamente l’apparecchio quando viene spento.
Utilizzare l’apparecchio solo dopo aver verificato che tutte le connessioni siano
state eseguite correttamente.
Posizionare l’apparecchio in un luogo sufficientemente ventilato. Evitare di
sistemarlo vicino a tende, sul tappeto o all’interno di un mobile quale, ad esempio,
una l breria.
CDR-7000U
Sistema radio-riproduttore portatile stereo con lettore CD a caricamento frontale
e telecomando completo.
MANUALE ISTRUZIONI
Raccomandiamo la lettura accurata di questo manuale d’istruzioni per potervi familiarizzare
con il vostro nuovo Radio Lettore Cassette prima di usarlo per la prima volta. Raccomandiamo
di conservare questo manuale per futuri riferimenti.
Non esporre l’apparecchio alla luce diretta del sole o a fonti di calore.
Noi, Roadstar Italia Spa
Viale Matteotti 39
I-22012 Cernobbio (Como)
Dichiariamo:
Che il modello Sistema Stereo Portatile, Radio-Registratore con CD, CDR-7000U della
Roadstar è prodotto in conformità al D.M. no. 548 datato 28/08/95 (G.U. no. 301 datata 28/12/
95) e, in particolare, è in conformità alle prescrizioni dell’articolo 2 comma 1.
Page 25

ItalianoItaliano
47
48
POSIZIONE DEI COMANDI
1. IMPUGNATURA
2. TASTO TIMER
3. TASTO SET/ID3
4. TASTO MO/ST./
5. TASTO CD PLAY/PAUSE
6. TASTO CD SKIP UP / TUNING+
7. TASTO CD SKIP BACK / TUNING -
8. TASTO OPEN/CLOSE
9. TASTO SLEEP
10. TASTO MEMORIA
11. TASTO EQ
12. TASTO FUNZIONE
13. TASTO FOLD./10/M-
14. TASTO FOLD./10/M+
15. TASTO STANDBY
16. TASTO VOLUME
17. TASTO PROG./P-MODE
18. JACK CUFFIE
19. PORTA USB
20. DISPLAY LCD
21. JACK AUX IN
22. DIFFUSORI
23. SENSORE REMOTO
24. PORTA CARICO FRONTALE CD
25. ANTENNA TELECOPOCICA FM
26. PRESA AC
27. VANO BATTERIE
TELECOMANDO
6. TASTO CD B-SKIP DOWN/TUN.-
7. TASTO CD PLAY/PAUSE
8. TASTO P-MODE
9. TASTO STOP/MO/ST.
10. TASTO CLK ADJ.
11. TASTO CD F-SKIP UP/TUN.+
12. TASTO ID3
13. TASTO VOLUME UP/DOWN
14. TASTO TIMER/SLEEP
15. TASTO MUTE
16. TASTO STANDBY
17. SENSORE REMOTO
18. VANO BATTERIE
Nota: Prima dell’uso estrarre la protezione delle batterie.
FUNZIONAMENTO TELECOMANDO
per far funzionare l’apparecchio con il telecomando, puntare il
telecomando verso il sensore remoto posto sul pannello frontale e
premere l’appropriato tasto posto telecomando.
La funzione odel telecomando è a circa 6 ~ 7 metri dal pannello frontale e
con un angolo di 30 gradi. La luce solare
diretta o un ambiente eccessivamente illuminato possono interferire con la
funzionalità del telecomando. Nel caso
il telecomando non dovesse funzionare correttamente o dovesse smettere
di funzionare, sostituire le batterie
del telecomando, quindi provare a ridurre la luminosità dell’ambiente.
FUNZIONI PRINCIPALI:
1. TASTO FUNCTIONE
2. TASTO OPEN/CLOSE
3. TASTO MEMORIA
4. TASTO EQ
5. TASTO FOLD./10/M. UP/DOWN
INSTALLAZIONE BATTERIE AL LITIO DEL TELECOMANDO
Il telecomando è dotato di batteria al litio CR2025 (3V).
Per sostituire la batteria, spingere delicatamente il fermo nella direzione giusta comeindicato
Page 26

ItalianoItaliano
49 40
nelle istruzioni e quindi estrarre il vano batteria. Estrarre dal vano la batteria
scarica e installare una nuova batteria al litio (CR-2025) con la polarità positiva
verso l’alto. Portare il vano nella posizione iniziale, il rumore di un “clic” un
indica che il vano è stato riposizionato correttamente.
ALIMENTAZIONE
Questo apparecchio è stato concepito per essere utilizzato con alimentazione AC / DC.
FUNZIONAMENTO AC
Collegare l’estremità del cavo di alimentazione AC nella presa AC posta sull’unità e la spina
nella presa di corrente domestica. Le batterie saranno scollegate automaticamente. Per la
versione a doppia tensione, assicurarsi che il SELETTORE DI TENSIONE AC sia
posizionato sul valore della tensione di alimentazione locale.
FUNZIONAMENTO DC
Aprire la PORTA DEL VANO BATTERIE. Installare 8 batterie tipo UM-1 / D (non incluse) nel
vano. Rispettare le indicazioni della polarità indicate nel vano.
ATTENZIONE:
Rimuovere le batterie se scariche o se si prevede che l’apparecchio non sarà utilizzato per un
lungo periodo di tempo. Le batterie contengono sostanze chimiche, pertanto devono essere
smaltite correttamente.
FUNZIONI BASE
Accensione dell’unità
Dopo aver collegato l’alimentazione, il display visualizzerà AM 00:00. Rimanendo in questa
modalità, l’unità si spegnerà automaticamente dopo 15 minuti. Premere il pulsante
STANDBY per accendere il dispositivo, premere nuovamente il tasto STANDBY per farlo
funzionare.
Accenni di EDS-- Il Dispositivo potrebbe non resettare o reimpostare alcune
funzionalità causa dell’insorgenza di scariche elettrostatiche, in questo caso basta
spegnere e riaccendere il dispositivo
Impostazione dell’ora
Nota: Accertarsi che tutti i collegamenti siano stati portati a termine correttamente
1. In modalità standby sul display LCD lampeggerà 00:00. Premere il pulsante SET/ID3 , il
display visualizzerà la versione RTC 12 ore o la versione RTC 24. ore. Premere il
pulsante SKIP UP / DOWN sull’unità o sul telecomando per selezionare la versione
12 o 24ore. Premere il tasto SET/ID3 per confermare.
2. Dopo aver confermato il le ore , sul display lampeggeranno le cifre delle ore , premere il
tasto o il tasto sull’unità o sul telecomando per selezionare la versione 12 o 24 ore .
Premere il pulsante SET/ID3 per confermare. A questo punto sul display lampeggeranno
le cifre dei minuti, premere il pulsante o , A questo punto sul display lampeggeranno
le cifre dei minuti, premere il pulsante o sull’unità o sul telecomando per impostare i
minuti , quindi premere nuovamente il tasto SET/ID3 per confermare il valore inserito.
Sveglia musicale (Radio/CD/USB)
È possibile impostare il timer per svegliarsi con il suono della radio, CD /MP3 or USB.
1. Dopo aver impostato il tempo in modalità standby, tenere premuto il tasto TIMER
sull’unità o premere il tasto TIMER sul telecomando per impostare l’orario di sveglia
desiderato.
2. Inserire l’orario desiderato premendo il tasto o , premere il tasto TIMER sull’unità o
sul telecomando per confermare. Inserire i minuti desiderati con i tasti o , premere
il tasto TIMER sull’unità o sul telecomando per confermare. Quindi scegliere la
modalità di sveglia desiderata (RADIO / CD / USB), con i tasti o il pulsante e
premere il pulsante TIMER sull’unità o sul telecomando per confermare.
3. Allo scoccare dell’ora preimpostata , si accenderà automaticamente la modalità di
sveglia desiderata.
Timer di spegnimento
1) È possibile impostare il timer di spegnimento per spegnere automaticamente
l’apparecchio durante la riproduzione dopo un determinato periodo di tempo (10, 20, 30
... fino a 90 minuti).
2) Durante il funzionamento, premere il tasto SLEEP sull’unità o sul telecomando per
selezionare il tempo di spegnimento desiderato da 90 minuti a 10 minuti, fino alla comparsa
del tempo di spegnimento desiderato , dopo circa 5 secondi verrà impostato
automaticamente il tempo di spegnimento e sul display si accenderà l’indicazione
“SLEEP”.
3) La radio, il CD/MP3 o USB o il lettore AUX continueranno a funzionare fino a quando il
timer di spegnimento non arriverà al valore “00” quindi si spegneranno
automaticamente.
Nota:Se lo spegnimento è stato programmato per le unità CD / USB / AUX, il suono si
arresterà solo quando sarà finito il disco,, anche se è stato selezionato un tempo di
spegnimento più lungo.
Page 27

ItalianoItaliano
51 52
Accensione dell’unità
Premere il tasto STANDBY sull’unità o sul telecomando, quindi premere il pulsante FUNCTION
sull’unità o sull’unità o sul telecomando per scegliere la modalità FM / CD / USB / AUX.
REGOLAZIONE DEL VOLUME
Ruotare il pulsante VOLUME sull’unità o sul telecomando per aumentare o diminuire il volume..
Premere il tasto MUTE sul telecomando per disattivare l’audio. Premerlo di nuovo per riattivarlo.
FUNZIONE EQ
Questa unità dispone di un sistema di equalizzatore incorporato, premere il tasto EQ sull’unità
o sul telecomando durante la riproduzione per selezionare i differenti stili musicali (tonalità del
suono): FLA, JAZZ, ROC, CLASS e POP.
Sistema ID3
Quando si riproduce un file MP3, premere il pulsante SET/ID3 sull’apparecchio o il tasto ID3
sul telecomando, apparirà “ID3 ON”, se il file MP3 è del formato “ID3”, lo strumento cercherà
automaticamente le informazioni riguardo “ TITOLO “ “ ARTISTA “e” ALBUM “che saranno
mostrate sul display. Premere nuovamente il tasto SET/ID3 sull’apparecchio o il tasto ID3 sul
telecomando per tornare alla visualizzazione normale.
.
JACK CUFFIE
Per l’ascolto con le cuffie, inserire le cuffie da 3,5 mm (non incluso) all’apposito jack .
L’uscita SPEAKER sarà interrotta automaticamente.
ATTENZIONE: L’ASCOLTO AD ALTO VOLUME per un lungo periodo di tempo potrebbe
causare danni all’udito
FUNZIONAMENTO DELLA RADIO
SINTONIZZAZIONE STAZIONI RADIO
1 Premere il tasto FUNCTION sull’unità o sul telecomando per selezionare la banda d’onda
desiderata: FM.
2 Sintonizzarsi sulla stazione desiderata premendo il tasto TUN+ / o TUN-/ il
display mostrerà la frequenza della banda. Esempio: FM 97.10 MHz
3 Quando si ascoltando trasmissioni FM, estendere l’ANTENNA TELESCOPICA FM per
tutta la sua lunghezza. Quando si ascoltano programmi FM, spostare delicatamente
l’unità avanti e indietro per ottenere una migliore ricezione, o posizionare l’unità in un
luogo aperto.
Note: Nota: La funzione radio è preimpostata in modalità STEREO, se quando si ascolta
una stazione FM stereo, la ricezione è troppo rumorosa, premere il tasto MO / ST /
sull’unità o premere il tasto MO / ST/ del telecomando , per passare alla modalità FM
MONO.
1.Per passare ad altre funzioni premere il tasto FUNCTION, per spegnere l’unità premere il
pulsante STANDBY.
FUNZIONAMENTO DELLA RADIO CON LE STAZIONI MEMORIZZATE
1. È possibile prememorizzare 20 stazioni radio(FM) con il telecomando, è quindi sarà
possibile ascoltare la stazione desiderata direttamente e velocemente, senza la necessità
di eseguire alcuna operazione.
2. In modalità FM premere il pulsante FUNCTION
3. Premere il pulsante MEM / PROG. / P-MODE sul telecomando, sul display lampeggerà
“P01”. Quindi premere il pulsante TUN+/ or TUN-/ per selezionare la prima stazione
desiderata.
4. Premere il tasto FOLD./10/M + o FOLD./10/M- sull’unità o il tasto MEM/FOLD./10 + sul
telecomando per selezionare la sequenza desiderata da memorizzare, quindi premere il
tasto MEMORY sull’unità o premere di nuovo il tasto -MEM / PROG. / P-MODE + sul
telecomando per confermare.
5. Per ricercare un’altra stazione, ripetere i passi (2) e (3) finché non saranno memorizzate
tutte le stazioni desiderate. Possono essere programmate fino a 20 stazioni.
6. Premere il tasto FOLD./10/M + o FOLD./10/M- sull’unità o MEM/FOLD./10 UP / DOWN
sul telecomando per ascoltare direttamente la stazione memorizzata.
FUNZIONAMENTO CD/MP3
Dischi riproducibili
Questo sistema può riprodurre tutti gli audio digitali CD/MP3, gli audio digitali registrabili su CD
(CD-R) , gli audio digitali riscrivibili su CD (CD-RW) e gli udio digitali del formato CD-DA CD /
CD-R / CD -RW.
LETTURA DISCHI
1. Per selezionare la modalità “CD”, premere il tasto FUNCTION sull’unità o sul
telecomando
Page 28

ItalianoItaliano
53 54
2. Per aprire lo sportello del CD premere il tasto OPEN / CLOSE, sul display apparirà la
scritta “OPEN”.
3.Inserire nell’alloggiamento un disco audio CD/MP3 con il lato anteriore rivolto verso l’alto.
4.Chiudere lo sportello CD
Sul display lampeggerà la scritta “ — READING — quindi sarà mostrato numero totale dei
brani e inizierà la riproduzione della prima traccia
Per rimuovere il CD, premere il tasto OPEN / CLOSE per aprire la porta CD, sul display
lampeggerà la scritta “OPEN”. Prendere il CD per i bordi, e riporlo con cura nell’apposita
custodia
Nota:
Prima di aprire la PORTA CD assicurarsi che il disco si sia fermato
Per garantire buone prestazioni del dispositivo, rima di procedere attendere che l’unità abbia
legge completamente il disco
Se nessun disco sarà presente nell’alloggiamento, oppure il disco non è leggibile, sul display
apparirà la scritta “NO DISC”.
RIPRODUZIONE DI UN DISCO
1. Per mettere in pausa la riproduzione, premere il pulsante sull’unità o sul
telecomando. Sul display lampeggerà il periodo di riproduzione trascorso.
Per riprendere la riproduzione, premere di nuovo il pulsante sull’unità o sul
telecomando.
2. Per interrompere la riproduzione, premere il tasto MO / ST. / sull’unità o sul
telecomando, sul display lampeggerà il numero totale dei brani eseguiti.
SELEZIONE DI UN BRANO / PASSAGGIO
Per selezionare un brano
In modalità di arresto o durante la riproduzione premere rispettivamente il tasto TUN+/ or
TUN-/ sull’unità o sul telecomando, fino a visualizzare sul display, il brano desiderato
Premere il tasto sull’unità o sul telecomando per avviare la riproduzione.
Per cercare un particolare passaggio durante la riproduzione (scansione pista ad alta
velocità)
Per eseguire la scansione del brano in riproduzione ad alta velocità , premere e tenere
premuto il TUN + / o TUN-/ sull’unità o sul telecomando fino a quando non appare il
punto desiderato (di passaggio), quindi rilasciare il tasto per la modalità di riproduzione
normale. La riproduzione riprenderà da questo punto.
Per selezionare un brano il cui numero di traccia supera 10
Per selezionare un brano / traccia il cui numero è superiore a 10, premere il tasto FOLD./
10/M- o FOLD./10/M + sull’unità o il tasto -MEM/FOLD./10 + sul telecomando per saltare
indietro o in avanti di 10 tracce , quindi premere il tasto TUN + / o TUN-/ sull’unità o
sul telecomando per selezionare il brano desiderato. Ad esempio: per selezionare la traccia
17 ° dal 1 ° brano,premere il tasto FOLD./10/M + sull’unità o premere il tasto MEM/FOLD./
10 UP (12) sul telecomando, quindi premere per sei volte in rapida successione il pulsante
SKIP UP sull’unità o sul telecomando
Per selezionare una cartella (per dischi MP3 che contengono più di una cartella)
Durante la riproduzione , tenere premuto il tasto FOLD./10/M + o il tasto FOLD./10/Msull’unità o il tasto -MEM/FOLD./10 + sul telecomando per selezionare la cartella successiva
/ precedente.
Programmazione brani
La programmazione dei brani di un disco è possibile solo quando la riproduzione non è
attiva. Nella memoria possono essere memorizzati in qualsiasi ordine fino a 20 brani CD /
99 brani MP3.
1. In modalità di arresto, premere il tasto PROG. / P-MODE sull’unità o premere il tasto MEM
/ PROG. / P-MODE sul telecomando per accedere alle impostazioni del programma, sul
display lampeggeranno PROG e P01 001.
2. Premere il tasto TUN/ + sull’unità o sul telecomando per selezionare il primo brano da
programmare. (Esempio: traccia 2)
3. Premere il tasto PROG. / P-MODE sull’unità o premere il tasto MEM / PROG. / P-MODE
sul telecomando per confermare. Sul display dovrebbero lampeggiare PROG e P02 002.
4. Ripetere i passaggi 2 e 3 per memorizzare altri brani fino a raggiungere il numero di brani
programmabili.
5. Premere il tasto sull’unità o sul telecomando per iniziare la riproduzione dal primo
brano programmato. Sul display appariranno 001 e l’indicatore “PROG”
6. Premere il tasto / MO / ST sull’unità o sul telecomando per interrompere la
riproduzione del programma
Per cancellare un programma
1. Premere il tasto MO/ST./ sull’unità o sul telecomando una volta terminata la
riproduzione del disco
2. Aprendo il coperchio del vano CD, il programma sarà cancellato.
RIPETIZIONE
È possibile riprodurre ripetutamente un brano o tutti i brani di un disco.
Page 29

ItalianoItaliano
55 56
Per ripetere un brano singolo
1.Durante la riproduzione premere il tasto PROG. / P-MODE sull’unità o premere il tasto
MEM / PROG. / P-MODE sul telecomando, sul display lampeggerà il simbolo e la
traccia corrente sarà riprodotta più volte fino a che non si premerà il tasto MO / ST. /
sull’unità o sul telecomando.
2.Per annullare la ripetizione della riproduzione , premere il tasto PROG. / P-MODE
sull’unità o premere il tasto MEM / PROG. / P-MODE sul telecomando fino a quando il
simbolo non sarà scomparso dal display.
Per ripetere tutti i brani
1.Premere il tasto PROG. / P-MODE sull’unità o premere il tasto MEM / PROG. / P-MODE
sul telecomando fino a quando la scritta ALL non sarà stabile sul display, tutti i
brani del disco saranno riprodotti più volte fino a quando non si premerà il tasto MO / ST. /
sull’unità o sul telecomando.
2.Per annullare la ripetizione della riproduzione , premere il tasto PROG. / P-MODE
sull’unità o premere il tasto MEM / PROG / P-MODE sul telecomando fino a quando la
scritta “ALL” non sarà scomparsa dal display..
Per ripetere una cartella (solo per dischi MP3 che contengono più di una cartella)
1.Premere il tasto PROG. / P-MODE sull’unità o premere il tasto MEM / PROG. / P-MODE
sul telecomando fino a quando la scritta “DIR” non si fermerà stabilmente sul
display, la cartella corrente sarà ripetuta più volte più volte fino a quando non si premerà il
tasto MO / ST. / sull’unità o sul telecomando..
2.Per annullare la ripetizione della riproduzione , premere il tasto PROG. / P-MODE
sull’unità o premere il tasto MEM / PROG / P-MODE sul telecomando fino a quando la
scritta “ALL” non sarà scomparsa dal display..
RIPRODUZIONE CASUALE
In modalità di riproduzione premere il tasto PROG. / P-MODE sull’unità o premere il tasto
MEM / PROG. / P-MODE sul telecomando fino a quando la scritta “RAN” no si fermerà
stabilmente sul display, la riproduzione casuale inizierà automaticamente dal brano
successivo , fino a quando tutti i brani non saranno riprodotti e poi si fermerà. Premere il
tasto PROG / P-MODE sull’unità o premere i tasto MEM / PROG. / P-MODE sul
telecomando fino a quando la scritta “RAN” non sarà scomparsa dal display.
FUNZIONAMENTO USB
1. Premere il tasto FUNCTION sull’unità o sul telecomando per selezionare la modalità “USB”.
2. Collegare il cavo USB all’ingresso USB. Il display visualizzerà il numero totale di brani
memorizzati nell’unità USB .Dopo aver letto l’unità USB , partirà automaticamente la
riproduzione a partire dalla traccia 1.
3. Premere il tasto / MO / ST sull’unità o sul telecomando per arrestare la riproduzione.
Sul display compariranno il numero totale di brani USB riprodotti e STOP.
4.Ripetizione riproduzione (repeat 1- repeat folder - repeat all) /program play/skip up son
identiche a quelle descritte per il FUNZIONAMENTO “CD/MP3 OPERATION”.
ATTENZIONE:
Non utilizzare alcun cavo di prolunga USB per il collegamento dell’unità USB perché potrebbe
causare interferenze dannose
FUNZIONAMENTO AUX
Premere il tasto funzione per selezionare la modalità “AUX”.
1. Inserire la spina della linea AUX alla presa AUX IN (Ö3.5mm) del lettore, la musica
riprodotta dal dispositivo sarà amplificata ed emessa dagli altoparlanti.
2. Regolare il volume dell’unità principale al livello desiderato.
3. Per avviare la riproduzione premere il tasto PLAY della sorgente audio esterna (es. lettore
MP3)
MANUTENZIONE COMPACT DISC
1. Utilizzare sempre un compact disc con il marchio mostrato a lato.
2. Note sulla gestione dei dischi, Rimuovere il disco dalla custodia e caricarlo
Non toccare la superficie registrata riflettente. Non incollare adesivi o scrivere sulla
superficie. Non piegare il disco.
3. Conservazione
Conservare il disco nella sua custodia. Non esporre i dischi alla luce diretta del sole o ad alte
temperature, elevata umidità o luoghi
4. Pulizia di un disco
Eliminare, sporcizia, polvere e impronte della dita con un panno morbido Il disco deve essere
pulito dal centro verso il bordo
IMPORTANTE
Dato che il movimento del meccanismo del CD ed il circuito delicato possono causare interferenza
su una sintonizzazione radio vicina; spegnere questo apparecchio mentre si sta utilizzando
l’altro dispositivo radio.
Questo prodotto laser utilizza:
Pericolo - Radiazione laser invisibile quando viene aperto e il dispositivo di sincronizzazione
si arresta o fallisce. Evitare l’esposizione diretta ai raggi.
Attenzione - L’uso dei controlli, regolazioni o procedure non elencate in questo manuale
Page 30

ItalianoItaliano
5857
potrebbero causare un’esposizione rischiosa a radiazioni.
Riguardo i Compact Discs
Solo i compact discs che portano questo marchio possono
essere utilizzati con questo lettore CD.
Non usare mai benzene, diluenti, detergenti o antistatico liquidi o spray
Non toccare la lente. Chiudere bene la porta CD per impedire che sia contaminato dalla polvere
CURA E MANUTENZIONE
• I prodotti elettronici di questo tipo non dovranno mai essere soggetti a temperature estreme
o umidità eccessiva. Per esempio, questo apparecchio non dovrà essere posizionato in
bagni, vicino a stufe o termosifoni.
• Se necessario, pulire l’apparecchio con un panno inumidita solo con acqua (Assicurarsi
che il Cavo di Alimentazione AC sia stato scollegato dalla Presa di Corrente). Non usare
cere o detergenti forti giacché potrebbero danneggiare la superficie dell’apparecchio.
Questo apparecchio è stato disegnato e fabbricato per soddisfare i più alti standard
internazionali, ma, come un qualsiasi apparecchio elettrico che funzione a voltaggio
principale, la cura dovrà essere effettuata così potrà ottenere i migliori risultati e poter
assicurare la sicurezza dell’apparecchio. Questo è particolarmente importante per un
impianto audio.
FARE . . . Leggere il manuale d’istruzioni prima di tentare l’utilizzo dell’apparecchio.
FARE . . . Assicurarsi che tutti i collegamenti elettrici ( includendo la spina principale, i
terminali della prolunga e i collegamenti tra i pezzi dell’apparecchio) siano
stati fatti in modo corretto e secondo le istruzioni del fabbricante. Controllare
che il fusibile principale a potenza nominale sia corretto.
FARE . . . Contattare sempre il vostro rivenditore se avesse alcun dubbio
sull’installazione, funzionamento o la sicurezza del vostro apparecchio. Lui
sarà la miglior persona che vi potrà dare consigli.
NON FARE . . . Ostruire i fori necessari per la ventilazione - In modo speciale NON posizionare
l’apparecchio vicino a tende o su mobili soffici tali come tappeti. Un
surriscaldamento può causare un danneggiamento inutile o una diminuzione
della vita dell’apparecchio.
Ricordare che per ottenere la migliore prestazione e una soddisfazione duratura dal vostro
apparecchio, portarlo da un centro di servizi affidabile per poter darle una regolare
manutenzione.
SOPRATTUTTO:-
• Non lasciare che i bambini introducano oggetti estranei nei fori o nelle fessure della scatola
- Questo potrebbe causare una scarica elettrica;
• Non fare congetture o rischiare con apparecchiature elettriche di qualsiasi tipo - È meglio
essere sicuro che dispiaciuto!
SPECIFICHE
GENERALITÀ
Requisiti alimentazione…………………………AC 230V~50Hz
DC 12V UM-1/D x 8pcs
Consumo energetico ……………………40 Watt
Peso ……………………………………………..3.5 kg
Dimensioni ………………………………………513 (L) x 287(W) x 162 (H) mm
Temperatura di funzionamento ……………… + 5°C - + 35° C
SEZIONE RICEVITORE
Bande di ricezione ………………………………FM ONLY
Gamma di frequenze ………………………FM 87.5 – 108 MHz
SEZIONE COMPACT DISC
Pickup Ottico …………………………….…… 3-Beam Laser
Risposta in frequenza …………………………100Hz – 16KHz
SEZIONE AUDIO
Potenza di uscita…………………………………… 8W x 2 (RMS)
ACCESSORI
Libretto istruzioni ………………………………1
Telecomando………………………………… 1
Cavo AC …………………………………………1
Le specifiche sono soggette a modifiche dovute a miglioramenti continui, il produttore si riserva
il diritto di apportare modifiche senza preavviso.
Page 31

EspañolEspañol
59 60
ATENCIÓN
El símbulo de exclamación dentro un triángolo tiene el objeto de
advertir al usuario de la presencia de instrucciones importantes de
funcionamiento y mantenimiento en la documentación adjunta con
el equipo.
El símbulo del rayo con punta de flecha dentro de un triángulo
adverte al usuario de la presencia de tensiones peligrosas en el
equipo.
Para reducir los riesgos de descargas eléctricas, no retire la
cubierta. La unidad no hay en su enterior componentes que pueda
manipular el usuario. Encargue su reparación a personal cualificado.
Esta unidad utiliza el laser. Solamente personal autorizado puede
remover la cobertura del aparato, causa de posibles daños a la
vista.
Radiaciones laser invisibles a aparado abierto. El uso de
interruptores o regulaciones de las caracteristicas tecnicas o
manejos diferentes de aquellos especificados, puede resultar una
peligrosa exposición a radiaciones laser.
Esta unidad funciona con 230V ~ 50Hz. Cuando el equipo vaya a
estar un tiempo prolongado sin utilizarse, desenchufar el cable de
alimentación.
La unidad no debería ser expuesta a lluvia o humedad.
El interruptor de encendido del aparato está montado en el circuito
secundario y al apagarlo no desconecta de la alimentación todo el
aparato.
No conecte la unidad hasta que no se hayan efectuado todas las
otras conexiones.
CDR-7000U
Radio Lector estereo portátil con lector CD frontal y telemando completo.
MANUAL DE INSTRUCCIONES
Recomendamos la lectura cuidadosa de este manual de instrucciones para poderse familiarizar
con su nuevo Radio Lector Casetes antes de usarlo por la primera vez. Recomendamos
conservar este manual para futuras consultaciones.
La unidad se debe instalar de forma que su posición no le impida
tener ventilación adecuada. Por ejemplo, el equipo no se debe
colocar cerca de cortinas o sobre el tapete, ni en una instalación
como puede ser un armario.
La unidad no debería ser expuesta a la luz solar directa ni a fuentes
emisora de calor.
Page 32

EspañolEspañol
61 62
LOCALIZACIÓN DE LOS CONTROLES
1. EMPUÑADURA
2. BOTÓN TIMER
3. BOTÓN SET/ID3
4. BOTÓN MO/ST./
5. BOTÓN CD PLAY/PAUSE
6. BOTÓN CD SKIP UP / TUNING+
7. BOTÓN CD SKIP BACK / TUNING -
8. BOTÓN OPEN/CLOSE
9. BOTÓN SLEEP
10. BOTÓN MEMORIA
11. BOTÓN EQ
12. BOTÓN FUNCIÓN
13. BOTÓN FOLD./10/M-
14. BOTÓN FOLD./10/M+
15. BOTÓN STANDBY
16. BOTÓN VOLÚMEN
17. BOTÓN PROG./P-MODE
18. TOMA DE ENTRADA AURICULARES
19. PUERTO USB
20. PANTALLA LCD
21. PUERTO AUX IN
22. ALTAVOCES
23. SENSOR REMOTO
24. RANURA LECTOR CD
25. ANTENA TELESCÓPICA FM
26. ENCHUFE AC
27. COMPARTIMENTO DE LA BATERÍA
MANDO A DISTANCIA
FUNCIONES PRINCIPALES:
1. BOTÓN FUNCTIONE
2. BOTÓN OPEN/CLOSE
3. BOTÓN MEMORIA
4. BOTÓN EQ
5. BOTÓN FOLD./10/M. UP/DOWN
6. BOTÓN CD B-SKIP DOWN/TUN.-
7. BOTÓN CD PLAY/PAUSE
8. BOTÓN P-MODE
9. BOTÓN STOP/MO/ST.
10. BOTÓN CLK ADJ.
11. BOTÓN CD F-SKIP UP/TUN.+
12. BOTÓN ID3
13. BOTÓN VOLUME UP/DOWN
14. BOTÓN TIMER/SLEEP
15. BOTÓN MUTE
16. BOTÓN STANDBY
17. SENSOR REMOTO
18. COMPARTIMENTO PILAS
Nota: Antes de usar, retire la protección de la batería
FUNCIONAMENTO MANDO A DISTANCIA
Para poner en funcionamiento el aparato con el mando a
distanca apuntar con el mando a distancia hacia el sensor
remoto del panel frontal y pulsar el botón correspondiente en el
mando a distancia.
El funcionamiento óptimo del mando es a unos 6-7 metros del
panel frontal y con un ángulo de 30 grados. La luz solar directa o
un am biente excesivamente iluminado pueden interferir en la
funcionalidad del mando a distancia.En el caso de que el mando
a distancia no funcionara correctamente o dejara de funcionar,
cambiar las pilas se intentar reducir la luminosidad del entorno.
INSTALACIÓN DE LAS PILAS DE LITIO EN EL MANDO A DISTANCIA
El mando a distancia está equipado con una pila de litio CR2025 (3V).
Para sustituir la batería, empujar delicadamente el pestillo en la dirección exacta como se
indica en las intrucciones y a continuación extraiga la tapa de la pila. Retire la pila vieja
del compartimento e instale una nueva pila de litio (CR-2025) con el polo positivo hacia
Page 33

EspañolEspañol
63 64
arriba. Colocar la tapa en la posición inicial y el sonido de un “clic” le indicará
que la tapa se ha colocado correctamente.
FUENTE DE ALIMENTACIÓN
Este aparato ha sido diseñado para ser utilizado con una fuente de alimentación AC/DC.
FUNCIONAMIENTO AC
Conectar el extremo del cable de alimentación AC a la toma AC de la unidad y el enchufe en
la toma de corriente doméstica. Las baterías se desconectarán automáticamente. Para la
versión de doble voltaje,asegurarse que el SELECTOR DE TENSIÓN AC se coloque en el
valor de la tensión de alimentación local.
FUNCIONAMIENTO DC
Abrir la TAPA DEL COMPARTIMENTO DE LAS PILAS. Instalar 8 pilas de tipo UM-1/D (no
incluídas) en el compartimento de las pilas. Respetar las indicaciones de polaridad indicadas
en dicho compartimento.
ATENCIÓN:
Retirar las pilas si se han agotado o si se cree que el aparato no será utilizado durante un
largo periodo de tiempo. Las pilas contienen sustancias químicas, por lo que debe deshacerse
de ellas correctamente.
UP / DOWN en el aparato o en el telecomando para seleccionar la versión 12 o 24
horas. Pulsar el botón SET/ID3 para confirmar.
2.Después de confirmar la hora, sobre la pantalla parpadeará la hora, pretar el botón o el
botón sobre el aparato o el mando a distancia para seleccionar la versión 12 o 24 horas.
Pulsar el botón SET/ID3 para confirmar. En este punto en la pantalla parpadearán las cifras de
los minutos, pulsar el botón o . En ese momento sobre la pantalla parpadearán las
cifras de los minutos , pulsar el botón o , sobre el aparato o el mando a distancia para
ajustar los minutos, por tanto pulsar nuevamente SET/ID3 para confirmar el valor introducido.
Alarma musical (Radio/CD/USB)
No se puede poner el despertsdor con el sonido de la radio, CD /MP3 o USB.
1. Después de ajustar la hora en modalidad standby, pulsar el botón TIMER sobre el
aparato o el botón TIMER en el mando a distancia para ajustar el horario de alarma
deseado.
2. Introducir el horario deseado pulsando el botón o , pulsar el botón TIMER sobre la
unidad o sobre el mando a distancia para confirmar. Instroducir los minutos deseados
en los botones o , pulsar el botón TIMER sobre la unidad o sobre el mando a
distancia para confirmar. Por tanto elegir la modalidad de alarma deseada (RADIO /
CD / USB), con los botones o el botón o pulsar el TMER sobre la unidad o sobre el
mando a distancia para confirmar.
3. Una vez programada la hora, se encenderá automáticamente la modalidad de alarma
deseada.
FUNCIONES BASE
Encender la unidad
l Después de conectar la fuente de alimentación, la pantalla mostrará las 00:00 AM.
Dejándolo en este modo, la unidad se apagará automáticamente después de 15 minutos.
Pulsar STANDBY para encender el dispositivo, pulsar nuevamente el botón STANDBY
para iniciar el funcionamiento.
l Indicios de EDS-- El Dispositivo podría no reiniciar ciertas funciones debido a la
aparición de descargas electroestáticas, en este caso basta apagar y encender de nuevo
el dispositivo.
l Ajuste de la hora
Nota: Asegúrese de que todas las conexiones se hayan hecho correctamente.
1.En el modo standby sobre la pantalla LCD parpadeará 00:00. Pulsar el botón SET/ID3 ,
la pantalla mostrará la versión RTC 12 horas o la versión RTC 24 horas. Pulsar el botón SKIP
Apagado
1) Es posible ajustar el temporizador de apagado para apagar automáticamente la unidad
durante la reproducción después de un período determinado de tiempo (10, 20, 30 ...
hasta 90 minutos).
2) Durante el funcionamiento, pulsar el botón SLEEP sobre la unidad o sobre el mando a
distancia para seleccionar el tiempo en el que deseamos que se apague desde 90 minutos
a 10 minutos, hasta que desaparezca el tiempo, después de unos 5 segundos, se ajusta
automáticamente el tiempo de desconexión y sobre la pantalla se encenderá la indicación
“SLEEP”.
3) La radio, el CD/MP3 o USB o el lector AUX continuarán funcionando hasta que el
temporizador de apagado no llegue al valor “00” y se apaguen automáticamente.
Nota: Si el apagado ha sido programado por las unidades CD / USB / AUX, la música se
Page 34

EspañolEspañol
65 66
detendrá sólo cuando termine el disco, aunque haya sido seleccionado un tiempo de
apagado más largo.
Encender la unidad
Pulsar el botón STANDBY sobre la unidad o el mando a distancia, después el botón FUNCTION
en la unidad o en el mando a distancia para elegir la función FM / CD / USB / AUX.
AJUSTE DEL VOLUMEN
Girar el botón VOLUME de la unidad o del mando a distancia para aumentar o disminuir el
volumen.
Pulsar el botón MUTE sobre el mando a distancia para desactivar el audio. Pulsar de nuevo
para reactivarlo.
FUNCIÓN EQ
Esta unidad dispone de un sistema de ecualización incorporado, pulsar el botón EQ de la
unidad o en el mando a distancia durante la reproducción para seleccionar los diferentes
estilos musicales (tono del sonido): FLA, JAZZ, ROC, CLASS e POP.
Sistema ID3
Cuando se reproduce un archivo MP3, pulsar el botón SET/ID3 sobre el aparato o el botón ID3
del mando a distancia, aparecerá “ID3 ON”, si el archivo MP3 es de formato “ID3”, el instrumento
buscará automáticamente las informaciones necesarias sobre “TÍTULO” “ARTISTA” y “ALBÚM”
que se mostrarán en la pantalla. Pulsar de nuevo el botón SET/ID3 sobre el aparato o el botón
ID3 del mando a distanca para volver a la pantalla normal.
TOMA DE AURICULARES
Para escuchar con los auriculares, inserir los auriculares de 3,5 mm (no incluídos) en el
conector de auriculares.
ALTAVOCES se detendrán automáticamente.
ATENCIÓN: LA MÚSICA A VOLUMEN DEMASIADO ALTO durante mucho rato podría causar
daños de audición.
FUNCIONAMIENTO DE LA RADIO
SINTONIZACIÓN DE LA RADIO
1 Pulsar el botón FUNCTION sobre la unidad o el mando a distancia para seleccionar la
banda de frecuencia deseada: FM.
2 Sintonice la emisora deseada pulsando el botón TUN+/ o TUN-/ la
pantalla mostrará la frecuencia de la banda. Ejemplo: FM 97.10 MHz
3 Cuando se escuchen transmisiones FM, extienda LA ANTENA TELESCÓPICA FM en
toda su longitud. Cuando se escuchen programas FM, mueva delicadamente el aparato
de un lado a otro para obtener una mejor recepción, o colocar la unidad en un lugar
abierto.
Nota: La función radio está preestablecida en la modalidad STEREO, si cuando se
escucha una emisora FM estéreo, la recepción es demasiado ruidosa, pulsar el botón MO/
ST/ sobre la unidad o MO/ST/ del mando a distancia, para pasar a la modalidad FM
MONO.
1.Para pasar a otras funciones pulsar el botón FUNCTION, para apagar la unidad pulsar el
botón STANDBY.
FUNCIONAMIENTO DE LA RADIO CON LAS EMISORAS MEMORIZADAS
1. Es posible memorizar 20 emisoras de radio (FM) con el mando a distancia, y entonces
será posible escuchar la emisora deseada de forma directa y rápida, sin la necesidad de
realizar ninguna acción.
2. En modalidad FM pulsar el botón FUNCTION
3. Pulsar el botón MEM / PROG. / P-MODE del mando a distancia, sobre la pantalla parpadeará
“P01”. Por tanto pulsar el botón TUN+/ o TUN-/ para seleccionar la primera
emisora deseada.
4. Pulsar el botón FOLD./10/M + o FOLD./10/M- sobre la unidad o el botón MEM/FOLD./10
+ del mando a distancia para seleccionar la secuencia que se quiere memorizar, por
tanto pulsar el botón MEMORY de la unidad o pulsar de nuevo el botón -MEM/ PROG. / PMODE + del mando a distancia para confirmar.
5. Para buscar otra emisora, repetir los pasos (2) y (3) hasta que se hayan memorizado
todas las emisoras deseadas. Pueden ser programadas hasta 20 emisoras.
6. Pulsar el botón FOLD./10/M + o FOLD./10/M- de la unidad o MEM/FOLD./10 UP / DOWN
sobre el mando a distancia para escuchar directamente la emisora memorizada.
FUNCIONAMIENTO CD/MP3
Discos reproducibles
Este sistema puede reproducir todos los audios digitales CD/MP3, los audios digitales
registrables en CD (CD-R) , los audios digitales regrabables en CD (CD-RW) y los audios
digitales de formato CD-DA CD / CD-R / CD -RW.
Page 35

EspañolEspañol
67 68
LECTURA DE DISCOS
1. Para seleccionar la modalidad “CD”, pulsar el botón FUNCTION sobre la unidad o
sobre el mando a distancia.
2. Para abrir el lector del CD pulsar el botón OPEN / CLOSE, en la pantalla aparecerá la
palabra “OPEN”.
3.Introducir en la ranura un disco audio CD/MP3 con la cara frontal hacia arriba.
4.Cerrar el lector de CD.
5.En la pantalla aparecerá la palabra “ — READING — se mostrarán el número total de
temas e iniciará la reproducción de la primera pista.
Para extraer el CD, pulsar el botón OPEN / CLOSE para abrir el compartimento de CD, en
la pantalla aparecerá la palabra “OPEN”. Coja el CD por los bordes, y con cuidado
colóquelo en la caja para CD.
Nota:
Antes de abrir el COMPARTIMENTO DE CD asegúrese de que el disco se haya detenido.
Para asegurar un buen rendimiento del dispositivo, antes de proceder, esperar a que la unidad
haya leído completamente el disco.
Si no hay ningún disco en la ranura , o el disco no se puede leer aparecerá escrito en la
pantalla “NO DISC”.
REPRODUCCIÓN DE UN DISCO
1. Para poner en pausa le reproducción, pulsar el botón en la unidad o en el mando a
distancia. Sobre la pantalla parpadeará el tiempo de reproducción transcurrido.
Para reanudar la reproducción pulsar de nuevo el botón en la unidad o en el mando a
distancia.
2. Para interrumpir la reproducción, pulsar el botón MO / ST. / en la unidad o en el
mando a distancia, sobre la pantalla parpadeará el número total de pistas.
SELECCIÓN DE UNA PISTA
Para seleccionar una pista
En modalidad de pausa o durante la reproducción pulsar respectivamente el botón TUN+/
o TUN-/ en la unidad o en el mando a distancia, hasta visualizar en la pantalla la pista
deseada. Pulsar el botón en la unidad o en el mando a distancia para iniciar la reproducción.
Para buscar una pista determinada durante la reproducción (escaneo de la pista a
gran velocidad).
Para continuar con la búsqueda de la pista en reproducción de alta velocidad, mantener
pulsado el botón TUN + / o TUN-/ en la unidad o mando a distancia hasta llegar
al punto deseado, y soltar el botón para volver a la modalidad de reproducción normal. La
reproducción se reanudará en ese punto.
Para seleccionar una pista en la que el número de audios es mayor de 10
Para seleccionar una pista / audio dónde el número es superior a 10, pulsar el botón
FOLD./10/M- o FOLD./10/M + en la unidad o el botón -MEM/FOLD./10 +del mando a
distancia, y para saltar hacia atrás o hacia delante de 10 pistas , por tanto pulsar el botón
TUN + / o TUN-/ en la unidad o en el mando a distancia para seleccionar la pista
deseada. Por ejemplo: para seleccionar la pista 17 de la primera lista de reproducción,
pulsar el botón FOLD./10/M + o en la unidad o el botón MEM/FOLD./10 UP (12) del mando
a distancia, por tanto pulsar seis veces seguidas de forma veloz el botón SKIP UP en la
unidad o mando a distancia.
Para seleccionar una carpeta (para discos MP3 que contengan más de una carpeta)
Durante la reproducción, mantener pulsado el botón FOLD./10/M + o el botón FOLD./10/Men la unidad o el botón -MEM/FOLD./10 + del mando a distancia para seleccionar la carpeta
sucesiva/ precedente.
Programación pistas
La programación de las pistas de un disco es posible sólo cuando la reproducción no está
activa. En la memoria pueden memorizarse en cualquier orden hasta 20 pistas CD/99
PISTAS MP3.
1. En modalidad de pausa, pulsar el botón PROG. / P-MODE en la unidad o el botón MEM /
PROG. / P-MODE del mando a distancia para acceder a la configuración del programa,
en la pantalla parpadearán PROG y P01 001.
2. Pulsar el botón TUN/ + en la unidad o en el mando a distancia para seleccionar la
primera pista que programar (ejemplo: pista 2)
3. Pulsar el botón PROG. / P-MODE de la unidad o el botón MEM / PROG. / P-MODE del
mando a distancia para confirmar. En la pantalla deberían parpadear PROG e P02 002.
4. Repetir los pasos 2 y 3 para memorizar otras pistas hasta alcanzar el número de pistas
programables.
5. Pulsar el botón en la unidad o en el mando a distancia para iniciar la reproducción de
la primera pista programada. En la pantalla aparecerán 001 y el indicador “PROG”
6. Pulsar el botón / MO / ST / de la unidad o en el mando a distancia para interrumpir
Page 36

EspañolEspañol
7069
la reproducción del programa.
Para eliminar un programa
1. Pulsar el botón MO/ST./ de la unidad o del mando a distancia una vez terminada
la reproducción del disco.
2. Abriendo el compartimento de CD, el programa se cancelará.
REPETICIÓN
Es posible reproducir repetidamente una pista o todas las pistas de un disco.
Para repetir una sola pista
1.Durante la reproducción pulsar el botón PROG. / P-MODE de la unidad o el botón MEM /
PROG. / P-MODE del mando a distancia, en la pantalla parpadeará el símbololo y
la pista actual se reproducirá repetidamente hasta que no se pulse el botón MO / ST. /
de la unidad o del mando a distancia.
2.Para cancelar la repetición de la reproducción, pulsar el botón PROG. / P-MODE en la
unidad o el botón MEM / PROG. / P-MODE del mando a distancia hasta que el símbolo
desaparezca de la pantalla.
Para repetir todas las pistas
1.Pulsar el botón PROG. / P-MODE de la unidad o el botón MEM / PROG. / P-MODE del
mando a distancia hasta que la señal ALL no quede de forma estable en la
pantalla, todas las pistas del disco serán reproducidas repetidamente hasta que no se
pulse el botón MO / ST. / en la unidad o en el mando a distancia.
2.Para cancelar la repetición de la reproducción, pulsar el botón PROG. / P-MODE sobre la
unidad o pulsar MEM / PROG / P-MODE en el mando a distancia hasta que la señal
“ALL” no desaparezca de la pantalla.
Para repetir una carpeta (sólo para discos MP3 que contengan más de una carpeta)
1.Pulsar la tecla PROG. / P-MODE de la unidad o el botón MEM / PROG. / P-MODE del
mando a distancia hasta que no aparezca “DIR” no se mantendrá de forma
constante en la pantalla, la carpeta actual se repetirá continuadamente hasta que no se
pulse el botón MO / ST. / en el aparato o en el mando a distancia.
2.Para cancelar la repetición de la reproducción, pulsar el botón PROG. / P-MODE en la
unidad o pulsar el botón MEM / PROG / P-MODE del mando a distancia, y hasta que no
aparezca “ALL” no desaparecerá de la pantalla.
REPRODUCCIÓN ALEATORIA
En modalidad reproducción pulsar el boton PROG. / P-MODE en la unidad o el botón EM /
PROG. / P-MODE en el mando a distancia hasta que no aparezca escrito “RAN” no se
detendrá de forma estable en la pantalla, la reproducción aleatoria iniciará automáticamente
con la pista sucesiva, hasta que se reproduzcan todas las pistas y entonces se detendrá.
Pulsar el botón PROG / P-MODE en la unidad o el botón MEM / PROG. / P-MODE del
mando a distancia hasta que la palabra “RAN” no desaparezca de la pantalla.
FUNCIONAMIENTO USB
1. Pulsar el botón FUNCTION de la unidad o del mando a distancia para seleccionar la
modalidad “USB”.
2. Conectar el cable USB en el puerto USB. La pantalla mostrará el número total de pistas
memorizadas en la unidad USB. Después de leer la unidad USB, se iniciará
automáticamente la reproducción desde el audio 1.
3. Pulsar el botón / MO / ST en la unidad o en el mando a distancia para detener la
reproducción. En la pantalla aparecerán el número total de pistas USB reproducidas y
STOP.
4. Repetición de las reproducciones (repeat 1- repeat folder - repeat all) /program play/skip
up son idénticas a las descritas para el FUNCIONAMIENTO “CD/MP3 OPERATION”.
ATENCIÓN:
No utilizar ningún cable de extensión USB para la conexión de la unidad USB porqué podría
causar interferecias perjudiciales.
FUNCIONAMIENTO AUX
Pulsar el botón función para seleccionar la modalidad “AUX”.
1. Introducir la clavija de la línea AUX a la entrada AUX IN (Ö3.5mm) del reproductor, la
música reproducida por el dispositivo se amplificará y se emitirá por los altavoces.
2. Ajustar el volúmen de la unidad principal hasta el nivel deseado.
3. Para iniciar la reproduccion pulsar el botón PLAY en la fuente de audio externa (ejemplo.
reproductor de MP3).
MANTENIMIENTO DEL COMPACT DISC
1.Usar siempre un compact disc con la marca que se muestra al lado..
2.Notas sobre el manejo de los discos Retirar el disco de la caja e introducirlo
No tocar la superficie grabada reflectante. No pegue adhesivos ni escriba en la superficie.
No doble el disco.
3.Conservación Conservar el disco en su caja
No exponga el disco a la luz directa del sol o a altas temperaturas, alta humedad o lugares
4.Limpieza de un disco Elimine la suciedad, el polvo y las huellas dactilares de los dedos con
un paño suave
Page 37

EspañolEspañol
7271
El disco debe limpiarse desde el centro hasta los bordes
No use nunca benceno, disolventes, productos de limpieza, aerosoles antiestáticos o spray
Cierre bien la caja del CD para evitar que sea contaminado por el polvo,
No toque la lente
CUIDADO Y MANUTENCIÓN
• Los productos electrónicos de este tipo no tendrán que ser sometidos jamás a temperaturas
elevadas o excesiva Humedad. Por ejemplo, este aparato no tendrá que ser colocado en
cuartos de baño, cerca de estufas o aparatos de calefacción.
• Si es necesario, limpiar el aparato con paño humedecido sólo con agua (Asegurarse de
que el Cable de Alimentación CA haya sido desconectado de la Toma de Corriente). No
usar ceras o detergentes fuertes ya que podrían dañar la superficie del aparato.
Este aparato ha sido diseñado y fabricado para satisfacer los más altos estándar
internacionales, pero, como cualquier aparato eléctrico que funciona con voltaje principal,
el cuidado tendrá que ser efectuado así podrá obtener los mejores resultados y poder
asegurar la seguridad del aparato. Esto es particularmente importante para una instalación
audio.
HACER . . . Leer el manual de instrucciones antes de utilizar el aparato.
HACER . . . Asegurarse de que todas las conexiones eléctricas ( incluyendo la clavija
principal, los terminales de la extensión y las conexiones entre las piezas del
aparato) hayan sido efectuadas correctamente y según las instrucciones del
fabricante. Controlar que el fusible principal de potencia nominal sea correcto.
HACER . . . Contactar siempre su revendedor si tuviese alguna duda sobre la instalación,
funcionamiento y la seguridad de su aparato. Él será la mejor persona que le
podrá dar consejos.
NO HACER . . . Obstruir los foros necesarios para la ventilación - En modo especial NO colocar
el aparato cerca de cortinas o sobre muebles suaves tales como alfombras.
Un recalentamiento podría causar un daño inútil o una disminución de la vida
del aparato.
Recordar que para obtener los mejores rendimientos y una satisfacción duradera de su
aparato, llevarlo a un centro de servicios confiable para poder darle una regular manutención.
SOBRETODO:-
• No dejar que los niños introduzcan objetos extraños en los foros y en las fisuras de la caja
- Esto podría causar una descarga eléctrica.
• No hacer conjeturas o arriesgar con aparatos eléctricos de cualquier tipo - Es mejor estar
segura que disgustado!.
IMPORTANTE
Dado que el movimiento del mecanismo del CD y el circuito delicado pueden causar interferencias
en una sintonización radio cercana; apagar este aparato mientras se está utilizando el otro
dispositivo radio.
Este producto láser utiliza:
Peligro - Radiación láser invisible cuando se abre y el dispositivo de sincronización se
detiene o falla. Evitar la exposición directa a los rayos.
Atención - El uso de los controles, regulaciones o procedimientos no mencionados en
este manual podrían causar una exposición a radiaciones arriesgada.
Acerca de los Compact Discs
Solamente los compact discs que llevan este sello pueden
ser utilizados con este lector CD.
SPECIFICACIONES
GENERALES
Requisitos de alimentación………………………… AC 230V~50Hz
DC 12V UM-1/D x 8pcs
Consumo energético ………………………….… 40 Watt
Peso ……………………………………………... 3.5 kg
Dimensiones ……………………………………….. 513 (L) x 287(W) x 162 (H) mm
Temperatura de funcionamiento …………………………+ 5°C - + 35° C
SECCIÓN RECEPTORA
Emisiones en la banda ………………………………… FM ONLY
Rango de frecuencia ……………………………… FM 87.5 – 108 MHz
SECCIÓN COMPACT DISC
Pickup Láser …………………………….…… 3-Beam Laser
Respuesta en Frecuencia ………………………… 100Hz – 16KHz
SECCIÓN AUDIO
Potencia de salida…………………………………… 8W x 2 (RMS)
ACCESORIOS
Libro de instrucciones ………………………………1
Mando a distancia………………………………… 1
Cable AC ………………………………………… 1
Las características están sujetas a cambios debido a la mejora continua, el fabricante se
reserva el derecho de realizar cambios sin previo aviso.
 Loading...