

Page 1
R
AUTO-HIFI
R
AUTO-HIFI
Double DIN Car Stereo CD/USB/SD/MMC
This product meets the essential requirements laid down by EEC Directive 89/336
and has been built in accordance with European standards EN50013, EN50020.
Dieses Produkt entspricht den Mindestanforderungen laut EU-Richtlinie 89/336 und
wurde gemäß den Normen EN50013, EN50020.
Se produit répond aux critères minima prévus par la directive 89/336/CEE et il a été
construit conformément aux normes EN50013, EN50020.
Questo prodotto soddisfa i requisiti minimi previsti dalla direttiva 89/336/CEE ed é
stato costruito in conformitá alle norme EN50013, EN50020.
Este producto cumple con todos los requisitos dispuestos por la directiva 89/336/EEC
y ha sido fabricado conformemente con las normas EN50013, EN50020.
O produto satisfaz os requisitos minimos previstos pela directiva 89/336/CEE e foi
fabricado em conformidade com as normas EN50013, EN50020.
MP3, Cassette Player with MW/FM Stereo
Radio, Radio Data System and Detachable
Front Panel System
CD-900USMP
Instruction manual
Bedienungsanleitung
Manuel d’instructions
Manuale d’istruzioni
Manual de instrucciones
Manual de instruções
is a registered Trademark of Roadstar S.A. - Switzerland All rights reserved
R
Page 2
INDEX
CD-900USMP
English Page 1
Deutsch Seite 13
Français Page 2 5
Italiano Pagina 37
Español Página 49
Portuguès Pagina 61
Fig.
Fig.
• Your new unit was manufactured and assembled
under strict ROADSTAR quality control.
Thank-you for purchasing our product for your
music enjoyment.
Before operating the unit, please read this instruction manual carefully. Keep it also handy for
further future references.
• Il vostro nuovo apparecchio è stato prodotto ed
assemblato sotto lo stretto controllo di qualità
ROADSTAR.
Vi ringraziamo di aver acquistato un nostro
prodotto per il vostro piacere d’ascolto.
Prima di procedere all'utilizzo dell'apparecchio,
leggete attentamente il manuale d’istruzioni e
tenetelo sempre a portata di mano per futuri
riferimenti.
9
8
21
22
12
2114
SD
13 15
310
7
17
24
6
18 19
16
23
1
5
14
26
20
• Ihr neues Gerät wurde unter Beachtung der
strengen ROADSTAR-Qualitätsvorschriften
gefertigt.
Wir danken Ihnen für den Kauf unseres Produktes
und wünschen Ihnen optimalen Hörgenuss. Bitte
lesen Sie diese Bedienungsanleitung durch, und
heben Sie sie auf, um jederzeit darin
nachschlagen zu können.
• Votre nouvel appareil a été fabriqué et monté en
étant soumis aux nombreaux tests ROADSTAR.
Nous espérons que cet appareil vous donnera
entière satisfaction.
Avant de vous adonner à ces activités, veuillez
lire attentivement ce manuel d’instructions.
Conservez-le à portée de main à fin de référence
ultérieure.
• Vuestro nuevo sistema ha sido construido según
las normas estrictas de control de calidad
ROADSTAR.
Le felicitamos y le damos las gracias por su
elección de este aparado. Por favor leer el manual
antes de poner en funcionamiento el equipo y
guardar esta documentación en case de que se
necesite nuevamente.
• Seu novo aparelho foi construido e montado sob
o estrito controle de qualidade da ROADSTAR.
Agradecemos por ter comprado nosso produto
para a sua diversão.
Antes de usar esta unidade é necessário ler
com atençâo este manual de instruçâes pare
que possa ser usada apropriadamente;
mantenha o manual ao seu alcance para outras
informaçâes.
2725
28
29
Page 3
12
EnglishEnglish
W ARNINGS
The exclamation point within the triangle is a warning sign alerting the user of important instructions accompanying the
product.
The lightening flash with arrowhead symbol within the triangle
is a warning sign alerting the user of “dangerous voltage” inside
the unit.
To reduce the risk of electric shock, do not remove the cover. No
CAUTION
RISK OF ELECTRIC
user serviceable parts inside the unit. Refer all servicing to
SHOCK
DO NOT OPEN
qualified personnel.
Invisible laser radiation when the unit is opened or interlocks
defeated. Avoid exposure to laser beam. Use of controls,
adjustments or procedures other than those specified herein
may result in hazardous radiation exposure.
This unit must not be exposed to moisture or rain.
This unit should be positioned so that it is properly ventilated.
Do not expose this unit to direct sunlight or heat radiating
sources.
Correct Disposal of This Product
(Waste Electrical & Electronic Equipment)
This marking shown on the product or its literature, indicates that it
should not be disposed with other household wastes at the end of its
working life. To prevent possible harm to the environment or human
health from uncontrolled waste disposal, please separate this from
other types of wastes and recycle it responsibly to promote the
sustainable reuse of material resources.
Household users should contact either the retailer where they
purchased this product, or their local government office, for details of
where and how they can take this item for environmentally safe recycling.
Business users should contact their supplier and check the terms and
conditions of the purchase contract. This product should not be mixed
with other commercial wastes for disposal.
CD-900USMP
Car Stereo Compact Disc CD/CD-R/CD-RW/MP3/ Cassette Player with US B-SD,
PLL FM Stereo Radio
INSTRUCTION MANUAL
Please read this instruction manual carefully and familiarize yourself with your new Radio
CD before using it for the first time. Please retain this manual for future reference.
TABLE OF CONTENTS
• Location of Controls
• Features
• Installation
• Precautions and Maintenance
• Operating Instructions
• Specifications
LOCATIONS OF CONTROLS
1. POWER ON/OFF
2. SCAN function (AM / FM Radio)
3. VOL UP/VOL DOWN FOR BASS/TREBLE/BALANCE/FADER + ENTER
4. PRESET STATIONS (1,2,3,4,5,6)
5. 'AF' function (ALTERNATIVE FREQUENCIES)
6. 'TA' function (TRAFFIC ANNOUNCEMENT)
7. 'PTY' function (PROGRAM TYPE)
8. PANEL OPEN BUTTON
9. MODE BUTTON (MODE)
10. BAND BUTTON (BND) / LOUD
11. AUTOMATIC OR MANUAL TUNING (FREQ UP >> OR FREQ DOWN << /
CD TRACK/SEARCH BUTTON
12. AUTO SEEK SEARCH TUNING (AS)
13. LCD DISPLAY
14. PANEL RELEASE BUTTON
15. CD SLOT
16. CD EJECT BUTTON
17. CD / USB / SD-PAUSE BUTTON
18. INTRO BUTTON (CD SCAN) CD / USB / SD
19. REPEAT BUTTON (REPEAT) CD / USB / SD
20. RANDOM BUTTON (SHUFFLE) CD / USB / SD
21. USB PORT
Radio Data System, Cassette, Detachable Front Panel.
Page 4

34
EnglishEnglish
22. INFRARED REMOTE SENSOR
23. FRONT PANEL
24. MUTE BUTTON
25. RESET BUTTON (on main unit)
26. AUX-IN AUDIO
27. CASSETTE TAPE EJECT BUTTON
28. CASSETTE TAPE SLOT-IN
29. FAST FORWARD / REWIND TAPE BUTTONS
FEATURES
The unit features a detachable front control panel, AM/FM/FM stereo-RDS, CD/MP3 player
the following features:
• The best stations memory automatically memorizes the best (strongest) station in the
order of their strength (AS).
• USB / SD Card Reader
• Electronic Volume, Bass, Treble, Fader, Balance and Equalizer control.
• Precision electronic tuning with phase-lock loop (P.L.L.) circuitry.
• Programmable 30 preset memory tuning (6 each for AM1 / AM2 / FM1/ FM2 / FM3)
• Autoreverse Cassette Mechanism
• Loudness control
• Manual / Auto (Seek) / up and down tuning control
• Band selector for AM1 / AM2 / FM1/ FM2 / FM3
• Display control (Frequency, Station Name, Program Type, Clock)
• Clock Function in RDS
• CD / USB / SD Repeat Function
• CD - MP3 files on CD/CD-R/CD-RW / USB / SD player function
• Preamplified Line-out
• Detachable front panel protects against theft
• Lighting system
• RDS Function: PI (Program Identification) TA (Traffic Announcement)
PS (Program Service Name) PTY (Program Type)
AF (List of Alternative Frequencies)
TP (Traffic Program)
• Avoid installing the unit where it would be subject to high temperatures, such as from
direct sunlight or hot air from the heater, or where it would be subject to dust, dirt or
excessive vibration.
• Use only the supplied mounting hardware for a safe and secure installation.
• Be sure to remove the front panel before installing the unit.
Mounting angle adjustment
Adjust the mounting angle to less than 20
MOUNTING EXAMPLE
Installation in the dashboard
o
.
INSTALLATION
PRECAUTIONS
• Choose the mounting location carefully so that the unit will not interfere with the normal
driving functions of the driver.
Page 5
5
6
EnglishEnglish
Detaching and attaching the front panel
The front panel of this unit can be detached in order to prevent the unit from being stolen.
DETACHING THE FRONT P ANEL
Before detaching the front panel (14), be sure to press the POWER button (1) To Off first.
Pull out the panel towards you in order to detach completely the panel from the main unit.
A TTACHING THE FRONT P ANEL
Make sure the front panel is the right way up when attaching it to the unit as it cannot be
attached upside down. Bring side B of panel to side A of main unit.
Insert the panel in and push until it clicks.
Notes:
• Do not press the front panel hard against the unit when attaching it. It can be easily
attached by pressing it lightly against the unit.
• When you carry the front panel with you, put it in the supplied front panel case.
• Do not press hard or give excessive pressure to the display window of the front panel
when attaching it to the unit.
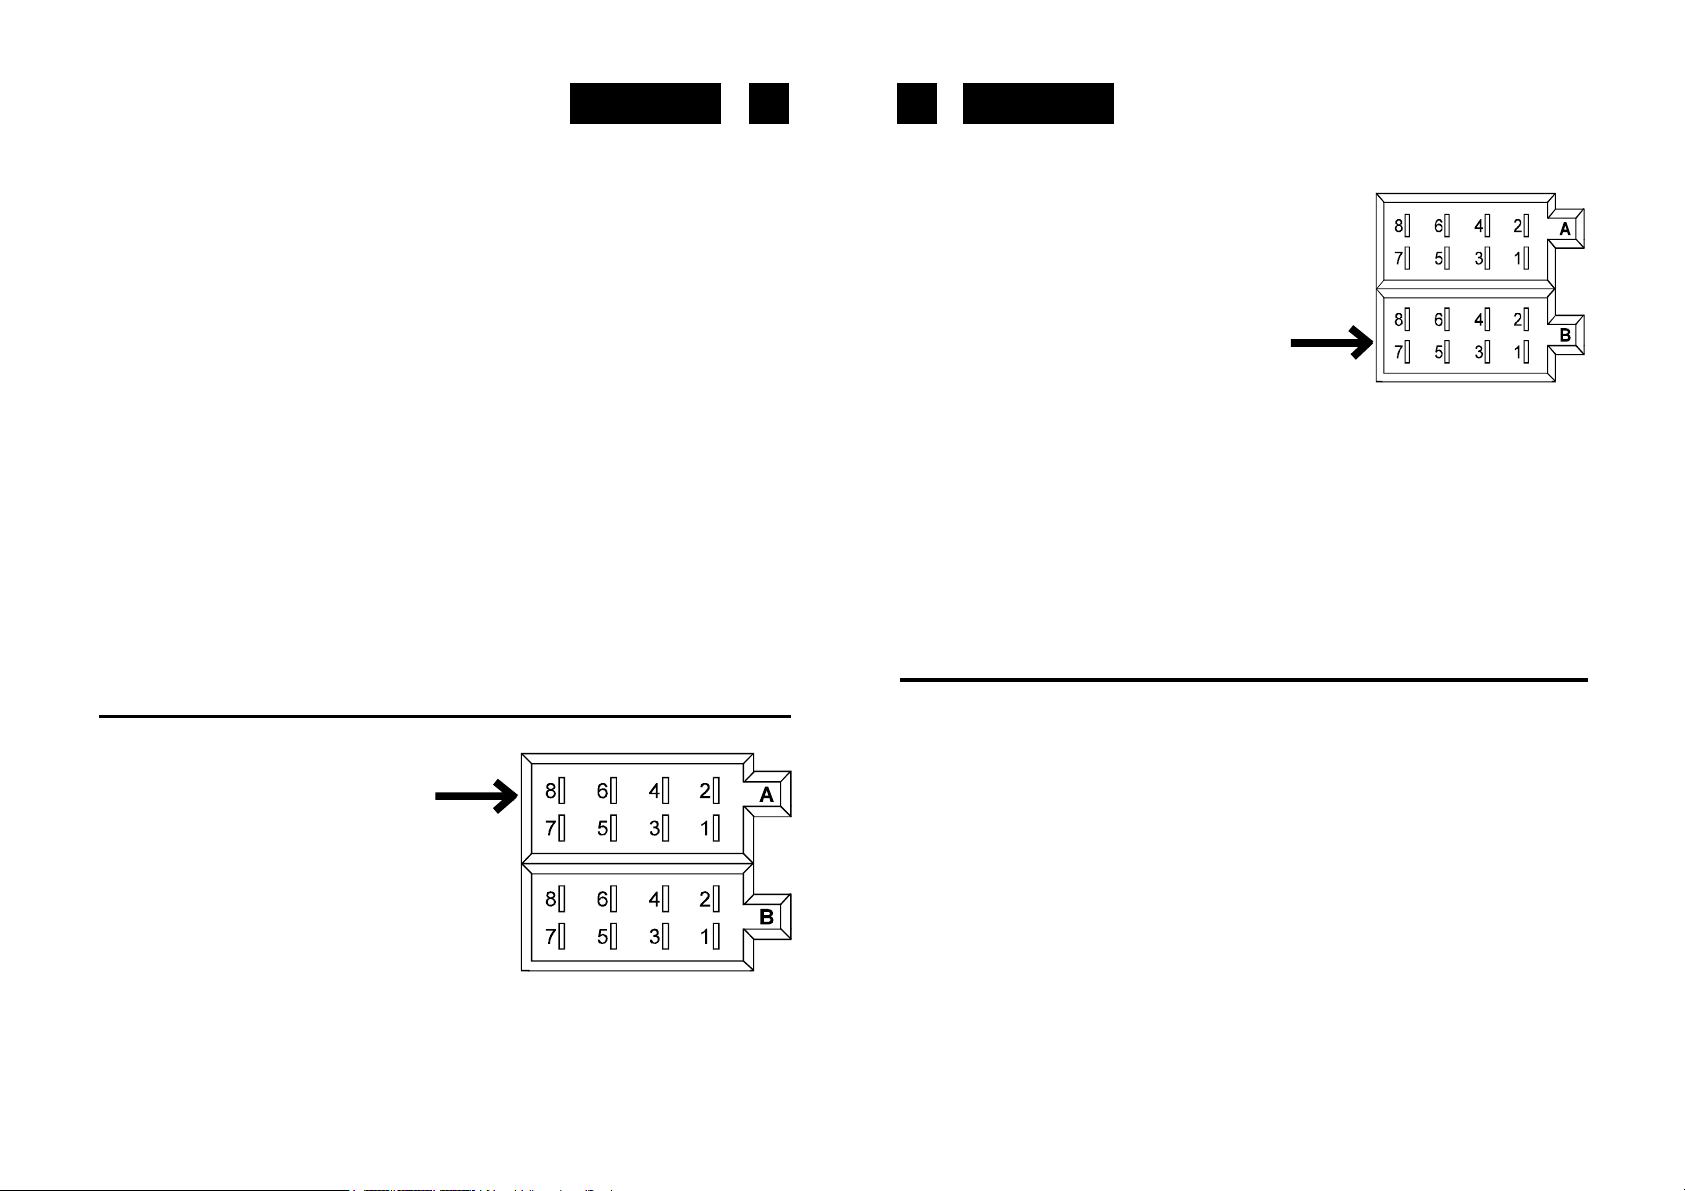
BUILT - IN ISO CONNECTOR
CONNECTOR A
1.
2.
3.
4. MEMORY +12V
5. AUTO ANTENNA OUTPUT
6.
7. +12V (TO IGNITION KEY)
8. GROUND
Note: 12 V wire (connector A no. 7) must be connected by car ignition key in order to avoid
that car battery becomes weak when the car will be not used for long period.
4. FRONT RIGHT SPEAKER (-)
5. FRONT LEFT SPEAKER (+)
6. FRONT LEFT SPEAKER (-)
7. REAR LEFT SPEAKER (+)
8. REAR LEFT SPEAKER (-)
Maintenance
FUSE REPLACEMENT
If the fuse blows, check the power connecton and replace the fuse. If the fuse blows again
after the replacement, there may be an internal malfunction. In this case, consult your
nearest repairing centre.
Warning
Use the specified amperage fuse for each lead. Use of a higher amperage fuse may cause
serious damage.
OPERATING INSTRUCTIONS
1. POWER ON/OFF
Insert the front panel in the unit and push Power button in order to switch on the unit. Push
PWR button newly in order to switch off the unit and push REL button (14) to release the
front panel.
Note: Never release the front panel when the unit is on. Power remains on even when car
radio is off.
2. SCAN
Press this button to scan the stored programs of the Radio.
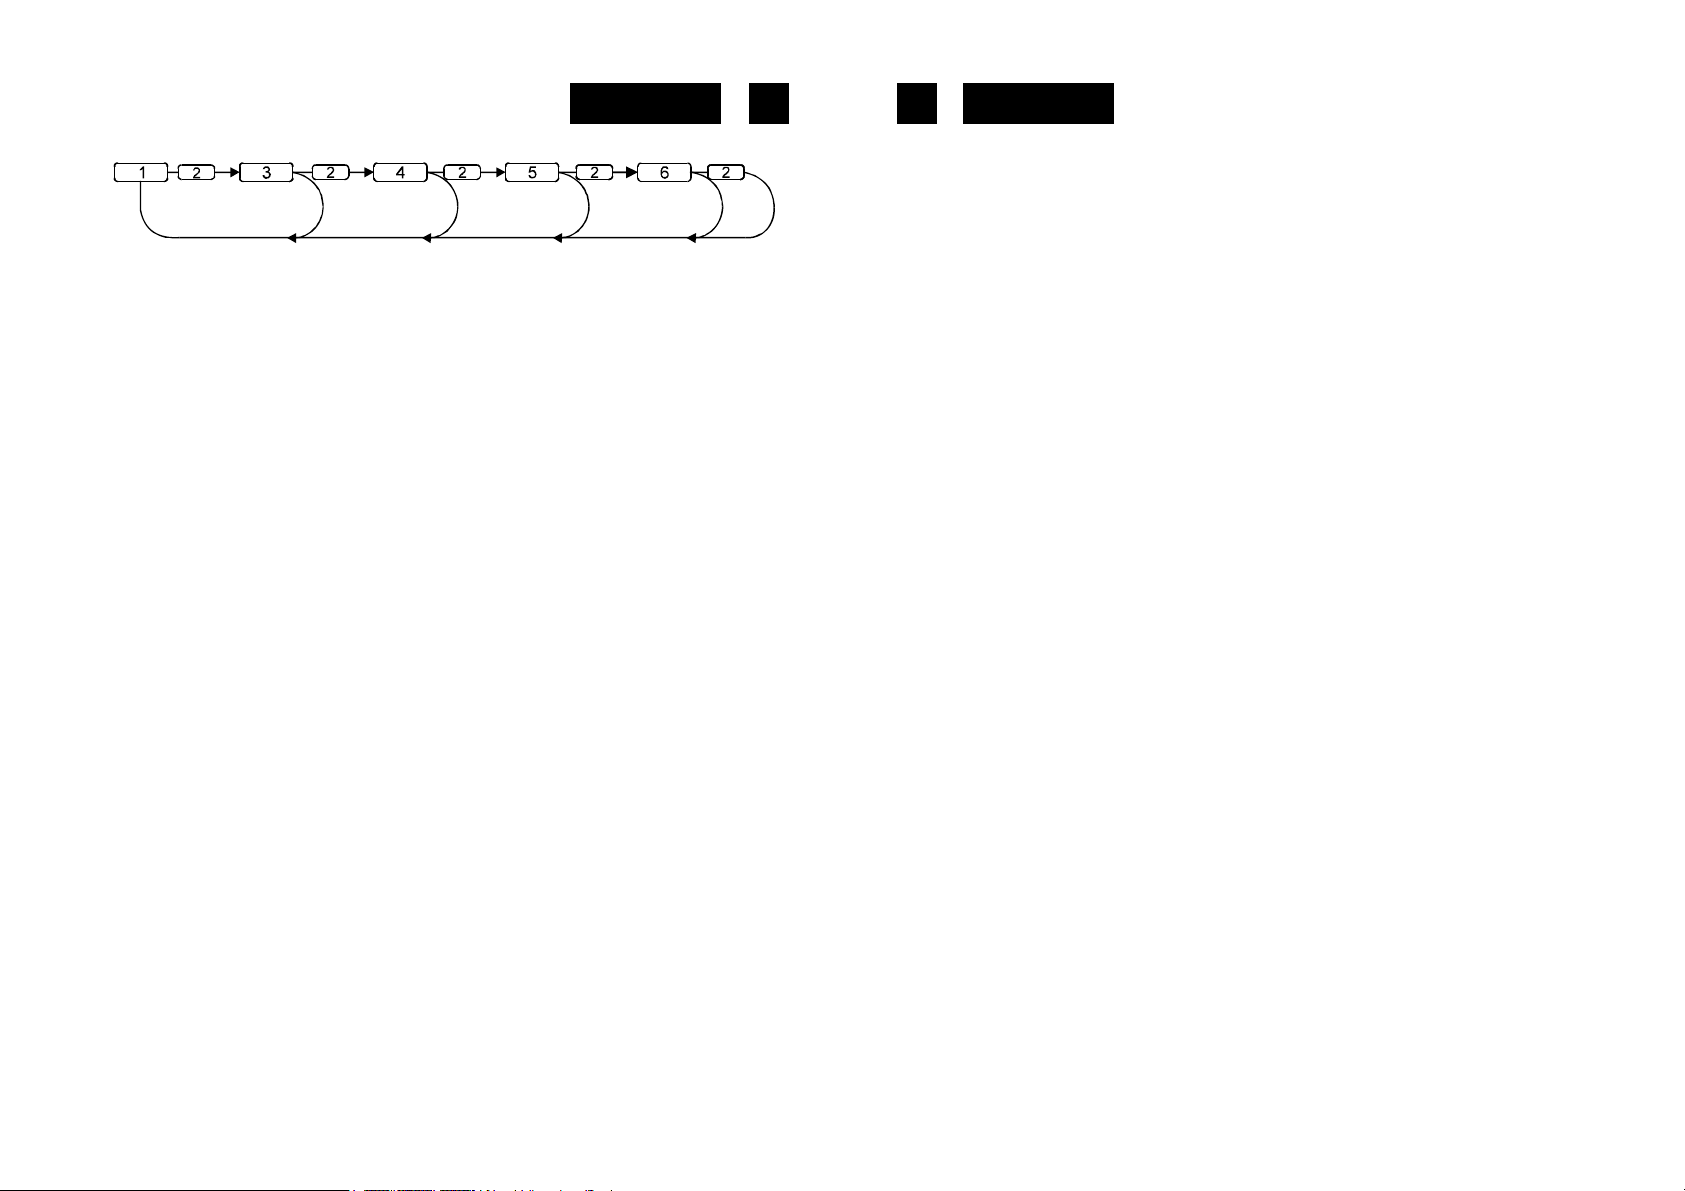
3. VOLUME UP/DOWN / ENTER
Rotate the VOLUME Knob (3) to control the VOLUME. To select other functions, press the
VOLUME (3) button shortly until the desired functions is shown on the display. Figure 1
shows how control functions are selected by pressing VOLUME button.
CONNECTOR B
1. REAR RIGHT SPEAKER (+)
2. REAR RIGHT SPEAKER (-)
3. FRONT RIGHT SPEAKER (+)
Fig. 1 Selection of sound control functions
1. VOLUME (rotate knob)
Page 6

78
EnglishEnglish
2. SELECT (push down)
3. BASS
4. TREBLE
5. BALANCE
6. FADER
7. EQUALIZER
Rotate the VOLUME knob to increase or decrease the volume. This knob can be used to
adjust the BASS, TREBLE, BALANCE, FADER and EQUALIZER.
4. PRESET STA TIONS (1,2,3,4,5,6)
(A) RADIO MODE:
When pressed short, these keys select a preset station directly. When pressed longer
than 1 sec., current station is stored in preset memory bank. When PTY mode is
selected, the PTY switch is shared as follows:
PTY music group ---- PTY speech group ---- OFF
MUSIC SPEECH
1. POP M, ROCK M 1. NEWS, AFFAIRS, INFO
2. M.O.R. M, LIGHT M 2. SPORT, EDUCATE, DRAMA
3. CLASSICS, OTHER M 3. CULTURE, SCIENCE, VARIED
4. JAZZ, COUNTRY 4. WEATHER, FINANCE, CHILDREN
5. NATION M, OLDIES 5. SOCIAL, RELIGION, PHONE IN
6. FOLK M 6. TRAVEL, HOBBIES, DOCUMENT
(B) CD/MP3 PLAYER MODE:
1. PAUSE 2. INTRO 3. REPEAT 4. RANDOM
USING THE RDS FUNCTION
What is RDS?
The RDS (Radio Data System) is a digital information system developed by the EBU
(European Broadcast Union). Piggy-backed on normal FM broadcasts, RDS offers a variety
of information services and automatic retuning functions for RDS-compatible car stereos.
In 1988, RDS became available in the United Kingdom, France, West Germany, Ireland
and Sweden. Test transmissions are being conducted in many other european countries.
It is expected that RDS will be available in most western european countries in the near
future.
5. 'AF/REG' function (ALTERNATIVE FREQUENCIES)
When pressed short, AF/REG switchig mode is selected.
When AF/REG switching mode is selected, the radio checks the signal strength of the AF
all the time. When pressed long, it is activated as regional mode ON/OFF.
– Regional mode ON:
AF switching or PI SEEK is implemented to the station which have all PI codes same as
current station. REG segment is turned on, in LCD display.
– Regional mode OFF
The regional code in the format of PI code is ignored when AF switching or PI SEEK is
implemented.
6. 'TA' function (TRAFFIC ANNOUNCEMENT)
When pressed short, it is activated as TA mode ON or OFF
When TA mode is on and traffic announcement is transmitted
– When the unit is it CD/MP3 mode, it will switch to radiomode temporarily.
– If the volume level was under the threshold point, it will be raised to the threshold point.
– When TP station is received, TP segment is turned on in LCD display.
7. 'PTY' function (PROGRAM TYPE)
PTY MUSIC ---- PTY SPEECH ---- PTY OFF
While selecting PTY type, its selection is impremented by preset buttons as described
in preset key. When PTY is selected, the radio starts to search corresponding PTY
information, and stops if the corresponding PTY information, is detected.
8. OPEN PANEL
Press this button to fold down the front panel.
9. MODE BUTTON (MODE)
By pressing this key, user can select: RADIO / CD / USB / SD / AUX-IN mode.
10.BAND BUTTON (BAND) / LOUDNESS
Each band is toggled cyclically by pressing this key AM1 / AM2 / FM1/ FM2 / FM3.
LOUDNESS CONTROLS
When press the button BAND for more than 2 seconds, LOUD ON mode is selected.
The bass and treble response will be boosted.
11. AUTOMATIC OR MANUAL TUNING (FREQ UP >> OR FREQ DOWN <<)
(A) RADIO MODE
When pressed short, these keys are operated as MANUAL tuning mode.
When pressed longer than 1 sec., they are operated as SEEK tuning mode.
(B) CD/MP3 PLAYER MODE
When pressed short, they are operated as TRACK UP or TRACK DOWN mode.
When pressed longer than 1 sec., they are operated as CUE or REVIEW mode.
Page 7

109
EnglishEnglish
CD / USB / SD TRACK/SEARCH BUTTON
FORWARD AND REVERSE TRACK SEARCH (or changing songs)
Press the SKIP button (TUN<< or TUN>>) during play to go to the desired track(song).
TUN<<....REVERSE TUN>>....FORWARD
Press and hold the SKIP button (TUN<< or TUN>>) during play to scan the disc at high
speed. When the desired music section of the disc is found, release the button. Normal play
will resume.
When CD/MP3 play is finished, CD/MP3 mode automatically changes to radio mode.
12.AUTO SEEK / PRESET SCAN
By pressing shortly, the radio searches for each preset station (Preset Scan).
When field strength level is bigger than the threshold level of stop level, the radio is
holding at that preset number for 5 sec. with releasing mute, and than searches again.
By pressing longer than 1 sec, and then 6 strongest stations are preset to the corresponding preset number.
When AS operation is finished, the radio executes the preset scan.
13.LCD DISPLA Y
The Liquid Crystal Display will display the current state of the unit.
14. FRONT PANEL RELEASE BUTTON
CD CONTROL LOCA TION OF PARTS
15.CD SLOT-IN
16.CD EJECT BUTTON
Press the EJECT button to remove the CD.
20.RANDOM BUTTON 'SHUFFLE' CD / USB / SD
When this button is pressed, ‘SHF’ indication is displayed and each track of the disc are
played in random instead of normal progression. To cancel RANDOM mode, press
‘SHF’ button (20) again.
21. USB PORT
22. REMOTE CONTROL SENSOR
23.FRONT PANEL
24.MUTE BUTTON
Press this buttton to mute the sound. Press it again to resume listening.
25.RESET BUTTON
Reset button (25) is placed on the housing.
The reset button is to be activated for the following reason:
• Initial installation of the unit when all wiring is completed.
• All the function buttons do not operate properly.
• Error symbol on the display.
26. AUX-IN
Use this input to connect Discman or other external devices with Audio output.
HOW TO SELECT MP3 FILES
A. Searching Track directly
Press the AS/PS Button (12) once, the displays shows “MP3 *”: select the MP3 track by
number with the following method:
17. PAUSE BUTTON CD / USB / SD
During “PLAY”, press (17) ‘PAUSE’ button to “PAUSE”. Press it again to resume play.
18. INTRO BUTTON (CD SCAN) CD / USB / SD
When this button is pressed, ‘SCN’ indication is displayed and the first several seconds
of each track of the disc are played. Press again to stop intro and listen to track.
19.REPEAT BUTTON 'REPEAT' CD / USB / SD
When this button is pressed, ‘RPT’ indication is displayed and play of the selected track
will be continually repeated until the Track repeat mode is cancelled by pressing ‘RPT’
button again.
rotate the Volume knob (3) to scroll through the numbers.
Then press VOLUME (ENTER,10) to confirm.
B. Searching by Directory or Track name
Press AS/PS twice, the displays shows “*”. Enter the character directly. The unit searches
files and directories which have the same character which is inputted by the user. The
unit shows these sorted files and directories by VOLUME (3) Knob. If the selected name
is directory, the user can go into the selected directory by press AS / PS BUTTON (12)
and continue to search the directory or file name in the directory by VOLUME. The selected
file can be played by pressing (3) VOLUME/Enter Button.
C. Searching from Directory
SEARCH DIRECTORY BY USING VOLUME UP / DOWN KNOB (3).
Page 8

1211
EnglishEnglish
Under MP3 play mode, press AS/PS BUTTON (12) three times. Then the first Directory
name is shown. Rotate VOLUME UP/DOWN to navigate through the directory list, press
VOLUME/ENTER BUTTON (3) to select the desired directory. The display will show “ \\ “.
To select the tracks under the selected directory, rotate VOLUME UP / DOWN then press
VOLUME/ENTER (3) to confirm when desired track is found.
Rotate the Volume knob (3) in both directions to scroll through the characters
(alphanumerical). Then press VOLUME/ENTER (10) to confirm.
ID3 Tag
Press CLK button on Remote Control repeatedly to Display ID3 TAG information.
If the MP3 file is available with ID3 TAG, pressing the CLK button repeatedly will show
information in the following sequence:
SONG TITLE > ARTIST> ALBUM TITLE > YEAR> COMMENTS
If any of the ID3-TAG information is not available, pressing the DISPLAY button re
peatedly will show information in the following sequence:
UNKNOWN SONGNAME> UNKNOWN ARTIST> NO ALBUM TITLE > UNKNOWN
YEAR > NO COMMENTS
If the MP3 file is without ID3 TAG, pressing the CLK button, “NO ID3 TAG” will be
displayed.
The file name & track number of the MP3 file will scroll repeatedly through the display
during the playing of the MP3 file.
27. TAPE EJECT KEY
In TAPE mode, push this key fully to stop tape playback and release cassette tape. The
car radio cassette player will automatically go into radio mode.
28. CASSETTE TAPE DOOR
In RADIO mode, insert a cassette into this slot, the tape playback starts automatically.
29. FAST FORWARD / REVERSE BUTTON
For fast-forward, push in the button (>>) which indicates the same direction of the lighted
tape direction indicator. For rewind, push the button (<<) with the arrow marks in the opposite
direction of that shown by the tape direction indicator. At the end or tape in either fast forward
or rewind, the unit will automatically select play mode. To release either fast forward or
rewind button from the lock position, push in the other button approximately half-way. During
tape play, pushing both fast forward and rewind buttons simultaneously will change the
direction of tape travel.
SPECIFICATIONS
CD / USB / SD MP3 PLA YER SECTION
Signal to Noise Ratio > 70dB
Channel Separation > 50 dB (1kHz)
Frequency Response 20Hz - 20 kHz
TUNER
Sensitivity 2 dBμ
Stereo separation 35 dB
Signal to noise radio 55 dB
Frequency range FM 87.5-108 MHz
AM 522-1620 KHz
Channel step 50 kHz
Intermediate frequency 10.7 MHz
LINE-OUT
Output 350mV max.
Impedance 10kOhm
GENERAL
Power Supply 13.8V DC
(10.8-15.6V allowable)
Speaker impedance 4 or 8 ohm
Output power 25W RMS x 4CH
Note: Specifications and the design are subject to possible modification without notice due
to improvement.
Page 9

13 14
DeutschDeutsch
SICHERHEITSHINWEISE
Das Ausrufszeichen im Dreieck weist den Benutzer auf wichtige
Bedienungs- und Wartungsanweisungen (Service) in diesem Handbuch
hin, die unbedingt zu befolgen sind.
Das Blitzsymbol im Dreieck weist den Benutzer auf “gefährliche
Spannungen” an einigen freiliegenden Bauteilen im Innem des Gerätes
hin.
CAUTION
RISK OF ELECTRIC
DO NOT OPEN
Um die Gefahr elektrischer Schläge auszuschliessen, Gehäuse auf keinen
Fall abnehmen. Im Innem befinden sich keine vom Benutzer selbst
SHOCK
instandsetz-baren Teile. Reparaturen dürfen nur von einer autorisierten
Fachwerkstatt durchgeführt werden.
Dunkelstrahlung bei geöffneten Geräten und defektem Verschluss.
Bedienung oder Regulierung der technischen Eigenschaften oder
sonstige nicht spezifierte Prozeduren auf dieser manuellen Betriebsart
können zur Ausetzung gefährlicher Laserstrahlen führen.
Setzen Sie das Gerät weder Feuchtigkeit noch Regen aus.
Stellen Sie das Gerät so auf, dass immer eine ungestörte Frischluftzufuhr
sichergestellt ist.
Setzen Sie das Gerät weder direkter Sonneneinstrahlung noch
Wärmequellen aus.
Korrekte Entsorgung dieses Produkts (Elektromüll)
Die Kennzeichnung auf dem Produkt bzw. auf der dazugehörigen
Literatur gibt an, dass es nach seiner Lebensdauer nicht zusammen
mit dem normalen HaushaltsmüIl entsorgt werden darf. Entsorgen Sie
dieses Gerat bitte getrennt von anderen Abfallen, um der Umwelt bzw.
der menschlichen Gesundheit nicht durch unkontrollierte
Müllbeseitigung zu schaden. Recyceln Sie das Gerät, um die
nachhaltige Wiederverwertung von stofflichen Ressourcen zu fördern.
Private Nutzer sollten den Händler, bei dem das Produkt gekauft wurde,
oder die zuständigen Behörden kontaktieren, um in Erfahrung zu
bringen, wie sie das Gerät auf umweltfreundliche Weise recyceln
können.
Gewerbliche Nutzer sollten sich an Ihren Lieferanten wenden und die
Bedingungen des Verkaufsvertrags konsultieren. Dieses Produkt darf
nicht zusammen mit anderem Gewerbemüll entsorgt werden.
CD-900USMP
Auto-CD/CD-R/CD-RW/MP3-Spieler mit USB/SD, PLL-UKW/Stereo-Radio
Radio-Daten-System mit PTY, Kassette und abnehmbares Bedienteil.
BEDIENUNGSANLEITUNG
Bitte lesen Sie aufmerksam diese Bedienungsanleitung, um sich mit Ihrem neuen Autoradio
vertraut zu machen, bevor Sie es zum ersten Mal in Betrieb nehmen. Bitte bewahren Sie diese
Anleitung auf, um später jederzeit nachschlagen zu können.
INHALTSVERZEICHNIS
• Lage der Bedienungselemente
• Merkmale
• Installation
• Vorsichtsmaßnahmen und Wartung
• Anschlüsse
• Funktionsanleitungen
• Technische Daten
LAGE DER BEDIENUNGSELEMENTE
1. Netztaste EIN/AUS
2. Automatisches Anhoren beim Scannen (SCN)
3. Lautstärkeregelung AB /AUF (+,- Bässe/Höhen/Balance/Fader)
4. Vorwahl-Tasten (1,2,3,4,5,6)
5. AF-Taste
6. TA-Taste
7. PTY-Taste
8. Bedienteil-öffnen-taste
9. Modus-Taste (MODE)
10. Band-Taste/ LOUD / ENTER
11. Auto/Manuell-Suchlauf AB (<<)/ Suchlauf AUF (>>)/CD-Spuren
12. Auto-Suchlauf-Taste (AS)
13. LCD-Anzeige
14. Bedienteil-Entriegelungstaste
15. CD-Schublade
16. CD-Auswurf-Taste
17. CD / USB / SD-Pause-Taste
Page 10

15 16
DeutschDeutsch
18. CD / USB / SD-Intro-Taste (CD SCAN)
19. CD / USB / SD-Wiederhol-Taste (REPEAT)
20. CD / USB / SD-Zufallswiedergabe-Taste (SHUFFLE)
21. USB-Porte
22. FERNBEDIENUNG IR-Sensor
23. FRONTBEDIENTEILS
24. MUTE-Taste
25.RESET-Taste
26. AUX-IN AUDIO
27. KASSETTE EJECT-TASTE
28. KASSETTE IN
29. KASSETTE VERWENDEN VON SCHNELLVORLAUF UND RÜCKSPULEN
MERKMALE
Dieses Gerät ist mit einem abnehmbaren Frontbedienteil, AM / UKW-Stereo und einem CD/
CD-R/CD-RW/MP3-USB / SD / Kassette Spieler mit den folgenden Merkmalen ausgestattet:
• Elektronische Lautstärke-, Tiefen- Höhen-, Fader- und Balance-Regler.
• Genaues elektronisches Abstimmen durch den Phasenkuppelungsring (P.L.L.)-Schaltkreis.
• 30 programm. Stationsspeicher (6AM1 / 6AM2 / 6UKW 1/ 6UKW2 / 6UKW3)
• Loudness-Regler
• Kassette
• Leicht zu betätigende Netztaste Ein/Aus
• Manueller/Automatischer (Seek)/Abstimmknopf Auf und Ab
• Bandwahlschalter (BND) zur Wahl von AM1, AM2, UKW1-UKW2 oder UKW3
• Display-Funktionen (Frequenz, Stationsname, Programmtyp, Uhr)
• Uhr-Funktion in RDS
• CD- und MP3-Spieler
• Vorverstärkte-Ausgang (RCA, rückseitig) zum Anschluß eines Leistungsverstärkers
• Abnehmbares Frontbedienteil zum Schutz gegen Diebstahl
• Beleuchtungssystem
• RDS-Funktion: PI (Programm-Identifikation) TA (Verkehrsdurchsage)
PS (Programmdienstname) PTY (Programmtyp)
AF (List der Alternativfrequenzen) TP (Traffic Program)
INST ALLATION
VORSICHTSMASSNAHMEN
• Wählen Sie sorgfältig, wo Sie Ihr Autoradio einbauen möchten, damit das Gerät nicht
die normale Fahrtätigkeit des Fahrers beeinflußt.
• Vermeiden Sie, das Gerät dort zu installieren, wo es hohen Temperaturen, wie dem
direkten Sonnenlicht oder Heißluft vom Heizer, oder wo es Staub, Schmutz oder
übermäßigen Schwingungen ausgesetzt werden könnte.
• Verwenden Sie nur das mitgelieferte Montagematerial, um eine sichere Installation
zu garantieren.
• Bevor Sie das Gerät installieren, entfernen Sie das Frontbedienteil.
Regulierung des Montagewinkels
Der Montagewinkel muß kleiner als 20º sein.
Montagebeispiel
Einbau ins Armaturenbrett
Page 11
17 18
DeutschDeutsch
Abnehmen und Anbringen des Frontbedienteils
Das Frontbedienteil dieses Gerätes kann abgenommen werden, um Diebstahl vorzubeugen.
ABNEHMEN DES FRONTBEDIENTEILS
Bevor Sie das Frontbedienteil abnehmen, drücken Sie zuerst die POWER-Taste (1).
Dann drücken Sie die ENTRIEGELUNGSTASTE-Taste (14) und nehmen das Bedienteil ab,
indem Sie es herausziehen, wie in der Abbildung gezeigt .
ANBRINGEN DES FRONTBEDIENTEILS
Nehmen Sie die rechte Seite des Frontbedienteils und setzen Sie es auf das Gerät, wie in
der Abbildung gezeigt, und drücken Sie, bis es einrastet.
Bitte beachten Sie, dabei keinen Druck auf das Display oder die Bedienungstasten
auszuüben.
Hinweise:
• Vergewissern Sie sich, daß Sie das Frontbedienteil richtig herum auf das Gerät
aufsetzen.
• Drücken Sie das Frontbedienteil nicht zu stark gegen das Gerät, wenn Sie es
aufsetzen. Es kann einfach angebracht werden, indem Sie es leicht gegen das Gerät
drücken. Wenn Sie das Frontbedienteil mit sich nehmen, legen Sie es in die
mitgelieferte Schutzhülle.
• Drücken Sie nicht zu stark oder mit übermäßiger Kraft auf das Display-Fenster des
Frontbedienteils, wenn Sie es am Gerät anbringen.
BUILD-IN ISO-ANSCHLUSSTEIL
ANSCHLUSSTEIL A
1.
2.
3.
4. SPEICHER +12V
5. AUTOANTENNENAUSGANG
6.
7. +12V (AN DEN ZÜNDSCHLÜSSEL)
8. ERDUNG
Hinweis:
Der +12V Draht (Anschlußteil A Nr.7) muß an die Autozündung angeschlossen werden, um
zu vermeiden, daß die Autobatterie entladen wird, wenn das Auto längere Zeit nicht benutzt
wird.
ANSCHLUSSTEIL B
1. HINTERER RECHTER LAUTSPRECHER (+)
2. HINTERER RECHTER LAUTSPRECHER (-)
3. VORDERER RECHTER LAUTSPRECHER (+)
4. VORDERER RECHTER LAUTSPRECHER (-)
5. VORDERER LINKER LAUTSPRECHER (+)
6. VORDERER LINKER LAUTSPRECHER (-)
7. HINTERER LINKER LAUTSPRECHER (+)
8. HINTERER LINKER LAUTSPRECHER (-)
Wartung
ERSETZEN DER SICHERUNG
Wenn die Sicherung durchgebrannt ist, überprüfen Sie den Netzanschluß und ersetzen Sie
die Sicherung. Wenn die Sicherung nach dem Ersetzen erneut durchbrennt, könnte ein
internes Funktionsproblem vorliegen. In diesem Falle wenden Sie sich an Ihr nächstes
Kundendienstzentrum.
Achtung
Verwenden Sie für jedes Kabel die vorgeschriebene Amperestärke. Wenn Sie eine Sicherung
mit höherer Amperestärke verwenden, könnte das ernsthafte Schäden verursachen.
FUNKTIONSANWEISUNGEN
1. NETZTASTE EIN/AUS (POWER)
Setzen Sie das Frontbedienteil auf das Gerät auf und drücken Sie die Netztaste, um das Gerät
einzuschalten. Drücken Sie erneut die POWER-Taste, um das Gerät auszuschalten und
drücken Sie die ENTRIEGELUNGS-Taste (14), um das Frontbedienteil freizugeben.
Hinweis: Entriegeln Sie das Frontbedienteil niemals, wenn das Gerät eingeschaltet ist.
Strom fließt auch, wenn das Autoradio ausgeschaltet ist.
2.AUTOMATISCHES ANH–REN BEIM SCANNEN (SCN)
Diese Taste hat die Funktion RADIO SCANNEN. Diese Funktion ist der normalen
automatischen Suche -hnlich, aber der abgestimmte Senderwird 5 Sekunden lang angehirt.
3. WAHL-TASTE (ENTER) / LAUTSTÄRKEREGELUNG
Der Knopf VOLUME reguliert die LAUTSTÄRKE. Um andere Funktionen zu wählen, drücken
Sie kurz die WAHL-Taste, bis die gewünschte Funktion auf dem Display erscheint. In der
Abbildung 1 wird gezeigt, wie die Kontrollfunktionen gewählt werden, wenn Sie die WAHLTaste drücken.
Page 12
19 20
1. Abbildung der Klangfunktionen
1. LAUTSTÄRKE (Knopf drehen)
2. WAHL (SEL) (drücken)
3. BÄSSE
4. HÖHEN
5. BALANCE
6. FADER
7. EQUALIZER
3. LAUTSTÄRKEREGELUNG
Erhöhung und Erniedrigung der Lautstärke ist durch den VOLUME-Regler möglich. Dieser
Knopf hat die gleiche Funktion auch bei Bässen, Höhen, Balance und Fader, wenn sie durch
die WAHL-Taste (3) gewählt sind.
4. VORAUSWAHLEN (1,2,3,4,5,6)
(A) BETRIEB RADIO:
Durch einen leichten Druck auf diese Tasten kann man direkt einen vorher ausgewählten
Sender anwählen. Wird die Taste länger als 1 Sekunde gedrückt, wird der gerade eingestellte
Sender gespeichert. Ist der PTY Modus aktiv, wird die PTY Taste wie folgt unterteilt:
PTY Gruppe Musik ----- PTY Gruppe gesprochen ----- AUS
MUSK GESPROCHEN
1.POP Musik, ROCK Musik 1.NACHRICHTEN, WIRTSCHAFT, INFOS
2.UNTERHALTUNGS Musik 2.SPORT, ERZIEHUNG, DRAMEN
3.KLASSIK, ANDERE Musik 3.KULTUR, WISSENSCHAFT, VERSCHIEDENES
4.JAZZ, COUNTRY 4.WETTERVORHERSAGEN, FINANZEN, KINDER
5.NATION M, OLDIES 5.SOZIALES, RELIGION, TELEFON
6.VOLKS Musik 6.REISEN, UNTERHALTUNG, DOKUMENTATIONEN
DeutschDeutsch
von EBU (European Broadcasting Union) entwickelt und auf dem Markt eingeführt wurde.
Über die normalen FM Übertragungssender ausgestrahlt, bietet RDS eine Reihe Informationen
wie z.B. den Sendernamen, das Programm, Verkehrsnachrichten und nützliche Funktionen
wie die automatische Abstimmung der besten im gewählten Programm zur Verfügung
stehenden Signale.
5. AF/REG‘ Funktion (ALTERNATIVE FREQUENZEN)
Mit einem leichten Tastendruck wählt man den AF/REG Modus.
Wenn der AF/REG ausgewählt wird, kontrolliert das Radio ständig das AF Signal. Drückt
man die Taste länger als 2 Sekunden, wird der Modus Regional EIN/AUS aktiviert.
– Modus Regional EIN:
Die AF Umschaltung oder die PI SEEK Suche ist auf all die Sender ausgeweitet, die den
gleichen PI Code des momentan eingestellten Senders haben. Es erscheint die Schrift
REG auf dem Display.
– Modus Regional AUS
Der Regionalcode im PI Format wird ignoriert, wenn die AF Umschaltung oder die PI SEEK
Suche auf alle Sender ausgeweitet ist.
6. ‘TA’ FUNKTION (VERKEHRSFUNK)
Bei leichtem Tastendruck wird der Modus TA ein oder aus gewählt.
Wenn der TA Modus ausgewählt und eine Verkehrsnachricht übertragen wird
– Wenn das Gerät auf der Betriebsart CD/USB/SD-MP3 steht, wird zeitweilig auf Radio
umgeschaltet.
– Ist nur eine geringe und nicht gut hörbare Lautstärke eingestellt, wird diese auf ein gut
hörbares Niveau erhöht.
7. ‚PTY‘ Funktion (PROGRAMMTYP)
PTY MUSIK ----- PTY GESRPOCHEN ----- PTY AUS
Wählt man PTY, hängt das Programm wie vorher beschrieben von den Vorauswahltasten ab.
Wenn man PTY wählt, beginnt das Radio mit der Suche nach entsprechenden PTY- Informationen und stoppt mit der Suche, wenn die entsprechende PTY Information gefunden wird.
(B) BETRIEB CD/MP3 PLAYER:
1. PAUSE 2. INTRO 3. WIEDERHOLEN 4. ZUFÄLLIG
DIE RDS FUNKTION. WAS BEDEUTET RDS SYSTEM?
RDS (Radio Data System) ist die Abkürzung für ein digitales Radio-Informations-System,das
8. BEDIENTEIL-Entriegelungstaste
9. MODE TASTE (MODE)
Durch Drücken dieser Taste kann der Bediener wählen zwischen
Betrieb des RADIOS / CD / USB / SD / KASSETTE / AUX-IN Players .
Page 13

2221
DeutschDeutsch
10. BAND TASTE (BAND) / LOUD
Jedes Frequenzband wird durch das hintereinander abfolgende Drücken dieser Taste
umgeschaltet AM1---AM2--- FM1---FM2---FM3.
LOUDNESS-EINSTELLUNGEN (2)
Wenn die LOUD-Taste länger als 2 Sek. gedrückt wird, wird die Funktion LOUD ON aktiviert.
Die Bässe und Höhen zunehmen.
11. AUTOMATISCHE ODER MANUELLE ABSTIMMUNG (FREQ AUF >> ODER FREQ AB <<)
(A) BETRIEB DES RADIOS
Bei leichtem Druck fungieren diese Tasten zur manuellen Suche.
Drückt man länger als 1 Sekunde, wird die automatische Suche aktiviert (SEEK)
(B) BETRIEB DES CD/MP3 PLAYERS
Bei leichtem Druck fungieren diese Tasten als LIEDER ÜBERSPRINGEN HOCH oder
RUNTER.
Werden diese Tasten kürzer als 3 Sekunden lang gedrückt, wird die SUCHE VORWÄRTS
oder RÜCKWÄRTS aktiviert.
LIED-SUCHE-TASTE
VORWÄRTS- UND RÜCKWÄRTSSUCHE DER LIEDER (oder Wechsel der
musikalischen „Album“ Blöcke)
Beim Abspielen die SKIP Taste (<< oder >>) betätigen, um zum gewünschten Lied zu
wechseln. <<....ZURÜCK >>....VOR
Beim Abspielen die SKIP Taste (<< oder >>) drücken und gedrückt halten, um auf der CD
eine Schnellsuche zu starten. Wenn der gesuchte Musikabschnitt gefunden wird, die Taste
loslassen. Man kehrt zur normalen Wiedergabe zurück.
Ist das Abspielen der CD/MP3 beendet, schaltet die Betriebsart CD/MP3 automatisch aufs
Radio um.
12. AUTOMATISCHE ABSTIMMUNG (AUTO SEEK SEARCH ) (AS)
Bei leichtem Druck stimmt das Radio jeden der vorgewählten Sender ab (Preset Scan).
Ist das Signal stärker als die Abstimmungsschwelle, bleibt das Radio 5 Sekunden lang auf
diesem Sender und nimmt die Lautstärke einen Moment lang weg, um dann wieder mit der
Suche nach einem anderen Sender zu starten.
Drückt man die Taste länger als 1 Sekunde, werden die sechs stärksten Sender in der
entsprechenden Position der Vorwahltasten gespeichert.
Ist die AUTOMATISCHE SUCHE (AS) beendet, geht das Radio zum Scannen/Anhören
der gespeicherten Sender über.
13. LCD DISPLAY
Der Flüssigkristalldisplay zeigt den momentanen Empfang und die Operationen an.
14. ENTRIEGELUNGSTASTE-Taste
Dann dr.cken Sie die ENTRIEGELUNGSTASTE-Taste und nehmendas Bedienteil ab, indem
Sie es herausziehen, wie in der Abbildunggezeigt.
STEUERUNG DES CD PLAYERS
15. CD FACH
16. CD AUSWURFTASTE
Zum Entnehmen der CD die Auswurftaste drücken.
17. PAUSENTASTE CD / USB / SD
Beim Abspielen die Taste PAUSE (17) ‘PAUSE’ betätigen, um das Abspielen kurzfristig
anzuhalten. Erneut drücken, um zum normalen Abspielen zurückzukehren.
18. INTRO TASTE (CD SCAN) CD / USB / SD
Nach Drücken dieser Taste erscheint die Anzeige ‘SCN’ auf dem Display und die ersten
10 Sekunden jeden Liedes werden abgespielt.
19. REPEAT TASTE ‚REPEAT‘ CD / USB / SD
Wird diese Taste gedrückt, erscheint die Anzeige ‘RPT’ auf dem Display und das aktuelle
Lied wird solange abgespielt, bis die ‘RPT’ Taste erneut betätigt wird.
Wird diese Taste in der Betriebsart MP3 länger als eine Sekunde lang gedrückt, erscheint
die Anzeige ‘D-RPT’ und die mit den Tasten Auf/Ab ausgewählten Lieder des laufenden
Albums werden abgespielt.
20. RANDOM TASTE ‚SHUFFLE‘ (ZUFÄLLIG) CD / USB / SD
Wird diese Taste betätigt, erscheint die Aufschrift ‘SHF’ und jedes Lied wird in zufälliger
Reihenfolge und nicht in der normalen Reihenfolge abgespielt. Um diesen Modus zu
löschen, erneut die Taste ‘SHUFFLE’ (20) betätigen.
Page 14

2423
DeutschDeutsch
21. USB-port
22. FERNBEDIENUNG IR-Sensor
23. FRONTBEDIENTEILS
24.MUTE-TASTE
Zum Tonabschalten drücken SIE die MUTE-Taste. Wird die Taste erneut gedrückt,
spielt die Anlage mit der bisherigen Lautstärke weiter.
25. RESET-TASTE
Die Reset-Taste (25) befindet sich auf der Innenseite.
Die Reset-Taste ist aus einem der folgenden Gründe zu drücken:
• Erste installation des Gerätes, wenn alle Kabel angeschlossen sin.
• Keine der vorhandenen Tasten funktioniert.
• Fehlersymbol auf dem Display.
26. AUDIO AUX IN JACK
Legen Sie Ihren tragbaren Spieler in die Buchse, in irgendeinenAbspielmodus ein, damit
der Klang durch die Autolautsprecher zu hören.
WIE DIE SUCHE NACH DEN MP3 LIEDERN ABLÄUFT
A. Direkt Lied-Suchen
Drücken Sie die Taste PS/AS (12) einmal, an der Anzeige erscheint “MP3 *”: wählen Sie
die MP3-Spur durch Nummer:
drehen Sie den Lautstärkeknopf (3).
Dann drücken Sie VOLUME/ENTER (3) zu bestätigen.
Drücken Sie die Taste AS/PS (12) dreimal. Erscheint die erste Album-Name. Drehen
Sie knopf VOLUME UP / DOWN (3), um in der Liste der Alben zu bewegen, dann drücken Sie
die knopf VOLUME/ENTER, um das gewünschte Album zu wählen. An der Anzeige erscheint
“ \\ “. Um die Lieder in diem Album zu wählen, drehen Sie knopf VOLUME UP / DOWN (3)
dann drücken Sie VOLUME/ENTER, um zu bestätigen,oder drehen Sie den Lautstärkeknopf
(3) in beiden Richtungen, um die Buchstaben anzusehen (alphanumerisch). Dann drücken
Sie VOLUME/ENTER (3) zu bestätigen.
ID3 Tag
Drücken Sie die Taste CLK (fernbedienung) wiederholt um die Information ID3 TAG
anzuzeigen. Wenn der MP3-Dokument mit ID3 TAG erforderlich ist, durch Drücken der Taste
CLK erscheint die folgende Information in der Folge:
LIED-TITEL > SÄNGER> ALBUM-TITEL > JAHR > BEMERKUNGEN
Wenn eines des MP3-Dokuments mit ID3 TAG nicht erforderlich ist, durch Drücken
der Taste DISPLAY erscheint die folgende Information in der Folge:
UNKNOWN SONGNAME> UNKNOWN ARTIST> NO ALBUM TITLE > UNKNOWN
YEAR > NO COMMENTS
Wenn das MP3-Dokument ohne ID3 TAG ist, durch Drücken der Taste CLK
erscheint “NO ID3 TAG”.
Der Lied-Name und die Spur-Nummer des MP3-Dokuments läuft kontinuierlich auf der
Anzeige währen der Wiedergabe.
TECHNISCHE DATEN
CD/MP3-SPIELERTEIL
Rauschabstand: > 70 dB
Kanaltrennung: > 50 dB (1kHz)
Frequenzgang: 20Hz - 20 kHz
B. Suchen durch Album- oder Titel-Name
Drücken Sie die Taste AS/PS (12) zweimal, an der Anzeige erscheint “*”, treten Sie die
Buchstabe ein. Das Gerät sucht Titel und Alben mit der gleiche eingetretene
Buchstabe. Drehen Sie die knopf VOLUME UP / DOWN (3) um die Titel und Alben zu
wählen . Wenn der gewünschte Name ist ein Album, drücken Sie die VOLUME/
ENTER, dann drehen Sie die knopf VOLUME UP / DOWN (3). drücken Sie die VOLUME/
ENTER, um das gewählte Lied abzuspielen
Die Wahl der alphabetischen Buchstaben ist wie folgt.
Drehen Sie den Lautstärkeknopf (3) in beiden Richtungen, um die Buchstaben anzusehen
(alfanumerisch). Dann drücken Sie knopf VOLUME/ENTER (3) zu bestätigen.
C. Suchen durch Album
Suchen Sie das Album mit der knopf VOLUME UP / DOWN (3).
UKW-TUNER
Empfindlichkeit: 2 dBμ
Stereo-Trennung: 35 dB
Rauschabstand: 55 dB
Frequenzbereich: 87.5 – 108MHz
Kanal-Stufe: 50 kHz
IF-Frequenz: 10.7MHz
AUSGANGSLEITUNG
Ausgang: MAX. 350mV
Impedanz: 10 kOhm
Page 15

25 26
FrançaisFrançais
CAUTION
RISK OF ELECTRIC
SHOCK
DO NOT OPEN
ATTENTION
Le symbole “point d’exclamation” à l’intérieur d’un triangle avertit l’utilisateur
que d’importantes instructions d’utilisation et de maintenance sont contenues
dans le mode d’emploi.
Le symbole “éclair” à l’intérieur d’un triangle sert à avertir l’utilisateur de la
présence du courant à l’intérieur de l’appareil qui pourrait constituer un
risque.
Afin de minimiser les risques, ne pas ouvrir le boîtier ni ôter le dos de
l’appareil. En cas de panne, faites appel aux techniciens qualifiés pour les
réparations. L’appareil ne renferme aucune pièce réparable par l’utilisateur.
Un rayonnement laser invisible est présent lorsque l’appareil est ouvert ou
le verrouillage de sécurité est inopérant. Eviter toute exposition directe au
rayon laser. L’utilisation des commandes, réglages ou procédés autres que
ceux stipulés dans le présent mode d’emploi sont dangereux.
L’appareil ne doit pas être exposé à l’humidité ou à la pluie.
L’appareil doit être gardé dans un endroit suffisamment ventilé.
L’appareil ne doit pas être exposé à la lumière directe du soleil ou à des
sources de chaleur.
Comment éliminer ce produit -
(déchets d'équipements électriques et électroniques)
Ce symbole sur le produit ou sa documentation indique qu'il ne doit
pas être éliminé en fin de vie avec les
autres déchets ménagers. L'élimination incontrôlée des déchets
pouvant porter préjudice a l'environnement ou a la santé humaine,
veuillez le séparer des autres types de déchets et le recycler de
façon responsable. Vous favoriserez ainsi la réutilisation durable des
ressources matérielles.
Les particuliers sont invites a contacter le distributeur leur ayant vendu
le produit ou a se renseigner auprès de leur mairie pour savoir ou et
comment ils peuvent se débarrasser de ce produit afin qu'il soit recyclé
en respectant l'environnement.
Les entreprises sont invitées a contacter leurs fournisseurs et a
consulter les conditions de leur contrat de vente. Ce produit ne doit
pas être éliminé avec les autres déchets commerciaux.
CD-900USMP
Autoradio FM Stéréo Digitale PLL avec lecteur de CD/CD-R/CD-RW/MP3
Syntoniseur Radio Data System avec USB / SD / CASSETTE et Façade frontale
détachable
MODE D’EMPLOI
Veuillez lire attentivement ce mode d’emploi, afin de familiariser avec votre nouvel
appareil avant de l’utiliser pour la première fois. Veuillez s’il vous plaît garder ce mode
d’emploi comme référence pour le futur.
TABLE DES MATIERES
• Emplacement des Commandes
• Caractéristiques
• Installation
• Précautions et Entretien
• Connexions
• Opérations
• Fonctions CD
• Spécifications
EMPLACEMENT DES COMMANDES
1. TOUCHE MARCHE/ARRET
2. TOUCHE SCAN RADIO
3. VOLUME BAS/HAUT (+ REGLAGE BAS/AIGUS/BALANCE/FADER)
4. TOUCHES DE PRESELECTION RADIO (1,2,3,4,5,6)
5. TOUCHE AF (FREQUENCES ALTERNATIVES)
6. TOUCHE TA (MESSAGES SUR LE TRAFIC)
7. TOUCHE PTY (TYPE DE PROGRAMME)
8. TOUCHE OUVERDURE FAÇADE
9. TOUCHE MODE
10. TOUCHE BANDE (BND) / LOUD
11. SYNTONIE AUTOMATIQUE OU MANUELLE (HAUT TUN>> /BAS TUN<<
/ SAUT/RECHERCHE CD)
12. RECHERCHE ET MEMORISATION AUTOMATIQUE (AMS) / MENU
13. AFFICHEUR LCD
14. TOUCHE RELACHEMENT FAÇADE
Page 16

27 28
FrançaisFrançais
15. LOGEMENT CD
16. TOUCHE EXPULSION CD
17. TOUCHE DE PAUSE CD/USB/SD
18. TOUCHE D’EXPLORATION CD (CD SCAN) CD/USB/SD
19. TOUCHE DE REPETITION CD (REPEAT) CD/USB/SD
20. TOUCHE RANDOM (LECTURE ALEATOIRE CD) (SHUFFLE) CD/USB/SD
21. PORTE USB
22. REMOTE SENSOR
23. FAÇADE AMOVIBLE
24. TOUCHE MUTE
25. TOUCHE DE RESET
26. AUX-IN
27. TOUCHE EJECT CASSETTE
28. LECTEUR CASSETTES
29. TOUCHE AVANCEMENT/RETOUR RAPIDE DE LA CASSETTE
CARACTERISTIQUES
Cette autoradio douée de façade amovible, AM/FM/FM stéréo, lecteur CD/MP3 a les suivantes
caracteristiques :
• Mémorisation automatique des stations meilleures en ordre de puissance du signal
• Contrôle électronique Volume, Aigus, Bas, Balancement, Fader
• Syntonie électronique de précision douée de circuit PLL.
• 30 stations mémorisables (6AM1 + 6AM2 + 6FM1 + 6FM2 + 6FM3)
• Lecteur Cassette Autoreverse
• Loudness
• Interrupteur Marche/Arrêt illuminé
• Contrôle syntonie Manuelle/Automatique Haut/Bas
• Sélecteur Bande pour la sélection de AM1, AM”, FM1, FM2 ou FM3
• Contrôle display (Fréquence, Nom station, Type de programme)
• Fonction horloge en RDS
• Fonction Répétition CD
• Lecteur de CD et fichiers MP3 enregistrés sur CD/CD-R/CD-RW
• Prise de sortie PRE (type RCA) pour la connexion à l’amplificateur
• Façade amovible qui fonctionne d’antivol
• Système d’illumination
• Fonctions RDS : PI (Identification Programme) TA (Annonce Trafic)
PS (Service Nom Programme) PTY (Type Programme)
AF (Liste Fréquences Alternatives)
TP (Progamme Trafic)
INST ALLATION
PRECAUTIONS
• Choisir l’emplacement du montage en veillant à ce que l’appareil ne gêne pas le
conducteur au volant.
• Eviter d’installer l’appareil dans un endroit exposé à des températures élevées,
comme les rayons directs du soleil ou l’air chaud de l’installation de chauffage ou
bien dans un endroit exposé à la poussière, saleté ou à de fortes vibrations.
• Ne se servir que des outils de montages fournis pour effectuer une installation sûre.
• S’assurer d’avoir ôté la façade extractible avant d’installer l’appareil..
Réglage de l’angle de montage.
Régler l’angle de montage à moins de 20º.
EXEMPLE DE MONTAGE
Installation dans le tableau de bord
Page 17

31 30
FrançaisFrançais 29
Comment placer et enlever la façade.
La façade peut être enlevée de façon à éviter que l’appareil puisse être volé.
COMMENT ENLEVER LA FACADE
Avant tout, s’assurer d’avoir pressé le bouton POWER (éteint) (1). Presser ensuite le bouton
RELEASE (14) et la retirer en tirant vers soi comme le montre le dessin.
COMMENT REMETTRE LA FACADE
Portez la partie de la façade à la zone de l’appareil comme le montre la figure et pressez tant
que vous n’entendez pas un déclic.
Faites attention à ne pas exercer aucune pression sur le display et sur les autres touches.
Nota:
• S’assurer que la façade est dans la bonne position lorsque vous la remettez en
place sur l’appareil, pour ne pas l’appliquer à l’envers.
• Ne pas trop presser la façade contre l’appareil; il suffit d’appuyer légèrement sur
l’appareil.
• Lorsque vous emportez la façade, rangez-la dans son étui.
• Ne pas trop appuyer sur l’afficheur de la façade lorsque vous le remettez en place.
CONNECTEUR ISO ”BUILD- IN”(INTÉGRÉ)
CONNECTEUR A
1.
2.
3.
4. MEMOIRE + 12V PERMANENT
5. SORTIE ANTENNE AUTOMATIQUE
6.
7. + 12V (A LA CLEF D’IGNITION)
8. MASSE
N.B.:
Le fil +12V Nº7 du connecteur A, doit être connecté sous clef de démarrage pour éviter que
la batterie de la voiture se décharge lorsque cette dernière n’est pas utilisée pendant
longtemps.
CONNECTEUR B
1. HAUT-PARLEUR ARRIERE DROIT (+)
2. HAUT-PARLEUR ARRIERE DROIT (-)
3. HAUT-PARLEUR AVANT DROIT (+)
4. HAUT-PARLEUR AVANTR DROIT (-)
5. HAUT-PARLEUR AVANT GAUCHE (+)
6. HAUT-PARLEUR AVANT GAUCHE (-)
7. HAUT-PARLEUR ARRIERE GAUCHE (+)
8. HAUT-PARLEUR ARRIERE GAUCHE (-)
REMPLACEMENT DES FUSIBLES
Si un fusible est grillé, contrôler la connexion électrique et remplacer le fusible. Si le fusible
se grille même après avoir été remplacé, il se peut qu’il y ait un mauvais fonctionnement à
l’intérieur. Dans ce cas, consultez le revendeur le plus proche.
Attention
Utiliser des fusible ayant l’ampérage spécifié pour chaque câble. L’emploi de fusibles
possédant un ampérage supérieur pourrait provoquer de graves dommages.
OPÉRATIONS
1. ALLUMAGE/ COUPAGE
Insérez la façade amovible dans l’appareil et pressez la touche POWER pour mettre en
fonction l’autoradio.
Pour éteindre l’autoradio, pressez encore la touche POWER, puis pressez la touche
RELACHEMENT (14) pour extraire la façade.
Faites attention à ne pas extraire la façade lorsque l’autoradio est allumée.
2. SCAN
Pressez la touche SCAN pour fair partir la scansion des programme radio.
3. VOLUME
Le contrôle VOLUME règle la sortie du son. Pour sélectionner les autres fonctions pressez
légèment la touche VOLUME (3) jusqu’à ce que la fonction choisie est visualisée sur
l’afficheur. Employer les touches du VOLUME pour modifier les autres fonctions. La figure
1 montre la sélection des fonctions.
Fig. 1 Sélection des fonctions
Page 18

31 32
FrançaisFrançais
1. VOLUME (tourner)
2. SELECT(ION) (pousser)
3. GRAVES
4. AIGUS
5. BALANCE
6. FADER
7. EQUALIZER
Contrôle VOLUME (3).
Augmentation ou diminution du volume en tournant le contrôle VOLUME. Ce bouton peut
être utilisé pour ajuster la tonalités BASSES, AIGUÊS, BALANCE, FADER et EQUALIZATEUR.
4. PRESELECTIONS (1,2,3,4,5,6)
(A) MODALITE RADIO:
Si appuyées légèrement, ces touches permettent de sélectionner directement une station
présélectionnée. L’appui sur ces touches pendant plus de 1 seconde mémorise la station
actuellement syntonisée. Lorsqu’on sélectionne la modalité PTY, la touche PTY est
partagée de la manière suivante: PTY groupe musique —— PTY groupe parlé —— ETEINT
MUSIQUE PARLE
1.Musique POP, Musique ROCK 1.JOURNAL PARLE, AFFAIRES, INFOS
2.Musique EASY, Musique LEGERE 2.SPORT, EDUCATION, PIECES
3.CLASSIQUE, AUTRE Musique 3.CULTURE, SCIENCES, DIVERS
4.JAZZ, COUNTRY 4. PREVIS. DU TEMPS, FINANCES, ENFANTS
5.NATION M, OLDIES 5.SOCIAL, RELIGION, TELEPHONE
6.Musique FOLK 6. VOYAGES, DIVERTIS. , DOCUMENTAIRES
(B) MODALITE LECTEUR CD/USB/SD MP3 :
1. PAUSE 2. BALAYAGE 3. REPETITION 4. CASUEL
LA FONCTION RDS. QU’EST-CE QUE LE SYSTEME RDS?
RDS (Radio Data System) est un système d’informations numériques radio développé et
introduit par l’EBU (European Broadcasting Union). Transmis sur le canal des émissions
normales FM.
Le RDS offre une variété d’informations telles le nom des stations, le programme et les
informations sur le trafic, ainsi que des fonctions utiles comme la syntonisation automatique
des meilleurs signaux disponibles dans le programme choisi.
Une légère pression sur cette touche permet de sélectionner la modalité AF/REG.
Lorsque la modalité AF/REG est sélectionnée, la radio contrôle continuellement le niveau
du signal AF. L’appui sur cette touche pendant plus de 2 secondes active la modalité
BRANCHE/DEBRANCHE Régional.
– Modalité Régionale BRANCHEE:
La commutation AF ou la Recherche PI SEEK est effectuée dans toutes les stations ayant
le même code PI que la station actuelle. L’inscription REG s’affiche.
– Modalité Régionale DEBRANCHE
Le code Régional dans le format PI est ignoré lorsqu’on effectue la commutation AF ou la
Recherche PI SEEK.
6. Fonction ‘TA’ (ANNONCES TRAFIC)
Une légère pression sur cette touche permet de brancher ou de débrancher la modalité TA.
Lorsque la modalité TA est sélectionnée et une annonce sur le trafic est transmise
– Lorsque l’appareil est en modalité CD/MP3, elle commutera temporairement sur la
modalité radio.
– Si le niveau du volume était sous le seuil bien audible, le niveau bien audible augmentera.
– Lorsqu’on reçoit une station TP, l’inscription TP s’affiche.
7. Fonction ‘PTY’ (TYPE DE PROGRAMME)
PTY MUSIQUE —— PTY PARLE —— PTY DEBRANCHE
Lorsqu’on sélectionne PTY, il est effectué par les touches de présélection ainsi que décrit
dans les touches de présélection. Lorsqu’on sélectionne PTY, la radio commence à
chercher l’information PTY correspondante et elle s’arrête si l’information PTY correspondante
est trouvée.
8. TOUCHE OUVERDURE FAÇADE
9. TOUCHE MODE (MODE)
L’appui sur cette touche permet à l’utilisateur de sélectionner
Modalité RADIO / CD / USB / SD / AUX-IN
10. TOUCHE DE BANDE (BAND)
Chaque bande est commutée en appuyant l’une après l’autre sur les touches:
AM1- AM2- FM1-FM2-FM3.
5. Fonction ‘AF/REG’ (FREQUENCES ALTERNATIVES)
CONTRÔLES LOUDNESS
Pressez la touche "BAND" (2) pendant plus de 2 secondes pour sélectionner LOUD ON.
Page 19

3433
FrançaisFrançais
La réponse des tonalités basses et aiguées seront augmentées.
11. SYNTONISATION AUTOMATIQUE OU MANUELLE (FREQ HAUT>> OU FREQ BAS<<)
(A) MODALITE RADIO
Si appuyées légèrement, ces touches font fonction de Recherche Manuelle.
Une pression de plus de 1 seconde active la Recherche Automatique.
(B) MODALITE LECTEUR CD/MP3
Si appuyées légèrement, ces touches font fonction de SAUT MORCEAU HAUT ou BAS.
Une pression de plus de 1 secondes active la RECHERCHE EN AVANT ou EN ARRIERE.
TOUCHE RECHERCHE MORCEAU
RECHERCHE EN AVANT ET EN ARRIERE DES MORCEAUX (ou changement de blocs
musicaux “album”). Appuyer sur la touche de SAUT (TUN<< o TUN>>) durant la lecture pour
aller au morceau désiré.TUN<<....REVERSE TUN>>....FORWARD
Appuyer et conserver la pression sur la touche SAUT (TUN<< o TUN>>) durant la lecture
pour chercher su le CD à haute vitesse. Lorsque la section de musique cherchée est trouvée,
relâcher la touche. On retourne ainsi à la reproduction normale. Lorsque la lecture du CD/
MP3 est terminée, le mode CD/MP3 commute automatiquement sur la radio.
12. SYNTONISATION AUTOMATIQUE (AUTO SEEK SEARCH )
Si appuyée légèrement, la radio syntonise chacune des stations présélectionnées.
Lorsque le signal est plus fort que le seuil de syntonisation, la radio demeure sur cette
station pendant 5 secondes, en mettant à zéro le volume pendant un instant et en
recommençant ensuite la recherche d’une autre station.
Un appui de plus de 1 seconde permet de mémoriser les six stations plus fortes dans les
positions correspondantes des touches de présélection.
Lorsque l’opération de RECHERCHE AUTOMATIQUE (AS) est terminée, la radio passe
au balayage des stations mémorisées.
13. AFFICHEUR LCD
L’afficheur à cristaux liquides illustre l’état actuel de réception des opérations.
14. TOUCHE RELACHEMENT FAÇADE
CONTROLES LECTEUR CD
15. TIROIR CD
16. TOUCHE EJECTION CD
Appuyer sur la touche d’éjection pour retirer le CD.
17. TOUCHE PAUSE CD / USB / SD
Durant la lecture, appuyer sur la touche PAUSE (17) ‘PAUSE’ pour arrêter momentanément
la lecture. Appuyer de nouveau pour retourner à la lecture normale.
18. TOUCHE INTRO CD / USB / SD
(Balayage de tous les morceaux). L’appui sur cette touche affiche l’indication ‘SCN’ et effectue
la reproduction des 10 premières secondes de chaque morceau.
19. TOUCHE REPEAT ‘REPEAT’ CD / USB / SD
L’appui sur cette touche affiche l’indication ‘RPT’ et la lecture du morceau actuel est répétée
jusqu’à ce que le mode répétition soit effacé en appuyant à nouveau sur la touche ‘RPT’ .
20. TOUCHE RANDOM ‘SHUFFLE’ (CASUEL) CD / USB / SD
L’appui sur cette touche affiche l’indication ‘SHF’ et chaque morceau du disque est lu dans
un ordre casuel et non dans la séquence normale. Pour effacer le mode Casuel, appuyer à
nouveau sur la touche ‘SHUFFLE’ (20).
21. PORTE USB
22. SENSOR TELECOMMANDE
23. FAÇADE FRONT AL
24.TOUCHE MUTE
Pousser la touche MUTE pour annuler le volume. Pousser de nouveau pour reporter le
volume au niveau précédent.
25. TOUCHE RESET
La touche Reset (25) se trouve sur la façade interne. Utilisez la pointe d’un stylo à bille ou
d’un autre objet métallique pour l’actionner. La touche Reset doit être utilisée dans les cas
suivants:
• installation initiale de l’appareil, après avoir branché tous les câbles,
• défaut de fonctionnement de toutes les touches,
• symbole d’erreur affichée.
26. ENTREE AUDIO AUX
Brancher votre lecteur portable à l'entrée AUX IN, en n'importe quelle modalité de
fonctionnement, pour amplifier le son à travers les haut-parleurs de l'auto.
Page 20

3635
FrançaisFrançais
Comment effectuer la recherche des morceaux MP3
A. Recherche directe de la piste
Appuyer sur la touche de AS/PS (12) une fois, à l’afficheur apparaît “MP3 *”: sélectionner
la piste MP3 par numéro avec la suivante méthode:
tourner le contrôle de Volume (3) pour lister les numéros.
Puis appuyer sur ENTER (VOLUME, 3) pour confrimer.
B. Recherche par nom d’Album (Directory) ou de Piste (T rack)
Appuyer sur la touche de AS/PS (12) deux fois, à l’afficheur apparaît “*”. Entrer la lettre
directement. L’appareil cherche les pistes et les albums qui ont la même lettre initiale
entrée. Les pistes et les albums sont listées avec les tournéz de VOLUME (11). Si le
nome sélectionné est d’un album, ont peut entrere dans l’album en pressant la touche
VOLUME/ENTER et continuer la recherche de la piste avec les VOLUME (3). La pièce
sélectionnée peut être lue en pressant sur la touche VOLUME/ENTER.
La distribution des caractères alphabétique et comme suivant:
tourner le contrôle de Volume (3) dans les deux sens pour lister les caratères
alphanumériques. Puis appuyer sur VOLUME/ENTER (3) pour confrimer.
C. Recherche par Album
Rechercher l’album avec le VOLUME (3).
En mode lecture MP3, appuyer sur la touche de AS/PS (12) trois fois. Le nom du
premier album sera montré.Tournez VOLUME (3) pour naviguer dans l’album, puis
presser VOLUME/ENTER (3) pour sélectionner l’album désiré. A l’afficheur apparaît “ \\
“. Pour choisir les pièces dans l’album sélectionné, tournez VOLUME (3) puis presser
VOLUME/ENTER (3) pour confirmer la pièce. Tourner le contrôle de Volume (3) dans les
deux sens pour lister les caratères alphanumériques. Puis appuyer sur Volume/ENTER
(3) pour confrimer.
ID3 Tag
Appuyer sur CLK sir telecommande à maintes reprises pour montrer l’information ID3
TAG. Si le document MP3 est fournin de ID3 TAG, appuyer sur DISPLAY à maintes re
prises pour montrer l’information comme suivant:
TITRE CHANSON > ARTISTE>TITRE ALBUM > ANNEE> COMMENTAIRES
Si il y a quelque information ID3-TAG pas présente, appuyer sur CLK à maintes
reprises pour montrer l’information comme suivant:
UNKNOWN SONGNAME> UNKNOWN ARTIST> NO ALBUM TITLE > UNKNOWN
YEAR > NO COMMENTS
Si il y n’y a pas d’information ID3 TAG, appuyer sur DISPLAY, apparaîtra “NO ID3 TAG”
à l’afficheur.
Le nom et le numéro du document passeront en continuation sur l’afficher pendant la lecture.
27. TOUCHE EJECT CASSETTES
En mode TAPE (cassette), appuyer partiellement sur cette touche pour activer la fonction
avance rapide. Appuyer à fond sur cette touche pour interrompre la lecture de la cassette
et éjecter cette dernière. L’autoradio entrera automatiquement en mode Radio.
28. LECTEUR CASSETTES
En mode RADIO, insérer une cassette dans le logement prévu à cet effet, la lecture de la
cassette commence automatiquement.
29.
FONCTION AVANCEMENT/RETOUR RAPIDE DE LA CASSETTE
Pour l’avancement rapide de la cassette pressez la touche (8). Lorsque la cassette est à la
fin, la reproduction commence automatiquement du côté opposé (Auto-reverse), Pour le
retour rapide de la cassette pressez la touche (). Lorsque la cassette est à la fin, la
reproduction commence automatiquement du début du même côté (Auto-replay). Vous
pouvez bloquer les fonctions d’avancement et retour rapide en pressant la touche opposée
à la touche insérée en ce moment.
SPECIFICATIONS
LECTEUR CD/MP3
Rapport Signal/Brouillage > 70dB
Séparation Canal > 50 dB (1KHz)
Réponse en fréquence 20Hz - 20 KHz
SYNTONISATEUR FM
Sensibilité 2 dBμ
Séparation Stéréo 35dB
Rapport Signal/Brouillage 55dB
Gamme fréquence 87.5 – 108MHz
Pas Canal 50 kHz
Fréquence intermédiaire 10.7MHz
SORTIE PREAMPLIFIEE
Sortie 350mV (MAX)
Impédance 10kOhm
GENERALITES
Voltage alimentation 13.8V DC (10.8-15.6V), Negative à la masse
Impédance haut-parleurs 4 ou 8 Ohms
Puissance maximale de sortie 40W x 4 canaux
Les spécifications et le design peuvent changer sans avis préalable.
Page 21

ItalianoItaliano 37 38
A TTENZIONE
Il punto di esclamazione all’interno di un triangolo avverte l’utente che il libretto
d’istruzioni contiene delle importanti istruzioni per l’uso e la manutenzione.
Il simbolo del fulmine all’interno di un triangolo avverte l’utente della presenza di una
pericolosa tensione all’interno dell’apparecchio.
CAUTION
RISK OF ELECTRIC
DO NOT OPEN
Noi, Roadstar Italia Spa
Che il modello Autoradio FM Stereo Digitale PLL, Sistema Radio Data System con PTY,
Lettore CD/MP3, Pannello Frontale Totalmente Estraibile CD-900USMP della Roadstar
è prodotto in conformità al D.M. no. 548 datato 28/08/95 (G.U. no. 301 datata 28/12/95)
e, in particolare, è in conformità alle prescrizioni dell’articolo 2 comma 1.
Per ridurre i rischi di scosse elettriche, non aprire l’apparecchio. L’apparecchio non
contiene parti riparabili dall’utente. In caso di guasto fare appello a tecnici qualificati
SHOCK
per le riparazioni.
Radiazioni laser invisibili possono fuoriuscire ad apparecchio aperto on in caso di
guasto del dispositivo di sicurezza. Evitare l’esposizione diretta ai raggi laser. L’uso
di comandi, regolazioni o procedure non specificate in questo manuale possono
causare pericolose esposizioni alle radiazioni laser.
Non esporre l’apparecchio alla pioggia o all’umidità.
Posizionare l’apparecchio in un luogo sufficientemente ventilato.
Non esporre l’apparecchio alla luce diretta del sole o a fonti di calore.
Viale Matteotti 39
I-22012 Cernobbio (Como)
Dichiariamo:
Corretto smaltimento del prodotto - (rifiuti elettrici ed elettronici)
II marchio riportato sul prodotto e sulla sua documentazione indica che
il prodotto non deve essere smaltito can altri rifiuti domestici al termine
del ciclo di vita. Per evitare eventuali danni all'ambiente o alla salute
causati dall'inopportuno smaltimento dei rifiuti, si invita l'utente a
separare questo prodotto da altri tipi di rifiuti e di riciclarlo in maniera
responsabile per favorire il riutilizzo sostenibile delle risorse materiali.
Gli utenti domestici sono invitati a contattare il rivenditore presso il quale
e stato acquistato il prodotto a l'ufficio locale preposto per tutte le
informazioni relative alla raccolta differenziata e al riciclaggio per questo
tipo di prodotto.
Gli utenti aziendali sono invitati a contattare il proprio fornitore e verificare
i termini e le condizioni del contratto di acquisto. Questo prodotto non
deve essere smaltito unitamente ad altri rifiuti commerciali.
CD-900USMP
Autoradio Digitale FM Stereo con lettore di CD/CD-R/CD-RW/USB/SD MP3
Sistema Radio Data System con PTY e Pannello Frontale Estraibile.
MANUALE ISTRUZIONI
Raccomandiamo la lettura accurata di questo manuale per potervi familiarizzare con il
vostro nuovo Radio Lettore di CD prima di utilizzarlo per la prima volta. Raccomandiamo
di conservare questo manuale per futuri riferimenti.
INDICE
• Localizzazione dei controlli
• Caratteristiche
• Installazione
• Precauzioni e Manutenzione
• Connessioni
• Istruzioni
• Funzione CD/USB/SD
• Specifiche
LOCALIZAZIONE DEI CONTROLLI
1. TASTO ACCENSIONE/SPEGNIMENTO
2. TASTO SCANSIONE PROGRAMMI RADIO
3. CONTROLLO VOLUME (+,- REGOLAZ. BASSI, ACUTI, BALANCE, FADER)
4. TASTI PRESELEZIONE (1-6)
5. TASTO AF
6. TASTO TA
7. TASTO PTY
8. TASTO APERTURA PANNELLO FRONTALE
9. TASTO MODE (MODE)
10. TASTO BANDA (BND) / LOUD
11. SINTONIA RADIO - CD SALTO/RICERCA BRANI SU/GIU (>>/<<)
12. TASTO RICERCA AUTOMATICA (AS)
13. DISPLAY LCD
14. TASTO RILASCIO FRONTALINO
15. VANO CD
16. TASTO ESPULSIONE CD
17. TASTO PAUSA CD / USB / SD
Page 22

0
ItalianoItaliano 39 4
18. TASTO INTRO (CD SCAN) CD / USB / SD
19. TASTO RIPETIZIONE (REPEAT) CD / USB / SD
20. TASTO RANDOM (SHUFFLE) CD / USB / SD
21. PORTA USB
22. SENSORE TELECOMANDO
23. PANNELLO FRONTALE
24. TASTO MUTE
25. TASTO RESET (UNITA CENTRALE)
26. INGRESSO AUDIO ESTERNO (AUX-IN)
27. TASTO ESTRAZIONE CASSETTA
28. SPORTELLO INSERIMENTO CASSETTA
29. AVANZAMENTO VELOCE / INVERSIONE DIREZIONE CASSETTA
CARATTERISTICHE
Questa autoradio a frontale estraibile AM / FM Stereo con lettore CD/MP3 ha le seguenti
caratteristiche:
• Memorizzazione automatica AS delle migliori stazioni in ordine di forza segnale.
• Controllo elettronico Volume, Acuti, Bassi, Bilanciamento, Fader, Equalizzatore.
• Sintonia elettronica di precisione con circuito PLL.
• 30 stazioni memorizzabili (AM1 / 6 AM2 / 6FM 1/ 6FM2 / 6FM3 )
• Riproduttore cassette autoreverse
• Controllo Loudness
• Interruttore Accensione / Spegnimento Illuminato
• Controllo Sintonia Manuale SU / GIU
• Controllo Sintonia Automatica SEEK SU / GIU
• Selettore Banda (BAND) per la selezione della banda richiesta ( AM / FM)
• Controllo Display (Frequenza, Nome stazione, Tipo programma)
• Funzione orologio in RDS
• Funzione ripetizione brani CD
• Funzione lettore CD e MP3 di brani registrati su CD-R/CD-RW
• Uscita preamplificata
• Pannello frontale estraibile come sistema anti-furto.
• Sistema di illuminazione
• Funzioni RDS: PI (Identificazione Programma)
TA (Annuncio Traffico)
PS (Servizio Nome Programma)
AF (Lista Frequenze Alternative)
TP (Programma traffico)
PTY (Tipo di Programma)
INST ALLAZIONE
PRECAUZIONI
• Scegliere la posizione di montaggio con attenzione in modo che l’apparecchio non
interferisca con le normali funzioni di guida del conducente.
• Evitare di installare l’apparecchio ove sarebbe esposto adalte temperature, come la
luce diretta del sole o l’aria calda dell’impianto di riscaldamento, o esposto a
polvere, sporcizia o vibrazione eccessiva.
• Usare soltanto gli attrezzi di montaggio forniti per una installazione sicura.
• Assicurarsi di aver rimosso il pannello frontale prima di installare l’apparecchio.
Regolazione dell’angolo di montaggio
Regolare l’angolo di montaggio a meno di 20º.
ESEMPIO DI MONTAGGIO
Installazione nel cruscotto
Come staccare ed attaccare il pannello anteriore (frontalino)
Page 23

41 42
ItalianoItaliano
Il pannello anteriore (frontalino) di questo apparecchio può essere staccato per evitare che
l’apparecchio stesso venga rubato.
COME STACCARE IL PRONTALINO
Prima di staccare il frontalino, assicurarsi di avere premuto il pulsante su OFF (spento)(1),
quindi premere il pulsante RELEASE (14) .
INSERIMENTO DEL FRONTALINO
Applicare la parte destra B del frontalino all’apparecchio principale facendo combaciare e
spingendo la parte sinistra sino a che sentirete un “CLIC”.
Fate attenzione a non esercitare alcuna pressione sul display o sui tasti.
Nota:
• Assicurarsi che il frontalino sia nella corretta posizione quando viene ricollegato
all’apparecchio, in modo che non venga applicato a rovescio.
• Non premere con forza il frontalino contro l’apparecchio quando il primo viene
ricollegato; è sufficiente una leggera pressione verso l’apparecchio stesso.
• Quando portate con voi il frontalino, riponetelo nell’apposita custodia.
• Non premere forte o esercitare troppa pressione sul display del frontalino quando lo
ri-applicate all’apparecchio.
CONNETTORE ISO INTEGRA TO (BUILD- IN)
CONNETTORE A
1.
2.
3.
4. MEMORIA + 12V PERMANENTE
5. USCITA ANTENNA AUTOMATICA
6.
7. +12V (alla chiave d’accensione)
8. MASSA
N.B.:
Il filo 12V Nº7 del connettore A, deve essere collegato sotto chiave accensione dell’automobile per evitare che la batteria dell’auto si scarichi quando quest’ultima non viene utlilizzata
per diversi giorni.
2. ALTOPARLANTE POSTERIORE DESTRO (-)
3. ALTOPARLANTE ANTERIORE DESTRO (+)
4. ALTOPARLANTE ANTERIORE DESTRO (-)
5. ALTOPARLANTE ANTERIORE SINISTRO (+)
6. ALTOPARLANTE ANTERIORE SINISTRO (-)
7. ALTOPARLANTE POSTERIORE SINISTRO (+)
8. ALTOPARLANTE POSTERIORE SINISTRO (-)
Manutenzione
SOSTUITUZIONE DEI FUSIBILI
Se un fusibile si dovesse bruciare, controllare il collegameto elettrico e sostituire il fusibile.
Se il fusibile dovesse bruciarsi ancora dopo la sostituzione, potrebbe esserci un
malfunzionamento interno. In questo caso, consultare il centro assistenza più vicino.
Attenzione
Usare il fusibile con l’amperaggio specificato per ciascun conduttore.
L’uso di fusibili con amperaggio superiore potrebbe dar luogo a seri danni.
ISTRUZIONI
1. ACCENSIONE / SPEGNIMENTO
Inserite il Pannello nell’apparecchio e premete il tasto PWR (1) per accendere l’autoradio.
Per spegnere l’apparecchio, ripremete il tasto PWR poi premere il tasto REL (14) per estrarre
il pannello.
N.B.: Non estraete mai il pannello ad autoradio accesa.
2. SCAN
Premere questo tasto per effettuare una scansione automatica dei programmi radio.
3. VOLUME / ENTER
Il controllo VOLUME regola l’uscita del suono.
Per selezionare le altre funzioni premete leggermente il tasto SELECT (2) sino a che la
funzione desiderata non appare sul display. La figura 1 mostra come vengono selezionate
le funzioni.
CONNETTORE B
1. ALTOPARLANTE POSTERIORE DESTRO (+)
Page 24

43 44
ItalianoItaliano
1. VOLUME (ruotare)
2. SELECT (premere)
3. BASSI
4. ACUTI
5. BALANCE
6. FADER
7. EQUALIZZATORE
Fig. 1 Selezione delle funzioni audio
4. PRESELEZIONI (1,2,3,4,5,6)
(A) MODALIT A’ RADIO:
PremutI leggermente, questi tasti selezionano direttamente una stazione
preselezionata.
Se premuto più a lungo di 1 sec., la stazione attualmente sintonizzata viene
memorizzata.
Quando la modalità PTY è selezionata, il tasto PTY è condiviso come segue:
PTY gruppo musica ----- PTY gruppo parlato ----- SPENTO
MUSICA P ARLA T O
1.Musica POP, Musica ROCK 1. NOTIZIARI, AFFARI, INFO
2.Musica EASY, Musica LEGGERA 2. SPORT, EDUCAZIONE, DRAMMA
3.CLASSICA, ALTRA Musica 3. CULTURA, SCIENZEE, VARIE
4.JAZZ, COUNTRY 4. PREVISIONI TEMPO, FINANZE, BAMBINI
5.Musica NAZIONALE, OLDIES 5. SOCIALE, RELIGIONE, TELEFONO
6.Musica FOLK 6. VIAGGI, DIVERTIMENTO, DOCUMENTARI
Quando la modalità AF/REG viene selezionata, la radio controlla continuamente il livello
del segnale AF. Se premuto per più di 2 secondi, viene attivata la modalità ACCESO/
SPENTO Regionale.
– Modalità Regionale ACCESO:
La commutazione AF o la Ricerca PI SEEK è implementata a tutte le stazioni che hanno
lo stesso codice PI della stazione attuale. La scritta REG viene visualizzata sul display.
– Modalità Regionale SPENTO
Il codice Regionale nel formato PI è ignorato quando la commutazione AF o la Ricerca PI
SEEK è implementata.
6. Funzione ‘T A’ (ANNUNCI TRAFFICO)
Se premuto leggermente, viene selezionata la modalità TA acceso o spento.
Quando la modalità TA viene selezionata e un annuncio sul traffico viene trasmesso
– Quando l’apparecchio è in modalità CD/MP3, commuterà su modalità radio
temporaneamente.
7. Funzione ‘PTY’ (TIPO DI PROGRAM)
PTY MUSICA ----- PTY PARLATO ----- PTY SPENTO
Quando si seleziona PTY, esso è implementato dai tasti di preselezione come descritto
nei tasti di preselezione. Quando si seleziona PTY, la radio inizia a cercare l’informazione
PTY corrispondente, e si ferma se l’informazione PTY corrispondente viene trovata.
8. TAST O APERTURA P ANNELLO FRONT ALE
9. TASTO MODE (MODE)
Premendo questo tasto, l’utente può selezionare la Modalità:
RADIO / CD / CASSETTA / AUX-IN / USB-SD.
10. TASTO BANDA
Ogni banda viene commutata premendo consecutivamente questo tasto:
AM1- AM2- FM1- FM2- FM3.
(B) MODALIT A’ LETTORE CD/MP3 :
1. PAUSA 2. INTRO 3. RIPETIZIONE 4. CASUALE
LA FUNZIONE RDS. COS’E’ IL SISTEMA RDS?
RDS (Radio Data System) è un sistema di informazioni digitali radio sviluppato ed
introdotto dalla EBU (European Broadcasting Union). Trasmesso sul canale delle
emissioni normali FM,
L’RDS offre una varietà di informazioni tipo il nome delle stazioni, il programma e le
informazioni sul traffico e funzioni utili tipo la sintonizzazione automatica dei migliori
segnali disponibili nel programma scelto.
5. Funzione ‘AF/REG’ (FREQUENZE ALTERNA TIVE )
Se premuto leggermente, viene selezionata la modalità AF/REG.
CONTROLLI LOUDNESS
Premere il pulsante "BAND" (10) per più di 2 secondi. La modalità LOUD ON sarà
selezionata. I toni bassi e acuti verranno enfatizzati.
11. SINTONIZZAZIONE AUTOMATICA O MANUALE (FREQ SU >> O FREQ GIU <<)
(A) MODALITA’ RADIO
Se premuto leggermente, questi tasti fungono da Ricerca Manuale.
Premendo più a lungo di 2 secondi, si attiva la Ricerca Automatica.
(B) TASTO RICERCA BRANO MODALITA CD / USB / SD
RICERCA AVANTI E INDIETRO DEI BRANI (o cambio di blocchi musicali “album”)
Page 25

ItalianoItaliano 45 46
Premere il tasto SKIP (<< o >>) durante la lettura per andare al brano desiderato.
<<....REVERSE >>....FORWARD
Premere e tenere premuto il tasto SKIP (<< o >>) durante la lettura per ricercare sul CD a
velocità elevata. Quando la sezione di musica ricercata viene trovata, rilasciare il tasto. Si
ritorna alla riproduzione normale.
Quando la lettura del CD/MP3 è terminata, la modalità CD/MP3 commuta automaticamente su radio.
12. SINTONIZZAZIONE AUTOMATICA (AUTO SEARCH )
Se premuto leggermente, la radio sintonizza ognuna delle stazioni preselezionate.
Quando il segnale è più forte della soglia di sintonizzazione, la radio si mantiene su quella
stazione per 5 secondi, azzerando il volume per un attimo, e poi ripartendo per la ricerca
di un’altra stazione.
Premendo più a lungo di 1 secondo, le sei stazioni più forti verranno memorizzate nelle
corrispondenti posizioni dei tasti di preselezione.
Quando l’operazione di RICERCA AUTOMATICA (AS) è terminata, la radio passa alla
scansione delle stazioni memorizzate.
13. DISPLAY LCD
Il display a cristalli liquidi mostra lo stato attuale di ricezione e operazioni.
CONTROLLI LETTORE CD
15. VANO INSERIMENTO CD
16. TASTO ESPULSIONE CD
Premere il tasto di espulsione per rimuovere il CD.
17. TASTO PAUSA CD/USB/SD
Durante la lettura, premere il tasto PAUSA (17) ‘PAUSE’ per fermare momentaneamente
la lettura. Premere di nuovo per tornare alla lettura normale.
viene ripetuto finché la modalità di ripetizione non viene cancellata, premendo il tasto ‘RPT’
di nuovo.
20. TASTO RANDOM ‘SHUFFLE’ (CASUALE) CD/USB/SD
Quando questo tasto viene premuto, appare l’indicazione ‘SHF’ e ogni brano del disco
viene letto in ordine casuale invece che nella sequenza normale. Per cancellare la
modalità Casuale, premere di nuovo il tasto ‘SHUFFLE’.
21. PORTA USB
22. PANNELLO FRONTALE
24. T ASTO MUTE
Premere il tasto Mute per abbassare immediatamente il volume del suono. Premere
Mute di nuovo per riportare il volume al livello precedente.
COME EFFETTUARE LA RICERCA DEI BRANI MP3
A. Ricerca diretta del brano (pista)
Premere il tasto AS/PS (12) una volta, il display mostrerà “MP3 ***”: selezionare la pista
MP3 dal numero nel modo seguente:
ruotare la manopola del Volume (3) per scansionare i numeri.
Poi premere VOLUME/ENTER (3) per confermare.
B. Ricerca per nome dell’Album ( Directory) o della pista (T rack)
Premere il tasto AS/PS (12) due volte, il display mostrerà “*”. Immettere la lettera
direttamente. L’apparecchio ricercherà gli album e i brani che hanno la stessa iniziale
scelta. L’apparecchio mostrerà gli album e i brani elencati ruotando la manopole
VOLUME. Se il nome selezionato è un album, allora si può entrare in esso premendo il
tasto VOLUME/ENTER e continuare la ricerca dell’album o dei brani con la manopola
VOLUME. Il brano selezionato può essere riprodotto premendo il tasto VOLUME/ENTER.
ruotare la manopola del Volume (3) per scansionare i caratteri alfanumerici.
Poi premere VOLUME/ENTER (10) per confermare.
18. TASTO INTRO (Scansione di tutti i brani) (CD SCAN) CD/USB/SD
Quando questo tasto viene premuto, appare l’indicazione ‘SCN’ sul display e i primi 10
secondi di ogni brano viene riprodotto.
19. TASTO REPEAT ‘REPEAT’ CD/USB/SD
Quando questo tasto viene premuto, appare l’indicazione ‘RPT’ e la lettura del brano attuale
C. Ricerca per album ( Directory)
Ricercare l’album usando la manopola VOLUME.
In modalità lettura brani MP3, premere il tasto AS/PS tre volte. Appare il primo nome di
Album (Directory). Ruptare la manopola VOLUME per navigare nella lista dell’album,
premer VOLUME/ENTER per selezionare l’album. Sul display apparirà “ \\ “. Per
selezionare i brani nell’album scelto, premere il tasto ENTER per confermare quando il
Page 26

ItalianoItaliano 47 48
brano desiderato è stato trovato, ruotare la manopola del Volume (3) in entrambe le
direzioni per scansionare i caratteri alfanumerici. Poi premere VOLUME/ENTER (3) per
confermare.
ID3 Tag
Premere CLK dal telecomando ripetutamente per mostrare l’informazione ID3 TAG.
Se il documento MP3 è fornito di ID3 TAG, premendo il tasto DISPLAY ripetutamente
verrà mostrata l’informazione nel modo seguente:
TIOLO BRANO > ARTISTA>TITOLO ALBUM > ANNO > COMMENTI
Se qualche informazione ID3-TAG non è presente, premendo il tasto CLK ripetutamente
verrà mostrata l’informazione nel modo seguente:
UNKNOWN SONGNAME> UNKNOWN ARTIST> NO ALBUM TITLE > UNKNOWN
YEAR > NO COMMENTS
Se il documento MP3 non è fornito di ID3 TAG, premendo il tasto DISPLAY, apparirà “NO
ID3 TAG”.
Il nome del documento e il suo numero appariranno continuamente sul display durante
la lettura del brano.
25. RESET
Il tasto RESET (25) è posto sull’apparecchio principale.
Il tasto Reset va attivato per le seguenti ragioni:
• Quando si installa l'apparecchio la prima volta e tutti i collegamenti sono fatti.
• Tutti i tasti funzione non funzionano correttamente.
• Quando appare un simbolo di errore sul display.
26. INGRESSO AUDIO AUX IN: Collegare il vostro lettore portatile all’ingresso AUX IN, in
qualsiasi modalità di funzionamento, per amplificare il suono attraverso gli altoparlanti
dell’auto.
SPECIFICHE
SEZIONE LETTORE CD / USB / SD - MP3
Rapporto Segnale/Disturbo > 70dB
Separazione canali > 50 dB (1KHz)
Risposta di frequenza 20Hz - 20 KHz
TUNER
Sensibilità 2 dBμ
Separazione Stereo 35 dB
Rapporto Segnale/Disturbo 55 dB
Risposta di frequenza 87.5-108 MHz
Passi canali (channel step) 50 kHz
Frequenza intermedia 10.7 MHz
GENERALE
Voltaggio alimentazione 13.8V DC (10.8-15.6V accettabile)
Impedenza altoparlanti 4 o 8 ohm
Massima potenza d’uscita 40W x 4CH
Nota: Specifiche e disegno soggetti a possibili modifiche senza preavviso.
27. TASTO EJECT
In Modalità TAPE, premere questo tasto a metà per fare avanzare il nastro velocemente o
premerlo tutto per interrompere la lettura ed estrarre la cassetta.
28. INGRESSO CASSETTA
In modalità RADIO, inserire la cassetta nel vano, la cassetta verrà automaticamente
riprodotta.
29. FUNZIONE AVANZAMENTO / RITORNO VELOCE NASTRO
Per l’avanzamento veloce del nastro premete il tasto . Quando viene raggiunta la fine del
nastro, la riproduzione inizia automaticamente dal lato opposto (Auto-reverse). Per il ritorno
veloce del nastro premete il tasto . Quando viene raggiunta la fine del nastro la riproduzione
inizia automaticamente all’inizio dello stesso lato (Auto-replay). Potete bloccare le funzioni
di avanzamento e ritorna veloce premendo il tasto opposto a quello inserito in quel momento.
Page 27

EspañolEspañol 49 50
CAUTION
RISK OF ELECTRIC
SHOCK
DO NOT OPEN
ATENCIÓN
El símbolo de exclamación dentro un triángulo tiene el objeto de advertir al
usuario de la presencia de instrucciones importantes de funcionamiento
y mantenimiento en la documentación adjunta con el equipo.
El símbolo del rayo con punta de flecha dentro de un triángulo advierte al
usuario de la presencia de tensiones peligrosas en el equipo.
Para reducir los riesgos de descargas eléctricas, no retire la cubierta. La
unidad no tiene en su interior partes que el usuario puede reparar. Encargue
su reparación a personal cualificado.
Radiaciones laser invisibles a aparado abierto. El uso de interruptores o
regulaciones de las caracteristicas tecnicas o manejos diferentes de
aquellos especificados, puede resultar una peligrosa exposición a
radiaciones laser.
La unidad no debería ser expuesta a lluvia o humedad.
La unidad se debe instalar de forma que su posición no le impida tener
ventilación adecuada.
La unidad no debería ser expuesta a la luz solar directa ni a fuentes emisora
de calor.
Eliminación correcta de este producto -
(material electrico y electrónico de descarte)
La presencia de esta marca en el producto o en el materiál informativo
que lo acompaña, indica que al finalizar su vida útil no deberá
eliminarse junto con otros residuos domésticos. Para evitar los
posibles daños al medio ambiente o a la salud humane que
representa la eliminación incontrolada de residuos, separe este
producto de otros tipos de residuos y reciclelo correctamente para
promover la reutilización sostenible de recursos materiales.
Los usuarios particulares pueden contactar con el establecimiento
donde adquirieron el producto, o con las autoridades locales
pertinentes, para informarse sobre cómo y dónde pueden lIevario para
que sea sometido a un reciclaje ecológico y seguro.
Los usuarios comerciales pueden contactar con su proveedor y
consultar las condiciones del contrato de compra. Este produco no
debe eliminarse mezclado con otros residuos comerciales.
CD-900USMP
Autorradio FM/FM Estéreo Electrónica Digitál PLL con lector de CD/CD-R/CD-RW/MP3
USB/SD, Sintonizador Radio Data System con PTY , leitor Casete Y Panel Frontal
Extraible
MANUAL INSTRUCCIONES
Recomendamos la lectura cuidadosa de este manual para poderse familiarizar con su
nuevo Radio Lector de CD antes de utilizarlo por la primera vez. Recomendamos
conservar este manual para futuras consultaciones.
ÍNDICE
• Localización de los Controles
• Caracteristicas
• Instalación
• Precauciones y Mantenimiento
• Cableado Conector ISO
• Instrucciones
• Función CD
• Especificaciones
LOCALIZACIÓN DEL LOS CONTROLES
1. TECLA ENCENDIDO/APAGADO
2. SINTONIA AUTOMATICA DE BOSQUEDA (SCN)
3. CONTROL DE NIVEL VOLUMEN (+,- REG. GRAVES, AGUDOS,BALANCE, FADER)
4. BOTONES DE PRESELECCION (1,2,3,4,5,6)
5. TECLA AF
6. TECLA TA
7. TECLA PTY
8. BOTON DE LIBERACION PANEL
9. TECLA MODE (MODE)
10. TECLA BANDA (BND) / LOUD
11. TECLAS SINTONIA AUTOMATICA Y MANUAL (<< / >>) - SALTO/BUSQUEDA CD
12. TECLA SINTONIA AUTOMATICA Y MEMORIZACION (AS)
13. PANTALLA LCD
14. BOTON DE LIBERACION PANEL
15. LUGAR DEL CD
Page 28

EspañolEspañol 51 52
16. TECLA EJECCION CD
17. TECLA PAUSA CD
18. TECLA INTRO CD (CD SCAN)
19. TECLA REPETICION CD (REPEAT)
20. TECLA RANDOM CD (SHUFFLE) (REPR. CASUAL)
21. PORTA USB
22. SENSOR TELEMANDO
23. PANEL FRONTAL
24. TECLA MUTE
25. BOTON RESET
26. AUX-IN
27. BOTÓN DE EXPULSIÓN DE LA CINTA
28. TAPA DEL CASETE
29. FUNCION AVANCE / RETROCESO RAPIDO DE LA CINTA
CARACTERISTICAS
Este autoradio es con frontal extraible, AM / FM / FM Estéreo con lector de CD/MP3 y tiene
las siguentes caracteristicas:
• Memorización automatica AS de las mejores emisoras en orden de fuerza señal.
• Control electronico Volumen, Agudos, Bajos, Balance, Fader.
• Sintonia elettronica de precisión con circuito PLL.
• 18 Emisoras memorizables (6 AM1 / 6 AM2 / 6 FM1 / 6 FM2 / 6 FM3)
• Control Loudness
• Interruptor encendido / apagado iluminado.
• Control sintonia automática / manuál Arriba/Abajo
• Seletor banda (BND) para la selección de AM1, AM2, FM1, FM2, FM3
• Control Display (Frecuencia, Nombre estación, tipo programa).
• Función reloj en RDS
• Lector CD /USB / SD y archivos MP3 grabados en CD/CD-R/CD-RW
• Enchufe salida PRE (Tipo RCA) para conexiónes al amplificador.
• Panel frontal extraible como sistema anti-robo.
• Iluminación controles
• Funciónes RDS: PI (Identificación Programa) - TA (Anuncio Tráfico)
PS (Servicio Nombre Programa) TP (Programe Tráfico)
AF (Lista Frecuencia Alternativa)
PTY (Tipo programa)
INSTALACIÓN
PRECAUCIONES
• Elegir la posición de montaje con atención, de forma que el aparato no interfiera con
las funciones normales del conductor
• Evitar el instalarlo donde estaría expuesto a altas temperaturas, como la luz directa
del sol o el aire caliente de la calefacción o donde estaría expuesto a polvo,
suciedad o a excesiva vibración.
• Usar solo las herramientas de montaje proporcionadas para una segura
instalación.
• Asegúrense de haber quitado el panel frontal antes de instalar el aparato.
Regulación del ángulo de montaje
Regular el ángulo de montaje a menos de 20º.
EJEMPLO DE MONTAJE
Instalación en el salpicadero
Page 29

54
EspañolEspañol 53
Nota: Tener la llave de desbloqueo en un sitio seguro para el momento en el que fuese
necesario quitar el aparato del coche.
COMO SEPARAR Y UNIR EL PANEL ANTERIOR (FRONTAL)
El panel anterior (frontal) de este aparato puede ser separado para evitar que éste sea
robado.
COMO SEPARAR EL FRONTAL
Antes de separar el frontal, asegúrense de haber oprimido el botón PWR (OFF =apagado).
A continuación oprimir el botón RELEASE (14) y separar el panel tirando hacia ustedes como
se ilustra en la figura.
COMO UNIR EL FRONTAL
Adaptar el lado izquierdo B del frontal al aparato pricipal A como se ilustra en la figura y
presionar hasta oir un clic.
CUIDADO! : No ejercite ninguna presión en el display o en los botones.
Notas:
• Asegúrense de que el frontal esté en la posición correcta, cuando viene conectado
de nuevo al aparato, de manera que no sea adaptado al revés.
• No oprimir con fuerza el frontal contra el aparato cuando el primero se vuelve a
conectar; es suficiente una ligera presión hacia el aparato mismo.
• Cuando lo lleven con ustedes, vuelvan a ponerlo en su estuche
• No presionen fuerte o ejerzan demasiada presión sobre el display del frontal
cuando lo conecten al aparato.
CONNECTOR ISO “BUILD IN”
CONECTOR B
1. (+) ALTAVOZ TRASERO DERECHO
2. (-) ALTAVOZ TRASERO DERECHO
3. (+) ALTAVOZ DELANTERO DERECHO
4. (-) ALTAVOZ DELANTERO DERECHO
5. (+) ALTAVOZ DELANTERO IZQUIERDO
6. (-) ALTAVOZ DELANTERO IZQUIERDO
7. (+) ALTAVOZ TRASERO IZQUIERDO
8. (-) ALTAVOZ TRASERO IZQUIERDO
Mantenimiento
SUSTITUCION DE LOS FUSIBLES
Si un fusible se quemase, controlar la conexión eléctrica y sustituir el fusible. Si éste se
quemase de nuevo después de la sustitución, podría existir un mal funcionamiento interno.
En este caso, consultar al vendedor más cercano.
Atención:
Usar el fusible con el amperaje indicado para cada conductor. El uso de fusibles con aperaje
superior, podría causar serios daños.
INSTRUCCIONES
1. ENCENDIDO / APAGADO POWER
Inserte el panel en el aparto y presione la tecla POWER para encender el autoradio.
Para apagar el aparato, presione de nuevo la tecla POWER después presione la tecla
LIBERACION (14) para extraer el panel.
NOTA: No extraiga el panel con el autoradio encendido.
CONNECTOR A
1.
2.
3.
4. (+ 12.V ) MEMORIAS
5. SALIDA ANTENA AUTOMATICA
6.
7. (+12V ) CON CONTACTO
8. MASA
NOTA: El cable +12V Nº7 Conector A, debe ser conectado a la llave de encendido del vehiculo
para evitar que la bateria se descargue cuando esta no es utilizada por un largo periodo de
tiempo.
2. TECLA SINTONIA AUTOMATICA DE BOSQUEDA (SCN)
Esta tecla tiene la funciŠn de BòSQUEDA DE RADIOEsta operaciŠn es parecida a la
bœsqueda autom/tica normal pero la emisora sintonizada seescucha por 5 segundos.
3. SELECCION / VOLUMEN
El control VOLUMEN regula la salida del sonido. Para selecionar las demás funciones
presione ligeramente la tecla ENTER (3) sino la función deseada no aparecerá en el display.
La fig. 1 muestra como será seleccionada la función.
Fig. 1 Selección de las funciones
Page 30

55 56
EspañolEspañol
1. VOLUMEN (girar)
2. SELECT (pulsar)
3. BAJOS
4. AGUDOS
5. BALANCE
6. FADER
7. EQUALIZADOR
4. PRESELECCIONES (1,2,3,4,5,6)
(A) MODALIDAD RADIO:
Pulsados ligeramente estas teclas se selecciona directamente una emisora
preseleccionada.
Si se pulsa por más de 1 seg, la emisora sintonizada queda memorizada. Cuando la
modalidad PTY está seleccionada, la tecla PTY es repartida en el modo siguiente:
PTY grupo música —— PTY grupo hablado —— APAGADO
MÚSICA HABLADO
1.Música POP, Música ROCK 1.NOTICIEROS, NEGOCIOS, INFO
2.Música EASY, Música LIGERA 2.DEPORTES, EDUCACIÓN, DRAMA
3.CLÁSICA, OTRA Música 3.CULTURA, CIENCIAS, VARIOS
4.JAZZ, COUNTRY 4.PRONÓSTIC DEL TIEMPO, FINANCIAS, NIÑOS
5.NATION M, OLDIES 5.SOCIAL, RELIGIÓN, TELÉFONO
6.Música FOLK 6.VIAJES, DIVERSIONES, DOCUMENTALES
(B) MODALIDAD LECTOR CD / USB / SD MP3:
1. PAUSA 2. EXPLORACIÓN 3. REPETICIÓN 4. CASUAL
LA FUNCIÓN RDS. EL SISTEMA RDS
RDS (Radio Data System) es un sistema de informaciones digitales radio desarrollado
e introducido por EBU (European Broadcasting Union). Transmitido en el canal de
emisiones normales FM, el RDS ofrece una variedad de informaciones como el
nombre de las emisoras, el programa y le informaciones sobre el tráfico y funciones
útiles tipo la sintonización automática de las mejores señales disponibles en el
programa escogido.
5. Función ‘AF/REG’ (FRECUENCIAS ALTERNA TIV AS)
Si se pulsa ligeramente, se selecciona la modalidad AF/REG.
Cuando se selecciona la modalidad AF/REG, el radio controla continuamente el nivel
de la señal AF. Si se pulsa por más de 2 segundos, se activa la modalidad ENCENDIO/
APAGADO Regional.
– Modalidad Regional ENCENDIDO:
La conmutación AF o la Búsqueda PI SEEK está implementada a todas las emisoras
que tienen el mismo código PI que la emisora actual. En el display aparece REG.
– Modalidad Regional AP AGADO:
5
El código Regional en el formato PI es ignorado cuando la conmutación AF o la Búsqueda
PI SEEK está implementada.
6. Función ‘TA ’ (ANUNCIOS DE TRÁFICO)
Si se pulsa ligeramente, se selecciona la modalidad TA encendido o apagado.
Cuando se selecciona la modalidad TA y se transmite un anuncio en el tráfico:
– cuando el aparato está en modalidad CD/MP3, conmuta su modalidad radio
temporáneamente;
– si el nivel del volumen estaba debajo del umbral bien oíble, se alza al nivel bien oíble.
– Cuando se recibe emisora TP, en el display aparece TP.
7. Función ‘PTY’ (TIPO de PROGRAMA)
PTY MUSICA ----- PTY HABLADO ----- PTY APAGADO
Cuando se selecciona PTY, es implementado por las teclas de preselección como se
describe en las teclas de preselección. Cuando se selecciona PTY, el radio comienza a
buscar la información PTY correspondiente, y se detiene si se encuentra la información
PTY correspondiente.
8. TECLA ABERTURA PANEL FRONT AL
9. TECLA MODE (MODE)
Pulsando esta tecla, puede seleccionarse:
Modalidad RADIO / CASETA / AUX-IN / USB / SD / CD/MP3 .
10. TECLA BANDA / LOUDNESS
Cada banda se conmuta pulsando consecutivamente esta tecla AM1AM2 FM1 FM2 FM3.
CONTROLES LOUDNESS
Pulsar el botón "BAND" más de 2 segundos. Se activa la modalidade LOUD ON.
Las tonalidades Bajos y Agudos serán renforzados.
11. SINTONIZACIÓN AUTOMÁTICA O MANUAL (FREQ ARRIBA>> O FREQ ABAJO <<)
(A) MODALIDAD RADIO
Si se pulsa ligeramente esta tecla hace de Búsqueda Manual.
Pulsando por más de 2 segundos, se activa la Búsqueda Automática.
(B) MODALIDAD LECTOR CD / USB / SD MP3
Si se pulsa ligeramente, esta tecla hace de SALTO DE PIEZAS ARRIBA >> o ABAJO <<.
Pulsando por más de 2 segundos, se activa la BÚSQUEDA ADELANTE o ATRÁS.
TECLA BÚSQUEDA DE MÚSICA (CD / USB / SD)
BÚSQUEDA ADELANTE y ATRÁS DE LAS PIEZAS (o cambio de grupos musicales
“álbumes”).
Pulse la tecla SKIP (<< o >>) durante la lectura para ir a la pieza deseada.
<<....REVERSE >>....FORWARD
Page 31

7 58
EspañolEspañol 5
Mantenga pulsada la tecla SKIP (<< o >>) durante la lectura para buscar en el CD a
velocidad elevada. Al encontrar la sección de música buscada, libere la tecla. Se regresa
a la reproducción normal.
Terminada la lectura del CD/MP3, la modalidad CD/MP3 conmuta automáticamente a radio.
12. SINTONIZACIÓN AUTOMÁTICA (AUTO SEEK SEARCH ) (AS)
Si se pulsa ligeramente, el radio sintoniza cada una de las emisoras preseleccionadas.
Cuando la señal es más fuerte que el umbral de sintonización, el radio se mantiene en
esa emisora por 5 segundos, poniendo en cero el volumen por un momento y partiendo
para la búsqueda de otra emisora.
Pulsando más de 1 segundo, las seis emisoras más fuertes serán memorizadas en
las corresondientes posiciones de las teclas de preselección.
Cuando se termina la operación de BÚSQUEDA AUTOMÁTICA (AS), el radio pasa a la
búsqueda de las emisoras memorizadas.
13. DISPLA Y LCD
El display de cristales líquidos muestra el estado actual de recepción y las operaciones.
14. BOTON DE LIBERACION PANEL
CONTROLES DEL LECTOR CD / USB / SD
15. COMPARTIMIENTO CD
16. TECLA DE EXPULSIÓN CD
Pulse la tecla de expulsión para extraer el CD.
17. TECLA DE PAUSA (CD / USB / SD)
Durante la lectura, pulse la tecla PAUSA (17) ‘PAUSE’ para detener momentáneamente la
lectura. Pulse nuevamente para regresar a la lectura normal.
18. TECLA INTRO (búsqueda de todas las piezas) (CD SCAN) CD / USB / SD
Al pulsar esta tecla, aparece la indicación ‘SCN’ en el display y se reproducen los primeros
10 segundos de cada pieza.
19. TECLA REPEAT ‘REPEAT’ CD / USB / SD
Cuando questo tecla viene pulsado, appar la indicación ‘RPT’ y la lectura del brano actual
viene ripetuto finché la modalidad de repetición no viene cancellata, pulsando la tecla
‘RPT’ de nuevo.
20. TECLA RANDOM ‘SHUFFLE’ (CASUAL) CD / USB / SD
Cuando se pulsa esta tecla, aparece la indicación ‘AHF’ y cada pieza del disco es leída en
orden casual en vez que en la secuencia normal. Para suprimir la modalidad Casual, pulse
nuevamente la tecla ‘SHUFFLE’ (20).
22. SENSOR TELEMANDO
23. PANEL FRONTAL
24.TECLA MUTE
Pulsar la tecla MUTE para bajar el volumen. Apriete de nuevo para regresar el volumen
al nivel precedente.
25. RESET
El botón Reset (25) se halla en la faz interna.
Se debe accionar este botón por uno de las siguientes razones:
• Instalación inicial del aparato, una vez conectados todos los cables.
• Ausencia de funcionamiento de todos los botones.
• Símbolo de error en el display.
26. ENTRADA AUDIO AUX IN
Conectar el vuestro lector portátil a la entrada AUX IN, encualquiera modalidades de
funcionamiento, para amplificar el sonido por los altavocesdel coche.
Cómo efectuar la búsqueda de las piezas MP3
A. Búsqueda directa de la pieza (canción)
Pulsar AS/PS (12) una vez , la pantalla visualizará “MP3 *”: seleccionar la pista MP3 por
número como siguiente:
rodar el control Volumen (3) para desfilar a través de los números.
Entonces pulsar VOLUME/ENTER (3) para confirmar.
B. Búsqueda por nombre de Álbum (Directory) o de Canción (Pista)
Pulsar AS/PS dos veces, la pantalla visualizará “*”. Entre la letra directamente. La unidad
investiga los archivos (canciones) y directorios (álbums) que tienen el mismo carácter
que es entrado. La unidad visualiza los archivos (canciones) y directorios (álbums)
rodando VOLUME (3). Si el nombre seleccionado es album, el usuario puede entrar en
el álbum pulsando VOLUME/ENTER y continúa investigando o nombre del álbum o de la
canción rodando VOLUME (3). La reproducción de la pieza inicia pulsando la tecla
VOLUME/ENTER.
La distribución de carácteres alfabéticos se lista como sigue:
rodar el control Volumen (3) en las dos direcciones para desfilar a través de los
carácteres alfanuméricos. Entonces pulsar VOLUME/ENTER (3) para confirmar.
21. PORTA USB
C. Búsqueda por Álbum (Directory)
Buscar el álbum con las controles VOLUME (3).
Page 32

9 60
EspañolEspañol 5
En modalidad lectura MP3, pulsar la tecla AS/PS tres veces. Después aparace el nombre
del primero álbum. Rodar VOLUME (3) para navegar en la lista de álbums. Pulsar
VOLUME/ENTER para seleccionar el álbum deseado. La pantalla visualizará “ \\ “. Para
seleccionar las canciones bajo el directorio seleccionado, rodar VOLUME (3) entonces
pulsar VOLUME/ENTER para confirmar cuando se encuentra la canción deseada.
Rodar el control Volumen (3) en las dos direcciones para desfilar a través de los
carácteres alfanuméricos. Entonces pulsar VOLUME/ENTER (3) para confirmar.
ID3 T ag (Etiqueta)
Pulsar CLK repetidamente (Mando a DIstancia) para visualizar la información ID3 TAG.
Si el archivo MP3 está disponible con ID3 TAG, pulsando la tecla CLK repetidamente se
mostrará la información en la sucesión siguiente:
TÍTULO CANCIÓN > ARTISTA> TÍTULO ALBUM > AÑO> COMENTOS
Si cualquiera de la información ID3-TAG no está disponible, pulsando la tecla DISPLAY
repetidamente se mostrará la información en la sucesión siguiente:
UNKNOWN SONGNAME> UNKNOWN ARTIST> NO ALBUM TITLE > UNKNOWN
YEAR > NO COMMENTS
Si el archivo MP3 está sin ID3 TAG, pulsando la tecla DISPLAY, aparecerá “NO ID3 TAG”.
El nombre del archivo y el número de la canción desfilará repetidamente a través de la
pantalla durante el jugar del archivo MP3.
25. RESET
El botón Reset (25) se halla en la faz interna.
Se debe accionar este botón por uno de las siguientes razones:
• Instalación inicial del aparato, una vez conectados todos los cables.
• Ausencia de funcionamiento de todos los botones.
• Símbolo de error en el display.
26. ENTRADA AUDIO AUX IN
Conectar el vuestro lector portátil a la entrada AUX IN, en cualquiera modalidades de
funcionamiento, para amplificar el sonido por los altavoces del coche.
27. BOTÓN DE EXPULSIÓN
En el modo TAPE (cinta), pulse este botón hasta la mitad para avanzar rápidamente, y
hasta el fondo para detener la reproducción de la cinta y expulsar la cinta. El reproductor
de cintas para el automóvil pasará automáticamente al modo de RADIO.
29. USO DE LA FUNCION A VANCE / RETROCESO RAPIDO DE LA CINTA
Para el avance rápido de la cinta presione la tecla (). Cuando la cinta esta al final la
reproducción se inicia automaticamente del lado opuesto (Autoreverse).
Para el retroceso rápido de la cinta presione la tecla (). Cuando la cinta esta totalmente
rebobinada la reproduccián se inicia automaticamente en el mismo lado (Autoreplay). Para
bloquear la función de avance y retroceso rápido, presione la tecla opueata á la dirección
de la cinta.
ESPECIFICACIONES
LECTOR CD / USB / SD - MP3
Señal / Disturbio > 70dB
Separación canal > 50 dB (1KHz)
Respuesta de frecuencia 20Hz - 20 KHz
SINTONIZADOR FM
Sensibilidad 2 dBμ
Separación Stereo 35 dB
Señal / Disturbio 55 dB
Gama de frecuencia 87.5-108 MHz
Channel step 50 kHz
Frecuencia intermedia 10.7MHz
LINE OUT
Salida 350mV (MAX)
Impedancia 10kOhm
GENERAL
Voltaje alimentación 13.8V DC (10.8-15.6V), Negativo massa
Impedancia altavoces 4 o 8 Ohmios
Potencia máxima de salida Max. 40W x 4 canales
Nota: Especificaciones y diseño sujetos a posibles modificaciones sin previo aviso para su
mejora.
28. TAP A DEL CASETE
En modo de RADIO, introduzca una cinta de casete en este compartimiento y la
reproducción comenzará automáticamente.
Page 33

Português
61 62
Português
CAUTION
RISK OF ELECTRIC
SHOCK
DO NOT OPEN
ATENÇÃO
O ponto de exclamação dentro de um triângulo avisa o utilizador que no
manual de instruções há importantes informações de uso e de
manutenção.
O símbolo com o raio dentro de um triângulo avisa o utilizador que há
tensão perigosa no interior do aparelho.
Para reduzir o risco de choque eléctrico, não abra o aparelho. O aparelho
não contém peças que podem ser reparadas pelo utilizador. Em caso de
avarias, para a reparação, contacte um técnico qualificado.
Radiações laser invisíveis podem sair se a aparelhagem for aberta ou se
estragar-se o dispositivo de segurança. Evite exposição directa aos raios
laser. A utilização de comandos, regulações ou procedimentos não
especificados neste manual pode causar perigosas exposições a
radiações laser.
Não exponha o aparelho à chuva nem à humidade.
Coloque o aparelho num local suficientemente ventilado.
Não exponha o aparelho directamente à luz do sol nem a fontes de calor.
CD-900USMP
Toca CD/CD-R/CD-R W USB/SD MP3 para automóvel com rádio PLL FM - Estéreo
Sintonia Radio Data System, Cinta y Painel Frontal Extraível
MANUAL DE INSTRUÇÕES
Recomendamos a leitura com atenção deste manual para poder acostumar-se com o
vosso novo Rádio Toca CD, antes de utilizá-lo pela primeira vez. Também
recomendamos guardar este manual para futuras consultas.
ÍNDICE
• Localização dos comandos
• Características
• Instalação
• Precauções e Manutenção
• Ligações
• Instruções
• Função CD
• Especificações Técnicas
LOCALIZAÇÃO DOS COMANDOS
Eliminaçao Correcta Deste Produto -
(Resíduo de Equipamentas Eléctricos e Electrónicos)
Esta marca, apresentada no produto ou na sua literatura indica que
ele não deverá ser eliminado juntamente com os residuos domésticos
indiferenciados no final do seu periodo de vida útil. Para impedir
danos ao ambiente e á saúde humana causados pela eliminação
incontrolada de resíduos deverá separar este equipamento de outros
tipos de residuos e reciclá-lo de forma responsável, para promover
uma reutilização sustentável dos recursos materiais.
Os utilizadores domesticos deverão contactar ou o estabelecimento
onde adquiriram este produto ou as entidades oficiais locais para
obterem informaçães sobre onde e de que forma podem levar este
produto para permitir efectuar uma reciclagem segura em termos
ambientais.
Os utilizadores profissionais deverão contactar o seu fornecedor e
consultar os termos e condições do contrato de compra. Este produto
não devera ser misturado com outros residuos comerciais para
eliminação.
1. Botão POWER ligar/desligar
2. Varrimento (scanner) das Emissoras (SCN)
3. Controlo VOLUME +/- (+regulação Graves, Agudos, Equilíbrio, Fader)
4. Botões selecções prévias do Rádio (1,2,3,4,5,6)
5. Botão AF
6. Botão TA
7. Botão PTY
8. Botão Visor (DISP)
9. Botão Modo CD (MODE)
10. Botão ONDA (BND) / LOUD
11. Botões Sintonia RÁDIO/Salto/Procura CD para frente/para trás
12. Botão AMS (AutoMemoryStore/Preset Scan)
13. Visor LCD
14. Botão soltar painel frontal
Page 34

Português
63 64
Português
15. Abertura para CD Tecla Faixa
16. Botão expulsão CD
17. Botão Pausa CD / USB / SD
18. Botão INTRO (CD SCAN) CD / USB / SD
19. Botão Repetição (REPEAT) CD / USB / SD
20. Botão Random (SHUFFLE) CD / USB / SD
21. Porta USB
22. Sensor mando
23.Botão DSP
24.Botão MUTE
25. Botão RESET
26. AUDIO Aux-IN
27. BOTÃO DE EJECÇÃO CINTA
28. Porta CINTA
29. A V ANÇO E RETROCESSO CINT A
CARACTERÍSTICAS
Este auto-rádio de frontal extraível, AM/FM/FM Estéreo com toca CD/MP3 , possui as
seguintes características:
• Memorização automática AS das melhores estações em ordem de potência do sinal.
• Comando electrónico de Volume, Agudos, Graves, Equilíbrio, Fader.
• Sintonia electrónica de precisão com circuito PLL.
• 30 estações memorizáveis (6 para cada faixa AM1 / AM2 / FM1/ FM2 / FM3)
• Função Loudness
• Comando Sintonia Manual P ARA FRENTE/ATRÁS
• Comando Sintonia Automática PARA FRENTE/ATRÁS
• Selector Onda (BAND) para AM1 / AM2 / FM1/ FM2 / FM3
• Comando Visor (Frequência, Nome da estação, Tipo de programa, Relógio)
• Função Relógio em RDS
• Repetição de faixa de CD / USB / SD
• Função leitor CD / USB / SD e MP3 su CD/CD-R/CD-RW
• Saída preamplificada
• Painel frontal extraível como recurso contra furto.
• Iluminação nocturna
• Funções RDS: PI (Identificação Programa)
T A (Aviso Trânsito)
PS (Serviço Nome Programa)
AF (Lista Frequências Alternativas)
TP (Programa de trânsito)
INST ALAÇÃO
CUIDADOS
• Evite instalar o aparelho num local exposto a altas temperaturas, a luz directa do sol
ou a ar quente do aquecimento, nem exposto a poeira, sujidade ou vibrações
excessivas.
• Utilize somente os acessórios para instalação fornecidos, para efectuar uma
instalação segura.
• Certifique-se que o painel frontal foi removido antes da instalação do aparelho.
Regulação do ângulo de montagem
O ângulo de montagem pode ser inferior a 20°.
EXEMPLO DE INSTALAÇÃO
Instalação do aparelho no painel do automóvel
Page 35

Português
65 66
Português
Como retirar e colocar o painel frontal
O destaque do painel frontal pode evitar roubos.
COMO RETIRAR O PAINEL FRONTAL
Antes de soltar o painel frontal, certifique-se foi apertado o botão PWR (desligado), aperte
em seguida o botão OPEN (14) para soltar o painel e puxe-o para fora da maneira ilustrada
na figura. Nota: Não deixar cair o painel, na hora do destaque.
ATAQUE DO PAINEL FRONTAL
Encaixe a parte direita do painel no aparelho principal, faça coincidir a parte B do painel com
a parte A do aparelho, da maneira ilustrada na figura, até escutar um 'clique'.
Preste atenção para não exercer nenhuma pressão no visor nem nas teclas.
Observações:
• Certifique-se que o painel frontal esteja na posição certa quando o encaixar, de maneira
que não seja colocado ao contrário.
• Não prima com força o painel frontal no aparelho ao encaixar; é suficiente uma leve
pressão sobre o próprio aparelho.
• Depois de tirar o painel frontal, guarde-o sempre no seu estojo.
• Não prima com força nem exerça pressão excessiva no visor do painel quando for
encaixá-lo no aparelho.
CONECTOR ISO EMBUTIDO (BUILD-IN)
CONEXÃO A
1.
2.
3.
4. MEMÓRIA + 12V
5. AUTO ANTENA SAÍDA
6.
7. +12V (CHAVE DE IGNIÇÃO)
8. MASSA
Observação:
O fio +12V n.° 7 conexão A deve ser ligado sob a chave de ignição do automóvel, para evitar
que se descarregue quando o automóvel não for utilizado durante vários dias.
CONEXÃO B
1. ALTIFALANTE TRASEIRO DIREITO (+)
2. ALTIFALANTE TRASEIRO DIREITO (-)
3. ALTIFALANTE DIANTEIRO DIREITO (+)
4. ALTIFALANTE DIANTEIRO DIREITO (-)
5. ALTIFALANTE DIANTEIRO ESQUERDO (+)
6. ALTIFALANTE DIANTEIRO ESQUERDO(-)
7. ALTIFALANTE TRASEIRO ESQUERDO (+)
8. ALTIFALANTE TRASEIRO ESQUERDO (-)
MANUTENÇÃO
REPOSIÇÃO DOS FUSÍVEIS
Se o fusível queima, checar a conexão e fazer a troca. Se este novo queimar, é provável que
seja um problema interno.
Advertência
Usar a amperagem específica para cada fio. O uso de uma alta amperagem pode causar
danos.
INSTRUÇÕES
1. LIGAR / DESLIGAR
Coloque o Painel no aparelho e carregue na tecla POWER (1) para ligar o auto-rádio.
Para desligar o aparelho, carregue novamente na tecla POWER e, em seguida carregue em
REL (14) para tirar o painel.
Obs.: Nunca tire o painel quando o auto-rádio estiver ligado.
2.VARRIMENTO (scanner) DAS EMISSORAS (SCN)
Premir a tecla SCAN e o sistema de r/dio efectuar/ um varrimento de todas as
emissorasdispon™veis, parando durante 5 segundos em cada uma, a fim de que possa
seleccionar aemissora que mais lhe agrade. Premir suavemente para desligar o sistema
quando estiverna emissora eleita.
3. SELECÇÃO / VOLUME
O comando VOLUME regula a saída de som.
O comando VOLUME pode tamém selecionar uma opción RDS.
Para seleccionar as outras funções carregue levemente na tecla VOLUME/SELECT (3) até
a função desejada aparecer no visor.
Page 36

Português
67 68
Português
A figura 1 mostra como são seleccionadas as funções.
Fig. 1 Selecção das funções áudio
1. VOLUME (girar)
2. SELECÇÃO (premir)
3. GRAVES
4. AGUDOS
5. EQUILÍBRIO
6. FADER
7. EQUILIZADOR
4. ESTAÇÕES PRESET (1,2,3,4,5,6)
(A) RADIO MODE:
Estas teclas seleccionam directamente a estação memorizada quando pressionadas
rapidamente. Quando pressionadas durante mais de 1 segundo, a estação actual será
memorizada no botão pressionado. Quando é seleccionado o modo PTY, o Botão
funcionará na seguinte sequência:
PTY music group ----- PTY speech group ----- OFF
MUSICA DISCURSO
1.POP M, ROCK M 1.NOTICIAS, AFFAIRS, INFORMAÇÃO
2.EASY M, LIGHT M 2.DESPORTO, EDUCAÇÃO, DRAMA
3.CLÁSSICO, OUTROS M 3.CULTURA, CIÊNCIA, VARIED
4.JAZZ, COUNTRY 4.METEOROLOGIA, FINANÇAS, CRIANÇAS
5.NATION M, OLDIES 5.SOCIAL, RELIGIÃO, PHONE IN
6.FOLK M 6.VIAJAR, TEMPOS LIVRES, DOCUMENTAÇÃO
(B) LEITOR DE CD/MP3:
1. PAUSE 2. SCAN 3. REPEAT 4. SHUFFLE
RDS
O RDS (Radio Data System) é um sistema de informação digital desenvolvido pela EBU
(European Broadcast Union).
Quando o modo de troca AF/REG é seleccionado, o radio verifica constantemente a
frequência do sinal AF. Se premir durante mais tempo, será activado como modo regional
ON/OFF.
– Modo Regional ON
AF ou PI SEEK é implementado na estação que tenha todos os códigos PI assim como as
presentes estações. O segmento REG é sintonizado, no display LCD .
– Modo Regional OFF
O código regional no formato PI é ignorado quando ligar AF ou implementar o PI SEEK.
6. Função ‘TA’ (ANUNCIO SOBRE O TRÂNSITO)
Quando premir rapidamente, liga ou desliga o modo TA
Quando o modo TA encontra-se ligado e estiver a ser transmitido anúncios de trânsito
– Quando a unidade está em CD/MP3 mudará temporariamente para radio.
– Caso o volume se encontra esteja baixo, será elevado ao volume standard do anuncio.
– Quando recebe uma estação TP, o segmento TP é sintonizado.
7. Função ‘PTY’ (TIPO DE PROGRAMA)
PTY MUSIC ----- PTY SPEECH ----- PTY OFF
Enquanto selecciona o tipo PTY, poderá implementar a selecção premindo os botões de
acordo com o indicado no botão preset. Quando o PTY é seleccionado, o radio começará
a procurar informação correspondente ao PTY, e terminará quando encontrar a informação
correspondente.
8. Botão Abertura painel frontal
9. BOTÃO MODE (MODE)
Ao premir este botão, poderá seleccionar .
Modo RADIO/CASETE/AUX-IN/USB/SD/CD-MP3
.
10. TECLA ONDA (BAND) / LOUDNESS
Cada banda é ciclicamente alternada premindo os botões AM1 / AM2 / FM1/ FM2 / FM3.
CONTROLOS LOUDNESS
Premer o botão "BAND" por mais de 2 segundos. Activa-se a função LOUD ON.
Aumentará a resposta dos graves e dos agudos
11. SINTONIZAÇÃO AUTOMÁTICA OU MANUAL (FREQ ACIMA >> OU FREQ ABAIXO <<)
(A) MODO RADIO
Se premir rapidamente estes botões, estes funcionarão para entrar no modo para busca
manual.
Se premir durante mais de 1 segundo, eles funcionam para busca automática.
5. A função ‘AF/REG’ (FREQUÊNCIAS ALTERNATIVAS)
Se premir rapidamente, o modo de troca AF/REG será seleccionado.
(B) LEITOR DE CD/MP3
Se premir rapidamente funcionará como modo de FAIXA ACIMA >> ou FAIXA ABAIXO <<.
Page 37

Português
7069
Português
Se premir durante mais de 1 segundo, funcionarão para sinal de entrada ou para rever.
BOTÃO DE BUSCA DE FAIXAS CD / USB / SD
BUSCA DE FAIXA PARA TRÁS E PARA A FRENTE (ou mudar de canção)
Prima o botão SKIP (<< ou >>) durante a reprodução (play) para ir para a faixa desejada.
<<....REVERSE >>....FORWARD
Prima e mantenha o botão SKIP (<< ou >>) durante a reprodução (play) para percorrer o
disco a alta velocidade. Após ter encontrado a faixa desejada, deixe de premir o botão.
Regressará à reprodução normal. Quando a reprodução em CD/MP3 terminar, o modo
CD/MP3 mudará automaticamente para radio.
12. BUSCA AUTO DE SINTONIZAÇÃO (AS)
Se premir rapidamente, o radio fará a busca de cada estação .
Quando o nível de força é superior ao mínimo, o radio manter-se-á nesse número
predefinido durante 5 segundos, procurando novamente
Premindo por mais de 1 segundo, as 6 estações mais serão memorizadas nos números
correspondentes .
Quando a operação AS tiver terminado, o radio executa a sintonização estabelecida.
LOCALIZAÇÃO DOS CONTROLES CD
15. INGRESO CD
16. BOTÃO CD EJECT
Prima o botão EJECT para retirar o CD.
17. BOTÃO PAUSE CD / USB / SD
Durante reprodução “PLAY”, prima o botão (17) ‘PAUSE’. Prima novamente pare
retomar a reprodução.
18. BOTÃO INTRO (Rever todas as pistas) (CD SCAN) CD / USB / SD
Se premir este botão aparecerá a indicação, ‘SCN’ e ouvirá os primeiros 10 segundos
de cada faixa do disco.
19. BOTÃO REPETIR ‘REPEAT’ CD / USB / SD
Ao premir este botão, aparecerá a indicação ‘RPT’ e a faixa seleccionada será repetida
até cancelar ao premir premindo novamente o botão ‘RPT’.
20. BOTÃO RANDOM ‘SHUFFLE’
Se premir este botão aparecerá a indicação ‘SHF’ e o rádio tocará cada faixa de forma
aleatória. Para cancelar esta função prima novamente o botão ‘SHUFFLE’ (20).
21. PORTA USB
22. SENSOR MANDO
23. PAINEL FRONTAL
24. BOTÃO MUTE
Premer o botão Mute para desligar imediatamente o volume sonoro. Prima novamente
Mute para voltar ao nível de volume anterior.
25. BOTÃO RESET
Prima o botão RESET (25) na unidade principal con um bolígrafo quando:
• Se instala a unidade a primeira vez.
• Todas as botões no funcionen perfectamente.
• O símbolo de ERROR aparece no visor.
26. ENTRADA AUDIO AUX IN:
Insira seu leitor portátil na tomada AUX, em qualquer modo de leitura atual, de forma
que o som pode passar pelos altifalantes do carro.
COMO SELECCIONAR FICHEIROS MP3
A. Búsqueda directa da faixa (canção)
Premir AS/PS (12) uma vez , o visor visualizará “MP3 *”: selecionar a faixa MP3 por
número, no modo seguente:
girar o controlo Volume (3) para desfilar a través dos números.
Depois premir VOLUME/ENTER (3) para confirmar.
B. Búsqueda por nome do Ãlbum (Directory) ou de Canção (Faixa)
Premir AS/PS duas vezes, o visor visualizará “*”. Entre a letra directamente. O aparelho
investiga os archivos (canções) e directorios (albums) que tienen o misma letra entrada.
O aparelho visualiza os archivos (canções) e directorios (albums) rotar VOLUME (3). Se
o nome selecionado es álbum, se puede entrar no album premendo VOLUME/ENTER
e continúa investigando o nome do álbum o de la canción rodando VOLUME (3). A
reprodução da faixa inicia premendo no botão VOLUME/ENTER.
A distribução das letras alfabéticas se lista como sigue:
rotar o controlo Volume (3) nas duas direcções para desfilar a través dos carácteres
alfanuméricos. Depois premir VOLUME/ENTER (3) para confirmar.
Page 38

Português
7271
Português
C. Búsqueda por Álbum (Directory)
Escolher o álbum com os botões VOLUME (3).
Na modalidade leitura MP3, premir o botão AS/PS tres vezes. Depois aparace o nome
do primeiro álbum. Rodar VOLUME (3) para navegar na lista de álbums. Premir VOLUME/
ENTER para selecionar o álbum desejado. O visor visualizará “ \\ “. Para selecionar as
canções baixo o álbum selecionado, rodar VOLUME (3) entonces pulsar VOLUME/
ENTER para confirmar quando se encontra a canção desejada. Rotar o controlo Volume
(3) nas duas direcções para desfilar a través dos carácteres alfanuméricos. Depois
premir VOLUME/ENTER (3) para confirmar.
ID3 Tag
Premir CLK (mando a distancia) repetidamente para visualizar a informação ID3 TAG.
Se o arquivo MP3 está disponible com ID3 TAG, premendo a tecla CLK repetidamente
se visualizará a informação na sucessão seguente:
TÍTULO CANÇÃO > ARTIST A > TÍTULO ALBUM > AÑO> COMENTOS
Se qualquer da informação ID3-TAG no está disponible, premendo a tecla CLK
repetidamente se visualizará a informação na sucessão seguente:
UNKNOWN SONGNAME> UNKNOWN ARTIST> NO ALBUM TITLE > UNKNOWN
YEAR > NO COMMENTS
Se o arquivo MP3 está sem ID3 TAG, premendo a tecla CLK, aparecerá “NO ID3 TAG”.
O nome do arquivo e o número da canção desfilará repetidamente a través do visor
durante a leitura do arquivo MP3.
27. BOTÃO DE EJECÇÃO
No modo TAPE, desloque este botão até meio para avançar rapidamente, e até ao fim
para interromper a reprodução e ejectar a cassete. O auto-rádio e leitor de cassetes
passa automaticamente ao modo de rádio.
28. PORTA DA CASSETE
No modo RÁDIO, introduza uma cassete nesta ranhura e a reprodução começa
automaticamente.
ESPECIFICAÇÕES
SECÇÃO LEITOR CD / USB / SD - MP3
Taxa S/N > 70dB
Separação Canal > 50 dB (1kHz)
Resposta de frequência 20Hz - 20 kHz
SECÇÃO FM
Sensibilidade empregada 2dBu
Separação Stereo >35 dB
Taxa S/N 55 dB
Faixa de frequência 87.5 – 108MHz
Channel step 50 kHz
Frequência I.F 10.7 MHz
LINHA DE SAÍDA
Saída 350mV max.
Impedência 10kOhm
GERAL
Tensão de Alimentação 13.8V DC (10.8-15.6V) Negativo a massa
Impedência alti-falantes 4 ou 8 ohm
Máxima Potência de Saída 40W x 4CH
AS CARACTERÍSTICAS E OS MODELOS ESTÃO SUJEITOS A MODIFICAÇÕES SEM
QUALQUER AVISO PRÉVIO
29. USANDO AVANÇO E RETROCESSO
Para uma velocidade avançada teclar
automaticamente, começando do lado oposto (Auto-reverse)
avançada de retrocesso teclar
camente, começando do início do mesmo lado (Auto-replay).
. Quando a fita terminar, a música começará
. Para uma velocidade
. Quando a fita terminar, a música começará automati-
É possível parar o avanço ou retrocesso veloz se for premida a tecla contrária à
activada no momento.¨
 Loading...