

Page 1
R
AUDIO VIDEO
AUTO-HIFI
Car Stereo CD-MP3 Player with PLL / RDS
This product meets the essential requirements laid down by EEC Directive 89/336
and has been built in accordance with European standards EN50013, EN50020.
Dieses Produkt entspricht den Mindestanforderungen laut EU-Richtlinie 89/336 und
wurde gemäß den Normen EN50013, EN50020.
Se produit répond aux critères minima prévus par la directive 89/336/CEE et il a été
construit conformément aux normes EN50013, EN50020.
Questo prodotto soddisfa i requisiti minimi previsti dalla direttiva 89/336/CEE ed é
stato costruito in conformitá alle norme EN50013, EN50020.
Este producto cumple con todos los requisitos dispuestos por la directiva 89/336/EEC
y ha sido fabricado conformemente con las normas EN50013, EN50020.
O produto satisfaz os requisitos minimos previstos pela directiva 89/336/CEE e foi
fabricado em conformidade com as normas EN50013, EN50020.
AM/FM Stereo Radio, USB-Port, 4 x 7 W RMS
and Bluetooth with A2DP.
CD-810BT
Instruction manual
Bedienungsanleitung
Manuel d’instructions
Manuale d’istruzioni
Manual de instrucciones
Manual de instruções
is a registered Trademark of Roadstar S.A. - Switzerland All rights reserved
R
AUDIO VIDEO
Page 2
INDEX
English Page 1
Deutsch Seite 15
Français Page 2 9
Italiano Pagina 44
Español Página 58
Portuguès Pagina 7 2
Fig.
Fig.
CD-810BT
• Your new unit was manufactured and assembled
under strict ROADSTAR quality control.
Thank-you for purchasing our product for your
music enjoyment.
Before operating the unit, please read this instruction manual carefully. Keep it also handy for
further future references.
• Ihr neues Gerät wurde unter Beachtung der
strengen ROADSTAR-Qualitätsvorschriften
gefertigt.
Wir danken Ihnen für den Kauf unseres Produktes
und wünschen Ihnen optimalen Hörgenuss. Bitte
lesen Sie diese Bedienungsanleitung durch, und
heben Sie sie auf, um jederzeit darin
nachschlagen zu können.
• Votre nouvel appareil a été fabriqué et monté en
étant soumis aux nombreaux tests ROADSTAR.
Nous espérons que cet appareil vous donnera
entière satisfaction.
Avant de vous adonner à ces activités, veuillez
lire attentivement ce manuel d’instructions.
Conservez-le à portée de main à fin de référence
ultérieure.
• Il vostro nuovo apparecchio è stato prodotto ed
assemblato sotto lo stretto controllo di qualità
ROADSTAR.
Vi ringraziamo di aver acquistato un nostro
prodotto per il vostro piacere d’ascolto.
Prima di procedere all'utilizzo dell'apparecchio,
leggete attentamente il manuale d’istruzioni e
tenetelo sempre a portata di mano per futuri
riferimenti.
• Vuestro nuevo sistema ha sido construido según
las normas estrictas de control de calidad
ROADSTAR.
Le felicitamos y le damos las gracias por su
elección de este aparado. Por favor leer el manual
antes de poner en funcionamiento el equipo y
guardar esta documentación en case de que se
necesite nuevamente.
• Seu novo aparelho foi construido e montado sob
o estrito controle de qualidade da ROADSTAR.
Agradecemos por ter comprado nosso produto
para a sua diversão.
Antes de usar esta unidade é necessário ler
com atençâo este manual de instruçâes pare
que possa ser usada apropriadamente;
mantenha o manual ao seu alcance para outras
informaçâes.
/9
24
23
Page 3
12
EnglishEnglish
W ARNINGS
The exclamation point within the triangle is a warning sign alerting the user of important instructions accompanying the
product.
The lightening flash with arrowhead symbol within the triangle
is a warning sign alerting the user of “dangerous voltage” inside
the unit.
To reduce the risk of electric shock, do not remove the cover. No
CAUTION
RISK OF ELECTRIC
user serviceable parts inside the unit. Refer all servicing to
SHOCK
DO NOT OPEN
qualified personnel.
Invisible laser radiation when the unit is opened or interlocks
defeated. Avoid exposure to laser beam. Use of controls,
adjustments or procedures other than those specified herein
may result in hazardous radiation exposure.
This unit must not be exposed to moisture or rain.
This unit should be positioned so that it is properly ventilated.
Do not expose this unit to direct sunlight or heat radiating
sources.
CD-810BT
Car Stereo CD -MP3 Player with PLL A M/ FM Stereo Radio
USB. Detachable Front Panel System and Bluetooth function.
INSTRUCTION MANUAL
Please read this instruction manual carefully and familiarize yourself with your new Radio
before using it for the first time. Please retain this manual for future reference.
TABLE OF CONTENTS
• Location of Controls
• Features
• Installation
• Precautions and Maintenance
• Operating Instructions
• Specifications
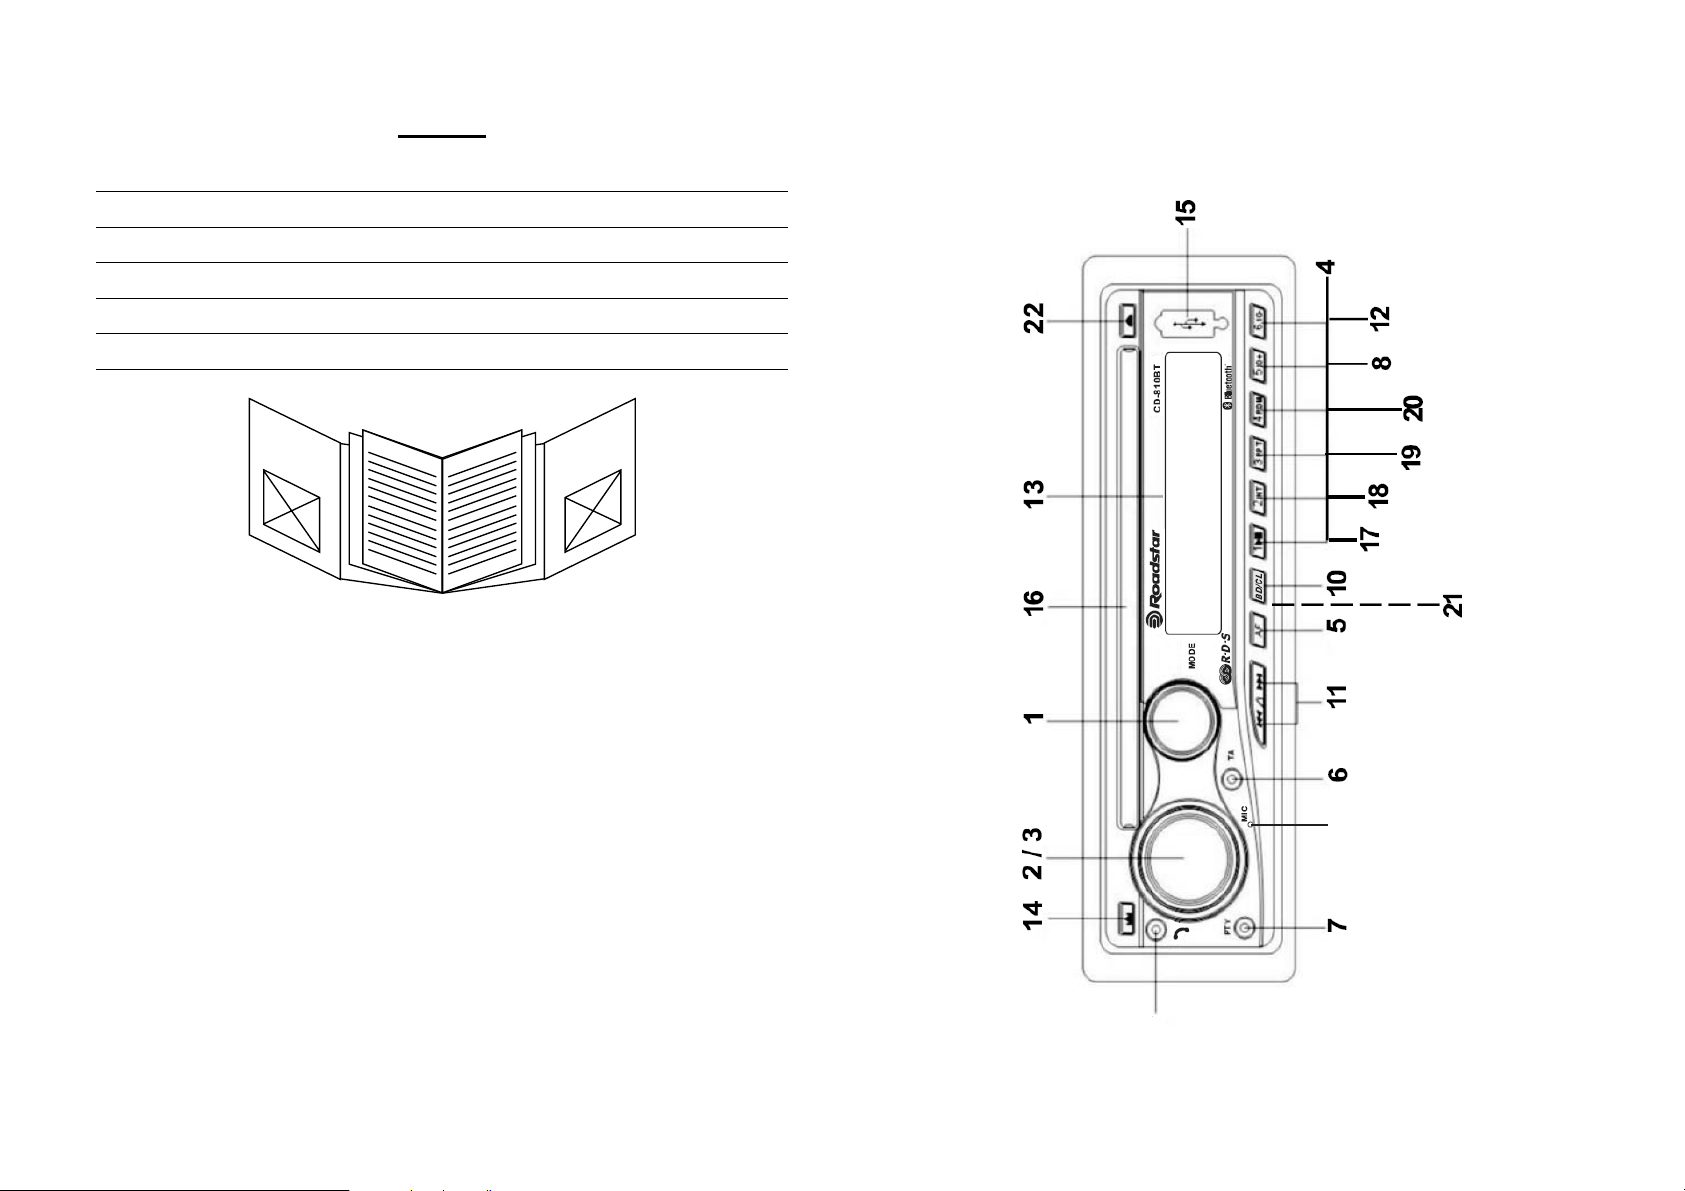
LOCATIONS OF CONTROLS
1. POWER ON/OFF / MODE Button
2. FUNCTION SELECT BUTTON: BASS/TREBLE/BALANCE/FADER / TA SEEK / PI /
LOUDNESS / AUDIO DSP/LOC-DX(/STEREO. “ENTER” IN MP3 MODE.
3. VOL UP/VOL DOWN FOR BASS/TREBLE/BALANCE/FADER
4. PRESET STATIONS (1,2,3,4,5,6)
5. 'AF' function (ALTERNATIVE FREQUENCIES)
6. 'TA' function (TRAFFIC ANNOUNCEMENT)
7. 'PTY' function (PROGRAM TYPE)
8. + 10 BUTTON (CD / MP3)
9. MODE BUTTON (MODE)
10. BAND BUTTON (FM1 / FM2 / FM3) + CLEAR for Bluetooth
11. AUTOMATIC OR MANUAL TUNING (FREQ UP >> OR FREQ DOWN << /
CD - USB (MP3) TRACK SKIP BUTTON
12. - 10 BUTTON (CD / MP3)
13. LCD DISPLAY
14. PANEL RELEASE BUTTON
15. USB PORT
16. CD SLOT-IN
17. PAUSE BUTTON
18. INTRO BUTTON (CD SCAN)
19. REPEAT BUTTON (REPEAT)
20. RANDOM BUTTON (SHUFFLE)
21. RESET BUTTON (on main unit)
22. CD EJECT BUTTON
23. TALK BUTTON
24. BLUETOOTH MICROPHONE
RDS with PTY and
Page 4
34
EnglishEnglish
FEATURES
The unit features a detachable front control panel, AM/FM stereo RDS, CD - USB:
• Electronic Volume, Bass, Treble, Fader and Balance control.
• Bluetooth Handfree with A2DP
• CD Player with antishock protection
• Precision electronic tuning with phase-lock loop (P.L.L.) circuitry.
• Programmable 30 preset memory tuning
• Loudness control
• Manual / Auto (Seek) / up and down tuning control
• Band selector for FM1/ FM2 / FM3 /MW1 / MW2
• Clock Function in RDS
• MP3 Repeat Function
• Preamplified Line-out
• Detachable front panel protects against theft
• Lighting system
• RDS Function: PI (Program Identification) TA (Traffic Announcement)
PS (Program Service Name) PTY (Program Type)
AF (List of Alternative Frequencies)
TP (Traffic Program)
INST ALLATION
PRECAUTIONS
• Choose the mounting location carefully so that the unit will not interfere with the normal
driving functions of the driver.
• Avoid installing the unit where it would be subject to high temperatures, such as from
direct sunlight or hot air from the heater, or where it would be subject to dust, dirt or
excessive vibration.
• Use only the supplied mounting hardware for a safe and secure installation.
• Be sure to remove the front panel before installing the unit.
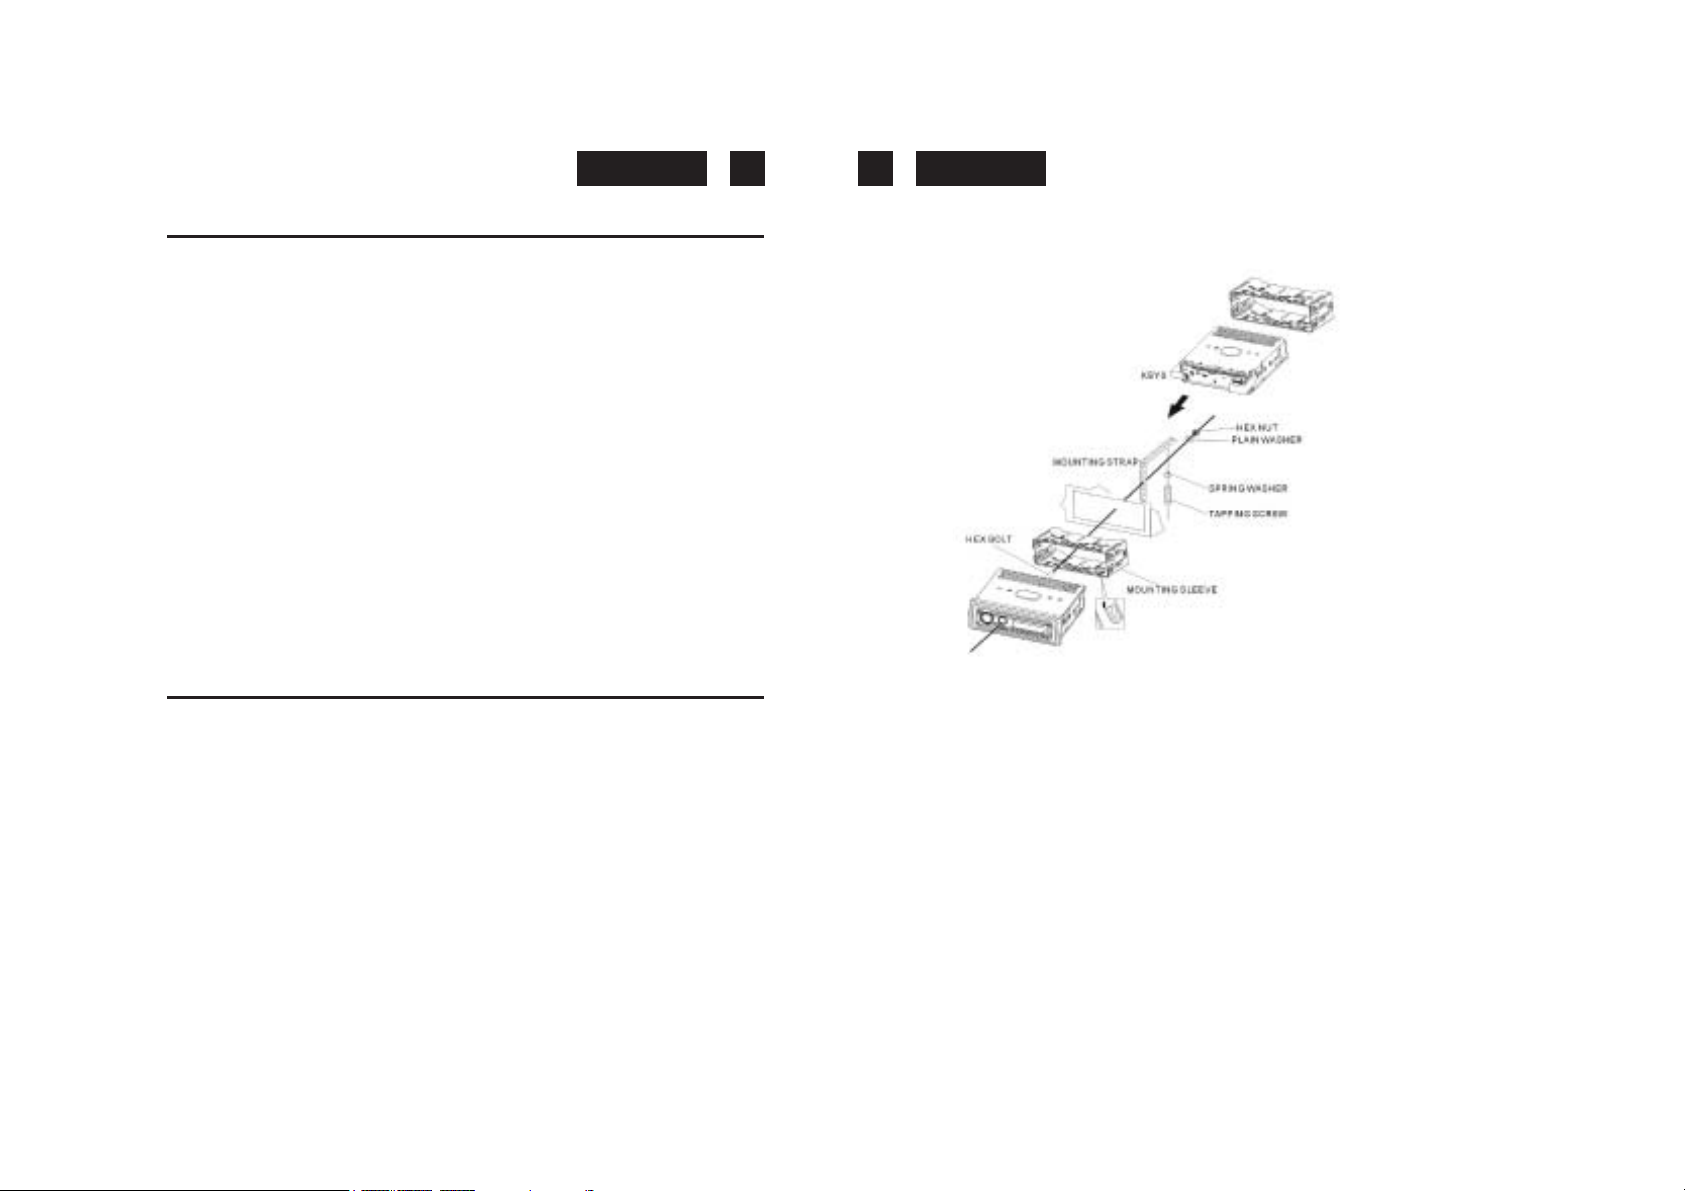
MOUNTING EXAMPLE
Installation in the dashboard
Note: Keep the release key in the safe place as you may need it in future to remove the unit
from the car.
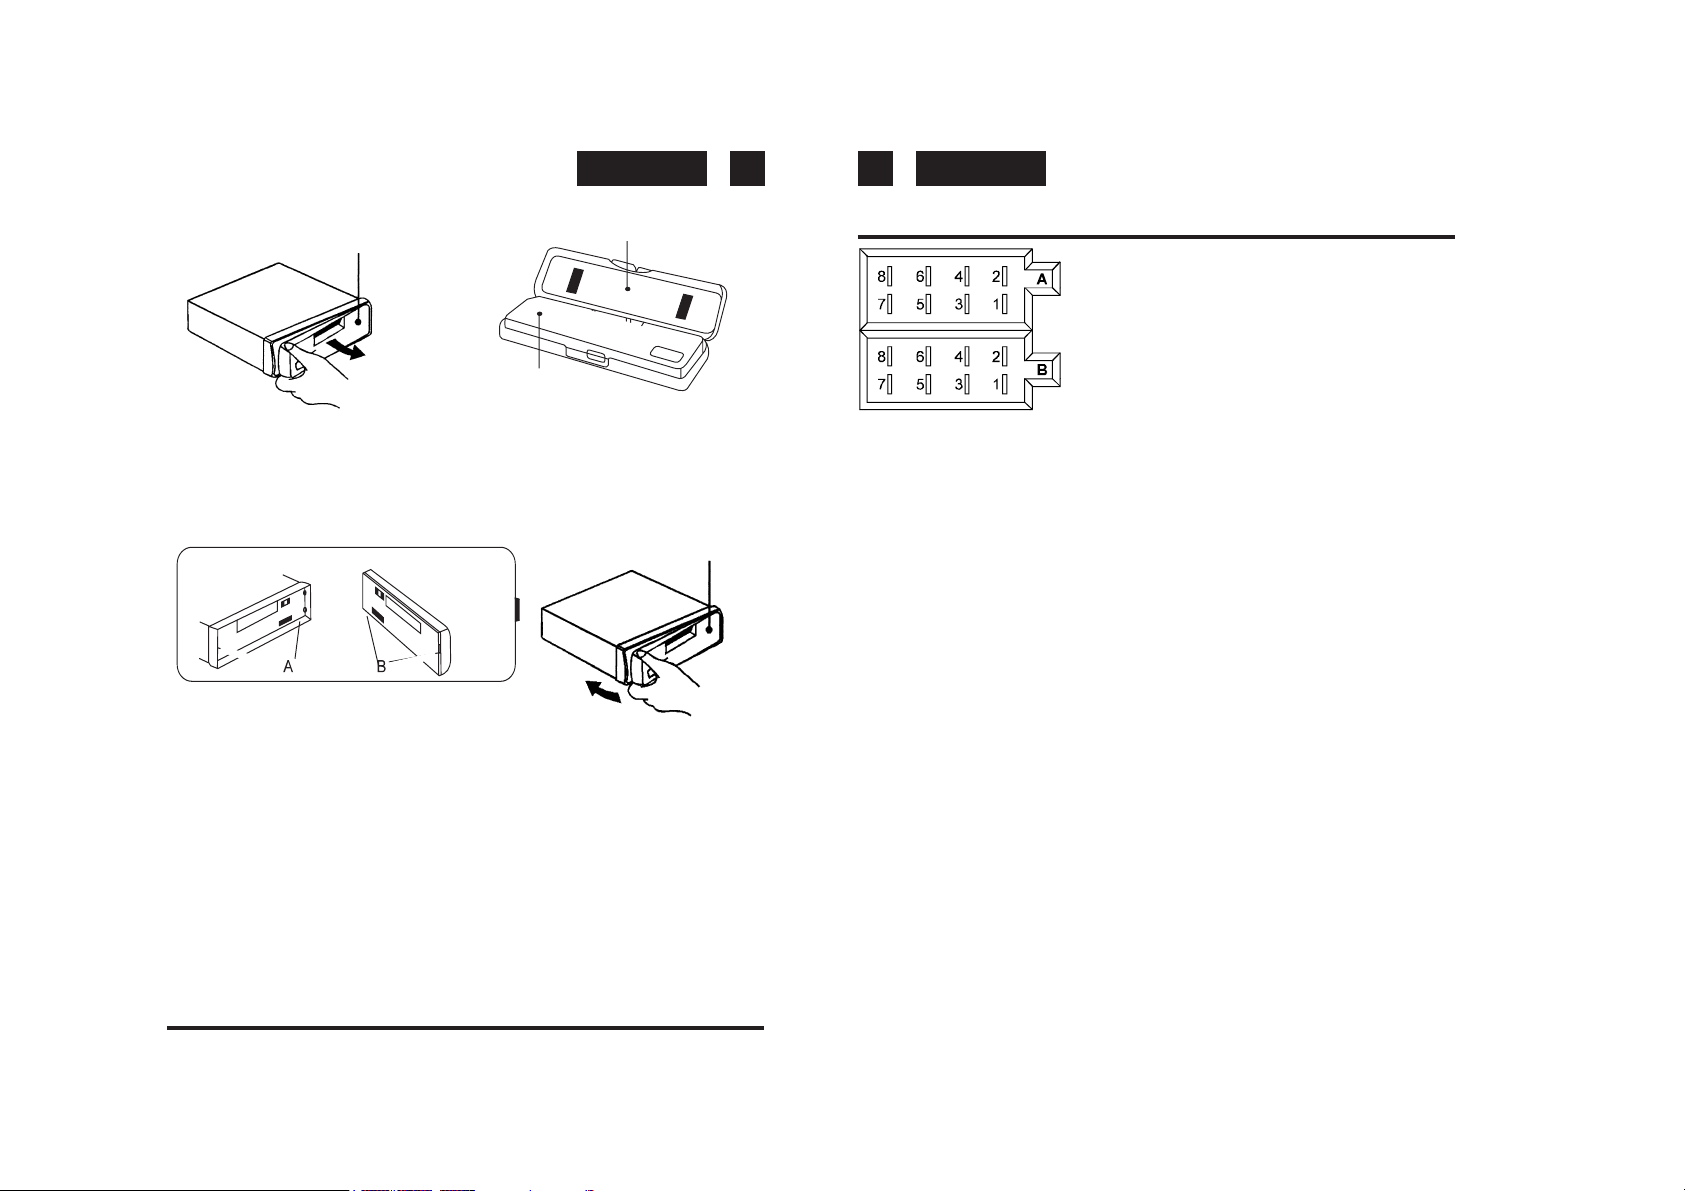
Detaching and attaching the front panel
The front panel of this unit can be detached in order to prevent the unit from being stolen.
DETACHING THE FRONT P ANEL
Before detaching the front panel (14), be sure to press the PWR button (1) To OFF first.
Pull out the panel towards you in order to detach completely the panel from the main unit.
Refer to below instruction.
Mounting angle adjustment
Adjust the mounting angle to less than 20
o
.
Page 5
5
6
EnglishEnglish
Front panel
Front panel
A TTACHING THE FRONT P ANEL
Make sure the front panel is the right way up when attaching it to the unit as it cannot be
attached upside down. Bring side B of panel to side A of main unit.
Insert the panel in and push until it clicks.
Panel is attached.
Main unit
Notes:
• Do not press the front panel hard against the unit when attaching it. It can be easily
attached by pressing it lightly against the unit.
• When you carry the front panel with you, put it in the supplied front panel case.
• Do not press hard or give excessive pressure to the display window of the front panel
when attaching it to the unit.
Rear of the front panel
Panel case
Front panel
BUILT - IN ISO CONNECTOR
RCA Jack Line Out (Rear) Gray : Red (right)
: White (left)
CONNECTOR A
1.
2.
3.
4. MEMORY +12V
5. AUTO ANTENNA OUTPUT
6.
7. +12V (TO IGNITION KEY)
8. GROUND
Note: 12 V wire (connector A no. 7) must be connected by car ignition key in order to avoid
that car battery becomes weak when the car will be not used for long period.
CONNECTOR B
1. REAR RIGHT SPEAKER (+)
2. REAR RIGHT SPEAKER (-)
3. FRONT RIGHT SPEAKER (+)
4. FRONT RIGHT SPEAKER (-)
5. FRONT LEFT SPEAKER (+)
6. FRONT LEFT SPEAKER (-)
7. REAR LEFT SPEAKER (+)
8. REAR LEFT SPEAKER (-)
Maintenance
FUSE REPLACEMENT
If the fuse blows, check the power connecton and replace the fuse. If the fuse blows again
after the replacement, there may be an internal malfunction. In this case, consult your
nearest repairing centre.
Page 6

78
EnglishEnglish
Warning
Use the specified amperage fuse for each lead. Use of a higher amperage fuse may
cause serious damage.
OPERATING INSTRUCTIONS
POWER ON/OFF (1) (PWR)
Insert the front panel in the unit and push Power button in order to switch on the unit. Push
PWR button newly in order to switch off the unit and push REL button (14) to release the
front panel.
Note: Never release the front panel when the unit is on. Power remains on even when car
radio is off.
SELECT (2) VOLUME UP/DOWN (3)
Rotate the VOLUME Knob (3) to control the VOLUME. To select other functions, press the
SELECT (2) button shortly until the desired functions is shown on the display. Figure 1
shows how control functions are selected using the SELECT button.
1. VOLUME (rotate knob)
2. SELECT (push down)
3. BASS
4. TREBLE
5. BALANCE
6. FADER
7. LOUDNESS ON / OFF
8. DSP (ROCK - POP - CLASS - SDP OFF)
9. DX / LOC
10. STEREO / MONO Fig. 1
3. VOLUME CONTROL
Rotate the VOLUME knob to increase or decrease the volume. This knob can be used to
adjust the BASS, TREBLE, BALANCE and FADER.
This knob also selects the possible options in RDS function.
TA SEEK/TA ALARM (2)
When press the SEL button for more than 2 seconds, it is activated as selecting mode
of these function. Turn the volume knob to select:
TA SEEK Mode or TA ALARM mode.
- TA SEEK mode:
When newly turned station does not receive TP information for 5 sec., the radio retunes
to next station which has not the same station (PI) as the last station, but has the TP
information.
In TA seek mode, the current station can be changed to the completely different station
because the unit searches TP station when the field strength of the current station is
very weak, or the current station has no TP signal.
- TA ALARM mode:
Any automatic retune mode is not activated, just can be heard Beep sound.
RETUNE L / RETUNE S
The initial time of automatic TA search or PI search mode is selected.
When PI information is not caught for retune time, the radio start to retune to next same
PI station. When same PI station does not catch 1 cyclic search, the radio goes to last
station and waits for 4-5 minute until PI code is received.
4. PRESET STATIONS (1,2,3,4,5,6)
(A) RADIO MODE:
When pressed short, these keys select a preset station directly. When pressed longer
than 1 sec., current station is stored in preset memory bank. When PTY mode is selected, the PTY switch is shared as follows:
PTY music group ---- PTY speech group ---- OFF
MUSIC SPEECH
1. POP M, ROCK M 1. NEWS, AFFAIRS, INFO
2. M.O.R. M, LIGHT M 2. SPORT, EDUCATE, DRAMA
3. CLASSICS, OTHER M 3. CULTURE, SCIENCE, VARIED
4. JAZZ, COUNTRY 4. WEATHER, FINANCE, CHILDREN
5. NATION M, OLDIES 5. SOCIAL, RELIGION, PHONE IN
6. FOLK 6. TRAVEL, HOBBIES, DOCUMENT
(B) CD/MP3 PLAYER MODE:
1. PAUSE 2. INTRO 3. REPEAT 4. RANDOM
USING THE RDS FUNCTION
What is RDS?
The RDS (Radio Data System) is a digital information system developed by the EBU (European Broadcast Union). Piggy-backed on normal FM broadcasts, RDS offers a variety of
Page 7

109
EnglishEnglish
information services and automatic retuning functions for RDS-compatible car stereos.
In 1988, RDS became available in the United Kingdom, France, West Germany, Ireland and
Sweden. Test transmissions are being conducted in many other european countries. It is
expected that RDS will be available in most western european countries in the near future.
5. 'AF/REG' function (ALTERNATIVE FREQUENCIES)
When pressed, AF/REG switchig mode is selected.
When AF/REG switching mode is selected, the radio checks the signal strength of the AF
all the time. When pressed long, it is activated as regional mode ON/OFF.
– Regional mode ON:
AF switching or PI SEEK is implemented to the station which have all PI codes same as
current station. REG segment is turned on, in LCD display.
– Regional mode OFF
The regional code in the format of PI code is ignored when AF switching or PI SEEK is
implemented.
6. 'TA' function (TRAFFIC ANNOUNCEMENT)
When pressed short, it is activated as TA mode on or off
When TA mode is on and traffic announcement is transmitted
– When the unit is it CD/MP3 mode, it will switch to radiomode temporarily.
– If the volume level was under the threshold point, it will be raised to the threshold point.
– When TP station is received, TP segment is turned on in LCD display.
7. 'PTY' function (PROGRAM TYPE)
PTY MUSIC ---- PTY SPEECH ---- PTY OFF
While selecting PTY type, its selection is impremented by preset buttons as described
in preset key. When PTY is selected, the radio starts to search corresponding PTY
information, and stops if the corresponding PTY information, is detected.
8. + 10 BUTTON (CD / USB MP3)
Press this button to skip 10 tracks each time up of CD / USB MP3
9. MODE BUTTON (MODE)
By pressing this key, user can select.
RADIO / USB /AUX-IN / PHONE / CD mode.
10.BAND BUTTON (BAND)
Each band is toggled cyclically by pressing this key FM1---FM2---FM3 -- MW1-- MW2.
In CD / USB (MP3) mode, when this key is pressed it is operated as the conversion of
each display mode as follow:
TITLE - SONG - ARTIST - DIRECTORY
11. AUTOMATIC OR MANUAL TUNING (FREQ UP >> OR FREQ DOWN <<)
(A) RADIO MODE
When pressed short, these keys are operated as MANUAL tuning mode.
When pressed longer than 1 sec., they are operated as SEEK tuning mode.
(B) USB-CD / MP3 PLAYER MODE
When pressed short, they are operated as TRACK UP or TRACK DOWN mode.
12. - 10 BUTTON (CD / USB MP3)
Press this button to skip 10 tracks each time back of CD / USB MP3
15. USB PORT
17.PAUSE BUTTON
During “PLAY”, press (17) ‘PAUSE’ button to “PAUSE”. Press it again to resume play.
18. INTRO BUTTON (MP3 SCAN)
When this button is pressed, ‘SCN’ indication is displayed and the first several seconds
of each track of the disc are played. Press again to stop intro and listen to track.
19. REPEAT BUTTON 'REPEA T'
When this button is pressed, ‘RPT’ indication is displayed and play of the selected track
will be continually repeated until the Track repeat mode is cancelled by pressing ‘RPT’
button again.
20.RANDOM BUTTON 'SHUFFLE'
When this button is pressed, ‘SHF’ indication is displayed and each track of the disc are
played in random instead of normal progression. To cancel RANDOM mode, press
‘SHF’ button (20) again.
21. RESET BUTTON
Reset button (25) is placed on the housing.
The reset button is to be activated for the following reason:
• Initial installation of the unit when all wiring is completed.
• All the function buttons do not operate properly.
• Error symbol on the display.
Page 8

1211
EnglishEnglish
ID3 Tag
Press BAND button repeatedly to Display ID3 TAG information.
If the MP3 file is available with ID3 TAG, pressing the display button repeatedly will show
information in the following sequence:
SONG TITLE > ARTIST> ALBUM TITLE > YEAR> COMMENTS
If any of the ID3-TAG information is not available, pressing the BAND button re
peatedly will show information in the following sequence:
UNKNOWN SONGNAME> UNKNOWN ARTIST> NO ALBUM TITLE > UNKNOWN
YEAR > NO COMMENTS
If the MP3 file is without ID3 TAG, pressing the BAND button, “NO ID3 TAG” will be
displayed.
The file name & track number of the MP3 file will scroll repeatedly through the display
during the playing of the MP3 file.
HOW TO SELECT MP3 FILES
A. Searching Track directly
Keep pressed the BAND Button (10) once, the displays shows “TRK SCH”: select the
MP3 track by rotate the Volume knob (3) to scroll through the numbers. Then press
ENTER (VOLUME) to confirm.
B. Searching by Directory or FIle name
Keep pressed the BAND twice, the displays shows “FILE SCH”. Enter the character
directly. The unit searches files and directories which have the same character which is
inputted by the user. The unit shows these sorted files and directories by VOLUME UP /
DOWN (1) Knob. If the selected name is directory, the user can go into the selected
directory by press MP3 ENTER BUTTON and continue to search the directory or file
name in the directory by VOLUME UP / DOWN knob. The selected file can be played by
pressing MP3 Enter Button.
Rotate the Volume knob (3) in both directions to scroll through the characters
(alphanumerical). Then press ENTER (VOLUME) to confirm.
* IMPORTANT INFORMATION:BECAUSE OF THE GREAT VARIETY OF PRODUCTS WITH
USB AND THEIR SOMETIMES QUITE MANUFACTURER-SPECIFIC FUNCTIONS WE
CAN NEITHER GUARANTEE THAT ALL DEVICES WILL BE RECOGNIZED NOR THAT
ALL OPERATING OP-TIONS THAT ARE POSSIBLE IN THEORY WILL ACTUALLY WORK
23. PHONE TALK BUTT ON
Press this button to answer of incoming calls.
24. MICROPONE (Bluetooth)
Integrated high sensitivity microphone to talk via Bluetooth.
C. Searching from Directory
SEARCH DIRECTORY BY USING VOLUME UP / DOWN KNOB.
Under MP3 play mode, keep pressed BAND three times. Then the first Directory name
is shown (DIR SCH). Move VOLUME UP/DOWN to navigate through the directory list,
press MP3 ENTER BUTTON to select the desired directory. Select the tracks under the
selected directory, press MP3 ENTER KNOB knob again to confirm when desired track
is found. Rotate the Volume knob (1) in both directions to scroll through the characters
(alphanumerical). Then press MP3 ENTER BUTTON (3) to confirm.
Page 9

13
14
EnglishEnglish
HOW TO USE BLUETOOTH IN YOUR CAR AUDIO
How to Perform Pairing:
Before you can dial out from the car stereo, you must first perform PAIRING. Pairing is a
procedure used to connect 2 Bluetooth devices together.
1. This unit’s Bluetooth function is always on, perform the pairing starting from your
cellular phone. Refer to your cellular manual on proper pairing.
2. Perform the search for available Bluetooth devices, “CAR--BT ” will show. Enter ‘0000’
when asking for code.
3. After successful pairing (BT-ON appear in the display), connect to the head unit if it is
not automatically connected.
How to make / receive calls using front panel
• Press the MODE button until “PHONE” is displayed then dial the phone number using
your phone to dial the desired number.
2. Press “ ” (23) to dial out.
• During conversation, press “BD/CL” button to end call.
• When there is incoming call, press “ ” (23) button to receive call.
• Press “BD/CL” button to reject incoming call.
Audio Streaming (A2DP)
1. If your phone is “A2DP” format compatible, you can play music in your mobile and the
music will be transferred to car audio unit.
2. Make sure your mobile and the car radio unit is paired and connected.
3. Play the music in your mobile according to your mobile operating method.
4. You can press
>> or << on head unit for previous or next tracks.
SPECIFICATIONS
CD/MP3 PLA YER SECTION
Signal to Noise Ratio > 70dB
Channel Separation > 50 dB (1kHz)
Frequency Response 20Hz - 20 kHz
TUNER
Sensitivity 2 dBμ
Stereo separation 35 dB
Signal to noise radio 55 dB
FM Frequency range 87.5-108 MHz
MW Frequency Range: 522 - 1620 KHz
Channel step FM: 50 kHz
Channel step MW: 9 kHz
Intermediate frequency 10.7 MHz
LINE-OUT
Output 350mV max.
Impedance 10kOhm
GENERAL
Power Supply 13.8V DC
(10.8-15.6V allowable)
Speaker impedance 4 or 8 ohm
Output power 7 W (RMS) x 4CH
Note: Specifications and the design are subject to possible modification without notice due
to improvement.
Correct Disposal of This Product (Waste Electrical & Electronic
Equipment)
This marking shown on the product or its literature, indicates that it should
not be disposed with other household wastes at the end of its working
life. To prevent possible harm to the environment or human health from
uncontrolled waste disposal, please separate this from other types of
wastes and recycle it responsibly to promote the sustainable reuse of
material resources.
Household users should contact either the retailer where they purchased
this product, or their local government office, for details of where and how
they can take this item for environmentally safe recycling. Business users
should contact their supplier and check the terms and conditions of the
purchase contract. This product should not be mixed with other
commercial wastes for disposal.
Page 10

15 16
DeutschDeutsch
SICHERHEITSHINWEISE
Das Ausrufszeichen im Dreieck weist den Benutzer auf wichtige
Bedienungs- und Wartungsanweisungen (Service) in diesem Handbuch
hin, die unbedingt zu befolgen sind.
Das Blitzsymbol im Dreieck weist den Benutzer auf “gefährliche
Spannungen” an einigen freiliegenden Bauteilen im Innem des Gerätes
hin.
CAUTION
RISK OF ELECTRIC
DO NOT OPEN
Um die Gefahr elektrischer Schläge auszuschliessen, Gehäuse auf keinen
Fall abnehmen. Im Innem befinden sich keine vom Benutzer selbst
SHOCK
instandsetz-baren Teile. Reparaturen dürfen nur von einer autorisierten
Fachwerkstatt durchgeführt werden.
Dunkelstrahlung bei geöffneten Geräten und defektem Verschluss.
Bedienung oder Regulierung der technischen Eigenschaften oder
sonstige nicht spezifierte Prozeduren auf dieser manuellen Betriebsart
können zur Ausetzung gefährlicher Laserstrahlen führen.
Setzen Sie das Gerät weder Feuchtigkeit noch Regen aus.
Stellen Sie das Gerät so auf, dass immer eine ungestörte Frischluftzufuhr
sichergestellt ist.
Setzen Sie das Gerät weder direkter Sonneneinstrahlung noch
Wärmequellen aus.
CD-810BT
Auto-MP3-Spieler mit PLL MW/UKW/Stereo-Radio Radio-Daten-System, CDUSB, PTY, abnehmbares Bedienteil und Bluetooth mit A2DP.
BEDIENUNGSANLEITUNG
Bitte lesen Sie aufmerksam diese Bedienungsanleitung, um sich mit Ihrem neuen Autoradio
vertraut zu machen, bevor Sie es zum ersten Mal in Betrieb nehmen. Bitte bewahren Sie diese
Anleitung auf, um später jederzeit nachschlagen zu können.
INHALTSVERZEICHNIS
• Lage der Bedienungselemente
• Merkmale
• Installation
• Vorsichtsmaßnahmen und Wartung
• Anschlüsse
• Funktionsanleitungen
• Technische Daten
LAGE DER BEDIENUNGSELEMENTE
1. Netztaste EIN/AUS
2. WAHL-FUNKTION LOUDNESS / DSP / DX-LO / ST. - MONO / TA / PI / RETUNE / BEEP
3. Lautstärkeregelung AB /AUF (+,- Bässe/Höhen/Balance/Fader)
4. Vorwahl-Tasten (1,2,3,4,5,6)
5. AF-Taste
6. TA-Taste
7. PTY-Taste
8. + 10 WAHLTASTEN
9. Modus-Taste (MODE)
10. Band-Taste/ LOUD und “CLEAR” für Bluetooth
11. Auto/Manuell-Suchlauf AB (<<)/ Suchlauf AUF (>>) MP3-SKIP
12. - 10 WAHLTASTEN
13. LCD-Anzeige
14. Bedienteil-Entriegelungstaste
15. USB PORT
16. CD-Schublade
17. MP3-Pause-Taste
18. MP3-Intro-Taste
Page 11

17 18
DeutschDeutsch
19. MP3-Wiederhol-Taste (REPEAT)
20. MP3-Zufallswiedergabe-Taste (SHUFFLE)
21.RESET-Taste
22. CD-Auswurf-Taste
23. EINEM RUF ANTWORTEN
24. Bluetootj Mikrophone
MERKMALE
Dieses Gerät ist mit einem abnehmbaren Frontbedienteil, MW / UKW-Stereo und einem CDUSB / MP3-Spieler mit den folgenden Merkmalen ausgestattet:
• Elektronische Lautstärke-, Tiefen- Höhen-, Fader- und Balance-Regler.
• Genaues elektronisches Abstimmen durch den Phasenkuppelungsring (P.L.L.)-Schaltkreis.
• 30 programm. Stationsspeicher (6UKW 1/ 6UKW2 / 6UKW3 / 6MW1 / 6MW2)
• Loudness-Regler
• Leicht zu betätigende Netztaste Ein/Aus
• Manueller/Automatischer (Seek)/Abstimmknopf Auf und Ab
• Bandwahlschalter (BND) zur Wahl von UKW1-UKW2 UKW3 oder MW1 MW2
• Uhr-Funktion in RDS
• Bluetooth
• RADIO- und MP3-Spieler
• Vorverstärkte-Ausgang (RCA, rückseitig) zum Anschluß eines Leistungsverstärkers
• Abnehmbares Frontbedienteil zum Schutz gegen Diebstahl
• Beleuchtungssystem
• RDS-Funktion: PI (Programm-Identifikation) TA (Verkehrsdurchsage)
PS (Programmdienstname) PTY (Programmtyp)
AF (List der Alternativfrequenzen) TP (Traffic Program)
INST ALLATION
Regulierung des Montagewinkels
Der Montagewinkel muß kleiner als 20º sein.
Montagebeispiel
Einbau ins Armaturenbrett
Wenn nötig,
biegen Sie diese Haken.
Hinweis: Bewahren Sie den Entriegelungsschlüssel an einem sicheren Ort auf, Sie könnten
Ihn später zum Entfernen des Gerätes aus dem Auto gebrauchen.
ABNEHMEN DES FRONTBEDIENTEILS
Bevor Sie das Frontbedienteil abnehmen, drücken Sie zuerst die PWR-Taste (1).
Dann drücken Sie die ENTRIEGELUNGSTASTE-Taste (14) und nehmen das Bedienteil ab,
indem Sie es herausziehen, wie in der Abbildung gezeigt .
Schutzhülle
VORSICHTSMASSNAHMEN
• Wählen Sie sorgfältig, wo Sie Ihr Autoradio einbauen möchten, damit das Gerät nicht
die normale Fahrtätigkeit des Fahrers beeinflußt.
• Vermeiden Sie, das Gerät dort zu installieren, wo es hohen Temperaturen, wie dem
direkten Sonnenlicht oder Heißluft vom Heizer, oder wo es Staub, Schmutz oder
übermäßigen Schwingungen ausgesetzt werden könnte.
• Verwenden Sie nur das mitgelieferte Montagematerial, um eine sichere Installation
zu garantieren.
• Bevor Sie das Gerät installieren, entfernen Sie das Frontbedienteil.
Frontbedienteil
Herausnehmen
Frontbedienteil
Page 12

19 20
DeutschDeutsch
ANBRINGEN DES FRONTBEDIENTEILS
Nehmen Sie die rechte Seite des Frontbedienteils und setzen Sie es auf das Gerät, wie in
der Abbildung gezeigt, und drücken Sie, bis es einrastet.
Bitte beachten Sie, dabei keinen Druck auf das Display oder die Bedienungstasten
auszuüben.
Frontbedienteil
Hauptgerät Rückseite des Bedienteils
Hinweise:
• Vergewissern Sie sich, daß Sie das Frontbedienteil richtig herum auf das Gerät
aufsetzen.
• Drücken Sie das Frontbedienteil nicht zu stark gegen das Gerät, wenn Sie es
aufsetzen. Es kann einfach angebracht werden, indem Sie es leicht gegen das Gerät
drücken. Wenn Sie das Frontbedienteil mit sich nehmen, legen Sie es in die
mitgelieferte Schutzhülle.
• Drücken Sie nicht zu stark oder mit übermäßiger Kraft auf das Display-Fenster des
Frontbedienteils, wenn Sie es am Gerät anbringen.
ISO-ANSCHLUSSTEIL
RCA-Buchse Ausgangsleitung (Hinten) –
Grau : Rot (rechts)
: Weiß (links)
7. ROT : +12V (AN DEN ZÜNDSCHLÜSSEL)
8. SCHWARZ : ERDUNG
Hinweis:
Der ROTE Draht (Anschlußteil A Nr.7) muß an die Autozündung angeschlossen werden, um
zu vermeiden, daß die Autobatterie entladen wird, wenn das Auto längere Zeit nicht benutzt
wird.
ANSCHLUSSTEIL B
1. VIOLETT : HINTERER RECHTER LAUTSPRECHER (+)
2. VIOLETT/SCHWARZ : HINTERER RECHTER LAUTSPRECHER (-)
3. GRAU : VORDERER RECHTER LAUTSPRECHER (+)
4. GRAU/SCHWARZ : VORDERER RECHTER LAUTSPRECHER (-)
5. WEISS : VORDERER LINKER LAUTSPRECHER (+)
6. WEISS/SCHWARZ : VORDERER LINKER LAUTSPRECHER (-)
7. GRÜN : HINTERER LINKER LAUTSPRECHER (+)
8. GRÜN/SCHWARZ : HINTERER LINKER LAUTSPRECHER (-)
Wartung
ERSETZEN DER SICHERUNG
Wenn die Sicherung durchgebrannt ist, überprüfen Sie den Netzanschluß und ersetzen Sie
die Sicherung. Wenn die Sicherung nach dem Ersetzen erneut durchbrennt, könnte ein
internes Funktionsproblem vorliegen. In diesem Falle wenden Sie sich an Ihr nächstes
Kundendienstzentrum.
Achtung
Verwenden Sie für jedes Kabel die vorgeschriebene Amperestärke. Wenn Sie eine Sicherung
mit höherer Amperestärke verwenden, könnte das ernsthafte Schäden verursachen.
ANSCHLUSSTEIL A
1.
2.
3.
4. GELB : SPEICHER +12V
5. BLAU: AUTOANTENNENAUSGANG
6.
FUNKTIONSANWEISUNGEN
NETZTASTE EIN/AUS (1) (PWR)
Setzen Sie das Frontbedienteil auf das Gerät auf und drücken Sie die Netztaste, um das Gerät
einzuschalten. Drücken Sie erneut die PWR-Taste, um das Gerät auszuschalten und
drücken Sie die ENTRIEGELUNGS-Taste (14), um das Frontbedienteil freizugeben.
Hinweis: Entriegeln Sie das Frontbedienteil niemals, wenn das Gerät eingeschaltet ist.
Strom fließt auch, wenn das Autoradio ausgeschaltet ist.
Page 13

21 22
DeutschDeutsch
WAHL-TASTE (2) (SEL)/LAUTSTÄRKEREGELUNG (3)
Der Knopf VOLUME reguliert die LAUTSTÄRKE. Um andere Funktionen zu wählen, drücken
Sie kurz die WAHL-Taste (2), bis die gewünschte Funktion auf dem Display erscheint. In der
Abbildung 1 wird gezeigt, wie die Kontrollfunktionen gewählt werden, wenn Sie die WAHLTaste drücken.
1. LAUTSTÄRKE (Knopf drehen)
2. WAHL (SEL) (drücken)
3. BÄSSE
4. HÖHEN
5. BALANCE
6. FADER
7. LOUDNESS EIN AUS
8. DSP (ROCK - POP - CLASS - DSP OFF)
9. DX / LOC (RADIO)
10. STEREO / MONO
LAUTSTÄRKEREGELUNG (3)
Erhöhung und Erniedrigung der Lautstärke ist durch den VOLUME-Regler möglich. Dieser
Knopf hat die gleiche Funktion auch bei Bässen, Höhen, Balance und Fader, wenn sie durch
die WAHL-Taste (2) gewählt sind.
Diesen Knopf wird benutzt auch, um die RDS-SDK-Optionen zu wählen.
TA SEEK/TA ALARM (2)
Die "SEL"-Taste (2) länger als 2 Sekunden drücken, wählt man eine der folgenden
Funktionen . Lautstärke-Regler benutzen, um TA-SUCH-Modus oder TA-ALARM-Modus zu
wählen.
- TA-SUCH-Modus:
Wenn eine aktuell gehörte Station 5 Sekunden lang keine TP-Informationen erhält, schaltet
das Radio auf die anschließende Station um, die nicht die gleiche PI der letzten Station hat,
die aber TP-Informationen bringt.
In TA-Such-Modus, die aktuelle Station kann zu einem ganz verschiedenen Sender
wechseln, weil das Gerät einen TP-Sender sucht und die Feldstärke des aktuellen Senders
sehr schwach ist, oder kein TP-Signal hat.
- TA-ALARM-Modus:
Wenn man dieses System wählt, wird beim Fehlen des TP-Signals keine alternative Station
gesucht, sondern es wird ein doppeltes Signal (ALARM) abgegeben, um darauf
hinzuweisen, daß das TP-Signal fehlt.
(C) NEUABSTIMMUNG L /NEUABSTIMMUNG S
Es wird die Startzeit zur automatischen TA oder PI Suche ausgewählt.
Wenn die PI Information nicht innerhalb der Neuabstimmungsdauer gefunden wird,
beginntdas Radio mit der Neuabstimmung auf den nächsten PI Sender. Wird der PI Sender
bei der ersten zyklischen Suche nicht gefunden, geht das Radio auf den gleichen Sender
und wartet 4-5 Minuten, solange bis der PI Code empfangen wird.
– L Abstimmung: als 90 Sekunden gewählt.
– S Abstimmung: als 30 Sekunden gewählt.
4. VORAUSWAHLEN (1,2,3,4,5,6)
(A) BETRIEB RADIO:
Durch einen leichten Druck auf diese Tasten kann man direkt einen vorher ausgewählten
Sender anwählen. Wird die Taste länger als 1 Sekunde gedrückt, wird der gerade eingestellte
Sender gespeichert. Ist der PTY Modus aktiv, wird die PTY Taste wie folgt unterteilt:
PTY Gruppe Musik ----- PTY Gruppe gesprochen ----- AUS
MUSK GESPROCHEN
1.POP Musik, ROCK Musik 1.NACHRICHTEN, WIRTSCHAFT, INFOS
2.UNTERHALTUNGS Musik 2.SPORT, ERZIEHUNG, DRAMEN
3.KLASSIK, ANDERE Musik 3.KULTUR, WISSENSCHAFT, VERSCHIEDENES
4.JAZZ, COUNTRY 4.WETTERVORHERSAGEN, FINANZEN, KINDER
5.NATION M, OLDIES 5.SOZIALES, RELIGION, TELEFON
6.VOLKS Musik 6.REISEN, UNTERHALTUNG, DOKUMENTATIONEN
(B) BETRIEB USB-SD-MMC/MP3 PLAYER:
1. PAUSE 2. INTRO 3. WIEDERHOLEN 4. ZUFÄLLIG
DIE RDS FUNKTION. WAS BEDEUTET RDS SYSTEM?
RDS (Radio Data System) ist die Abkürzung für ein digitales Radio-Informations-System, das
von EBU (European Broadcasting Union) entwickelt und auf dem Markt eingeführt wurde.
Über die normalen FM Übertragungssender ausgestrahlt, bietet RDS eine Reihe Informationen
wie z.B. den Sendernamen, das Programm, Verkehrsnachrichten und nützliche Funktionen
wie die automatische Abstimmung der besten im gewählten Programm zur Verfügung
stehenden Signale.
5. AF/REG‘ Funktion (ALTERNATIVE FREQUENZEN)
Mit einem leichten Tastendruck wählt man den AF/REG Modus.
Page 14

2423
DeutschDeutsch
Wenn der AF/REG ausgewählt wird, kontrolliert das Radio ständig das AF Signal. Drückt
man die Taste länger als 2 Sekunden, wird der Modus Regional EIN/AUS aktiviert.
– Modus Regional EIN:
Die AF Umschaltung oder die PI SEEK Suche ist auf all die Sender ausgeweitet, die den
gleichen PI Code des momentan eingestellten Senders haben. Es erscheint die Schrift
REG auf dem Display.
– Modus Regional AUS
Der Regionalcode im PI Format wird ignoriert, wenn die AF Umschaltung oder die PI SEEK
Suche auf alle Sender ausgeweitet ist.
6. ‘TA’ FUNKTION (VERKEHRSFUNK)
Bei leichtem Tastendruck wird der Modus TA ein oder aus gewählt. Wenn der TA Modus
ausgewählt und eine Verkehrsnachricht übertragen wird – Wenn das Gerät auf der Betriebsart
CD/MP3 steht, wird zeitweilig auf Radio umgeschaltet. – Ist nur eine geringe und nicht gut
hörbare Lautstärke eingestellt, wird diese auf ein gut hörbares Niveau erhöht.
7. ‚PTY‘ Funktion (PROGRAMMTYP)
PTY MUSIK ----- PTY GESRPOCHEN ----- PTY AUS
Wählt man PTY, hängt das Programm wie vorher beschrieben von den Vorauswahltasten ab.
Wenn man PTY wählt, beginnt das Radio mit der Suche nach entsprechenden PTY- Informationen und stoppt mit der Suche, wenn die entsprechende PTY Information gefunden wird.
8. SPRUNG + 10 WAHLTASTEN
Durch Drücken dieser Taste schaltet man auf den + 10 skip.
9. MODE TASTE (MODE)
Durch Drücken dieser Taste kann der Bediener wählen zwischen
Betrieb des RADIOS oder des CD / USB / AUX-IN / PHONE .
10. BAND TASTE (BAND)
Jedes Frequenzband wird durch das hintereinander abfolgende Drücken dieser Taste
umgeschaltet FM1---FM2---FM3 - MW1 - MW2.
Drücken der Taste BAND erscheint die folgende Information in der Folge:
TITLE - SONG - ARTIST - DIRECTORY
11. AUTOMATISCHE ODER MANUELLE ABSTIMMUNG (FREQ AUF >> ODER FREQ AB <<)
(A) BETRIEB DES RADIOS
Bei leichtem Druck fungieren diese Tasten zur manuellen Suche.
Drückt man länger als 1 Sekunde, wird die automatische Suche aktiviert (SEEK)
(B) BETRIEB DES USB-SD-MMC/MP3 PLAYERS
Bei leichtem Druck fungieren diese Tasten als LIEDER ÜBERSPRINGEN HOCH oder
RUNTER.
12. SPRUNG - 10 WAHL T ASTEN
Durch Drücken dieser Taste schaltet man auf den - 10 skip.
13. LCD DISPLAY
Der Flüssigkristalldisplay zeigt den momentanen Empfang und die Operationen an.
STEUERUNG DES CD / USB PLAYERS
15. USB PORT
17. PAUSENTASTE
Beim Abspielen die Taste PAUSE (17) ‘PAUSE’ betätigen, um das Abspielen kurzfristig
anzuhalten. Erneut drücken, um zum normalen Abspielen zurückzukehren.
18. INTRO TASTE (CD SCAN)
Nach Drücken dieser Taste erscheint die Anzeige ‘SCN’ auf dem Display und die ersten
10 Sekunden jeden Liedes werden abgespielt.
19. REPEAT TASTE ‚REPEAT‘
Wird diese Taste gedrückt, erscheint die Anzeige ‘RPT’ auf dem Display und das aktuelle
Lied wird solange abgespielt, bis die ‘RPT’ Taste erneut betätigt wird.
Wird diese Taste in der Betriebsart MP3 länger als eine Sekunde lang gedrückt, erscheint
die Anzeige ‘D-RPT’ und die mit den Tasten Auf/Ab ausgewählten Lieder des laufenden
Albums werden abgespielt.
20. RANDOM TASTE ‚SHUFFLE‘ (ZUFÄLLIG)
Wird diese Taste betätigt, erscheint die Aufschrift ‘SHF’ und jedes Lied wird in zufälliger
Reihenfolge und nicht in der normalen Reihenfolge abgespielt. Um diesen Modus zu
löschen, erneut die Taste ‘SHUFFLE’ (20) betätigen.
21. RESET-TASTE
Die Reset-Taste (21) befindet sich auf der Innenseite.
Die Reset-Taste ist aus einem der folgenden Gründe zu drücken:
• Erste installation des Gerätes, wenn alle Kabel angeschlossen sin.
• Keine der vorhandenen Tasten funktioniert.
• Fehlersymbol auf dem Display.
Page 15

dass alle Geräte erkannt werden, noch dass alle Funktionen mit diesen Geräten zur
2625
DeutschDeutsch
Verfügung stehen werden.
ID3 Tag
Drücken Sie die Taste BAND wiederholt um die Information ID3 TAG anzuzeigen.
Wenn der MP3-Dokument mit ID3 TAG erforderlich ist, durch Drücken der Taste
BAND erscheint die folgende Information in der Folge:
LIED-TITEL > SÄNGER> ALBUM-TITEL > JAHR > BEMERKUNGEN
Wenn eines des MP3-Dokuments mit ID3 TAG nicht erforderlich ist, durch Drücken
der Taste DISPLAY erscheint die folgende Information in der Folge:
UNKNOWN SONGNAME> UNKNOWN ARTIST> NO ALBUM TITLE > UNKNOWN
YEAR > NO COMMENTS
Wenn das MP3-Dokument ohne ID3 TAG ist, durch Drücken der Taste BAND
erscheint “NO ID3 TAG”.
Der Lied-Name und die Spur-Nummer des MP3-Dokuments läuft kontinuierlich auf der
Anzeige währen der Wiedergabe.
WIE DIE SUCHE NACH DEN MP3 LIEDERN ABLÄUFT
A. Direkt Lied-Suchen
Drücken Sie die Taste BAND (10) einmal, an der Anzeige erscheint “TRK SCH”: Drehen Sie
den Lautstärkeknopf (3). Dann drücken Sie ENTER (2) zu bestätigen.
B. Suchen durch Album- oder File-Name
Drücken Sie die Taste BAND (10) zweimal, an der Anzeige erscheint “FILE SCH”, treten Sie
die Buchstabe ein. Das Gerät sucht Titel und Alben mit der gleiche eingetretene Buchstabe.
Drehen Sie die Tasten VOLUME UP / DOWN (2) um die Titel und Alben zu wählen . Wenn der
gewünschte Name ist ein Album, drücken Sie die Taste ENTER, dann drehen Sie die
Tasten VILUME UP / DOWN (2). Drücken Sie die Taste ENTER, um das gewählte Lied
abzuspielen Die Wahl der alphabetischen Buchstaben ist wie folgt: oder drehen Sie den
Lautstärkeknopf (2) in beiden Richtungen, um die Buchstaben anzusehen (alfanumerisch).
Dann drücken Sie ENTER (3) zu bestätigen.
22. CD AUSWURFT ASTE
Zum Entnehmen der CD die Auswurftaste drücken.
23. EINEM RUF ANTWORTEN
Bei einem eingehenden Anruf drücken Sie die Taste „ ”, um den Anruf anzunehmen.
24. Bluetooth Mikrophone
C. Suchen durch Album
Suchen Sie das Album mit der Tasten VOLUME UP / DOWN (2).
Drücken Sie die Taste BAND (10) dreimal. Erscheint die erste Album-Name. drehen
Sie volume UP / DOWN (3), um in der Liste der Alben zu bewegen, dann drücken Sie die
Taste ENTER, um das gewünschte Album zu wählen. Um die Lieder in diem Album zu
wählen, drehen Sie VOLUME UP / DOWN (3) dann drücken Sie ENTER, um zu
bestätigen,oder drehen Sie den Lautstärkeknopf (3) in beiden Richtungen, um die
Buchstaben anzusehen (alphanumerisch). Dann drücken Sie ENTER (3) zu bestätigen.
WICHTIGE INFORMATION: Aufgrund der Vielzahl der Produktemit USB, deren
gelegentlich je nach Hersteller variierenden Funktionen, können wir weder garantieren,
Page 16

27
28
DeutschDeutsch
BLUETOOTH-NUTZUNG IN IHREM AUTORADIO
Ausführung der Paarung
Bevor Sie vom Autoradio aus telefonieren können, müssen Sie zunächst ein PAIRING durchführen. Pairing ist ein Vorgang, bei dem 2 Bluetooth-Geräte miteinander verbunden werden.
1. Die Bluetooth-Funktion des Geräts ist immer aktiviert. Führen Sie das Pairing mit Ihrem
Handy aus. Schauen Sie in Ihrem Handy-Handbuch nach, wie das Pairing richtig ausgeführt
wird.
2. Führen Sie eine Suche nach verfügbaren Bluetooth-Geräten aus; „CAR--BT” erscheint.
Geben Sie ‚0000’, wenn Sie nach einem Code gefragt werden.
3. Nach erfolgreichem Pairing schließen Sie das Kopfstück an, wenn es nicht automatisch
verbunden wird.
Anrufen / Anrufe empfangen mit dem Bedienfeld
• Drücken Sie die Taste „MODE” bis wann “PHONE” zeigt, dann mit die handy, um das
Nummer zu anrufen
2. Drücken Sie die Taste „ ” um das Anruf zu bestätigen.
• Bei einem eingehenden Anruf drücken Sie die Taste „ ”, um den Anruf
anzunehmen.
• Drücken Sie während des Gesprächs die Taste „BC/CL”, um den Anruf zu beenden.
Audio-Streaming
TECHNISCHE DATEN
CD/MP3-SPIELERTEIL
Rauschabstand: > 70 dB
Kanaltrennung: > 50 dB (1kHz)
Frequenzgang: 20Hz - 20 kHz
UKW-TUNER
Empfindlichkeit: 2 dBμ
Stereo-Trennung: 35 dB
Rauschabstand: 55 dB
Frequenzbereich: FM 87.5 – 108MHz
MW 522 - 1620 KHz
Kanal-Stufe: 50 kHz
IF-Frequenz: 10.7MHz
AUSGANGSLEITUNG
Ausgang: MAX. 350mV
Impedanz: 10 kOhm
ALLGEMEINES
Betriebsspannung: 13.8V DC (10.8-15.6V), Negative Erdung
Lautsprecher-Impedanz: 4 oder 8 Ohm
Max. Ausgangsleistung: 7W (RMS) x 4 Kanäle
Hinweis: Auf Grund ständiger Verbesserungen bleibt die Änderung der technischen Daten
und des Designs ohne Vorankündigung vorbehalten.
1. Wenn Ihr Telefon mit dem „A2DP”-Format kompatibel ist, können Sie auf Ihrem Handy
Musik abspielen, und die Musik wird an das Autoradio übermittelt.
2. Stellen Sie sicher, dass Ihr Handy und das Autoradio über Pairing verbunden und angeschlossen sind.
3. Spielen Sie die Musik auf Ihrem Handy gemäß der Betriebsmethode Ihres Handys ab.
4. Sie könnenoderam Kopfstück
>> / << für den vorherigen oder nächsten Track
drücken.
Korrekte Entsorgung dieses Produkts (Elektromüll)
Die Kennzeichnung auf dem Produkt bzw. auf der dazugehörigen Literatur gibt an, dass
es nach seiner Lebensdauer nicht zusammen mit dem normalen HaushaltsmüIl entsorgt
werden darf. Entsorgen Sie dieses Gerat bitte getrennt von anderen Abfallen, um der Umwelt
bzw. der menschlichen Gesundheit nicht durch unkontrollierte Müllbeseitigung zu schaden.
Recyceln Sie das Gerät, um die nachhaltige Wiederverwertung von stofflichen Ressourcen
zu fördern.
Private Nutzer sollten den Händler, bei dem das Produkt gekauft wurde, oder die zuständigen
Behörden kontaktieren, um in Erfahrung zu bringen, wie sie das Gerät auf umweltfreundliche
Weise recyceln können.
Gewerbliche Nutzer sollten sich an Ihren Lieferanten wenden und die Bedingungen des
Verkaufsvertrags konsultieren. Dieses Produkt darf nicht zusammen mit anderem
 Loading...