

Page 1

CD240MPR/512
Car Audio with CD/MP3/WMA playback
FM/MW RDS tuner and 512 USB
memory drive
Page 2

CD240MPR/512
2
Introduction
Thank you for buying the CD240MPR/512. This unit is designed to give
you many years of trouble-free service.
You may already be familiar with using a similar product but do please
take time to read these instructions. They are designed to familiarise
you with the many features of this unit and to ensure you get the very
best from your purchase.
Safety is Important
Keep this information in a safe place for future reference.
WARNING! Your safety and the safety of others is important.
Please therefore, ensure you read the Safety Instructions before
you operate this unit.
Page 3

CD240MPR/512
3
Introduction ............................................................................. 2
Safety is Important ................................................................. 2
Safety Instructions ................................................................. 5
Power Source ........................................................................................... 5
Safety Considerations .............................................................................. 5
Servicing .................................................................................................. 5
Getting Started ........................................................................ 6
In the box ................................................................................................. 6
Installation ............................................................................... 7
Recommendations ................................................................................... 7
ISO connector .......................................................................................... 7
ISO connector plug wiring details ............................................................. 8
Fitting the DIN mounting sleeve ............................................................... 9
Fitting the sleeve ...................................................................................... 9
Inserting and connecting the unit ........................................................... 10
Initial switching on and off ...................................................................... 10
Location of controls ............................................................. 11
Front Panel ............................................................................................. 11
Flash drive .............................................................................................. 13
Radio Data Systems (RDS) .................................................. 14
Basic Functions .................................................................... 15
Power on/off ........................................................................................... 15
Selecting the sound source .................................................................... 15
Volume ................................................................................................... 15
Sound adjustment .................................................................................. 15
Using the Radio .................................................................... 16
Band selection ........................................................................................ 16
Station selection auto tune ..................................................................... 16
Station scan auto tune ........................................................................... 16
Station selection manual tune ................................................................ 16
Auto program seek and store ................................................................. 16
Program scanning .................................................................................. 17
Station storing ........................................................................................ 17
Radio functions ...................................................................................... 17
RDS operation ........................................................................................ 19
Using the CD Player ............................................................. 21
CD operation .......................................................................................... 21
MP3 operation ........................................................................................ 23
Page 4

CD240MPR/512
4
Recording .............................................................................. 25
Recording from Audio CDs .................................................................... 25
Recording from MP3 Discs .................................................................... 25
Recording from Radio ............................................................................ 26
Voice Recording ..................................................................................... 26
Deleting Files ......................................................................................... 26
The Flash MP3 Player ........................................................... 27
Removing the Flash MP3 Player ............................................................ 27
Basic functions ....................................................................................... 28
Transfering files from your PC ............................................................... 28
Play Mode .............................................................................................. 30
Settings .................................................................................................. 31
Record mode .......................................................................................... 32
Record settings ...................................................................................... 32
FM Radio ................................................................................................ 34
Help and Advice .................................................................... 36
Replacing the fuse ................................................................................. 37
Care and Maintenance ......................................................... 38
Cleaning CDs ......................................................................................... 38
Technical Specification ........................................................ 39
Guarantee .............................................................................. 40
Page 5

CD240MPR/512
5
Safety Instructions
Power Source
• The power supply for the unit is obtained from the 12 volt car
battery, negative earth.
• The equipment is protected by 3 x fuses. One in the power supply
line, one in the memory supply and one in the power antenna line.
The fuses are located in the choke enclosure and in-line with wiring
that connects to the rear of the unit.
Safety Considerations
• Do not use the unit in humid or damp conditions. Do not allow the
unit to get wet, i.e. dripping or splashing, as this may cause damage
to the unit.
• Always keep the volume low enough so you can hear warning
sounds outside of the car.
Servicing
• The CD240MPR/512 unit contains fuses that may be changed by
suitably qualified service personnel when necessary. The
instructions for carrying out fuse replacement are contained in Help
& Advise chapter of this guide.
• Consult your dealer if you are ever in doubt about the installation,
operation, servicing or safety of this product.
• Keep this manual handy as a reference for operating procedures.
• If the yellow lead from the unit is removed from the power supply, or
the battery is disconnected from the car or becomes discharged,
the preset radio stations (in memory) will be erased and will require
re-programming. All function mode will be reset to factory defaults.
WARNING! PLEASE READ ALL OF THE SAFETY
INSTRUCTIONS BEFORE USING YOUR CD240MPR/512 CAR
AUDIO
Page 6

CD240MPR/512
6
Getting Started
Remove your Roadstar CD240MPR/512 car audio carefully from the
box. You may wish to store the packaging for future use.
In the box
Included in this package are the following items:
• Roadstar car audio with CD/MP3 player
• Detachable front panel and case
• DIN front mounting sleeve plus fixing accessories
• 2 x release keys
• 512MB Flash MP3 player with neck cord
• USB extension lead
• USB software driver on the supplied CD.
• User Guide
Should any of these items be missing, please contact the helpline on
0870 873 0084.
Main features
• Plays CD/CD-R/CD-RW and MP3 files
• Auto memorize the strongest stations in order of their strength
• 30 preset memory locations
• Electronic volume, bass, treble, fader and balance control
• RDS/RDS Clock functions
• CD Repeat function
• LINE input and LINE output connectors
• 4 x 40W output
• Detachable front panel for added security
Page 7

CD240MPR/512
7
Installation
Recommendations
• Choose the mounting location where the unit will not interfere with
the normal driving function of the driver.
• Before finally installing the unit, connect the wiring temporarily and
make sure it is all connected up properly and the unit and the
system work properly.
• Use only the parts included with the unit to ensure proper
installation. The use of unauthorized parts can cause malfunctions.
• Consult with your nearest dealer if installation requires the drilling of
holes or other modifications of the vehicle.
• Install the unit where it does not get in the driver’s way and cannot
injure the passenger if there is a sudden stop, like an emergency
stop.
• If the installation angle exceeds 20 degrees from the horizontal, the
unit may not give its optimum performance.
• Avoid installing the unit where it would be subject to high
temperature, such as from direct sunlight, or from hot air, from the
heater, or where it would be subject to dust, dirt or excessive
vibration.
ISO connector
Nowadays cars are fitted with an ISO connector that is ready-wired to
all speakers and power leads within the car.
This unit is fitted with an ISO connector plug that will mate with the carfitted ISO connector socket thereby providing a very simple wiring
installation. See page 8.
NOTE: Some older cars will not have an ISO connector. In these
cases you will need to obtain a “patch cable assembly” that
connects to the connector that is fitted. The other end of this
cable has an ISO connector to mate with that from this unit.
Page 8
CD240MPR/512
8
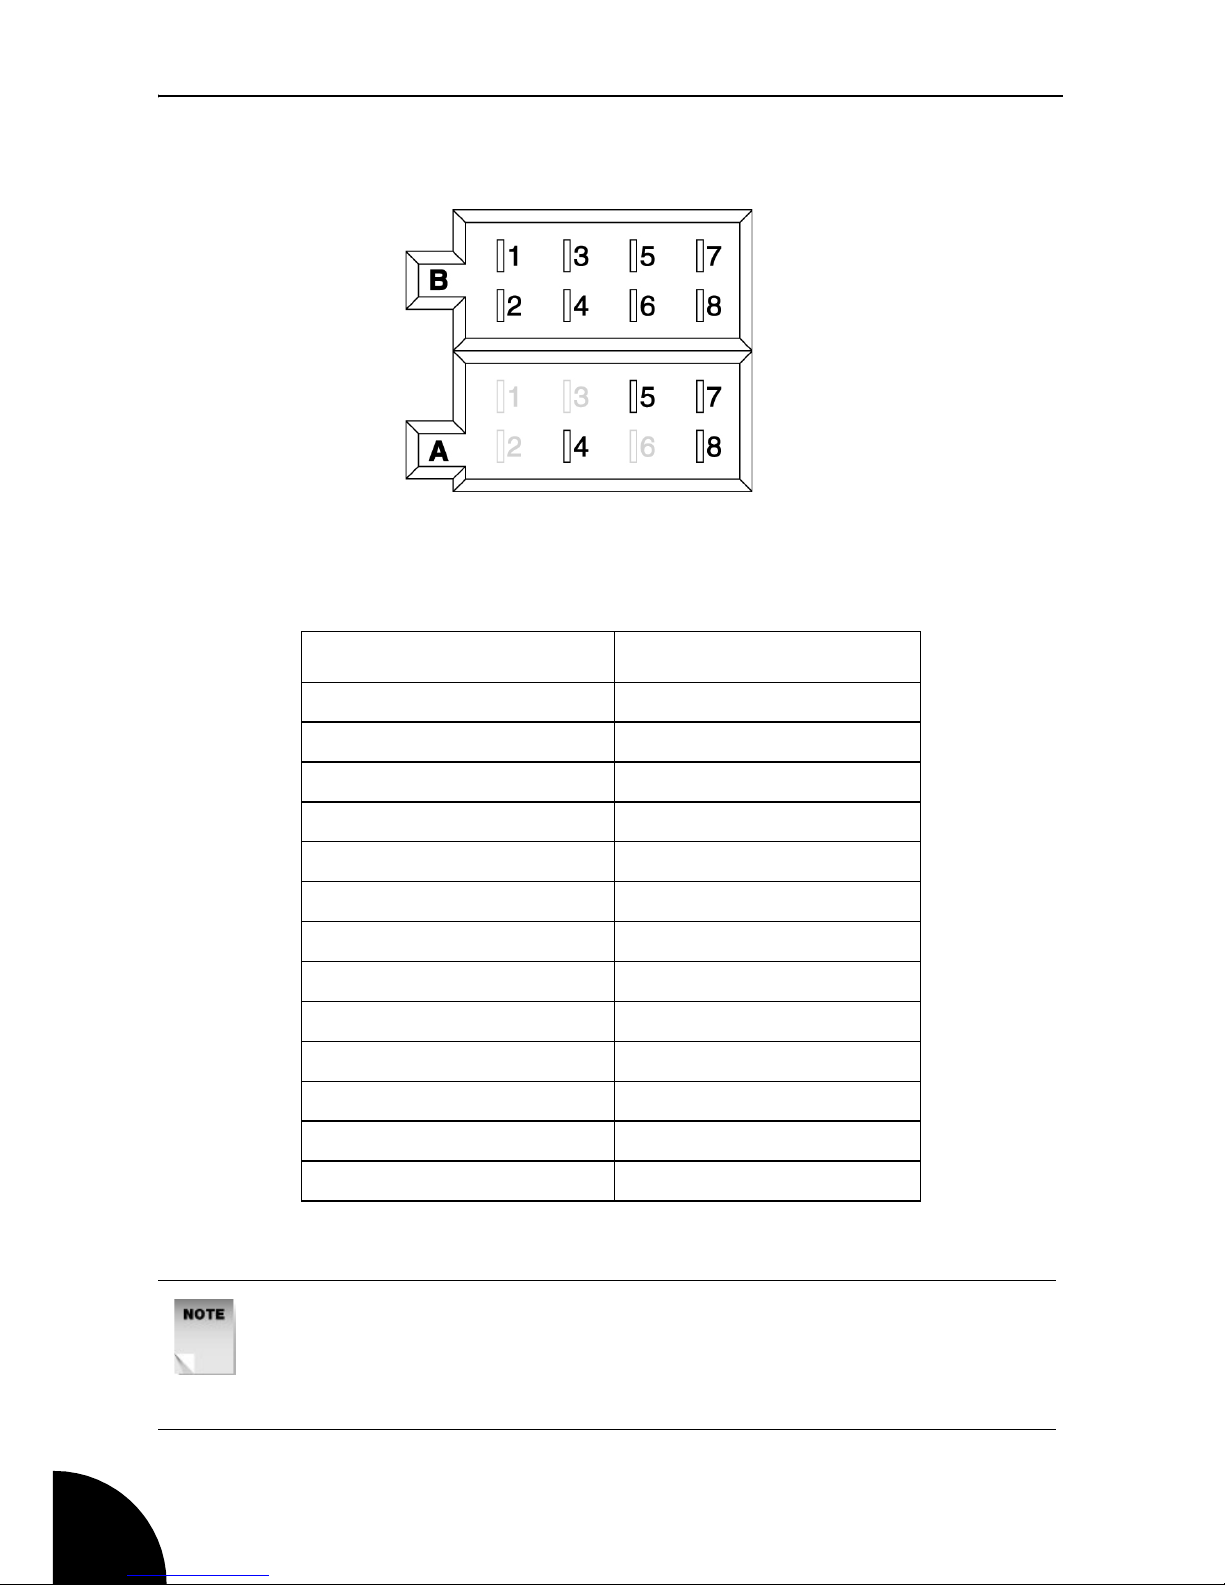
ISO connector plug wiring details
FUNCTION ISO PLUG PIN NUMBER
Memory +12v 4-A
Power antenna 5-A
Ignition switch +12v 7-A
Ground 8-A
Rear right speaker + 1-B
Rear right speaker - 2-B
Front right speaker + 3-B
Front right speaker - 4-B
Front left speaker + 5-B
Front left speaker - 6-B
Rear left speaker + 7-B
Rear left speaker - 8-B
NOTE: The lead that connects to 7-A (ignition switch +12v) must
be connected via the car’s ignition key switch in order to avoid the
car’s battery becoming weak when the car is not used for long
periods.
Rear panel ISO connector plug
Page 9
CD240MPR/512
9
Fitting the DIN mounting sleeve
DIN front-mounting
This unit can be properly installed using the DIN front-mounting method.
Do not connect the unit to any wiring at this stage.
The fixing hardware supplied is for the front mounting method. This
method also uses a stabilising strap that fits on a threaded stud fitted to
the rear face of the unit for connection to a suitable structure behind the
dashboard.
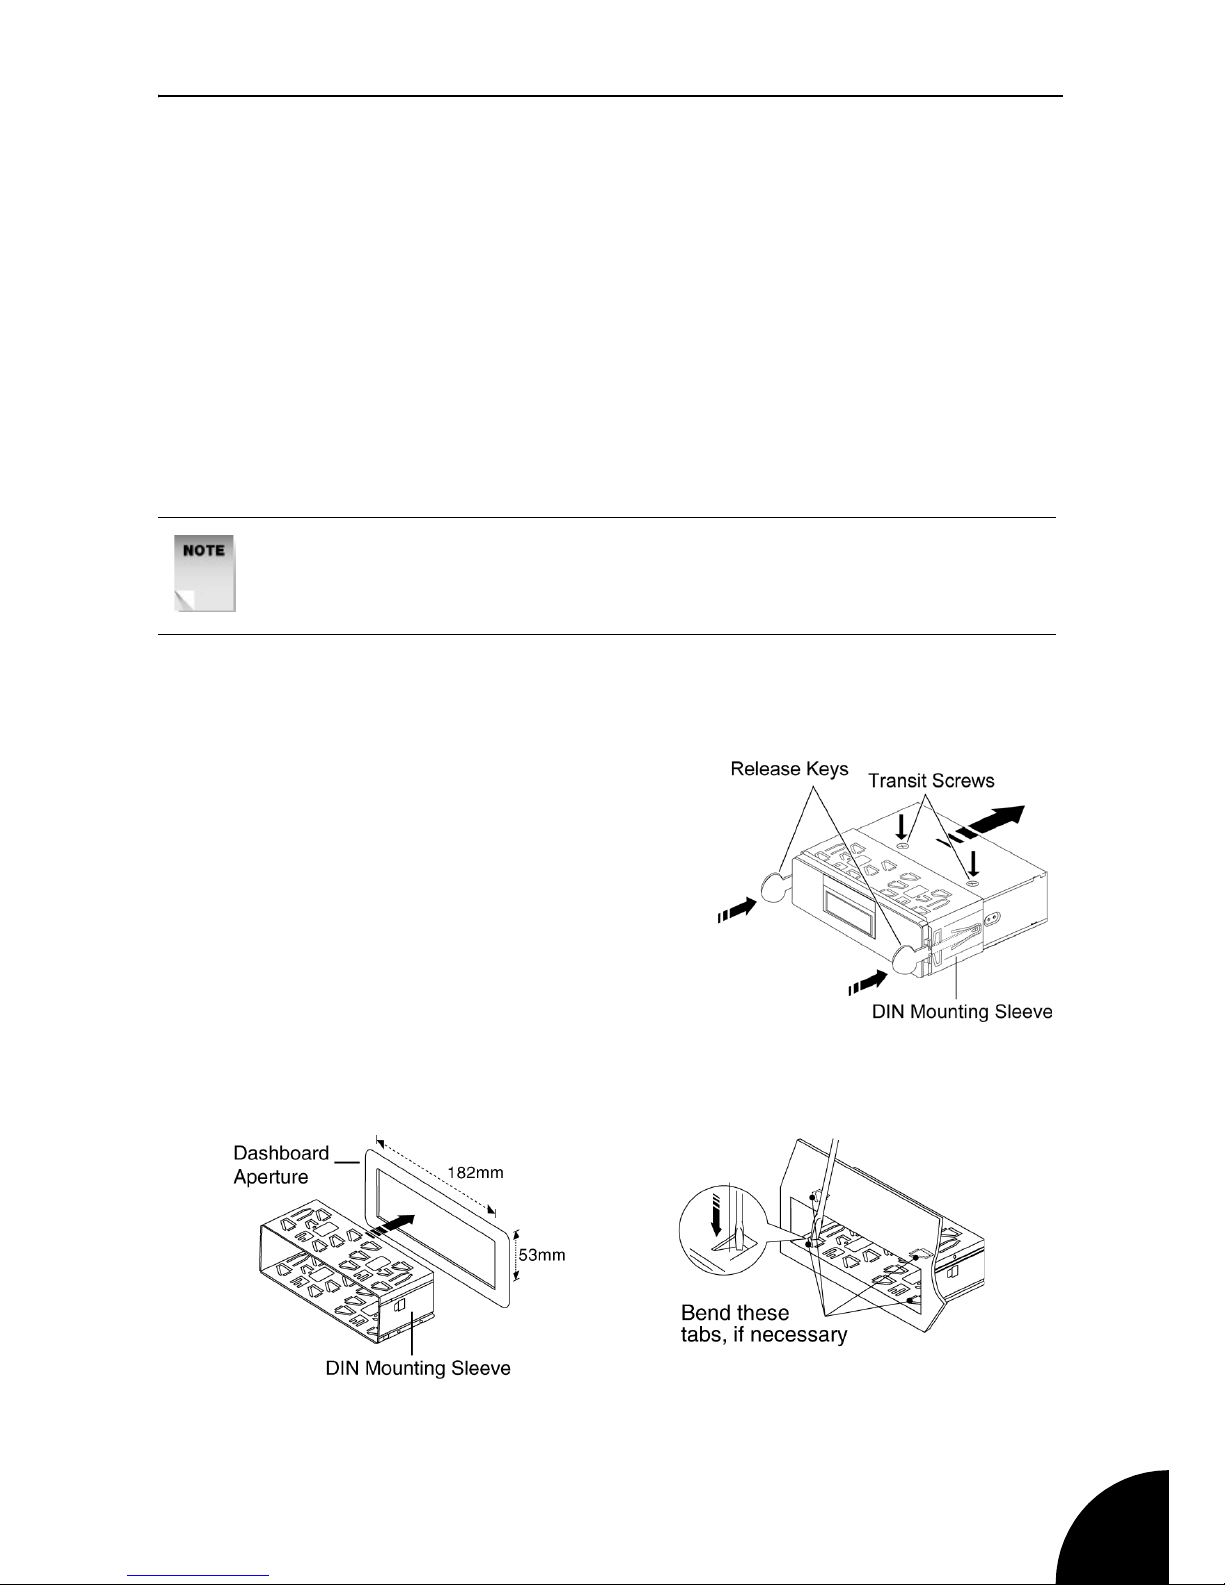
Fitting the sleeve
1. First remove the front panel from the unit. See page 9.
2. Remove the two transit screws from the unit.
3. Insert the two release keys into the
groove on each side of the unit until
they click, then slide the sleeve off
the unit in the direction as shown.
4. Insert the sleeve into the aperture
provided in the dashboard where
the unit is to be fitted. See below.
5. Bend a sufficient number of the
tabs in the sleeve towards the outer
so that they hold the sleeve
securely to the dashboard.
NOTE: Ensure that you remove the two transit screws before
attempting to install the unit. These are on the top panel and
screw through two red coloured labels attached to the unit
Page 10

CD240MPR/512
10
Inserting and connecting the unit
1. Where possible use the strap to
support the back of the unit.
2. Bend the strap (by hand) to the
desired angle to reach the
surrounding structure. Fit to the car
structure using the fixings provided.
3. Connect the ISO connector plug to
the car ISO socket. Plug the aerial
lead in.
4. Slide the unit into the sleeve and
secure the strap to the stud on the rear of the unit using the plain
washer and nut supplied.
Removing the unit
1. Switch the ignition key off
2. If the strap was used to support the unit, remove this first.
3. Insert the release keys into the groove on each side of the unit until
they click. Pull the levers out with the unit to remove it from the
sleeve in the dashboard.
Initial switching on and off
Reset the unit first
Reset the unit by briefly pressing the RESET button with a ball point
pen. The unit is now reset to the factory defaults,
After a reset the unit will initially switch on in radio mode.
Switch the unit on/off
Press the PWR button on the front panel. The LCD display will light up
with the message WELCOME followed by FM1 87.50. Press the PWR
button again to switch the unit off
Page 11
CD240MPR/512
11
Location of controls
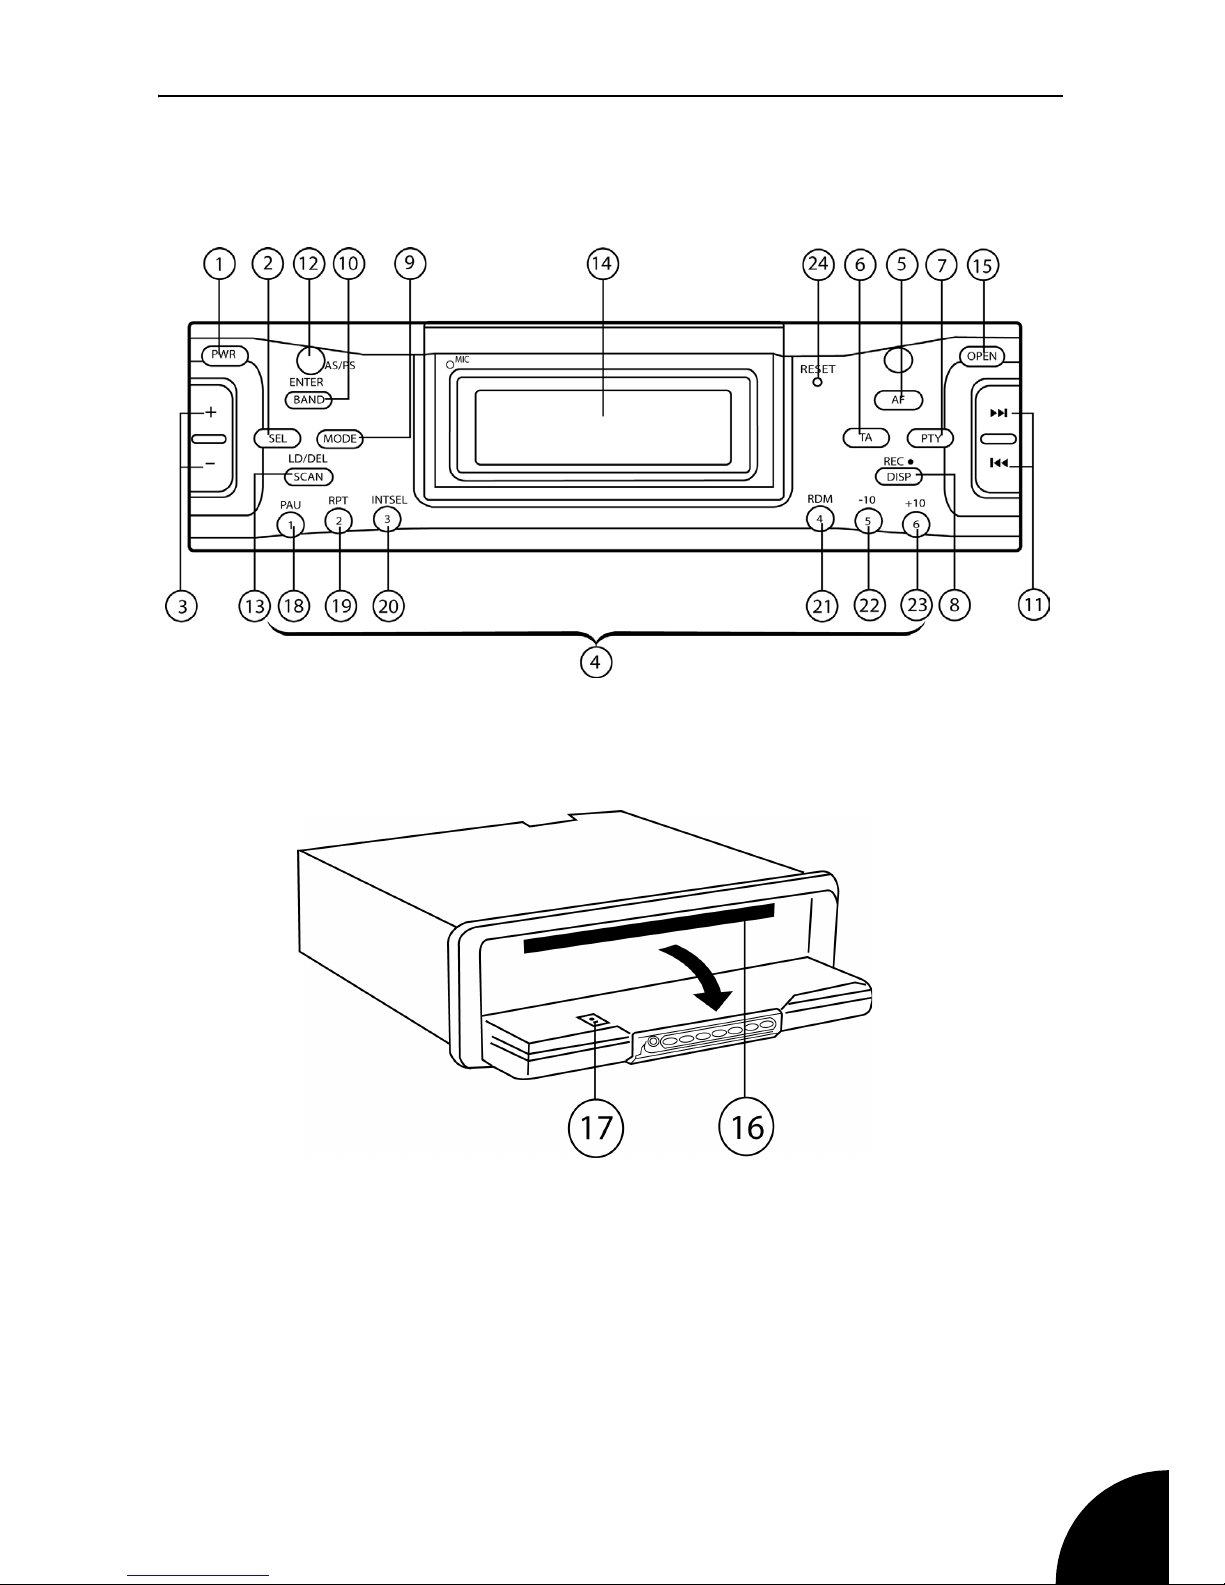
Front Panel
Page 12

CD240MPR/512
12
No Label Function
1PWR Power ON/OFF
2 & FUNCTION
SELECT BUTTON
Select button for: Initial Volume / Bass / Treble /
Balance / Fader / DSP/ CT/ TA Vol/ Eon.
3 VOL Up/Down Controls for: Initial Volume / Bass / Treble / Bal-
ance / Fader / DSP/ CT/ TA Vol/ Eon.
4 1,2,3,4,5,6 Preset Radio Stations 1 to 6
5 AF Alternative frequencies, RDS function
6 TA Traffic announcement, RDS function
7 PTY Program Type, RDS function
8 DISPLAY/
RECORD
Display, show a selection of information available
9 MODE Select the Mode,
10 BAND/ENTER Select tuner frequency band
11 TRACK/TUNE
BUTTONS
Automatic or manual tuning, freq up or freq down /
CD/MP3 Track / Search button
12 AS/PS Automatic programme seek and store.
13 SCAN Scans frequency band and stops for 5 secs on
each station detected
14 DISPLAY LCD display screen
15 PANEL OPEN
BUTTON
Front panel release button
16 CD SLOT Insert CD label side up
17 EJ CD eject
18 PAU Pause button, pause CD track play
19 RPT Repeat button.
20 INT Introduction, preview all CD/MP3 tracks
21 RND Random play button
22 -10 Jumps back 10 tracks
23 +10 Jumps forwards 10 tracks
24 RESET Reset button
Page 13
CD240MPR/512
13
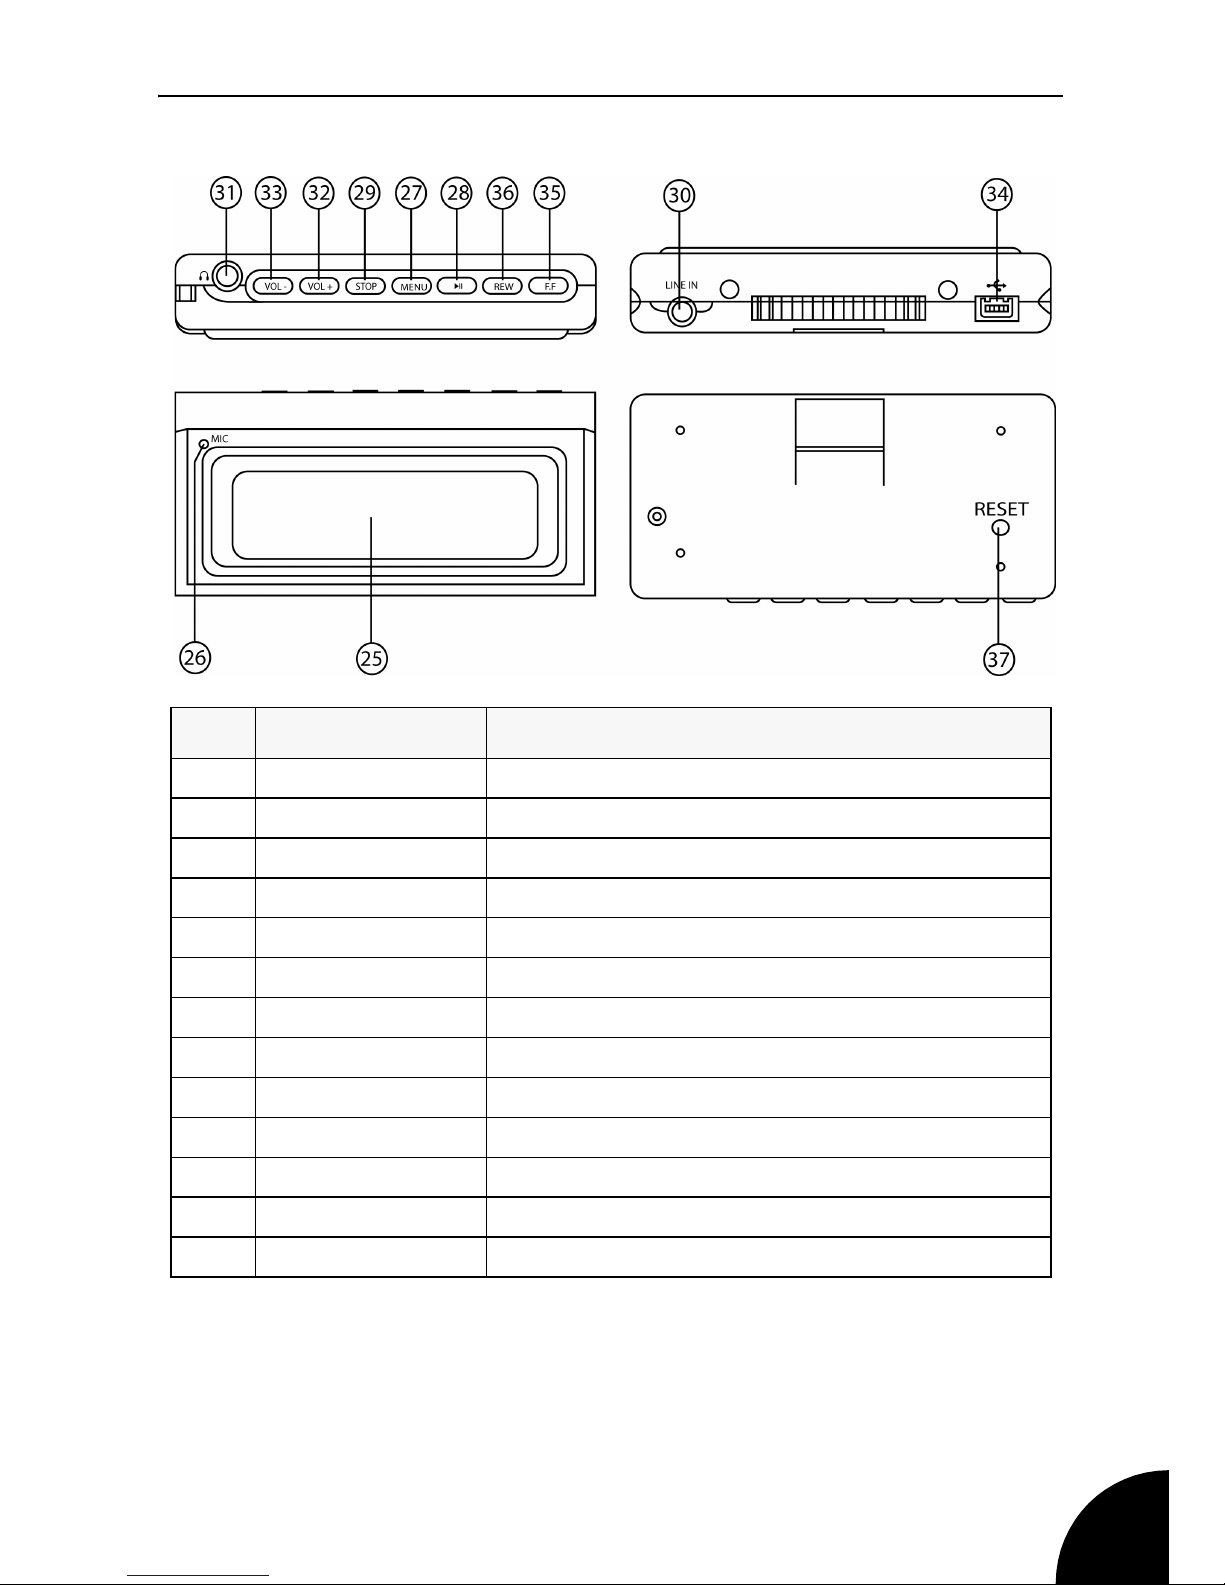
Flash drive
No Label Function
25 LCD Display
26 MIC Microphone
27 MENU Enters the menu screen
28 PLAY/PAUSE
29 STOP
30 LINE IN
31 HEADPHONES
32 VOL +
33 VOL -
34 USB SOCKET
35 F. F.
36 REW
37 RESET
Page 14

CD240MPR/512
14
Radio Data Systems (RDS)
Radio Data System. RDS is a service provided by radio stations. In
addition to conventional music and speech programmes, the stations
also transmit additional information in the form of encoded digital
signals that can be analysed by the car radio.
These are the most common facilities available on RDS radios:
Station Name (PS-Program Service)
This function will display the name of the selected radio station.
Alternate Frequency (AF.
The car radio automatically selects the frequency with the best
reception for the current programme.
Traffic Announcement (TA) and Traffic Programme (TP)
This function searches and stands by for a traffic announcement station
using TP and TA data. The Traffic Announcement (TA) feature allows
interruption of a CD playing when there is a travel report from a local
radio station. The radio will automatically switch from CD to the radio for
the duration of the travel announcement.
Enhanced Other Networks (EON)
When a traffic announcement (TA) is transmitted on a Network radio
station (e.g. BBC Radio 2) the facility will automatically switch to your
nearby BBC Local Radio station for the travel bulletin for the duration of
the announcement.
Programme Type (PTY)
A function supported to an increasing extent by the radio stations that
enables the car radio to select radio stations by their programming type
(i.e. news, rock, pop, sport, etc.).
Clock Time (CT)
Some stations broadcast the time and date within the encoded RDS
signal. Usually, the time of day is just displayed. The time signal is
automatically adjusted for British Summer Time.
Page 15

CD240MPR/512
15
Basic Functions
Power on/off
Press PWR button on the front panel to turn the unit ON.
Press the PWR button to turn the unit OFF.
Selecting the sound source
Each press of the MODE button will select Tuner, CD/MP3, NAND
Removable MP3 player) or AUX. The button toggles between these
sources.
Volume
Press the VOL + button to increase the volume
Press the VOL - button to reduce the volume.
The display will show the current level.
Sound adjustment
Briefly press the SEL button. Each press of this button will step through
the available audio functions in the following order to be set as required:
-> VOL (volume) -> BAS (bass) -> TRE (treble) -> BAL (balance L&R)
-> Fad (fade front to rear speakers) ->
Use the VOL +/- button to adjust the function.
The display will show the current level.
NOTE: Switching the unit on after a RESET, or when the power to
the unit was disconnected, the unit will revert to the factory default
settings
NOTE: Each time a button is pressed a beep tone is sounded, this
is the default option. To turn the beep off (BEEP OFF) see page
19.
Page 16

CD240MPR/512
16
Using the Radio
Band selection
In the radio mode:
Press the BAND button to select the desired band.
As you press the button the bands will be stepped through and
displayed on the screen in the following cyclic order: ->FM1 -> FM2 ->
FM3 -> MW1 -> MW2 ->
Station selection auto tune
Press and hold the TRACK/TUNE buttons for about a second to
activate the automatic station seek function.
The display shows the selected band with the frequency changing while
it scans for a station. When one is found the display shows in turn the
frequency tuned to and the station name and continues to display the
name.
Station scan auto tune
The SCN function scans the band until a station is found. The station is
then played for about 3 seconds before the scan continues.
Press the SCN button to activate station scan. Press again to cancel the
scan function.
Station selection manual tune
Briefly press the TRACK/TUNE buttons to step up or down the
frequency band from the current position until you reach the required
frequency or hear a station you like.
Auto program seek and store
The AS/PS function scans and stores the six strongest stations found.
The stored stations are recalled by pressing the preset buttons (1 to
6) on the front panel. Select the BAND first.
Press and hold the AS/PS button for several seconds. The stations
found with the highest signal strengths are stored in the six preset
memory locations.
Page 17

CD240MPR/512
17
The radio will scan continuously, then cycle through the stations found
and play each for a brief period
During the scan press AS/PS to stop and play the currently displayed
station.
Program scanning
Press AS/PS button briefly to scan the preset stations.
When the field strength level is above a preset threshold the radio plays
the preset station for a short time before resuming its scan. At any time
press AS/PS again to halt the scan and play the station displayed at the
time.
Station storing
There are six preset buttons (1 to 6) to store your favourite stations.
To store the currently playing station at preset number 1:
Press and hold 1 PAU button for several seconds until a beep sounds.
The current station is stored at preset number 1.
Radio functions
Press and hold the SEL button for several seconds. Each press of this
button will step through the available functions.
Use the VOL +/- button to adjust the function
When the required function is displayed this will be set after a few
seconds, the display then returns to the current mode of operation.
These are the available functions (factory defaults shown in bold):
-> DSP OFF -> CLASSIC -> ROCK -> POP -> FLAT -> NONE
-> INIT VOL -> Sets the volume when the unit is first switched on.
-> CT -> Allows you to set the clock time.
-> TA VOL -> Sets the Traffic Announcement Volume.
-> EON ON -> Switches the EON function ON or OFF.
NOTE: The unit can store up to six stations on each band
for recall at any time. A total of 30 stations can be preset 6
in each band.
Page 18

CD240MPR/512
18
Reset (reset functions to factory defaults)
The RESET button can be activated with either a ball point pen or a thin
metal object. It will need to be activated:
• After completing the installation of the unit.
• If any function buttons do not operate.
• When an error symbol is displayed.
Reset the unit by briefly pressing the RESET button with a ball point
pen.The unit is now reset to the factory defaults, switch the ignition off
and refit the front panel.
Page 19

CD240MPR/512
19
RDS operation
Using PTY (Program type)
This function allows the radio to select stations by their programme type
(PTY). When PTY is selected, the radio starts to search for the selected
PTY information and stops when the this information is detected. If the
selected PTY information is not detected the function automatically
ends, flashes NO PTY on the display for a short time and then exits to
normal operation. The PTY button is used in conjunction with the VOL
+/- buttons.
To use the PTY function:
1. Press the PTY button to turn the PTY function on or off, the PTY
symbols will be shown on the display.
2. Press and hold the PTY button to select a Program Type:
The current selection will be displayed. Use the Vol + or Vol - buttons
to select from the following
NEWS AFFAIRS INFO SPORT
EDUCATE DRAMA CULTURE SCIENCE
VARIED WEATHER FINANCE CHILDREN
SOCIAL RELIGION PHONE IN TRAVEL
LEISURE DOCUMENT
When the program type you want is displayed, press the PTY button to
search for that program type.
AF (Alternative Frequencies)
Briefly press the AF button to toggle AF on and off.
When selected, the symbol AF appear on the display.
The broadcast station name (PS) is displayed when an RDS station is
being received. The AF symbol starts blinking if the received broadcast
signal is deteriorating.
ALARM will be displayed when an emergency broadcast is received.
When this happens the sound output level will be adjusted to the preset
output level automatically when the volume control is set at minimum.
Page 20

CD240MPR/512
20
Regional Program Operation (REG)
Some broadcasting stations change their programme from normal
broadcasting to regional broadcasting.
When REG ON is selected the current listening program remains
unchanged. When REG OFF is selected it allows the reception to
moves to a regional station.
Press and hold the AF button for a few seconds. REG ON or REG OFF
is displayed (depending on which function was previously selected).
Press AF to toggle REG ON and REG OFF.
Listening to Traffic Announcement
This function when set will cause any traffic announcements to interrupt
the programme being listened to.
To use TA (Traffic Announcement):
Press the TA button to toggle TA on and off. When on the TA symbol
will be displayed.
When TA mode is on any transmitted traffic announcement will be
heard.
If the unit is in CD mode, it will switch from CD to the radio for the
duration of the travel announcement.
Enhanced Other Networks (EON)
When a traffic announcement (TA) is transmitted on a Network radio
station (e.g. BBC Radio 2) the facility will automatically switch to your
nearby BBC Local Radio station for the travel bulletin for the duration of
the announcement. The symbol EON is displayed.
NOTE: The current traffic announcement may be cancelled
by pressing the TA button, but the TA mode is not turned
off.
Page 21

CD240MPR/512
21
Using the CD Player
CD operation
Press the MODE button and select CD
CD play
Carefully insert a compact disc into the disc slot with the label side up.
The disc is then automatically loaded into the unit and starts playing
from the first track on the disc. The display will first show the total tracks
on the disc, then display the current track number and track time
elapsed.
To Eject the CD
Press the EJ button. The CD stops playing and ejects the CD from the
slot. The unit is then put into Radio mode.
To switch from CD play to radio
Press the MODE button and select TUNER. The CD will stop playing,
the radio will then play. To resume CD play press the MODE button
again, the CD will play from the beginning of the current track.
Select tracks
During CD play press TRACK/TUNE buttons to move to the previous
track or the next track. The track number is displayed.
During CD play, hold TRACK/TUNE button to fast reverse or fast
forward through the CD. Play starts from when you release the button.
Pause play
During play, press 1 PAU button to pause play of the CD. Press 1 PAU
again to resume play.
NOTE: If the CD is inserted label side down, the unit will return to
Radio mode. The CD will not automatically eject, so you will need
to press the EJ button to remove the CD.
NOTE: If the Ejected CD is not removed within about 5 seconds
the CD will be taken back into the unit to protect it, the CD will not
play.
Page 22

CD240MPR/512
22
Repeatedly play a track
During CD play, press 2 RPT button, the display shows RPT. This will
continuously replay the same track. Press 2 RPT again to exit repeat
play. The repeat indicator will be removed from the display.
Preview all tracks
During CD play, press 3 INT button, the display shows INT. This will
play a short intro of each track on the current disc. Press 3 INT again to
exit preview play, The INT indicator will be removed from the display.
Play all tracks randomly
During CD play, press 4 RDM button, the display shows RDM.This will
play tracks in a random order. Press 4 RDM again to exit random play,
the display shows RDM OFF.
CD-R/CD-RW disks
On this unit, in addition to an audio CD, you can play disc types CD-R
and CD-RW that contain audio tracks.
However, depending on the conditions of the recording equipment or
the CD-R/ CD-RW disc itself, some CD-R and CD-RW discs may not
play.
Do not stick paper or tape onto the label side or the recording side of
any CD-R/CD-RW, as it may cause a malfunction in the unit.
Page 23

CD240MPR/512
23
MP3 operation
When an MP3 format disc is inserted, the unit initially searches the disc
for the number of MP3 files and folders on the disc, song length, song
title, artist name and album name, it then starts playing the first song.
This information is then displayed in sequence together with the MP3
symbols during each song played. The track number and time elapsed
are also displayed.
Track search
To search for a track number:
1. Press AS/PS button once. The display will show SEARCH 001 and
the first digit (the 1) on the display will start blinking.
2. Use the TRACK/TUNE buttons to SELECT to select the first digit
then press SELECT to enter it.
3. Repeat step 2 until all 3 digits have been entered.
4. Press the ENTER button. The chosen track will now play.
File search
To search for a file name in the ROOT directory:
1. Press AS/PS button twice. The display will show SEARCH A** and
the first digit (the A) on the display will start blinking.
2. Use the TRACK/TUNE buttons to SELECT to select the first digit
then press SELECT to enter it.
3. Repeat step 2 until the first 3 characters have been entered.
4. Press SELECT, the display will show the first file that starts with
those letters, to move to the next track that starts with those letters
use the TRACK TUNE buttons.
5. Press the ENTER button to play the displayed file.
Page 24

CD240MPR/512
24
Directory search:
If the MP3 files have been place in directories on the disc. you can
search for a particular directory by:
1. Press AS/PS button three times.
2. The unit displays DIR: (name of first directory).
3. Use the TRACK TUNE buttons to scroll through the directory list.
4. When the directory you want to play is shown on the display, press
the ENTER button
Skip up and down 10 tracks
This option is useful because MP3 discs can contain many songs.
To skip forward 10 tracks:
1. During MP3 play press preset 6 button to skip forward 10 tracks.
The track number will be displayed and play will start.
To skip backwards 10 tracks:
1. During MP3 play press preset 5 button to skip backwards 10 tracks.
The track number will be displayed and play will start.
2. Repeatedly pressing 5 or 6 will skip 10 tracks at a time.
Common functions
The functions Search, Select track, Pause, Repeat, Preview and
Random are common to both MP3 discs and CDs. Please refer to CD
operation to use these functions for MP3 operation. See page 21.
Page 25

CD240MPR/512
25
Recording
This unit allows you to record from the CD or Radio and store the
recording on to the removable flash MP3 player.
Recording from Audio CDs
1. Press MODE button repeatedly to select CD.
2. Press and hold the REC button until NAND ONE TRACK is shown
on the display
3. Choose between NAND ONE TRACK and NAND ALL TRACK by
briefly pressing the REC button.
NAND ONE TRACK:- Records the current track.
NAND ALL TRACK:- Records all of the tracks on the CD.
4. Press the ENTER button to start the recording.
5. To stop the Recording, press the ENTER button again.
Recording from MP3 Discs
1. Press MODE button repeatedly to select CD.
2. Use the TRACK/TUNE buttons to select the file you want to transfer
to the removable flash MP3 player.
3. Press and hold the REC button to start recording.
The recording percentage will be shown on the display.
4. To stop recording, press the ENTER button.
Page 26

CD240MPR/512
26
Recording from Radio
1. Press MODE button repeatedly to select TUNER.
2. Select the station you want to record.
3. Press and hold the REC button to start recording.
REC starts flashing on the display
4. To stop recording, press the ENTER button
Voice Recording
1. Press MODE button repeatedly to select NAND.
2. Press and hold the REC button to start voice recording.
3. To stop recording, press the ENTER button.
Deleting Files
1. Press MODE button repeatedly to select NAND.
2. Use the TRACK/TUNE buttons to select the file you want to delete.
3. Press the SCAN button to delete the file.
4. Press the ENTER button to confirm.
Page 27

CD240MPR/512
27
The Flash MP3 Player
Removing the Flash MP3 Player
1. Press the OPEN button, to lower the front panel.
2. Press the clip on the rear of the panel until a click is heard
3. Slide the Flash MP3 Player from the front panel.
Headphones
Plug your headphones into the headphones socket on the side of the
Flash MP3 Player.
Page 28

CD240MPR/512
28
Basic functions
Switching on
To turn the Flash MP3 Player on, press and hold the Play/Pause button
for around 2 seconds.
Adjusting the volume
Press the VOL +/- buttons on the Flash MP3 Player unit to increase or
decrease the volume.
Mode selection
1. Press the MENU button to enter the main menu and to make
selections.
2. Use the REW or FF buttons to scroll through the options, select
from the following modes
• Play:- Select this option to play the music (MP3) files stored on the
Flash MP3 player. See page 30
• Record:- Enter Recording mode. See page 32
• FM Radio:- Enter Radio mode. see page 34
• Exit:- Leave the menu
Switching off
To turn the MP3 Player off press and hold the STOP button until the
display goes blank.
Transfering files from your PC
If your computer is running Windows 2000 or later the MP3 player does
not require any special software (use the Software CD supplied if you
are running windows 98). When it is connected to your PC it will appear
as a mass storage device and as such can be used to store any PC files
and folders.
The following procedure is an example based on a computer running
Windows XP. It assumes that your PC is already powered on. It is not
necessary to power on the Player before connecting it to the PC.
1. Connect the MP3 Player to your computer using the USB to MP3
player cable.
Page 29

CD240MPR/512
29
2. A window will open on your PCs task bar stating that new hardware
has been found and that it is a mass storage device. This will then
change to a message stating that the new hardware is ready to use.
3. Open ‘My Computer’ on your PC. You should see the new device
listed in your disk drives.
4. You can simply copy files to the new drive as you would any other
disk drive. Similarly files can be deleted from the new drive as you
would any other disk drive.
5. The file structure will be preserved. When playing for the first time
any files in the root directory will be played first followed by any
files stored in folders.
6. Once the files have been transferred click on the ‘remove hardware
safely’ icon on the PCs task bar. A window will open and the USB
mass storage device will be listed.
7. Click on the USB mass storage device. The PC will then state when
it is safe to remove the hardware.
Disconnect the player and replace the USB cover.
Your MP3 player is now ready to use.
NOTE: If the new drive is not listed it may be necessary to
restart your computer
NOTE: Do not disconnect your Player while files are being
transferred as this will corrupt the data
Page 30

CD240MPR/512
30
Play Mode
Playing tracks on the Flash MP3 Player.
1. Connect your headphones and press the PLAY/PAUSE button to
start playback.
The display will show the track title, elapsed time for the track, the track
number and the total number of tracks.
Selecting tracks
When the Flash MP3 player is stopped, press the REW or FF button to
browse through the tracks. When the track title you require is displayed
press the PLAY/PAUSE button to start playback.
1. Press the FF button to skip to the next track.
2. Press the REW button to go to the start of the current track.
3. To go to the previous track while the Flash MP3 player is playing
press the REW button twice.
Searching within a track
During playback, press and hold the FF button for more than one
second to fast forward.
During playback, press and hold the REW button for more than one
second to fast reverse.
NOTE: If the track title has more than 15 characters the
display will scroll during playback.
Page 31

CD240MPR/512
31
Settings
1. During playback, press and hold the MENU button to enter the
settings menu and to make selections.
2. Use the REW or FF buttons to scroll through the options, select
from the following modes
Play mode
Music files can be set to playback in a variety of repeat and random
modes. The options are:
•Normal
• Shuffle Folder,
• Shuffle Once,
• Shuffle Repeat
• Track once
• Repeat Folder
• Repeat All
• Repeat Track
•Intro
Equalizer
Your Flash MP3 Player has five preset equalization settings that
enhance certain frequency bands to suit the type of audio output.
The five EQ settings are:
• Normal (no equalization)
•Rock
•Jazz
• Classical
•Pop
Page 32

CD240MPR/512
32
Settings
You can adjust the play mode setting in this menu the options available
to change are:
• Contrast: Adjusts the screen contrast from 10 to 100
• Backlight: Sets the length of time the backlight stays on after a
button press from 0 - 20 seconds
• Idle Shutdown: This will automatically switch the MP3 player off
after a preset period. The period can be set to Disable (0), up to 20
minutes.
• Information: Displays the current software version number and the
total memory capacity of this MP3 Player.
• Factory Settings: Reset the setting to factory default values
• Format: Formats the Memory on the MP3 Player
Play Speed
Adjust the playback speed from 0 - 200% 100% is the default value.
Record mode
1. Press the PLAY/PAUSE button to begin recording.
2. Speak clearly into the microphone.
3. To stop recording, press the STOP button.
To listen to the file you will need to enter the Play mode as described
See “Mode selection” on page 28.
Record settings
Recording mode:
This menu adjusts the sampling rate of any recordings you make, the
sampling rates available are 16 KBPS, 24 KBPS, 32 KBPS, 40 KBPS,
48 KBPS, 56 KBPS, 64 KBPS, 80 KBPS, 96 KBPS, 112 KBPS, 128
KBPS, 160 KBPS, and 192 KBPS.
NOTE: Increasing the sampling rate will give a better
quality recording but will also increase the file size.
Page 33

CD240MPR/512
33
Recording Input
Select from Voice (Microphone) and Line input.
VAD
This option allows you to adjust the sensitivity of the microphone input,
we recommend you keep this setting set to OFF.
Select between:
• Off - Starts recording immediately
• Low - Only starts recording when a voice at a little above normal
volume is heard by the microphone.
• High - Only starts recording when a loud voice is heard by the
microphone
Auto Sync
The auto sync option allows you to make syncronous recordings
through the line in socket
Select between:
• Off - Starts Line-In recording immediately
• 1 - adds 1 second to the begining and end of each file.
• 2 - adds 2 seconds to the begining and end of each file.
• 3 - adds 3 seconds to the begining and end of each file.
• 4 - adds 4 seconds to the begining and end of each file.
Page 34

CD240MPR/512
34
FM Radio
Tuning
1. Use the REW or FF buttons to search for a station, the frequency
will increase or decrease by 0.1 Mhz with each press.
2. Press and hold the REW or FF buttons to activate the autoscan
feature.
When a programme is found the search will stop. If this is not the
programme you require press the REW or FF buttons again to continue
the search.
Saving a station to a preset number
This section gives instructions for saving programme presets.
1. Tune the radio to the station you want to preset.
2. Press the Play/Pause button once.
CH1 will be shown on the display
3. Use the REW or FF buttons to select the preset number, e.g. 8 and
press MENU button to store the station at the selected preset
number.
4. Memory will be displayed for a brief time to indicate the programme
has been saved.
NOTE: The headphones act as an aerial and must be
connected in order to receive a good signal.
NOTE: A maximum of 20 stations can be stored.
Page 35

CD240MPR/512
35
Normal /Preset tuning
Normal mode simply means that with each press of the FF or REW
button the frequency will increase by 0.1 Mhz
Preset mode means that with each press of th.e FF or REW button the
Radio will skip to the next preset station. 1-20
Using the preset mode
This section explains how to turn on the PRESET MODE.
1. Press and hold the MENU button until the menu icons are
displayed.
2. Use the FF or REW buttons to select PRESETS and press the
MENU button to select.
3. Use the FF or REW buttons to turn the presets mode on or off and
press the MENU button to save your option.
4. Exit the menu system.
Page 36

CD240MPR/512
36
Help and Advice
Troubleshooting
Before going through the check list, check wiring connection. If any of
the problems persist after the check list has been made, consult your
nearest service dealer.
Symptom Cause Solution
No Power
1. The car ignition
switch is not turned
on.
2. Fuse has blown
1. If the power supply is
properly connected to
the car accessory
circuits, but the engine
is not moving, switch
the ignition key to
“ACC”.
2. Replace the fuse (see
page 37)
Disc cannot be
loaded or ejected.
1. Presence of CD disc
inside the player.
2. Inserting the disc in
reverse direction.
3. Temperature inside
the car is too high.
4. Condensation.
1. Remove the disc in
the player, then put a
new one in.
2. Insert the compact
disc with the label
facing upward.
3. Clean the disc or try to
play a new one.
4. Leave the player off
for an hour or so, then
try again.
No sound.
1. Volume is at
minimum.
2. Wiring is not properly
connected.
1. Adjust volume to a
desired level.
2. Check wiring
connection.
Sound skips.
1. Press the RESET
button with a ball
point pen or similar
object.
2. The disc is extremely
dirty or defective
disc.
1. Adjust the installation
angle less than 20
degrees.
2. Clean the compact
disc, then try to play a
new one.
Page 37

CD240MPR/512
37
Replacing the fuse
Replace only with the type and value as fitted.The unit will need to be
removed to access the fuse which is located on the rear panel next to
the ISO connector plug.
Customer Helpline Number: 0870 873 0084
Internet address:www.roadstar-uk.co.uk
The operation keys
do not work.
1. The built-in
microcomputer is not
operating properly
due to noise.
1. Press the RESET
button with a ball point
pen or similar object.
The radio does not
work. The radio
station automatic
selection does not
work.
1. The antenna cable is
not connected.
2. The signals are too
weak.
1. Insert the antenna
cable firmly.
2. Ensure the antenna is
fully extended.
Symptom Cause Solution
Page 38

CD240MPR/512
38
Care and Maintenance
Cleaning the unit
Wipe with a soft cloth. If the unit is very dirty, dampen the cloth with a
weak solution of neutral detergent and water, and then wipe clean. Dry
thoroughly with a clean dry cloth.
Cleaning CDs
Use a soft cloth to wipe off any fingerprints and dust from the disc
surface. Wipe in a straight line from the centre to the outside of the disc.
Small dust particles and light stains will not affect reproduction quality.
• Never use chemicals such as record sprays, antistatic sprays,
benzene or thinners to clean your CDs.
• To reduce the risk of scratches, always put CDs back in their cases
after use.
• Do not expose CDs to direct sunlight, high humidity or high
temperatures for long periods.
• Do not stick paper or write anything on either side of the CD.
Page 39

CD240MPR/512
39
Technical Specification
CD/MP3 PLAYER SECTION
Signal to Noise Ration >60dB
Channel Separation >50dB (1kHz)
Frequency Response 20Hz-20kHz
TUNER (FM)
Frequency Range 87.5 - 108 MHz
Intermediate Frequency 10.7 MHz
Stereo Separation 30dB
Signal to Noise Ratio 50dB
Channel Step 50kHz
TUNER (MW)
Frequency Range 522-1620 kHz
Intermediate Frequency 450kHz
LINE OUT
Output 350mV
Impedance 10 kOhms
GENERAL
Power Supply 13.8V DC
Speaker impedance 4 or 8 Ohms
Output power 40W x 4 CH
Page 40

CD240MPR/512
40
Guarantee
This product is guaranteed for 12 months from the date of original
purchase. If any defect arises due to faulty materials or
workmanship, the unit will either be replaced, a refund given or
repaired free of charge (where possible) during this period by the
dealer from whom you purchased the unit.
The guarantee is subject to the following provisions:
• The guarantee is only valid within the boundaries of the country of
purchase.
• The product must be correctly assembled and operated in
accordance with the instructions contained in this booklet.
• The guarantee does not cover accidental damage, misuse, or
consumable items.
• The guarantee will be rendered invalid if the product is resold or has
been damaged by inexpert repair.
• The manufacturer disclaims any liability for incidental or
consequential damages.
This guarantee is in addition to and does not diminish your
statutory, or legal rights.
Page 41

LPS-REV1-APR06
 Loading...