


2
About manual
Thanks for purchase the RoadRunner what is the first portable car navigation
system in Korea.
Should be fully known well the application after read this manual to make yourself
familiar with the RoadRunner’s new function.
It will be possible to use this product more conveniently after known well the
installation and notice before use.
It is possible to be shown differently between the actual drawing and image, color of
this manual according to the time of making this manual.
It is prohibited to reprint, copy, transfer, circulate with any reason without
manufacturer’s allowance.
The contents of this manual will be changed without any preannounce. The
manufacturer has the right to adjust, improve the contents without notify to personal or
any organization.

3
FFCCCC RRFF
IINNTTEERRFFEERREENNCCEE SSTTAATTEEMMEENNT
T
NOTE :
This equipment has been tested and found to comply with the limits for a Class B
digital device, pursuant to Part 15 of the FCC Rules.
These limits are designed to provide reasonable protection against harmful
interference in a residential installation.
This equipment generates, uses and can radiate radio frequency energy and,
if not installed and used in accordance with the instructions, may cause harmful
interference to radio communications.
However, there is no guarantee that interference will not occur in a particular
installation.
If this equipment does cause harmful interference to radio or television reception
which can be determined by turning the equipment off and on, the user is
encouraged to try to correct the interference by one or more of the following measures.
- Reorient or relocate the receiving antenna.
- Increase the separation between the equipment and receiver.
- Connect the equipment into an outlet on a circuit different from that to which
the receiver is connected
- Consult the dealer or an experienced radio, TV technical for help.
- Only shielded interface cable should be used.
Finally, any changes or modifications to the equipment by the user not expressly
approved by the grantee or manufacturer could void the users authority to
operate such equipment.

4
The users manual or instruction manual for an intentional or unintentional radiator
shall caution the user that changes or modifications not expressly approved by the
party responsible for compliance could void the user’s authority to operate
the equipment.
THIS DEVICE COMPLIES WITH PART 15 OF THE FCC RULES.
OPERATION IS SUBJECT TO THE FOLLOWING TWO CONDITIONS :
(1)THIS DEVICE MAY NOT CAUSE HARMFUL INTERFERENCE, AND
(2)THIS DEVICE MUST ACCEPT ANY INTERFERENCE RECEIVED,
INCLUDING INTERFERENCE THAY MAY CAUSE UNDESIRED OPERATION.
FCC ID : Q5MPN-100 MADE IN SEOUL, KOREA

5
Notice & Warning for Safety use
Please carefully read this manual and use this product according to manual to keep
user’s safety and protect property from accident.
About AC Adapter
1. Do not make damage by curve the Power cord with force or pressing with heavy
things.
2. Do not use damaged power cord & plug, loose-fitting consent.
3. Do not touch or pull out the power plug or part of cord with wet hands.
4. Use the right AC Adapter supplied with product by manufacturer.
About operating under driving
1. Operate this product after stop driving car to the safe area it may cause car
accident under driving operation.
It is only user’s responsibility to keep safe driving and protect from accident by
using this product under driving.
2. User’s are responsible for protect this product from damage under driving by
using the Car Cradle supplied by manufacturer.
About product maintenance
1. Be careful not to leave this product alone in the car for long time because indoor
temperature sometime possible to go up to 80 degree.
2. Do not reconstruct, disassemble or repair by only yourself.
3. Electromagnetic waves signal can make something wrong or disoperating the
electronic system in the car. Please check in advance with your car
manufacturer whether the car is influenced by RF wave energy.

6
-- Contents Of User’s Manual --
1. Product Instruction
1-1. Composition Instruction
1-2. Name of Each Part
1-3. Installation (Cradle)
2. Start
2-1. Notice Before Use
2-2. Start
2-2-1. Detailed Instruction Of Menu
A. CAR Navigation
B. MP3 Player
C. Voice Memo
D. Utility
2-2-2. Utility Menu Instruction
A. Calculator
B. Calendar
C. Game
D. Calibrati
E. USB Active Sync
F. Setup
3. Product Specification
3-1. Main body
3-2. Accessory
3-3. Battery Using and Charging Time
3-4. Using Environment

7
1. Product Instruction
RoadRunner is portable CAR Navigation system.
It means designed possible to use portable and fax on the car.
For CAR Navigation system, there are GPS engine and antenna, also close
electronic map inside of this product.
RoadRunner can unify GPS engine, antenna and computer system for data
processing as one and has PocketNaviTM made by GeoandspaceTM as software for
Car Navigation system. PocketNavi User’s Manual will guide application and
instruction of Car Navigation system’s software.
Notice: PocketNaviTM user’s manual is explained for common PDA and will be
some different about the contents for hardware system.
In this case, be referred to this user’s manual.
RoadRunner is possible to be used not only in the car but also outside of the car as
worker’s mode. In addition, built in the convenient & superior capability MP3 Player.
Finally, it is car entertainment system that containing Calculator, Calendar, Voice
Memo, etc., for user’s convenience.
Details are referred to the manual.
Notice: This product is minute machinery and the user should use it carefully.
Roadrunner is not only for driving assistance but also portable use designed.
But the user have responsibility to protect damage by using car cradle
manufacturer is supplying.
Warning: User should be in take a responsibility to be careful for safe driving
during this product is used.
It is dangerous to operate this product during car driving.

8
1-1. Composition Instruction
Please confirm the composition same as follows.
If there is un-matching or lack of composition, contact to the selling agency.
RoadRunner Body Cradle for Car DualLock for Cradle
Cigar Jack AC Adapter USB Sync Cable
External Antenna User’ s Manual USB ActiveSync. CD
1-2 Name of each Parts

9
Name of each parts basically have to know for using the system.
FRONT GPS Antenna
Speaker LED
Power Switch
LCD Screen
Keypad
NAME FUNCTION
GPS Antenna Receive GPS Satellite Signal.
LED Show Power/Charging/Status of GPS Receiving Satellite.
Power Switch Use for Power on or Initialize the system.
Speaker Speaker for Voice guidance.
LCD Screen Showing the screen.
Keypad Input the letter or Number / Using the given function
----------------------------------------------------------------
Signal Light ( LED) Instruction
LED NAME STATUS FUNCTION

10
PWR GREEN Operating System
OFF System Power Off
CHG RED Under Battery Charging
ORANGE Stop Battery Charging
GREEN Finish Battery Charging
OFF Under Battery Discharging
GPS ORANGE Searching GPS Satellite
GREEN Fix Present Location
OFF GPS Receiver Power off
REAR
External GPS Antenna
Connecting Port
Reset Switch
Position of Duallock™
Attaching
NAME FUNCTION
External GPS Antenna Port for External GPS Antenna Connecting when use
Connecting Port External GPS Antenna
RESET Switch for System Reset
(Use after cut off the External Power)
Position of DualLock Attaching Position of DualLock Attaching

11
SIDE
Volume
LCD Light
Control Button
Audio Jack
CF Slot
NAME FUNCTION
Audio Jack Stereo Audio Jack for enjoying MP3
Volume Volume Up /Down Button
LCD Light Control Button LCD Light Control Button
CF Slot Port for Insert MP3 CF Card
.

12
BOTTOM
External Power Port(DC-IN)
I/O Port
USB Port
NAME FUNCTION
External Power Port Port for Connecting Cigar Jack Power or AC Adapter
USB Port Port for Connecting USB Sink Cable
I/O Port Port for System debugging
1-3. Installation (Cradle)

13
Method for mounting RoadRunner and recommended position for mounting to the
car.
<Picture1> <Picture2>
1. Firstly attach the Duallock
TM
tape made by 3M to the position of Cradle bracket &
RoeaRuuner’s backside position. (Picture2)
2. Mount the Cradle to the car dashboard at the recommended position using the 3M
tape. (Picture1)
3. Mount after put together the RoadRunner’s Duallock™ position & car cradle
braket’s Duallock™ position.
4. Set to the easy position to see using the set screw of car cradle.
5. Connect the power cable for car to the RoadRunner’s DC-IN(External Power Port).
Mounting is finished.
6. <Picture3> Feature after mounting <Picture4> Recommended position on car dash
board
<Picture 3: Feature after mounting> < Picture 4: Recommended position on dashboard>
Notice : After 72 Hours attaching on dashboard 3M™ Tape will be strongly mounted
and will be impossible to re-mounting the other position.

14
2. Start
2-1 Notice Before Use
Point to know before using RoadRunner.
POWER SWITCH
Power Switch of RoadRunner is multi-functional Power Switch and supplying the
following function.
1) Fast Power ON : RoadRunner, usually power off using power switch, will be
off storing the state program operated before power off.
Later power on again, the system will start with the
program was operated before power off.
This makes the user operating the RoadRunner within 1~2
seconds after push the power button and this will be
repeated until the internal battery is charging out.
2) Full power OFF/ON: If you want to initialize the RoadRunner in case of
abnormal operating or stop program due to system error,
push the power switch during more 6 seconds.
Then, all the power of system will be off.
RoadRunner, after power on again, will delete all the
contents of memory and will start with early menu.
RESET BUTTON
This button is positioned on the rear side of RoadRunner and make system
initialize when the power switch is not operated due to any electric shock from
the outside.
Notice: Use reset button after release the DC-IN.
GPS External Antenna Connecting Cable

15
It is possible to use External Antenna in case of unable to mount internal
antenna to the recommended position due to car interior construction.
Insert GPS External Antenna Connecting Cable we are supplying to the GPS
External Antenna Connecting Port of RoadRunner and connect SMA type
external antenna.
Purchase external antenna at the market or from us separately.
< Feature after mounting the External Antenna >
Battery
Battery is built in into the RoadRunner because it is designed portable use.
Thus, it will be charging out during transporting and safe keeping even it is produced
full charging condition.
First time after unpacking, use AC Adapter or Cigar power cable.
Especially, using RoadRunner in the car, recommend you to use the Cigar power cable.
It will be possible to happen automatically stop charging for data protection when
you use at high temperature and high humidity.
Refer to Manual 3-3, for Battery Using & Charging time information.
Notice: Use after connecting DC-IN when it appeared battery low due to battery
discharging. RoadRunner will go automatically to power off mode within 2~5 minutes for
data protection in case of continuous using after low battery appeared.

16
Reception of GPS Satellite
Once operating the CAR Navigation. RoadRunner starts satellite reception
GPS is an equipment to supply present location, speed, height, time, etc., using 24
Satellites that were sent by U.S. Department of Defense.
To see present location by GPS, should receive signal from at least 3 satellites.
Notice: 1. It should be possible to see the wide sky without obstacle for GPS
satellite reception.
The obstacles same as high building area, cliff and leaves what can
cover the sky makes it need additional time to calculate exact location than
normal areas.
Locate the GPS Antenna always to the place good to see the sky.
2. Rainy day (especially, with thunder and lightening) cause delay time to
calculate location than normal weather.
3. Especially, in case of metal coating on the glass of car front, it is
impossible to show location due to the Satellite signal blocking by metal
coating. (Satellite signal can’t pass the metal)
GPS Initialization
It needed GPS Initialization when this product is used firstly.
GPS needed at least 3 satellite signal to calculate location and calculate the
location usually within 2~3 minutes.
GPS Initialization is needed for using Roadrunner first time after moving long
distance (over 150 ~ 200 km).
If you operate Car Nav program by pressing the Car Navigation button on the menu,
it will be appeared Map screen. Then select GPS Icon. It will be initialized if you
select ‘Initialization’ on the left top.
GPS Initialization is positively necessary for the following cases.
1. When use the Roadrunner first time after buying.
2. When use first time after moving long distance ( over 150-200km)
3. Roadrunner is impossible to inform the location for 10 minutes
After GPS Initialization, when the user using the Roadrunner’s car navigation, it
will be possible to inform the location within 2~3 minutes.
Notice : In case of GPS initialization, it will be appeared on the screen of car

17
navigation within 2 ~3 minutes after calculation the location. But, if user
push the initialization button, recommend to wait for 10 ~15 minutes after
power on. This is for making the GPS keeps the tracking report for 24
satellite. Once finish tracking 24 satellites, location guiding time will be
shorter time to use the Roadrunner.
Speaker & Audio Jack
The Speaker included in RoadRunner is Max. 2W Mono speaker.
This speaker is designed for voice introduction of car navigation.
When the user enjoying MP3 music through this speaker, it will be happened sound
crushing in the high volume according to the sound source condition.
This is caused the mp3 file is not guarantee for the size of sound source.
Recommend to enjoying the MP3 music through Stereo Audio Jack.
Will be nice to enjoy MP3 music to use headset or earphone for portable using and
car speaker after connecting to AUX-IN terminal or car-pack.
< Feature of MP3 Player operating>
CF Slot
RoadRunner has 2 CF Slots.
The one is built in and used to connecting CarNavi software and Electronic Map to the
internal CF Slot.
The other is outside and side position of system. (Refer to ‘Name of Parts – SIDE’)
Refer to followings when insert or pull out the CF Card.

18
1) Push the marked point of CF Slot cover
same as picture left.
2) The end parts of CF Slot cover will pop
out after pushing the marked point.
3) Will take off the CF Slot cover same as
<Picture2> after pulling the pop out
point.
4) Can see the CF Slot & Eject button after
the CF Slot cover pop out.
5) Insert or Pull out the CF Card using CF
<Picture 1> Slot & Eject button.
6) Push in the CF Slot cover to fix the hole
after working finished.
Eject Button
CF Slot
<Picture 2>

19
2-2. Start
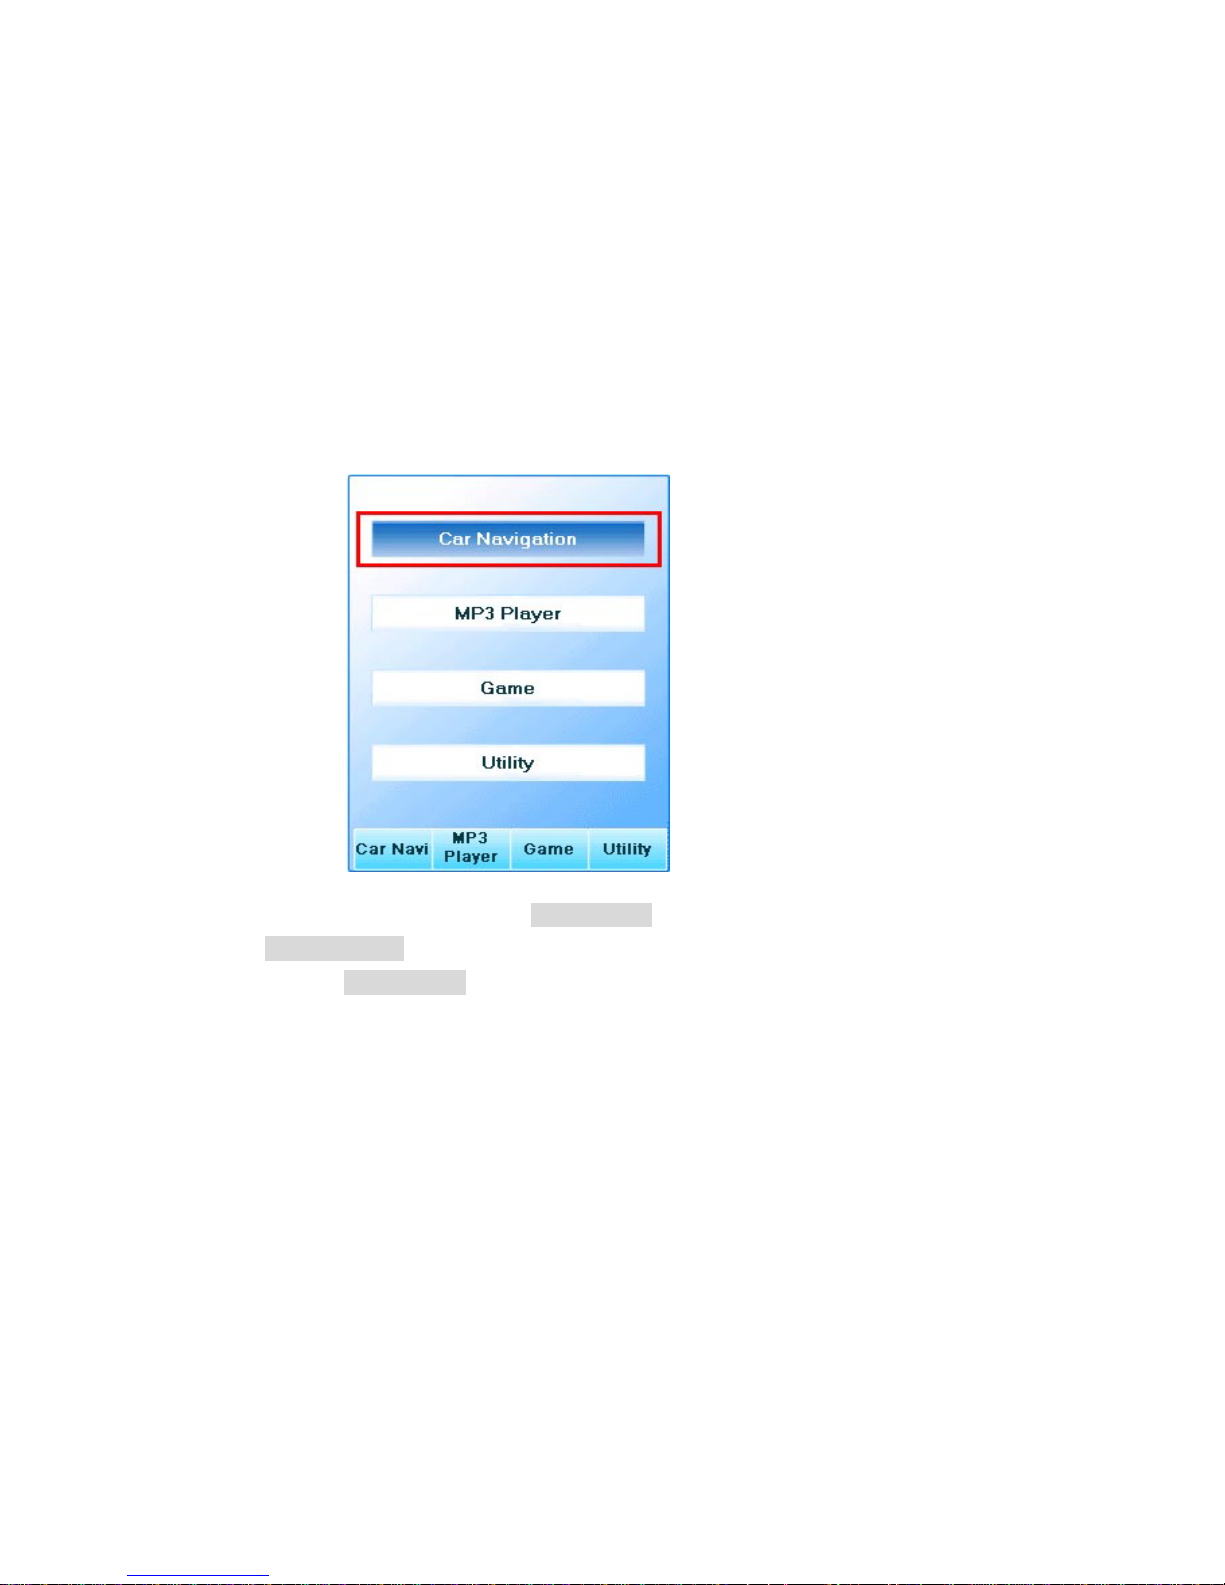
If you power on the Roadrunner by pushing power button, the first menu will be
appeared same as below.
20
2-2-1. Detailed Instruction of Menu
A. CAR NAVIGATION
If you Press CAR Navigation key, Car Navigation software will be operated and
possible to get the screen & voice guide with real time to destination by searching
& setting up the destination.
RoadRunner is containing PocketNavi™ Car Navigation software made by
GeoandspaceTM.
Refer to PocektNavi™ User’s manual for details of Car Navigation software.

21
B. MP3 PLAYER
B-1. Operating – Press MP3 Player key and then MP3 Player will be operated.
< mp3 player selection> < mp3 player initial screen>
Play Mode will be firstly shown on the screen. Playing the music on the Play list
at Play Mode
Music Title
Play list
Play Menu
< Play Mode screen>

22
B-2. Select Music Contents
If you operate this software first time. Play list would be empty. Change to
Edit Mode for adding the music to the Play list. Go to Edit Mode by
pressing Map (Select Music) key after insert Storage Card (MP3 file is
saved) to the Slot.
Tip) Possible to convert from Play Mode to Edit Mode by pressing Map key, or
from Edit Mode to Play Mode.
File list
Play list
Edit Menu
< Edit Mode screen >
RELOAD: Reloading Storage Card.
ADDALL: Add MP3 file in present directory to the Play list.
DELETE: Delete selected music from Play list.
DELALL: Delete all music in the Play list.

23
B-2-1. Select music content
If you move the selected box to the directory wanted by using the up, down
key onto File list, and then press Enter key, possible to go to selected directory.
If you want to go previous directory, press left arrow key or key.
For adding the MP3 file in the File list to the Play list, move the select bar to
the music and then press Enter key.
Tip) Onto List (File list, Play list) number of keypad 1, 3 keys functions Page Up,
Page Down. In case of propriety use, you can make it move faster.

24
B-2-2. Select All Music Contents
If you like to add all music contents in current directory, press F2 (ADD
ALL).
B-2-3. Delete Music Contents
If you like to delete a certain music contents in the Play list, select the music
contents in the play list and press F3(DELETE) to delete the music contents
from the Play list

25
B-2-4. Delete All Music Contents
Press F4(DELETE ALL) key to delete all the music contents in the play list.

26
B-2-5. Play
After organizing your own Play list, you are ready to play music you want.
Press Map (Select music) key to move onto Play Mode. In the Play Mode, press
F2 key to play the music contents you want.
- Once you started, the detail information of music contents, such as music title
will be displayed on the Play list
- Press F2 key to temporarily stop playing. Press F2 key again to re-play.
- Press F3 key to stop playing.
- Press F1 key to play a previous music.
- Press F4 key to play a next music.
Tip) Press Drive key to change the mode of Repeat Style. The different modes are
explained below:
: Play all the music contents in the Play list from the first to end only once.
: Playing all the music contents again.
: Repeat function to play the music again.
Tip) Press Left Arrow key to change the order of music in the Play list. For
example, the order of selected music will be replaced with previous music. Press
Right Arrow key to replace the order of music contents with next music.

27
Tip) Press keypad no. 4, 6 keys to 10 seconds forward and backward the music
contents playing.
Tip) Please refer the Tip section on top of MP3 player. In the Play Mode, you can
refer Play Tip, and Edit Tip in the Edit mode.
B-2-6. Closing Mp3 Player
Press Cancel key to closing MP3 Player. (Able to close in both Play Mode, Edit
Mode)
- Press F3 key, and select “Yes” to close MP3 Player.
- Press F4 key, and select “No” to move back to previous menu.
Tip) Press Menu key to see the menu list while in the MP3 Player mode.

28
B-2-7. Summary
- Play Mode
Version
Tip
Music Title
Detail info.
Duration
Play list
Repeat Style
Proceeding Bar Playing time
Previous title Next title
Play & Pause Stop

29
- Edit Mode
Tip
Previous directory
File list
MP3 file
Directory
Play list
Edit Menu
Delete all Play list
Reloading the Storage Card
Add all the music contents to the play list
Delete the music contents selected of Play list

30
C. Voice Memo
In the Voice Memo, you can store and manage the voice as file after simply
recording it.
C-1. Operation
If press Voice Memo key, will start.
< Select Voice Memo > <Initialized Voice Memo Screen>

31
C-2. Recording
Recording will start if press F1 key. Processing will be shown at the below menu.
Press F1 key when hope to finish recording. The file just finished recording will
be added to the file list when the recording is finished.

32
C. Listen to the record
When you want to listen to the recorded, press F3 key after move select bar to
the wanted file.
It is possible to stop to press F3 during Listen the record for a little while.
Pressing F3 key again, will start from the stop after.

33
C-3. Delete Recorded File
For continuous recording, delete old recorded file because it is limited size
possible to recording.
When you want to delete recorded file, press F4 key after moving the select bar
to the wanted file.
34
2-2-2. Instruction Utility Menu
Press Utility menu to see the details.
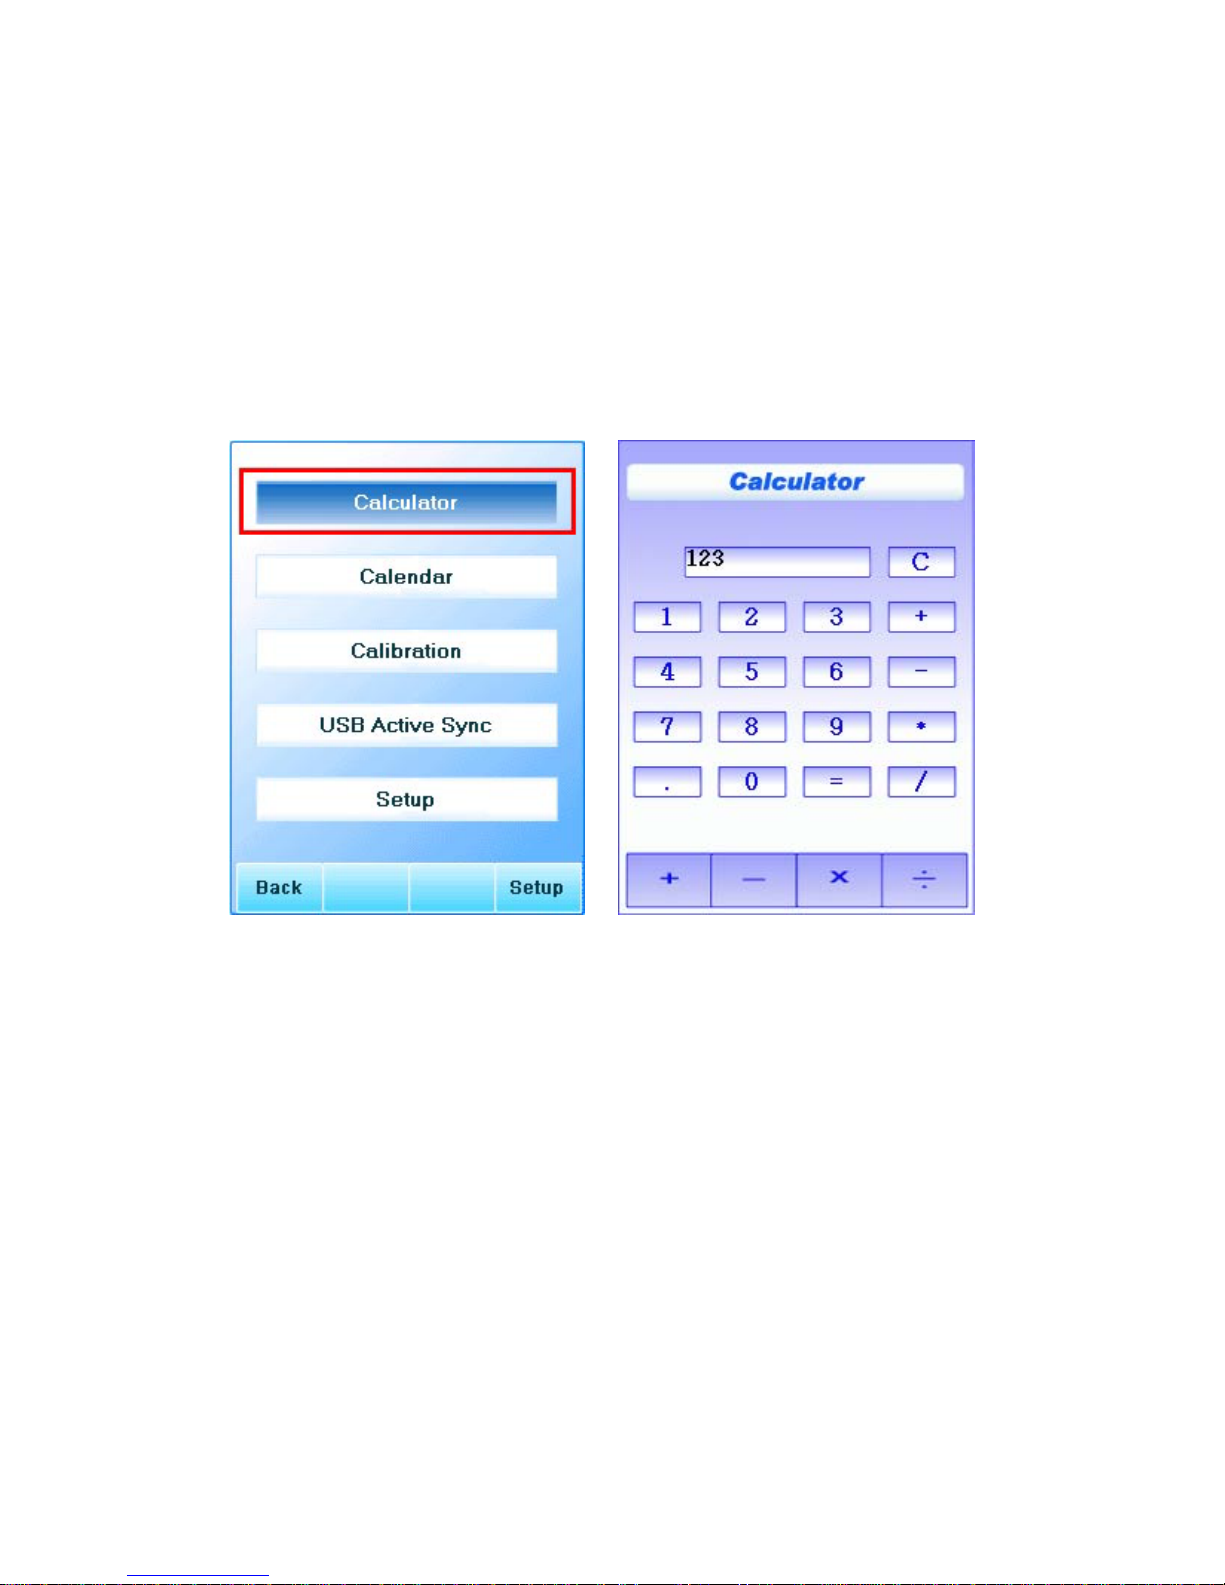
A. CALCULATOR
In the Utility menu, you can have select Calculator bar.
< Select Calculator> <Calculator>
The method will be basically same as normal calculator. The simple application is
as below:
- After typing a figure, press four arithmetical operations(+, -, ×, ÷) to move on.
- Press Enter key to get a result.
- After calculation, press Drive key to reset.
- Press Menu to close the calculator, and display menu screen.

35
B. CALENDAR
In the Utility menu, you can have choice as Calendar.
< Select Calendar > < Calendar >
The simple application is as below:.
- Add one additional year by pressing F1 key, 1 key(Numeric), and Arrow ↓ key
respectively
- Minus one additional year by pressing F2 key, 3 key(Numeric), and Arrow ↑ key
respectively.
- Add one additional month by pressing F3 key, 7 key(Numeric), and Arrow ← key
respectively.
- Minus one additional year by pressing F4 key, 9 key(numeric), and Arrow → key
respectively
- Move to the current date by pressing 5 key(Numeric).
- Press Menu key to close the Calendar, and display menu screen.

36
C. CALIBRATION (OPTIONAL)
- Modifying the setting of Touch Screen.
(Notify) This function is only available in the model supporting touch screen.
If you just buy this RoadRunner or operating the system in the Full Power Mode, it
will be happen un-accurately.
For making it accurately, must operating Calibration. Once Calibration just 1 time, it
will be working accurately even in case of Fat Power Off/On but
In the Utility menu, you can have a choice as Calibration.
< Select Calibration> < Calibration >
As an instruction on the screen, accurately click the CROSS sign several times. The
Calibration procedure will be completed shortly, and will ask you to save this new
setting. If you apply this new setting, click the screen or press ENTER key within 10
seconds. If not, just wait for 10 seconds restore the previous setting.

37
D. USB ACTIVE SYNC
D-1. USB Active Sync
This product is possible to communicate with Computer using Active Sync. It
means possible to move the RoadRunner’s data to the computer or computer data to
the RoadRunner. Using this function, update to new version Car Navigation software
and updating MP3 player program, copy MP3 files to the RoadRunner.
Following process is drawn up based Windows XP. It is possible to install with
same process in case of different operating system. But details of Installation or
Operating process, the messages on the computer screen can be different with the
drawing on the manual.
Microsoft Active Sync version finished testing by us is ver.3.7 and recommend to
use the latest version consider operating environment.
D-2. Composition for Installation
Microsoft Active Sync Install file (MSASYNC.EXE)
RoadRunner device driver (wceusbsh.inf, wceusbsh.sys)
Microsoft Active Sync Install file can be downloaded the newest version of Active
Sync install program at the below Microsoft home page.
http://www.microsoft.com/mobile/pocketpc/downloads
Also, RoadRunner device driver is in the CD we are supplying and possible to
download from the following homepage in case of CD loss.
http://www.digitalsis.com

38
D-3. Install
D-3-1. RoadRunner Device driver Instabll.
1) Power on the RoadRunner and connecting computer & RoadRunner with USB
cable appears “Searching new hardware”. Select Install(High level) and press
next key onto List or Select position.
2) Press Searching select the path there is RoadRunner’s device driver.
If you have CD, select the location of CD or if you download due to lose,
select the path the device drive exist.

39
3) After select the path and press next, will install automatically device drive
same as follow.
4) If the warning message, press ‘continue’ key.
5) Press ‘Yes’ key when the message appears same as below.
(It will not appears depend on the user’s computer condition)

40
6) After adding new hardware and press ‘Finished’ will finish Install.
7) Once normally installed Controller Æ System Æ Construction Manager and
can see following.

41
D-3-2. Install Active Sync
1) After power on the RoadRunner, connect Computer and RoadRunner using
USB cable, operating the Active Sync install program.
2) If you operate Active Sync install program, will release the compression.
3) After release the compression, to go next step pressing the ‘Next’ key
4) Set up Install folder, press ‘Next, and go to next step.
You can change install folder this time.

42
5) Starting file copy. It will take long time at processing 91%.
Following window will be automatically disappeared after finishing install.
6) Following window will come out when you installed Active Sync without
connecting USB cable. Selecting ‘Cancel’ and connect USB cable in advance.
Operate Active Sync program again.
43
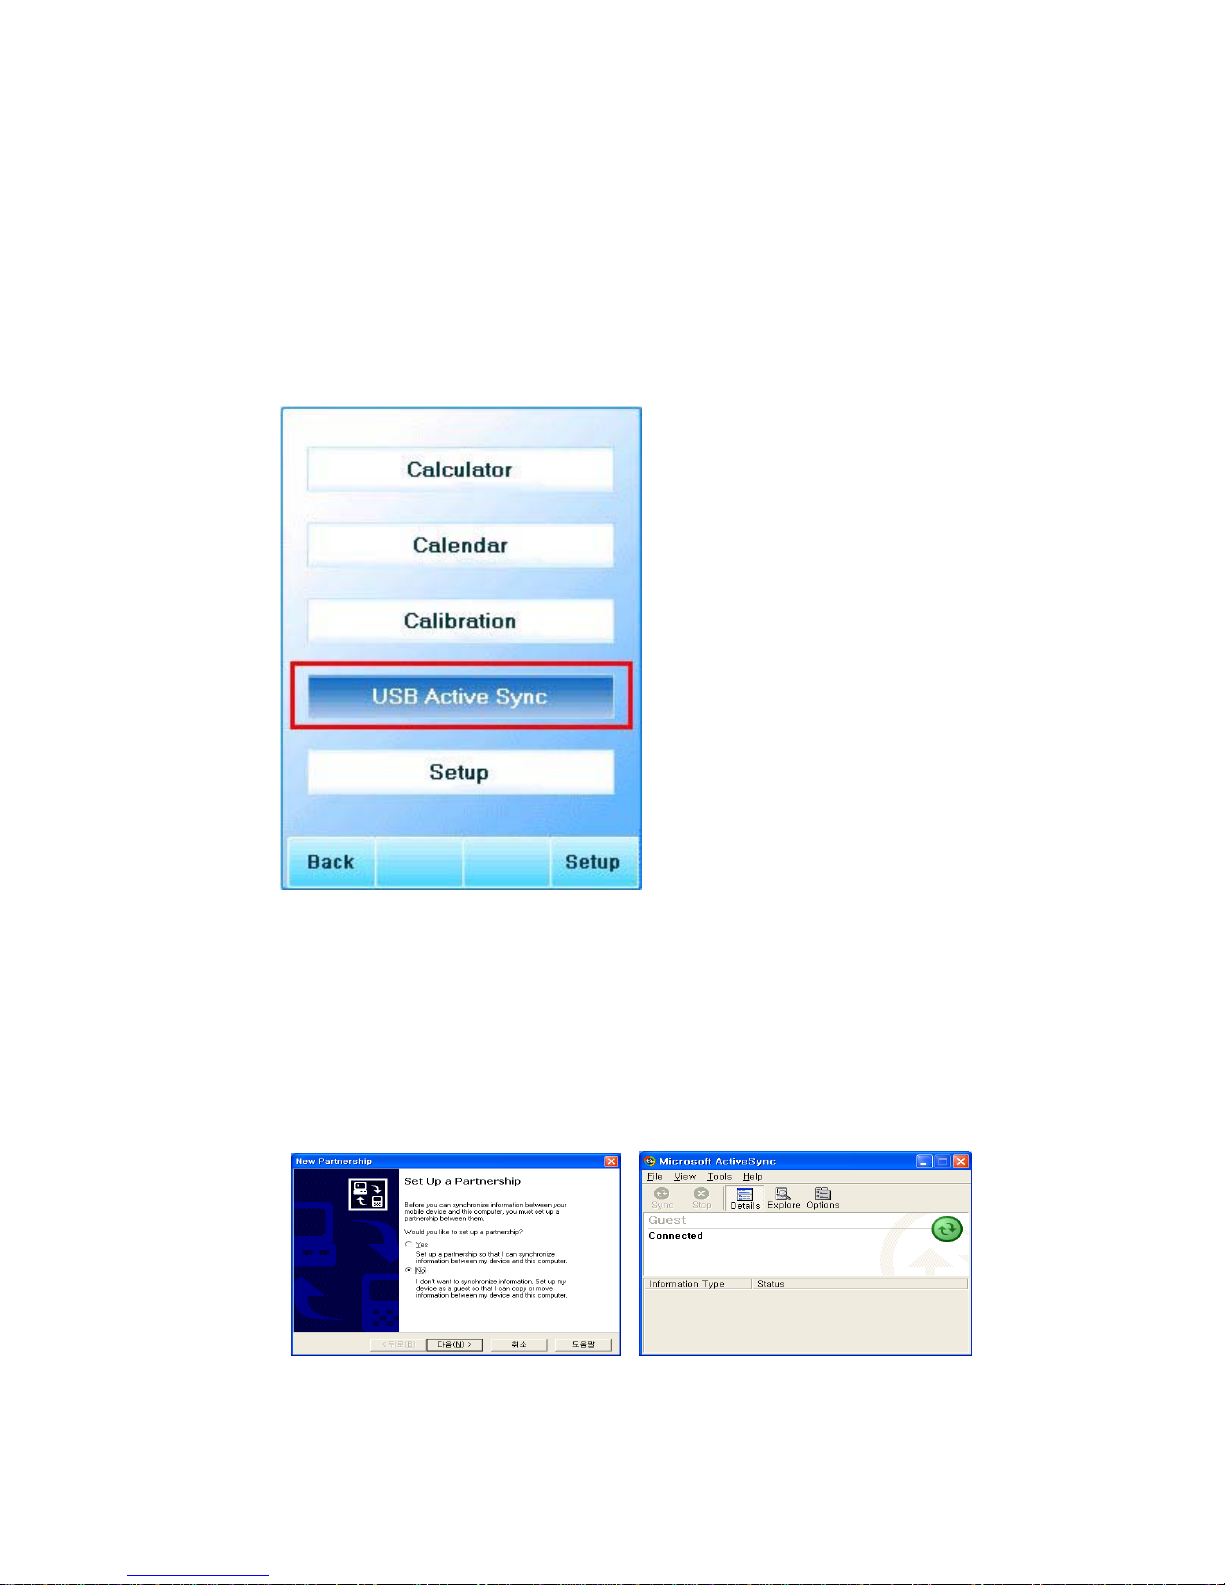
D-3-3. Active Sync Operating
If you select Active Sync onto Utility Menu, it appear “Connecting with Host”
message.
< USB Active Sync Selection >
1) Connecting is succeed, sound will coming out and activated Active Sync
program of Computer.
2) Right screen appears when select ‘No’ and press ‘Next’ onto partnership set
up window.

44
3) When you press Explore, can see the contents of RoadRunner’s directory.
4) Error message at RoadRunner will be appeared when it failed connection.
Then check the condition of USB cable connection. In case of continuous fail to
connect, Reset the RoadRunner or Full Power Off. Then try again. Still it is
failed rebooting the computer.

45
E. SETUP
If you select Setup on Utility Menu will go over to the Setup screen. Possible to see
information related with RoadRunner’s setting up.
< Select Setup > < Setup Screen >
- There are 3 menus onto Setup. First screen is Settings.
- Onto the Set up window, possible to check or change the LCD Front-Light, Storage
Card presence, Sound Volume, Battery Charging status.
- On System Info possible to get RoadRunner’s System information.
- On About show you the rest information.
- Moving by pressing F2 ~ F4 key to each pages matching. (F2 – Settings, F3 –
System Info, F4 – About)

46
3. SPECIFICATION
3-1. Main
DEVISION SPECIFICATION
C P U Intel StrongARM 206Mhz
MEMORY 8/16(Optional) Flash, 32/64(Optional) SDRAM
DISPLAY 3.5 inch 240x320 TFT 64K color LCD
STORAGE 2 CF card support
SOUND 16bit Stereo Sound/Stereo Jack support
SPEAKER MAX.2W Mono Speaker (Car-Navi Voice Guide)
KEYPAD 4개의 Function Key / Alpaha-numeric key support
Exclusive key support for Car-Navi
(Menu/Map/Drive/Cancel/Enter/Map extend/reduction
etc., support)
GPS High capability 12 or 18 channel GPS Engine
ANTENNA High sensitive Helical Active Antenna
Support External Antenna connecting port (option)
BATTERTY Lithium Polimer Rechargeable 3.7V ,2100mAH(Internal)
I/O Port 1USB port/ 1DC-IN /1 Serial(Option)/ 1 CF Slot /
External Antenna Port/ 1 Stereo Audio Jack
CONTROL BUTTON Volume up, down/ LCD Lighting Control button
1 reset button
3-2. Accessory
DIVISION SPECIFICATION
AC ADAPTER 7.5V @1.1A AC 100 ~ 240V, 50/60Hz
CIGAR POWER JACK For car 12V /24V Connecting Cable
CRADLE & Cradle
ATTACHING TAPE DualLock™ attaching/release 1000 times
Tape : 1 time use
USB CABLE PC-RoadRunner Connecting Cable
EXTERNAL ANTENNA External Active Patch Antenna Connecting Cable /
CONNECTING CABLE Connector : SMA

47
3-3. Battery Running & Charging Time
DIVISION SPECIFICATION
<Running Time>
GPS Satellite Receive 3 Hours
MP3 Playing 3 Hours
Utility/ Game 5 Hours
<Charging Time>
Battery Charging Time 4-5 Hours
Notice: 1. Battery life is Charging/Discharging 500 times.
Running time will be reduced after running 500 times.
2. Battery life can be different depend on running temperature, life itself, user.
3. Recommend you to make possible to Battery charging with connecting Cigar
jack cable when use it in the car.
Possible to go charging mode once you connect the Power because the
Charging circuit is built in the Roadrunner.
3-4. Using Environment
DIVISION SPECIFICATION
Temperature -15 ~ 50C (keeping), -5 ~ 40C (running)
Humidity 5% ~90 %(keeping), 20 ~ 80 %(running)
 Loading...