

GPS NAVIGATION SYSTEM
Hardware Instruction Manual

Hardware Instruction Manual
Congratulations on choosing a RoadNavigator product. We have every expectation that you
will be completely satised with your new purchase. To always guarantee optimal function and
performance of your product, we would ask the following:
• Before using the appliance for the rst time, carefully read the operating
instructions and adhere to the safety precautions!
• Also read the software user manual including the End User License Agreement.
• All activities at and with this appliance may only be carried out as described in
these operating instructions.
• Please be sure to include the operating instructions in case you pass along this
product to someone else.
Packaging
This appliance is delivered in protective packaging to prevent transportation damage.
Packaging materials are raw materials and can therefore be recycled. Please recycle these
materials.
2

Hardware Instruction Manual
Contents
1 Brief introduction of hardware 4
2 Specications 6
2.1 Supported le formats 6
3 Operating the hardware 7
3.1 Turning the device On/Off and activating ‘sleep mode’ 7
3.2 The ‘Programs’ menu 8
3.3 Using music player 9
3.3.1 Music player explained 9
3.3.2 Adding les to the playlist 10
3.4 Using video player 11
3.4.1 Video player explained 11
3.4.2 Adding les to the playlist 12
3.5 Using text viewer 13
3.5.1 Text viewer explained 13
3.5.2 Opening text les 14
3.6 Using photo viewer 14
3.6.1 Photo viewer explained 14
3.6.2 Opening photo les 15
4 With reference to environmental protection 16
3
RN10
7
2 4 51
6
3
8
9
1 0
1 2
1 3
1 4
1 5
1 1
Hardware Instruction Manual
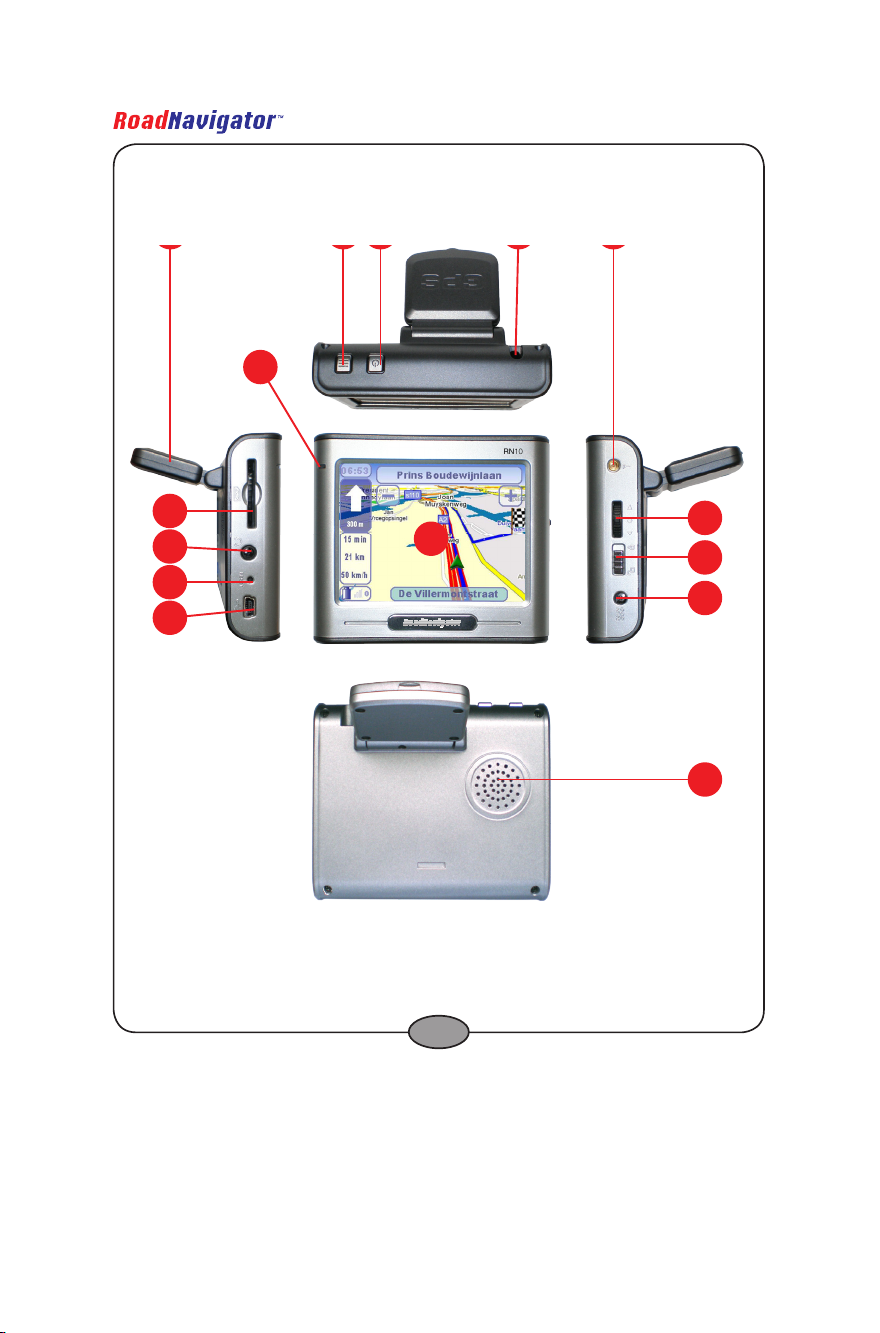
1 Brief introduction of hardware
4
Hardware Instruction Manual
1. Antenna
2. Menu button
3. Power button (hold down 3 sec.)
4. Touch pen (stylus)
5. External antenna socket
6. Indicator light:
Power on: blue light
Battery charging: yellow light
Battery fully charged: green light
7. Touch screen
8. SD-card slot
9. Headphone jack
10. Reset button
11. USB
12. Volume and OK button
13. Locking switch
14. DC in (12V)
15. Speaker
5

Hardware Instruction Manual
2 Specications
Size: 90.5mm*78mm*22mm
Operation temperature: -10ºC ~ +70ºC
Storage temperature: -40ºC ~ +80ºC
Operation frequency: 400MHz
CPU: Samsung S3C2440A-40
SDRAM: 64MB
NAND FLASH: 128mB
Navigation Software: CosmicSoftII
Operating system: WinCE 4.2 NET
Touch screen: TFT 3.5 inch, 320*240 screen resolution
Audio output:: Stereo headphone/Built-in 1w speaker
DC voltage input: 9--30V (12V DC input via cigarette lighter)
Battery: 900mAh Li-ion Polymer battery
Chip Set: SiRF Star III
Antenna: Built-in GPS Antenna (can be connected to an external
antenna)
2.1 Supported le formats
Audio player supports MP3,WAV & MID;
Video player supports ASF, AVI, MP4, WMV;
Picture browser supports BMP,JPG,PNG & GIF;
Text viewer supports TXT.
6

Hardware Instruction Manual
3 Operating the hardware
3.1 Turning the device On/Off and activating
‘sleep mode’
When the device is turned off, press the Power button and hold it for more than 3 seconds to
turn on the device. The indicator light will be lit and a loading screen will appear on the touch
screen. Please wait until the loading is nished.
When the device is turned on, ‘sleep mode’ can be activated by pressing the Power button
for 1 second. The ‘sleeping’ screen will appear before ‘sleep mode’ is activated. In ‘sleep
mode’ your device will save power and can be turned on quickly by pressing the Power button
again.
To turn off the device, press the Power button and hold it for more than 3 seconds. First you
will see the ‘sleeping’ screen, followed by the ‘Power off’ screen. You device is now turned
off.
7

Hardware Instruction Manual
3.2 The ‘Programs’ menu
When your device has nished loading after turning it on, you will hear a notication sound
and the ‘Programs’ menu will appear. It consists of six buttons:
The ‘Navigation’ button
Tap this button to operate the navigation software of your device.
More information on the operation of the navigation software can be
found in the Software User Manual.
The ‘Music’ button
Tap this button to operate the music player. More information can be
found in section 3.3.
The ‘Movie’ button
Tap this button to operate the movie player. More information can be
found in section 3.4.
The ‘Text’ button
Tap this button to operate the text viewer. More information can be
found in section 3.5.
The ‘Photo’ button
Tap this button to operate the photo viewer. More information can be
found in section 3.6.
The ‘Settings’ button
Tap this button to view and/or change the settings of your device.
8

Hardware Instruction Manual
3.3 Using music player
3.3.1 Music player explained
After tapping the ‘Music’ button in the ‘Programs’ menu you will enter the music player
interface.
It consists of the following elements:
Tap this button to exit the music player and return to the
‘Programs’ menu.
( ) Tap this button to play (or to pause) music.
Tap this button to go to the next song.
Tap this button to go to the previous song.
The bottom right slider can be used to control the playing ‘cursor’ within a le.
Tap this button to activate the ‘repeat’ function. This function will
repeat the selected song. Tap it again to deactivate the ‘repeat’
function.
Tap this button to play music in the playlist’s order.
( ) Tap this button to mute (or activate) the sound.
The centre left slider can be used to adjust the volume.
9

Hardware Instruction Manual
Tap this button to delete the selected le from the playlist.
Tap this button to delete all les from the playlist.
Tap this button to add les to the playlist.
3.3.2 Adding les to the playlist
After tapping the button to add les to the playlist ( ), a le exploring screen will appear
showing the content of your SD card.
Select an audio le (MP3,WAV or MID) and tap to add the selected le to the playlist. It
is also possible to select the entire audio content of a folder by tapping . Otherwise, tap
to return to the music player.
10

Hardware Instruction Manual
3.4 Using video player
3.4.1 Video player explained
After tapping the ‘Video’ button in the ‘Programs’ menu you will enter the video player
interface.
It consists of the following elements:
Tap this button to exit the video player and return to the
‘Programs’ menu.
Tap this button to set the video player to full screen.
Tap this button to hide the playlist (right of the screen)
thereby expanding the movie window.
( ) Tap this button to play (or to pause) videos.
Tap this button to go to the next song.
Tap this button to go to the previous song.
The left slider can be used to control the playing ‘cursor’ within a le.
( ) Tap this button to mute (or activate) the sound.
The right slider can be used to adjust the volume.
11

Hardware Instruction Manual
Tap this button to delete the selected le from the playlist.
Tap this button to delete all les from the playlist.
Tap this button to add les to the playlist.
3.4.2 Adding les to the playlist
After tapping the button to add les to the playlist ( ), a le exploring screen will appear
showing the content of your SD card.
Select an video le (ASF, AVI, MP4 or WMV) and tap to add the selected le to the playlist.
It is also possible to select the entire video content of a folder by tapping . Otherwise, tap
to return to the video player.
12

Hardware Instruction Manual
3.5 Using text viewer
3.5.1 Text viewer explained
After tapping the ‘Text’ button in the ‘Programs’ menu you will enter the text viewer interface.
It consists of the following elements:
Tap this button to show le information.
Tap this button to edit text viewer settings.
Tap this button open text les.
Tap this button to exit the text viewer and return to the ‘Programs’
menu.
Tap this button to go to the rst page.
Tap this button to go to the last page.
Tap this button to go to the previous page.
Tap this button to go to the next page.
Tap this button to activate automatic scrolling.
13

Hardware Instruction Manual
3.5.2 Opening text les
After tapping the button to open text les ( ), a le exploring screen will appear
showing the content of your SD card.
Select a text le (TXT) and tap to view the selected le or tap to return to the text
viewer.
3.6 Using photo viewer
3.6.1 Photo viewer explained
After tapping the ‘Photo’ button in the ‘Programs’ menu you will enter the photo viewer
interface.
14

Hardware Instruction Manual
It consists of the following elements:
Tap this button to show le information.
Tap this button to edit slideshow settings.
Tap this button open photo les.
Tap this button to exit the photo viewer and return to the
‘Programs’ menu.
Tap this button to view the previous photo le in the folder.
Tap this button to view the next photo le in the folder.
Tap this button to start a slideshow of the les in the folder.
Tap this button to view the photo at it’s actual size.
Tap this button to zoom out.
Tap this button to zoom in.
Tap this button to rotate the photo 90 degrees counter clockwise.
Tap this button to rotate the photo 90 degrees clockwise.
3.6.2 Opening photo les
After tapping the button to open photo les ( ), a le exploring screen will appear
showing the content of your SD card.
15

Hardware Instruction Manual
Select a photo le (BMP,JPG,PNG or GIF) and tap to view the selected le or tap to
return to the photo viewer.
4 With reference to environmental protection
Packing materials are raw materials and can be used again.
Keep packing materials separate. For more information about recycling
contact your local administration.
Old devices do not belong in the domestic refuse!
Dispose of old devices responsibly, and contribute to environmental
protection.
Your local administration will inform you about collecting points and opening
times.
Old batteries do not belong in the domestic refuse!
Dispose of old batteries accordingly and contribute to environmental
protection. Your local administration will inform you about collecting points
and opening times.
This product complies with European directives
16
 Loading...