

Page 1
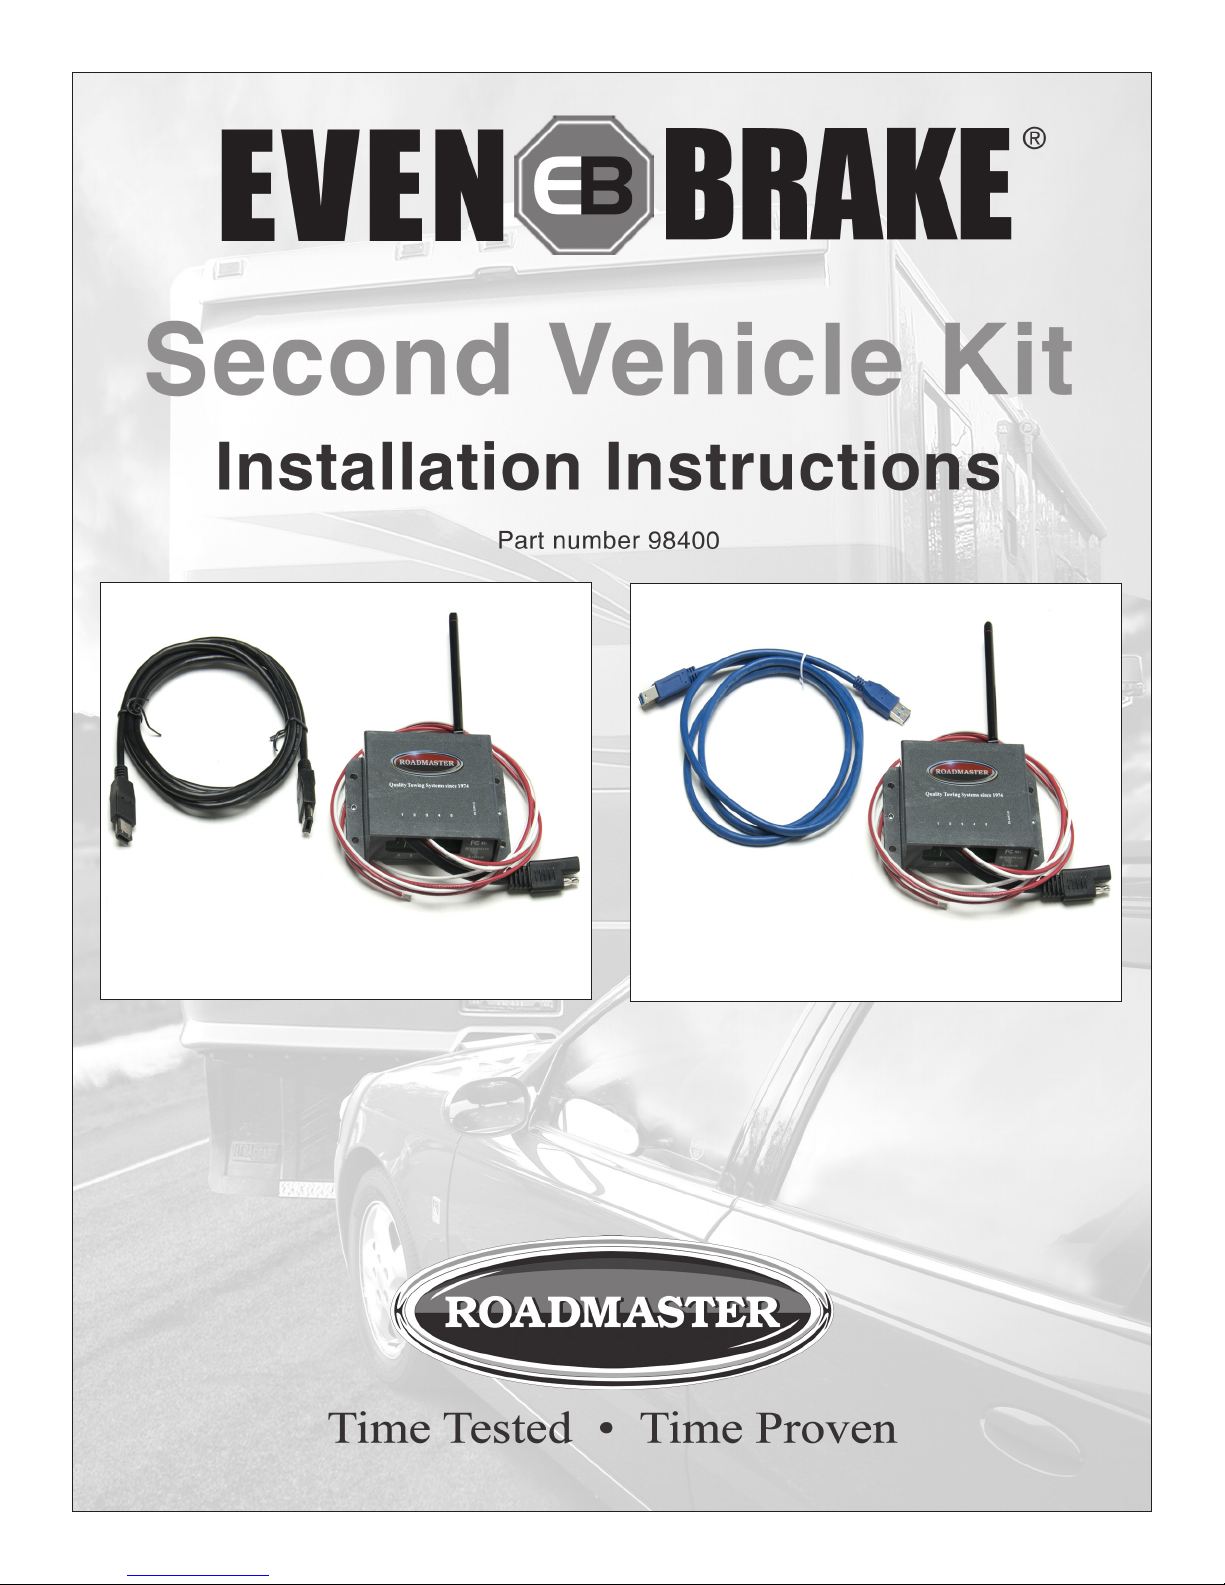
cable not
included
cable not
included
Even Brakes with a
black cable need second vehicle kit 98400
Even Brakes with a
blue cable need second vehicle kit 98450
CAUTION
Check the Even Brake serial number before continuing.
This kit is compatible ONLY with Even Brake systems with serial numbers of 27,496 and below. Check the
serial number on the bottom of the Even Brake unit before proceeding.
ROADMASTER, Inc. • 6110 NE 127th Ave. • Vancouver, WA 98682 • 800-669-9690 • Fax 360-735-9300 • roadmasterinc.com
© 2006-2018 ROADMASTER, Inc. All rights reserved. 853300-14 11/18
Page 2
Statement of FCC compliance
This device complies with part 15 of the FCC Rules. Operation is subject to the following two conditions: (1) this
device may not cause harmful interference, and (2) this device must accept any interference received, including interference that may cause undesired operation.
damage, brake damage, or any other damage to ve Read all instructions before installing
or operating Even Brake. Failure to understand how to install or operate Even Brake
could result in property damage, personal
injury or even death.
CAUTION
Not for use on older vehicles without power brakes.
Even Brake is designed to work with vehicles that
have a power brake system (even though the power
brakes are not activated while towing). Using Even
Brake on vehicles that do not have power brakes will
result in over-braking and severe non-warranty brake
damage.
CAUTION
Do not install Even Brake in a vehicle with an ‘active’ braking system.
‘Active’ (or, ‘continuous power assist’) braking systems are a safety feature on some new vehicles. This
feature allows the brakes to always have power, even
with the ignition off. The only supplemental braking
systems that ROADMASTER manufactures for these
vehicles are InvisiBrake and BrakeMaster. A Brake
Pressure Reducer (part number 900002) must also
be used with BrakeMaster.
If any ROADMASTER supplemental braking system
other than these two is installed, the vehicle will brake
with excessive force, which will damage the tires.
Other non-warranty damage may also occur.
It is the owner’s responsibility (or if professionally
installed, the installer’s responsibility) to determine if
the vehicle being equipped with supplemental brakes
has an active braking system — refer to the vehicle
owner’s manual or the dealership. ROADMASTER expressly disallows any and all claims relating to tire
hicles with ‘active’ braking systems caused by: 1) in-
stallation of any ROADMASTER supplemental braking
system other than InvisiBrake or BrakeMaster; or 2)
failure to install a Brake Pressure Reducer with the
BrakeMaster.
The Even Brake 12-volt power cord is always
“last in, first out.” Never plug in the power cord until
Even Brake is completely installed, according to these
instructions.
Once it receives power, any movement of the box
could cause Even Brake to activate unexpectedly.
Similarly, never disconnect Even Brake without first
unplugging the 12-volt power cord.
Failure to install and operate Even Brake as in-
structed may cause property damage, personal injury
or even death.
These instructions contain information that is very important to know and understand. This information is provided for
safety and to prevent equipment problems. To help recognize this information, observe the following symbols.
WARNING indicates a potentially hazardous situ-
ation which, if not avoided, could result in property
damage, serious personal injury or even death.
CAUTION indicates a potentially hazardous situation which, if not avoided, may result in property damage, or minor or moderate personal injury.
IMPORTANT NOTICE!
Safety Definitions
CAUTION
CAUTION used without the safety alert symbol in-
dicates a potentially hazardous situation which, if not
avoided, may result in property damage.
NOTE
Refers to important information and is placed in italic
type. It is recommended that you take special notice of
these items.
Page 3

3b 3d
2
2d
Components
2c
3h
3g
3, 3e
3a
2a
2b
part number description
1.
9420 ............................................. ICX transmitter
a.
450310-20 & -22 ...................... Velcro pads (2)
b.
350006-20 ................................ Phillips screws (4)
2.
88410 ........................................... Brake-Lite Relay
a.
450782-1 .................................. fuse tap (1)
b.
300140-04 ................................ zip ties (4)
c.
300085-00 ................................ blue butt connector (4)
d.
300080-02 ................................ 16 ga. red wire
3.
650898 ......................................... break away switch
a.
8602 ......................................... break away cable
b.
650900 ..................................... break away wiring harness
c.
300117-00 ................................ rubber grommet
d.
350400-20 ................................ 1" hex bolt
e.
350251-20 ................................ 1/4" nut
f.
450782-2 .................................. fuse tap (1)
g.
300036-00 ................................ ring terminal, blue
h.
300115-22 ................................ insulated female terminal, red
3c
1, 1a & 1b
All illustrations and specifications contained herein are based on the latest information available at the time of publication. ROADMASTER, Inc.
reserves the right to make changes, at any time, without notice, in material, specifications and models, or to discontinue models.
1
Page 4

Before you begin the installation…
1. Check the Even Brake serial number. This kit is
compatible ONLY with Even Brake systems with serial
numbers of 27,496 and below. Check the Even Brake serial
number (on the bottom of the Even Brake) before proceeding.
2. Always check the ROADMASTER web site — roadmasterinc.com — for vehicle-specific information. Select
‘Supplemental Braking Systems’ under ‘Vehicle Specific
Info’ and enter the vehicle’s make, model and year.
3. If the battery must be disconnected for towing,
a 12-volt outlet kit (part number 9332) and a stop light
switch must be installed. Stop light switch kits are listed
by vehicle at roadmasterinc.com; to see if one is available
for your vehicle, select ‘Supplemental Braking Systems’
under ‘Vehicle Specific Info.’ Enter the vehicle’s make,
model and year and scroll down the page.
Note: if a stop light switch kit is listed on the web site
for any particular vehicle, it is required.
Note: an Automatic Battery Disconnect (part number
766) is available for vehicles which must be towed with
the battery disconnected.
If you choose to install an Automatic Battery Disconnect, a 12-volt outlet kit and a stop light switch are still
required; the Brake-Lite Relay is not required.
4. If fuse(s) must be removed from the vehicle before
it can be towed — verify that removing the fuse(s) will
not disrupt power to Even Brake or the ICX transmitter,
or otherwise affect the installation or operation.
Note: ‘FuseMaster’ automatic fuse disconnects are
available through ROADMASTER. Visit roadmasterinc.
com and click the ‘Vehicle Specific Info’ page for a fit list.
5. Check the towed vehicle’s 12-volt outlet for correct power — Even Brake is powered through the 12-volt
outlet, with the ignition turned to the “tow” position. However, some vehicles only have power at the 12-volt outlet
when the engine is running. Before you begin the installation, verify that you have power in the towed vehicle’s
12-volt outlet with the ignition turned to the “tow” position.
If there is no power, you can install ROADMASTER's
optional 12-volt outlet kit (part number 9332). When installed, this kit will provide power to the 12-volt outlet even
when the engine is off.
6. Check the 12-volt outlet socket to make certain that:
a) the socket has been wired correctly; and b) the socket
is not corroded.
a. Make certain that the socket has been wired cor-
rectly — the contact point at the bottom of the socket
should be positive, and the outer shell around the top of
the socket should be negative.
CAUTION
If the socket’s positive and negative connections
have been reversed, the fuse in the Even Brake power
cord will blow when the cord is plugged into the 12volt outlet.
b. Make certain that the socket is not corroded or
otherwise damaged — a corroded socket may not pro-
vide constant power to Even Brake, which may cause
intermittent operation or disrupt the Even Brake diagnostic
program, causing false alerts.
If the socket is corroded or damaged, you can install
ROADMASTER’s optional 12-volt outlet kit (part number
9332). When installed, this kit will provide constant power
to Even Brake.
CAUTION
If the towed vehicle has a single 12-volt outlet
which has been used to heat a cigarette lighter plug,
install the optional 12-volt outlet kit for the Even Brake
power supply.
Using a cigarette lighter plug in a 12-volt socket
will corrode the contact points. The socket will not
supply sufficient voltage to be used as the Even Brake
power source — Even Brake may not operate, or may
only operate intermittently.
7. The circuit at the towed vehicle’s 12-volt outlet
must be rated at NO LESS THAN 15 AMPS to power
Even Brake. Check the fuse at the outlet — if the fuse
is rated at 15 amps or higher, the circuit is adequate to
power Even Brake. If the fuse is rated at less than 15
amps, install the optional 12-volt outlet kit (part number
9332). When installed, this kit will provide adequate power
to Even Brake.
CAUTION
If the circuit at the 12-volt outlet is rated at less
than 15 amperes, install the optional 12-volt outlet
kit. Depending on the available current during towing, Even Brake may not function, or may function
incorrectly, without at least 15 amps.
If the circuit is rated at less than 15 amps, do not
simply replace the outlet’s fuse with a higher-amperage fuse. This will cause the wiring to overheat,
which can cause wiring damage, an electrical fire or
other consequential, non-warranty damage.
8. Check the towed vehicle’s brake lights — Even Brake
must function with the ignition in the “tow” position; however, some vehicles’ brake lights only operate with the
ignition in the “on” position. Check to see if this is the
case: turn the ignition to the “tow” position, apply the
brakes and check to see if the brake lights illuminate. If
the brake lights do not illuminate, a two-prong stop light
switch and 10-amp fuse must be installed.
Note: check the owner’s manual to see if the vehicle
is equipped with an “automatic shut down” feature. If this
is the case, ensure that the vehicle is not in automatic
shut down mode before performing this test.
Stop light switch kits are listed by vehicle at roadmasterinc.com; to see if one is available for your vehicle,
select ‘Supplemental Braking Systems’ under ‘Vehicle
continued on next page
2
Page 5

continued from previous page
Specific Info.’ Enter the vehicle’s make, model and year
and scroll down the page.
9. Route all wiring to avoid the possibility of a short circuit
or other damage to the vehicle.
Route all wiring to avoid moving parts, sharp edges,
the fuel lines or hot components such as the engine
or exhaust system.
Wiring exposed by moving parts, sharp edges or
hot components may cause a short circuit, which can
result in damage to the vehicle’s electrical system as
well as other, consequential damage.
Wiring which is attached in close proximity to the
fuel lines may ignite the fuel.
Installation instructions
10. If you are a professional installer, return these instruc-
tions to the owner of the vehicle after the installation, for
the owner’s future reference.
Step A
Install the break away system
1. Mount the break away switch (Figure 1) at the front
of the vehicle, on the driver’s side. Choose an area you
can easily reach, with a surface of sufficient strength to
hold the switch firmly in place, so that the break away
pin (Figure 1) will pull freely from the switch. Mount the
switch in a horizontal position, with the break away pin
facing toward the motorhome.
Ensure that the break away pin can be pulled freely
away from the towed vehicle, without any obstructions.
Do not attach the break away switch to the tow bar.
In the unlikely event that the tow bar should separate,
the break away switch will separate with it, preventing
the break away system from activating.
The towed vehicle’s brakes will not be applied,
which may cause property damage, personal injury
or even death.
2. The Inter Connect transmitter (“ICX transmitter”) will
be attached in a later step; however, since the break away
wiring harness will be connected to it, choose a location
for the ICX transmitter now. Look for a mounting point on
the driver’s side of the towed vehicle, on the lower portion
of the dashboard, where the end of the transmitter with
the antenna and socket will be visible and accessible.
Choose an area away from pre-existing components
or electronics, and where the transmitter will not present
an obstruction or hazard to the driver of the vehicle or
interfere with the operation of the vehicle. The mounting
surface must be of sufficient strength to hold the transmitter firmly in place, so that an electrical connector can
be plugged into and out of the transmitter.
3. Once you have found a location for the ICX transmitter,
look for a pre-existing hole in the firewall (or, if there is
sufficient space, a pre-existing grommet with other wiring) close to where you will mount the ICX transmitter, to
route the break away wiring harness through the firewall.
If there is no pre-existing hole or grommet with sufficient space, drill a 1/2" hole through the firewall.
Drill from the engine compartment or from the interior
of the vehicle, whichever is more convenient. Before drilling, make certain you will not damage any components
on the other side of the firewall.
continued on next page
Figure 1
3
Page 6

continued from preceding page
4. Route the wiring harness (Figure 1) from the break
away switch to the firewall (or, from the firewall to the
break away switch, whichever is more convenient), avoiding moving parts, sharp edges, the fuel lines or hot components such as the engine or exhaust system. Where
appropriate, use wire ties to secure the break away wiring
harness.
Connect the wiring harness to the break away
switch.
5. Cut through the included grommet (Figure 1) on one
side, slide it over the wiring harness and fit the grommet
into the hole in the firewall. Feed the remaining length of
the wiring harness through the grommet. Then, seal the
grommet with a silicone sealant.
You will connect the wiring harness to the ICX transmitter in a later step.
Step B
Modifications to the
towed vehicle’s lighting system
A supplemental braking system will affect the opera-
tion of the vehicle’s tow lighting system. Use the information below to determine if optional components must be
installed in a vehicle which has been wired for towing — or,
if no lighting system has been installed, which systems
are appropriate.
1. First, identify the type of brake and turn signals in the
vehicle. There are two types — combined or separate.
In a combined system
(Figure 2), the brake light
does the flashing for the
turn signal; in a separate
system (Figure 2), there
are amber or red turn
signal lights which are
separate from the brake
lights.
2. Next, test to see if
the towed vehicle’s brake
lights will illuminate with
the engine off — with the
ignition at the “tow” position, press the brake pedal and check the brake
lights.
3. Based on whether or
not the brake lights illuminate, and the type of brake and
turn signals, there are three possibilities:
• the brake lights illuminate and the towed vehicle has
combined lighting;
• the brake lights illuminate and the towed vehicle has
separate lighting; or
• the brake lights do not illuminate.
There are a number of lighting methods available for
each of these three possibilities; they are described below.
(If you choose to install a Universal Wiring Kit, a Bulb
& Socket Wiring Kit or magnetic tow lights, complete in-
Figure 2
stallation instructions and wiring diagrams are included
with the kits; this information is also available online at
roadmasterinc.com. Installation instructions for the BrakeLite Relay are included in the literature packet.)
If the brake lights illuminate and the
towed vehicle has combined lighting…
…one of the three alternatives below is required:
• A Universal Wiring Kit (part number 154) with a Brake-
Lite Relay — a system of diodes is installed to rewire the
vehicle’s turn signals, taillights and brake lights for towing.
See Step C — “If required, install the Brake-Lite Relay.”
• Install an optional Bulb and Socket set, part numbers
152-LED or 155.
• Install an optional magnetic tow light system (part number 2100 or 2120).
If the brake lights illuminate and the
towed vehicle has separate lighting…
…one of the four alternatives below is required:
• A Universal Wiring Kit (part number 154) with a Brake-
Lite Relay — a system of diodes is installed to rewire the
vehicle’s turn signals, taillights and brake lights for towing.
See Step C — “If required, install the Brake-Lite Relay.”
• Install six diodes, and jump the diodes. See page 7.
• Install an optional Bulb and Socket set, part numbers
152-LED or 155.
• Install an optional magnetic tow light system (part number 2100 or 2120).
If the brake lights do not illuminate…
…an optional stop light switch must be installed. Stop
light switch kits for many vehicles are available through
ROADMASTER; visit roadmasterinc.com for the most current list.
Any one of the following tow lighting systems must also
be installed with the stop light switch:
• A Universal Wiring Kit (part number 154) — a system
of diodes is installed to rewire the vehicle’s turn signals,
taillights and brake lights for towing.
• An optional Bulb and Socket set, part numberws 152LED or 155.
• An optional magnetic tow light system (part number
2100 or 2120)
Step C
If required, install the Brake-Lite Relay
Note: do not install the Brake-Lite Relay unless it is
required. Refer to Step B — “Modifications to the towed
vehicle’s lighting system.”
If the Brake-Lite Relay is required, install it now. The
instructions are included in the literature packet. After the
Brake-Lite Relay is installed, proceed to Step D, “Wire
and attach the ICX transmitter.”
If the Brake-Lite Relay is not required…
…proceed to Step D, “Wire and attach the ICX transmi tter.”
continued on next page
4
Page 7

Step D
Wire and attach the ICX transmitter
1. Before attaching the ICX transmitter, first connect the
break away system harness and the towed vehicle’s brake
switch wire to the ICX transmitter. Then, connect the ICX
transmitter to a 12-volt power source, as well as a suitable
ground…
a. Connect the break away system — plug the end of the
break away wiring harness, which you routed through the
vehicle’s firewall in Step A, into the flat, two-prong molded
plug in the ICX transmitter (Figure 3).
b. Connect the brake switch wire…
• If the Brake-Lite Relay was installed — push the fe-
male spade connector at the end of the green wire into
the terminal marked “1” on the ICX transmitter (Figure 3).
• If the Brake-Lite Relay was not installed — connect
the “cold” side of the brake light switch to the terminal
marked “1” on the ICX terminal (Figure 3).
c. Connect to a power source — identify a fuse that is
constantly powered when the ignition is in the “tow” position. Pull the fuse.
Do not remove any fuse connected to the air bag cir-
cuit. Air bag deployment can result. Consult the vehicle
owner’s manual to determine fuse assignments for other
safety systems.
Note: make certain this fuse is not part of a “retained
accessory power” circuit — with this feature, the vehicle’s
electronics continue to function normally for about ten minutes after the ignition is turned off. Then the electronics will
no longer function, which shuts off power.
Insert the fuse you just pulled into the provided ATM fuse
tap, into the slot closest to the fuse blades (Figure 4), then
insert the fuse tap into the empty slot in the fuse panel.
Using the attached blue butt connector, connect the red
wire from the ICX transmitter (Figure 3) to the wire from the
fuse tap.
Note: unless the red (power) wire is connected to a
fuse that provides 12 VDC+ at all times, the motorhome
monitor will display error messages relating to low battery
power, such as “Low Battery,” when towing.
d. Connect to a suitable ground — connect the white wire
from the ICX transmitter to any good chassis ground.
2. Insert the provided 10-amp fuse into the ATM fuse tap
(Figure 4).
3. Once you have connected the break away system
harness and the vehicle’s brake switch wire to the ICX
transmitter, and connected the ICX transmitter to a 12-volt
power source and ground, attach the ICX transmitter to
the driver’s side dashboard, at the mounting point you
chose in Step A.
Attach the transmitter so that the end of the transmitter with the antenna and socket will be facing the rear of
the vehicle. Use either the supplied screws (one at each
corner) or the Velcro strips to mount the transmitter.
4. Ensure that the wiring for the break away system, the
brake switch wire, and the power and ground connections
will not present an obstacle or hazard to the driver of
the vehicle or interfere with the operation of the vehicle.
Use one or more of the included wire ties, if necessary,
to secure the wiring out of the way.
Step E
Program the motorhome monitor
Once the second vehicle kit has been installed, program the system to recognize the second ICX transmitter.
A second 12-volt outlet (in addition to the towed vehicle’s) will be necessary to complete this step.
1. Before programming, first install and connect Even
Brake in the towed vehicle — follow the “Operation” instructions in the owner's manual. Even Brake must be
completely installed and connected, with both the ICX
transmitter cord and the power cord plugged in.
Read all instructions in the Even Brake owner's
manual before installing or operating Even Brake.
Failure to understand how to install or operate Even
Brake could result in property damage, personal injury or even death.
Note: before transferring Even Brake to a second (or
third, or fourth) vehicle, it may be necessary to adjust the
feet to maintain stability. Refer to Step B — “Adjust the
feet and the seat pad” — in the “Operation” section of the
Even Brake owner's manual.
2. Next, at the towed vehicle, plug the motorhome monitor power cord into the second 12-volt outlet. (This outlet
must be receiving power for the monitor to operate.) The
LCD text display will read “Even Brake.”
3. Now, press the “Dim” button on the motorhome monitor
(Figure 5) for approximately six seconds, until the LCD
text display reads “Receiver is in Learn Mode.” \
4. Release the “Dim” button. The LCD text display will
continued on next page
Figure 3
Figure 4
5
Page 8

continued from preceding page
read “Learning ICX #1 — Advance? OK .”
If you are programming the monitor for a second towed
vehicle, press the button with the left-hand arrow (<) on
the monitor to scroll to the next message — “Learning ICX
#2 — Advance? OK .” If you are programming the monitor for a third or fourth towed vehicle, continue to press
the button with the left-hand arrow (<) on the motorhome
monitor to scroll to the appropriate message in this series
— “Learning ICX #3…” or “Learning ICX #4…”
5. Press the “Test” button (Figure 6) on the Even Brake
touch pad control panel. Even Brake will begin a selfdiagnostic test.
(As part of the test, Even Brake will cycle the brake
pedal clamp up and down three times. When the brake
pedal clamp is depressed, the LCD display on the motorhome monitor will read “Braking.”)
6. After Even Brake has completed the self-diagnostic
test, the test light on the touch pad control panel (Figure
6) will illuminate green to indicate the system is ready, or
red to indicate the system is not ready.
• If the test light is green and the LCD display reads
“Test Is Good — System Ready,” the motorhome monitor
is programmed to the ICX transmitter. When the vehicle is
towed, the monitor will display braking activity and system
status information from Even Brake.
The monitor can be programmed in this manner for up
to four vehicles. Once programmed, the monitor will automatically recognize the ICX transmitter in each vehicle
without further adjustment.
• If the test light is red, check the motorhome monitor
LCD text display for detailed information. You can also
refer to the “Communications” sections (“Overview” and
“Reference Chart”) in the Even Brake owner’s manual.
7. Before towing, read the owner’s manual, cover to cover.
Understand how to install and operate Even Brake, and
carefully follow the instructions and safety precautions.
Note: the Even
Brake pedal clamp will
not fit the brake pedals
of a small number of
late-model Volkswagen
vehicles, such as the
2007 Volkswagen Golf. A photo of the 2007 Golf brake
pedal is shown to the right.
Use the optional 9329-VW replacement pedal clamp
for these vehicles.
Read all instructions before installing or operating
your Even Brake. Failure to understand how to install
or operate Even Brake could result in property damage, personal injury or even death.
The installation is complete. The remaining page describes an alternative wiring method.
As a final step, test Even Brake to ensure that it has
been installed correctly.
After you are certain Even Brake is functioning as it
should, show the owner how to properly operate Even
Brake. Demonstrate how to connect and disconnect Even
Brake, and how to adjust the settings, until the owner is
comfortable with its operation.
Step F
Test all functions
1. Follow the Even Brake owner’s manual to connect and
disconnect Even Brake, and to adjust its settings.
6
Figure 5
Figure 6
Page 9

Install six diodes
Note: this wiring method can only be used if the brake
lights illuminate with the engine off and the towed vehicle
has separate lighting. See page 4.
Note: if the motorhome has combined brake and turn
signals, use Figure 7 to wire the towed vehicle. If the
motorhome has separate brake and turn signals, visit
roadmasterinc.com. Use the ‘Separate towed vehicle to
separate’ motorhome wiring diagram under ‘Support.'
Note: if a 3-to-2 converter has been installed in a motorhome with separate brake and turn signals, wire the
towed vehicle according to Figure 7.
To test for a 3-to-2 converter, use a test light to find the
turn signal and brake light circuits on the motorhome electrical socket. If the same circuit energizes both the turn
signals and the brake lights, a 3-to-2 converter has been
installed. If the turn signal and brake lights have separate
circuits, a 3-to-2 converter has not been installed.
1. Cut the factory turn signal, taillight and brake light
wires, as close to the lights as possible.
2. Install the six diodes in line, as shown in Figure 7.
Install the diodes as close to the lights as possible.
CAUTION
Attach the diodes as close to the vehicle’s lights as
possible, to avoid interaction with other circuits which
may be tied into the center brake light, the running
lights, the turn signals or the brake light wires.
Attaching the diodes farther away may cause the
towed vehicle’s lights to work improperly and may
also cause damage to other electrical components
in the vehicle.
3. On each side, jump the brake and turn signal diodes,
as shown in Figure 7.
CAUTION
Unless the brake and turn signal diodes are jumped,
the towed vehicle’s brake light circuits will override
the motorhome’s turn signals — the towed vehicle’s
turn signals will not operate in conjunction with the
motorhome’s turn signals, as required by law.
4. Test the installation…
A. If the motorhome has a combined lighting system
(Figure 2)…
1. The towed vehicle’s turn signals and brake lights
will both flash (each side) when the motorhome’s turn
signal is on; and
2. When the motorhome’s turn signal and brake signal
are both on (each side), the towed vehicle’s brake lights
will stay illuminated, while the turn signal flashes.
B. If the motorhome has a separate lighting system
(Figure 2), the towed vehicle’s turn signals and brake lights
will illuminate identically to the motorhome’s.
Figure 7
7
 Loading...