

Road Bear RV Class C 19-22', Class C 23-26', Class C 27-30', Class A 29-32', Class C 29-31' User Manual
...
Manual
Welcome to Road Bear RV

Table of contents
1. GENERAL INFORMATION_________________________________________ 4
1.1. LOCATION INFORMATION ________________________________________ 5
1.2. STATION MAPS _________________________________________________ 6
1.2.1. LOS ANGELES, AGOURA HILLS, CA (LAX) __________________________ 6
1.2.2. SAN FRANCISCO, HAYWARD, CA (SFO) ____________________________ 7
1.2.3. LAS VEGAS, LAS VEGAS, NV (LAS) ________________________________ 8
1.2.4. DENVER, COMMERCE CITY, CO (DEN)______________________________ 9
1.2.5. NEW YORK, MIDDLETOWN, NJ (NYC)______________________________ 10
1.3. SAFETY ______________________________________________________ 11
1.4. ACCIDENT ____________________________________________________ 12
1.5. BREAKDOWN _________________________________________________ 12
1.6. FLAT TIRE_____________________________________________________ 12
1.7. MAINTENANCE ________________________________________________ 12
1.8. REPAIR _______________________________________________________ 12
1.9. DROP-OFF ____________________________________________________ 12
1.10. MEASUREMENT CONVERSIONS__________________________________ 13
1.11. SPECIFICATIONS_______________________________________________ 14
2. CAMPGROUNDS _______________________________________________ 15
2.1. ARRIVING AT THE CAMPSITE ____________________________________ 16
2.2. WHEN LEAVING THE CAMPSITE__________________________________ 16
3. THE CABIN____________________________________________________ 17
3.1. FORD CABIN (CHASSIS)_________________________________________ 17
3.2. CHEVROLET CABIN (CHASSIS)___________________________________ 17
3.3. THE MOTOR HOME CLASS C (P-MODEL SHOWN) ___________________ 19
3.4. THE MOTOR HOME CLASS C (S-MODEL SHOWN) ___________________ 20
3.5. THE MOTOR HOME CLASS A (U-MODEL SHOWN) ___________________ 21
3.6. ELECTRICAL SYSTEM __________________________________________ 22
3.6.1. MONITOR PANEL_______________________________________________ 23
3.6.2. GENERATOR __________________________________________________ 24
3.6.3. ROOF AIR CONDITIONER________________________________________ 25
3.6.4. MICROWAVE __________________________________________________ 25
3.6.5. CONVECTION MICROWAVE______________________________________ 25
3.6.6. TV / DVD PLAYER ______________________________________________ 26
3.6.7. CARBON MONOXIDE DETECTOR _________________________________ 26
3.6.8. SMOKE DETECTOR_____________________________________________ 26
3.7. L.P. GAS SYSTEM ______________________________________________ 27
3.7.1. L.P. GAS DETECTOR____________________________________________ 27
3.7.2. REFRIGERATOR / FREEZER _____________________________________ 27
3.7.3. REFRIGERATOR – DOMETIC _____________________________________ 27
3.7.4. REFRIGERATOR – NORCOLD ____________________________________ 28
3.7.5. STOVE TOP AND OVEN _________________________________________ 28
3.7.6. FURNACE_____________________________________________________ 29
3.7.7. WATER HEATER _______________________________________________ 29
3.8. PLUMBING SYSTEM ____________________________________________ 30
2

3.8.1. FRESH WATER_________________________________________________ 30
3.8.2. WASTE WATER ________________________________________________ 31
3.8.3. TOILET _______________________________________________________ 32
3.8.4. SHOWER _____________________________________________________ 32
3.9. SLIDE-OUT ROOM______________________________________________ 33
3.10. AWNING ______________________________________________________ 34
4.
TROUBLESHOOTING
___________________________________________ 36
4.1. ELECTRICAL SYSTEM __________________________________________ 36
4.2. GAUGES & INSTRUMENTS ______________________________________ 37
4.3. L.P. GAS SYSTEM ______________________________________________ 38
4.4. PLUMBING SYSTEM ____________________________________________ 39
5. DISCLAIMER __________________________________________________ 40
3

1. General information
Introduction
Thank you for choosing Road Bear RV - the company with the newest rental fleet
in the United States.
Are you ready to take off with your motor home to explore North America? If your
personal walk-through was overwhelming or just too much information, please
take a few minutes and read this manual carefully. Familiarize yourself with the
vehicle. This will assure that you get the full use of your motor home. We at Road
Bear RV are committed to make your vacation as fun and trouble-free as
possible. In the event of unanswered questions or an unforeseen malfunction
please call our Roadside assistance number. Please leave this manual in the
motor home. Lost manuals are subject to a charge upon return.
Based on the changes in models from year to year, we cannot precisely describe
every motor home individually, but the systems and functionality are very similar
if not the same. We provide this manual as a guide. Please read the following
information thoroughly. It will help you to avoid problems. Enjoy your vacation!
In case of a technical problem or an accident please call our toll free
Roadside assistance / Emergency Number
1-888-832-4080
Please have your vehicle ID ready. It is located on your key tag or sun visor.
4

1.1. Location information
STATION ADDRESS LISTING 2007-2008
International customers should call the rental station immediately upon
arrival but no later than between 8 am and 10 am of the departure day to
schedule the pick up. Pick up shuttle transfer time is between 12 - 1 pm.
Motor home pick up time is between 1 - 4.30 pm. Motor home drop-off
time is between 8 am - 11am. The shuttle leaves at 11 am to airport or
airport hotel. There are no more shuttle transfers after 11 am.
LAX (Los Angeles)
28404 Roadside Drive
Agoura Hills CA 91301
Tel: 1 (818) 865-2925
Toll free: 1-888-832-4080
Fax: 1 (818) 991-2744
Email: info@roadbearrv.com
Sales tax: 8.25%
SFO (San Francisco)
847 Industrial Parkway West
Hayward, CA 94544
Tel: 1 (510) 247-1119
Toll free: 1-866-249-1119
Sales tax: 8.75%
LAS (Las Vegas)
4730 Boulder Hwy
Las Vegas, NV 89121
Tel: 1 (702) 453-1109
Toll free: 1-866-303-1057
Sales tax: 7.75%
DEN (Denver)
7685 Dahlia Street
Commerce City, CO 80022
Tel: 1 (720) 570-1100
Toll free: 1-866-457-1100
Sales tax: 4.85%
NYC (New York)
42 Highway 36
Middletown, NJ 07748
Tel: 1 (732) 495-0959
Toll free: 1-866-787-3682
Sales tax: 7.00%
Business Hours:
Mo – Fr. 8:00 AM – 5:00 PM
Sa. 8:00 AM – 1:00 PM (longer during season)
Sundays & Holidays closed
5

1.2. Station Maps
1.2.1. Los Angeles, Agoura Hills, CA (LAX)
6

1.2.2. San Francisco, Hayward, CA (SFO)
7

1.2.3. Las Vegas, Las Vegas, NV (LAS)
8

1.2.4. Denver, Commerce City, CO (DEN)
9

1.2.5. New York, Middletown, NJ (NYC)
10

1.3. Safety
The following information is provided to make you are aware of the basic
requirements to operate your motor home safely. Please read before you take off
and enjoy your trip.
- The motor home is substantially wider, longer, higher and heavier than a car.
These differences do call for special driving procedures.
- Always utilize factory installed seat belts while vehicle is in motion.
- Do not occupy any seats, beds or overhead bunks (cab over) without any seat
belts while vehicle is in motion.
- Secure any loose equipment before you take off.
- Always get help before parking or backing up → do not depend on mirrors only
when backing up! Have someone outside of the motor home checking for
overhead clearance, side clearance and obstacles even when equipped with
rearview monitor.
- Be aware of the total height (12-13ft.) of your vehicle and verify clearance of
any low object before attempting to pass beneath.
- Lock all doors when vehicle is in motion.
- Emergency window exits are not to be opened except for emergencies.
- Exhaust ports of furnace, water heater and generator are extremely hot when in
use. Do not touch to prevent burns!
- Showers are very slippery when wet and not for utilization while coach is in
motion.
- Roof tops are dangerous. Generally renters should not access the roof
area!
- Never attempt to change a tire on your vehicle. Always contact roadside
assistance. They will send someone to change it for you.
- Use caution or stop if necessary when traveling in high wind condition. Do not
ignore wind warnings.
- Leave enough space to the vehicle in front of you. The motor home is much
heavier than a car and takes longer to perform a full stop.
- The rear of the motor home swings out and cuts corners when you make turns
- Drive slowly over humps, bumps, rough terrain and other obstacles of this kind.
Be sure to clear obstacles with the back wheels also.
- Shut off all equipment (furnace, water heater, refrigerator, stove and generator)
while refueling gasoline or propane.
- Motor homes can be a target of thieves. When leaving the motor home do lock
all doors, windows, close all curtains and hang the privacy curtain. Do not
leave cameras, radios, etc. lying out where they can be seen.
Failure to follow the above safety information may result in injury or death. Follow
all local, state and national speed laws. Plan your route and know your vehicle
limitations.
11

1.4. Accident
The registration- / insurance papers and an accident report are located in the
pouch of the sun visor.
- Please call the police in case of an accident (for emergencies dial 911) and
have them take a report. Request the officer’s name, ID-, case number and
the phone number of the office.
- The accident report form in the rental vehicle must be completed by
the renter and documented with pictures of the scene if possible.
- Road Bear RV must be contacted as soon as possible but max. within 24
hours (emergency # at 1-888-832-4080).
- For accidents not reported on time or if no police report can be provided, the
insurance has the right to decline coverage.
1.5. Breakdown
- Call our emergency # at 1-888-832-4080. Unauthorized towing will not be
reimbursed!
1.6. Flat tire
- In case you have a flat tire please call our emergency # at 1-888-832-4080
for assistance. We will have someone sent to you to change the tire.
However, replacement cost of the tire is your responsibility!
1.7. Maintenance
- Check the engine oil and coolant every second time when refilling your
gas tank (89 octane).
- An oil change is required every 5000 miles driven after pick-up.
1.8. Repair
- Repairs over US$ 50 need prior authorization by Road Bear RV. Nonauthorized repairs or repairs without a receipt will not be reimbursed.
1.9. Drop-off
- The unit is due back between 8 am and 11 am. At 11 am the shuttle service
leaves to designated airports and airport hotels. If you plan on using the
shuttle service make sure that you are at the drop-off station no later than
10.30 am.
> There is no shuttle service for returns after 11 am.
12

How to drop-off the unit: - Gasoline tank full
- L.P. Gas tank full
- Waste water tanks empty
- All kitchen equipment must be cleaned
- Unit clean inside (including refrigerator,
microwave, shower and toilet)
Minimum charges: Late charges/surcharges US$ 30/hour or US$
300/day plus daily rate
Gasoline US$ 20
L.P. Gas US$ 15
Dumping US$ 50-$75
Cleaning Fee US$ 50
Smoking & pets US$ 250
Please make sure no belongings have been left in the motor home. Road Bear
RV is not responsible for lost or stolen items. Items left will be donated or
disposed after 14 days.
1.10. Measurement conversions
A quick guide for our international customers
Distance
1 Kilometer 0.62 miles
1 mile 1.60 kilometers
Temperature
60 degrees Fahrenheit 15 degrees Celsius
70 degrees Fahrenheit 21 degrees Celsius
80 degrees Fahrenheit 26 degrees Celsius
90 degrees Fahrenheit 32 degrees Celsius
100 degrees Fahrenheit 37 degrees Celsius
Liquid
1 gallon 3.78 liters
1 quart 0.94 liters
1 liter 0.26 gallons
Speed
35 miles per hour 56 kilometers per hour
45 miles per hour 72 kilometers per hour
65 miles per hour 104 kilometers per hour
13

1.11. Specifications
Model
Seat belts 6 7 6 6
Sleeps up to 4-6 6-8 5-6 4-6
Engine V10 V10 V10 V8
Transmission automatic automatic automatic automatic
AM / FM / CD Player yes yes yes yes
Dash AC yes yes yes yes
3 burner stove yes yes yes yes
Microwave yes yes yes yes
Oven or Convection Oven yes yes yes yes
Fridge / Freezer 2-way 2-way 2-way 2-way
Furnace yes yes yes yes
Roof A/C yes yes yes yes
Shower inside yes yes yes yes
Shower outside yes no no no
Flush toilet yes yes yes yes
Generator yes yes yes yes
Awning yes yes yes yes
Backup camera yes no no no
TV / DVD yes yes no no
Slide-out yes yes yes no
Hitch yes yes yes yes
Exterior width w/o mirror
Exterior height incl. AC
Interior height
Cab over bed
Sofa bed
Dinette bed
Rear bed
Fuel tank gallon / liter 75 / 285 55 / 210 55 / 210 35 / 130
Miles/gallon 5-8 7-10 7-10 7-10
Liter/100km 30-45 25-35 25-35 25-35
Fresh water gallon 74 48 56 56
Fresh water liter 265 150 210 210
Waste Tanks Grey gallon 56 28 28 37
Waste Tanks Grey Liter 210 105 105 140
Waste Tanks Black gallon 40 28 28 22
Waste Tanks Black Liter 150 105 105 83
ALL MEASUREMENTS ARE APPROXIMATE, NOT GUARANTEED AND SPECS MAY CHANGE ANY TIME WITHOUT PRIOR NOTICE!
Class A Class C Class C Class C
30-32 ft 29-31 ft 25-27 ft 21-23 ft
102” 100” 100” 100”
259 cm 254 cm 254 cm 254 cm
12’3” 11’2’’ 11’2’’ 11’2”
375 cm 340 cm 340 cm 340 cm
6’8” 6’8’ 6’10’ 6’10”
203 cm 203 cm 208 cm 208 cm
N/A 86”x57” 86”x57” 95”x57”
N/A 218x145 cm 218x145 cm 241x145 cm
67”x48” 67”x40” N/A N/A
170x122 cm 170x102 cm N/A N/A
68x42” 67x42” 74”x42” 76”x46”
173x107 cm 170x107 cm 188x107 cm 193x114 cm
75”x60” 75”x60” 80”x60” 80”x60”
190x152 cm 190x152 cm 203x152 cm 203x152 cm
14

2. Campgrounds
There are many different places to camp overnight:
- National Parks
- State Parks
- U. S. National Forest Campgrounds
- KOA Campgrounds
- Private Campgrounds
- or even in front of a Wal-Mart Store
For safety reasons Road Bear RV does not recommend “roadside” camping!
The National or State Parks and the Forest Campgrounds usually offer the most
beautiful and spacious camp- sites. There is often a wooden table and a fire ring
on each site. They also offer hiking trails.
There are also differences in campsites:
Full hook up sites - offer electricity, water and sewage
No hook up sites - just the site without any hook ups, usually the campground
has a dump station
National Parks
Reservations: by phone → 1-800-436-PARK
by internet → www.nps.gov
Price: US$10 - US$25
Sites: some campgrounds offer hook up sites, usually a water - /
dump station and coin showers are available
For the National Parks it is recommended to purchase a National Park Pass
(approx. US$ 50). This annual pass provides admission to any National Park
since most parks charge US$20 per entry.
State Parks
Reservations: by phone → 1-800-444-PARK
by internet → www.reserveamerica.com
Price: US$10 - US$25
Sites: some campgrounds offer hook up sites, usually a dump –
and water station and coin showers are available
U.S National Forest Campgrounds
Reservations: www.reserveamerica.com
Price: US$5 - US$12
Sites: seldom hook up sites, sometimes dump stations
15

KOA Campgrounds
Refer to the KOA campground directory in your motor home. Do not forget your
10% value card!
Private Campgrounds
Refer to the Woodall’s campground directory or RV magazines located in your
vehicle
2.1. Arriving at the campsite
1. Park your motor home on a level spot if possible. Otherwise use the leveling
blocks or levelers to level the vehicle.
2. Check for clearance before extending the slide out and the TV antenna.
3. Hook up the 110V electrical cable, water - and sewer hose.
4. Enjoy your stay!
2.2. When leaving the campsite
Make sure that: - the electrical cable is unplugged and stored
- water - and sewer hoses are disconnected and stored
- all compartment doors are latched or locked
- the slide-out is moved in
- the awning is rolled back & secured
- the water heater and - pump are turned off
- the TV antenna is cranked down
- the entry step is retracted
- all roof vents are closed
- all loose items are secured
- entry door is locked
- your park break is released
- the leveling blocks or levelers are stored away
- seat belts are latched
16

3. The cabin
3.1. Ford cabin (chassis)
1 Light control / dimmer for instrument panel (cluster)
Courtesy lamp → rotate knob fully counter-clockwise
2 Turn signal / Wiper/Washer Control
3 Gearshift (press brake to shift)
Tow/Haul—default “off” = overdrive
Tow/Haul on → use this position to descent
moderate grades for safety and for towing.
2-3 → use 2 or 3 to drive up moderately steep
grades or to provide engine braking (slowing)
on downgrades (do not drive faster than
45 mph)
1 → use 1 to drive down steep grades
to provide maximum engine braking
(do not drive faster than 25 mph)
4 - 8 Cruise Control (working at 35mph or
faster)
to turn on speed control → ON (4)
to set speed → SET (5)
to set higher speed press and hold ACCEL (5)
to set lower speed press and hold COAST (7)
to disengage the speed control, depress the
brake pedal to return to a previously set speed → RES (6)
to turn off speed control → OFF (8)
3.2. Chevrolet cabin (chassis)
Cruise control (working at 35mph or faster)
a Turn on cruise control from O to I
b Set it by pushing knob
To accelerate push knob a to +
b
To turn off cruise off push a to O or simply
step on the brake
Push knob a to + to resume after stepping
on the brake
a
17

TOW/HAUL mode only to use when pulling a trailer!
1 All lights are “OFF”
2 Daytime running lamps. Automatic activation as
soon gear shifter is moved out of park position.
1
2 3
4
3 Parking lights
4 Headlamps (low-beam). To activate high-beam by
pulling the turn signal lever towards you.
5 To adjust brightness of instrument panel (cluster)
push knob to extend it.
6
5
Courtesy Lamp → rotate knob fully counterclockwise
6 Courtesy lamp override
Emergency Start (9)
In case the engine battery is low and does not allow to start the engine, press
and hold the emergency switch and then start engine. Once the engine is running
release the switch.
9
Parking Brake Release (10)
Always use the parking brake when being parked. Apply brake prior to shifting
gear into “P”.
18

3.3. The Motor Home Class C (P-model shown)
TV AntennaAir Conditioner Ladder Awning
Storage
110V outlet
LP Gas
Entry step
Storage
Generator
Fuel tank fill
City water connection
110V cable
Waste water outlet
Spare tire
in trunk
Storage
Water heater
Furnace
19

3.4. The Motor Home Class C (S-model shown)
TV AntennaAir Conditioner Ladder Awning
Storage
LP Gas
Water heater
Furnace
Slide out Awning
Slide out
Storage
110V outlet
Entry step
Storage
City water connection
Waste water outlet
Generator
Water fill
Spare tire
in trunk
Storage
Fuel tank fill
110V cable
Cable TV hookup
20

3.5. The Motor Home Class A (U-model shown)
Water heater
Storage LP Gas
Slide out
TV AntennaAir Conditioner
Furnace
Awning
Entry stepSpare tire 110V outlet
Slide out Awning
Ladder
Storage
Water fill
Generator
Fuel tank fill
Waste water outlet
Cable TV hookup
110V cable
City water connection
Outside shower
21

3.6. Electrical System
The motor home has 2 different electrical systems: 12 Volt DC (auxiliary
batteries) and 110 Volt AC (on board generator or external power source).
12V system:
Most electrical devices in the motor home run on 12 volt DC current: lights, fans,
water pump, monitor panel, LP Gas detector, furnace, slide out (if equipped) and
electric controls for the water heater, roof A/C and refrigerator.
The engine battery is charged by the alternator while the engine is running. The
engine battery runs cabin-related functions, while the auxiliary battery runs
coach-related functions.
The auxiliary battery will be charged in two ways:
- by running the generator or being plugged into an external power source
- by the engine alternator while driving the motor home
The power converter is “trickle” charging the auxiliary batteries while having the
110V supply and converts 110V to 12V to operate the 12V systems. The most
convenient and fastest way to charge the batteries is driving.
All motor homes have a battery disconnect switch which is located by the entry
door. Leave the switch on to assure overall function of the appliances. The only
time it should be turned off is during refueling.
Battery disconnect
110V system:
The roof A/C, microwave, 110V outlets, etc. run only on 110V power.
You must be connected with an external source of electricity (shore line) or have
the generator running to get 110V. For hook-up, pull the electrical cable out of the
side compartment and connect it to an outlet at the campground or house. It is
possible that the plug will not fit and you will need to use the adapter provided.
Turn the breaker at the power pole to “ON”.
The vehicle fuse/breaker box has a brown cover (plastic or metal) and is located
inside the coach holding a series of fuses (standard 12V automotive fuses) and
110V circuit breakers.
The GFI (ground fault interrupter) is a special circuit breaker for 110V outlets. It is
usually located on an electrical outlet in the bathroom or kitchen area. If too much
current or a faulty electrical appliance is used, the RESET button pops out and
the power is interrupted. If this should occur, first unplug all devices and then
22

reset the GFI by pushing the RESET button back in. It will only work if you have
110V supply otherwise it will not let you do it.
How to reset a 110V circuit breaker: (sample with 20A A/C breaker)
breaker is on “ON” breaker tripped flip breaker to “OFF” position
before back to “ON”!
3.6.1. Monitor Panel
The monitor panel provides the status of the various systems:
- Fresh water tank level
- Gray/Holding water tank level
- Black water tank level
- LP Gas level
- Battery (Auxiliary) charging / condition
In addition, you can turn on the water pump, water heater (in some models LP
gas and electric) and start/stop the generator.
23

3.6.2. Generator
All motor homes have an on board generator. It’s used to get 110V power if you
do not have any other electricity source. It’s located in an outside compartment.
The generator runs on gasoline of the main fuel tank. The fuel tank must be at
least ¼ full in order for the generator to operate.
Please make sure before starting the generator that all electrical appliances
(especially the roof A/C) are turned off. Attempting to start the generator when
the roof A/C is “ON” may overload the generator causing the circuit breaker at
the generator to trigger (1) or the 20A breaker marked as AC located inside the
coach at the electrical panel.
To use 110V power from the generator, you need to plug the power cable into
this outlet (2) located in the electrical compartment on the outside of the vehicle.
The generator can be started from the inside of the motor home or with the
switch at the generator itself. Let it run 1 to 2 minutes before turning any
electrical appliances on.
1
RESET breaker (white arrow) if triggered.
“ON” = pointing toward outside of vehicle.
2
PLUG in cable if generator is used
24

3.6.3. Roof Air Conditioner
The roof air conditioner only works with 110V electricity hooked up or if the
generator is running.
Motor home: Ducted Roof A/C with thermostat on the wall.
- Set the system switch (1) to COOL.
- Set the fan switch (2) to AUTO (recommended) (fan operates cyclically) or
ON (fan operates continuously).
- Set the thermostat switch (3) to the desired temperature.
Note: current inside temperature is shown on display, if equipped.
3
1
2
2
1
13
3.6.4. Microwave
All motor homes have a built in 110V microwave. Do not use appliances when
the vehicle is in motion. Follow the functions you see as a menu on the display
or just simply enter the desired time and press start.
3.6.5. Convection microwave
Some motor homes have a 110V convection microwave instead of a propane
oven. Please remove the metal tray if used as a microwave. For convection use
button 1 and for microwave button 2.
3
12
25

3.6.6. TV / DVD player
TV and a DVD player require either 12V or 110V electrical power. DVD players
are region coded and only play movies distributed in North America.
Antenna reception:
In order to have reception, the antenna amplifier needs to be “ON” and the
antenna crank up (2)
Then pull down the plastic ring and rotate the antenna until
you get best reception.
2
Pull & turn for
reception
1
Cable TV at campground:
Hook up the external cable (Coax-cable) to TV cable hookup located on the
outside of motor home. Note: cable is not provided by Road Bear RV. Make sure
the antenna amplifier black button (1) is “OFF”. If left “ON” it will interfere with the
cable TV signal.
3.6.7. Carbon Monoxide Detector
1
If the detector will sound an alarm carbon monoxide (CO) (1)
is present in the interior of the motor home or if the RV battery
reaches low voltage. In case of an alarm, open all windows
and the door to air out the interior of the motor home. This
alarm system is either hardwired to 12V or works of a 9V
1
battery. Refer to troubleshooting guide on page 35.
3.6.8. Smoke Detector
The smoke detector (2) is very sensitive and easily goes
off while cooking. If the alarm sounds open windows
2
and doors to air out the unit. The alarm is powered by a 9V
block battery. If it needs to be replaced you will hear a
chirping sound. Refer to troubleshooting guide on page 35.
Amplifier
“ON/OFF”
button
26

3.7. L.P. Gas System
All motor homes are equipped with a propane gas system that provides LPG
(Liquid Petroleum Gas / Propane) to the refrigerator/freezer, stove/oven, furnace
and water heater.
The propane tank is located outside the motor home in one of the compartments.
The main valve located at the propane tank needs to be in the open position to
operate the gas appliances.
3.7.1. L.P. Gas Detector
The detector is located just above the floor of the motor home. It is designed to
detect and alert with a beeping sound in case of a possible LP Gas leak. Please
push the mute button and air out the vehicle.
The L.P. gas detector is very sensitive. It can also react to alcohol, perfumes and
cleaning fluids.
3.7.2. Refrigerator / Freezer
The refrigerator can be operated on either LP Gas or 110V. It does not run on
12V from the auxiliary batteries only.
You should use the AUTO mode to operate your refrigerator. In this case it will
select the power source (LP Gas or 110V) itself. Important: Make sure that the
motor home is parked level to ensure proper function of the refrigerator.
110-Volt electrical operation is only possible with electrical hook up or if the
generator is running.
If the vehicle is parked in the sun and high ambient temperatures exist, the
efficiency of the refrigerator will be reduced.
3.7.3. Refrigerator – Dometic
Leave the refrigerator on “AUTO” operation, that means button (1) is pushed in
and the “AUTO” light (2) is lit. In “AUTO” operation the refrigerator runs on
propane and switches automatically to 110-Volt if available.
27

In case the check light (3) is on, turn off the refrigerator (button 4), wait for 30
seconds and then turn it on again.
Climate Control Switch, located on inside top (freezer section) must be on “OFF”
position at all times.
3.7.4. Refrigerator – Norcold
Leave the refrigerator on “AUTO” position. Adjust temperature if necessary
In case the GAS light is flashing, turn the refrigerator off, wait for 30 seconds and
then turn it back on.
3.7.5. Stove top and Oven
To use the stove top burner:
Push in and turn the desired burner knob to the LITE position. Then turn the
igniter knob in the direction of the arrows (if your model does not have an igniter
knob use the lighter)
To use the oven:
Push in and turn the oven knob to PILOT ON.
While holding the knob in, use a match or
Lighter to light the pilot flame. Hold the flame
to the pilot (4) (located in front of the burner
under the bottom rack of the oven) until the
pilot lights. Adjust the oven control knob to the
desired temperature.
Hint: Please be patient lighting the pilot flame.
While using the stove top or oven, turn on the fan above the stove to prevent the
smoke alarm from going off.
28

3.7.6. Furnace
All motor homes have a furnace or heater. You can operate and control the
furnace with the thermostat. The furnace should not be used while driving. The
blower fan of the furnace will drain the auxiliary batteries.
The furnace runs on L.P. Gas and the fan of the furnace works off the house
battery. The heater has a built in time delay.
1) Set the system switch (1) to FURNACE/HEAT.
2) Set the fan switch (2) to AUTO.
3) Set the thermostat switch (3) to the desired temperature.
3
2
3
2
1
1
3.7.7. Water heater
The water heater operates on LP Gas. Some models include an optional 110V
electrical water heater. It does not run on 12V from the auxiliary batteries. We
recommend operating on LP Gas since using the electric water heater in
conjunction with other appliances may overload the electrical system. The water
heater has a capacity of 6 gallon of water. It takes about 10-30 minutes to heat
the water. Turn the water heater off while driving and at night.
Switch on water heater. When water heater has ignited, fault light (2) goes off.
If the water heater does not ignite (fault light “ON” (2)), the house battery may be
drained and need recharging. Start the engine and try to restart the hot water
heater then turn the engine off.
29

3.8. Plumbing System
3.8.1. Fresh water
During “dry camping” or on the road fresh water is available out of the onboard
water tank. Water is transported to the faucets by means of the water pump. The
“ON/OFF” switch is located at the monitor panel (some models have additional
external switches in bathroom and/or outside.
The motor home has 2 fresh water sources:
- fresh water tank > on board (48-74 gal. depending on model)
- external city water hookup
You use the fresh water in the tank with the 12V water pump (located at the
monitor panel) for pressure while you do not have city water hookup meaning
while traveling or when dry camping. The city water hookup can only be used
when you are at a campground.
The fresh water tank can be filled through an opening on the side or on some
models with city water hookup. There is a valve either outside or inside the
vehicle which needs to be switched accordingly. The monitor panel shows the
freshwater level instantly.
Hint: Switch “OFF” the water pump while being connected to city water!
23
1
1 City fill and tank fill on P & Q:
City water hookup or while using
water pump - Keep valves upright
(as shown).
Freshwater tank refill – change
valves to “tank fill”. Once water tank
is full, water will overflow.
After tank
fill is completed change valves to
pump/city pressure.
Remark: Pump/city pressure will not
fill your fresh water tank.
2&3 City fill and tank fill on P, Q & S:
City water hookup on P & Q models:
Like picture 2. For water pump and
water fill switch valve to position 3
City water hookup and water pump
on S models like picture 2. For water
fill only switch valve to position 3
Hint: Make sure to return filler valves to the correct position after filling the tank!
For winterization: please call your pickup location for more info.
30

3.8.2. Waste water
The motor home has two separate waste water or holding tanks:
- “grey water” – kitchen and bathroom sinks and shower
- “black water” - toilet
The holding tank drain valves are mostly on the left side of the vehicle. First you
need to attach the sewer hose (located in one of the outside storage
compartments) via the bayonet coupling to the outlet after removing the sewer
outlet cap by a quarter turn. The open end of the sewer hose with the red 90
degree angle piece goes into the sewer pipe at the dump station or campsite.
Then open the valves by pulling the sliding handles out.
Start with the black water valve (larger of the 2 valves) and then the grey water
valve. Once they are both empty close the 2 valves. In case the monitor panel
does not show empty (E) repeat this task otherwise remove sewer hose and
snap the cap back on. Store sewer hose in its place. Add chemicals for the black
tank into the toilet.
In case you stay for a few days at full hookup (incl. sewer) never leave both
valves open. Pull them once a day only or when needed (especially the black
tank). Dry waste makes emptying the tanks very difficult.
Most campgrounds have a dump station. There are also dump stations on some
rest areas and some gas stations, just look out for the following freeway sign:
31

3.8.3. Toilet
All motor homes are equipped with a flush toilet. Flushing the toilet requires
water pressure from the internal water pump or city water connection. You need
either the water pump to be turned on or city water hooked up. Flushing the toilet
is done either by pulling the lever on the side of the stool or with the foot pedal.
Always use plenty of water to flush. Use 1 ply toilet paper only and never throw
foreign objects including Kleenex, paper towels and feminine hygiene products
etc. into the toilet. It may plug up the pipes and make dumping impossible.
Before you use the toilet the first time (either after you have picked-up the unit or
after emptying the waste water tank) make sure to flush down a half a bottle of
toilet chemicals into the toilet before using it.
3.8.4. Shower
The shower head has a water saving feature with an on/off valve built into the
handle to reduce the consumption of water during dry camping.
32

3.9. Slide-Out room
The slide out (if equipped) is a great feature that allows you to greatly expand
your living space while parked. Please follow these steps before operating the
slide-out to assure proper function:
1. Make sure the motor home is level. Two levelers are stored in one of the
outside compartments to simplify the task.
2. The park brake should be engaged prior to “park”.
3. Make sure the transmission is in the “P” park-position.
4. Turn the engine off and remove ignition key from the lock. Slide out will not
operate with key in radio / ignition on position.
5. Make sure the driver seat is moved forward so that it does not interfere with
the slide-out frame. If you fail to do this task, it will damage the backside of the
seat.
6. Verify clearance to objects on the outside before operating the slide out to its
full extension (min. 3 ft outside clearance)
7. Make certain that no object gets jammed between the slide-out frame and the
slide-out wall while extracting the slide-out. Do not store anything on top of the
slide-out frame.
8. Do not allow anyone to sit on the couch or dinette while operating the slide out.
9. Push the button to extend the slide out.
To retract the slide out please follow the steps backwards. Make sure the path is
clear of objects and watch your feet while retracting
Hint: low battery > start engine> start generator> turn engine off> move slide out
Attention: - Never move or drive the motor home while the slide out is extended.
Before using the “MANUAL OVERRIDE” please call for assistance first.
33

3.10. Awning
unlock
pull lever down
loosen
3
1
2
pull awning all the way out
4
push spreader on both sides all the way out till they lock in
tighten lock nut
6
5
34
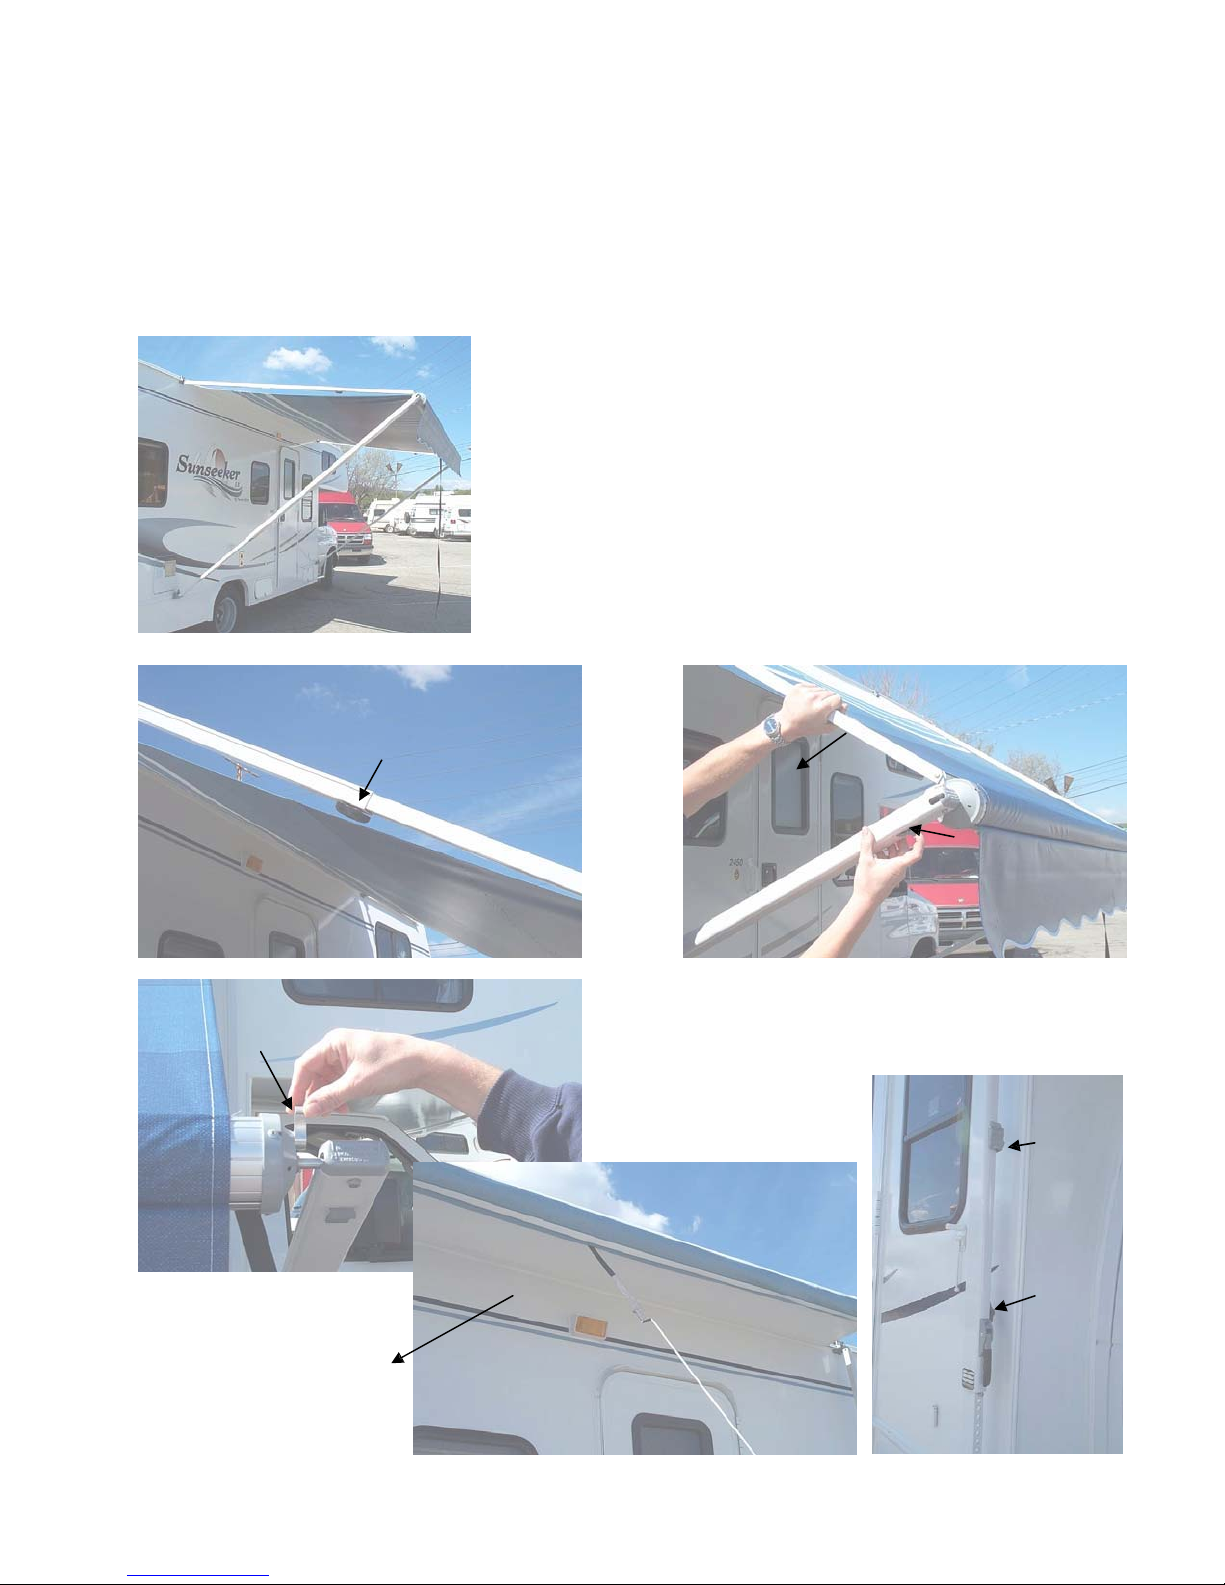
Enjoy the shade!
ATTENTION: - when it is windy retract or roll-up the awning
- NEVER use awning during rain or gusty wind
- NEVER leave awning unattended
7
loosen lock nut
push spreaders all the way back to the motor
home
pull
9
8
grasp the pull strap, pull toward you, and flip the locking lever up to the ROLL UP / LOCK position
lock
10
Do not release the awning pull
strap, it is under tension and
could snap back against the
vehicle side!
let awning roll back and slide the pull strap
to the center
11
12
tighten lock nut slightly
35

4.
Troubleshooting
4.1. Electrical System
ELECTRICAL 110V POWER
Problem Cause Solution
No electrical power to unit No power source Check breaker on campground or
generator
Circuit breaker may be off or
tripped
Power cable unplugged
Bad power cord adapter Replace adapter
AIR CONDITIONER
No electrical power to unit No power source Make sure you have power from
A/C does not work Circuit breakers may be off or
tripped
A/C not or low cooling Evaporator coils are iced up Turn A/C off and run A/C on fan
RECEPTACLE / GFI
No electrical power to
receptacle
GFI receptacle may be off or
Circuit breaker may be off or
GENERATOR
Generator cranks but will
not start
Generator may be low on oil.
Generator starts but no
power
Power cable unplugged Plug in power cable to receptacle
Circuit breaker trips Overloaded circuit Turn off some of the electrical
Stops when driving around
corners
Low oil Add oil
TV
TV does not work Circuit breakers may be off or
TV with cable hook up has
poor reception
TV antenna has poor
reception
No power source Make sure you have power from
tripped
tripped
Generator may be out of gas Check the fuel level
Altitude regulator being off
Circuit breakers may be off or
tripped
Low fuel Refill gas tank
tripped
Antenna amplifier turned on Turn amplifier switch off
Amplifier not turned on
Antenna not extended
Reset breaker(s)
Plug in cable into junction box for
generator
the shoreline or generator
Reset circuit breakers at power
center and/or generator
only for about 45 min.
the shoreline
Reset GFI. (only possible with
110V power to vehicle)
Reset breaker at power center
At least ¼ of fuel in tank required
Check the oil level. (use 10W30)
Adjust altitude accordingly
Reset breaker switches at
generator. Reset circuit breakers
at power center
load and reset the circuit breaker
Reset circuit breakers at power
center
Turn amplifier switch on
Extend antenna

MICROWAVE OVEN
Microwave oven will not
operate
Door open or closed incorrect Close door
ELECTRICAL 12V POWER
No power at all Check battery 12V power Turn battery disconnect on
Reading low on the monitor
panel
“Rotten egg” smell The auxiliary battery is emitting
LIGHTS
Lights are off Check battery 12V power Turn battery disconnect on
Lights dim or half bright Low battery Check battery condition / start
CO DETECTOR (CARBON MONOXIDE)
CO detector alarm going off CO in coach Turn off engine and/or generator
CO detector “chirping” Low 9V battery Replace 9V battery
Low auxiliary battery if hard-wired recharge auxiliary battery
MONITOR PANEL
Monitor Panel is off Check battery 12V power Turn battery disconnect on
Blown fuse replace fuse at power center
RADIO (DASHBOARD)
Radio is off Check battery 12V power Turn battery disconnect on
No power to microwave oven Check power supply and circuit
breaker.
Auxiliary battery is low recharge the auxiliary battery by
staring engine or hooking up
Call Roadside Assistance
sulfur fumes due to a possible
short, or overcharging
engine
and open all windows
4.2. Gauges & Instruments
GEARSHIFTER
Problem Cause Solution
Cannot put shifter into gear Brake-shift interlock feature on Press brake with right foot
Cannot take out key Gear not in Park position Put in Park position
ABS
Light on Failure of ABS Call Roadside Assistance
Light on & Brake light on ABS sensor malfunction Call Roadside Assistance
BRAKES
Light on Parking brake may be on Release park brake
Light on & ABS light on ABS sensor malfunction Call Roadside Assistance
SERVICE ENGINE SOON
Light on Malfunction Call Roadside Assistance
Light is flashing Misfire or stored error Call Roadside Assistance
TOW/HAUL
Light on Transmission malfunction Call Roadside Assistance
ENGINE COMPARTMENT
Water leak in engine comp. AC condensation water OK if water is clear without smell
37

4.3. L.P. Gas System
LP GAS / PROPANE GAS SYSTEM
Problem Cause Solution
Smell LP Gas in and/or
around unit
Do not touch electrical switches
Shut off the gas supply at the
Open doors and other ventilating
Leave the area until odor clears
Have the gas system checked
LPG detector alarm going
off
Low auxiliary battery Recharge auxiliary battery by
FURNACE
Furnace does not light May be out of LP gas or valve
Low battery Recharge battery
No 12V power Turn battery disconnect on
Furnace fan does not run Blown fuse Replace fuse at power center
WATER HEATER
Water Heater not working
or illuminated switch not lit
May be out of LP gas Fill LP gas tank
Water is already hot Check for hot water at faucet
REFRIGERATOR
Refrigerator not cooling Unit not level Make sure unit is level
Check LP gas level Fill LP gas tank or open valve
Check CHECK light Turn off and after 30 seconds
Reduced cooling Outside extremely hot
Refrigerator is off Check on/off switch Turn on
Check battery 12V power Turn battery disconnect on
STOVE TOP
Stove burner will not light No LP Gas Check LP Gas
OVEN
Turned knob but oven won’t
light
Possible gas leak in system Extinguish any open flames, pilot
lights and all smoking material
tank valve
openings
and leakage source corrected
before using again
LP Gas in coach Air out coach and try to reset the
detector. If unable to reset, call
Roadside Assistance
starting engine or hooking up
Fill LP gas tank or open valve
closed
No 12V power Turn battery disconnect on
turn back on
Move out of sunshine
Climate control switch “ON”
Unit not leveled
Pilot light must be lit manually Turn oven knob to “Pilot” and
Turn “OFF” switch
Level unit
keep pushing it, then use match
or lighter to light pilot light
38

4.4. Plumbing System
FRESH WATER SYSTEM
Problem Cause Solution
Fresh water tank will not fill Tank is already full Check the monitor panel
no water Check water hookup or tank
not filling water Make sure valves are in correct
position
Fresh water dripping under
vehicle
WATER PUMP
Pump fails to start when
switch is on
No water Check the monitor panel
Water system hooked up to city
WASTE TANK
Waste tank will not drain Build-up in tank Check for build-up in tank at stool
Empty waste tank
Contents in tank are frozen Try dumping in warmer climate
Waste water valve is broken Call Roadside Assistance
Grey water is backing up Full waste tank
Monitor panel shows full
tank, or registers more than
empty after you have
dumped
Tank full
Valves incorrectly set
Fuse may have blown at power
center
water
Monitor panel switch and second
bathroom switch may “dead lock”
each other
Or solids did not completely
dissolve
Toilet paper has been used and
is stuck on the sensors
Set valves to correct city or water
pump position
Set valves to correct position
Replacing fuse
Remove hose from city water or
turn water pump switch off
Flip bathroom switch to “OFF”
Empty the gray water holding
tank
Try to flush tanks out several
times at a dump station. Try to
use more water than usual and
use chemicals
SHOWER
No water at shower head Knob at shower head is turned off Turn knob on the back of the
shower head
No water
Water pump off
Water backs up into shower
while running kitchen or
bath faucet
Water backs up into shower
while using it
Shower drain basket is plugged Clean out shower drain basket
Gray holding tank is full Empty the gray water holding
Gray holding tank is full Empty the gray water holding
Check water hookup or tank
turn pump “ON”
tank
tank
39

5. Disclaimer
This document is the property of Road Bear RV and is for informational purposes
only.
Road Bear RV reserves the right to change the document at any time without
prior notice. Road Bear RV does not assume any liability for the accuracy of any
instructions or specifications contained herein. The document is not intended to
describe the specific function of any appliance or item within a particular motor
home. Please assure yourself of the contents and the operation of each item in
your motor home before you leave our location. Our employees are able to give
you specific instructions. Please ask if you have any questions.
This document is copyrighted by Road Bear RV and is not to be duplicated in any
way without written consent by Road Bear RV.
Agoura Hills, CA / March 2007
PLEASE LEAVE IN THE MOTOR HOME
Have a save and enjoyable trip!
☺
40
 Loading...