

Page 1
HALO PROHALO PRO
USER GUIDE
Page 2
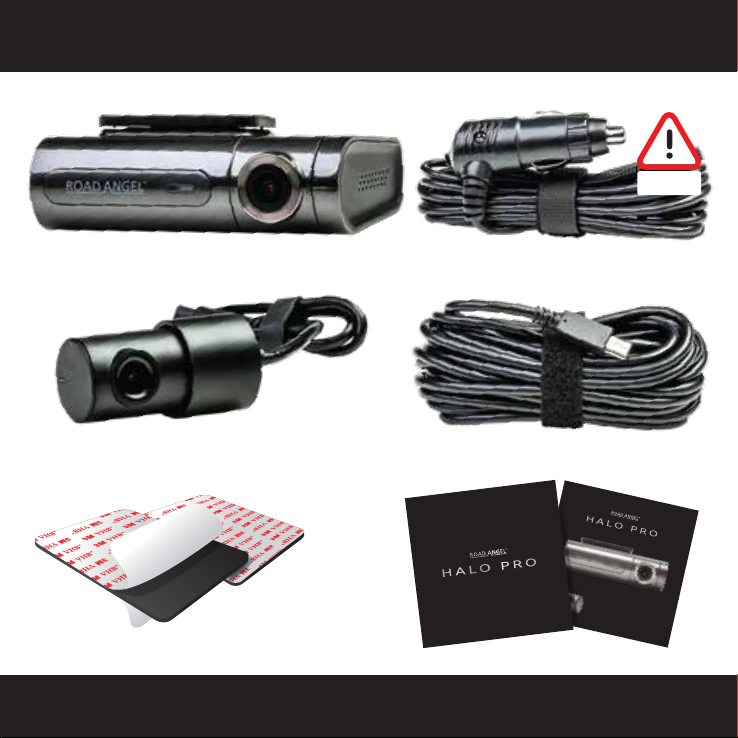
PACKAGE CONTENTS
Halo Pro Front Camera Halo Pro Power Cable
Halo Pro Rear Camera Halo Pro Rear Camera Cable
USER GUIDE
WARNING
THIS IS A 12V POWER CABLE.
USE WITH OTHER DEVICES COULD
CAUSE DAMAGE.
3M Sticky Pads Instructions
HALO PROHALO PRO
Page 3
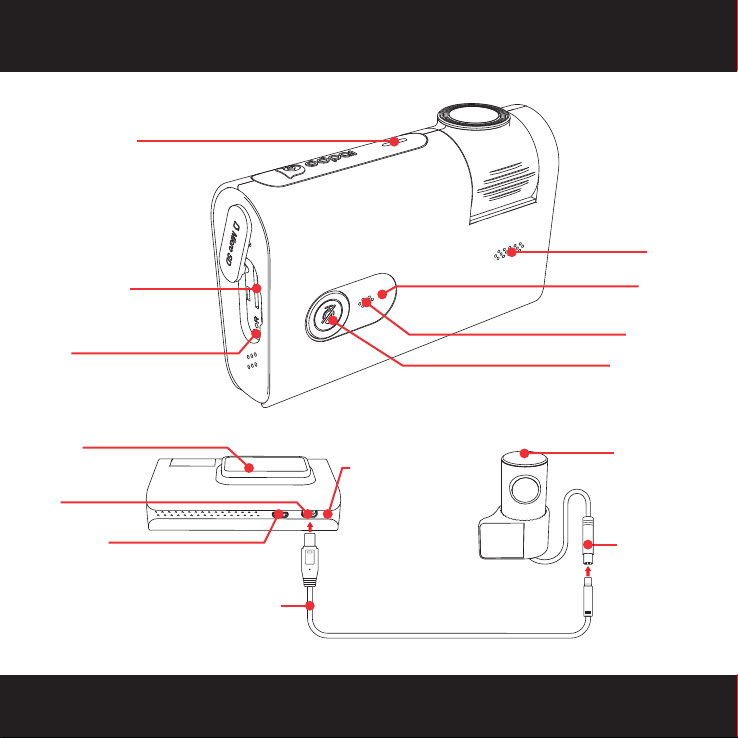
Parking Monitor
Indicator Light
CONFIGERATION & BUTTON INSTRUCTION
Speaker
Micro SD Card
Reset
Holder
Rear Camera
Port
Power Port
Connection Wire for Rear Camera
Front & Rear
Channel
Connection
Indicator Light
HALO PROHALO PRO
Operating
Indicator Light
Microphone
Mute Button &
Mute Indicator Light
Rear Camera
Indicator Light
Rear Camera
Connector
Page 4
OPERATION INSTRUCTIONS
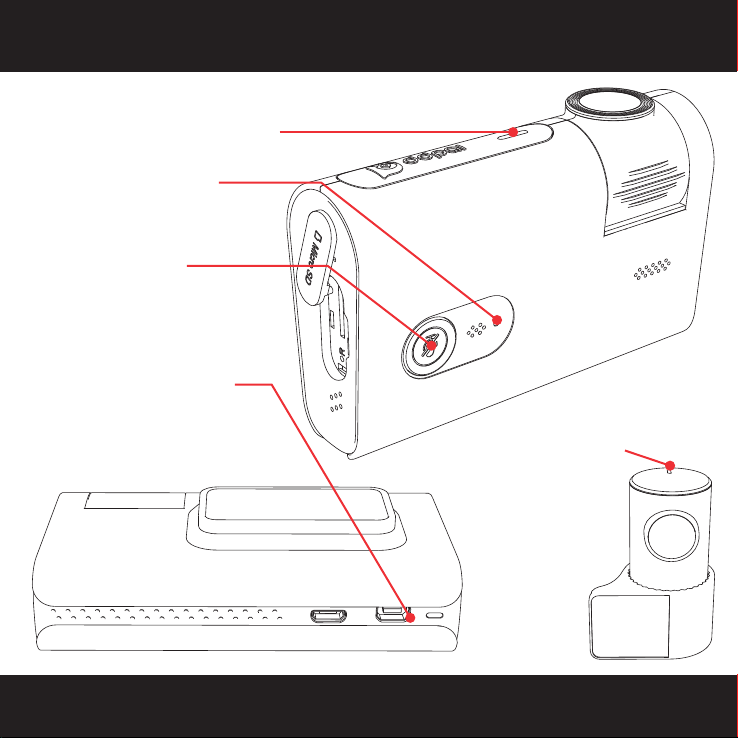
INDICATOR LIGHT STATUS INSTRUCTIONS
1. Parking Monitoring Indicator Light
Working: 1 Flash per second
2. Operating Indicator Light
a) Working: 1 Flash per second
b) TF Card Failure: Quick Flash
c) Failure: Remains lit
3. Mute Indicator Light
a) Mute: The light illuminates
when pressed
b) Sound Recording: Press the
mute button twice, light off
4. Front & Rear Camera
Connection Indicator Lights
Light remains illuminated
5. Rear Camera Operating
Indicator Lights
a) Working: 1 Flash
per second
b) Failure: Light
remains illuminated
HALO PROHALO PRO
Page 5
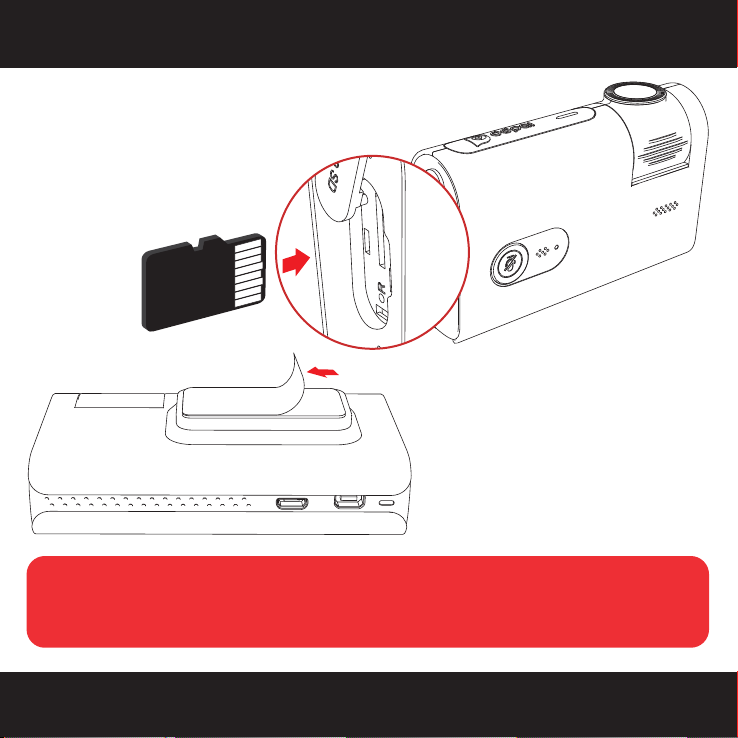
GETTING STARTED
1. Power off your car engine and ignition.
2. Insert the SD card into the SD card slot.
• Halo Pro supports up to
128Gb class 10 SD cards.
3. Mount the Halo Pro to your windscreen
by peeling off the protective film from
the 3M stcky pad and place behind the
rear-view mirror.
Do not remove SD Cards when the Camera is on. The SD Card will need formatting with the device before
first use.
Ensure the Halo Pro does not obstruct the view of the driver.
1
HALO PROHALO PRO
Page 6
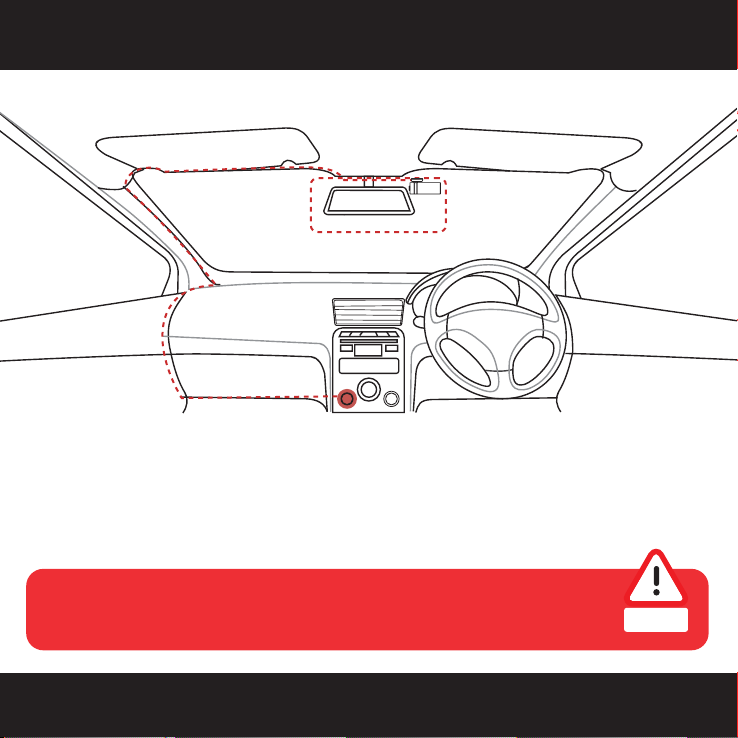
GETTING STARTED
2
5. Plug the USB cable into the back of the power adapter and the micro USB into Halo Pro.
6. Follow the wire-running diagram on the next page to install the included rear camera link cable into
your vehicle from the front camera to the position of the rear camera.
A constant/permanent power source is required for parking mode to operate correctly.
WARNING
THIS IS A 12V POWER CABLE.
USE WITH OTHER DEVICES COULD
Hardwiring kits and accessories are available separately.
CAUSE DAMAGE.
HALO PROHALO PRO
Page 7
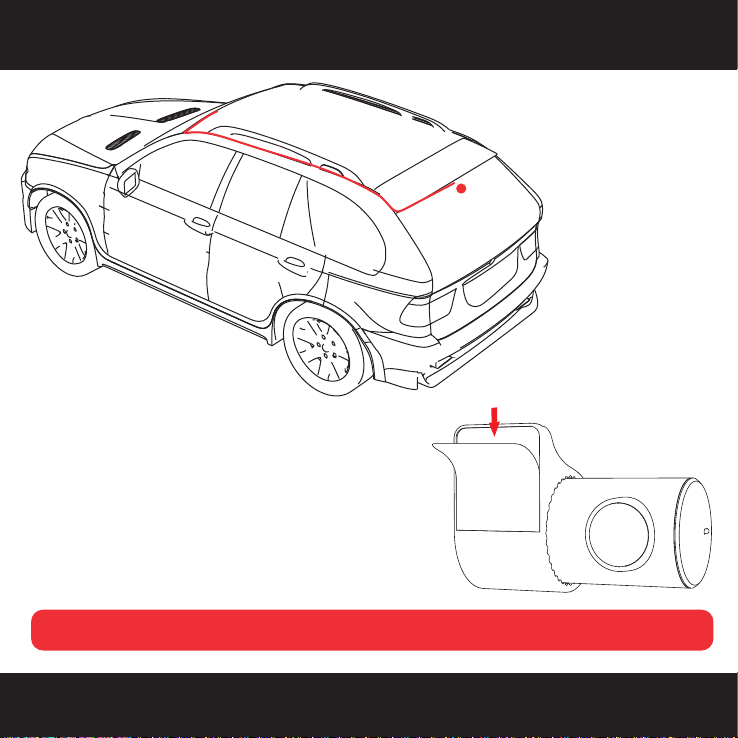
• Wiring diagram for the rear camera
8. Mount the Halo Pro rear camera to your rear window by
peeling off the protective film from the 3M sticky pad
and place in a location that will not obstruct your view.
9. Turn on the car’s ignition and check everything is
working correctly. The Halo Pro will automatically boot
up with a welcoming voice alert.
GETTING STARTED
7. Connect the rear camera link cable
to the front and rear camera
following the diagrams on the
configuration and button
instructions page.
3
Both front and rear cameras should be installed inside the vehicle only.
HALO PROHALO PRO
Page 8
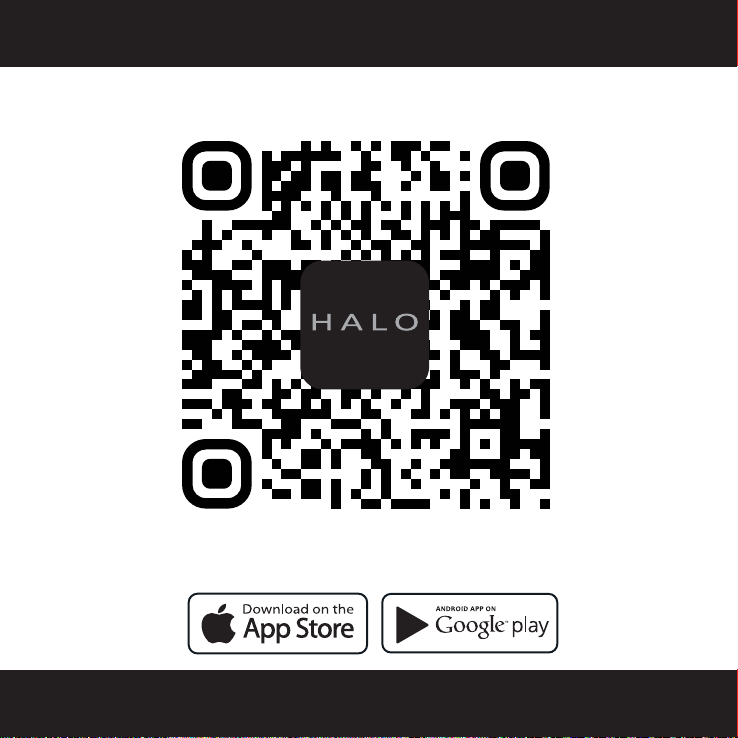
APP INSTALLATION
Scan the QR Code to download the Road Angel App.
Download the Road Angel App from the Google Playstore or Apple Appstore using the above QR code.
Alternatively navigate to your preferred Appstore and search for Road Angel Halo.
HALO PROHALO PRO
Page 9
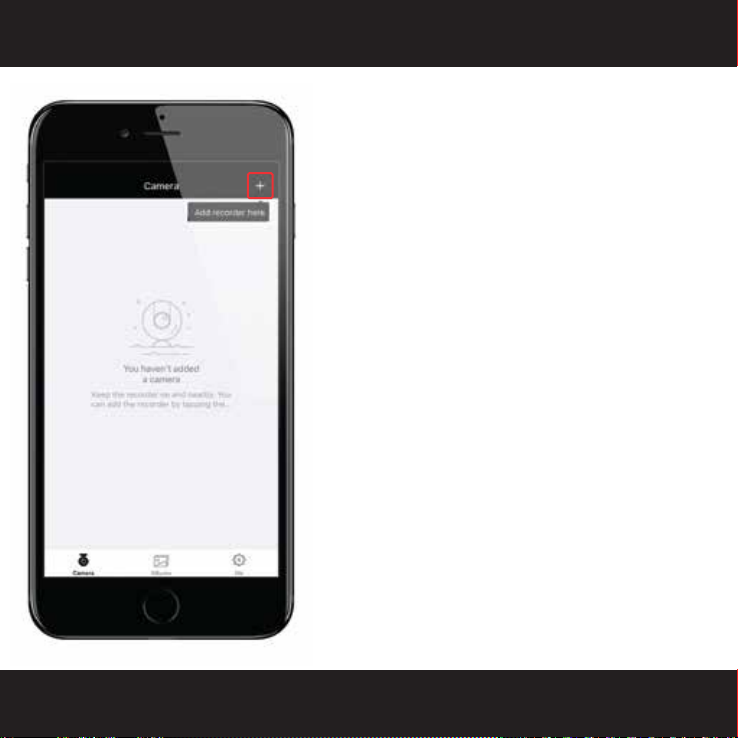
WI-FI SETUP
Launch the App. Press the ‘+’ icon in the top right corner.
Then follow the instructions that will be shown in the App
on how to connect the device via Wi-Fi. Once connected
successfully you may return to the Halo App.
• The default Wi-Fi password is set to ‘1234567890’.
HALO PROHALO PRO
Page 10
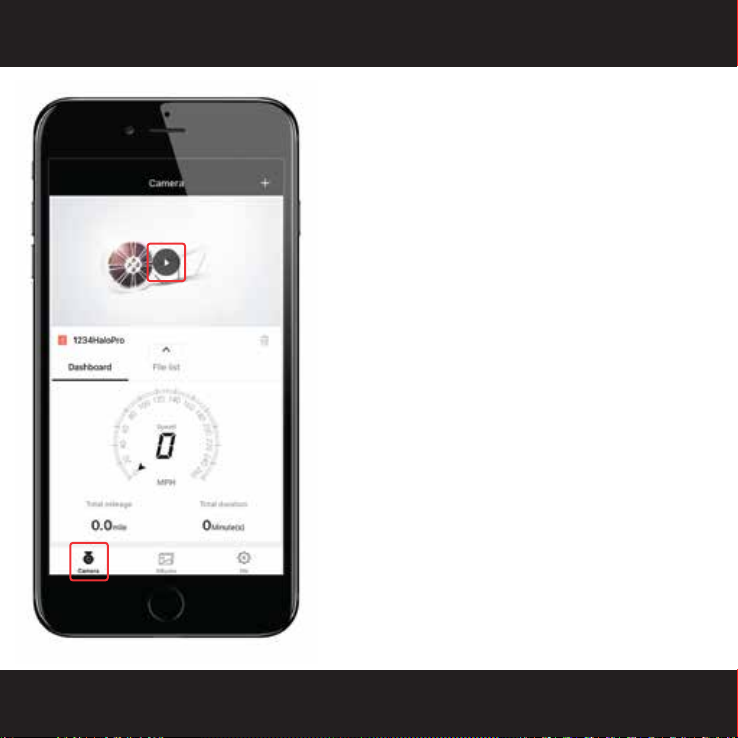
LIVE PREVIEW
1
To preview the dash camera currently recording footage,
select the ‘Camera’ tab at the bottom of the screen and
press the play icon. This will display a real time view of the
live dash camera footage.
Below the live footage preview is an area that will show you
come basic GPS informartion relating to your speed and
mileage; current MPH, ‘Total mileage’ and ‘Total duration’.
HALO PROHALO PRO
Page 11
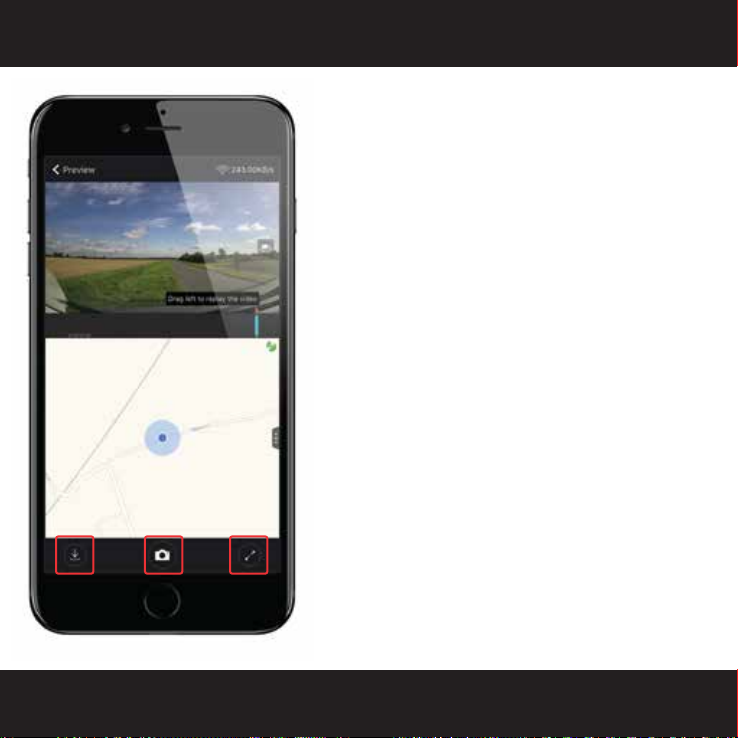
LIVE PREVIEW
At the top of the screen you will see the current live
preview of the dash camera.
In the middle is the map of your current location. This will
update as you drive.
At the bottom you will see 3 icons that allow you to
download, take a photo or enter full screen. The download
tab lets you download an image taken or download
footage, this will take you to the download screen ready to
create a clip.
2
HALO PROHALO PRO
Page 12
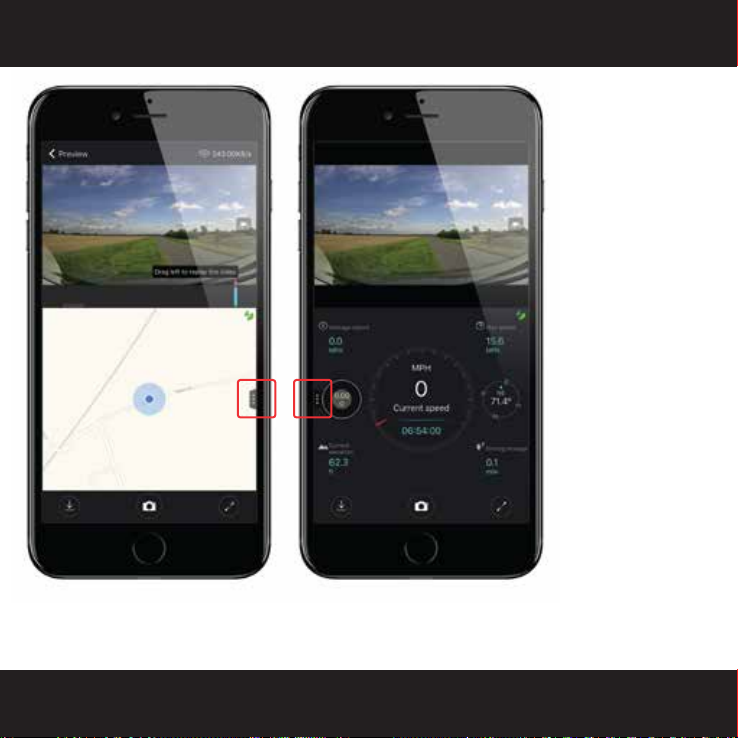
LIVE PREVIEW
3
This shows data such as;
‘Current speed’,
‘Average speed’, ‘Max
speed’, ‘Current
elevation’, Compass/
Direction and ‘Driving
mileage’.
Pressing the tab on the right of the map
display will open the live data display.
You can switch back to the live map
display at any time by pressing the
tab on the left of the screen.
HALO PROHALO PRO
Page 13
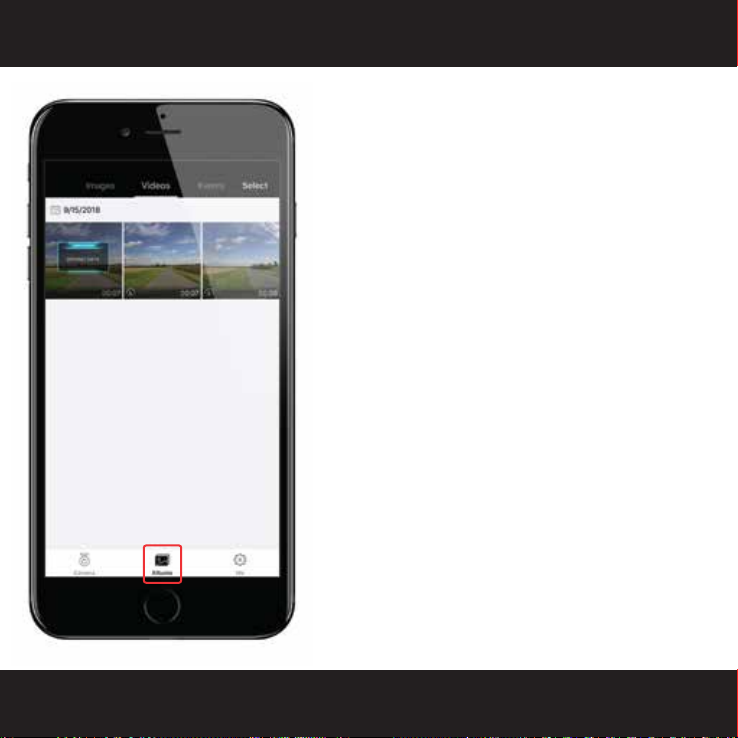
LIVE PREVIEW
Enter the albums tab to view images, downloaded videos
and events. Events are moments stored when the camera
detects an impact from its G-Axis Sensors.
Select the image or video to view the file. Here you can
save, delete or edit the file, saving the file saves it into
your phone’s media gallery outside of the app. If you wish
to select multiple clips at once, you can do so by pressing
and holding.
4
HALO PROHALO PRO
Page 14
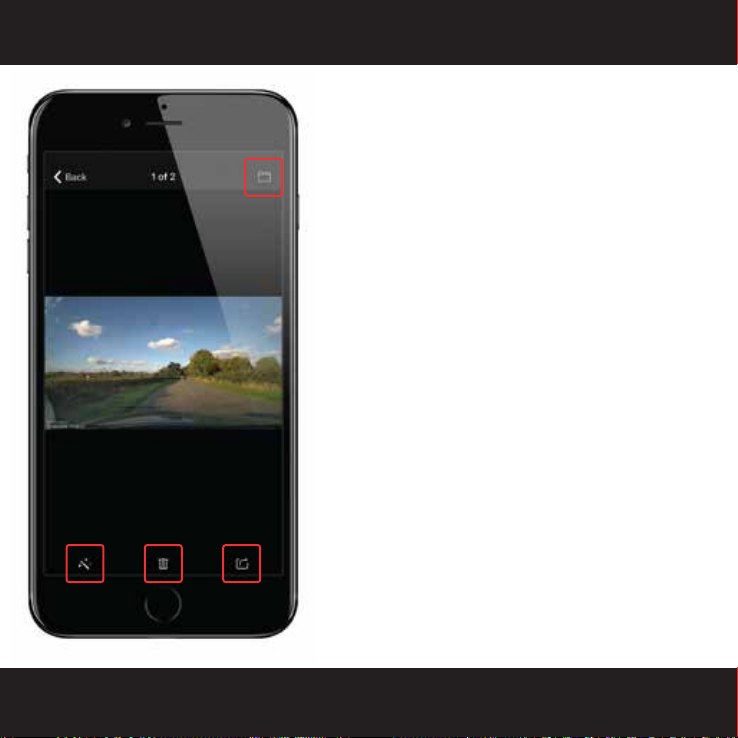
PHOTO EDITING
1
After you have selected the photo from the Album page
you have several options.
Top right button saves photos to the phone’s photo album.
Bottom left magic wand opens the photo editing mode.
Middle trash can deletes the photo and bottom right
allows you to share the photo.
HALO PROHALO PRO
Page 15
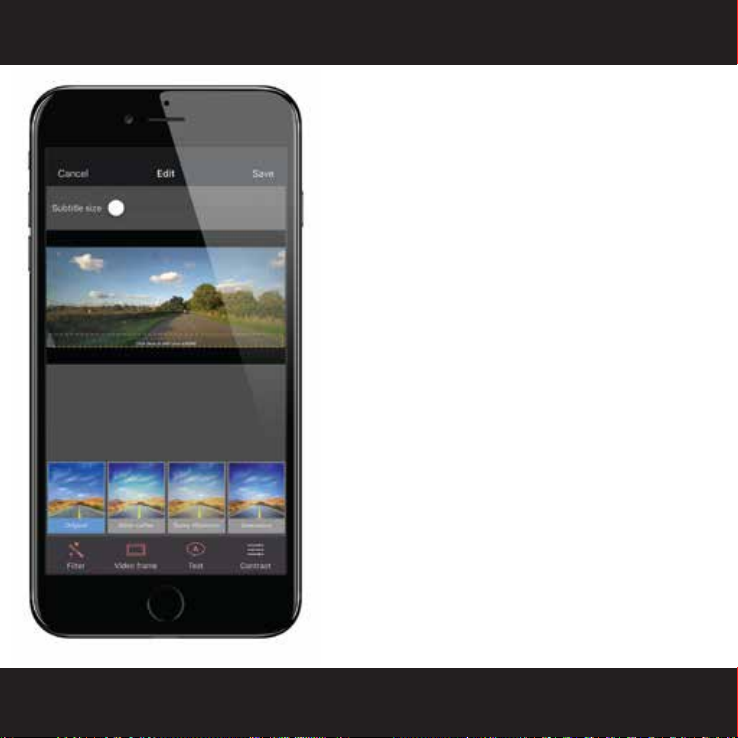
PHOTO EDITING
The photo editing screen allows you to add text captions,
video frames, contrast settings and choose from 17
photo filters.
When you are finished simply save your file.
2
HALO PROHALO PRO
Page 16
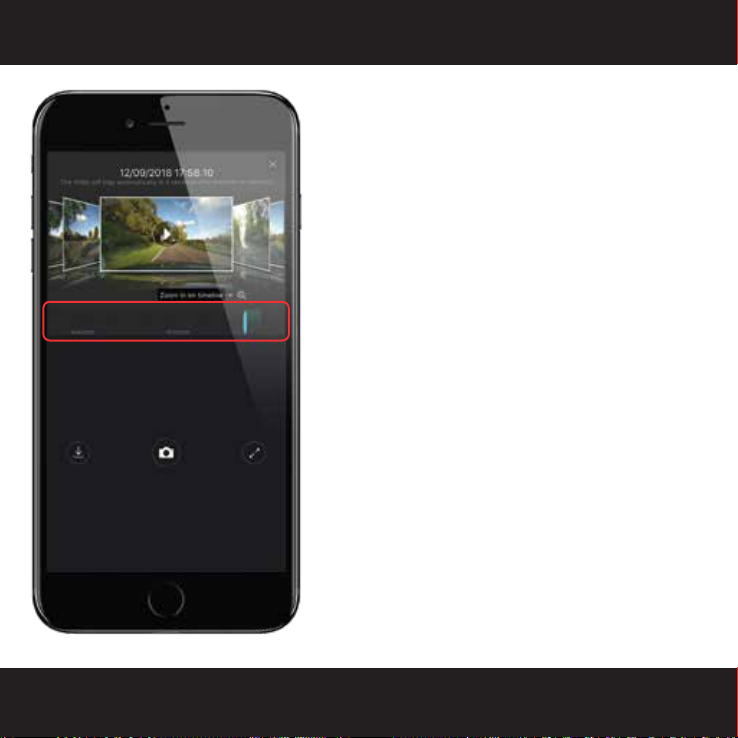
VIDEO PLAYBACK
1
To playback footage, slide the scroll bar which will show
you a thumbnail of the moment about to be viewed along
with the date and time.
HALO PROHALO PRO
Page 17
VIDEO PLAYBACK
2
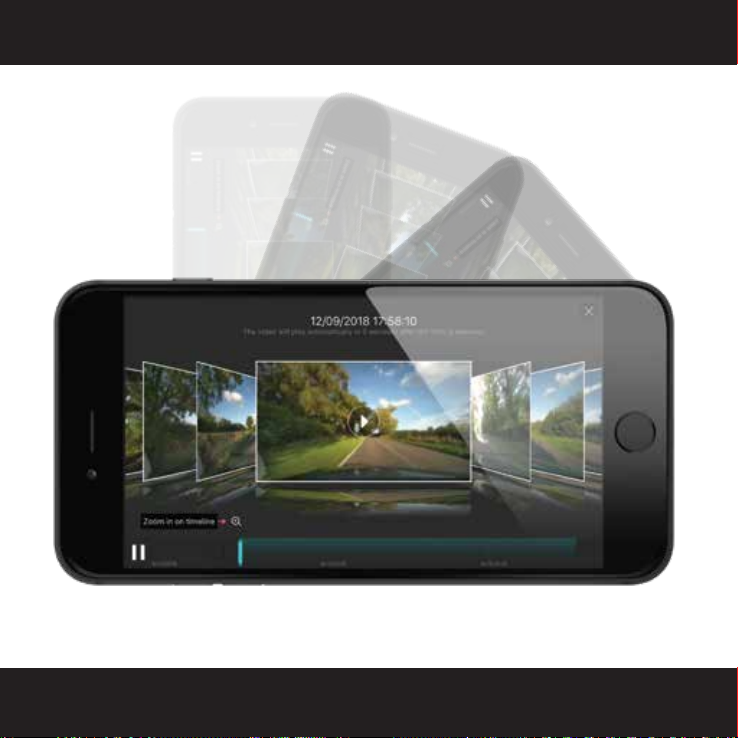
You can rotate your phone to the side to enhance the experience. This also works for Live Preview, Photo
Viewing, Video Viewing and Downloading Footage.
HALO PROHALO PRO
Page 18
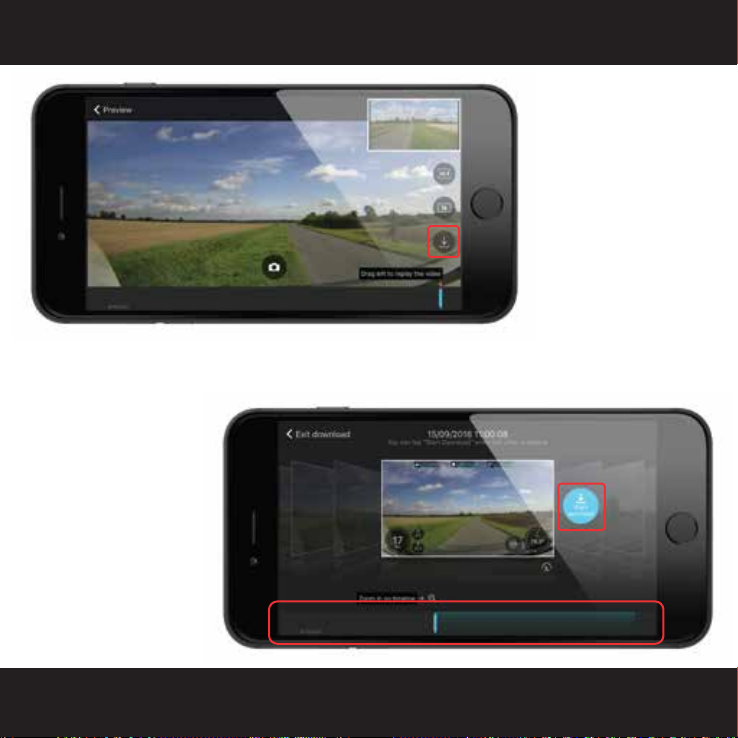
DOWNLOAD FOOTAGE
To create a clip of what has
been recorded, slide the
viewing bar to the right to
scroll backwards in time and
to the left to go forwards. A
thumbnail of what moment
you are on with a date and
time will be displayed to
help select the right clip.
Press ‘Start download’, on
the right of the thumbnail,
the footage will begin
playing showing you what is
being saved.
1
When in the video playback
mode, select the download
icon on the right of the
screen which will take you
to the download screen.
HALO PROHALO PRO
Page 19
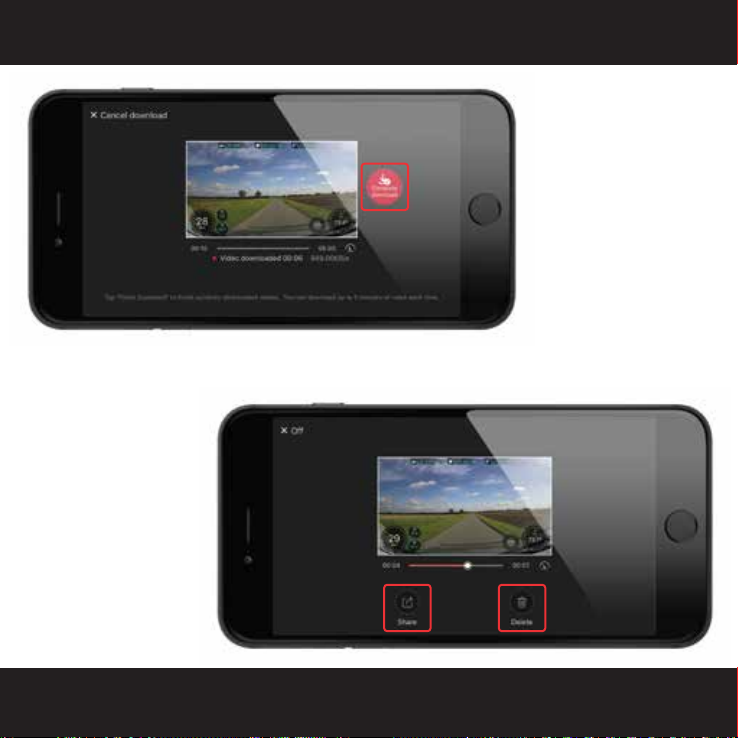
This will show you a
thumbnail of the created
clip, giving you the option
to ‘share’ or ‘delete’ the
clip. The clip stored in the
app album tab and can be
played back at your leisure
or downloaded to your
phone.
DOWNLOAD FOOTAGE
When you are happy with
the length of the clip, press
‘Complete download’.
2
HALO PROHALO PRO
Page 20
VIDEO EDITING
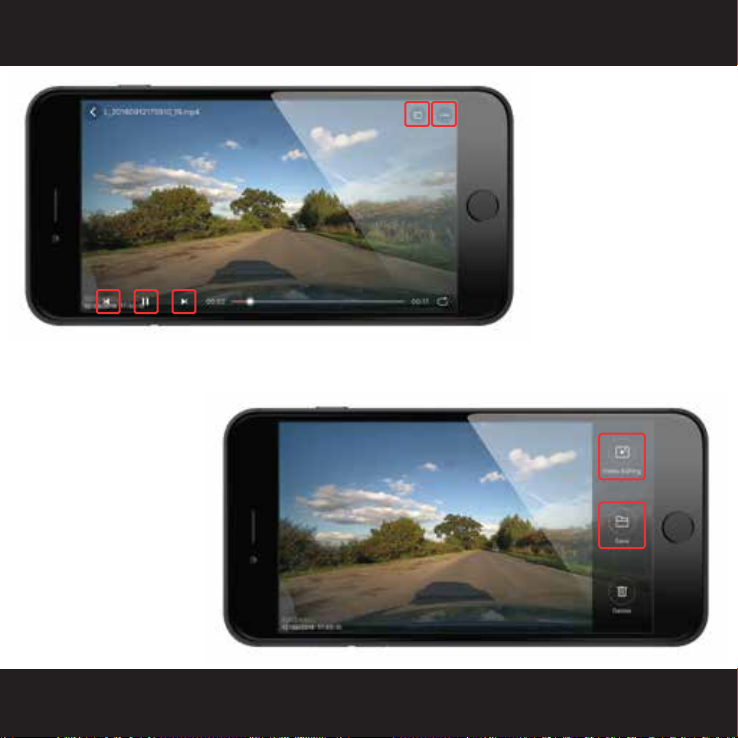
From the side menu you can
delete the video, ‘Save’ the
video to your phones
photo/video album or open
the ‘Video Editing’ mode.
1
After you have selected a
video from the Album page
you have several options.
The bottom controls
change playback options.
The top right buttons allow
you to share the video and
open the side menu.
HALO PROHALO PRO
Page 21
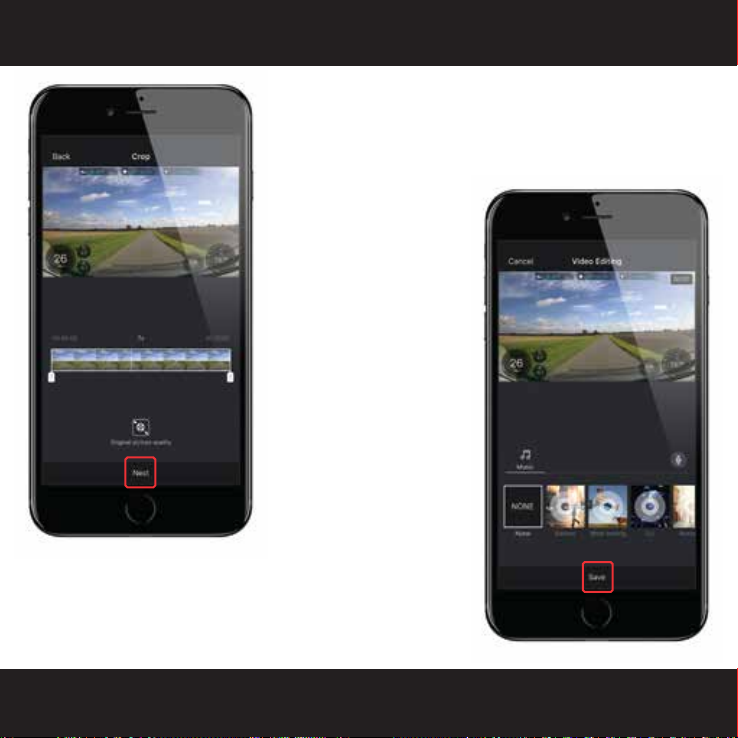
The video editing screen lets you crop the length of the selected
video and choose video quality. Once done press the ‘Next’ button
at the bottom to continue.
From the next video editing screen you can change the sound
options for the video. You can toggle the sound on and off or you
can choose from 7 music tracks.
VIDEO EDITING
2
When you are finished simply ‘Save’ your file.
HALO PROHALO PRO
Page 22
GPS TELEMATICS
1
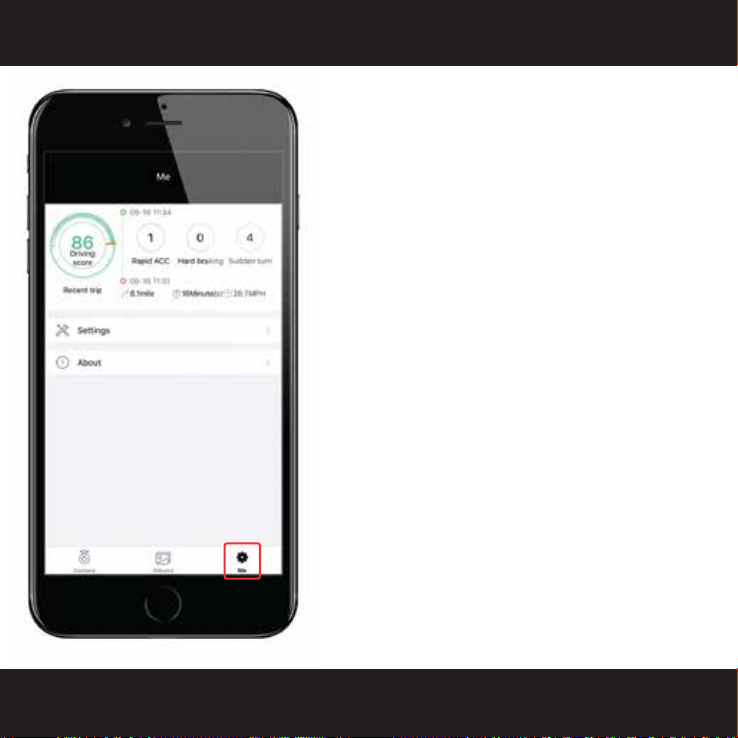
To access the GPS/Telematics data press the Setting icon
(’Me’) in the bottom right to access the general settings of
the dash camera.
At the top of the first settings page you will see most
recent GPS/Telematics data from your last route.
This will show you some basic information about your most
recent route. Including driving scores, start and finish
locations and mileage.
Press this tab/panel to show more information.
HALO PROHALO PRO
Page 23
GPS TELEMATICS
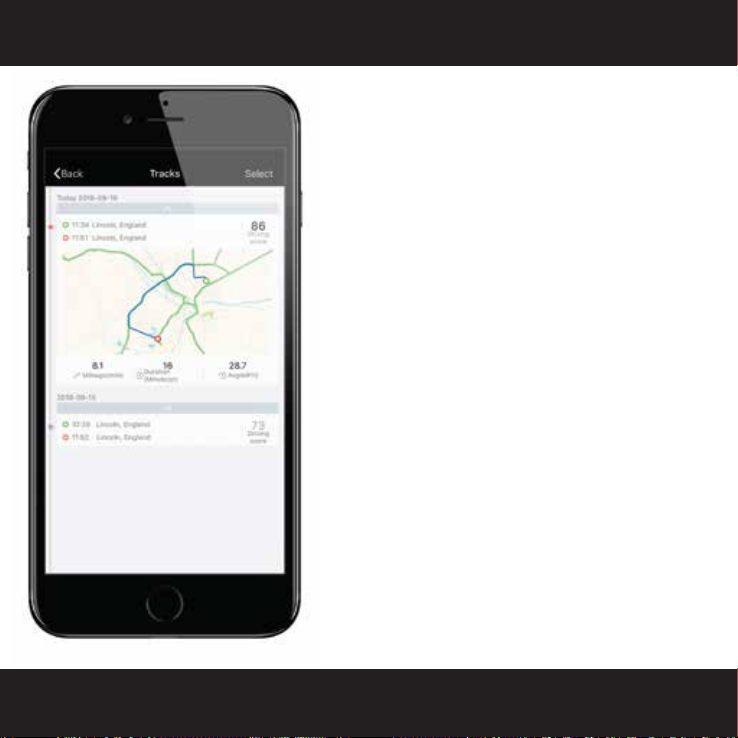
After pressing the tab/panel for more information you
will be presented with this page.
This page stores and shows more than just your most
recent route with much more added information.
Clicking on different tabs will expand the details and
show that route in map form.
Pressing a map will take you to the next page.
2
HALO PROHALO PRO
Page 24
GPS TELEMATICS
3
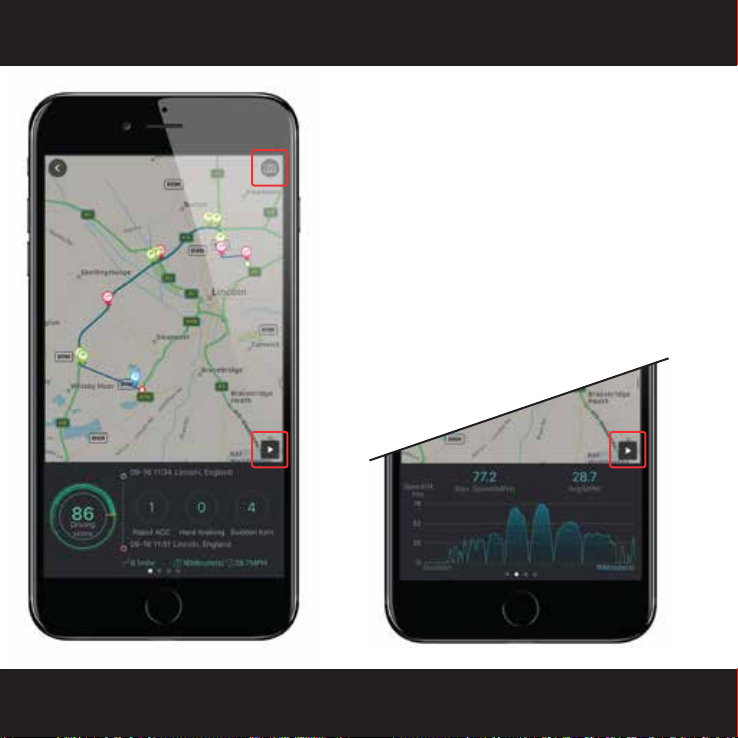
After pressing the map information on the last page you
will be presented with detailed information regarding the
GPS/Telematics of that particular route.
Pressing the Play icon in the bottom right of the map will
playback the route in map form with live data replay.
You can also press the top right button to save an image
with all current information.
The information at the bottom of the page can be changed
by swiping to the left.
HALO PROHALO PRO
Page 25
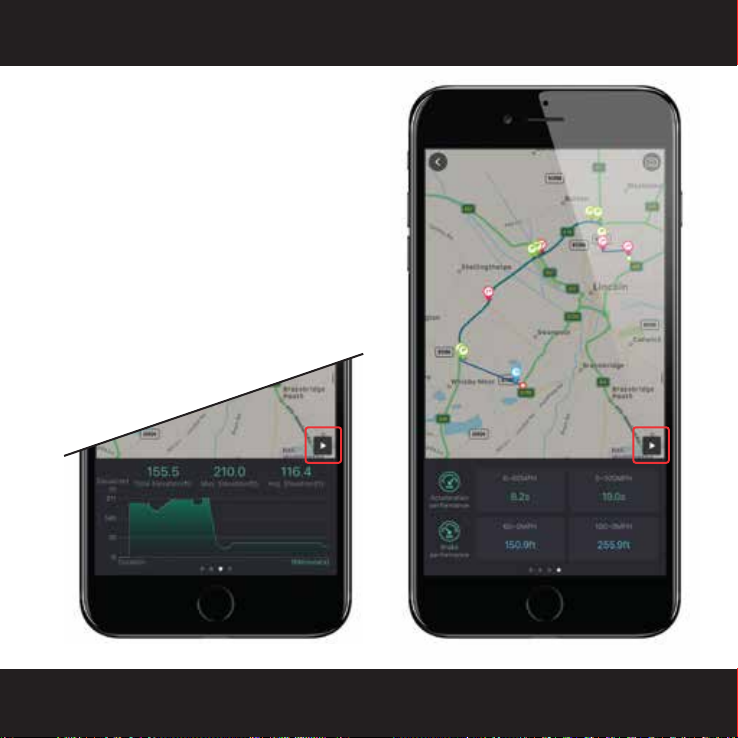
Swiping left on the data panels will cycle through the
information that has been recorded.
The data types that are recorded represent
information about driving score, speed (in graph
form) over the entire route, elevation (in graph form),
acceleration and brake performance (shown in
speed/time format) and distance.
GPS TELEMATICS
4
HALO PROHALO PRO
Page 26
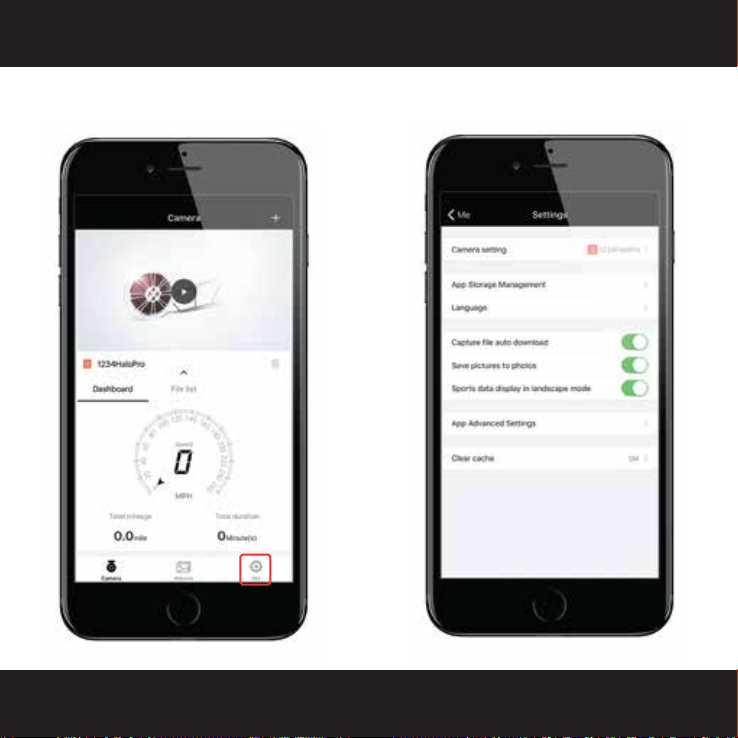
CAMERA SETTINGS
When connected to the camera, press the Settings icon (’Me’) in the bottom right to access the general
settings of the dash cam.
HALO PROHALO PRO
Page 27
PARKING MODE
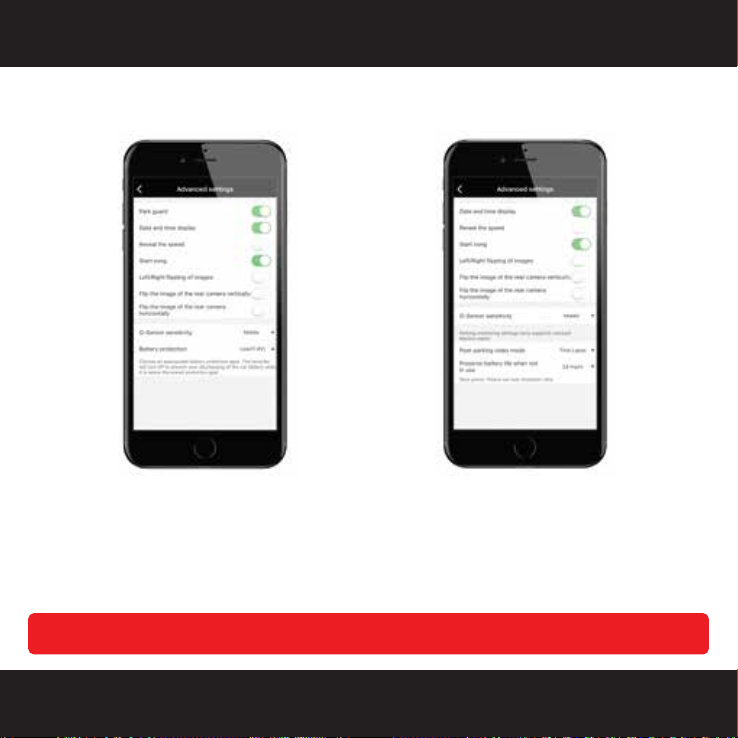
The Halo Pro’s parking mode records video footage even when your vehicle is parked. The parking mode
feature has several settings that can be changed. these will be different depending on the vehicles ignition state.
When the vehicles ignition is turned ON the
‘Advanced Camera Settings’ screen will show as
above. Here you can toggle the Parking Mode
(Park Guard) on/off. You can also adjust the Parking
Mode G-Sensor sensitivity and set the threshold for
the Parking Mode Low Battery Shutoff protection.
Parking Mode requires a Hardwiring Kit to function. These can be purchased separately.
HALO PROHALO PRO
When the vehicles ignition is turned OFF the
‘Advanced Camera Settings’ screen will show as
above. Here you can adjust the Parking Mode
G-Sensor sensitivity, set what type of video format
you want Parking Mode to be recorded in and set the
duration of the Parking Mode recording time limit.
Page 28

FAQS
VIDEO RECORDING
Q1: Shall I keep the Halo Pro connected with my Smart phone when it is working?
A1: The Halo Pro starts to record video automatically when the car is started without needing to connect
to your phone. However, if they are connected, you can preview, download and playback the videos
from the Halo App on your Smart phone.
Q2: Why are some of the Halo Pro video recordings missing?
A2: Make sure the Halo App and the Halo Pro’s firmware’s are the latest version. If there is a ‘Storage
exception’ notification, this means the SD card is corrupted and needs to be replaced.
Q3: Why is the image unclear on my Smart phone?
A3: The video downloaded to your Smart phone is compressed, you can review HD recordings via a PC
in MP4 format.
WI-FI AND APP CONNECTIVITY
Q1: How do I change the Wi-Fi name and password of the Halo Pro?
A1: Make sure your Halo Pro is connected to the App. Then go to Me > Settings > Camera Settings >
Camera Name (changes your Wi-Fi name), Camera Password (changes your Wi-Fi password).
Q2. Why is my Wi-Fi always disconnected?
A2: Go to Settings > Wi-Fi > Menu > Advanced > Disable ‘Scanning always available’. If ‘Scanning
always available’ is checked, make sure your Smart phone is near the Halo Pro.
Q3: After connection to the Halo Pro Wi-Fi, why can’t my Android Smart phone access it’s Mobile Data?
A3: Due to the settings of Android Smart phones, Mobile Data is no longer available when it’s connected
to the Wi-Fi of the Halo Pro.
HALO PROHALO PRO
Page 29

SPECIFICATIONS & REFERENCES
MAIN HARDWARE
Recording Front: 2K 1440P@25fps HD Loop Recording
Rear: 720P@20fps HD Loop Recording
Lens Front: 140° Viewing Angle - f/1.8 Aperture – 6 Layer
Rear: 120° Viewing Angle - f/2.2 Aperture – 4 Layer
Image Sensor Front: Omnivision OV4689 CMOS Image Sensor
Rear: Omnivision OV9712 CMOS Image Sensor
Processor Front: Hisilicon Hi3516D Processor
TECHNICAL PARAMETERS
Storage TF Card,
up to 128Gb,
Auto Loop
Video Resolution Front: 1440P
Rear: 720P
Image Resolution 4 Million Pixels
Connectivity Wi-Fi 2.4GHz
Rear: Hisilicon Hi3518E Processor
• Apps and camera firmware continue to update.
• Store temperatures: -20
o
C - 70oC
• Foreign objects on the lens will seriously reduce image quality. Clean the lens using a soft non-static
cloth. Do not clean using abrasive materials and/or chemicals.
• In the unlikely event of a problem with the device, repairs must be undertaken by a professional.
• Do not dispose of this item in household refuse, please use dedicated electrical recycling widely available.
FCC STATEMENT This device complies with Part 15 of the FCC Rules. Operation is subject to the following 2 conditions: (1) This device may not
cause harmful interference, and (2) Must accept any interference received, Incl. interference that may cause undesired operation.
WARNING Changes or modifications not expressly approved by the partly responsible for compliance could void the user’s authority to operate
the equipment.
NOTE This equipment has been tested and found to comply with the limits for a Class B digital device. These limits are designed to provide
reasonable protection against harmful interference in a residential installation. This equipment generates uses and can radiate radio frequency
energy and, if not installed and used in accordance with the instructions, may cause harmful interference to radio communications. However,
there is no guarantee that interference will occur in a particular installation. If this equipment does cause harmful interference to radio or TV
reception, which can be determined by turning the equipment off and on, the user is encouraged to try to correct the interference by one or
more of the following measures: (1) Reorient or relocate the receiving antenna. (2) increase the separation between the equipment and receiver.
(3) Connect the equipment into an outlet on a circuit different from that which the receiver is connected. (4) Consult the dealer or an
experienced radio/TV technician for help.
Road Angel Group, DB House, Rani Drive, Nottingham NG5 1RF
roadangelgroup.co.uk
Copyright© 2019 Road Angel Group. All Rights Reserved
HALO PROHALO PRO
Page 30

SMART DRIVERS HAVE A
The Pure is a high quality, compact, well
designed bit of kit with reliable data and
powerful features. It’s an excellent all-in-one
driver aid for the speed-conscious.
For more info visit: RoadAngelGroup.com
 Loading...