

Page 1

MAZE WORM FARM
Components: There may be variation in components and colours.
Lid
x1
Worm Saver
Tray
Liquid
x1
Collection Tray
x1
Working
Tray
x2
Base
Maze Distribution Pty Ltd
Telephone 03 9544 6999 - 1300 449 107 - Facsimile 03 9544 6911
Email - info@mazedistribution.com.au - Website www.mazeproducts.com.au
28 Buckland St, Clayton VIC 3168. Australia
x1
Coconut
Peat
x1
Page 2
MAZE WORM FARM
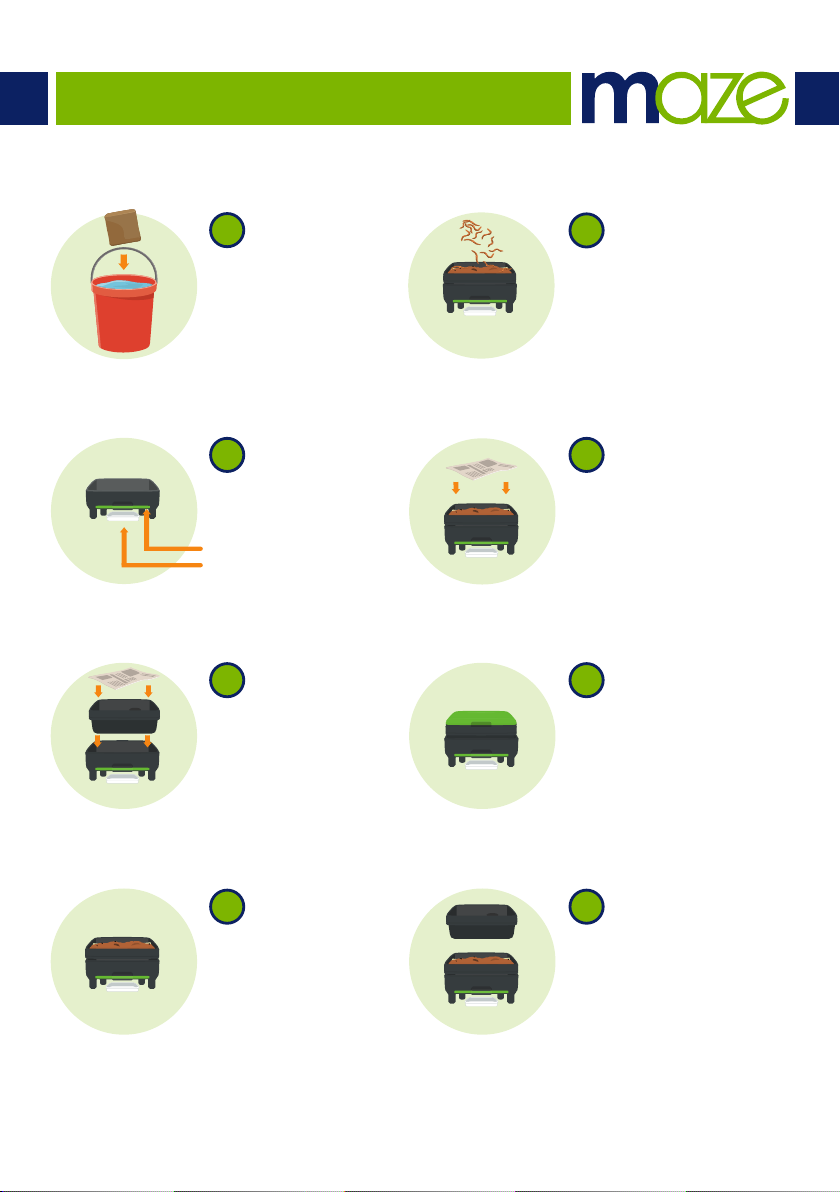
1
Soak coconut peat in half a
bucket of water for 15-30
minutes. This will become
the bedding for your worms.
2
Start with the base - Install
legs if you have them (may
be sold separately).
Ensure worm saver tray
& liquid collection tray
are in place.
3
Put first working tray in
place and line with 2-3
sheets of wet newspaper
(not supplied). The second
working tray won’t be
needed until the first is full,
so keep in a safe place.
5
Now it’s time to add your worms
(may be sold separately). Place
them on top of the coconut
peat with any bedding that
came with them. Leave the
worms a week before adding
any food scraps. This allows the
worms time to settle into their
new home.
6
Ideally you should over them
with a worm blanket (not
supplied). The worm blanket can
be any fabric made from
natural, non-synthetics such as
hessian. Several sheets of
newspaper or cardboard can
also be used.
7
Place the lid on the worm farm
and put it in a cool dry area
away from the sun and rain.
4
Add wet coconut peat to
the layer of wet newspaper,
this becomes the bedding
for your worms. Make sure
it’s not too wet or too dry.
The bedding should feel
moist with minimal water
dripping out when you
squeeze it.
Using Your 2nd Working Tray
8
When your first working tray is full
you can then add your second.
When two working trays are
being used the worms will travel
through the holes in the bottom
to find new food scraps. When
the second tray is full the first will
be full of casting to use on your
plants.
Page 3

MAZE WORM FARM
This will entice them to go into the second tray once
Feeding your worms
• After a week you can start to add a small amount of food scraps, about a handful every
few days. Gradually increase this as you notice the worms eating more. Once it’s
established and the worms are breeding, they will consume more food scraps. Be careful
not to overfeed them. Uneaten food will begin to smell and attract unwanted pests.
• When adding food scraps it’s important not to spread it out covering the entire area.
Start in a section and when you add new scraps put them in a different section working
your way around the farm.
• It’s a good idea to cover any new food scraps added with their bedding that is already in
the worm farm or some compost from your compost bin.
• Cut food into small pieces. This will make it easier for the worms to eat.
• To keep your worms happy make sure you are giving them some diversity with their food.
• Worms will change with the season, you may need to feed them more in the warmer
months and less in the cooler months.
Things I CAN add Things I CAN’T add
• Fruit scraps
• Vegetable scraps
• Teabags
• Coffee grounds
• Crushed eggshells
• Small amounts of bread
• Small amounts of cooked rice or pasta
• Moist cardboard & newspaper
• Onion
• Garlic
• Chilli
• Dairy
• Uncooked potato skins
• Citrus fruit or peel
• Meat, bones or fish
• Oils or grease
Adding your second working tray
• It’s time to add your second working tray once the first is full.
Make sure the second tray comes in contact with the
bedding in the first allowing the worms to travel freely into it.
• You can add food scraps directly into the second working
tray but it will speed up the process by adding a small
mount of organic soil, compost or existing bedding first.
• Stop feeding your worms for a week before adding the
second working tray to make the worms nice and hungry.
Page 4

MAZE WORM FARM
Harvesting
You will get 2 types of fertiliser from your worm farm; Worm tea & Castings
Worm tea
This accumulates in the liquid collection tray at the
bottom of your worm farm. This worm farm is
designed to be free draining. This eliminates the
risk of the liquid building up and potentially
drowning your worms. It can be diluted 1 part
liquid to 9 parts water. It should look like a weak
tea.
Castings
You will find some casting on the pull out worm
saver tray. But the bulk of this will be found on the
bottom working tray. When the second tray is full
the first will be full of casting to use on your plants.
Worm farm maintenance
• Every week or so it’s a good idea to flush your worm fam with half a bucket of water.
This ensures the entire farm stays moist. When doing this make sure to replace the liquid
collection tray with a vessel that will hold the sudden influx of water.
• A healthy worm farm should smell earthy. If your worm farm smells rotten and vinegary,
then acidity may be too high. This can be fixed by gently aerating the worm farm,
and or adding some crushed egg shells (it’s a good idea to dry them out first), dolomite
lime or garden lime (a dusting over the top is a sufficient amount).
• It’s important to protect your worms in extreme weather conditions. To protect against
heat make sure that they are in a shady part of the garden. Be sure to keep your worm
farm moist. You may need to flush it with water every day or so. In extreme cold climates
make sure the worm farm is out of the rain and a thick worm blanket is being used.
You could also add additional bedding of compost and worm castings.
www.mazeproducts.com.au
Maze Distribution
28 Buckland St
Clayton VIC 3168
Australia
P 03 9544 6999
P 1300 449 107
F 03 9544 6911
E info@mazedistribution.com.au
 Loading...