


Right-Hand
Pier
Left-Hand
Pier
Entertainment
Console
Bridge and
Back Panel
Riverside
FURNITURE
email: info@riverside-furniture.com
Page 1 of 6
Made in Viet Nam
Mirabelle
Entertainment Wall System
Assembly Instructions
M
M

Step 1
To remove the drawer if it ever becomes
necessary:
A. Pull the drawer fully open so the black latch
is visible in the inside channel of the guides.
B. Release the latches by simultaneously
pushing one lever up and the other down.
C. At the same time, pulling the drawer forward
until the slides release.
To reinstall the drawers, carefully align the
channels of the guide and push drawer back
into Desk. Open and close drawer fully a
couple times to verify proper operation.
Riverside
FURNITURE
email: info@riverside-furniture.com
Page 2 of 6
Made in Viet Nam
5 pcs.
1 pc.
Mirabelle
Entertainment
Assembly Instructions
8 pcs.
2 pcs.
Note:
1. Carefully place the Console
on its back and install the
levelers into the bottom of
each leg. The levelers can
be used to compensate for
uneven flooring if needed.
2. Carefully stand the Console
upright and move to the
desired location in the
room.
3. Open the doors and install
the Shelf Pins (C) at the
desired levels and place the
Wood Shelves (D) on the
pins.
Note B: If the Console will be
used without the Pier
Cabinets and Back Panel, if
desired, the Wood Rail
attached to the Top Back
edge can be removed using
the Allen Wrench provided.
2 pcs.
4mm Allen
Wrench
1 pc.

Left Pier
Right Pier
B
Riverside
FURNITURE
email: info@riverside-furniture.com
Page 3 of 6
Made in Viet Nam
1 pc.
2 pcs.
Mirabelle
Entertainment
Assembly Instructions
12 pcs.
1 pc.
4 pcs.
Note:
1. Carefully place the Pier Cabinet on
its back and install the levelers
into the bottom of each leg. The
levelers can be used to compensate
for uneven flooring if needed.
2. Carefully stand the Pier Cabinet
upright and move to the desired
location in the room.
3. Open the door and install the Shelf
Pins (C) at the desired levels in the
lower area and at the upper area,
and place the Wood Shelves (A &
B) on the pins.
If using the Pier Cabinet with the TV
Console, connect the units
together using the Allen Head
Bolts (G), Washers (I & J) and
Connector Caps (H). Tighten with
the Alen Wrench (K).

Mounting
Plates
Riverside
FURNITURE
email: info@riverside-furniture.com
Page 4 of 6
Made in Viet Nam
2 pcs.
1 pc.
Mirabelle
Entertainment
Assembly Instructions
1 pc.
1 pc.
22 pcs.
22 pcs.
4mm Allen
Wrench
#26244
Bridge and Back panel
6 pcs.
8 pcs.
8 pcs.
8 pcs. 1 pcs.
4 pcs.
The following steps must be performed to the Bridge, TV Console and Left and Right Piers before
they are arranged and connected together.
1: Bridge--Attach the Mounting Plates (L) to the top ends using the 7/8" long Allen Head Bolts (G),
Spring Washers (H) and Flat Washers (I). Tighten with the Allen Wrench (K). The Mounting
Plates are only intended to help support the Bridge while it is being connected to the Pier
Cabinets, and must not be used as the only method of support.
2:
Allen Wrench
16 pcs.
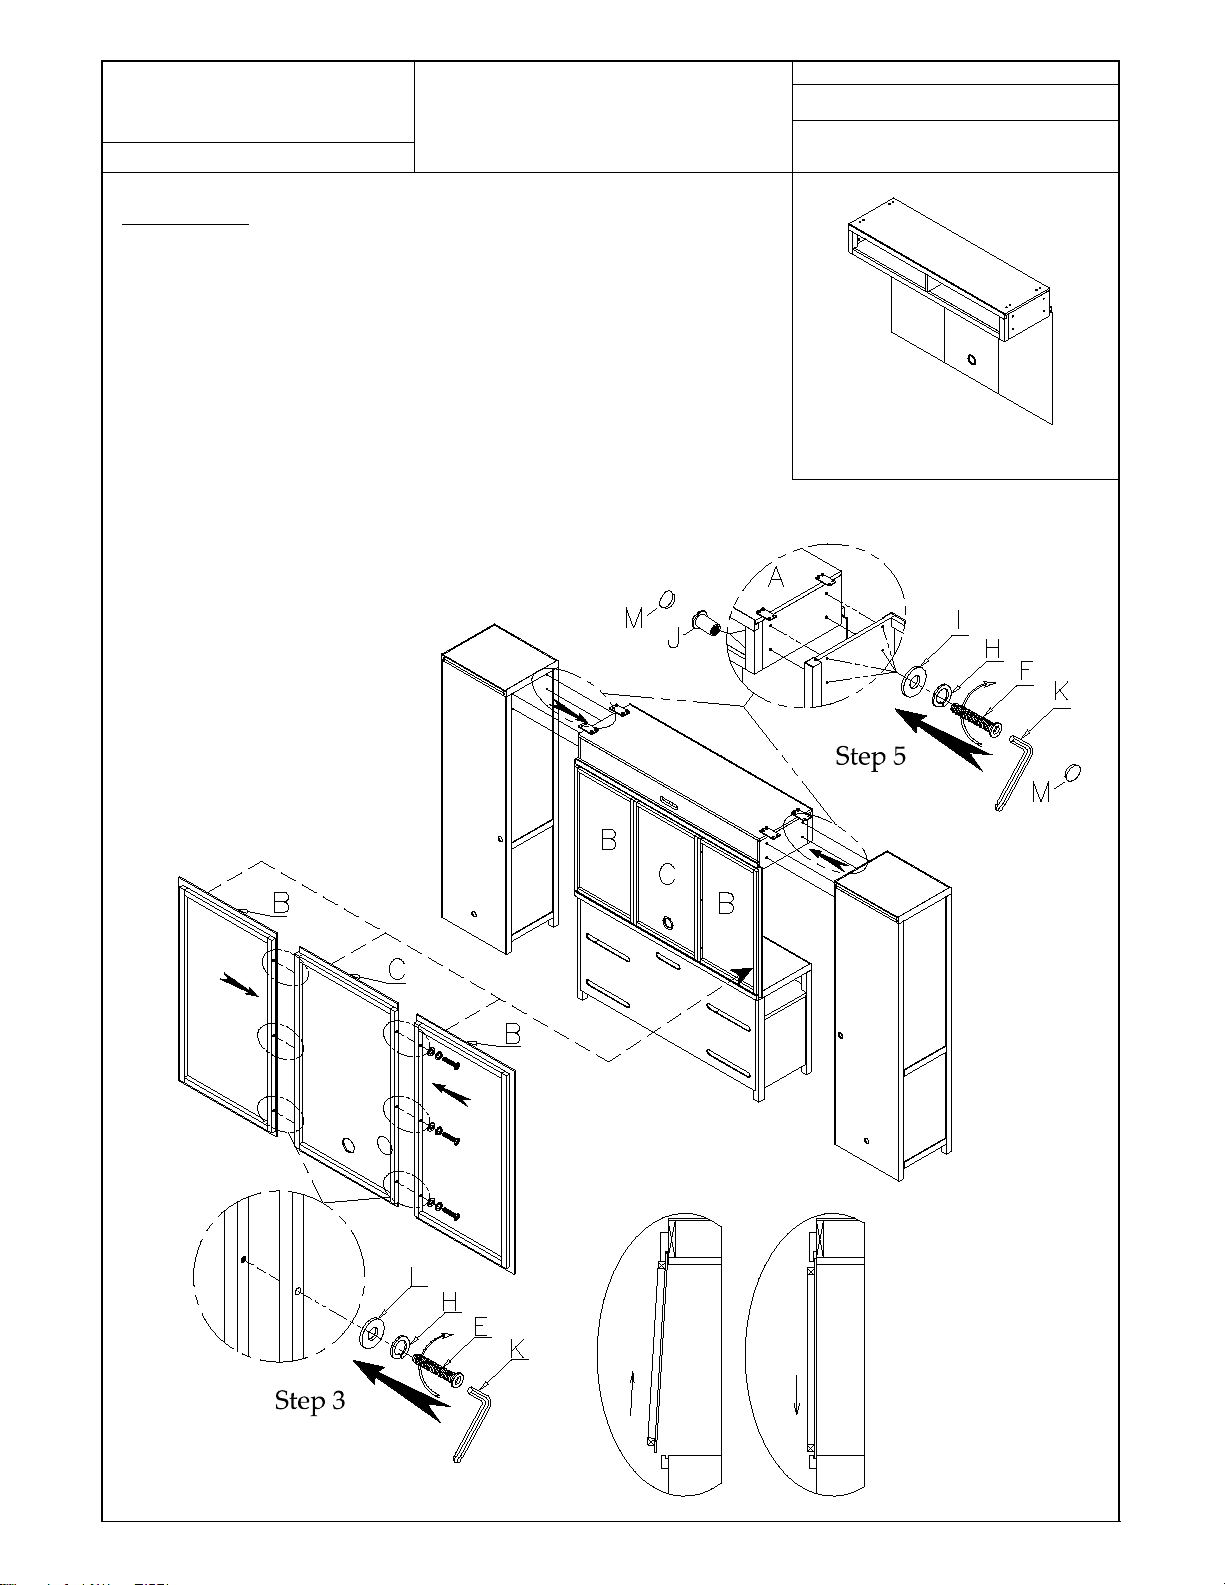
#26244
Bridge and Back panel
3: Back Panels--Assemble the Side Back Panels (B) to each side edge of
the Center Back Panel (C) using the 1-1/2" long Allen Head Bolts (E)
and the same Washers as previous Steps. Align the top edges of the
panels and tighten with the Allen Wrench. Lean the assembled
Back Panels against the wall where the Wall Unit will be assembled
together.
4: Carefully move the TV Console to where it will be used in the room.
5: Carefully move the Left and Right Pier Cabinets to be snug to the
ends of the TV Console. It is strongly recommended that the Piers
be attached to the wall behind using the Anti-Tip Kit attached to the
back of the Pier Cabinets. Refer to the mounting instructions on the
following pages. Using two people, carefully place the Bridge onto
and between the top of the Pier Cabinets. It is advisable that one
person continue to support the Bridge while it is being connected to
the Pier Cabinets, using the Allen Head Bolts (F), Spring Washers
(H) and Flat Washers (I) and Connector Cap inside the Bridge.
Tighten Bolts using the Allen Wrench (K). Press the Plugs (M) over
the Connector Bolts and Caps.
Riverside
FURNITURE
email: info@riverside-furniture.com
Page 5 of 6
Made in Viet Nam
Mirabelle
Entertainment
Assembly Instructions
6: To install the Back
Panels: Raise the Back
Panels, placing the top
edge into the slot across
the bottom back edge of
the Bridge. Pull the
Back Panels forward
against the Piers and
lower the bottom edge
into the slot across the
top back edge of the TV
Console.

1. Temporarily locate the furniture to near it's final location in the room next to a wall. Locate a
wall stud behind your furniture and also mark the stud's location on the back of your furniture.
2. Firmly attach one bracket to the stud approximately 2" below the top of the furniture with the
2 inch long Wood Screws provided. It may be necessary to drill 3/32 dia. pilot holes for the screws.
3. Firmly attach the other bracket onto a solid, structural part on the back of the furniture using the
5/8 inch long Wood Screws. It may also be necessary to pilot bore for these screws.
4. Move the furniture into its final position, taking care to line up the wall bracket with the furniture
bracket. Thread a strap through the bracket as shown in the illustration. Tighten strap until snug
but do not over tighten.
Caution: Riverside Furniture Corp. assumes no liability for improper installation or excessive
loads placed on screws, brackets or straps. Failure to detach this restraint before moving furniture
may result in personal injury and property damage.
Warning: This tip-over restraint is not to be a substitute for proper adult supervision. Do not allow
children to climb on furniture. Items left on top of the TV and furniture, such as toys, remote
controls and treats might tempt young children to climb. Push the TV as far back as possible from
the front of its stand. Place electrical cords out of a child's reach, and teach children not to play
with the cords.
email: info@riverside-furniture.com
FURNITURE
Riverside
Approximately
2"
Anti-Tip Hardware
Installation Instructions
Install screws
through the small
hole in brackets
Notice: Riverside Furniture Corp. recommends that steps be taken for certain furniture items to
prevent or minimize the risk of tip-over. This furniture is equipped with Tip-over Restraint
Hardware for use to minimize this risk, if used. Please follow below installation steps. Riverside
Furniture Corp. recommends that parents and guardians periodically visit the U.S. Consumer
Product Safety Commission (CPSC) website at http://www.cpsc.gov/ and stay up to date on all
issues related to children's product safety.
Page 6 of 6
 Loading...