

Page 1
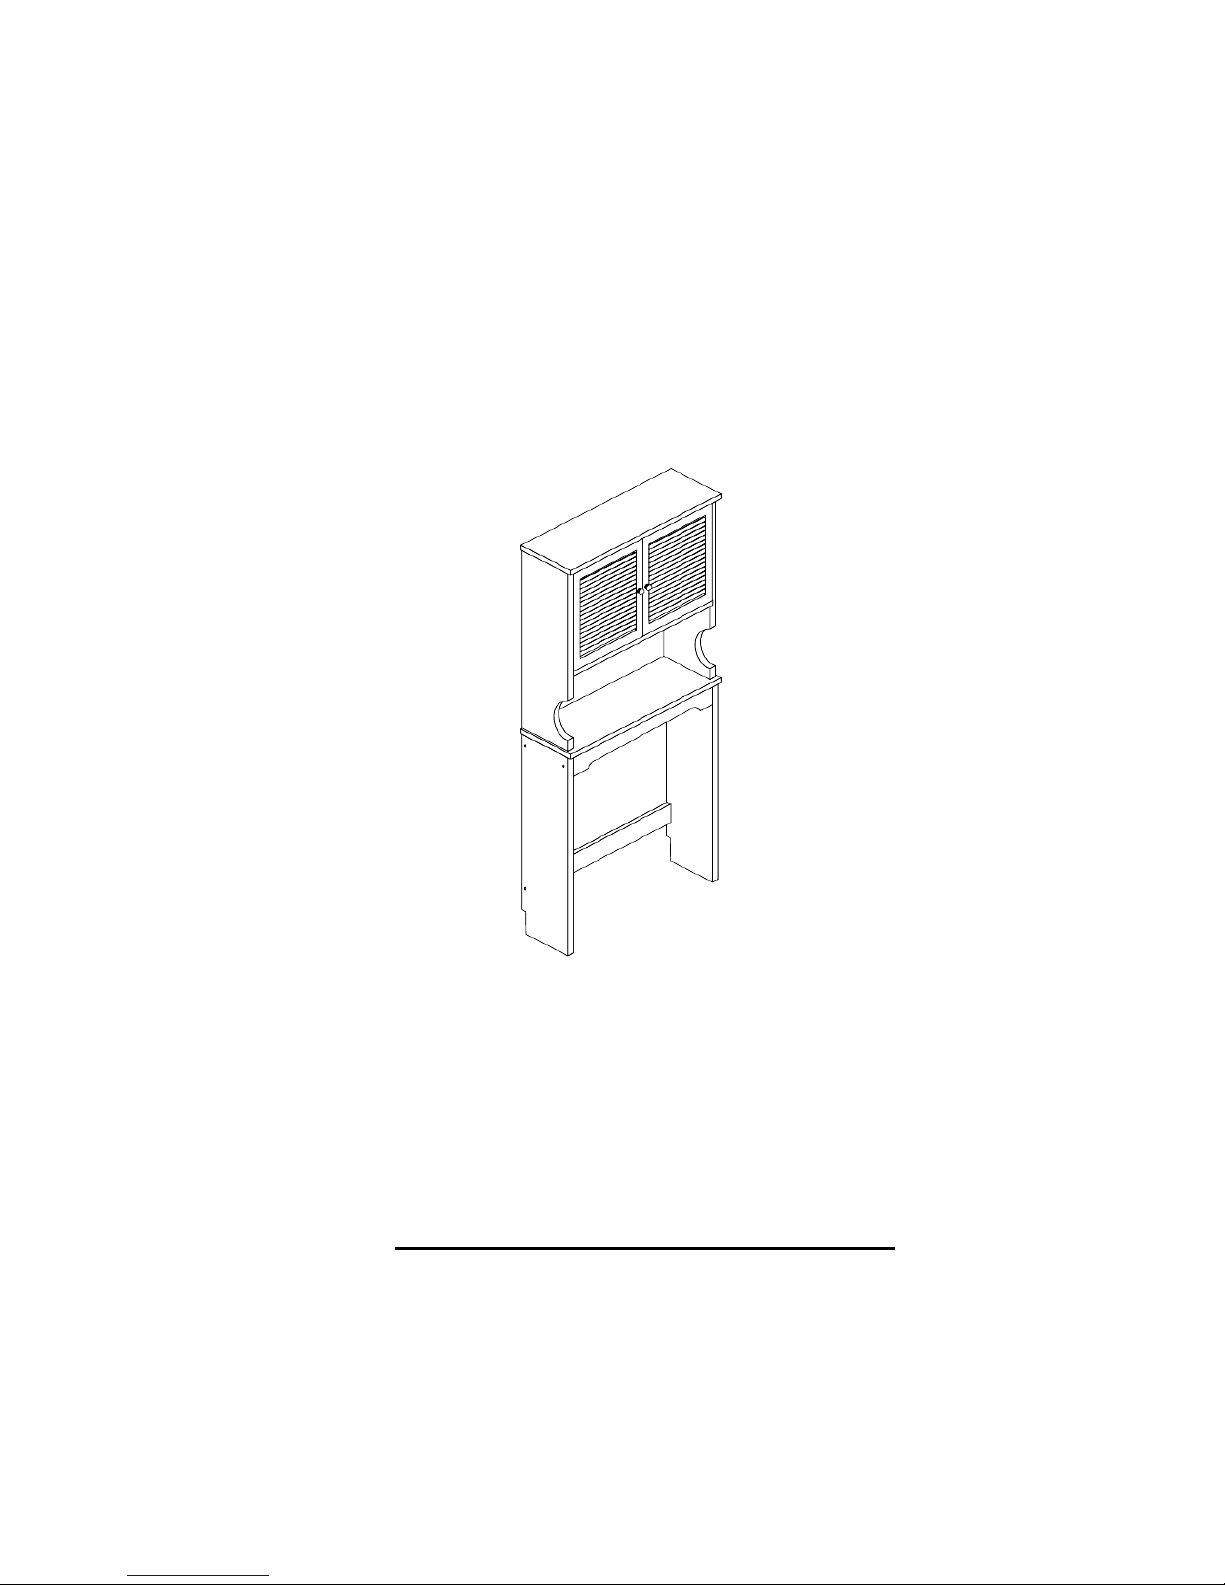
ADULT ASSEMBLY REQUIRED
This product requires assembly by an adult because of the small parts. Care should be
taken in unpacking and assembling this item to keep the small parts away from children.
WARNING
ASSEMBLY INSTRUCTIONS
TWO DOOR SPACESAVER
Young children can be seriously injured or killed, if furniture tips over.
Don’t use this item for a TV stand.
Use angle-braces or anchors to secure furniture to the wall.
Page 2
THIS SHELF UNIT WILL HOLD UP TO 25 POUNDS PER SHELF OR A TOTAL OF 75 POUNDS. DO
NOT LOAD EACH SHELF WITH MORE THAN 25 POUNDS. IF LOADED WITH MORE THAN 25
POUNDS PER SHELF AS THIS MAY CAUSE DAMAGE TO THE SHELF AND MAY CAUSE SERIOUS
INJURY OR DEATH.
Page 3
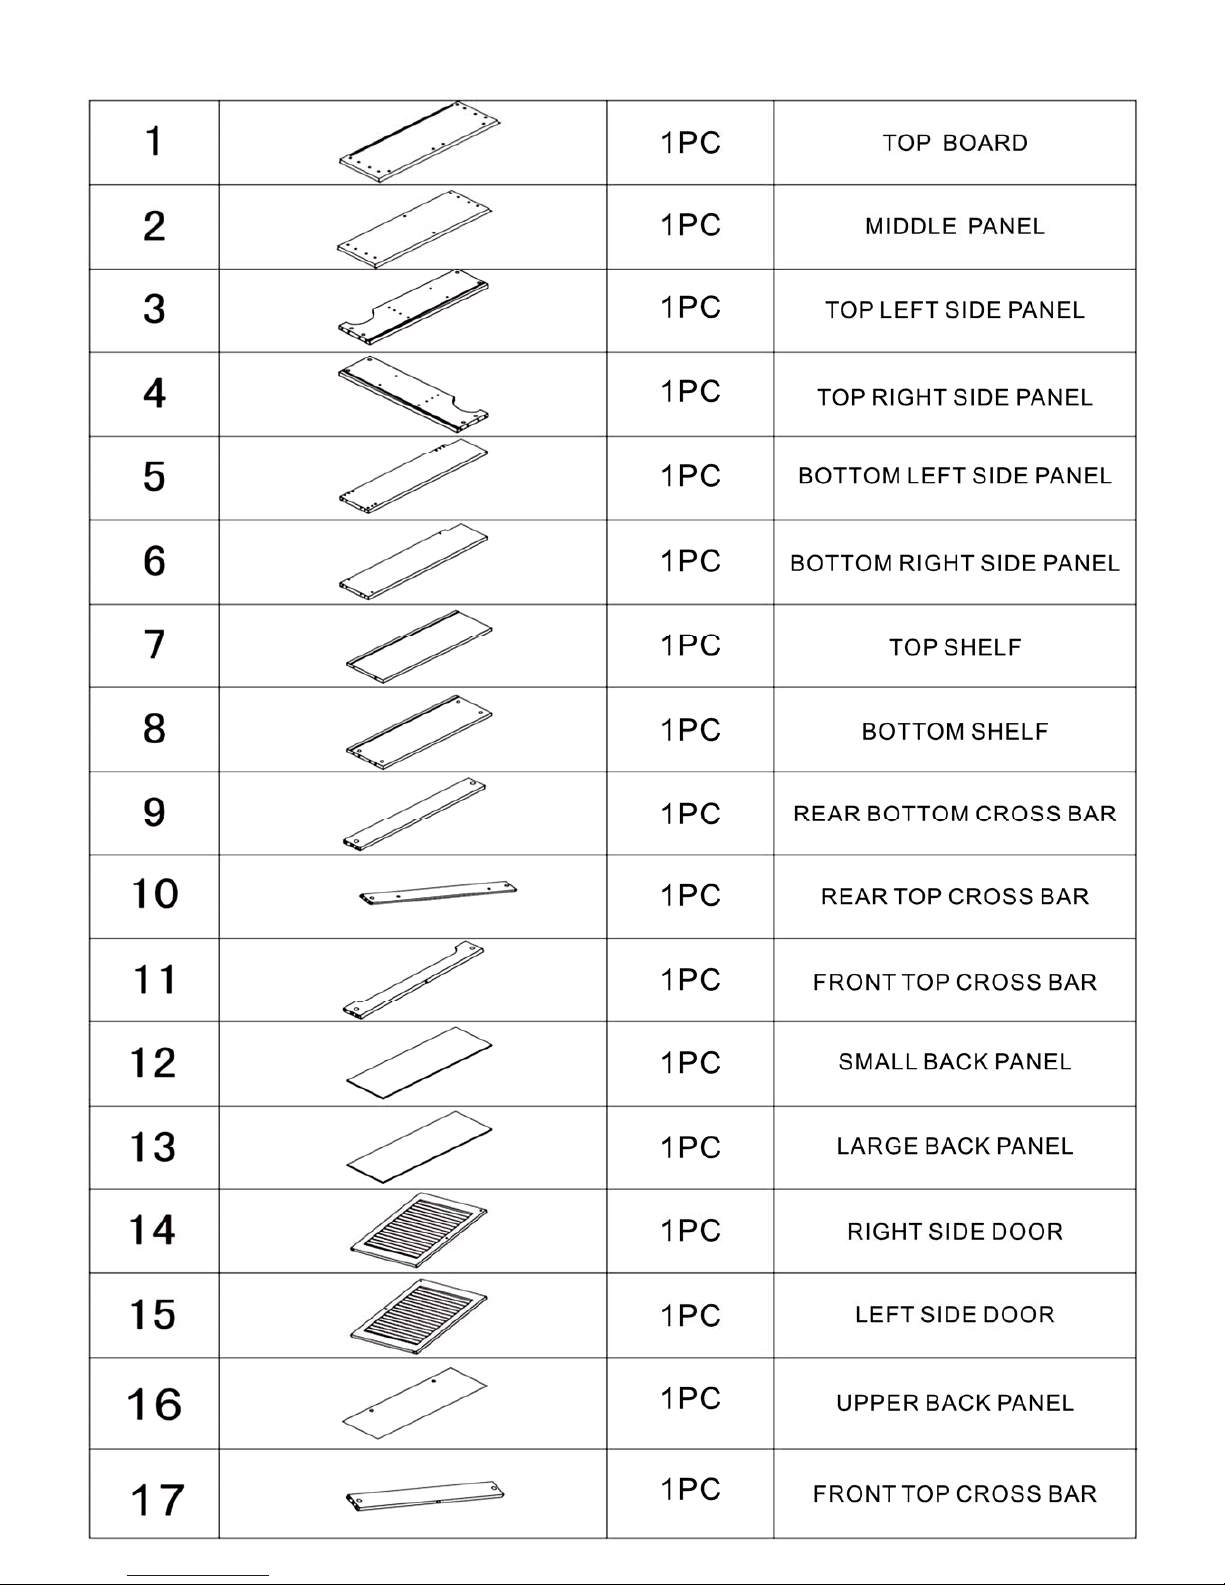
PARTS LIST
Page 4
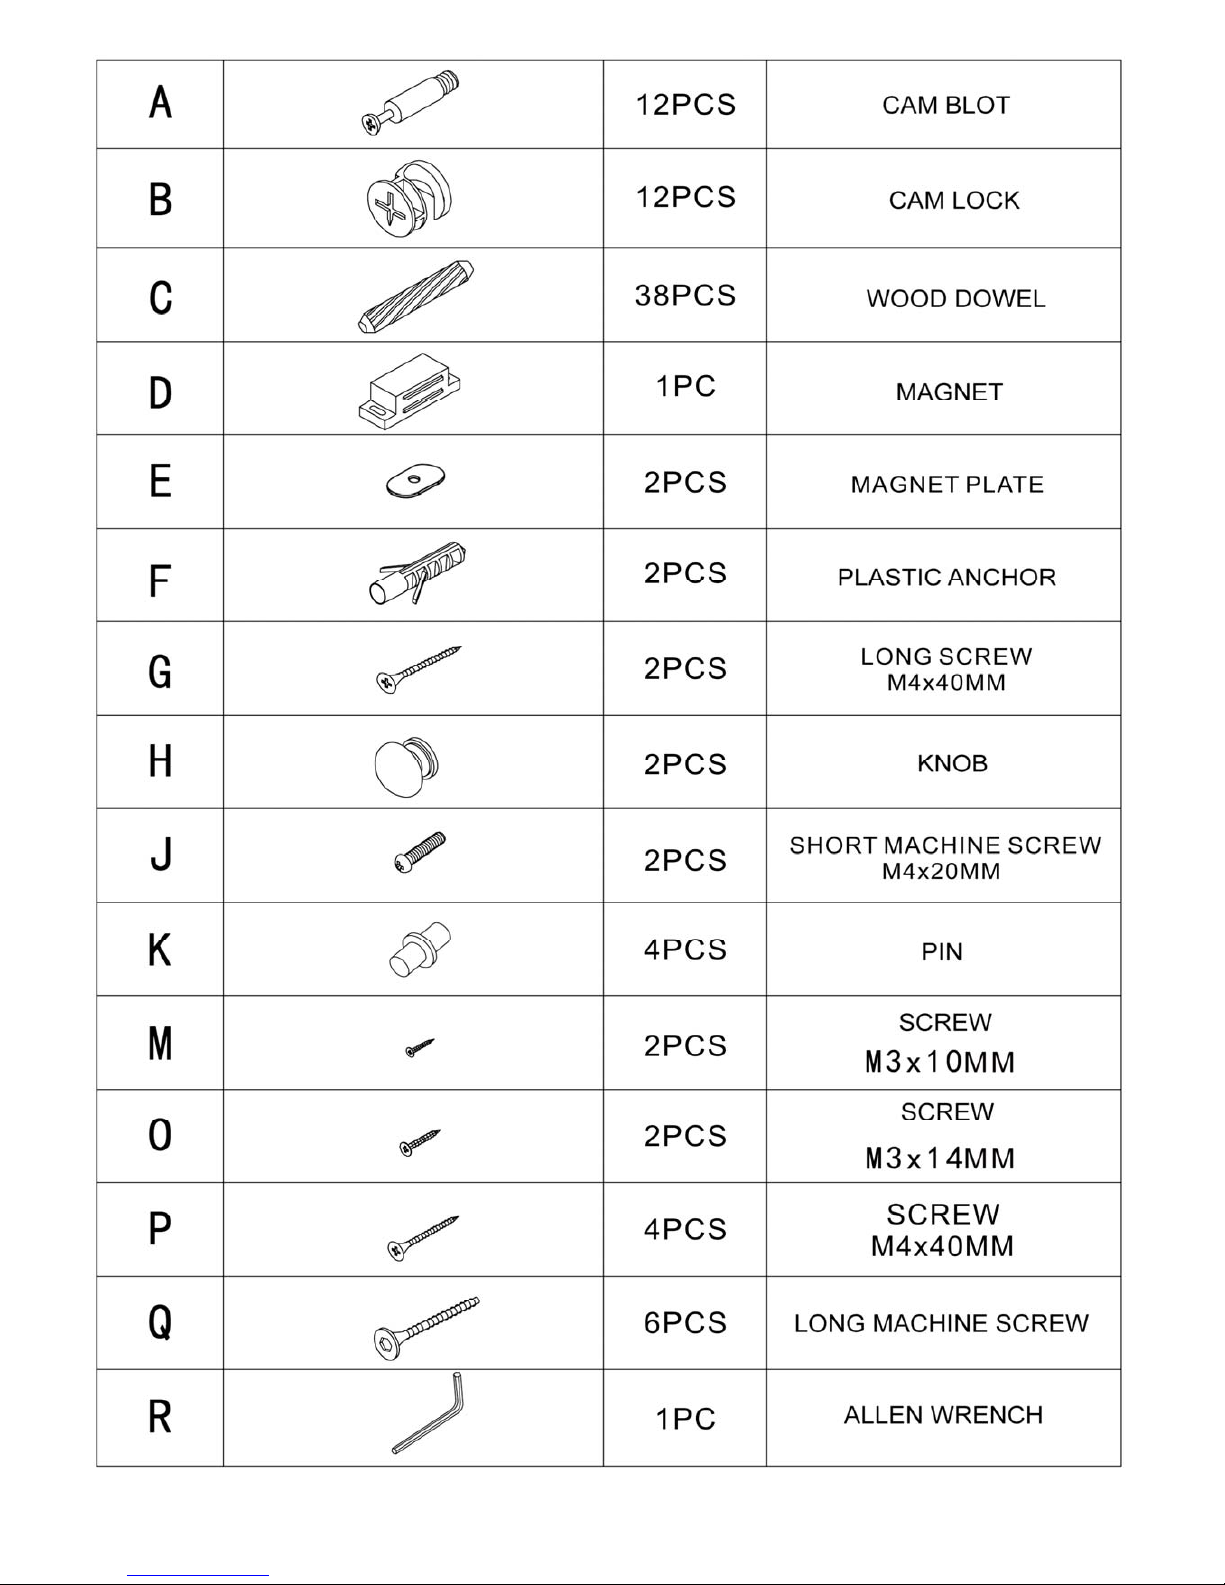
TOOLS NEEDED FOR ASSEMBLY : FLAT & PHILIPS SCREWDRIVER (NOT INCLUDED)
THE USE OF POWER SCREWDRIVER IS NOT RECOMMENED
Page 5
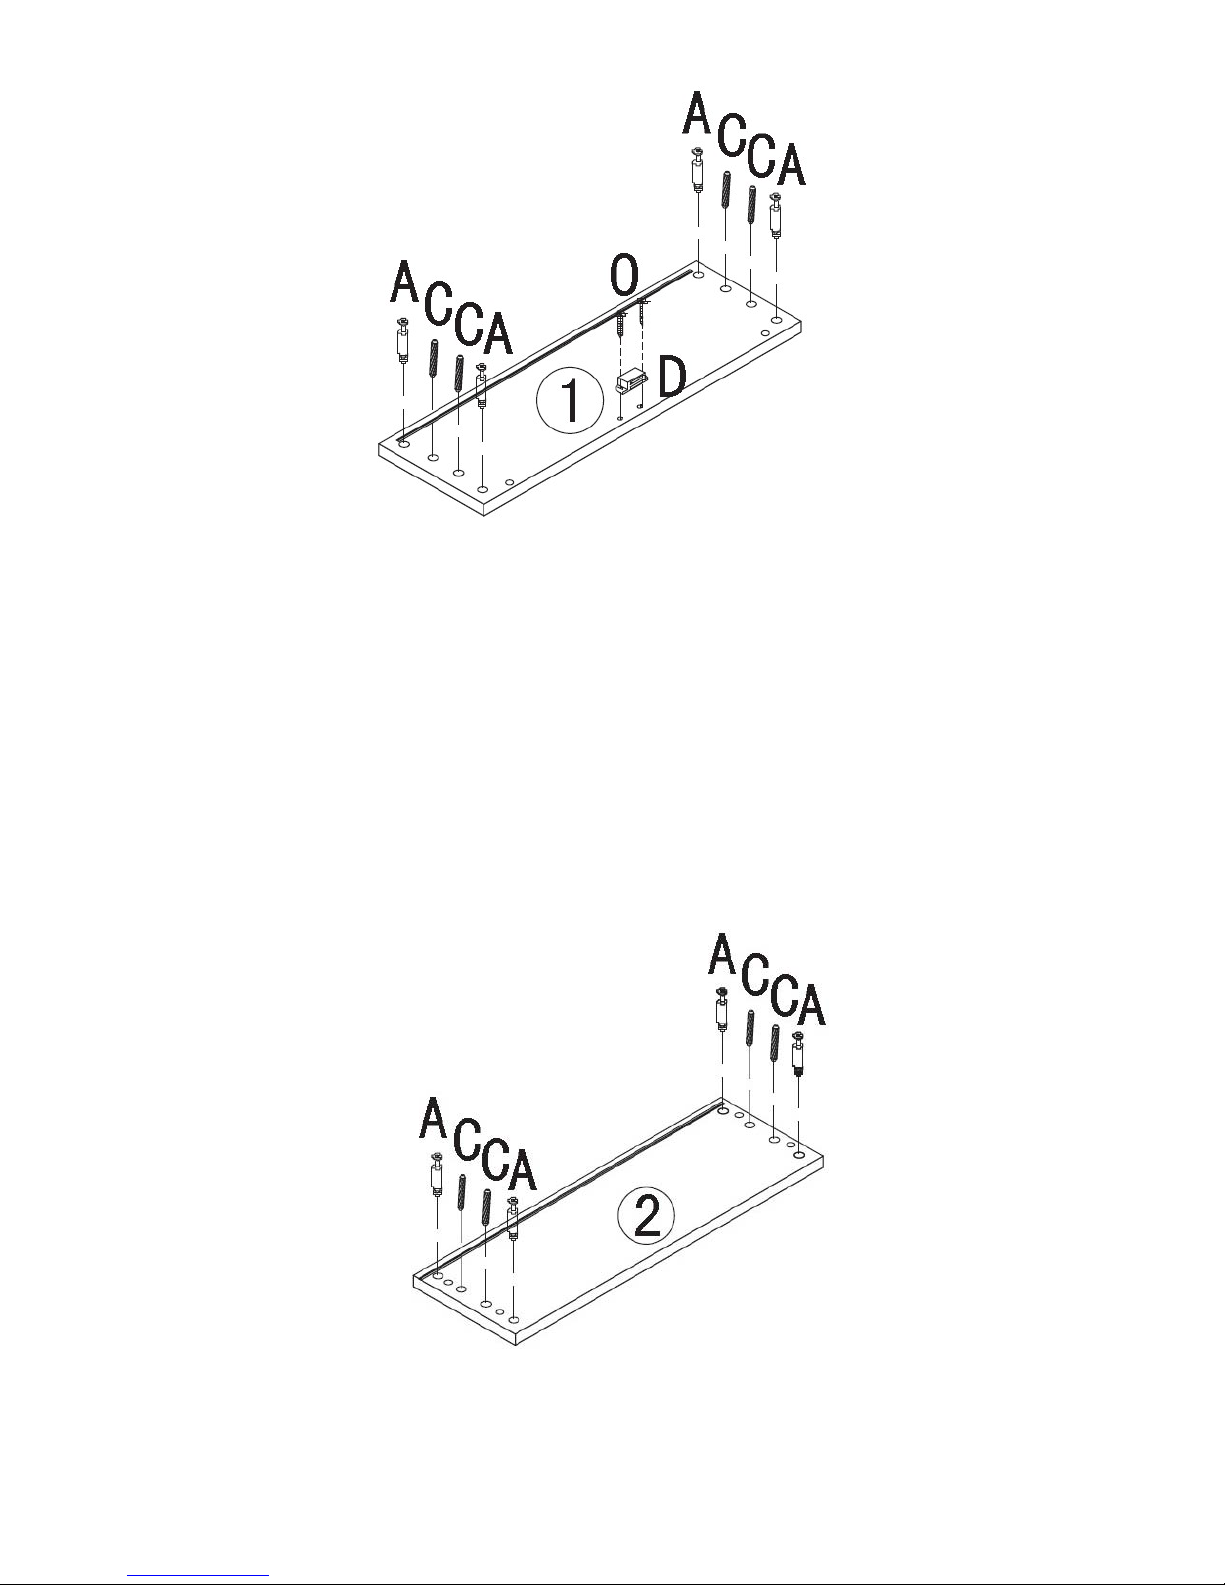
STEP 1
STEP 1
1.Screw 4 cam bolts (A) into the pre-threaded holes on the top board (1) by using a Philips
screwdriver.
2. Insert 4 wood dowels (C) into the dowel holes on the top board (1).
3. Attach the magnet (D) to the top board (1).
4. Insert 2 screws (O) through holes on the magnet (D) then tighten to top board (1) by using a Philip
screwdriver.
STEP 2
STEP 2
1.Screw 4 cam bolts (A) into the pre-threaded holes on the middle connection board (2) by using a
Philips screwdriver.
2.Insert 4 wood dowels (C) into the dowel holes on the middle connection board (2).
Page 6
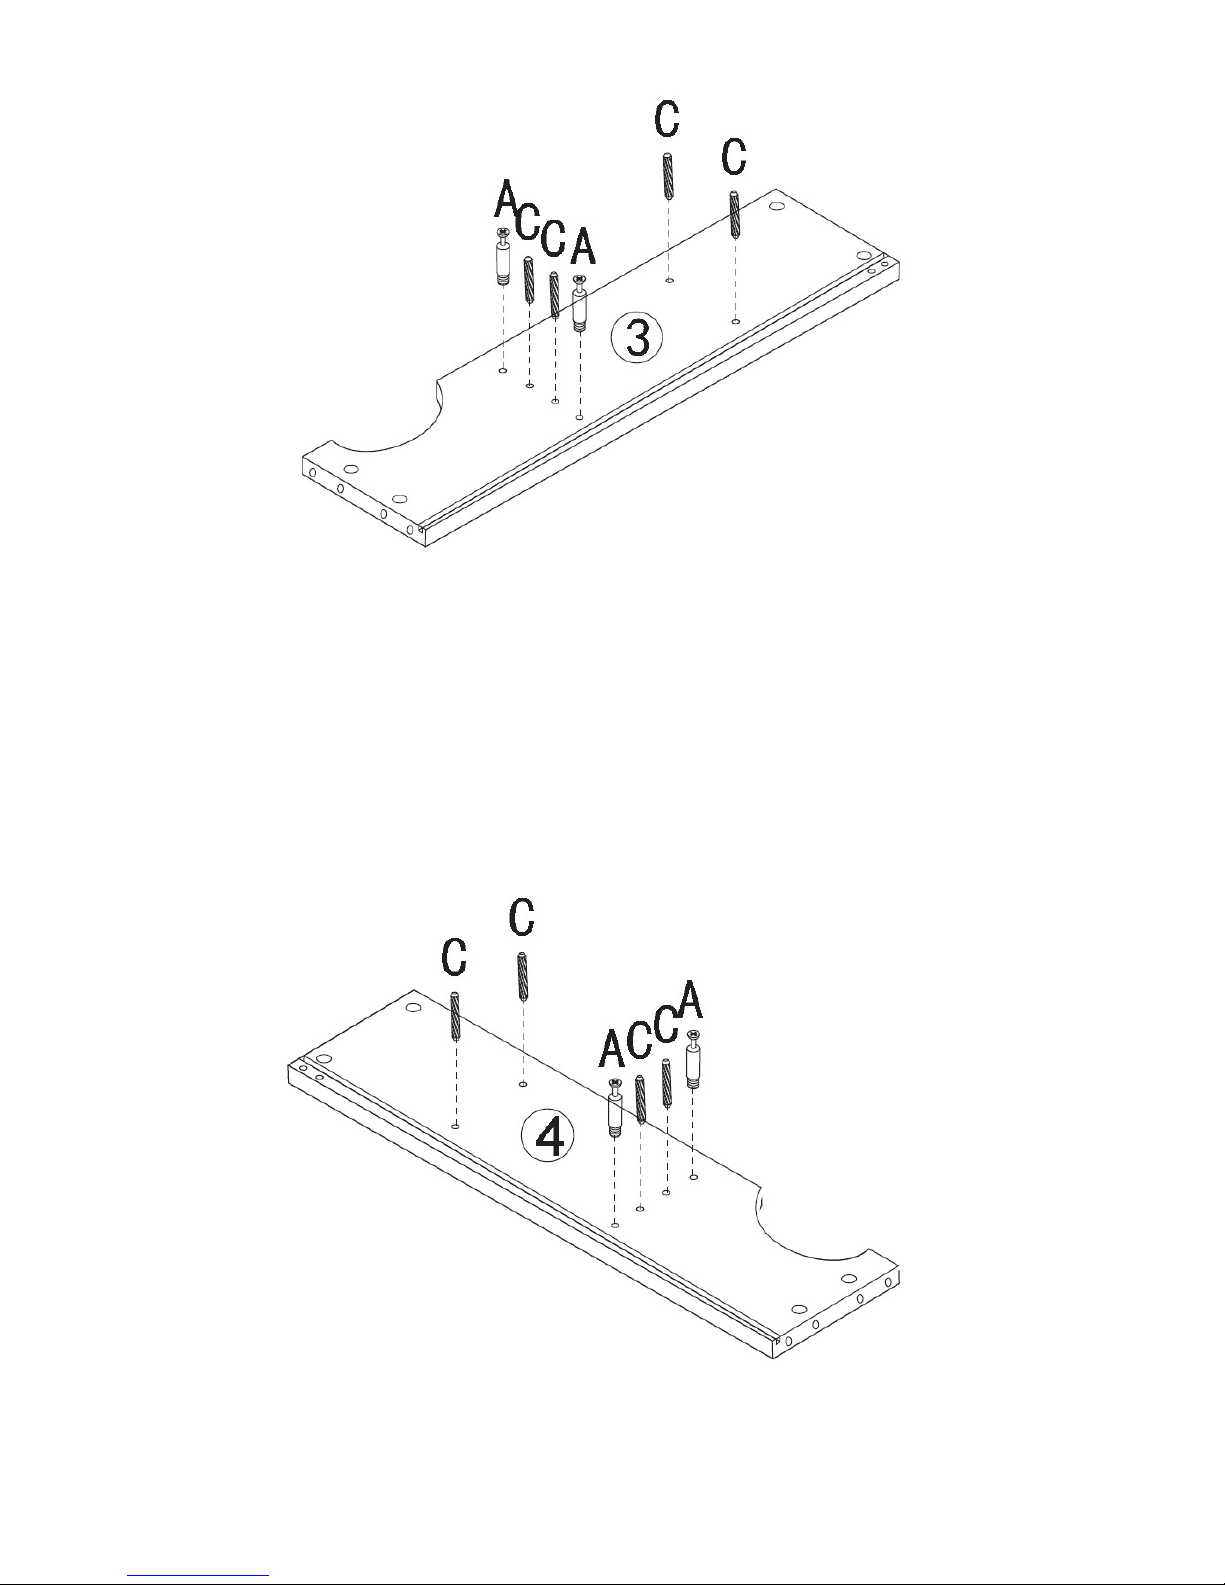
STEP 3
STEP 3
1.Screw 2 cam bolts (A) into the pre-threaded holes on the top left side panel (3) by using a Philips
screwdriver.
2.Insert 4 wood dowels (C) into the dowel holes on the top left side panel (3).
STEP 4
STEP 4
1. Screw 2 cam bolts (A) into the pre-threaded holes on the top right side panel (3) by using
a Philips
screwdriver.
2. Insert 4 wood dowels (C) into the dowel holes on the top right side panel (3).
Page 7
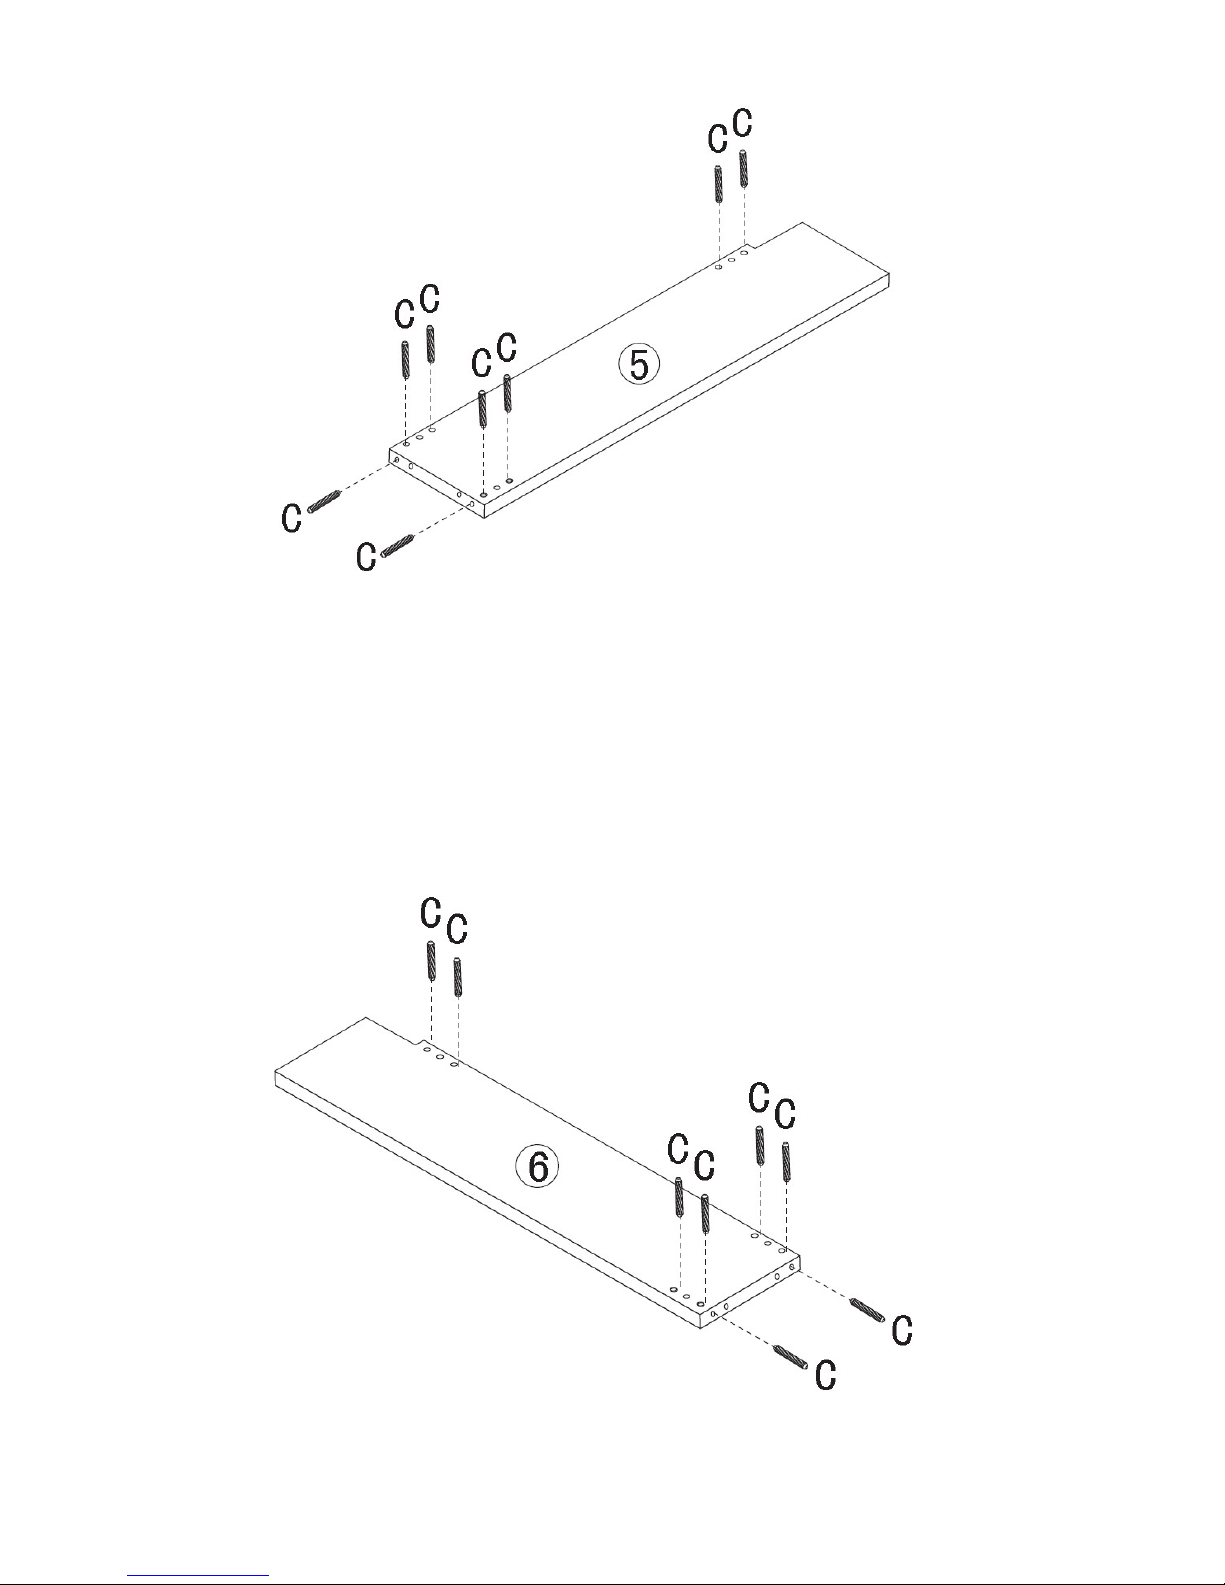
STEP 5
STEP 5
1.Insert 8 wood dowels (C) into the dowel holes on the bottom left side panel (5).
STEP 6
STEP 6
1.Insert 8 wood dowels (C) into the dowel holes on the bottom right side panel (6).
Page 8
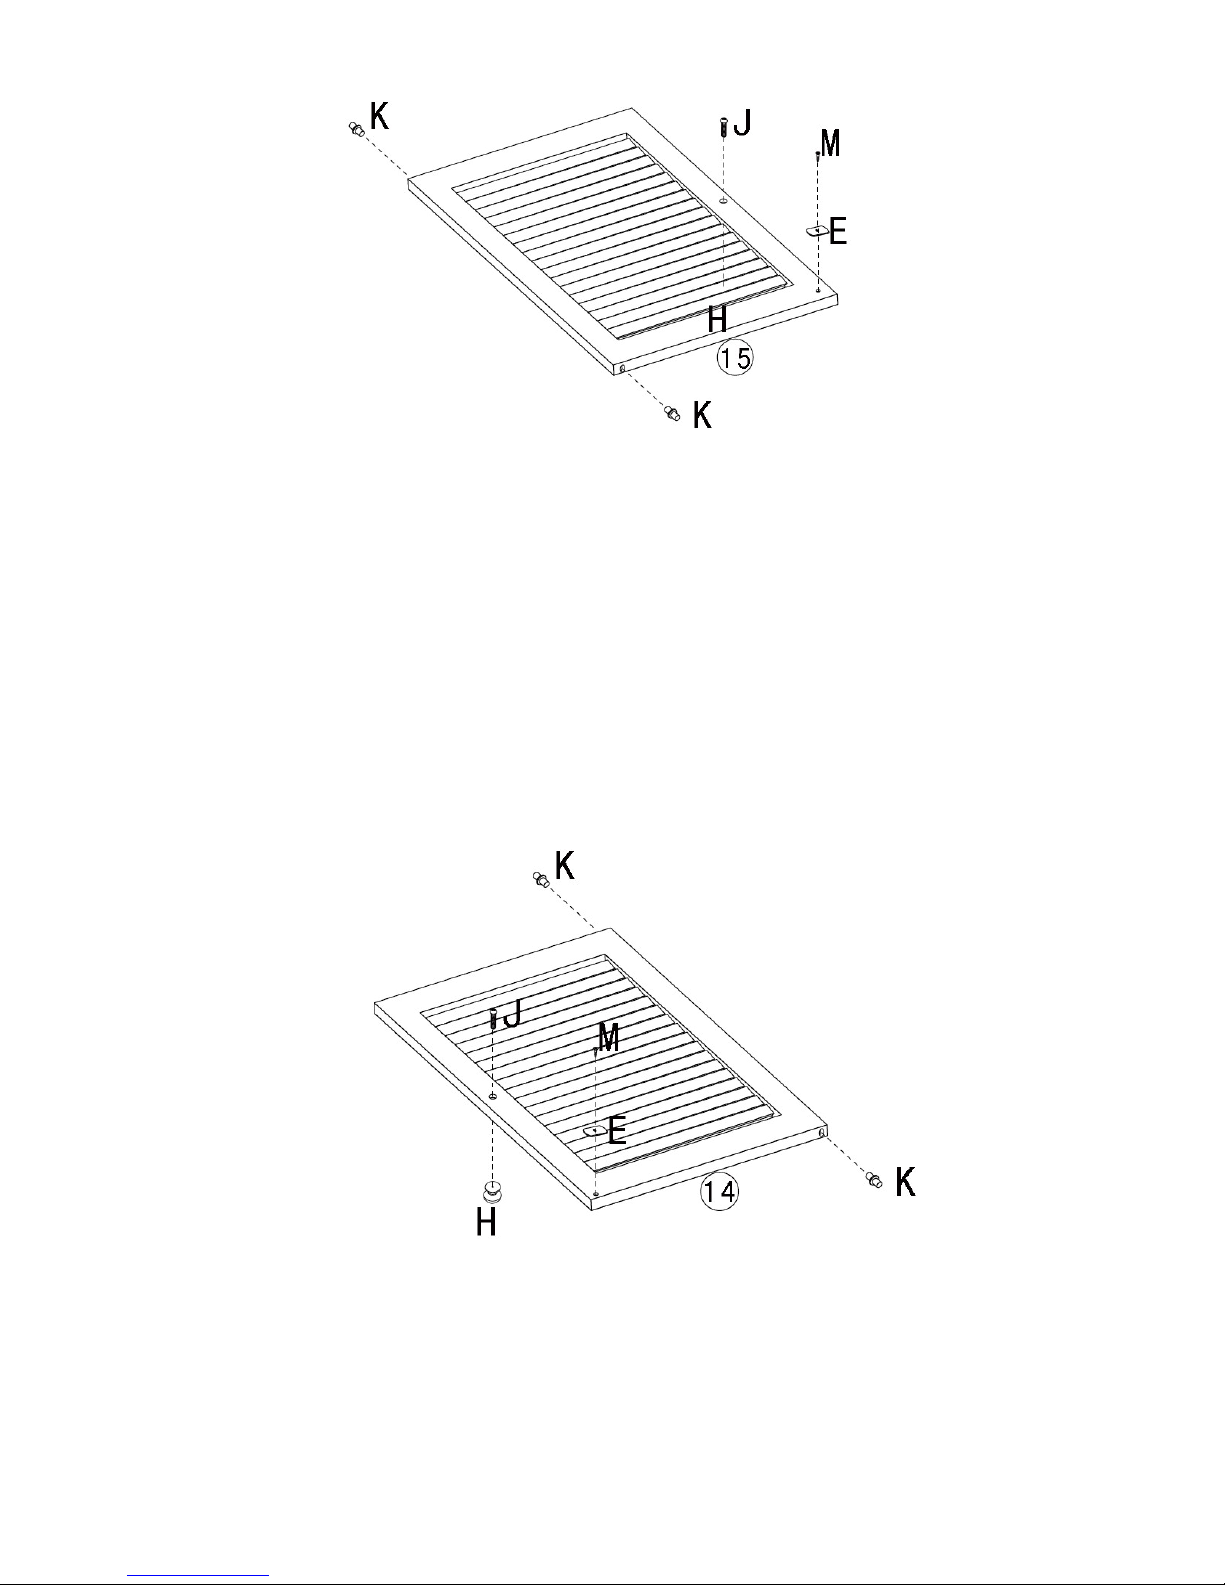
STEP 7
STEP 7
1.Insert 1 screw (M) through hole on the magnet plate (E) then tighten to left side door (15)
by using a
Philips screwdriver.
2.Attach knob (H) to the left side door (15) , insert 1 screw (J) through hole on the left side door (15)
then tighten to knob (H) by using a Philips screwdriver.
3.Insert 2 pins (K) into the holes on each end of the left side door (15).
STEP 8
STEP 8
1.Insert 1 screw (M) through hole on the magnet plate (E) then tighten to right side door (14)
by using
a Philips screwdriver.
2.Attach knob (H) to the right side door (14),insert 1 screw (J) through hole on the right side door (14)
then tighten to knob (H) by using a Philips screwdriver.
3.Insert 2 pins (K) into the holes on each end of the right side door (14).
Page 9
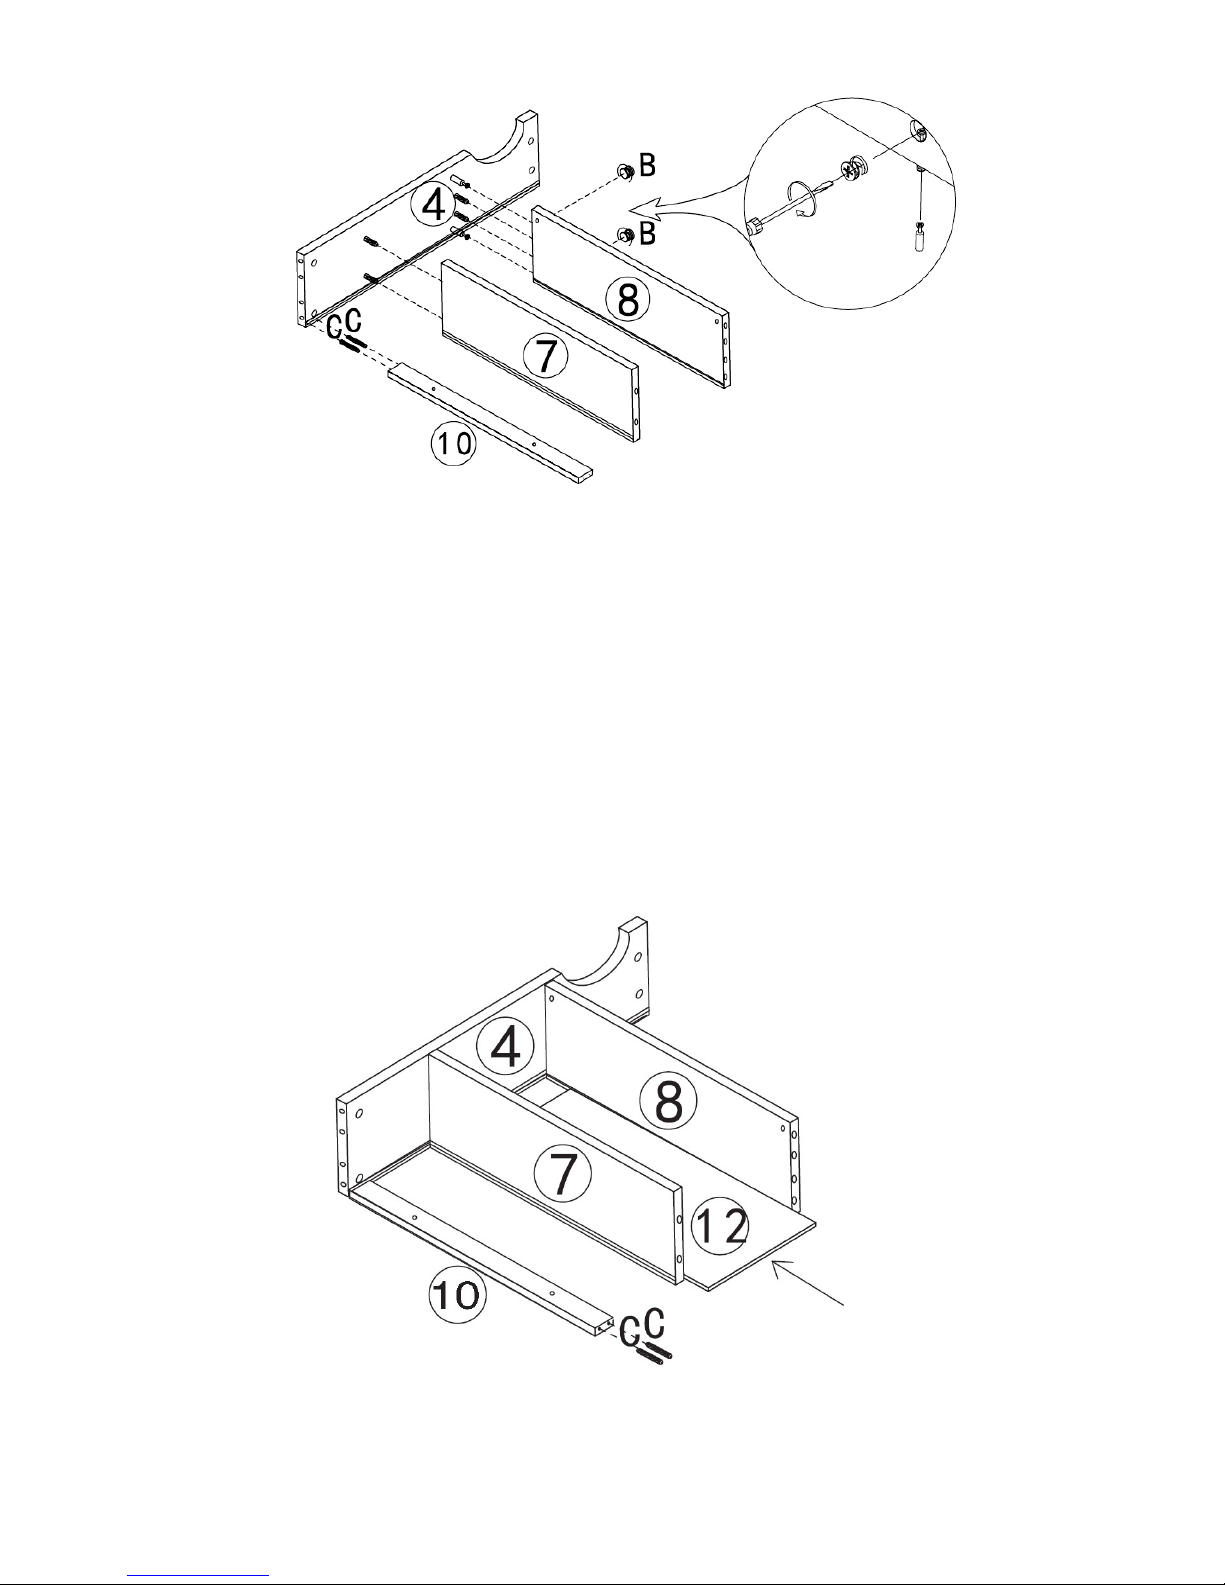
STEP 9
STEP 9
1.Attach the top shelf (7) and bottom shelf (8) to the top right side panel (4) by inserting cam
bolts
into cam lock holes and inserting wood dowels into dowel holes on the top shelf (7) and bottom
shelf (8).
2.Insert 2 cam locks (B) into cam lock holes on the bottom shelf (8) then rotateclockwise to secure
cam bolts in place by using a Philips screwdriver.
3.Attach the rear top cross bar(10)to the top right side panel (4)by inserting 2wood dowels (C)into
dowel holes on the rear top cross bar(10).
STEP 10
STEP 10
1.Slide in the small back panel (12) to the grooves on the top right side panel (4), top shelf (7) and
bottom shelf (8).
2.Insert2 wood dowels (c) into dowel holes on the end of rear top cross bar(10).
Page 10
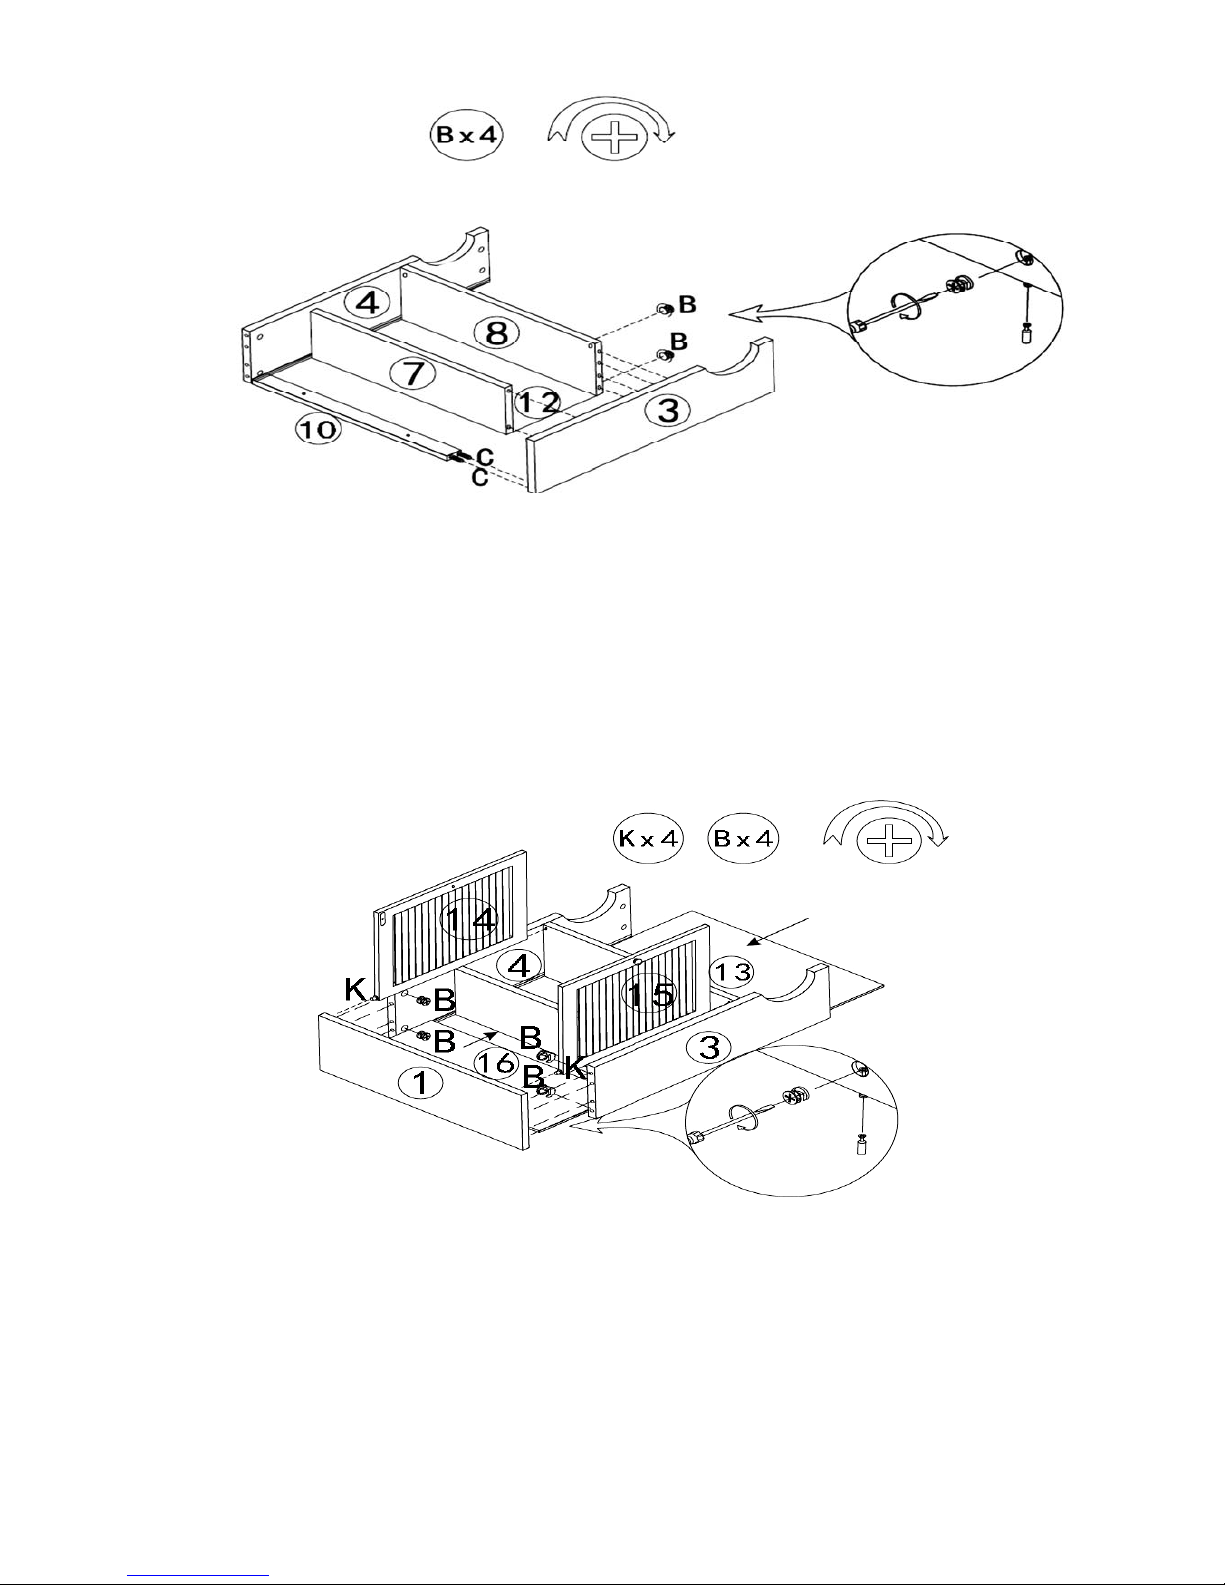
STEP 11
STEP 11
1.Attach the top left side panel (3) to the pre-assembled top shelf (7)
and bottom shelf (8) by inserting
cam bolts into cam lock holes and inserting wood dowels into dowel holes on the top shelf (7) and
bottom shelf (8). and rear top cross bar(10).
2.Insert 2 cam locks (B) into the cam lock holes on the bottom shelf (8) then rotate clockwise to
secure cam bolts in place by using a Philips screwdriver.
STEP 12
STEP 12
1.Attach the both doors (14),(15) to bottom shelf (8) by inserting pins into the
holes on the bottom
shelf (8).
2. Slide the small back panel (12) and large back panel (13) to the grooves on the top left side panel
(3),top right side panel (4) and top board (1).
3. Attach the top board (1) to the pre-assembled top left side panel (3) and top right side panel (4) by
inserting cam bolts into cam lock holes and inserting wood dowel into dowel
holes on the top left
side panel (3) and top right side panel (4), and insert pin into the pin hole on the top board (1).
4. Insert 4 cam locks (B) into cam lock holes on the top left side panel (3) and top right side panel (4)
separately then rotate clockwise to secure cam bolts in place by using a Philips screwdriver.
Page 11
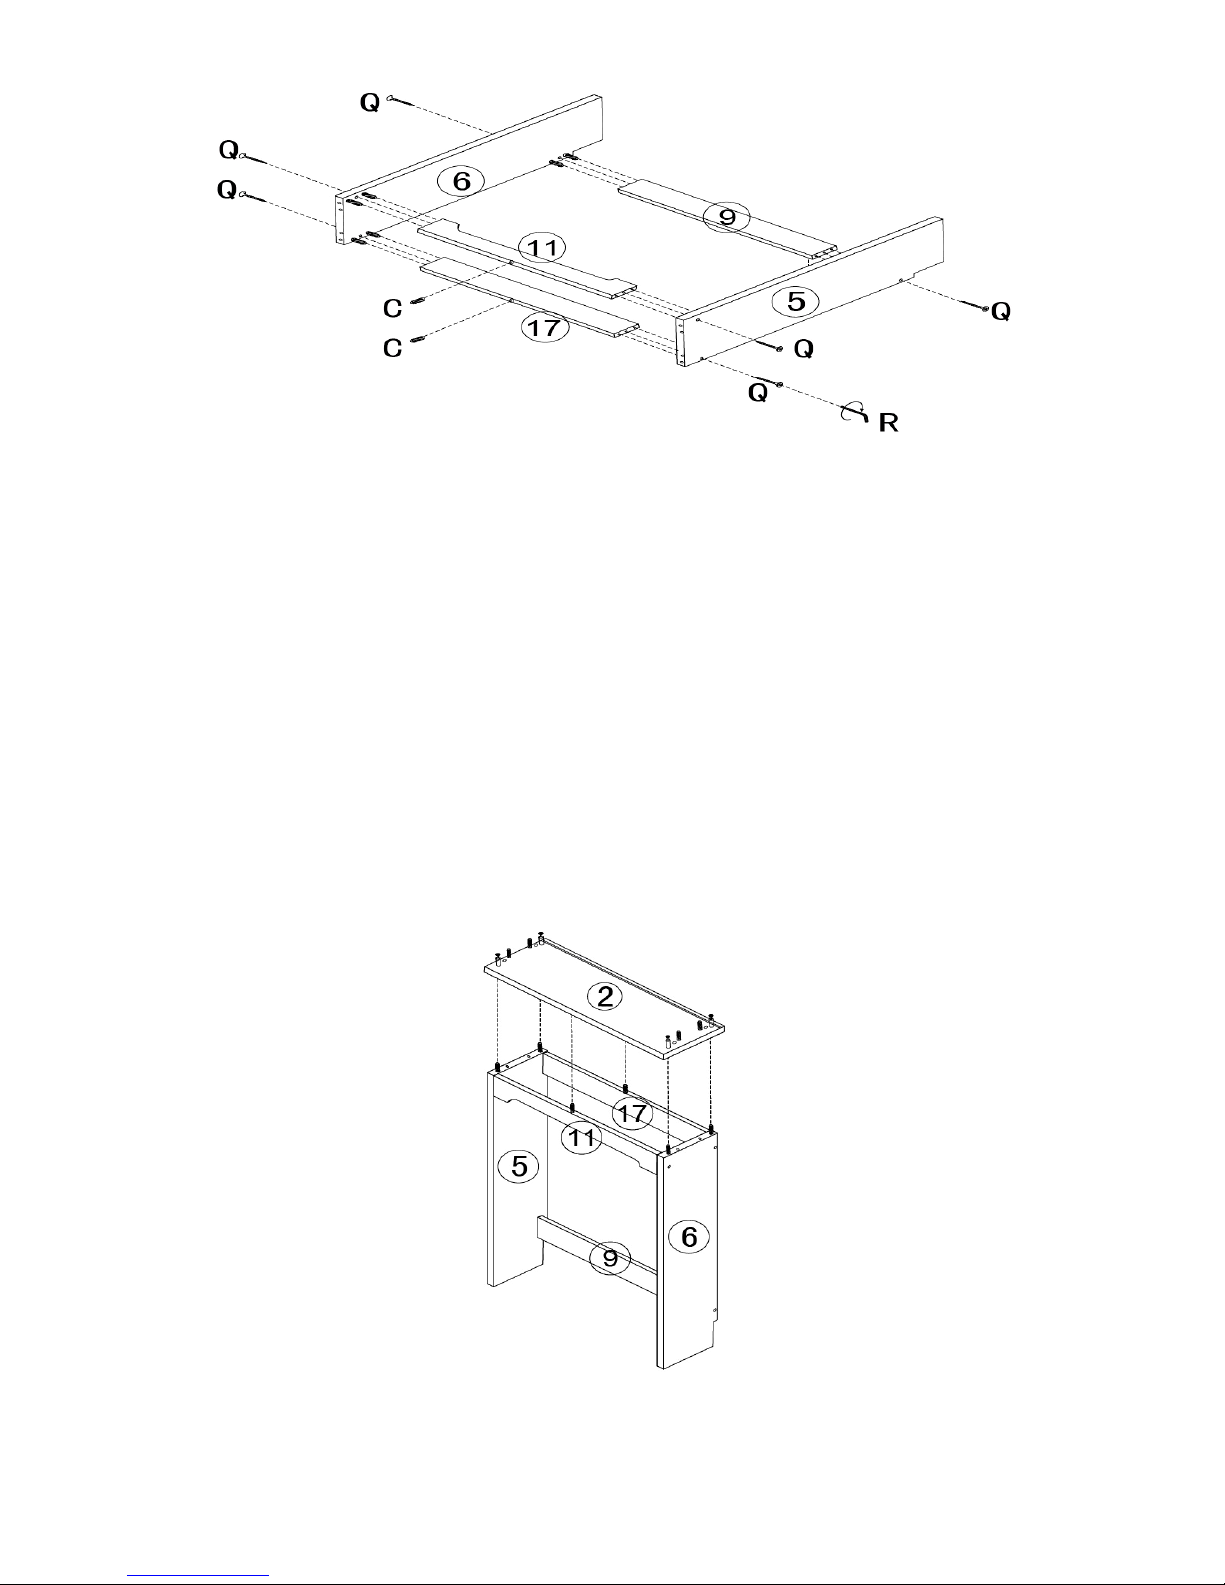
STEP 13
STEP 13
1.Attach the bottom left side panel (5) to rear bottom cross bar (9) ,rear top cross bar (17)and front top cross bar
(11) by inserting wood dowels into dowel holes on the rear bottomcross bar (9),rear top cross bar (17) and front
top cross bar (11).
2.Insert 3 screws (Q) through the holes on the bottom left side panel (5) then tighten to rear bottom cross bar
(9),rear top cross bar (17) and front top cross bar (11) by using a allen wrench
.
3.Attach the bottom right side panel (6) to rear bottom cross bar (9),rear top cross bar (17)and front top cross bar
(11) by inserting wood dowels into dowel holes on the rear bottom cross bar (9),rear top cross bar (17) and front
top cross bar (11).
4.Insert 3 screws (Q) through the holes on the bottom right side panel (6) then tighten to rear bottom cross bar
(9),rear top cross bar (17) and front top cross bar (11) by using a Philips screwdriver.
5.Insert 2 wood dowels (C) into the dowel holes on the rear top cross bar (17) and front top cross bar (11).
STEP 14
STEP 14
1. Attach the middle connection board (2) to the pre-assembled bottom left side panel (5) and bottom right
sidepanel (6),rear top cross bar (17) and front top cross bar (11) by inserting wood dowels into dowel holes on
the middle connection board (2).
Page 12
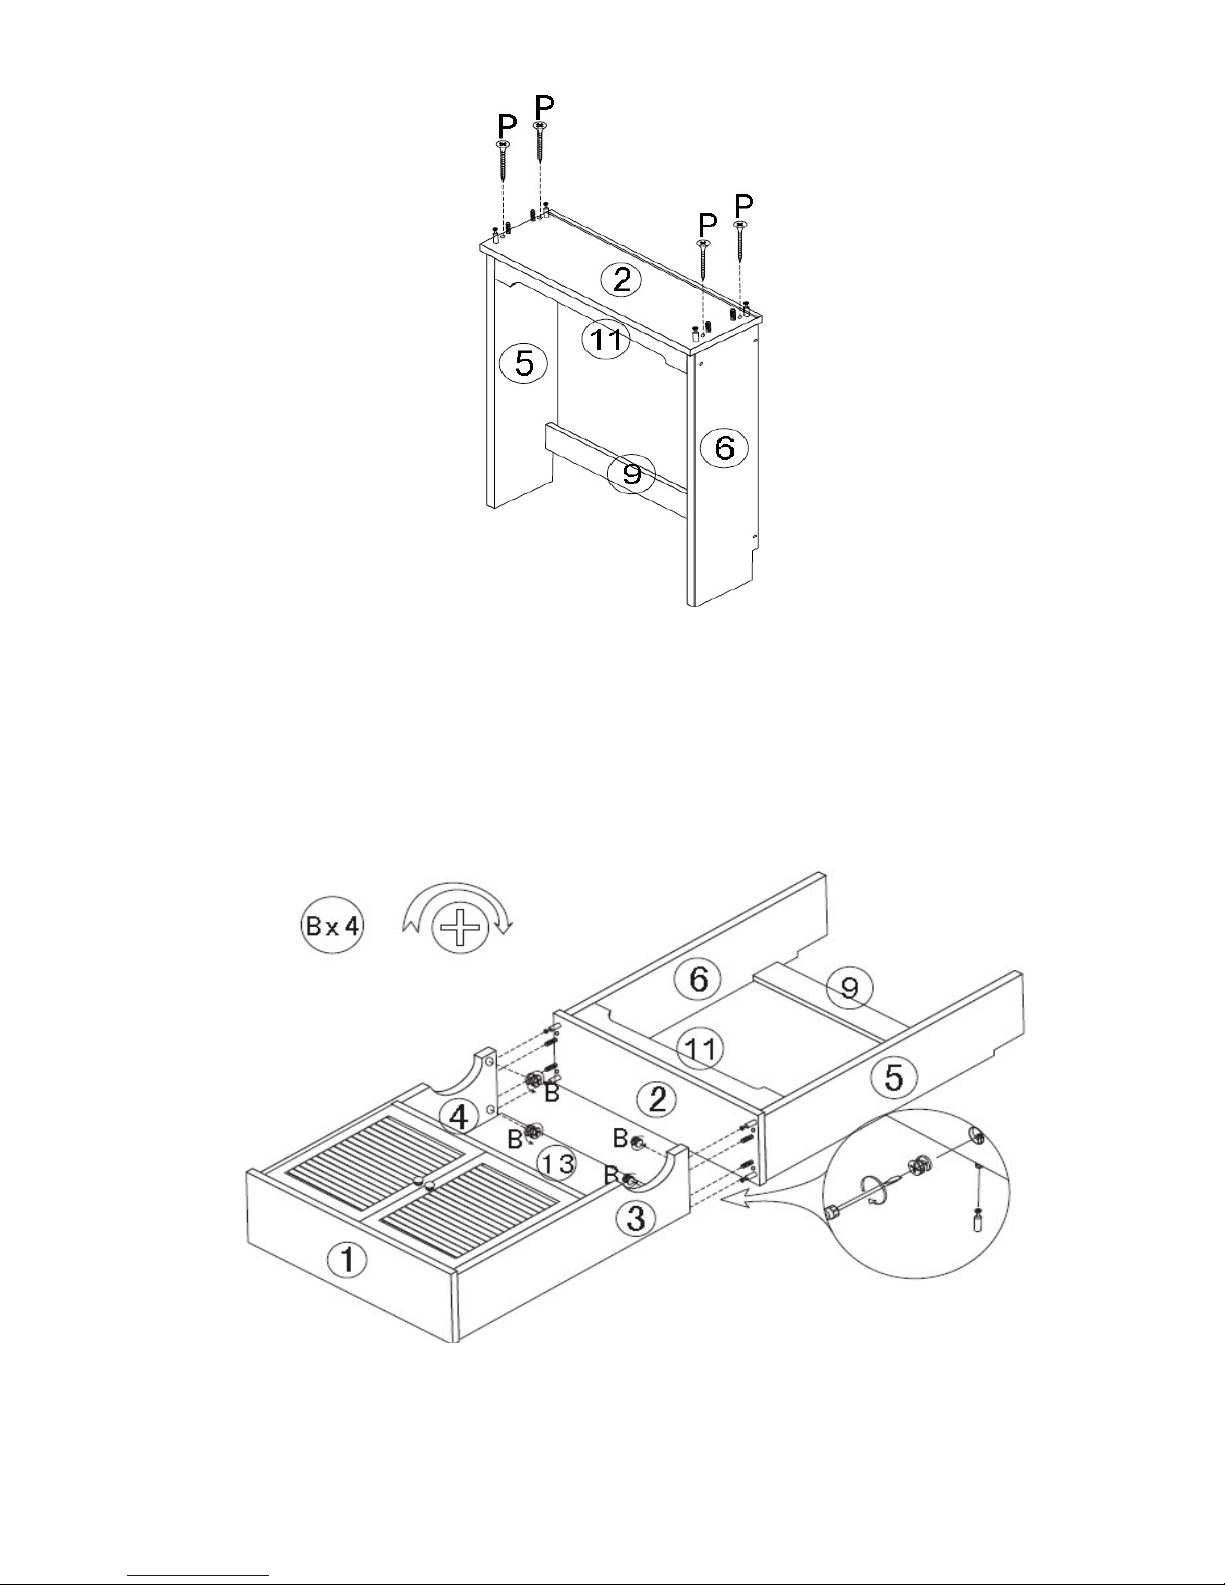
STEP 15
STEP 15
1.Insert 4 screws (P) through holes on the middle connection board (2) then tighten to the bottom
left side panel (5) and bottom right side panel (6) by using a Philips screwdriver.
STEP 16
STEP 16
1.Place the top portion onto the middle connection board (2) by inserting the wood dowels into the
dowel holes and cam bolts into cam lock holes on the end of both top side panels (3),(4)
2. Insert 4 cam lock (B) into the cam lock holes on the both top side panel (3) (4), then rotate
clockwise to secure cam bolts in place by using a Philips screwdriver.
Page 13
STEP 17
STEP 17
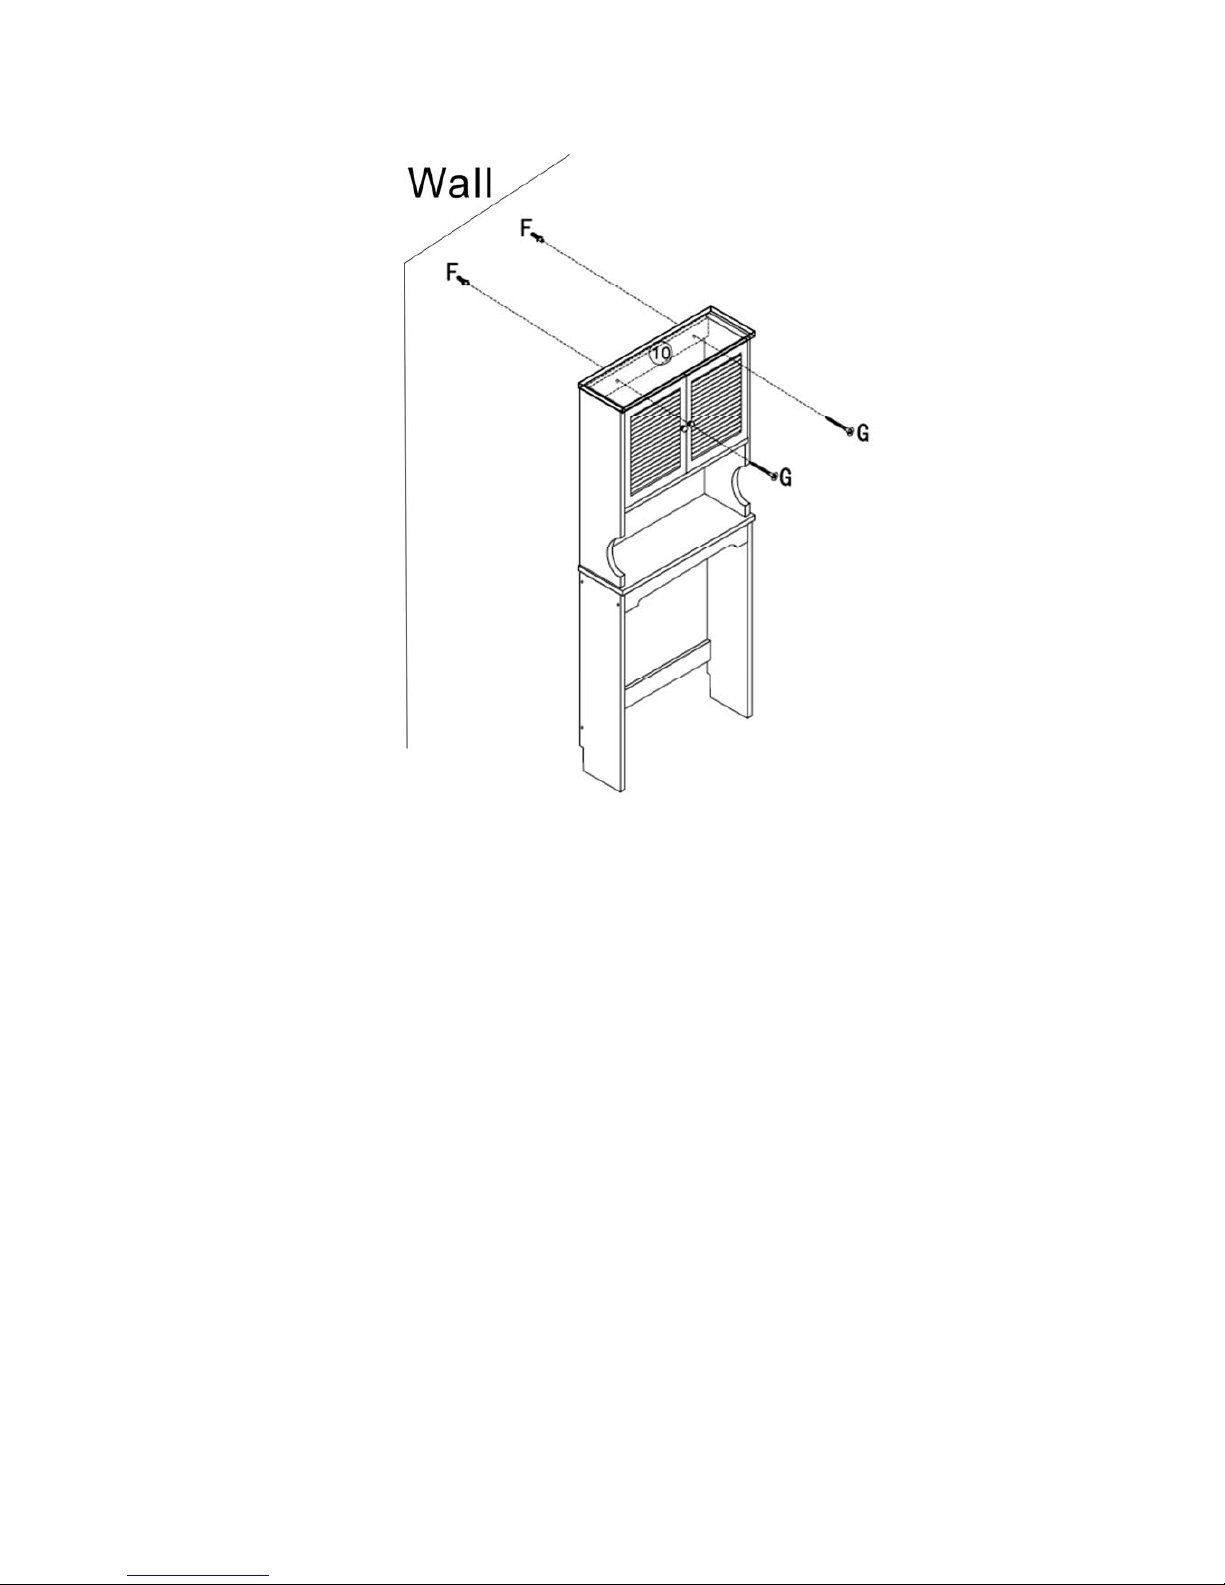
1.Place the drawing with hole position on the wall that you desire to fix the spacesaver.
2.Drill 2 holes through the hole position on the drawing.
3.Insert 2 plastic anchors (F) into the holes.
4.Attach the spacesaver in place w/holes, then insert 2 long screws (G) through the holes on the
back top cross bar (10) then tighten the spacesaver to the wall.
Page 14
Attention Adults: The cabinet should be checked periodically for damage or loose screws/parts.
Take appropriate action necessary to correct the hazard such as tightening of screws and taking
any damaged parts away from the children.
ENJOY YOUR NEW CABINET NOW !
Thank you for purchasing this item. We hope you enjoy it, and consider purchasing other
items.
 Loading...