

Riverbed SteelConnect SDI-130, Ocedo G50, Ocedo G50w, Ocedo G100, SteelConnect SDI-130W Hardware Manual
...Page 1

SteelConnect
™
Gateway Hardware Guide
Model Name Producing line serial no.
DTAHA
DTAHB
1UAIA
SteelConnect SDI-130 Series (Ocedo G50)
SteelConnect SDI-130W Series (Ocedo G50w)
SteelConnect SDI-330 Series (Ocedo G100)
Page 2

Page 3
SteelConnect Gateway Hardware Guide
7
1
SteelConnect Overview
The SteelConnect gateway appliances offer the benefits of software-defined networking (SDN)
automation coupled with the ability for customers to protect their privacy by storing their network
configuration locally. The gateway appliances allow you to easily set up a secure connection between
local area networks, data centers, and home offices. Uplink balancing can be used for back-up or load
balancing purposes. The Next Generation Firewall provides user-based and application-based
firewalling.
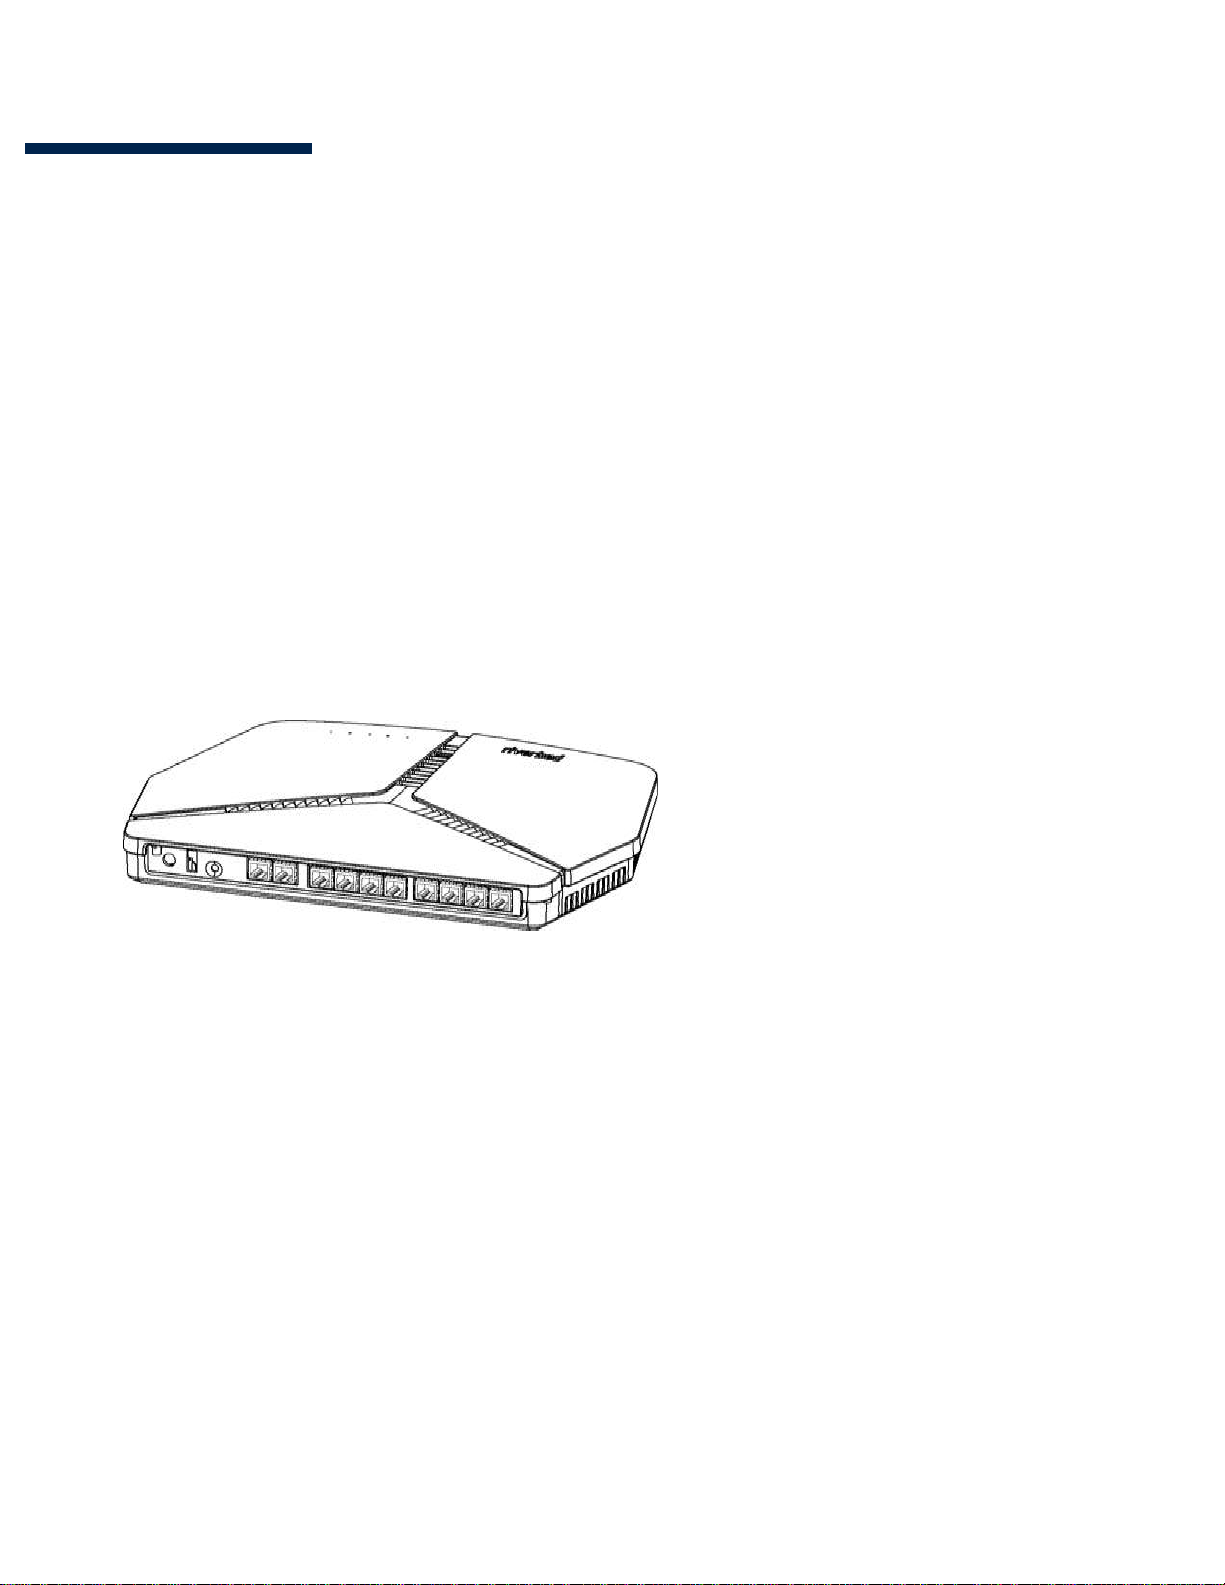
Figure 1-1. SteelConnect SDI-130 and SDI-130W
The following items can be found on the SDI-130 appliances:
A reset button resets the appliance to its factory state. Press the button for 10 seconds. After
releasing the reset button the LEDs flash and the appliance resets to the factory default state.
One USB 2.0 port
10 GbE ports (RJ45) on the SDI-130 and SDI-130W appliances. There are eight LAN (switched) ports
and two WAN ports on the SDI-130 and two WAN ports on the SDI-130W.
Page 4
8 SteelConnect Gateway Hardware Guide
SteelConnect Overview SteelConnect SDI-330 Gateway Appliances
OLED Text Definition
State of the LED Description
SteelConnect SDI-130 Gateway LEDs
This table describes the LEDs for the SDI-130 and SDI-130W appliances.
Off
Solid green Trying to establish a connection to the SteelConnect Controller.
Connection to the SteelConnect Controller established.
SteelConnect SDI-330 Gateway Appliances
The SDI-330 is a 1U gateway appliance recommended for the medium branch office.
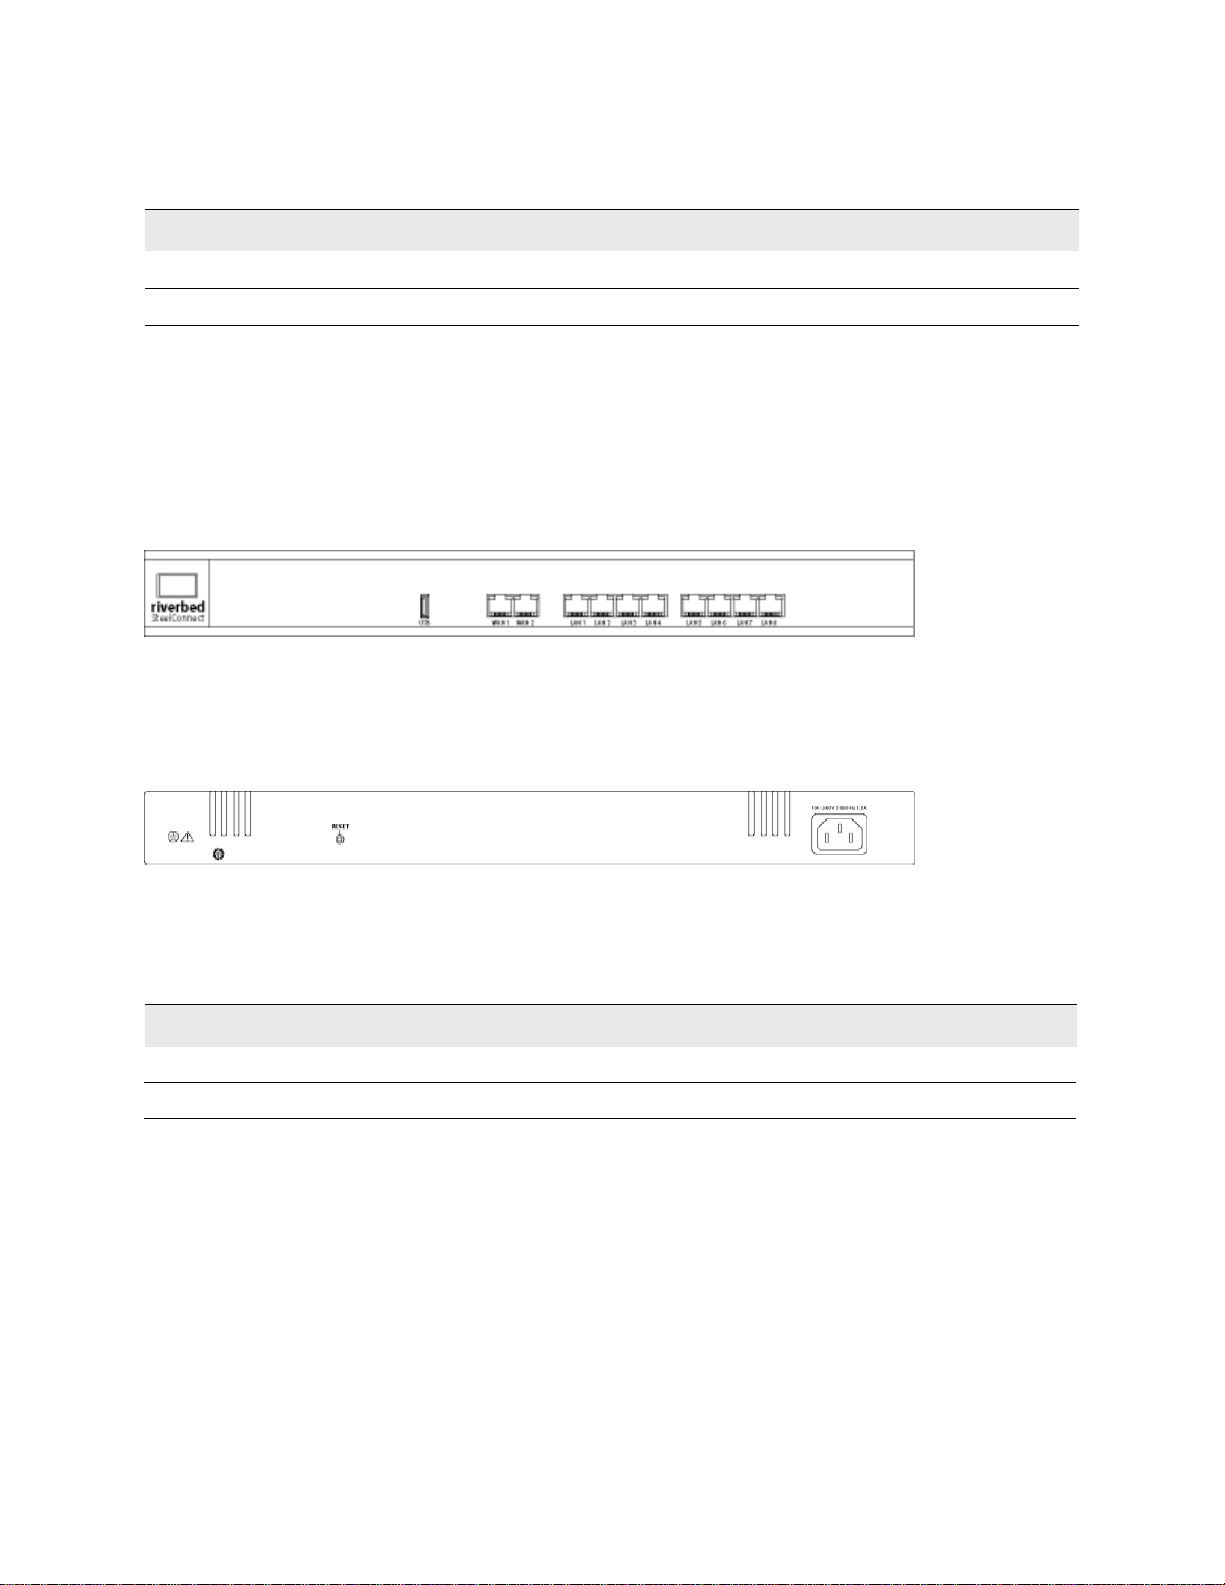
There is an organic LED (OLED) screen, USB 2.0 port, and 10 GbE ports (RJ45) on the front panel of the
SDI-330 appliance. There are eight LAN (switched) ports and two WAN ports.
Figure 1-2. SDI-330 Front Panel
The AC power supply inlet, grounding screw, and reset button are on the back panel. A reset button
resets the appliance to its factory state. Press the button for 10 seconds. After releasing the reset
button the LEDs flash and the appliance resets to the factory default state.
Figure 1-3. SDI-330 Back Panel
SteelConnect SDI-330 Gateway LEDs
This table describes the LEDs for the SDI-330 appliance.
Connected! Connection to the SteelConnect Controller established.
Connecting Trying to establish a connection to the SteelConnect Controller.
Page 5

SteelConnect Gateway Hardware Guide
9
2
Mounting the SteelConnect Gateway
Appliances
This chapter describes how to install or mount the SteelConnect gateway appliances and discusses the
following topics:
“Site Preparations or Considerations”
“Required Tools and Equipment”
“Mounting the SDI-130 Gateways”
“Rack-Mounting the SDI-330”
Site Preparations or Considerations
“Safety Information”
“Environmental Considerations”
Safety Information
Do not attempt to service the appliance. This sealed unit contains no user-serviceable parts or
adjustments. Do not open or tamper with the power supply.
Carefully inspect the work area in which the appliance will be located to ensure against hazards
such as damp floors, ungrounded power extension cords, and missing ground connections.
Before you connect the appliance to power, locate the power OFF switch on the appliance and
locate the main circuit breaker for the room in which the appliance is installed. If an electrical
accident occurs, turn power OFF immediately.
Before operating the appliance, ensure that external power sources comply with the requirements.
Ensure that the ampere rating of all equipment plugged into wall outlets does not exceed the
capacity of the outlet.
If you require an extension cord, ensure that the ampere rating of all equipment plugged into the
extension cord does not exceed the cord’s ampere rating.
If the appliance is exposed to moisture or condensation, disconnect it from the power source
immediately and obtain service assistance.
If the appliance exhibits unexpected behavior, such as smoking or becoming extremely hot,
disconnect it from the power source immediately and then obtain service assistance.
Page 6

SteelConnect Gateway Hardware Guide
11
Mounting the SteelConnect Gateway Appliances Required Tools and Equipment
Environmental Considerations
The following is a list of environmental considerations that will ensure safe and efficient operations of
the appliance:
Ensure that the appliance has at least 12 inches of clearance on all sides to allow for proper
ventilation. The appliance generates heat and requires adequate circulation to maintain proper
operating temperatures. Never cover or obstruct the appliance ventilation slots.
Do not position the appliance near high-powered radio transmitters or electrical equipment, such
as electrical motors or air conditioners. Interference from electrical equipment can cause
intermittent failures.
Do not install the appliance in areas where condensation, water, or other liquids may be present.
These may cause safety hazards and equipment failure.
Required Tools and Equipment
You need the following tools and equipment to mount the SteelConnect SDI-130 and SDI-130W:
A power drill
The enclosed mounting kit that ships with your gateway
You need the following tools and equipment to mount the SteelConnect SDI-330 in a rack:
A standard server-type rack
A standard Phillips screwdriver
The rack mount kit that ships with your gateway
Mounting the SDI-130 Gateways
The SDI-130 and SDI-130W can be mounted to a wall or ceiling using the snap disk. If a solid mount is
not required, the appliance can be used as a tabletop unit. Distance from the gateway to the power
supply source should be considered before mounting.
The gateway ships with a snap disk, screw, and drywall anchor. Supply the gateway with power by either
using the power supply or a Power over Ethernet (PoE). Attach the power to the gateway before
mounting it.
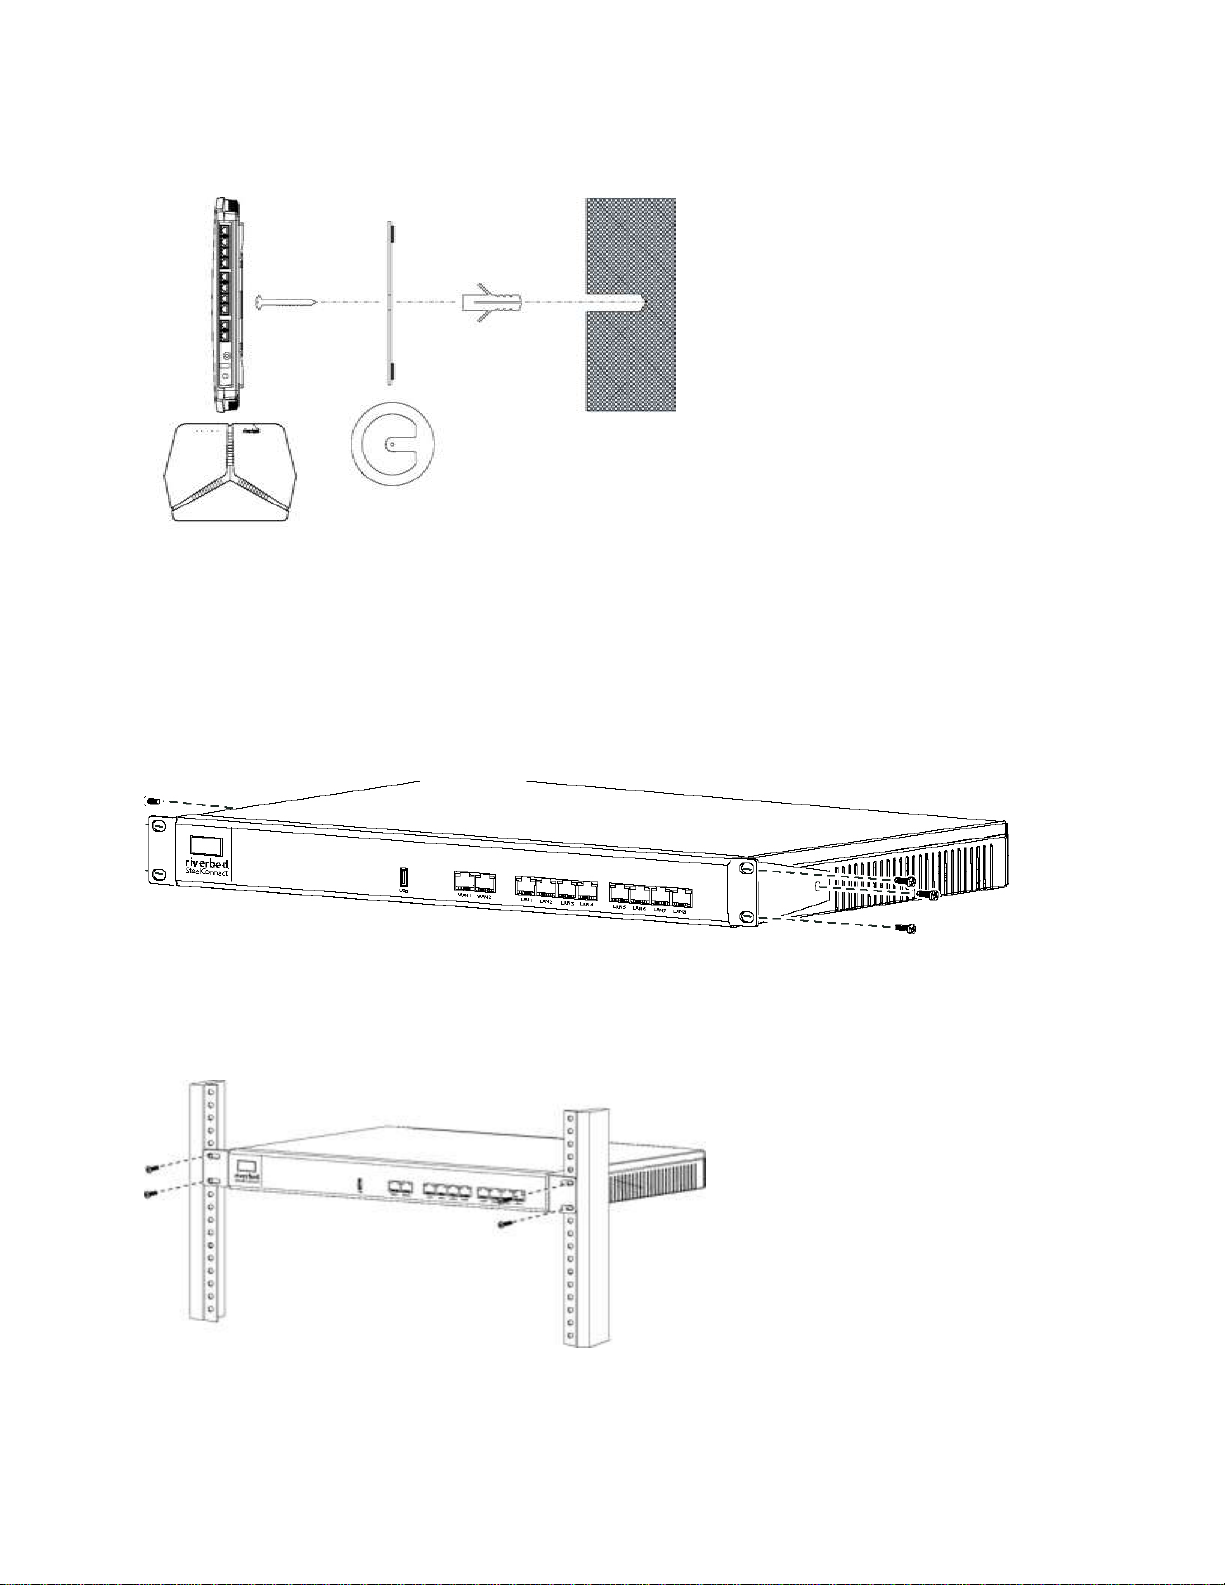
To mount the SDI-130 and SDI-130W to a wall or ceiling
1. Use a power drill to drill pilot holes for the dry wall anchor. Insert the drywall anchor into the pilot
hole.
2. Place the snap disk over the drywall anchor. Secure the snap disk to the wall by driving the screw
into the drywall anchor.
3. Place the gateway over the snap disk and snap it into place.
Page 7
10 SteelConnect Gateway Hardware Guide
Rack-Mounting the SDI-330 Mounting the SteelConnect Gateway Appliances
4. Plug in the power supply or PoE to power up the gateway.
Figure 2-1. Mounting the SDI-130 and SDI-130W
Rack-Mounting the SDI-330
The SDI-330 ships with rack mount hardware and the rubber feet to attach to the appliance for desktop
placement.
1. Attach the rack mount ears to the SDI-330 with the included screws.
Figure 2-2. Attaching the Rack Mount Ears
2. Position the gateway in the rack and attach the rack mount ears to the rack with the included
screws.
Figure 2-3. Rack Mounting the SDI-330
Page 8
SteelConnect Gateway Hardware Guide
13
Specification Definition
Specification Definition
A
SteelConnect Gateway Specifications
SteelConnect SDI-130 and SDI-130W Specifications
Interface 8 x GbE LAN ports
2 x GbE WAN ports
2 x WLAN (2.4/5 GHz, 2x2 MIMO) SDI-130W only
Power 12V/2A DC power adapter
Dimensions 32.0 x 23.5 x 4.5 cm (12.6 x 9.3 x 1.8 in.)
Weight 0.8 kg (1.8 lb)
Temperature Range Operating: 0 to 40°C (32 to 104°F)
1 x USB 2.0 port
Storage: -20 to 60°C (-4 to 140°F)
SteelConnect SDI-330 Specifications
Interface 8 x GbE LAN ports
2 x GbE WAN ports
Power 100-240V 50/60Hz AC (built in)
Dimensions 44.1 x 21.9 x 4.4 cm (17.4 x 8.6 x 1.7 in.)
Weight 3 kg (6.61 lb)
Temperature Range Operating: 0 to 40°C (32 to 104°F)
1 x USB 2.0 port
OLED status display
Storage: -20 to 60°C (-4 to 140°F)
 Loading...