

Riverbed Cascade Shark, CSK-02100, Cascade Shark 1000, Cascade Shark 3000, Cascade Shark 2000 Quick Start Manual
...Page 1

Cascade® Shark® Appliance
Quick Start Guide
Version 10.6
March 2014
Page 2

© 2014 Riverbed Technology. All rights reserved.
712-00093-08
Accelerate®, AirPcap®, BlockStream™, Cascade®, Cloud Steelhead®, Granite™, Interceptor®, RiOS®, Riverbed®, Shark®,
SkipWare®, Steelhead®, TrafficScript®, TurboCap®, Virtual Steelhead®, Whitewater®, WinPcap®, Wireshark®, and
Stingray™ are trademarks or registered trademarks of Riverbed Technology, Inc. in the United States and other countries.
Riverbed and any Riverbed product or service name or logo used herein are trademarks of Riverbed Technology. All other
trademarks used herein belong to their respective owners. The trademarks and logos displayed herein cannot be used without
the prior written consent of Riverbed Technology or their respective owners.
F5, the F5 logo, iControl, iRules, and BIG-IP are registered trademarks or trademarks of F5 Networks, Inc. in the U.S. and certain
other countries. Linux is a trademark of Linus Torvalds in the United States and in other countries. VMware, ESX, ESXi are
trademarks or registered trademarks of VMware, Incorporated in the United States and in other countries.
Portions of Cascade® products contain copyrighted information of third parties. Title thereto is retained, and all rights therein
are reserved, by the respective copyright owner. PostgreSQL is (1) Copyright © 1996-2009 The PostgreSQL Development
Group, and (2) Copyright © 1994-1996 the Regents of the University of California; PHP is Copyright © 1999-2009 The PHP
Group; gnuplot is Copyright © 1986-1993, 1998, 2004 Thomas Williams, Colin Kelley; ChartDirector is Copyright © 2007
Advanced Software Engineering; Net-SNMP is (1) Copyright © 1989, 1991, 1992 Carnegie Mellon University, Derivative Work
1996, 1998-2000 Copyright © 1996, 1998-2000 The Regents of The University of California, (2) Copyright © 2001-2003
Network Associates Technology, Inc., (3) Copyright © 2001-2003 Cambridge Broadband Ltd., (4) Copyright © 2003 Sun
Microsystems, Inc., (5) Copyright © 2003-2008 Sparta, Inc. and (6) Copyright © 2004 Cisco, Inc. and Information Network
Center of Beijing University of Posts and Telecommunications, (7) Copyright © Fabasoft R&D Software; Apache is Copyright ©
1999-2005 by The Apache Software Foundation; Tom Sawyer Layout is Copyright © 1992 - 2007 Tom Sawyer Software; Click
is (1) Copyright © 1999-2007 Massachusetts Institute of Technology, (2) Copyright © 2000-2007 Riverbed Technology, Inc.,
(3) Copyright © 2001-2007 International Computer Science Institute, and (4) Copyright © 2004-2007 Regents of the
University of California; OpenSSL is (1) Copyright © 1998-2005 The OpenSSL Project and (2) Copyright © 1995-1998 Eric
Young ([email protected]); Netdisco is (1) Copyright © 2003, 2004 Max Baker and (2) Copyright © 2002, 2003 The Regents
of The University of California; SNMP::Info is (1) Copyright © 2003-2008 Max Baker and (2) Copyright © 2002, 2003 The
Regents of The University of California; mm is (1) Copyright © 1999-2006 Ralf S. Engelschall and (2) Copyright © 1999-2006
The OSSP Project; ares is Copyright © 1998 Massachusetts Institute of Technology; libpq++ is (1) Copyright © 1996-2004 The
PostgreSQL Global Development Group, and (2) Copyright © 1994 the Regents of the University of California; Yahoo is
Copyright © 2006 Yahoo! Inc.; pd4ml is Copyright © 2004-2008 zefer.org; Rapid7 is Copyright © 2001-2008 Rapid7 LLC;
CmdTool2 is Copyright © 2008 Intel Corporation; QLogic is Copyright © 2003-2006 QLogic Corporation; Tarari is Copyright ©
2008 LSI Corporation; Crypt_CHAP is Copyright © 2002-2003, Michael Bretterklieber; Auth_SASL is Copyright © 2002-2003
Richard Heyes; Net_SMTP is Copyright © 1997-2003 The PHP Group; XML_RPC is (1) Copyright © 1999-2001 Edd Dumbill, (2)
Copyright © 2001-2006 The PHP Group; Crypt_HMAC is Copyright © 1997-2005 The PHP Group; Net_Socket is Copyright ©
1997-2003 The PHP Group; PEAR::Mail is Copyright © 1997-2003 The PHP Group; libradius is Copyright © 1998 Juniper
Networks. This software is based in part on the work of the Independent JPEG Group the work of the FreeType team.
This documentation is furnished “AS IS” and is subject to change without notice and should not be construed as a commitment
by Riverbed Technology. This documentation may not be copied, modified or distributed without the express authorization of
Riverbed Technology and may be used only in connection with Riverbed products and services. Use, duplication, reproduction,
release, modification, disclosure or transfer of this documentation is restricted in accordance with the Federal Acquisition
Regulations as applied to civilian agencies and the Defense Federal Acquisition Regulation Supplement as applied to military
agencies. This documentation qualifies as “commercial computer software documentation” and any use by the government
shall be governed solely by these terms. All other use is prohibited. Riverbed Technology assumes no responsibility or liability
for any errors or inaccuracies that may appear in this documentation.
This manual is for informational purposes only. Addresses shown in screen captures were generated by simulation software
and are for illustrative purposes only. They are not intended to represent any real traffic or any registered IP or MAC addresses.
Page 3

Contents
Cascade Shark Appliance Quick Start Guide 1
Overview ............................................................................................................................................................................. 1
Product description .............................................................................................................................................. 1
Safety considerations ........................................................................................................................................... 1
Inventory and inspection ............................................................................................................................................. 1
Preparation for installation ........................................................................................................................................ 2
Data sources............................................................................................................................................................. 2
Rack space ................................................................................................................................................................ 2
Power .......................................................................................................................................................................... 2
Cooling ....................................................................................................................................................................... 2
Cabling ........................................................................................................................................................................ 2
Access to network ................................................................................................................................................. 3
Mounting ............................................................................................................................................................................. 3
Cascade Shark model CSK-01100 (1U chassis) ......................................................................................... 3
All other Cascade Shark models (2U and 3U chassis) ............................................................................ 4
Cabling ................................................................................................................................................................................. 5
Console connections ............................................................................................................................................. 5
Management network connections ................................................................................................................ 6
Interface (capture port) connections ............................................................................................................ 6
Power cables ............................................................................................................................................................ 7
Configuration .................................................................................................................................................................... 7
Initial setup .............................................................................................................................................................. 7
Installation Verification ................................................................................................................................................ 9
Additional Configuration .......................................................................................................................................... 10
Contacting Riverbed ................................................................................................................................................... 11
Cascade Shark Appliance Quick Start Guide iii
Page 4

iv Cascade Shark Appliance Quick Start Guide
Page 5

Cascade Shark Appliance Quick Start Guide
Regulatory
1UADA
CSK-01100
1U
4.3 cm
(1.7 in.)
43.7 cm
(17.2 in.)
65.0 cm
(25.6 in.)
15.4 kg
(34 lbs.)
2UADA
CSK-02100
2U
8.9 cm
(3.5 in.)
43.7 cm
(17.2 in.)
64.8 cm
(25.5 in.)
25.9 kg
(57 lbs.)
CSK-02200
3UADA
CSK-03100
3U
13.2 cm
(5.2 in.)
43.7 cm
(17.2 in.)
64.8 cm
(25.5 in.)
39.9 kg
(88 lbs.)
CSK-03200
Overview
This document describes the mounting, cabling, and initial configuration of Riverbed® Cascade
Shark series 1000, 2000, or 3000 appliances (Sharks). When the installation is complete your
appliance will have a minimum network configuration, and you can configure it for normal
operation on your network. Configuration instructions are in the Cascade Shark Appliance User’s
Guide.
Product description
The Cascade Shark appliance monitors network traffic seen on taps or on mirror (SPAN) ports of
switches and routers. It can be ordered with various storage and interface options. The models are:
®
Compliance
Code Product Model
Rack
Space Height Width Depth Weight
Safety considerations
Two people should be available for lifting the chassis. The rack should be secure to avoid tipping
over when a chassis is extended on its mounting rails. Power should be adequate, as described
below, and properly grounded.
To reduce the risk of personal injury or equipment damage, observe the safety warnings and
cautions provided in the Riverbed Safety and Compliance Guide (shipped with the appliance).
Inventory and inspection
1. Check the shipping documentation to ensure that all cartons have arrived.
2. Visually inspect each carton for indications of damage.
3. If any cartons are damaged or missing, contact Riverbed Support before continuing.
Phone – United States and Canada: 1 888 782 3822
Phone – outside U.S. and Canada: +1 415 247 7381
Email: [email protected]
Web: https://support.riverbed.com
4. Unpack the contents of the shipping cartons and inventory the contents against the shipping
documentation.
5. If any components of the order are damaged or missing, contact Riverbed Support.
Cascade Shark Appliance Quick Start Guide 1
Page 6

Preparation for installation
Data sources
The Cascade Shark appliance must be receiving traffic from at least one source in order for you to
verify successful installation and configuration. The traffic source can be a tap or a mirror (SPAN)
port on a switch or router.
Rack space
The Cascade Shark appliance is shipped with rack mounting rails. The rails fit racks with square
holes or unthreaded round holes.
The chassis requires a 4-post, 19-inch rack or cabinet. It must be mounted with the rails provided
and never placed on a table, shelf, or another chassis. Stacking chassis or mounting them in racks
that are not secured to solid surfaces allows vibrations to shorten disk drive life.
Power
Line voltage: 100-240 Vac (auto-ranging)
Line Frequency: 50 -60 Hz
Typical Current: 9A (115V) or 4.5A (230V)
Cooling
Ambient air should be:
• Air temperature: 10° to 35° C (50° to 95° F)
• Relative humidity: 20% to 90%
Cabling
Console port
The console port connects through a set of keyboard, video, and mouse connectors or a 9-pin
D-subminiature serial connector. Ensure that a KVM device or terminal emulator device is available
for the initial setup procedure.
Management port
Each Cascade Shark appliance chassis is equipped with a 100/1000baseTX management port that
must connect to a hub or switch on the management network. The chassis management port is set
by default for auto-negotiation.
• Ensure that a straight-through cable to a hub or switch port on the management network is
available at the rack location.
• Ensure that the management network switch port is set to establish a connection at 100 or
1000 Mb/s and full duplex.
2 Cascade Shark Appliance Quick Start Guide
Page 7

Interfaces (capture ports)
Port on network card
Cable type
Cable connector type
RJ-45 electrical
Ethernet
RJ-45
1-Gb/s SX SFP optical
Multimode fiber-optic
LC
1-Gb/s LX SFP optical
Single-mode fiber-optic
LC
10-Gb/s SR SFP optical
Multimode fiber-optic
LC
10-Gb/s LR SFP optical
Single-mode fiber-optic
LC
The interfaces that capture network traffic are provided by network interface cards. These may be
optical or electrical, depending on your order. Check your purchase documentation or view the
back panel of the chassis to determine the number and type of cables needed.
Ensure that the correct types of cables with the correct types of connectors are available for
connecting between the Cascade Shark interfaces and the traffic sources they are to monitor. To
expedite installation, it is recommended that you run the cables from the appropriate taps or
mirror ports to the rack where the appliance is to be installed.
At least one traffic source is required to verify the installation.
Access to network
If you lock down your network on a port-by-port basis, ensure that the following ports are open
between the Cascade Shark appliance and other devices it must communicate with:
• TCP/22 – (ssh) Command line interface
• TCP/443 – (https) Web interface and control from Cascade Pilot software
• TCP or UDP/514 – Default port for external log use, configured in Shark web UI
®
• TCP/41017 – Traffic data to Riverbed
Cascade® Profiler appliances
• UDP/123 – (ntp) Time synchronization
• UDP/319 and 320 – (ptp) Time synchronization
Mounting
The mounting instructions for the 1U chassis used for Cascade Shark Model CSK-01100 are slightly
different from the mounting instructions for the 2U and 3U chassis used with all other models.
Cascade Shark model CSK-01100 (1U chassis)
The 1U model is shipped with the inner components of the rail assemblies already attached to the
chassis. The outer components are in two pieces and must be assembled before being attached to
the rack.
The package also includes two pairs of short brackets. These can be used to extend the front and
back ends of the outer rails if needed for a non-standard rack size.
Cascade Shark Appliance Quick Start Guide 3
Page 8
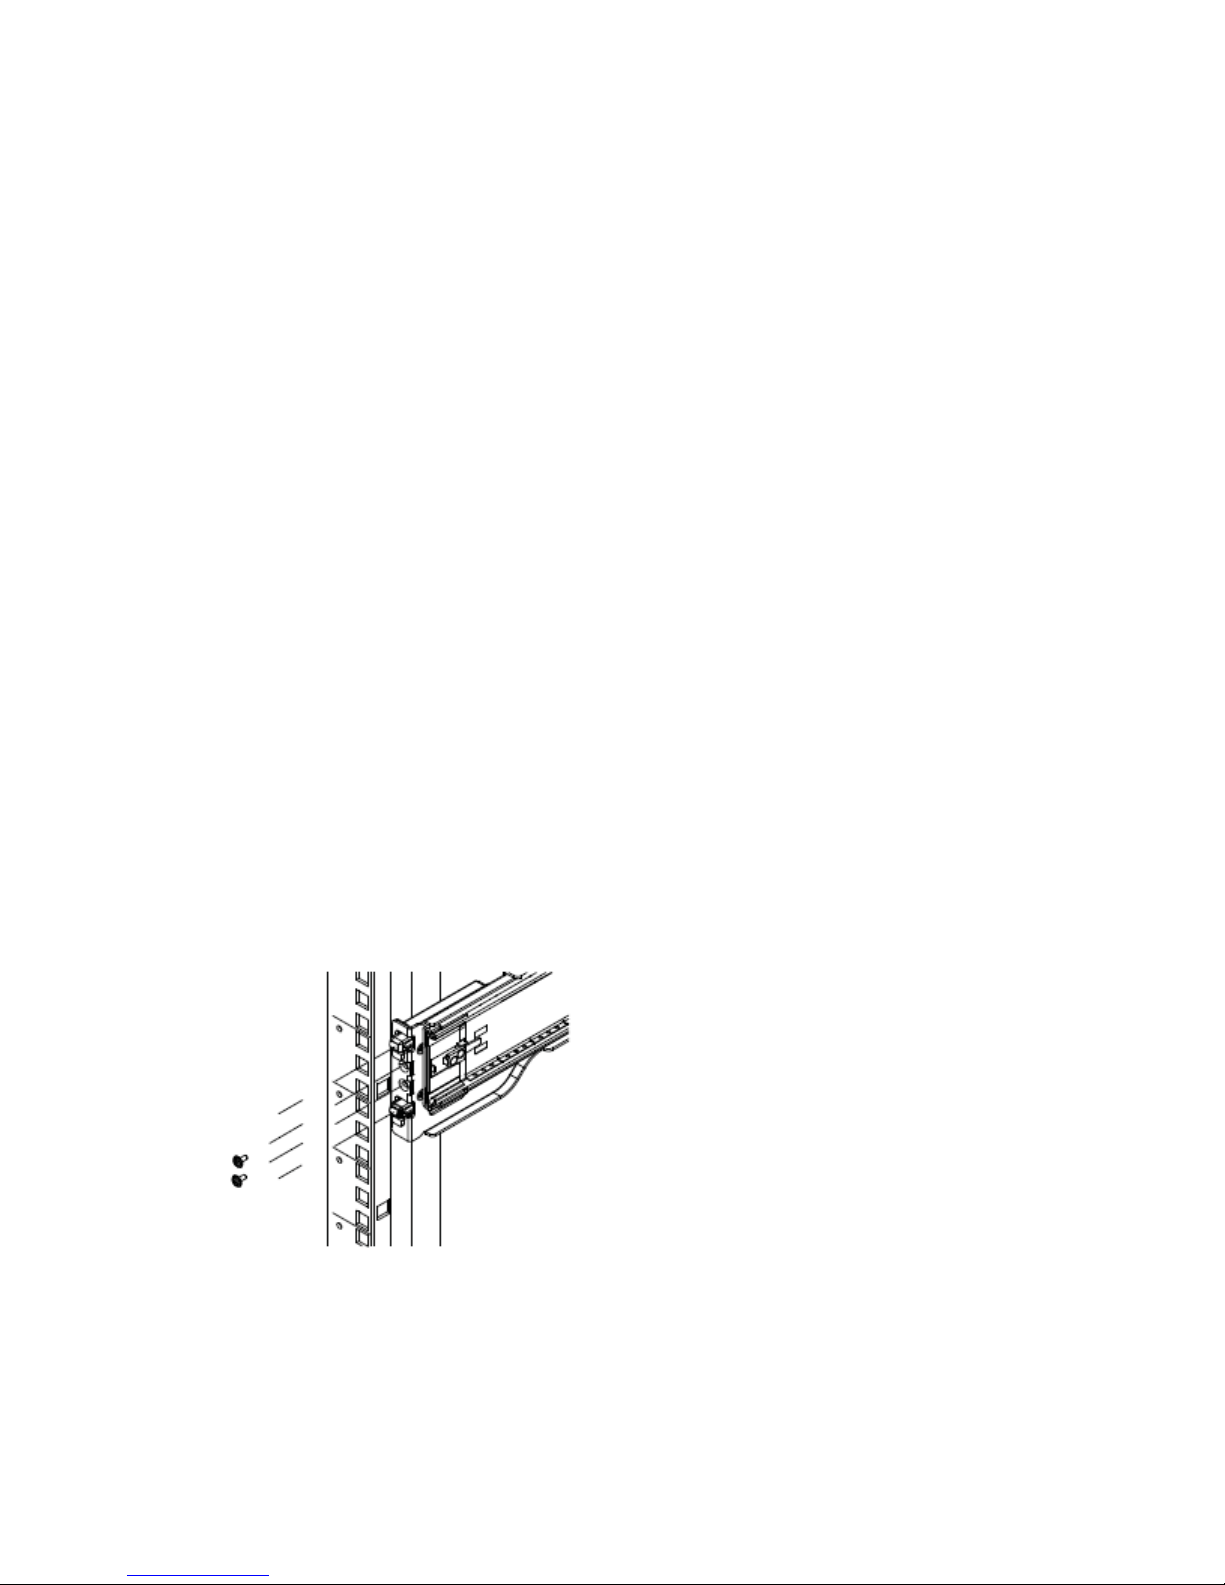
To install the appliance in a rack:
1. Locate the long brackets that have the mounting ears for the back of the rack. (They are
labeled BACK.)
2. Insert the pins of the long brackets into the slots in the outer rails and secure the brackets
to the rails with the screws provided.
3. Check the distance from the front of the rack to the back to ensure that the outer rails fit
into the rack correctly. If the rack is too deep for the length of the rails, attach the extension
brackets to the front or back ends of the rails as necessary.
4. Secure the outer rails to the rack, using two screws for the front and three screws for the
back.
5. Observing the lifting safety precautions, line up the chassis with the rails in the rack and
slide the chassis rails into the rack rails. Maintain an even pressure on both sides as you
push the chassis into the rack. You may need to press the locking tabs to allow the chassis to
slide into the rack.
As the chassis is fully inserted into the rack, listen for the sound of the locking tabs clicking
into place.
6. If desired, use additional screws to secure the front of the chassis to the rack.
All other Cascade Shark models (2U and 3U chassis)
The 2U and 3U models are shipped with the inner rails already attached to the chassis.
The ends of the outer rail assemblies have hooks that hang through the mounting holes in the rack.
Spring-loaded plastic tabs hold the hooks securely in the mounting holes.
Install the outer rails in the rack and mount the chassis in the rack as follows:
1. Place the hooks on the ends of the rails through the mounting holes in the rack. For a more
secure installation, use the screws provided with the kit to secure the outer rails to the front
and back of the rack.
2. Observing the lifting safety precautions, line up the chassis with the rails in the rack and
slide the chassis rails into the rack rails. Maintain an even pressure on both sides as you
push the chassis into the rack. You may need to press the locking tabs to allow the chassis to
slide into the rack.
As the chassis is fully inserted into the rack, listen for the sound of the locking tabs clicking
into place.
4 Cascade Shark Appliance Quick Start Guide
Page 9
3. If desired, use additional screws to secure the front of the chassis to the rack.
tc1
tc0
eth1
eth0
eth1
eth0
tc0
tc7
Cabling
Console connections
Initial setup requires the use of either the KVM (keyboard, video, mouse) connectors or the console
serial port connector. If you use the console port, connect to it with the included serial cable and
ensure that your terminal emulator software is configured for:
• Baud rate: 9600 bps
• Data bits: 8
• Parity: none
• Stop bits: 1
• vt100 emulation
• No flow control
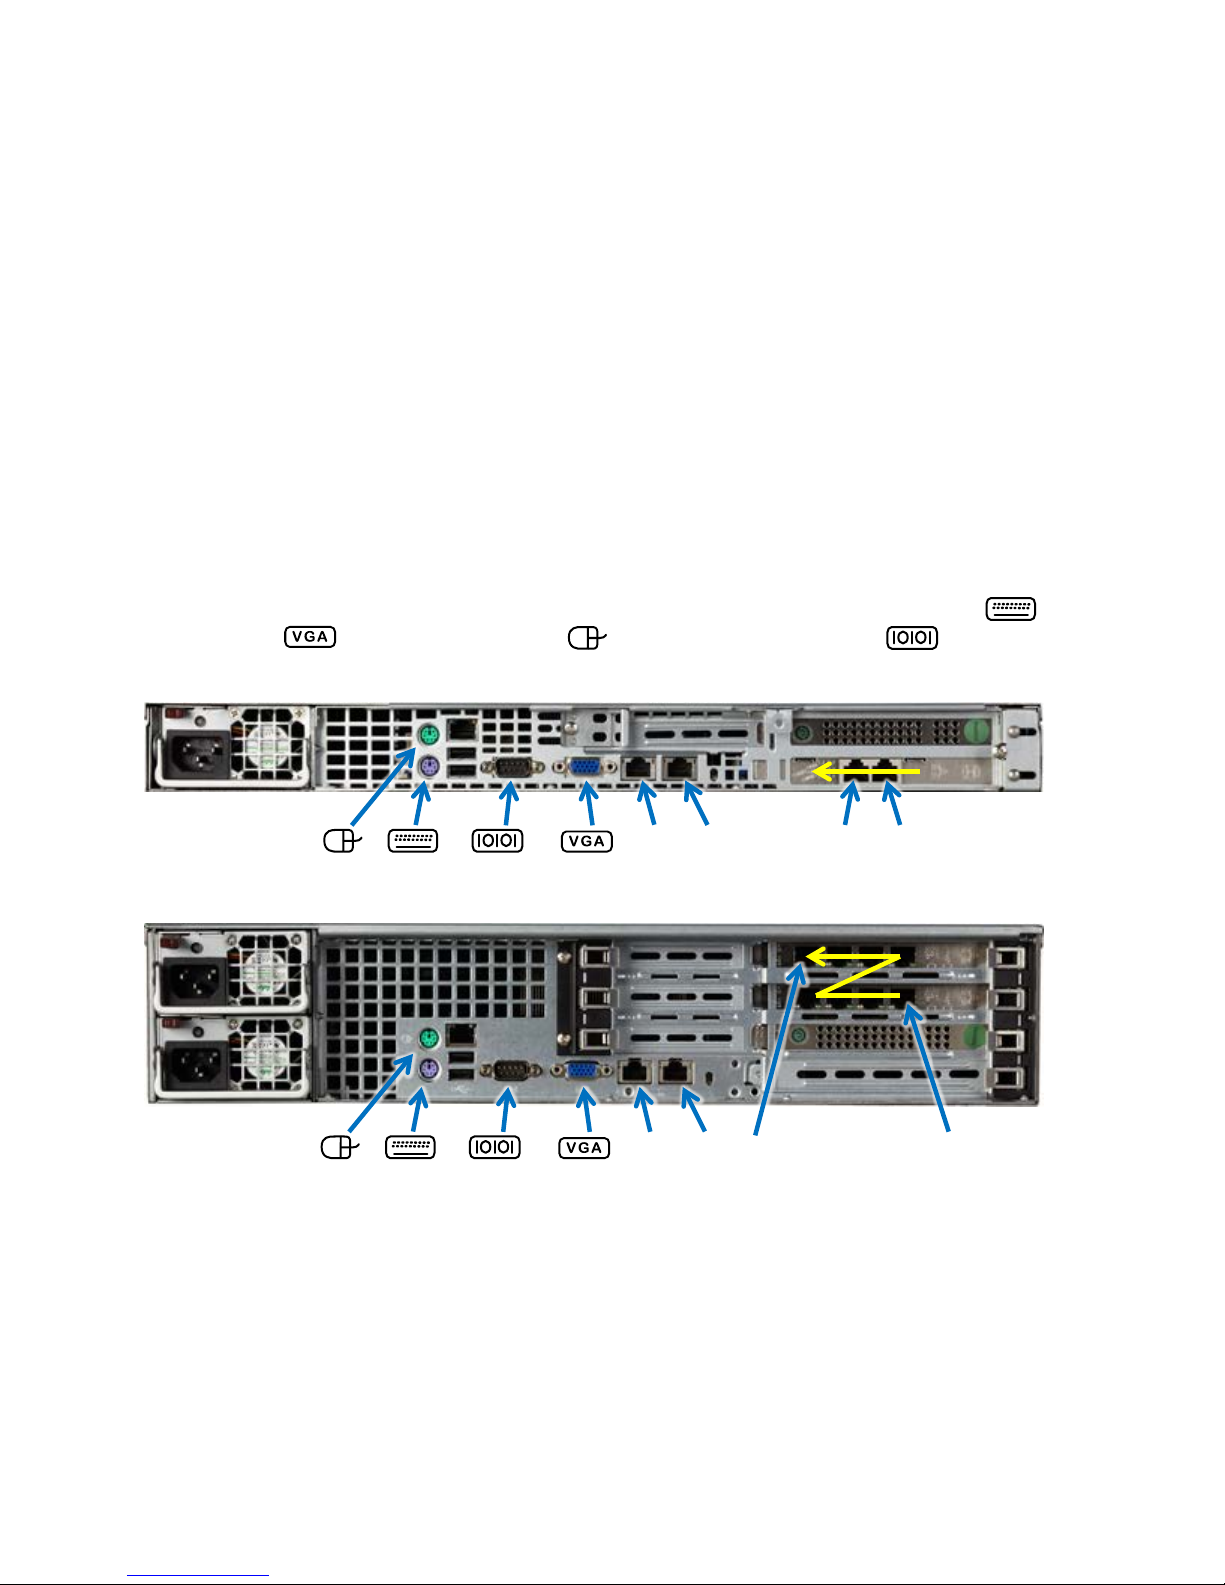
Connect the cable(s) from your KVM device or terminal emulation device to the keyboard ,
video monitor , and mouse connectors or to the serial console port , as required.
Cascade Shark Appliance Quick Start Guide 5
Page 10
eth1
eth0
tc0
tc7
tc0
tc1
Management network connections
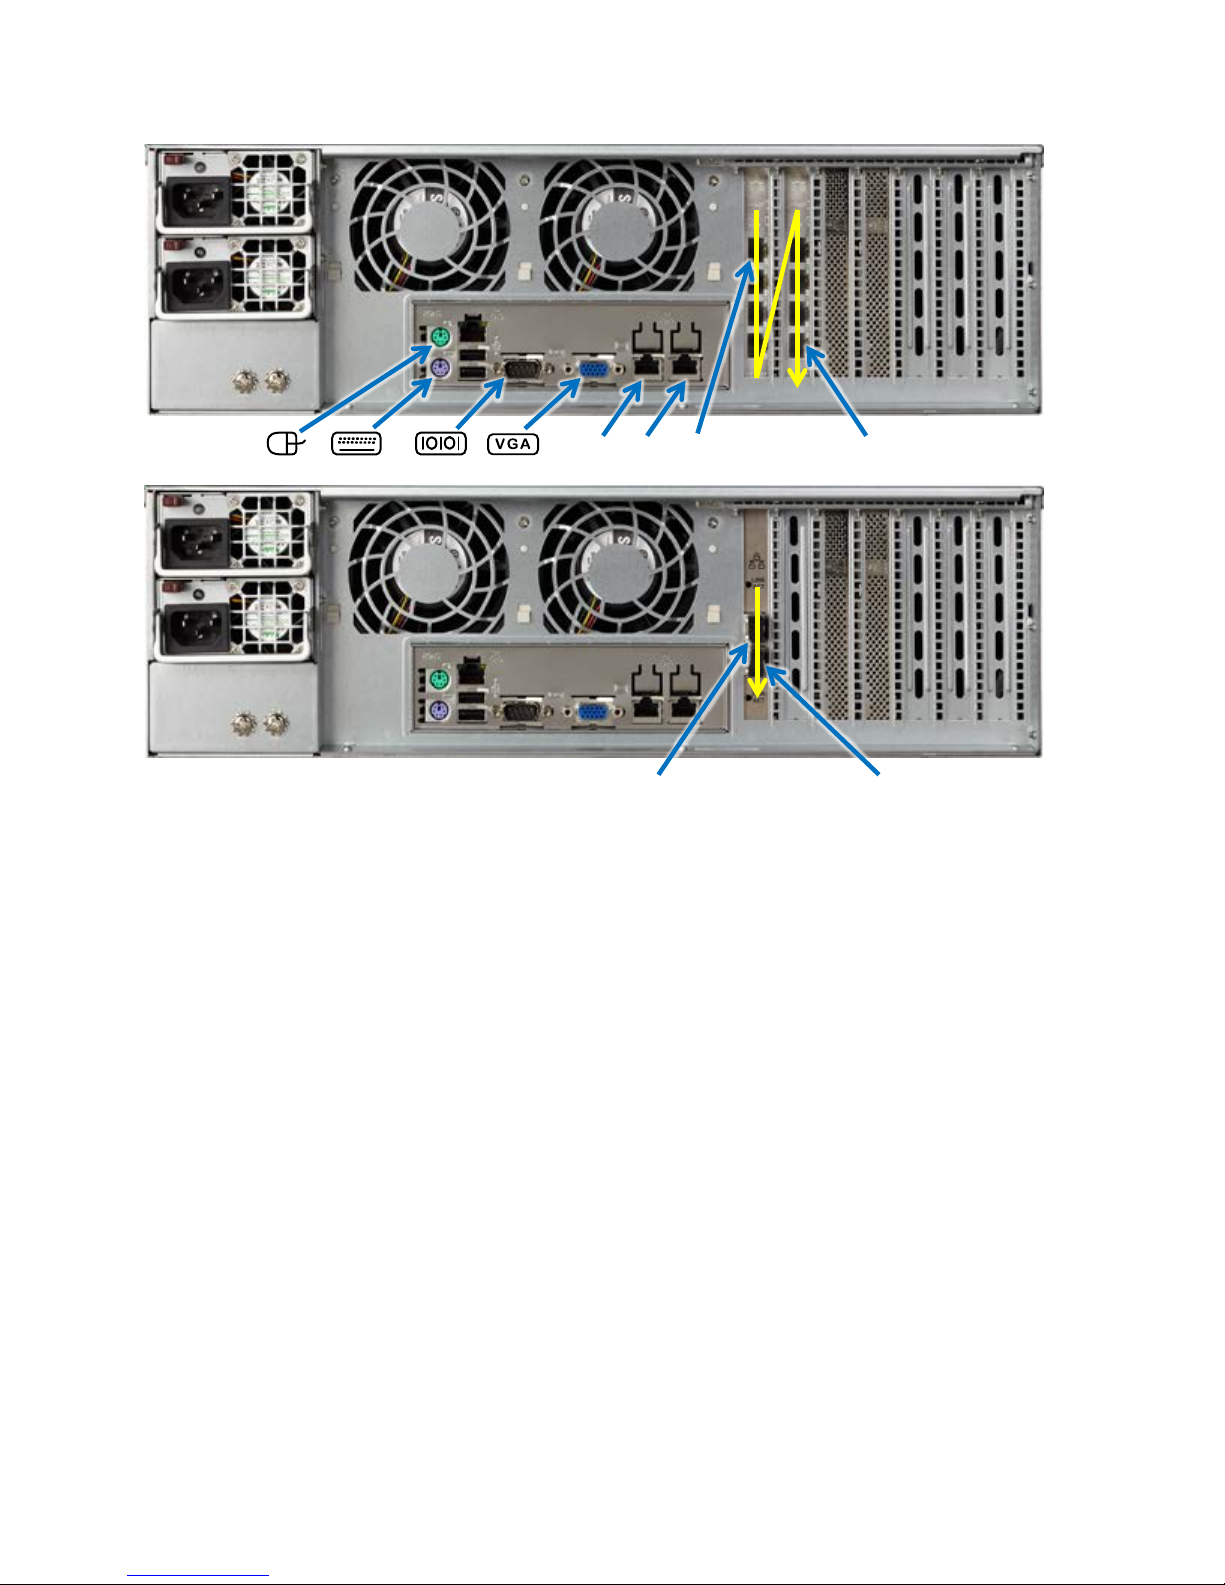
After the initial setup, operate and manage the appliance over the management network. Connect a
cable from the management network to the RJ45 connector labeled eth0.
Interface (capture port) connections
Connect the cables from the live traffic sources to the interface connectors (tc0, tc1, …) on the back
of the chassis.
Optical connectors
Models that include a 1-Gb/s network interface card have SFP transceiver inserts pre-installed. If
you ordered an SX model, use a multimode fiber-optic cable with an LC connector. If you ordered an
LX model, use a single-mode fiber-optic cable with an LC connector.
Models that include a 10-Gb/s network interface card have SFP+ transceiver inserts pre-installed. If
you ordered an SR model, use a multimode fiber-optic cable with an LC connector. If you ordered an
LR model, use a single-mode fiber-optic cable with an LC connector.
Interface numbering
In the Cascade Shark series 1000 appliances, interfaces are numbered right-to-left.
6 Cascade Shark Appliance Quick Start Guide
Page 11
In the Cascade Shark series 2000 appliances, interfaces are numbered right-to-left and
admin
admin
power button
bottom-to-top.
In the Cascade Shark series 3000 appliances, interfaces are numbered top-to-bottom and
left-to-right.
Power cables
Models using the 2U and 3U chassis have redundant power supplies. Plug each unit into a different
circuit.
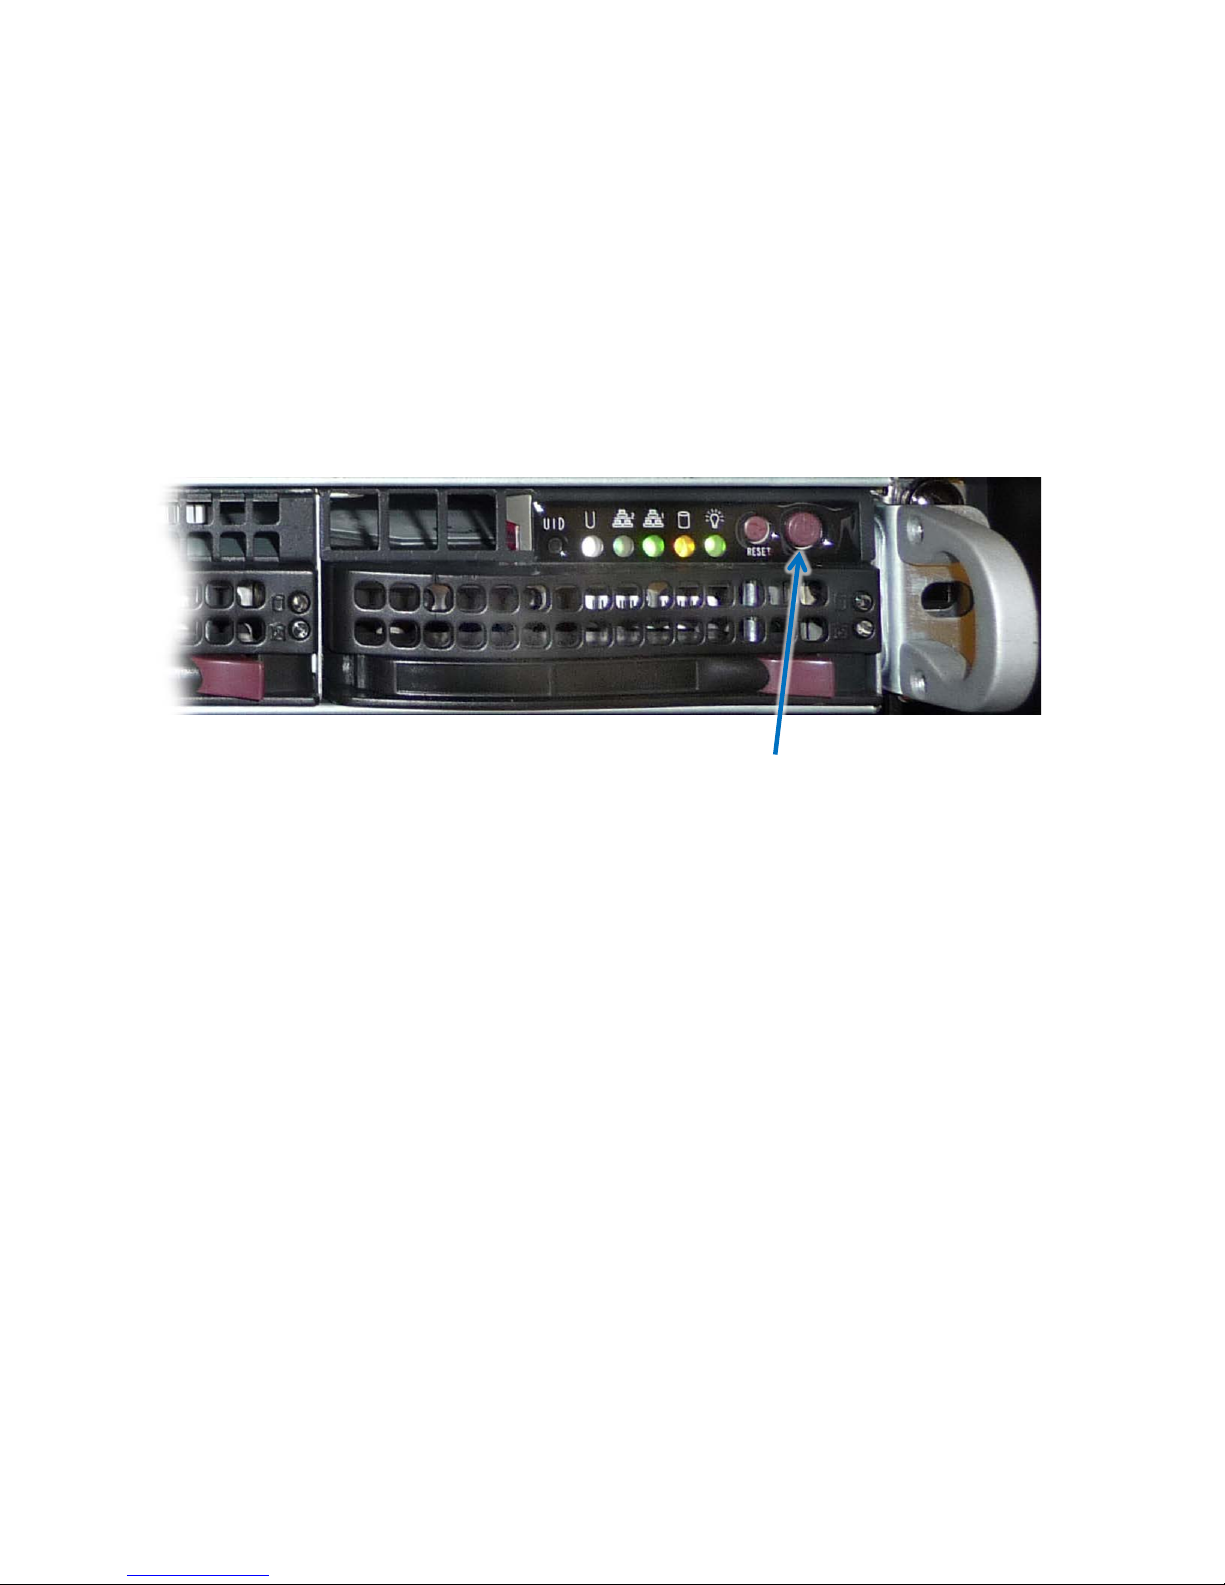
Install the power cables and press the power button on the front of the chassis. (If the cover is on
the front of the chassis, you will have to remove it to gain access to the power button.) Observe that
the chassis powers up.
Configuration
After the Cascade Shark appliance finishes booting up, a login prompt appears on the console
terminal or KVM device. Perform the initial setup using the command line interface. For additional
configuration, use the web interface. (See the Cascade Shark Appliance User’s Guide for details.)
Initial setup
1. Using the KVM or serial console port, log in to the Cascade Shark appliance command line
interface using the default login name and password.
Login:
Password:
Note: You must always keep a record of the login password.
Cascade Shark Appliance Quick Start Guide 7
Page 12

2. Run the setup wizard to configure the appliance for operation on the network.
wizard
Enter
Shark11
no
10.0.20.11
255.255.255.0
10.0.20.3
no
10.0.20.1,10.0.20.2
example.com
Australia/*
Australia/Perth
yes
yes
no
yes
shark>
The setup wizard guides you through the initial configuration of the appliance. Press
at any step to accept the current setting and move to the next step. For example:
Step 0: Hostname [localhost]?
Step 1: Use DHCP for eth0 [yes]?
Step 2: eth0 IP address []?
Step 3: eth0 netmask []?
Step 4: eth0 default gateway []?
Step 5: Enable eth1 [no]?
Step 10: DNS servers []?
Step 11: Domain name []?
Step 12: Timezone (type * for list) [America/Los_Angeles]? *
Africa/ America/ Antarctica/ Arctic/
Asia/ Atlantic/ Australia/ Etc/
Europe/ Indian/ Pacific/
Step 12: Timezone (type * for list) [America/Los_Angeles]?
Adelaide Brisbane Broken_Hill Currie
Darwin Eucla Hobart Lindeman
Lord_Howe Melbourne Perth Sydney
Step 12: Timezone (type * for list) [America/Los_Angeles]?
Step 13: Enable SSH [yes]?
Step 14: Enable PTP [yes]? Note: The PTP steps appear on version 10.6 or later of the
appliance. They do not appear on version 9.6 or earlier. See description below.
Step 15: PTP Interface [eth0]?
Step 16: NTP server names [0.riverbed.pool.ntp.org,1.riverbed.pool.ntp.org,
2.riverbed.pool.ntp.org,3.riverbed.pool.ntp.org]?
The purposes of the steps in the setup wizard are as follows:
Step 0 sets the hostname (without the domain).
Steps 1 through 4 configure the IP management network. Enter
for the eth0 management port or
to use a static IP configuration, and press Enter. When
in Step 1 to use DHCP
setting up an address to be provisioned by DHCP, refer to the MAC address of the
management port (eth0 or eth1) on the label on top of the appliance. For a static IP
configuration, use Step 2 to specify the IP address, Step 3 to specify the IP net mask, and
Step 4 to specify the default gateway.
Step 5 selects whether to use the second management port (eth1). Enter
to enable eth1.
If eth1 is enabled, Steps 6 through 9 configure eth1 for either DHCP or a static IP
configuration.
Steps 10 and 11 configure the DNS servers (as a comma- or space-separated list) and the
domain name of the appliance. If DHCP is used for the eth0 management network
configuration, these steps are skipped (because they are configured by the DHCP server).
8 Cascade Shark Appliance Quick Start Guide
Page 13

Step 12 sets the time zone of the appliance. Entering an asterisk * lists the available time
/*
Europe/Rome
Etc/*
s
https://<shark>
admin
admin
zone areas. To list the specific time zones within an area (for example, Europe), enter the
area followed by
area (for example,
. To specify a particular time zone, enter the full time zone including the
). Use
Step 13 enables or disables the remote shell (SSH).
Steps 14 and 15 select and configure the use of Precision Time Protocol (PTP) in version
10.6 or later appliances.
Step 16 defines the NTP server(s) used for clock synchronization. Enter one or more NTP
server names or IP addresses, separated by commas or spaces.
At the end of the configuration, the wizard prints out a summary of the parameters. Each
step can be revisited by entering the step number. Entering an “s” saves the configuration,
and entering a “c” cancels it.
To change an answer, enter the step number to return to.
Type 's' to save changes and exit
Type 'c' to exit without saving changes
3. Once the configuration is complete, enter
Note: A change to the host name, IP address, or time zone requires a reboot in order to
take effect. The wizard asks for confirmation before rebooting the appliance.
to specify GMT time.
to save the configuration and exit.
After you save the settings and exit the wizard, the appliance is accessible on the
management network. Ensure that you can ping it from another workstation on the
management network before logging out of the command line interface.
Installation Verification
Once the Cascade Shark appliance can be pinged, you can use a browser to verify that the appliance
has been successfully installed.
1. Point a browser to
the Cascade Shark appliance. This displays the web interface login page. The Shark web
interface is supported on Mozilla Firefox 24.1 ESR and Microsoft Internet Explorer 7/8
and 9. Make sure that SSL, cookies, and JavaScript are enabled in your browser.
2. Log in using the default web username and password.
Username:
Password:
The Cascade Shark appliance displays the Status page.
Note that the web username and password can be changed on the Settings > Users and
Groups page of the web interface.
where <shark> is the IP address or DNS name of
3. For each port that you have connected, check the Link Status and Received Packets values
in the Interfaces section. Link status should be UP.
Cascade Shark Appliance Quick Start Guide 9
Page 14
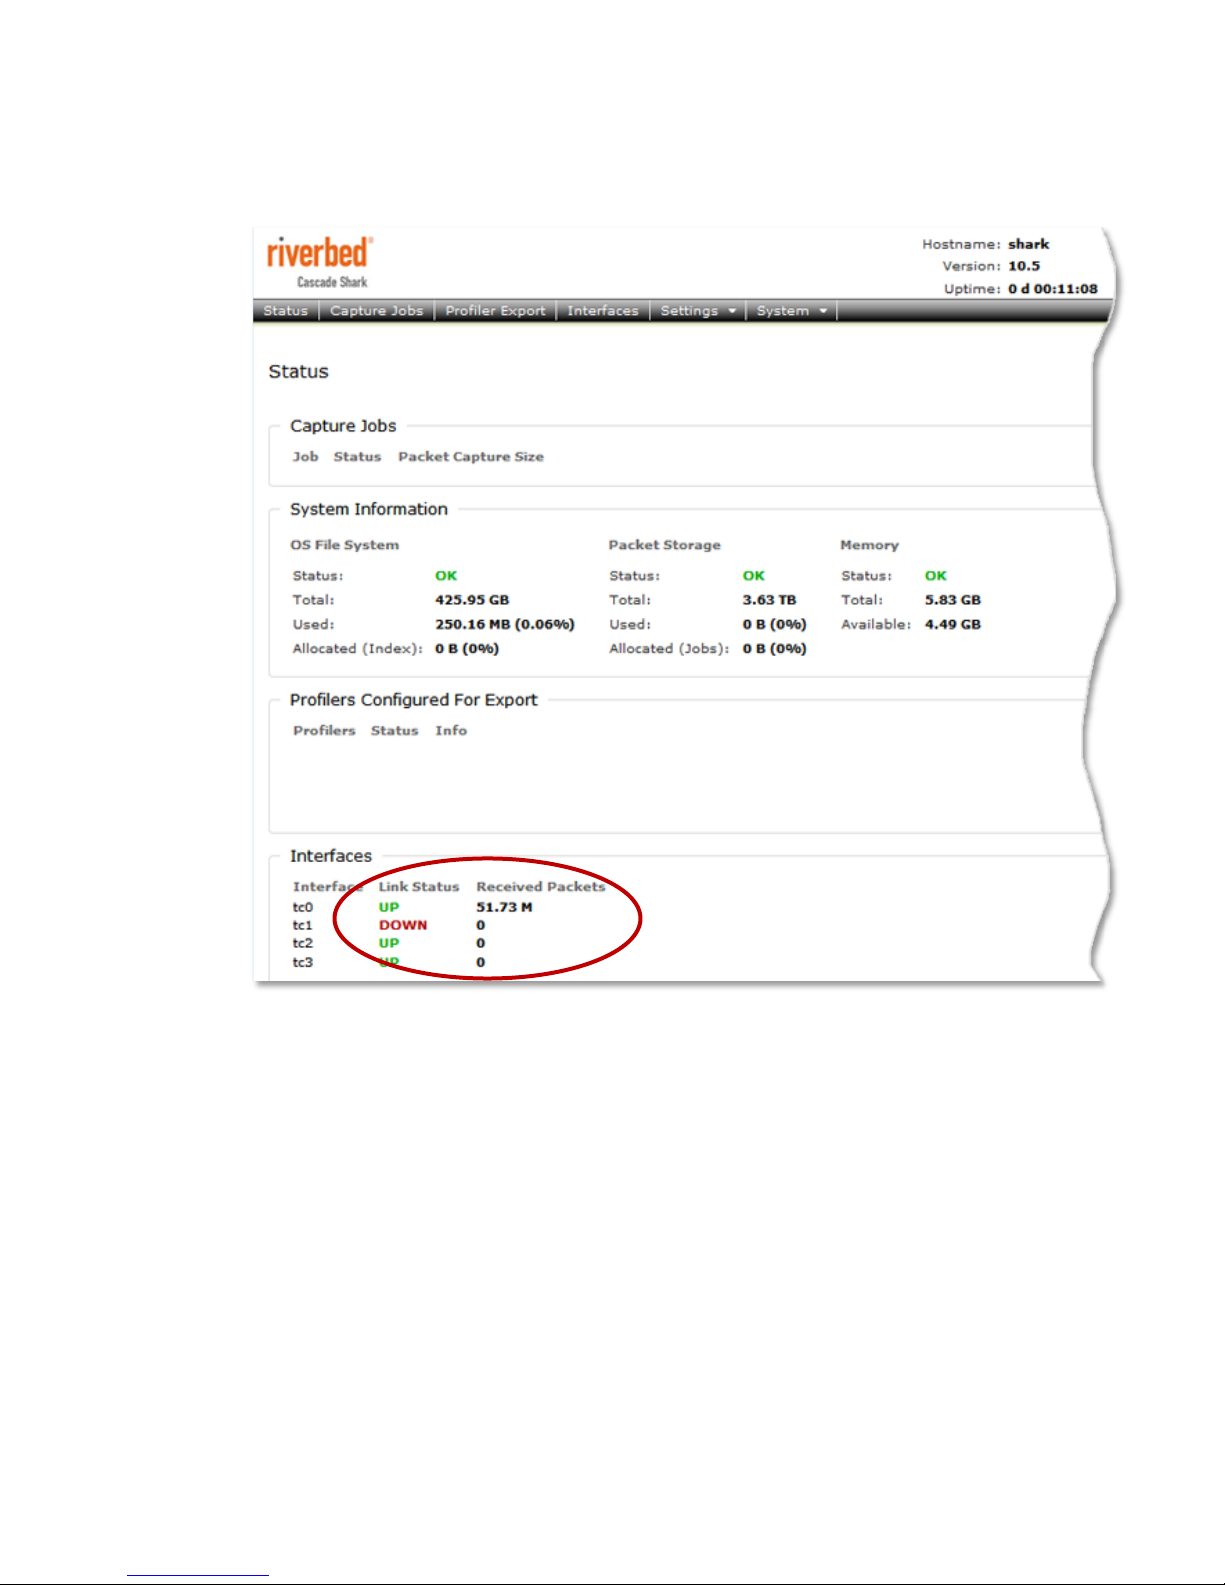
4. Refresh the browser page (or wait for it to auto-refresh) to confirm that the received packet
count is incrementing.
5. When you have verified that all interfaces that you have connected to packet sources are up
and that the received packets counters are incrementing, the installation is complete.
If the interfaces are not up or the packet counters are not incrementing, see the Cascade
Shark Appliance User’s Guide for troubleshooting information.
Additional Configuration
For operational configuration and use, including setting up interfaces, capture jobs, and
communication with Cascade Profiler appliances, refer to the Cascade Shark Appliance User’s Guide.
10 Cascade Shark Appliance Quick Start Guide
Page 15

Contacting Riverbed
Options for contacting Riverbed include:
Internet - Find out about Riverbed products at http://www.riverbed.com.
Support - If you have problems installing, using, or replacing Riverbed products, contact
Riverbed Technical Support or your channel partner who provides support. To contact
Riverbed Technical Support, please open a trouble ticket at https://support.riverbed.com or
call 1-888-RVBD-TAC (1-888-782-3822) in the United States and Canada or +1 415 247 7381
outside the United States.
Professional Services - Riverbed has a staff of engineers who can help you with installation,
provisioning, network redesign, project management, custom designs, consolidation project
design, and custom-coded solutions. To contact Riverbed Professional Services, go to
http://www.riverbed.com or email [email protected].
Documentation - Riverbed continually strives to improve the quality and usability of its
documentation. We appreciate any suggestions you may have about our on line documentation
or printed materials. Send documentation comments to [email protected].
Cascade Shark Appliance Quick Start Guide 11
Page 16

 Loading...