

Page 1

Steelhead® Central Management Console
Installation Guide
Version 6.5.3
February 2012
Page 2

Riverbed Technology
199 Fremont Street
San Francisco, CA 94105
Fax: 415.247.8801
Web: http://www.riverbed.com
Phone: 415.247.8800
Part Number
712-00117-09
© 2012 Riverbed Technology. All rights reserved.
Riverbed®, Cloud Steelhead®, Granite™, Interceptor®, RiOS®, Steelhead®, Think Fast®, Virtual Steelhead®, Whitewater®,
Mazu®, Cascade®, Cascade Pilot™, Shark®, AirPcap®, Skipware®, TurboCap®, WinPcap®, Wireshark®, and Stingray™ are
trademarks or registered trademarks of Riverbed Technology, Inc. in the United States and other countries. Riverbed and any
Riverbed product or service name or logo used herein are trademarks of Riverbed Technology. All other trademarks used herein
belong to their respective owners. The trademarks and logos displayed herein cannot be used without the prior written consent
of Riverbed Technology or their respective owners.
Apple and Mac are registered trademarks of Apple, Incorporated in the United States and in other countries. Linux is a trademark
of Linus Torvalds in the United States and in other countries. Microsoft, Windows, Vista, Outlook, and Internet Explorer are
trademarks or registered trademarks of Microsoft Corporation in the United States and in other countries. Oracle and JInitiator
are trademarks or registered trademarks of Oracle Corporation in the United States and in other countries. UNIX is a registered
trademark in the United States and in other countries, exclusively licensed through X/Open Company, Ltd. VMware, ESX, ESXi
are trademarks or registered trademarks of VMware, Incorporated in the United States and in other countries. Cisco is a registered
trademark of Cisco Systems, Inc. and its affiliates in the United States and in other countries. EMC, Symmetrix, and SRDF are
registered trademarks of EMC Corporation and its affiliates in the United States and in other countries. IBM, iSeries, and AS/400
are registered trademarks of IBM Corporation and its affiliates in the United States and in other countries.
Parts of this product are derived from the following software:
Apache © 2000-2003. The Apache Software Foundation. All rights reserved.
Busybox © 1999-2005 Eric Andersen
ethtool © 1994, 1995-8, 1999, 2001, 2002 Free Software Foundation, Inc
Less © 1984-2002 Mark Nudelman
Libevent © 2000-2002 Niels Provos. All rights reserved.
LibGD, Version 2.0 licensed by Boutell.Com, Inc.
Libtecla © 2000, 2001 by Martin C. Shepherd. All rights reserved.
Linux Kernel © Linus Torvalds
login 2.11 © 1993 The Regents of the University of California. All rights reserved.
md5, md5.cc © 1995 University of Southern California, © 1991-2, RSA Data Security, Inc.
my_getopt.{c,h} © 1997, 2000, 2001, 2002, Benjamin Sittler. All rights reserved.
NM SDK, v4.0P1, © 2008 Netapp Inc. All rights reserved.
NET-SNMP © 1989, 1991, 1992 by Carnegie Mellon University. All rights reserved. Derivative Work - 1996, 1998-2000 Copyright
1996, 1998-2000 The Regents of the University of California. All rights reserved.
OpenSSH © 1983, 1990, 1992, 1993, 1995, 1993 The Regents of the University of California. All rights reserved.
pam © 2002-2004 Tall Maple Systems, Inc. All rights reserved.
pam-radius © 1989, 1991 Free Software Foundation, Inc.
pam-tacplus © 1997-2001 by Pawel Krawczyk
sscep © 2003 Jarkko Turkulainen. All rights reserved.
ssmtp © GNU General Public License
syslogd © 2002-2005 Tall Maple Systems, Inc. All rights reserved.
Vixie-Cron © 1988, 1990, 1993, 1994 by Paul Vixie. All rights reserved.
Zile © 1997-2001 Sandro Sigalam © 2003 Reuben Thomas. All rights reserved.
This product includes software developed by the University of California, Berkeley (and its contributors), EMC, and Comtech
AHA Corporation. This product is derived from the RSA Data Security, Inc. MD5 Message-Digest Algorithm.
NetApp Manageability Software Development Kit (NM SDK), including any third-party software available for review with such
SDK which can be found at http://communities.netapp.com/docs/DOC-3777, and are included in a NOTICES file included
within the downloaded files.
For detailed copyright and license agreements or modified source code (where required), see the Riverbed Support site at https:/
/support.riverbed.com. Certain libraries were used in the development of this software, licensed under GNU Lesser General
Public License, Version 2.1, February 1999. For a list of libraries, see the Riverbed Support at https://support.riverbed.com. You
must log in to the support site to request modified source code.
This documentation is furnished "AS IS" and is subject to change without notice and should not be construed as a commitment by
Riverbed Technology. This documentation may not be copied, modified or distributed without the express authorization of
Riverbed Technology and may be used only in connection with Riverbed products and services. Use, duplication, reproduction,
release, modification, disclosure or transfer of this documentation is restricted in accordance with the Federal Acquisition
Regulations as applied to civilian agencies and the Defense Federal Acquisition Regulation Supplement as applied to military
agencies. This documentation qualifies as "commercial computer software documentation" and any use by the government shall
be governed solely by these terms. All other use is prohibited. Riverbed Technology assumes no responsibility or liability for any
errors or inaccuracies that may appear in this documentation.
Part Number
712-00117-09
Page 3

Contents
Preface.........................................................................................................................................................5
About This Guide ..........................................................................................................................................5
Audience ..................................................................................................................................................5
Document Conventions.........................................................................................................................5
Hardware and Software Dependencies......................................................................................................6
SNMP-Based Management Compatibility.................................................................................................7
CMC Compatibility .......................................................................................................................................7
Additional Resources ....................................................................................................................................8
Online Notes............................................................................................................................................8
Riverbed Documentation and Support Knowledge Base.................................................................8
Contacting Riverbed......................................................................................................................................9
Internet .....................................................................................................................................................9
Technical Support ...................................................................................................................................9
Professional Services..............................................................................................................................9
Documentation........................................................................................................................................9
Chapter 1 - Overview of the CMC............................................................................................................11
Overview of the CMC .................................................................................................................................11
Upgrading to Version 6.5.3 .........................................................................................................................12
Technical Specifications ..............................................................................................................................12
Environmental Specifications.....................................................................................................................13
CMC Status Lights and Ports.....................................................................................................................13
Model 8000.............................................................................................................................................14
Model 8150.............................................................................................................................................14
Chapter 2 - Installing the CMC.................................................................................................................17
Checking Your Inventory............................................................................................................................17
Preparing Your Site for Installation...........................................................................................................18
Completing the Configuration Checklist .................................................................................................18
Steelhead Central Management Console Installation Guide iii
Page 4

Contents
Powering On the CMC................................................................................................................................19
Connecting to the CMC ..............................................................................................................................19
Completing the Initial Configuration .......................................................................................................20
Connecting the CMC to Your Network ....................................................................................................22
Verifying Your Connections .......................................................................................................................22
Logging in to the CMC ...............................................................................................................................23
Index..........................................................................................................................................................25
iv Steelhead Central Management Console Installation Guide
Page 5

Preface
Welcome to the Steelhead Central Management Console Installation Guide. Read this preface for an overview of
the information provided in this guide and the documentation conventions used throughout, hardware and
software dependencies, additional reading, and contact information. This introduction includes the
following sections:
“About This Guide” on page 5
“Hardware and Software Dependencies” on page 6
“SNMP-Based Management Compatibility” on page 7
“CMC Compatibility” on page 7
“Additional Resources” on page 8
“Contacting Riverbed” on page 9
About This Guide
The Steelhead Central Management Console Installation Guide describes how to install and configure the
Steelhead Central Management Console (CMC).
Audience
This guide is written for storage and network administrators with familiarity administering and managing
WANS using common network protocols such as TCP, CIFS, HTTP, FTP, NFS, and so on.
Document Conventions
This manual uses the following standard set of typographical conventions to introduce new terms, illustrate
screen displays, describe command syntax, and so on.
Convention Meaning
italics Within text, new terms and emphasized words appear in italic typeface.
boldface Within text, CLI commands and GUI controls appear in bold typeface.
Steelhead Central Management Console Installation Guide 5
Page 6

Preface Hardware and Software Dependencies
Convention Meaning
Courier Code examples appear in Courier font:
amnesiac > enable
amnesiac # configure terminal
< > Values that you specify appear in angle brackets:
interface <ipaddress>
[ ] Optional keywords or variables appear in brackets:
ntp peer <addr> [version <number>]
{ } Required keywords or variables appear in braces:
{delete <filename> | upload <filename>}
| The pipe symbol represents a choice to select one keyword or variable to the left or right of
the symbol (the keyword or variable can be either optional or required):
{delete <filename> | upload <filename>}
Hardware and Software Dependencies
The following table summarizes the hardware and software requirements for the Central Management
Console.
CMC Component Hardware and Software Requirements
CMC appliance 19-inch (483 mm) two- or four-post rack.
Steelhead Central Management Console Any computer that supports a Web browser with a color image
The following table summarizes the CMC and Steelhead appliance version compatibility.
display.
The Management Console has been tested with Mozilla Firefox
version 1.5.x, 2.0.x and Microsoft Internet Explorer version 6.0.x,
and 7.0.
NOTE: JavaScript and cookies must be enabled in your Web
browser.
Steelhead Version Hardware and Software Requirements
CMC appliance 19-inch (483 mm) two- or four-post rack.
Steelhead Central
Management
Console
6 Steelhead Central Management Console Installation Guide
Any computer that supports a Web browser with a color image
display.
The Management Console has been tested with Mozilla Firefox
v2.x, v3.x and Microsoft Internet Explorer v6.x and v7.x.
NOTE: JavaScript and cookies must be enabled in your Web
browser.
Page 7

SNMP-Based Management Compatibility Preface
SNMP-Based Management Compatibility
The Steelhead appliance supports a proprietary Riverbed MIB accessible through SNMP. SNMPv1 (RFCs
1155, 1157, 1212, and 1215), SNMPv2c (RFCs 1901, 2578, 2579, 2580, 3416, 3417, and 3418), and SNMPv3 are
supported, although some MIB items might only be accessible through SNMPv3 and SNMPv2.
SNMP support allows the Central Management Console to be integrated into network management
systems such as Hewlett Packard OpenView Network Node Manager, BMC Patrol, and other SNMP-based
network management tools.
CMC Compatibility
The Steelhead appliance has been tested with the following Central Management Console (CMC) versions:
Steelhead
RiOS
Version
v6.5 v6.1.x partial
v6.1.x v6.1.0 Parity; Includes Virtual
v6.0.x v6.1.0, 6.0.1 Parity; Manages all
v5.5.x v6.1.0, 6.0.1 Parity; Manages all
Recommended
CMC Version
support
Parity in
subsequent v6.5
release.
CMC v6.1.x CMC v6.0.x CMC v5.5.x
Manages only v6.1.x
features, does not
support QoS.
Steelhead, does not
support ProCurve.
Steelhead appliance
v6.0.2 and later
features, including RSP.
Steelhead appliance
v5.5.4 only, does not
support RSP.
- Not supported
Manages some RiOS v6.1.x
features might be
supported in subsequent
point releases of CMC v6.0.
Parity; Manages all
Steelhead appliance v6.0.x
features.
Parity; Manages all
Steelhead appliance v5.5.4
features only, does not
support RSP.
Not supported
CMC v5.5.3 and
later, manages only
v5.5 Steelhead
appliance features.
Parity; does not
support RSP.
Steelhead Central Management Console Installation Guide
7
Page 8

Preface Additional Resources
Additional Resources
This section describes resources that supplement the information in this guide. It includes the following
sections:
“Online Notes” on page 8
“Riverbed Documentation and Support Knowledge Base” on page 8
Online Notes
The following online file supplements the information in this manual. It is available on the Riverbed
Support site at https://support.riverbed.com.
Online File Purpose
<product>_<version_number>.pdf Describes the product release and identifies fixed problems, known
problems, and work-arounds. This file also provides documentation
information not covered in the manuals or that has been modified since
publication.
Please examine this file before you begin the installation and configuration process. It contains important
information about this release of the Steelhead appliance.
Riverbed Documentation and Support Knowledge Base
For a complete list and the most current version of Riverbed documentation log in to the Riverbed Support
Web site located at https://support.riverbed.com.
The Riverbed Knowledge Base is a database of known issues, how-to documents, system requirements, and
common error messages. You can browse titles or search for key words and strings.
To access the Riverbed Knowledge Base, log in to the Riverbed Support site located at
https://support.riverbed.com.
8 Steelhead Central Management Console Installation Guide
Page 9

Contacting Riverbed Preface
Contacting Riverbed
This section describes how to contact departments within Riverbed.
Internet
You can learn about Riverbed products through our Web site at http://www.riverbed.com.
Technical Suppor t
If you have problems installing, using, or replacing Riverbed products contact Riverbed Support or your
channel partner who provides support. To contact Riverbed Support, please open a trouble ticket at
https://support.riverbed.com or call 1-888-RVBD-TAC (1-888-782-3822) in the United States and Canada
or +1 415 247 7381 outside the United States.
Professional Services
Riverbed has staff of professionals who can help you with installation assistance, provisioning, network
redesign, project management, custom designs, consolidation project design, and custom coded solutions.
To contact Riverbed Professional Services go to http://www.riverbed.com or email
[email protected].
Documentation
We continually strive to improve the quality and usability of our documentation. We appreciate any
suggestions you might have about our online documentation or printed materials. Send documentation
comments to [email protected].
Steelhead Central Management Console Installation Guide
9
Page 10

Preface Contacting Riverbed
10 Steelhead Central Management Console Installation Guide
Page 11

CHAPTER 1
Overview of the CMC
This chapter provides an overview of the CMC, new features, upgrade instructions, technical and
environmental specifications, and a description of the status lights in the CMC. It includes the following
sections:
“Overview of the CMC” on page 11
“Upgrading to Version 6.5.3” on page 12
“Upgrading to Version 6.5.3” on page 12
“Technical Specifications” on page 12
“Environmental Specifications” on page 13
“CMC Status Lights and Ports” on page 13
Overview of the CMC
The CMC facilitates the essential administration tasks for the Riverbed system:
Configuration - The CMC enables you to automatically configure new Steelhead appliance groups or
to send configuration settings to appliances in remote offices. The CMC utilizes configuration objects
(profiles and groups) to facilitate centralized configuration and reporting.
Monitoring - The CMC provides both high-level status and detailed statistics of the performance of
Steelhead appliances and enables you to configure event notification for managed Steelhead
appliances.
Management - The CMC enables you to start, stop, restart, and reboot remote Steelhead appliances.
You can also schedule jobs to send software upgrades and configuration changes to remote appliances
or to collect logs from remote Steelhead appliances.
Partial Federation - You can put any appliance into branch-managed mode to prevent configuration
changes or maintenance operations from the CMC. The CMC continues to monitor and gather statistics
from appliances that are branch managed.
Operations History - The Operations History page lists all of the actions related to configuring
Steelhead appliances that have been performed and tells you if they are successful or not.
Steelhead Central Management Console Installation Guide 11
Page 12

Overview of the CMC Upgrading to Version 6.5.3
Upgrading to Version 6.5.3
To upgrade to version 6.5.3, follow these procedures.
Note: A CMC running v5.0 must be upgraded to v5.5.3 or v5.5.4 before it can be upgraded to v6.1. Upgrading directly
from v5.0 to v6.1 is not supported.
Note: The CMC must be upgraded to either v6.0 or v6.1 before it can be upgraded to v6.5.2. Upgrading directly from
v5.5 to v6.5.0 is not supported.
To upgrade CMC software
1. Download the software image from the Riverbed Support to a location such as your desktop.
2. Log in to the Central Management Console using the Administrator account (admin).
3. Go to the Configure > Maintenance > Software Upgrade page and choose one of the following options:
– From URL - Type the URL that points to the software image in the text box
Note: Installing directly from https://support.riverbed.com is not supported.
– From Local File - Browse your file system and select the software image.
– Schedule Upgrade for Later - Type the date and time using the following format:
YYYY/MM/DD HH:MM:SS.
– Click Install to upgrade your CMC software.
4. Reboot the CMC.
Technical Specifications
The following tables summarizes the physical and power specifications for the CMC.
Specification Model CMC Model 8000 Model 8150
Form Factor 1U (Unit) 1U 1U
Height, Width, and Depth 1.7 x 16.8 x 16.1 in
(4.31 x 42.7 x 40.9 cm)
Weight 17 lbs (7.7 kg) 26.0 lbs. (11.80 kg) 30 lb. (13.6 kg)
Voltage 100-240 V 100-240 V 110-220 V
Frequency 50-60 Hz 50-60 Hz 50-60 Hz
12 Steelhead Central Management Console Installation Guide
1.69 x 17.6 x 21.5 in
(4.27 x 44.7 x 54.61 cm)
1.71 x 17.2 x 25.41 in
4.35 x 43.6 x 64.54 cm
Page 13

Environmental Specifications Overview of the CMC
Specification Model CMC Model 8000 Model 8150
Power (Watts) 206 W 149 W 151 W
Amps 1.76 A 4A-2A 1.8 A
VA 207 V 2.27A @110 V 153 V
BTU 646 BTU
(per hour max.)
Hard Disk 1 x 80 GB 1 x 250 GB 1 TB
Data Store 80 GB 80 GB 400 GB
Power Requirement 250W 149W 151 W
Power Supply Single 250W Single 345W Single 650 W
508 BTU
(per hour max.)
515 BTU
(per hour max.)
Environmental Specifications
The following table summarizes the environmental requirements for the CMC.
Note: The temperature refers to the outside ambient temperature of the appliance. It does not refer to the internal
temperature of the appliance. Internal temperatures might be higher than the values stated here.
Category
Temperature (Operating)
(outside, ambient)
Temperature (Storage)
(outside, ambient)
Model CMC Model 8000 Model 8150
10° - 35°C
50° - 95°F
-40° - 65°C
-40° - 149°F
10° - 35°C
50° - 95°F
-40° - 65°C
-40° - 149°F
10º - 40º C
50° - 95°F
-40° - 65°C
-40° - 149°F
Relative Humidity 20% - 80%
non-condensing
Storage Humidity 5% - 95%
non-condensing
Operating Altitude Up to 10,000 ft. Up to 10,000 ft. Up to 10,000 ft.
20% - 80%
non-condensing
8% to 85%
non-condensing
20% - 80%
non-condensing
5% - 95%
non-condensing
CMC Status Lights and Ports
The following section illustrates the status lights, ports, power switches, and so on for the following CMC
models:
“Model 8000,” next
“Model 8150” on page 14
Steelhead Central Management Console Installation Guide
13
Page 14
Overview of the CMC CMC Status Lights and Ports
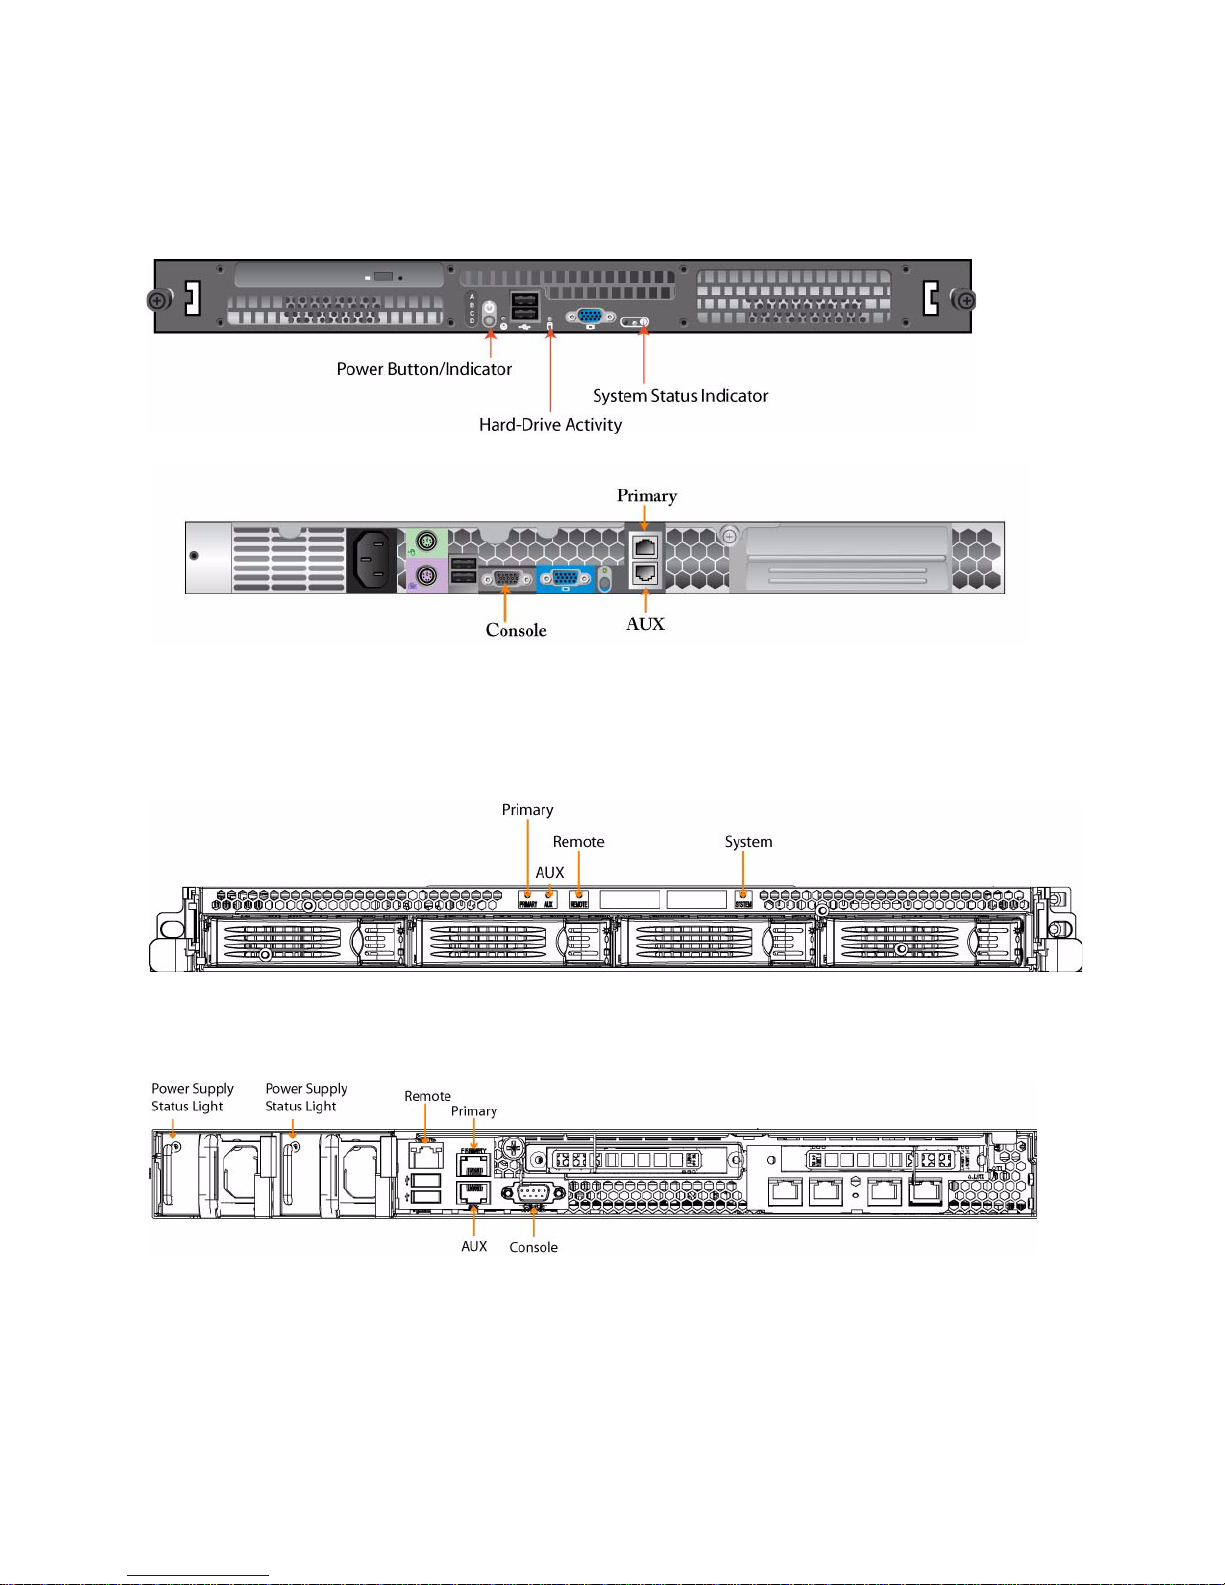
Model 8000
Figure 1-1 and Figure 1-2 show the Model 8000.
Figure 1-1. Front Panel
Figure 1-2. Back Panel
Model 8150
Figure 1-3 and Figure 1-4 show the Model 8150 status light and port locations.
Figure 1-3. Fron t Pa nel
Figure 1-4. Back Panel
14 Steelhead Central Management Console Installation Guide
Page 15

CMC Status Lights and Ports Overview of the CMC
The following table summarizes the system LEDs.
LED Description
System LEDs Healthy = Blue
Network Status LEDs (Front LAN-WAN LEDs) Link = Solid Blue
BYP/BLK
(Bypass or Block (Disconnect) Mode)
HDD LEDs Disk Connected = Solid Blue
LAN-WAN LEDs Left LED
Power Supply LEDs Solid Green= Healthy power supply with AC power
Degraded = Yellow
Critical = Red
System Boot = Yellow
Activity = Blinking Blue
Normal = No Light
Bypass or Block (Disconnect) = Orange
Read/Write Activity = Blinking Blue
Failed Disk = Orange
Link = Solid Green
Activity = Blinking Green
Right LED
GB = Orange
100 MB = Green
10 MB = No Light
connected.
Blinking Green= Unit is halted, but the power supplies are
still connected to AC power.
Solid Orange= AC power is not connected to this power
supply, but the unit is still powered on due to the other
power supply.
Solid Orange= Occurs when the power supply
automatically shuts off due to some error condition, such
as an overheat.
Blinking Orange= Indicates a power supply predictivefail condition, such as a fan failure. The power supply
might then shut itself off, which will change the LED to
solid orange. A log entry of this predictive-fail can be
viewed using the show hardware error-log all command
in the Riverbed Command-Line Interface.
No LED= No AC power connected.
Steelhead Central Management Console Installation Guide
15
Page 16

Overview of the CMC CMC Status Lights and Ports
16 Steelhead Central Management Console Installation Guide
Page 17

CHAPTER 2
Installing the CMC
This chapter describes how to install and configure the Steelhead Central Management Console (CMC). It
includes the following sections:
“Checking Your Inventory” on page 17
“Preparing Your Site for Installation” on page 18
“Completing the Configuration Checklist” on page 18
“Powering On the CMC” on page 19
“Connecting to the CMC” on page 19
“Completing the Initial Configuration” on page 20
“Connecting the CMC to Your Network” on page 22
“Verifying Your Connections” on page 22
“Logging in to the CMC” on page 23
Checking Your Inventory
This section describes the contents of the CMC shipping carton.
Check your shipment to ensure it contains the following items:
The CMC appliance
One CAT-5E straight-through cable
One RS-232 serial extension cable
One power cable
One mounting kit
Documentation Set CD
If any items are damaged or missing, email [email protected] for replacement or repair.
Steelhead Central Management Console Installation Guide 17
Page 18

Installing the CMC Preparing Your Site for Installation
Preparing Your Site for Installation
This section lists the prerequisites to installation.
Ensure your site meets the following requirements:
A standard electronic environment where the ambient temperature does not exceed 35º C (95º F) and
the relative humidity does not exceed 95 percent (non-condensing). For details, see “Technical
Specifications” on page 12.
An Ethernet connection available within the standard Ethernet limit.
Space on a two- or four-post, 19-inch, Telco-type mounting rack. The CMC requires 1U of rack space.
For details about installing the CMC to a rack see the Rack Installation Guide or the printed instructions
that were shipped with the CMC.
A clean power source dedicated to computer devices and other electronic devices.
The CMC is completely assembled with all the equipment parts in place and securely fastened. The CMC
is ready for installation with no further assembly required. You will need a standard Phillips-head
screwdriver to secure the CMC to the rack.
Note: The RSP image and package pushes will be resumed from where they left off previously if they fail.
Completing the Configuration Checklist
This section lists the parameters you specify to complete the initial configuration of the CMC and to register
remote Steelhead appliances.
Be prepared to provide values for the parameters listed in the following checklist:
Appliance Parameter Your Value
CMC Appliance Hostname
IP address
Netmask
Default gateway
DNS Server
Domain Name
Remote Steelhead
Appliances
Serial number
Ve rs i o n
IP address or hostname
User name
Password
18 Steelhead Central Management Console Installation Guide
Page 19
Powering On the CMC Installing the CMC
Powering On the CMC
This section describes how to connect and power on the CMC.
To connect the power to the CMC
1. If your model has a master power switch, make sure it is in the off position (on the rear panel).
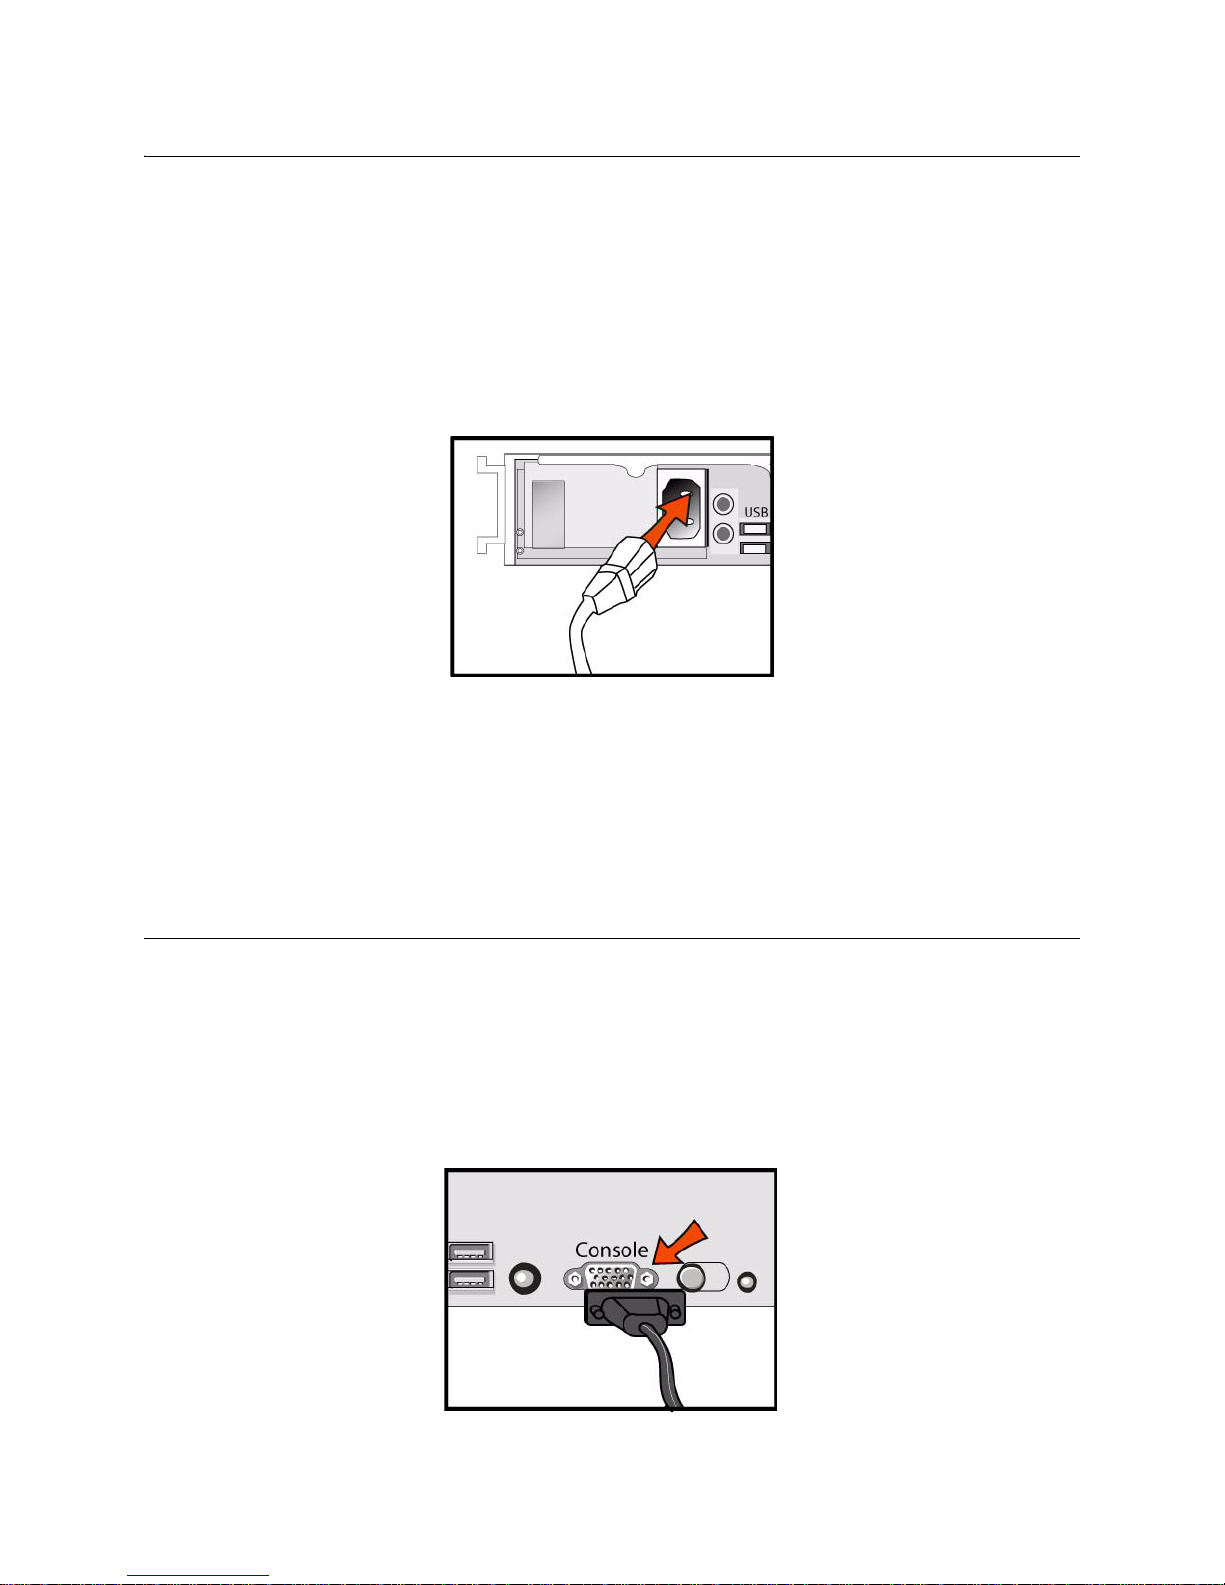
2. Plug the Alternating Current (AC) power cord provided in your shipment into the CMC.
Figure 2-1. Connecting the Power
3. Plug the AC power cord into an uninterrupted AC outlet.
4. If your model has a master power switch, press in the master power switch (ON).
5. Press in the system power switch on the front of the CMC.
6. Check the status lights on the CMC. For details, see, “CMC Status Lights and Ports” on page 13.
Connecting to the CMC
This section describes how to access the configuration wizard and CLI.
To connect to the CMC
1. Plug the serial cable provided in your shipment into the Console port on the CMC.
Figure 2-2. Connecting the CMC
Steelhead Central Management Console Installation Guide
19
Page 20

Installing the CMC Completing the Initial Configuration
2. Start your terminal emulation program such as Tera Term Pro or HyperTerminal. The terminal device
must have the following settings:
Baud rate: 9600 bps
Data bits: 8
Parity: none
Stop bits: 1
No flow control
3. Log in as an administrator:
login as: admin
Sent username "admin"
password: password
4. Check the system and disk status lights. For details, see “Technical Specifications” on page 12.
Completing the Initial Configuration
This section describes how to complete the initial configuration of the CMC.
To configure the CMC
1. After you log in to the CMC as administrator, the system prompts you to start the configuration wizard.
Enter yes at the system prompt:
Configuration wizard.
Do you want to use the wizard for initial configuration? yes
2. Complete the configuration wizard steps as described in the following table.
Tip: Press
entering configuration jump-start at the system prompt.
Tip: Press '?' for help. Press
Wizard Prompt Description Example
Step 1: Host Name? Enter the hostname for the CMC
Step 2: Use DHCP? You are given the option to enable the
ENTER
to enter the default value. If you mistakenly answer no, you can start the configuration wizard by
CTRL-B
to go back to the previous step.
.
DHCP to automatically assign an IP
address to the primary interface for
the CMC.
Riverbed recommends that you do not
set DHCP.
The default value is no.
Step 1: Hostname? minna
Step 2: Use DHCP? no
20 Steelhead Central Management Console Installation Guide
Page 21

Completing the Initial Configuration Installing the CMC
Wizard Prompt Description Example
Step 3: Primary IP address? Enter the IP address for the CMC
.
Step 4: Netmask? Enter the netmask for the network on
which the CMC is to reside.
Step 5: Default gateway? Enter the default gateway for the
network on which the CMC is to
reside.
Step 6: Primary DNS server? Enter the primary DNS server for the
network on which the CMC is to
reside.
Step 7: Domain name? Enter the domain name for the
network on which the CMC is to
reside.
If you set a domain name, you need
not specify the domain names when
you set up remote appliances to be
managed by the CMC.
NOTE: When you configure DNS
server settings, map riverbedcmc to
the IP address for the CMC.
Step 8: Admin password? Riverbed strongly recommends that
you change the default password at
this time. The password must be
minimum of 6 characters.
The default administrator password is
password.
Step 3: Primary IP address?
10.0.0.74
Step 4: Netmask? 255.255.0.0
Step 5: Default gateway?
10.0.0.1
Step 6: Primary DNS server?
10.0.0.2
Step 7: Domain name? example.com
Step 8: Admin password? xxxyyy
3. The system confirms your settings.
You have entered the following information:
1. Hostname: minna
2. Use DHCP: no
3. Primary IP address: 10.0.0.74
4. Netmask: 255.255.0.0
5. Default gateway: 10.0.0.1
6. Primary DNS server: 10.0.0.2
7. Domain name: example.com
8. Admin password: xxxyyy
To change an answer, enter the step number to return to.
Otherwise hit <enter> to save changes and exit.
Choice:
The CMC configuration wizard automatically saves your initial configuration settings.
4. To log out of the system, enter the following command at the system prompt:
# exit
Steelhead Central Management Console Installation Guide
21
Page 22
Installing the CMC Connecting the CMC to Your Network
Connecting the CMC to Your Network
This section describes how to connect the CMC to your network.
To connect the CMC to your network
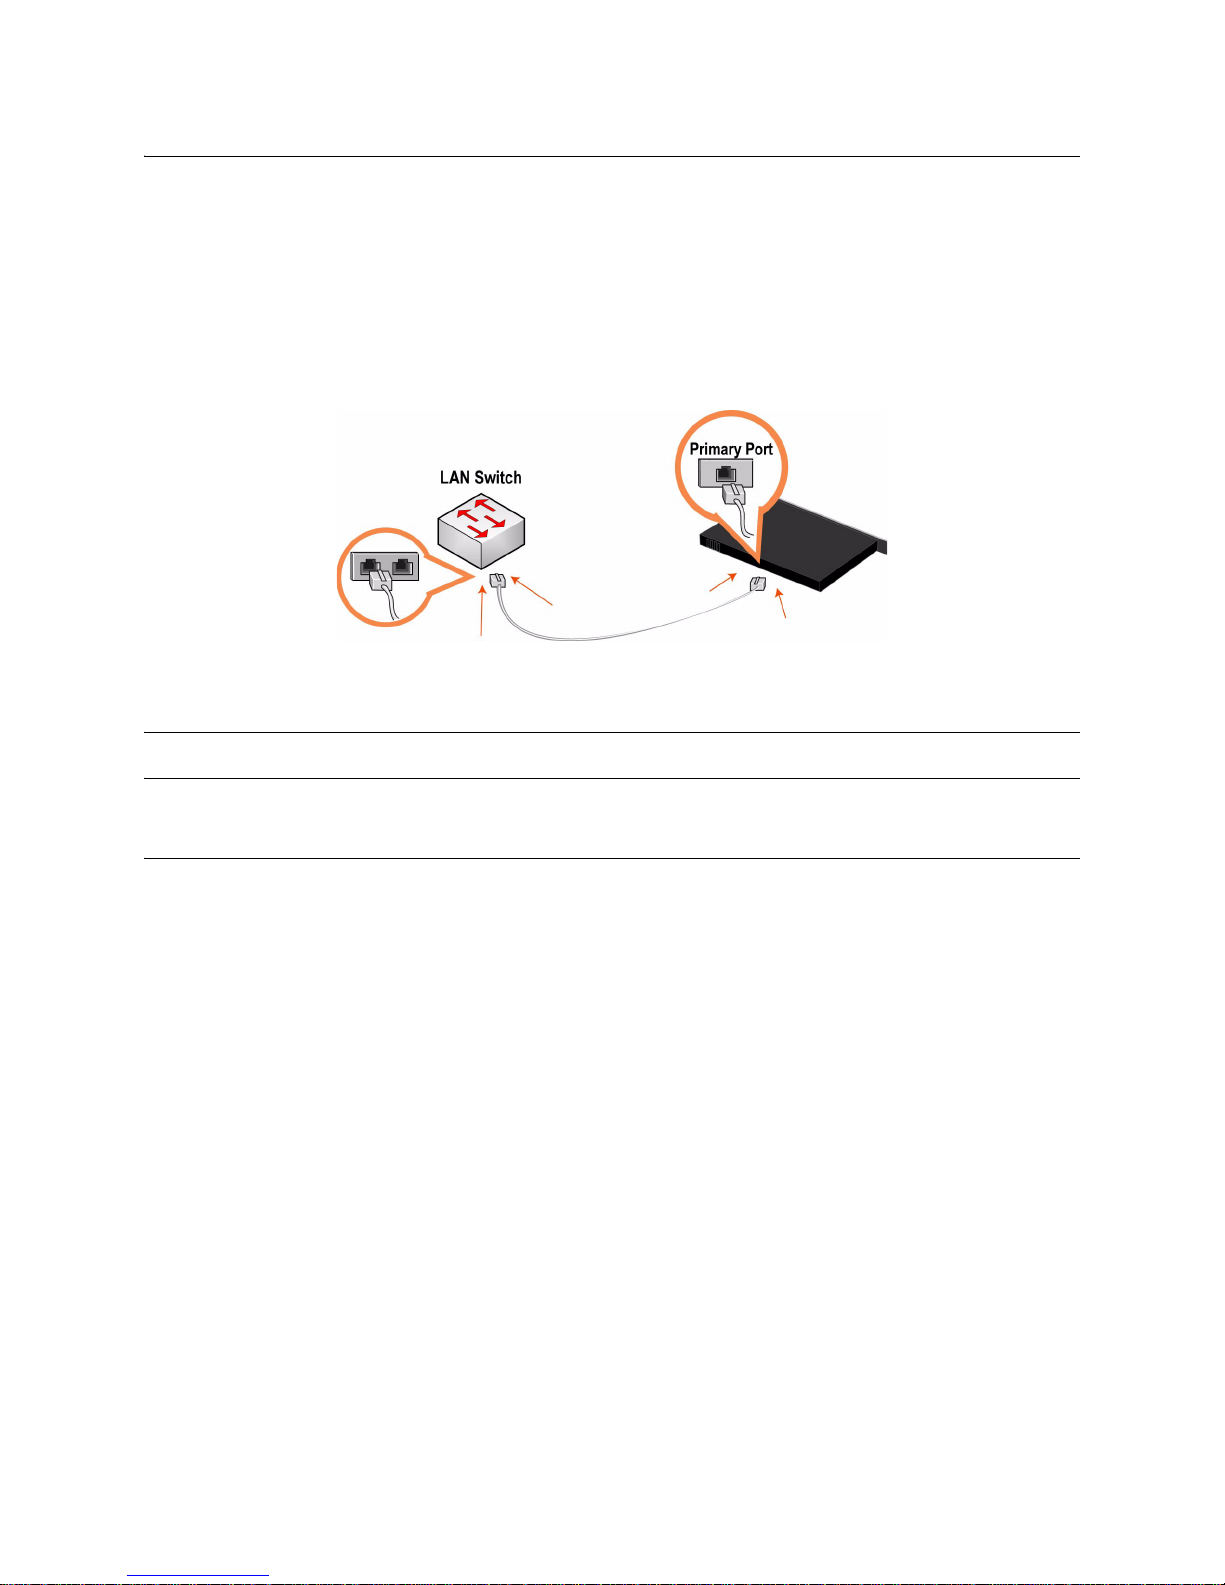
1. Plug the straight-through cable provided in your shipment into the Primary port of the CMC and the
LAN switch (this can be any port on your LAN switch that acts as a host).
Figure 2-3. Connecting the Primary Port and LAN Switch
2. If your model has a front bezel, replace the bezel on the CMC.
Important: If your network has a firewall between the CMC and remote Steelhead appliances, open SSH port 22.
Verifying Your Connections
This section describes how to verify that you have properly connected the CMC.
T o verify your connections
1. From a remote host, connect to the CLI. At the system prompt, enter the following command:
or
ssh admin@ipaddress
2. When you are prompted for a password, specify the administrator password you set when you ran the
configuration wizard.
3. At the system prompt, enter ping commands to verify the connections:
ping -I <primary-IP-address> <primary-default-gateway>
22 Steelhead Central Management Console Installation Guide
Page 23
Logging in to the CMC Installing the CMC
Logging in to the CMC
This section describes how to log in to the CMC.
You can connect to the CMC through any supported Web browser. To connect to the CMC you must know
the host, domain, and administrator password that you assigned during the initial setup of the CMC.
Note: Cookies and JavaScript must be enabled in your browser.
Note: RSP packages and images are not backed up in the CMC external backups. CMC external backups and restores
do not apply to RSP package and image files stored on the CMC.
To log in to the CMC
1. Enter the URL for the CMC in the location box of your browser:
protocol://host.domain
protocol is http or https. The secure HTTPS uses SSL protocol to ensure a secure environment. If you
use HTTPS to connect, you are prompted to inspect and verify the SSL key.
host is the IP address or hostname you assigned to the CMC during the initial configuration. If your
DNS server maps the IP address to a name, you can specify the DNS name.
domain is the full domain name for the CMC.
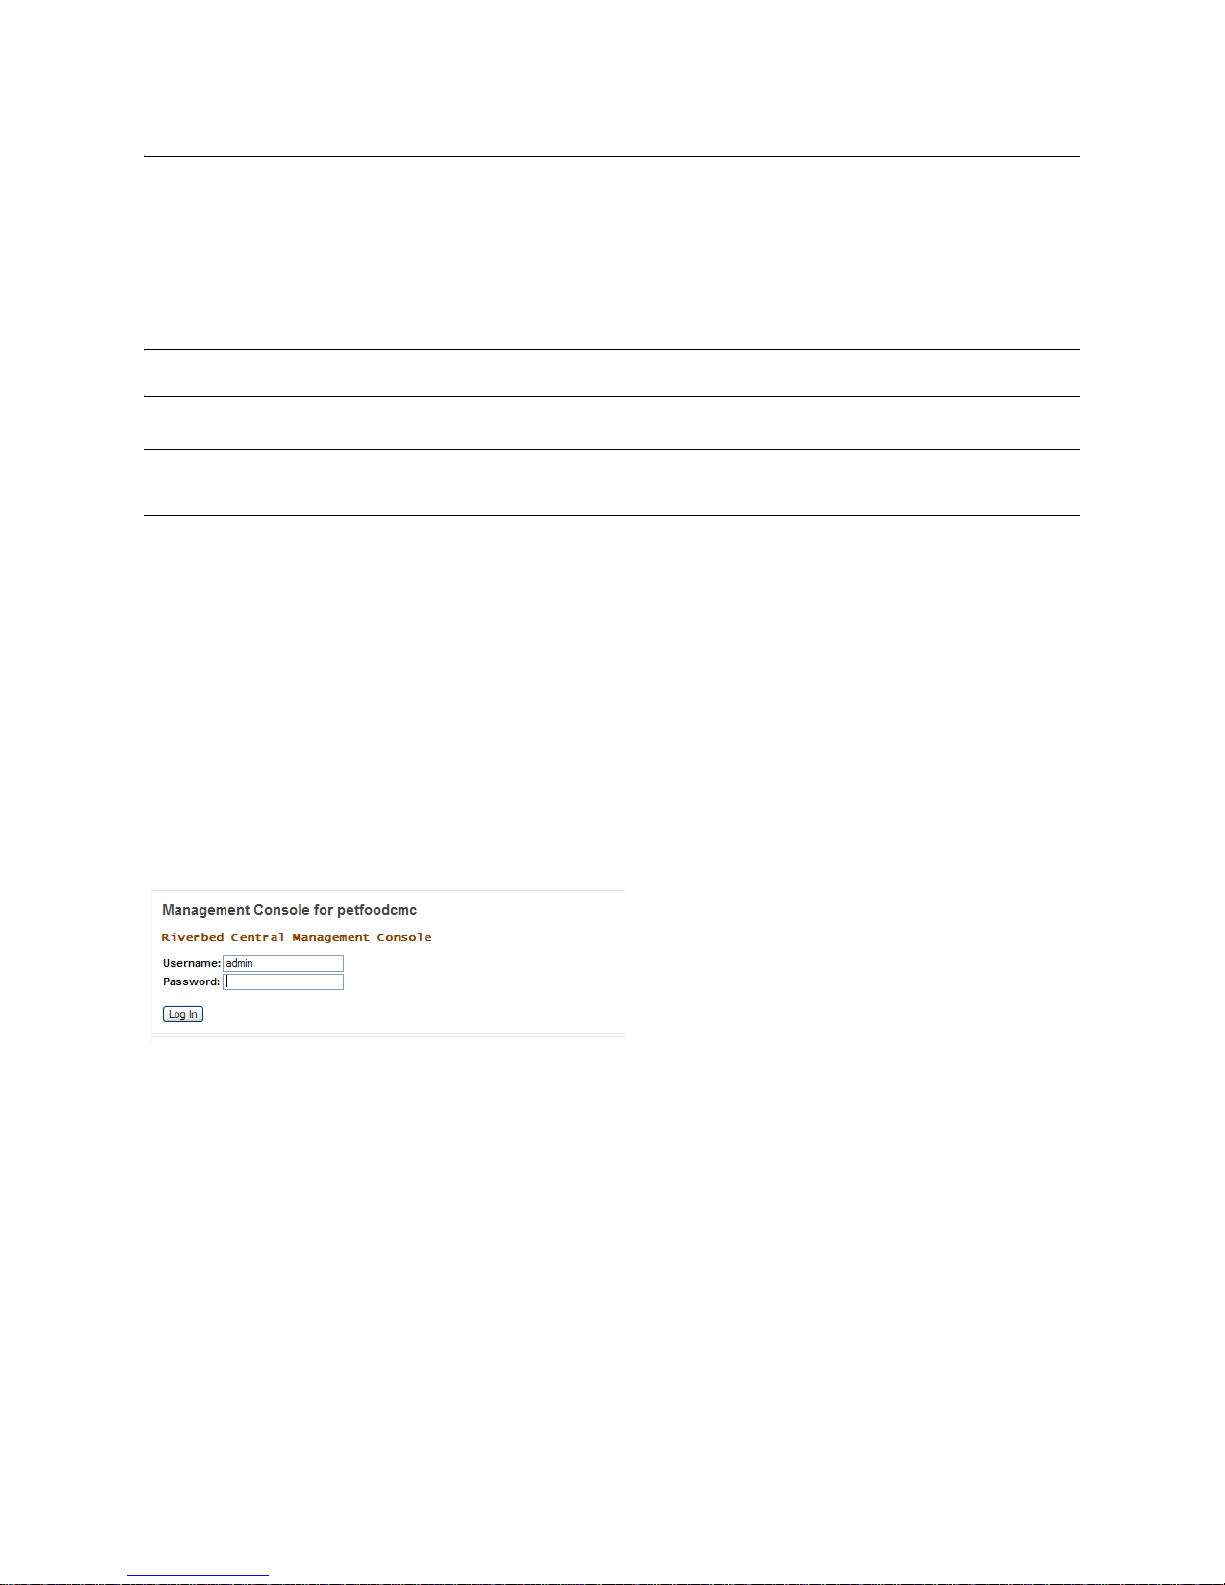
The CMC graphical user interface appears, displaying the Login page.
Figure 2-4. Login Page
2. In the Account text box, the default account admin appears.
You must specify the account admin when you first log in.
Optionally, at a later time, you can configure the monitor user name, RADIUS users, or TACACS+
users. For details, see the Steelhead Central Management Console User’s Guide.
3. In the Password text box, type the password you assigned in the CMC configuration wizard.
4. Click Login to log in and display the Home: Welcome page.
Steelhead Central Management Console Installation Guide
23
Page 24

Installing the CMC Logging in to the CMC
24 Steelhead Central Management Console Installation Guide
Page 25

Index
A
Appliance, connecting to 19
Appliance, connecting your network 22
Appliance, logging in 23
Appliance, overview of 11
B
Back panel, Model 8000 14
C
CMC compatibility 7
Configuration checklist 18
Configuration wizard, completing 20
Configuration, initial 20
Connections, verifying 22
D
Documentation, contacting 9
E
Environmental specifications 13
Ethernet network compatibility 7
F
Front panel 14
Front panel, Model 8000 14
I
Initial configuration 20
Installing, prerequisites 18
Online notes 8
P
Ports 13
Power, connecting 19
Product inventory 17
Professional services, contacting 9
R
Release notes 8
S
SNMP compatibility 7
Specifications, physical and power 12
Status lights 13
T
Technical support, contacting 9
U
Upgrade instructions 12
K
Known issues 8
M
Model 8000, back panel 14
Model 8000, front panel 14
Model 8150, front and back panel 14
Model 8150, status lights 14
N
Network, connecting to your 22
O
Online documentation 8
Steelhead Central Management Console Installation Guide 25
Page 26

Index
26 Steelhead Central Management Console Installation Guide
 Loading...