

Page 1
S12P
Electric Skillet
Owner’s Guide
READ AND SAVE THESE INSTRUCTIONS
Page 2

-2-
IMPORTANT SAFEGUARDS
When using electrical appliances, basic safety precautions should always
be followed, including the following:
1. Read all instructions before using.
2. Be sure that handles are assembled and fastened properly before
using this appliance. See assembly instructions on page 4.
3. Do not touch hot surfaces. Use HANDLES or KNOBS.
4. To protect against electrical shock, do not immerse CORD, PLUG,
or TEMPERATURE CONTROL PROBE in water or other liquid.
5. Close supervision is necessary when any appliance is used near
children. This appliance is not to be used by children.
6. Unplug from outlet when not in use and before cleaning. Allow to
cool before putting on or taking off parts, and before cleaning.
7. Do not operate any appliance with a damaged CORD or PLUG or
after the appliance malfunctions or has been damaged in any
manner. Return appliance to Rival®(see warranty) for examination,
repair, or adjustment.
8. The use of accessory attachments not recommended by Rival
®
may
cause injuries.
9. Do not use outdoors.
10. Do not let CORD hang over edge of table or counter, or touch
heated surfaces.
11. Do not place on or near a hot gas or electric burner, or in a heated
oven.
12. Extreme caution must be used when moving an appliance containing
hot oil or other hot liquids.
13. Always attach TEMPERATURE CONTROL PROBE to appliance first,
then plug cord into the wall outlet. To disconnect, turn TEMPERATURE CONTROL DIAL to “OFF”, then remove plug from wall outlet.
14. Do not use appliance for other than intended use.
Page 3
SAVE THESE INSTRUCTIONS
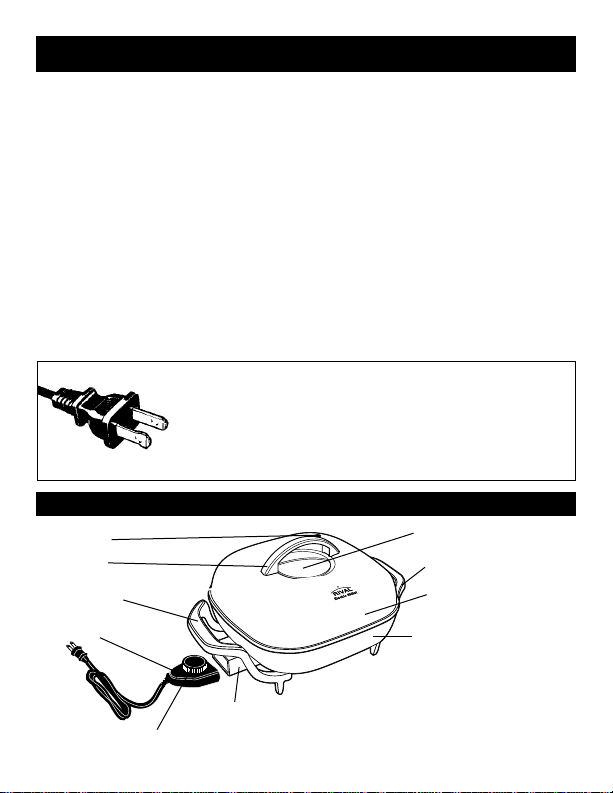
KNOW YOUR ELECTRIC SKILLET
This appliance has a polarized plug (one blade is wider than the
other). As a safety feature, this plug will fit in a polarized outlet
only one way. If the plug does not fit fully in the outlet, reverse
the plug. If it still does not fit, contact a qualified electrician. Do not
attempt to defeat this safety feature.
POLARIZED PLUG
steam vent
lid handle
view window
non-stick surface on pan
(inside and outside)
lid
This appliance is for HOUSEHOLD USE ONLY. No user-serviceable parts
inside. Power Unit never needs lubrication. Do not attempt to service this
product.
A short power-supply cord is provided to reduce the hazards resulting from
entanglement or tripping over a longer cord. AN EXTENSION CORD MAY BE
USED WITH CARE; HOWEVER, THE MARKED ELECTRICAL RATING
SHOULD BE AT LEAST AS GREAT AS THE ELECTRICAL RATING OF THE
SKILLET. The extension cord should not be allowed to drape over the counter
or tabletop where it can be pulled on by children or unintentially tripped over.
KEEP WARM SETTING: The TEMPERATURE CONTROL PROBE has a
“Keep Warm” range setting of approximately 160° to 180° F. The indicator light
will cycle on and off when this setting is maintaining the desired temperature.
NOTE: During initial use of this appliance, some slight smoke and/or odor may
be detected. This is normal with many heating appliances and will not recur
after a few uses. Only use with Temperature Control Probe number MPTC-5.
side handle/leg
-3-
NOTE: Do not operate skillet prior to
assembly of LID HANDLE and SIDE
HANDLES/LEGS.
temperature
control probe
temperature
control dial
probe guard
side handle/leg
Page 4

-4-
Remove all parts from the packaging.
ASSEMBLING LID HANDLE
1. Find lid and lid handle.
2. Holding LID HANDLE on the outside
top of LID, align holes in lid handle
into holes located on the outside of
the lid. Handle should be centered
over glass in the lid.
3. Place the phillips head screws
through screw holes on the inside
of the lid (2 places).
4. Tighten screws until snug. Screws
should be seated flush against lid
surface. The lid is now ready for use.
ASSEMBLING SIDE HANDLES/LEGS
1. Place pan upside down on table.
2. Find one SIDE HANDLE/LEG and mount on the pan side where the probe
connects to the pan.
3. Align screw holes in SIDE HANDLE/LEG over the screw posts on pan
(2 places per handle).
4. Insert screws (2 per handle) through holes in bottom of SIDE HANDLE/LEG
and align screws in holes in the pan.
5. Tighten screws with a screwdriver until snug. Screws should be seated
flush against handle.
6. Repeat steps 3 through 5 with the other SIDE HANDLE/LEG.
7. Once both handles are tightened securely, place skillet upright onto its
legs. Assembly is complete.
CAUTION: Do not operate skillet prior to assembly of SIDE HANDLES/LEGS
and LID HANDLE.
IMPORTANT
Check the side handles/legs of your skillet periodically for looseness. If needed,
re-tighten with a screwdriver. CAUTION: Overtightening can result in stripping
of screws or cracking of handles and base.
HOW TO ASSEMBLE YOUR ELECTRIC SKILLET
RIVAL
E
l
e
c
t
r
i
c
S
k
i
l
l
e
t
Page 5

-5-
BEFORE FIRST USE
• Wash the BASE and LID in warm soapy water. Rinse and dry thoroughly.
CAUTION: Do not wash or immerse TEMPERATURE CONTROL PROBE.
• Before using the skillet for the first time, condition the non-stick cooking
surface by lightly brushing the cooking surface with vegetable oil. Heat,
uncovered, to 300° F. Turn to “OFF” and cool completely. Wipe away
excess oil.
USING YOUR ELECTRIC SKILLET
1. Set the skillet on a flat, dry, heat resistant surface.
2. Set TEMPERATURE CONTROL DIAL to “OFF” and plug TEMPERATURE
CONTROL PROBE into PROBE GUARD on skillet. Plug cord into 120 volt AC
outlet.
3. Turn TEMPERATURE CONTROL DIAL to desired temperature. Indicator light
will go off when selected temperature is reached. NOTE: The cooking
temperatures listed in this Owner‘s Guide are estimates. Adjust the cooking
temperature slightly up or down to acheive the results you prefer.
4. Place food in skillet and cook according to Temperature Guide or your
favorite recipe. Adjust temperature according to personal preference and
type of food prepared.
5. Use the LID and close the steam vent when a moist-heat cooking method is
desired, as for roasting, braising or steaming. When a drier heat is preferred,
you may wish to open the steam vent during the last 10 to 15 minutes of
cooking. CAUTION: Escaping steam is hot! To avoid escaping steam, lift LID
away from you. CAUTION: Skillet is hot! Use hot pads or oven mitts.
6. After food is cooked, set the TEMPERATURE CONTROL DIAL to “WARM”
until ready to serve, or to “OFF” if food is removed immediately.
7. After cooking, turn TEMPERATURE CONTROL DIAL to “OFF”. Unplug CORD
from wall outlet. After skillet has cooled, remove TEMPERATURE CONTROL
PROBE. CAUTION: TEMPERATURE CONTROL PROBE may be hot.
HOW TO USE YOUR ELECTRIC SKILLET
Page 6

-6-
HOW TO CLEAN YOUR ELECTRIC SKILLET
1. After skillet has cooled, remove TEMPERATURE CONTROL PROBE (make sure
that it is unplugged from outlet). CAUTION: Do not immerse TEMPERATURE
CONTROL PROBE in water or other liquids. TEMPERATURE CONTROL PROBE
may be cleaned by wiping with a damp cloth. CAUTION: Always make sure
that PROBE GUARD and TEMPERATURE CONTROL PROBE are completely dry
prior to use.
2. Wash LID in hot soapy water, then rinse thoroughly and dry.
3. Thoroughly wash skillet in hot soapy water, then rinse thoroughly and dry.
NOTE: To remove stubborn stains from skillet or LID, use a non-abrasive cleaner
such as Bon-Ami
®
polishing cleanser. CAUTION: Do not use metal scouring
pads or harsh abrasive powders.
4. In time, the non-stick COOKING SURFACE may discolor. This is normal and will
not alter its non-stick properties. To remove any discoloration, use a commercial
cleaner for non-stick finishes such as Dip-It
®
coffeepot destainer. Follow package
directions. Recondition the non-stick COOKING SURFACE before using again.
HINTS
• Use only nylon or heat-proof plastic utensils. Metal utensils may scratch the
non-stick surface.
• This skillet is not designed to deep fry. To pan-fry, do not use more than
1 cup of oil. Select a vegetable oil or peanut oil for frying. Butter and
olive oil should only be used to saute foods on a lower temperature setting.
• When preparing foods not listed in Temperature Guide, start with a low
temperature and work up to desired cooking temperature.
• If cooking surface has been conditioned (see above), there is no need for
additional cooking oils or fats when cooking. A small amount of butter,
shortening or oil will however, add flavor and aid in even browning.
IMPORTANT POINTS
• To avoid scratching the non-stick COOKING SURFACE, use only plastic, nylon
or wooden utensils. Metals utensils such as metal spatulas or knives can
scratch the non-stick COOKING SURFACE and can cause permanent damage.
• CAUTION: Do not immerse TEMPERATURE CONTROL PROBE or CORD in
water or other liquids.
• Use skillet only on heat-resistant surfaces.
Page 7

-7-
TEMPERATURE GUIDE
BURGERS 1/4 lb. 3 to 9 minutes/per side (medium) 300°F
STEAK 1" thick, boneless 9 to 12 minutes/per side 300°F
CHICKEN boneless breasts 6 to 7 minutes/per side 300°F
FRENCH TOAST 3 to 5 minutes/per side 325°F
PANCAKES 1 to 3 minutes/per side 300°F
EGGS
Fried 2 to 3 minutes/first side 300°F
1 to 2 minutes/second side
Melt 1 to 2 tsp. butter or
margarine in skillet
Poached 1 to 6 eggs 2 to 3 minutes 250°F or 300°F
Pour 2 cups water and 1 tsp.
cider vinegar in skillet.
Heat to boiling. Break each egg
into a bowl; slip into water.
LID and cook 2 to 3 minutes.
Scrambled 3 to 4 minutes 300°F
Melt 1 to 2 tablespoons butter
or margarine in skillet. Add
eggs, cook, stir gently, until
set and cooked.
BACON 5 minutes/first side 300°F
1 to 3 minutes/second side
SAUSAGE
LINKS 8 to 10 minutes 300°F
SAUSAGE
PATTIES 6 minutes/first side 300°F
5 to 6 minutes/second side
FOOD AMOUNT TIME/DIRECTIONS TEMP.
Page 8

-8-
RECIPES
APPLE NUT PANCAKES
2 tablespoons butter or margarine Dash nutmeg
1
⁄2 cup plus 2 tablespoons all-purpose flour
2
⁄3 cup milk
11⁄2 teaspoons sugar 1 egg
2 teaspoons baking powder
1
⁄2 cup peeled and finely chopped apple
1
⁄4 teaspoon salt 2 tablespoons chopped pecans or walnuts
1
⁄4 teaspoon cinnamon Vegetable oil
Melt butter. Set aside to cool slightly. Combine flour, sugar, baking powder,
salt and spices in a small bowl. Combine melted butter and milk in mixing
bowl. Add egg and beat lightly to combine. Blend in flour mixture, stirring
just until combined. Fold in apple and nuts. Preheat skillet to 350°F. Brush
lightly with oil. Pour about
1
⁄4cup batter for each pancake. Cook until bubbles
come to the surface and the bottom is golden brown, about 2 minutes. Serve
3 warm with maple syrup for breakfast or brunch or top with ice cream, additional nuts and caramel syrup for dessert.
CLASSIC FRENCH TOAST
1 egg, slightly beaten 1 tablespoon butter or margarine
1
⁄3 cup milk 2 slices French bread, sliced 1-inch thick
1
⁄4 teaspoon vanilla extract
Dash nutmeg or cinnamon Confectioner’s sugar
1
⁄2 teaspoon confectioner’s sugar Maple syrup
Combine egg, milk, spice and sugar in shallow pan. Preheat skillet to 350° .
Add butter to skillet. Dip both sides of bread quickly into egg mixture then
place in skillet. Cook 2 to 3 minutes per side or until bread is golden brown.
Dust each piece lightly with confectioner’s sugar and serve with maple syrup.
Page 9

-9-
DENVER OMELET
1
⁄2 cup diced, cooked ham 3 eggs
1
⁄4 cup chopped green bell pepper 2 tablespoons water
1
⁄4 cup sliced fresh mushrooms
1
⁄8 teaspoon salt
1 green onion, sliced Dash cayenne pepper
1 tablespoon butter or margarine
1
⁄3 cup (1-ounce) cheddar cheese, shredded
Set skillet temperature to 300° F. Add ham, green bell pepper, mushrooms,
onions and butter. Saute 2 minutes, stirring frequently. Arrange vegetables in
an even layer. Lightly beat eggs with water, salt and cayenne pepper; pour
egg mixture over ham and vegetables. Cover and cook 4 minutes or until
eggs are set. Sprinkle with cheese, cover and cook additional 2 minutes. To
serve, slice omelet in half then gently fold each part in half. Lift omelets from
skillet with a wide spatula.
HAM AND EGG FAVORITE
1 tablespoon butter or margarine 2 eggs
1
⁄4 cup chopped onion
1
⁄2 cup chopped cooked ham
2 tablespoons all-purpose flour
1
⁄2 cup chopped fresh spinach
1
⁄4 cup milk
3
⁄4 cup (3-ounces) Swiss cheese, shredded
Set skillet temperature to 300° F. Add butter and melt. Add onions and saute
until onions are tender, about 2 minutes, remove onion from skillet and set
aside. Combine flour, milk and eggs; beat lightly to blend. Pour egg mixture
into pan. Cover and cook 2 minutes. Arrange ham, spinach and cooked
onions evenly over eggs. Sprinkle cheese evenly over top. Cover and cook
additional 2 minutes. Gently cut into four pie-shaped wedges. Lift each wedge
onto serving plate.
CHEESE AND BACON POTATOES
6 slices bacon
1
⁄4 cup onion, finely chopped
4 large potatoes, thinly sliced with skins on 11⁄2 cup (6-ounces) cheddar cheese, shredded
1 can (4-ounces) chopped green chilies
Place bacon in cold skillet. Turn temperature control dial to 350° F. Fry bacon
until crisp, remove and drain. Carefully remove grease, reserving 2 tablespoons bacon grease in skillet. Add potatoes to skillet; cover and cook 10
minutes. Turn potatoes and cook an additional 5 minutes. Crumble bacon and
combine with green chilies and onion. Sprinkle over potatoes. Top with
cheese; cover and cook 5 more minutes.
Page 10

-10-
PASTA WITH PEPPERS AND CHICKEN
1 clove garlic, minced Pinch ground red pepper
1 tablespoon olive oil Salt and ground black pepper to taste
1 whole boneless, skinless chicken breast, 11⁄2 teaspoons cornstarch
cut into 1⁄2-inch x 2-inch strips
3
⁄4 cup chicken broth
1 cup sliced red, green or yellow bell pepper 4-ounces linguine or fettuccine, cooked
(or combination) and drained
1
⁄2 teaspoon basil
Set skillet temperature to 350° F. Add garlic and oil and saute 2 minutes. Add
chicken; cook and stir for 5 minutes. Stir in bell peppers and allow to cook
additional 2 minutes or until vegetables are crisp tender and chicken is done.
Reduce temperature to 250° F. Blend seasonings and cornstarch into chicken
broth, stirring until well blended. Pour broth mixture into skillet. Heat, stirring
gently, 1 minutes or until mixture is hot and thickened. Serve over past.
Makes 2 servings.
EASY BEEF FAJITAS
juice of 2 limes
1
⁄2 green or red bell pepper, thinly sliced
2 tablespoons olive oil 4 flour tortillas
1
⁄2 teaspoons ground cumin
1
⁄2 cup (2-ounces) monterey jack
1
⁄4 teaspoon salt or cheddar cheese, shredded
1 clove garlic, minced guacamole, optional
1
⁄8 teaspoon red pepper flakes salsa, optional
freshly ground black pepper, to taste sour cream, optional
3
⁄4-lb. top round steak, thinly sliced chopped tomatoes, optional
1 small onion, thinly sliced
Combine lime juice, 1 tablespoon olive oil, cumin, salt, garlic, red pepper and
black pepper in glass bowl. Add beef and allow to stand, at room temperature, 30 minutes. Set skillet temperature to 350° F. Add remaining 1 tablespoon olive oil, onion and green/red bell pepper and stir gently. Cover and
cook 1 to 2 minutes or until vegetables are tender. Remove vegetables and
keep warm. Drain meat, discard marinade and place meat in skillet, Saute
meat 7 to 9 minutes or until done. Meanwhile, wrap tortillas in aluminum foil
and heat in 350° F. oven for 5 minutes. To assemble, spoon about
1
⁄4of meat
and vegetables into center of each warmed tortilla. Sprinkle with 2 tablespoons cheese. Roll tortilla and place on serving plate. Garnish, as desired,
with guacamole, salsa, sour cream and/or chopped tomatoes.
Page 11

-11-
SWISS STEAK
11⁄2-lbs beef round steak, 3⁄4- to 1-inch thick 1 can (8-ounces) tomato sauce
1
⁄4 cup flour 1 onion, sliced
3
⁄4 teaspoon salt 1 stalk celery, sliced
1
⁄4 teaspoon ground black pepper 1 carrot, thinly sliced
2 tablespoons shortening
1
⁄2 teaspoon worcestershire sauce
1 can (141⁄2-ounces) stewed tomatoes, drained
Cut meat into 6 serving-size pieces. Combine flour, salt and pepper. Coat
meat with flour mixture. Add shortening to skillet and preheat to 300° F.
Brown meat on both sides. Carefully drain off excess fat. Add remaining ingredients. Set temperature Control dial to “SIMMER”. Cover and cook over low
heat about 1
1
⁄2hours or until meat is tender. Remove meat from skillet.
Combine
1
⁄4cup cold water and 1 tablespoon flour, add to tomato mixture in
skillet. Cook and stir until thick and bubbly. Serve meat with tomato sauce
spooned over meat.
SHRIMP AND VEGETABLE STIR-FRY
3
⁄4-lb. raw, shrimp, shelled and deveined 1 small sweet red bell pepper, in thin strips
2 tablespoons light soy sauce 1 cup broccoli flowerettes
2 tablespoons dry sherry
1
⁄2 medium onion, thinly sliced
2 teaspoons cornstarch 5 large fresh mushrooms, sliced
1 teaspoon grated gingerroot
1
⁄2 package (3-ounces) frozen snow peas, thawed
1 tablespoon vegetable oil 2 stalks celery, sliced
Place cleaned shrimp in bowl. Combine soy sauce, sherry, cornstarch, and
gingerroot; pour over shrimp. Preheat skillet to 400° F. Add oil to skillet. Stirfry celery, red bell pepper, broccoli and onions for 2 minutes. Add shrimp with
marinade and stir-fry additional 2 minutes or until shrimp turn pink. Add
mushrooms and snow peas. Stir-fry until heated through.
PORK CHOPS WITH SPANISH RICE
2 to 4 center cut pork chops, about 1⁄2-inch thick
1
⁄3 cup raw long grain rice
1
⁄3 cup chopped onion
1
⁄2 teaspoon chili powder
1
⁄4 cup chopped green bell pepper 1 can (141⁄2-ounces) whole tomatoes
Set skillet temperature to 350° F. Add chops and cook on first side 5 minutes.
Turn chops; add onion and green bell pepper. Cook, stirring vegetables occasionally, 2 minutes. Reduce temperature to “WARM”. Add rice, chili powder
and tomatoes and stir to blend into vegetables. Cover and cook 25 to 30
minutes, stirring occasionally.
Page 12

-12-
FISH FILLETS WITH LEMON DILL SAUCE
1/4-lb. fresh mushrooms, sliced 1 tablespoon lemon juice
2 green onions, sliced 1/3 teaspoon dill weed
2 tablespoons butter or margarine 1/4 teaspoon salt
11/2 teaspoons all-purpose flour Dash ground black pepper
1/4 cup milk 1 to 2 orange roughy or other firm fish fillets,
2 tablespoons water (about 8-ounces each)
1 tablespoon white wine 1/4 cup cream, optional
Set skillet temperature to 300° F. Add mushrooms, onions and butter. Saute, stirring frequently, 2 minutes. Add flour; cook, stirring constantly, 1 minutes.
Combine milk and water.
Reduce temperature to “WARM”. Add milk mixture to skillet and cook, stirring
constantly, 1 minutes. Blend in wine, lemon juice and seasonings. Arrange fish
fillets in sauce, spooning sauce over fish. Cover and cook 8 to 10 minutes or until
fish flakes easily with a fork. Lift fish from sauce with a wide spatula.
If not using cream, spoon sauce over fish and serve. If desired, remove fish from
serving platter and keep warm. Blend cream into sauce in skillet. Heat uncovered
1 to 2 minutes. Spoon sauce over fish.
CHICKEN CACCIATORE
2 tablespoons vegetable oil
1
⁄3 cup chopped green bell pepper
3 to 4 pieces chicken (thighs, legs, of halved breasts) 1 can (4-ounces) sliced mushrooms, drained
1
⁄3 cup chopped onion 1 bay leaf
1 clove garlic, minced 1 teaspoon Italian seasoning
1 can (141⁄2-ounces) peeled, diced tomatoes salt and ground black pepper to taste
hot cooked spaghetti or other pasta
Set skillet temperature to 350° F. Add oil. Arrange chicken pieces, skin side-down
in skillet. Cook chicken until well browned on first side, about 5 minutes. Turn
chicken. Add onion and garlic around chicken. Cook 3 minutes, or until onion is
cooked, but not brown. Reduce temperature to ”WARM”. Add remaining ingredients, except spaghetti. Cover and cook 30 to 40 minutes, or until chicken is
cooked. Stir sauce and spoon over chicken occasionally. Serve chicken and sauce
over spaghetti or other pasta.
Page 13

-13-
STIR-FRY BEEF AND BROCCOLI
1
⁄2 to 3⁄4-lb. top round or sirloin
1
⁄4 teaspoon sugar
1 clove garlic, minced salt to taste
dash ground ginger 2 tablespoons sesame or peanut oil
2 tablespoons soy sauce, divided
3
⁄4 cup broccoli flowerettes
2 tablespoons dry sherry, divided 1 to 2 medium carrots, bias sliced
1
⁄2 cup beef broth
1
⁄2 onion, sliced in thin wedges
11⁄2 teaspoons cornstarch Hot cooked rice
Slice beef into very thin slices and place in glass bowl. (Partially freeze beef for
30 to 60 minutes to make beef easier to slice.) Add garlic, ginger, 1 tablespoon soy sauce and 1 tablespoon sherry. Toss to coat. Allow beef to stand, at
room temperature for 30 minutes.
Combine remaining soy sauce and sherry with broth, cornstarch, sugar and
salt; set aside. Set skillet temperature to 350° F. Add oil and heat 1 minutes.
Drain meat, discarding marinade and add meat to skillet. Stir fry 7 to 9
minutes or until beef is done. Remove meat and keep warm. Add vegetables.
Cover and cook 3 minutes or until vegetables are crisp tender. Stir mid-way
through cooking. Reduce temperature to 250° F. Blend meat into vegetables.
Stir broth mixture then pour over meat and vegetables. Heat, stirring, until
broth is hot and thickened. Serve over rice.
STEAK AU POIVRE
2 teaspoons black peppercorns or mixture 1 tablespoon butter or margarine
of black, green and pink peppercorns 1 green onion, sliced
1
⁄2 to 3⁄4-lb. boneless steak, (1 strip or sirloin steak) 3 tablespoons bourbon or beef broth
3 tablespoons water
Place peppercorns in plastic bag. Crack peppercorns with rolling pin or mallet.
Press cracked peppercorns evenly over both sides of steak. Set aside. Set skillet
temperature to 300° F. Add steak and cook, 7 minutes per side for mediumrare, or until desired doneness. Remove steak from skillet and keep warm.
Add butter and green onion. Saute, stirring for 1 minute. Combine
bourbon/beef broth and water; pour over green onions. Allow to cook, stirring constantly, about 2 minutes or until sauce has thickened slightly. Cut
steak into serving portions. Return steak to skillet and spoon sauce over meat.
Heat 1 minutes. Serve steaks with sauce spooned over meat.
Page 14

©2001, Rival
A Division of The Holmes Group
Printed in China S12P/428-0120
LIMITED ONE-YEAR WARRANTY
Rival®warrants this product to be free from defects in materials or workmanship for one (1) year from date of
original purchase. If you have a claim under this warranty please follow these procedures:
1) Within the first 45 days from date of original purchase, defective product should be returned to original
place of purchase for replacement (with proof-of-purchase).
2) Within the first 12 months from date of purchase Rival will repair or replace (at no charge) the defective
product if it is delivered freight prepaid during that period to an authorized service station. To obtain warranty
service visit:
www.rivalproducts.com
Or, you may write to Rival c/o The Holmes Group, attention: Customer Service Department, P.O. Box 769,
Milford, MA 01757. Proof of purchase is required when requesting warranty service - SAVE YOUR SALES
RECEIPT. This warranty is extended only to the original purchaser and does not apply to commercial use,
unreasonable use, or to damage to the product (not resulting from defect or malfunction) while in the possession of the consumer. Rival disclaims all responsibility for consequential, incidental, or commercial losses
caused by the use of this product. Some states do not allow this exclusion or limitation of incidental or consequential losses, so the foregoing disclaimer may not apply to you. This warranty gives you specific legal
rights, and you may also have other legal rights which vary from state to state.
 Loading...