

Page 1
TABLE OF CONTENTS
Page 2

We truly appreciate that you have chosen the RIVA S for your listening experience. Many days
and months have gone into designing this product in the hope that you will have as much
pleasure listening to it as we had creating it!
The RIVA Team
Fountain Valley, California
TABLE OF CONTENTS
Page 3
CONTENTS
REGISTER YOUR RIVA
Warranty Coverage Registration
GETTING STARTED
Power On/O
CONNECTION
Connect Your Devices
RIVA Audio
Mobile App
TRILLIUM™ SURROUND
Movie & Gaming
CALL ME
Speakerphone
CHARGE OUT
Charge Your Phone/Tablet
VINYL JUNKIES WANTED
Phono Mode
TAKE CONTROL
Controls
HOOK UPS
Inputs
THE MINERALS
Tech Specs & What’s Included
MAXIMIZE YOUR PLACEMENT
For Immersive Sound
RIVA S TIPS
Usage & Care Tips
Q & A
Troubleshooting
ADDITIONAL SUPPORT
Online Resources/Reference
COMPLIANCE
EU Countries
FCC and IC (USA & Canada Only)
PLAY SAFE
Safety Guidelines
LEGAL
Disclaimers
32
31
22
20-21
8
2
4
5
6
18-19
17
13
RIVA S SHORTCUTS
Button Controls
14-15
GET THIS PARTY STARTED
Party/Multi-User Mode
12
DIVIDE & CONQUER
TrueWireless™
11
10
9
30
29
27
25-26
23
1
Page 4

Register your RIVA S for warranty coverage and to receive VIP access
to RIVA Nation!
Be sure to have your RIVA S serial number, located on the bottom of the RIVA S unit or
on the side of the unit’s box.
Register online at:
www.rivaaudio.com/registeration
REGISTER YOUR RIVA:
Warranty Coverage Registration
2
TABLE OF CONTENTS
Page 5

START ME UP!
rivaaudio.com/support
3
TABLE OF CONTENTS
Page 6
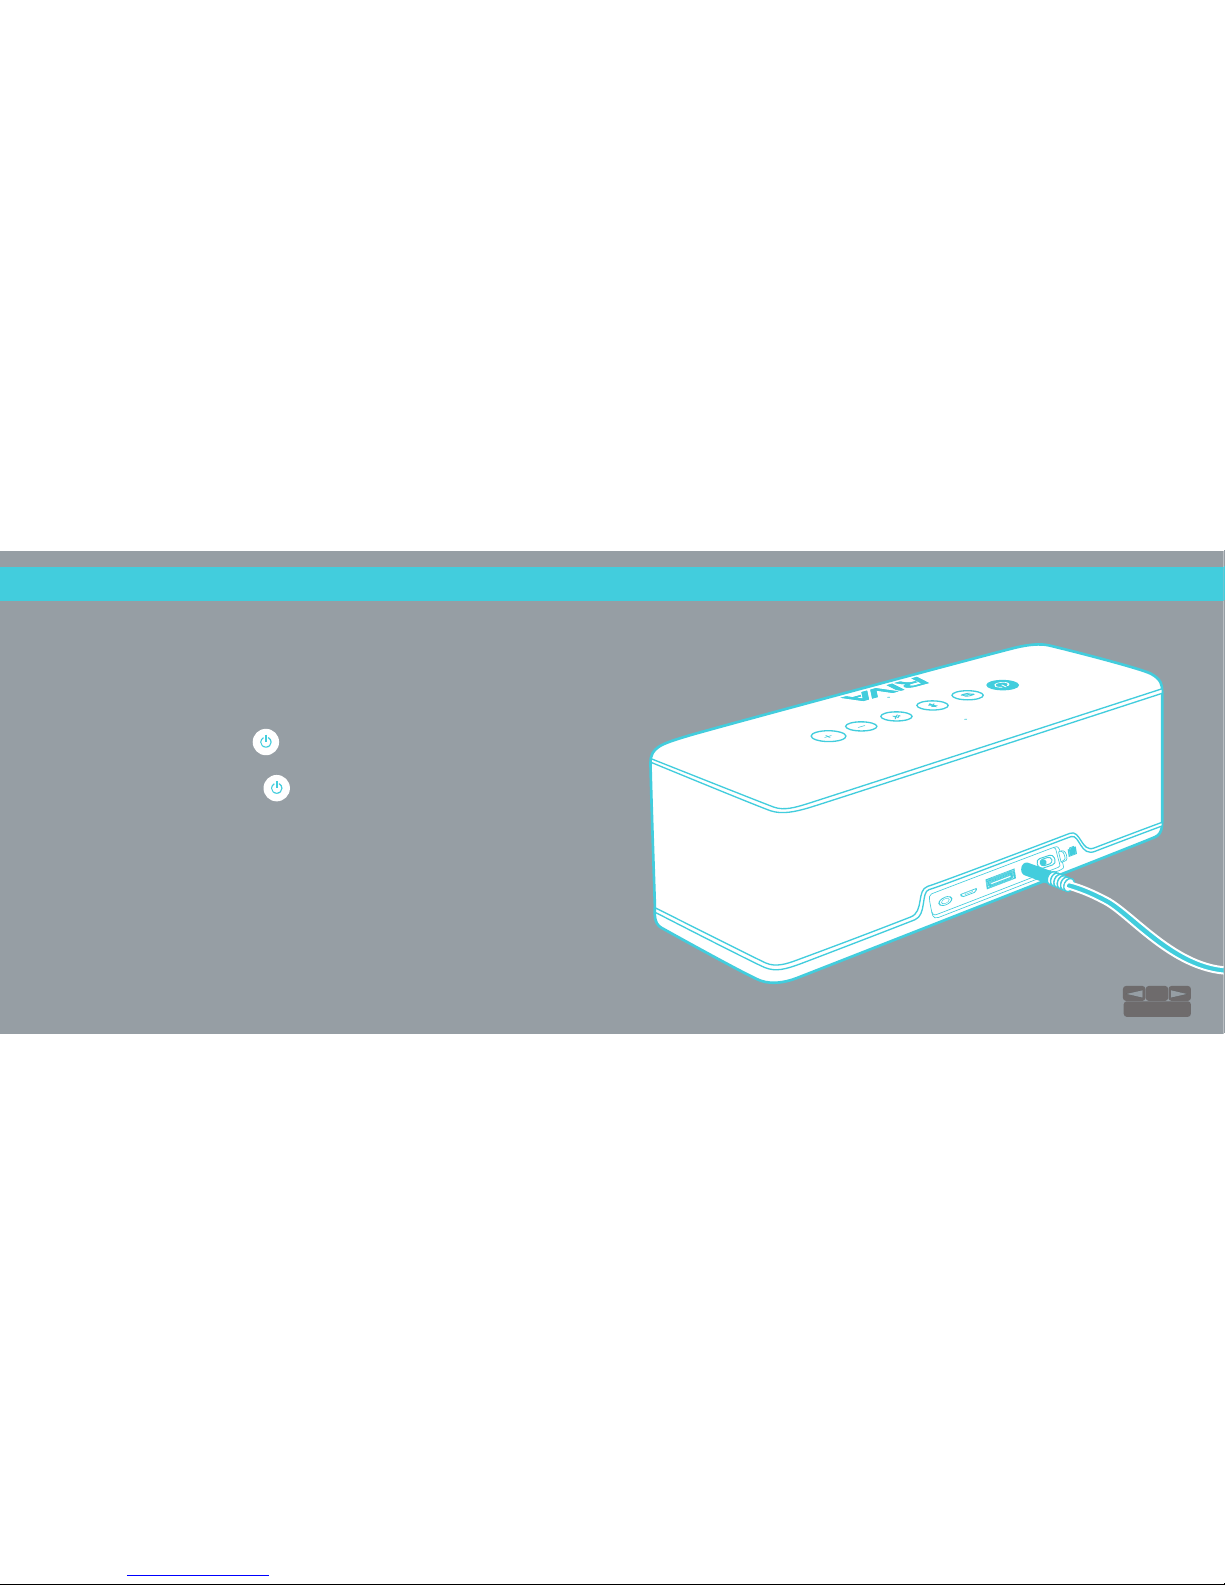
GETTING STARTED:
Power On / O
1. On the back of the RIVA S, slide the BATT ON/OFF switch to
ON to engage the battery.
2. Power On: Tap the to turn ON.
3. Power O: Hold the to turn OFF.
NOTE: We recommend you play RIVA S for 3 hours at 50% volume to “break in” the speakers
for maximum acoustic performance.
1. RIVA S is partially charged out of the box. Plug in immediately with the
power adapter to charge to 100%. The Battery icon LED will appear steady
and a voice prompt will announce when the battery is fully charged.
When on the GO
4
TABLE OF CONTENTS
Page 7
●
Bluetooth® Device
●
Non-Bluetooth® Device
●
Using the included 3.5 mm or red/white RCA cables, connect the output on
your non-Bluetooth® device to the Aux input on the RIVA S.
●
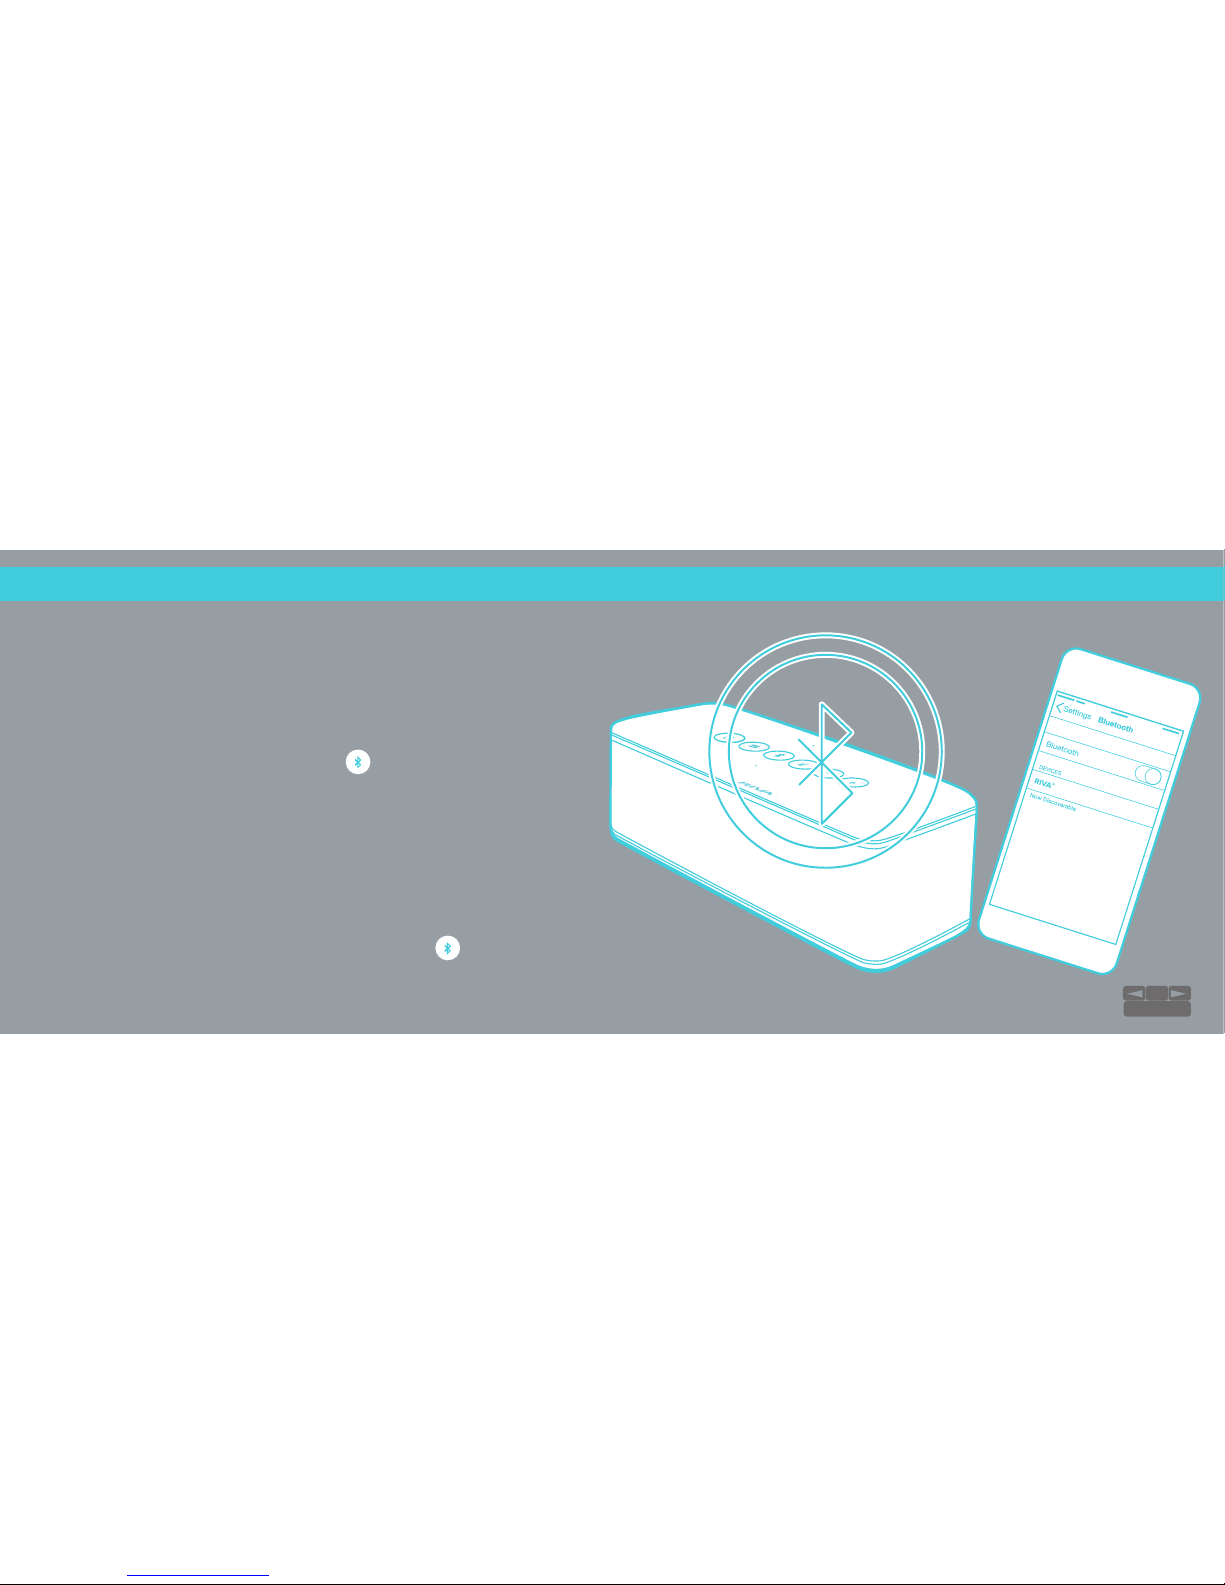
To pair a new device, hold down the to discover your device. The
Bluetooth® icon will pulse blue when pairing and stay solid once paired.
●
When you first turn your RIVA S on, it will automatically go into
discovery/pairing mode to connect to a Bluetooth® device.
●
The unit will appear on your device as RIVA S along with a unique MAC
address. Once paired, you can begin playing.
●
Bluetooth® takes priority, so please pause your Bluetooth® source. The RIVA S
will automatically switch to the Aux input and the will turn green.
NOTE: Please see the Play Safe page for additional safety guidelines.
CONNECTION:
Connect Your Devices
S 9A84F6
5
TABLE OF CONTENTS
Page 8
●
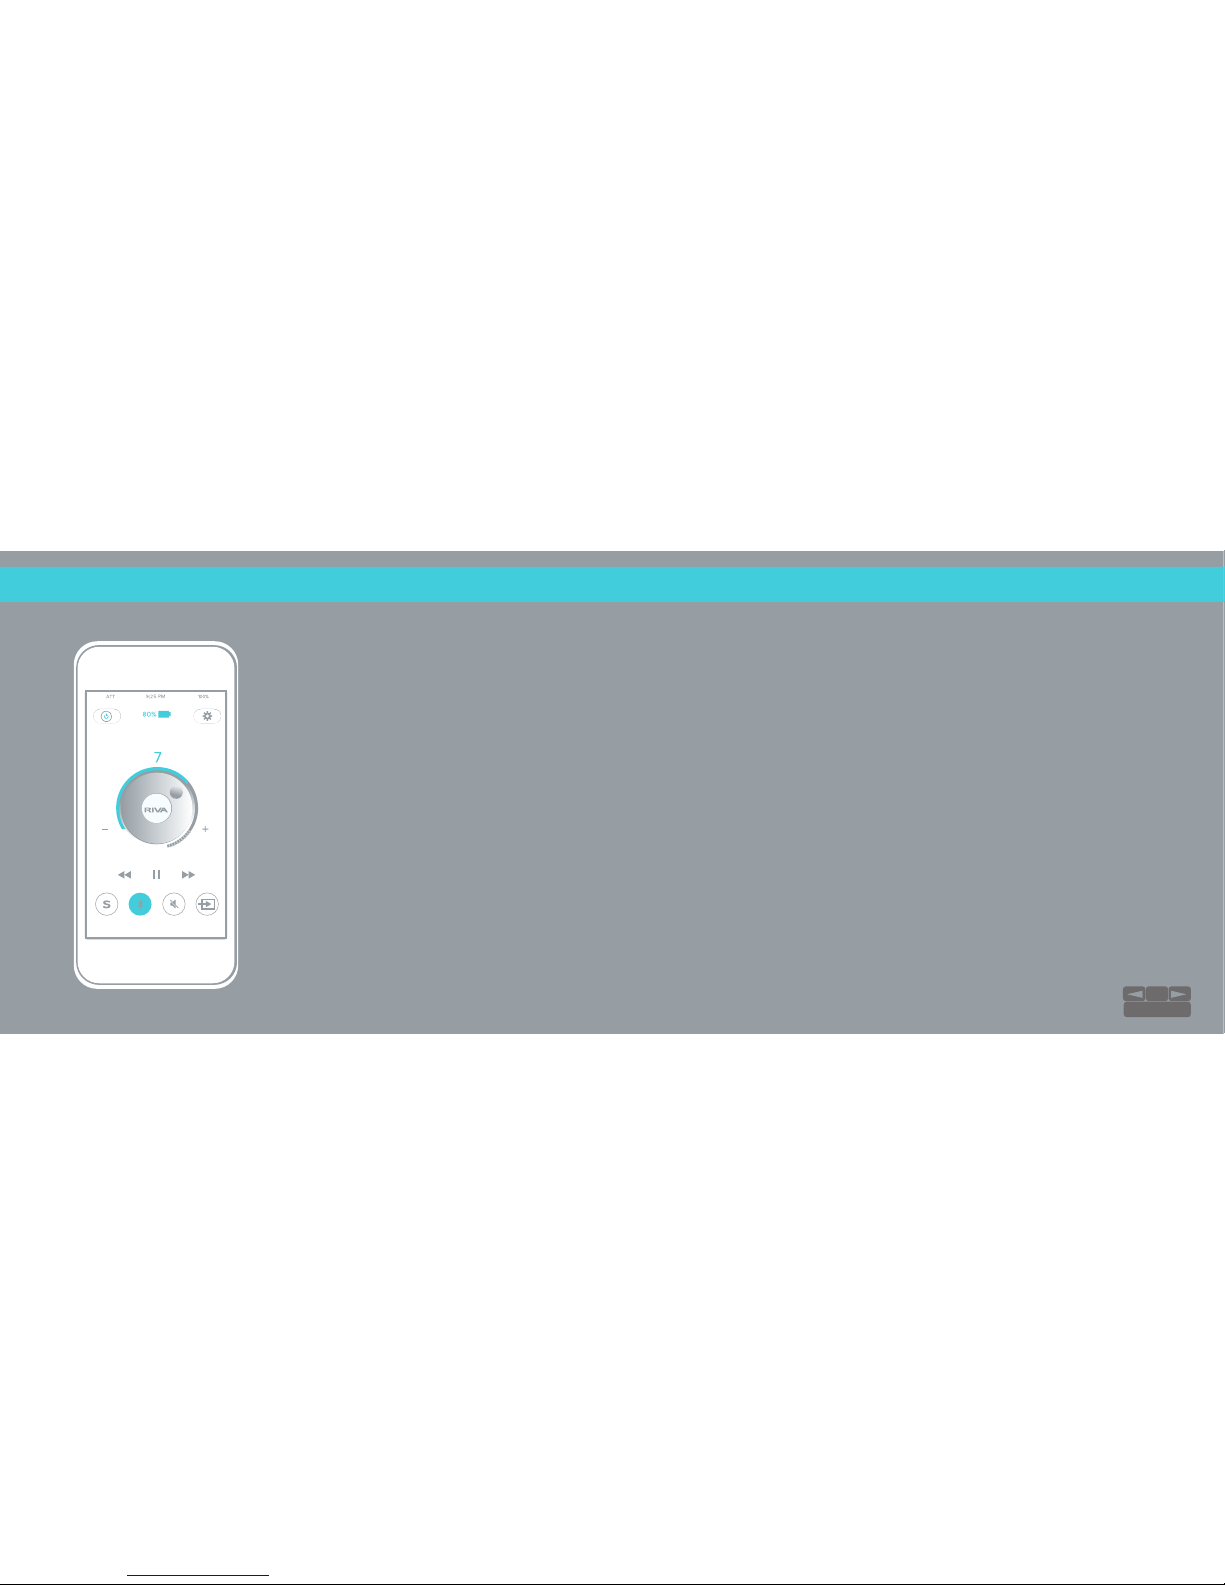
Manage audio prompts – Voice, tones and silent modes available.
●
Control Trillium™ Surround mode.
●
Monitor battery life.
●
Change app background color.
●
Control volume up, down and mute.
●
Power On/O your RIVA S
●
Select app and speaker language
• Control all of the features on your RIVA S directly from your phone or tablet for iOS or Android™!
Download the free RIVA AUDIO app from the App Store or Google Play. ™
●
RIVA is constantly developing software with the latest technologies to improve your experience. Visit
rivaaudio.com/support for the latest information.
RIVA Audio App:
Mobile App
Volume
6
TABLE OF CONTENTS
Page 9

PLAY ME!
rivaaudio.com/support
7
TABLE OF CONTENTS
Page 10
TRILLIUM® SURROUND:
Movie & Gaming Surround Sound
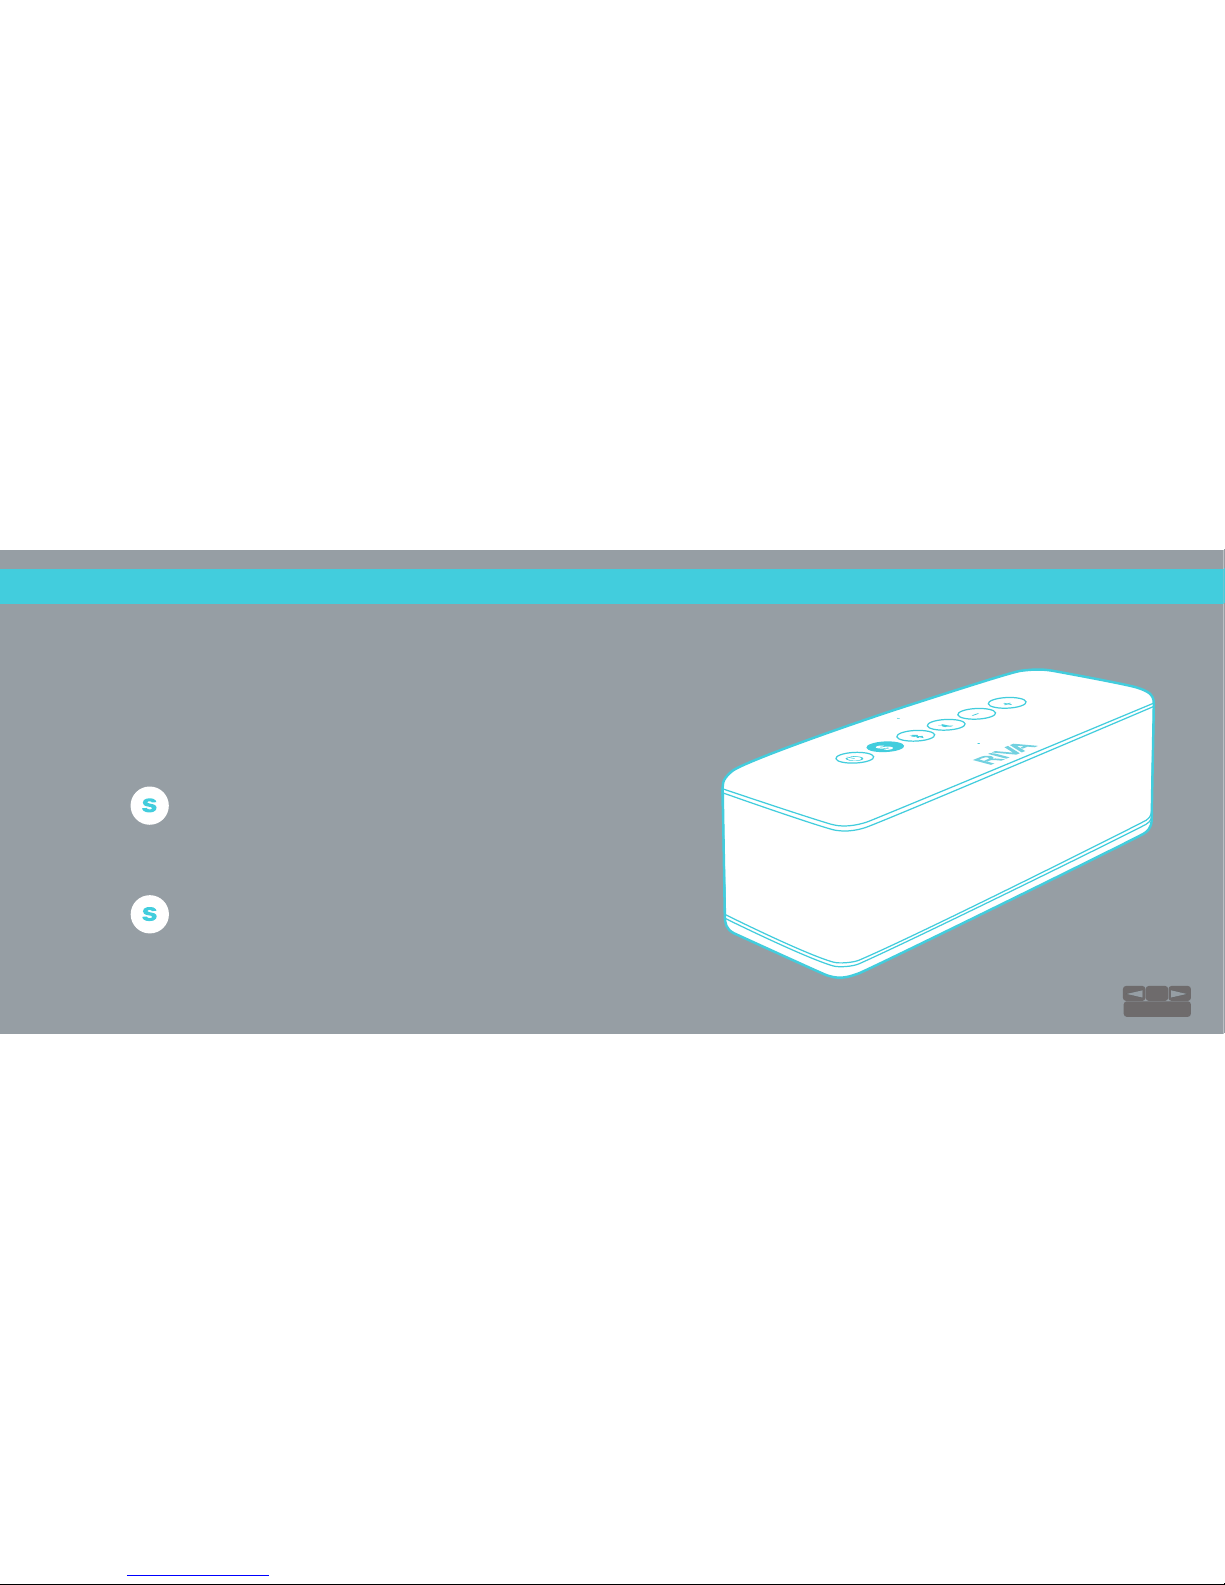
Trillium™ Surround enhances your audio visual experience while playing movies or
video games through your RIVA S.
Tap the button to activate. The Surround icon will remain lit when
Surround is active.
Tap the button to turn o Surround.
8
TABLE OF CONTENTS
Page 11
CALL ME:
Speakerphone
●
Outbound Call:
●
Make sure your device is paired with the RIVA S via Bluetooth®.
●
Place the call using your device and make sure RIVA S is selected as
the audio output.
●
Decline/End Call:
●
To decline or end a call, tap the or directly from your device.
●
RIVA S will return to the settings used prior to the call.
●
For Best Clarity:
●
Speak directly toward the RIVA S speaker.
●
Do not obstruct or cover the microphone openings.
●
Incoming Call:
●
When connected to your RIVA S via Bluetooth®, incoming calls will ring
through your RIVA S.
●
Accept the call by tapping the or directly from your device. Make sure
RIVA S is selected as the audio output.
9
TABLE OF CONTENTS
Page 12
CHARGE OUT:
Charge your Phone / Tablet
●
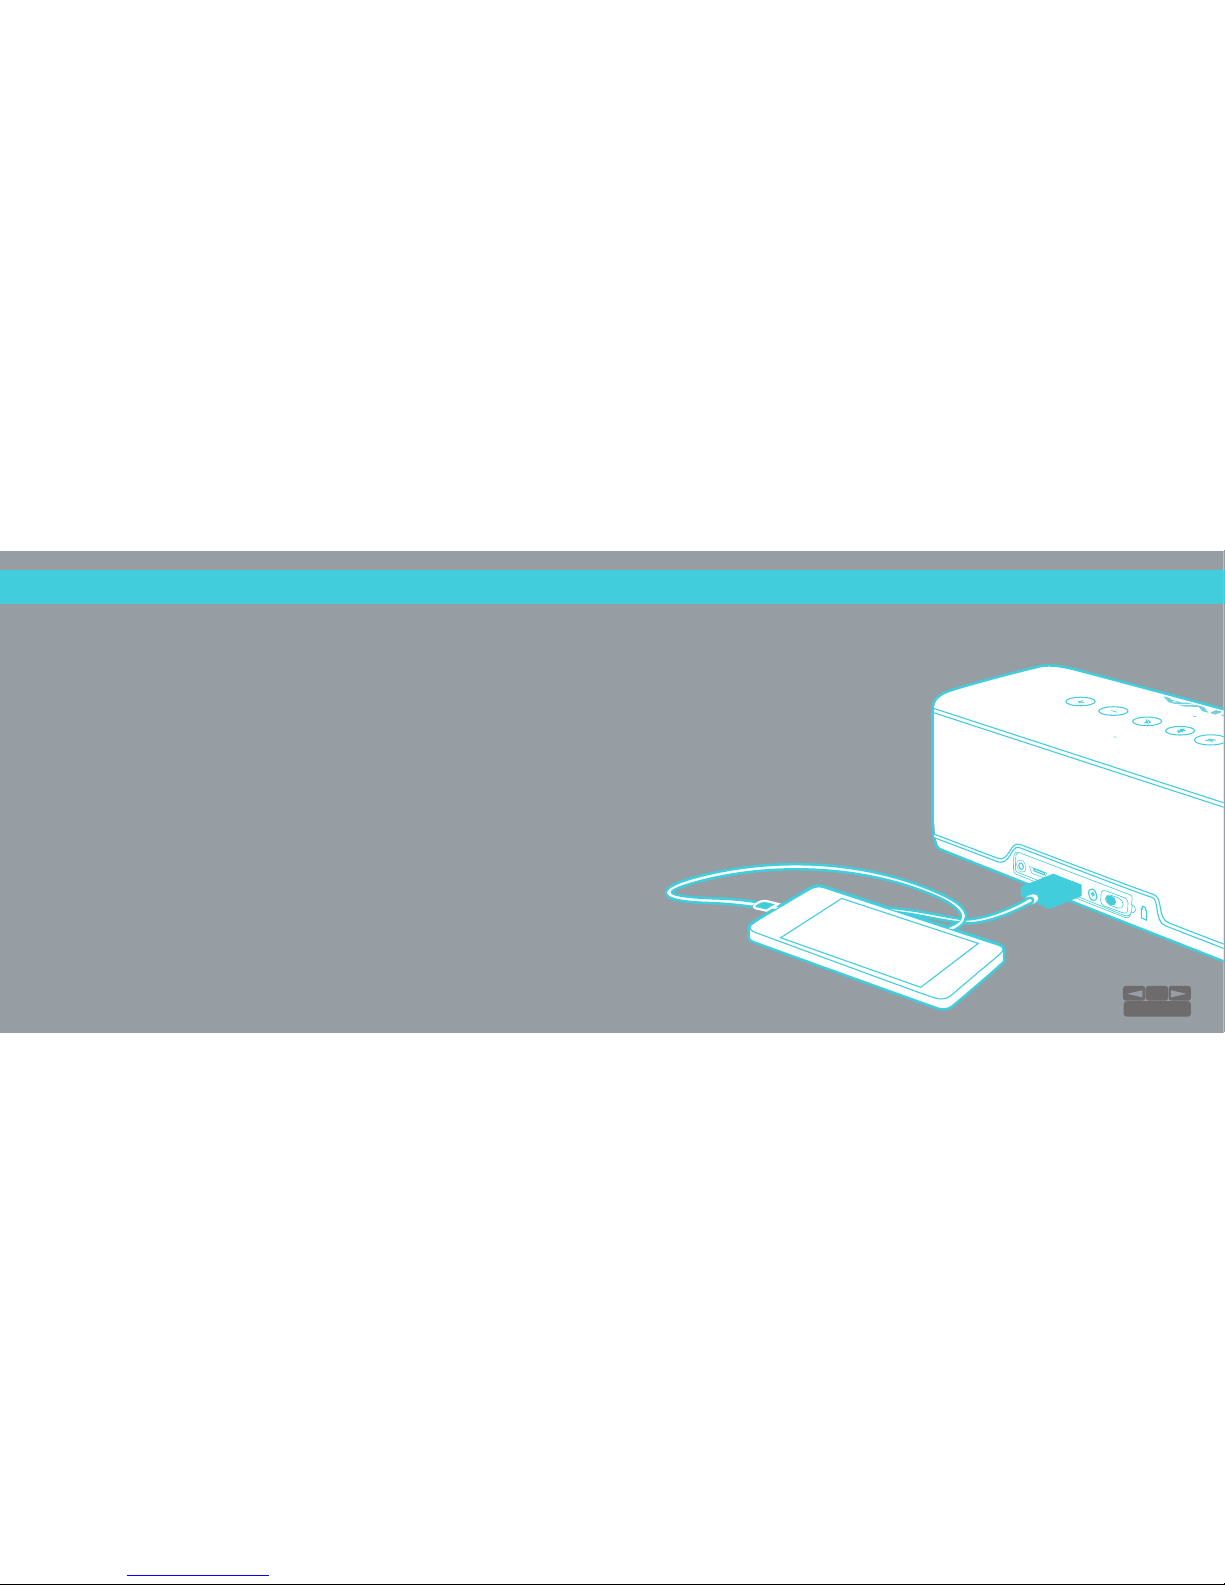
Charge your phone or tablet by connecting your device’s USB cable into the
Charge Out port on the RIVA S.
●
Make sure slide the BATT ON/OFF switch to the ON position.
●
RIVA S can charge yor device when it has over 30% battery power.
The Battery icon LED will be green or orange.
10
TABLE OF CONTENTS
Page 13
DIVIDE & CONQUER:
TrueWireless™
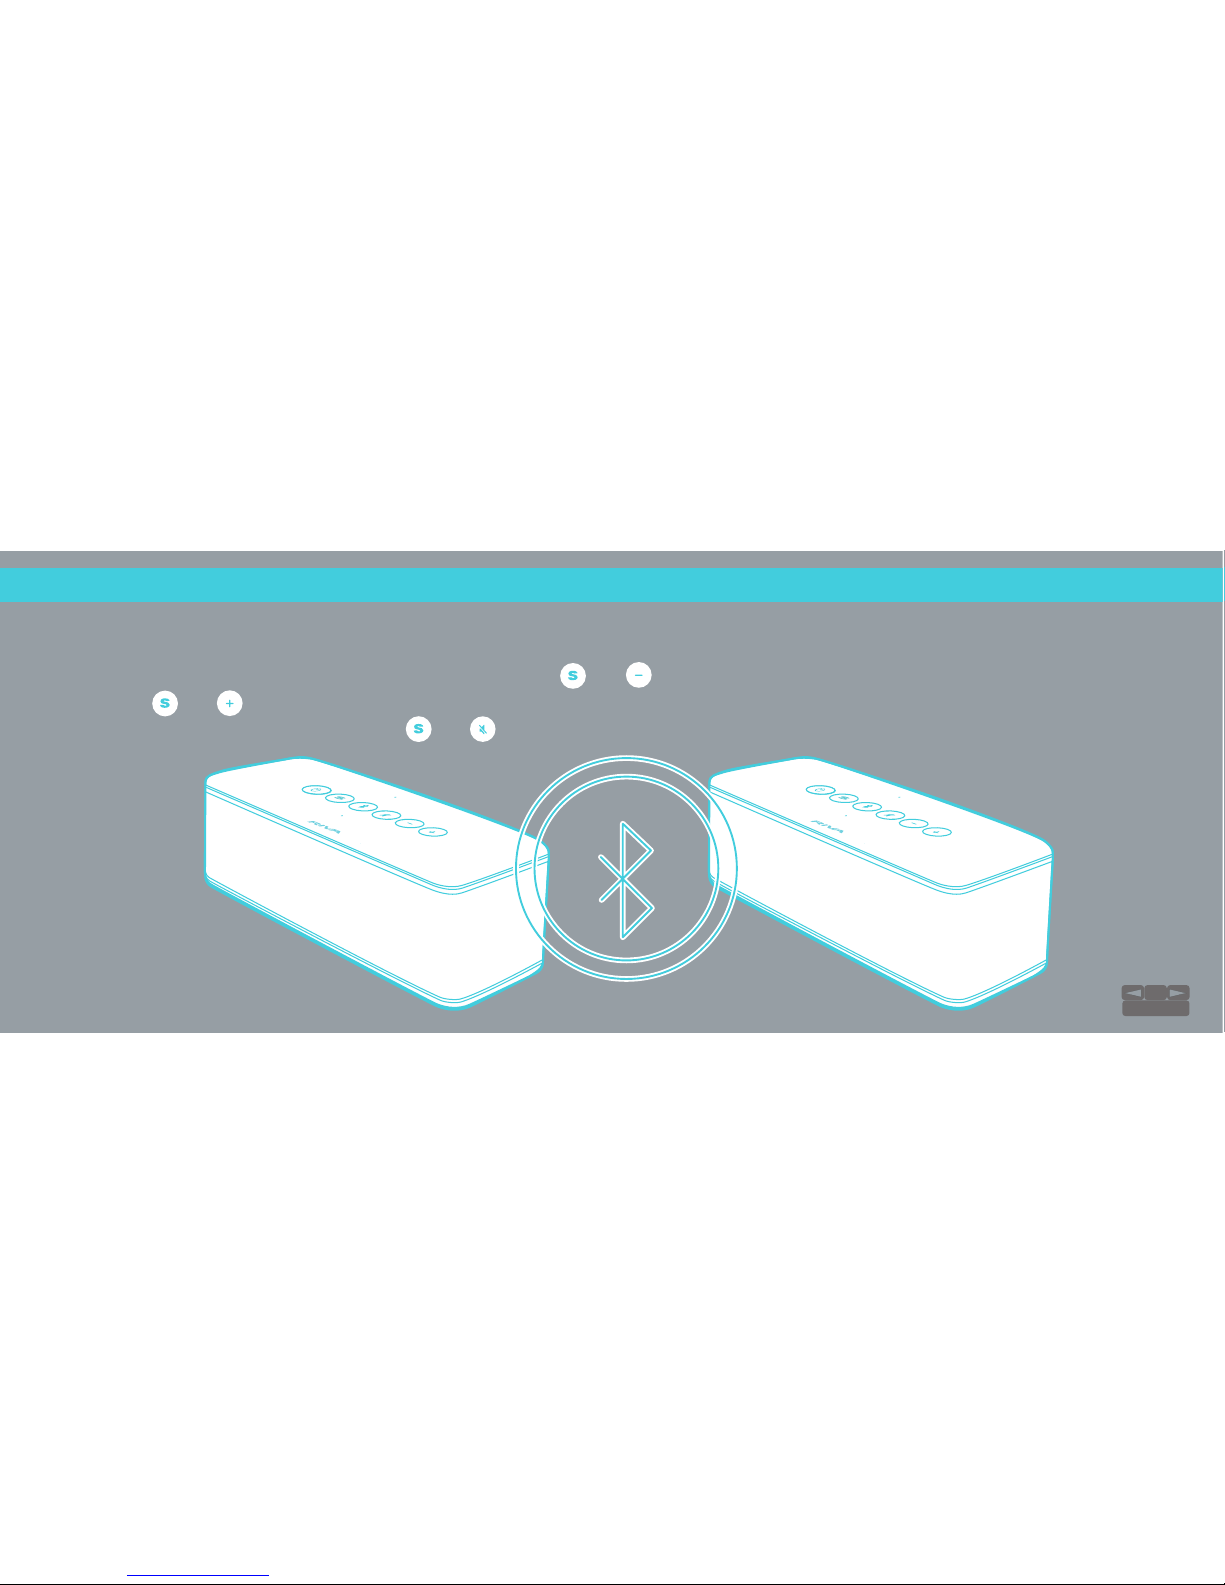
Connect two RIVA S speakers wirelessly to create left and right channel stereo.
To activate TrueWireless™: On the Master speaker press and hold the and buttons until it says TrueWireless™. On the secondary speaker, press
and hold the and buttons until it says TrueWireless™. Once the secondary speaker is paired, both speakers will announce TrueWireless™ is paired.
To disconnect TrueWireless™, press and hold the and buttons at the same time on the Master speaker.
11
TABLE OF CONTENTS
Page 14
GET THIS PARTY STARTED:
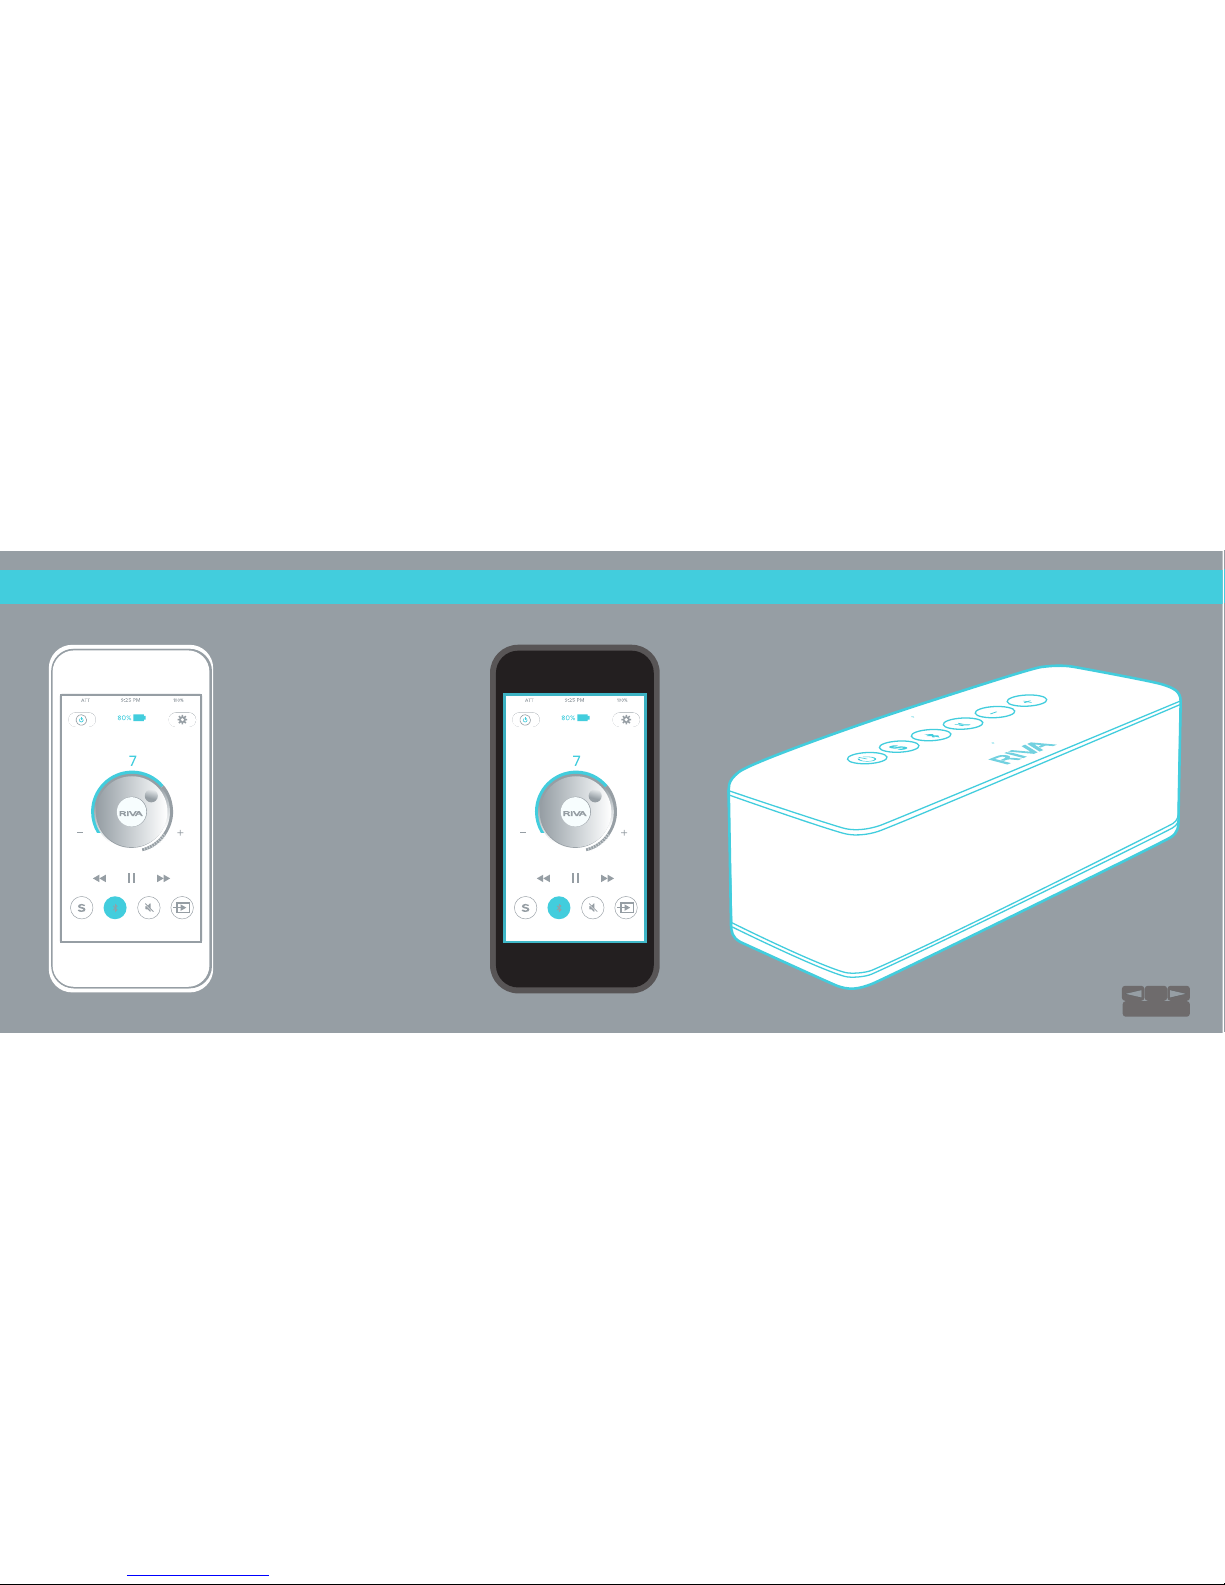
Party/Multi-User Mode
Volume Volume
Pair two Bluetooth®
devices to one RIVA S for
multi-user control.
12
TABLE OF CONTENTS
Page 15
VINYL JUNKIES WANTED:
Phono Mode
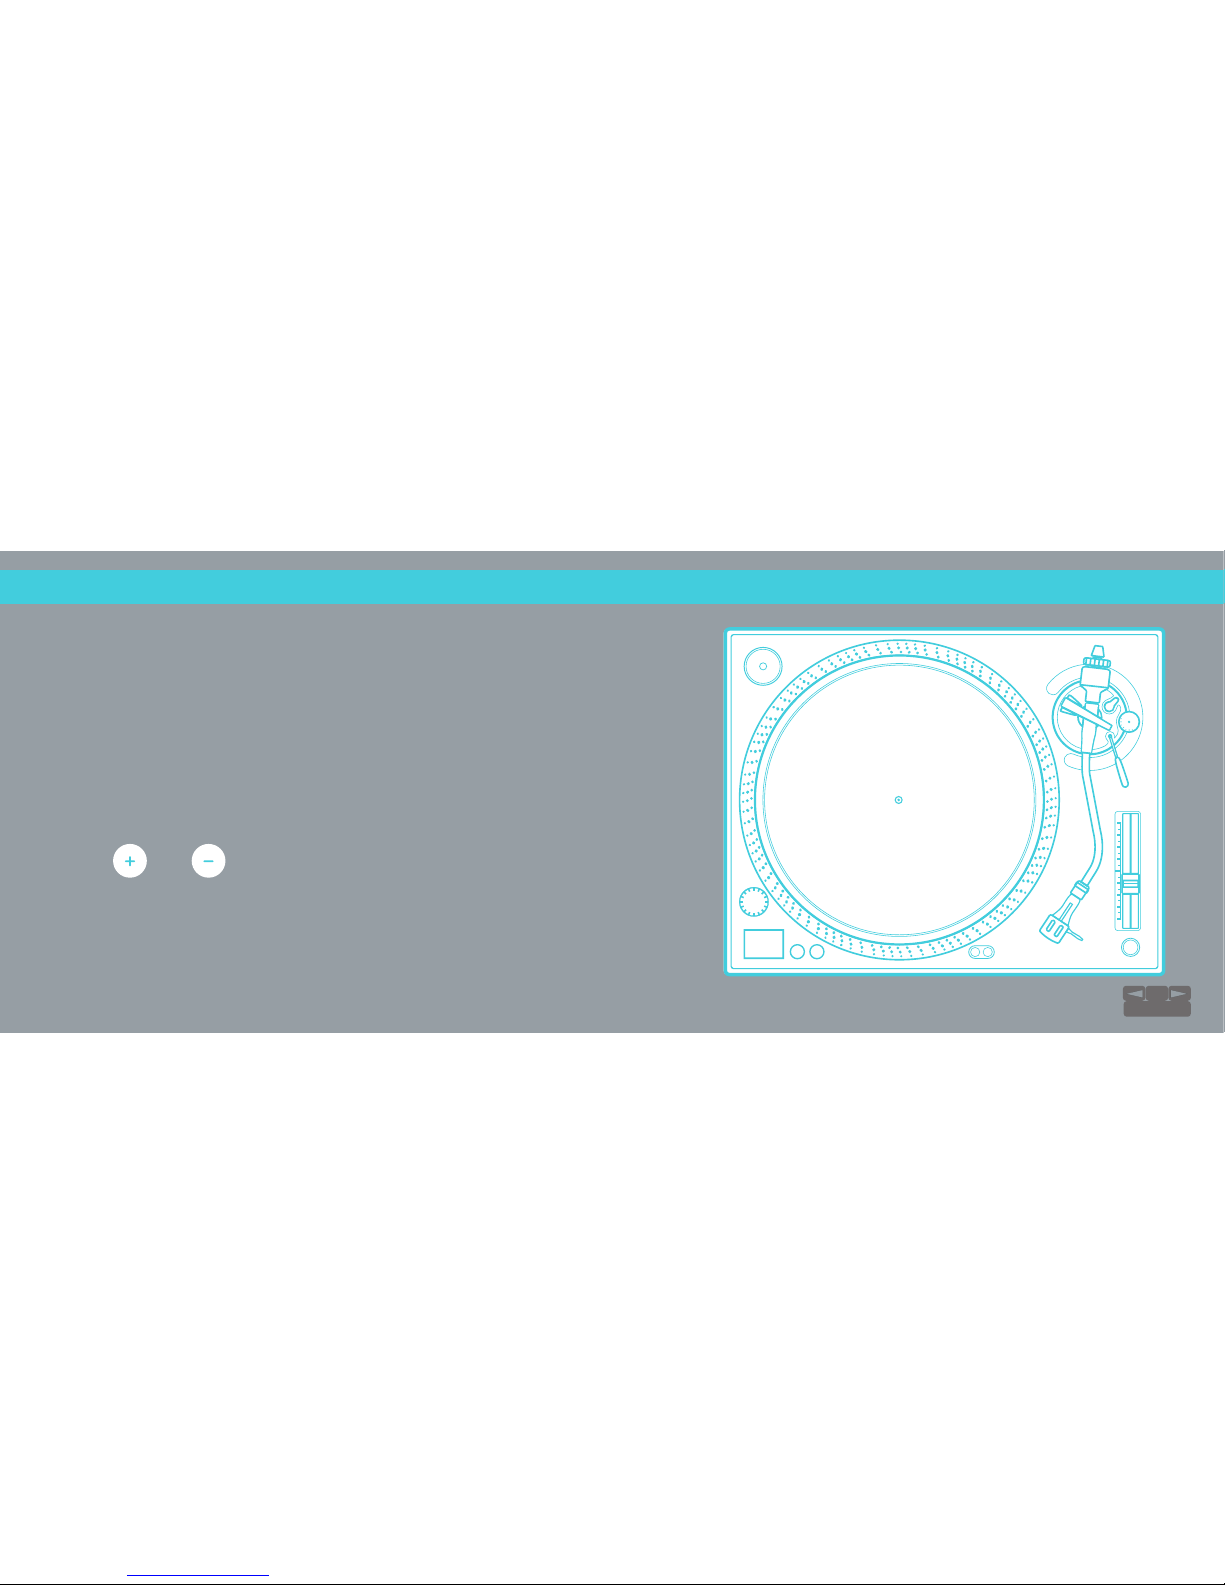
Adds up to 9dB of gain to the speaker’s output to account for the
inherently weaker signal coming from a turntable with built-in phono
preamp or traditional turntable with external phono preamp. This mode
also bypasses the automatic gain control in the DSP for the auxiliary
input, providing a clean, uncompressed signal to the amplifier. No other
Bluetooth speaker has the capability to play vinyl like this!
To use with turntable with low audio output, plug in aux cable and hold
down and for 3 seconds. Bluetooth light will turn orange.
13
TABLE OF CONTENTS
Page 16
RIVA S SHORTCUTS...
Vinyl Junkies Included
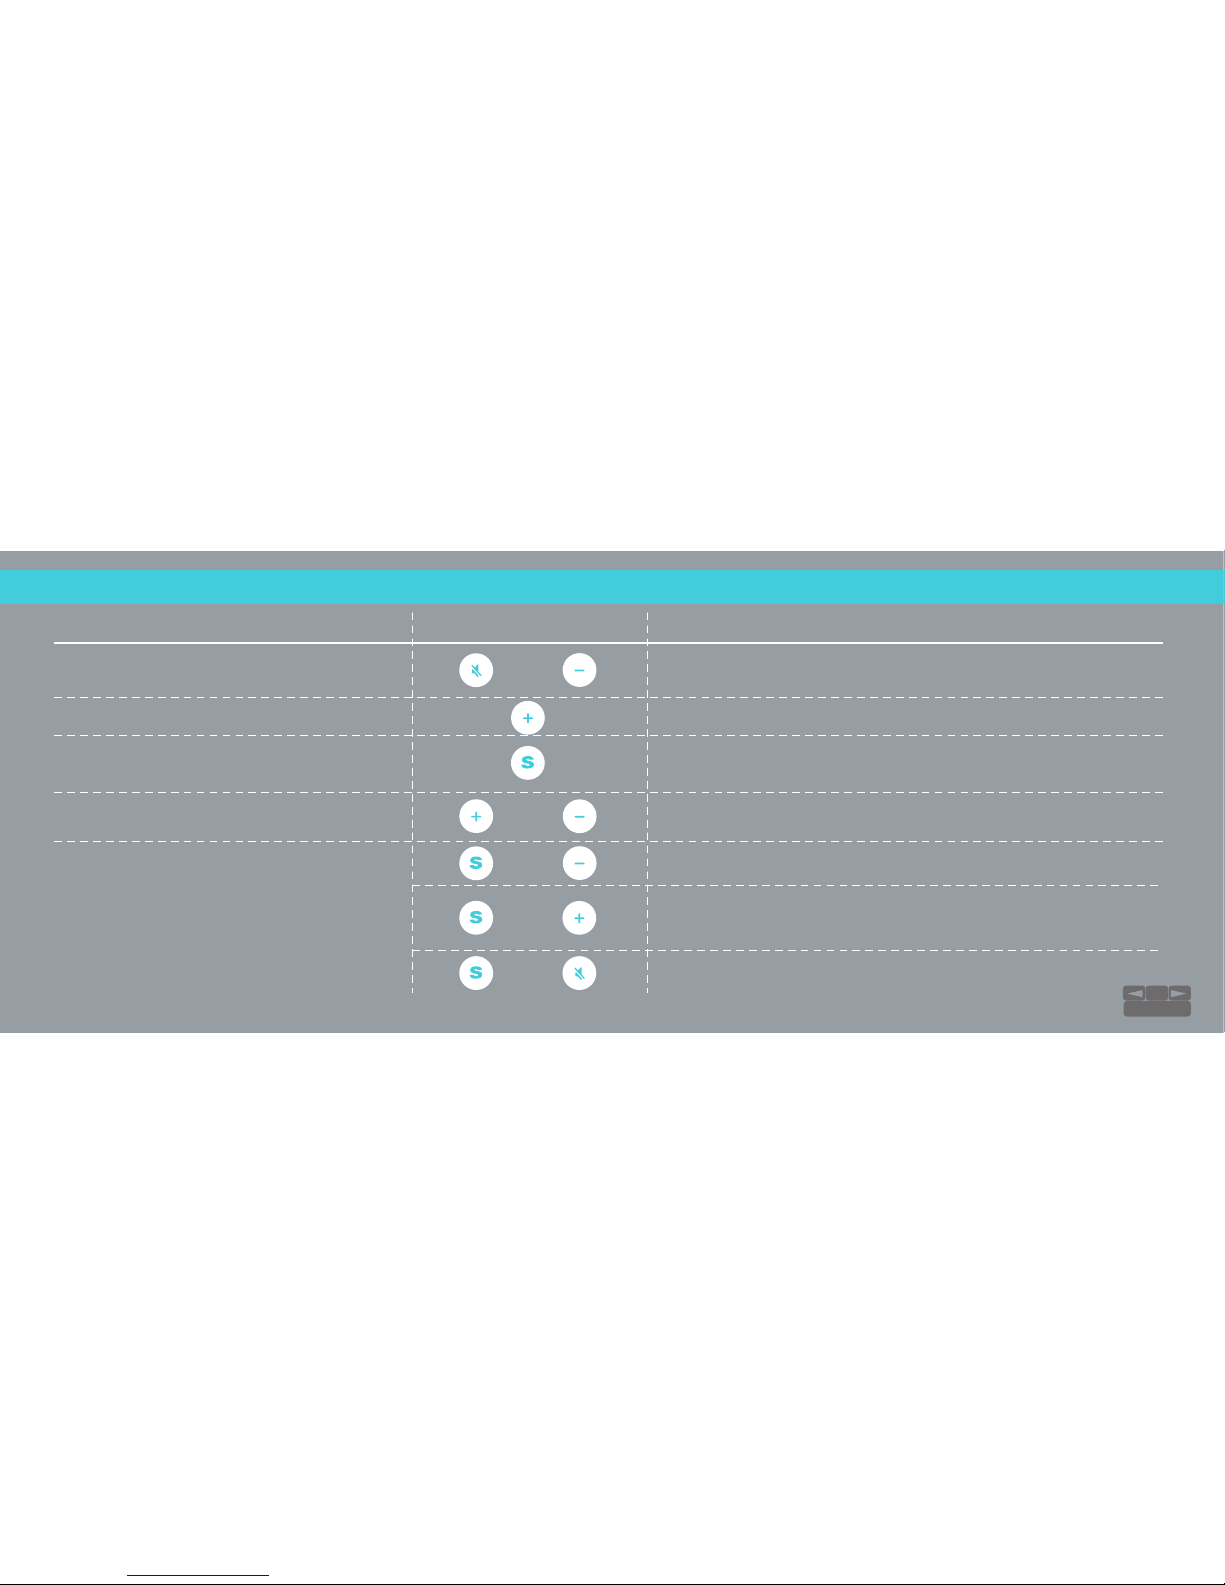
Hold down for 3 seconds to lock all keys. Bluetooth® icon will turn RED
while engaged. Repeat to unlock.
Speakerphone mode: Tap to accept an incoming call.
Speakerphone mode: Tap to reject an incoming call or hang up an
active call.
To use with turntable with low audio output, plug in aux cable and hold
down for 5 seconds. Bluetooth® icon light will turn orange.
and
and
Phono Mode
On 1st RIVA S speaker, press and hold down for 5 seconds.
Prompt will annonuce “TrueWireless”.
Then on 2nd RIVA S speaker, press and hold down for 5 seconds.
Prompt will annonuce “TrueWireless”, then “TrueWireless is paired” on
both speakers.
TrueWireless™
Speakerphone: Reject/Hang Up
Speakerphone: Accept Call
Key Lock
and
and
To disconnect TrueWireless™, press and hold the surround and mute
buttons at the same time on the Master speaker.
FEATURE BUTTONS NOTES
and
14
TABLE OF CONTENTS
Page 17
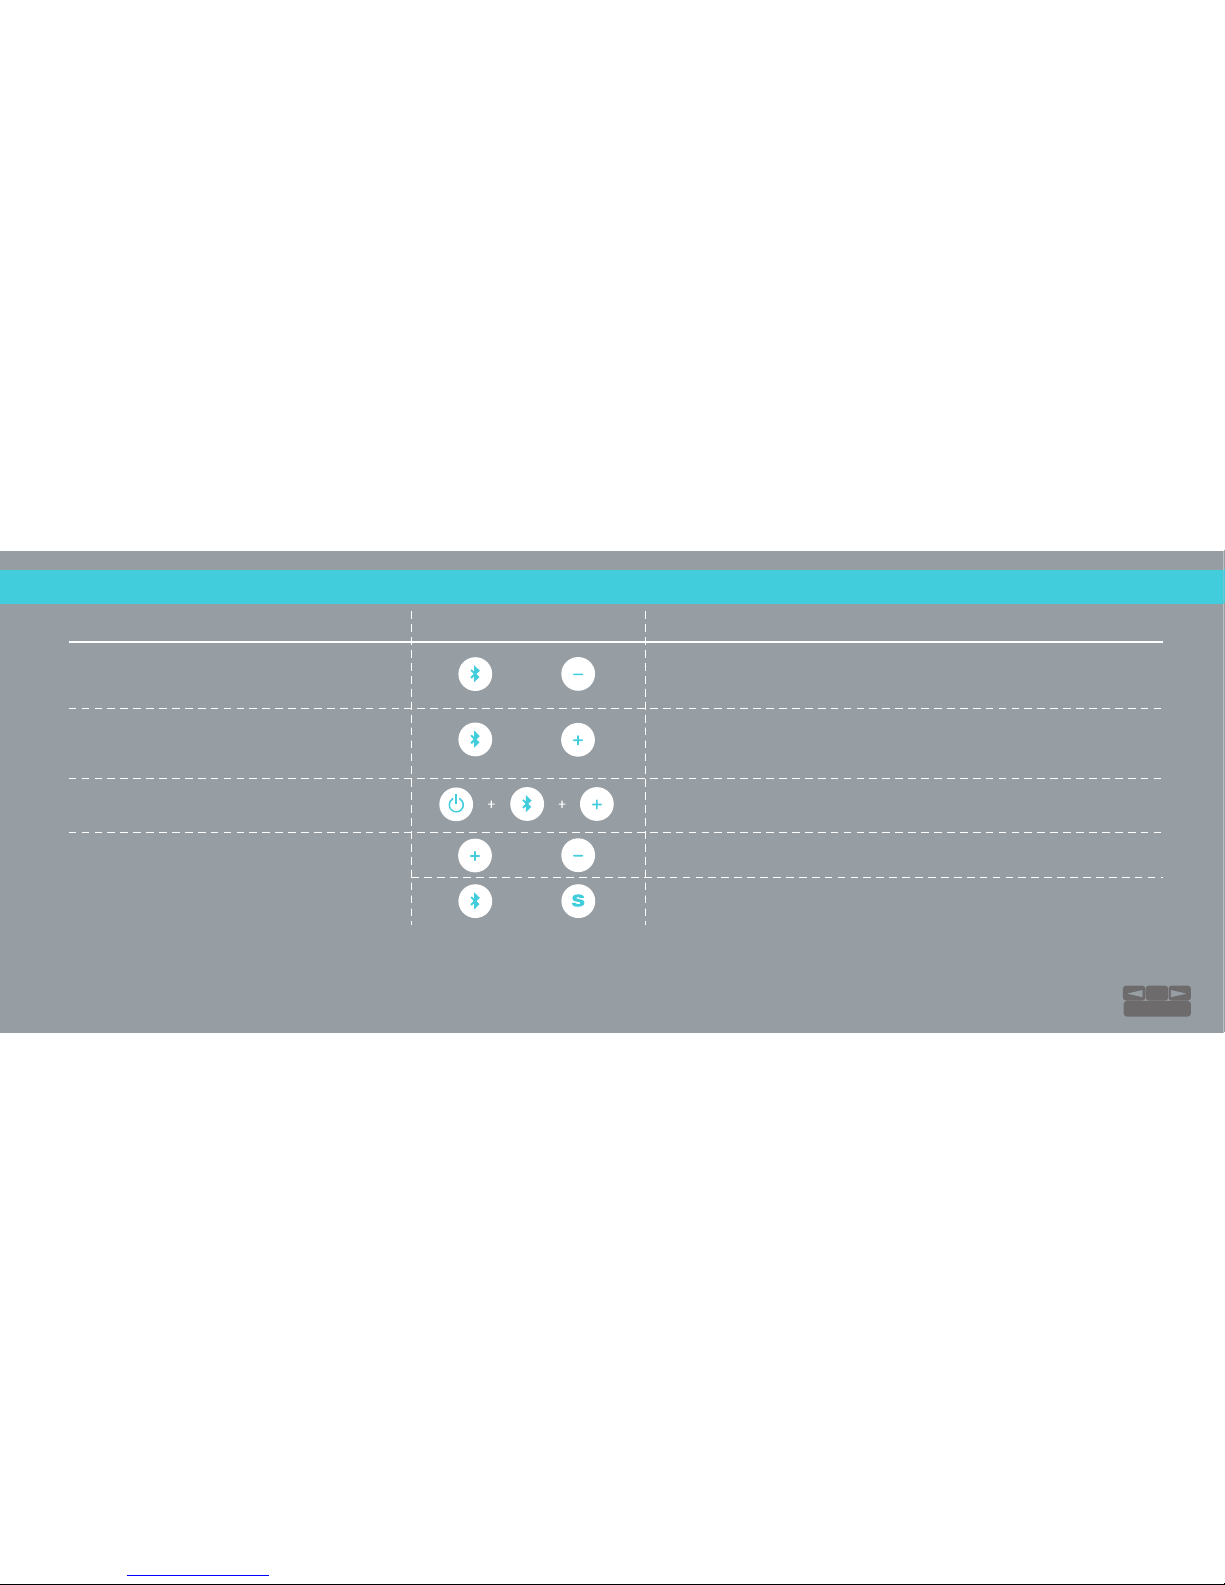
RIVA S SHORTCUTS...
Vinyl Junkies Included
Hold down for 3 seconds. Prompt will announce “pairing”, 2nd device
can now pair to speaker. Prompt will announce “paired” when
connected. To disconnect, 2nd device needs to “Forget Device”.
Hold down together for 2 seconds to cycle through the audio prompt
modes. You’ll hear a quick double beep when prompt mode has
changed. Hold continuously to cycle through all audio prompt modes.
Change Audio Prompts
and
Party Mode: Multi-User Control
Hold down together for 10-15 seconds to erase device memory and
restore factory settings.
Skip to next track.
Go back to previous track.
Factory Reset
Playlist Control:
Only available with
Bluetooth® Input
FEATURE BUTTONS NOTES
and
and
and
15
TABLE OF CONTENTS
Page 18

16
SOUND MACHINE
rivaaudio.com/support
16
TABLE OF CONTENTS
Page 19
Trillium™ is our proprietary audio technology
that delivers truly immersive sound with rich
and powerful bass to fill your room with
music.
Take your RIVA S anywhere for great sound!
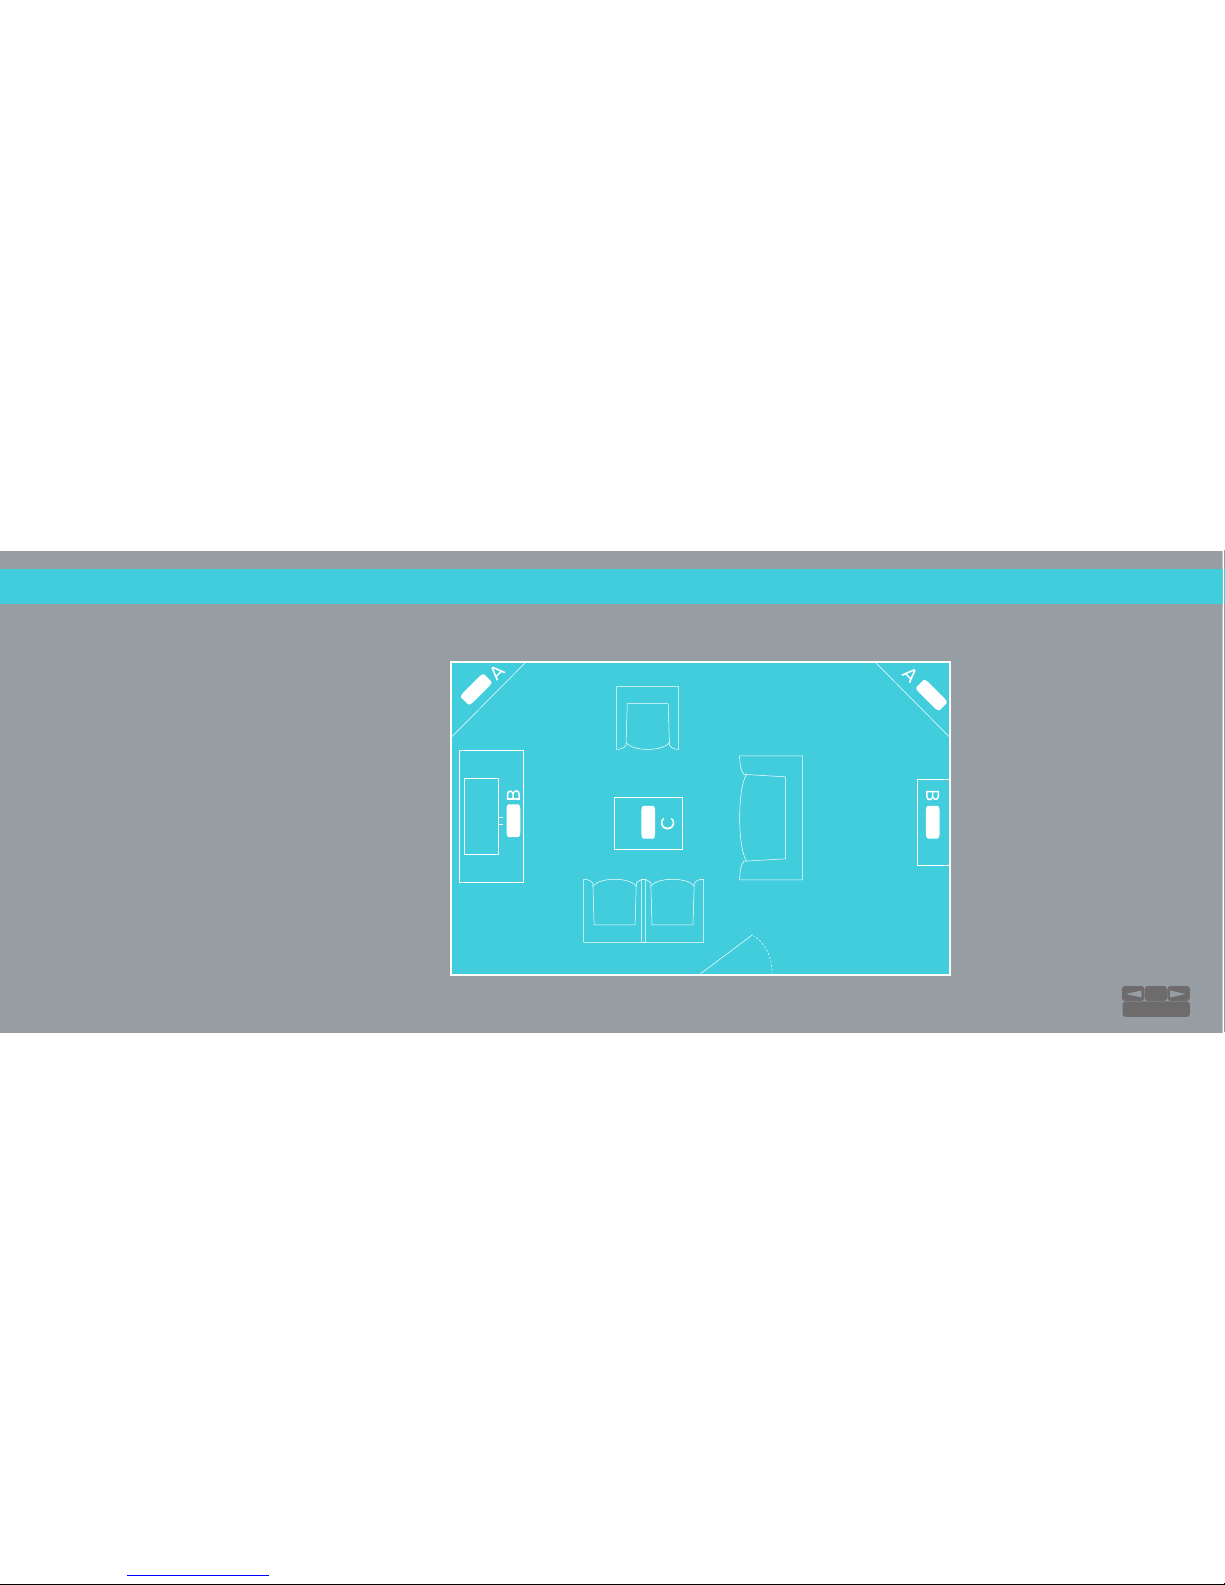
To get the most out of your RIVA indoors,
place the speaker about 3-6 inches (8-15 cm)
from a wall or corner to take advantage of the
natural acoustics of the room. (see diagram)
MAXIMIZE YOUR PLACEMENT:
For Immersive Sound
A: Best
In any corner
B: Really Good
Solid, reflective
surface behind RIVA
C: Good
Open area/outdoors
17
TABLE OF CONTENTS
Page 20
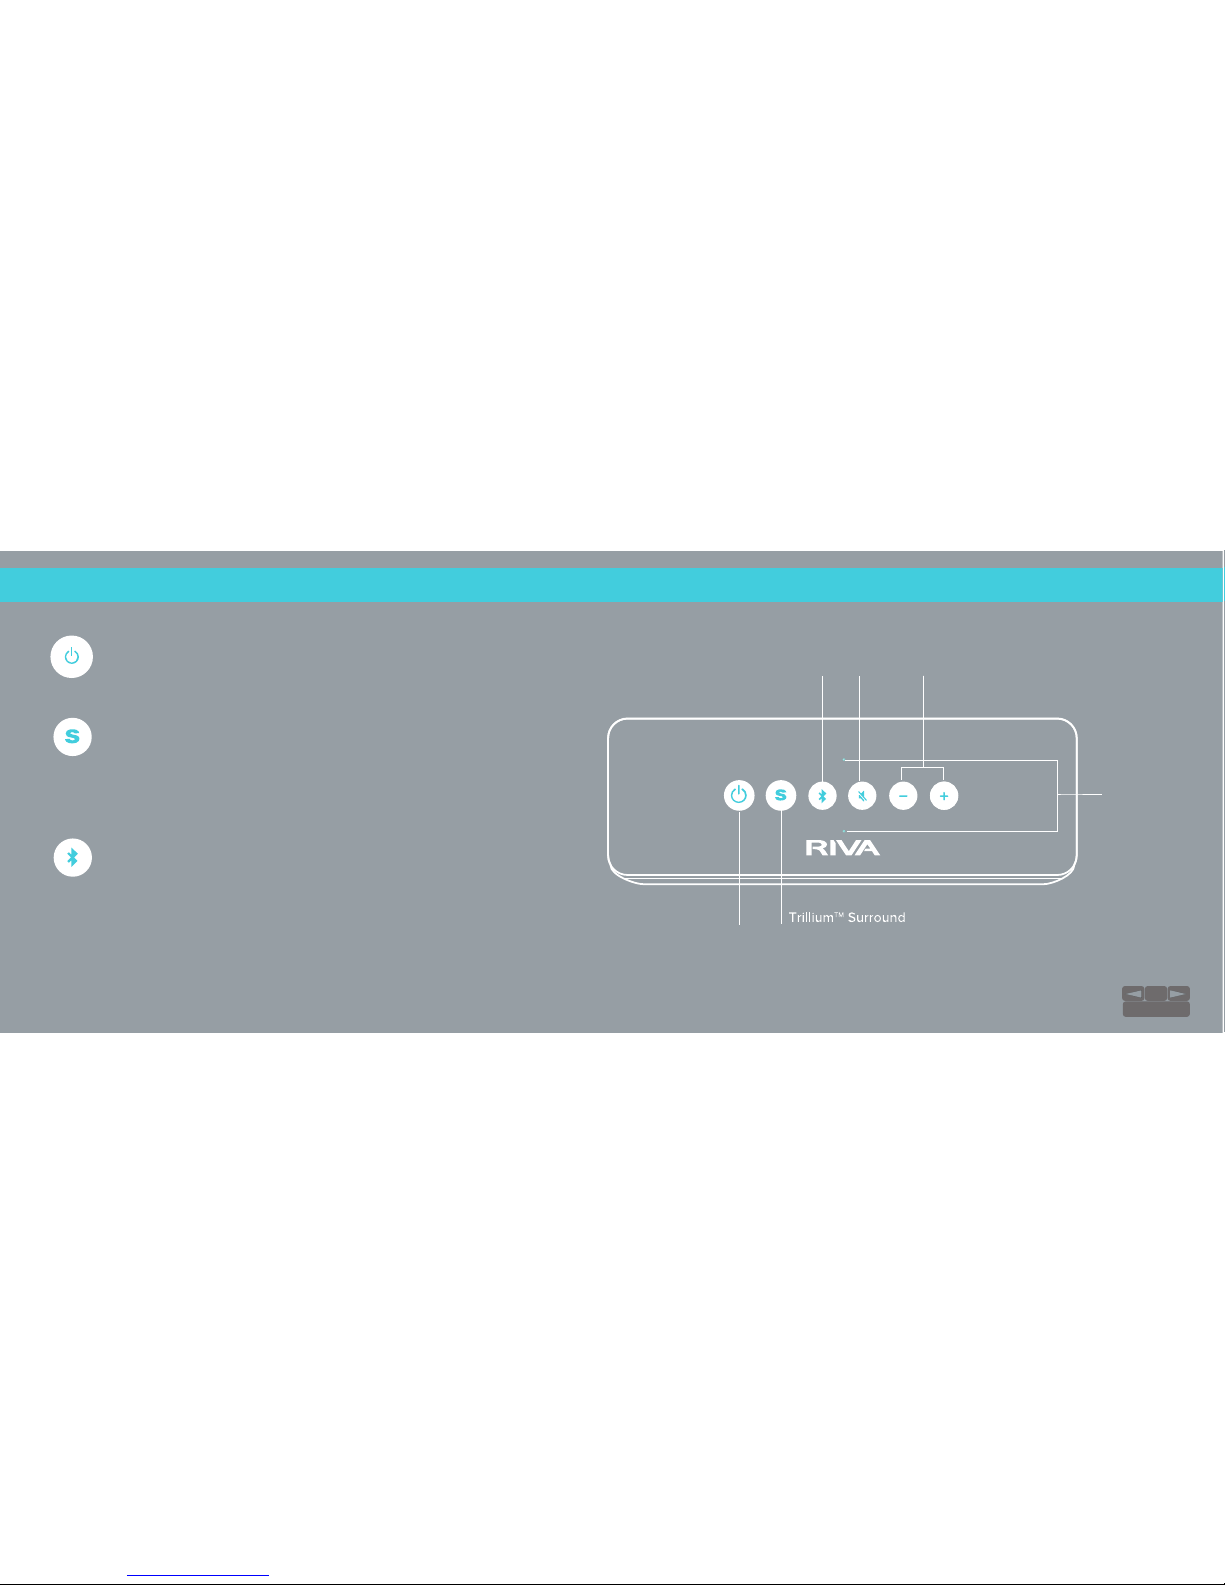
Power On/O
Power On: Tap the Power button.
Power O: Tap the Power button.
Trllium™ Surround
Surround On: Tap the surround button. The Surround icon
will remain blue while in Surround mode.
Surround O: Tap the Surround button again to turn o.
Input
Press and hold the Input button to enter Bluetooth® pairing
mode. To switch to AUX, plug in a device and pause all audio
on your Bluetooth device. The light will change depending on
the connection:
Bluetooth® Input: Solid Blue
Auxiliary 3.5 mm Input: Flashing Green
NOTE: Solid Green is when connected to a Bluetooth® device
TAKE CONTROL:
Controls
Microphone
Power
Volume Up/Down
Mute
Input
18
TABLE OF CONTENTS
Page 21
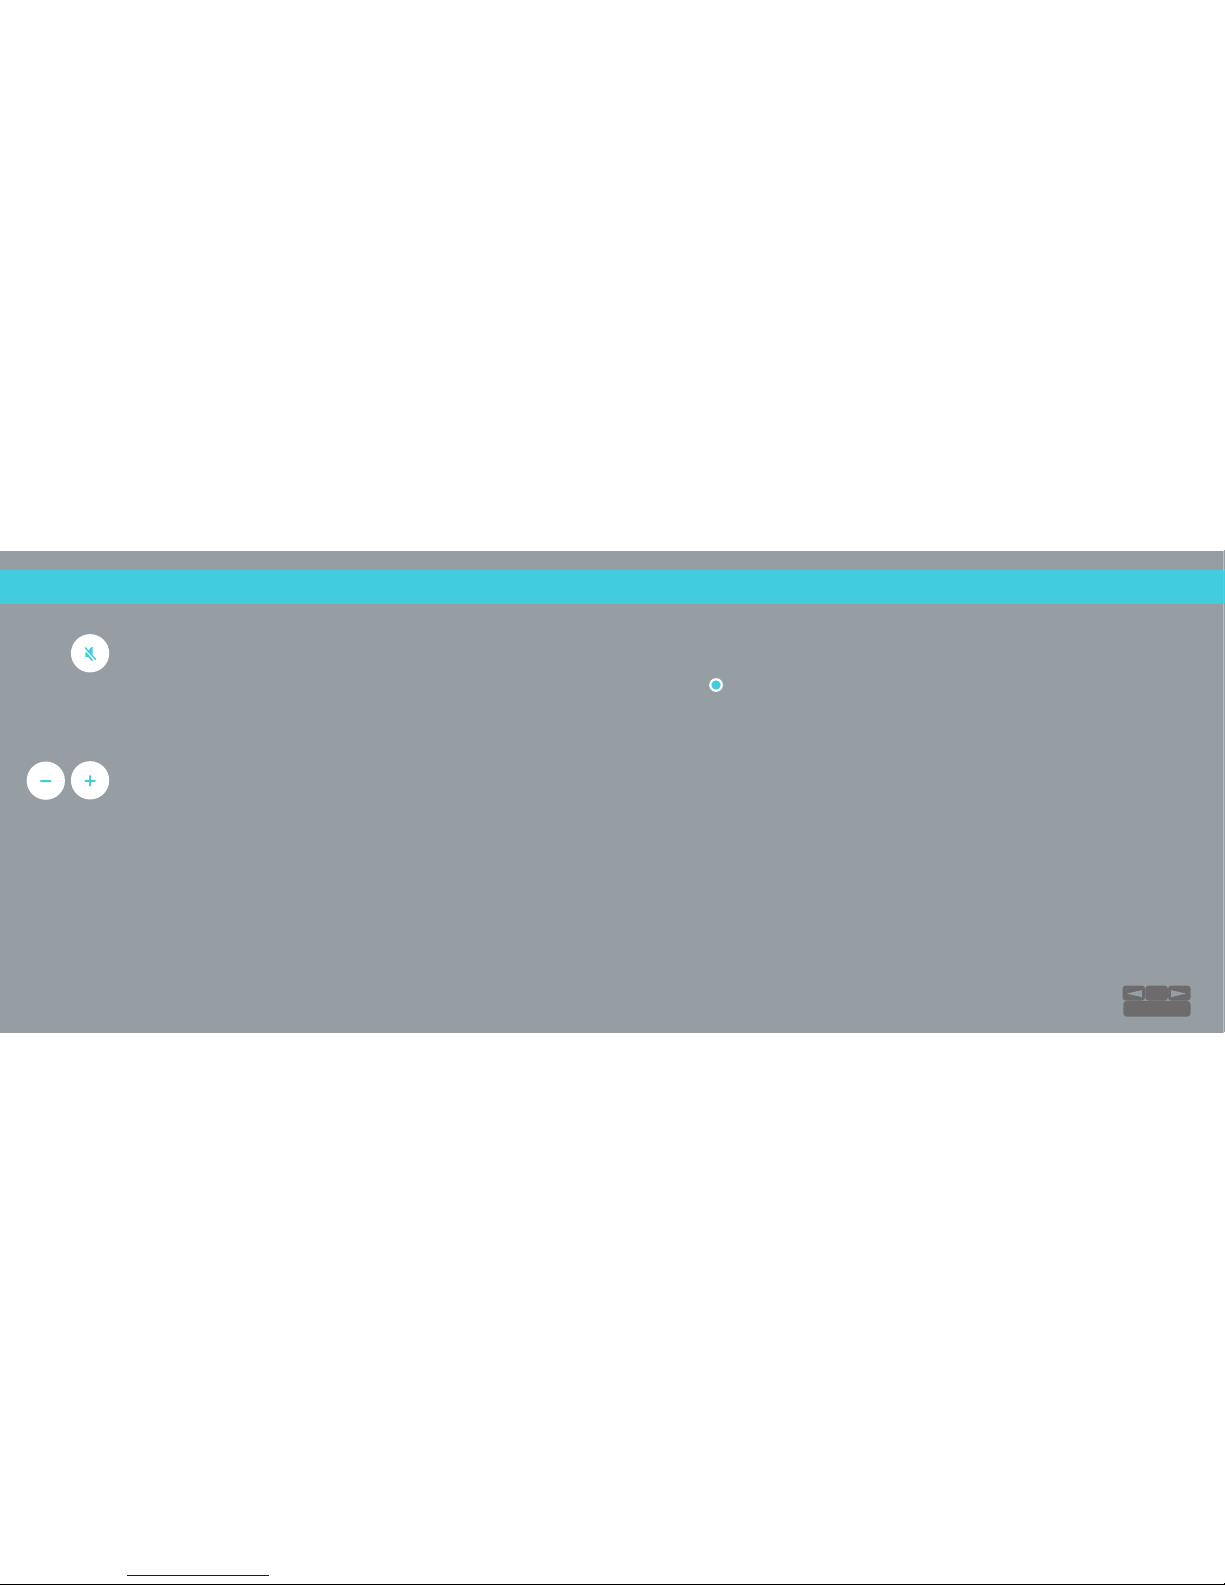
Volume Down/Up
Control the volume - or +
NOTE: Volume level will aect your battery playing time. Please see The Minerals
section of this guide for more details.
Microphone for Teleconferencing
Pair your phone or other Bluetooth® device to the RIVA S to
enjoy crystal clear teleconferencing with noise and echo
canceling microphone.
NOTE: Do not cover or stick anything in the microphone
opening (toothpicks, q-tips, spaghetti sauce, etc.) Doing so
will void your warranty.
TAKE CONTROL:
Controls
Mute
Tap to mute. The Mute icon light will remain blue while muted. Tap
again to unmute.
19
TABLE OF CONTENTS
Page 22
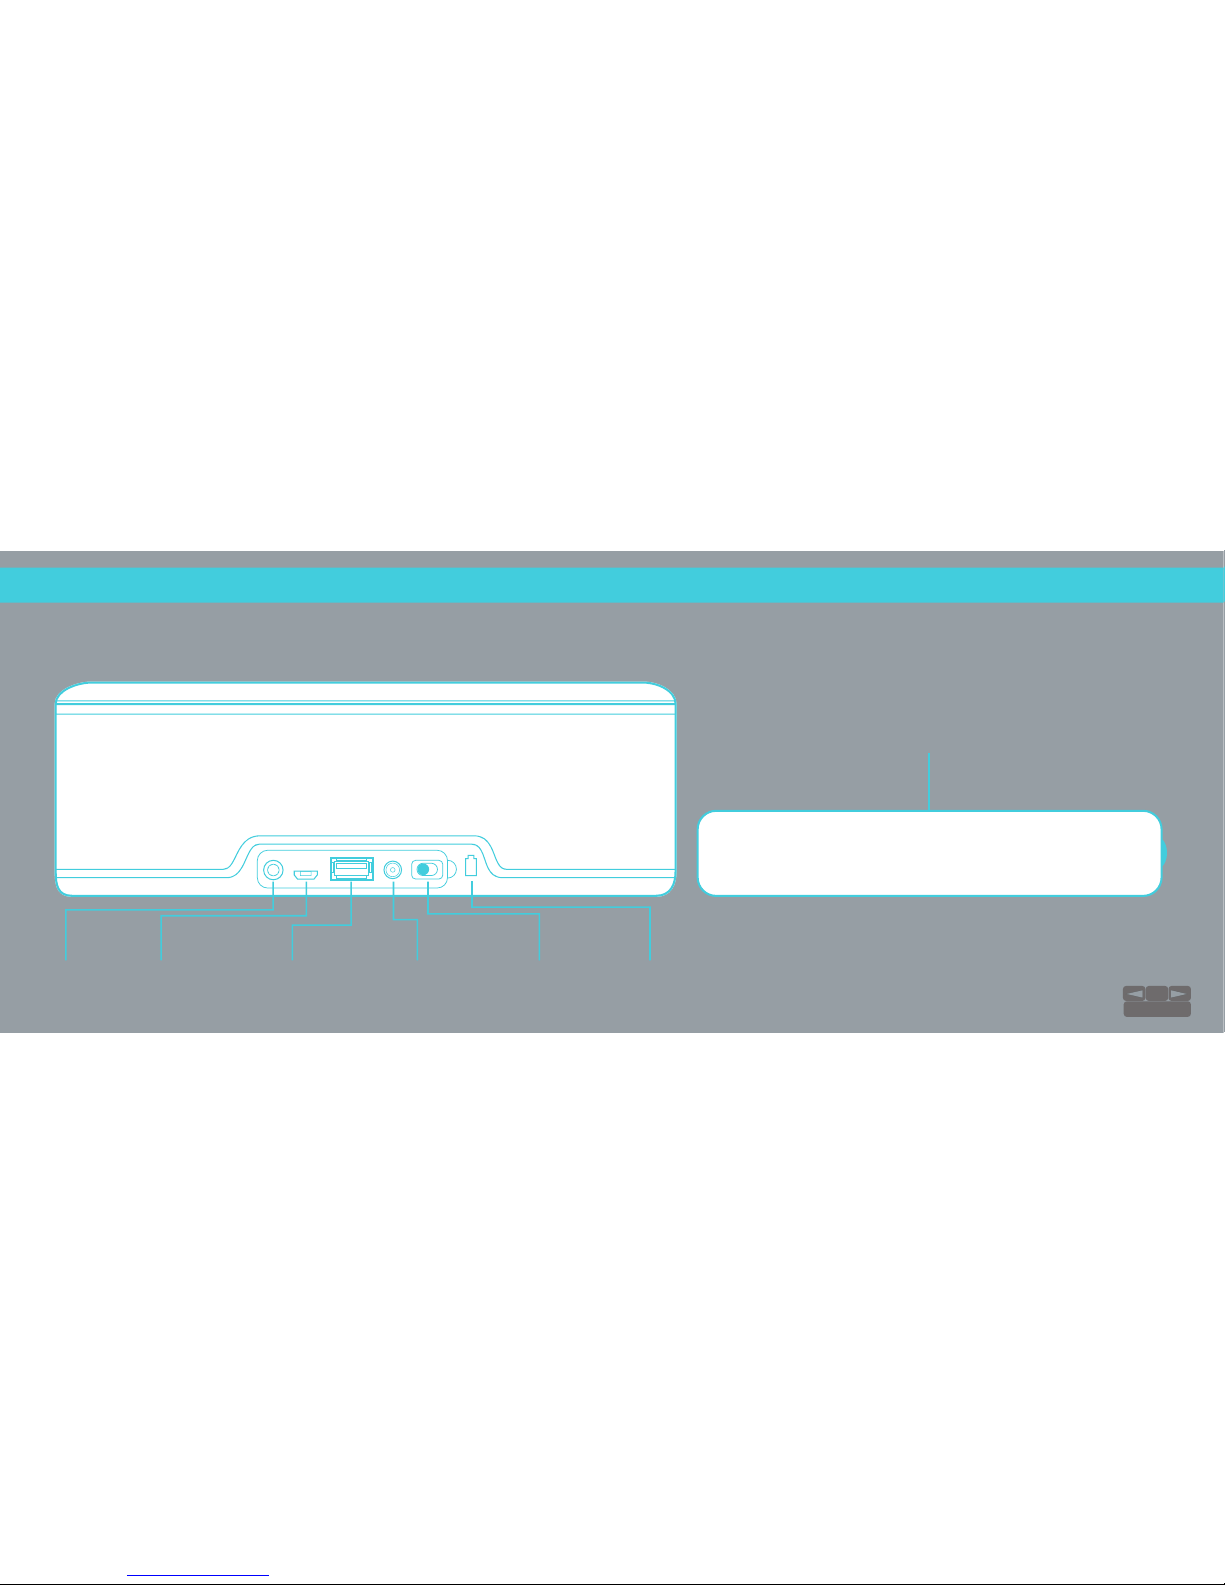
HOOK UPS:
Inputs
NOTE: Do not cover or stick anything into the input openings (paper clips, nails, gum, etc.) except the I/O Cover
or appropriate plugs. Doing so will void your warranty.
Use the I/O cover, located on the bottom of your RIVA S to
help resist dust and splashes.
AUXILIARY
USB DATA
CHARGE OUT
19V DC
BATTERY
ON/OFF
BATTERY LEVEL INDICATOR
20
TABLE OF CONTENTS
I/O COVER
Page 23
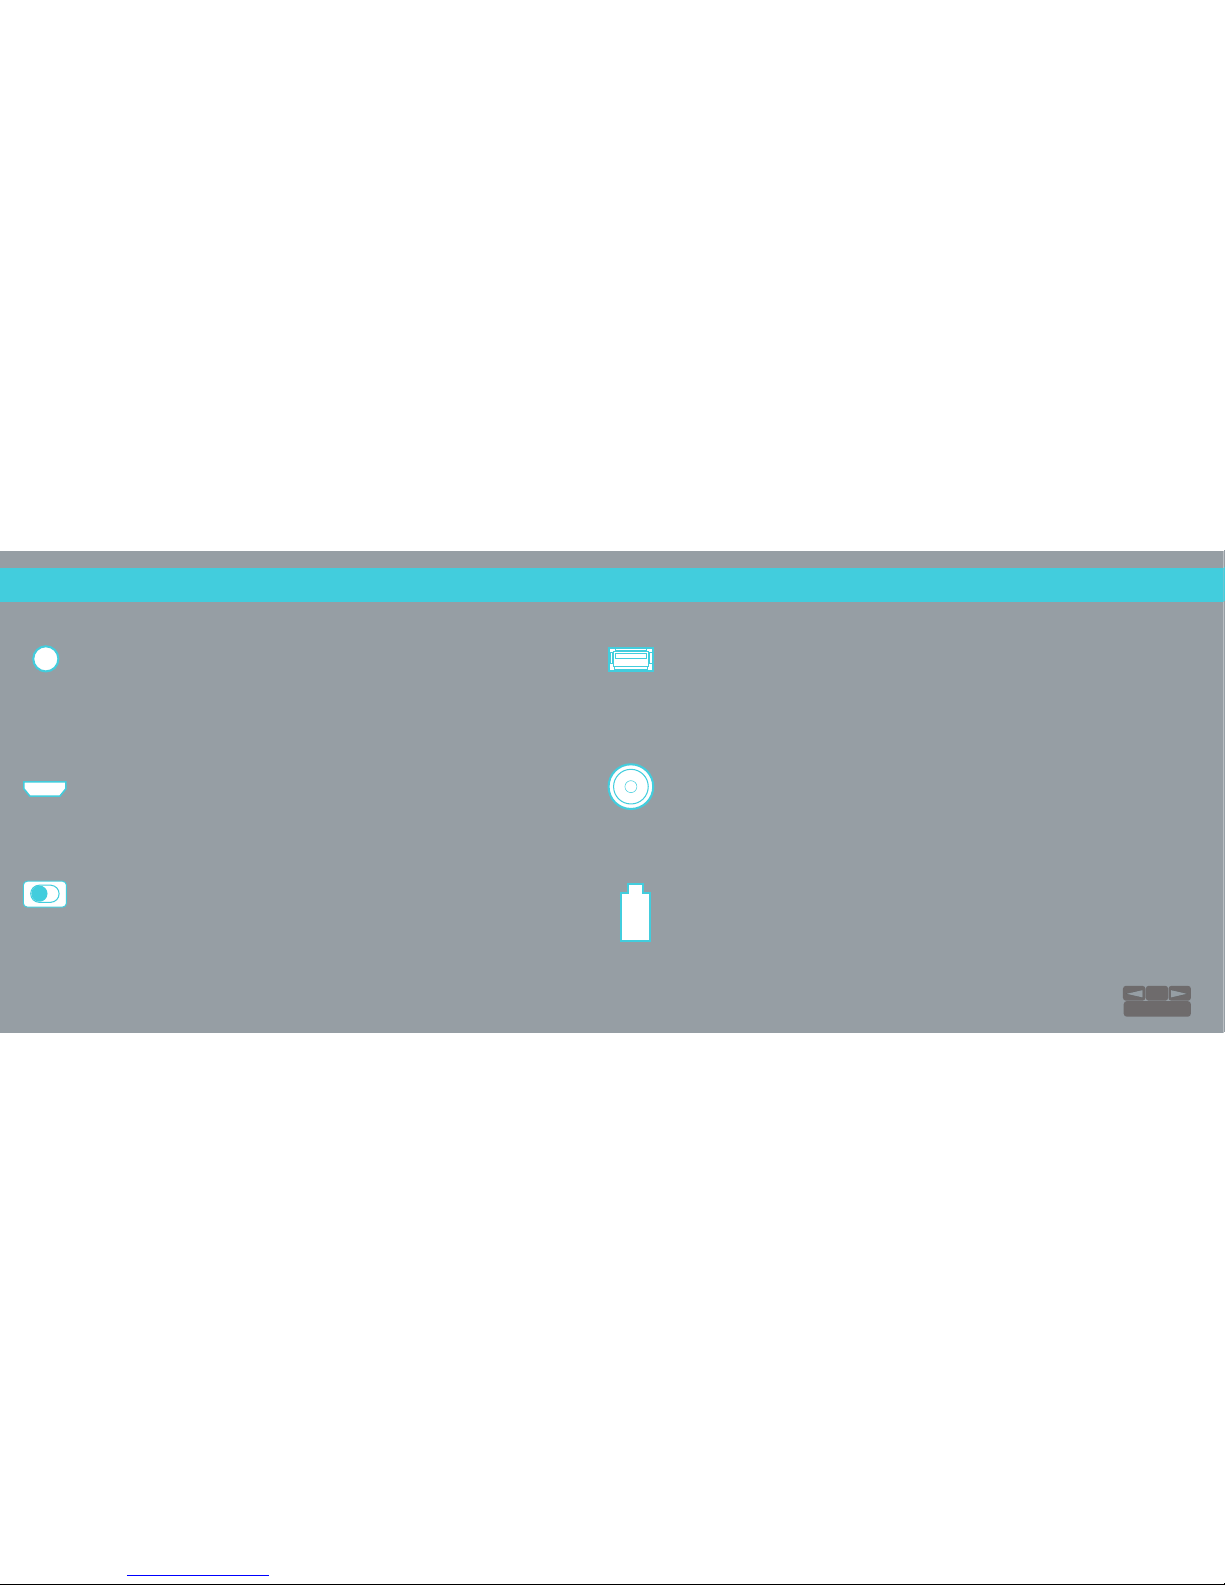
Auxiliary 3.5 Input
A 3.5 mm cable is included to connect your non-Bluetooth®
audio devices.
NOTE: Allowable input voltage range is 200mV to 2Vrms.
USB Data Input
This input is used for software upgrades and future updates.
Also supports USB audio playback from a computer.
CHARGE OUT
Plug in your phone or tablet using a compatible cord to charge from
the RIVA S’s powerful battery. The BATT ON/OFF button must be ON.
19V DC Power Adaptor Input
Use the provided external power supply to charge the RIVA S. Use of
any other non-approved power adapter may damage the electronics
and will void the warranty.
Battery Icon
Green: 60 – 100% charge remaining
Orange: 30 – 60% charge remaining
Red: 0 – 30% charge remaining
Battery icon will pulse while being charged.
Battery ON/OFF
Control battery power functions. Switch OFF to conserve
battery, especially when you will be separated from your
RIVA S for an extended period of time. When OFF, all
functions will be disabled.
HOOK UPS:
Inputs
21
TABLE OF CONTENTS
Page 24
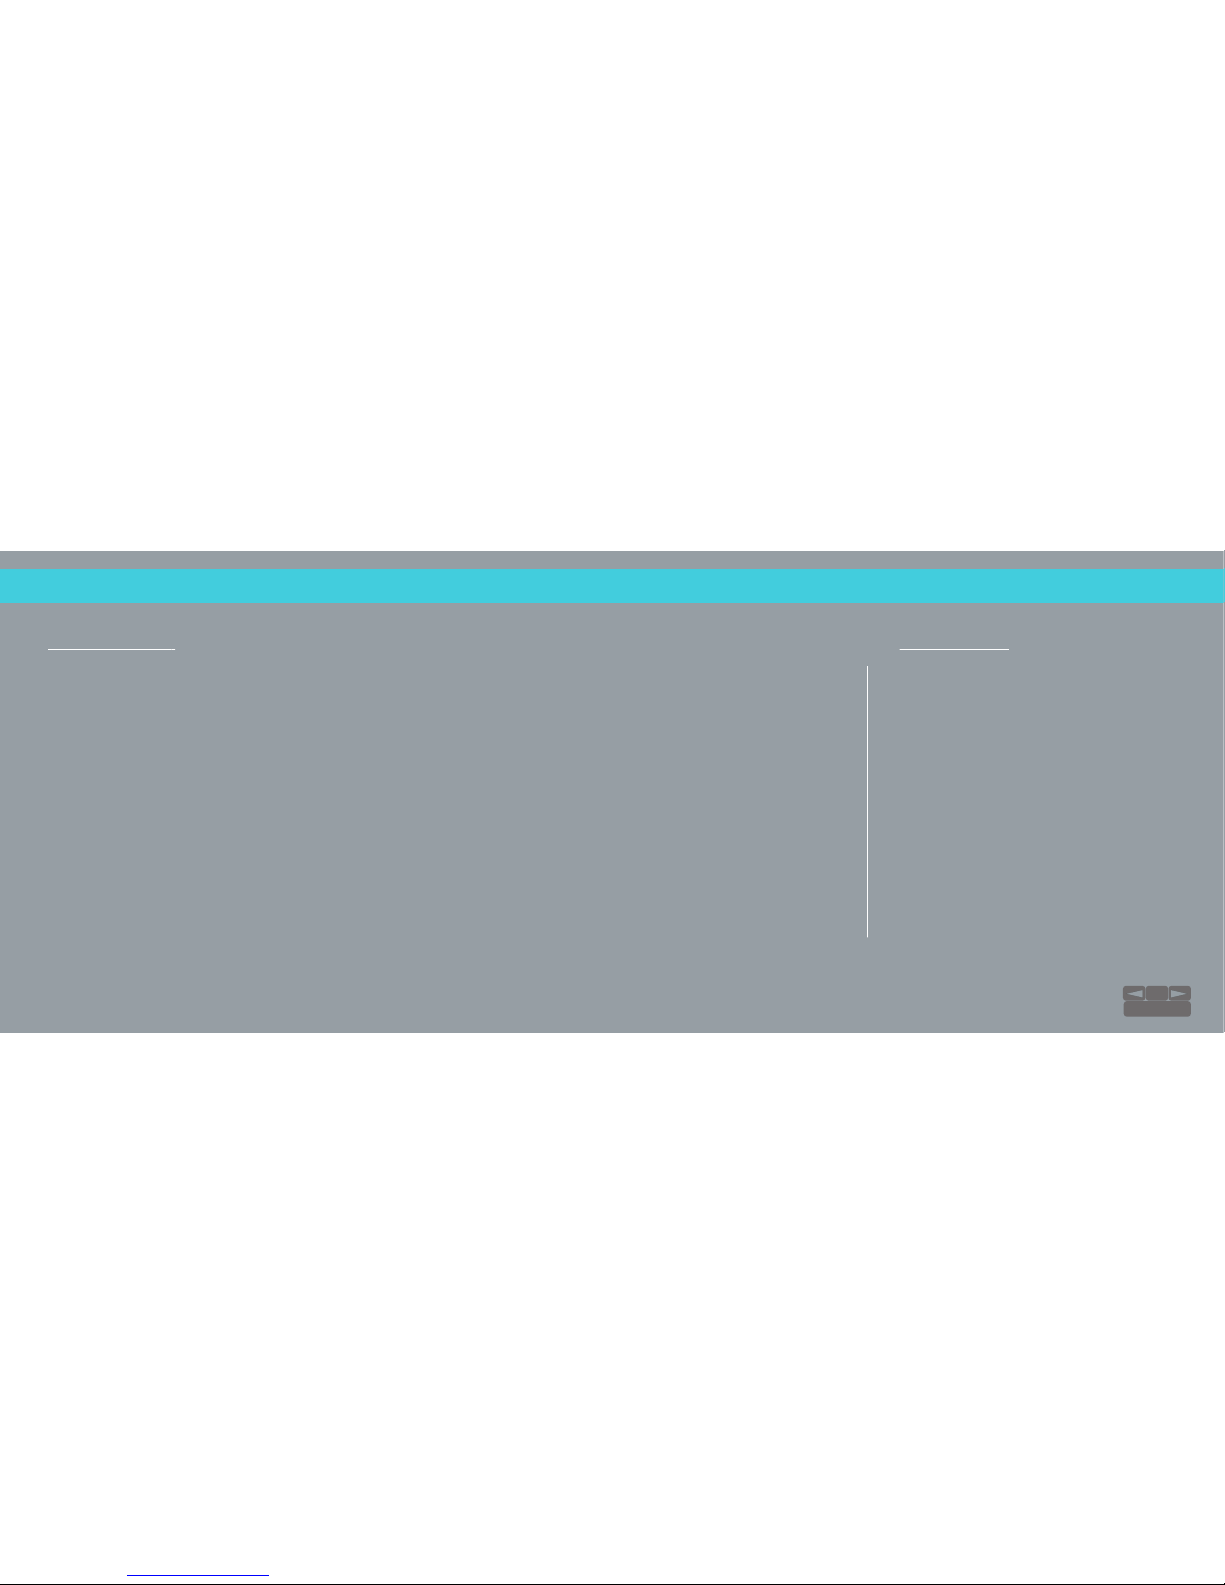
THE MINERALS:
Technical Specifications & What’s Included
●
Battery Life* :
13 hours in at 70dB
volume
7.48 in (190 mm) L
2.64 in (67 mm) W
2.68 in (68mm ) H
●
Dimensions:
1.5 lbs. (0.7 kg)
Features, specifications, and appearance are subject to change without notice.
*These hours are approximate based on averages as tested in our laboratory.
●
Weight:
19V DC, 2.5A
●
AC Adapter
100-240 VAC
50-60Hz
●
Power Adapter
Input Rating
SBC, AAC, aptX®
External Power Supply
40” 3.5 mm to RCA Connector
40” 3.5 mm to 3.5 mm Connector
Splash-Resistant I/O Cover
User Guide
●
Audio Codecs
Supported
Protection from the
splashing of water
from any direction.
●
IPX4
Water Resistance
Tech Specs: In The Box
22
TABLE OF CONTENTS
Page 25
Care:Usage Tips:
RIVA S TIPS:
Usage & Care Tips
Capacitive Touch
• Since the RIVA S’ buttons are capacitive touch, a
gentle tap will suce.
Picking Up RIVA While Playing
• We recommend picking up the RIVA S in the center
to avoid accidentally tapping the Power button.
(Visit rivaaudio.com/support for additional information.)
• We recommend that you unplug and turn OFF the
BATTERY ON/OFF button before cleaning your RIVA S.
• Do not clean your RIVA while it is charging because doing
so could result in electric shock.
• Clean your RIV
A S with a soft, dry cloth, preferably
microfiber. Do not use steel wool, grill brushes, or other
abrasive cleaners.
• If your RIVA S isn’t feeling its best, contact us at
[email protected] Remember, you have a warranty,
and we know how to make them feel better.
Volume
• If you hold down the or , the volume will go
multiple steps in the direction of the button you are
holding.
• Some audio recordings are louder or quieter than
others. Adjust the volume level accordingly.
23
TABLE OF CONTENTS
Page 26

24
HELP ME, RIVA!
rivaaudio.com/support
24
TABLE OF CONTENTS
Page 27

Q: Why is there no power to the RIVA S?
Q & A:
Troubleshooting
• Check to see if you AC adapter is plugged in and the BATT ON/OFF button is in the ON position.
• Make sure the Battery icon LED is not red, indicating the RIVA has less than 30% battery power left.
Q: I plugged in my phone/tablet to charge through my RIVA S, but it’s not charging.
• Check to see if the BATT ON/OFF button is in the ON position.
• Make sure the Battery icon LED is not red. RIVA S will only charge if it has more than 30% of battery remaining. A red Battery icon LED
means the RIVA has less than 30% of battery power left.
Q: I wave my hand over the RIVA S and nothing happens.
• Check to see if the BATT ON/OFF button is in the ON position.
• Check to see if the battery is charged, and if not, plug into the wall with the provided power supply.
• Proximity sensing works between 1 to 2 inches (25 – 50 mm) from the top cover of RIVA S.
Q: How do I play from a non-Bluetooth® device?
• Connect your device using the Auxiliary 3.5 mm input and select the Auxiliary 3.5 mm input, indicated by the green light on the .
25
TABLE OF CONTENTS
Page 28

Q: RIVA S is paired with my phone/tablet, but I can’t hear anything.
• Make sure the is not pulsing. If pulsing, the RIVA S is in Bluetooth® pairing mode.
• Make sure the music is playing on the device.
• Make sure RIVA RIVA S is selected as the output device.
• Check to see if the is solid blue. If solid blue, RIVA S is muted.
• Increase volume level.
• Make sure the Bluetooth® input is selected. The will be solid blue. Green indicates the Auxiliary 3.5 mm input is selected.
Q: I don’t like the current voice prompts, what can I do?
RIVA S has two audio prompt settings: voice and tones. To switch, go to the Settings page in the RIVA Audio app
to make your selection. If you choose to disable the voice prompts, these will be replaced with tone prompts.
Have more questions, visit
rivaaudio.com/support
Q & A:
Troubleshooting
26
TABLE OF CONTENTS
Page 29
ADDITIONAL SUPPORT:
Online Resources / Reference
●
FAQ:
rivaaudio.com/support
●
Register your RIVA S
rivaaudio.com/registeration
●
Firmware Updates
Download the latest firmware updates for your RIVA S directly from rivaaudio.com/support.
●
Digital User Guide
This guide is available in a variety of languages at rivaaudio.com/support.
●
Customer Support
1-844-GET-RIVA
rivaaudio.com/support
●
RIVA Audio App
Download the free RIVA Audio app from the App Store or Google Play™.
●
Technical Specifications
rivaaudio.com/products/riva-s
●
Privacy Policy
rivaaudio.com/support
●
Warranty Information
rivaaudio.com/support
●
Connect with RIVA!
facebook.com/RIVANation
@RIVAaudio
pinterest.com/RIVANation
instagram.com/RIVANation
RIVA Audio
You Tube
27
TABLE OF CONTENTS
Page 30

28
COVERING OUR ASSETS
rivaaudio.com/support
28
TABLE OF CONTENTS
Page 31
COMPLIANCE:
EU Countries
• This product is compliant with the CE directive. All returns must be made to the original place of purchase.
• WEEE Notice
The Directive of Waste Electrical and Electronic Equipment (WEEE), which entered into force as European Law on 13th February
2003, resulted in a major change in the treatment of electrical equipment at end-of-life.
The purpose of the directive is, as a first priority, the prevention of WEEE, and in addition, to promote the reuse, recycling and
other forms of recovery of such wastes as to reduce disposal.
The WEEE logo on the product or on its box indicating collection for electrical or electronic equipment consist of the crossed
out wheel bin, as shown below.
This product must not be disposed of or dumped with your other household waste. You are liable to dispose of all your
electronic and electrical waste equipment by relocating over to the specified collection point for recycling of such hazardous
waste. Isolated collection and proper recovery of your electronic equipment at the time of disposal will allow us to help
conserve natural resources.
Moreover, proper recycling of the electronic and electrical waste equipment will ensure safety of human health and
environment. For more information about electronic and electrical waste equipment disposal, recovery, and collection points,
please contact your local city center, household waste disposal service, shop from where you purchased the equipment, or the
manufacturer of the equipment.
• ROHS Compliance
This product is in compliance with Directive 2011/65/EU of the European Parliament and of the Council of 8 June 2011 of the
restriction of the use of certain hazardous substances in electrical and electronic equipment.
• EU Batteries Directive 2006/66/EC
A new battery directive 2006/66/EC on Battery and Accumulator replacing directive entered into force on the 26th September
2008. The directive applies to all types of batteries and accumulators (AA, AAA, button cells, lead acid, rechargeable packs)
including those incorporated into appliances except for military, medical and power tool applications.
The directive sets out rules for collection, treatment, recycling and disposal of batteries, and aims to prohibit
certain hazardous substances and to improve environmental performance of batteries and all operations in the
supply chain.
• Instructions for Users on Removal, Recycling and Disposal of Used Batteries
For products with a built-in-battery that last for the lifetime of the product, removal may not be possible for the
user. In this case, recycling or recovery centers handle the dismantling of the product and the removal of the
battery. If, for any reason, it becomes necessary to replace such a battery, this procedure must be performed
by authorized service centers.
In the European Union and other locations, it is illegal to dispose of any battery with household trash. All
batteries must be disposed of in an environmentally sound manner.
Contact your local waste-management ocials for information regarding environmentally sound collection,
recycling and disposal of used batteries.
WARNING: Danger of explosion if battery is incorrectly replaced. To reduce risk of fire or burns, don’t
disassemble, crush, puncture, short external contacts, expose to temperature above 60˚C (140˚F), or dispose of
in fire or water. Replace only with specified batteries. The symbol indicating “separate collection” for all
batteries and accumulators shall be the crossed-out wheeled bin shown in the far left column.
• For All Products with Wireless Operation
Audio Design Experts, Inc. hereby declares that this equipment is in compliance with the essential
requirements and other relevant provisions of Directive 1999/5/EC, ErP 2009/125/EC Directive and RoHS
2-11/65/EU Directive. The declaration of conformity may be viewed at rivaaudio.com/support.
This product qualifies for ENERGY STAR in the “factory default” setting, and this is the
setting in which power savings will be achieved. Changing the factory default settings or
enabling other features will increase power consumption that could exceed the limits
necessary to qualify for ENERGY STAR rating. We want to help you save energy.
29
TABLE OF CONTENTS
Page 32

COMPLIANCE:
FCC and IC (USA & CANADA only)
FCC Interference Communication
• This equipment has been tested and found to comply with the limits for a Class B digital device, pursuant to part 15 of the FCC rules. The limits are designed to provide reasonable protection against harmful interference in a residential installation.
This equipment generates, uses and can radiate radio frequency and, if not installed and used in accordance with the instructions, may cause harmful interference to radio communications. However, there is no guarantee that the interference will
not occur in a particular installation. If this equipment does cause harmful interference to radio or television reception, which can be determined by turning the equipment o and on, the user is encouraged to try and correct the interference by one
or more of the following measures:
- Reorient or relocate the receiving antenna.
- Increase the separation between the equipment and receiver.
- Connect the equipment into an outlet on a circuit dierent from that to which the receiver is connected.
- Consult the dealer or an experienced radio/TV technician for help.
FCC and IC Statements
• This device complies with the Pat 15 of the FCC Rules. Operation is subject to the following conditions:
- This device may not cause harmful interference, and
- This device must accept any interference received, including interference that may cause undesired operation.
- The Class B digital apparatus complies with Canadian ICES-003.
Under Industry Canada regulations, this radio transmitter may only operate using an antenna of a type and maximum (or lesser) gain approved for the transmitter by Industry Canada. To reduce potential radio interference to other users, the antenna
type and its gain should be so chosen that the equivalent isotropically radiated power (e.i.r.p.) is not more than that necessary for successful communication.
FCC CAUTION
• Any changes or modifications not expressly approved by the party responsible for compliance could void the user’s authority to operate this equipment. This device and its antenna(s) must not be co-located or operating in conjunction with any other
antenna or transmitter. To locate FCC identification numbers, please look on the underside of the RIVA S unit.
FCC and IC Radiation Exposure Information
• This equipment complies with FCC/IC RSS-102 radiation exposure limits set forth for an uncontrollable environment. This equipment should be installed and operated with minimum distance 20 cm between the radiator and your body.
Disposal and Recycling Instructions
This product must be disposed of according to local laws and regulations once it comes to the end of its life.
30
TABLE OF CONTENTS
Page 33
PLAY SAFE:
Safety Guidelines
• Use the RIVA S near water or pour water/other liquids
on the unit.
• Submerge your RIVA S in any liquid.
• Install near any heat sources such as radiators, heat
registers, stoves, or other apparatus (including
amplifiers) that produce heat.
• Puncture, throw, kick/punt, shred, crush, step on,
microwave, light on fire, or toss your RIVA S in the
dishwasher.
• Insert foreign objects into your RIVA S.
• Leave or store the RIVA S or any of its accessories over
or near your car’s airbag. Serious injury may result if the
airbag deploys.
• Place the RIVA S on high surfaces where the speakers
may shift or fall o the edge.
• Leave a battery on prolonged charge when not in use.
• Charge the battery in damp places.
• Block ventilation openings.
RIVA vouches that no entertainment or
sports celebrities were used or
exploited in laboratory testing during
the development and creation of the
RIVA RIVA S.
Your RIVA S is designed and manufactured to operate within defined design limits, and misuse may result in electrical shock or fire. To prevent
your RIVA from being damaged, the following rules should be observed f or the installation, use, and maintenance. Please read the following
safety instructions before operating your RIVA.
DO NOT: Caution: Care:
• Allow the power cord to be walked on or pinched,
particularly at plugs, convenience receptacles, and
the point where they exit from the apparatus.
• Disassemble, paint or blanket in stickers.
• Drag sharp objects across any surface.
• Leave in the sun for extended periods.• Place in low or
freezing temperatures.
• Use the included cords in the RIVA S packaging for
any other purpose other than the intended one.
• Defeat the safety purpose of the polarized or
grounding type plug. A polarized plug has two blades
with one wider than the other. A grounding type plug
has two blades a third grounded prong. The wide
blade or the third prong are provided for your safety. If
the provided plug does not fit into your outlet, consult
an electrician for the replacement of the obsolete
outlet.
• Try to replace the RIVA S battery. Contact us at
rivaaudio.com/support, and we will help you.
• Use only the manufactured supplied power
supply and accessories with your RIVA S.
• Only charge your RIVA S according to the
instructions provided by the RIVA Team in this
and online manuals.
• Do not dispose of the RIVA S or its battery in a
fire. Doing so could cause the battery to explode
causing injury or death.
• Listening to music at high volume over extended
period of time may damage your hearing. The
maximum volume levels achievable with RIVA
speakers may exceed safe levels for extended
listening. RIVA accepts no liability for hearing
loss, bodily injury or property damage as a result
of use or misuse of this product.
• Do not clean your RIVA S while it is charging because doing so could result
in electric shock.
• Clean your RIVA S with a soft dry cloth, preferably microfiber. Do not use
steel wool, grill brushes or other abrasive cleaners.
• If your RIVA S is under the weather, contact us at rivaaudio.com/support.
Remember you have a warranty, rivaaudio.com/support/warranty, and we
know how to make them feel better!
31
TABLE OF CONTENTS
Page 34

LEGAL:
Disclaimer
This RIVA S User Guide contains information that is subject to change without notice. For the most updated information or questions, visit
rivaaudio.com/support or e-mail [email protected].
©2014-2015 Audio Design Experts, Inc. All Rights Reserved. RIVA, Turbo Series by RIVA, ADX and Trillium are trademarks of Audio Design Experts, Inc.,
register in the US and other countries.
Member of the CSR plc group of companies. CSR plc registered in England and Wales, registered number 4187346, registered oce Churchill House,
Cambridge Business Park, Cowley Road, Cambridge, CB4 0WZ, United Kingdom. aptX™ and TrueWireless are trademarks of CSR plc or one of its group
companies and may be registered in one or more jurisdictions.
The Bluetooth® word mark and logos are registered trademarks owned by Bluetooth SIG, Inc. and any use of such marks by Audio Design Experts, Inc. is
under license.
iOS is a trademark or registered trademark of Cisco in the U.S. and other countries and is used under license.
App Store is a service mark of Apple Inc.
Android and Google Play are trademarks of Google Inc.
All other company and product names mentioned may be trademarks or service marks of their respective owners. Mention of any third-party products is
for informational purposes only and does not constitute an endorsement or recommendation. Audio Design Experts, Inc. assumes no responsibility for
these products’ performance or use of.
32
TABLE OF CONTENTS
Page 35

DESIGNED TO AMAZE
33
TABLE OF CONTENTS
 Loading...