

Rittal 3311.700, 3311.710, 3311.600,3311.800,3311.610,3311.810,3311.700,3311.900,3311.710,3311.910, 3311.600, 3311.900 Assembly And Operating Instructions Manual
...Page 1
TopTherm LCP Hybrid
3311.600 3311.800
3311.610 3311.810
3311.700 3311.900
3311.710 3311.910
Montage-, Installations- und Bedienungsanleitung
Assembly and operating instructions
Page 2

EN
Foreword
Foreword
Dear Customer!
Thank you for choosing a Rittal Liquid Cooling Package
(also referred to hereafter as "LCP").
This documentation applies to the LCP Hybrid unit.
Take time to read this documentation carefully.
Pay particular attention to the safety instructions in the
text and to section 2 "Safety instructions".
This is essential for:
– secure assembly of the Liquid Cooling Package
– safe handling and
– trouble-free operation.
Please keep the complete documentation readily available so that it is always on hand when needed.
We wish you every success!
Yours
Rittal GmbH & Co. KG
Rittal GmbH & Co. KG
Auf dem Stützelberg
35745 Herborn
Germany
Tel.: +49(0)2772 505-0
Fax: +49(0)2772 505-2319
E-mail: info@rittal.de
www.rimatrix5.com
www.rimatrix5.de
We are always happy to answer any technical questions
regarding our entire range of products.
2 Rittal Liquid Cooling Package
Page 3

Table of contents
Table of contents
1 Notes on documentation .................. 4
1.1 Storing the documents.................................. 4
1.2 Symbols used in these operating instructions 4
1.3 Associated documents ................................. 4
1.4 Normative instructions .................................. 4
1.4.1 Legal information concerning the operating instruc-
tions ..................................................................... 4
1.4.2 Copyright ............................................................. 4
1.4.3 Revision ................................................................ 4
2 Safety instructions ............................ 5
2.1 Important safety instructions ......................... 5
2.2 Service and technical staff ............................ 5
2.3 RoHS compliance ......................................... 5
3 Device description ............................ 6
3.1 General functional description ....................... 6
3.2 Air routing ..................................................... 8
3.3 Equipment assembly..................................... 9
3.3.1 Unit components .................................................. 9
3.3.2 Air/water heat exchanger with cold water
connection ......................................................... 10
3.4 Proper and improper usage ........................ 10
3.5 Supply scope of a Liquid Cooling Package . 11
12 Accessories .................................... 29
EN
13 Further technical information ........... 30
13.1 Hydrological information............................. 30
13.2 Characteristic curves and tables................. 30
13.2.1 General .............................................................. 30
13.2.2 Determination of the dew point ........................... 30
13.2.3 Pressure loss ...................................................... 31
13.2.4 Cooling output at a room temperature of 21°C ... 33
13.2.5 Cooling output at a room temperature of 22°C ... 35
13.2.6 Cooling output at a room temperature of 23°C ... 37
13.2.7 Cooling output at a room temperature of 24°C ... 39
13.2.8 Cooling output at a room temperature of 25°C ... 42
13.3 Overview drawing....................................... 45
14 Preparation and maintenance of the
cooling medium .............................. 49
15 List of spare parts ........................... 50
16 Glossary ......................................... 51
4 Transportation and handling ........... 12
4.1 Transportation ............................................ 12
4.2 Unpacking .................................................. 12
5 Assembly and siting ....................... 13
5.1 General....................................................... 13
5.1.1 Installation site requirements ............................... 13
5.1.2 Installation guidelines .......................................... 13
5.2 Assembly procedure ................................... 14
5.2.1 General .............................................................. 14
5.2.2 Seal the server enclosure .................................... 14
5.2.3 Dismantle the rear server enclosure door ............ 14
5.2.4 Fit the door latch mechanisms ............................ 15
5.2.5 Fit the LCP Hybrid .............................................. 15
5.2.6 Fitting the potential equalisation .......................... 16
5.2.7 Install the air routing kit (optional) ........................ 16
5.2.8 Remove the mounting aid ................................... 16
6 Installation ...................................... 18
6.1 Cooling water connection ........................... 18
6.2 Bleeding the air from the heat exchanger .... 19
6.3 Installing the cover ...................................... 20
7 Commissioning checklist ................ 22
8 Troubleshooting ............................. 24
9 Inspection and maintenance .......... 25
10 Storage and disposal ..................... 26
11 Technical specifications ................. 27
11.1 10 kW versions ........................................... 27
11.2 20 kW versions ........................................... 28
Rittal Liquid Cooling Package 3
Page 4
1 Notes on documentation
EN
1 Notes on documentation
1.1 Storing the documents
The assembly, installation and operating instructions as
well as all applicable documents are an integral part of
the product. They must be passed to those persons
who are engaged with the unit and must always be available and on hand for the operating and maintenance
personnel.
1.2 Symbols used in these operating instructions
The following symbols are used in this documentation:
Danger!
Hazardous situation which may lead to
death or serious injury if the instructions
are not followed.
Warning!
Hazardous situation which may lead to
death or severe injury if the instructions
are not followed.
in this documentation. Liability for indirect damages associated with the supply or use of this documentation is
excluded to the extent allowable by law.
1.4.2 Copyright
The distribution and duplication of this document and
the disclosure and use of its contents are prohibited unless expressly authorised.
Offenders will be liable for damages. All rights created by
a patent grant or registration of a utility model or design
are reserved.
1.4.3 Revision
Rev. 1A of 08/10/2014
Caution!
Hazardous situation which may lead to
(minor) injuries if the instructions are not
followed.
Note:
Information concerning individual proce-
dures, explanations, or tips for simplified approaches. It also indicates situations which
may result in material damage.
This symbol indicates an "Action Point" and shows
that you should perform an operation/procedure.
1.3 Associated documents
In conjunction with these assembly, installation and operating instructions, the superordinate system documentation (if available) also applies.
Rittal GmbH & Co. KG is not responsible for any damage
which may result from failure to comply with these assembly, installation and operating instructions. The
same applies to failure to comply with the valid documentation for the accessories used.
1.4 Normative instructions
1.4.1 Legal information concerning the operating
instructions
We reserve the right to make changes in content. Rittal
GmbH & Co. KG will not be held liable for any mistakes
4 Rittal Liquid Cooling Package
Page 5
2 Safety instructions
2 Safety instructions
The Liquid Cooling Packages produced by Rittal GmbH
& Co. KG are developed and produced with due regard
to all safety precautions. Nevertheless, the unit still poses a number of unavoidable dangers and risks. The
safety instructions provide you with an overview of these
dangers and the necessary safety precautions.
In the interests of your own safety and the safety of others, please read these safety instructions carefully before assembly and commissioning of the Liquid Cooling
Package.
Follow the user information found in these instructions
and on the unit carefully.
2.1 Important safety instructions
Danger! Injury due to falling loads!
Do not stand under suspended loads
when transporting the unit with a hoist
trolley, a forklift, or a crane.
Warning! Danger of cut wounds, especially from the sharp edges of the heat
exchanger module!
Put on protective gloves before beginning assembly or cleaning work!
Warning! Injury due to falling loads!
If the server rack is not fully populated,
there is a risk of it tipping over when the
Liquid Cooling Package is swung away.
Heavy equipment should be installed in
the bottom part of the server enclosure.
Where necessary, secure the server enclosure to the floor to prevent it tipping
over.
Caution! Risk of malfunction or damage!
The medium necessary for the control
system, i.e. cooling water, must be available throughout the entire operating
time.
Caution! Risk of malfunction or damage!
It is vital that the manufacturer's consent is obtained before adding antifreeze!
Caution! Risk of malfunction or damage!
During storage and transportation below
freezing point, the water circuit should
be drained completely using compressed air!
2.2 Service and technical staff
The installation, commissioning, maintenance and repair
of this unit may only be carried out by qualified, trained
mechanics.
Only properly instructed personnel may work on a unit
while in operation.
2.3 RoHS compliance
The Liquid Cooling Package fulfils the requirements of
EU Directive 2011/65/EC on the Restriction of Use of
Certain Hazardous Substances in Electrical and Electronic Equipment (RoHS) of 1 July 2011.
Note:
The corresponding information about the
RoHS Directive can be found on our website
at www.rittal.com.
EN
Caution! Risk of malfunction or damage!
Do not modify the unit! Use only original
spare parts!
Caution! Risk of malfunction or damage!
Proper operation can only be ensured if
the unit is operated under the intended
ambient conditions. As far as possible,
be sure that the ambient conditions for
which the unit is designed are complied
with, e.g. temperature, humidity, air purity.
Rittal Liquid Cooling Package 5
Page 6
3 Device description
bene
Server
erver
r
HD
t
t
t
LCP Hybrid
Server rack
12 345
EN
3 Device description
3.1 General functional description
The LCP Hybrid is essentially an air/water heat exchanger. It cools the room by cooling the hot air from devices
in a server enclosure to the ambient temperature. This
prevents the temperature at the installation site from rising as a result of heat loss from the IT components. To
this end, the device is fitted to the rear of a server enclosure.
Air routing follows the "front to back" cooling principle,
and is effected by the device fans built into the server enclosure. The expelled warm air is routed through the air/
water heat exchanger of the Liquid Cooling Package. To
this end, the fans of the built-in 482.6 mm (19") equipment must be capable of overcoming the airside pressure loss from the LCP Hybrid.
There, the air is cooled and then flows out into the ambient air at the rear.
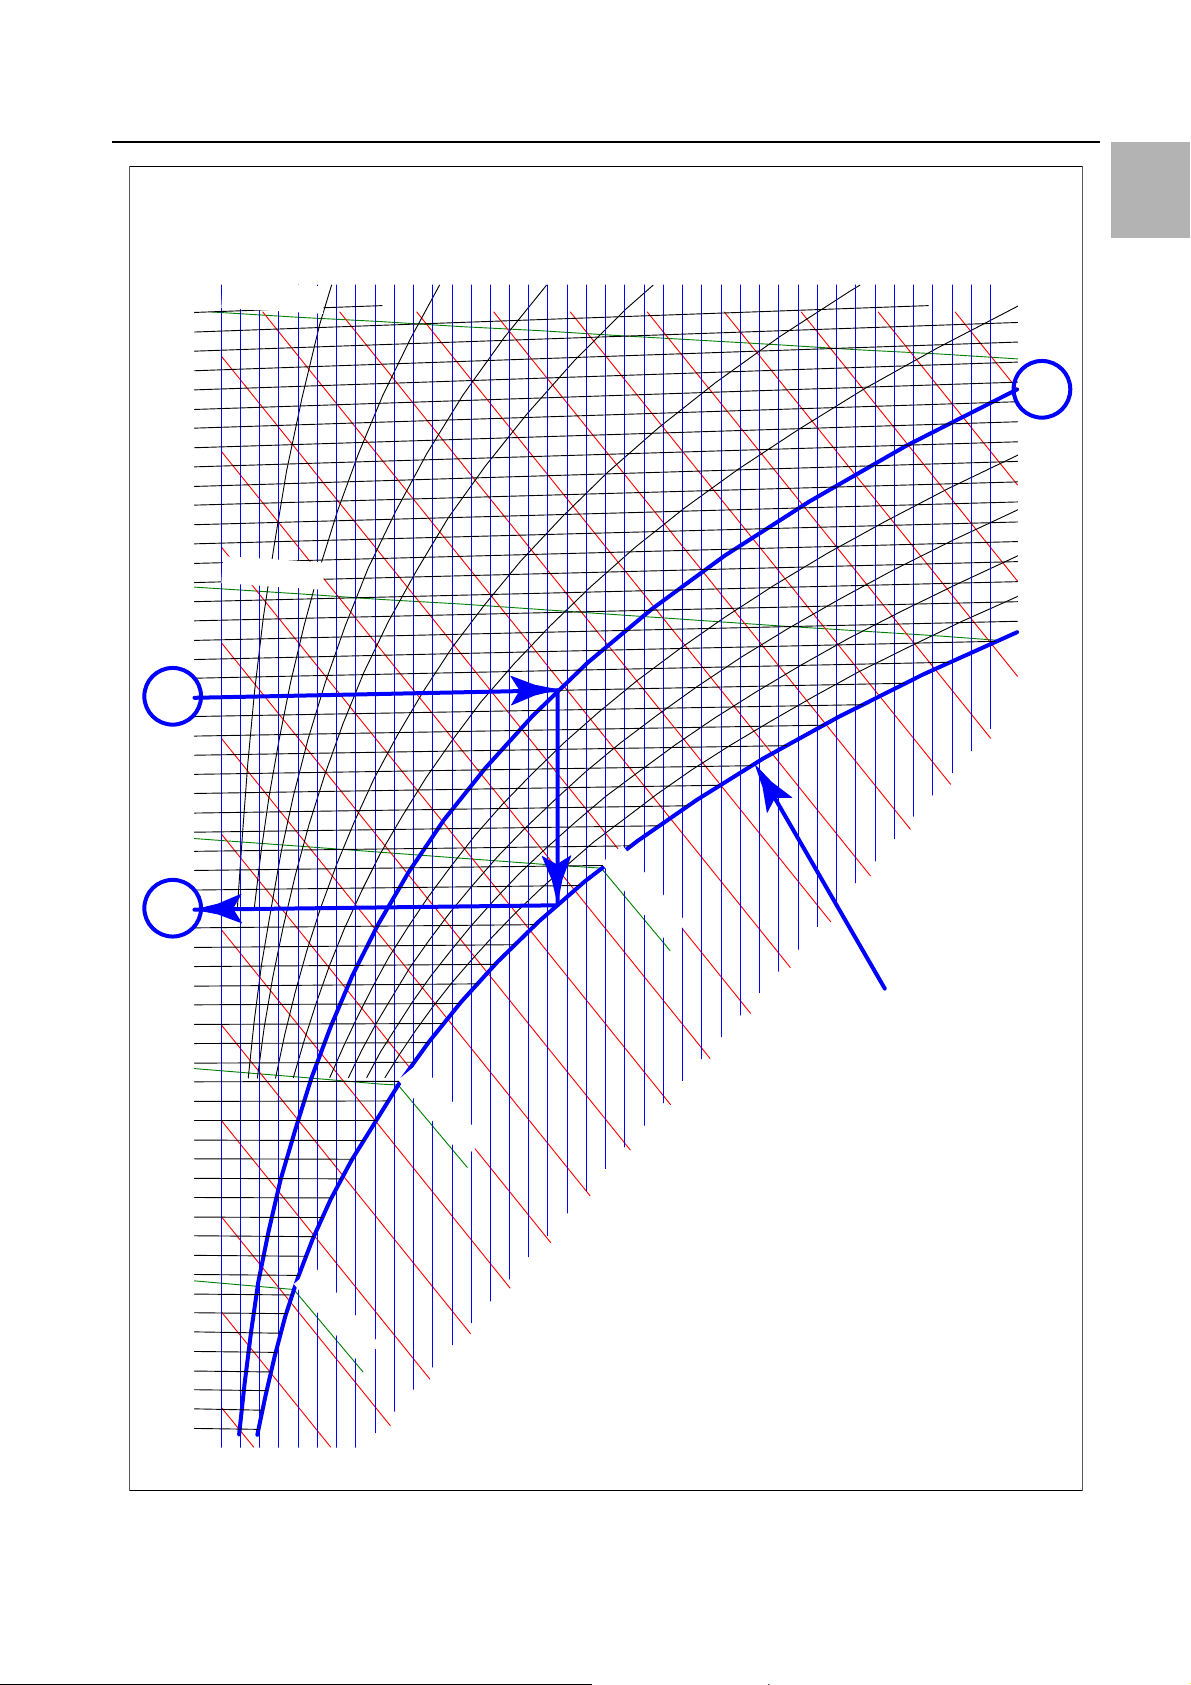
Note:
The water inlet temperature must always be
selected (controlled) to be above the dew
point for the existing ambient temperature
and humidity in the data centre. The dew
point can be found in the Mollier h-x diagram
(fig. 2).
Furthermore, we advise compliance with the
ASHRAE standard "ASHRAE TC 9.9, 2011
Thermal Guidelines for Data Processing Environments".
Note:
As an alternative to use of the h-x diagram, in
section 13.2.2 "Determination of the dew
point", you will find tables showing the dew
point for selected temperatures and air humidity levels.
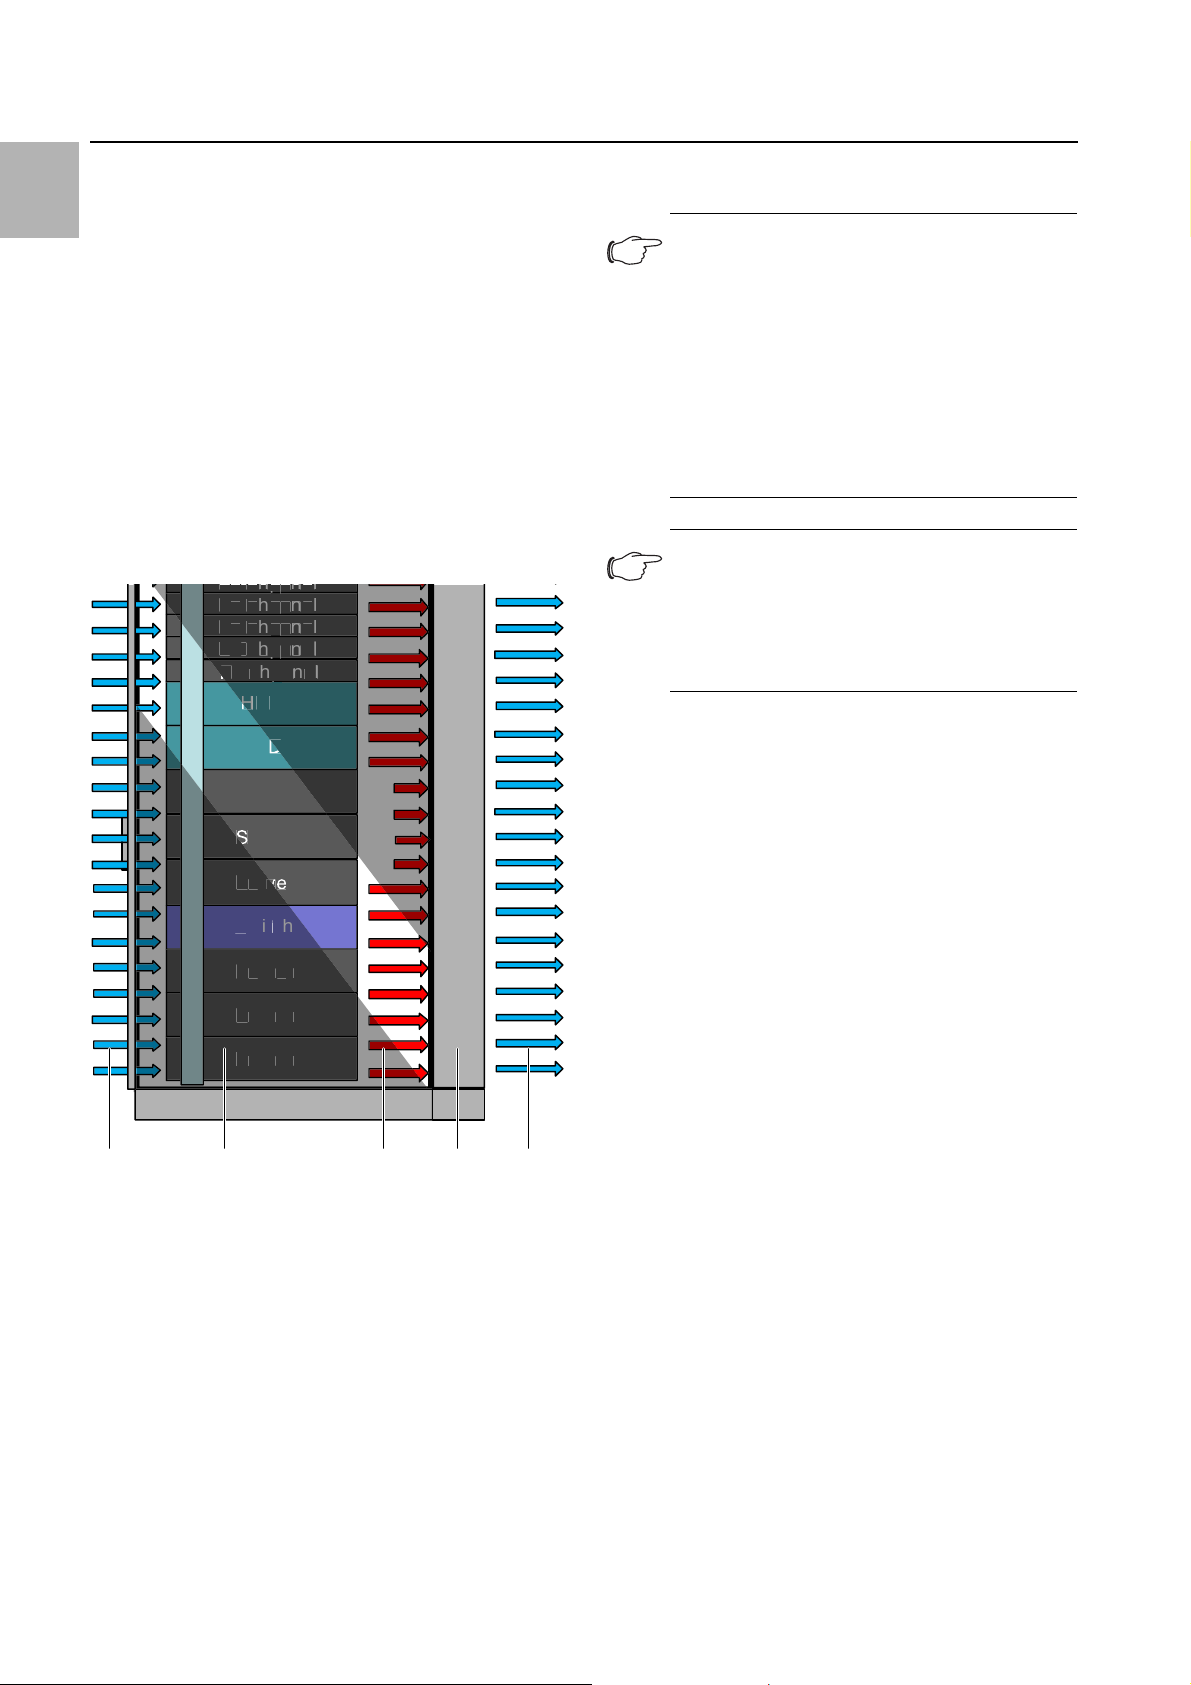
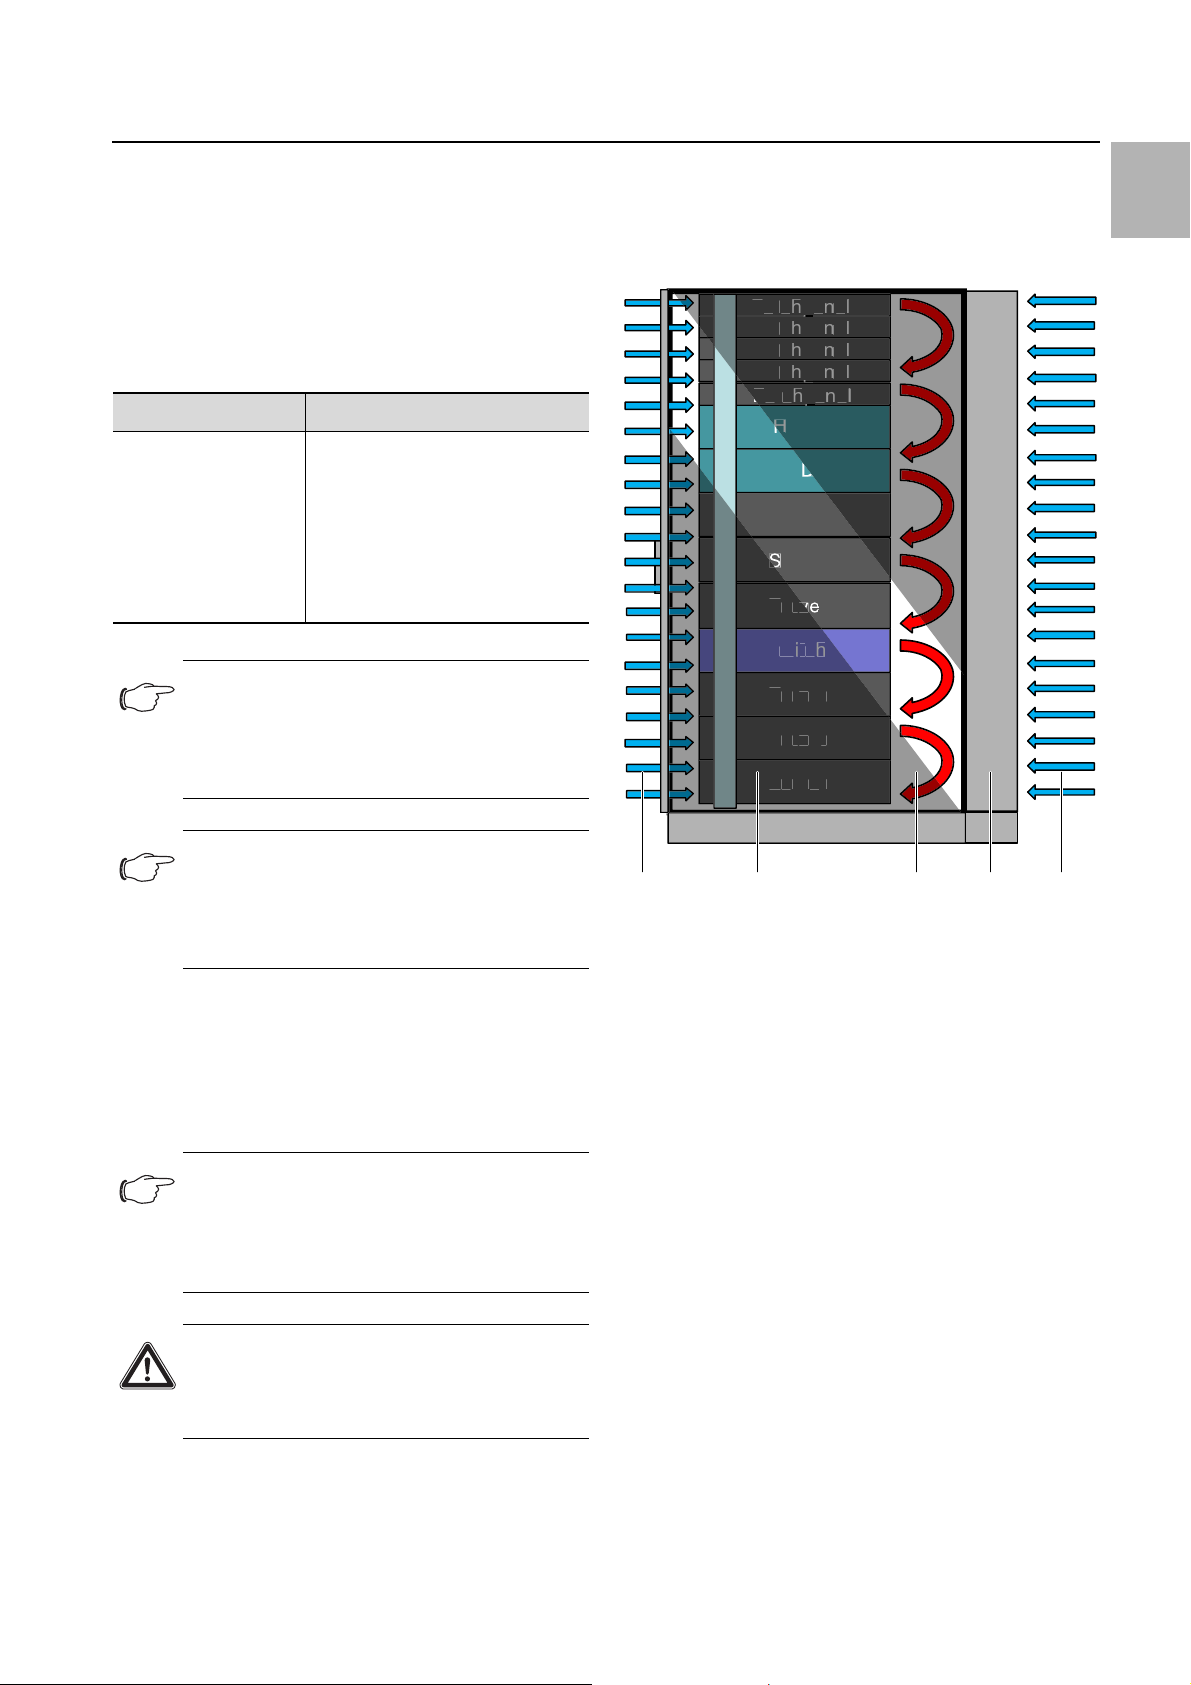
Fig. 1: Air routing on the LCP Hybrid – Side view
Key
1 Cold ambient air
2 Server rack with installed equipment
"
3 Hot airflow from 482.6 mm (19
4 LCP Hybrid with air/water heat exchanger
5Cooled air
Immediately in front of the heat exchanger is a row of
heat pipes. These heat pipes support even distribution
of the thermal load over the entire height of the heat exchanger.
In the heat exchanger, the thermal energy (heat loss
from the devices) is transferred to a cold water system.
6 Rittal Liquid Cooling Package
) equipment
Page 7
3 Device description
0 g/kg
Temperature
1.05 kg/m3
40˚
35˚
30˚
1.10 kg/m3
25˚
22˚
20˚
2 g/kg
4 g/kg
6 g/kg
8 g/kg
10 g/kg
12 g/kg
14 g/kg
16 g/kg
30% 20% 15% 10% 5%
18 g/kg
Water
20 g/kg
40%
50%
60%
70%
80%
90%
100%
EN
Rel. Humidity
15˚
11˚
10˚
-5˚
-10˚
-15˚
60 kJ/kg
1.15 kg/m3
5˚
1.20 kg/m3
0˚
20 kJ/kg
1.25 kg/m3
0
kJ/kg
40 kJ/kg
Dew point curve
Enthalpy
Mollier h-x diagram for humid air – pressure 0.950 bar (537.000 m / 10.000˚C / 80.000% rF)
Fig. 2: Mollier h-x diagram for humid air
Rittal Liquid Cooling Package 7
Page 8
3 Device description
EN
3.2 Air routing
In order to ensure adequate cooling in the server enclosure, it is important to ensure that the hot air from the
fans of the installed equipment is routed directly via the
LCP Hybrid and is prevented from accumulating inside
the server enclosure.
Targeted air routing in the server enclosure has a major
effect on the heat loss to be dissipated. It is therefore important to assemble the device and the additional installed equipment in the server enclosure as described
in section 5.2 "Assembly procedure".
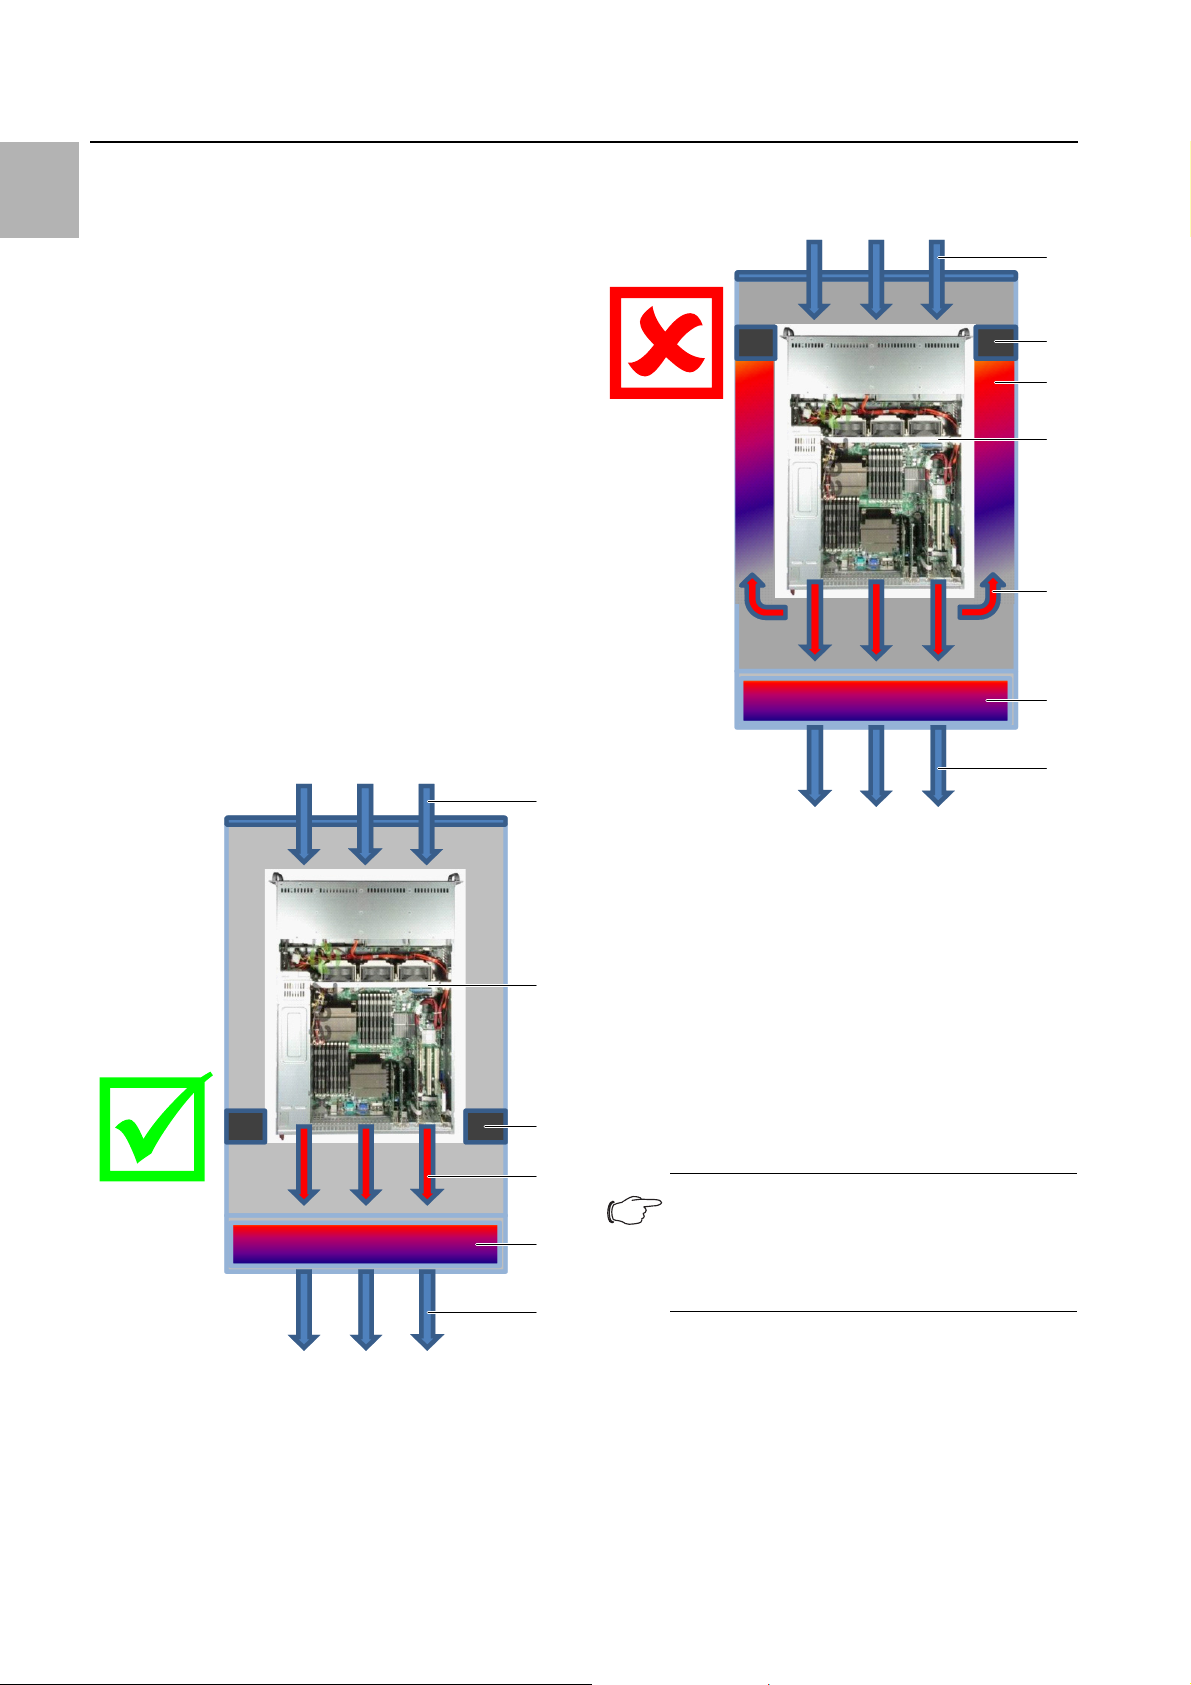
In order to ensure targeted air routing in the system, the
server enclosure should be divided vertically into warm
air and cold air sections. The division is accomplished in
the rear section of the server assembly to the left and
right of the 482.6 mm (19") level using air baffle plates,
which, depending on the enclosure width and the number of server enclosures to be cooled, can be ordered as
accessories (see section 12 "Accessories").
This prevents the hot air from flowing back at the sides
adjacent to the server installations and forming hot spots
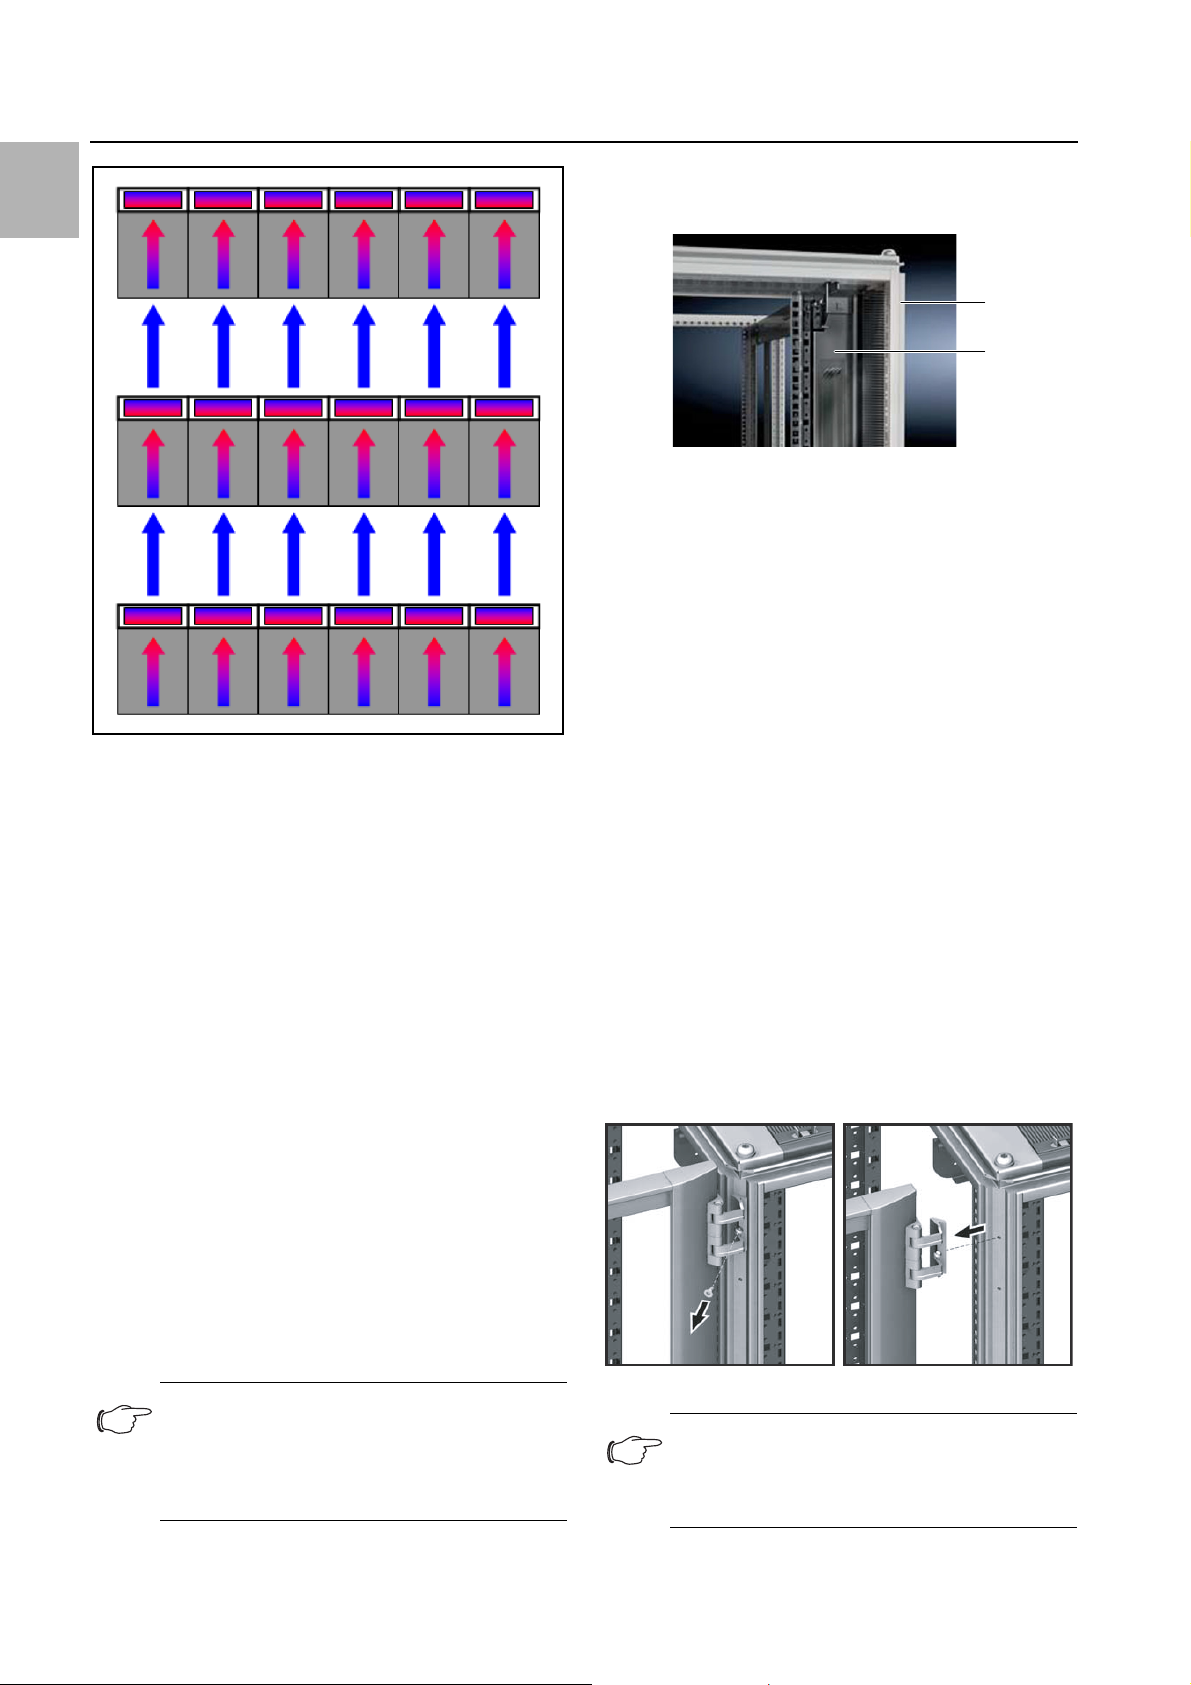
(fig. 3).
1
2
If the air baffle plates remain in the front section of the
server enclosure, hot spots may form in the server enclosure (fig. 4).
1
2
3
4
5
6
7
Fig. 4: Incorrect arrangement of the partitioning plates (air baf-
fle plates)
Key
1 Cold ambient air
2 Partitioning plates in the front section
3 Formation of a hot spot
4 Installed devices
5 Misdirected hot airflow
6 LCP Hybrid with air/water heat exchanger
7Cooled air
If devices which require sideways air throughput are built
into the server enclosure (e.g. switches, router, etc.),
these may be cooled via targeted repositioning of the air
3
baffle plates.
4
Note:
When using devices which require sideways
5
air throughput, repositioning of the air baffle
plates means that the entire width of the heat
exchanger is not used to optimum effect.
6
Fig. 3: Correct arrangement of the partitioning plates (air baffle
plates)
Key
1 Cold ambient air
2 Installed devices
3 Partitioning plates in the rear section
4Hot airflow
5 LCP Hybrid with air/water heat exchanger
6Cooled air
8 Rittal Liquid Cooling Package
Page 9
3 Device description
1
3.3 Equipment assembly
EN
3.3.1 Unit components
2
5
3
4
5
6
4
7
8
1
2
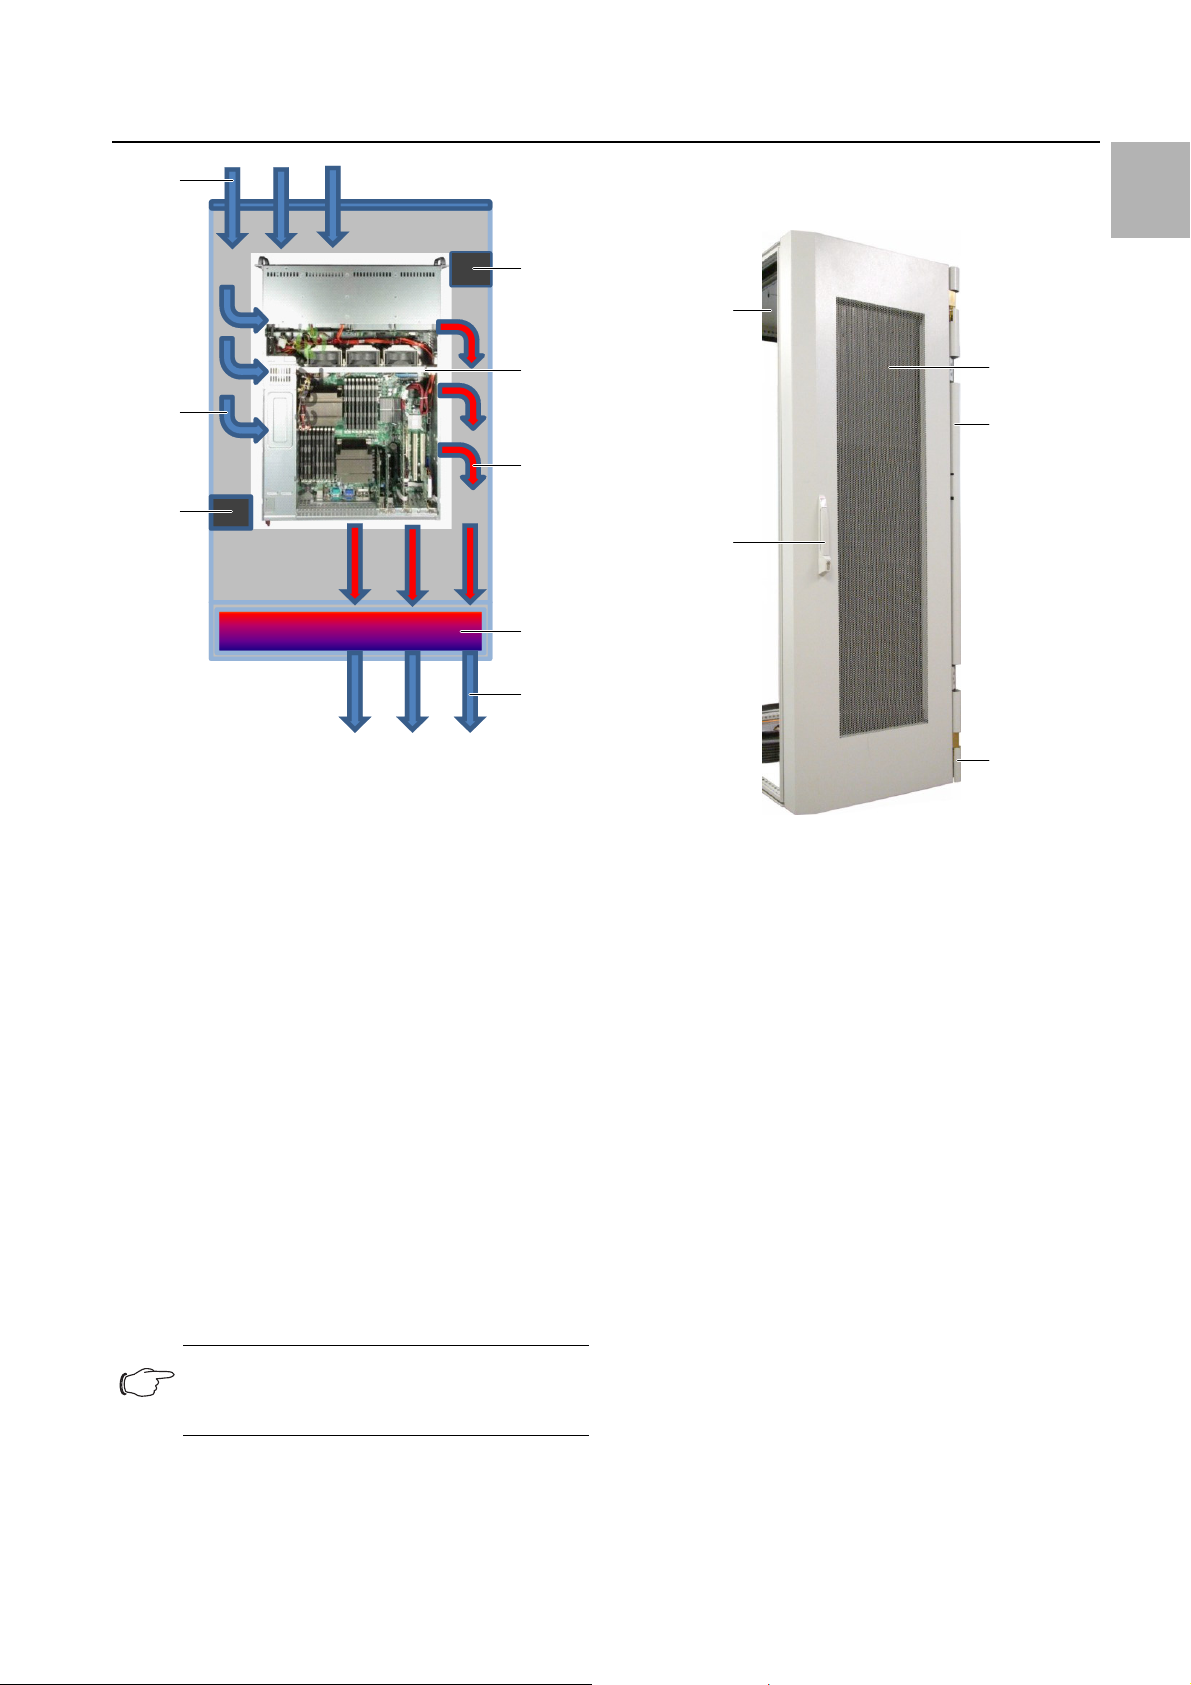
Fig. 5: Arrangement of the partitioning plates (air baffle plates)
for devices with sideways air throughput
Key
1 Cold ambient air
2 Partitioning plate in the front section
3 Installed devices
4 Cold airflow in the server enclosure
5 Hot airflow in the server enclosure
6 Partitioning plate in the rear section
7 LCP Hybrid with air/water heat exchanger
8Cooled air
Additionally, please observe the following regarding installed equipment in the server enclosure:
Ensure that the 482.6 mm (19") equipment is distributed as evenly as possible inside the server enclosure.
This prevents selective loading of the heat exchanger.
Install heavy equipment with high heat generation at
the bottom of the server enclosure, and passive components with low heat generation at the top.
If the server enclosure is not fully populated, seal the
open height units (U) in the 482.6 mm (19") level with
blanking plates, available as Rittal accessories (see
section 12 "Accessories").
3
Fig. 6: LCP Hybrid – Door closed
Key
1 LCP door with air/water heat exchanger
2Door bracket
3Cooling water connection
4 Door handle
5 Server enclosure
The Liquid Cooling Package is comprised of a rear door
with heat exchanger and a side frame.
The door is fitted with a special door bracket at the rear
of the server enclosure, and seals the server enclosure
with 4-point locking.
There is a maintenance door fitted on the inside of the
Liquid Cooling Package. Whilst closed, this provides access protection for the heat exchanger.
Note:
Foam strips may also be used as an alterna-
tive to air baffle plates.
Rittal Liquid Cooling Package 9
Page 10
3 Device description
EN
1
4
2
3
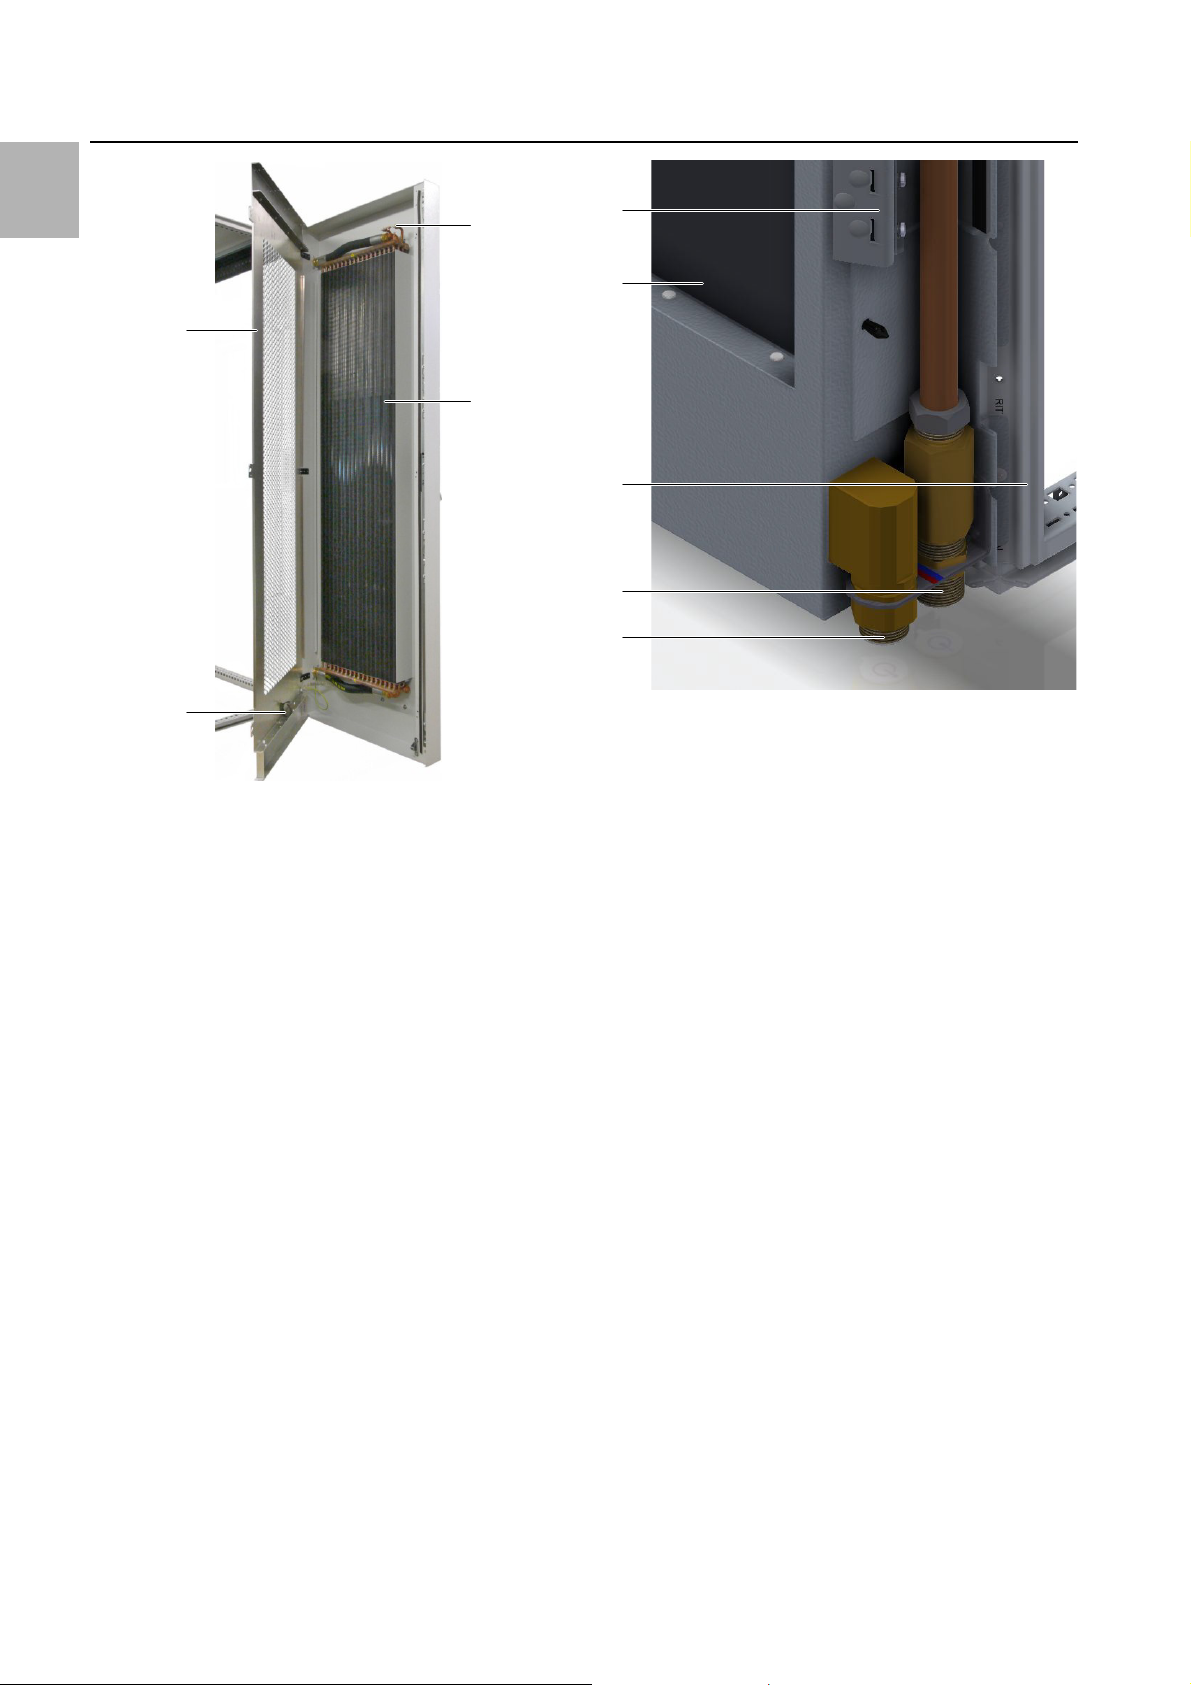
Fig. 7: LCP Hybrid – Maintenance door open
Key
1 Vent valves
2 Air/water heat exchanger with heat pipes
3Ventilation hose
4 Maintenance door
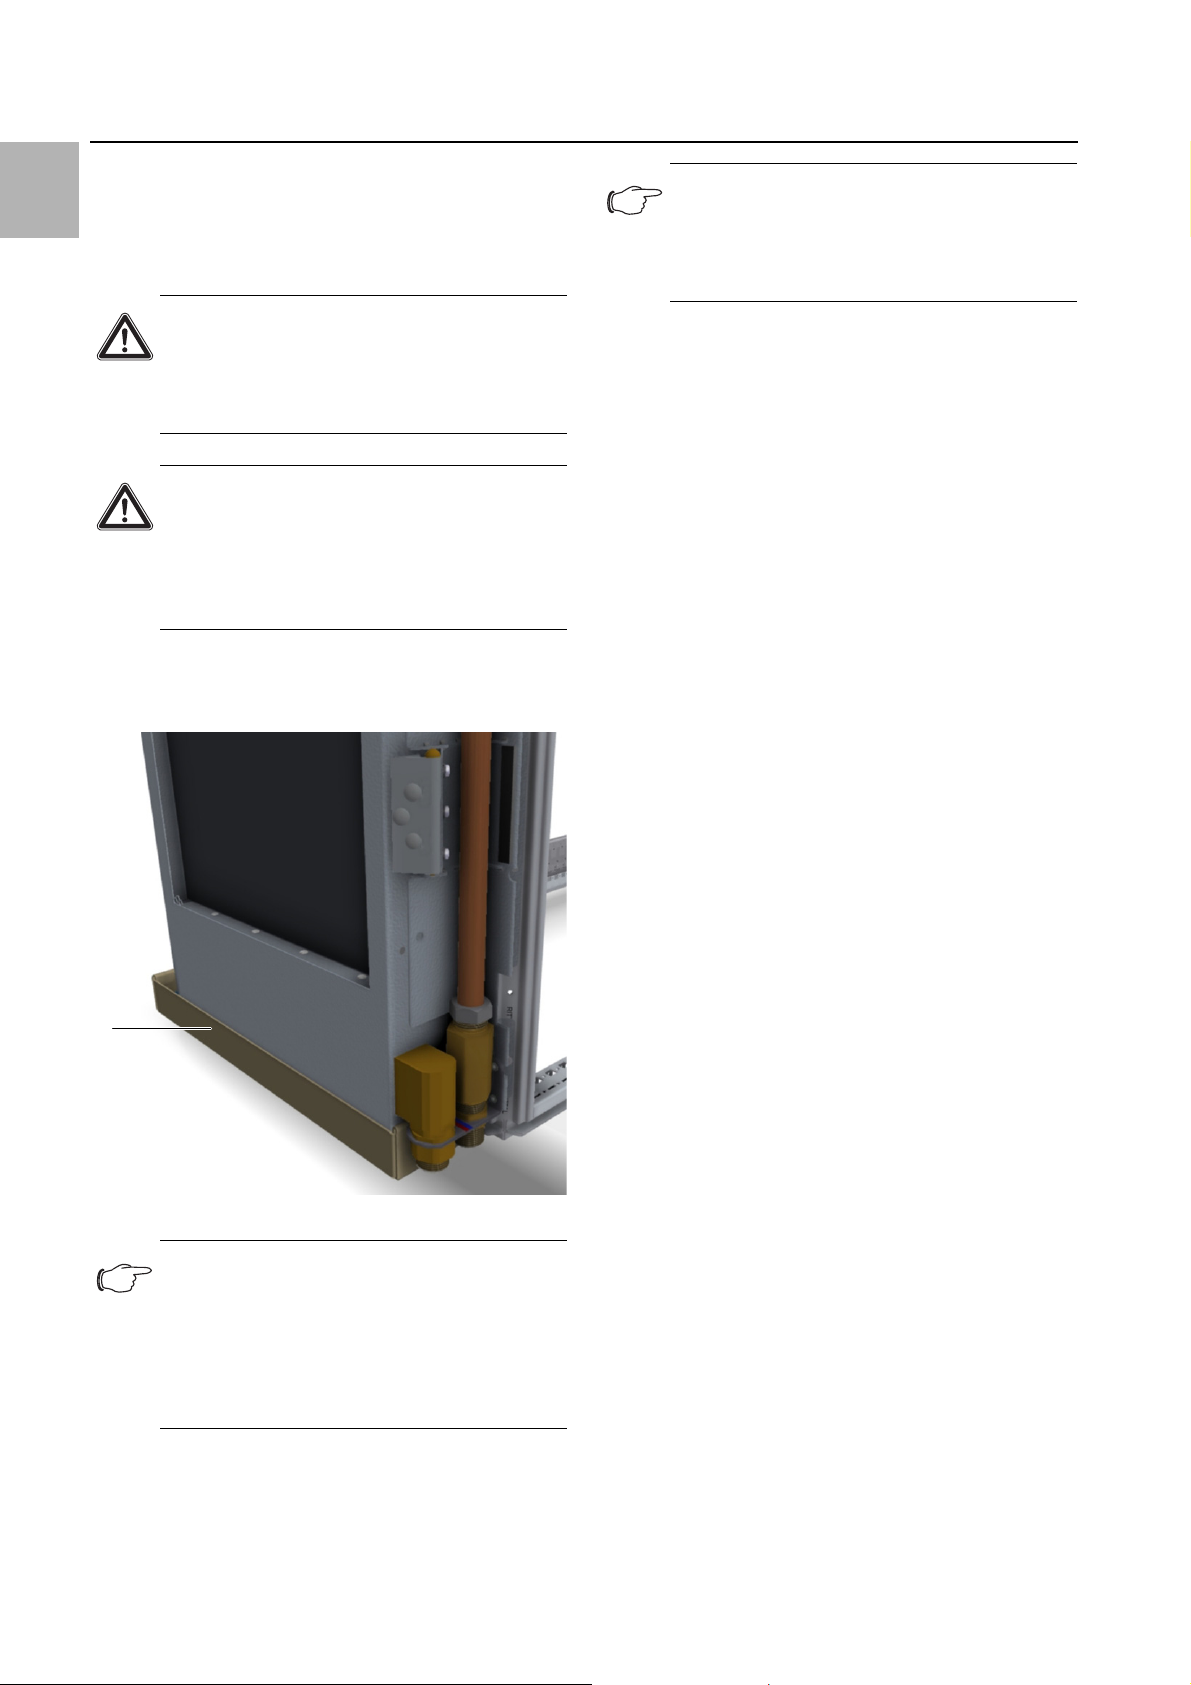
3.3.2 Air/water heat exchanger with cold water
connection
The air/water heat exchanger is fitted as a rear door in
the Liquid Cooling Package. The cooling water connection is connected to the main inlet and return connections by two DN 25 (G1") externally threaded pipes. The
connection nozzles are positioned vertically downwards.
1
2
3
4
5
Fig. 8: Connection nozzles at the bottom of the LCP Hybrid
Key
1 Door bracket hinge
2LCPHybrid
3 Server enclosure
4 Cooling water connection, inlet
5Cooling water connection, return
The cooling water is generally connected to the cold water system using an optional connection hose. Alternatively, the LCP Hybrid may also be connected on-site
with the installed pipework.
3.4 Proper and improper usage
The Liquid Cooling Package is used to dissipate high
heat losses and for the effective cooling of the waste air
from IT components built into a server enclosure.
The unit is state of the art and built according to recognised safety regulations. Nevertheless, improper use
can pose a threat to the life and limb of the user or third
parties, or result in possible damage to the system and
other property.
Consequently, the unit must only be used properly and
in a technically sound condition! Any malfunctions which
impair safety should be rectified immediately. Follow the
operating instructions!
Proper use also includes following the operating instructions and fulfilling the inspection and maintenance conditions.
10 Rittal Liquid Cooling Package
Page 11

Inappropriate use can be dangerous. Examples of inappropriate use include:
– Use of impermissible tools.
– Improper operation.
– Improper rectification of malfunctions
– Use of replacement parts which are not authorised by
Rittal GmbH & Co. KG.
3.5 Supply scope of a Liquid Cooling Package
The Liquid Cooling Package supply includes:
Qty. Parts
1 Liquid Cooling Package, ready for connection
1Cover
1 Assembly instructions
5 Posidrive raised countersunk screw
3 Contact washer
7 Screw
3 Device description
EN
1Bleed tool
Tab. 1: Supply scope of an LCP Hybrid
Rittal Liquid Cooling Package 11
Page 12
4 Transportation and handling
EN
4 Transportation and handling
4.1 Transportation
The Liquid Cooling Package is delivered on a pallet in a
protective box.
Caution!
Because of its height and narrow base,
the Liquid Cooling Package is subject to
tipping. Risk of toppling, especially after
the unit is removed from the pallet!
Caution!
Transportation of the Liquid Cooling
Package without a pallet:
Use only suitable and technically sound
lifting gear and load-bearing devices
with sufficient load capacity.
4.2 Unpacking
Remove the unit's packaging materials but not the
mounting aid.
Note:
Damage and other faults, e.g. incomplete delivery, should be reported immediately, in
writing, to the shipping company and to Rittal
GmbH & Co. KG.
Place the unit in its intended location.
1
Fig. 9: Mounting aid
Note:
After unpacking, the packaging materials
must be disposed of in an environmentally
friendly way. They consist of the following
materials:
Wood, polythene, polypropylene, corrugated
cardboard, steel.
Check the unit for any damage that may have occurred during transport.
12 Rittal Liquid Cooling Package
Page 13
5 Assembly and siting
t
t
t
5 Assembly and siting
5.1 General
5.1.1 Installation site requirements
In order to ensure problem-free operation of the Liquid
Cooling Package, the following conditions for the installation location should be observed:
Supply connections required at the installation site
Type of connection Connection description:
Cooling water connection:
Tab. 2: Supply connections required at the installation site
Note:
Please also observe the instructions and data
relating to the cold water connection as outlined in section 6.1 "Cooling water connection".
15°C inlet temperature (depending on relative humidity)
Max. 6 bar permissible operating
pressure
Volumetric flow: depending on
design (see section 13.2 "Characteristic curves and tables")
DN 25 (G1") external pipe thread
taken to ensure that external air streams are not pointing
directly at the rear of the LCP Hybrid. Such counterflows
prevent hot air from being expelled by the LCP Hybrid,
leading to the formation of a hot spot inside the server
enclosure.
HD
bene
Server rack
Server
erver
r
LCP Hybrid
EN
Recommendation:
To facilitate easy servicing of the Liquid
Cooling Package, maintain a distance of at
least 1 m between the rear of the device and
the nearest wall.
Floor conditions
– The floor of the installation space should be rigid and
level.
– Choose the installation site so that the unit is not situ-
ated on a step or uneven surface, etc.
Recommendation:
Room temperature +22°C at 47% relative air
humidity, according to ASHRAE guidelines.
The room temperature must correspond to
the required air intake temperature.
Caution! Risk of tipping over!
Stand-alone enclosures should be se-
cured to the floor to prevent them tipping over.
12 345
Fig. 10: Incorrect external air stream
Key
1 Cold ambient air
2 Server rack with installed equipment
3 Hot spot caused by failure to expel hot air
4 LCP Hybrid with air/water heat exchanger
5 External air stream onto the LCP Hybrid
A serial layout is the best option. This means that cold air
produced by the LCP Hybrid is drawn in by a server enclosure positioned behind it. The LCP Hybrid installed
there cools the air from this enclosure, and so on.
If several server enclosures are positioned adjacent to
one another, each enclosure must be partitioned separately. To this end, we recommend using a partition between two enclosures, and a corresponding side panel
as the termination.
5.1.2 Installation guidelines
The positioning in the rack aisles must be considered
when planning the layout. In particular, care should be
Rittal Liquid Cooling Package 13
Page 14
EN
5 Assembly and siting
Fig. 11: Serial layout
Secure one air baffle plate from the LCP Hybrid accessories to one of the rear supports in the server rack
(fig. 12).
1
2
Fig. 12: Air baffle plate in the server rack
Key
1 Server rack
2 Air baffle plate
If devices which require cooling via sideways air
throughput (e.g. switches, router, etc.) are built into the
server enclosure, the air baffle plates will need to be
repositioned to allow for cooling (fig. 5):
Attach the air baffle plate in the front section on one
side of the server rack.
Attach the air baffle plate in a suitable place in the rear
section on the other side of the server rack.
5.2 Assembly procedure
5.2.1 General
Before the Liquid Cooling Package can be bayed onto a
server enclosure, the following work should be carried
out:
– Seal the server enclosure,
– Dismantle the rear server enclosure door, if available
– Remove the lock pieces with the divided rear door and
– Fit the side panels.
After baying the Liquid Cooling Package, the optional air
routing kit may be installed.
5.2.2 Seal the server enclosure
In order to ensure targeted air routing in the system, the
server enclosure is vertically divided into hot air and cold
air zones by sealing the 482.6 mm (19") level.
Proceed as follows to seal the 482.6 mm (19") level:
If the server enclosure is only partially configured, seal
the open sections of the 482.6 mm (19") level using
blanking plates. Screw these tightly into the server
rack from the rear.
5.2.3 Dismantle the rear server enclosure door
For baying the LCP Hybrid, the rear door of the server
enclosure (if available) will need to be removed. The
frame of the LCP Hybrid is bayed to the server enclosure
frame in place of the existing server door.
Proceed as follows to dismantle the server enclosure
door:
Remove the sealing bungs from the four door hinges
using an appropriate tool (e.g. screwdriver).
Release and open the server enclosure door.
On each hinge, loosen the locking screw used to secure it to the server enclosure.
Note:
Fig. 13: Removing a door hinge
Blanking plates in the various height units (U)
and narrow air baffle plates are available as
Rittal accessories (see section 12 "Accessories").
14 Rittal Liquid Cooling Package
Note:
Support the server enclosure door so that it
will not fall as the hinges are loosened. If necessary, work with a second person.
Page 15
Remove the server enclosure door from the enclosure,
including the hinges, to the rear.
If divided rear doors were fitted to the server enclosure, the lock pieces in the centre will additionally need
to be removed.
5.2.4 Fit the door latch mechanisms
To lock the LCP Hybrid with the server enclosure, the
four lock pieces included with the supply are mounted
on the handle side.
4 x
M6 x 12
5 Assembly and siting
EN
1
2
3
MD= 9 Nm
Fig. 14: Lock piece
Rotate the first lock piece so that the "L" marking is
legible.
Screw the lock piece through the bottom opening on
one of the four mounting positions in the server enclosure.
In the same way, attach the three other lock pieces to
the lock side of the server enclosure.
5.2.5 Fit the LCP Hybrid
Note:
At least two people must work together to in-
stall the LCP Hybrid.
Leaving the LCP Hybrid in its packaging, position it behind the server enclosure on which it is to be fitted.
Open the packaging.
With at least two people, lift the LCP Hybrid out of the
packaging and set it upright.
Rotate the LCP Hybrid on the mounting aid, in such a
way that the mounting points and the cooling water
connections are on the right-hand side.
Push the LCP Hybrid against the server enclosure on
the mounting aid, and align it in such a way that the
mounting points in the door hinge of the LCP Hybrid
are aligned with the corresponding openings in the
server enclosure.
Fig. 15: Mounting the LCP Hybrid – Exterior
Key
1 Server enclosure
2 Mounting point
3 Door hinge
Screw the LCP Hybrid onto the four mounting points
to which standard server enclosure door hinges are
attached.
The LCP Hybrid is additionally screw-fastened to the inside of the server enclosure at the top and bottom.
Swing the LCP Hybrid away from the server enclosure
to give you access to the rear of the server enclosure.
Secure the LCP Hybrid on the inside top using two
screws included with the supply.
Rittal Liquid Cooling Package 15
Page 16
EN
5 Assembly and siting
1
2
2
3
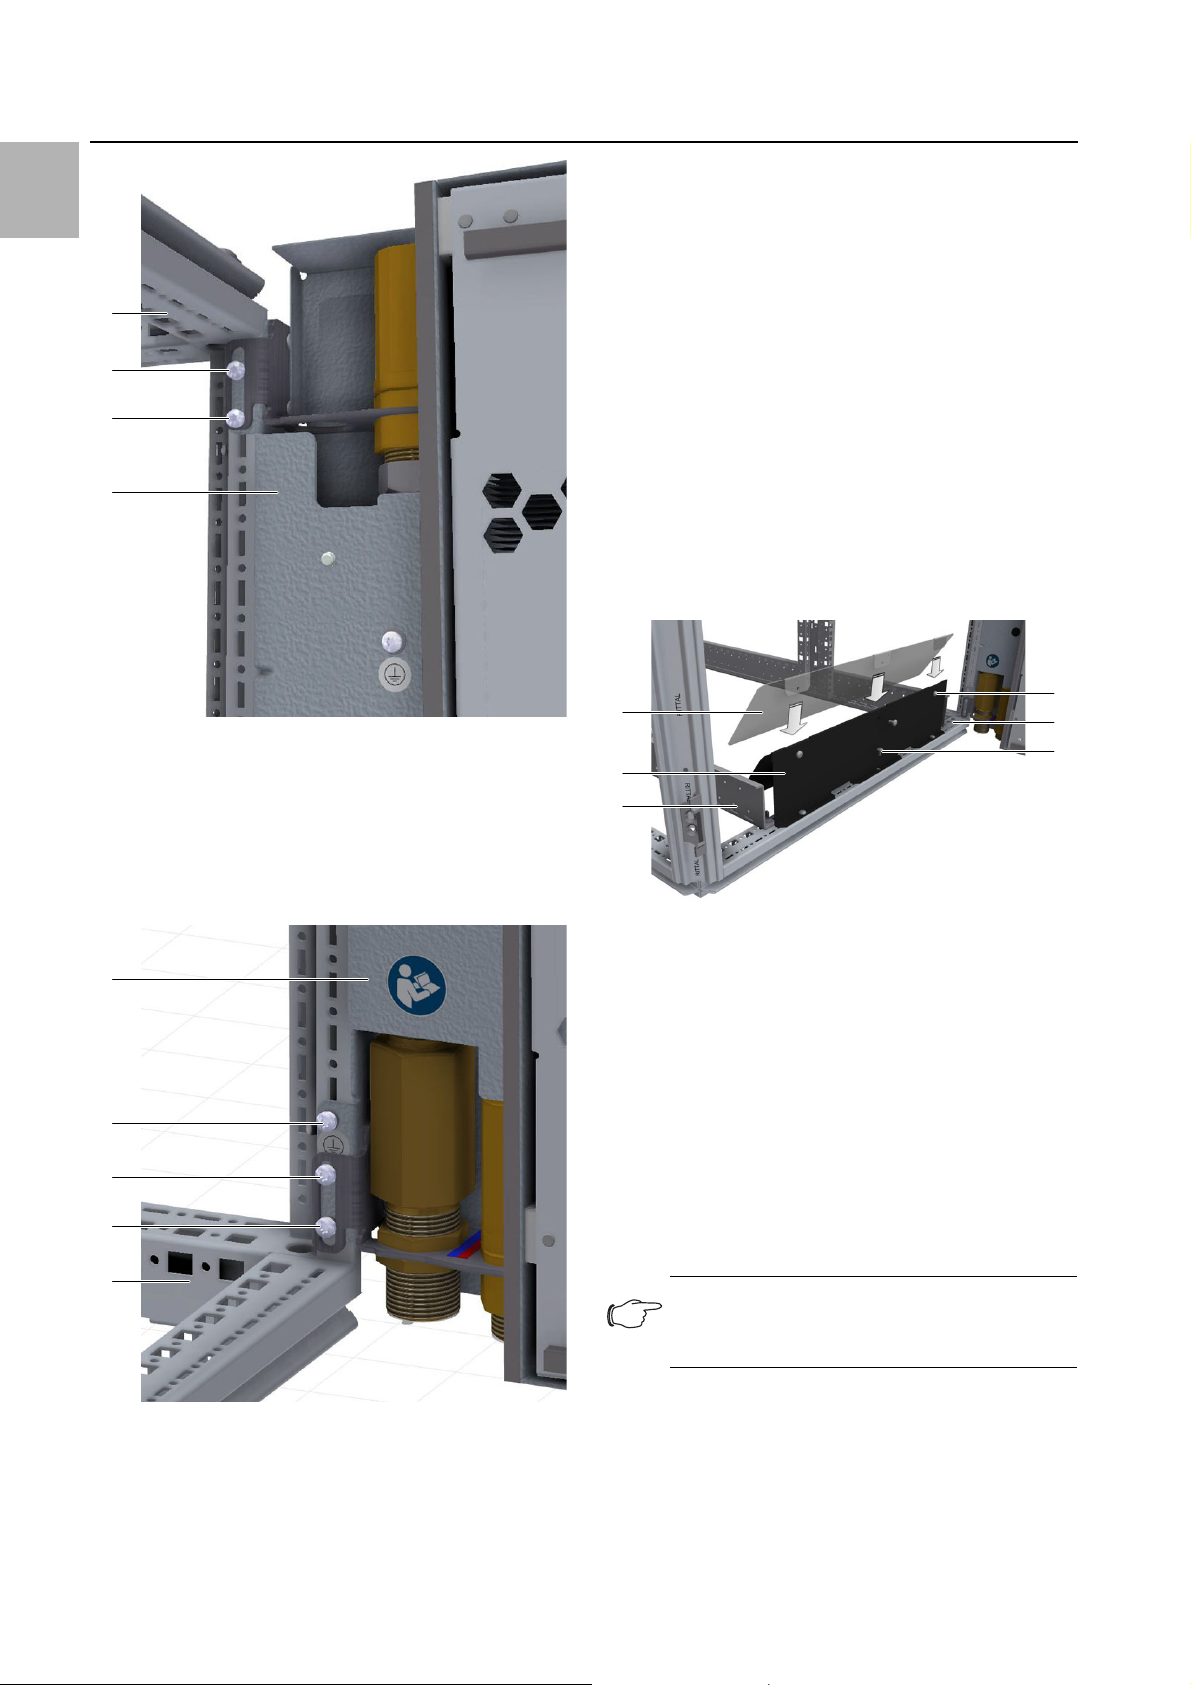
5.2.6 Fitting the potential equalisation
In order to ensure reliable potential equalisation between
the server enclosure and the LCP Hybrid, it is additionally necessary to fit the special potential equalisation
screw.
Screw the potential equalisation screw and contact
washer included with the supply into the point marked
with an earth symbol above the bottom two assembly
screws, as far as they will go (fig. 17, item 2).
5.2.7 Install the air routing kit (optional)
It is also important to ensure correct routing of the heated air through the LCP Hybrid for the devices installed at
the top and bottom of the server enclosure. To this end,
the air routing kit (3311.160) available as an accessory
should be mounted at the rear on the inside of the server
enclosure frame.
First, insert one air baffle plate each from above into
the corresponding fastening plate.
Fig. 16: Mounting the LCP Hybrid – Inside top
Key
1 Server enclosure
2 Assembly screws (2x)
3LCPHybrid
Secure the LCP Hybrid at the inside bottom using two
screws included with the supply.
1
2
3
3
4
6
5
4
Fig. 18: Air routing kit at the bottom of the server enclosure
Key
1 Assembly screw, air baffle plate – fastening plate (3x)
2 Server enclosure
3 Assembly screw, fastening plate – server enclosure (3x)
4 482.6 mm (19") level
5 Fastening plate
6 Air baffle plate
Secure the air baffle plate in this position using a total
of three assembly screws.
Mount the fastening plate, including the air baffle plate,
at the bottom rear of the server enclosure frame, and
secure it in this position, likewise with three assembly
screws.
Note:
The side position of the air baffle plate is de-
termined by the 482.6 mm (19") chassis.
1
2
3
Fig. 17: Mounting the LCP Hybrid – Inside bottom
Key
1LCPHybrid
2 Position for potential equalisation
3 Assembly screws (2x)
4 Server enclosure
16 Rittal Liquid Cooling Package
Fit the second air baffle plate in the server enclosure as
outlined above.
5.2.8 Remove the mounting aid
Finally, remove the mounting aid beneath the Liquid
Cooling Package.
Page 17

Fig. 19: Mounting aid on the LCP Hybrid
5 Assembly and siting
EN
Rittal Liquid Cooling Package 17
Page 18

6 Installation
EN
6 Installation
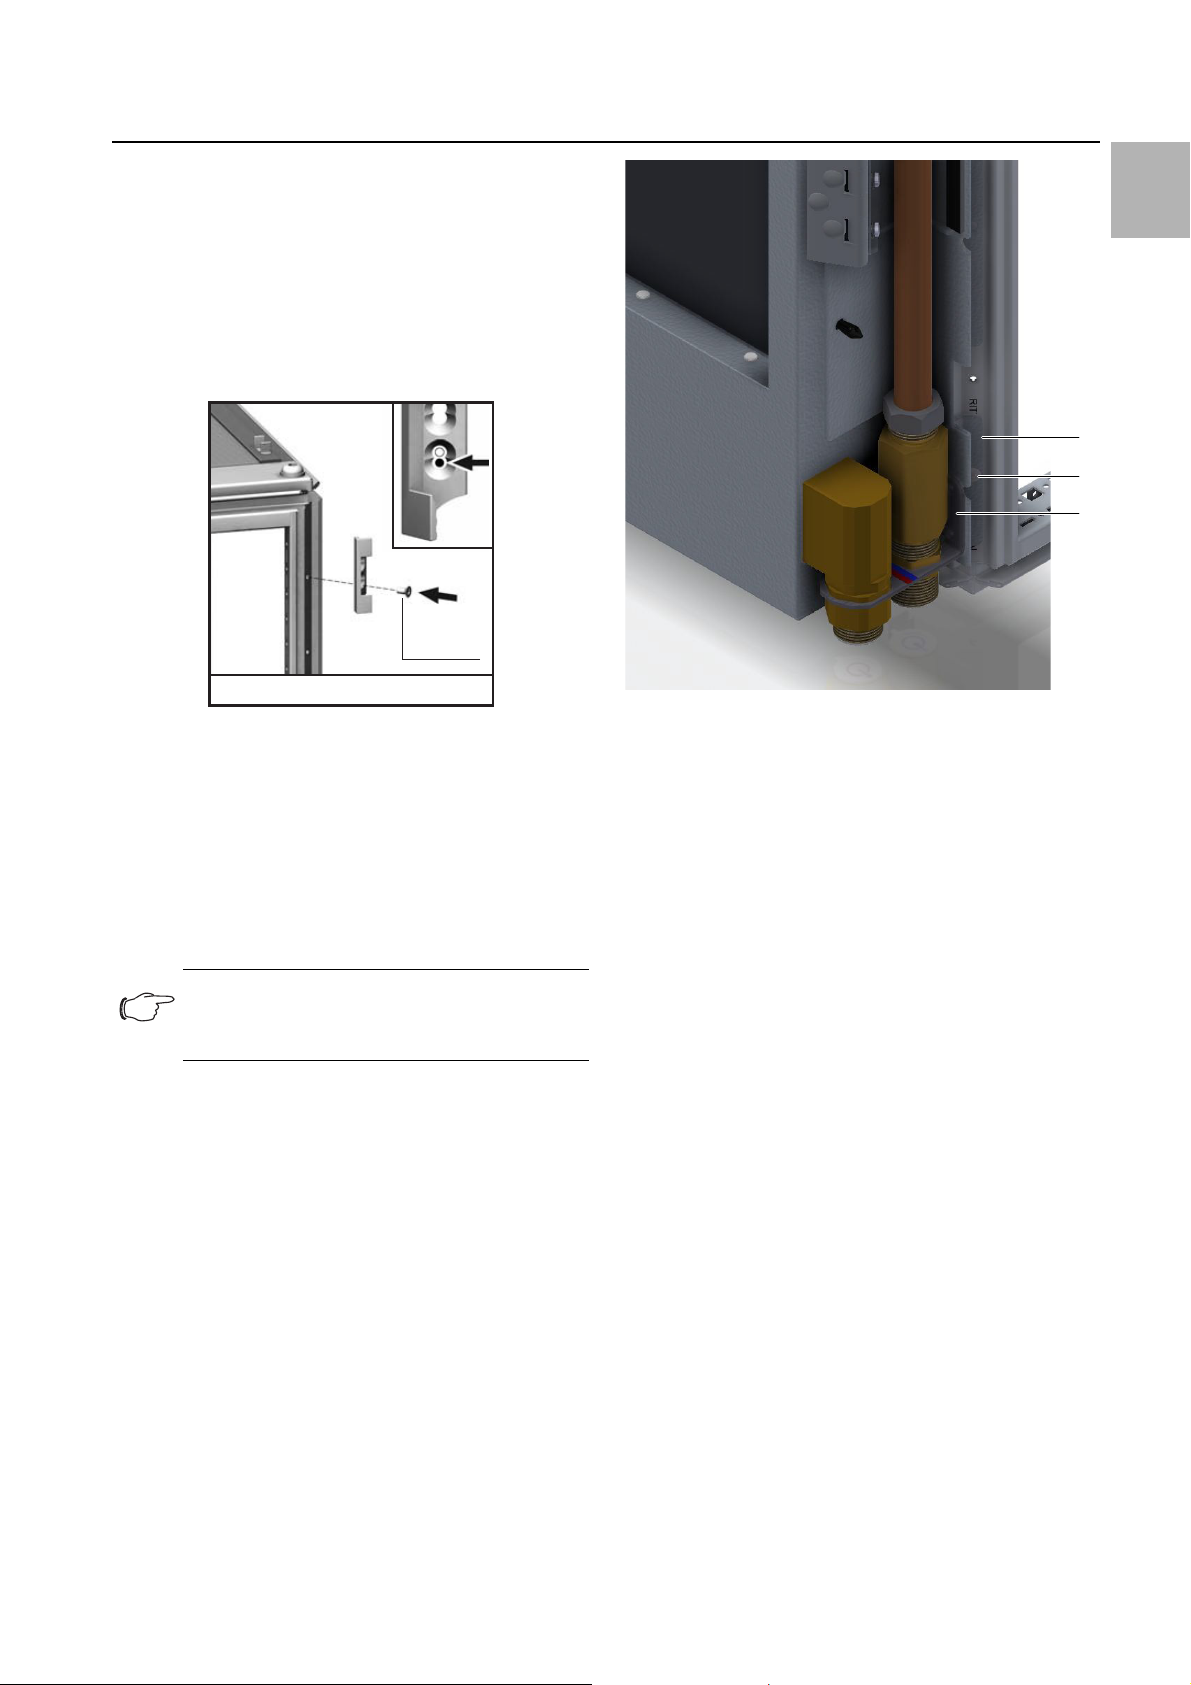
6.1 Cooling water connection
The Liquid Cooling Package is connected to the cold
water network via two DN 25 (G1") threaded pipe connections (external thread) on the inlet and return (on the
underside of the unit). The connection nozzles are positioned vertically downwards. If there is a raised floor
present, connection to the on-site cold water network is
made in a downward direction.
1
2
3
Recommendation:
Ideally, Liquid Cooling Packages should be
connected to the cooling water circuit via a
water/water heat exchanger when using a
water/glycol mixture.
Benefit:
– Reduction of water volumes in the second-
ary circuit,
– Setting of a defined water quality,
– Setting of a defined inlet temperature and
– Setting of a defined volumetric flow.
Tichelmann principle and hydraulic balancing
For an efficient cold water supply to the Liquid Cooling
Package, the cold water system must be hydraulically
balanced. If the hydraulics are not balanced, the LCP
systems will not be supplied homogeneously with the required volume of cold water. This will adversely affect efficient operation.
4
5
Fig. 20: Cold water network connection
Key
1Door bracket hinge
2LCPHybrid
3 Server enclosure
4 Cooling water connection, inlet
5 Cooling water connection, return
Caution!
When installing, observe the applicable
specifications concerning water quality
and water pressure.
Caution!
Connection of the LCP Hybrid to the
cooling water supply may only be carried
out by properly trained staff.
Fig. 21: Cooling distribution without hydraulic balancing
Key
1 Circulating pump
2 Shut-off valve
3 Fine filter
4Return
5 Supply
6 Pump pressure
7 Appliance to be cooled (LCP Hybrid)
8 Pipe friction pressure factor
9 Opening of control valve
10 Control valve
Here, hydraulic balancing can be achieved via balancing
valves.
18 Rittal Liquid Cooling Package
Page 19

Fig. 22: Cooling distribution with hydraulic balancing
However, if the individual connection lines for the LCP
systems are laid according to the "Tichelmann" connection principle, hydraulic balancing is not necessary. With
this connection variant, all individual connection lines
have the same pressure loss.
6 Installation
closed, but they must be opened prior to commissioning.
Warning! Danger of cut wounds, especially from the sharp edges of the heat
exchanger module!
Put on protective gloves before beginning assembly or cleaning work!
Proceed as follows to bleed the device:
Swing the LCP Hybrid away from the server enclosure.
Remove the three assembly components from the inner maintenance door of the LCP Hybrid and open the
maintenance door.
Remove the vent hose included with the supply from
the inside of the maintenance door.
EN
Fig. 23: Cooling distribution with Tichelmann principle
Notes on water quality
For safe operation, it is vital that the requirements of Directive VDI 2035-2 are observed.
Note:
The maximum permissible working pressure
(PS1) of the LCP Hybrid is 6 bar. Membrane
expansion tanks and safety valves must be
used to ensure that this pressure is not exceeded.
Note:
Before commencing operation with water, all
supply lines must be adequately flushed.
1
2
Fig. 24: Vent hose on the LCP Hybrid
Key
1Vent hose
2 Maintenance door
Connect the vent hose to the collective vent of the
heat exchanger from below.
1
2
3
4
Detailed diagrams and tables showing cooling output
and pressure loss can be found in section 13.2 "Characteristic curves and tables".
6.2 Bleeding the air from the heat exchanger
Two vent valves are installed at the uppermost point of
the heat exchanger package in the Liquid Cooling
Package. The unit is delivered with these valves fully
Rittal Liquid Cooling Package 19
Fig. 25: Vent valves on the LCP Hybrid
Key
1Vent valve 1
2Vent valve 2
3Collective vent
4Vent hose
Page 20

EN
6 Installation
Position a collecting vessel underneath the open end
of the vent hose to collect any escaping water.
Open the two vent valves using the supplied bleed tool
until you hear the hiss of escaping air.
Wait until water escapes from the vent hoses, then
close the valves again completely.
Next, open both vent valves again slightly and check
whether any more air escapes.
If so, hold the vent valves open until water escapes
again.
Repeat this process until there are no bubbles visible
in the vent hose for a significant period of time, ensuring that there is no air left in the system.
Once you have finished the vent process, remove the
vent hose again, and secure it to the inside of the
maintenance door.
Close the inner maintenance door of the Liquid
Cooling Package.
Swing the LCP Hybrid towards the server enclosure
and close the door.
Note:
The system is usually bled during the course
of commissioning. This process may need to
be repeated if the device is failing to supply
the desired cooling output (see section 8
"Troubleshooting").
6.3 Installing the cover
Once all the installation work is complete, the cover is fitted over the door hinge.
1
Fig. 26: Cover on the LCP Hybrid
Key
1Cover
Position the cover over the entire height of the door
hinge at the side.
Secure the cover with the screws supplied loose.
Create potential equalisation using the screw and contact washer supplied loose.
20 Rittal Liquid Cooling Package
Page 21

1
Fig. 27: Cover on the LCP Hybrid
Key
1 Screw and contact washer for potential equalisation
6 Installation
EN
Rittal Liquid Cooling Package 21
Page 22

7 Commissioning checklist
Photo: Amacell
Photo: Honeywell
EN
7 Commissioning checklist
Rittal GmbH & Co. KG hopes that this checklist will help
its customers and cooperation partners install and operate the products of the Liquid Cooling Package family
successfully.
Before the installation:
Are shut-off valves installed in the flow and return?
These valves make it easier to replace or repair the
Liquid Cooling Package without the need to shut off
the entire cold water supply.
Is there a taco-setter installed in the return of each Liquid
Cooling Package?
The taco-setter ensures a constant volumetric flow
and helps to maintain the hydraulic balance of the system, especially when operating with other types of
units, such as convectors.
Note:
If the pipework for the Liquid Cooling
Package is laid according to the Tichelmann
principle, a taco-setter is not necessary.
Is the water supply properly insulated?
Proper insulation protects against condensate formation, especially on the cooling water inlet components.
Is there a good water supply available which meets the
quality requirements?
Water quality determines the lasting reliability of the
system. It ensures that no undesirable corrosion or
harmful deposits will occur. The exact manufacturer's
recommendations regarding water quality can be
found in section 13.1 "Hydrological information" of the
assembly and operating instructions of your Liquid
Cooling Package. It is important to ensure that the
recommended water quality is maintained even after
installation.
Was the pipework sufficiently flushed before the Liquid
Cooling Package was connected?
It is important to clean or flush the water circuits appropriately, especially for new installations. Experience
has shown that there are often remnants of sealants,
lubricants, and even metal chips in new systems,
which may lead to a premature failure of the Liquid
Cooling Package. Cleaning the cold water system
carefully before connecting the Liquid Cooling
Package ensures reliable operation later.
Are the permissible bending radii of the hoses adhered
to?
The hoses must not be kinked too tightly, otherwise
the flow volume may be impaired and the materials
may fatigue prematurely.
22 Rittal Liquid Cooling Package
If the water quality of the primary cold water supply is inadequate, was a separate water circuit with a water/water heat exchanger installed?
If the cold water supply is strongly contaminated, it
may make sense to install a second, high quality cold
water circuit which is connected to the primary circuit
via a water/water heat exchanger. Even in this case,
the water circuit on the Liquid Cooling Package side
must be carefully cleaned before connecting the device. Our recommendations regarding water quality in
section 13.1 "Hydrological information" of the assembly and operating instructions of your Liquid Cooling
Package apply to this procedure as well.
Page 23

7 Commissioning checklist
Photo: Clariant
Was the water prepared/treated with the appropriate
additives?
In addition to our recommendations regarding water
quality, we recommend that the water be enriched
with corrosion inhibitor and/or antifreeze. Also, a treatment to prevent algae and biofilms may be expedient
in some cases.
Are unused height units in the bayed server enclosures
sealed with vertical blanking plates, and are the side vertical air baffle plates installed?
In order to prevent undesired air short circuits and circulation patterns inside the server enclosure, all unused height units of the 482.6 mm (19") level should
be closed off with blanking plates. This prevents the
warm air from being routed back in front of the installed equipment. The blanking plates are available in
various heights. The vertical air baffle plates installed
on each side of the server enclosure ensure that the
warm air cannot collect at the sides of the 482.6 mm
(19") level. Air baffle plates are available for 2 applications and 2 enclosure widths.
Venting of the Liquid Cooling Package
In order to ensure even water circulation through the
circuit and effective heat transfer, the Liquid Cooling
Package must be vented during commissioning.
Please feel free to contact Rittal if you have any questions or problems:
For malfunctions and repairs
Rittal Service Department
Tel.: +49(0)2772 505-1855
E-mail: RSI@Rittal-Service.com
EN
Are all water connections correctly made?
Before water is admitted, and, ideally before the ball
valves are opened, be sure to check that all connections are properly made.
Is the server enclosure equipped with suitable doors?
The front side/front door of the server enclosure must
have unrestricted air permeability, so that the servers
can draw in the cool ambient air at the front.
After admitting cold water:
Are all parts and connections watertight?
Please check to be sure that all parts and connections
which carry water are watertight. The Liquid Cooling
Package is subject to an individual, comprehensive
factory test, which also includes checking for leaks.
This additional check serves to locate problems, such
as possible transport damage, and to prevent greater
damage.
Rittal Liquid Cooling Package 23
Page 24

EN
8 Troubleshooting
8 Troubleshooting
Malfunction location
Malfunction Cause of malfunction Effect Remedy
Liquid Cooling Package
The unit is not
supplying the
required
cooling output
Air in the system If there is air in the system,
Increased pressure loss on
the piping network side, e.g.
through a clogged filter or incorrectly set flow limiter
Air routing not correct The cooled air passes
In order to prevent malfunctions caused by the cold water system, the following remedies should be implemented.
Malfunction location
Malfunction Cause of malfunction Effect Remedy
the water cannot circulate
properly in the heat exchanger. Thus, it cannot remove heat.
The external pumps are not
able to pump enough cold
water through the Liquid
Cooling Package.
through unsealed openings
past the equipment to the
front of the enclosure.
Bleed the air from the heat
exchanger.
Clean the filter, set the flow
limiter correctly.
Unused height units in the
482.6 mm (19") level as well
as side slots and openings
must be sealed using blanking plates or air baffle plates.
Both are available as accessories.
Cold water
system
Corrosion
and contaminants in the
cold water
system
Insufficient cleaning after a
new installation
Improper treatment of the
water with corrosion protection additives
Older systems with existing
contaminants
Unclean and aggressive water leads to a weakening of
the material and to improper
function.
During initial installation, the
pipe network and the system
parts should be flushed out
before installing the Liquid
Cooling Package.
Rittal GmbH & Co. KG recommends the installation of
filters and the treatment of
the water with appropriate
corrosion and, if needed, antifreeze additives. The recommended notes regarding
water quality are found in
section 13.1 "Hydrological
information".
When integrating into existing cold water networks, the
use of a water/water heat
exchanger is recommended.
This forms a second water
circuit.
24 Rittal Liquid Cooling Package
Page 25

9 Inspection and maintenance
The Liquid Cooling Package is largely maintenance-free.
An additional external strainer with fine-mesh sieve
(0.25 mm) is required if the cooling water is contaminated. This should be cleaned regularly.
Visually inspect for leaks regularly (annual cycle).
The maintenance door to the Liquid Cooling Package
should be opened at regular intervals and the heat exchanger vacuumed clean.
9 Inspection and maintenance
EN
Rittal Liquid Cooling Package 25
Page 26

EN
10 Storage and disposal
10 Storage and disposal
Caution! Risk of damage!
The air/water heat exchanger must not
be subjected to temperatures above
+70°C during storage.
During storage, the air/water heat exchanger must be
laid on its side.
Disposal can be performed at the Rittal plant.
Please contact us for advice.
Emptying:
During storage and transportation below freezing point,
the air/water heat exchanger should be drained completely.
To this end, attach two vent hoses to the vent valves of
the Liquid Cooling Package and open the valves so that
the cooling fluid can run out (see section 6.2 "Bleeding
the air from the heat exchanger").
Caution! Risk of environmental contamination!
Refrigerant must not be released from
the heat pipes. It must be properly disposed of in accordance with the valid regional regulations.
26 Rittal Liquid Cooling Package
Page 27

11 Technical specifications
11 Technical specifications
EN
11.1 10 kW versions
Technical specifications
Description/Model No. TopTherm LCP Hybrid / 3311.610 (2000 mm high, 600 mm wide)
Description/Model No. TopTherm LCP Hybrid / 3311.710 (2200 mm high, 600 mm wide)
Description/Model No. TopTherm LCP Hybrid / 3311.810 (2000 mm high, 800 mm wide)
Description/Model No. TopTherm LCP Hybrid / 3311.910 (2200 mm high, 800 mm wide)
Dimensions and weight 3311.610 3311.710 3311.810 3311.910
(Width x height x depth [mm]) 600 x 2000 x 105 600 x 2200 x 105 800 x 2000 x 105 800 x 2200 x 105
Usable U 42474247
Opening angle of door 135° 135° 135° 135°
Weight [kg] 76 78 78 81
Cooling circuit
Cooling medium Water (see Internet for specifications)
Cold water inlet temperature [°C] +7…+30 and at least 3 K above the dew points of the ambient and flowing air
Permissible operating pressure PS1
[bar]
Fill quantity of heat exchanger [l] 8
Max. volumetric flow of water [l/min] 70
Fill quantity of heat pipe with R134a
[kg]
Water connection DN 25 (G1")
Rated cooling output
Cooling output, sensible [kW] 10
Volumetric flow of cooling water
[l/min]
Cold water inlet temperature [°C] +15
Volumetric flow of air [m
Room air temperature [°C] +24 (air outlet temperature from LCP Hybrid)
Relative humidity [%] 43
Other information
3
/h] 2700 (air from IT equipment)
6
0.65
30
Noise level Depends on the configuration of the IT rack with equipment
Colour RAL 7035
Tab. 3: Technical specifications for 10 kW versions
Rittal Liquid Cooling Package 27
Page 28

EN
11 Technical specifications
11.2 20 kW versions
Technical specifications
Description/Model No. TopTherm LCP Hybrid / 3311.600 (2000 mm high, 600 mm wide)
Description/Model No. TopTherm LCP Hybrid / 3311.700 (2200 mm high, 600 mm wide)
Description/Model No. TopTherm LCP Hybrid / 3311.800 (2000 mm high, 800 mm wide)
Description/Model No. TopTherm LCP Hybrid / 3311.900 (2200 mm high, 800 mm wide)
Dimensions and weight 3311.600 3311.700 3311.800 3311.900
(Width x height x depth [mm]) 600 x 2000 x 105 600 x 2200 x 105 800 x 2000 x 105 800 x 2200 x 105
Usable U 42474247
Opening angle of door 135° 135° 135° 135°
Weight [kg] 76 81 81 84
Cooling circuit
Cooling medium Water (see Internet for specifications)
Cold water inlet temperature [°C] +7…+30 and at least 3 K above the dew points of the ambient and flowing air
Permissible operating pressure PS1
[bar]
Fill quantity of heat exchanger [l] 8
Max. volumetric flow of water [l/min] 70
Fill quantity of heat pipe with R134a
[kg]
Water connection DN 25 (G1")
Rated cooling output
Cooling output, sensible [kW] 20
Volumetric flow of cooling water
[l/min]
Cold water inlet temperature [°C] +15
Volumetric flow of air [m
Room air temperature [°C] +24 (air outlet temperature from LCP Hybrid)
Relative humidity [%] 43
Other information
Noise level Depends on the configuration of the IT rack with equipment
3
/h] 4000 (air from IT equipment)
6
0.65
58
Colour RAL 7035
Tab. 4: Technical specifications for 20 kW versions
28 Rittal Liquid Cooling Package
Page 29

12 Accessories
12 Accessories
Item Model No. Qty./Packs of Remarks
Air baffle plate for TS IT 5501.805 1 Width x height: 600 mm x 2000 mm
Air baffle plate for TS IT 5501.815 1 Width x height: 800 mm x 2000 mm
Air baffle plate for TS IT 5501.825 1 Width x height: 600 mm x 2200 mm
Air baffle plate for TS IT 5501.835 1 Width x height: 800 mm x 2200 mm
Connection hose 3301.351 2 Length 1 m, may be cut to required
length.
Air routing kit 3311.160 2
Tab. 5: Accessories list – Liquid Cooling Package
EN
Rittal Liquid Cooling Package 29
Page 30

13 Further technical information
EN
13 Further technical information
13.1 Hydrological information
To avoid damages to the system and ensure reliable operation, the provisions of VDI 2035 should be observed
for filling and top-up water.
Admissible cooling media
– Saline and low-salinity water based on VDI 2035 plus
max. 50 volume percent Antifrogen-N (see table 6).
Recommended cooling medium
– Low-salinity water (demineralised water) based on VDI
2035. Up to a maximum of 50 volume percent Antifrogen-N may be added (see table 6).
Low-salinity Saline
Electrical conductivity at 25°C [μS/cm]
Appearance Free from sedimenting substances
pH value at 25°C 8.2…10.0
Oxygen [mg/l] < 0.1 < 0.02
Tab. 6: Water specifications
13.2 Characteristic curves and tables
13.2.1 General
All information in the following tables refers to the use of
pure water as a cooling medium. The cooling performance data when using a water-glycol mixture is available on request from Rittal.
Proceed as follows to determine the required cooling
water temperature:
Determine the dew point for the room temperature
and relative humidity in the room (see section 13.2.2
"Determination of the dew point"). Alternatively, you
can use the h-x diagram (fig. 2).
Determine the minimum admissible cooling water
temperature by adding a safety margin of 3°C to this
figure.
Determine the required water throughput and
achieved cooling efficiency for the required airside
temperature difference T.
If the cooling efficiency determined in this way is 100%,
then the air outlet temperature from the LCP Hybrid will
be less than, or at the most, equal to the air inlet temperature into the server enclosure.
If the cooling efficiency determined in this way is less
than 100%, then the air outlet temperature from the LCP
Hybrid will be greater than the air inlet temperature into
< 100 100…1,500
the server enclosure. The room temperature will rise accordingly over time.
13.2.2 Determination of the dew point
Determination of the dew point for room temperature
20°C
Room temperature [°C/°F]
20 / 68.0 40 6 / 42.8
20 / 68.0 45 7.7 / 45.9
20 / 68.0 50 9.3 / 48.7
20 / 68.0 55 10.7 / 51.3
20 / 68.0 60 12 / 53.6
Tab. 7: Determination of the dew point for room temperature
20°C
Determination of the dew point for room temperature
21°C
Room temperature [°C/°F]
21 / 69.8 40 6.9 / 44.4
21 / 69.8 45 8.6 / 47.5
21 / 69.8 50 10.2 / 50.4
21 / 69.8 55 11.6 / 52.9
21 / 69.8 60 12.9 / 55.2
Tab. 8: Determination of the dew point for room temperature
21°C
Determination of the dew point for room temperature
22°C
Room temperature [°C/°F]
22 / 71.6 40 7.8 / 46
22 / 71.6 45 9.5 / 49.1
22 / 71.6 50 11.1 / 52
22 / 71.6 55 12.5 / 54.5
22 / 71.6 60 13.9 / 57
Tab. 9: Determination of the dew point for room temperature
22°C
Rel. humidity
[%]
Rel. humidity
[%]
Rel. humidity
[%]
Dew point
[°C/°F]
Dew point
[°C/°F]
Dew point
[°C/°F]
30 Rittal Liquid Cooling Package
Page 31

Determination of the dew point for room temperature
23°C
13 Further technical information
EN
Room temperature [°C/°F]
23 / 73.4 40 8.7 / 47.7
23 / 73.4 45 10.4 / 50.7
23 / 73.4 50 12 / 53.6
23 / 73.4 55 13.5 / 56.3
23 / 73.4 60 14.8 / 58.6
Tab. 10: Determination of the dew point for room temperature
23°C
Determination of the dew point for room temperature
24°C
Room temperature [°C/°F]
24 / 75.2 40 9.6 / 49.3
24 / 75.2 45 11.3 / 52.3
24 / 75.2 50 12.9 / 55.2
24 / 75.2 55 14.4 / 57.9
Rel. humidity
[%]
Rel. humidity
[%]
Dew point
[°C/°F]
Dew point
[°C/°F]
Fig. 28: Airside pressure loss in the "10 kW" version
Tab. 11: Determination of the dew point for room temperature
24°C
Determination of the dew point for room temperature
25°C
Room temperature [°C/°F]
25 / 77 40 10.5 / 50.9
25 / 77 45 12.2 / 54
25 / 77 50 13.8 / 56.8
Tab. 12: Determination of the dew point for room temperature
25°C
Rel. humidity
[%]
Dew point
[°C/°F]
13.2.3 Pressure loss
Note:
When using a water/glycol mixture (67% water, 33% glycol), the waterside pressure loss
must be multiplied by a factor of 1.2.
Fig. 29: Airside pressure loss in the "20 kW" version
Fig. 30: Upstream pressure loss in the "10 kW" version
Rittal Liquid Cooling Package 31
Page 32

EN
13 Further technical information
Fig. 31: Upstream pressure loss in the "20 kW" version
32 Rittal Liquid Cooling Package
Page 33

13 Further technical information
13.2.4 Cooling output at a room temperature of 21°C
10 kW devices 3311.610/710/810/910
Cooling output, sensible [kW] 5 5 5 5 5 5 5
Inlet temperature [°C] 12 13 14 15 16 17 18
Return temperature [°C] 19 19 19 19 19.5 19.5 20
Water volume [l/min] 10111419212840
Volumetric airflow [m
Air outlet from LCP Hybrid [°C] 21 21 21 21 21 21 21
Air inlet to LCP Hybrid [°C] 33 33 33 33 33 33 33
T air [K] 12121212121212
Tab. 13: Cooling output at partial load and a T air of 12 K
Cooling output, sensible [kW] 5 5 5 5 5 5 5
Inlet temperature [°C] 12 13 14 15 16 17 18
3
/h] 1200 1200 1200 1300 1300 1300 1300
EN
Return temperature [°C] 19 19.5 19 19 19.5 20 20
Water volume [l/min] 10111419212840
Volumetric airflow [m
Air outlet from LCP Hybrid [°C] 21 21 21 21 21 21 21
Air inlet to LCP Hybrid [°C] 36 36 36 36 36 36 36
T air [K] 15151515151515
Tab. 14: Cooling output at partial load and a T air of 15 K
Cooling output, sensible [kW] 10 10 10 10 10
Inlet temperature [°C] 12 13 14 15 16
Return temperature [°C] 17.5 17.5 18 18 18
Water volume [l/min] 2630304658
Volumetric airflow [m
Air outlet from LCP Hybrid [°C] 21 21 21 21 21
Air inlet to LCP Hybrid [°C] 33 33 33 33 33
T air [K] 1212121212
3
/h] 1000 1000 1000 1100 1100 1100 1100
3
/h] 2400 2500 2500 2600 2400
Tab. 15: Cooling output at full load and a T air of 12 K
Cooling output, sensible [kW] 10 10 10 10 10
Inlet temperature [°C] 12 13 14 15 16
Return temperature [°C] 17.5 18 18 18 19
Water volume [l/min] 2630354658
Volumetric airflow [m
Tab. 16: Cooling output at full load and a T air of 15 K
Rittal Liquid Cooling Package 33
3
/h] 2000 2100 2100 2100 2100
Page 34

13 Further technical information
EN
Cooling output, sensible [kW] 10 10 10 10 10
Air outlet from LCP Hybrid [°C] 21 21 21 21 21
Air inlet to LCP Hybrid [°C] 36 36 36 36 36
T air [K] 1515151515
Tab. 16: Cooling output at full load and a T air of 15 K
20 kW devices 3311.600/700/800/900
Cooling output, sensible [kW] 15 15 15 15 15
Inlet temperature [°C] 12 13 14 15 16
Return temperature [°C] 18.5 19 19 19 20
Water volume [l/min] 3236425060
Volumetric airflow [m
Air outlet from LCP Hybrid [°C] 21 21 21 21 21
Air inlet to LCP Hybrid [°C] 33 33 33 33 33
T air [K] 1212121212
Tab. 17: Cooling output at partial load and a T air of 12 K
3
/h] 3600 3600 3800 3800 3800
Cooling output, sensible [kW] 15 15 15 15 15
Inlet temperature [°C] 12 13 14 15 16
Return temperature [°C] 19 19 19 20 20
Water volume [l/min] 3236434860
Volumetric airflow [m
Air outlet from LCP Hybrid [°C] 21 21 21 21 21
Air inlet to LCP Hybrid [°C] 36 36 36 36 36
T air [K] 1515151515
Tab. 18: Cooling output at partial load and a T air of 15 K
Cooling output, sensible [kW] 20 20 20 20
Inlet temperature [°C] 12 13 14 15
Return temperature [°C] 17.5 18 18 19
Water volume [l/min] 50556075
Volumetric airflow [m
Air outlet from LCP Hybrid [°C] 21 21 21 21
3
/h] 3200 3200 3200 3200 3200
3
/h] 4500 4800 4800 4800
Air inlet to LCP Hybrid [°C] 33 33 33 33
T air [K] 12121212
Tab. 19: Cooling output at full load and a T air of 12 K
34 Rittal Liquid Cooling Package
Page 35

13 Further technical information
Cooling output, sensible [kW] 20 20 20 20
Inlet temperature [°C] 12 13 14 15
Return temperature [°C] 18 18.5 18 19
Water volume [l/min] 48526875
Volumetric airflow [m
Air outlet from LCP Hybrid [°C] 21 21 21 21
Air inlet to LCP Hybrid [°C] 36 36 36 36
T air [K] 15151515
Tab. 20: Cooling output at full load and a T air of 15 K
3
/h] 4000 4000 4000 4000
13.2.5 Cooling output at a room temperature of 22°C
10 kW devices 3311.610/710/810/910
Cooling output, sensible [kW] 5 5 5 5 5 5 5 5
Inlet temperature [°C] 12 13 14 15 16 17 18 19
Return temperature [°C] 20 20 20 20 20 20 21 21
Water volume [l/min] 9 11 13 15 19 22 28 40
Volumetric airflow [m
3
/h] 1300 1300 1300 1300 1300 1300 1300 1300
EN
Air outlet from LCP Hybrid [°C] 22 22 22 22 22 22 22 22
Air inlet to LCP Hybrid [°C] 34 34 34 34 34 34 34 34
T air [K] 1212121212121212
Tab. 21: Cooling output at partial load and a T air of 12 K
Cooling output, sensible [kW] 5 5 5 5 5 5 5 5
Inlet temperature [°C] 12 13 14 15 16 17 18 19
Return temperature [°C] 20.5 20 20 20 20 20.5 21 21
Water volume [l/min] 9 11 13 15 19 22 28 40
Volumetric airflow [m
Air outlet from LCP Hybrid [°C] 22 22 22 22 22 22 22 22
Air inlet to LCP Hybrid [°C] 37 37 37 37 37 37 37 37
T air [K] 1515151515151515
Tab. 22: Cooling output at partial load and a T air of 15 K
Cooling output, sensible [kW] 10 10 10 10 10
Inlet temperature [°C] 12 13 14 15 16
3
/h] 1100 1100 1100 1100 1100 1100 1100 1100
Return temperature [°C] 18 18 19 19 19
Water volume [l/min] 2428303745
Tab. 23: Cooling output at full load and a T air of 12 K
Rittal Liquid Cooling Package 35
Page 36

13 Further technical information
EN
Cooling output, sensible [kW] 10 10 10 10 10
Volumetric airflow [m3/h] 2400 2500 2500 2500 2500
Air outlet from LCP Hybrid [°C] 22 22 22 22 22
Air inlet to LCP Hybrid [°C] 34 34 34 34 34
T air [K] 1212121212
Tab. 23: Cooling output at full load and a T air of 12 K
Cooling output, sensible [kW] 10 10 10 10 10
Inlet temperature [°C] 12 13 14 15 16
Return temperature [°C] 18 18.5 19 19 19
Water volume [l/min] 2428303745
Volumetric airflow [m
Air outlet from LCP Hybrid [°C] 22 22 22 22 22
Air inlet to LCP Hybrid [°C] 37 37 37 37 37
T air [K] 1515151515
Tab. 24: Cooling output at full load and a T air of 15 K
3
/h] 2000 2100 2100 2100 2100
20 kW devices 3311.600/700/800/900
Cooling output, sensible [kW] 15 15 15 15 15 15
Inlet temperature [°C] 12 13 14 15 16 17
Return temperature [°C] 19 19 20 20 20 20.5
Water volume [l/min] 323638404860
Volumetric airflow [m
Air outlet from LCP Hybrid [°C] 22 22 22 22 22 22
Air inlet to LCP Hybrid [°C] 34 34 34 34 34 34
T air [K] 121212121212
Tab. 25: Cooling output at partial load and a T air of 12 K
Cooling output, sensible [kW] 15 15 15 15 15 15
Inlet temperature [°C] 12 13 14 15 16 17
Return temperature [°C] 20 20 20 21 21 21
Water volume [l/min] 283236384654
Volumetric airflow [m
3
/h] 3600 3600 3600 3600 3600 3600
3
/h] 3100 3100 3100 3100 3100 3100
Air outlet from LCP Hybrid [°C] 22 22 22 22 22 22
Air inlet to LCP Hybrid [°C] 37 37 37 37 37 37
T air [K] 151515151515
Tab. 26: Cooling output at partial load and a T air of 15 K
36 Rittal Liquid Cooling Package
Page 37

13 Further technical information
Cooling output, sensible [kW] 20 20 20 20
Inlet temperature [°C] 12 13 14 15
Return temperature [°C] 18 19 19 19
Water volume [l/min] 48485462
Volumetric airflow [m
Air outlet from LCP Hybrid [°C] 22 22 22 22
Air inlet to LCP Hybrid [°C] 34 34 34 34
T air [K] 12121212
Tab. 27: Cooling output at full load and a T air of 12 K
Cooling output, sensible [kW] 20 20 20 20
Inlet temperature [°C] 12 13 14 15
Return temperature [°C] 19 19 19.5 20
Water volume [l/min] 44485262
Volumetric airflow [m
Air outlet from LCP Hybrid [°C] 22 22 22 22
3
/h] 4500 4500 4500 4500
3
/h] 4100 4100 4100 4100
EN
Air inlet to LCP Hybrid [°C] 37 37 37 37
T air [K] 15151515
Tab. 28: Cooling output at full load and a T air of 15 K
13.2.6 Cooling output at a room temperature of 23°C
10 kW devices 3311.610/710/810/910
Cooling output, sensible [kW] 5 5 5 5 5 5 5 5 5
Inlet temperature [°C] 12 13 14 15 16 17 18 19 20
Return temperature [°C] 22 22 21 21 21 21 21.5 22 22
Water volume [l/min] 7 8 10121417202638
Volumetric airflow [m
Air outlet from LCP Hybrid [°C] 23 23 23 23 23 23 23 23 23
Air inlet to LCP Hybrid [°C] 35 35 35 35 35 35 35 35 35
T air [K] 121212121212121212
Tab. 29: Cooling output at partial load and a T air of 12 K
3
/h] 1200 1200 1200 1200 1200 1200 1200 1200 1200
Cooling output, sensible [kW] 5 5 5 5 5 5 5 5 5
Inlet temperature [°C] 12 13 14 15 16 17 18 19 20
Return temperature [°C] 22.5 19.5 21 21 21 21 22 22 22
Water volume [l/min] 7 11 10 12 14 17 20 26 38
Tab. 30: Cooling output at partial load and a T air of 15 K
Rittal Liquid Cooling Package 37
Page 38

13 Further technical information
EN
Cooling output, sensible [kW] 5 5 5 5 5 5 5 5 5
Volumetric airflow [m3/h] 1000 1000 1000 1000 1000 1000 1000 1000 1000
Air outlet from LCP Hybrid [°C] 23 23 23 23 23 23 23 23 23
Air inlet to LCP Hybrid [°C] 38 38 38 38 38 38 38 38 38
T air [K] 151515151515151515
Tab. 30: Cooling output at partial load and a T air of 15 K
Cooling output, sensible [kW] 10 10 10 10 10
Inlet temperature [°C] 12 13 14 15 16
Return temperature [°C] 18.5 19 19.5 19 19
Water volume [l/min] 2123254647
Volumetric airflow [m
Air outlet from LCP Hybrid [°C] 23 23 23 23 23
Air inlet to LCP Hybrid [°C] 35 35 35 35 35
T air [K] 1212121212
Tab. 31: Cooling output at full load and a T air of 12 K
3
/h] 2400 2400 2400 2900 2900
Cooling output, sensible [kW] 10 10 10 10 10
Inlet temperature [°C] 12 13 14 15 16
Return temperature [°C] 19 19 20 19 20
Water volume [l/min] 2123254650
Volumetric airflow [m
Air outlet from LCP Hybrid [°C] 23 23 23 23 23
Air inlet to LCP Hybrid [°C] 38 38 38 38 38
T air [K] 1515151515
Tab. 32: Cooling output at full load and a T air of 15 K
3
/h] 2000 2000 2000 2600 2600
20 kW devices 3311.600/700/800/900
Cooling output, sensible [kW] 15 15 15 15 15 15
Inlet temperature [°C] 12 13 14 15 16 17
Return temperature [°C] 19 19.5 20 20 20.5 21
Water volume [l/min] 303234384658
Volumetric airflow [m
3
/h] 3700 3700 3700 3700 3700 3700
Air outlet from LCP Hybrid [°C] 23 23 23 23 23 23
Air inlet to LCP Hybrid [°C] 35 35 35 35 35 35
T air [K] 121212121212
Tab. 33: Cooling output at partial load and a T air of 12 K
38 Rittal Liquid Cooling Package
Page 39

13 Further technical information
Cooling output, sensible [kW] 15 15 15 15 15 15
Inlet temperature [°C] 12 13 14 15 16 17
Return temperature [°C] 20 20 21 21 22 22
Water volume [l/min] 283234364050
Volumetric airflow [m
Air outlet from LCP Hybrid [°C] 23 23 23 23 23 23
Air inlet to LCP Hybrid [°C] 38 38 38 38 38 38
T air [K] 151515151515
Tab. 34: Cooling output at partial load and a T air of 15 K
Cooling output, sensible [kW] 18 18 18 18 18 18
Inlet temperature [°C] 12 13 14 15 16 17
Return temperature [°C] 19 19 20 20 20 21
Water volume [l/min] 404550556575
Volumetric airflow [m
Air outlet from LCP Hybrid [°C] 23 23 23 23 23 23
3
/h] 3200 3200 3200 3200 3200 3200
3
/h] 4500 4500 4500 4500 4500 4500
EN
Air inlet to LCP Hybrid [°C] 35 35 35 35 35 35
T air [K] 121212121212
Tab. 35: Cooling output at full load and a T air of 12 K
Cooling output, sensible [kW] 20 20 20 20 20 20
Inlet temperature [°C] 12 13 14 15 16 17
Return temperature [°C] 20 20 20 20 20 21
Water volume [l/min] 374045557575
Volumetric airflow [m
Air outlet from LCP Hybrid [°C] 23 23 23 23 23 23
Air inlet to LCP Hybrid [°C] 38 38 38 38 38 38
T air [K] 151515151515
Tab. 36: Cooling output at full load and a T air of 15 K
3
/h] 4000 4000 4000 4000 4000 4000
13.2.7 Cooling output at a room temperature of 24°C
10 kW devices 3311.610/710/810/910
Cooling output, sensible [kW] 5 5 5 5 5 5 5
Inlet temperature [°C] 12 13 14 15 16 17 18
Return temperature [°C] 24 23 23 22 22 22 22
Water volume [l/min] 7 8 8 11 13 16 18
Tab. 37: Cooling output at partial load and a T air of 12 K
Rittal Liquid Cooling Package 39
Page 40

13 Further technical information
EN
Cooling output, sensible [kW] 5 5 5 5 5 5 5
Volumetric airflow [m3/h] 1200 1300 1300 1300 1300 1300 1300
Air outlet from LCP Hybrid [°C] 24 24 24 24 24 24 24
Air inlet to LCP Hybrid [°C] 36 36 36 36 36 36 36
T air [K] 12121212121212
Tab. 37: Cooling output at partial load and a T air of 12 K
Cooling output, sensible [kW] 5 5 5 5 5 5 5
Inlet temperature [°C] 12 13 14 15 16 17 18
Return temperature [°C] 24 23 23 22 22 22 22
Water volume [l/min] 6 8 9 11 13 16 20
3
Volumetric airflow [m
Air outlet from LCP Hybrid [°C] 24 24 24 24 24 24 24
Air inlet to LCP Hybrid [°C] 39 39 39 39 39 39 39
T air [K] 15151515151515
Tab. 38: Cooling output at partial load and a T air of 15 K
/h] 1000 1100 1100 1100 1100 1100 1100
Cooling output, sensible [kW] 10 10 10 10 10 10 10
Inlet temperature [°C] 12 13 14 15 16 17 18
Return temperature [°C] 19 19.5 20 20 21 21 21.5
Water volume [l/min] 20222426303440
Volumetric airflow [m3/h] 2400 2400 2400 2400 2500 2500 2500
Air outlet from LCP Hybrid [°C] 24 24 24 24 24 24 24
Air inlet to LCP Hybrid [°C] 36 36 36 36 36 36 36
T air [K] 12121212121212
Tab. 39: Cooling output at full load and a T air of 12 K
Cooling output, sensible [kW] 10 10 10 10 10 10 10
Inlet temperature [°C] 12 13 14 15 16 17 18
Return temperature [°C] 20 20 20 20 21 21 21
Water volume [l/min] 20222426303846
Volumetric airflow [m
Air outlet from LCP Hybrid [°C] 24 24 24 24 24 24 24
3
/h] 2100 2100 2100 2100 2200 2200 2200
Air inlet to LCP Hybrid [°C] 39 39 39 39 39 39 39
T air [K] 15151515151515
Tab. 40: Cooling output at full load and a T air of 15 K
40 Rittal Liquid Cooling Package
Page 41

13 Further technical information
20 kW devices 3311.600/700/800/900
Cooling output, sensible [kW] 15 15 15 15 15 15 15
Inlet temperature [°C] 12 13 14 15 16 17 18
Return temperature [°C] 20 21 21.5 22 22 22.5 23
Water volume [l/min] 23252830333842
Volumetric airflow [m
Air outlet from LCP Hybrid [°C] 24 24 24 24 24 24 24
Air inlet to LCP Hybrid [°C] 36 36 36 36 36 36 36
T air [K] 12121212121212
Tab. 41: Cooling output at partial load and a T air of 12 K
Cooling output, sensible [kW] 15 15 15 15 15 15 15
Inlet temperature [°C] 12 13 14 15 16 17 18
Return temperature [°C] 21 21.5 22 22 22 23 23.5
Water volume [l/min] 24262830343838
Volumetric airflow [m
3
/h] 3500 3500 3500 3500 3500 3500 3500
3
/h] 3000 3000 3000 3000 3000 3000 3000
EN
Air outlet from LCP Hybrid [°C] 24 24 24 24 24 24 24
Air inlet to LCP Hybrid [°C] 39 39 39 39 39 39 39
T air [K] 15151515151515
Tab. 42: Cooling output at partial load and a T air of 15 K
Cooling output, sensible [kW] 18 18 18 18 18 18
Inlet temperature [°C] 12 13 14 15 16 17
Return temperature [°C] 20 20 20 21 21 22
Water volume [l/min] 303436404655
Volumetric airflow [m
Air outlet from LCP Hybrid [°C] 24 24 24 24 24 24
Air inlet to LCP Hybrid [°C] 36 36 36 36 36 36
T air [K] 121212121212
Tab. 43: Cooling output at full load and a T air of 12 K
Cooling output, sensible [kW] 20 20 20 20 20 20
Inlet temperature [°C] 12 13 14 15 16 17
3
/h] 4200 4200 4200 4200 4200 4200
Return temperature [°C] 20 20 21 21 21 18
Water volume [l/min] 404446546075
Volumetric airflow [m
Air outlet from LCP Hybrid [°C] 24 24 24 24 24 24
Tab. 44: Cooling output at full load and a T air of 15 K
Rittal Liquid Cooling Package 41
3
/h] 4500 4500 4500 4500 4500 4500
Page 42

13 Further technical information
EN
Cooling output, sensible [kW] 20 20 20 20 20 20
Air inlet to LCP Hybrid [°C] 39 39 39 39 39 39
T air [K] 151515151515
Tab. 44: Cooling output at full load and a T air of 15 K
13.2.8 Cooling output at a room temperature of 25°C
10 kW devices 3311.610/710/810/910
Cooling output, sensible [kW] 5 5 5 5 5 5 5
Inlet temperature [°C] 12 13 14 15 16 17 18
Return temperature [°C] 26 25 24 24 23 23 23
Water volume [l/min] 5678101214
Volumetric airflow [m
Air outlet from LCP Hybrid [°C] 25 25 25 25 25 25 25
Air inlet to LCP Hybrid [°C] 37 37 37 37 37 37 37
T air [K] 12121212121212
Tab. 45: Cooling output at partial load and a T air of 12 K
3
/h] 1200 1200 1200 1300 1300 1300 1300
Cooling output, sensible [kW] 5 5 5 5 5 5 5
Inlet temperature [°C] 12 13 14 15 16 17 18
Return temperature [°C] 26 25 25 25 24 24.5 23.5
Water volume [l/min] 5678101214
Volumetric airflow [m
Air outlet from LCP Hybrid [°C] 25 25 25 25 25 25 25
Air inlet to LCP Hybrid [°C] 40 40 40 40 40 40 40
T air [K] 15151515151515
Tab. 46: Cooling output at partial load and a T air of 15 K
Cooling output, sensible [kW] 10 10 10 10 10 10 10
Inlet temperature [°C] 12 13 14 15 16 17 18
Return temperature [°C] 20 20 21 21 21.5 22 22
Water volume [l/min] 18202224263034
Volumetric airflow [m3/h] 2400 2500 2500 2500 2500 2500 2500
Air outlet from LCP Hybrid [°C] 25 25 25 25 25 25 25
3
/h] 1000 1000 1000 1100 1100 1100 1100
Air inlet to LCP Hybrid [°C] 37 37 37 37 37 37 37
T air [K] 12121212121212
Tab. 47: Cooling output at full load and a T air of 12 K
42 Rittal Liquid Cooling Package
Page 43

13 Further technical information
Cooling output, sensible [kW] 10 10 10 10 10 10 10
Inlet temperature [°C] 12 13 14 15 16 17 16
Return temperature [°C] 20 20.5 21 21 22 22 22
Water volume [l/min] 20222426283238
Volumetric airflow [m3/h] 2200 2200 2200 2300 2300 2300 2300
Air outlet from LCP Hybrid [°C] 25 25 25 25 25 25 25
Air inlet to LCP Hybrid [°C] 40 40 40 40 40 40 40
T air [K] 15151515151515
Tab. 48: Cooling output at full load and a T air of 15 K
20 kW devices 3311.600/700/800/900
Cooling output, sensible [kW] 15 15 15 15 15 15
Inlet temperature [°C] 12 13 14 15 16 17
Return temperature [°C] 21.5 22 22 23 23 23
Water volume [l/min] 232526283235
Volumetric airflow [m
3
/h] 3700 3700 3700 3700 3700 3700
EN
Air outlet from LCP Hybrid [°C] 25 25 25 25 25 25
Air inlet to LCP Hybrid [°C] 37 37 37 37 37 37
T air [K] 121212121212
Tab. 49: Cooling output at partial load and a T air of 12 K
Cooling output, sensible [kW] 15 15 15 15 15 15
Inlet temperature [°C] 12 13 14 15 16 17
Return temperature [°C] 22 22 22.5 23 23 24
Water volume [l/min] 242628303235
Volumetric airflow [m
Air outlet from LCP Hybrid [°C] 25 25 25 25 25 25
Air inlet to LCP Hybrid [°C] 40 40 40 40 40 40
T air [K] 151515151515
Tab. 50: Cooling output at partial load and a T air of 15 K
Cooling output, sensible [kW] 18 18 18 18 18 18
Inlet temperature [°C] 12 13 14 15 16 17
3
/h] 3200 3200 3200 3200 3200 3200
Return temperature [°C] 21 21 22 22 22.5 22
Water volume [l/min] 303234374050
Volumetric airflow [m
Air outlet from LCP Hybrid [°C] 25 25 25 25 25 25
Tab. 51: Cooling output at full load and a T air of 12 K
Rittal Liquid Cooling Package 43
3
/h] 4500 4500 4500 4500 4500 4500
Page 44

13 Further technical information
EN
Cooling output, sensible [kW] 18 18 18 18 18 18
Air inlet to LCP Hybrid [°C] 37 37 37 37 37 37
T air [K] 121212121212
Tab. 51: Cooling output at full load and a T air of 12 K
Cooling output, sensible [kW] 20 20 20 20 20 20
Inlet temperature [°C] 12 13 14 15 16 17
Return temperature [°C] 22 22 22 22 23 23
Water volume [l/min] 303436404450
Volumetric airflow [m
Air outlet from LCP Hybrid [°C] 25 25 25 25 25 25
Air inlet to LCP Hybrid [°C] 40 40 40 40 40 40
T air [K] 151515151515
Tab. 52: Cooling output at full load and a T air of 15 K
3
/h] 4000 4000 4000 4000 4000 4000
44 Rittal Liquid Cooling Package
Page 45

13.3 Overview drawing
13 Further technical information
EN
437
1
6
8
8
105
82
590
4
50
Cut-out for piping
29
X1 (1 : 4)
OUT
409
1
6
7
8
1
9
7
8
IN
1
0
4
2
5
5
7
1
1
567
7
3
1
1
0
5
1
4
-
2
0
X1
X2
°
5
13
1
0
0
0
/
1
2
0
0
Fig. 32: Overview drawing of LCP Hybrid (600 x 2000)
Rittal Liquid Cooling Package 45
X2 ( 1 : 3 )
Page 46

EN
13 Further technical information
437
1
6
8
8
105
182
790
4
50
OUT
Cut-out for piping
29
X1 (1 : 4)
431
1
6
7
8
1
9
7
8
IN
1
0
4
2
5
7
1
1
0
5
767
3
1
7
1
4
2
0
-
X1
X2
°
5
13
1
0
0
0
/
1
2
0
0
Fig. 33: Overview drawing of LCP Hybrid (800 x 2000)
46 Rittal Liquid Cooling Package
X2 ( 1 : 3 )
Page 47

13 Further technical information
EN
437
1
6
8
8
105
4
50
Cut-out for piping
29
X1 (1 : 4)
590
OUT
82
1
6
7
8
2
1
7
8
IN
1
0
4
2
5
7
1
409
567
2
7
3
1
0
5
1
1
4
1
2
-
0
X1
5°
3
1
1
0
0
0
/
1
2
0
0
Fig. 34: Overview drawing of LCP Hybrid (600 x 2200)
Rittal Liquid Cooling Package 47
X2
X2 ( 1 : 4 )
Page 48

EN
13 Further technical information
437
1
6
8
8
105
4
50
Cut-out for piping
29
X1 (1 : 4)
1
5
590
OUT
5
1
0
82
1
6
7
8
2
1
7
8
IN
1
0
4
2
7
431
3
767
2
7
X1
1
1
4
-
1
2
0
X2
X2 ( 1 : 4 )
1
0
0
0
/
1
2
0
0
Fig. 35: Overview drawing of LCP Hybrid (800 x 2200)
48 Rittal Liquid Cooling Package
Page 49

14 Preparation and maintenance of the cooling medium
14 Preparation and maintenance of
the cooling medium
Depending on the type of installation to be cooled, certain purity requirements are placed on the cooling water
in a recooling system. According to the level of contamination and the size and design of the recooling systems,
a suitable process is used to prepare and/or maintain
the water. The most common types of contamination
and frequently used techniques to eliminate them in industrial cooling are:
Type of impurity Procedure
EN
Mechanical contamination
Excessive hardness Soften the water via ion exchange
Moderate content of
mechanical contaminants and hardeners
Moderate levels of
chemical contaminants
Biological contaminants, slime bacteria
and algae
Tab. 53: Cooling water contaminants and treatment procedures
Filter the water using:
Mesh filter, sand filter, cartridge filter, precoated filter, magnetic filter
Add stabilisers and/or dispersing
agents to the water
Add passifiers and/or inhibitors to
the water
Treat the water with biocides
Note:
For the proper operation of a recooling system that uses water on at least one side, the
composition of any additive used or system
water should not deviate substantially from
hydrological data presented in section 13.1
"Hydrological information".
Rittal Liquid Cooling Package 49
Page 50

EN
2
1
15 List of spare parts
15 List of spare parts
Fig. 36: Overview of spare parts
Key
1 Plastic attachment kit
2 Plastic hinge kit
Note:
As well as the spare part number, the follow-
ing information must also be provided when
ordering spare parts:
–Unit model
– Fabrication number
– Date of manufacture
This information can be found on the rating
plate.
50 Rittal Liquid Cooling Package
Page 51

16 Glossary
16 Glossary
1U server:
1 U servers are very flat and deep, modern high performance servers, whose height corresponds to one
height unit (1 U = 44.54 mm, the smallest standard
height division). Typical dimensions are (W x H x D)
482.6 mm (19") x 1 U x 800 mm.
These systems normally include 2 CPUs, multiple GB
of RAM and hard drives, so that they require up to
100 m³/h cooling air at a maximum of 32°C.
482.6 mm (19") level:
The front of the devices built into the server enclosure
form the 482.6 mm (19") level.
Blade server:
By orienting dual CPU systems vertically and placing
up to 14 units on a common backplane to provide for
signal routing and power supply, a blade server is created.
Blade servers can "generate" up to 4.5 kW heat loss
per 7 U and 700 mm depth.
Switch:
Multiple servers normally communicate with one another and in the network using switches.
Because as many inputs as possible are located on
the front of switches, they frequently have an airflow
from the side, not "front to back" cooling.
EN
Hot spot:
A hot spot is the concentration of thermal energy in a
small area.
Hot spots normally lead to local overheating and can
cause system malfunctions.
Air/water heat exchanger:
Air/water heat exchangers operate according to the
same principle as automobile radiators. A liquid (water)
flows through the heat exchanger, while, at the same
time, air is blown over its surface area (which is as
large as possible), facilitating energy exchange.
Depending on the temperature of the circulating liquid
(water), an air/water heat exchanger may either heat or
cool the circulated air.
Recooling system:
As an initial comparison, a recooling system is like a
refrigerator – although unlike a household refrigerator,
a recooling system produces cold water via an active
cooling circuit. The thermal energy which is removed
from the water is dissipated to the outside by fans. Because of this, it is normally advisable to locate recooling systems outside of buildings.
Recooling systems and air/water heat exchangers
form a complete cooling solution.
Rittal Liquid Cooling Package 51
Page 52

Enclosures
Power Distribution
Climate Control
IT Infrastructure
Software & Services
RITTAL GmbH & Co. KG
Postfach 1662 · D-35726 Herborn
Phone +49(0)2772 505-0 · Fax +49(0)2772 505-2319
E-mail: info@rittal.de · www.rittal.com
10.2014 / ID no.D-0000-00000159
 Loading...