

Risco RP432KPP User Manual
LCD Keypad &
LCD Proximity Keypad
(Models: RP432KP, RP432KPP)
PL

2
1
4
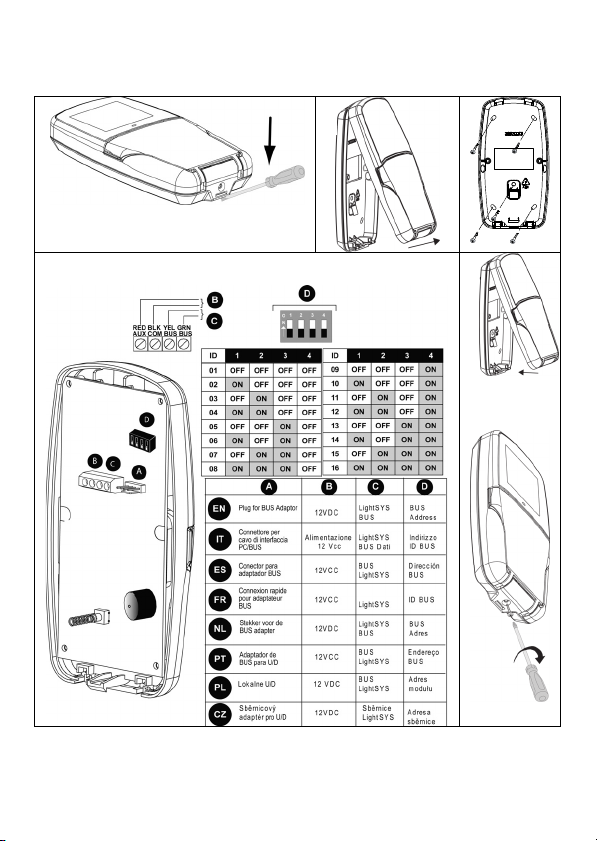
Installing the LightSYS Keypad
2
Main Panel Back Side
3
5
6
3
Introduction
The user-friendly LightSYS LCD/LCD Proximity keypad enables simple operation and
programming of the LightSYS and ProSYS security systems.
The following instructions offer a brief keypad operation overview. For detailed
information on programming the system, refer to the LightSYS or ProSYS Installer and
User manuals.
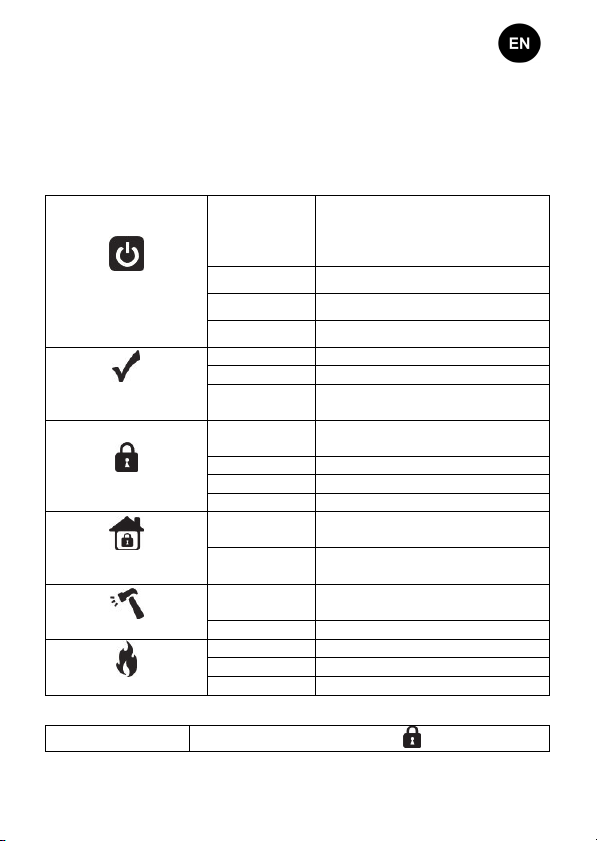
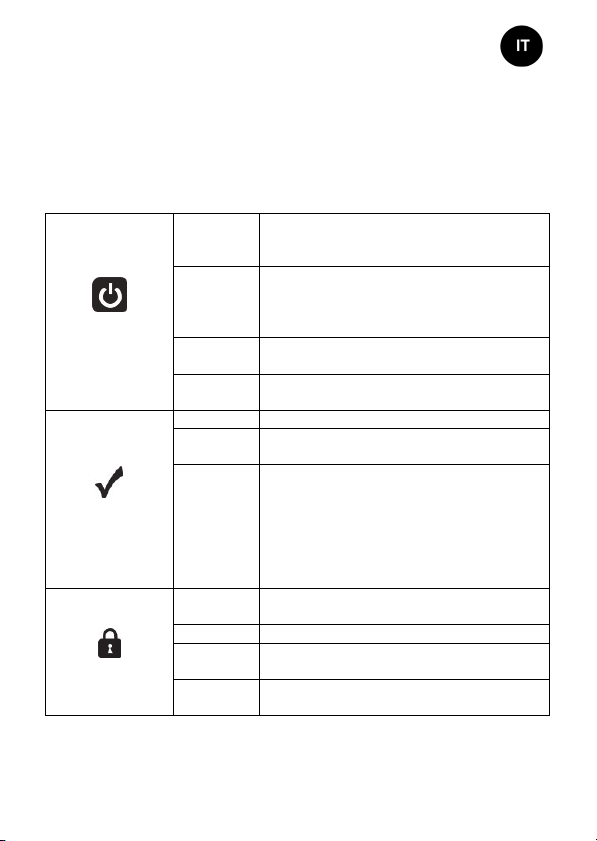
Indicators
System is operating properly from
AC power, its backup battery is in
good condition and there are no
troubles in the system.
System is ready to be armed (set)
while exit/entry zone is open.
System is armed in Full Arm or Stay
Arm (Part Set) mode.
System is in Stay Arm (Part Set) or
Zone Bypass (omit) mode.
Zone/keypad/external module has
been tampered.
Power
Ready
Arm (Set)
Stay / Bypass
(Part Set/ Omit)
Tamper
Fire
On
Off No power.
Slow Flash System is in programming.
Rapid Flash System trouble (fault).
On System is ready to be armed.
Off System is not ready to be armed
Slow Flash
On
Off System is disarmed (unset).
Slow Flash System is in Exit Delay.
Rapid Flash Alarm condition.
On
Off No bypass zones in system.
On
Off All zones are operating normally.
On Fire alarm.
Off Normal operation.
Flashing Fire circuit problem.
LED (Red)
Arm / Alarm
Behaves in the same manner as the
indicator.
4
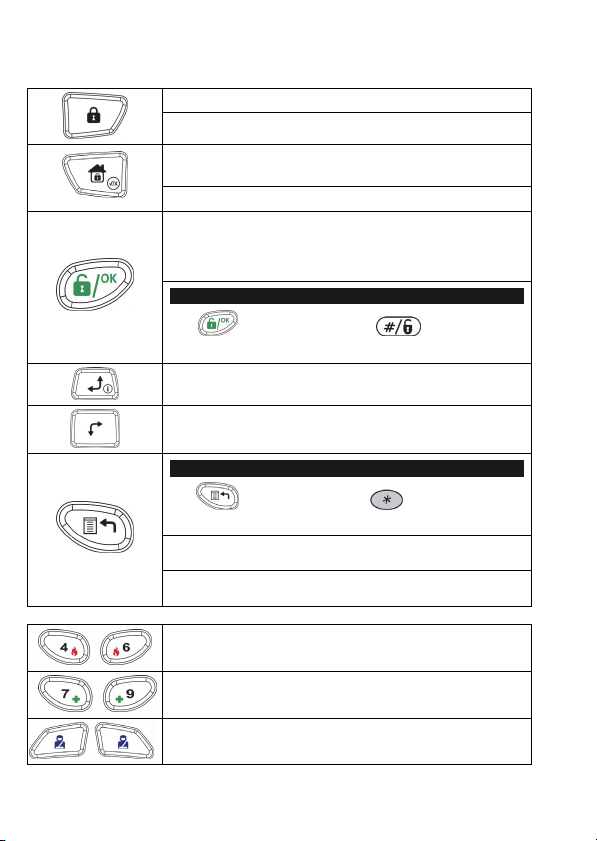
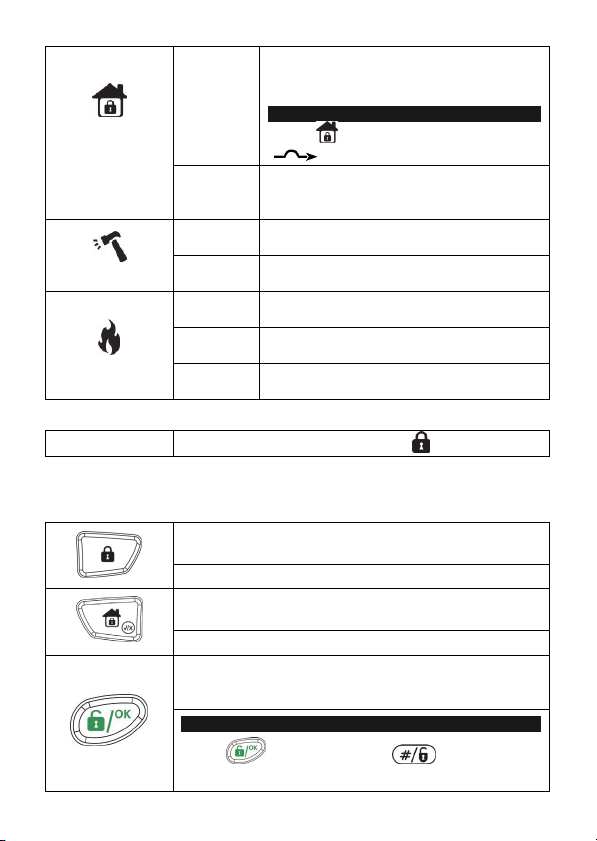
Keys
Control Keys
Emergency Keys
In Normal Operation mode: Used for Away (Full setting).
In User Functions menu: Used to change data.
In Normal Operation mode: Used for Stay arming (Part
Setting).
In User Functions menu: Used to change data.
Used to disarm (unset) the system after a user code is
entered;
OK
is used to terminate commands and confirm data to be
/
stored.
Note:
The key is equivalent to the key on ProSYS
keypads.
Used to scroll up a list or to move the cursor to the left ;
Provides the system status.
Used to scroll down a list or to move the cursor to the
right.
Note:
The icon is equivalent to the icon on ProSYS
keypads.
In Normal Operation mode: Used to enter the User Functions
menu.
In User Functions menu: Used to move back one step in the
menu.
Pressing both keys simultaneously for at least two seconds
activates a Fire alarm.
Pressing both keys simultaneously for at least two
seconds activates an Emergency alarm.
Pressing both keys simultaneously for at least two seconds
activates a Police (Panic) alarm.
5

Function Keys
Used to arm (set) groups of zones (by default) or to
activate a prerecorded series of commands (macros).
To activate press for 2 seconds.
Numeric Keys
Used to input numbers when required.
Keypad Settings
Note:
The following settings must be defined individually for each keypad connected to the system.
To define keypad settings, follow this procedure:
1. Press
2. Select the relevant icon using the
for two seconds until the Keypad Settings menu appears.
and keys. To enter option, press:
Brightness
Contrast
Keypad's buzzer volume
Language (ProSYS mode only)
Note:
• The LightSyS Language option can always be accessed by simultaneously
pressing and .
• For ProSYS versions prior to 5, set the keypad language according to the panel
language.
Panel RP432/RP128 (ProSYS)
Note:
Select RP432 when the keypad is connected to the LightSYS (default) or RP128
when the keypad is connected to ProSYS.
6
3. Adjust settings with arrow keys. Confirm adjusted settings with .
4. Press
5. Press
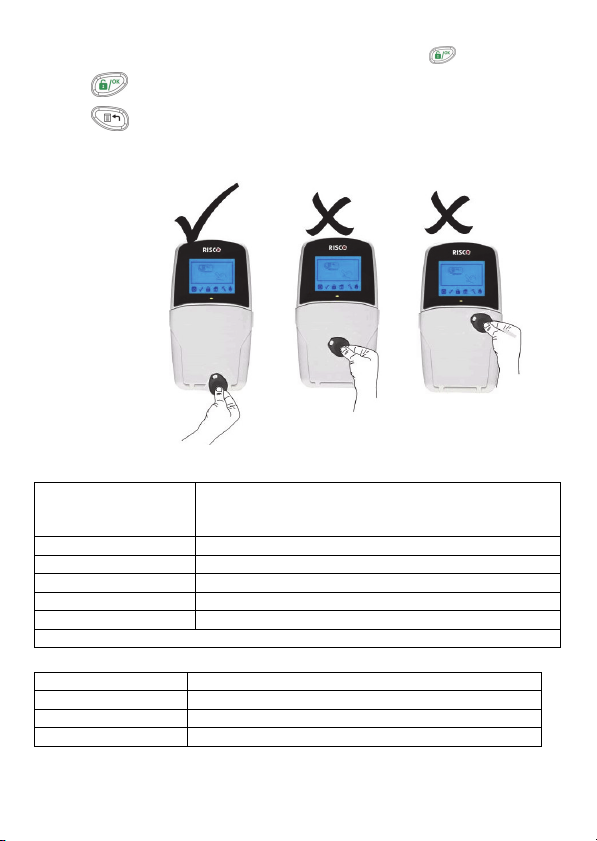
Using the Proximity Tag
The proximity tag,
used with the
proximity LCD
keypad (RP432
KPP) is correctly
used by applying
it within a 4 cm
distance from the
front of the
keypad bottom, as
shown at right.
to save the adjusted settings.
to exit the keypad settings menu.
Technical Specifications
Current consumption
RP432 KP
RP432 KPP
Main panel connection 4-wire BUS, up to 300 m (1000 ft) from Main Panel
Dimensions 153 x 84 x 28 mm (6.02 x 3.3 x 1.1 inch)
Operating temperature -10°C to 55°C (14°F to 131°F)
Storage temperature -20°C to 60°C (-4°F to 140°F)
Prox. RF frequency 13.56MHz
Complies with EN 50131-3 Grade 2 Class II
Ordering Information
Model Description
RP432 KP LightSYS LCD Keypad
RP432 KPP LightSYS LCD Keypad with Proximity 13.56MHz
RP200KT 10 prox keytags (13.56MHz)
13.8V +/-10%, 48 mA typical/52 mA max.
13.8V +/-10%, 62 mA typical/130 mA max.
7
Introduzione
La tastiera LightSYS LCD / LCD con circuito di Prossimità Integrato permette di
compiere semplici operazioni e programmare le centrali LightSYS e ProSYS in modo
facile ed intuitivo.
Le seguenti istruzioni offrono una panoramica delle operazioni disponibili. Per
informazioni dettagliate sulla programmazione del sistema fare riferimento ai manuali
Tecnico e Utente della LightSYS o ProSYS.
Indicatori
Indica che il sistema è in funzione con la
normale rete elettrica e che la batteria in
tampone è in buone condizioni.
Indica che il sistema non è in funzione a causa
di una mancanza di alimentazione (sia
elettrica che della batteria in tampone) ed è
quindi necessario un controllo.
Indica che il sistema è in modo Funzioni
Utente.
Indica la presenza di un guasto.
Indica che il sistema non è pronto
all’inserimento.
Indica che il sistema è pronto all’inserimento
mentre c’è una o più zone temporizzate
rimaste aperte o zone programmate come
inserimento forzato aperte. Le zone
programmate come inserimento forzato
verranno automaticamente escluse
dall’inserimento.
Indica che il sistema è inserito; eventuali
intrusioni verranno segnalate con un allarme.
Indica che il sistema sta scandendo il Tempo
di Ritardo in Uscita.
Indica un allarme
Alimentazione
Pronto
all’Inserimento
Inserimento
Acceso
Spento
Lampeggio
Lento
Lampeggio
Rapido
Acceso Indica che il sistema è pronto all’inserimento.
Spento
Lampeggio
Lento
Acceso
Spento Indica che i sensori sono disinseriti.
Lampeggio
Lento
Lampeggio
Rapido
8
Inserimento
Parziale /
Esclusione
Zona
Incendio
Manomissione
LED (Rosso)
Inserimento
Tasti
Tasti di Comando
Indica che risulta esclusa almeno una zona, o
che è stato selezionato il modo Inserimento
Acceso
Spento
Acceso
Spento
Acceso
Spento
Lampeggio
Si comporta alla stessa maniera del led
In Modo di Funzionamento Normale: Attiva l’Inserimento
Totale.
Nel Menù Funzioni Utente: Modifica i dati.
In Modo di Funzionamento Normale: Attiva l’Inserimento
Parziale.
Nel Menù Funzioni Utente: Modifica i dati.
Disinserisce il sistema dopo l’inserimento del codice utente
oppure termina i comandi e conferma i dati da
memorizzare.
Nota:
Il tasto è equivalente al tasto sulle altre
tastiere ProSYS.
Parziale
Nota:
L’icona è equivalente all’icona
sulle altre tastier ProSYS.
Indica che tutte le zone funzionano
normalmente e il sistema è in modo
Inserimento Totale.
Indica che un dispositivo collegato al sistema
è stato manomesso
Indica che tutte le zone funzionano
normalmente.
Indica che si sono verificati un allarme o
un’emergenza incendio
Indica che tutte le zone incendio funzionano
correttamente.
Indica che è stato rilevato un problema nel
circuito incendio ed è necessario un controllo.
.
9
 Loading...