

RIOTEC RIOSCAN iLS6302JS, RIOSCAN iLS6302NS, RIOSCAN iLS6302LS, RIOSCAN iLS6302KS Quick Manual
RIOSCAN 2D barcode scanner
Quick Guide
M o del no.:
i L S6302JS
i L S6302KS
i L S6302LS
i L S6302NS
Introduction
Designed primarily for smartphone, the scanner is a 2D
barcode scanner that allows you to scan various barcoded
items and send data to smartphone.
Its in-built ZEBRA engine allows you to reliably read 2D
barcodes on various shapes and is a great space-saver for
busy or limited workspaces.
It supports not only iOS devices through Bluetooth
communication, but also Android OTG devices through USB
cable
Delivery content
* Bluetooth Barcode scanner x 1
* Charging cradle x 1
* Holder for smartphone x 1
* USB cable x 1
* Quick Guide instructions x 1
Limited Warranty
Riotec provides a one year limited warranty.
This warranty does not cover any product which has been subject
to improper use, neglect or unauthorized repair or installation.
This warranty does not cover consumable parts. (Cables &
batteries are consumables.)
Safety instructions
* Never look into the laser beam and never point it at people
or animals. Laser radiation can seriously damage your
eyes.(for iLS6302KS)
* Do not point the laser beam at mirrors or other reflective
surfaces. The uncontrolled, reflected beam may strike
people or animals. (for iLS6302KS)
* Don’t put scanner in places excessively high temperatures,
such as expose under direct sunlight.
* Don’t use scanner in extremely humid area or drastic
temperature change
* The rechargeable battery is permanently built into the
product and cannot be replaced.
* Never damage the rechargeable battery. Damaging the
casing of the rechargeable battery might cause an
explosion or a fire!
Charging:
1. Switch on and charge the scanner for 3~4 hours before first
usage as shown on Fig.2. Please shift the switch of the scanner
to C mode (Charging mode) to charge.
2. The On and Off switch is located at the bottom of the handle.
You may use a fine and thin stick, then carefully press into it until
you hear a low clicking sound.
3. When you want to charge the smartphone & scanner, please use
smartphone original USB power adapter.
4. The cradle functions as a charger for the scanner. Even if the
scanner’s battery is full, the cradle will continue to supply power
to the scanner. We suggest removing the scanner from the cradle
when fully charged.
5. When you charge the scanner with the smartphone, please enter
Wired OTG mode & switch to “C- Charging mode”.
1

Scanner supports BT communication mode (for iOS and
Android) and wired OTG communication mode (For Android
OTG devices only/ For wired mode, you must shift the scanner’s
switch to “O”; followed by scanning the code of Wired OTG
communication mode if you are shifting back from BT).
*Scan the following codes to switch in between the modes. It is crucial to
scan the Clean memory data code on (Page 4 third column) before
switching from Bluetooth Communication to Wired OTG communication.
Bluetooth communication
Wired OTG communication mode
(default)
Operating elements
* Please switch ON and charge scanner for 3~4 hours for the
first usage.
How to Connect to Smartphone via BT
1. Make sure the default is BT mode (Page 2 at the top of
1st column) & your device has BT HID or SPP profile.
2. Scan the code of Bluetooth communication mode.
3. Turn off Power-Saving mode on your smartphone/tablet
4. Then, choose HID or SPP profile and scan the following 2
settings codes before connecting to smartphone/tablet.
(Either A1 A2 or B1 B2)
If you don’t know which profile to choose for your device,
try HID first, then, SPP (SPP requires a specific driver).
HID profile
SPP profile
A1
Demo
B1
A2
Demo
B2
Demo
4. Please complete the connection procedures as the above
image.
5. After the devices are paired, the screen will show
“Connected” beside the Bluetooth device that appears
with an “R” followed by a series of alpha numerical
number, and usually with a “Keyboard” icon.
5. Before using WordPad file or an appropriate APP, please
set keyboard language of the device to US English. You
may proceed to scan the barcodes and the barcode
encrypted data will show on the cursor side. If the data
cannot be transferred to the smartphone/tablet, please scan
the “Reset Configuration to Defaults” setting codes (Page
3, column 1).
1. Click on “Settings”
2. Click “General”
3. Click “Bluetooth”
4. Turn it ON, and search the
Devices
5. Select “Rxxxxxx” to connect
6. When it shows “Connected”
means connection is ready.
(example: pairing with iPhone)
Trigger / Power ON
Button
(For iOS Device ONLY)
Press the trigger for 4~5
seconds to raise and
lower soft-Keyboard
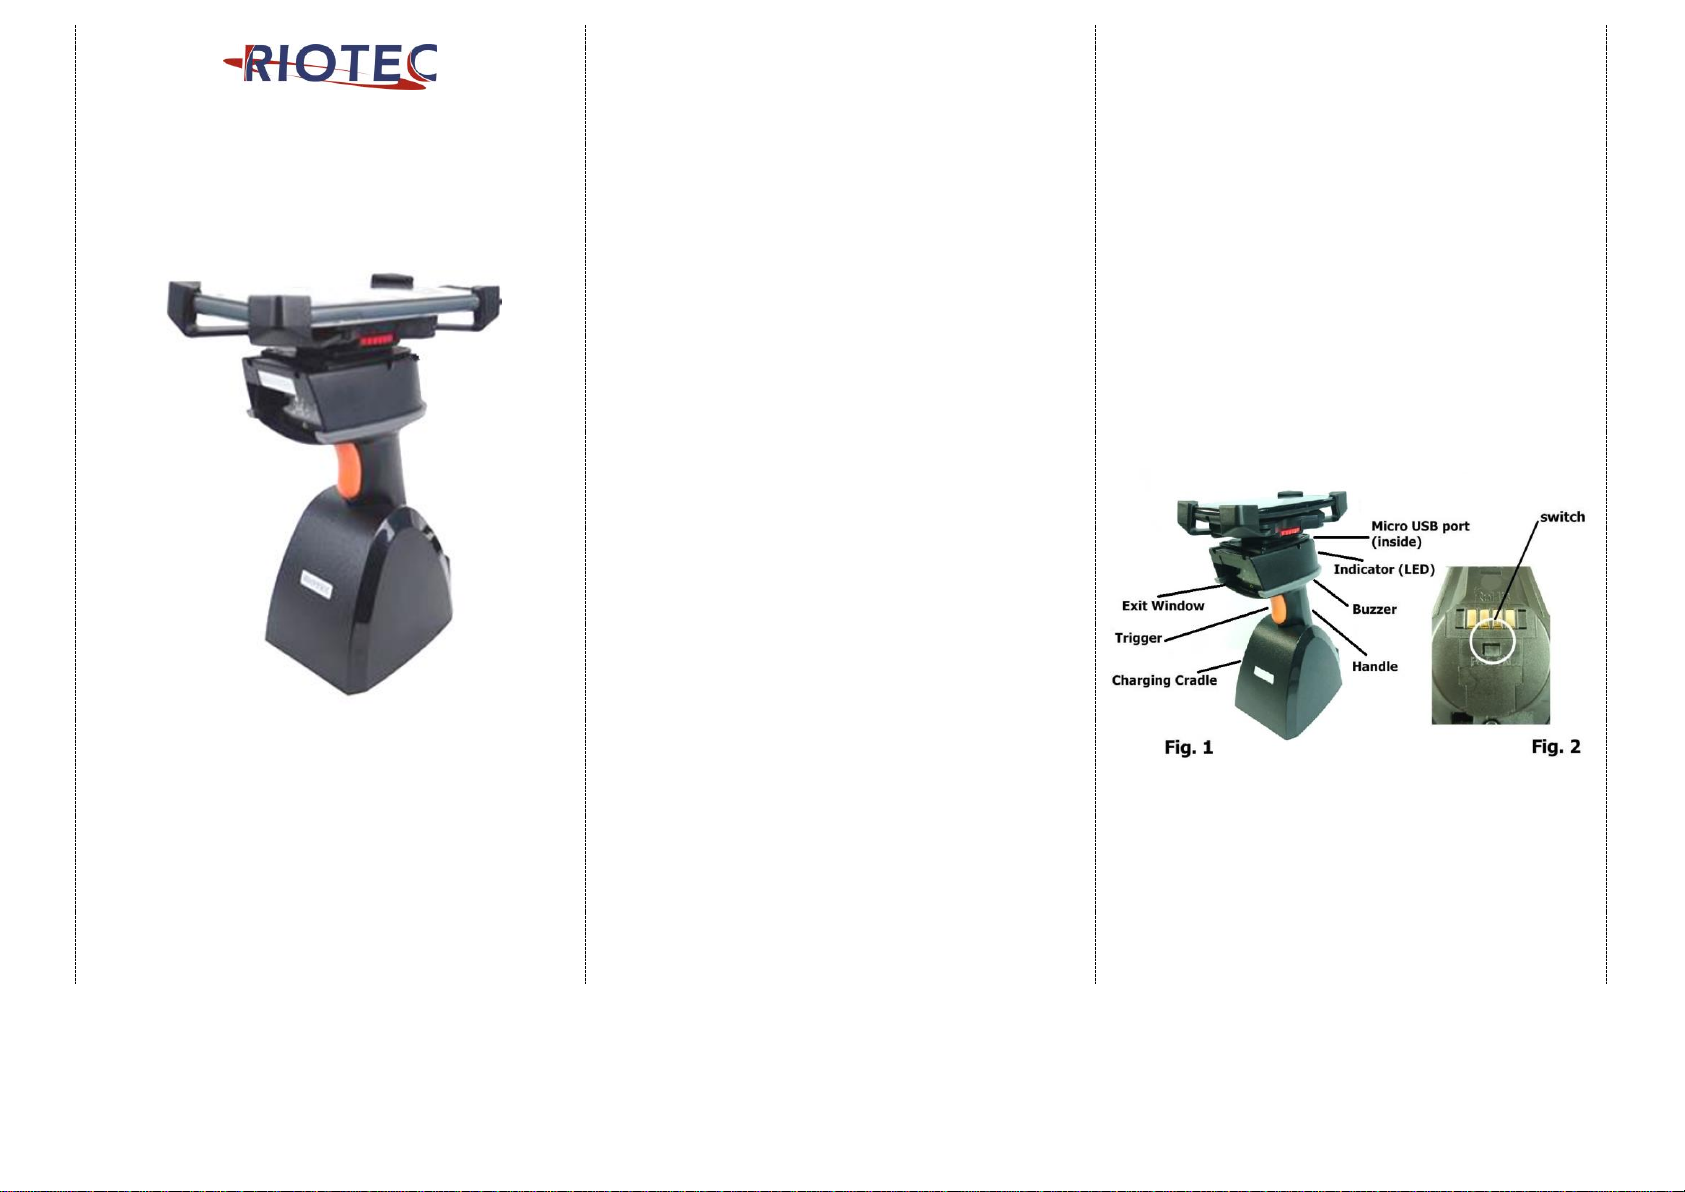
Exit
Window
Micro USB port
Use Micro USB cable to
connect to smartphone.
Charging
cradle
Indicator
(LED)
2
 Loading...