

Page 1

Laser Barcode
Scanner
Model no. LS6007
FS5027
User’s Manual
Page 2

FCC Compliance
This equipment has been tested and found to comply with the limits for a Class A digital
device, pursuant to Part 15 of the FCC Rules. These limits are designed to provide reasonable
protection against harmful interference when the equipment is operated in a commercial
environment. This equipment generates, uses, and can radiate radio frequency energy and, if
not installed and used in accordance with the instructions manual, may cause harmful
interference to radio communications. Operation of this equipment in a residential area is
likely to cause harmful interference in which case the user will be required to correct the
interference at his own expense.
Changes or modifications not expressly approved by the party responsible for compliance
could void the user‘s authority to operate the equipment.
Limited Warranty
No warranty of any kind is made in regard to this material, including, but not limited to,
implied warranties of merchantability or fitness for any particular purpose. We are not liable
for any errors contained herein or for incidental or consequential damages in connection with
furnishing, performance or use of this material. We shall be under no liability in respect of
any defect arising from fair wear and tear, willful damage, negligence, abnormal working
conditions, failure to follow the instructions and warnings, or misuse or alteration or repair of
the products without written approval.
Page 3

1
Table of Contents
1. INTRODUCTION……………………………………………………………………………… ..…2~3
2. INSTALLATION………………………………………………………………………………..…...4~7
3. SET UP FROM BAR CODE LABEL………………………………………………………….……..8
Multi-interface Functions……….………………………………………………………9~11
Interface-Serial……..……………………………………………………………………12~13
1D Symbologies On/Off……………………………………………………………….14~15
2D Symbologies On/Off…………………………………………………………………….16
Symbologies Set Up…………………………………………………………………….17~21
Termination String Setup Bar Codes…………………………………………………..22
Page 4

2
Introduction
Page 5
3
RIOTEC LS6007 FS5027 2D Laser barcode scanner, using Intermec engine, combines the
best scanning performance and value. The device provides an accurate, easy, and fast method
of data entry and data storage for computerized information systems. It is easy to install
drivers to operate.
RIOTEC LS6007 FS5027 2D laser barcode scanner can compatible several interfaces
(RS232-USB, RS-232,) and numerous configurations, is a powerful and reliable handheld
scanner without compromise.
All the operating parameters are programmed by bar code programming menu and stored in
non-volatile RAM which can retain the settings after power is turned off.
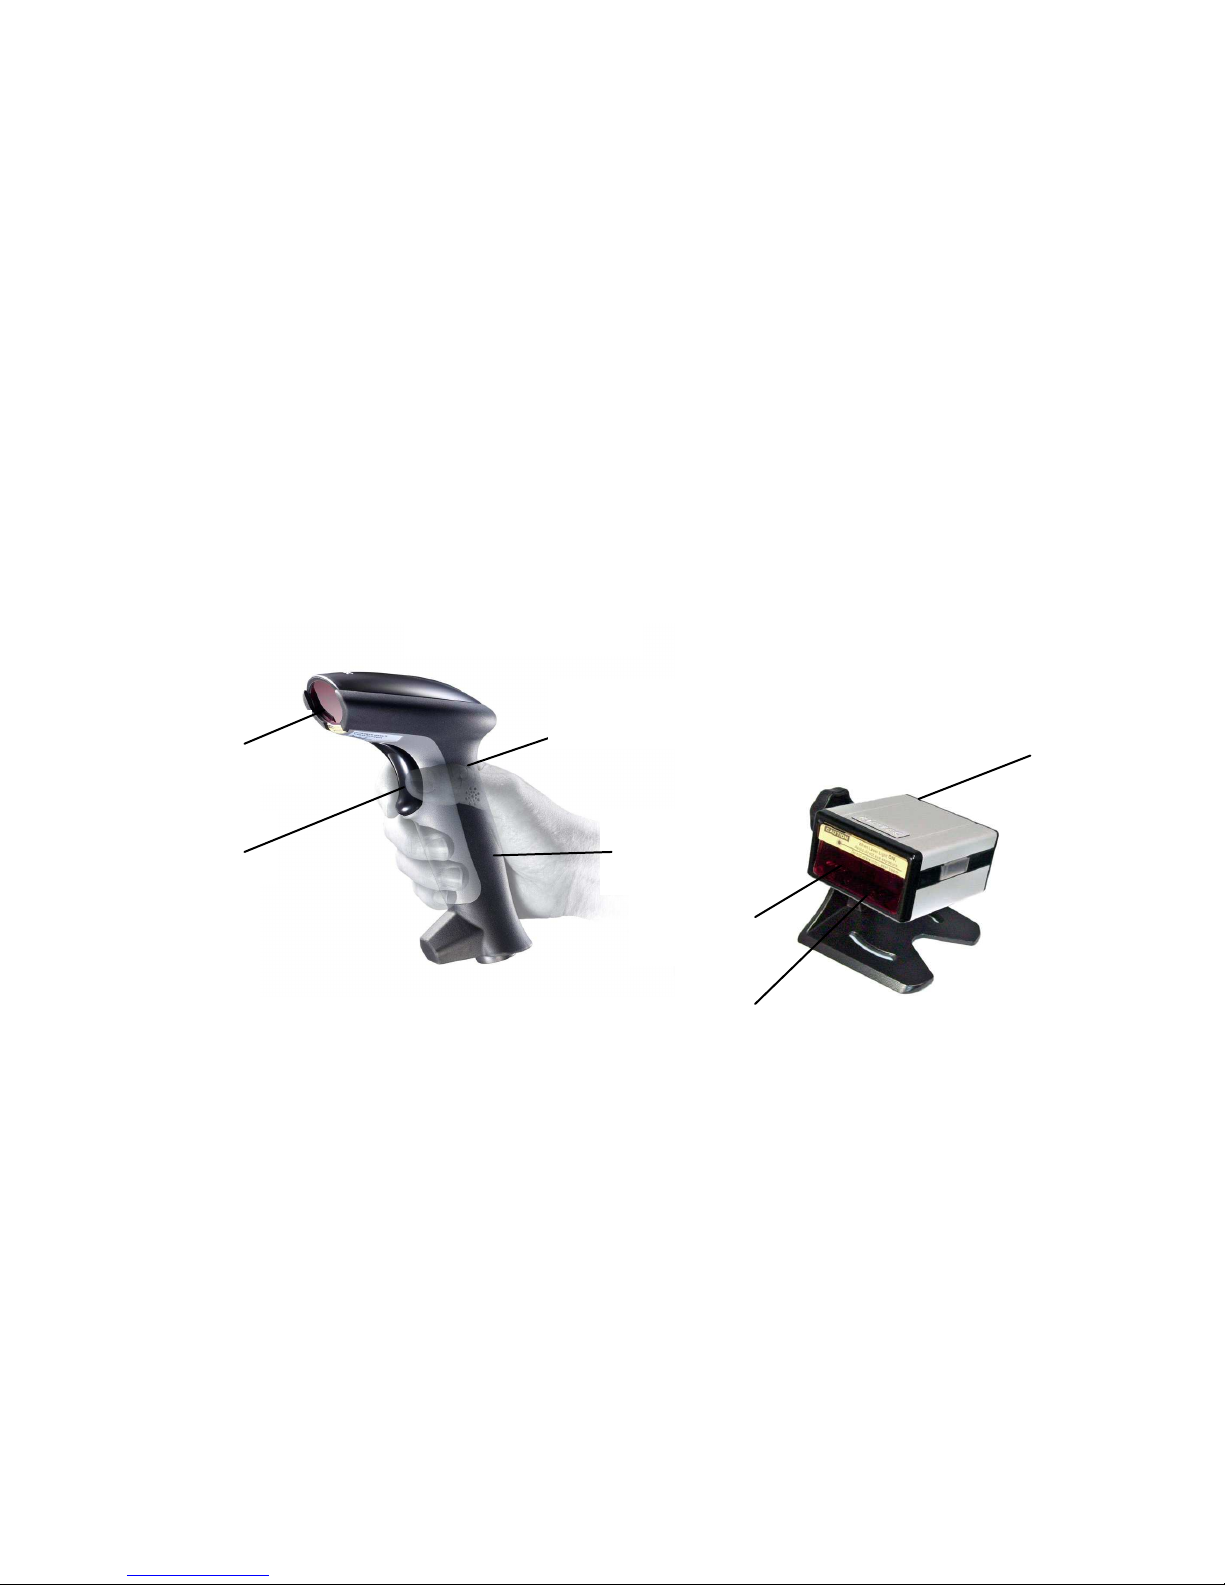
When a barcode is successful decoded, the blue LED light of the scanner will turn on and off.
The scanner will beep once.
LED (blue/red)
Exit Window
Trigger
Buzzer
Handle
Buzzer
Exit Window
LED
Page 6
4
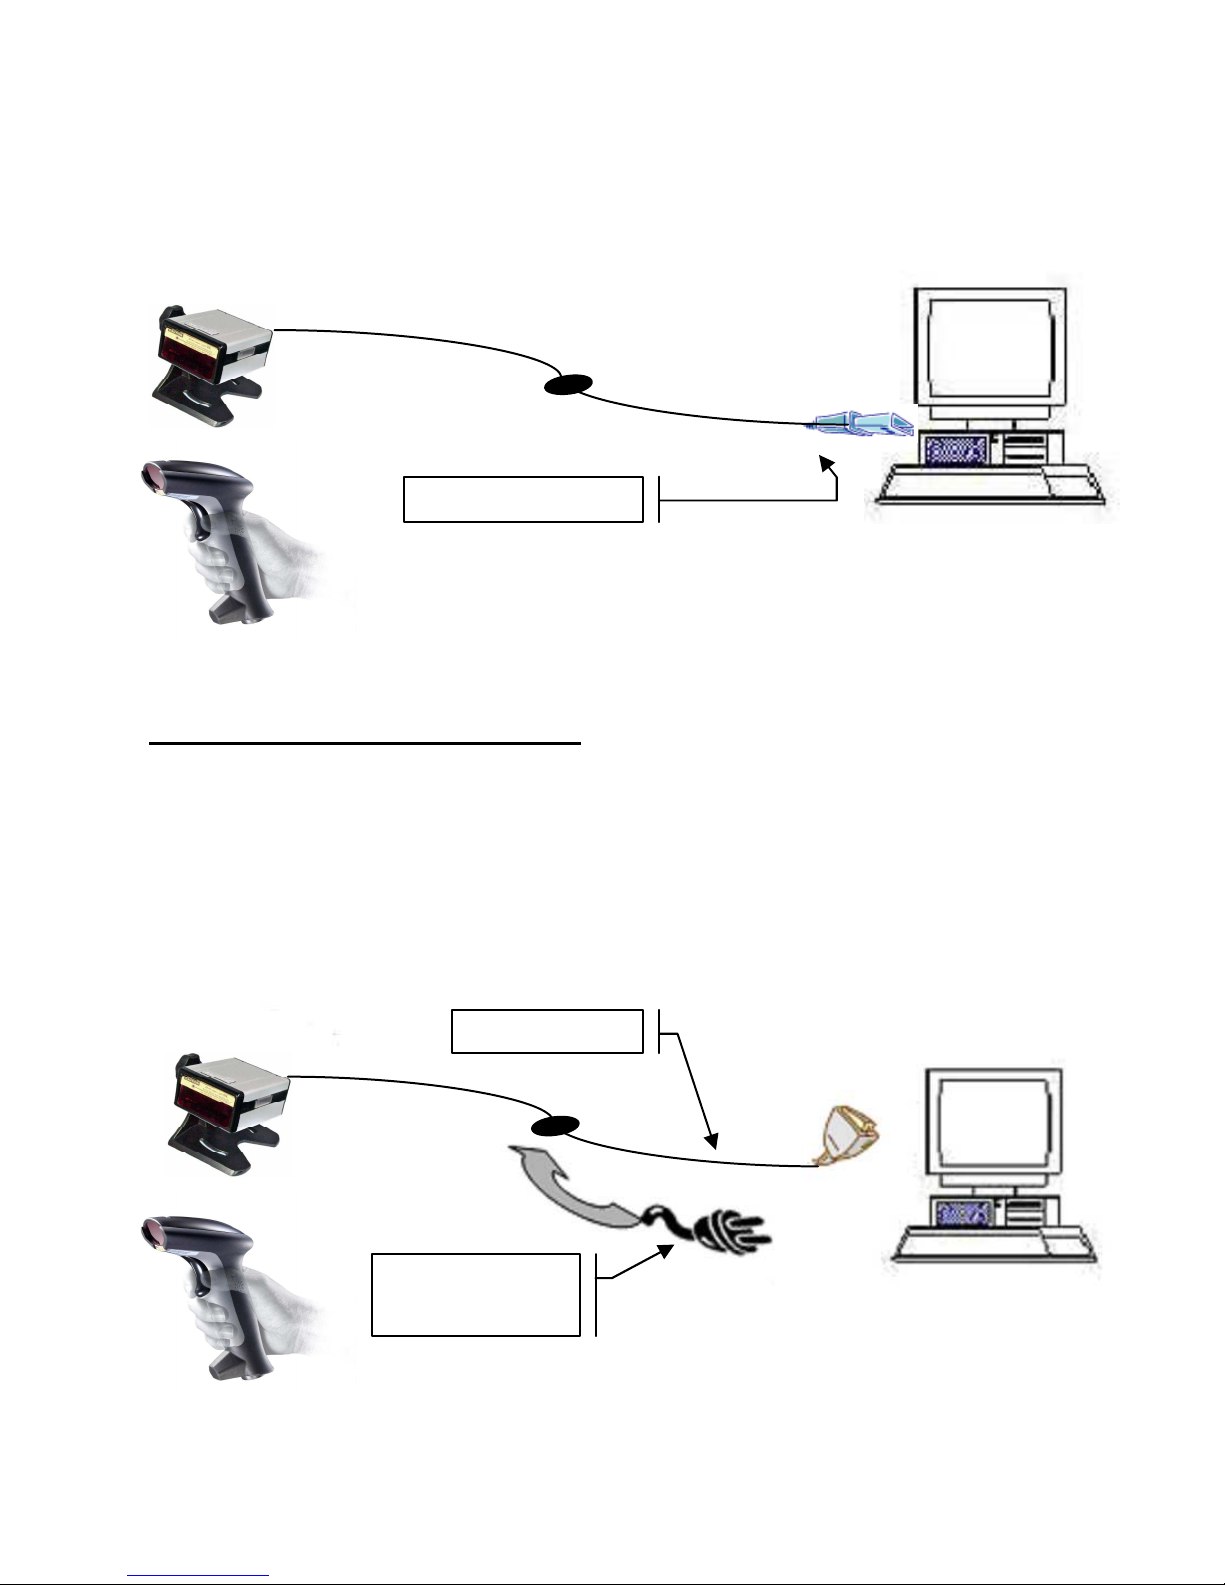
Installation
Insert the plug on the free end of the Communications Cable into the appropriate connector on
the host as below described:
1. USB cable Connection:
Reset Configuration to Defaults
If you are unsure of the scanner configuration or have scanned the incorrect codes,
please scan the “Reset Configuration to Defaults” barcode below . This will reset the
scanner to its factory defaults settings in USB interface.
2. RS232 cable Connection:
Connect with host
connect with host
Require 5V adapter
for power supply
Page 7

5
NOTE: for Serial port (RS232 cable), please plug the power connector of 5V power
adapter to RS232 cable.
1. Be sure that Host computer is turned OFF
2. Connect scanner cable to the USB port(COM port) on the host system.
3. .Ensure that all connections are secure. Turn on your host.
4. And please operate the scanner under the right software application.
5. Install the software “PL-2303 Driver Installer.exe” to the host system..
6. Go to My Computer One click right button of mouse Administrate
Device Administrator Connect Port (COM and LPT).
7. Choose Prolific USB-to-Serial Com Port, and see identify COM number, ex.
COM 5.
8. Go to START Programs Accessories Communications Hyper
Terminal.
9. Run Hyper Terminal and make the right setting: 9600, 8-data bits, NONE-parity,
1-stop bit, NONE-flow control.
10. Aim the scanner at a barcode, ensure that the scanner is in trigger mode (default),
and press the trigger.
11. On successful decode, the blue LED light will turn on and off. The scanner will
beep once. And will show the bar code data on the screen.
Detail set up on the Hyper Terminal, please see at the Figure 1 to Figure 3.
Page 8
6
Reset Configuration to Defaults
If you are unsure of the scanner configuration or have scanned the incorrect codes,
please scan the “Reset Configuration to Defaults” barcode. This will reset the scanner to
its factory defaults settings.
Please read following 2 barcode to reset to defaults.
Load All Factory Default
【
【【
【Pro CMD::::0001000】】】】
Save as User Default
【
【【
【Pro CMD::::0001150】】】】
Load User Default
【
【【
【Pro CMD::::0001160】】】】
Page 9

7
If USB(HID) VERSION,PLEASE SET THE OUT PUT MODE AS USB(HID)
Operation
12. Be sure that Host computer is turned OFF.
13. Ensure that all connections are secure.
14. Turn on your host. And please operate the scanner under the right software
application, such as Notepad or Word(RS232 interface should be under
Hyper Terminal” and make the right setting).
15. Aim the scanner at a barcode, ensure that the scanner is in trigger mode (default),
and press the trigger.
16. On successful decode, the blue LED light will turn on and off. The scanner will
beep once.
Tip
Do not hold the scanner directly over a barcode at 90˚. Scanning light bounces directly
back into the scanner from the barcode label is known as specular reflection which will
create a "dead zone" where decoding is difficult. Practice a few times to find what range
of angles works best.
Maintenance
Cleaning the scan window is the only maintenance required. A dirty window may
affect scanning accuracy.
Wipe the scanner window gently with a lens tissue or other material suitable for cleaning
optical material.
Do not spray water or other cleaning liquids directly onto the window.
Page 10

8
Setup from Bar Code Label
Page 11

9
Multi-Interface Functions
Please read following 2 barcode to reset to defaults.
RESET CONFIGURATION TO DEFAULTS
Save as User Default
【
【【
【Pro CMD::::0001150】】】】
Load User Default
【
【【
【Pro CMD::::0001160】】】】
Operating settings
** Hand-held Mode
Sensor Mode
Pro CMD:0302000
Pro CMD:0302010
Continuous Mode
Pro CMD:0302020
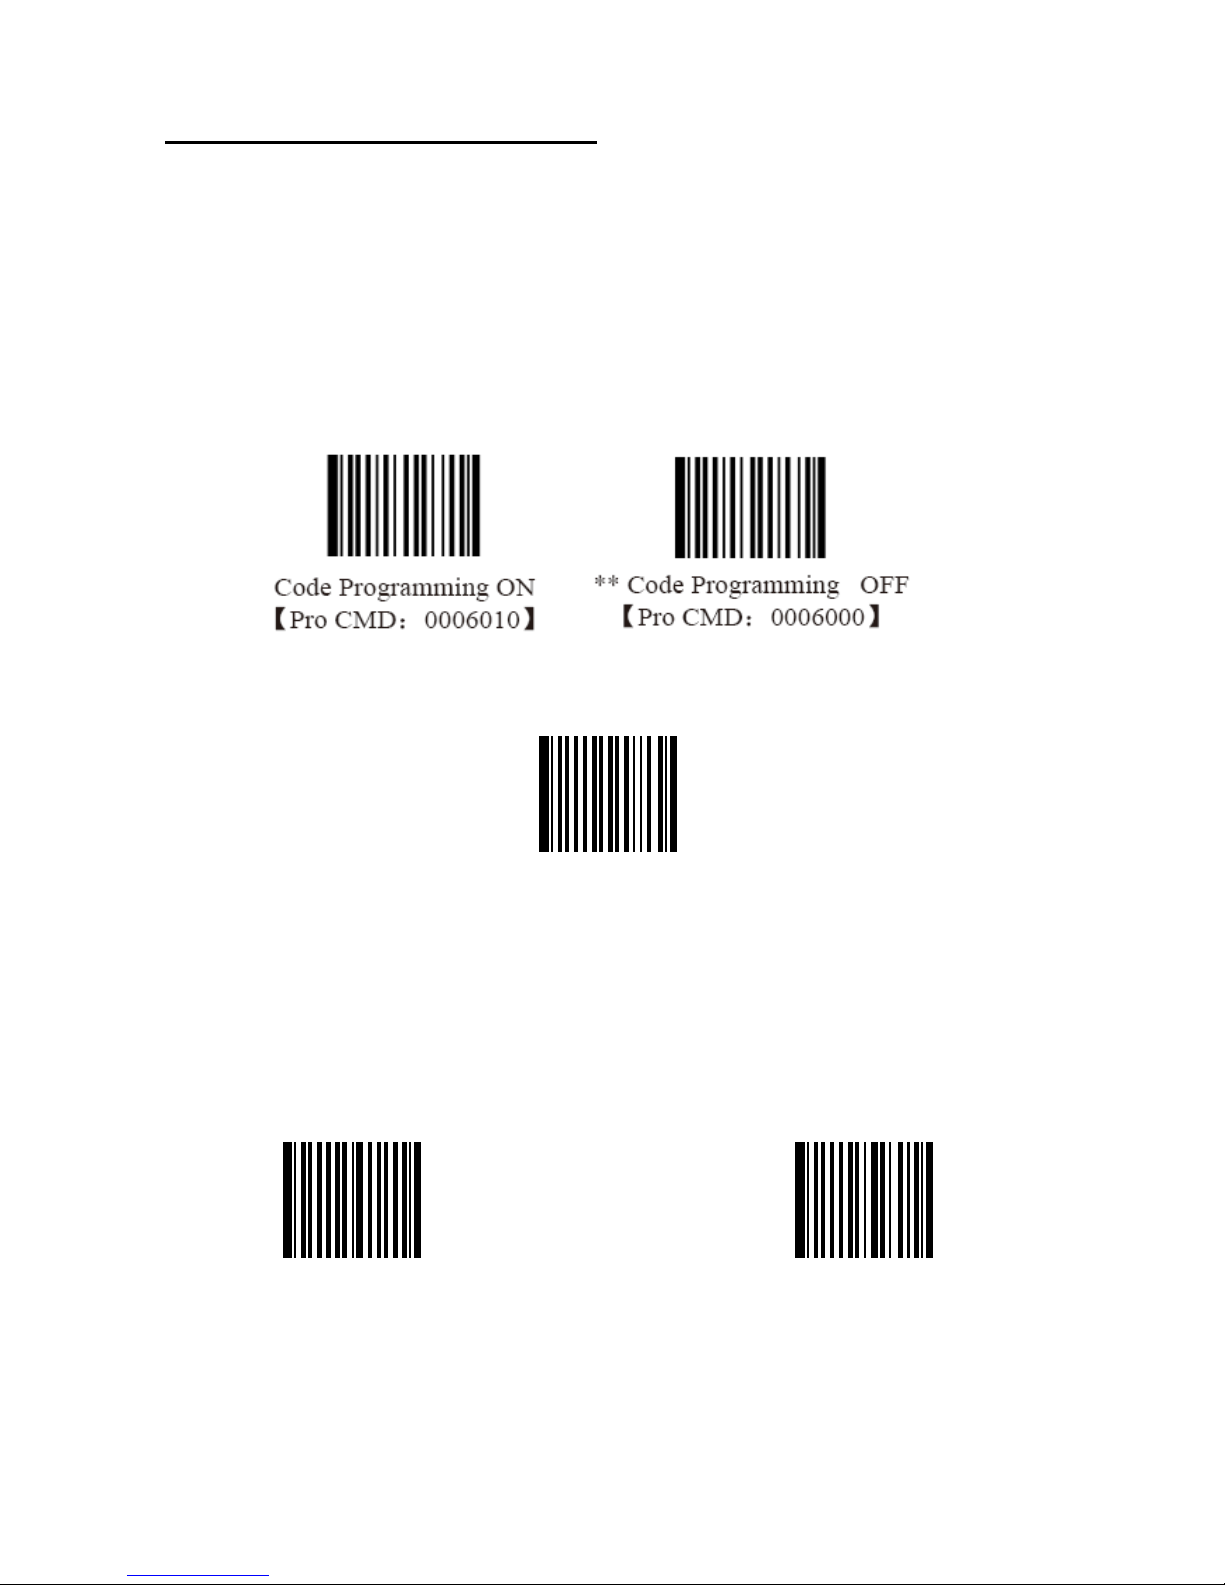
** Code Programming OFF
【Pro CMD:0006000】
** Code Programming ON
【Pro CMD:0006010】
Page 12

10
** Code Programming ON
【
【【
【Pro CMD::::0006010】
】】
】
** Code Programming OFF
【
【【
【Pro CMD::::0006000】
】】
】
Sensor Mode Timeout
Sensor
Mode
** High Sensitivity (= 4)
Pro CMD:0313000
Pro CMD:0312020
Normal Sensitivity (= 7)
Low Sensitivity (= 10)
Pro CMD:0312010
Pro CMD:0312000
Enhanced Sensitivity (= 1)
Program Sensitivity
Pro CMD:0312030
Pro CMD:0312040
Page 13

11
Allow Reading All = enable to read all
symbologies and programming codes
Prohibit
ProhibitProhibit
Prohibit Reading All = allow reading
programming codes only.
Pro CMD:0001020 Pro CMD:0001010
Allow Reading All 1D
Prohibit Reading All 1D
Pro CMD:0001040 Pro CMD:0001030
Allow Reading All 2D
Prohibit Reading All
222
2D
Pro CMD:0001060 Pro CMD:0001050
** Code Programming OFF
【Pro CMD:0006000】
** Code Programming ON
【Pro CMD:0006010】
Page 14

12
Interface – Serial - 1
SERIAL BAUD RATE - 2400
BAUD
RATE
SERIAL BAUD RATE - 4800
Pro CMD:0100010
Pro CMD:0100020
SERIAL BAUD RATE - 9600
SERIAL BAUD RATE - 14400
Pro CMD:0100030
Pro CMD:0100040
SERIAL BAUD RATE -19200
SERIAL BAUD RATE -38400
Pro CMD:0100050
Pro CMD:0100060
SERIAL BAUD RATE -57600
SERIAL BAUD RATE -115200
Pro CMD:0100070
Pro CMD:0100080
** Code Programming OFF
【Pro CMD:0006000】
** Code Programming ON
【Pro CMD:0006010】
Page 15

13
Interface – Serial - 2
SERIAL DATA BITS - 8
PARA-
METERS
SERIAL DATA BITS - 6
Pro CMD:0103030
Pro CMD:0103010
SERIAL DATA BITS - 7
SERIAL DATA BITS - 5
Pro CMD:0103020
Pro CMD:0103000
SERIAL STOP BITS - 1
SERIAL STOP BITS - 2
Pro CMD:0102000
Pro CMD:0102010
SERIAL PARITY - NONE
SERIAL PARITY - ODD
Pro CMD:0101000
Pro CMD:0101020
SERIAL PARITY - EVEN
Pro CMD:0101010
** Code Programming OFF
【Pro CMD:0006000】
** Code Programming ON
【Pro CMD:0006010】
Page 16

14
1D Symbologies On/Off - 1
CODE 39 ENABLE
CODE 39
CODE 39 DISABLE
Pro CMD:0408020
Pro CMD:0408010
CODE 93 - ENABLE
CODE 93
CODE 93 - DISABLE
Pro CMD:0410020
Pro CMD:0410010
CODE 128 - ENABLE
CODE 128
CODE 128 - DISABLE
Pro CMD:0400020
Pro CMD:0400010
CODABAR - ENABLE
CODABAR
CODABAR - DISABLE
Pro CMD:0409020
Pro CMD:0409010
I 2OF5 - ENABLE
INTERLEAVED
2 OF 5
I 2OF5 - DISABLE
** Code Programming OFF
【Pro CMD:0006000】
** Code Programming ON
【Pro CMD:0006010】
Page 17

15
Pro CMD:0405020
Pro CMD:0405010
CHINA POST 25 - ENABLE
China post 2 5
CHINA POST 25 - DISABLE
Pro CMD:0406020
Pro CMD:0406010
Page 18

16
1D Symbologies On/Off – 2
UPC-A ENABLE
UPC/EAN
UPC-A DISABLE
Pro CMD:0404020
Pro CMD:0404010
UPC-E ENABLE
UPC-E DISABLE
Pro CMD:0403020
Pro CMD:0403010
EAN-8 ENABLE
EAN-8 DISABLE
Pro CMD:0401020
Pro CMD:0401010
EAN-13 ENABLE
EAN-13 DISABLE
Pro CMD:0402020
Pro CMD:0402010
EAN-128 ENABLE
UUC/EAN
EAN-128 DISABLE
Pro CMD:0412020
Pro CMD:0412010
** Code Programming OFF
【Pro CMD:0006000】
** Code Programming ON
【Pro CMD:0006010】
Page 19

17
** Code Programming ON
【
【【
【Pro CMD::::0006010】
】】
】
** Code Programming OFF
【
【【
【Pro CMD::::0006000】
】】
】
2D Symbologies On/Off - 1
Data Matrix -ENABLE
Data Matrix
Data Matrix -DISABLE
Pro CMD:0504020
Pro CMD:0504010
**Forward Direction Barcode Only
Both
Pro CMD: 0504320
Pro CMD:0504322
Backward Direction Barcode Only
Pro CMD:0504321
QR Code -ENABLE
QR Code
QR Code -DISABLE
Pro CMD:0502020
Pro CMD:0502010
Enable Chinese-Sensible Code
Chinese-Sensible
Code
Disable Chinese-Sensible Code
Pro CMD:0508020
Pro CMD:0508010
Aztec -ENABLE
Aztec
Aztec -DISABLE
Page 20

18
Pro CMD:0503020
Pro CMD:0503010
PDF 417ENABLE
PDF 417
PDF 417 DISABLE
Pro CMD:0501020
Pro CMD:0501010
**Forward Direction Barcode Only
Both
Pro CMD:0501320
Pro CMD:0501322
Backward Direction Barcode Only
Pro CMD:0501321
Symbologies Set Up - 1
CODE 128 CHECK DIGIT –ENABLE
CODE 128 CHECK
DIGIT
CODE 128 CHECK DIGIT -DISABLE
Pro CMD:0400150
Pro CMD:0400160
TRANSMIT UCC/EAN-8
CHECK –ENABLE
UCC/EAN -8
CHECK BYTE
TRANSMIT UCC/EAN-8
CHECK –DISABLE
Pro CMD:0401040
Pro CMD:0401030
Page 21

19
TRANSMIT UCC/EAN-13
CHECK –ENABLE
UCC/EAN -13
CHECK BYTE
TRANSMIT UCC/EAN-13
CHECK –DISABLE
Pro CMD:0402040
Pro CMD:0402030
TRANSMIT UPC-E
CHECK –ENABLE
UPC-E CHECK
BYTE
TRANSMIT UPC-E
CHECK –DISABLE
Pro CMD:0403040
Pro CMD:0403030
TRANSMIT UPC-A
CHECK –ENABLE
UPC-A CHECK
BYTE
TRANSMIT UPC-A
CHECK –DISABLE
Pro CMD:0404040
Pro CMD:0404030
** Code Programming ON
【
【【
【Pro CMD::::0006010】
】】
】
** Code Programming OFF
【
【【
【Pro CMD::::0006000】
】】
】
NO Check, Transmit All
Interleaved 2 of 5
CHECK BYTE
Check, Transmit No Check
Pro CMD:0405050
Pro CMD:0405060
Check, Transmit All
Pro CMD:0405070
NO Check, Transmit All
CHINA POST 25
CHECK BYTE
Check, Transmit No Check
Page 22

20
Pro CMD:0406050
Pro CMD:0406060
Check, Transmit All
Pro CMD:0406070
NO Check, Transmit All
CODE 39
CHECK BYTE
Check, Transmit No Check
Pro CMD:0408050
Pro CMD:0408060
Check, Transmit All
Pro CMD:0408070
** Code Programming ON
【
【【
【Pro CMD::::0006010】
】】
】
** Code Programming OFF
【
【【
【Pro CMD::::0006000】
】】
】
NO Check, Transmit All
CODEBAR
CHECK BYTE
Check, Transmit No Check
Pro CMD:0409050
Pro CMD:0409060
Check, Transmit All
Pro CMD:0409070
Page 23

21
NO Check, Transmit All
CODE 93
CHECK BYTE
Check, Transmit No Check
Pro CMD:0410050
Pro CMD:0410060
Check, Transmit All
Pro CMD:0409070
Page 24

22
Symbologies Set Up – 2
EXPAND UPC-E TO UPC-A ENABLE
UPC/EAN
FORMATING
EXPAND UPC-E TO UPC-A DISABLE
Pro CMD:0401100
Pro CMD:0401090
Expand to UPC-A ENABLE
Expand to UPC-A DISABLE
Pro CMD:0403120
Pro CMD:0403110
2 Digits Addenda ENABLE
UCC/EAN-8
Addenda Code
2 Digits Addenda DISABLE
Pro CMD:0401060
Pro CMD:0401050
5 Digits Addenda ENABLE
5 Digits Addenda DISABLE
Pro CMD:0401070
Pro CMD:0401080
2 Digits Addenda ENABLE
UCC/EAN-
13
Addenda Code
2 Digits Addenda DISABLE
Pro CMD:0402060
Pro CMD:0402050
5 Digits Addenda ENABLE
5 Digits Addenda DISABLE
** Code Programming OFF
【Pro CMD:0006000】
** Code Programming ON
【Pro CMD:0006010】
Page 25

23
Pro CMD:0402080
Pro CMD:0402070
Page 26

24
Symbologies Set Up – 3
2 Digits Addenda ENABLE
UPC-E
Addenda Code
2 Digits Addenda DISABLE
Pro CMD:
0403060
Pro CMD:0403050
5 Digits Addenda ENABLE
5 Digits Addenda DISABLE
Pro CMD:0403080
Pro CMD:0403070
2 Digits Addenda ENABLE
UPC-A
Addenda Code
2 Digits Addenda DISABLE
Pro CMD:0404060
Pro CMD:0404050
5 Digits Addenda ENABLE
5 Digits Addenda DISABLE
Pro CMD:0404080
Pro CMD:0404070
** Code Programming OFF
【Pro CMD:0006000】
** Code Programming ON
【Pro CMD:0006010】
Page 27

25
TERMINATION STRING SETUP BAR CODES
Step 1
STRING# 1
TERMINATION
CHAR - CR
Step 2
Pro CMD:0310000
Pro CMD:0309010
Step3
Pro CMD:0000160
STRING# 1
TERMINATION
CHAR - LF
Step 1
Step 2
Pro CMD:0310000
Pro CMD:0309000
Step 3
** Code Programming OFF
【Pro CMD:0006000】
** Code Programming ON
【Pro CMD:0006010】
Page 28

26
Pro CMD:0000160
Page 29

27
Version: 1.0
Date: MAY 27, 2009
P/N: 79.60301.011
 Loading...