

P rogrammi ng Q u i c k G u i d e
- i L S 6 3 0 2 N BQ
- i L S 6 3 0 2 N BM
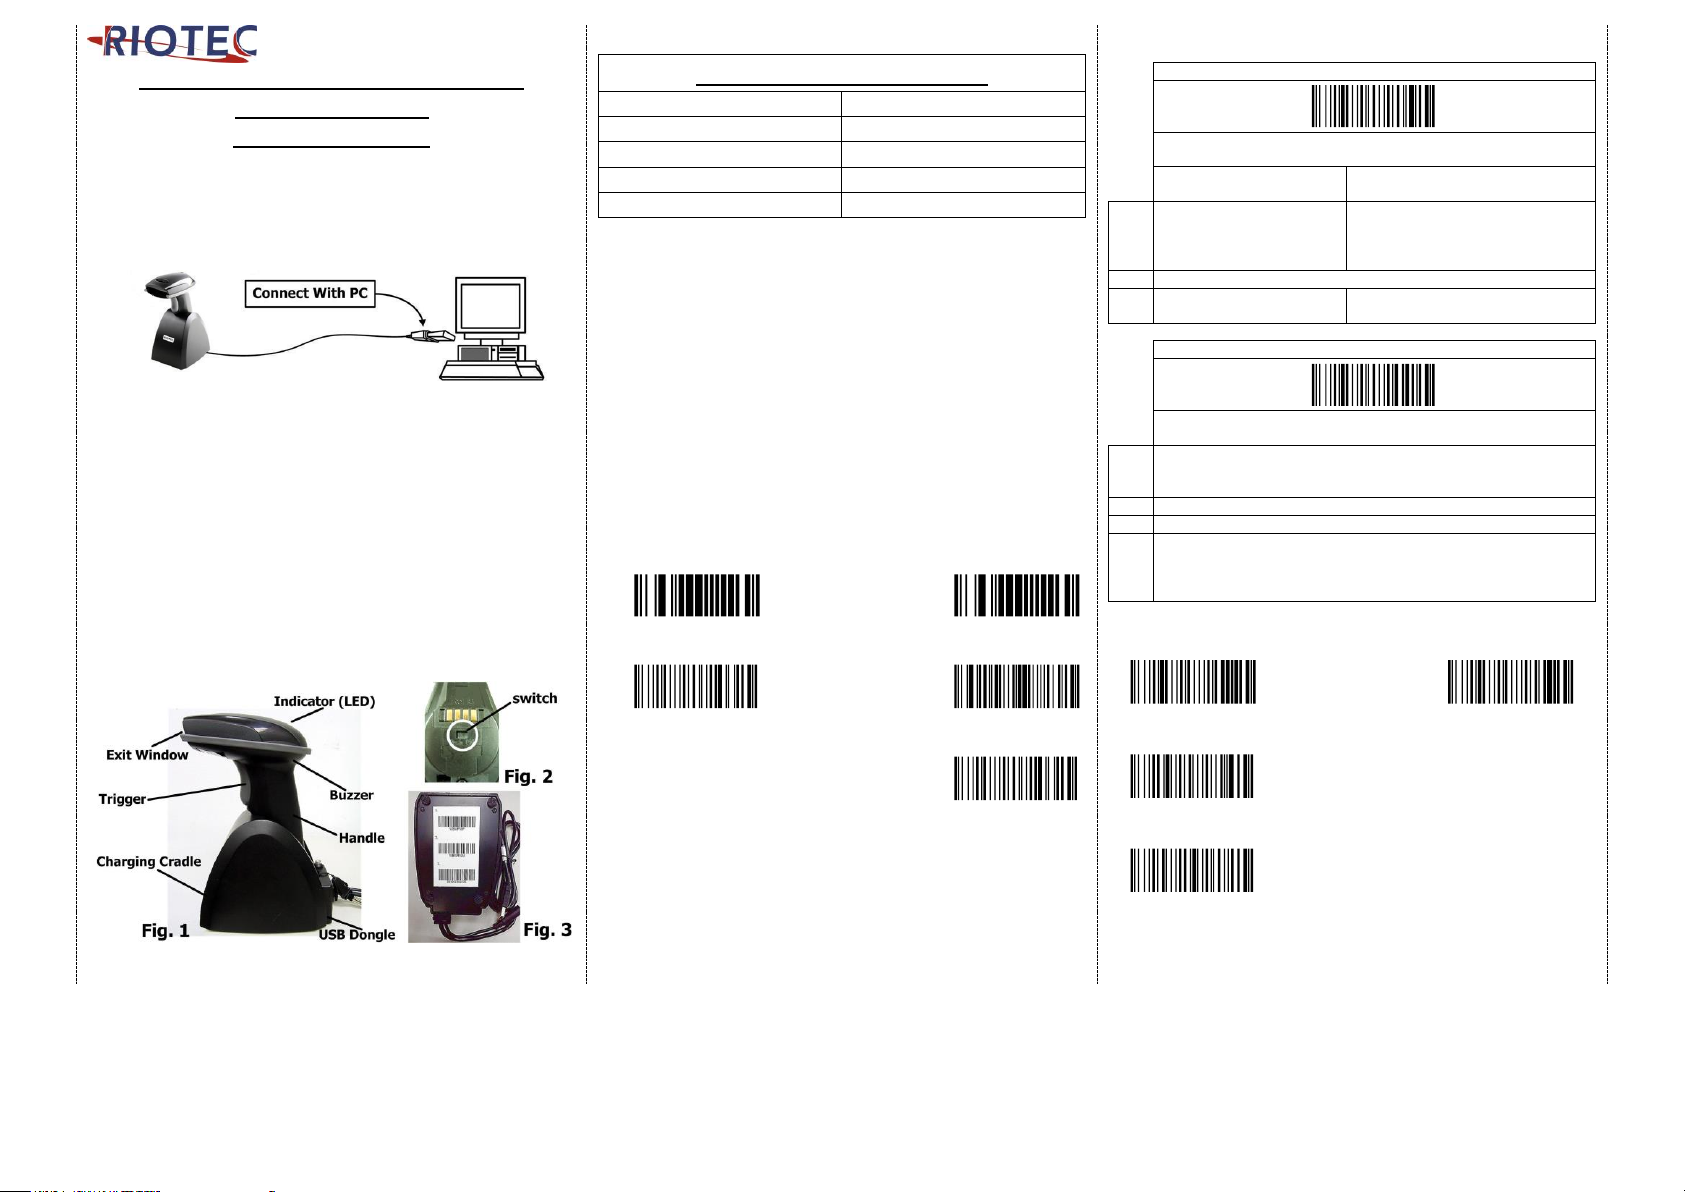
Connecting the Scanner
Be sure that PC is turned OFF, before Connect scanner cable to
the PC USB port on the PC as below described, Ensure that all
connections are ready, and turn on your PC.
1. Please switch ON and charge scanner for 4~5 hours at first time
before use. Scanner switch shown on Fig. 2.
2. After switch ON, the Orange LED will flash following with 3
beep-sounds. The RED LED will be OFF while it links to cradle
within Bluetooth radio range.
3. If RED LED is continual ON, please re-plug USB cable, then, scan
the 3 barcodes on the bottom of cradle sequentially. (Shown on
Fig. 3 From 1 to 3).
4. Charging issue: Cradle works as charger when putting scanner on
it. Even if the scanner's battery is full, the cradle will continue to
supply power to the scanner. We suggest you to remove scanner
from cradle when scanner is charged fully
* Note: Please install PL-2303 driver for iLS6302NBM
LED Indicator Information
Orange LED ON
Full charged
Orange LED Flashing
Charging / Low battery
Red LED ON
Offline / out of service
Green LED ON
Good read
Orange LED ON
Good read (Batch mode)
Remark:
* When the battery power is too low, the Orange LED will flash
and beep once. Scanner should be charged immediately.
* If scanner shuts down it is recommended to charge it fully
before turning it back on.
* Under power-saving mode, there will not be LED indication when
charging.
Reset Configuration to Defaults
(scan from A1 to A2 for iLS6302NBQ or B1 to B3 for iLS6302NBM)
iLS6302NBQ
iLS6302NBM
A1
B1
A2
Demo
B2
Demo
B3
Demo
* Note: Please install PL-2303 driver for iLS6302NBM
There are two operating modes on the scanner
1.Data Transmission mode (Default)
Demo
It is a necessary to scan “clean memory data" when
switching between these two modes.
Within Bluetooth radio
range
Beyond Bluetooth radio range
Data
read
Transmit data to PC/terminal
directly
Save data into scanner’s memory,
scanner will transmit data to PC/
terminal automatically when back to
Bluetooth radio range.
Enter Data Storage mode
LED
Green/ Orange LED flashes
followed by 3 beeps.
2.Data Storage mode (Batch Mode)
Demo
It is a necessary to scan “clean memory data" when switching
between these two modes.
Data
read
Save data directly to scanner’s memory, It will transmit the data to PC/
terminal after you scan the Transmit memory data code. To delete
data please scan the Clean memory data code.
Enter Data Transmission mode
LED
Green/Orange LED flashes followed by 3 beeps.
Always Clean memory data before switching to Data Transmission
Mode.
Otherwise Red/ Orange LED will flash with one long beep and will not
switch modes.
Under Data storage Mode
The data can be keep or delete by option after transmit
Demo
Demo
Keep the data
(Default)
Delete the data
Demo
Transmit memory data
Green/Orange LED Flashes followed by 3 beeps
Demo
Clean memory data
Green/Orange LED flashes followed by 3 beeps
The barcode data which is stored in the memory will be deleted.
1

Trigger Mode
Demo
Trigger always
(Trigger available at any time)
Demo
Trigger standard (Default)
(Trigger available, after data sent to the
device)
Transmission Speed
Transmission speed is dependent on your device. In order not to lose
data, please choose the correct speed. Middle-speed is the Default.
Demo
Demo
High-speed
Ultra Slow-speed
Transmission
1 transmission
Demo
Middle-speed
Ultra Slow-speed
Transmission
(Default)
2 transmission
Demo
Slow-speed
Ultra Slow-speed
Transmission
3 transmission
Bluetooth Auto-connection
Demo
Bluetooth Auto-connection ON:
When out of range, it will keep trying to connect
to device, scanner will not enter power-saving
mode.
Demo
Bluetooth Auto-connection OFF:
When you are out of BT signal range, scanner will
stop sending auto-connection signal to device after
2 minutes. During this time, it will not enter
power-saving mode.
Once you are back within range, press trigger to
connect to the device. (Default)
Keyboard Country(For USB HID only)
Scan the appropriate country code as below to program the keyboard
layout for your country or language. As a general rule, the following
characters are supported, but need special care for countries other
than the United States: @ | $ # { } [ ] = / ‘ \ < > ~
Demo
Demo
USA
(Original setting)
Italian
Demo
Demo
Norway
France
Demo
www.tec-it.com
Germany
Vietnam
Demo
Demo
Sweden
Spain
Demo
Demo
Denmark
Portugal
Demo
Demo
Switzerland
Hungary
Power-saving Mode
Demo
Power-saving mode OFF
Demo
Power-saving mode ON (Default):
Enter power-saving mode after 3-minute inactivity.
This function converses battery power. When you
press "SCAN/Power ON" button, it will wake up and
begin to scan.
Demo
Power-saving mode ON:
Enter power-saving mode after 10-minute
inactivity. This function converses battery power.
When you press "SCAN/Power ON" button, it will
wake up and begin to scan.
*When charging, the scanner will not enter power-saving mode
automatically
Redundancy Level
This scanner offers two levels of decode redundancy. Select higher
redundancy levels for decreasing levels of bar code quality.
As redundancy levels increase, the decoder’s aggressiveness decreases.
Select the redundancy level appropriate for the bar code quality.
Redundancy Level 1
barcode must be successfully read twice before
being decoded
Demo
Redundancy Level 2
barcode must be successfully read three times
before being decoded
2
How to append a “prefix” or a “suffix” to the
barcode data
Demo
Demo
prefix
suffix
1. Scan above configuration code for Prefix or Suffix
2. Enter the required values (right, numeric barcode) for Prefix or
Suffix using the hex values for the desired HEX values from “Prefix
& Suffix TABLE (blew page)”
3. Then, end by scanning Code X (below, right)
* The max. of special characters is 5.
* When you append 1~4 required values for Prefix or Suffix, it must
end with Code X.
* It doesn’t need Code X, if you append 5 values to barcode data.
How to delete Prefix or Suffix
1. Scan above configuration code for Prefix or Suffix
2. Enter the “0” “0” (above, right)
3. Then end by scanning Code X (below, right)
Numeric barcode for settings
Demo
0
Demo
6
Demo
C
Demo
1
Demo
7
Demo
D
Demo
2
Demo
8
Demo
E
Demo
3
Demo
9
F
Demo
4
Demo
A
Demo
5
Demo
B
Demo
X
Prefix & Suffix TABLE
HEX
HID
(SPP)
HEX
HID
(SPP)
HEX HEX HEX HEX
01
CTRL A
(SOH)
19
CTRL Y
(EM)
20
SPACE
38 8 50 P 68
h
02
CTRL B
(STX)
1A
CTRL
Z(SUB)
21 ! 39 9 51 Q 69 i 03
CTRL C
(ETX)
1B
ESC
(ESC)
22 " 3A : 52 R 6A j 04
CTRL D
(EOT)
1C
CTRL \
(FS)
23 # 3B ; 53 S 6B k 05
CTRL E
(ENQ)
1D
CTRL ]
(GS)
24 $ 3C < 54 T 6C l 06
CTRL F
(ACK)
1E
CTRL ^
(RS)
25 % 3D = 55 U 6D
m
07
CTRL G
(BEL)
1F
CTRL _
(US)
26 & 3E > 56 V 6E n 08
Backspace
(BS)
27 ' 3F ? 57 W 6F
o
09
Tab
(HT)
28 ( 40 @ 58 X 70
p
0A
CTRL J
(LF)
29 ) 41 A 59 Y 71 q 0B
CTRL K
(VT)
2A * 42 B 5A Z 72 r 0C
CTRL L
(FF)
2B + 43 C 5B [ 73 s 0D
Enter
(CR)
2C , 44 D 5C \ 74 t 0E
CTRL N
(SO)
2D - 45 E 5D ] 75
u
0F
CTRL O
(SI)
2E . 46 F 5E ^ 76 v 10
CTRL P
(DLE)
2F / 47 G 5F _ 77 w 11
CTRL Q
(DC1)
30 0 48 H 60 ` 78 x 12
CTRL R
(DC2)
31 1 49 I 61 a 79 y 13
CTRL S
(DC3)
32 2 4A J 62 b 7A z 14
CTRL T
(DC4)
33 3 4B K 63 c 7B
{
15
CTRL U
(NAK)
34 4 4C L 64 d 7C | 16
CTRL V
(SYN)
35 5 4D M 65 e 7D } 17
CTRL W
(ETB)
36 6 4E N 66 f 7E ~ 18
CTRL X
(CAN)
37 7 4F O 67 g
1D Symbologies -1
ENABLE
UPC-A
DISABLE
Demo
ENABLE
UPC-E
DISABLE
Demo
ENABLE
EAN-8
DISABLE
ENABLE
EAN-13
DISABLE
Demo
ENABLE
ISBT 128
DISABLE
www.tec-it.com
3
1D Symbologies -2
ENABLE
Code 39
FULL ASCII
DISABLE
ENABLE
Trioptic
Code 39
DISABLE
Demo
Demo
ENABLE
Code 32
DISABLE
ENABLE
CODE 93
DISABLE
ENABLE
CODE 11
DISABLE
Demo
ENABLE
Interleaved 25
DISABLE
ENABLE
Discrete 25
DISABLE
Demo
ENABLE
CODABAR
DISABLE
Demo
ENABLE
MSI
DISABLE
Demo
1D Symbologies -3
ENABLE
Code 39
DISABLE
ENABLE
Chinese 25
DISABLE
Demo
ENABLE
Matrix 25
DISABLE
Demo
ENABLE
GS1 DataBar
DISABLE
Demo
ENABLE
GS1 DataBar
Limited
DISABLE
Demo
Demo
ENABLE
GS1 DataBar
Expanded
DISABLE
Demo
Demo
ENABLE
Composite
CC-C
DISABLE
Demo
ENABLE
Composite
CC-A/B
DISABLE
www.tec-it.com
ENABLE
Composite
TLC 39
DISABLE
Demo
Demo
2D Symbologie
ENABLE
PDF 417
DISABLE
ENABLE
Micro
PDF 417
DISABLE
Demo
ENABLE
Data Matrix
DISABLE
ENABLE
Maxicode
DISABLE
ENABLE
QR CODE
DISABLE
Demo
Demo
ENABLE
Micro
QR CODE
DISABLE
ENABLE
Aztec
DISABLE
Quick guide is subject to change without notice.
R_180808_01
4
 Loading...