

Page 1
Wireless 2D
Pocket barcode scanner
Quick Guide
Model no.: iDC9507J
Introduction
Designed primarily for P.O.S. retail environments, the iDC9507J is a wireless
pocket barcode scanner that allows you to scan various barcoded items.
Its in-built excellent 2D engine allow s yo u to reliably read 1D / 2D barcodes
on various shapes and is a great space-saver for busy or limited workspaces.
It supports iOS, Android, and Windows devices through Bluetoot h HI D or SPP
communication.
Technical data
* Light source………………625 ± 10 nm LED
* Depth of field……….….. 2D (15mils PDF417):265mm
* Scan speed……………….60 frames / second
* Best resolution………….1D (4 mils) – Code 39
* Transmission range……BT Class 1 (100m, line of sight)
* Profiles………….…………HID & SPP profile 2.4GHz Wireless
* Memory Capacity………1MB memory inside
* Input voltage..............5V/DC
* Rechargeable battery…3.7V 900mA Li-Ion battery
* Operating time………….6,000 readings when full charged
* Operating conditions…-0℃ to 50℃
* Dimensions………………100 x 43 x 24.5mm (L x W x H)
* Symbologies:
2D: PDF417, QR code, Data Matrix
1D: Code 128, EAN-13, EAN-8, Code 39, UPC-A, UPC-E, Codabar, GS1 Databar,
Interleaved 2 of 5, UCC/EAN-128, , Code 11, Industrial 2 of 5, Plessey,
MSI-Plessey
Delivery content
* Pocket Barcode scanner x 1
* Mini USB cable x 1 (for charging only)
* Quick instructions x 1
* Strap x 1
Limited Warranty
Riotec provides one year limited w arran ty.
Riotec will not warranty any pro duct which ha s been subjected t o improper usa ge,
neglect or unauthorized repair or installation.
Besides, warranty does not cover the faulty usages or consumable parts. (Cable &
battery are consumable.)
Safety instructions
Read the operating instructions carefully and especially observe the safety
information. If you do not follow the safety instructions and information on
proper handling in this manual, we assume n o liability for any resulting personal
injury or damage to property.
* Don’t put scanner in places excessively high temperatures, such as expose
under direct sunlight
* Don’t use scanner in extremely humid area or drastic temperature change
* The rechargeable battery is permanently built into the product and cannot be
replaced.
* Never damage the rechargeable battery. Damaging the casing of the
rechargeable battery might cause an explosion or a fire!
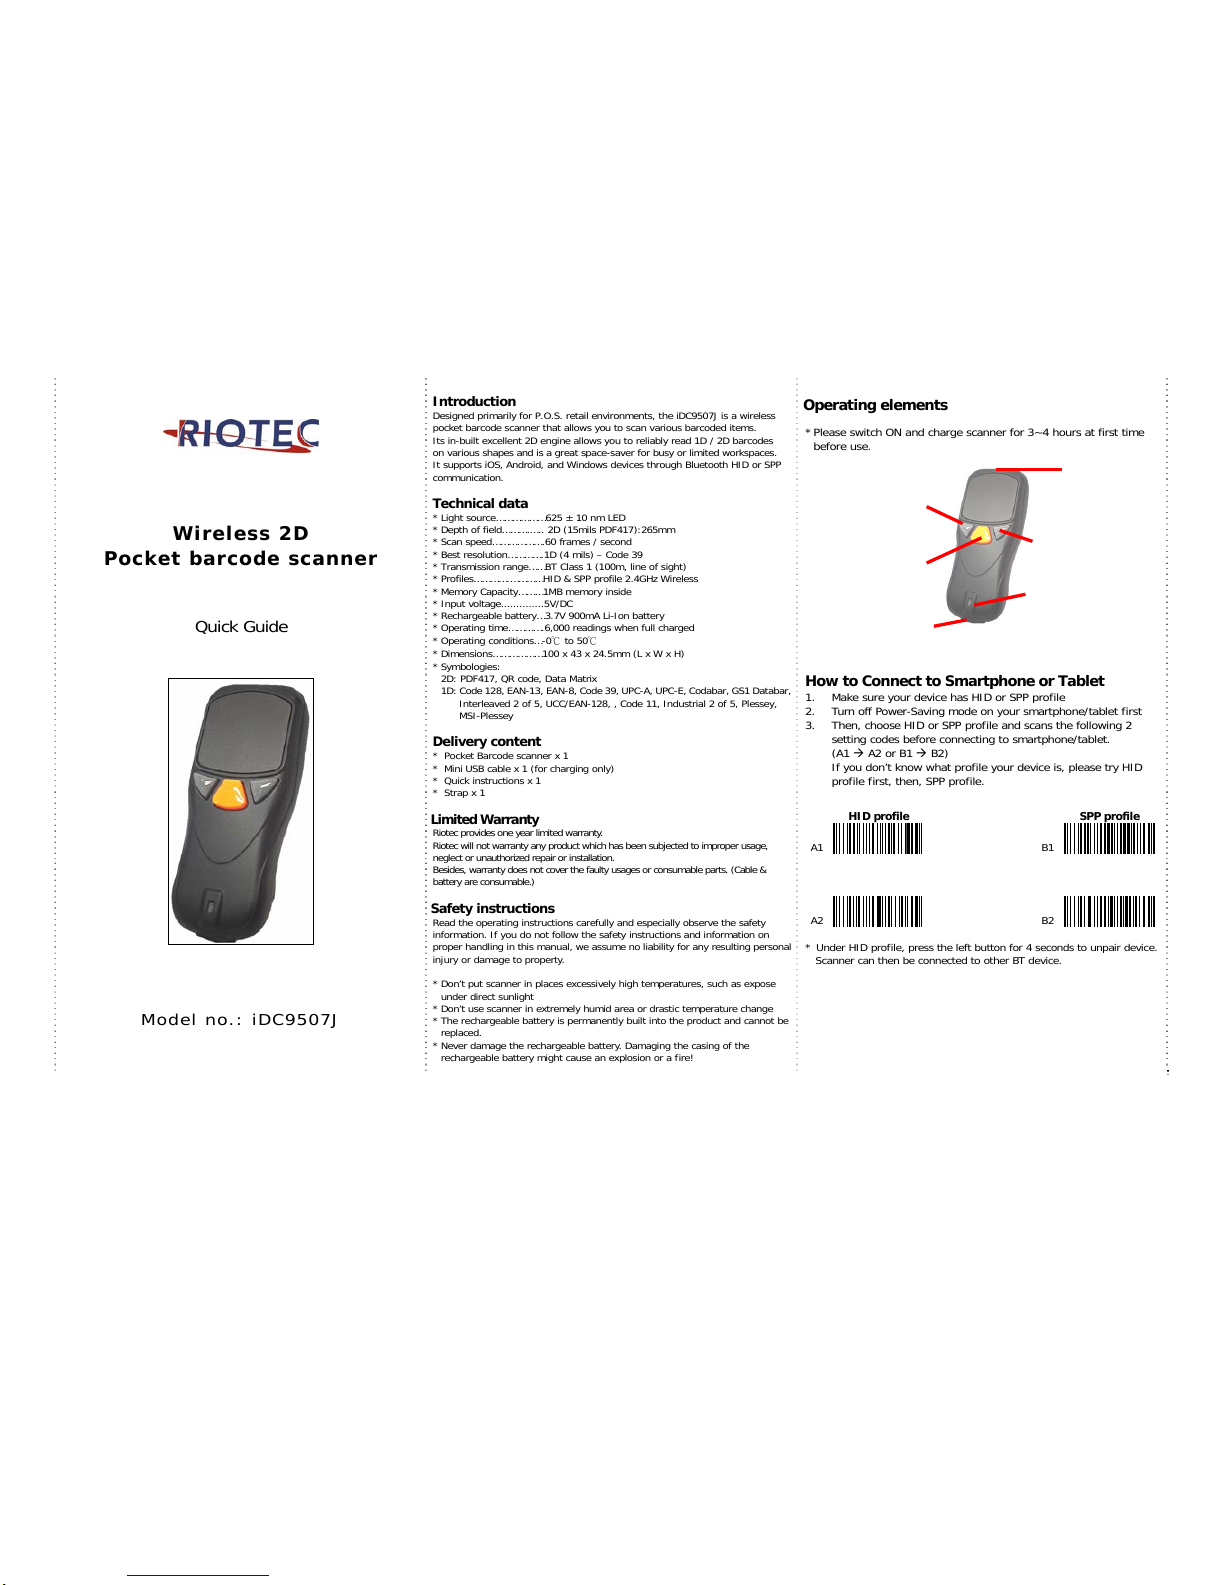
Operating elements
* Please switch ON and charge scanner for 3~4 hours at first time
before use.
How to Connect to Smartphone or Tablet
1. Make sure your device has HID or SPP profile
2. Turn off Power-Saving mode on your smartphone/tablet first
3. Then, choose HID or SPP profile and scans the fol lowi ng 2
setting codes before connecting to smartphone/tablet.
(A1 A2 or B1 B2)
If you don’t know what profile your device is, please try HID
profile first, then, SPP profile.
HID profile
SPP profile
A1
B1
A2
B2
* Under HID profile, press the left button for 4 seconds to unpair device.
Scanner can then be connected to other BT device.
Power Saving button:
Press the button for 2~3
seconds then enter power
saving mode
SCAN/ Power ON
Button
(For iOS Device ONLY)
the button to raise and lower
ON-Screen Keyboard
Indicator (LED)
Mini USB
port
with protective cover
charge scanner via mini USB host cable.
Exit
Window
1
Page 2
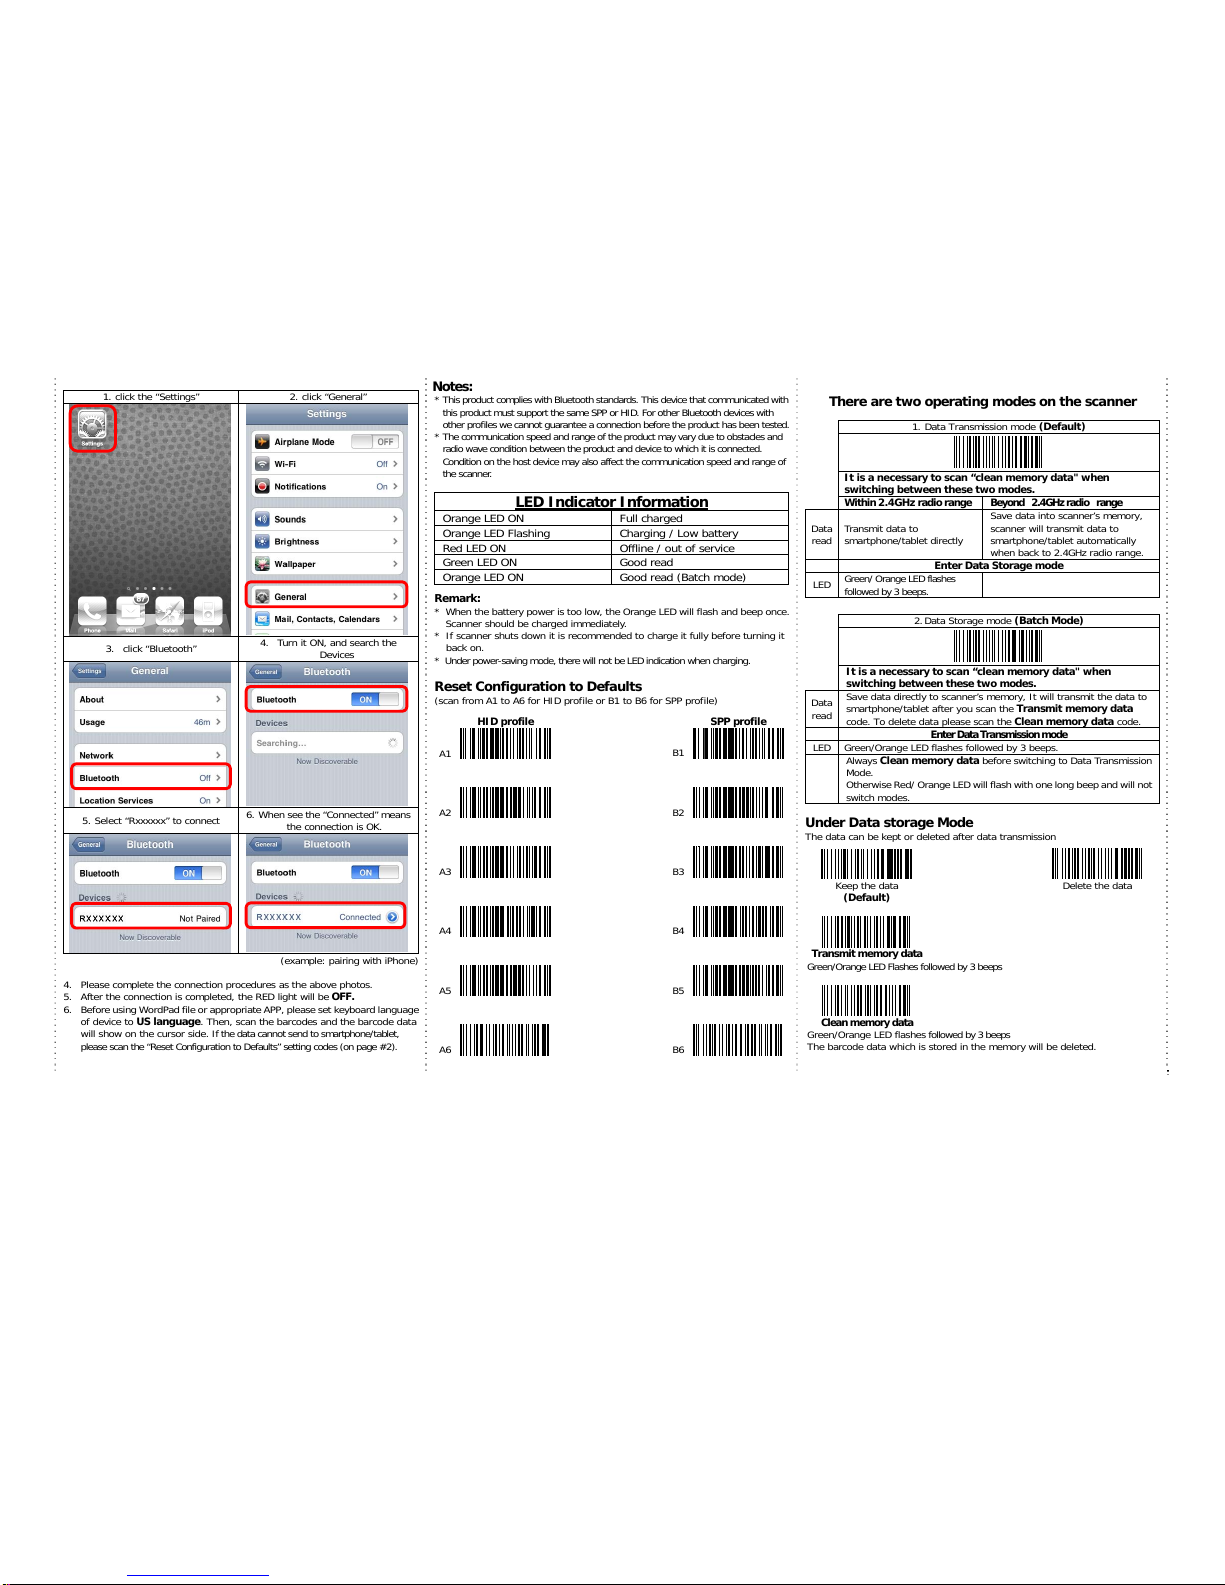
1. click the “Settings” 2. click “General”
3. click “Bluetooth”
4. Turn it ON, and search the
Devices
5. Select “Rxxxxxx” to connect
6. When see the “Connected” means
the connection is OK.
(example: pairing with iPhone)
4. Please complete the connection procedures as the above photos.
5. After the connection is completed, the RED light will be OFF.
6. Before using WordPad file or appropriate APP, please set keyboard language
of device to US language. Then, scan the barcodes and the barcode data
will show on the cursor side. If the data cannot send to smartphone/tablet,
please scan the “Reset Configuration to Defaults” setting codes (on page #2).
Notes:
* This product complies with Bluetooth standa rds. This device that commun icated with
this product must support the s ame SPP or HID . F or oth er Blu etooth devi ces with
other profiles we cannot guarantee a connection before the product has been tested.
* The communication speed an d ra nge of th e product may v ary due to obstacles and
radio wave condition between th e product and device to which it is conn ected.
Condition on the host device may also affect the communication speed and range of
the scanner.
LED Indicator Information
Orange LED ON Full charged
Orange LED Flashing Charging / Low battery
Red LED ON Offline / out of service
Green LED ON Good read
Orange LED ON Good read (Batch mode)
Remark:
* When the battery power is too low , the Or an ge LED wil l flash a nd beep once.
Scanner should be charged immediately.
* If scanner shuts down it is recommended to charge it fully before turning it
back on.
* Under power-saving mode, there will not be LED indication when charging.
Reset Configuration to Defaults
(scan from A1 to A6 for HID profile or B1 to B6 for SPP profile)
HID profile
SPP profile
A1
B1
A2
B2
A3
B3
A4
B4
A5
B5
A6
B6
There are two operating modes on the scanner
1. Data Transmission mode (Default)
It is a necessary to scan “clean memory data" when
switching between these two modes.
With i n 2.4GHz r ad i o r a n g e Beyond 2.4GHz radio range
Data
read
Transmit data to
smartphone/tablet directly
Save data into scanner’s memory,
scanner will transmit data to
smartphone/tablet automatically
when back to 2.4GHz radio range.
Enter Data Storage mode
LED
Green/ Orange LED flashes
followed by 3 beeps.
2. Data Storage mode (Batch Mode)
It is a necessary to scan “clean memory data" when
switching between these two modes.
Data
read
Save data directly to scanner’s memory, It will transmit the data to
smartphone/tablet after you scan the Transmit memory data
code. To delete data please scan the Clean memory data code.
Enter Data Transmission mode
LED Green/Orange LED flashes followed by 3 beeps.
Always Clean memory data before switching to Data Tr ansmission
Mode.
Otherwise Red/ Orange LED will flash with one long beep and will not
switch modes.
Under Data storage Mode
The data can be kept or deleted after data transmission
Keep the data
(Default)
Delete the data
Transmit memory data
Green/Orange LED Flashes followed by 3 beeps
Clean memory data
Green/Orange LED flashes follo w e d by 3 bee p s
T
he barcode data which is stored in the memory will be deleted.
2
Page 3
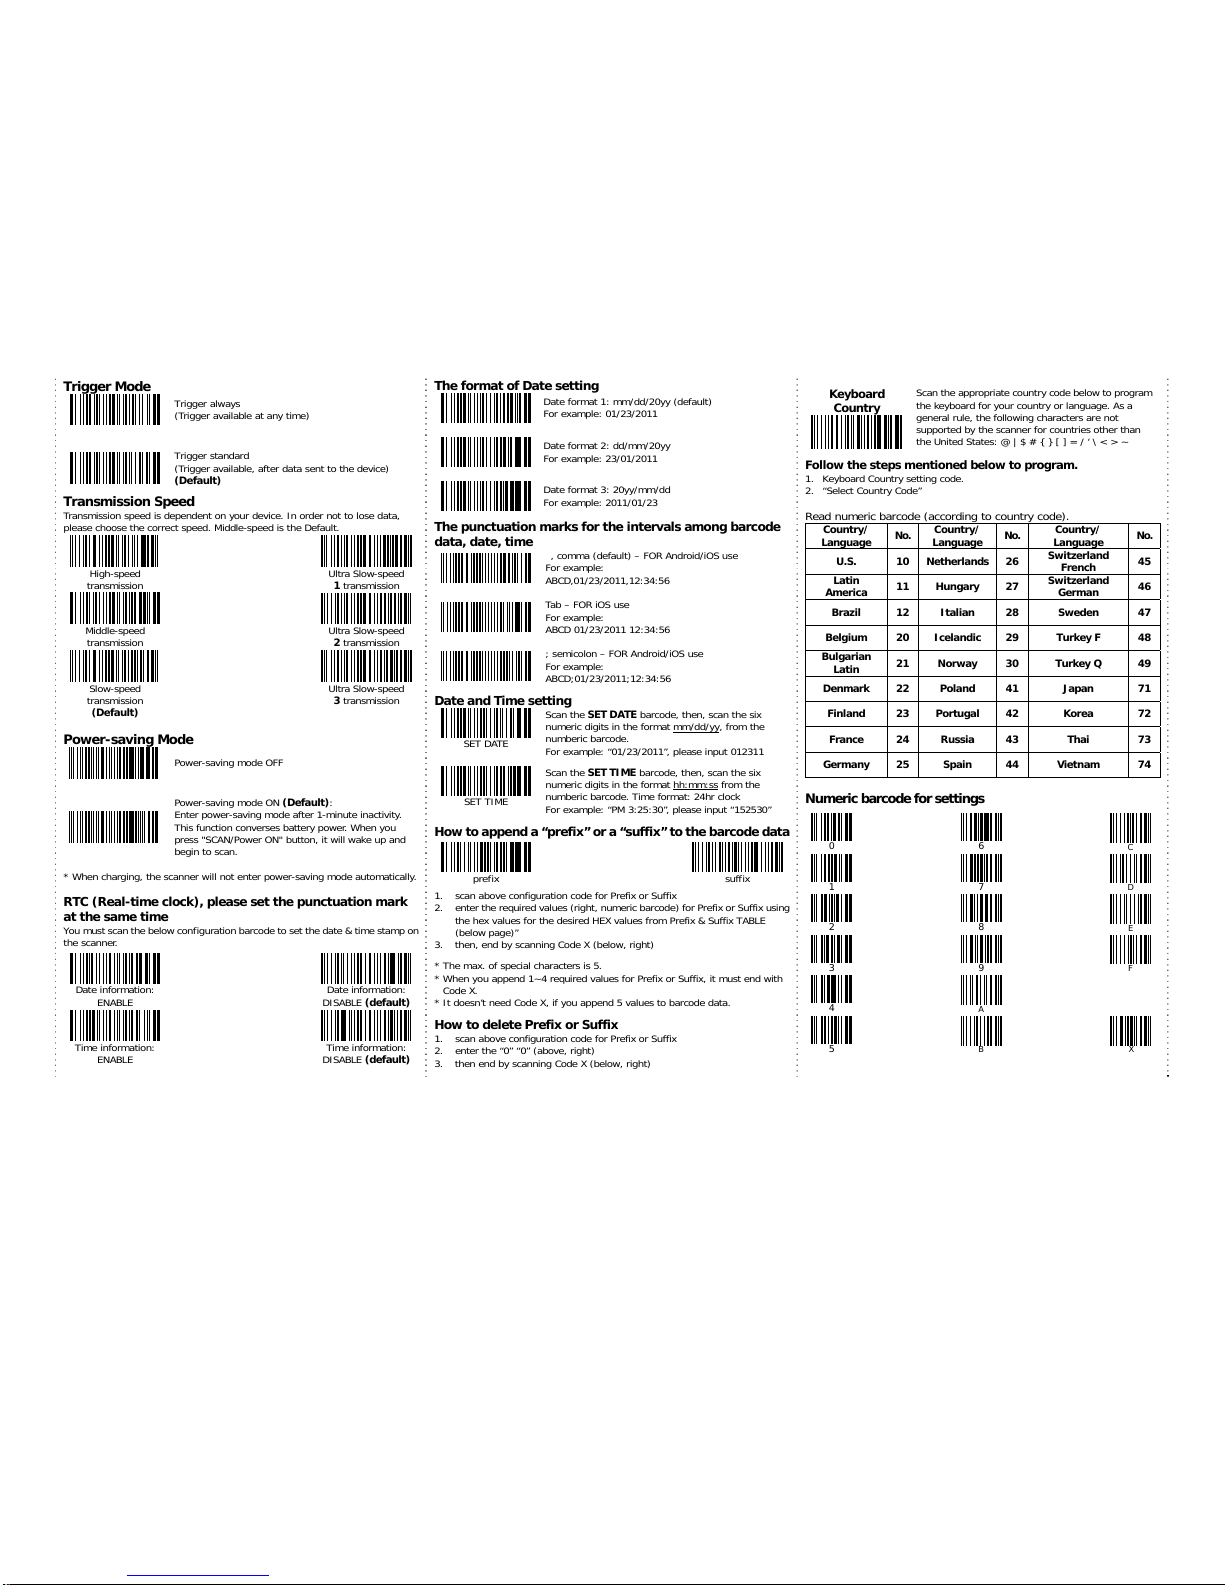
Trigger Mode
Trigger always
(Trigger available at any time)
Trigger standard
(Trigger available, after data sent to the device)
(Default)
Transmission Speed
Transmission speed is dependent on your device. In order not to lose data,
please choose the correct speed. Middle-speed is the Default.
High-speed
Ultra Slow-speed
transmission 1 transmission
Middle-speed Ultra Slow-speed
transmission 2 transmission
Slow-speed Ultra Slow-speed
transmission
(Default)
3 transmission
Power-saving Mode
Power-saving mode OFF
Power-saving mode ON (Default):
Enter power-saving mode after 1-minute inactivity.
This function converses battery power. When you
press "SCAN/Power ON" button, it will wake up and
begin to scan.
* When charging, the scanner will not enter power-saving mode automatically.
RTC (Real-time clock), please set the punctuation mark
at the same time
You must scan the below configuration barcode to set the date & time stamp on
the scanner.
Date information:
ENABLE
Date information:
DISABLE (default)
Time information:
ENABLE
Time information:
DISABLE (default)
The format of Date setting
Date format 1: mm/dd/20yy (default)
For example: 01/23/2011
Date format 2: dd/mm/20yy
For example: 23/01/2011
Date format 3: 20yy/mm/dd
For example: 2011/01/23
The punctuation marks for the intervals among barcode
data, date, time
, comma (default) – FOR Android/iOS use
For example:
ABCD,01/23/2011,12:34:56
Tab – FOR iO S use
For example:
ABCD 01/23/2011 12:34:56
; semicolon – FOR Android/iOS use
For example:
ABCD;01/23/2011;12:34:56
Date and Time setting
SET DATE
Scan the SET DATE barcode, then, scan the six
numeric digits in the format mm/dd/yy
, from the
numberic barcode.
For example: “01/23/2011”, please input 012311
SET TIME
Scan the SET TIME barcode, then, scan the six
numeric digits in the format hh:mm:ss
from the
numberic barcode. Time format: 24hr clock
For example: “PM 3:25:30”, please input “152530”
How to append a “prefix” or a “suffix” to the barcode data
prefix suffix
1. scan above configuration code for Prefix or Suffix
2. enter the required values (right, numeric barcode) for Prefix or Suffix using
the hex values for the desired HEX values from Prefix & Suffix TABLE
(below page)”
3. then, end by scanning Code X (below, right)
* The max. of special characters is 5.
* When you append 1~4 required values for Prefix or Suffix, it must end with
Code X.
* It doesn’t need Code X, if you append 5 values to barcode data.
How to delete Prefix or Suffix
1. scan above configuration code for Prefix or Suffix
2. enter the “0” “0” (above, right)
3. then end by scanning Code X (below, right)
Keyboard
Country
Scan the appropriate country code below to pr ogra m
the keyboard for your country or language. As a
general rule, the following characters are not
supported by the scanner for countries other than
the United States: @ | $ # { } [ ] = / ‘ \ < > ~
Follow the steps mentioned below to program.
1. Keyboard Country setting code.
2. “Select Country Code”
Read numeric barcode (according to country code).
Country/
Language
No.
Country/
Language
No.
Country/
Language
No.
U.S. 10 Netherlands 26
Switzerland
French
45
Latin
America
11 Hungary 27
Switzerland
German
46
Brazil 12 Italian 28 Sweden 47
Belgium 20 Icelandic 29 Turkey F 48
Bulgarian
Latin
21 Norway 30 Turkey Q 49
Denmark 22 Poland 41 Japan 71
Finland 23 Portugal 42 Korea 72
France 24 Russia 43 Thai 73
Germany 25 Spain 44 Vietnam 74
Numeric barcode for settings
0
6
C
1
7
D
2
8
E
3
9
F
4
A
5
B
X
3
Page 4
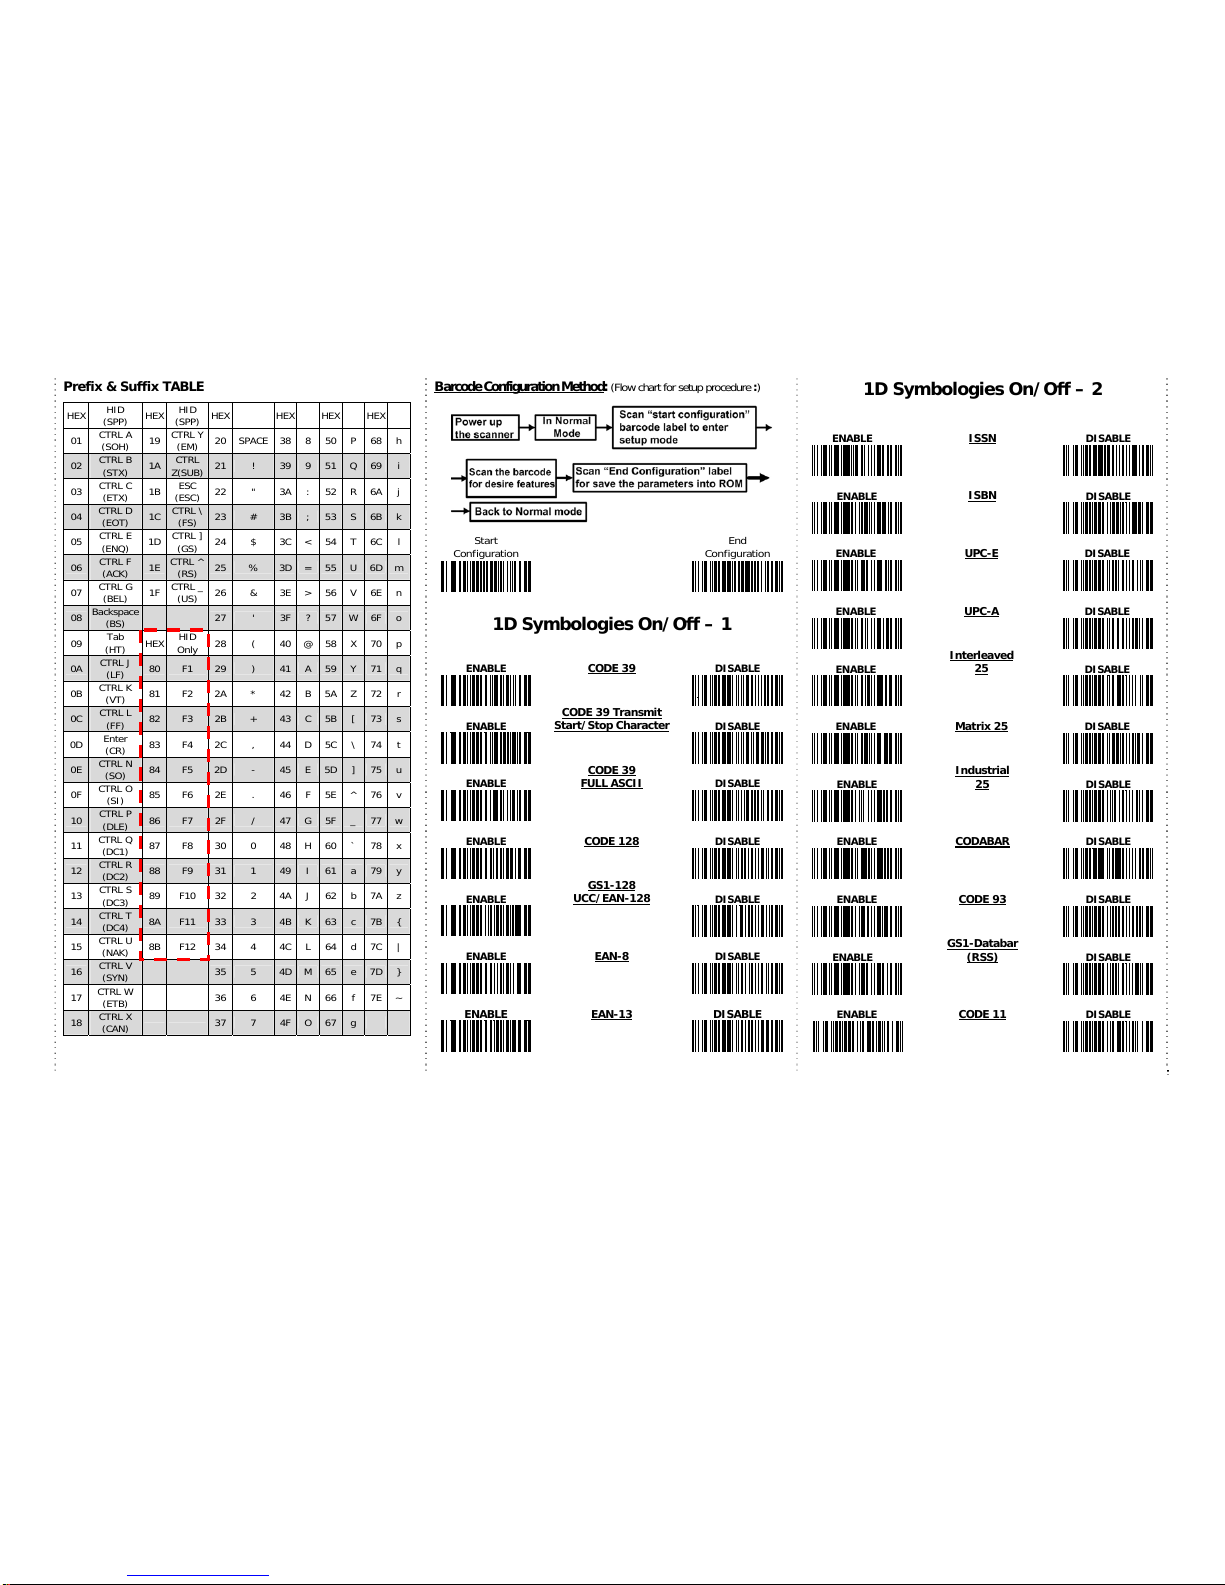
Prefix & Suffix TABLE
HEX
HID
(SPP)
HEX
HID
(SPP)
HEX HEX HEX HEX
01
CTRL A
(SOH)
19
CTRL Y
(EM)
20 SPACE 38 8 50 P 68 h
02
CTRL B
(STX)
1A
CTRL
Z(SUB)
21 ! 39 9 51 Q 69 i
03
CTRL C
(ETX)
1B
ESC
(ESC)
22 " 3A : 52 R 6A j
04
CTRL D
(EOT)
1C
CTRL \
(FS)
23 # 3B ; 53 S 6B k
05
CTRL E
(ENQ)
1D
CTRL ]
(GS)
24 $ 3C < 54 T 6C l
06
CTRL F
(ACK)
1E
CTRL ^
(RS)
25 % 3D = 55 U 6D m
07
CTRL G
(BEL)
1F
CTRL _
(US)
26 & 3E > 56 V 6E n
08
Backspace
(BS)
27 ' 3F ? 57 W 6F o
09
Tab
(HT)
HEX
HID
Only
28 ( 40 @ 58 X 70 p
0A
CTRL J
(LF)
80 F1 29 ) 41 A 59 Y 71 q
0B
CTRL K
(VT)
81 F2 2A * 42 B 5A Z 72 r
0C
CTRL L
(FF)
82 F3 2B + 43 C 5B [ 73 s
0D
Enter
(CR)
83 F4 2C , 44 D 5C \ 74 t
0E
CTRL N
(SO)
84 F5 2D - 45 E 5D ] 75 u
0F
CTRL O
(SI)
85 F6 2E . 46 F 5E ^ 76 v
10
CTRL P
(DLE)
86 F7 2F / 47 G 5F _ 77 w
11
CTRL Q
(DC1)
87 F8 30 0 48 H 60 ` 78 x
12
CTRL R
(DC2)
88 F9 31 1 49 I 61 a 79 y
13
CTRL S
(DC3)
89 F10 32 2 4A J 62 b 7A z
14
CTRL T
(DC4)
8A F11 33 3 4B K 63 c 7B {
15
CTRL U
(NAK)
8B F12 34 4 4C L 64 d 7C |
16
CTRL V
(SYN)
35 5 4D M 65 e 7D }
17
CTRL W
(ETB)
36 6 4E N 66 f 7E ~
18
CTRL X
(CAN)
37 7 4F O 67 g
Barcode Configuration Method: (Flow chart for setup procedure :)
Start
Configuration
End
Configuration
1D Symbologies On/Off – 1
ENABLE
CODE 39
DISABLE
ENABLE
CODE 39 Transmit
Start/Stop Character
DISABLE
ENABLE
CODE 39
FULL ASCII
DISABLE
ENABLE
CODE 128
DISABLE
ENABLE
GS1-128
UCC/EAN-128
DISABLE
ENABLE
EAN-8
DISABLE
ENABLE
EAN-13 DISABLE
1D Symbologies On/Off – 2
ENABLE
ISSN
DISABLE
ENABLE
ISBN
DISABLE
ENABLE
UPC-E
DISABLE
ENABLE
UPC-A
DISABLE
ENABLE
Interleaved
25
DISABLE
ENABLE
Matrix 25
DISABLE
ENABLE
Industrial
25
DISABLE
ENABLE
CODABAR
DISABLE
ENABLE
CODE 93
DISABLE
ENABLE
GS1-Databar
(RSS)
DISABLE
ENABLE
CODE 11
DISABLE
4
Page 5
5
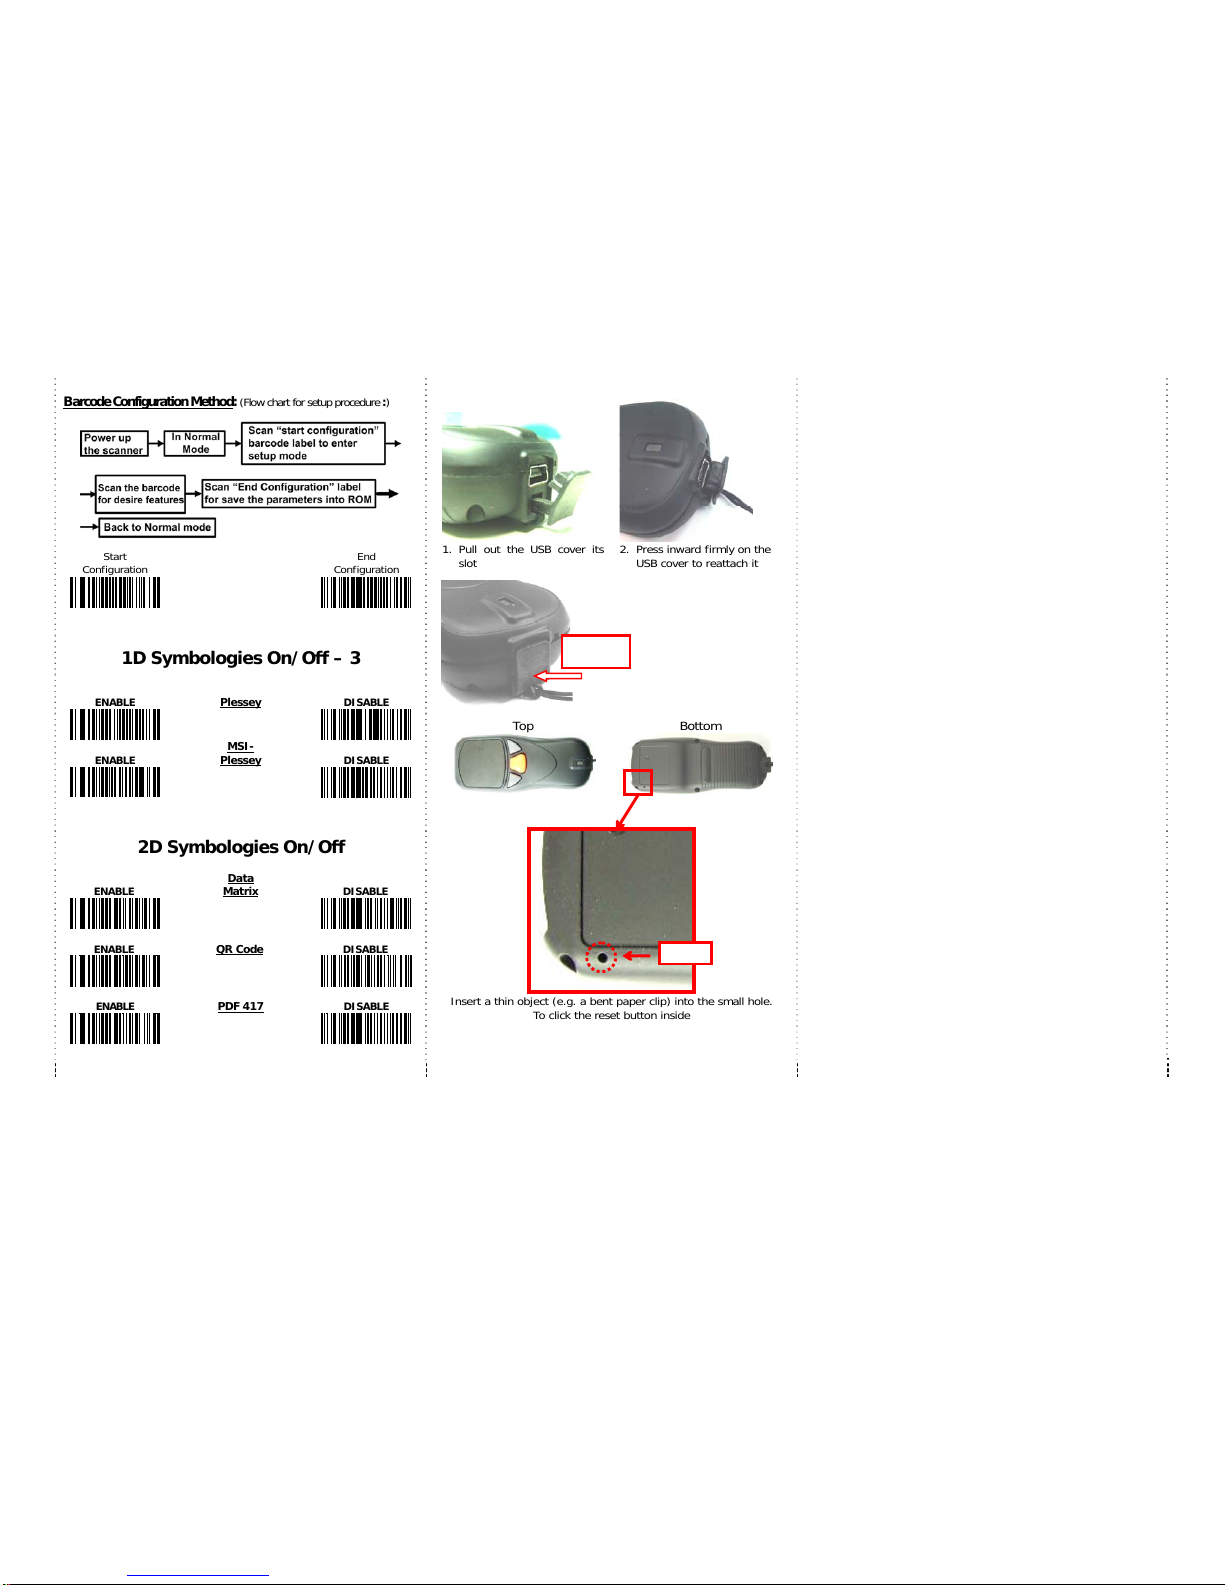
Barcode Configuration Method
: (Flow chart for setup procedure :)
Start
Configuration
End
Configuration
1D Symbologies On/Off – 3
ENABLE
Plessey
DISABLE
ENABLE
MSI-
Plessey
DISABLE
2D Symbologies On/Off
ENABLE
Data
Matrix
DISABLE
ENABLE
QR Code
DISABLE
ENABLE
PDF 417
DISABLE
1. Pull out the USB cover i
slot
ts 2. Press inward firmly on the
USB cover to reattach it
Top Bottom
Insert a thin object (e.g. a bent paper clip) into the small hole.
To click the res t button in side
e
Quick guide is subject to change without notice.
R_140516_03
Reset
Pressing
direction
 Loading...