

Page 1
1
Quick Guide
- iDC9277A
1
Connect to micro USB port of
Smartphone
2
3
* Before you use scanner, please switch to "C- Charge
mode" and charge inside battery for 3~4 hours first.
*
Under “C- Charge mode”, you can raise/lower
soft-keyboard easily. (For HID profile only)
4
iDC9277A is with Li-Ion battery inside. When in charging,
please use the original
USB power adaptor of
Smartphone
(recommend
ed). Through it, it charges both smartphone
&
iDC9277A batteries at the same time.
When in l
ow battery (Orange
LED flashing), please charge
it immediately.
Attention: Please don’t charge iDC9277A when in Operation
mode. Otherwise, the smartphone’s battery will charge back
to iDC9277A’s battery.
5
** When pressing Left button + Right button f or 8~9 seconds,
iDC9277A will enter deep sleeping mode.
** Please press Left button + Right button + Touch trigger for
8~9 seconds to activate iDC9277A.
** The touch sensor area is around the central area.
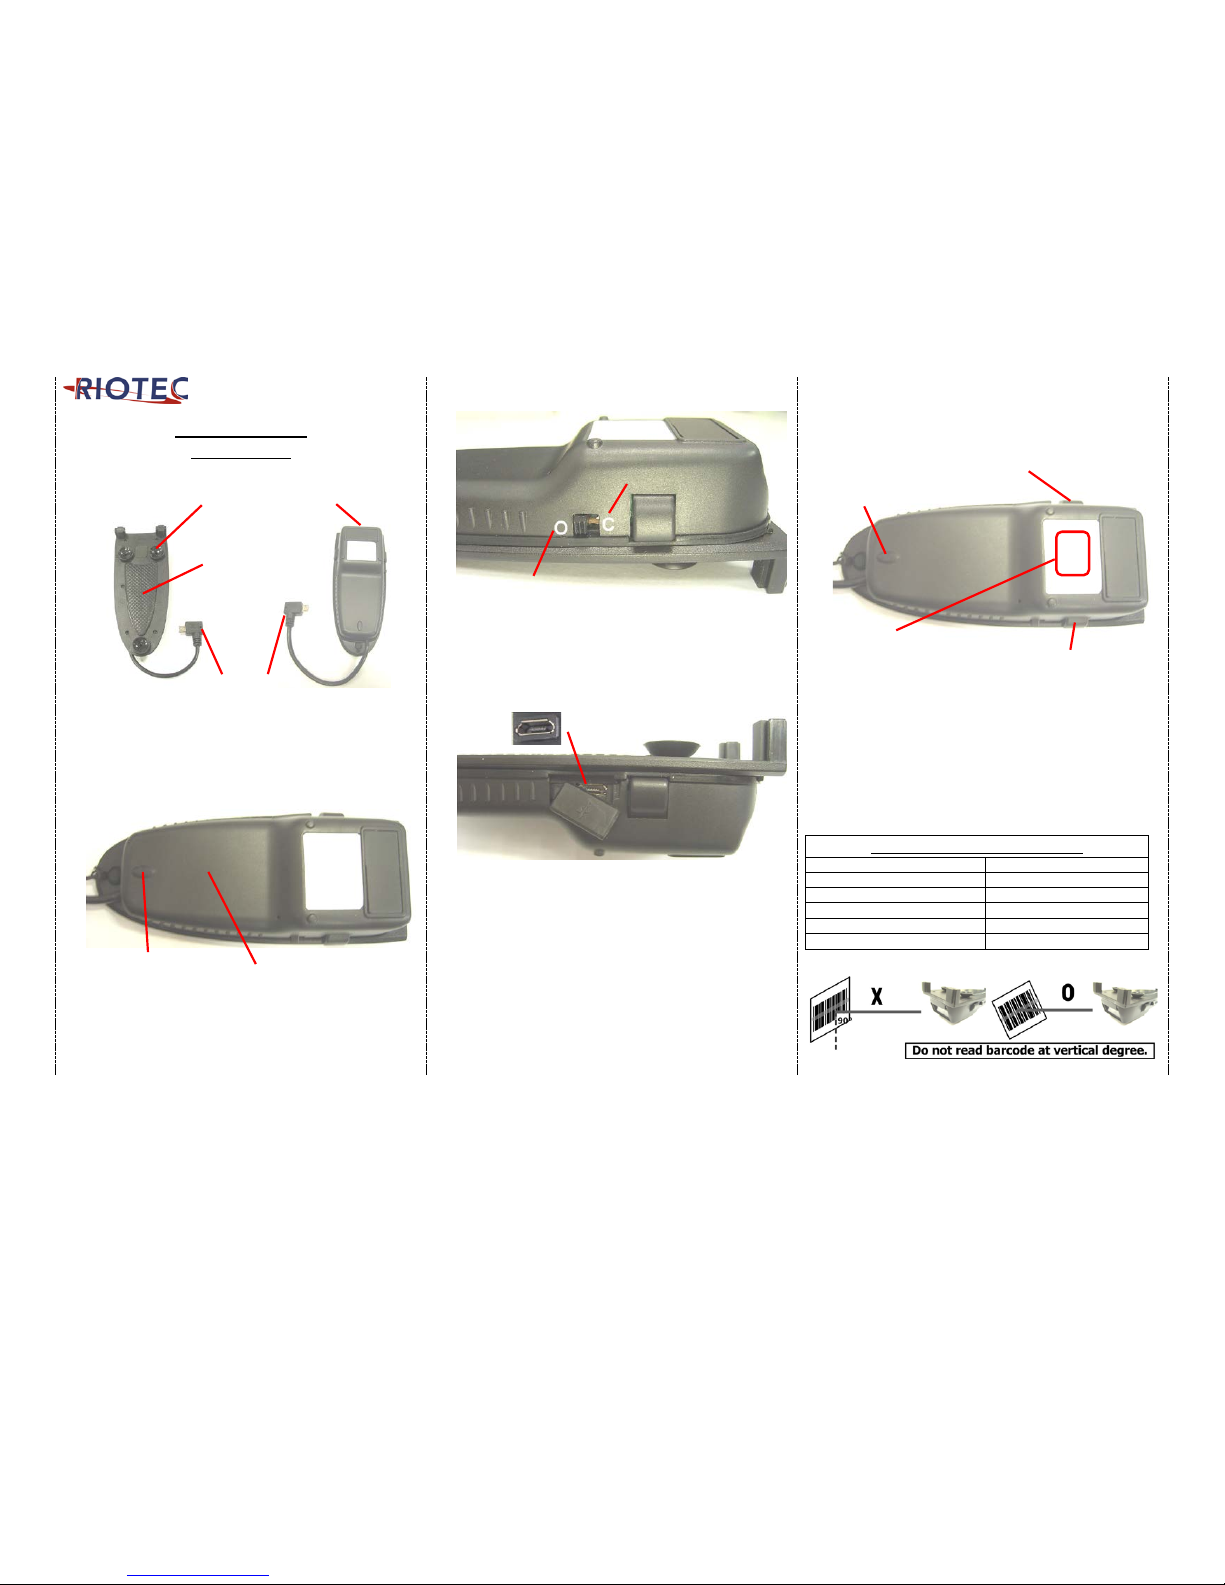
Please check the above drawing for your reference.
LED Indicator Information
Orange LED ON
Full charged
Orange and Red LED Flashing
Charging
Orange LED Flashing
Low battery
Red LED ON
Off line / out of service
Green LED ON
Good read
Orange LED ON
Good read (Batch mode)
O=Operation mode
C=Charge mode
Left Button
Under
BT HID Profile, press Left button to raise/
lower
soft
-Keyboard;
press the left button for 4 seconds to
un
-pair. Then, scanner can be connected with other
BT devices (Please check page #2, left column)
Touch Trigger Area
SCAN/ Power ON
Pr
ess 1 second to wake
it
up from power saving
mode
Right Button
Power Saving button:
Press the button for 2~3 second
then enter power saving mode
Indicator
(LED)
Charge port
Suction Cup
PU Glue
(Can be used
repeatedly)
Micro USB
cable (OTG)
Exit Window
Li- Ion Battery inside
Indicator (LED)
Page 2
2
How to Connect to Smartphone
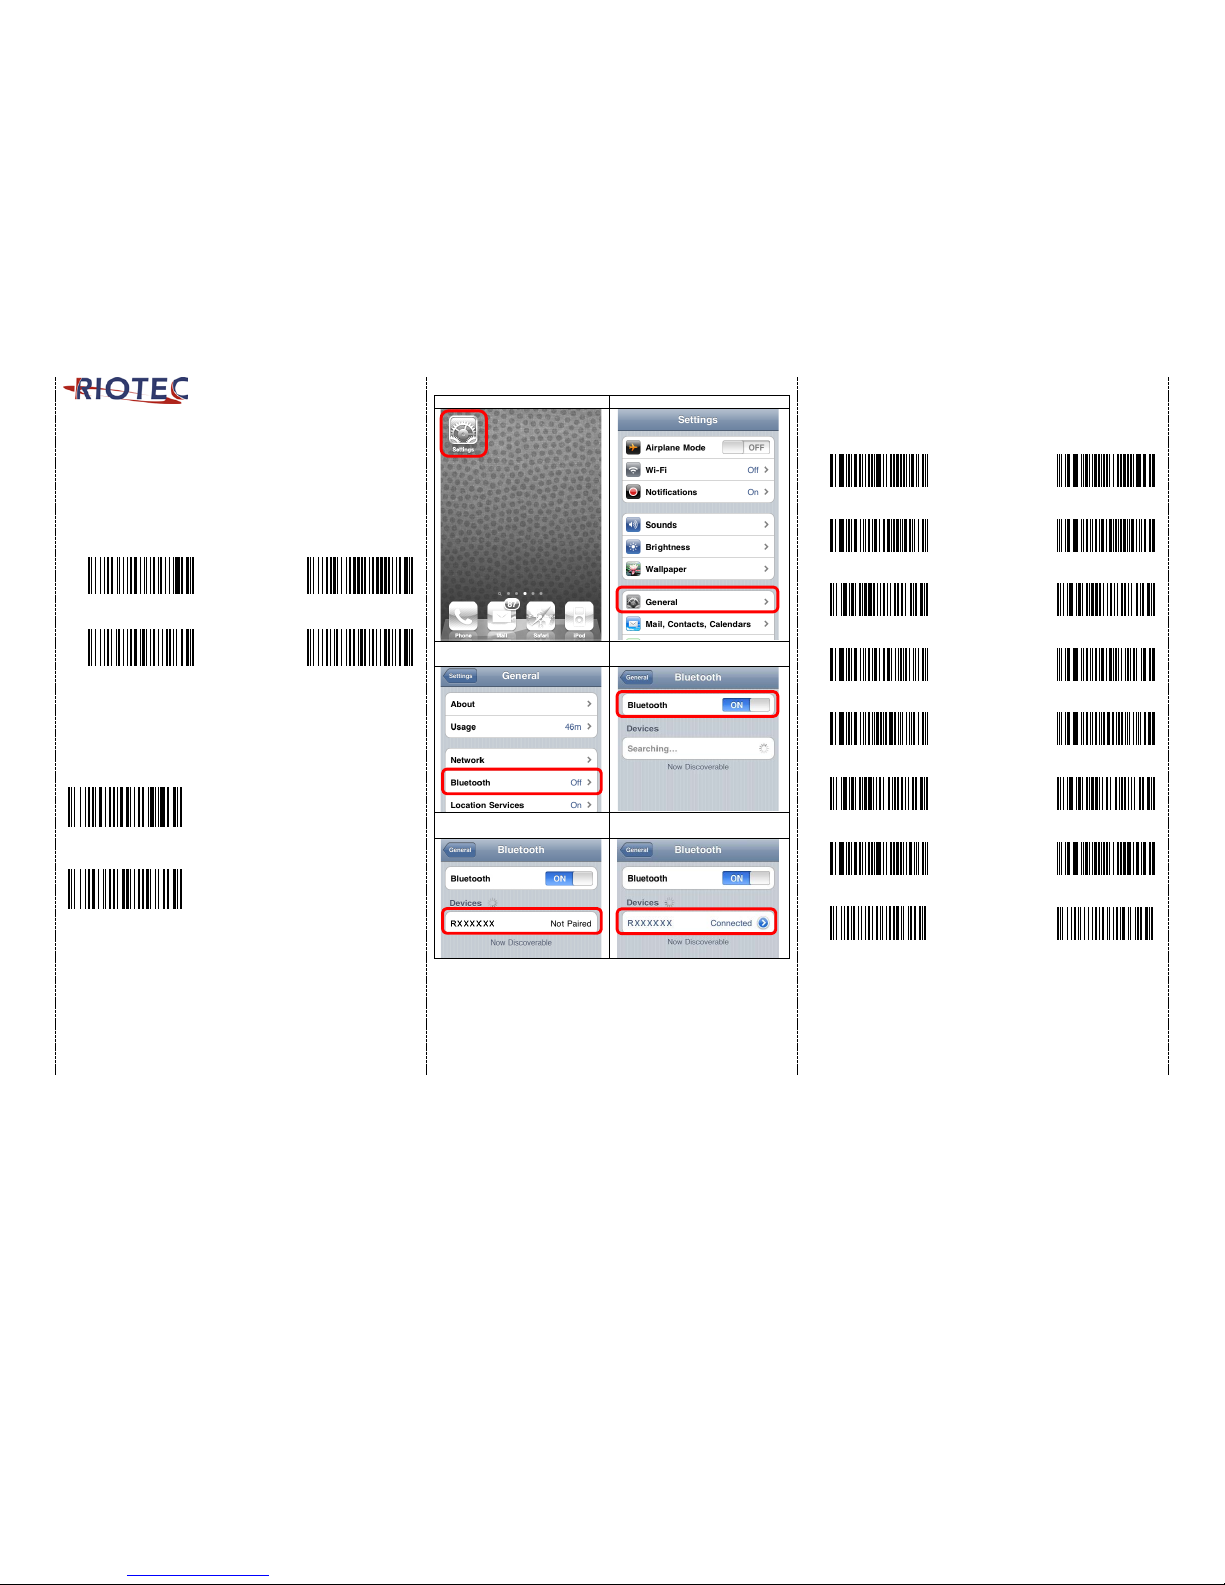
1. Make sure your device has BT HID or SPP prof ile
2. Turn off Power-Saving mode on your smartphone first
3. Then, choose HID or SPP profile and scans the following 2 setting
codes before connecting to smartphone.
(a1 a2 or b1 b2)
If you don’t know what profile your device is, please try HID
profile first, then, SPP profile.
HID profile
SPP profile
a1
b1
a2
b2
4. Please complete the connection procedures as the right photos.
5. After the connection is completed, the RED light will be OFF.
6. Before using WordPad file or appropriate APP, please set
keyboard language of device to User’s language. Then, scan
the barcodes and the barcode data will show on the cursor side.
Soft-Keyboard setting code for Android / iOS
For Android
For iOS
* Under Android system, if you want to raise/lower soft-keyboard, please
read the above settin g code first. Then, press l eft but ton (r efer t o dra wing
#5 on page #1) to raise keyboard (LED is RED /Bluetooth is offline), press
it again to lower keyboard (LED is off/ Bluetooth is online)
*It will take 5~10 seconds to make BT online/offline.
*Please be noted that when BT is offline, scanning function is
stopped.
*Or, switch “C” to “O” to make BT online. (Drawing 3, page #1)
* Under iOS system, press Left button to raise/lower soft-Keyboard;
* Press the left button for 4 seconds to un-pair. Then, scanner can be
connected with other BT devi ces
1. click the “Settings”
2. click “General”
3. click “Bluetooth”
4. Turn it ON, and search the
Devices
5. Select “Rxxxxxx” to connect
6. When see the “Connected” means
the connection is OK.
(example: pairing with iPhone)
Reset Configuration to Defaults
(scan from A1 to A8 for HID profile or B1 to B8 for SPP profile)
HID profile
SPP profile
A1
B1
A2
B2
A3
B3
A4
B4
A5
B5
A6
B6
A7
B7
A8
B8
Page 3

3
There are two operating modes on the scanner
1.Data Transmission mode (Default)
It is a necessary to scan “clean memory data" when
switching between these two modes.
Within 2.4GHz radio range
Beyond 2.4GHz radio range
Data
read
Transmit data to PC/terminal
directly
Save data into scanner’s memory,
scanner will transmit data to PC/
terminal automatically when back to
2.4GHz radio range.
Enter Data Storage mode
LED
Green/ Orange LED flashes
followed by 3 beeps.
2.Data Storage mode (Batch Mode)
It is a necessary to scan “clean memory data" when switching
between these two modes.
Data
read
Save data directly to scanner’s memory, It will transmit the data to PC/
terminal after you scan the Transmit memory data code. To delete
data please scan the Clean memory data code.
Enter Data Transmission mode
LED
Green/Orange LED flashes followed by 3 beeps.
Always Clean memory data before switching to Data Transmission
Mode. Otherwise Red/ Orange LED will flash with one long beep and
will not switch modes.
Under Data storage Mode
The data can be keep or delete by option after transmit
Keep the data
(Default)
Delete the data
Transmit memory data
Green/Orange LED Flashes followed by 3 beeps
Clean memory data
Green/Orange LED flashes followed by 3 b eeps
The barcode data which is stored in the memory will be deleted.
Trigger Mode
Trigger always
(Trigger available at any time)
Trigger standard (Default)
(Trigger available, after data sent to the device)
Transmission Speed
Transmiss ion speed is depende nt on your d evice. In order not to lose data,
please choose the correct speed. Middle-speed is the Default.
High-speed
Ultra Slow-speed
transmission
1 transmission
Middle-speed
Ultra Slow-speed
transmission
2 transmission
Slow-speed
Ultra Slow-speed
transmission
(Default)
3 transmission
Power-saving Mode
Power-saving mode OFF
Power-saving mode ON (Default):
Enter power-saving mode after 5-minute
inactivity. This fun ction con verses battery
power. When you press "SCAN/Power ON"
button, it will wake up and begin to scan.
Power-saving mode ON:
Enter power-saving mode after 10-minute
inactivity. This fun ction con verses battery
power. When you press "SCAN/Power ON"
button, it will wake up and begin to scan.
* When charging, the scanner will not enter power-saving mode
automatically.
RTC (Real-time clock),
please set the punctuation mark at the same time
You must scan the below configuration barcode to set the date & time
stamp on the scanner.
Date information:
ENABLE
Date information:
DISABLE (default)
Time information:
ENABLE
Time information:
DISABLE (default)
The format of Date setting
Date format 1: mm/dd/20yy (default)
For example: 01/23/2011
Date format 2: dd/mm/20yy
For example: 23/01/2011
Date format 3: 20yy/mm/dd
For example: 2011/01/23
The punctuation marks for the intervals among
barcode data, date, time
, comma (default) – FOR Android/iOS use
For example:
ABCD,01/23/2011,12:34:56
Tab – FOR iOS use
For example:
ABCD 01/23/2011 12:34:56
; semicolon – FOR Android/iOS use
For example:
ABCD;01/23/2011;12:34:56
Page 4
4
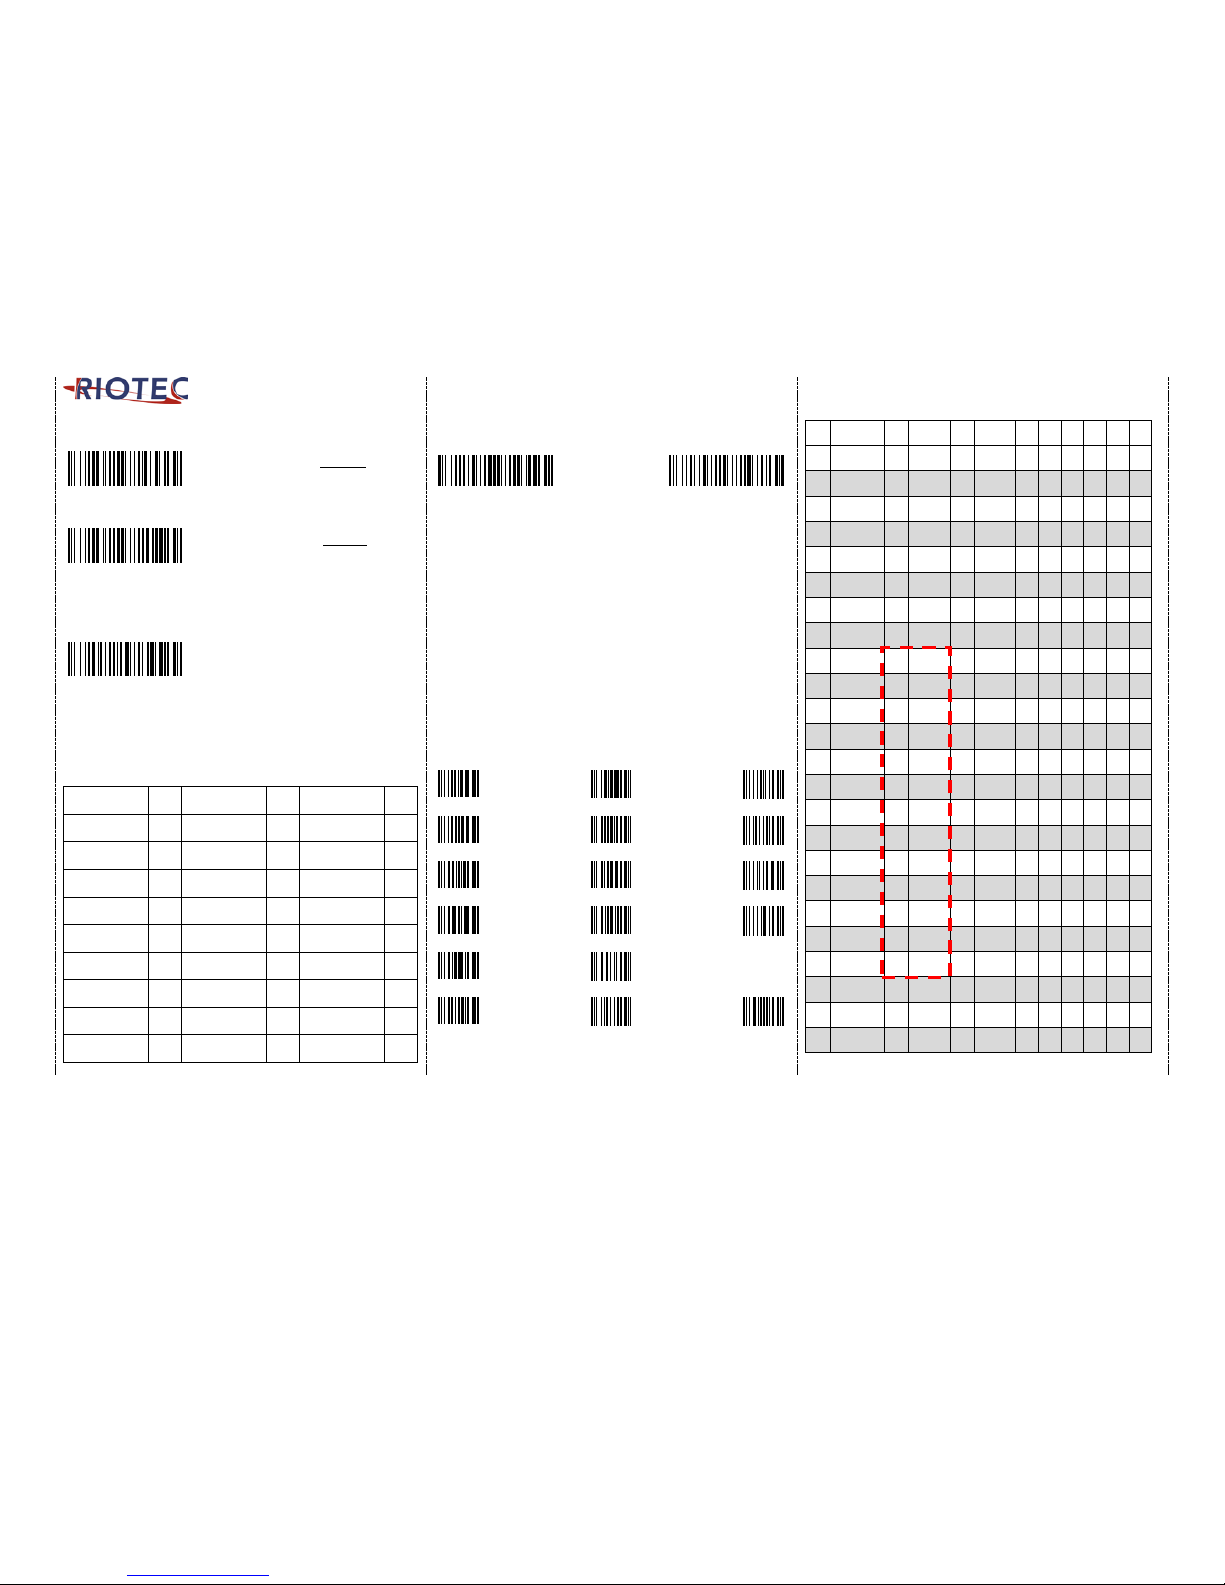
Date and Time setting
SET DATE
Scan the SET DATE barcode, then, scan the six
numeric digits in the format mm/dd/yy, from the
numeric barcode.
For example: “01/23/2011”, please input
012311
SET TIME
Scan the SET TIME barcode, then, scan the six
numeric digits in the format hh:mm:ss from the
numeric barcode. Time format: 24hr clock
For example: “PM 3:25:30”, please input
“152530”
Keyboard Country (For HID profile only)
Scan the appropriate country code as below
to program the keyboard layout for your
country or language. As a general rule, the
following characters are supported, but need
special care for countries other than the
United States: @ | $ # { } [ ] = / ‘ \ < > ~
Follow the steps mentioned below to program.
1. Keyboard Countr y setting code.
2. “Select Country C od e ”
Read numeric barcode (according to country code).
Country/
Language
No.
Country/
Language
No.
Country/
Language
No.
U.S. 10 Netherlands 26
Switzerland
French
45
Latin
America
11 Hungary 27
Switzerland
German
46
Brazil 12 Italian 28 Sweden 47
Belgium 20 Icelandic 29 Turkey F 48
Bulgarian
Latin
21 Norway 30 Turkey Q 49
Denmark 22 Poland 41 Japan 71
Finland 23 Portugal 42 Korea 72
France 24 Russia 43 Thai 73
Germany 25 Spain 44 Vietnam 74
How to append a “prefix” or a “suffix” to the
barcode data
prefix suffix
1. scan above configuration code for Prefix or Suffix
2. enter the required values (right, numeric barcode) for Prefix or Suffix
using the hex values for the desired HEX values from Prefix & Suffix
TABLE (below page)”
3. then, end by scanning Code X (below, right)
* The max. of special characters is 5.
* When you append 1~4 required values for Prefix or Suffix, it must end
with Code X.
* It doesn’t need Code X, if you append 5 values to barcode data.
How to delete Prefix or Suffix
1. scan above configuration code for Prefix or Suffix
2. enter the “0” “0” (above, left)
3. then end by scanning Code X (below, right)
Numeric barcode for settings
0
6
C
1
7
D
2
8
E
3
9
F
4
A
5
B
X
Prefix & Suffix TABLE
HEX
HID
(SPP)
HEX
HID
(SPP)
HEX HEX HEX HEX
01
CTRL A
(SOH)
19
CTRL Y
(EM)
20 SPACE 38 8 50 P 68 h
02
CTRL B
(STX)
1A
CTRL
Z(SUB)
21 ! 39 9 51 Q 69 i
03
CTRL C
(ETX)
1B
ESC
(ESC)
22 " 3A : 52 R 6A j
04
CTRL D
(EOT)
1C
CTRL \
(FS)
23 # 3B ; 53 S 6B k
05
CTRL E
(ENQ)
1D
CTRL ]
(GS)
24 $ 3C < 54 T 6C l
06
CTRL F
(ACK)
1E
CTRL ^
(RS)
25 % 3D = 55 U 6D m
07
CTRL G
(BEL)
1F
CTRL _
(US)
26 & 3E > 56 V 6E n
08
Backspace
(BS)
27 ' 3F ? 57 W 6F o
09
Tab
(HT)
HEX
HID
Only
28 ( 40 @ 58 X 70 p
0A
CTRL J
(LF)
80 F1 29 ) 41 A 59 Y 71 q
0B
CTRL K
(VT)
81 F2 2A * 42 B 5A Z 72 r
0C
CTRL L
(FF)
82 F3 2B + 43 C 5B [ 73 s
0D
Enter
(CR)
83 F4 2C , 44 D 5C \ 74 t
0E
CTRL N
(SO)
84 F5 2D - 45 E 5D ] 75 u
0F
CTRL O
(SI)
85 F6 2E . 46 F 5E ^ 76 v
10
CTRL P
(DLE)
86 F7 2F / 47 G 5F _ 77 w
11
CTRL Q
(DC1)
87 F8 30 0 48 H 60 ` 78 x
12
CTRL R
(DC2)
88 F9 31 1 49 I 61 a 79 y
13
CTRL S
(DC3)
89 F10 32 2 4A J 62 b 7A z
14
CTRL T
(DC4)
8A F11 33 3 4B K 63 c 7B {
15
CTRL U
(NAK)
8B F12 34 4 4C L 64 d 7C |
16
CTRL V
(SYN)
35 5 4D M 65 e 7D }
17
CTRL W
(ETB)
36 6 4E N 66 f 7E ~
18
CTRL X
(CAN)
37 7 4F O 67 g
Page 5

5
Barcode Configuration Method:
(Flow chart for setup procedure :)
Start
Configuration
End
Configuration
1D Symbologies – 1
ENABLE
CODE 39
DISABLE
ENABLE
CODE 39 Transmit
Start/Stop Character
DISABLE
ENABLE
CODE 39
FULL ASCII
DISABLE
ENABLE
CODE 11
DISABLE
1D Symbologies – 2
ENABLE
ISSN
DISABLE
ENABLE
ISBN
DISABLE
ENABLE
UPC-E
DISABLE
ENABLE
UPC-A
DISABLE
ENABLE
Interleaved
25
DISABLE
ENABLE
Matrix 25
DISABLE
ENABLE
EAN-8
DISABLE
ENABLE
EAN-13
DISABLE
ENABLE
MSI
DISABLE
1D Symbologies – 3
ENABLE
GS1-Databar
(RSS)
DISABLE
ENABLE
GS1-Databar
(RSS-Limited)
DISABLE
ENABLE
GS1-Databar
(RSS-Expand)
DISABLE
ENABLE
CODE 128
DISABLE
ENABLE
GS1-128
UCC/EAN-128
DISABLE
ENABLE
CODE 93
DISABLE
ENABLE
Industrial 25
DISABLE
ENABLE
CODABAR
DISABLE
Information in this document is subject to change without notice.
For more information, plea se visit:
www.riotec.com.tw
R_160426_01
 Loading...