

Page 1

Laser Barcode
Scanner
Model no.
LS6300E/LS6320E
User’s Manual
Page 2

FCC Compliance
This equipment has been tested and found to comply with the limits for a Class A digital
device, pursuant to Part 15 of the FCC Rules. These limits are designed to provide reasonable
protection against harmful interference when the equipment is operated in a commercial
environment. This equipment generates, uses, and can radiate radio frequency energy and, if
not installed and used in accordance with the instructions manual, may cause harmful
interference to radio communications. Operation of this equipment in a residential area is
likely to cause harmful interference in which case the user will be required to correct the
interference at his own expense.
Changes or modifications not expressly approved by the party responsible for compliance
could void the user‘s authority to operate the equipment.
Limited Warranty
No warranty of any kind is made in regard to this material, including, but not limited to,
implied warranties of merchantability or fitness for any particular purpose. We are not liable
for any errors contained herein or for incidental or consequential damages in connection with
furnishing, performance or use of this material. We shall be under no liability in respect of
any defect arising from fair wear and tear, willful damage, negligence, abnormal working
conditions, failure to follow the instructions and warnings, or misuse or alteration or repair of
the products without written approval.
Page 3

1
Table of Contents
1. INTRODUCTION……………………………………………………………………………… ..…2~3
2. INSTALLATION………………………………………………………………………………..…...4~6
3. SET UP FROM BAR CODE LABEL………………………………………………………….……..7
Multi-interface Functions……….………………………………………………………..8~9
Interface-KBW………………………………………………………………………………….10
Interface-Serial……..……………………………………………………………………11~12
Symbologies On/Off…………………………………………………………………….13~15
Symbologies Set Up…………………………………………………………………….16~21
Edit Setup Bar Codes……………………………………….……………….………..…… 22
Macro/Special Keys Setup Bar Codes………………………………………………….23
Termination String Setup Bar Codes…………………………………………………..24
4. FACTORY DEFAULT SETTING…………..……………………….………………..………25~26
5. APPENDIX A: TROUBLESHOOTING AND ERROR BEEPS……..………………….27~31
Page 4

2
Introduction
Page 5
3
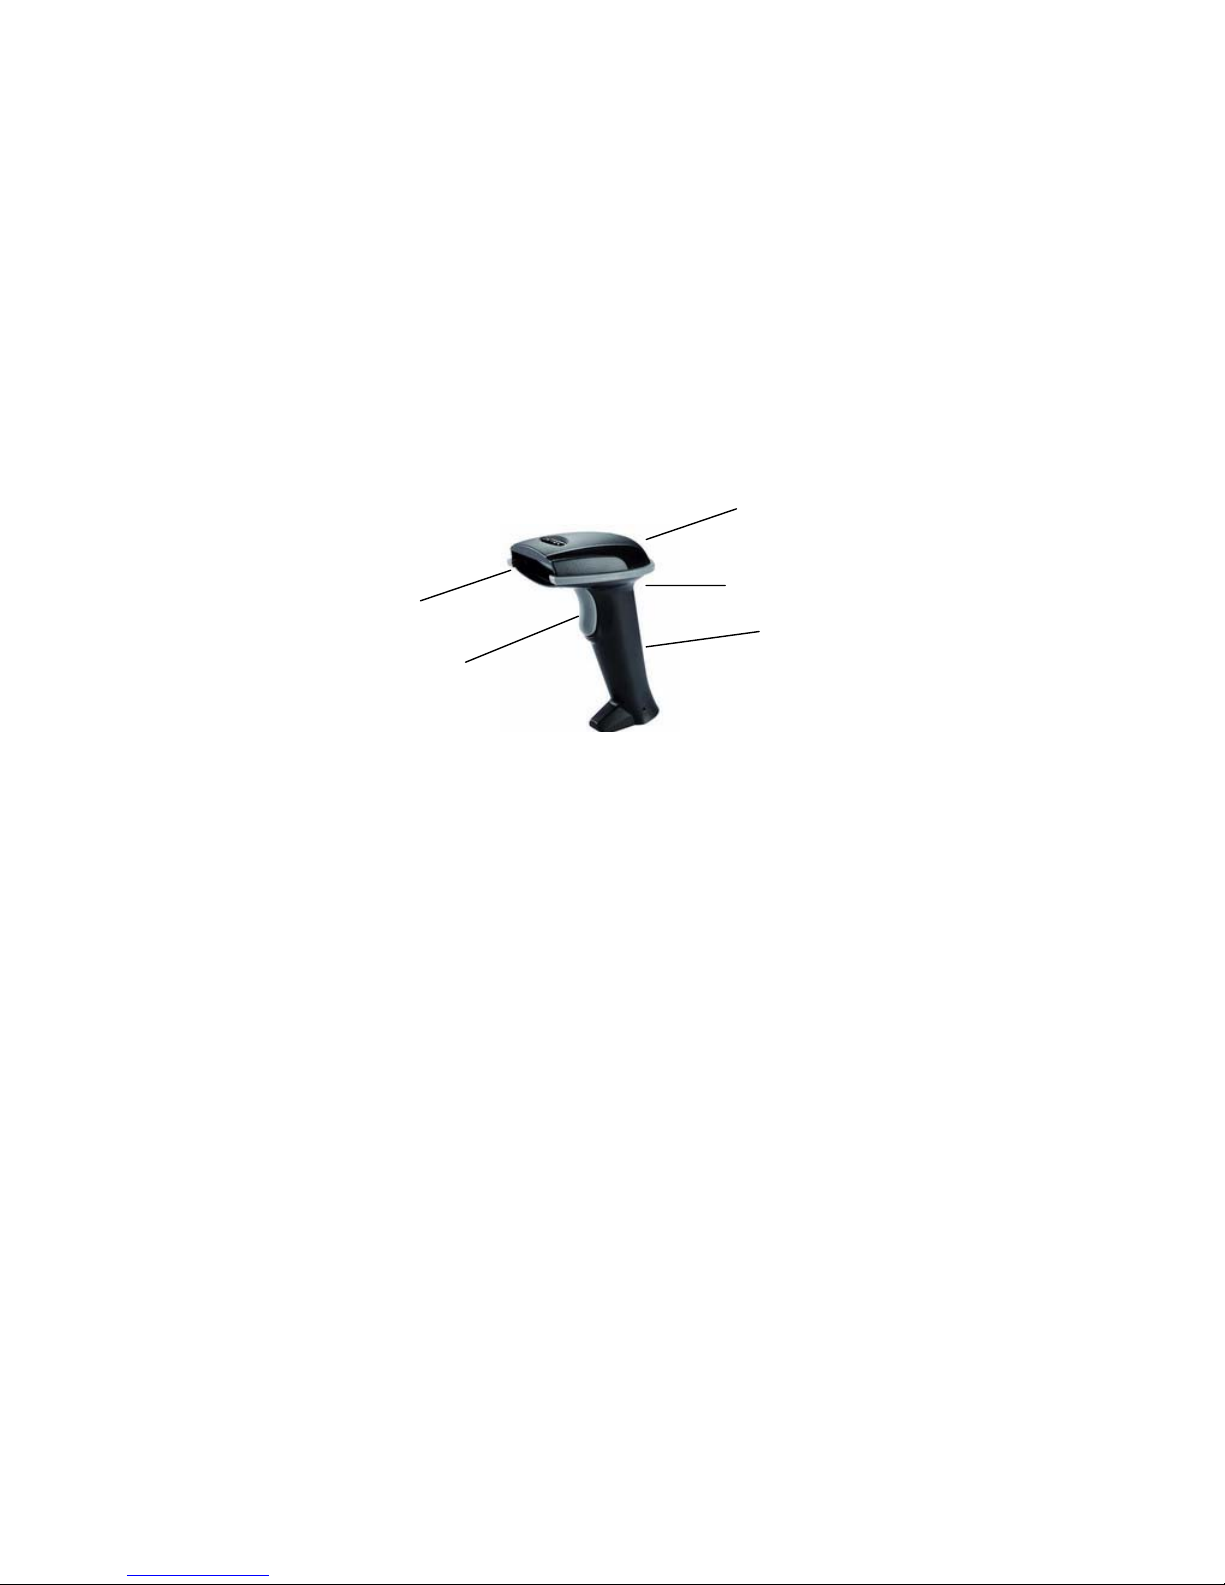
RIOTEC 1D Laser barcode scanner combines the best scanning performance and value. The
device provides an accurate, easy, and fast method of data entry and data storage for
computerized information systems. It is easy to install and does not require Software or
drivers to operate.
RIOTEC laser barcode scanner can compatible several interfaces (USB, K/B, RS-232,) and
numerous configurations, is a powerful and reliable handheld scanner without compromise.
All the operating parameters are programmed by bar code programming menu and stored in
non-volatile RAM which can retain the settings after power is turned off.
When a barcode is successful decoded, the blue LED light of the scanner will turn on and off.
The scanner will beep once. If the barcode is not successful read, the LED will show red and
the buzzer will not sound.
LED
Exit Window
Trigger
Handle
BUZZER
Page 6
4
Installation
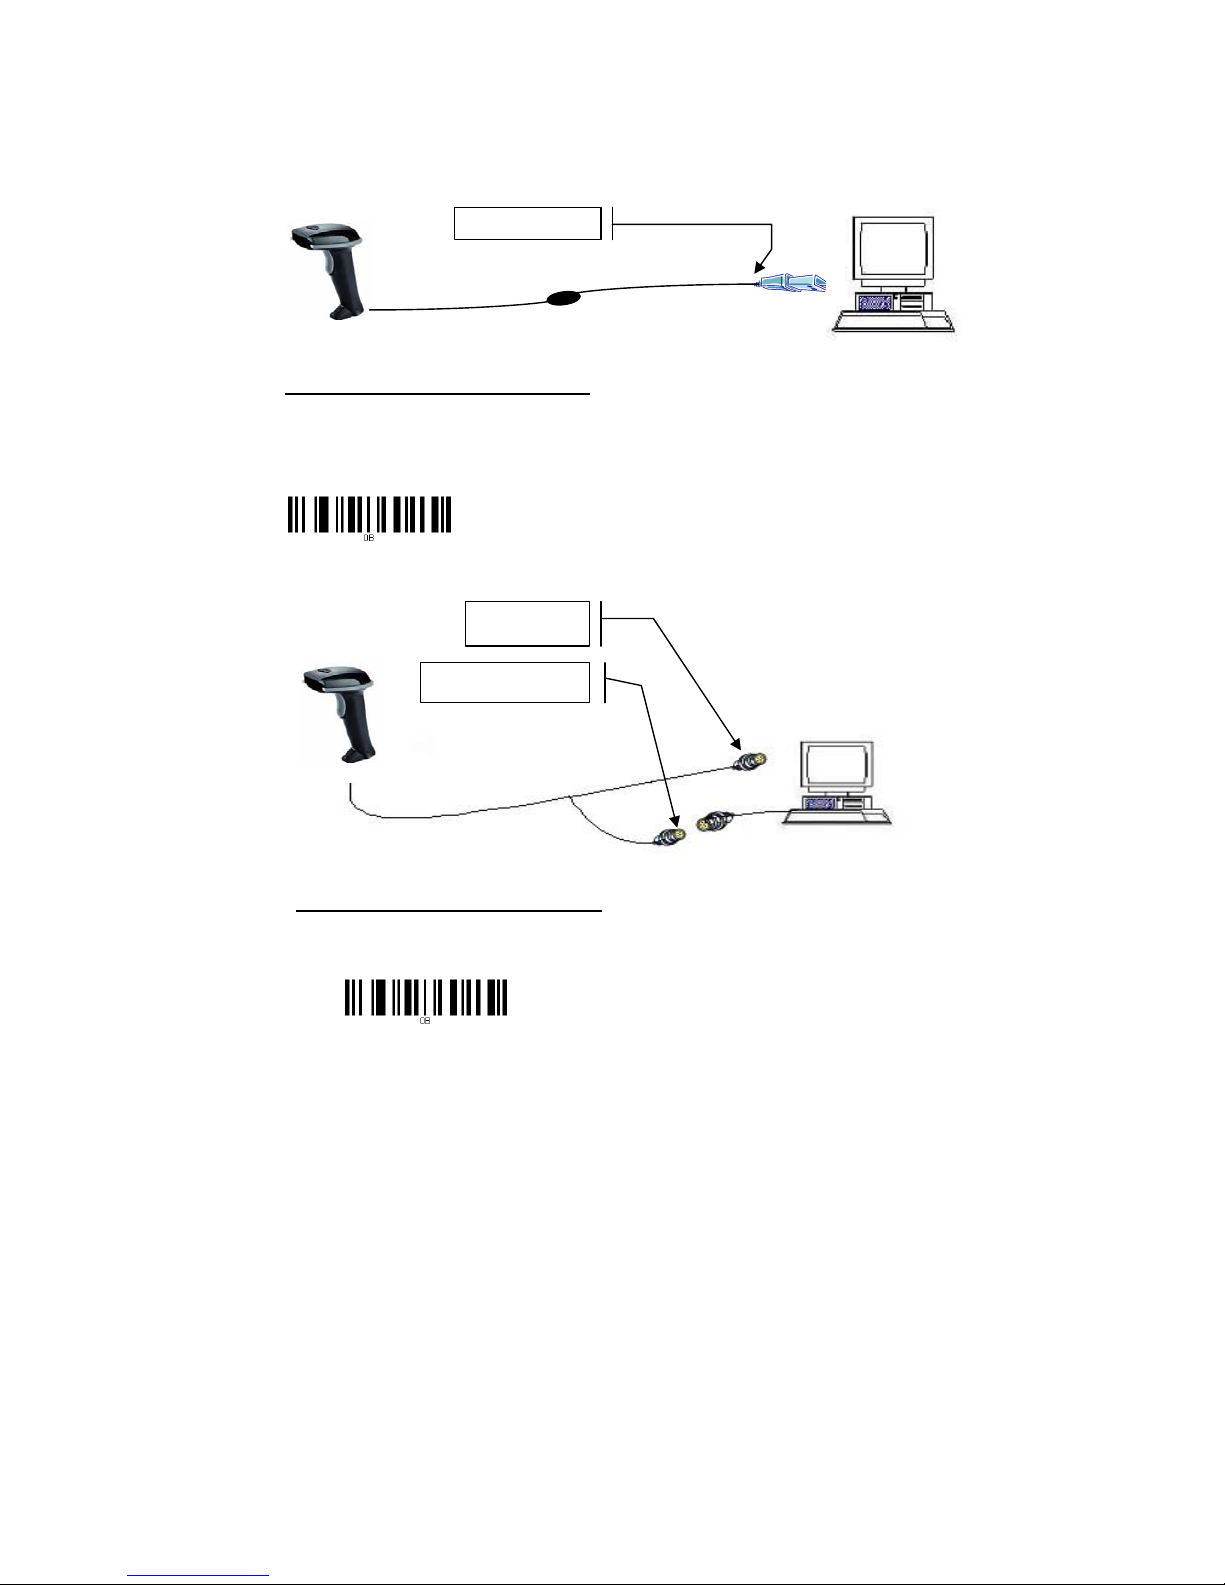
Insert the plug on the free end of the Communications Cable into the appropriate connector on
the t as below described:
1. USB cable Connection:
Reset Configuration to Defaults
If you are unsure of the scanner configuration or have scanned the incorrect codes,
please scan the “Reset Configuration to Defaults” barcode. This will reset the scanner
to its factory defaults settings in USB interface.
2. PS2 (K/B) cable Connection:
Reset Configuration to Defaults
If you are unsure of the scanner configuration or have scanned the incorrect codes,
please scan the “Reset Configuration to Defaults” barcode. This will reset the scanner to
its factory defaults settings in PS/2 interface.
Connect with host
Connect with host
Connect with keyboard’s
connector
Page 7

5
3. RS232 cable Connection:
NOTE: for Serial port (RS232 cable), please plug the power connector of 5V power
adapter to RS232 cable.
Reset Configuration to Defaults
If you are unsure of the scanner configuration or have scanned the incorrect codes,
please scan the “Reset Configuration to Defaults” barcode. This will reset the scanner to
its factory defaults settings. Then “000601” for RS232 serial setting.
4. Auto-sensing setup
For some scanners have auto-sensing function. There is an auto-sensing function button
shown on below photo. Default is ON.
*Auto-sensing normally is ON. Press once is OFF, Press once again is ON.
Connect with host
Require adapter for power supply
Page 8
6
Operation
1. Be sure that Host computer is turned OFF.
2. Ensure that all connections are secure.
3. Turn on your host. And please operate the scanner under the right software
application, such as Notepad or Word(RS232 interface should be under
Hyper Terminal” and make the right setting).
4. Aim the scanner at a barcode, ensure that the scanner is in trigger mode (default),
and press the trigger.
5. On successful decode, the blue LED light will turn on and off. The scanner will
beep once.
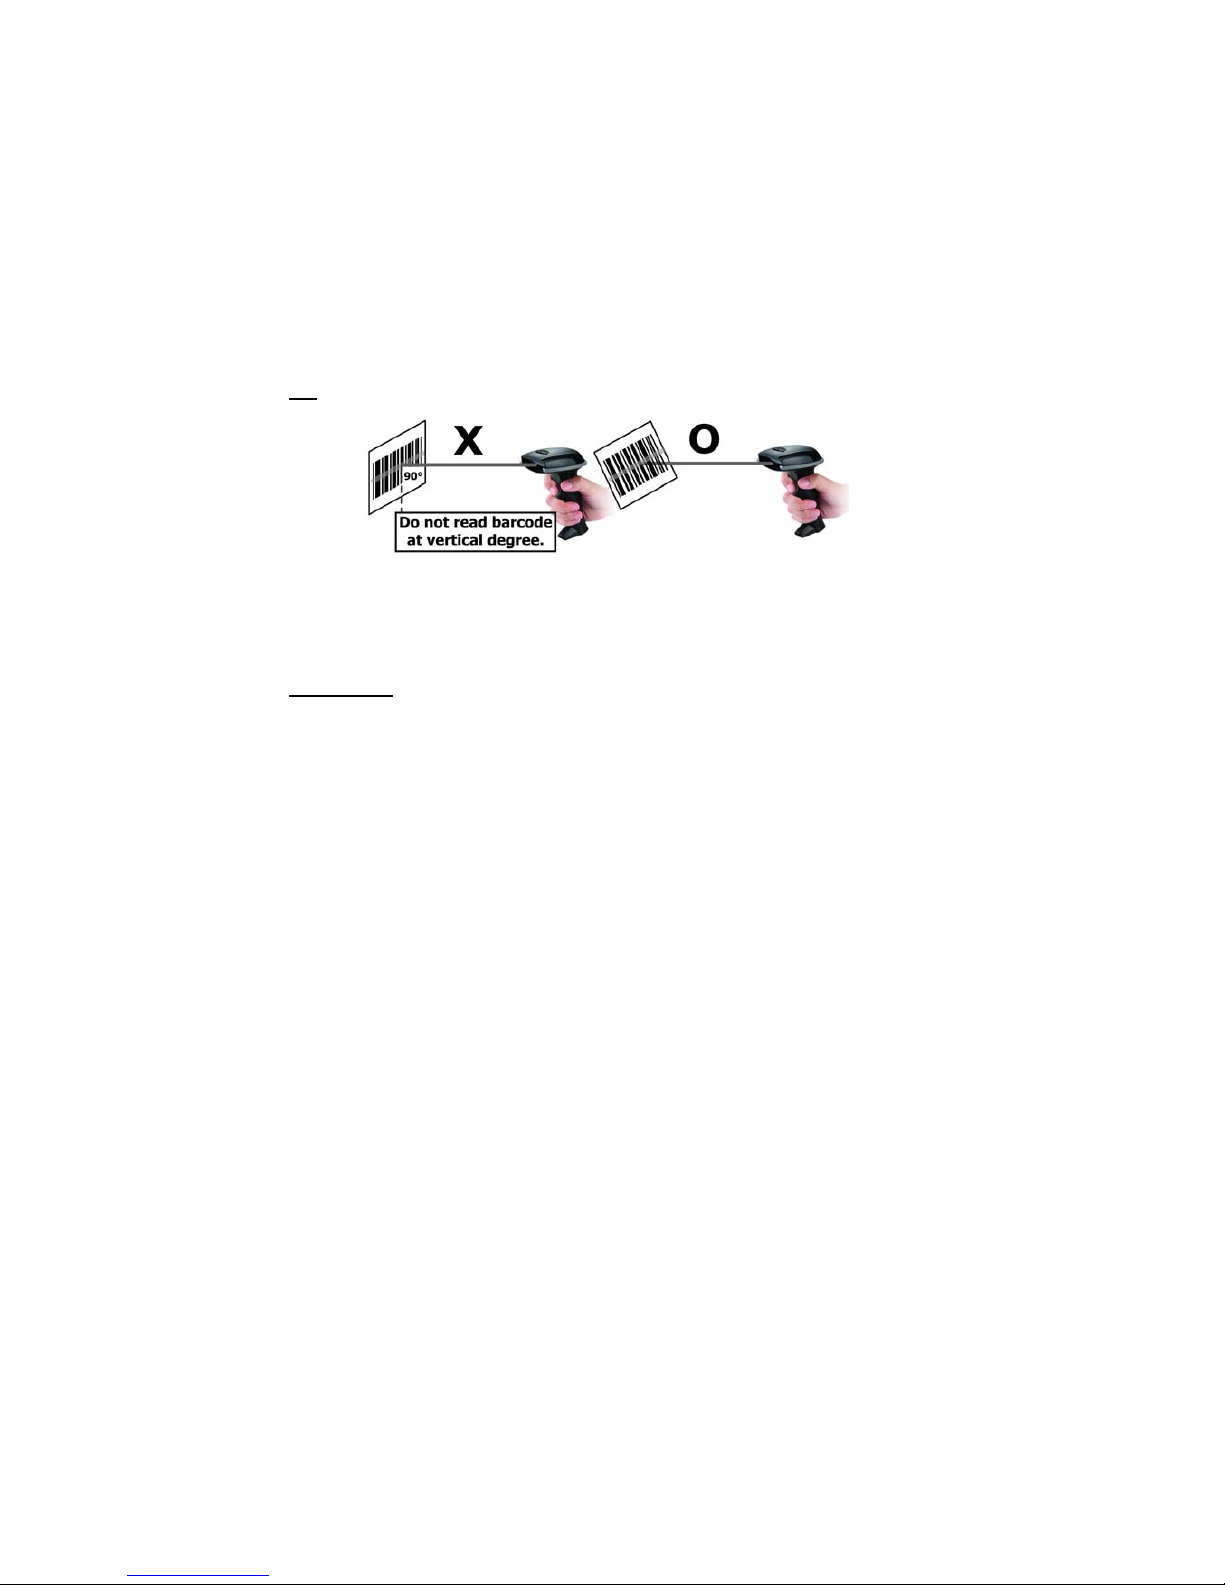
Tip
Do not hold the scanner directly over a barcode at 90˚. Scanning light bounces directly
back into the scanner from the barcode label is known as specular reflection which will
create a "dead zone" where decoding is difficult. Practice a few times to find what range
of angles works best.
Maintenance
Cleaning the scan window is the only maintenance required. A dirty window may
affect scanning accuracy.
Wipe the scanner window gently with a lens tissue or other material suitable for cleaning
optical material.
Do not spray water or other cleaning liquids directly onto the window.
Page 9

7
Setup from Bar Code Label
Page 10

8
Multi-Interface Functions – 1
OUTPUT FIRMWARE VERSION
RESET CONFIGURATION TO
DEFAULTS
0A 0B
OUTPUT MODE – KEYBOARD / USB
OUTPUT
MODE
OUTPUT MODE - SERIAL
000600 000601
GOOD READ BEEP TONE – NONE
BUZZER /
LED
GOOD READ BEEP TONE - RESET
014200 0B142
DECODE OPTIONS REVERSE IMAGE –
ENABLE
IMAGE
DECODE OPTIONS REVERSE IMANGE
- DISABLE
01391 01390
DECODE OPTIONS SEND BAR CODE ID -
DISABLE
CODE ID
DECODE OPTIONS SEND BAR CODE
ID – AS A PREFIX
01400 01401
DECODE OPTIONS SEND BAR CODE ID -
RESET
DECODE OPTIONS SEND BAR CODE
ID – AS A SUFFIX
Page 11

9
Multi-Interface Functions – 2
SCAN MODE – SINGLE SCAN
READING
MODE
SCAN MODE – SINGLE SCAN NO
TRIGGER
013300 013301
SCAN MODE – MULTISCAN
SCAN MODE – MULTISCAN
NO TRIGGER
013302 013303
SCAN MODE - PULSE
013305
LASER/CCD TIMEOUT – 5 SECONDS
LASER/CCD TIMEOUT – 2 SECONDS
0134005 0134002
LASER/CCD PULSE RATE - 7
LASER/CCD PULSE RATE - 3
013507 013503
Page 12

10
Interface – KBW
WEDGE MODE - AUTODETECT
PC
Communication
WEDGE MODE – SCAN SET 2 PASS
THRU
000200 000204
TRANSMIT SPEED - 0
TRANSMIT
SPEED
TRANSMIT SPEED - 25
0000000 0000025
KEYBOARD COUNTRY - USA
LANGUAGE
KEYBOARD COUNTRY - GERMAN
0005000 0005010
KEYBOARD COUNTRY – FRANCE
KEYBOARD COUNTRY - UNIVERSAL
0005009 0005025
KEYBOARD COUNTRY – HUNGARY
0005011
Page 13

11
Interface – Serial - 1
SERIAL BAUD RATE - 2400
BAUD RATE
SERIAL BAUD RATE - 4800
000703
000704
SERIAL BAUD RATE - 9600
SERIAL BAUD RATE - 19200
000705
000706
SERIAL HANDSHAKE - NONE
HAND
SHAKE
SERIAL HANDSHAKE – XON/XOFF
001200
001201
SERIAL HANDSHAKE – RTS/CTS
SERIAL HANDSHAKE – ACK/NAK
001202
001203
SERIAL HANDSHAKE TIMEOUT –
2 SECONDS
SERIAL HANDSHAKE TIMEOUT –
5 SECONDS
0013020
0013050
Page 14

12
Interface – Serial - 2
SERIAL DATA BITS - 8
PARAMETERS
SERIAL DATA BITS - 7
00081
00080
SERIAL STOP BITS - 1
SERIAL STOP BITS - 2
00090
00091
SERIAL PARITY - NONE
SERIAL PARITY - ODD
001000
001001
SERIAL PARITY - EVEN
SERIAL PARITY - MARK
001002
001003
SERIAL PARITY - SPACE
SERIAL PARITY - RESET
001004
0B010
Page 15

13
Symbologies On/Off - 1
CODE 11 - ENABLE
CODE 11
CODE 11 - DISABLE
01261
01260
CODE 39 ENABLE
CODE 39
CODE 39 DISABLE
00221
00220
FULL ASCII ENABLE
FULL ASCII DISABLE
00231
00230
Page 16

14
Symbologies On/Off - 2
CODE 93 - ENABLE
CODE 93
CODE 93 - DISABLE
00621
00620
CODE 128 - ENABLE
CODE 128
CODE 128 - DISABLE
00691
00690
CODE 128 ISBT - ENABLE
CODE 128 ISBT - DISABLE
00701
00700
CODABAR - ENABLE
CODABAR
CODABAR - DISABLE
00851
00850
I2OF5 - ENABLE
INTERLEAVED 2
OF 5
I2OF5 - DISABLE
00961
00960
ID2OF5 - ENABLE
INDUSTRIAL 2 OF 5
ID2OF5 - DISABLE
01061
01060
Page 17

15
Symbologies On/Off - 3
MSI - ENABLE
MSI
MSI - DISABLE
01151
01150
UPC-A ENABLE
UPC/EAN
UPC-A DISABLE
00341
00340
UPC-E ENABLE
UPC-E DISABLE
00351
00350
EAN-13 ENABLE
EAN-13 DISABLE
00361
00360
EAN-8 ENABLE
EAN-8 DISABLE
00371
00370
Page 18

16
Symbologies Set Up - 1
CODE 11 ID CHARACTER – “m”
CODE 11
CODE 11 ID CHARACTER – “Z”
0131m
0131Z
CODE 11 LASER/CCD REDUNDANCY -
ENABLE
CODE 11 LASER/CCD REDUNDANCY -
DISABLE
01321
01320
CODE 39 SS CHAR - NONE
CODE 39
CODE 39 SS CHAR ‛+’
002700
002704
CODE 39 SEND START/STOP CHARS
ENABLE
CODE 39 SEND START/STOP CHARS
DISABLE
00281
00280
CODE 39 ID CHARACTER ‛a’
CODE 39 ID CHARACTER ‛z’
0031a
0031Z
CODE 39 LASER/CCD REDUNDANCY
ENABLE
CODE 39 LASER/CCD REDUNDANCY
DISABLE
00331
00330
Page 19

17
Symbologies Set Up – 2
CODE 93 ID CHARACTER – “h”
CODE 93
CODE 93 ID CHARACTER – “Z”
0066h
0066Z
CODE 93 LASER/CCD REDUNDANCY -
ENABLE
CODE 93 LASER/CCD REDUNDANCY -
DISABLE
00681
00680
CODE 128 ID CHARACTER – ‛g’
CODE 128
CODE128 ID CHARACTER - ‛Z’
0081g
0081Z
CODE 128 LASER/CCD REDUNDANCY -
ENABLE
CODE 128 LASER/CCD REDUNDANCY -
DISABLE
00841
00840
CODABAR SEND START/STOP CHARS -
ENABLE
CODABAR
CODABAR SEND START/STOP CHARS -
DISABLE
00861
00860
CODABAR WIDE GAPS ALLOWED -
ENABLE
CODABAR WIDE GAPS ALLOWED -
DISABLE
00901
00900
Page 20

18
Symbologies Set Up – 3
CODABAR ID CHARACTER –‛k’
CODABAR
CODABAR ID CHARACTER –‛Z’
0094k
0094Z
CODABAR LASER/CCD REDUNDANCY
- ENABLE
CODABAR LASER/CCD
REDUNDANCY - DISABLE
00951
00950
I2OF5 CHECK DIGIT - DISABLE
Interleaved 2 of 5
I2OF5 CHECK DIGIT - ENABLE
00970
00981
I2OF5 ID CHARACTER – ‛i’
I2OF5 ID CHARACTER – ‛Z’
0104i
0104Z
I2OF5 LASER/CCD REDUNDANCY -
ENABLE
I2OF5 LASER/CCD REDUNDANCY -
DISABLE
01051
01050
ID2OF5 BAR START/STOP - ENABLE
Industrial 2 of 5
ID2OF5 BAR START/STOP - DISABLE
01071
01070
ID2OF5 ID CHARACTER - ‛j’
ID2OF5 ID CHARACTER - ‛Z’
0113j
0113Z
Page 21

19
Symbologies Set Up – 4
ID2OF5 LASER/CCD REDUNDANCY -
ENABLE
ID2OF5 LASER/CCD REDUNDANCY -
DISABLE
01141
01140
MSI CHECK DIGIT – MOD 10
MSI
MSI CHECK DIGIT –RESET
01160
0B116
MSI ISBN ID CHARACTER –‛f’
MSI ISBN ID CHARACTER –‛Z’
0053f
0053Z
MSI LASER/CCD REDUNDANCY -
ENABLE
MSI LASER/CCD REDUNDANCY -
DISABLE
01251
01250
EXPAND UPC-E TO UPC-A ENABLE
UPC/EAN
EXPAND UPC-E TO UPC-A DISABLE
00381
00380
EXPAND UPC-A TO EAN-13 ENABLE
EXPAND UPC-A TO EAN-13 DISABLE
00391
00390
CONVERT EAN-13 TO ISBN ENABLE
CONVERT EAN-13 TO ISBN DISABLE
00481
00480
Page 22

20
Symbologies Set Up – 5
SEND UPC-A CHECK DIGIT ENABLE
SEND UPC-A CHECK DIGIT DISABLE
00421
00420
SEND UPC-E CHECK DIGIT ENABLE
SEND UPC-E CHECK DIGIT DISABLE
00431
00430
SEND EAN-13 CHECK DIGIT ENABLE
SEND EAN-13 CHECK DIGIT DISABLE
00461
00460
SEND EAN-8 CHECK DIGIT ENABLE
SEND EAN-8 CHECK DIGIT DISABLE
00471
00470
UPC-A ID CHARACTER ‛b’
UPC-A ID CHARACTER ‛Z’
0049b
0049Z
UPC-E ID CHARACTER ‛c’
UPC-E ID CHARACTER ‛Z’
0050c
0050Z
EAN-13 ID CHARACTER ‛e’
EAN-13 ID CHARACTER ‛Z’
0051e
0051Z
Page 23

21
Symbologies Set Up – 6
EAN-8 ID CHARACTER ‛d’
EAN-8 ID CHARACTER ‛Z’
UPC/EAN
0052d
0052Z
ISBN ID CHARACTER ‛f’
ISBN ID CHARACTER ‛Z’
0053f
0053Z
UPC/EAN SUPPLEMENTS - DISABLE
UPC/EAN SUPPLEMENTS – 2 DIGIT
ONLY
00550
00551
UPC/EAN SUPPLEMENTS – 5 DIGIT ONLY
UPC/EAN SUPPLEMENTS – 2 & 5 DIGIT
00552
00553
UPC/EAN LASER/CCD REDUNDANCY
ENABLE
UPC/EAN LASER/CCD REDUNDANCY
DISABLE
00541
00540
Page 24

22
EDIT SETUP BAR CODES
EDIT #1 – STRIP 1 LEADING CHARACTER
ON ALL BAR CODES THAT START WITH
‛12345’
EDIT #1 - OFF
02000101000000100000000112345
0B20001
EDIT #2 – STRIP 1 TRAILING CHARACTER
EDIT #2 – OFF
020002020000001
0B20002
EDIT #1 – FILTER LEADING SPACES
EDIT #1 - OFF
020001030000032
0B20001
EDIT #1 – FILTER TRAILING SPACES
EDIT #1 - OFF
020001040000032
0B20001
EDIT – FILTER ALL ‛-’ CHARACTERS
EDIT – DISABLE FILTER OF ALL ‛-’ CHARS
020000050000045
0B20000050000045
EDIT - INSERT LEADING ZERO
EDIT – DISABLE INSERT LEADING ZERO
020000060000000048
0B20000060000000048
Page 25

23
MACRO/SPECIAL KEYS SETUP BAR CODES
MACRO #1 – FIND ‛1’ AND REPLACE WITH
‛ONE’
MACRO #1 - DISABLED
02010101011ONE
0B20101
MACRO #2 – FIND ‛2’ AND REPLACE WITH
‛TWO’ FOR CODE 39 ONLY
MACRO #2 - DISABLED
0201023012TWO
0B20102
MACRO – FIND ‛0’ AND REPLACE WITH ‛A’
MACRO – FIND ‛0’ AND REPLACE WITH ‛A’ -
DISABLE
02010001010A
0B2010001010A
SPECIAL KEY –MAP F3 TO ‛0’
SPECIAL KEY – DISABLE F3 KEY MAPPING
0162048
0B162
SPECIAL KEY – MAP KEYPAD ENTER TO ‛2’
SPECIAL KEY – DISABLE KEYPAD ENTER
MAPPING
0182050
0B182
Page 26

24
TERMINATION STRING SETUP BAR CODES
STRING #1 – TERMINATION CHAR - CR
STRING #1 – TERMINATION - LF
0202011000$0D
0202011000$0A
STRING #1 – TERMINATION CR+LF
STRING #1 - DISABLE
0202011000$0D$0A
0B20201
STRING #2– CODE 128 TERMINATION CHAR -
CR
STRING #2 – CODE 128 TERMINIATION CHAR -
LF
0202021080$0D
0202021090$0A
STRING #2– CODE 128 TERMINATION CHAR –
CR+LF
STRING #2– CODE 128 TERMINATION CHAR -
REMOVED
0202021080$0D$0A
0B20202
STRING – CODE 39 TERMINATION CHAR -
TAB
STRING – CODE 39 TERMINATION CHAR – TAB
- REMOVED
0202001020$09
0B202001020$09
STRING ALL CODES PREAMBLE - STX
STRING ALL CODES POSTAMBLE - ETX
0202002000$02
0202003000$03
Page 27

25
Appendix-A
Troubleshooting & Error Beeps
Page 28

26
a. Problem: Nothing happens when I follow the operating instructions.
Possible Cause Possible Solution
Interface cables are loose Check for loose cable connections
b. Problem: When I connected RS232 interface reader to PC, I could not get
power up signal.
Possible Cause Possible Solution
There is no power from PC series
port.
Use external power supply or take the
power from PC.
c. Problem: When I connected RS232 interface reader to PC or terminal, I got
power up signal but no data transmitted.
Possible Cause Possible Solution
This may cause by wrong pin out or
wrong communication protocol.
Check the pin out and communication
protocol to match the PC or terminal
you are using.
Page 29

27
d. My computer gets a keyboard error while booting up.
Possible Cause Possible Solution
The scanner is damaged or is no
longer functioning.
Disconnect the scanner from your
computer and use your keyboard only.
Reboot your computer. If your
computer still gets a keyboard error,
then the problem may not be the
scanner. Call technical support for
assistance.
e. Problem: Light comes on, but symbol does not decode.
Possible Cause Possible Solution
Scanner is not programmed for the
correct bar-code type.
Please refer User’s Guide and be sure
to select the correct interface selection
and ensure that the scanner is
programmed to read the type of
barcode you are scanning.
Barcode symbol is unreadable. Check the symbol to make sure it is
not de-faced. Try scanning test
symbols of the same barcode type.
Distance between scanner and
barcode is incorrect.
Move the scanner closer to or further
from the barcode.
Page 30

28
f. Problem: The scanner beeps, but no data is displayed on my computer.
Possible Cause Possible Solution
Scanner is not programmed for the
correct host type.
Please make sure the scanner is
configured to the appropriate host type
by scanning the corresponding
programming barcode on the User’s
Manual.
The scanner is configured to send the
numeric data as KEYPAD
NUMERICS, or the Keyboard Country
setting is set to UNIVERSAL.
Reconfigure the scanner to Send
Numerics as MAIN KEYBOARD KEYS
and set the Keyboard Country setting
to the country setting of your
computer.
g. Problem: Scanned data is incorrectly displayed on the host.
Possible Cause Possible Solution
Scanner is not programmed to work
with the host.
Be sure proper host type is selected.
For RS232, ensure the scanner’s
communication parameters match the
host’s settings
For keyboard emulation configuration,
ensure the system is programmed for
the correct keyboard type, and that the
CAPS LOCK key is off.
Be sure editing options (e.g UPC-E to
UPC-A Conversion) are properly
programmed.
The scanner’s Keyboard Country
setting does not match the computer’s
keyboard setup.
Set the scanners Keyboard Country to
the same setting as the keyboard on
your computer.
Page 31

29
h. Problem: Some of the barcode data is missing displayed on the host.
Possible Cause Possible Solution
The scanner’s transmit speed is too
fast.
For RS232, you can set up the
scanner’s transmit speed.
i. My Caps Lock LED on my keyboard flickers when I read a bar code.
Possible Cause Possible Solution
The Keyboard Country that you are
using requires shifting in and out of
the shift Lock mode to send the data
properly.
This is normal operation. You can
reduce the flickering and speed the
data transmit by sending numerics as
keypad numerics, or setting the
keyboard country to UNIVERSAL
mode.
Page 32

30
Version: 2.0
Date: September 12, 2007
P/N: 79.60002.101
 Loading...