

Page 1

Lever Drive
User Manual
Page 2

TM
Pivot
User Manual
The PivotTM from Rio Mobility transforms your wheelchair into a high performance
machine that can increase your mobility and physical tness. The PivotTM can provide
a number of benets including:
Easier hill climbing and higher speeds with 5 speed gearbox
▫
Reduces stress and resulting injury on shoulder rotator cus
▫
Increases upper body strength and supports good posture
▫
Promotes cardiovascular health
▫
Gives relief from Carpal Tunnel Syndrome by eliminating repeated grasping of pushrims
▫
Requires less manual dexterity to operate than pushrims
▫
Keep your hands clean, and no need to wear gloves
▫
If you’re new to lever drives, you may feel soreness and fatigue at rst. This is normal, but remember,
over-exertion can cause injury. As always, consult with your dealer or health care professional to
determine if the PivotTM is appropriate for you.
Be patient and reasonable with your expectations; physical tness takes time to achieve. It also
takes some practice to become procient with the PivotTM. Most importantly, have fun and enjoy
the ride!
Dealer: You must give this manual to the Pivot
User: Before using the Pivot
TM
lever drive, read this manual and save it
TM
lever drive user
for future reference.
Questions or concerns? Contact us:
(888) 559-6225
(415) 278-9662
Rio Mobility
56 Tehama Street
San Francisco, CA 94105
Rio Mobility, a Daedalus Wings, Inc. company, is a designer and retailer of innovative
products that maximize options and increase mobility for wheelchair users.
We would like to acknowledge the National Institutes of Health for their support of the
development of the PivotTM lever drive.
Part Number 303
Rev C, 03/2010
© 2010 Daedalus Wings, Inc.
www.riomobility.com2
Page 3

TM
Pivot
User Manual
Table of Contents
Table of Contents
1. Safety Warnings 4
2. Wheelchair Requirements 5
3. The PivotTM Components 6
4. PivotTM Specications 9
5. Installing Your Pivot
6. The Pivot
TM
Controls 14
7. Driving the Pivot
8. The Pivot
TM
Out in the World 18
TM
9
TM
16
9. Special Adaptations 20
10. Safety and Maintenance Instructions 21
11. Troubleshooting Guide 24
12. Limited Warranty 25
13. Product Registration / Warranty Form 27
www.riomobility.com 3
Page 4

TM
Pivot
User Manual
1. Safety Warnings
WARNING
DO NOT OPERATE THIS EQUIPMENT WITHOUT FIRST
CONSULTING WITH A HEALTHCARE PROFESSIONAL.
Do not operate this equipment without rst reading and understanding this manual. If you are
unable to understand the warnings, cautions, or instructions, contact [email protected], your
health professional, dealer, or technical personnel before attempting to use this equipment, otherwise injury or damage may result.
IT IS RECOMMENDED THAT INITIAL SETUP OF THIS LEVER
DRIVE BE PERFORMED BY A QUALIFIED TECHNICIAN, SUCH
AS A WHEELCHAIR OR BICYCLE MECHANIC.
The PivotTM will increase the performance of your wheelchair. Follow the recommendations in your
wheelchair manual. Additional information, recommendations, and warnings are included in this
manual.
YOUR ANTI-TIP DEVICES MUST BE INSTALLED ON YOUR
WHELCHAIR TO ENSURE A SAFE RIDE.
The PivotTM is a specialized piece of medical equipment, with unique handling and maneuvering
characteristics. Whether you are a new wheelchair user or have years of experience, you MUST take
the time to learn and practice on the PivotTM before you begin regular riding.
Operating in or around a lever drive involves a certain level of risk and inherent danger of serious
bodily injury. These possible risks include, but are not limited to, permanent disability, neck and
head trauma, limb dismemberment and in extreme cases, even death.
Users must ride the PivotTM with the utmost care, caution, and safety. It is recommended that you
inspect your chair and lever drive carefully before each ride.
Rio Mobility is not responsible for any injuries resulting
from misuse.
www.riomobility.com4
Page 5

TM
Pivot
User Manual
2. Wheelchair Requirements
The PivotTM is compatible with all known commercially-available wheelchairs without the need for
any special adapters or kits.
The frame tube diameter must be either:
7
/8 inch (22mm)
1 inch (25.4mm)
Wheelchair
Frame Tube
Diameter
1
1
/8 inch
1.2 inch (30.5mm)
1¼ inch (31.8mm)
If by chance your tube diameter is not listed, please contact customer
service at [email protected]. If you do not know the diameter
of your tubing, cut out the ruler printed below to measure. Wrap it
around your tubing and note where the markings line up. The tube
must be straight for the width of the ruler.
(28.5mm)
Rear Wheel
Axle
Wheel
Diameter
Anti-Tips and
Seatbelts
Wheel Camber
Casters
Wheel Locks
Weight
RULER MUST BE PRINTED AT 100%
NO SCALING - RULER IS 6” (152mm) LONG
Your rear wheels must have quick release axles with a diameter of ½”
(12.7mm, USA standard), or 12mm.
Wheels can be either 24” (540mm rim) or 20” (451mm rim) in diameter.
Contact [email protected] for other diameters.
Because of the additional power and speed possible, anti-tip devices
MUST be installed on your wheelchair. A seat belt is also strongly
recommended.
If your chair has signicant wheel camber (>5º) please contact sales@
riomobility.com.
Due to the potential for higher speeds, it is recommended that the
diameter for the front wheels is 4 inches or greater.
May need to be removed, unless they are scissor-style.
Combined wheelchair and user weight must be less than 280lb (130kg).
1”
CUT ALONG DASHED LINE
AND WRAP AROUND TUBE
7
/8”
1 1/8”
1.2”
FRAME MUST BE STRAIGHT
FOR WIDTH OF RULER
START HERE
www.riomobility.com 5
1 1/4”
Page 6
TM
Pivot
User Manual
3. The PivotTM Components
Required tools:
Adjustable Wrench
1.
Pliers
2.
Torque Wrench
3.
Tire Pressure Gauge
4.
Bicycle Pump
5.
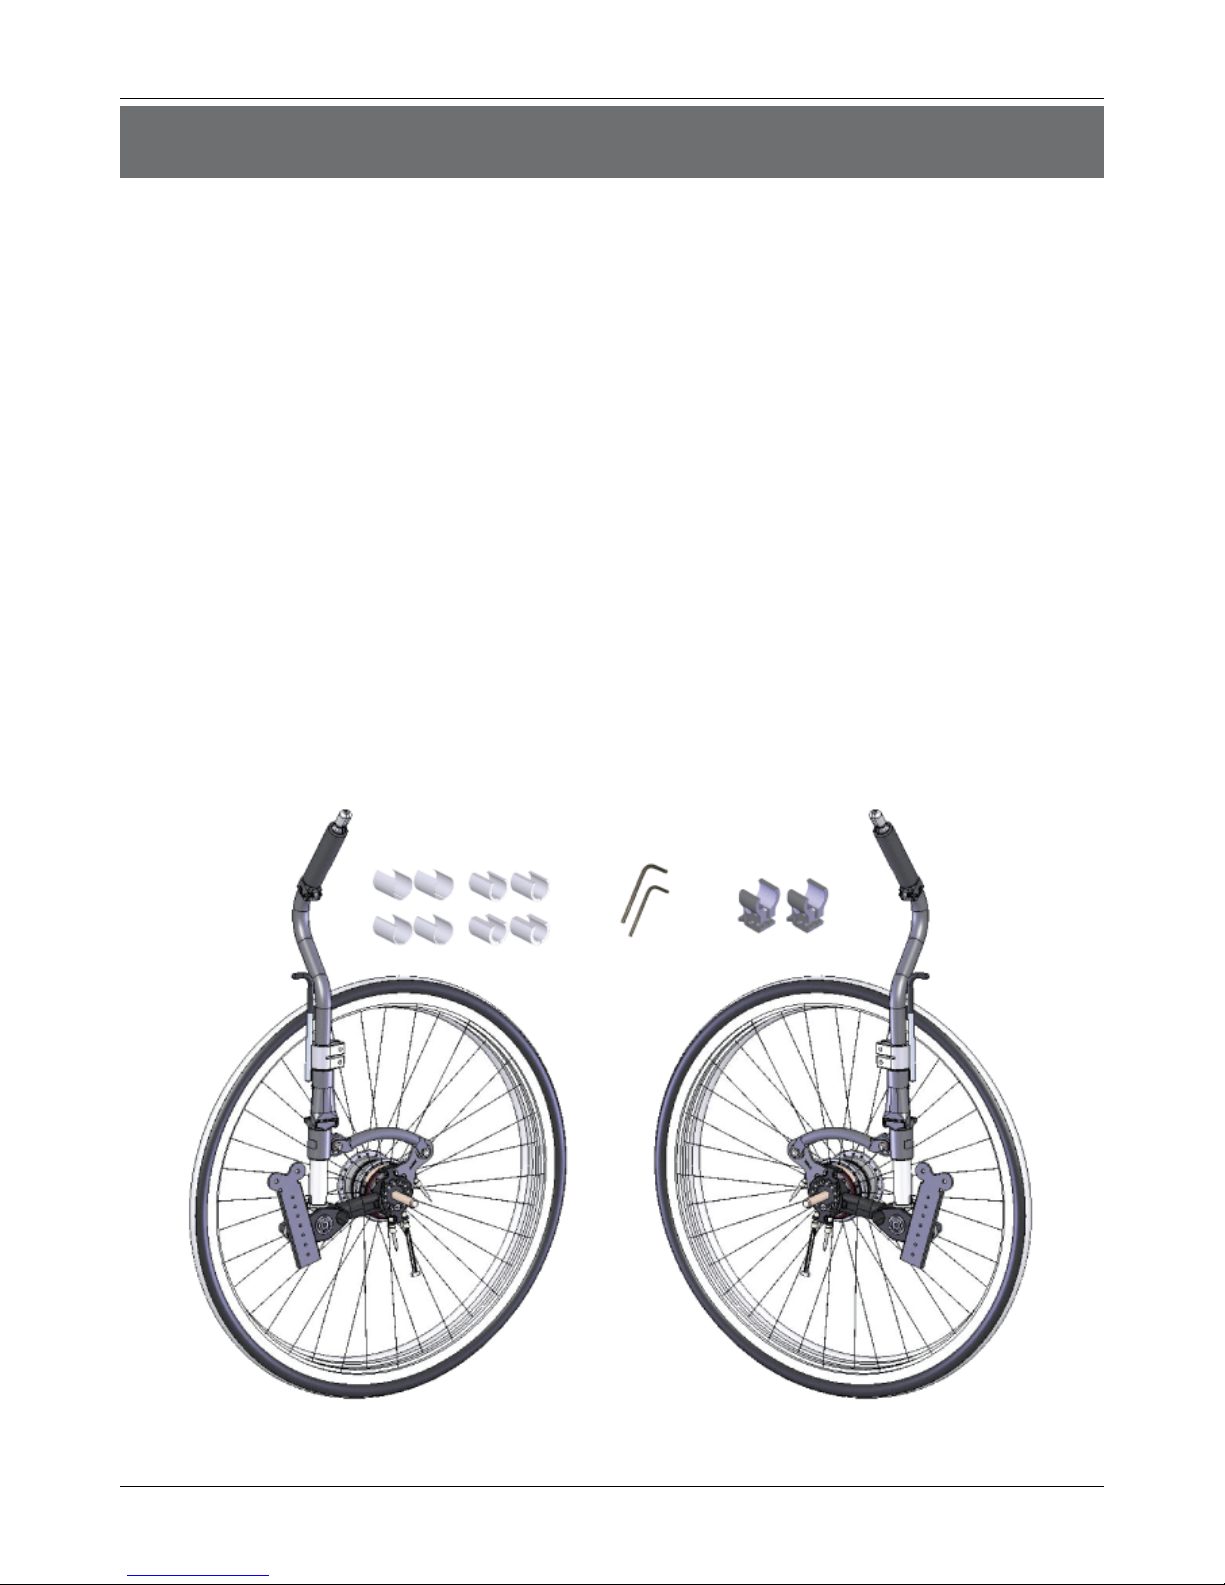
Remove the lever drive parts from the box and unpack the components. The contents include:
Lever Drive Assembly (left and right sides)
1.
2 Clamps
2.
4 Sets of Shims
3.
3mm and 4mm Hex Wrench
4.
If you are missing any of these items, please contact customer service at [email protected]
www.riomobility.com6
Page 7
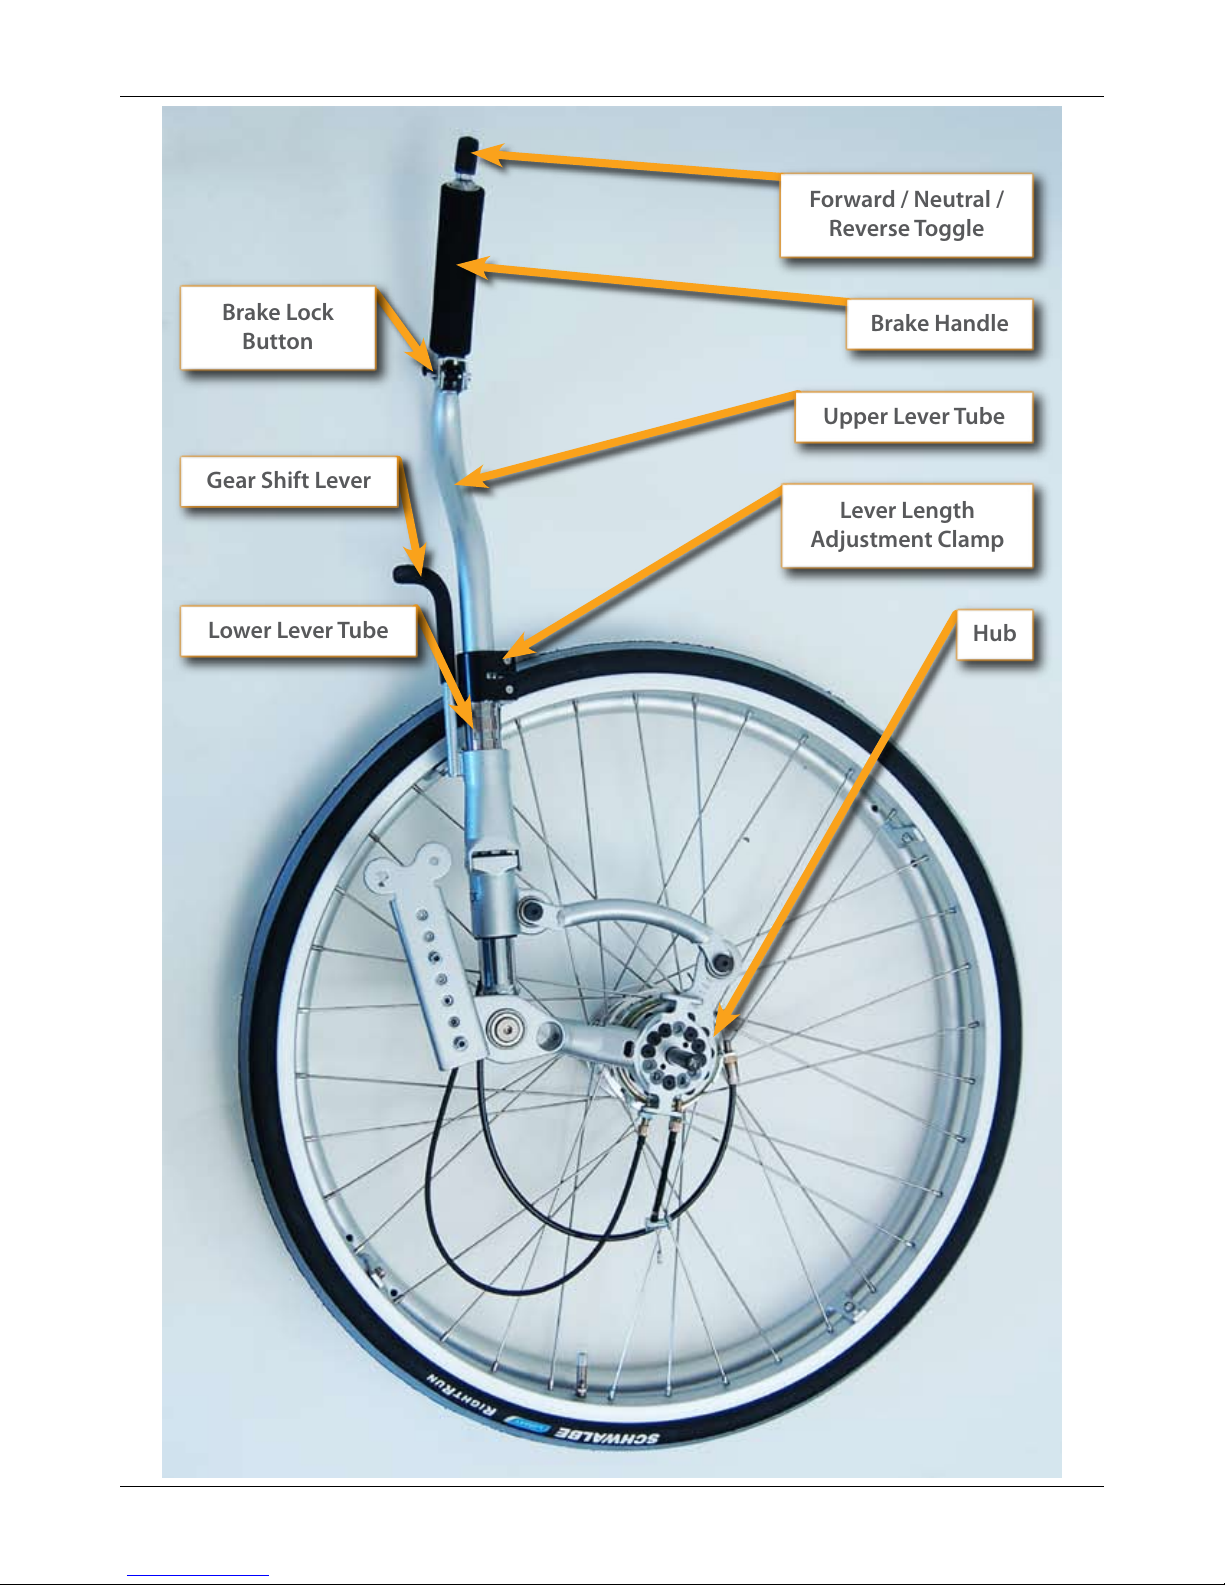
Pivot
Brake Handle
Forward / Neutral /
Reverse Toggle
Brake Lock
Button
Upper Lever Tube
Gear Shift Lever
Lever Length
Adjustment Clamp
Lower Lever Tube
Hub
TM
User Manual
www.riomobility.com 7
Page 8
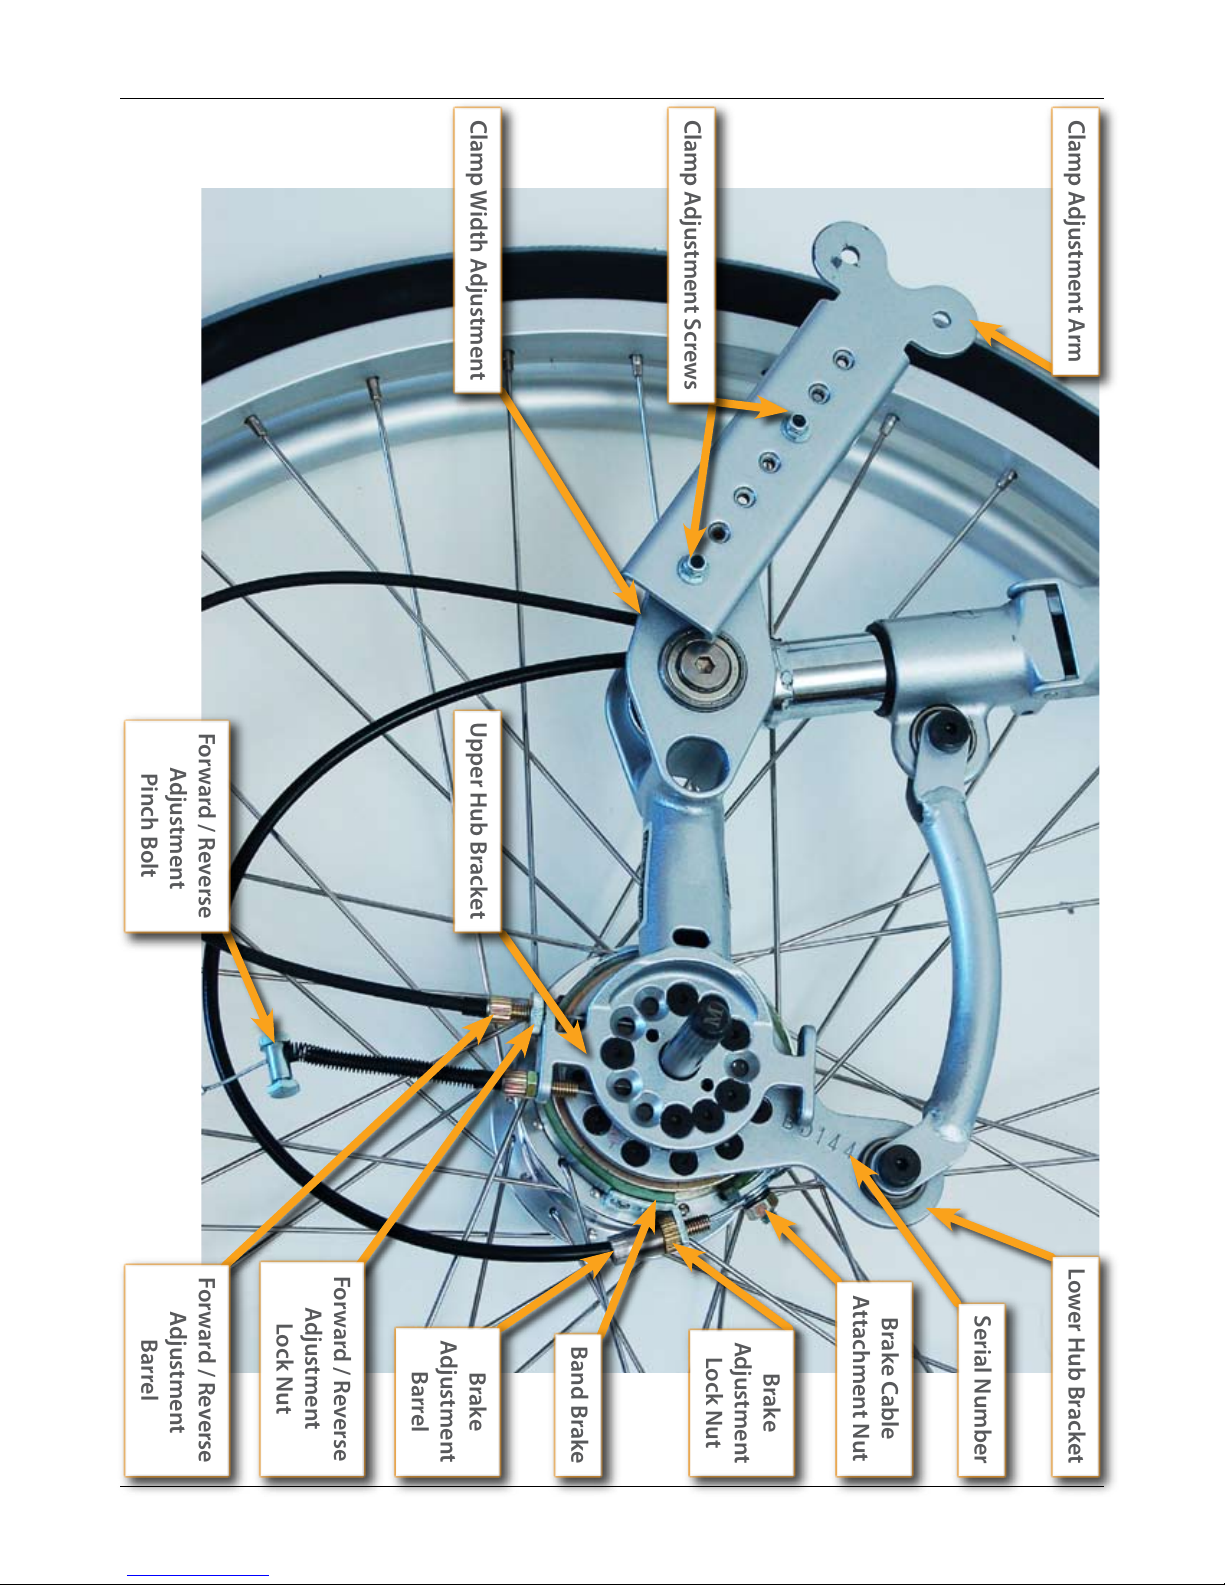
Pivot
Clamp Adjustment Arm
Clamp Adjustment Screws
Clamp Width Adjustment
Serial Number
Upper Hub Bracket
Lower Hub Bracket
Brake
Adjustment
Barrel
Brake Cable
Attachment Nut
Brake
Adjustment
Lock Nut
Forward / Reverse
Adjustment
Barrel
Forward / Reverse
Adjustment
Lock Nut
Band Brake
Forward / Reverse
Adjustment
Pinch Bolt
TM
User Manual
www.riomobility.com8
Page 9

Gearbox
TM
Pivot
User Manual
4. PivotTM Specications
Patented Multi-Functional Gearbox with the following Gear Ratios
(24”wheel) [For reference, pushrims have a 1:1 gear ratio] :
1st Gear - 1 : 0.9
▫
2nd Gear - 1 : 1.25
▫
3rd Gear - 1 : 1.5
▫
4th Gear - 1 : 1.75
▫
5th Gear - 1 : 2
▫
In forward gear, both pushing and pulling result in propulsion. In
reverse, propulsion results from pushing only.
Construction
Brakes
Color
Weight
All alloy steel construction for strength and reliability
Cable-actuated band brakes
Silver metallic
Added weight is approximately 16 lb (7 kg). Total weight is 24 lb (11 kg)
TM
5. Installing Your Pivot
Notes on Installation
Since the PivotTM is a highly customizable product, it is recommended that initial installation be
performed by two people. Once it is congured for your wheelchair, no additional assistance is
usually necessary.
If you are not comfortable adjusting your wheelchair, or with tasks such as assembly, tightening nuts
and bolts, or gripping a wrench, it is recommended that a qualied technician perform the initial
installation. A wheelchair or bicycle mechanic is suggested.
There are three installation steps:
Installing the Clamps
▫
Mounting the Pivot
▫
Customizing the Fit
▫
Familiarize yourself with the component names in the previous section. During the installation you
will need to locate and/or identify these components.
Contact customer service at [email protected] if you have any dicult installing your PivotTM.
www.riomobility.com 9
TM
Page 10
Installing the Clamps
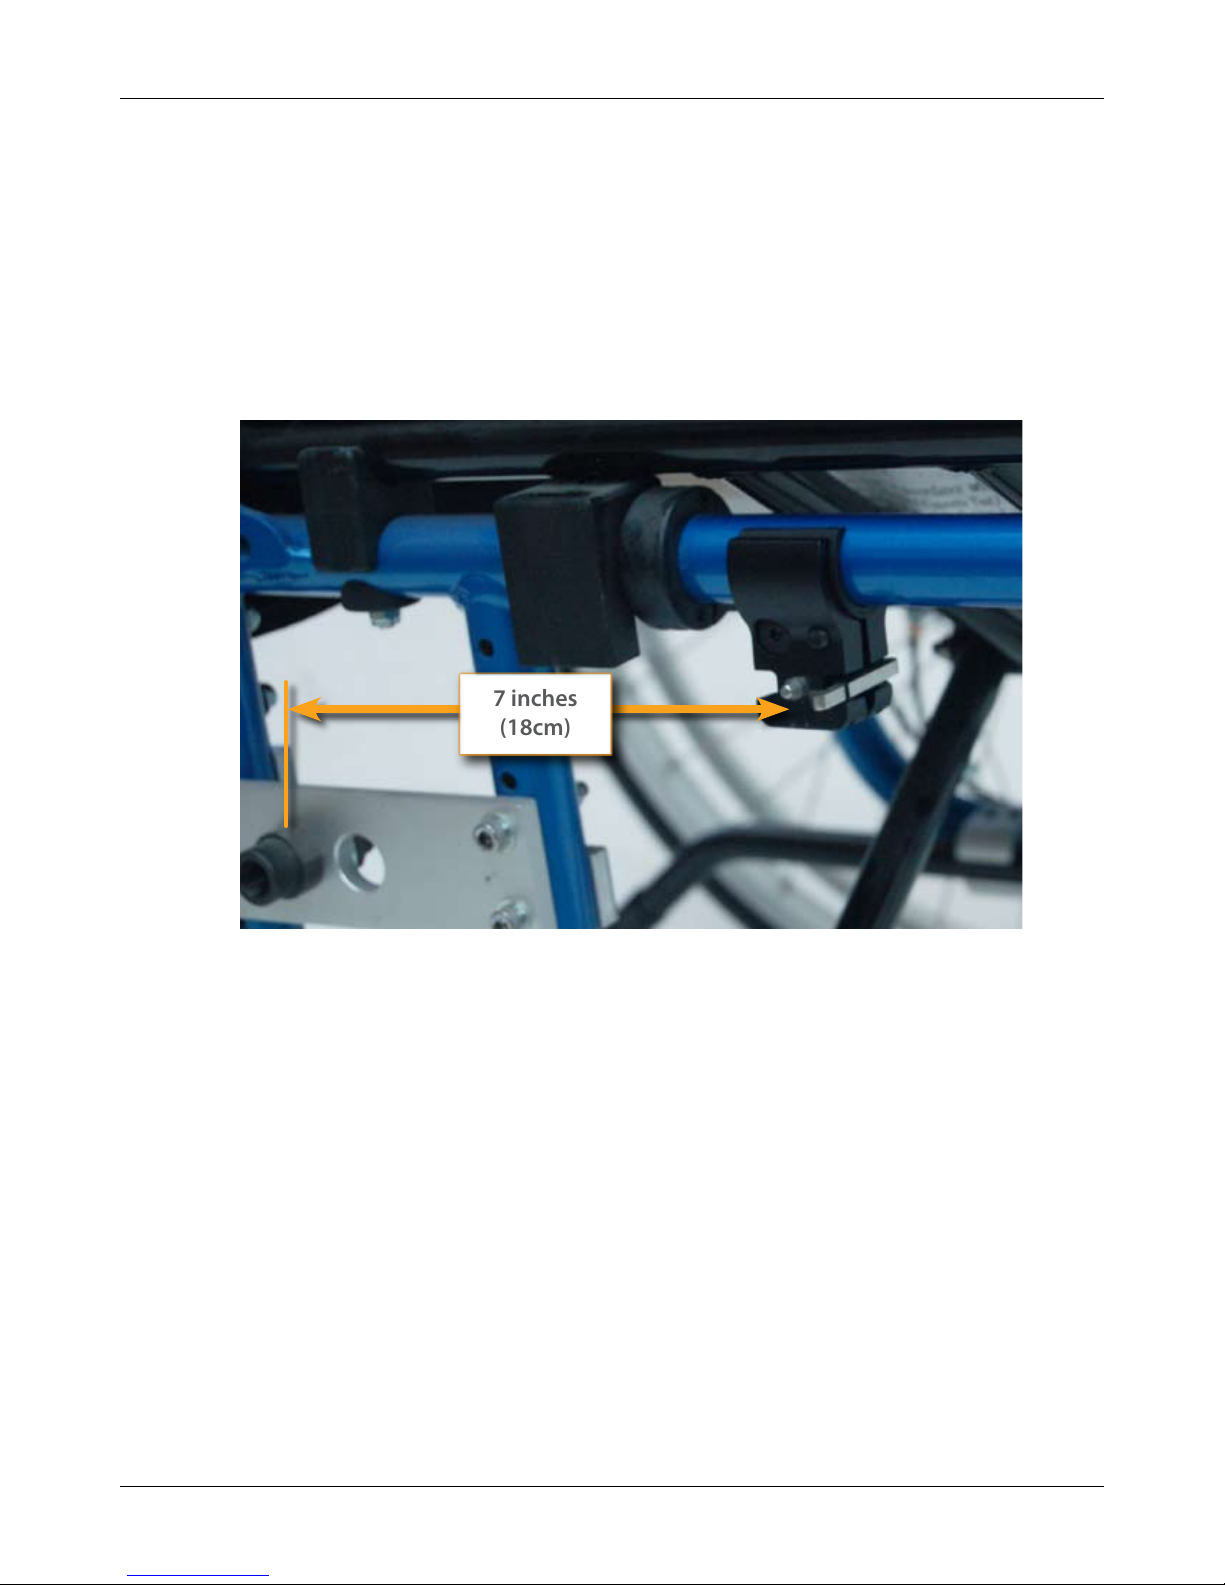
7 inches
(18cm)
Remove your quick release wheels
1.
Locate the horizontal frame tube under the right and left edges of the wheelchair
2.
seat
Place the right clamp (the latch facing forward) near the Suggested Clamp
3.
Position shown below. If there is interference at this position, move the Clamp
towards the front of your chair, but not more than 3 inches (75 mm). If moving
them forward is not an option, you can position your Clamps further back, but
again no more than 3 inches (75mm) from the Suggested Clamp Position
Pivot
TM
User Manual
The clamps are designed to t 1 ¼” (31.8 mm) diameter tubes. Smaller diameters
4.
are common so the following shims are provided:
7
/8 inch (22 mm)
1 inch (25.4 mm)
11/8 inch (28.5 mm)
1.2 inch (30.5 mm)
Find the set of shims that make the clamps t properly to the tube frame. To
install the shims, place the clamp in the desired position and slide the shim into
the space between the clamp and tube frame. Make sure the shims are centered
properly
Check that the Clamp position is vertical and loosely tighten the Clamp
5.
Repeat for the left side
6.
www.riomobility.com10
Page 11
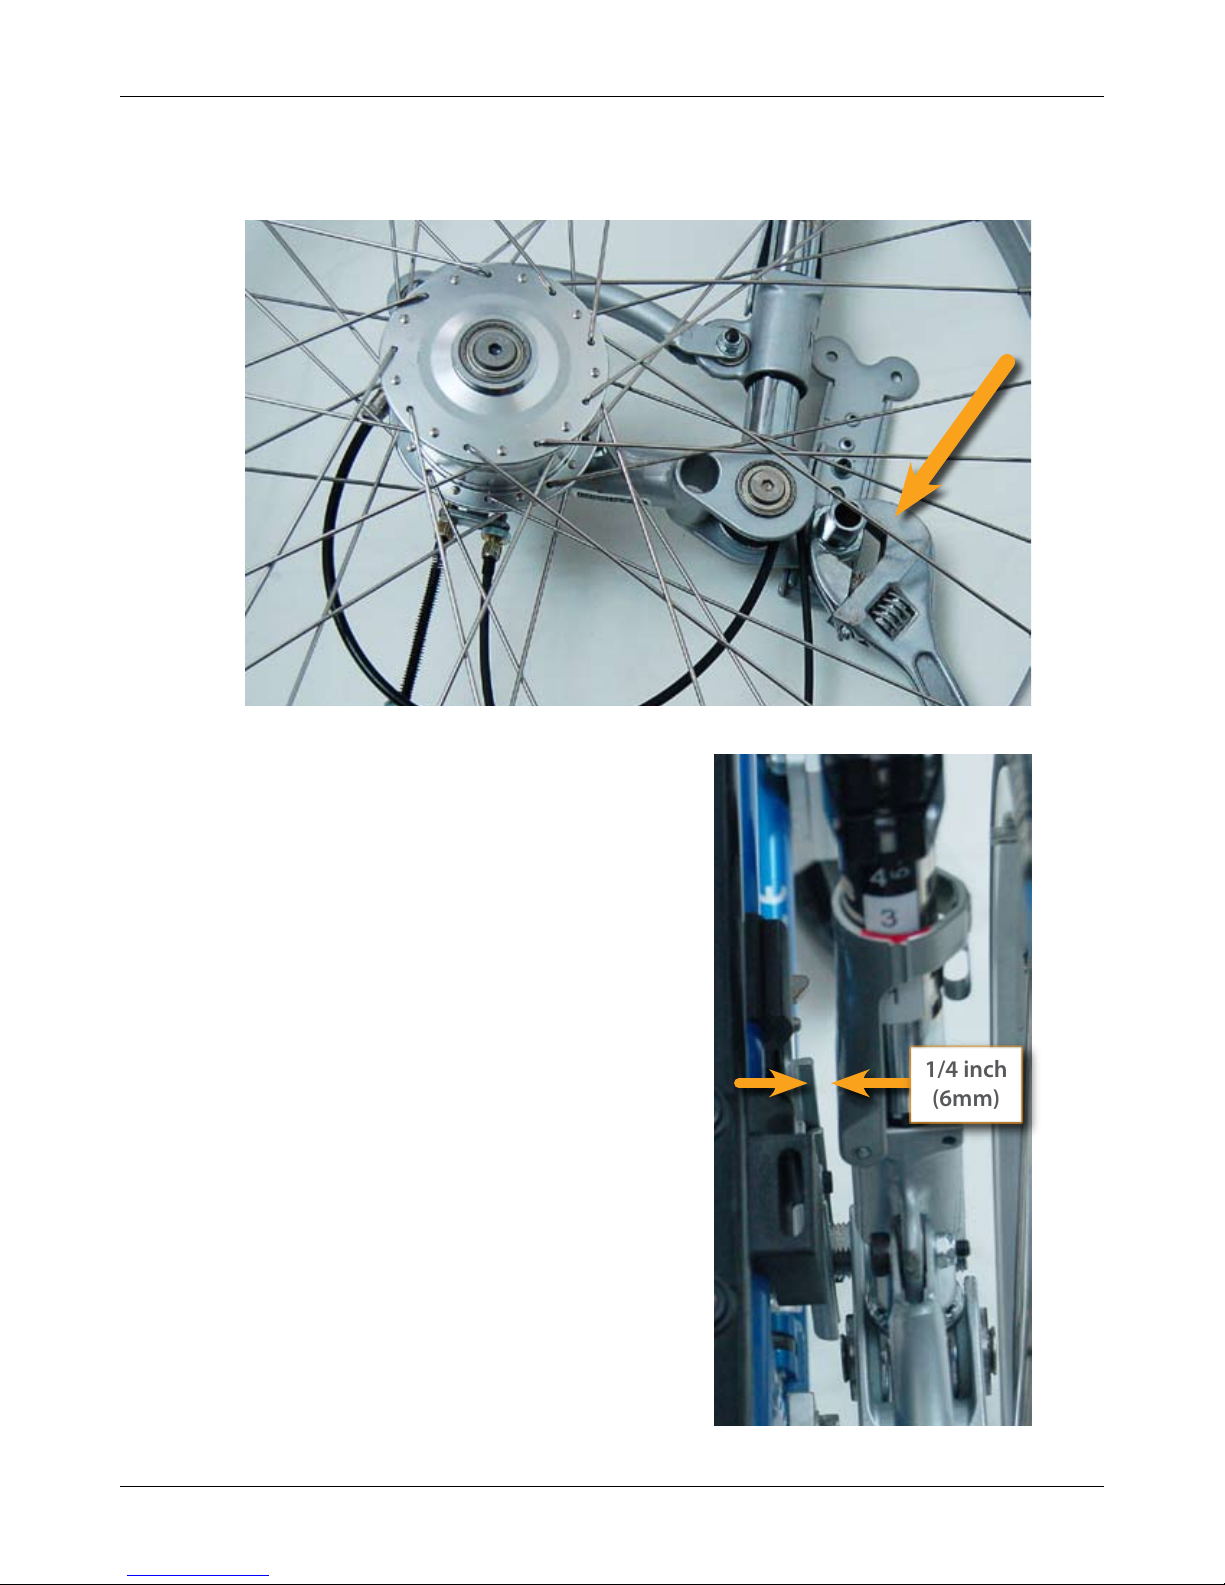
Mounting The Pivot
1/4 inch
(6mm)
Loosen the Lockdown Nut and slide the right lever assembly as far as possible
1.
into the axle sleeve just as you would with your original quick-release wheels.
TM
Pivot
User Manual
TM
Rotate the lever assembly through the
2.
normal operating range to determine if it
interferes with any part of the wheelchair
(i.e., clothes guard, armrest). If there is
interference, determine if the part can be
modied, replaced, or removed.
If the obstruction cannot be removed, rotate
the Clamp Attachment Arm as many times
as necessary until there is approximately ¼
inch (6mm) clearance between the lever and
the obstruction and insert it completely on
the pin of the Clamp. To release the clamp ‘s
latch, pull the latch away from you. Tighten
the Lockdown Nut.
At least 1” (25mm) of the axle
must be in the axle sleeve.
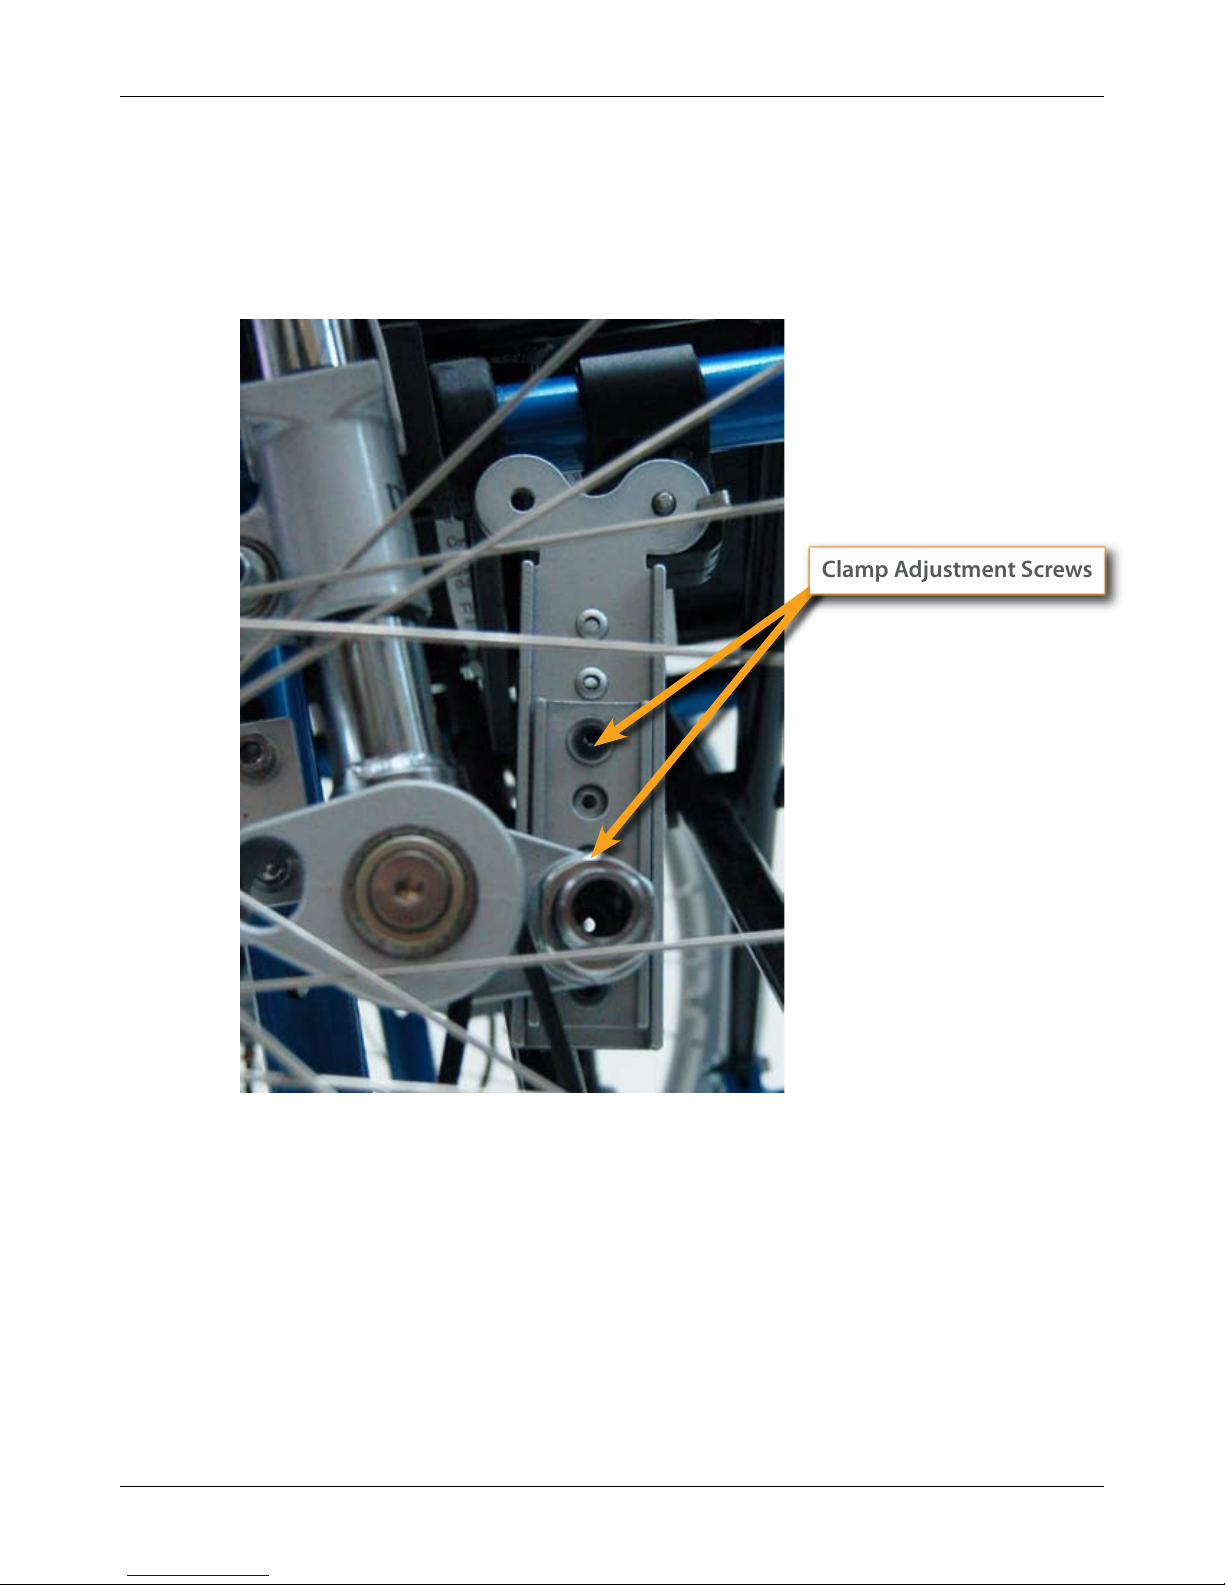
Check the Clamp to assure that the position
3.
is still correct (vertical). Tighten the Clamp
Screws on both sides of the Clamp using the
4 mm Allen wrench until snug (approximate
tightness of 5 ft-lbs (6.8 N-m). This is
approximately a force of 10 lbs at 6 inches
away from the screw (45 N at 15 cm away
from the screw). Do not overtighten.
Install the left lever in the same manner.
4.
www.riomobility.com 11
Page 12

Adjusting The Fit
Check the tire pressure and inate as necessary to within the range specied on
1.
the side of the tire
Engage the Parking Brakes (see p. 15)
2.
Transfer to your chair (see p. 17)
3.
Place your toggle switches in Neutral and shift into 5th gear (see p. 16)
4.
In an upright position grasp both padded handles and push the levers until they
5.
stop
If the levers stop at a position that is slightly beyond your fully extended arm
range, your Range of Motion is correct
If the levers stop more than one inch beyond your fully extended arm range, you
may want to shorten the Clamp Attachment Arm
If the levers stop more than one inch before you reach your fully extended arm
range, you may want to lengthen the Clamp Attachment Arm
Your Range of Motion must be adjusted according to the recommendations of
your health care professional and feel comfortable to you
Pivot
TM
User Manual
Note: If the range of motion is correct but the lever interferes with your wheelchair wheel
locks, check if you can move your wheel locks to a location that will not interfere with the
lever. If this is not possible, replace your wheel locks with scissor style wheel locks that
retract under your seat.
www.riomobility.com12
Page 13
TM
Clamp Adjustment Screws
Pivot
User Manual
To shorten or lengthen the Clamp Attachment Arm, engage the Brake Lock,
6.
place the Levers in the stowed position and transfer out of your chair
Using the 4mm Allen wrench and your adjustable wrench, remove the two
7.
screws and nuts from the Clamp Attachment Arm and slide the pieces to either
lengthen or shorten. Each screw position moved will result in approximately 1 ½
inches change in the Range of Motion
When the desired position is determined, tighten the screws and nuts. Make sure
there is at least one empty position between the two screws
Check all the nuts and screws and make sure they have been tightened properly
8.
Your PivotTM is ready to drive!
www.riomobility.com 13
Page 14
Pivot
Released
Engaged
TM
User Manual
6. The Pivot
Check that all components are properly installed and tightened.
It is recommended for your rst few sessions with the PivotTM to be in an open space with ample
turning room and no obstructions. The use of a safety belt is recommended and you must have your
anti-tips installed.
There are three controls:
Brakes
▫
Forward / Reverse / Neutral Toggle Switch
▫
Gear Shifter
▫
Transfer into your chair using the instructions in the next section.
On a at surface, without pushing or pulling the levers, place both hands on the padded handles,
with thumbs close to the toggle switches.
Controls
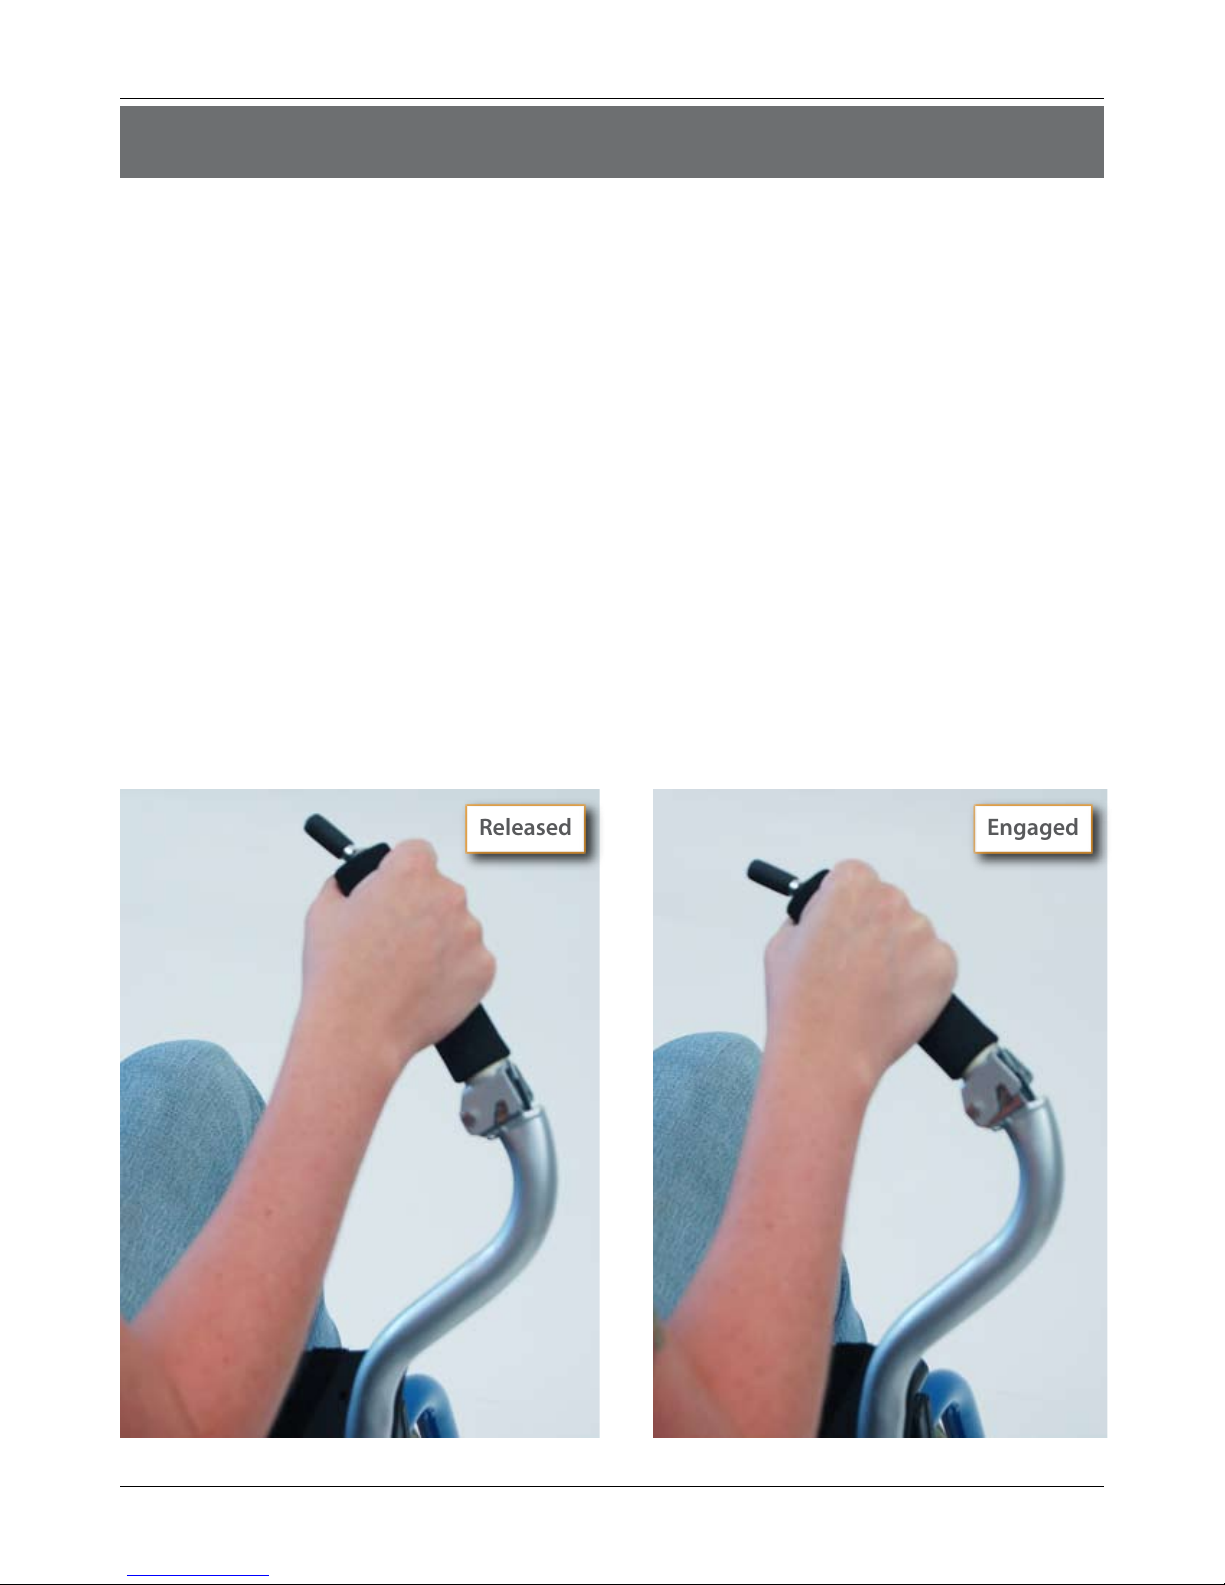
Brake
TM
To brake the padded handles are pushed downward, toward your lap.
www.riomobility.com14
Page 15
TM
Set
Release
Forward
Neutral
Reverse
Pivot
User Manual
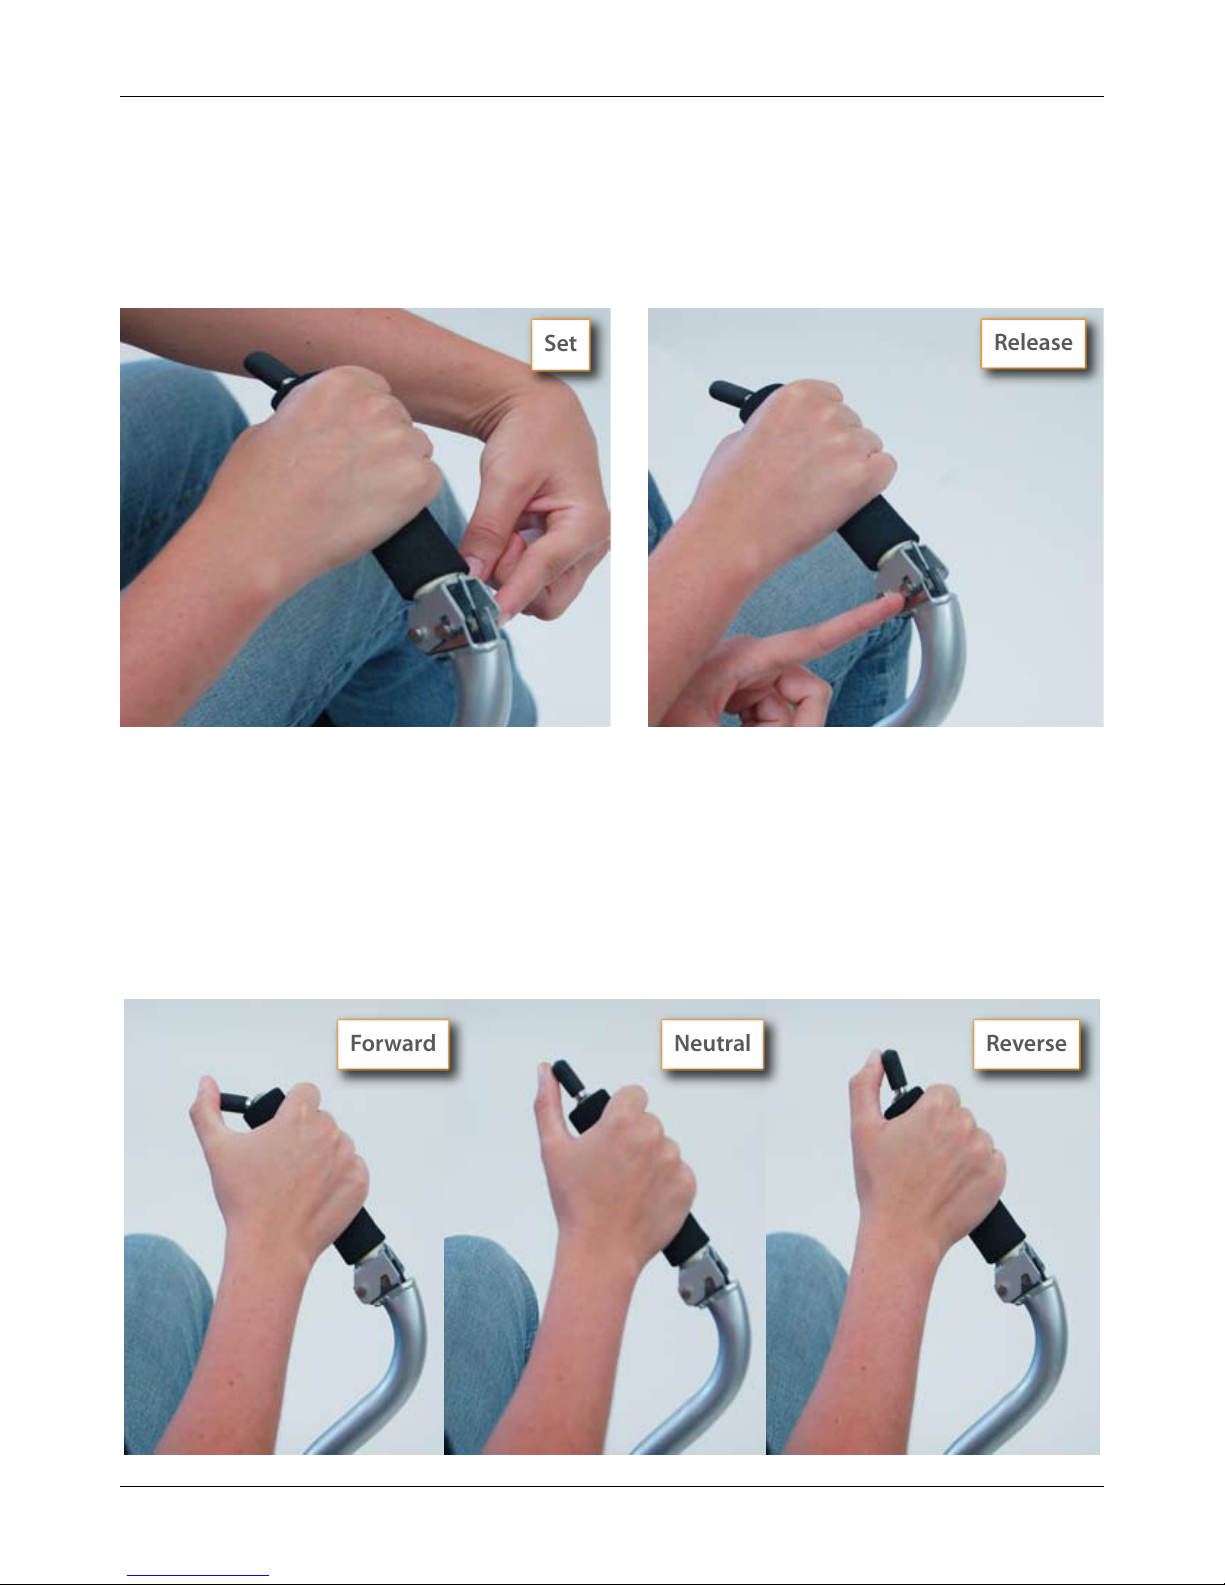
To engage the Brake Lock, rmly apply the brake and push the Brake Lock Pin toward your body.
If you are on an uphill slope or at ground, also switch into Forward drive. If you are on a downhill
slope, also switch into Reverse.
To release the brake, rmly pull the handle toward your body, as though you were applying the
brake. The pin should automatically retract to release the lock.
Forward / Reverse / Neutral Toggle Switch
To shift into Forward, push the toggle switches toward your body.
To engage Neutral, move the toggle switches to the upright position (in line with the handle).
To shift into Reverse, push the toggle switches away from your body while simultaneously moving
the lever back and forth slightly to engage the gears.
www.riomobility.com 15
Page 16
TM
One-handed
Two-handed
121
2
Pivot
User Manual
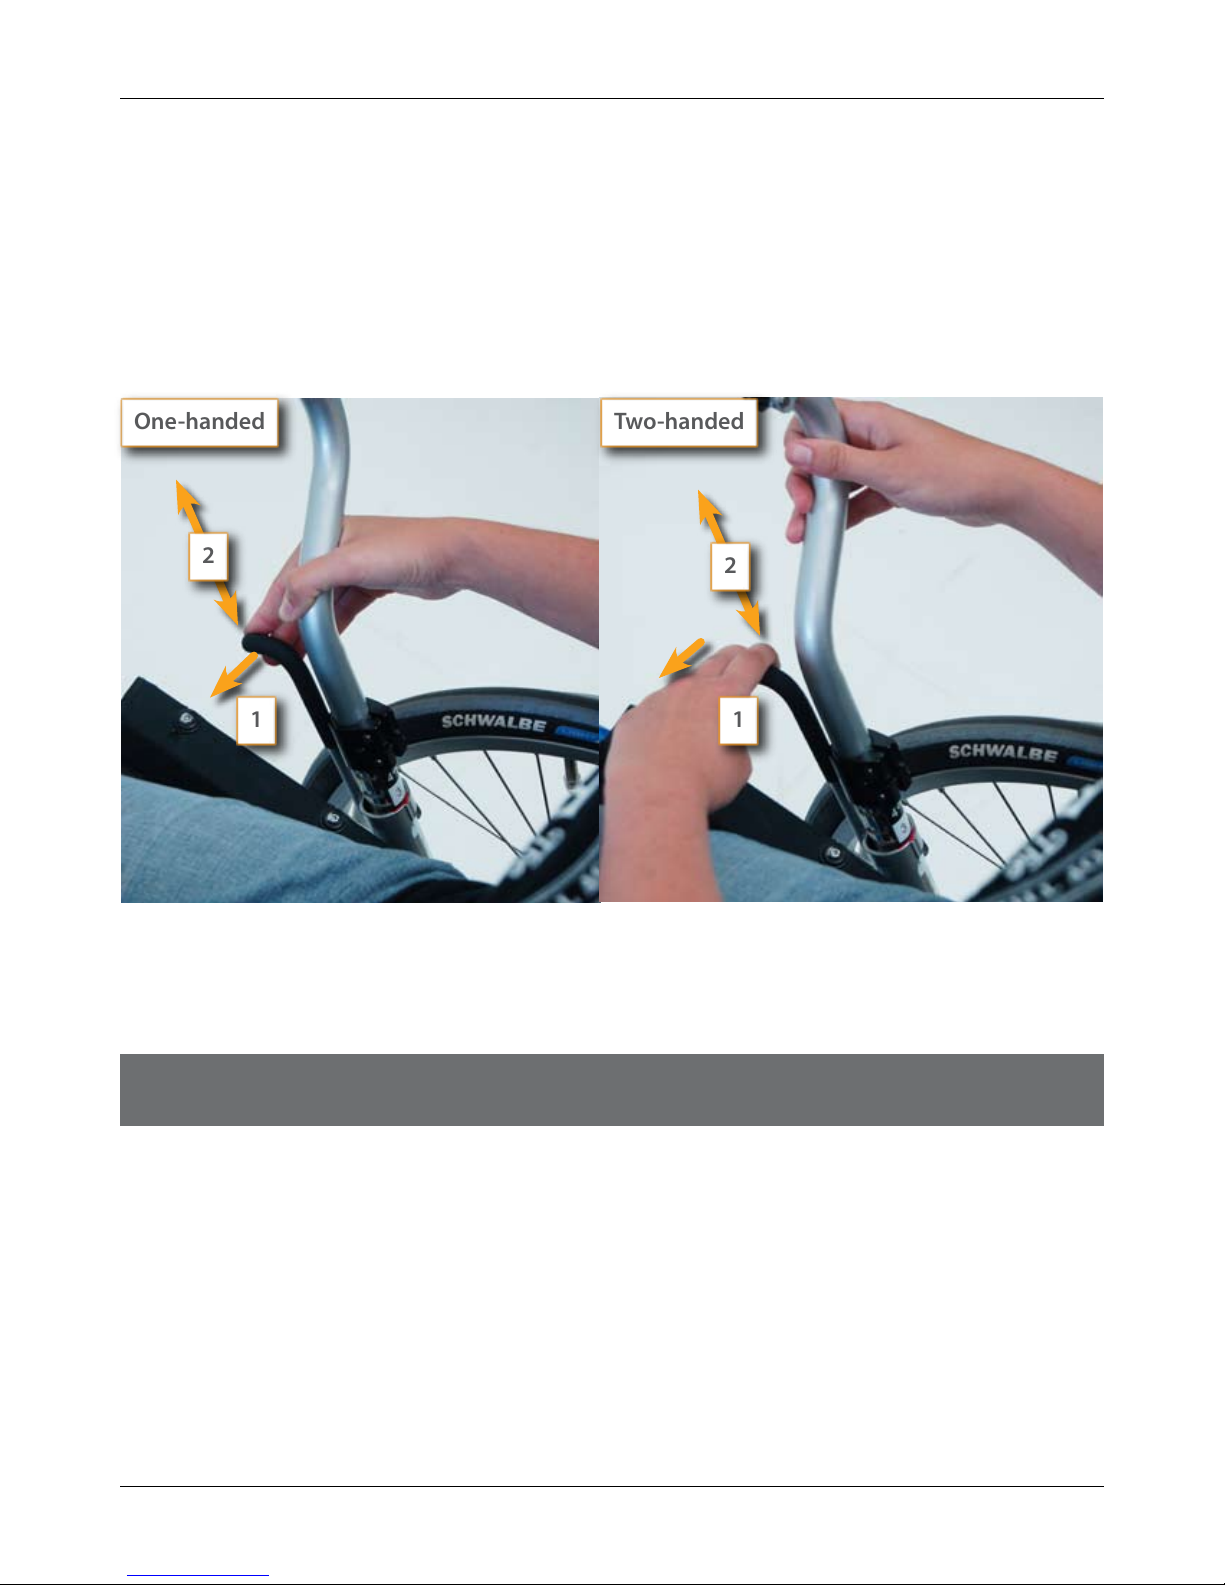
Gear Shifter
Your PivotTM has 5 gears. Lower gears are for hills and surfaces that require more eort. Higher gears
are for atter, smoother surfaces where higher speeds are possible.
To shift your Pivot™, place your Toggle Switches in neutral (with practice, you will be able to shift
gears without switching into neutral).
Push the Gear Shift in toward your body (“1” in gure). Select your gear (1-5) by raising or lowering
the shifter and releasing it (“2” in gure). You will hear and feel a “click” as the gear locks into place.
Note: If you want to shift gears while on a hill, the toggle switches MUST be in the
forward position to prevent rolling back.
TM
7. Driving the Pivot
After becoming familiar with the control switches and gear shifter you are ready to begin the process
of becoming procient with the PivotTM. It will take some practice before the PivotTM becomes intuitive. Following are some recommended exercises.
All exercises should take place in an open space, with ample turning room and at surfaces. If you
experience unusual diculty or excessive fatigue, please contact your healthcare professional or
[email protected].
www.riomobility.com16
Page 17

TM
Pivot
User Manual
Transferring
Consult with your healthcare professional for proper transferring instruction. The following is
intended only as a guideline.
Position the chair on at ground, or if this is not possible, facing uphill.
1.
Switch the Forward/Reverse/Neutral Toggles into Neutral (previous section).
2.
Place the Levers in the stowed position (all the way back).
3.
Switch into Forward to prevent rolling back.
4.
If installed, engage your wheelchair wheel locks. If you do not have wheel locks,
5.
engage the Brake Lock as described in the previous section.
Transfer into your chair as you normally would, using a transfer board if needed.
6.
Switch to neutral and grasp the handles of the lever and move them forward.
7.
Forward and Brake
Select your gear (1-5). You may want to start in one of the lower gears while learning to drive the
PivotTM. As you become more comfortable, you will want to shift up or down according to the conditions and desired speed.
Place your left toggle switch in forward (toggles point in, towards your body) and push/pull your
Lever a few times then gently engage your left brake by pushing down on the padded handle.
Notice that pushing and pulling the lever results in forward motion. Repeat this for the right side.
Practice this until you feel comfortable with the steering and braking motions.
NOTE: When pushing/pulling the levers, be careful not to inadvertently engage the
brake, it will make the movement much harder!
Turns
Take the box your PivotTM arrived in and place it in the middle of your training space. Practice driving
around the box. For gradual left turns, push and pull the right hand lever. For sharper left turns, push
and pull the right lever while engaging the left brake handle. For right turns reverse the process.
Practice going around your PivotTM box in both directions until you get the feel of gradual and sharp
turns.
Reverse
Practice reversing around your PivotTM box. Position both Toggle Switches in reverse (toggles
pointed away from your body). Note: While holding the toggle in the reverse position, pull the lever
back until you feel it engage.
Slowly push and pull the Levers. Practice backing up and braking. Occasionally you will need to
push/pull more on one side to maintain a straight line, as you would with any steering mechanism.
To make a turn in reverse, light pressure on the right brake will make your left wheel lead the turn.
Light pressure on the left brake will make your right wheel lead the turn. Practice going around the
box in reverse.
REMEMBER: At any time, you can switch to using your push rims simply by placing the
toggles in neutral. This disengages the PivotTM and allows the rims to move by hand.
www.riomobility.com 17
Page 18

TM
Pivot
User Manual
Turning in Place
Place one lever in reverse (toggle switch pointed out) and one lever in forward (toggle switch pointed
in). Using equal amounts of pressure push and pull your levers. Practice this movement until you
are comfortable turning in place.
Note: After several training sessions, it is quite common to need your brakes or toggle
switches adjusted. When cables are new, they will stretch more rapidly. If you notice a
change in your braking or shifting ability, adjust according to the procedure on page 22.
8. The Pivot
Out in the World
Before You Ride
TM
Make sure that your PivotTM is installed, adjusted, and maintained properly. Do not use the PivotTM
until you and your health care professional determine that you have enough experience to use it in
an uncontrolled environment.
Use your wheelchair as described in your wheelchair manual and use the PivotTM in the same safe
manner that you would your wheelchair with pushrims. Follow all additional warnings and instructions for the PivotTM in this manual.
Attachment and Transporting
Attach the PivotTM in the same manner as you would your quick release wheels, but instead of pushing
the button at the end of your quick-release axle, you will push the bracket though the Clamp Pin.
To release, retract the latch and pull the wheel out of the axle sleeve. Use caution, as the lever may
rotate downward when you release the latch.
Indoor Use
When moving slowly or in tight spaces remember you can still use the pushrims as you normally
would – as long as both Levers are in neutral, the PivotTM won’t interfere.
Side Slope
Just as with your pushrim wheels, your wheelchair will have a tendency to roll down a cross slope.
You will need to compensate to keep going straight. This will require extra power on the downhill
side and may require braking on the uphill side. This is exactly what you do with pushrims though
you may not be aware of this. With practice this will become just as natural.
Hill Climbing
The lower gears enable you to climb hills you would not be able to with your pushrims. It does take
some practice so proceed with caution. You may easily wheelie, but if your anti-tips are adjusted
properly this should not be a problem.
www.riomobility.com18
Page 19

TM
Pivot
User Manual
Descending an Incline
The brakes of the PivotTM require minimal eort and there is no friction on your hand. However the
ultimate braking power before the rear wheel slips is no dierent than your pushrims. Brake with
the same caution you would use with your pushrim wheels.
Turning
Always mind your speed, especially when turning. You should have full control at all times. Do not
exceed the maximum allowable speed recommended by your wheelchair manufacturer.
Obstacles
Be very careful going over bumps and curbs over 1” (25 mm) high. Initially use your pushrims to
get over these bumps, NOT the lever drive. Approach bumps and curbs straight on and at very low
speeds to avoid damage to your wheelchair and injury to you. Be aware of road surfaces, especially
on inclines or declines. Watch out for water, ice, and oil lms.
General Notes & Precautions
Mind your ngers and hands when using your lever drive.
Keep loose hair and jewelry away from the lever.
Keep children away from your lever drive to avoid possible
injury to both you and the child.
Do not carry anything that obstructs your view or interferes
with the lever operation.
Do not lift your wheelchair by the lever or handle.
Do not put weight on the levers – this includes weight due
to objects and people.
This lever drive is meant for everyday use and is not
intended for use in competition.
Rio Mobility is not responsible for any damage or injury due
www.riomobility.com 19
to misuse of your lever drive.
Page 20

TM
Pivot
User Manual
9. Special Adaptations
Rio Mobility can oer special adaptations tailored to your needs. Some are described below. If you
have additional requests, please discuss with your heath care professional and contact customer
service at [email protected].
Lever
The lever can be adjusted to be longer by loosening the Lever Length Adjustment Clamp (as seen
on p. 7), extending the Upper Lever Tube, and retightening the Lever Adjustment Clamp. If a
shorter length than standard is required, a custom lever can be made.
Handle
If you nd that you consistently inadvertently apply the brake while propelling, or the handle orientation is uncomfortable, the handle can be rotated by loosening the Lever Length Adjustment
Clamp (as seen on p. 7), rotating the Upper Lever Tube, and retightening the Lever Adjustment
Clamp.
Forward / Reverse / Neutral Toggle Switch
The Toggle Switch may be lengthened or a custom shape developed that requires less strength or
dexterity.
Gear Shifter
The Gear Shifter Lever may be modied or lengthened to require less strength or dexterity.
Propulsion
If you have dicultly pushing or pulling the levers, the Hub may be modied to disable either. The
push stroke in reverse can also be change to a pull stroke.
The PivotTM can also be modied to have a lower gear ratio than standard.
Single Lever Drive
If you have use of only one arm, the PivotTM can be modied to operate with only one lever.
www.riomobility.com20
Page 21

TM
Pivot
User Manual
10. Safety and Maintenance Instructions
Safety and Inspection Checklist
In addition to the requirements specied in your wheelchair manual, the following inspection
schedule is required.
Inspection / Maintenance Item Initially Weekly 6 Months
Check and Tighten Hardware
Brake Adjustment
Direction Shifter Adjustment
Lubrication
Brake Pad Wear
Basic Maintenance Guidelines
Your PivotTM was designed to require minimal maintenance. The gear hub is sealed for mtenancefree operation.
Inspect your lever drive frequently. Failure to inspect your lever drive and make necessary repairs
or adjustments can result in injury to you or to others. Make sure all parts are correctly assembled
and adjusted as indicated in this manual. Immediately replace any damaged, missing, or badly worn
parts.
Make sure all fasteners are correctly tightened as described in this manual. Parts that are not tight
enough can be lost or operate poorly. Over-tightened parts can be damaged or cause damage.
Make sure any replacement fasteners are the correct size and type.
Have a qualied wheelchair or bicycle technician make any adjustments or repairs for which you do
not have the correct tools, or if you have diculty understanding or performing the instructions in
this manual.
www.riomobility.com 21
Page 22
TM
Adjustment
Pivot
User Manual
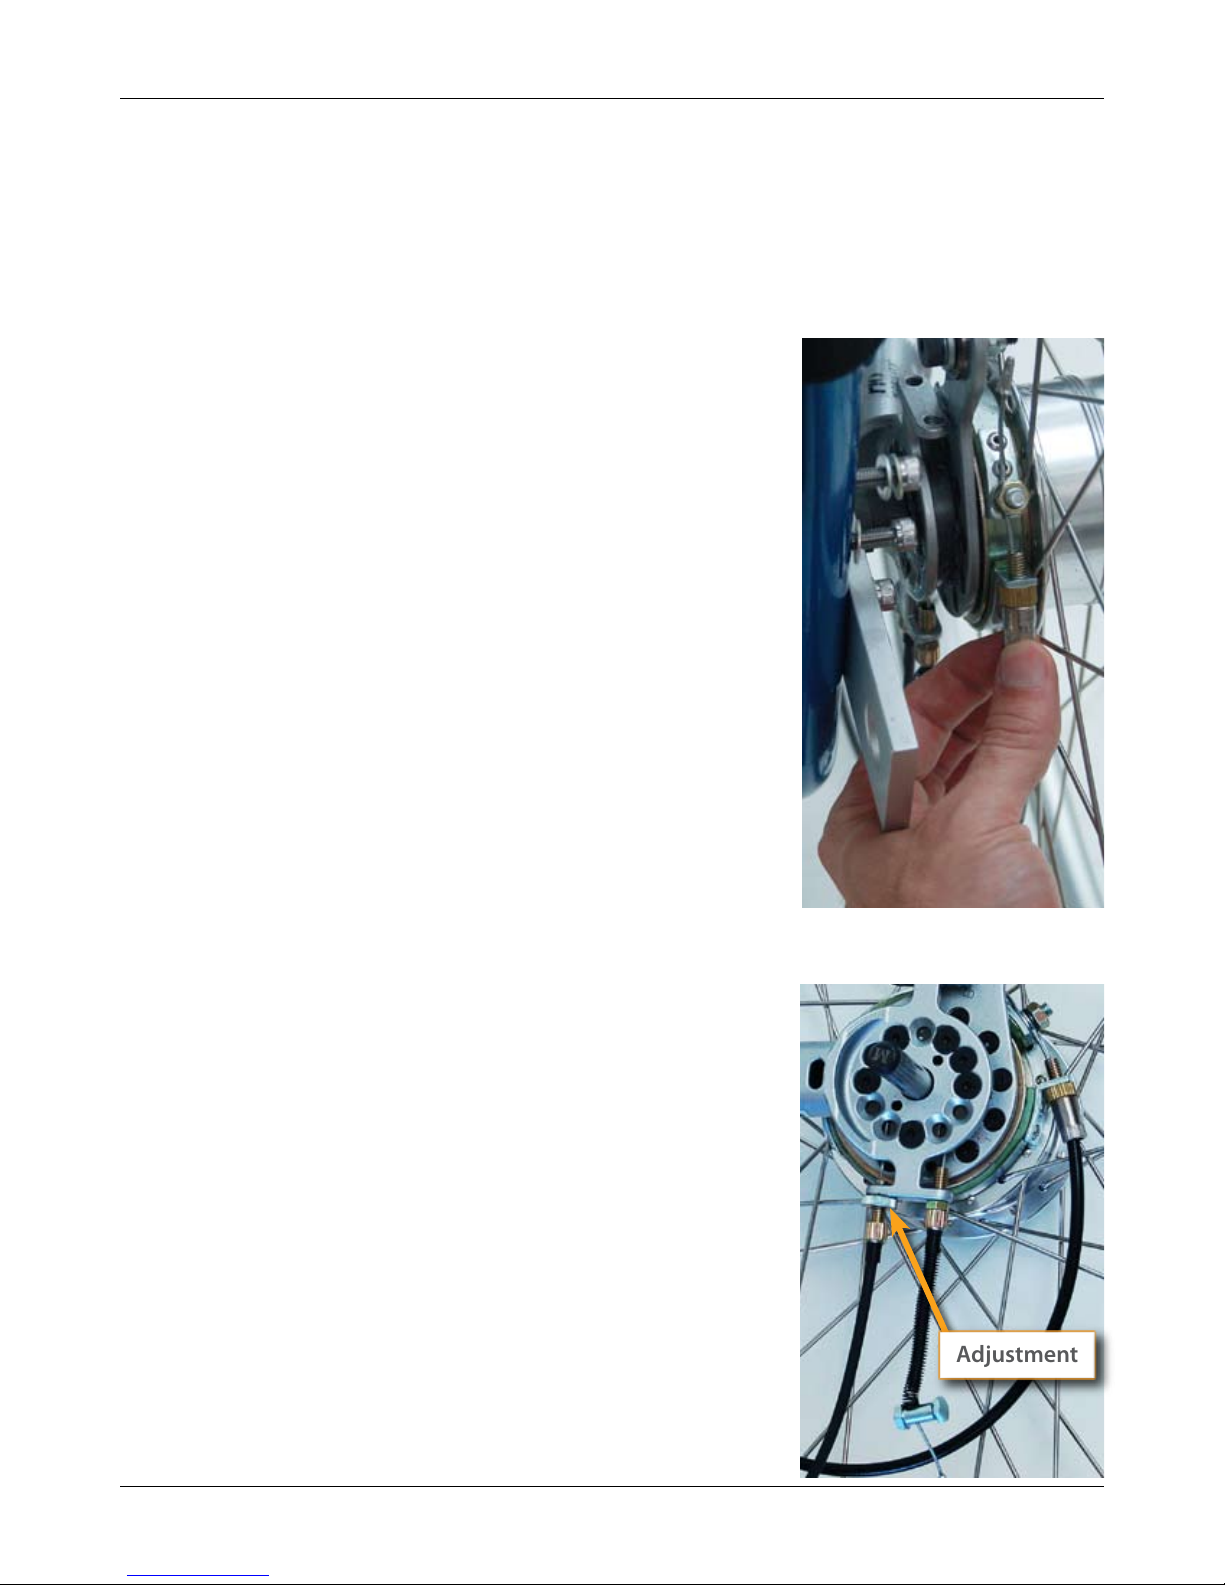
Brakes & Brake Lock Adjustments
It is common for your brakes to need adjustment, especially when your PivotTM is new and the cables
are rst being used. Adjustment will be needed less often after the initial break in period.
When your PivotTM is new, stretch the cable by applying the brake rmly 20 times.
Adjust the brake using the following procedure:
Rotate the wheels and note if they spin freely. If
1.
not, loosen the Brake Adjustment Lock Nut and
incrementally rotate the Brake Adjustment Barrel
clockwise until the wheel rotates freely.
Check that the Brake Lock will keep the wheelchair
2.
stationary for transfer. If not, loosen the Brake
Adjustment Lock Nut and incrementally rotate the
Brake Adjustment Barrel counter clockwise until the
parking brake functions properly but does not take
too much force to engage.
Steps 1 and 2 may need to be repeated to nd the
3.
proper adjustment between the braking and parking
brake function.
If the barrel adjuster is tightened to its limits, please
4.
contact [email protected] for a replacement
brake. DO NOT adjust the cable yourself, as this
means the brake has been worn to its useable limit.
Make sure the Brake Adjustment Lock Nut is
5.
tightened all the way down.
Direction Shifter Adjustment
It is common for your Direction Shifter to need adjustment, espe-
cially when your PivotTM is new. Adjustment will be needed less
often after the initial break-in period.
Adjust the Shifters using the following procedure:
Move the lever back and forth while simultaneously
1.
moving the Direction Shifter back and forth. Notice
the range of the shifter movement when it is in
neutral. At the middle of this range the shifter should
be vertical (aligned with the handle).
If the middle of the range is toward you then loosen
2.
the Shifter Adjustment Lock Nut and incrementally
rotate the Shifter Adjustment Barrel clockwise until
the middle of the range for neutral is vertical.
Note: There are two adjustment barrels next to each other.
Only adjust the one with the cable housing, not the spring.
www.riomobility.com22
Page 23

TM
Pivot
User Manual
If the middle of the range is away from you then loosen the Shifter Adjustment
1.
Lock Nut and incrementally rotate the Shifter Adjustment Barrel counter
clockwise until the middle of the range for neutral is vertical.
Make sure the Shifter Adjustment Lock Nut is tightened all the way down.
2.
Lubrication
Using wax, synthetic, or Teon lubricants (not non-synthetic oil such as WD-40 or Tri-Flo), follow
these guidelines to lubricate the lever drive:
Brake Lever
Brake & Shift
Cables
Axles
Important Note: The PivotTM is designed to require minimal maintenance. Lubrication of
parts other than those indicated above can cause damage and void the warranty.
Put one drop of oil on the pivot point of the brake lever
Put four drops of oil onto both ends of each cable. Allow oil to soak
back along the line
Put one drop of oil on the axle and wipe across the surface
Tires / Spokes / Pushrims
Follow the recommendations in your wheelchair manual regarding the maintenance and adjustment of Tires, Wheel Spokes, and Pushrims.
Brake Pad Replacement
The brake pads have been designed for very long life. If they need to be replaced, please contact
customer service at [email protected]
Cleaning
Clean the lever drive with a damp cloth. Do not soak or spray with water or use detergent. Lubricate
as necessary after cleaning.
Replacement Parts
Please contact [email protected] for information on replacement parts.
Storage
Your PivotTM should be stored in a cool and dry location to maintain lubrication and prevent
corrosion.
You may want to retain the box that your PivotTM was shipped in, as it makes a handy container for
storage of your lever drive, your lever drive accessories, the included tools, and the manual. It can
also be used for shipment to the factory in case of maintenance and warranty repairs.
www.riomobility.com 23
Page 24

TM
Pivot
User Manual
11. Troubleshooting Guide
The wheels do not spin freely, or your wheelchair tends to turn while coasting on
at ground.
The Band Brakes may need to be adjusted (see p. 22). If this does not correct the
problem, please contact customer service and [email protected].
The Direction Shifter does not shift properly into Forward.
The Direction Shifter may need to be adjusted (see p. 22). If this does not correct the
problem, please contact customer service and [email protected].
The Direction Shifter does not shift properly into Reverse.
The Direction Shifter may need to be adjusted (see p. 22). If this does not correct the
problem, please contact customer service and [email protected].
There is excessive side-to-side motion of the lever.
Please contact customer service at [email protected].
www.riomobility.com24
Page 25

TM
Pivot
User Manual
12. Limited Warranty
Rio Mobility warrants the PivotTM for two (2) years from the date of initial consumer purchase. This
warranty covers any defects in materials and workmanship with the exclusions below:
Warranty Exclusions (except for factory defects)
Tires, tubes, spokes, and wheel rims
▫
Handrims
▫
Foam handgrips
▫
Forward / Reverse shift lever
▫
Any other normal wear-and-tear item
▫
This warranty is only available for the original owner or purchaser and is non-transferable.
Rio Mobility is to perform all warranty work if deemed necessary. Shipping costs to Rio Mobility are
the sole responsibility of the buyer. Return shipping costs to the customer will be the responsibility
of Rio Mobility. Rio Mobility is not responsible for damages incurred to product during product
return shipping. All returns must be pre-approved and receive an ocial Return Authorization
number from Rio Mobility.
Limitations
This warranty is VOID if:
Assembly and installation is not performed according to the instructions
▫
Preventative and routine maintenance as not been performed
▫
The frame number is removed or altered
▫
The hub gearbox seal is broken
▫
The lever drive is used in any competitive event
▫
The lever drive is used in stunt riding, jumping, or similar activity
▫
The lever drive is submersed or sprayed with water
▫
The lever drive is driven under a load greater than the maximum rating
▫
The lever drive is used in a manner contrary to the instructions in the Owner’s Manual
▫
The warranty applies to U.S.A customers only. Please contact us for warranty information outside
the U.S.A.
www.riomobility.com 25
Page 26

Page 27

13. Product Registration / Warranty Form
Please complete and mail or fax this form to:
Rio Mobility
56 Tehama Street
San Francisco, CA 94105
(415) 520-0567 (fax)
Name :
Address :
City :
State / Province :
Zip / Postal Code :
Email :
Phone Number :
Rio Mobility Model # :
Serial #, Right Side :
Serial #, Left Side :
Purchased From :
Date of Purchase :
(888) 559-6225
(415) 278-9662
 Loading...