

Page 1

Table of Contents
the perfect player for
NEXT
your entire music collection
User's guide
Page 2
Important Safety Information
Warning
• RISK OF ELECTRIC SHOCK—DO NOT DISASSEMBLE. To
avoid potential electric shock, do not disassemble or
modify your Rio. No user-serviceable parts are inside. Refer
servicing to qualified personnel.
• Do not remove the rechargeable battery from the unit.
•To reduce the chance of shock or injury, do not use or
operate your Rio in or near water or wet locations. Do not
spill liquid on your Rio.
• Do not use in places exposed to strong magnetic or
electrostatic fields (close to TV or speakers). Do not use in
places where the humidity is excessively low.
• Never plug the charger/AC adapter into the headphone/
USB port. Only plug the charger/AC adapter into the
charger port on the bottom of the Rio.
Copyright © 2001-2002 SONICblue Incorporated. All Rights Reserved.
SONICblue Incorporated does not assume any responsibility for errors or omissions in this document or make any commit-
ment to update the information contained herein.
Rio is a registered trademark of RioPort, Inc. in the USA and/or other countries and is used under license. RealPlayer and
RealJukebox are registered trademarks of RealNetworks, Inc. This product is iTunes ready. iTunes is provided by Apple
Computer, Inc. Copyright © 2001 Apple Computer, Inc. All rights reserved. iTunes is a trademark of Apple Computer, Inc.
Mac and the Mac logo are trademarks of Apple Computer, Inc. registered in the United States and other countries. Microsoft,
Windows Media, and the Windows Logo are trademarks or registered trademarks of Microsoft Corporation in the United
States and/or other countries. All other product names may be trademarks of the companies with which they are associated.
First Edition, December 2001. Part Number 75550191-001.
Caution
• Use of headphones while operating a vehicle is not
recommended and is illegal in some areas. Be careful and
attentive while driving, biking or walking near traffic. Stop
listening to your Rio if you find it disruptive or distracting
while operating any type of vehicle. To listen to your Rio in
the car, use the optional car cassette adapter accessory
(not included).
• Listening to music at full power over extended periods of
time can damage your hearing. If you experience ringing in
your ears, discontinue use.
2
Rio Riot User’s Guide
BACK NEXT
Page 3
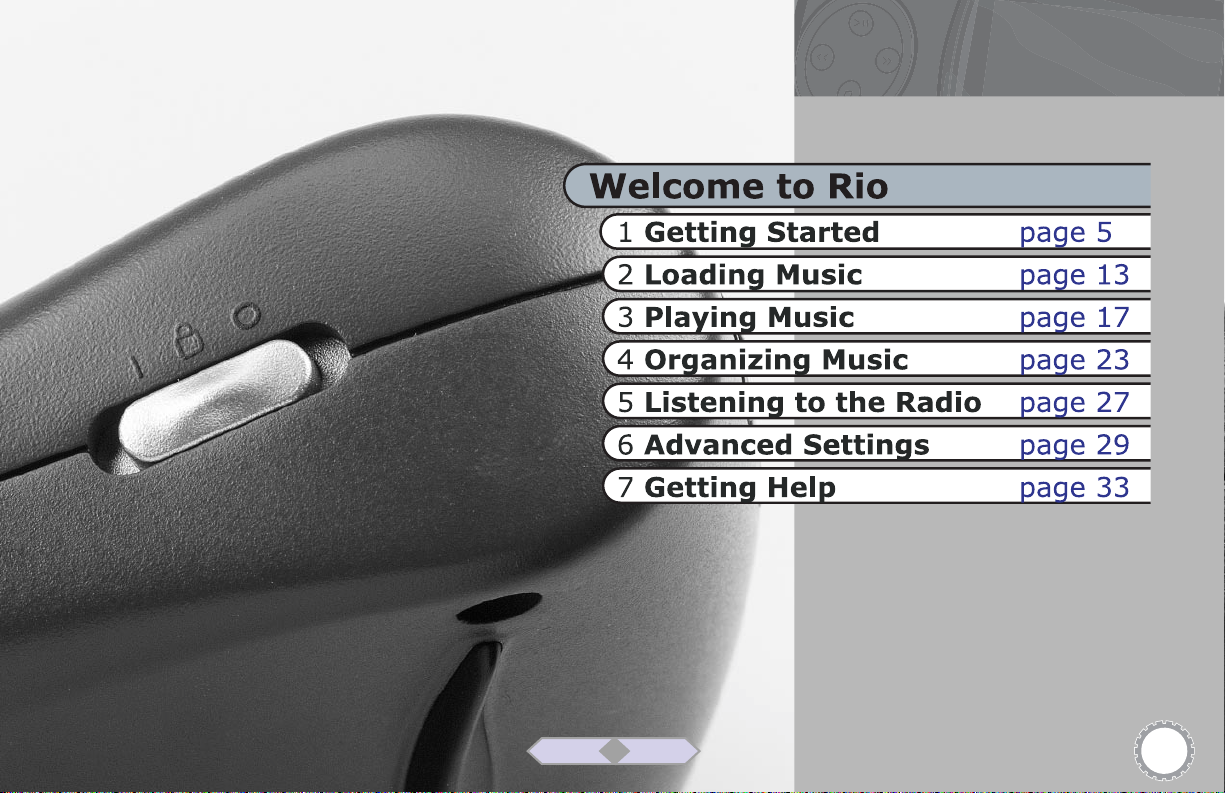
Table of Contents
BACK NEXT
3
Page 4

Expanded Table of Contents
1 Getting Started 5
So, What Does it Do? ................................................... 5
Tour of the Player ......................................................... 6
Charging the Battery .................................................... 8
Installing the Software.................................................. 9
Connecting the Rio to your Computer ...................... 12
2 Loading Music 13
Downloading Music from the Internet ......................... 13
Encoding (“Ripping”) Your CDs ................................. 14
Managing Your Music Files ......................................... 15
Loading Music to the Player ....................................... 16
3 Playing Music 17
Overview of Playback Options ................................... 17
Tour of the LCD Screen .............................................. 18
Instant Music with the Rio DJ..................................... 19
Playing Albums, Artists & Songs ................................ 20
Playing Your Favorites ................................................ 22
For an overview of the Rio Riot menu system,
see page 39.
4 Organizing Music 23
Creating a Playlist ....................................................... 23
Playlist Options ........................................................... 25
Deleting Albums, Artists & Songs .............................. 26
5 Listening to the Radio 27
Scanning for FM Stations ........................................... 27
Setting FM Presets ..................................................... 28
6 Advanced Settings 29
Equalizer/Audio Settings............................................ 29
Setting Player Preferences ......................................... 30
7 Getting Help 33
FAQs ........................................................................... 33
Upgrading the Firmware ............................................ 34
Customer Care Information ....................................... 35
Regulatory Information .............................................. 36
One Year Limited Warranty ........................................ 37
Index ........................................................................... 38
4
Rio Riot User’s Guide
BACK NEXT
Page 5

So, What Does it Do? 1 Getting Started
WELL, FIRST OF ALL try to imagine what you could do with
20GB of storage space...
That’s right, 20
400 albums.*
5,000 songs.*
All in the palm of your hand.
Just connect the Rio to your computer’s USB port,
download your music to the player and you’re on your way.
The Rio features a large, backlit graphic LCD display so
you can easily navigate your way through your massive
song list by artist, album or song title.
You can even use the built in Rio DJ to hear a 60-minute
sampling of your favorite songs, a playlist of just the
newest songs on the player, the most/least played songs,
only songs from your favorite decade, and much more.
Rather listen to the radio? No problem. An FM tuner is
built in, with up to eight presets.
Need long battery life? Again, not to worry. The lithiumion rechargeable battery lasts at least 10 hours per
charge at 50% volume.
gigabytes
of your favorite music.
The Rio supports popular audio formats, including WMA
(up to 192 kbps) and MP3 (up to 320 kbps). Plus you can
view and sort your music using ID3 and WMA tags.
The CD-ROM includes USB drivers for Windows (98, ME,
2000 or XP) and Mac OS (9.0.4 or higher), along with
RealJukebox and iTunes to help you manage your music.
So, what are you waiting for? Let’s get started...
How Much Music?
*
The example given is for 128 kbps sampling; see page 14
for player capacity at various sampling rates.
BACK NEXT
Table of Contents
55
Page 6
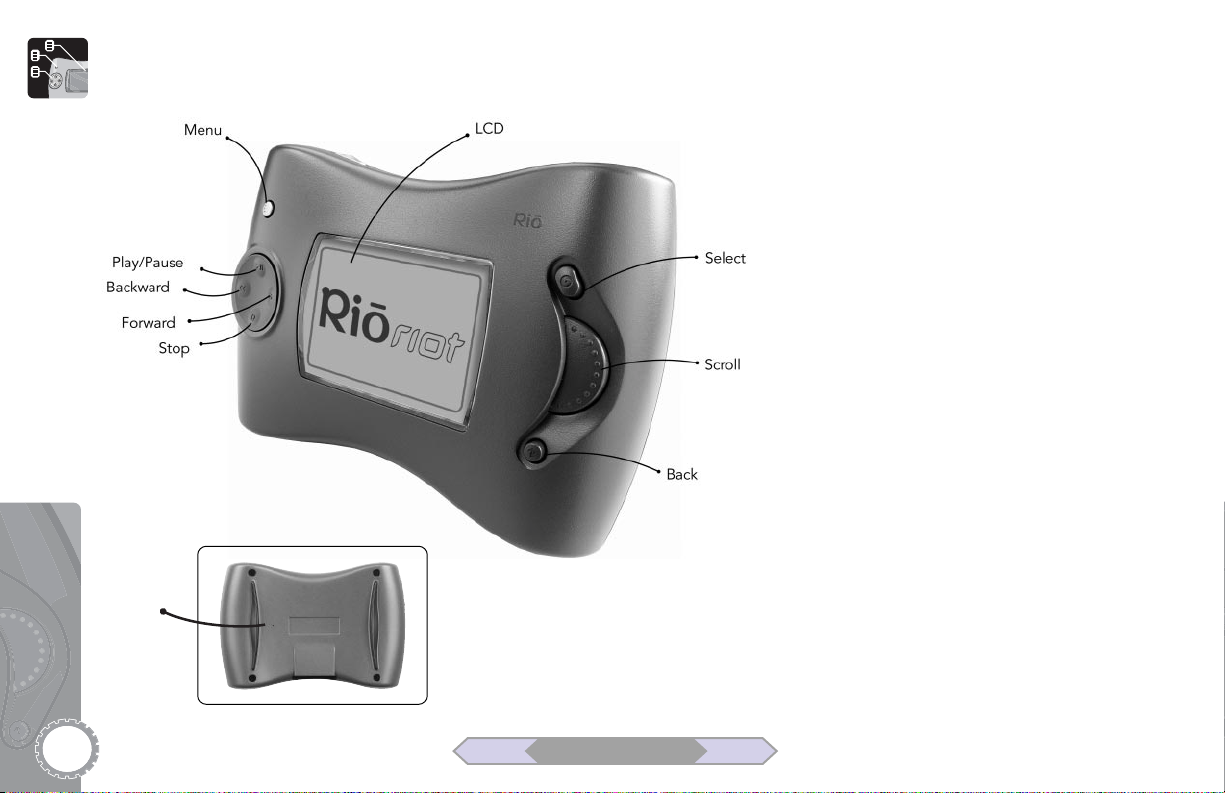
Tour of the Player
Reset
Menu Displays and exits the menu system.
LCD Liquid Crystal Display; see overview
on page 18.
Select Makes selections in menus.
Scroll Scrolls up/down through menu
choices.
Back Returns to previous menu. Also press
to display track info when a song is playing.
Stop Stops playback.
Forward Skips to next song. Press and hold
to scan forward.
Backward Skips to previous song. Press and
hold to scan backward.
Play/Pause Starts/pauses playback. To save battery life, the
player will “sleep” if left in pause or stop for several
minutes. Press Play/Pause to wake it up.
Reset Insert a pointed object, such as a paperclip, into this opening to
reset the Rio player. Do not use unless the player freezes; e.g., the display
is active but the Rio player does not respond for several minutes.
6
Rio Riot User’s Guide
BACK NEXT
Table of Contents
Page 7
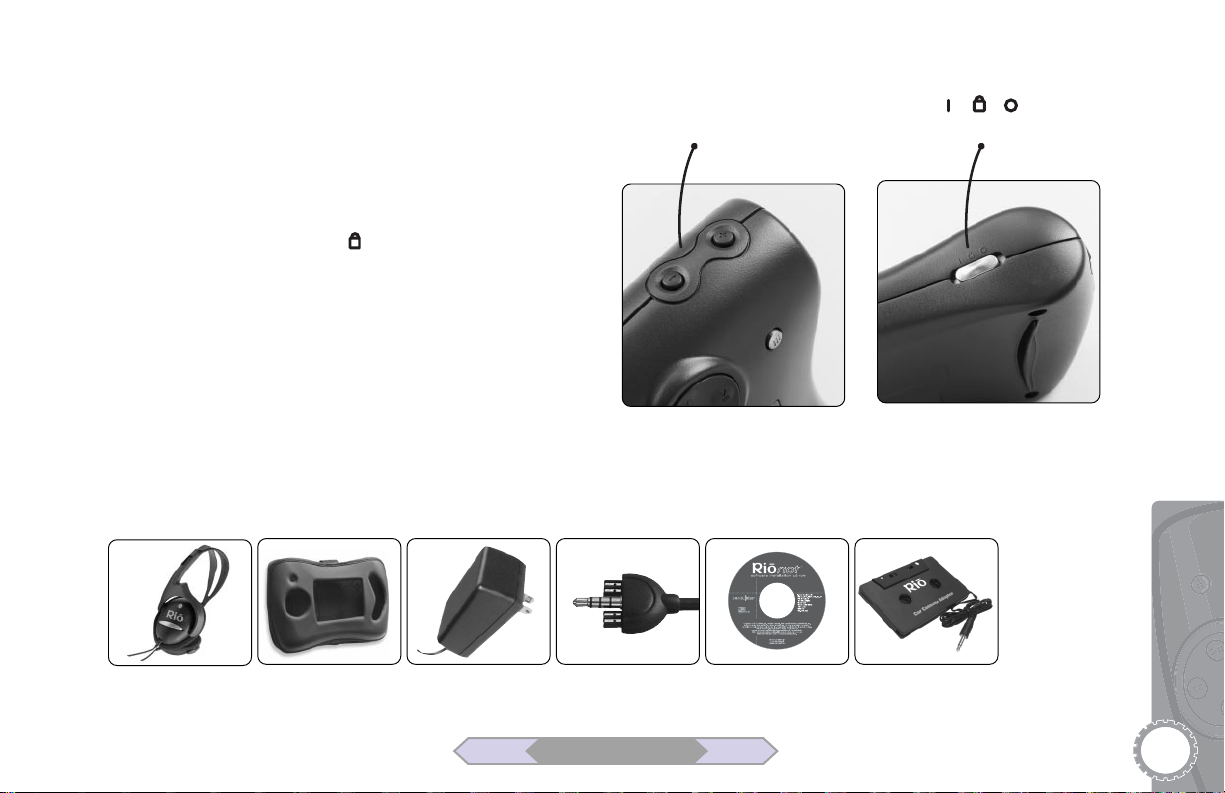
Volume +/– Adjusts volume level.
Power On/Lock/Off Powers the player on, off or
sets it to Lock mode ( ). In Lock mode, the player
is powered on but the keys are locked to prevent
accidental operation. Note: “LOCK” appears on
the LCD screen when the player is in Lock mode.
Accessories
Volume On - Lock - Off
Headphones
Carrying Case AC Adapter USB Cable CDs (Mac & PC) Car Cassette Adapter (Optional)
BACK NEXT
Table of Contents
1 Getting Started
7
Page 8
Charging the Battery
The Rio has a built-in lithium-ion rechargeable battery that
lasts up to 10 hours per charge.
When you first use the player, charge it for at least five hours
for maximum battery life. You can use the Rio while it is
charging, so go ahead and rip your CDs and load all your
music while you’re waiting!
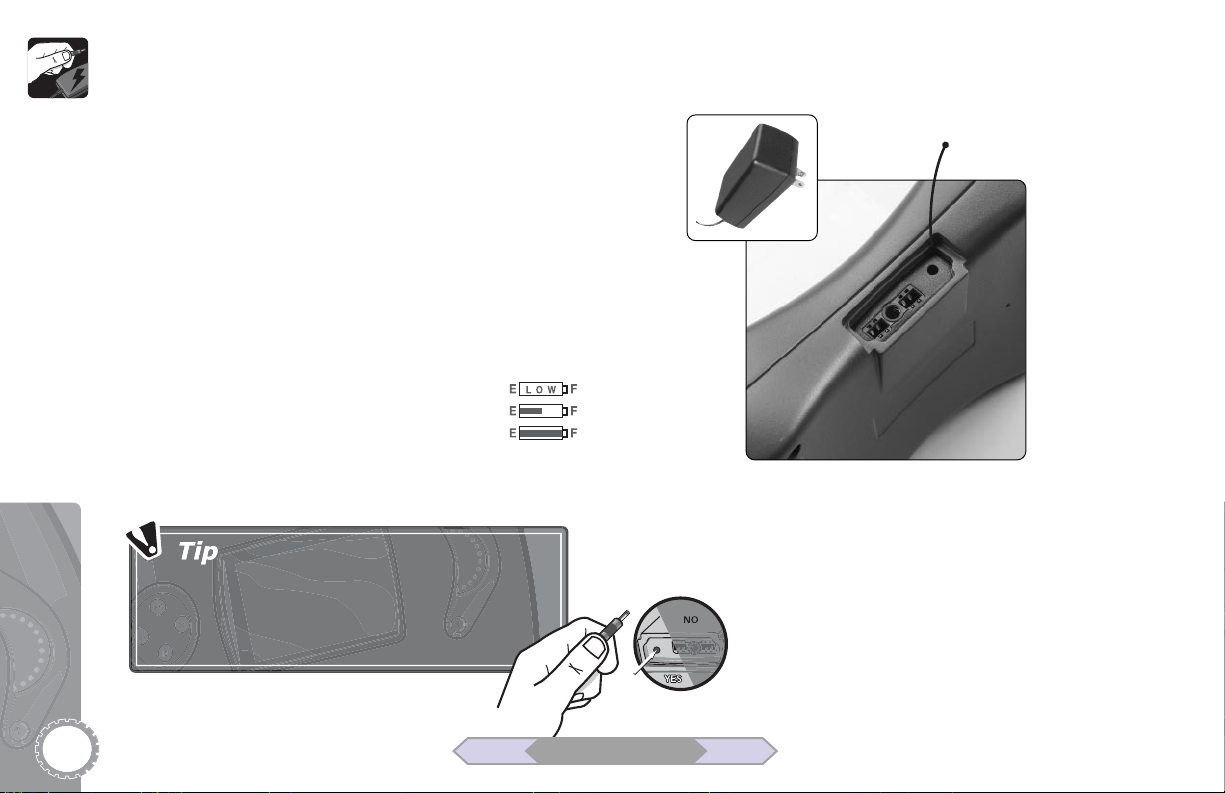
1 Connect the supplied AC adapter to the charger port on
the bottom of your Rio, as shown.
2 Plug the AC adapter into an electrical outlet and begin
charging the battery.
3 When the battery is fully charged, unplug the AC adapter
and disconnect it from the Rio.
• The battery charge is indicated on the LCD
screen.
•To increase battery life, do not leave your Rio
plugged in for extended periods of time after
the battery is charged.
To prevent damage to the player, never plug the
AC adapter into the headphone/USB port! Only
plug the AC adapter into the charger port.
AC Adapter
Charger Port
Charging the Battery
Connect the supplied AC Adapter to
the charger port, and then plug it into
an electrical outlet to charge the
battery.
8
Rio Riot User’s Guide
BACK NEXT
Table of Contents
Page 9
Installing the Software
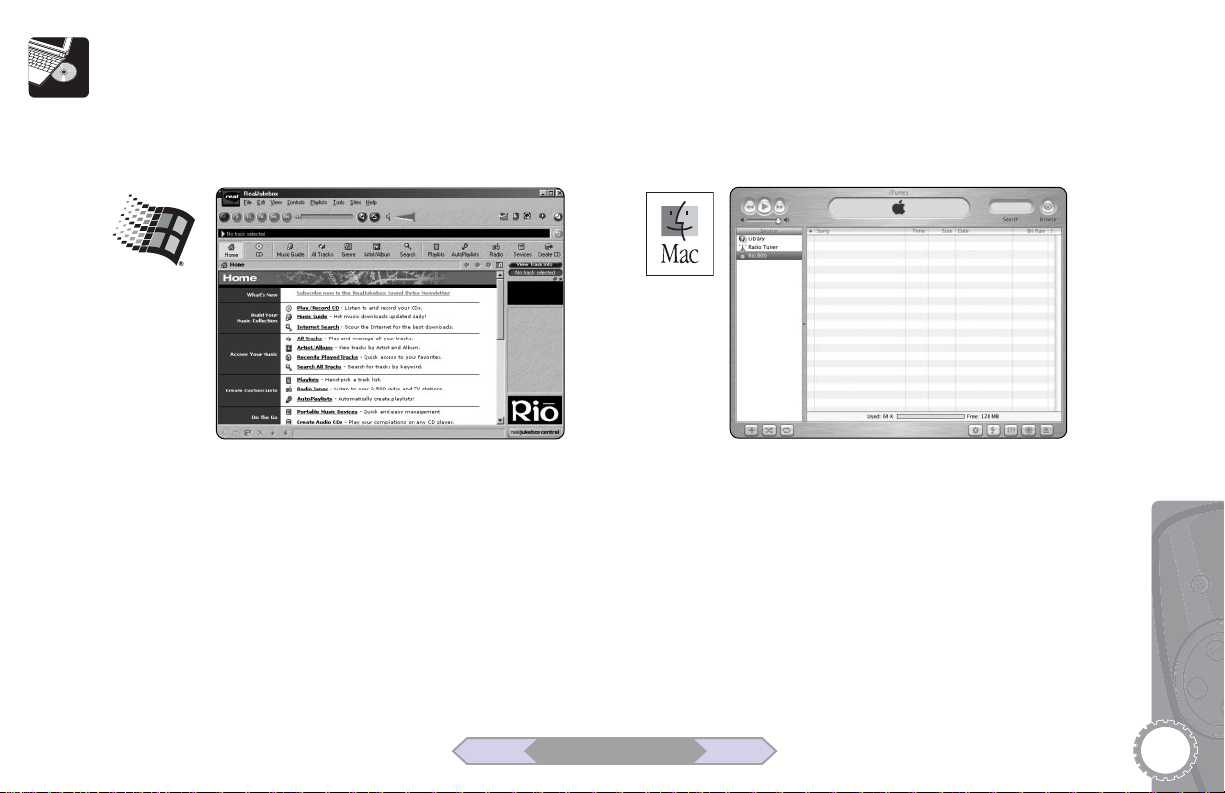
Now you are ready to install the USB driver and music management software to your computer. The supplied CD-ROM will
load RealJukebox for Windows or iTunes for Mac. See system requirements below.
RealJukebox for Windows
Music management software for Windows
computers.
PC System Requirements
• Microsoft Windows 98, Me, 2000 or XP
• Pentium 166 with 32 MB RAM
• USB port
• CD-ROM drive
• 35 MB available hard drive space
• Internet connection recommended
BACK NEXT
Table of Contents
iTunes for Mac
Music management software for Apple
Macintosh computers.
Mac System Requirements
• Mac OS 9.0.4 or later (9.2.1 recommended)
• 32 MB RAM
• USB port
• CD-ROM drive
• 35 MB available hard drive space
• Internet connection recommended
1 Getting Started
9
Page 10
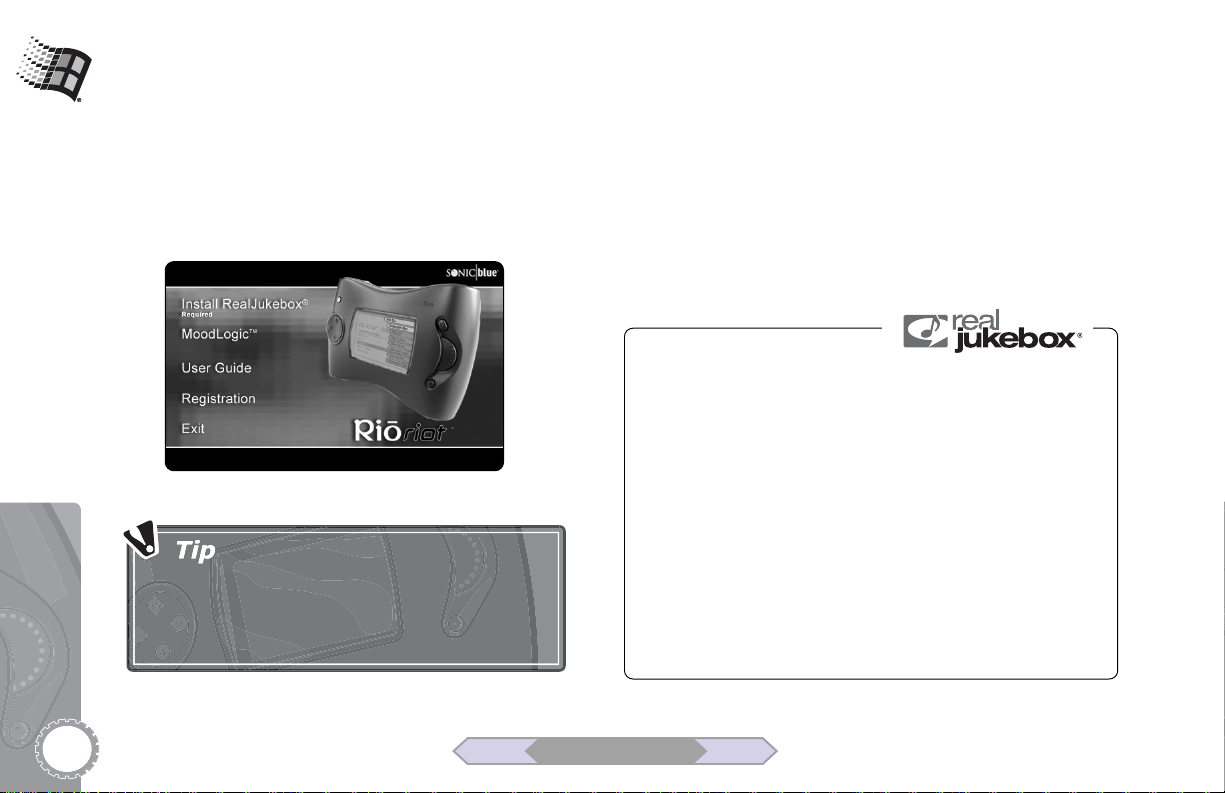
PC Software Installation
Follow these instructions to load the software that enables
your PC to recognize the Rio. The installation will also load
the RealJukebox music management software.
1 Place the installation CD in your computer’s CD-ROM
drive. After a few seconds, the Rio splash screen will
display:
If installation does not start automatically,
If installation does not start automatically,
click “Start > Run...>”, and then type
click “Start > Run...>”, and then type
“d:\setup32.exe,” where “d” is the letter of
“d:\setup32.exe,” where “d” is the letter of
your computer’s CD-ROM drive.
your computer’s CD-ROM drive.
2 Click the “Install RealJukebox” button, and then follow the
on-screen instructions.
3 When installation is complete, see page 12 to connect the
Rio to your PC.
About RealJukebox
RealJukebox will help you:
•Organize digital audio tracks on your computer.
•Organize tracks on your Rio.
• Record (encode) your audio CDs.
• Search for tracks on your computer or on the Internet.
•Create a custom CD—if you have CD burning hardware
and your computer supports it.
To learn more about using RealJukebox
• Click the RealJukebox “Help” menu
• Click the “Home” button, scroll to “RealJukebox Help”
and then click “Using RealJukebox” and/or “Frequently
Asked Questions”
•Visit the Real Web site at “www.real.com”
10
Rio Riot User’s Guide
BACK NEXT
Table of Contents
Page 11
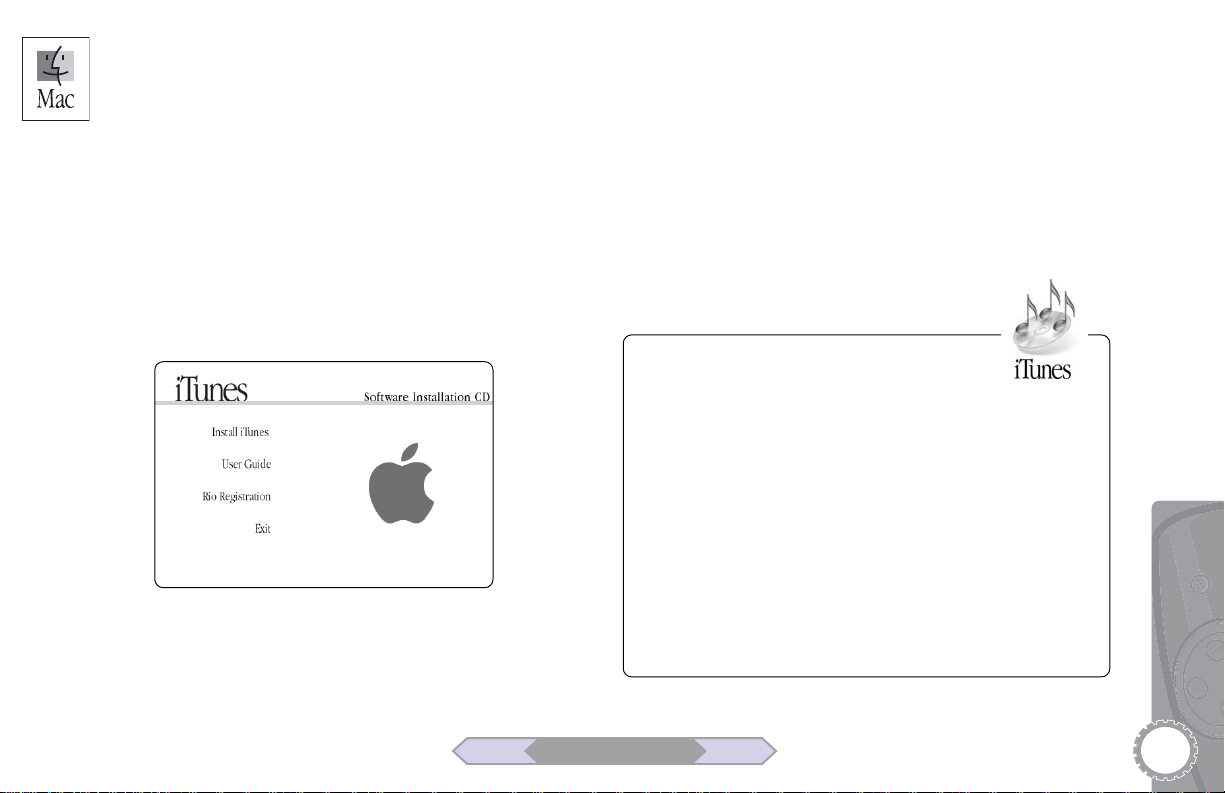
Mac OS Software Installation
Follow these instructions to load the software that enables
your Macintosh computer to recognize the Rio. The installation will also load the iTunes music management software.
1 Place the installation CD in your computer’s CD-ROM
drive.
2 The CD contents display automatically. To manually display
the CD contents, double-click the Rio icon on your
computer’s desktop.
3 Double-click the “Install” icon.
4 After a few seconds, the Rio splash screen will display:
5 Click the “Install iTunes” button, and then follow the on-
screen instructions.
6 Reboot your computer when the installation is complete.
7 When installation is complete, see
Rio to your Mac.
page 12 to connect the
About iTunes
iTunes music software takes the confusion
out of managing your personal music
collection. iTunes turns your Mac into a powerful
digital jukebox, complete with easy-to-use tools for
recording music from audio CDs (simply insert a CD to
import music to MP3s), searching and browsing your
entire collection, managing playlists, downloading
songs to your Rio, and listening to Internet radio
stations.
To learn more about using iTunes
•From within the software, click the “Help” menu and
choose “iTunes Help”
•Visit the iTunes Web site at “www.apple.com/itunes”
BACK NEXT
Table of Contents
1 Getting Started
11
Page 12
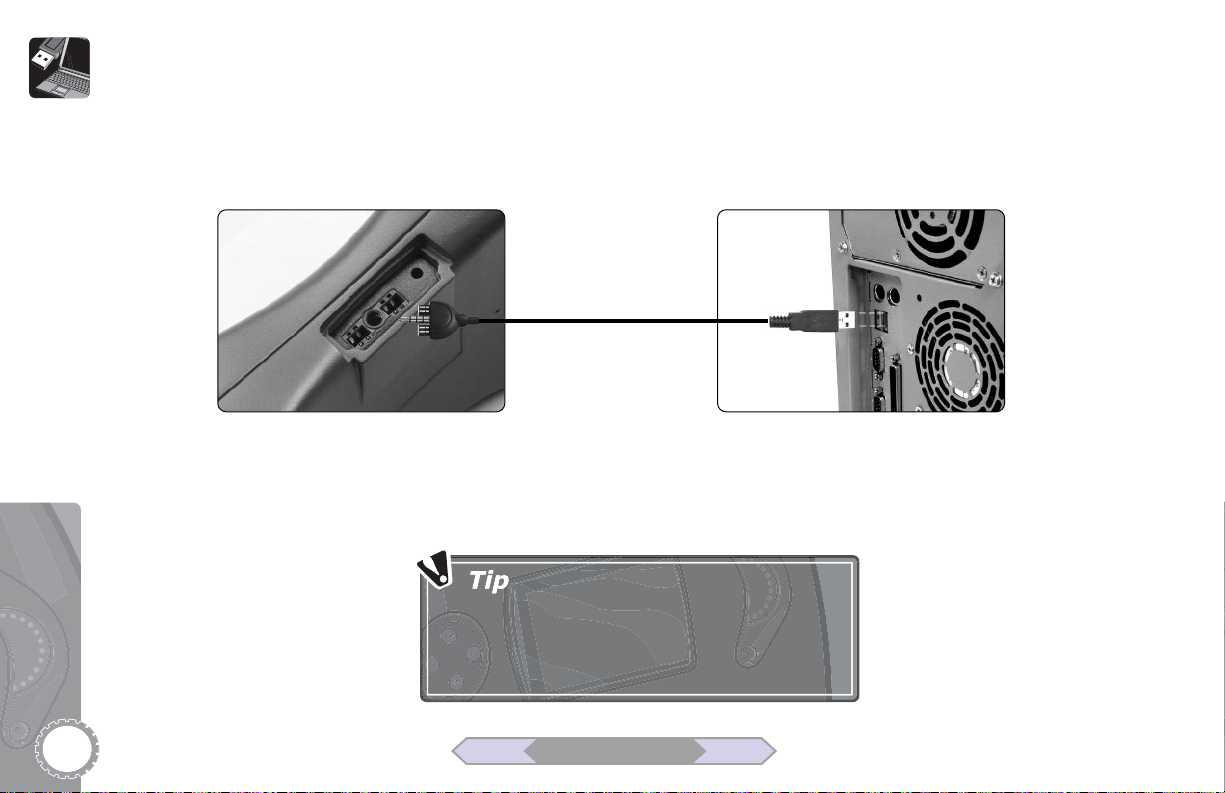
Connecting the Rio to your Computer
Once the software is installed, you are ready to connect the Rio to your PC or Mac.
12
Rio Riot User’s Guide
USB/Headphone Port
Connect one end of the supplied
USB cable to the USB/Headphone Port on the Rio...
The Rio Riot USB connection only fits one way.
Do not try to force the connection.
BACK NEXT
...and connect the other end to any
available USB port on your PC or
Mac. When finished, continue with
Chapter 2, “Loading Music.”
Table of Contents
Page 13

Downloading Music from
the Internet
You can acquire digital music in MP3 or WMA format in two
ways:
1 Downloading from the Internet
2 Encoding/ripping songs from your personal CD collection.
Note: If you already have digital music files stored on your
hard drive, feel free to skip to pages 15-16, which demonstrate how to manage your music files and download them to
the player.
Downloading Music from the Internet
There are thousands of Web sites that provide digital audio
content. Here are a few to get you started:
• www.riohome.com
• www.windowsmedia.com
• www.mp3.com
Simply point your favorite web browser to one of these sites,
follow the instructions on the site, and download the music
to your computer.
2 Loading Music
Visit Riohome.com
Go to “www.riohome.com” and click on “Music”
to download FREE music, or try the pay per track
service to purchase tracks from your favorite
artists.
BACK NEXT
Table of Contents
13
Page 14

Encoding (“Ripping”) Your CDs
Encoding a CD with RealJukebox
1 Insert an audio CD in your PC’s CD-ROM drive.
• If Auto-Record is enabled (under “Tools > Preferences >
General”), you will see a dialog box asking if you wish to
record the CD. If you select “Yes,” the RealJukebox
software will automatically begin encoding each song on
the CD.
• If Auto-Record is not enabled, continue with step 2.
2 In a few moments, the CD automatically opens in Real-
Jukebox showing the names of each track on the disc.
3 Click the check box next to each track you wish to encode,
or click “Check All” to encode the entire disc.
4Press the red “Record” button to start encoding.
• Songs will automatically play while they are encoding.
Encoding a CD with iTunes
1 Insert an audio CD in your Mac’s CD-ROM drive.
2 In a few moments, the CD automatically opens in iTunes
showing the names of each track.
3 Select the check box next to each track you wish to
encode (by default, all tracks are checked).
4 Click the “Import” button at the top left of the iTunes
window. The checked tracks will be converted to MP3
format.
Mega Storage
The Rio Riot can hold over 150 complete
albums at the highest possible sample rate!
Setting the Sample Rate
The default sample rate for RealJukebox is 128 kbps, which is
the minimum file size for “Near CD” quality, but you can
change it based on the size of your music collection and
desired sound quality. For example...
• If you have 300 or more CDs to rip, make sure you sample
at 160 kbps or lower to allow room on the player and still
retain “Near CD” quality.
• If you have 150 or fewer CDs, go ahead and encode at a
higher sample rate (256-320 kbps)—you’ve got the space,
you might as well use it!
• For WMA fans, you can get nearly twice the compression
for each sample rate at virtually the same sound quality.
14
Rio Riot User’s Guide
BACK NEXT
Table of Contents
Page 15

Managing Your Music Files
If you have MP3 and WMA files in various folders on your
hard drive, the music management software can seek them
out and gather them into one unified list. You can then use
the software to:
• Play tracks
• Rename tracks
• Clean up your ID3/WMA tags (highly recommended)
• Delete tracks
•Create playlists
• And, of course, download tracks to the player!
Managing Music with RealJukebox
1 Click “File>Import Wizard...” The Import Wizard dialog
box appears asking if you would like to search “All Drives”
or only specific drives for music files.
2 Click “Start Search” to begin scanning.
3 Click “Finish” to import all your music files into RealJuke-
box.
4 Click the “All Tracks” button to view the complete list of
tracks. You can then sort the
list by Track Name, Artist,
Album, Genre, CD Track #,
Length, Format, Quality or
File Name by clicking on the
appropriate header.
5To clean up your ID3 tags,
select a track and click “Edit
Track Info.”
Managing Music with iTunes
1 The iTunes software will automatically locate all music files
during the installation process. To add songs manually,
click “File>Add to Library”, and then browse to the folder
and files you wish to add.
2 All tracks are listed in the main window. You can sort the
list by Song, Time, Artist, Album, Genre by clicking on the
appropriate header.
3To clean up your ID3 tags, select a track and click “File/Get
Info” to view and change information about the song.
ID3 tags are automatically filled in when you
encode your CDs with RealJukebox or iTunes. If
you need to edit tags manually, the best time to
do so is BEFORE you load songs onto the player.
BACK NEXT
Table of Contents
2 Loading Music
15
Page 16

Loading Music to the Player
Loading Tracks with RealJukebox
Follow these steps to load music from your PC to the Rio.
1 Launch the RealJukebox software.
2 Connect the Rio to your PC using the supplied USB cable
and power on the player.
3 Click the “All Tracks” button in the RealJukebox main
screen to view a list of all music saved on your PC.
4 Shift-click the desired track(s) or press “Ctrl-A” to select all
tracks.
5 Click “Copy to > Device” in the right column, or right-click
on the selected track(s) and select “Copy to Device.”
6 Select the “Rio Riot Digital Audio Player” in the list of
devices, then click OK.
• The view changes to the “Devices” window, and the
song(s) you selected appear at the bottom of the list. The
“Transfer Status” column shows that the files are “Ready to
Transfer.”
7 Click “Copy Files” in the right column to download the
files to the player.
•Progress bars display while the music copies.
Loading Tracks with iTunes
Follow these steps to load music from your Mac to the Rio.
1 Launch the iTunes software.
2 Connect the Rio to your Mac using the supplied USB
cable and power on the player.
• The Rio shows up in the iTunes window.
3 Click and drag music files from the desktop to the iTunes
window.
•Progress bars display while the music copies.
16
Rio Riot User’s Guide
BACK NEXT
Table of Contents
Page 17

Overview of Playback
Options
The Rio provides a variety of ways to jump
quickly to the music you want with the least
amount of hassle. The “Play Music” menu
gives you seven ways to play:
Rio DJ
The Rio DJ automatically generates playlists
of your favorite music. For example, you can
hear a 60-minute sampling of just your favorite songs, a
collection of the songs you most recently downloaded,
only songs from a particular decade, and much more; see
page 19.
Albums
To listen to a particular album, see page 20.
Artists
To listen to the works of a particular artist, see page 20.
Genre
To load every song of a particular genre (such as Rock,
Jazz or Classical), see page 21.
Songs
To listen to a particular song, see page 21.
3 Playing Music
Favorites
To listen to just your favorite albums, artists or songs, see
page 22.
Playlists
To create custom song lists based on any criteria you wish,
see pages 23-25.
Playback Control
You can play, pause,
stop, scan and skip
forward and backward
with the four button
playback control.
To save battery life, the player will “sleep” if
left in stop or pause for several minutes. Press
PLAY/PAUSE to wake it up.
BACK NEXT
Table of Contents
17
Page 18

Tour of the LCD Screen
Track Info
When a track is playing, its title appears at
the top of the screen, followed by the track
length, time remaining, repeat/random
setting, volume level and play status. Upcoming tracks appear at the bottom of the screen.
Songs you’ve played are preceded by a check
mark. Press the BACK button to view detailed
track info, including Artist, Album, Codec,
Bitrate, Length and File Size.
Menu Navigation
Use the MENU button,
SELECT button, SCROLL
wheel and BACK button
to navigate and make
selections in the menu
system.
Menu System
When the MENU button is pressed,
the track information dims and
menu bars appear from the right
side of the screen. Use the SCROLL
wheel to highlight the desired
menu item, then press the SELECT
button to make your selection.
Press the BACK button any time to
jump back to the previous menu.
18
Rio Riot User’s Guide
BACK NEXT
Table of Contents
Page 19

Instant Music with the Rio DJ
The Rio DJ is a powerful tool that keeps track
of everything you play (and don’t play) to
access your music in seven entertaining ways.
1Press MENU.
2 Scroll to “Play Music,” then press SELECT.
3 Scroll to “Rio DJ,” then press SELECT.
4 Scroll to one of the following, then press
SELECT:
Entertain Me!
Generates a random mix of your
favorite songs.
• Scroll to “15 Minutes,” then press
SELECT. The box will blink to indicate
that it is selected.
• Scroll to set how long to play (from 15 minutes to 8 hours,
or “Everything”), then press SELECT.
Play All
Generates a playlist of every song on the player.
• Scroll to “Done”, then press SELECT. All songs on the
player will be loaded into the playlist.
Top Tunes
Generates a playlist of the songs you listen to the most.
• Scroll to “10,” then press SELECT.
• Scroll to pick the number of tracks to play (from 10 to 250),
then press SELECT.
New Music
Generates a playlist of the files you’ve most recently downloaded to the player.
• Scroll to “1 day,” then press SELECT.
• Scroll to set the time frame (from 1 day to 1 year), then
press SELECT.
Memory Lane
Generates a playlist of the songs you’ve listened to the least
in the past day, week, month, etc.
• Scroll to “1 day,” then press SELECT.
• Scroll to set the time frame (from 1 day to 1 year), then
press SELECT.
Sounds of...
Generates a playlist of all tracks on the player from a given
decade or year.
• Scroll to “1940’s,” then press SELECT.
• Scroll to pick a decade (from the ‘40s to the ‘00s) or
specific year (from 1950-2010), then press SELECT.
Random Play
Generates a completely random mix of songs.
• Scroll to “15 Minutes,” then press SELECT.
• Scroll to set how long to play (from 15 minutes to 8 hours),
then press SELECT.
5 Scroll to “Done,” then press SELECT to load the playlist.
6Press SELECT or PLAY to begin playback.
BACK NEXT
Table of Contents
3 Playing Music
19
Page 20

Playing Albums, Artists & Songs
Follow these steps to play a complete
album, selected works of a particular artist,
or any individual song.
Play an Album
1Press MENU.
2 Scroll to “Play Music,” then press SELECT.
3 Scroll to “Albums,” then press SELECT.
4 Scroll to the first letter of the album’s
name, then press SELECT.
5 Choose from the following:
•To load all albums and tracks that begin with the selected
letter, scroll to “Play All
Albums/Tracks,” then press
SELECT.
•To load a single album, scroll
to the album’s name, then
press SELECT.
•To load all tracks on the
selected album, scroll to “Play
All Tracks,” then press SELECT.
•To load a single track from the
album, scroll to the track’s
name, then press SELECT.
6Press SELECT or PLAY to begin
playback of the selected
album(s) or track(s).
Play Selected Works of an Artist
1Press MENU.
2 Scroll to “Play Music,” then press SELECT.
3 Scroll to “Artists,” then press SELECT.
4 Scroll to the first letter of the artist’s name,
then press SELECT.
5 Scroll to the artist’s name, then press
SELECT.
6 Choose from the following:
•To load all albums and tracks for the
selected artist, scroll to “Play All Albums/
Tracks,” then press SELECT.
•To load a single album, scroll
to the album’s name, then
press SELECT.
•To load all tracks on the
selected album, scroll to “Play
All Tracks,” then press
SELECT.
•To load a single track, scroll to
the track’s name, then press
SELECT.
7Press SELECT or PLAY to
begin playback of the work(s)
of the selected artist.
20
Rio Riot User’s Guide
BACK NEXT
Table of Contents
Page 21

Play an Individual Song
1Press MENU.
2 Scroll to “Play Music,” then press SELECT.
3 Scroll to “Songs,” then press SELECT.
4 Scroll to the first letter of the song’s name,
then press SELECT.
5 Choose from the following:
•To load all tracks that begin with the
selected letter, scroll to “Play All Tracks,”
then press SELECT.
•To load a single track, scroll to the track’s
name, then press SELECT.
6Press SELECT or PLAY to
begin playback of the
selected song(s).
Play by Genre
You can choose to play all
songs of a particular genre,
such as Rock, Jazz or Classical.
1Press MENU.
2 Scroll to “Play Music,” then
press SELECT.
3 Scroll to “Genre,” then press
SELECT. A list of all genres
loaded on the player
displays.
4 Scroll to choose a
genre from the list,
then press SELECT.
5 Scroll to “Done”,
then press SELECT.
All songs on the
player whose ID3
tags match the
selected Genre will be loaded into the playlist.
6Press SELECT or PLAY to begin playback.
BACK NEXT
Table of Contents
3 Playing Music
21
Page 22

Playing Your Favorites
The “Favorites” menu provides quick access to the 40 most
played albums, artists or songs on the player.
Play Favorite Albums
1Press MENU.
2 Scroll to “Play Music,” then press SELECT.
3 Scroll to “Favorites,” then press SELECT.
4 Scroll to “Albums,” then press SELECT.
5 Choose from the following:
•To load all favorite albums and tracks, scroll
to “Play All Albums/Tracks,” then press
SELECT.
•To load a single album, scroll to the album’s
name, then press SELECT.
•To load all tracks on the album, scroll to “Play
All Tracks,” then press SELECT.
•To load a single track from the album, scroll
to the track’s name, then press SELECT.
6Press SELECT or PLAY to begin playback of
the selected track(s).
Play Favorite Artists
1Press MENU.
2 Scroll to “Play Music,” then press SELECT.
3 Scroll to “Favorites,” then press SELECT.
4 Scroll to “Artists,” then press SELECT.
5 Scroll to the desired artist, then press SELECT.
6 Choose from the following:
•To load all favorite albums and tracks for the selected
artist, scroll to “Play All Albums/Tracks,” then press
SELECT.
•To load a single album, scroll to the album’s name, then
press SELECT.
•To load all tracks on the album, scroll to “Play All Tracks,”
then press SELECT.
•To load a single track from the album, scroll to the track’s
name, then press SELECT.
7Press SELECT or PLAY to begin playback of the selected
track(s).
Play Favorite Songs
1Press MENU.
2 Scroll to “Play Music,” then press SELECT.
3 Scroll to “Favorites,” then press SELECT.
4 Scroll to “Songs,” then press SELECT.
5 Choose from the following:
•To load all favorite tracks, scroll to “Play All Tracks,” then
press SELECT.
•To load a single track from the list, scroll to the track’s
name, then press SELECT.
6Press SELECT or PLAY to begin playback of the selected
track(s).
22
Rio Riot User’s Guide
BACK NEXT
Table of Contents
Page 23

A Playlist is a personalized list of songs you can save
and playback whenever you want. In this chapter you
will learn how to:
•Create a Playlist
• Edit a Playlist
• Delete a Playlist
• Rename a Playlist
• Select a Playlist for playback
Creating a Playlist
1Press MENU.
2 Scroll to “Organize,” then press SELECT.
3 Scroll to “My Playlists,” then press SELECT.
4 Scroll to “Create,” then press SELECT.
5 Think of a name for your playlist. Scroll through the
alphabetical matrix and find the first character of your
playlist name, then press SELECT.
6 Continue in this manner with each character until you
have spelled out the complete playlist name.
•To change case, scroll to the “Uppercase” button,
then press SELECT. Turn the Scroll wheel to toggle
between “Uppercase” and “Lowercase.”
• The “Uppercase” matrix includes numbers, and the
“Lowercase” matrix includes symbols.
•To add a space to your playlist name, scroll to the
word “space,” then press SELECT.
7 When finished, scroll to “Done,” then press SELECT.
8 Scroll to “Albums,” “Artists,” or “Tracks,” then press
SELECT:
BACK NEXT
Add Albums to Playlist
Scroll to the first letter of the
album’s name, then press
SELECT.
•To add all albums and tracks
that begin with the selected
letter, scroll to “Add All Albums/Tracks,” then press
SELECT.
•To add a single album, scroll to the album’s name, then
press SELECT.
•To add all tracks on the album, scroll to “Add All Tracks,”
then press SELECT.
•To add a single track from the album, scroll to the track’s
name, then press SELECT.
Add Artists to Playlist
Scroll to the first letter of the artist’s name, press SELECT,
then scroll to the artist’s name, and press SELECT again.
•To add all albums and tracks for the selected artist, scroll
to “Add All Albums/Tracks,” then press SELECT.
•To add a single album, scroll to the album’s name, then
press SELECT.
•To add all tracks on the album, scroll to “Add All Tracks,”
then press SELECT.
•To add a single track, scroll to the track’s name, then
press SELECT.
Table of Contents
4 Organizing MusicCreating a Playlist
continued...
23
Page 24

Add Tracks to Playlist
Scroll to the first letter of the song’s name, then press
SELECT.
•To add all tracks that begin with the selected letter, scroll
to “Add All Tracks,” then press SELECT.
•To add a single track, scroll to the track’s name, then
press SELECT.
9To continue adding tracks, press BACK repeatedly to
return to the “Add Tracks” menu and repeat Step 8 until
you have added all desired tracks.
10 When you are finished, press BACK repeatedly until the
message appears: “You have created the playlist: [playlist
name]. Do you want to save the changes or exit without
saving?”
11 Scroll to “Save,” then press SELECT to save your playlist.
12 To select and playback your playlist, see page 25.
The total number of tracks you have added is
displayed in the top right corner of the LCD,
with the message: “There are # tracks in
[playlist name].”
24
Rio Riot User’s Guide
BACK NEXT
Table of Contents
Page 25

Playlist Options
Editing a Playlist
1Press MENU.
2 Scroll to “Organize,” then press SELECT.
3 Scroll to “My Playlists,” then press SELECT.
4 Scroll to “Edit,” then press SELECT.
5 Choose from the following:
Add Tracks to Playlist
• Scroll to “Add Tracks,” then press SELECT.
• Scroll to the playlist you wish to edit, then press SELECT.
• Follow Steps 8-11 on pages 23-24 to add tracks to your
playlist.
Delete Tracks from Playlist
• Scroll to “Delete Tracks,” then press SELECT.
• Scroll to the desired playlist, then press SELECT.
• Scroll to the track you wish to delete, then press SELECT.
• Scroll to “Delete,” then press SELECT to delete the song.
Deleting a Playlist
1Press MENU.
2 Scroll to “Organize,” then press SELECT.
3 Scroll to “My Playlists,” then press SELECT.
4 Scroll to “Delete,” then press SELECT.
5 Scroll to the playlist you wish to delete, then press SELECT.
6 Scroll to “Delete,” then press SELECT to delete the
playlist.
Renaming a Playlist
1Press MENU.
2 Scroll to “Organize,” then press SELECT.
3 Scroll to “My Playlists,” then press SELECT.
4 Scroll to “Rename,” then press SELECT.
5 Scroll to the playlist you wish to rename, then press
SELECT.
6 Follow Steps 5-7 on page 23 to rename the playlist.
7 Scroll to “Save,” then press SELECT.
Selecting a Playlist for Playback
1Press MENU.
2 Scroll to “Play Music,” then press SELECT.
3 Scroll to “Playlists,” then press SELECT.
4 Scroll to the desired playlist, then press
SELECT.
5Press SELECT or PLAY to begin playback of
the selected playlist.
BACK NEXT
Table of Contents
4 Organizing Music
25
Page 26

Deleting Albums, Artists & Songs
Follow these steps to delete Albums, Artists or Songs from
the player. You also have the option to
delete everything, including all playlists,
songs and preferences.
1Press MENU.
2 Scroll to “Organize,” then press SELECT.
3 Scroll to “Delete...,” then press SELECT.
4 Scroll to one of the following, then press
SELECT:
Delete an Album
• Scroll to the first letter of the album’s name, then press
SELECT.
• Scroll to the album’s name, then press SELECT.
• Scroll to “Delete File,” then press SELECT to remove the
album.
Delete an Artist
• Scroll to the first letter of the
artist’s name, then press
SELECT.
• Scroll to the artist’s name, then
press SELECT.
• Scroll to “Delete File,” then
press SELECT to remove the artist.
Delete a Song
• Scroll to the first letter of the song’s name, then press
SELECT.
• Scroll to the song’s name, then press SELECT.
• Scroll to “Delete File,” then press SELECT to remove the
song.
Delete Everything!
• Scroll to “Delete All,” then press SELECT to remove all
playlists, songs and preferences from the player.
26
Rio Riot User’s Guide
BACK NEXT
Table of Contents
Page 27

Scanning for FM Stations 5 Listening to the Radio
Accessing the FM Tuner
The Rio Riot comes with a built-in FM tuner.
Follow these steps to access the FM tuner
and scan for stations in your area.
1Press MENU.
2 Scroll to “Radio,” then press SELECT.
3 The “FM Tuner” menu appears on the LCD screen:
• The top of the screen shows the FM frequency band.
• The middle of the screen shows the currently selected
FM station, followed by a graphical volume indicator.
• The bottom of the screen shows a list of eight available
“Radio Presets”; see page 28 to set and select presets.
Scanning for Stations
•Press the FORWARD/BACKWARD keys to step manually
up and down the FM frequency band in 0.1 MHz
increments.
•Press and hold the FORWARD/
BACKWARD keys to automatically scan to the next available
station.
Returning to the Player Menu
1Press MENU.
2 Scroll to “Player,” then press SELECT.
FM Tuner
For a change of pace, select the “Radio”
function and listen to your favorite FM presets.
BACK NEXT
Table of Contents
27
Page 28

Setting FM Presets
Programming FM Presets
Follow these steps to program up to eight
FM presets on the Rio Riot:
1Press MENU.
2 Scroll to “Radio,” then press SELECT. If
you are already in Radio mode, skip
directly to Step 3.
3 Use the FORWARD/BACKWARD keys to select the
desired station on the FM dial.
4 Scroll to any available preset number, then press and
hold SELECT until the word “empty” is replaced by the
selected radio station.
OR
5Press MENU.
6 Scroll to “Organize,” then press SELECT.
7 Scroll to “Set Preset,” then press SELECT.
8 Scroll to any available preset number, then press
SELECT. The preset will appear at the bottom of the
Radio screen.
9 Repeat Steps 3-8 to add up to eight presets.
Selecting FM Presets
To select an FM preset:
1From Radio mode, scroll to a programmed preset, then
press SELECT.
OR
2Press MENU.
3 Scroll to “Organize,” then press SELECT.
4 Scroll to “Select Preset,” then press SELECT.
5 Scroll to any available preset number, then press SELECT.
Clearing FM Presets
To clear a saved FM preset:
1From Radio mode, press MENU.
2 Scroll to “Organize,” then press SELECT.
3 Scroll to “Clear Preset,” then press SELECT.
4 Scroll to the preset number you wish to clear, then press
SELECT.
If you try to save over an existing FM preset,
“Overwrite Preset?” will appear on the screen.
Select “Save” and press SELECT to overwrite
the existing preset.
28
Rio Riot User’s Guide
BACK NEXT
Table of Contents
Page 29

Equalizer/Audio Settings 6 Advanced Settings
The Equalizer menu allows you to fine tune the audio
settings for your Rio with a 12 step Bass/Treble setting.
1Press MENU.
2 Scroll to “Equalizer,” then press SELECT.
3 Scroll to “Bass/Treble,” then press SELECT:
Bass / Treble
• Scroll to the “Bass” or “Treble”
slider, then press SELECT.
• Scroll to set the bass or treble
level from -6 to +6, then press
SELECT.
4 Scroll to “Done” or “Cancel”
then press SELECT.
Bass & Treble
You can adjust the bass & treble in a
12 dB range.
To adjust slider controls, such as the Bass/Treble
setting, scroll to the desired slider, press SELECT,
then use the scroll wheel to move the slider up
and down. When finished, press SELECT.
BACK NEXT
Table of Contents
29
Page 30

Setting Player Preferences
The Preferences menu allows you to customize your Rio
experience, including:
Play Options
Sets Repeat and Random
playback settings.
Contrast
Sets the contrast of the
LCD screen for different
lighting conditions.
Backlight
Turns backlighting on, off,
or on for 2-5 seconds.
Power Saver
Sets the player to sleep
after a specified time of
total inactivity.
Time/Date
Manually sets the time and
date.
Information
Displays the current status
of the player, including
firmware version, total
storage space, available
storage space and more.
“The” Filter
Allows you to alphabetize
lists without the word
“The.”
Displaying the Preferences Menu
1Press MENU.
2 Scroll to “Preferences,” then press SELECT.
3 Select from the following Preference settings:
Play Options
1 Scroll to “Play Options,” then
press SELECT.
2 Scroll to “Repeat” or “Random,”
then press SELECT:
Repeat
Scroll to one of the following
Repeat options, then press
SELECT:
• All - All tracks repeat.
• Track - Current track repeats.
• Off - Turns off repeat function.
Random
Scroll to one of the following Random options, then press
SELECT:
• On - All tracks play in random order.
• Off - Turns off random function.
3 Scroll to “Done” or “Cancel” then press SELECT.
4Press BACK to exit the menu system.
30
Rio Riot User’s Guide
BACK NEXT
Table of Contents
Page 31

Contrast
1From the Preferences menu, scroll
to “Contrast,” then press SELECT.
2 Scroll to the “Contrast” slider, then
press SELECT.
3 Scroll to set the Contrast level from
0 to 14. As you move the slider, the
screen contrast will change in real
time. When finished, press SELECT.
4 Scroll to “Done” or “Cancel” then press SELECT.
5Press BACK to exit the menu system.
Backlight
1From the Preferences
menu, scroll to “Back-
light,” then press
SELECT.
2 Scroll to “Always Off,”
then press SELECT.
3 Scroll to set the Backlight
to “Always Off,” “1
second,” “2 seconds,” “5
seconds” or “Always
On.” When set to a specific time, the backlight will turn on
whenever you press a key or turn the scroll wheel, and
then time out. When finished, press SELECT.
4 Scroll to “Done” or “Cancel” then press SELECT.
5Press BACK to exit the menu system.
Power Saver
1From the Preferences
menu, scroll to “Power
Saver,” then press
SELECT.
2 Scroll to “2 minutes,”
then press SELECT.
3 Scroll to set the player to
turn off automatically after “1 minute,” “2 minutes,” “5
minutes,” “15 minutes” or “Never.” Power Saver will not
turn off the player if music is playing, even if you have not
touched the controls for the specified time.
4 Scroll to “Done” or “Cancel” then press SELECT.
5Press BACK to exit the menu system.
Time/Date
The time and date will automatically synch up to your
computer’s time and date
whenever you download tracks
to the player. To set the time/
date manually:
1From the Preferences menu,
scroll to “Time/Date,” then
press SELECT.
BACK NEXT
Table of Contents
6 Advanced Settings
31
Page 32

2 Scroll to each of the following Time/Date options, pressing
SELECT after each: Month, Day, Year, Hour, Minutes, AM/
PM
3 Scroll to adjust each setting, pressing SELECT after each.
4 When finished, scroll to “Done” or “Cancel” then press
SELECT.
5Press BACK to exit the menu system.
Information
1From the Preferences menu,
scroll to “Information,” then
press SELECT.
2View the following information
about your player:
- Rio model name/number
- Current time
- Firmware version
-Total storage
-Free storage
- Supported music formats
-Number of albums and tracks in use
- Estimated space available for additional tracks
3Press BACK to exit the menu system.
“The” Filter
“The” Filter gives you the option
of displaying songs lists alphabetically without the word “The.”
For example, if “The” filter is off,
the following songs all appear
under the letter “T”:
• “The Reflux”
• “The Summer of 1968”
• “The Walls”
Whereas, if “The” filter is on, they appear as:
• “Reflux, The” under “R”
• “Summer of 1968, The” under “S”; and
•“Walls, The” under “W”
To set “The” Filter:
1From the Preferences menu, scroll to “The” Filter, then
press SELECT.
2 Scroll to “Off,” then press SELECT.
3 Scroll to set “The” Filter to “Off” or “On,” then press
SELECT.
4 Scroll to “Done” or “Cancel” then press SELECT.
5Press BACK to exit the menu system.
32
Rio Riot User’s Guide
BACK NEXT
Table of Contents
Page 33

7 Getting HelpFAQs
How do you load music to the Rio?
• The Rio interfaces with your computer through the USB
port. You can get digital audio from numerous Internet
sites or encode your own digital audio tracks from your
audio CDs using the CD-ROM drive on your computer. Use
the software included with the Rio to get audio from the
Internet, encode tracks from your audio CDs, or download
tracks to your Rio.
Can I use the Rio with Windows 95? I have the USB
supplement pack.
• No. The Rio USB devices can only be used with Windows
98, Windows ME, Windows 2000 or Windows XP operating systems, or Mac OS 9.0.4 or later. The Rio requires a
newer standard of USB that is not available in Windows 95,
even with the USB supplement pack.
Where is the serial number located on the Rio?
• The serial number is on the back of the Rio.
The Rio is connected to the USB, why doesn’t the computer recognize it?
• First, make sure the Rio RealJukebox software is running
and check to make sure the USB cable is fully connected to
both the Rio and to the computer. Then, turn the Rio off
and back on.
Is the Random menu function truly random?
• No. The Random function uses an algorithm called
pseudo-random which is common to all computers. The
Rio selects a seed number and then enters a list of
predetermined random numbers to play music in a
seemingly random order. If the same seed is picked, the
Rio may play songs in the same order.
What does the Rio Hold feature do?
• The Hold feature on the Rio locks all buttons and
controls except the Power switch. This is useful at times
when the Rio may be bumped or jostled. For example,
when exercising.
What are the differences between MP3 and WMA?
• If you use the WMA format instead of the MP3 format,
you can have comparable quality at about one half the
size. Since WMA offers “CD quality” at a smaller file size
than MP3, it enables you to store more music on your
PC or on your portable player. WMA files are exclusive
to the PC.
How can I get the best sound quality when encoding
from a CD?
• If you use a significant amount of your computer
system’s resources with other applications, encoding
songs from a CD may result in poor quality recordings. If
the song(s) you encode contain abnormalities, such as
pops or skips, close down other applications which are
running and encode those songs again. The condition of
the audio CD—scratches and so on—may effect the
quality of the recording as well.
BACK NEXT
Table of Contents
33
Page 34

Upgrading the Firmware
How to upgrade the Rio firmware
The Rio features upgradeable firmware. First determine the
version of the firmware installed on your Rio, so you do not
accidentally “downgrade” your Rio firmware by installing an
older version.
1Press MENU.
2 Scroll to “Preferences,” then press SELECT.
3 Scroll to “Information,” then press SELECT.
• The firmware version is the first item listed.
Downloading the Firmware Upgrade
1 Go to the Rio Web site at “www.riohome.com”
2 Click the “Support>Product Support” link.
3 Navigate to the Rio Riot PC or Rio Riot Mac links.
4 Select and download the latest firmware upgrade file to
your computer.
Upgrading the Rio firmware (PC)
Quit all other applications before running the firmware
upgrade. While running the firmware upgrade, do not close
the program, turn off the Rio or unplug the USB cable.
1 Connect the Rio to the computer with the USB cable.
2 Slide the Rio power switch to On.
3 Double-click the Rio Riot firmware upgrade file.
4 Click the “Upgrade Now” button on the RioFlasher window.
5 Click Yes.
6 When the upgrade is complete, a check of the firmware
version displays the new number.
Upgrading the Rio firmware (Mac)
Do not close the program, turn off the Rio or unplug the USB
cable during the upgrade.
1 Connect the Rio to the computer with the USB cable.
2 Slide the Rio power switch to On.
3 Double-click the “iTunes” icon.
4 Select the Rio icon.
5 Click the “Options” button on the iTunes window. The “Rio
Settings” window displays.
6 Click the “Upgrade Firmware” button on the “Rio Settings”
window.
7 Choose the Rio Riot firmware upgrade file.
8 Click the “Open” button.
9 When the upgrade is complete, a check of the firmware
version displays the new number.
34
Rio Riot User’s Guide
BACK NEXT
Table of Contents
Page 35

Customer Care Information
Customer Support Contact Information
E-mail
customersupport@sonicblue.com
Phone
New product support: (541) 967-2450
Customer service: (541) 967-2450
Customer service toll-free: 800-468-5846
Fax
New product support: (541) 967-2401
Customer service: (541) 967-2485
Web
www.riohome.com
Care of your Rio
• Exposure to extreme hot or cold temperatures may cause
damage to your Rio or cause it to malfunction. Do not
expose your Rio to direct sunlight continuously or leave it
in a vehicle with the doors and windows closed. The case
may become deformed, discolored or malfunction. Do not
use your Rio near open flame.
• If moving from a cold environment to a warm environment,
let the Rio’s temperature stabilize before operation.
• Keep dirt, sand, dust, and moisture from entering your Rio.
Do not use in areas of excessive dust. Do not use in places
where the humidity is excessively high.
• Do not drop or subject your Rio to shock.
• If interference occurs close to radios or TVs, move your Rio
away from them.
• Do not clean your Rio with solvents, chemicals or abrasive
cleaners. If necessary, use a soft cloth to clean your Rio.
Rio Product Support
With every Rio product you receive the following support
services:
• Unlimited access to the Rio web-based technical information resources, available 24 hours a day every day at
www.riohome.com. Here you will find FAQ files, a
knowledgebase search engine, product updates, and
other useful tools.
• Unlimited e-mail support for the duration of your Rio
product hardware warranty period.
• Access to the latest software updates and enhancements
for Rio product via our Web site.
BACK NEXT
Table of Contents
7 Getting Help
35
Page 36

Regulatory Information
Federal Communications Commission (FCC)
The device has been tested and found to
comply with limits for a Class B computing
device according to the specifications in FCC
rules Part 15. Operation is subject to the
following two conditions:
1 This device may not cause harmful
interference, and
2 This device must accept any interference
received, including interference that may
cause undesired operation.
If your device needs repairs, you must arrange
for the manufacturer to make them if you are
to keep the device’s FCC registration valid.
This equipment, like other electronic
equipment, generates and uses radio
frequency energy. If not installed and used
according to the instructions in this manual,
this equipment may cause interference with
your radio and television reception. If you think
this equipment is causing interference with
your radio or television reception, try turning
the equipment off and on. If the interference
problems stop when the equipment is
switched off, then the equipment is probably
causing the interference. You may be able to
correct the problem by doing one or more of
the following:
• Adjust the position of the radio or TV
antenna.
• Move the device away from the radio or TV.
If necessary, consult your dealer or an
experienced radio or television technician. You
may find this booklet helpful: “How to Identify
and Resolve Radio and TV Interference Problems”
(Stock No. 004-000-00345-4), prepared by the FCC
and available from the U.S. Government Printing
Office, Washington, DC 20402. See individual
devices for FCC ID and registration numbers.
Industry Canada
This Class B digital apparatus complies with
Canadian ICES-003.
Cet appareil numérique de la classe B est conforme
‡ la norme NMB-003 du Canada.
CISPR 22
Warning: This equipment is belongs to class A of
CISPR 22 recommendation. In a residential
environment, it can produce electromagnetic
interference. In that case, it can be requested to the
user to take some appropriated measures.
EU Declaration of Conformity
We DIAMOND Multimedia Systems Vertriebs
GmbH
Moosstrasse 18b
D-82319, Starnberg
GERMANY
On behalf of
SONICblue Incorporated
2841 Mission College Blvd.
Santa Clara, CA 95054 USA
Hereby declare under our sole responsibility that
the following product(s) conform to the requirements of the European Parliament Council Directive
1999/5/EC dated 9th March 1999. And to which this
declaration is related the product(s) listed are in
conformity with the following relevant harmonized
European Standards or other normative documents,
the references of which have been published in the
Official Journal of the European Communities /
European Union.
Product (s): Rio Riot
Harmonized Standards:
EN 55022: 1994, A1’95, A2’97 Specification for
limits and methods of measurement of radio
interference characteristics of Information Technology (IT) equipment.
EN 50082-1: 1998 Electromagnetic Compatibility,
Generic Immunity Standard, Part 1. Residential,
Commercial and Light Industry.
EN 50332-1: 1999 Maximum sound pressure level
measurement methodology and limit considerations. Part 1 General method for “one package
equipment.”
CEI/IEC 60065: 1998 Audio, Video, and similar
electronic apparatus Safety Requirements.
In accordance with the terms of Directive 1999/5/
EC, 89/336/EEC, 73/23/EEC and Council Decision
98/482/EC the original signed Declaration is
retained by us in the product compliance folder.
Upon request photocopies may be available.
Date: 02 November 2000
Place: St. Ingbert
Name of Authorizing Person
Scott Naccarato
Regulatory Compliance Manager
36
Rio Riot User’s Guide
BACK NEXT
Table of Contents
Page 37

One Year Limited Warranty
Our warranty to you
SONICblue Incorporated warrants that your
product will be free from defects in materials
and workmanship for a period of one year from
the date of original retail purchase. If you
discover a defect covered by this warranty, we
will repair or replace the product at our option
using new or remanufactured components.
SONICblue Incorporated’s liability is limited
solely to the repair or replacement of the
defective product. This warranty is extended to
the original end user purchaser only and is not
assignable or transferable to any other party.
Any parts or boards removed in the replacement or remanufacture process shall become
the property of SONICblue Incorporated. Out
of warranty service may also be available for a
fee.
How to obtain service under this warranty
To obtain service under this warranty, please
contact the dealer from whom you purchased
this product or contact SONICblue Customer
Care. Contact information for Customer Care is
available in this manual or at
www.sonicblue.com.
Yo u must deliver the product and the original
sale receipt to either the dealer from who you
purchased this product or to SONICblue
Incorporated in order to obtain service under
this warranty. If you return the product to us,
you must pay for shipping to SONICblue
Incorporated.
Product failures not covered by this warranty
This warranty covers defects in manufacture that
arise from correct use of the device. It does not
cover damage caused by abuse, misuse, improper
modification or repair, moisture, extreme heat or
cold, corrosive environments, shipping, or high
voltage surges from external sources such as power
line, telephone line, or connected equipment. This
warranty does not cover wear and tear on covers,
housing or wiring. This warranty does not apply to
any product with an altered or defaced serial number.
Opening or removing the player case will void this
warranty.
How to obtain out of warranty service
To obtain out of warranty service, please contact
SONICblue Customer Care. Contact information for
Customer Care is available in this manual or at
www.sonicblue.com.
Out of warranty service is provided for owners of Rio
Personal Digital Music Players who:
•Are unable to provide valid proof of purchase for
their Rio Personal Digital Music Player.
• Require repair service after the expiration of the
original warranty.
• Require service for product failures not covered
under the SONICblue Incorporated warranty on
this product.
Out of warranty service is limited to the Personal
Digital Music Player only and is not available for
headphones, memory cards or other accessories.
The fee for out of warranty repairs is payable by
credit card at the time the service agreement is
created and Return Authorization provided. This fee
includes all labor, parts needing replacement, and
return shipping.
You must deliver the product to SONICblue
Incorporated in order to obtain out of warranty
service. You must pay for shipping to SONICblue
Incorporated. It is recommended that you use a
shipping service providing you with tracking
capability, because we will not be responsible
for items lost in the mail. A Return Authorization
number is required for all shipments to
SONICblue Incorporated. Please contact our
Customer Care Center for more information or
to arrange for out of warranty service.
Limits of liability
We are only responsible for the repair of this
product. We will not be liable to you or anyone
else for any damages that result from the failure
of this product or from the breach of any
express or implied warranties. These include
damage to other equipment, lost data, lost
profits, or any consequential, incidental, or
punitive damages. In no event will SONICblue
Incorporated be liable for any amount greater
than the currently suggested retail price of this
product.
This written warranty represents the entire
warranty agreement between SONICblue
Incorporated and you. This warranty is given in
lieu of all other warranties, express or implied,
including without limitation implied warranties
of merchantability and fitness for a particular
purpose. This warranty is limited to the term
specified above. No warranties, either express
or implied, will apply after this period. This
warranty may not be altered in any way other
than in writing by an officer of SONICblue
Incorporated. This warranty gives you specific
legal rights and you may also have other rights,
which vary, from state to state. Some states limit
what warranties may be excluded as well as
how long an implied warranty lasts, so the
above limitation may not apply to you.
BACK NEXT
Table of Contents
7 Getting Help
37
Page 38

Index
A
Albums, Playing 20
Artists, Playing 20
Audio Settings 29
B
Back button 6
Backlight 31
Backward button 6
Bass 29
Battery, Charging 8
C
Connecting Rio to
PC 12
Contrast 31
Customer Care
Information 35
D
Date 31
Deleting
Albums 26
Artists 26
Everything 26
Songs 26
Downloading from
Internet 13
E
Encoding CDs 14
Entertain Me! 19
Equalizer Settings 29
F
FAQs 33
Favorites, Playing 22
Firmware
Upgrading 34
FM Presets
Clearing 28
Selecting 28
Setting 28
FM Tuner 27
Forward button 6
G
Genre 21
I
Information 32
iTunes
9, 11, 14, 15, 16
L
LCD Screen 18
Loading Music to Player
16
M
Managing Music Files 15
Memory Lane 19
Menu button 6, 7
Menu Navigation 18
Menu System 18
N
New Music 19
P
Play All 19
Play Options 30
Play/Pause button 6
Playback Control 17
Playback Options 17
Playing
Albums 20
Artists 20
by Genre 21
Favorites 22
Songs 21
Playlists
Adding Albums 23
Adding Artists 23
Adding Tracks 24
Creating 23
Defined 23
Deleting 25
Editing 25
Naming 23
Renaming 25
Selecting 25
Power Off/On/Hold
switch 7
Preferences 30
R
Radio, Listening to 27
Random 30
Random Play 19
RealJukebox
9, 10, 14, 15, 16
Regulatory Information
36
Repeat 30
Rio DJ 19
Ripping CDs 14
S
Scanning for Stations 27
Scroll Wheel 6, 18
Select button 6
Sleep 6, 17
Sleep Mode 6, 17
Software Installation
Mac 11
PC 10
Software, Installing 9
Song, Playing 21
Sounds of... 19
Stop button 6
System Requirements 9
T
Time 31
Top Tunes 19
Track Info 18
Treble 29
U
USB/Headphone Port 12
V
Volume +/- buttons 7
W
Wake up Player 6, 17
Warranty 37
WMA 14, 33
38
Rio Riot User’s Guide
BACK NEXT
Table of Contents
Page 39

Menu Tree
BACK NEXT
Table of Contents
7 Getting Help
39
Page 40

2481 Mission College Blvd.
Santa Clara, CA 95054-1838
www.sonicblue.com
Table of Contents
BACK NEXT
PN75510191-001
 Loading...