

Page 1
User Manual
• Safety precautions are intended to protect safety of the user and prevent property damages. Please read this manual and use the
product properly.
• After reading, always furnish this manual in a place that can be accessed by persons using the product.
• As figure
s used in this manual were drawn for the purpose of explanation, they may be partially different from actu
al appearance.
• External appearance and specifications of the product are subject to change without notice for quality improvement.
Product warranty is included in the manual.
• This p
roduct is subject to treatment of domestic waste and is to be discarded by the user according to the standards on plastic
garbage bag and separate disposal and recycling.
•This product is suitable for household use only.
Smart Wi-Fi Boiler
Smart Wi-Fi Boiler
WF-100W_EU | WF-100B_EU
Page 2
Block diagram of Wi-Fi boiler 3
Name of each part 4
Precautions for installation / checking wireless router 6
Correct method of use 7
Indoor temperature controller
7
How to download application
23
Application
24
Matters that require confirmation before reporting of failure 47
Installation 50
Product Specifications 53
Right of customers
Our customers have a precious right to receive free A/S during the warranty period when
failure occurs while using the product. However, please note that problems caused by
negligence of customers and natural disasters will involve cost regardless of the warranty
period.
Contents
Responsibility for paid service (cost burdened by customers)
When a customer requests a service, it is subject to paid service during the warranty
period in the following cases.
1. When failure is caused by injection of alien substances (water, beverage, coffee, toy, etc.)
into the product.
2. When the product is damaged or functional failure occurs from external impact during
installation or use.
3. When exterior is damaged or deformed by organic solvents like thinner and benzene.
4. When failure is caused by use of parts or consumables which are not standard products
supplied by Rinnai.
5. When failure occurs as the product is not installed according to the standard installation
method.
6. When failure is caused by incorrect type of gas, gas pressure or electric capacity.
7. When components are lost or damaged as the customer arbitrarily disassembles the product.
8. When the product is damaged from repair or remodeling by a non-service engineer of Rinnai
9. When failure is caused by natural disasters (lightning, fire, storm and flood, gas, salt,
earthquake, etc.)
10. When failure occurs as “Safety precautions” in User Manual of Rinnai product are not
followed.
2
Page 3
3
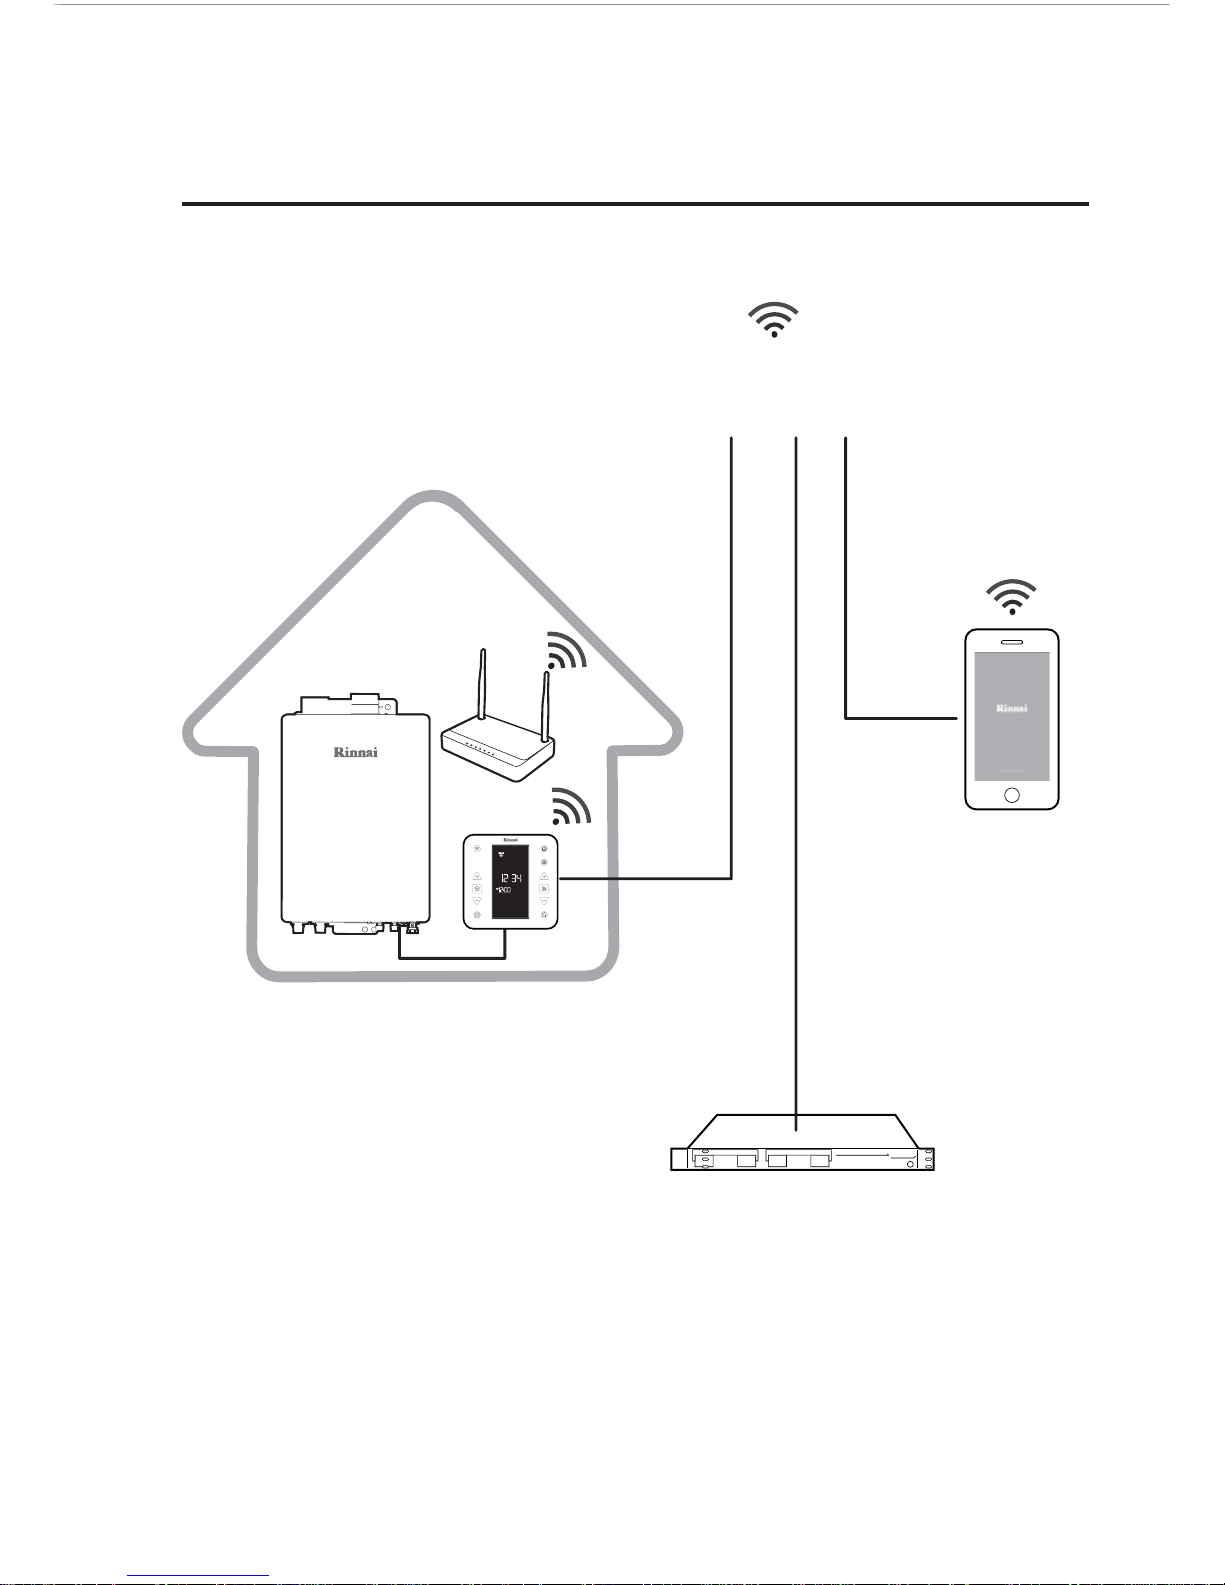
Block diagram of Rinnai Wi-Fi boiler
Communication network
(3G/4G/Internet)
3G/4G/Wi-Fi
Smart phone
Wireless router
HOME
Rinnai server
Page 4
4
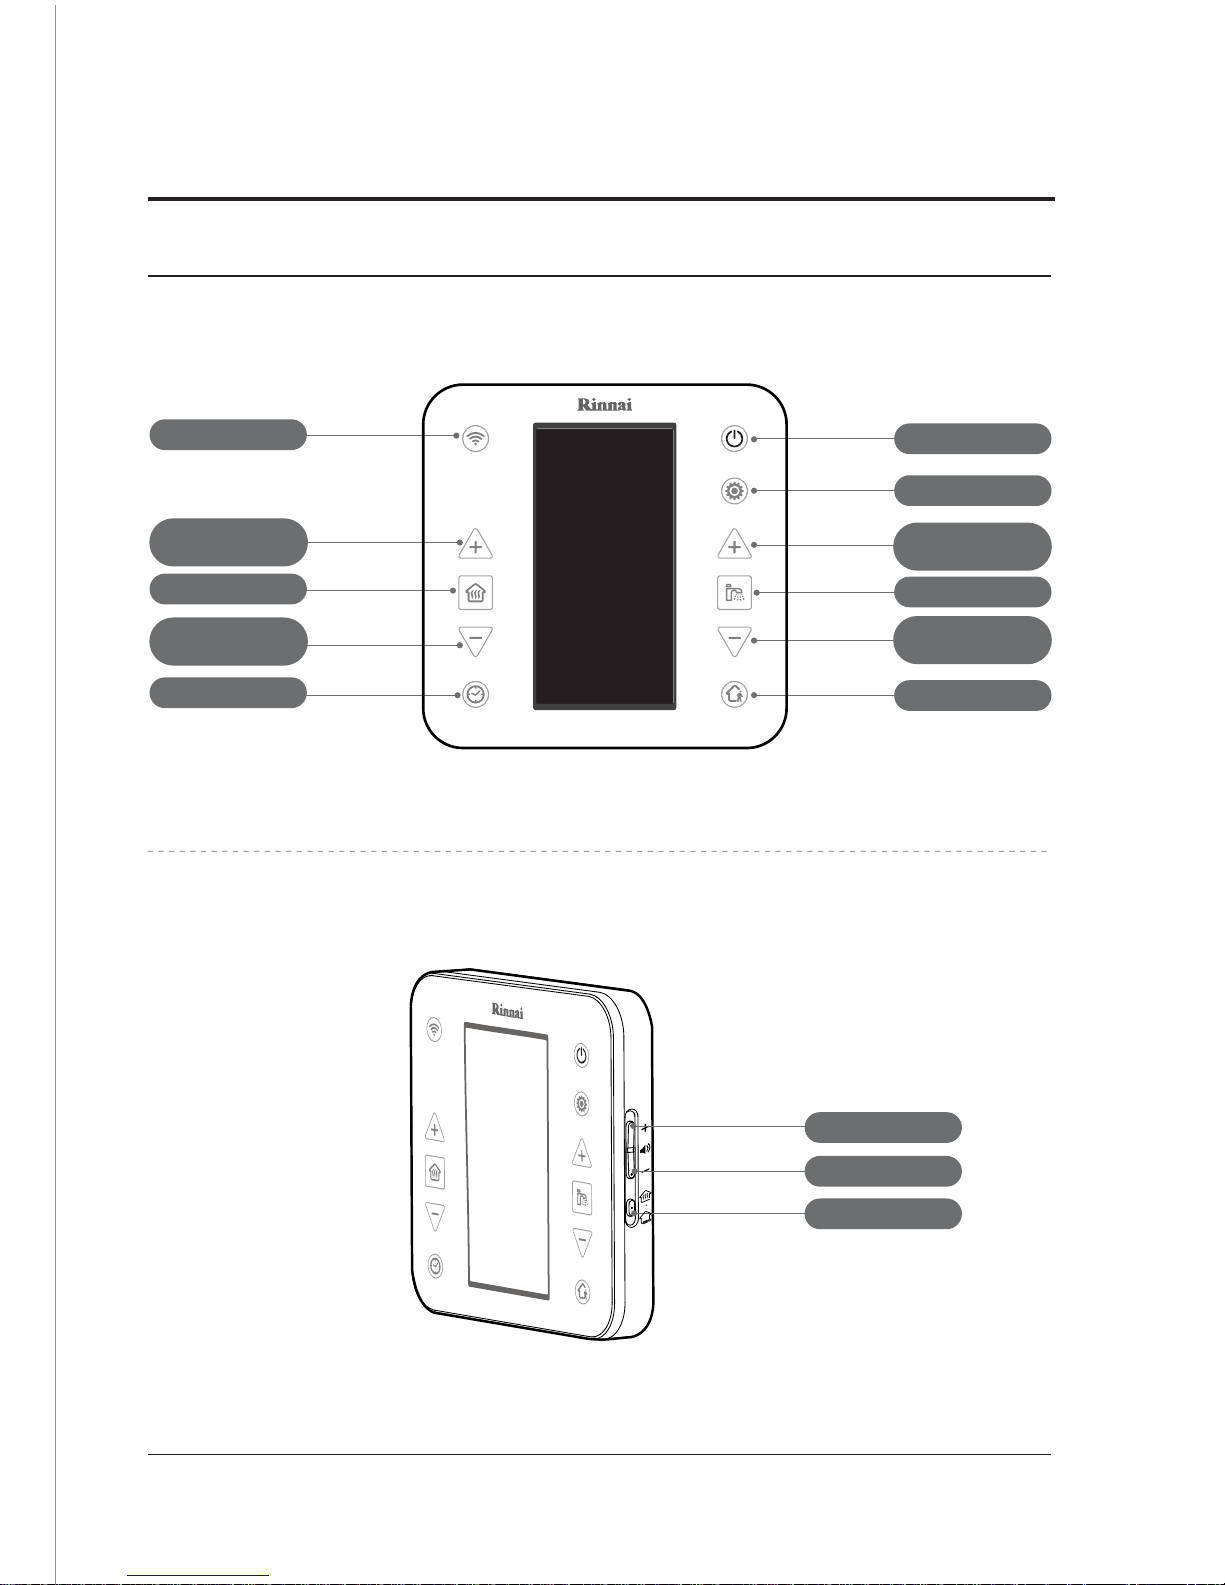
Buttons
Name of each part
Indoor temperature controller
Heating ON / OFF
Wi-Fi
Timer
Power
Settings
Outing
Increase volume
Decrease volume
Switch heating method
Hot water ON / OFF
Decrease heating
temperature
Increase heating
temperature
Increase hot water
temperature
Decrease hot water
temperature
Page 5
5
Components
• Check whether quantity of components is accurate.
• Remove all tapes, Styrofoam and papers attached to the product.
• Always store User Manual in an easily accessible place.
• Check the following components.
User Manual
Screws (2 ea.)
for installation of indoor
temperature controller
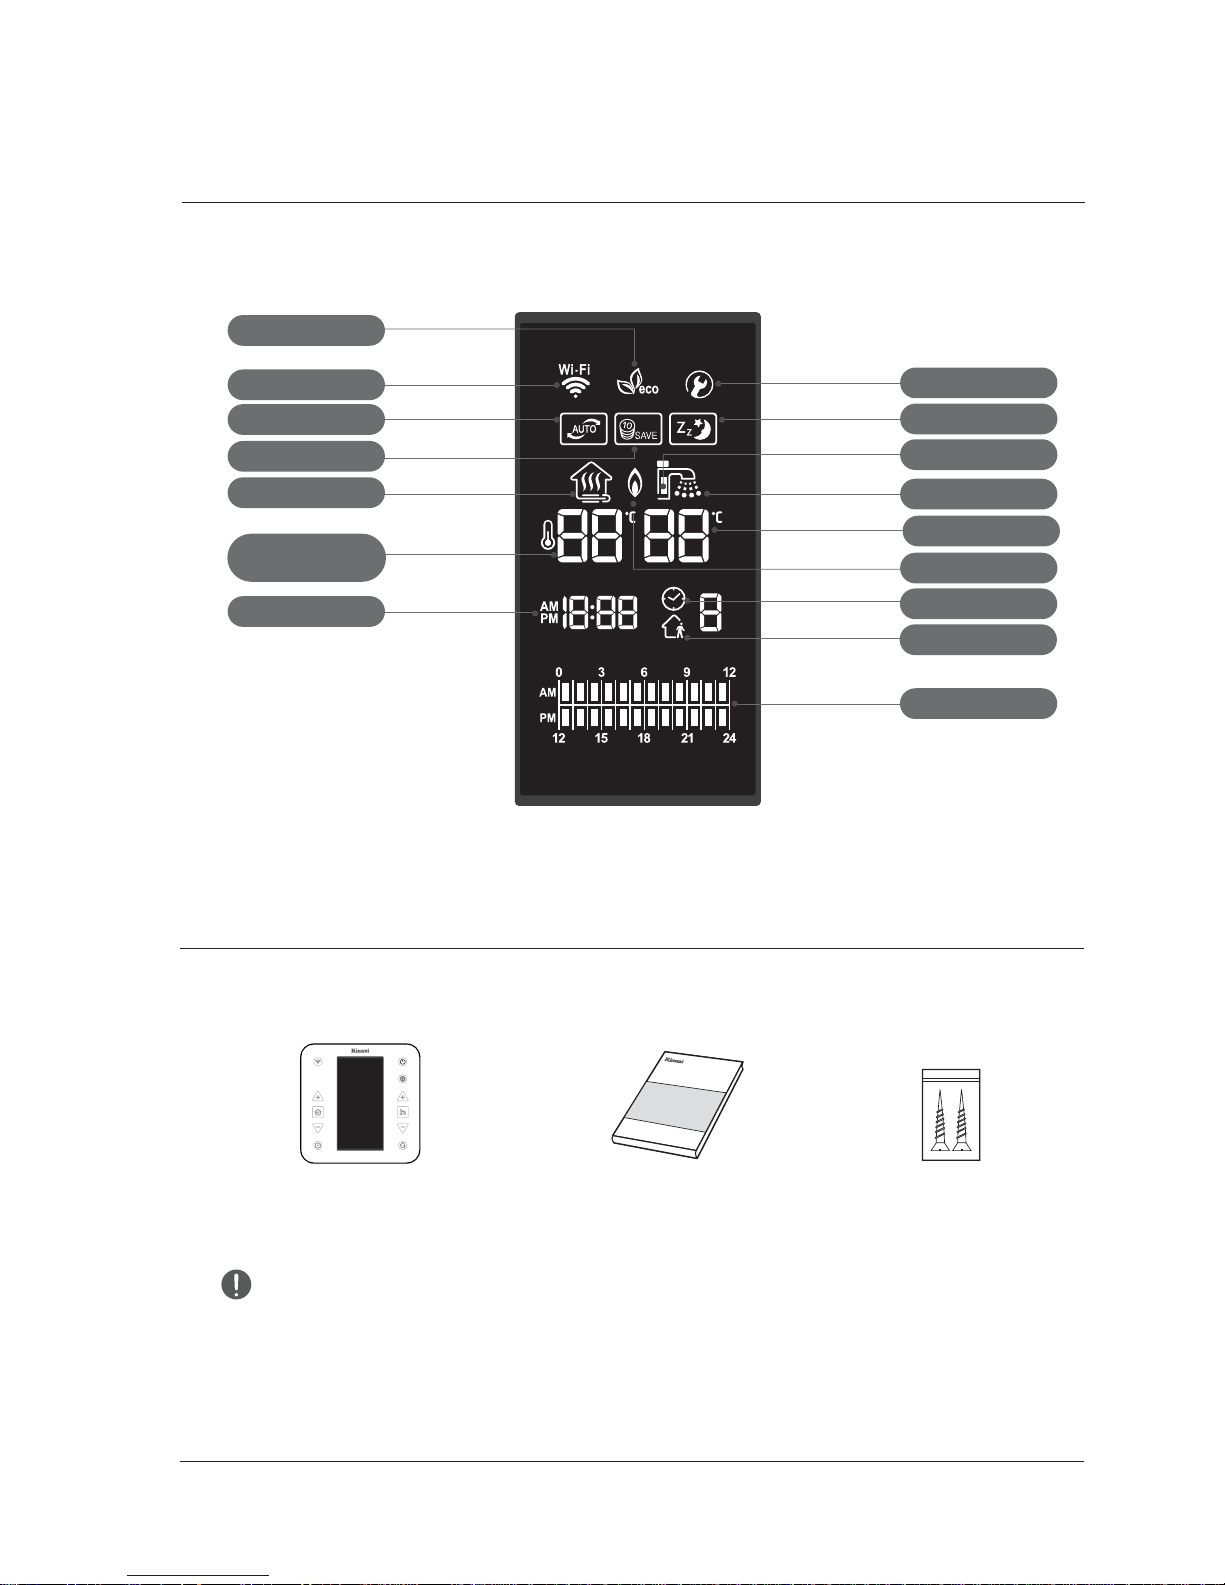
Indoor temperature controller
Indoor temperature controller
Outing mode
Heating mode
Automatic mode
Wi-Fi
Save mode
Time
Eco combustion
Sleep mode
Service mode
Combustion
Timer mode
Hot water mode
Hot water preheating
Display part
Timer setting
Hot water temperature
Heating temperature
(setting / current)
Page 6
6
Checking wireless routers
1. This product only supports DHCP (Dynamic Host Configuration Protocol). If the user
wish
es to use an existing wireless router, DHCP server option must be enabled.
2. Channels 1~13 are available for wireless routers.
3. Encryption of wireless router supports WPA and WPA2, but it does not support WEP
and non-standard authentication methods.
4. Quality of wireless network connection can be affected by surrounding wireless
environment.
5. Some wireless routers can send abnormal DNS address even if they are not
connected to the internet, which causes Wi-Fi icon on the LCD window of indoor
temperature controller to be turned on. In this case, please contact the manufacturer
of corresponding wireless router and internet service provider.
6. Rinnai Wi-Fi boiler only supports wireless routers with Wi-Fi 2.4Ghz.
7. Rinnai Wi-Fi boiler supports IEEE802.11.b communication protocol. Make sure to check
whether the router supports IEEE802.11.b before installation.
8. Only use letters and numbers for the name of Wi-Fi connection (characters like
&,%,+,é... may not be supported).
This device is appropriate for electromagnetic waves at home (class B)
and is intended for use at home. It can be used in all regions.
Precautions for installation
To use the APP together with the Wi-Fi remote controller a wireless router must
be available.
If there is no wireless router, it must be installed.
If connection between Wi-Fi remote controller and server is lost because of
problems caused by the internet connection, router or natural disaster
,
Rinnai Wi-Fi boiler application may not function properly.
Page 7
7
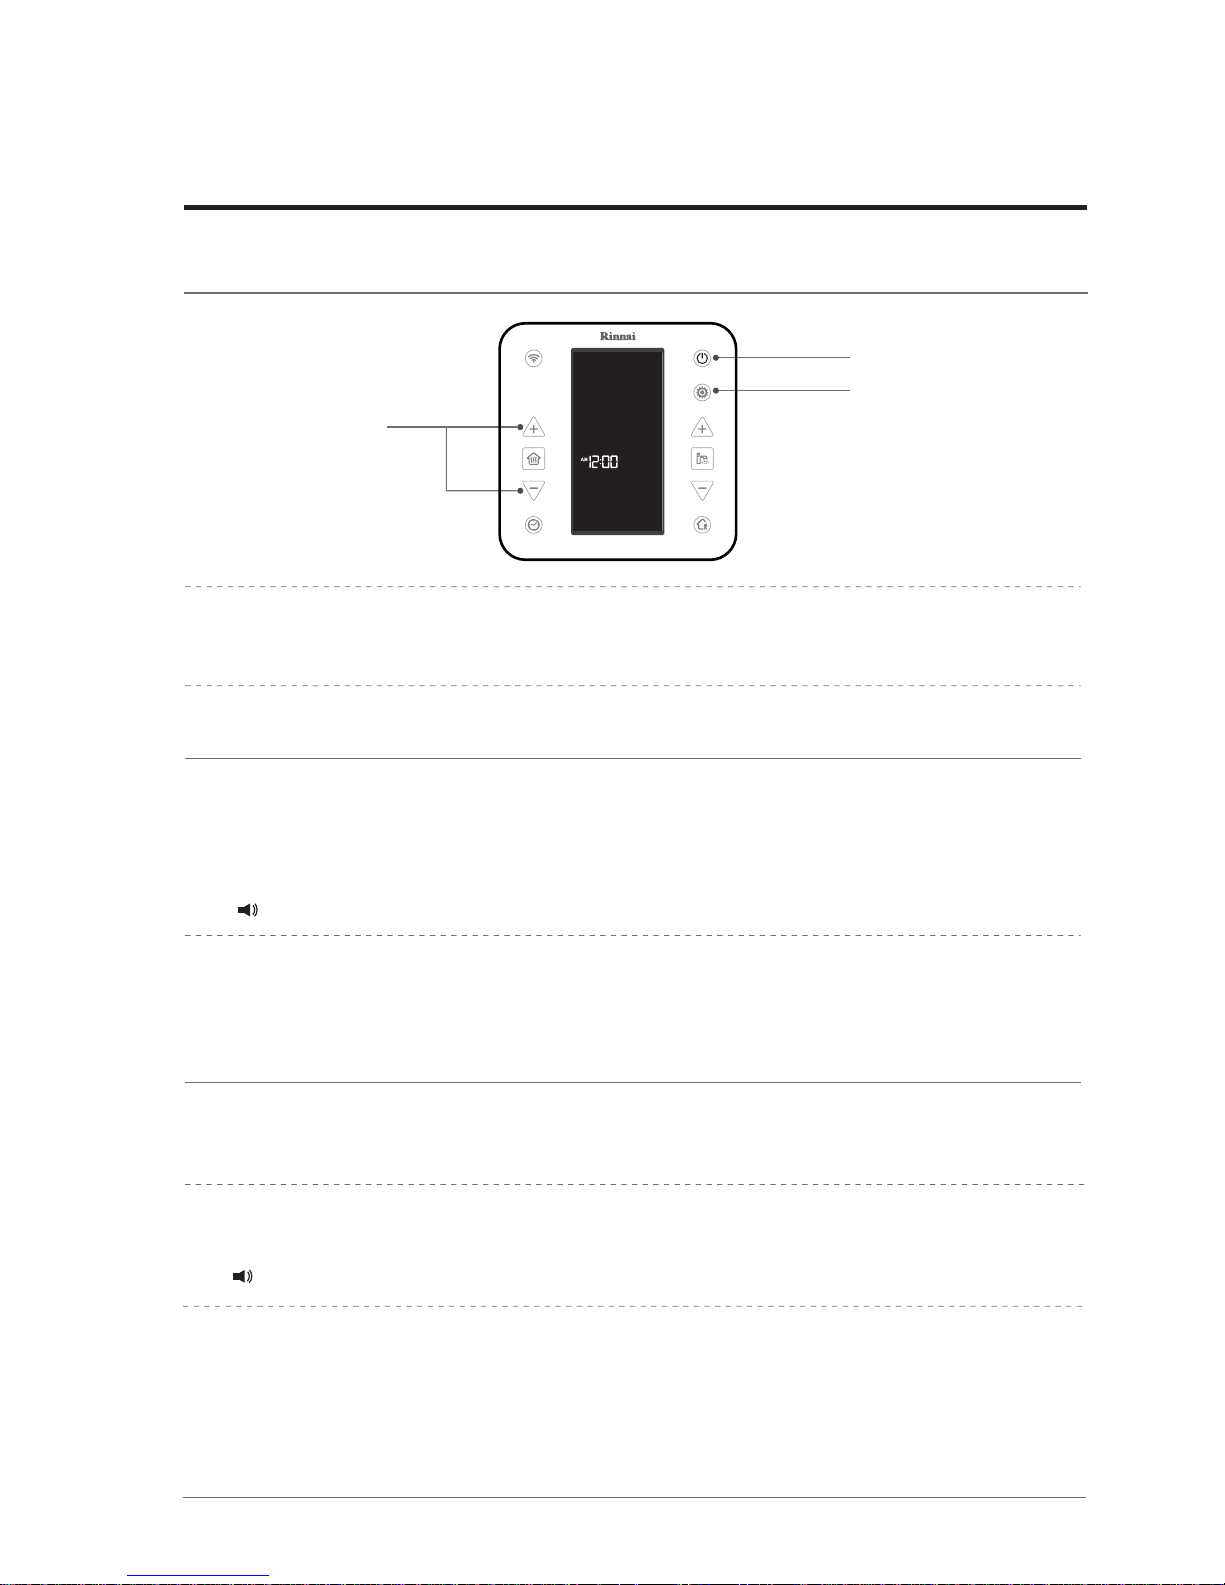
Turning temperature controller ON / OFF
1.
Temperature controller is turned ON to operate the boiler by pressing
ⓐ (power) button.
2.
Press ⓐ (power) button again to turn temperature controller OFF.
To set current time
1.
Pressⓑ (mode / setting) button for 3 seconds or longer.
2.
Wh
en hour digits flicker, use ⓒ (increase heating temperature or
decrease heating temperature) buttons to set current hour and press
ⓑ (mode / setting) button.
ⓒ
ⓑ
ⓐ
Please set present time.
Correct method of use
Indoor temperature controller
Time can only be set when heating and hot water mode are turned OFF.
Incorrect time will be displayed upon initial power connection and after long-term
power failure. Follow the instruction
s above to set current time.
Please set the time for proper use of timer function.
When smart phone function is used, current time is automatically set.
4.
Press ⓑ (mode / setting) button to finish time setting.
Time setting is completed.
3.
When minutes digits flicker, use ⓒ (increase heating temperature or
decrease heating temperature) bu
ttons to set current minutes.
Page 8
8
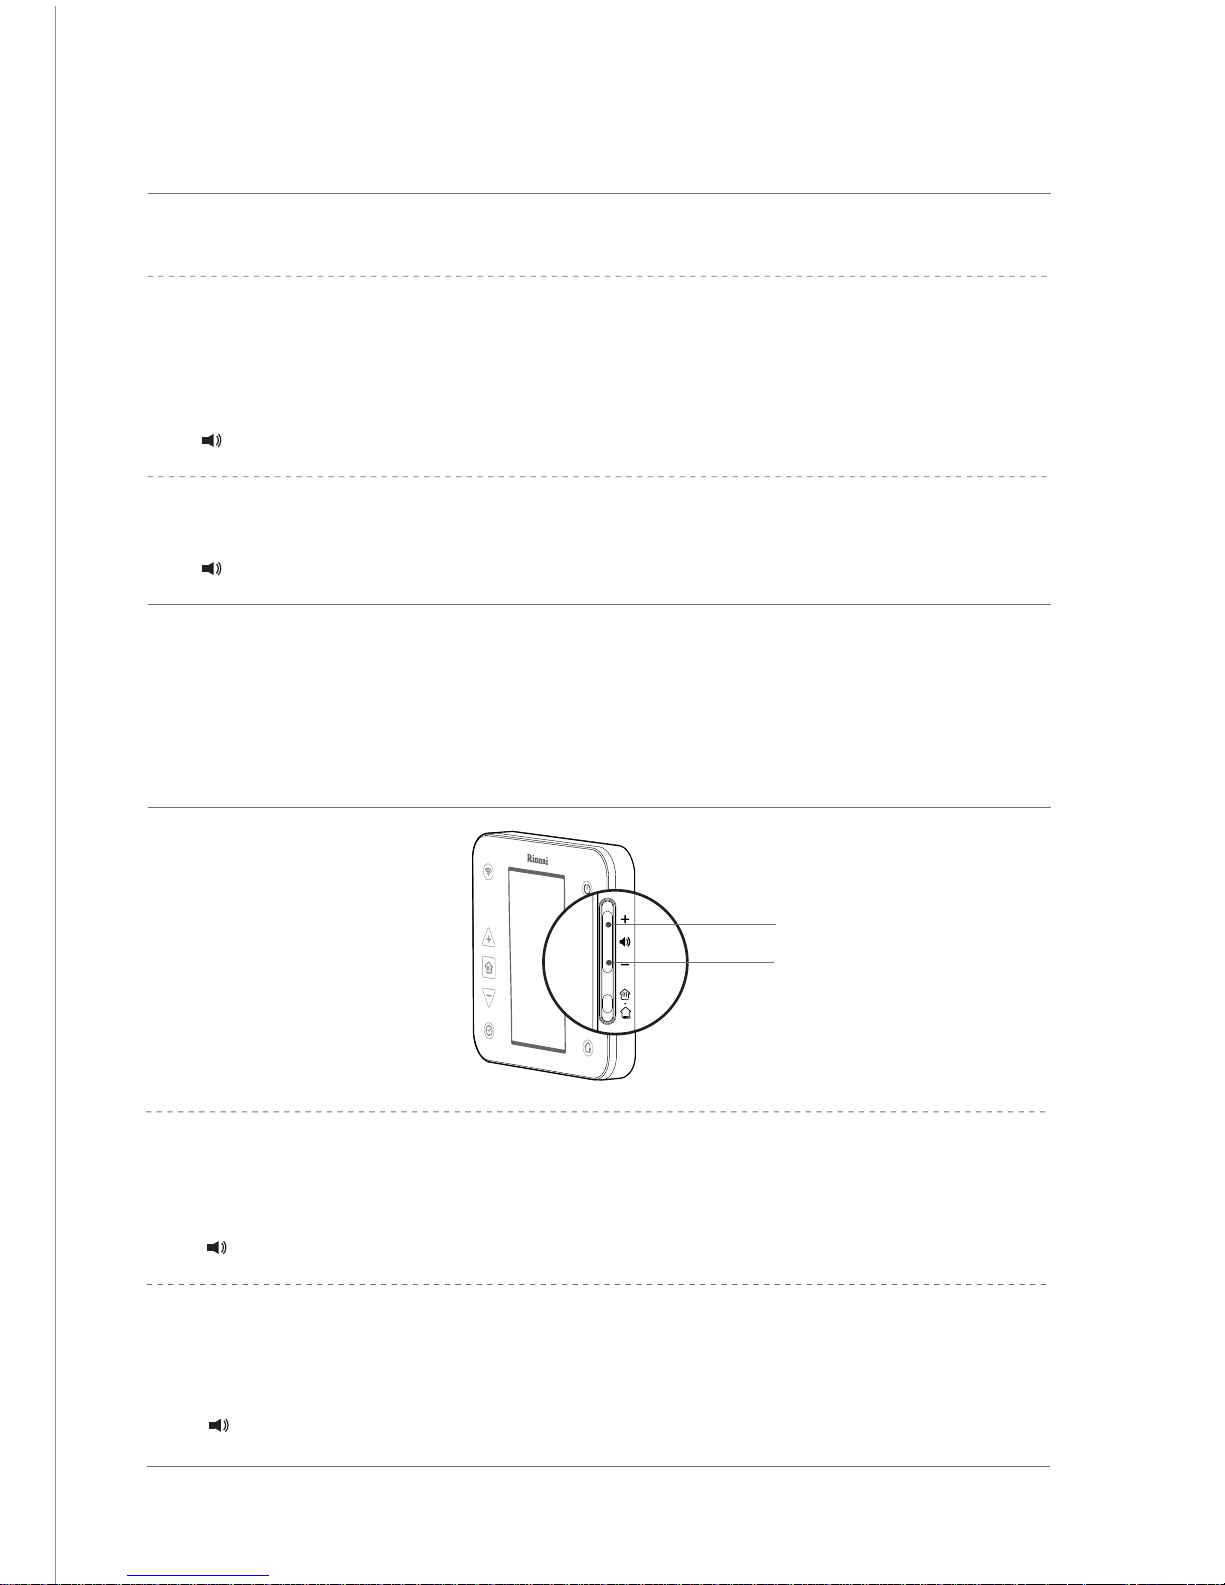
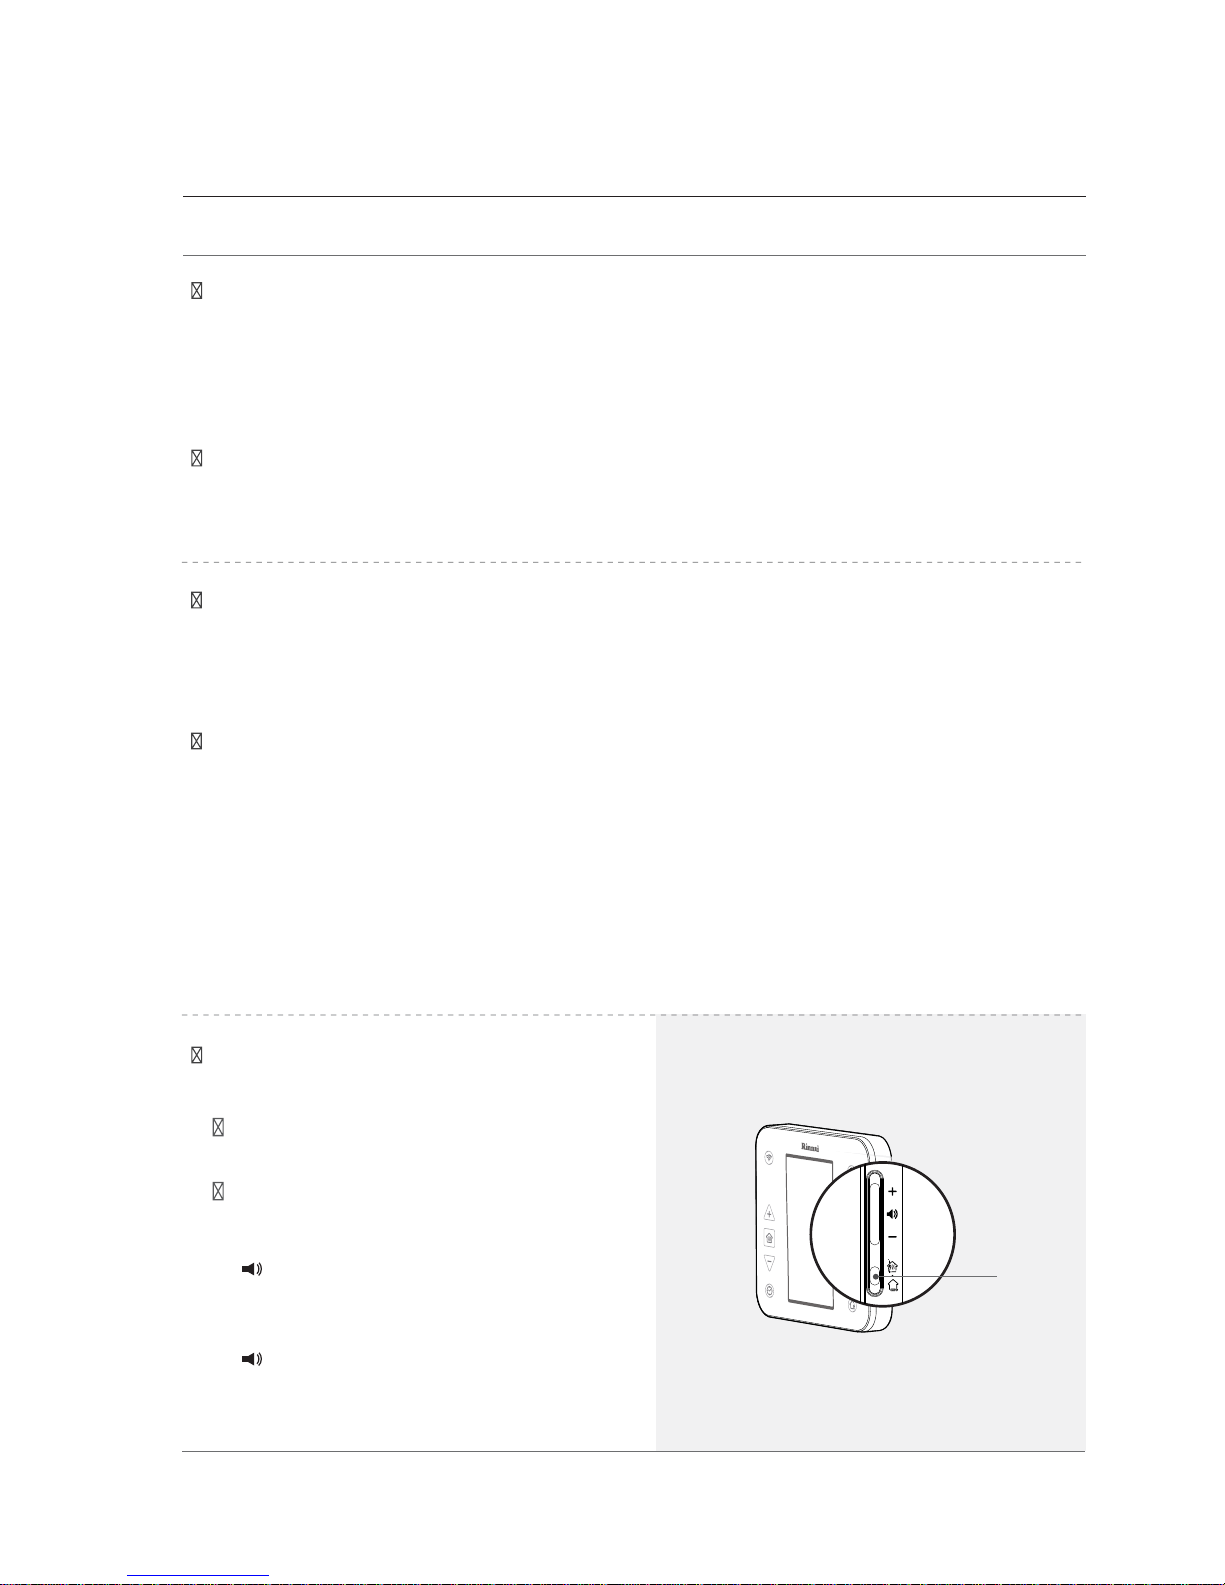
To use audio guide
1.
Press ⓐ (increase volume) button.
•
Volume can be adjusted to mute and steps 1~5.
2.
If you do not want audio guide, press ⓑ (decrease volume) until it is
muted.
ⓐ
ⓑ
Voice guidance is starting.
Voice guidance is over.
3.
To confirm voice guidance language, press
ⓑ
(settings).
Voice guidance is starting.
Voice guidance is starting.
To change voice guidance language
1.
Press ⓑ(Settings) for 3 seconds with the remote controller switched off.
2.
When the current language is displayed in the remote controller, select
the voice guidance language by using
ⓒ
(increase heating temperature
or decrease heating temperature) button.
Page 9
9
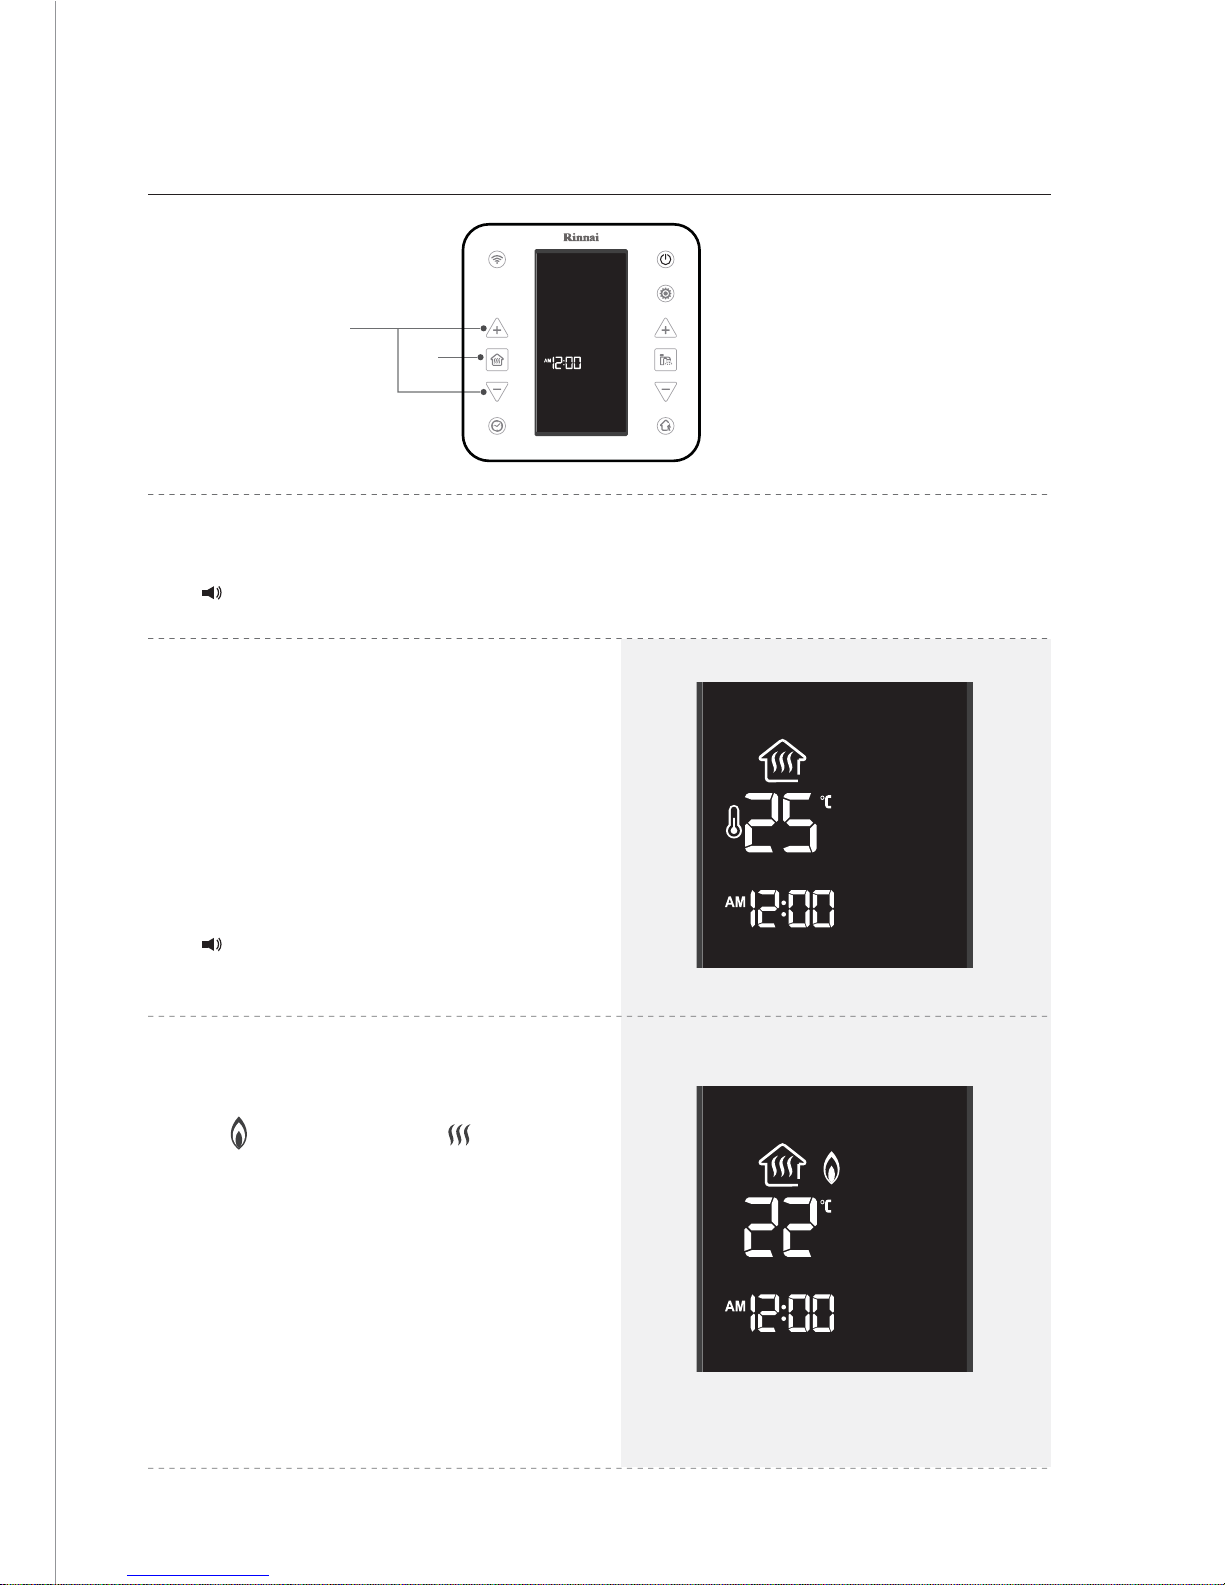
To change heating methods.
The user can choose among two different heating methods.
Installation requirements
• Install the remote controller 1.5 m off the floor, far from external doors and windows.
Indoor temperature (Space heating mode)
•
A temperature sensor attached to remote controller detects temperature of the
room to maintain constant indoor temperature. When the user configures temperature
inside the room, the boiler operates according to temperature setting.
(Default option of this product at the time of purchase is indoor temperature heating.)
Pres
sⓐ(switch heating method) button to
change heating method.
Heating method cannot be switched in
auto mode.
Please press the button after releasing
auto mode.
•
The Wi-Fi Remote controller allows the user to set the water flow temperature for
the heating system.
ⓐ
Start heating by indoor
temperature. (When switched to
Space heating mode)
Start heating by heating water
temperature. (When switched to
Flow temperature mode)
Floor heating (Flow temperature mode)
• The best position to install the remote controller is on an inner wall, without obstacles
around.
Wrong installation places
• In a place where the sun can shine directly on the remote controller.
• On a cold outside wall (provide insulation material behind the remote controller).
• Above a heat source such as a radiator, lamp or television.
Page 10
10
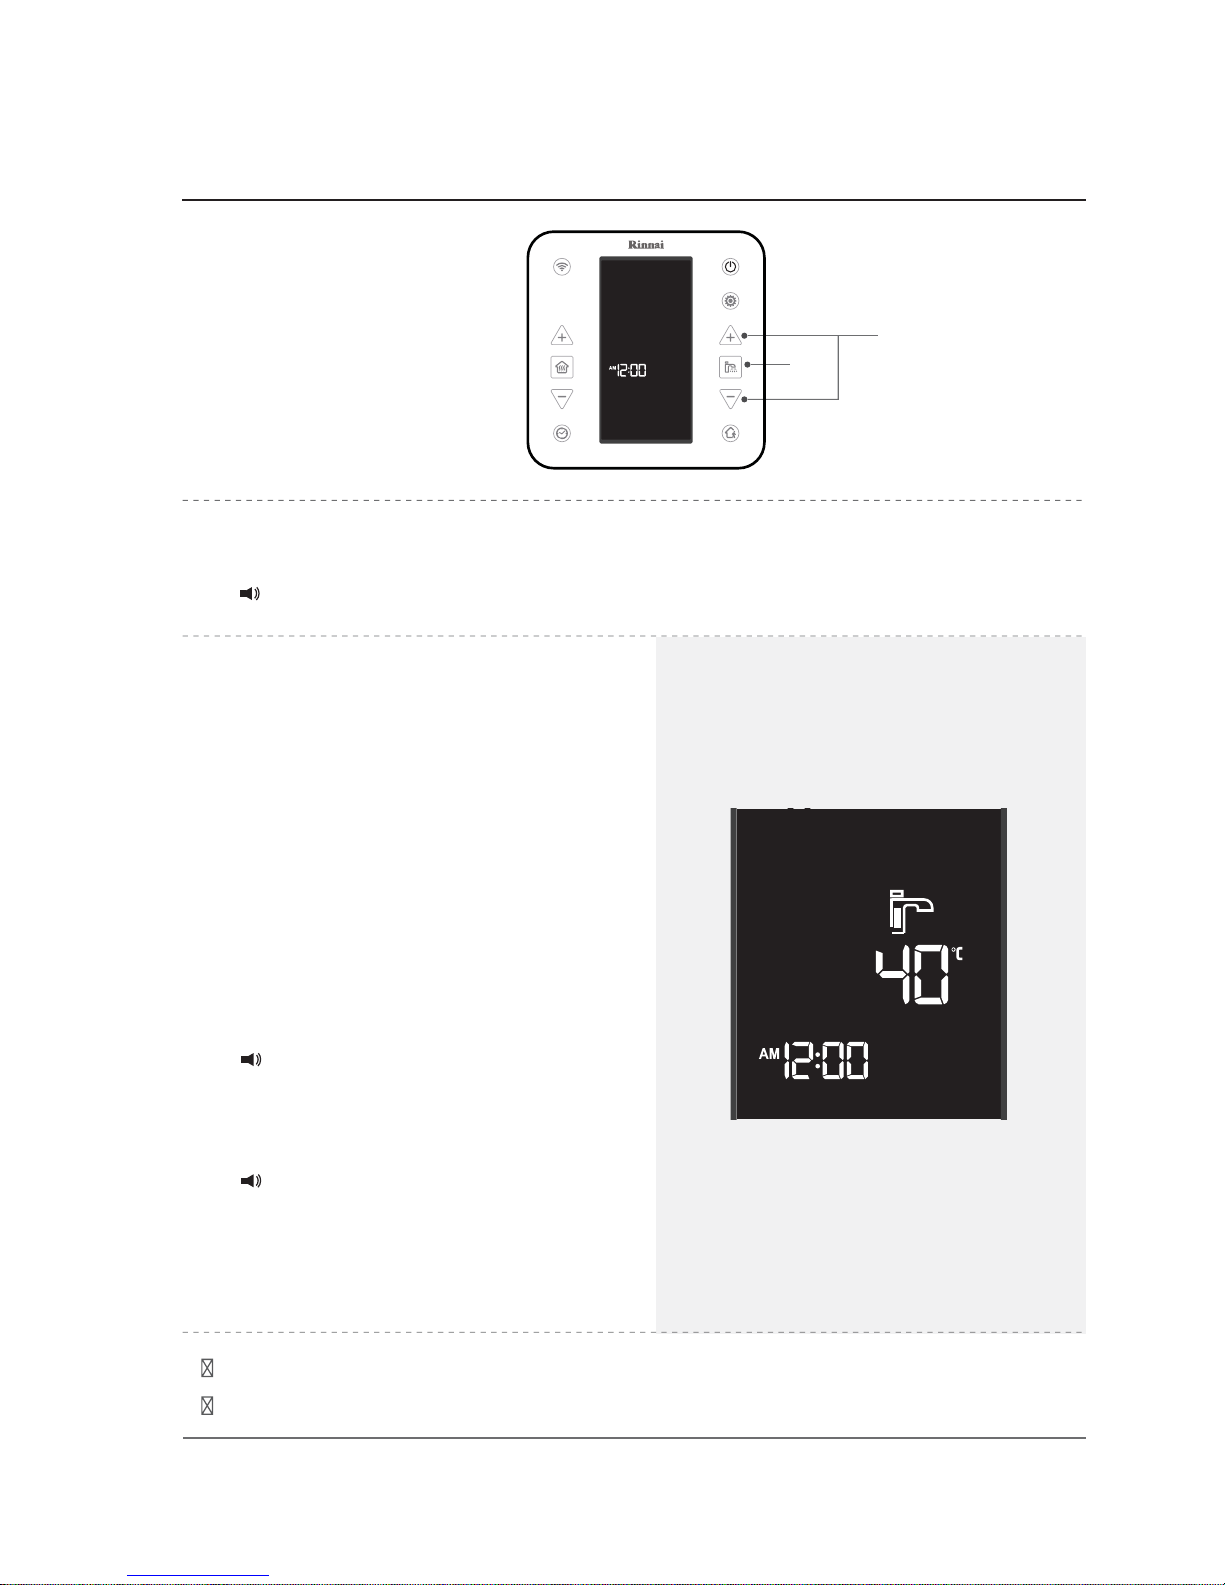
To use heating
1.
Press ⓐ (heating ON / OFF) button.
3.
Heating is operated.
•
When the boiler is in operation,
icon appears and icon flickers.
2.
S
et the wanted heating temperature by
pressing
ⓑ
(increase heating
temperature or decrease heating
tempe
rature) buttons.
• The boiler is not operated when
current temperature is higher than
setting temperature.
ⓐ
ⓑ
Liquid crystal display when [indoor
temperature heating] is used
Heating is ON.
Heating temperature has changed.
Range of temperature setting for indoor
temperature heating is between 5°C and 40°C.
Page 11
11
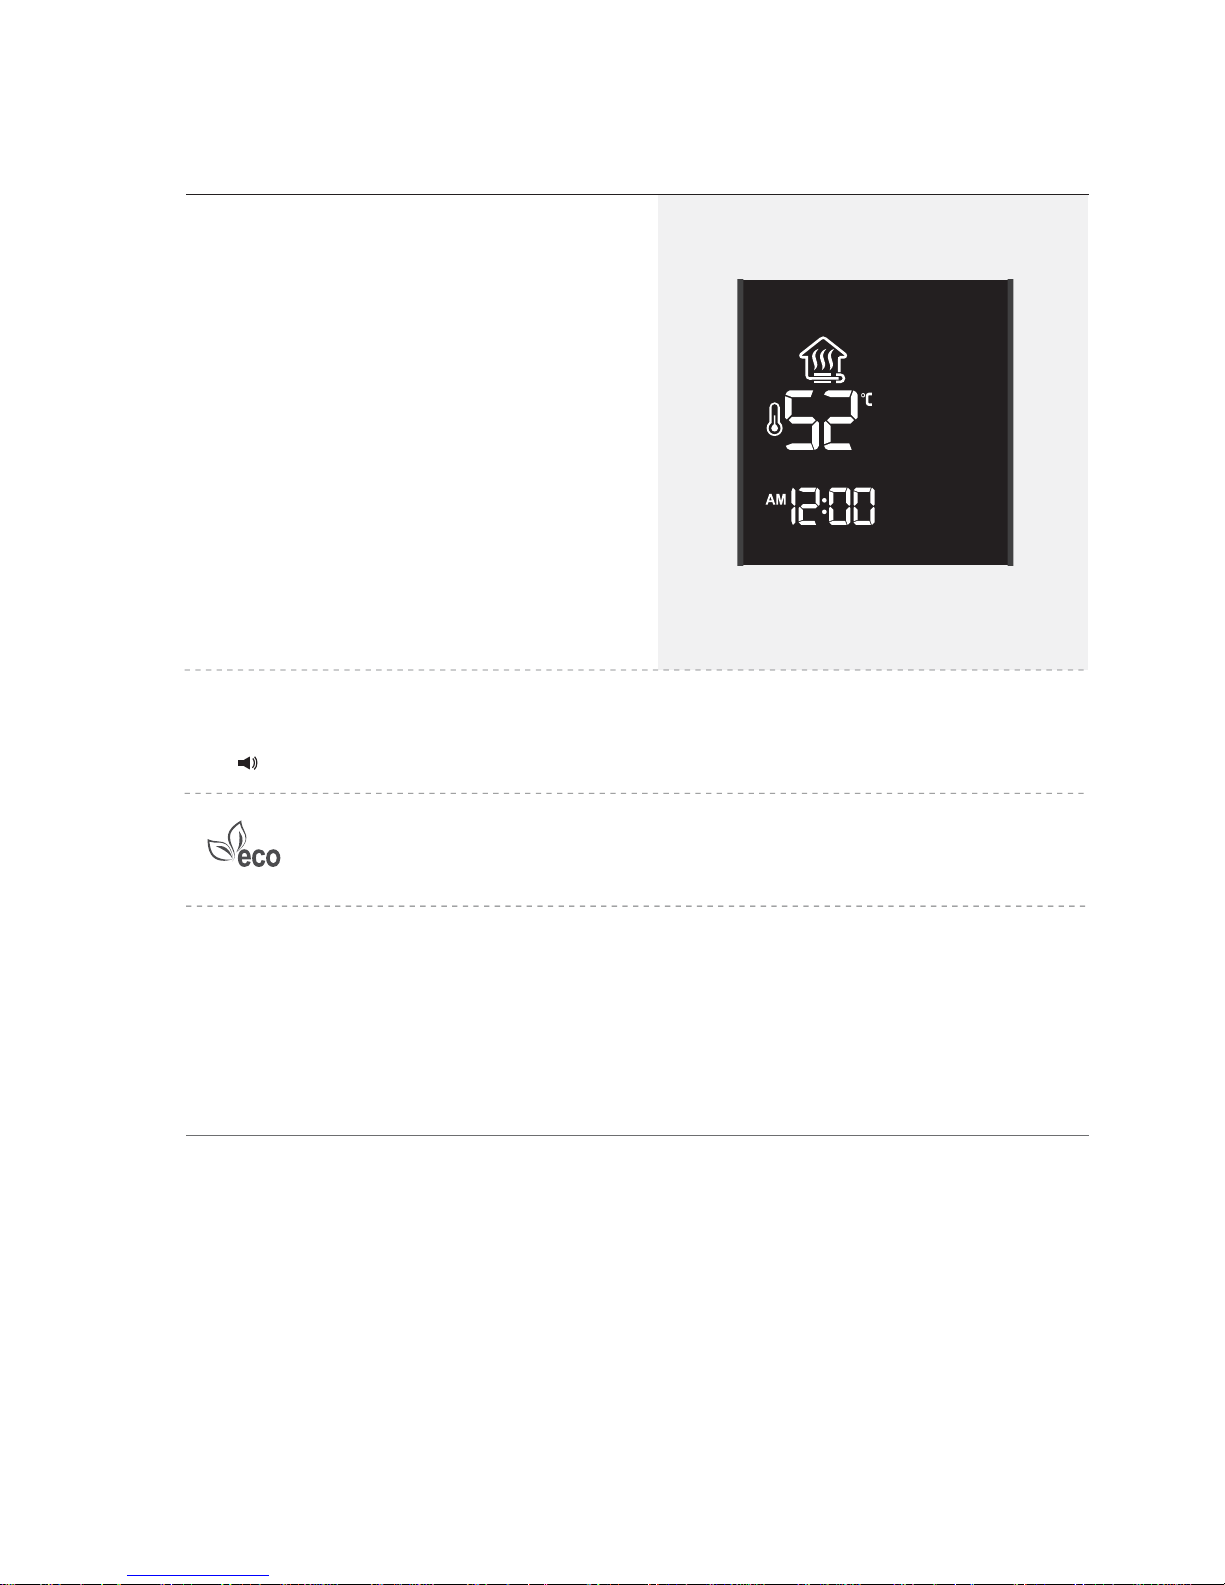
To use heating
When the boiler is operated, current temperature is displayed on the display window
in case of indoor temperature heating and setting temperature is displayed in case
of floor heating.
Press mode / setting button for 3 seconds during use of heating water
or hot water to check heating water temperature of the boiler for 10 seconds.
Heating temperature cannot be controlled in Auto mode and Sleep mode.
4.
Press ⓐ (heating ON / OFF) button to turn heating OFF.
Liquid crystal display when [floor heating]
is used
Range of temperature setting for floor
heating is between 50°C and 80°C.
Heating has been turned off.
Gas rates can be saved as energy efficiency of the boiler is highest in this
mode. ECO icon appears when the boiler uses environment-friendly
combustion with least amount of harmful gases.
Page 12
12
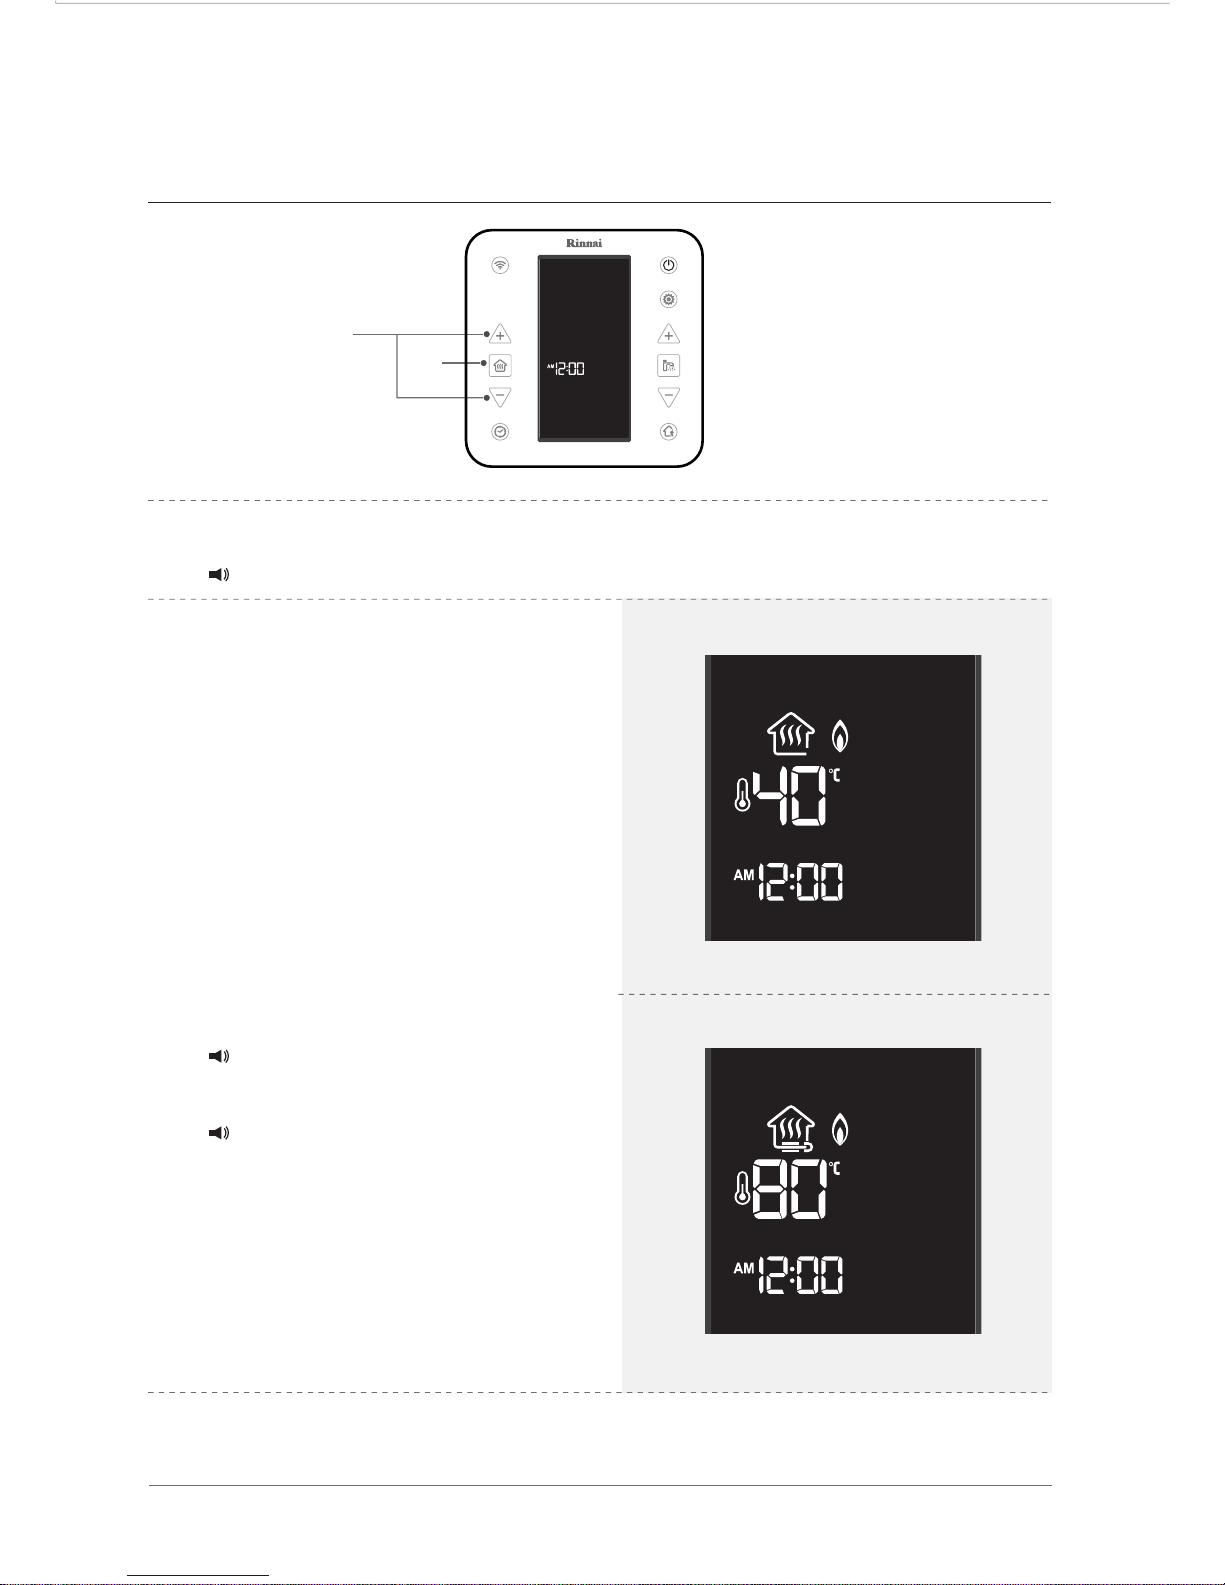
To use rapid heating
When indoor temperature is extremely low, it can be quickly heated by rapid heating function.
Rapid heating function can be operated at maximum setting temperature for 25 minutes
before automatically returning to the previous temperature setting.
Liquid crystal display when rapid heating is
used with [floor heating]
Temperature is automatically changed to 80°C,
the highest temperature possible.
Temperature is automatically changed to 40°C,
the highest temperature possible.
Liquid crystal display when rapid heating is
used with [indoor temperature heating]
ⓐ
ⓑ
1.
Press ⓐ (heating ON / OFF) button.
Heating is ON.
2.
Press ⓑ (increase heating
temperature and decrease heating
temperature) buttons at the same
time.
• Heating is set to highest temperature
possible.
• To
stop rapid heating function, change
setting temperature during operation
or pre
ssⓑ (increase heating
temperature and decrease heating
temperature) buttons at the same time.
Quick heating mode is starting.
(When rapid heating is turned on)
Quick heating mode is over.
(When rapid heating is turned off)
Page 13
13
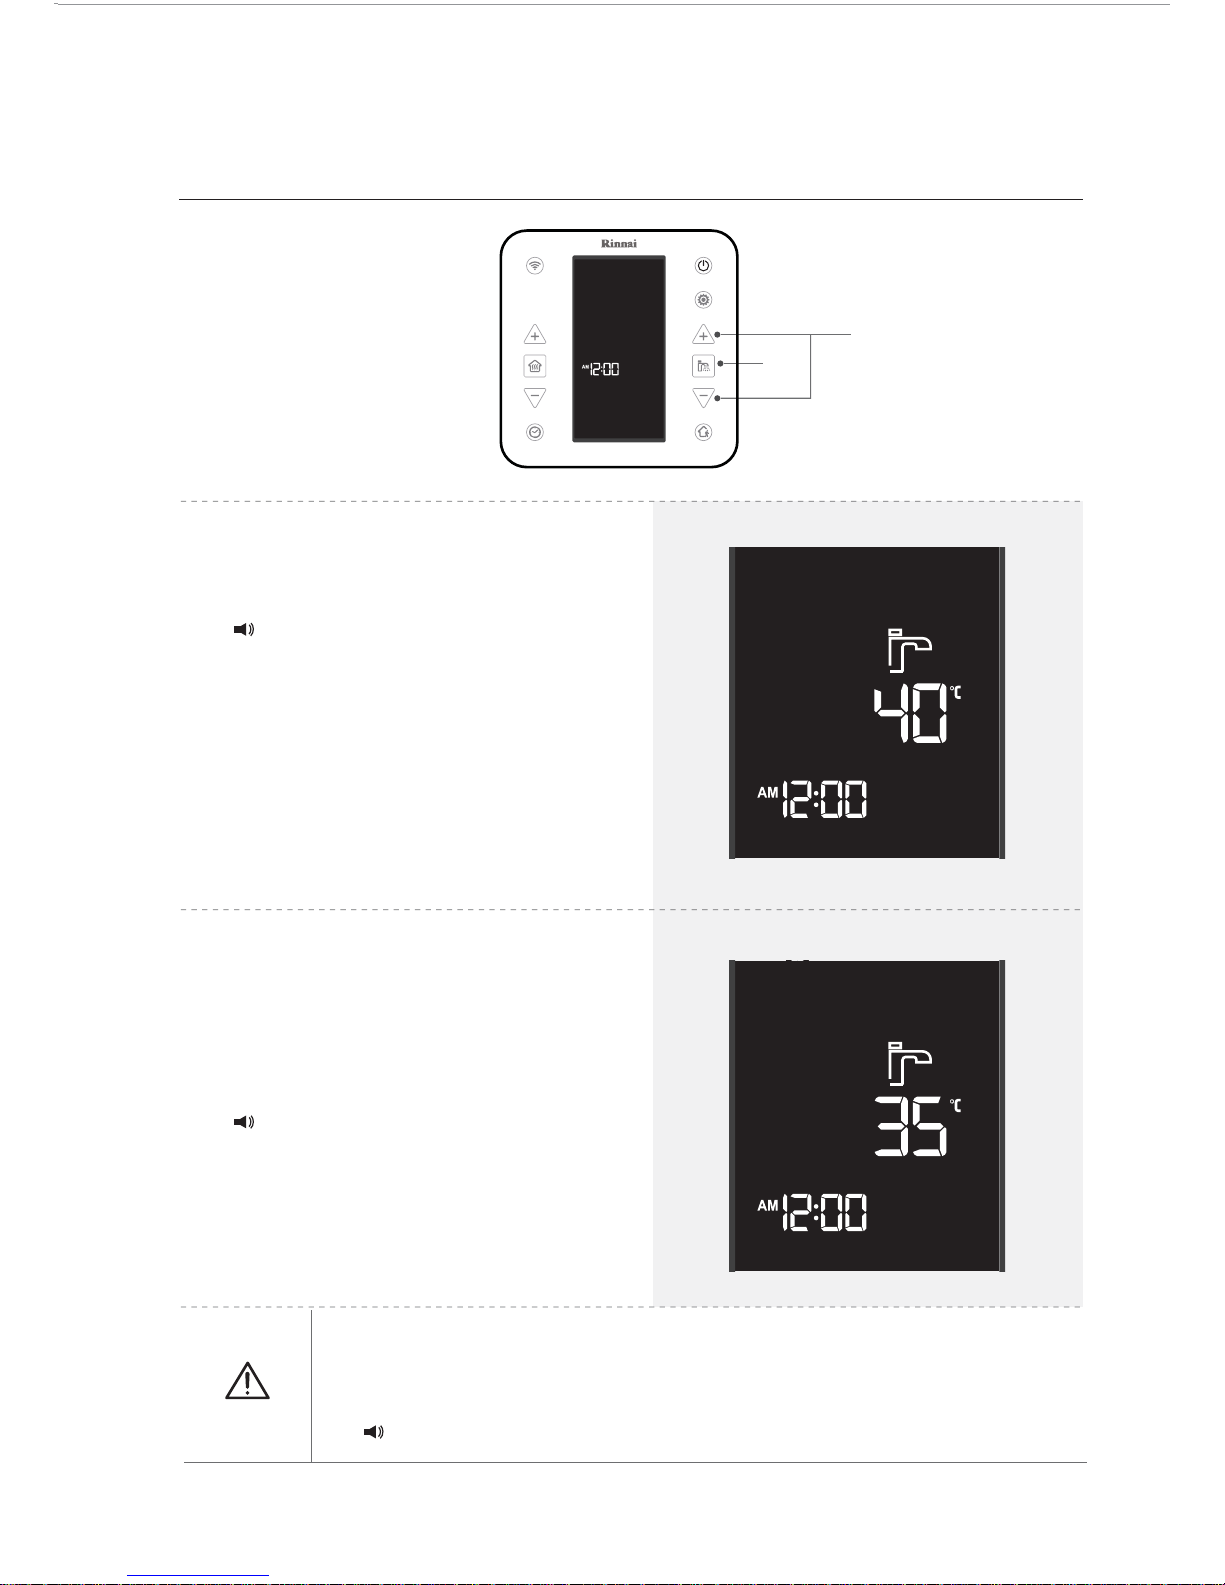
To use hot water
2.
Press ⓑ (increase hot water
temperature or decrease hot water
temperature) buttons to configure
hot water temperature.
ⓐ
ⓑ
1.
Press ⓐ (hot water ON / OFF)
button.
Hot water is available.
Hot water temperature has
changed.
Be careful as hot water temperature is high.
Hot water temperature can be set between 35°C and 60°C. When
changing from 55°C to 60°C, turn water off and press increase hot water
temperature button.
Warning
Page 14
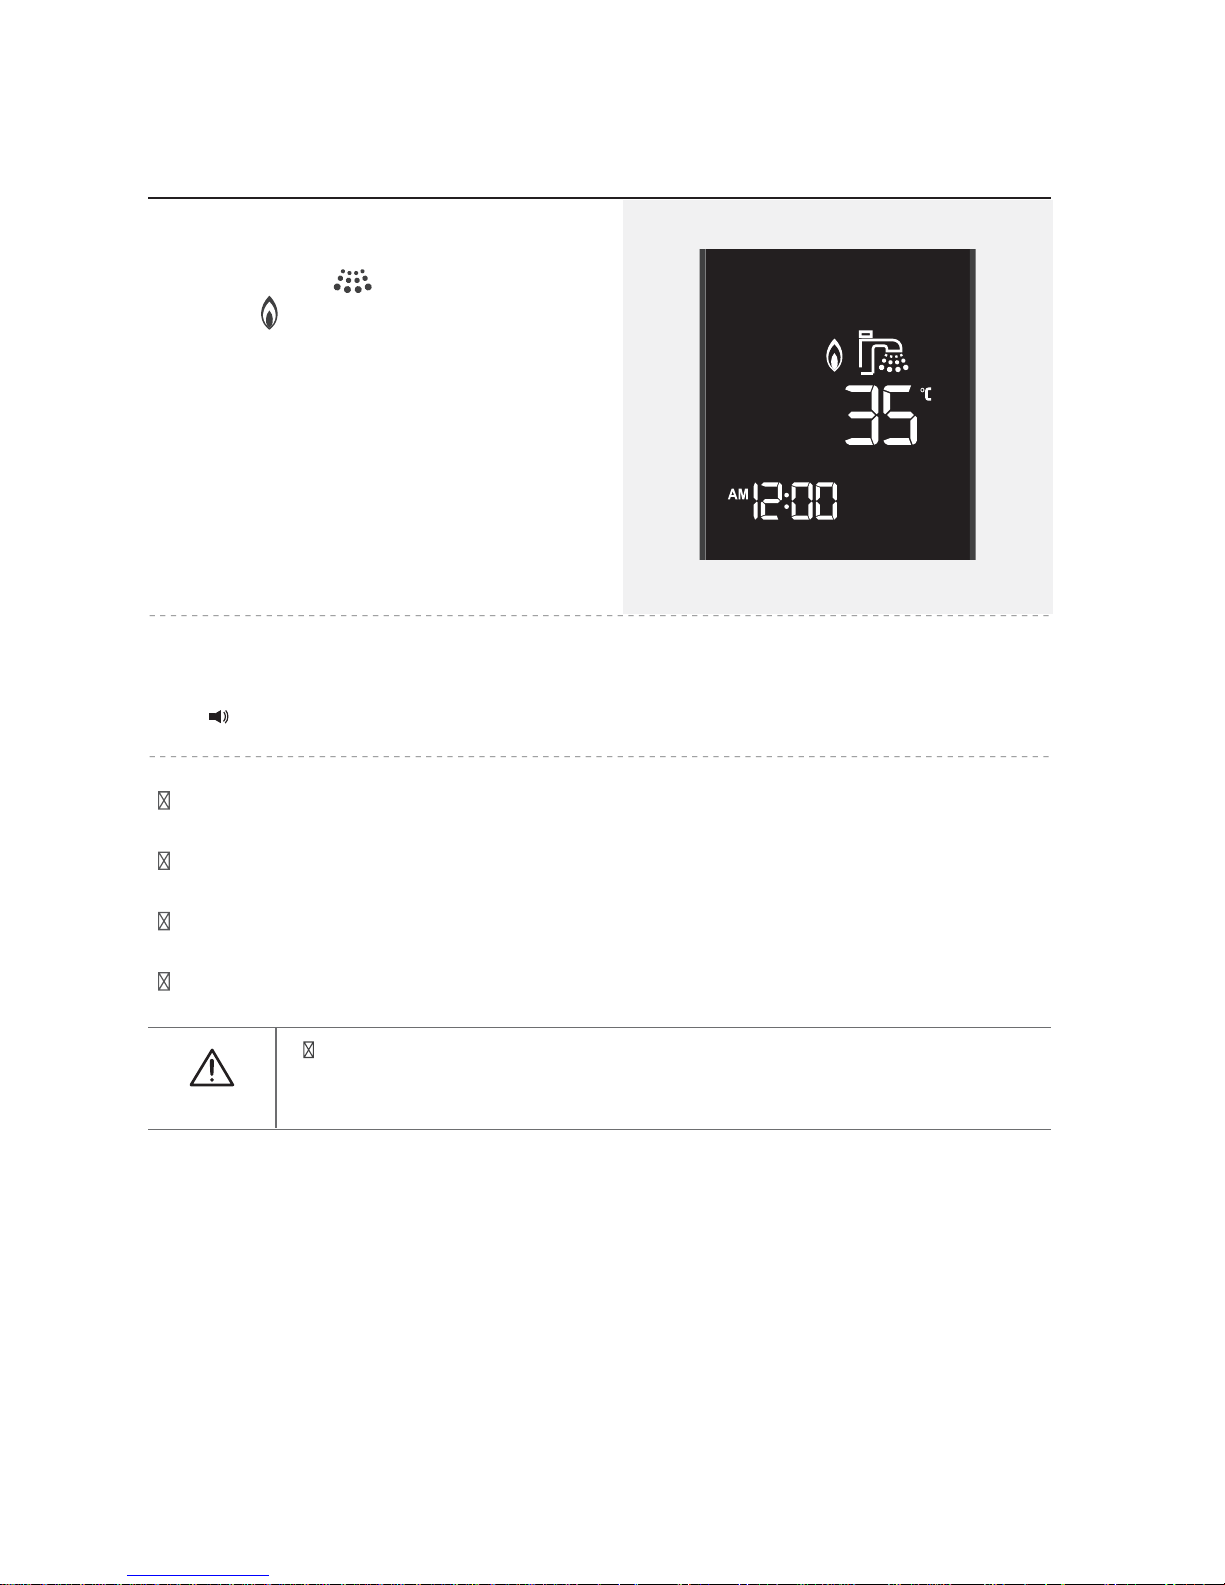
14
3.When hot water faucet is turned ON,
water drop icon flickers together
with flame icon.
4.
Press ⓐ (hot water ON / OFF) to turn the function OFF.
To use hot water
To use hot water at accurate temperature, completely turn the faucet to the hot
water side.
The boiler is not operated when hot water is not used, even if hot water function is
turned ON. It remains in hot water standby mode and does not consume gas.
When heating power button is pressed while using hot water function, both functions
can be used at the same time.
Heating cannot be done with only hot water turned ON.
Hot water and heating functions can be used at the same time by
pressing heating ON / OFF button while using hot water function.
Hot water function has always the priority over heating function.
Caution
Hot water is disabled.
Page 15
15
You can use hot water more quickly with hot water preheating function.
Hot water preheating is automatically turned OFF after 30 minutes.
2.
Press ⓑ (increase hot water
te
mperature and decrease hot water
te
mperature) buttons at the same
time.
• Red color appears on the hot water
display and preheating is turned ON.
• To stop hot water preheating function,
open the hot water faucet or press ⓑ
(increase hot water temperature and
decrease hot water temperature)
buttons at the same time.
To use hot water preheating
ⓐ
ⓑ
1.
Press ⓐ (hot water ON / OFF) button.
Hot water is available.
Preheating hot water is
starting. (When hot water
preheating is turned on)
Preheating hot water is
over. (When hot water
preheating is turned off)
Page 16
16
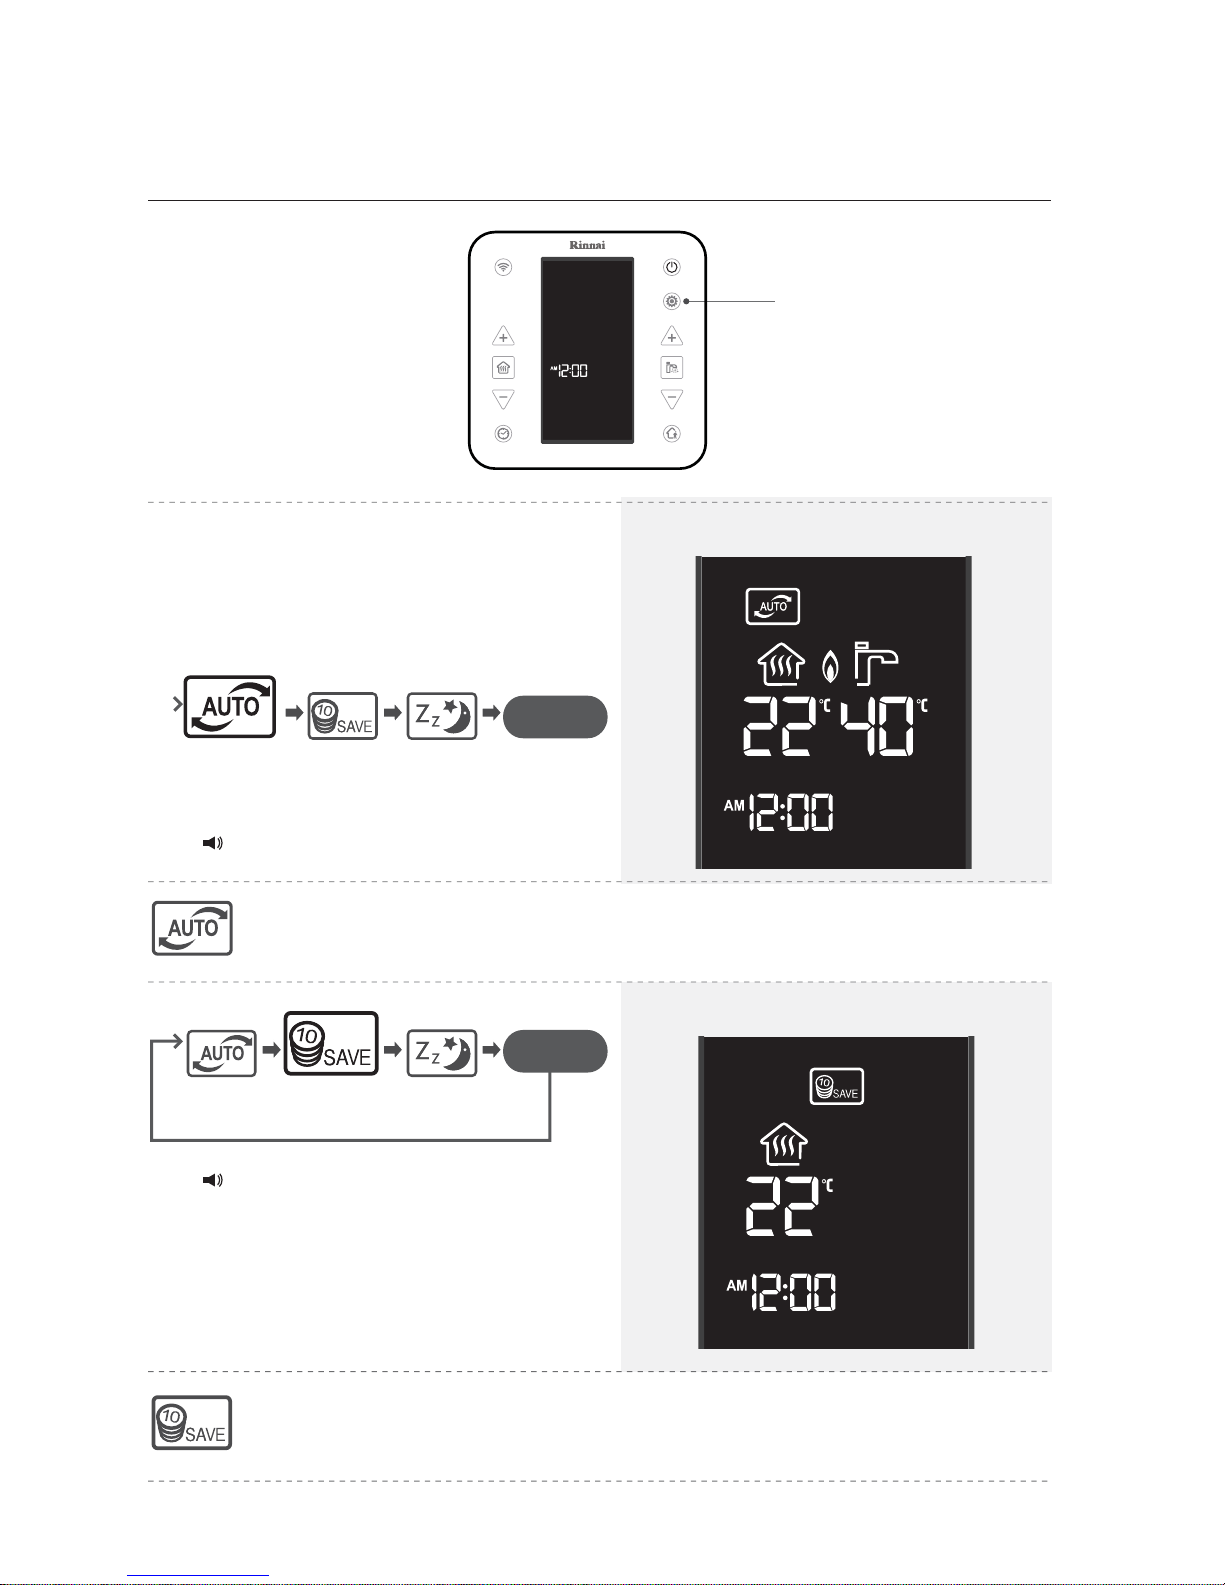
To use modes
1. Press ⓐ (mode / setting) button and
select the mode you want.
• Mode is changed as follows whenever
ⓐ (mode / setting) button is pressed.
ⓐ
Automatic heating is starting.
Save mode is starting.
This is a function that optimizes user convenience by judging external temperature
and automatically supplying pleasant heating and hot water. Sensible temperature
felt by the user may differ according to the environment of use.
This function adjusts combustion/extinguishing time and limits heating temperature
to save energy. (In save mode, maximum temperature setting is limited to 20°C for
indoor temperature heating and 60°C for floor heating.)
Liquid crystal display when [indoor temperature
heating] is done in auto mode
Liquid crystal display when
[Save mode] is used
Sleep
mode
Save
mode
Auto
mode
Sleep
mode
Save
mode
Auto
mode
OFF
OFF
Page 17
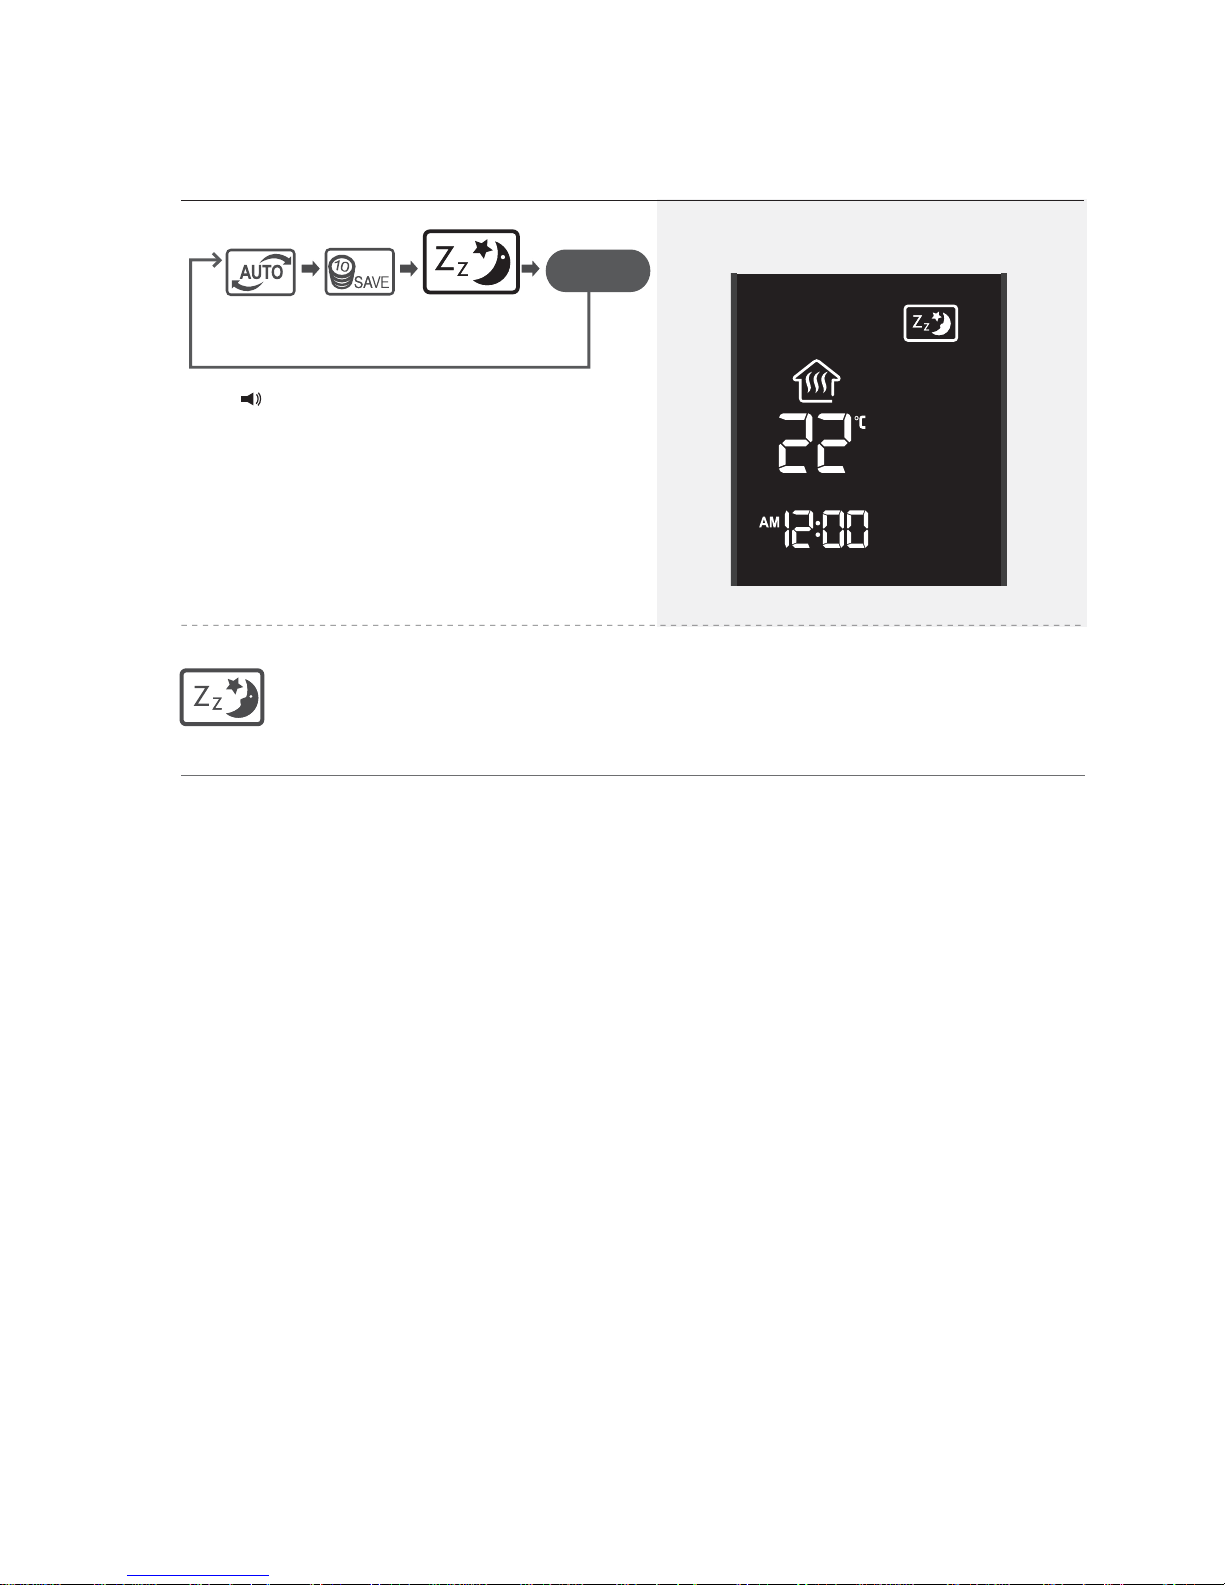
Liquid crystal display when
[sleep mode] is used
Auto
mode
Save
mode
Sleep
mode
OFF
This is convenient function that automatically adjusts indoor temperature
for 6 hours after sleep mode is set to provide sound sleep.
Sens
ible temperature felt by the user may differ according to the environment
of use.
Sleep mode is starting.
17
To use modes
Page 18

18
To use outing
ⓐ
For short periods of absence, this mode allows to reduce fuel consumption
and keeps the heating system warm and ready for the following activation.
•
When the Outing mode is activated
heating is stopped for 4 hours and
CH set temperature cannot
be modified. The boiler enters a 4h
loop as long as the function is
enabled. After 4 hours the boiler
ignites and operates for 10 min at a
flow temperature of 50°C only if the
heating system temperature is
below 25°C. again during
Liquid crystal display when [Indoor temperature
heating] is used with outing
Liquid crystal display when [Floor heating]
is used with with outing
1. Press ⓐ (outing) button .
Outing mode is enabled.
Outing mode is over.
ⓑ
Page 19

19
To use reservation timer
Set current time (refer to page 7)
• Heating program number is changed as
below whenever timer button is pressed.
ⓐ
ⓑ
OFF
Standard 1
• Choose the heating program and wait to finish timer setting.
• To cancel the timer, press timer button during operation.
• When the timer function is reused after a previous activation, it starts with the
last heating program that has been selected.
• Th
ere are three basic lifestyle patterns for timer numbers ~ , which cannot
be changed. If you would like to newly configure your own lifestyle pattern, ,
can be used.
1.
Press ⓐ (heating ON / OFF) button.
Heating is ON.
2.
P
ress ⓑ (timer) button.
3.
Use ⓑ (timer) button to set the
wanted heating program.
Heating program is starting.
Standard 2
Personal 2 Personal 1
Weekend
Page 20

20
To use reservation timer
ⓓ
ⓑ
ⓐ
ⓒ
1.
Press ⓐ (heating ON/OFF) button.
Heating is ON.
2.
Press ⓑ (timer) button and choose program 4 or 5.
3.
Press ⓒ (increase heating
temperature or decrease heating
temperature) buttons to move the
c
ursor to the wanted time and press
ⓓ (settings) button to confirm.
To turn off the timer press .
ⓓ
4.
Repeat the same method to set timer for the wanted time. Once timer
setting is completed, timer heating is automatically started after a few
seconds.
Please select heating time.
Heating program is starting.
Page 21

21
To use reservation timer
5.
Please press ⓑ (Timer) button after time set.
6.
Please
press ⓒ to set the daytime
ⓑ
temperature (H) and press
to confirm.
7.
Please
Boiler will start heating (CH).
Heating program is starting.
press ⓒ to set the night
ⓑ
temperature (L) and press
to confirm.
Page 22

22
To use Wi-Fi
ⓐ
1.
Press ⓐ (Wi-Fi) button.
will flicker and then turn ON.
2.
T
o disable Wi-Fi function, press ⓐ (Wi-Fi) button again.
Wi-Fi function will be stopped after is turned OFF.
Wi-Fi is connecting.
Wi-Fi is disconnected.
When the boiler is controlled on a smart phone application, it can only be used
when temperature controller is connected to Wi-Fi.
(Refer to the following page to download the application.)
Page 23

23
How to download application
Rinnai Wi-Fi boiler application can be
downloaded on Play Store or iPhone
A
pp Store by searching with the keyword
‘Mirai’.
Mirai
application is
optimized fo
r iOS
and Android.
Please check the version of OS on your
smart phone.
Supported versions:
- Android: from Gingerbread 2.3
- iOS:
Some functions may not work properly
when th
e application is used on other
devices or tablets.
Mirai
from iOS7
Page 24

24
Register the user of the Wi-Fi boiler.
How to register (for Android users)
Correct method of use (application)
Enable Wi-Fi connection on your
device.
1.
Run the application.
3.
Enter ⓐ (Country),
ⓑ (Phone number) and press
ⓒ (OK)button.
However, when ‘Proceed without
entering phone number’is selected,
you can enter user information on
the following page without entering
phone number.
2.
Read the terms of agreement of
Rinnai app, select ⓐ (Agree),
and press ⓑ (OK) button.
ⓑ
ⓐ
If the GPS function of the smartphone is switched off during the registration procedure
the GPS Notifications will not be available.
ⓐ
ⓑ
ⓐ
,
ⓐ
ⓑ
ⓒ
ⓑ
NB: during the registration procedure 3G/4G connection must be switched off.
Page 25

25
Correct method of use (application)
4.
Enter ⓐ(User Nickname),
ⓑ(Password), ⓒ (Question and
answer to find lost password),
and press ⓓ to scan the boiler
ⓔ
After pressing the button , check
the informations collected through
Q
R code: in particular verify the type
of g
as used. In case it is required,
proceed with a manual introduction
of data.
※ Password must be at least 4
characters long.
ⓐ
ⓑ
ⓒ
ⓔ
ⓓ
ⓐ
5.
Press ⓐ (Wi-Fi) button of
te
mperature controller for 3 seconds
to enter registration mode.
Registration can only be done when
heating and hot water are turned OFF
on temperature controller.
6.
Ch
eck the 4-digit unique ID
displayed on the display window
of temperature controller.
• R
egistration mode is turned OFF after
10 minutes.
• The following letters and numbers can
appear on temperature controller.
Numbers :
Letters :
4-digit unique ID
Please run the Rinnai boiler application
and choose thermostat ID.
ⓐⓑⓔ
ⓓ
ⓒ
AUTO SCAN QR CODE
QR code, then press (OK).
ⓓ
Page 26

26
How to register (for Android users)
7.
Select the wireless router to be
used at home.
8.
Ent
er ⓐ (Password) of the
wireless router set by the user
and press ⓑ (OK) button.
ⓐ
ⓑ
ⓐ
Page 27

27
10.
R
egistration of remote controller
has been successfully
completed.
How to register (for Android users)
9.
Select the item with 4-digit unique
ID displayed on temperature
controller.
•
Remote controller item type
Rinnai - #### ( 4-digit unique ID)
123A
Wi-Fi registration is complete.
Start over from step 1 if registration fails.
123A is changed according to each device.
4-digit unique ID
Registering...
Page 28

28
How to register (for iOS users)
Register the user of the Wi-Fi boiler.
If the GPS function of the smartphone is switched off during the registration procedure
the GPS Notifications will not be available.
1.
Run the application.
2.
Read the terms of agreement of
Rinnai app, select ⓐ (Agree),
and press ⓑ (OK) button.
ⓑ
ⓐ
Page 29

29
How to register (for iOS users)
3.
Enter ⓐ (Country),
ⓑ (Phone number) and press
ⓒ (OK) button.
However, when ‘Proceed without
entering phone number’ is
selected, you can enter user
information on the following page
without entering phone number.
4.
Enter ⓐ(User nickname),
ⓑ(Password), ⓒ (Question and
answer to find lost password),
and press ⓓ to scan the boiler QR
ⓔcode, then press (OK).
After pressing the button check
the informations collected through
Q
R code: in particular verify the type
of g
as used. In case it is required,
proceed with a manual introduction
of data.
※ Password must be at least 4
characters long.
ⓐ
ⓐ
ⓑ
ⓐ
ⓑ
ⓒ
ⓔ
ⓓ
ⓐⓑⓔⓓⓒ
AUTO SCAN QR CODE
ⓒ
ⓓ
Page 30

30
How to register (for iOS users)
ⓐ
7.
Press ⓐ (Home) button on your
device and then press ⓑ (Setting)
button.
ⓐ
5.
P
ress ⓐ (Wi-Fi) button of temperature
controller for 3 seconds to enter
registration mode.
Registration can only be done when heating
and hot water are turned OFF on
temperature controller.
6.
Check the 4-digit unique ID displayed
on
the display window of temperature
controller.
• Registration mode is turned OFF after
10 minutes.
• The following letters and numbers can
appear on temperature controller.
Run the Rinnai boiler application and
select ID of temperature controller.
Numbers :
Letters :
4-digit unique ID
ⓑ
Page 31

31
How to register (for iOS users)
9.
Select the item with 4-digit unique
ID displayed on temperature
controller.
• Type of temperature controller display.
Rinnai - ##### ( 4-digit unique ID)
8.
Select ⓐ Wi-Fi setting menu on
the setting screen.
ⓐ
ⓐ
Rinnai_123A
Rinnai_123A
ai_123A
Rinnai_123A
Rinnai_123A
※ 123A is changed according to each device.
4-digit unique ID
Page 32

32
How to register (for iOS users)
10.
Return to the application and
press ⓐ (OK) button.
ⓐ
11.
Select the wireless router to be
used at home.
Page 33

33
13.
Temperature controller has been
successfully registered.
How to register (for iOS users)
12. Enter ⓐ (Password) of the wireless
router set by the user and press
ⓑ (OK) button.
Wi-Fi registration is complete.
ⓐ
ⓑ
Registering...
Page 34

34
Login
2.
You can find your password using
the question selected during
registration.
If password is lost.
You can use the Wi-Fi boiler after logging in.
1.
Enter the password selected
during registration and press
ⓑ (OK) button.
ⓐ
ⓑ
Password
Page 35

35
3.
Enter new ⓐ (Password) and
press ⓑ (OK) button. You may
now log in with the new password
on the login screen.
Login
ⓑ
ⓐ
Type in your password(4~16digts)
Page 36

36
• ⓖ button can be pressed to set 4-hour
outing
• ⓗ
(Indo
or Temp/Floor heating) button can
be used to switch between indoor
temperature heating and floor heating.
SMART CONTROL function to easily and simply create a pleasant environment.
Auto: indoor temperature is automatically adjusted on a real-time basis.
Sleep: temperature is automatically heated to allow for deep sleep
Save: energy and gas rates can be saved.
Reservation timer: heating is operated according to timer setting.
Heating can be controlled on the user’s device.
1.
Press ⓐ (Power) button to turn the
power of temperature controller ON.
2.
Press ⓑ to enter heating
control screen.
4.
Adjust ⓓ to left and right or press
ⓔ button to select the wanted
setting temperature, and press
ⓕ (Confirm) button.
ⓒ
ⓓ
ⓐ
ⓑ
3.
Press ⓒ (Heating) button to start
heating.
How to use heating
ⓖ
ⓗ
ⓔ
ⓕ
Heating
Page 37

37
ⓖ is enabled when hot water is in use
and disabled when hot water is not in
use.
ⓗ (Hot water preheating) button can
be used to start / stop preheating
function.
When hot water is in use, hot water setting cannot be changed using the application.
ⓕ
ⓐ
ⓒ
Hot water can be controlled on the user’s device
1.
Press ⓐ (Power) button to turn t
he
power of temperature controller
ON.
3.
Press ⓒ (Hot water) button to
start hot water function.
2.
Press ⓑ to enter hot water
control screen.
4.
Adjust ⓓ to left and right or press
ⓔ button to select the wanted
setting temperature, and press
ⓕ (Confirm) button.
ⓓ
ⓔ
ⓔ
How to use hot water
ⓑ
ⓗ
ⓖ
Hot water
Hot water
preheating
+
Conrm
-
Page 38

The APP will display the 5 types of 24 hours reservation programs.
The selected reservation program will operate with daytime preset temperature ⓖ (H21°C)
and preset night temperature ⓗ (L16°C).
Temperatures H and L can be changed by the user for all the 5 program types.
38
1.
Press ⓐ (Reservation) button to
change timer setting.
2.
Press ⓑ (24-hour timer) button to
select 24-hour timer.
3.
Press ⓒ (Setting) button to
change timer.
4.
Press ⓕ (OK) button.
5.
After setting the timer, press timer
button on SMART CONTROL to
operate the timer.
(Refer to page for heating screen)
Reservation timer setting
Heating timer can be set for different hours.
■ 24-hour timer setting
ⓑ
ⓐ
ⓒ
ⓕ
• Types of 24-hour timer include
Standard 1, Standard 2,
Weekend, Personal 1 and
Personal 2.
•
Standard 1, Standard 2
and Weekend are basic modes.
New lifestyle patterns can
be set using Personal 1 and
Personal 2. (Standard 1 ,
Standard 2 and Weekend
cannot be changed.)
•
To set Personal 1 and Personal 2
select ⓓ as Personal 1 or
Personal 2 and choose the time
wanted for heating in ⓔ.
ⓓ
ⓖ
ⓔ
ⓗ
Page 39

39
The selected reservation program will operate with daytime preset temperature ⓖ (H21°C)
and preset night temperature ⓗ (L16°C).
Temperatures H and L can be changed by the user.
ⓔ
ⓗⓖ
Weekly timer can only be set and
changed on smart phone.
1.
Press ⓐ (Reservation) button to
change timer setting.
4.
Press ⓓ button to set / cancel
timer for the corresponding day.
5.
Chose
the time wanted for
heating in
ⓔ.
2.
Press ⓑ (Weekly timer) button to
select weekly timer.
3.
Press ⓒ (Setting) button to
change timer.
• Press ⓕ (OK) button once setting
is done.
Reservation timer setting
Heating timer can be set for different days of the week.
■ Weekly timer setting
ⓐ
ⓒ
ⓑ
ⓓ
ⓕ
16
L
Page 40

40
Additional functions
■ Outing / returning notification
Outing/return alarm notification requires
GPS function on your smart phone.
Since outing/return alarm is run
based on location information of GPS,
it can differ from actual conditions
depending on the siuation and result
in large battery consumption of the
device.
Unnecessary boiler operation is reduced during outing and pleasant heating environment
is provided by heating the house before returning.
2.
ⓑ can change distance between
the house and user.
(2, 4, 6, 8 and 10km)
3.
ⓒ can enable outing / return
notifications.
1.
Alarm can be turned ON and
OFF by pressing button
ⓐ.
ⓑ
ⓒ
ⓐ
Page 41

41
※ When wake-up mode is set, hot water is
automatically preheated 10 minutes
before waking up.
■ Wake-up mode
Pleasant and quick hot water is provided in the tiresome and busy morning.
ⓓ
• Setting can be repeated
Additional functions
1.
Press button ⓐ to set wake-up
time and day.
2.
Press button ⓑ to set volume
of alarm and alarm sound.
3.
ⓒ can confiqure heating and
hot water preheat functions for
wake-up mode.
▶
ⓓ can change wake-up time and
day.
ⓐ
ⓒ
ⓑ
07
Page 42

42
■ User notification
ⓔ can turn alarm function ON / OFF.
ⓕ can set volume of alarm sound
ⓖ can set alarm sound.
ⓕ
ⓖ
ⓔ
Current boiler status is displayed at the wanted time.
1.
Select the time you want to be
ⓐ
notified and press ⓑ (OK) button.
Additional functions
ⓐ
ⓑ
On
Page 43

43
Additional functions
■
Status change alarm,
Precaution alarm, Error alarm
ⓐ
ⓑ
ⓒ
■ Setting / Guide
Additional functions
1.
Press ⓐ button on the APP
controller.
2.
Press ⓑ button to change name
of temperature controller or add /
delete users.
ⓐ
ⓑ
ⓐ Status change alarm is a function
that notifies changes in the setting
of the boiler made by other users.
ⓑ Precaution alarm is a function
that notifies precautions about
times for inspection.
ⓒ Error alarm is a function that
notifies occurrence of error in
the boiler, type of error and
troubleshooting method.
Test 1
Test 2
Test
est
1
Test
2
Test
screen to add a new remote
Page 44

44
This function can additionally register
boilers at your parents’ house or vacation
house on your smart phone.
(You can add up to 3 Rinnai Wi-Fi boilers.)
User can be added without going through
a separate registration process.
New remote controller can be
registered by entering the name
of new device.
Additional functions
3.
ⓒ
The list an buttons allow to
check the registered users and
add/delete users.
(U
p to 10 users can be added
for each temperatu
re controller.)
1.
Press ⓐ button to change name
of temperature controller.
2.
ⓑ When several Rinnai Wi-Fi
boilers are used, select the boiler
to change the setting.
On
ce selected, ‘Select’ is switched
to ‘Selected’.
4. P
ress ⓓ button to delete
corresponding temperature
controller.
ⓓ
ⓐ
ⓑ
ⓒ
****
****
Boiler
Boiler
aaa
Page 45

45
■
App User Guide
■
Change user information
ⓓ
ⓐ
ⓑ
ⓒ
•
Change ⓐ (User nickname).
•
Change ⓑ (Password).
•
Enter ⓒ (Current password) and then
enter new password.
•
Once input is done, press ⓓ (OK)
button.
Additional functions
■ Gas Consumption
Page 46

46
Log out
Version
•
You can check the version of the
application.
•
You can check the privacy of the
application. Press ⓐ (Info Privacy)
button.
•
Press ⓐ (Log out) button to go
back to the Log in page.
Additional functions
ⓐ
Info privacy
ⓐ
Page 47

47
Matters to be confirmed before reporting of failure
When there is a problem in the boiler, check the following matters before requesting
a service.
Self-diagnostic
indication
Matters to be confirmed Measures
1. Immediately stop using the boiler.
2. Contact the installer to request inspection or repair.
1. Tighten the wall fixing screws to prevent shaking.
2. Contact the installer to request inspection or repair.
3. Open the manual air drain cork installed on top of
distributor in each room to drain air out of heating
pipes.
1. Insert the power cord.
2. Check setting temperature and current temperature.
3. Turn the boiler off and then turn it on. If the same
symptom is repeated, contact our service center.
4. Open the intermediate gas valve or replace to a new
one in case of LP gas.
1. Turn heating on using heating power button.
2. Appropriately adjust heating temperature.
3. Reduce timer or cancel outing mode.
4. Heating cannot be done while using hot water.
5. Open valve in each room.
6. Adjust temperature in each room when room
control is used.
7. Clean the heating filter. (Refer to page 18)
8. Open the manual air drain cork installed on top of
distributor in each room to drain air out of heating
pipes.
1. Turn hot water on using hot water power button.
2. Wait until water is supplied or open the water s
upply valve.
3. When water pressure is low and flow of water is
less than 2.3l per minute with the faucet fully
turned on, hot water cannot be used. Request
installation of a pressure device.
4. Adjust the faucet to flow of 2.3l per minute.
5. Adjust the amount of cold and hot water mixed.
1. Configure hot water temperature as high.
2. The amount of hot water is reduced when it is
used in many places at the same time.
3. Reduce the amount of cold water.
1. Is air supply / exhaust hole blocked?
2. Is air supply or exhaust system
disconnected or bent?
1. Is the power cord connected?
2. Is setting temperature lower than current
temperature?
3. Does [11] appear on the liquid crystal
display?
4. Is gas supplied properly?
1. Is the boiler attached properly to a wall?
2. Is the noise caused by vibration of air
supply or exhaust system?
3. Is the sound of water flowing inside pipes
large?
1. Is heating turned on?
2. Is heating temperature too low?
3. Is timer or outing function set?
4. Is hot water in use?
5. Is valve of each room closed?
6. Is controller of each room turned off?
7. Is the heating filter blocked?
8. Is there any air remaining in pipes?
1. Is hot water turned on?
2. Is there water outage or is water supply
valve closed?
3. Is water flow low because of low water
pressure?
4. Is the faucet opened too little?
5. Is the faucet leaned too much to cold
wat
er side when mixing cold and hot water?
1. Is hot water temperature setting low?
2. Is hot water being used in many places
at the same time?
3. Is the amount of cold water too much?
There is a
gas smell.
There is a smell
of exhaust gas.
Gas cannot
be ignited
Abnormal
noise is created.
Room does not
get hot.
Hot water does
not come out.
Hot water
temperature is
too low.
1. Immediately stop using gas, close the intermediate gas valve, and open all windows and doors for
ventilation.
2. Never use flames like matches and lighters, indoor light switches or electronic devices as spark can
cause explosion.
3. Contact the gas supplier.
- Regularly perform soap test on gas pipe to check leakage of gas.
Page 48

48
Matters to be confirmed before reporting of failure
When the boiler is not operated and numbers flicker on the liquid crystal display of temperature controller,
check the following matters. (Check the left two digits among four digits displayed on the liquid crystal display.)
Self-diagnostic
indication
Status of
use
Details
Measures
• Turn off the hot water faucet and press hot water power button on
temperature controller to restart the boiler.
• If no hot water faucet is turned on, there is possibility of water leak
in hot water pipe. Request the installer for inspection and repair.
• Check "password" and network connection again
• Check security setting (Set WPA, WPA2 only)
• When repeating the same symptoms, please contact our service center.
• Check the type of boiler in use.
• Complete the registration wifi remote controller within 10 minutes.
• Check whether water is supplied properly.
• Check frost in heating or water supply pipe.
• If initial air drain is not sufficiently done, remove and reconnect
power to repeat trial run.
• If there is no problem, remove and reconnect the power cord
and turn the boiler on.
• Check whether valve in each room is open.
(At least 1 valve must be open.)
• Open the manual air drain corks installed on top of distributor in
each room to drain air out of heating pipe.
• Clean the heating filter. (Refer to page 18)
• Check hot water or direct water valves for unnecessary opening
and water leak.
• Hot water icon flickers when hot water is continuously used for
1 hour or longer.
•
Clean the heating filter. (Refer to page 18)
• Check whether the intermediate gas valve is open.
Turn heating off and restart it.
• Check whether gas supply pressure is normal.
(Turn another gas device on.)
• Request inspection of the gas supplier.
• Turn off with heating or hot water power button and restart.
• If the same symptom recurs, contact our service center for service.
• Turn off with heating or hot water power button and restart.
• If the same symptom recurs, contact our service center for service.
Hot water used for
8 hours or longer
Direct water or hot
water is used for
1 hour or longer
Heating filter
blocked
No ignition
Accidental fire
Problem in safety
circuit, temperature
fuse or overheat
prevention device
Abnormal water
circulation
Overheat detection
Abnormal heating
thermistor
Abnormal low
temperature
thermistor
07
11
12
14
15
16
31
32
Hot water
Hot water
Heating
Heating,
hot water
Heating,
hot water
• Immediately call the technical support service of Rinnai.
Incorrect
adjustment of the
PCB microswitches.
20
Heating,
hot water
Heating,
hot water
Heating,
hot water
Heating,
hot water
Heating,
hot water
Heating,
hot water
Reset function error.
02
Fail 1
Fail 2
User
registration
of Remote
controller
Fail 3
Fail 4
Heating,
hot water
Password, Network
connection, Wrong
setting of Securit
Wi-Fi Module fails
(Trouble)
Defects for boiler
Elapsed time more
than 10minutes under
registation mode
icon flickers
icon
flickers
• Temporarily (up to 30 minutes) stop using the boiler and press
heating or hot water power button.
• If the same symptom is repeated, contact our service center to
request service.
Page 49

49
When the boiler is not operated and numbers flicker on the liquid crystal display of temperature controller,
check the following matters. (Check the left two digits among four digits displayed on the liquid crystal display.)
Matters to be confirmed before reporting of failure
• Turn the boiler off and turn it on again.
• If the same symptom recurs, contact our service center for service.
• Turn off with heating or hot water power button and restart.
• If the same symptom recurs, contact our service center
for service.
• Turn off with heating or hot water power button and restart.
• If the same symptom recurs, contact our service center for service.
• Defrost using electrical heating devices like hot wire and
replace the damaged parts.
• When water leaks because of damage in internal parts,
contact our service center for service.
• Immediately call the technical support service of Rinnai.
• Immediately call the technical support service of Rinnai.
• Turn off with heating or hot water power button and restart.
• If the same symptom recurs, contact our service center for service.
• Check whether water supply valve is open.
Remove and reconnect the power cord to repeat the trial run.
Abnormal fan
control Blocked
exhaust hole
Abnormal ratio arm
(gas governor)
control
Abnormal frost
prevention
thermistor
Abnormal trial
run on hot water
Abnormal
magnet valve
Internal fault of the
PCB
Abnomal flame
detected
Complete frost
detected
Exhaust closure
Abnormal
fan rotation
36
52
61
64
70
72
89
90
96
99
• Turn heating off and turn it on again.
• First apply for service by contacting our service center and
switch heating method to floor heating.
Abnormal indoor
temperature
thermistor
35
Heating
Heating
• Immediately call the technical support service of Rinnai.
Malfunction of
thermistor return CH
37
Heating
• Check the pressure gauge on the front panel and follow the
instructions at the start of the filling operation chapter.
Insufficient hydraulic
circuit pressure CH
43
• Check whether gas valve is completely open.
• Turn off heating and hot water and then turn on again.
• If the same symptom is repeated, contact the gas supplier.
Abnormal gas
pressure
47
Heating,
hot water
• Check that the condensate drainage system is not blocked.
Condensate drain
blocked
(filled siphon)
45
Heating,
hot water
Heating,
hot water
Heating,
hot water
Heating,
hot water
Heating,
hot water
Heating,
hot water
Heating,
hot water
Heating,
hot water
• Turn off with heating or hot water power button and restart.
• If the same symptom recurs, contact our service center for service.
Abnormal
magnet valve
71
Heating,
hot water
Power
connection
Trial run
• Check installation, status, crushing and clogging of exhaust
system. Contact the constructor to take necessary measure.
• Turn off with heating or hot water power button and restart.
• If the same symptom recurs, contact our service center
for service.
Abnormal hot
water thermistor
34
Hot water
Self-diagnostic
indication
Status of
use
Details
Measures
Page 50

Installation
Page 51

2) Improper installation location.
Place where the temperature would elevate to 40℃ or above (Adjacent to a
gas boiler and others)
Place with direct sunrays
Place with a high level of moist (A gas stove, a rice cooker and others)
Place with the risk of water spattering
Greasy area
Place where special chemicals (benzene, oil-based detergent and others)
51
Remote Controller Installation
1) Connection of the Remote controller
Do not plug the boiler until a power line of the remote controller is connected to
the boiler. Do not plug the boiler into the outlet until the installation of the remote
controller is completed.
Do not disassemble the remote controller. It could cause abnormal operation of
the boiler.
P
ower lines of the remote controller should be wired not to be influenced by direct heat.
The remote controller does not have the polarity.
1. Requirements for an Installation Location.
1) Install a remote controller on the wall at the height of 1.2~1.5m from the floor.
Also, the location provides a sufficient clearance for allowing of each access.
A living room or a main bed room could be suitable.
2. Power Connection of the Remote Controller.
Power lines of the remote controller must be a two-wire two-layer
vinyl chloride sheath copper wire and the aged power lines should
be exchanged. When the sheath is peeled off, it could lead to a
short circuit or current leakage, in turn deteriorating the boiler.
Do not tie up the power lines of the remote controller with other
230V AC power lines, or place them together in the underground
wire piping. Electric noise could arise.
When the remote controller is connected, Cover the power lines
with the insulating tape to prevent a short circuit or current leakage.
When the remote controller malfunctions due to the electromagnetic
wave noise, change the power lines of the remote controller to the
shield cable, which could shield the noise.
Caution
Page 52

52
3. Mounting the Remote Controller.
1) Mounting the Remote Controller to
the Wall
Make a hole for the hole plug (ø6.0x
depth 35~40mm) on the wall and then,
insert the hole plug.
Drill a hole to be vertical to the wall.
Do not exert too much force. Otherwise,
it could damage the remote controller.
Do not excessively fasten the screw.
Otherwise, it could deform the bracket,
which would make the installation hard.
When the power line of the remote
controller is taken out through the
bottom of the remote controller,
it should be taken out in between the
bottom of the bracket and the furrow
on the remote controller.
2) Mounting the Remote Controller to
the Switch Box
After separating the bracket from the
remote controller and then, affix the
bracket with the flat headed screw,
comes with the boiler.
Connect the power line of the remote
controller and then, put the remote
controller into the bracket.
Affix the bracket securely to the wall
with the flat headed screw. If screws
other than the flat headed screw are
used, it might not be possible to mount
the remote controller.
Flat headed screw
Flat headed screw
Hole plug
Cement
wall
Bracket for affixing the remote controller
Page 53

53
Product specifications
tatsomrehT iF-IW ianniReman tcudorP
Model name
Installation
Dimensions(mm)
Weight (g)
Power
Temperature
adjustment
Heating
Hot water
UE_B001-FWUE_W001-FW
Wall-mounted
120(H) X 120(W) X 16.6(D)
229 (Only thermostat)
447 (Total package)
DC 12V
3.5 (Only thermostat)
0.5 (Only thermostat)
Power Consumption (W)
Stand-by Power (W)
Heating water temperature : 50~80°C / indoor temperature : 5~40°C
35~47°C adjusted by 1°C and above 50°C is adjusted to 50, 55 and 60°C
Page 54

Memo
Page 55

Memo
Page 56

ver.161214
 Loading...