

Page 1
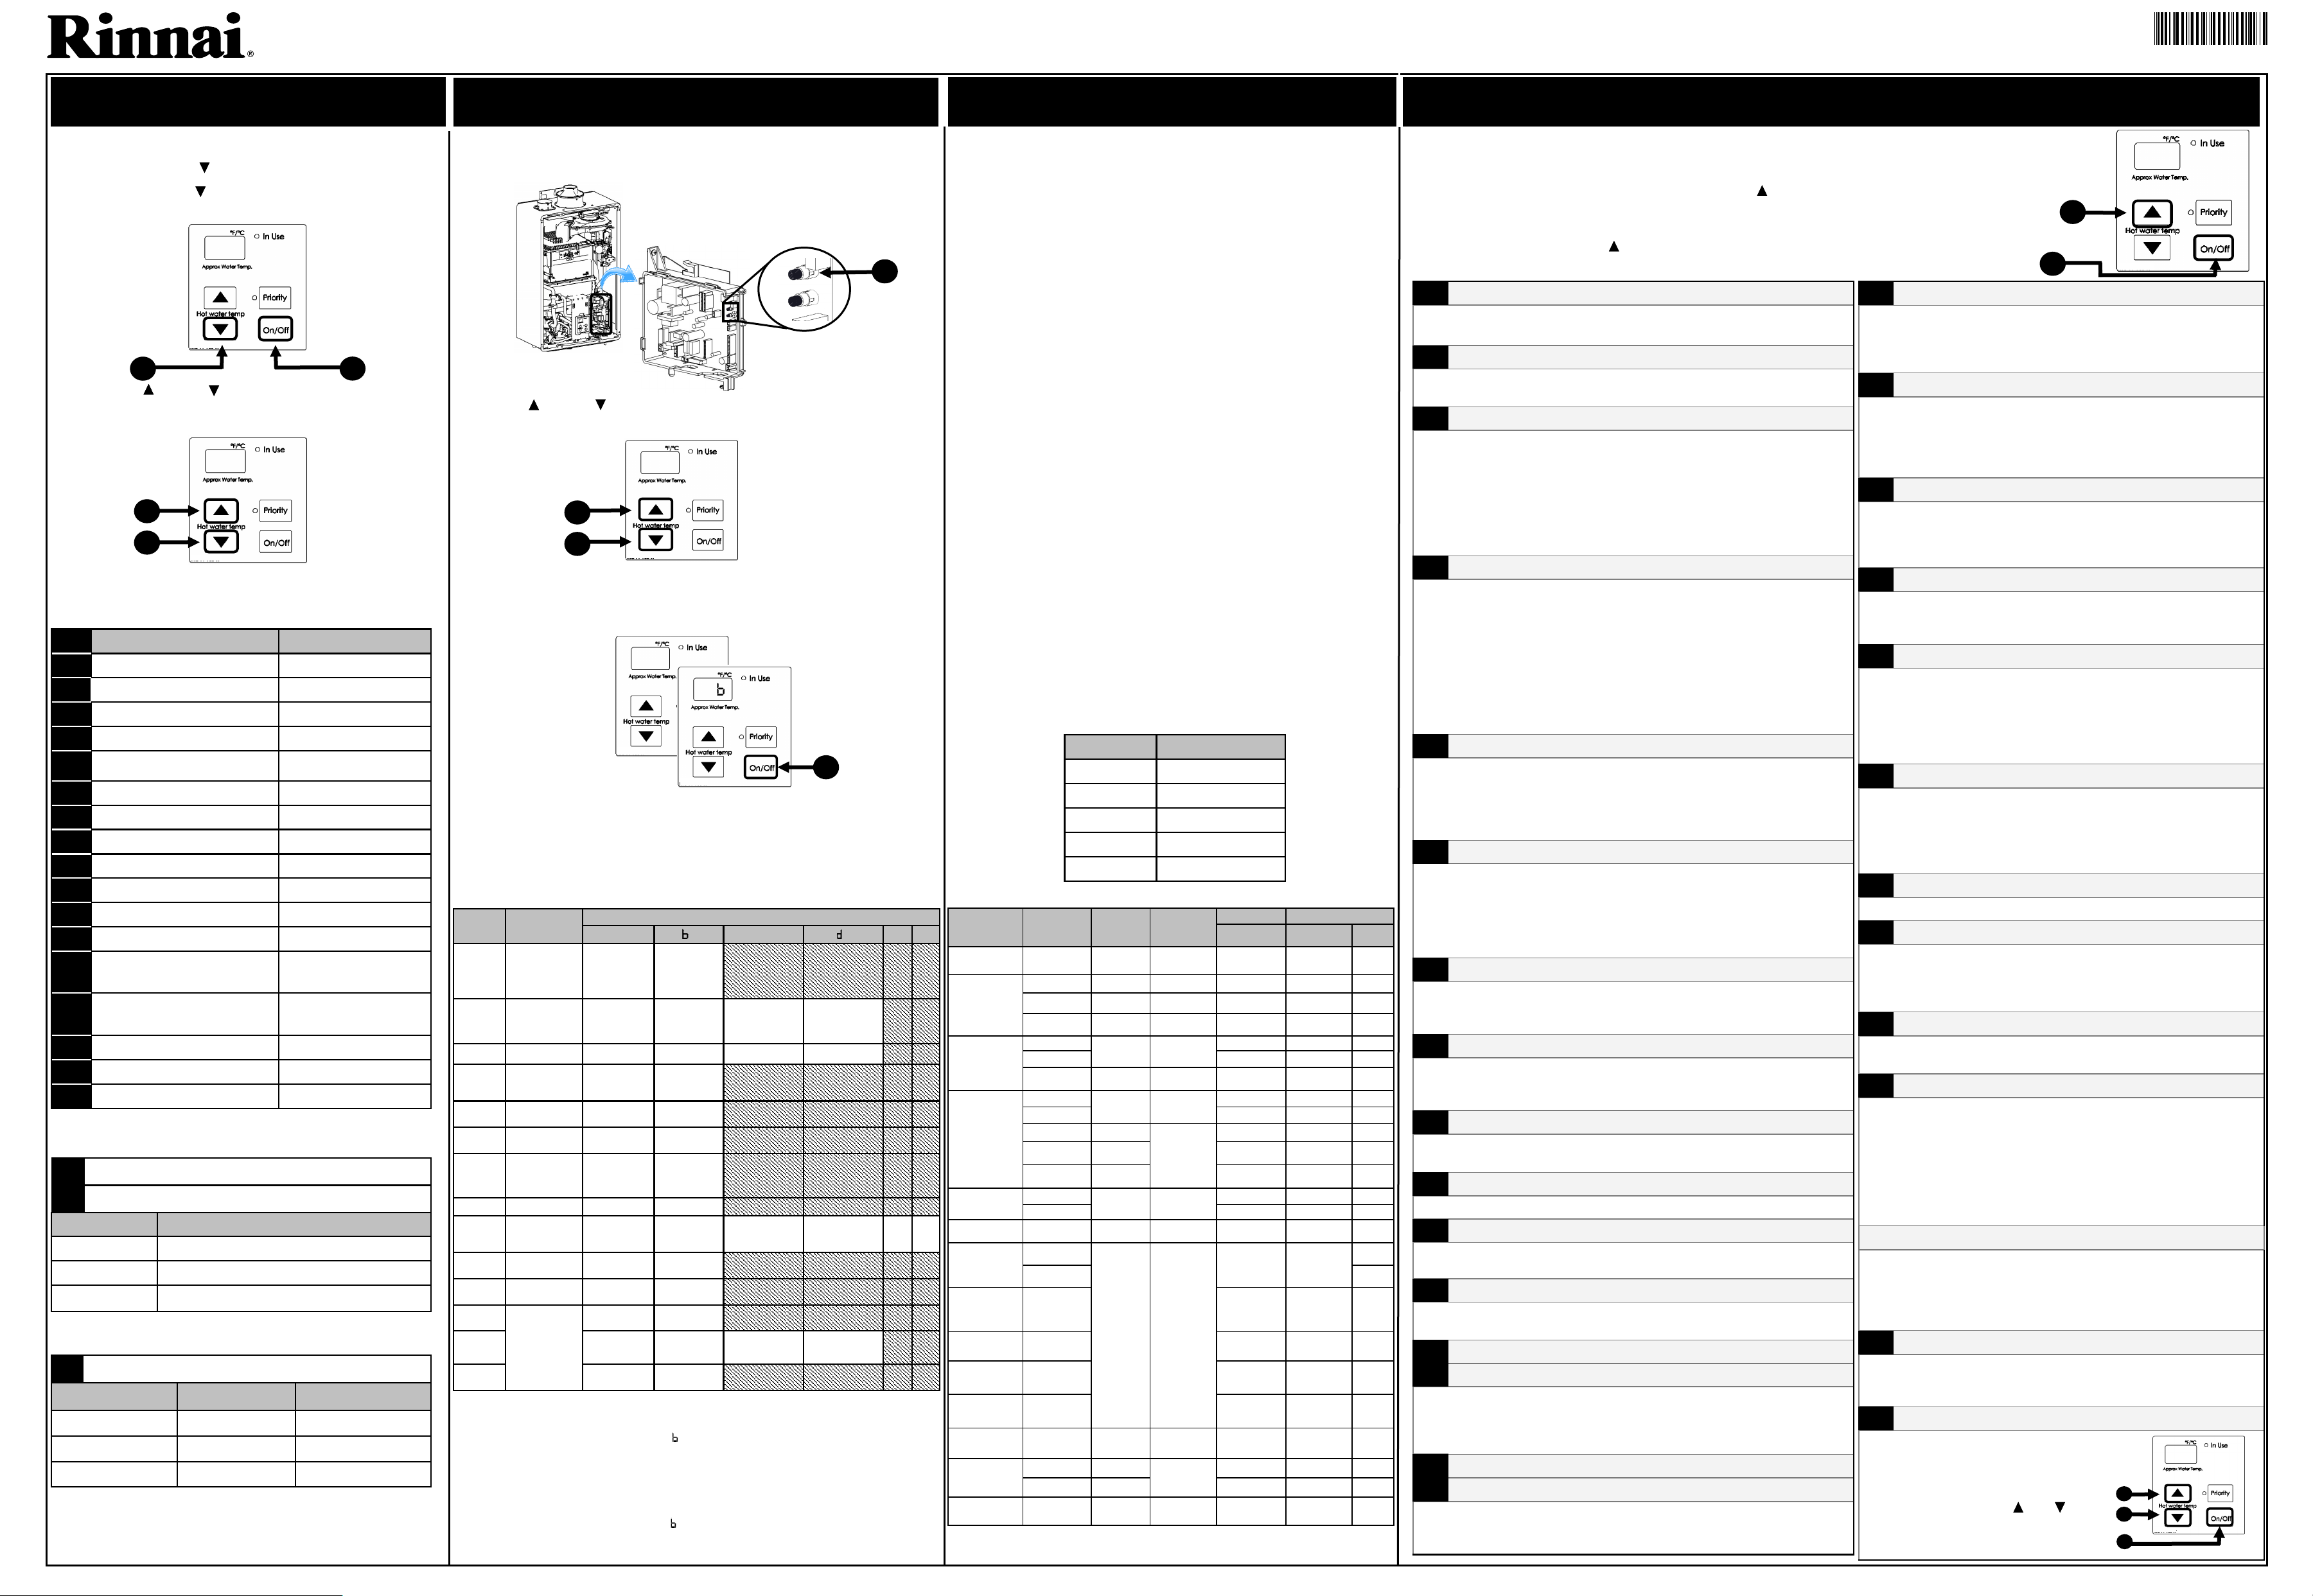
To obtain Performance Data:
1. Press and hold the (Down) buon.
2. While holding the (Down) buon for 2 seconds, press and
hold the “On/O” buon (hold both buons simultaneously).
3. Use the (Up) and (Down) buons to scroll to the desired
performance informaon described below.
PERFORMANCE DATA ELECTRICAL DIAGNOSTICS DIAGNOSTIC CODES
# DATA UNIT
01
Water Flow Rate x0.1 gal/min
02
Outgoing Temperature °F
03
Combuson Hours x100 Hours
04
Combuson Cycles See following informaon
05
Fan Frequency Hz
06
Addional Controllers Connected See following informaon
07
Water Flow Control Posion 0=mid, 1=Open, 2=Closed
08
Inlet Temperature °F
09
Fan Current x10 mA
10
Total Bath Fill Amount gallons
11
HEX Outlet Temperature °F
12
By-Pass Flow Control Posion Degrees of opening
15
Freeze Protecon Temperature
(Indoor Unit Only)
°F
17
Freeze Protecon Temperature
(Outdoor Unit Only)
°F
19
Pump Hours x100 Hours
20
Pump Cycles See following informaon
21
Exhaust Temperature °F
DISPLAY CYCLE COUNT
000 to 999
x100 (0 to 99,900)
10– to 99-
x10,000 (100,000 to 990,000)
1-- to 6--
x1,000,000 (1,000,000 to 6,000,000)
1
See secon “Service Soon, 55” in the Installaon and Operaon Manual for more
informaon.
2
Seng 05 is available only if seng 04
is selected.
Comfort mode cycles the pump more frequently, ensuring the loop temperature
remains higher (but also uses more energy).
Economy mode cycles the pump less oen, using less energy to maintain the
circulaon loop temperature.
3
BMS = Building Management System
4
Seng 09 is available only if seng 08
is selected.
5
Selecng “High” will increase the water ow rate to the maximum capacity.
To adjust the parameters:
1. Press the “A” buon for 1 second.
3. Once the desired seng number is selected, use the “On/O” buon on the
controller to change the selecon for the seng number. Example: Display will
change from 01A to 01b for Maximum Temperature seng (as shown below).
4. To exit the parameters, press the “A” buon on the PC board for 1 second.
NOTE: Wiring diagram is available in manual and on the inside front cover.
Important Safety Notes
There are a number of (live) tests required when performing electrical
diagnoscs on this product. Proceed with cauon at all mes to avoid contact
with energized components inside the water heater. Only trained and
qualied service technicians should aempt to repair this product. Before
checking for resistance readings, disconnect the power source to the unit and
isolate the item from the circuit (unplug it).
Freeze Protecon
This unit has freeze protecon heaters mounted at dierent points to protect
the water heater from freezing. All of them should display a posive
resistance reading.
Flame Rod
Place one lead of your meter to the ame rod and the other to ground. With
the unit running you should read between 5 - 150 VAC. Set your meter to the
micro (μ) amp scale and arrange meter leads in line with the ame rod. You
should read 1 μ amp or greater for proper ame circuit. In the event of low
ame circuit, remove the ame rod and check for carbon or damage.
Amp Fuses
This unit has two glass fuses located on the PC Board, one inline (10) amp and
one (4) amp glass fuse. Remove the fuses and check connuity through it. If
you have connuity through each fuse then it is funconing. Otherwise the
fuse is blown and must be replaced.
Thermistors
Check all thermistors by inserng meter leads into each end of the thermistor
plug. Set your meter to the 20 K scale and read resistance. Applying heat to
the thermistor bulb should decrease the resistance. Applying ice to the
thermistor bulb should increase the resistance.
Below are examples of typical temperatures and resistance readings.
(* Value to be measured while unit is in operaon)
To display diagnosc codes:
1. Turn o the water heater by pressing the “On/O” buon.
2. Press and hold the “On/O” for 2 seconds and then the (Up) buon simultaneously.
3. The last 9 maintenance codes display and ash one aer the other.
4. To exit diagnosc codes and return the water heater to normal operaon, press and hold the “On/O” buon
for 2 seconds and then the (Up) buon simultaneously.
5. Turn on the water heater by pressing the “On/O” buon.
03
Power interrupon during bath ll
(Water will not ow when power returns)
• Turn o all hot water taps. Press ON/OFF twice.
05
By-Pass Flow Control
• Measure resistance values of the by-pass ow control (See Electrical Diagnoscs).
• Replace By-Pass ow control device.
10
Air Supply or Exhaust Blockage/Condensate Trap is Full
• Ensure condensate line is not blocked.
• Ensure internal air lter is clean with no obstrucons. (Indoor Only)
• Ensure High Altude seng. (See Parameter Sengs)
• Ensure Combuson air and Exhaust vents are not blocked and approved venng
materials are being used. (Indoor Only)
• Ensure vent length is within limits. (Indoor Only)
• Check fan for debris and ensure wheel turns freely.
• Verify check valve is not stuck between fan casing and burner body.
11
No Ignion (Heater Not Turning On)
• Check that the gas is turned on at the water heater, meter, or cylinder.
• If the system is propane, make sure that gas is in the tank.
• Ensure gas type and inlet gas pressure are correct.
• Bleed all air from gas lines.
• Check the ground wire for the PC Board.
• Ensure ame rod wire is connected.
• Ensure igniter is operaonal. (See Electrical Diagnoscs)
• Check gas solenoid valves for open or short circuits.
(See Electrical Diagnoscs)
• Verify gas orice is correct.
12
No Flame
• Check that the gas is turned on at the water heater, gas meter, or cylinder.
• If the system is propane, make sure that gas is in the tank.
• Ensure ame rod wire is connected.
• Ensure gas type and inlet gas pressure is correct.
• Bleed all air from gas lines.
14
Heat Exchanger Overheat
• Measure resistance of Overheat Switch. (See Electrical Diagnoscs)
• Check heat exchanger surface for hot spots which indicate blockage due to scale
build-up.
• Refer to instrucons in manual for ushing heat exchanger. Hard water must be
treated to prevent scale build up or damage to the heat exchanger.
• Ensure it is not forced Hi seng.
15
Venturi Control
• Ensure the Venturi motor is operang correctly. (See Electrical Diagnoscs)
• Replace gas valve assembly.
• Clear diagnosc code by reseng the main power supply to the water heater.
16
High Outgoing Temperature
(safety shutdown because water heater is too hot)
• Conrm fan motor is funconing correctly.
• Replace the gas valve assembly.
17
Venturi Blockage
• Ensure Venturi isn't blocked.
• Please call Rinnai technical department.
19
Electrical Grounding
• Check all components for electrical short.
21
Data Transfer Error
• If the PCB has been replaced, ensure the data transfer process has been
completed.
25
Condensate Pump (Accessory)
• Conrm wire connecons and harness are good.
• Ensure condensate reservoir is empty and condensate pump is operang.
32
Outgoing Thermistor
33
Heat Exchanger Thermistor
• Check sensor wiring for damage.
• Measure resistance of sensor. (See Electrical Diagnoscs)
• Clean sensor of scale build-up.
• Replace sensor.
38
Exhaust Thermistor
41
Freeze Protecon Thermistor
• Check sensor wiring for damage.
• Measure resistance of sensor. (See Electrical Diagnoscs)
• Replace sensor.
51
Inlet Thermistor
• Check sensor wiring for damage.
• Measure resistance of sensor. (See Electrical Diagnoscs)
• Clean sensor of scale build-up.
• Replace sensor.
52
Gas Valve
• Check ame rod and wire for damage.
• Check gas solenoid valve for open or short circuit. (See Electrical
Diagnoscs)
• Replace gas valve assembly.
• Please call Rinnai technical department.
54
High Exhaust Gas Temperature
• Ensure Heat Exchanger ns are clean and not blocked.
• Conrm inlet water temperature is not too high.
• Clear diagnosc code by reseng the main power supply to the water
heater.
61
Combuson Fan
• Check the motor wire harness for loose or damaged connecons.
• Measure resistance of motor wire harness. (See Electrical Diagnoscs)
• Ensure the combuson fan spins freely.
63
Recirculaon Low Flow
• Ensure bypass plug is removed and bypass lter is installed. (COV Mode)
• Ensure both the inlet water lter and bypass lter are clean and free of
debris.
• Ensure Parameter seng are correctly set for recirculaon mode.
• Ensure Pump supply voltage.
• Ensure air is removed from the recirculaon line.
65
Water Flow Control
• Measure resistance values of the water ow control (See Electrical
Diagnoscs)
• The water ow control valve has failed to close during the bath ll
funcon. Immediately turn o the water and disconnue the bath ll
funcon. Contact a licensed professional to service the appliance.
70
PC Board
• Replace PC Board
71
Solenoid Valve Circuit
• Ensure dip switch on PC board is in the OFF posion.
• Ensure gas control wire is not loose or damaged.
• Ensure heater circuit is not grounded.
• Replace PC Board.
72
Flame Rod
• Check ame rod and wire for damage.
• Verify HEX is not leaking.
ss
(SS) Service Soon (Flush Heat Exchanger)
• 55 is a me-based service indicator set during installaon. See secon
“3.12 Parameter Sengs” for addional details on seng and changing
the 55 indicator.
• 55 indicates that it is me for service. The heat exchanger should be
ushed to prevent damage (refer to secon “5.3 Flushing the Heat
Exchanger” for more informaon). Hard water must be treated to
prevent scale build-up or damage to the heat exchanger.
• To reset the 55 code, push the On/O buon on the temperature
controller 5 mes in 5 seconds.
NO CODE - Nothing happens when water ow is acvated
• Verify you have at least the minimum ow rate required to re unit.
• Measure the resistance of the water ow control sensor.
(See Electrical Diagnoscs)
• Clean inlet water supply lter.
• On new installaons ensure hot and cold water lines are not reversed.
SE
Cascade Diagnosc Display (Commercial units only)
• With cascade connecons, display will ash between “SE” and the
selected set temperature when an error code is displayed on any
secondary unit .
FF
Maintenance Indicator
• Placeholder in Diagnosc code history
indicang that a service provider performed
maintenance or service.
• Enter this code aer performing
service by pressing (Up) , (Down)
and On/O simultaneously.
• FF is visible on the monitor.
A
B
PARAMETER SETTINGS
Performance Data Table
Parameter Sengs Table
Electrical Circuit Table
2. Use the (Up) and (Down) buon on the controller to select a seng number
(See Parameter Sengs Table).
0 1 A
0 1 B
COMPONENT WIRE COLOR VOLTAGE RESISTANCE
COMPONENT PCB
CONNECTOR CONNECTOR PIN
Spark
Electrode
Red-Black 11~13VDC*
34 K ~ 40 K
ohms
D2 D 12-21
Combuson
Fan
Red-Black 7~48VDC* N/A D3 D 4-6
White-Black 10~12VDC* N/A D3 D 10-6
Yellow-Black 11~13VDC* N/A D3 D 8-6
Water Flow
Control Device
Red-Pink
N/A 44~52 ohms
D4 D 18-20
White-Blue D4 D 16-14
Grey-Orange 12~14VDC N/A D4 D 30-12
Venturi
Control Device
Blue-White
N/A 35~41 ohms
D5 D 5-7
Yellow-Red D5 D 11-9
Black-Red 12~14 VDC
N/A
D5 D 30-12
Black-Brown
less than
1VDC*
D5 D 30-25
Black-Grey
less than
1VDC*
D5 D 30-23
By-Pass Flow
Control Device
Red-Pink
N/A 44~52 ohms
D6 D 15-13
White-Blue D6 D 17-19
Gas Solenoid
Valve
Yellow-Black 11~13VDC* 18~22 ohms D7 D 29-27
Outgoing
Thermistor
White-White
N/A See Example
H1
3-2
H
Blue-Blue 8-11
Inlet
Thermistor
White-White H2 H 4-2
Exhaust
Thermistor
White-White H3 H 2-5
Heat
Exchanger
Thermistor
White-White H4 H 2-6
Freeze
Protecon
Thermistor
Yellow-Black H5 H 2-7
Overheat
Switch
Black-Black 11~13 VDC
less than 1
ohm
H6 H 28-14
Water Flow
Sensor
Black-Red 11~13 VDC
N/A
H7 H 30-12
Yellow-Black 4~7 VDC* H7 H 12-30
Addional
Controller(s)
White-White 10~13 VDC N/A K - -
Temperature Resistance Readings
59°F 11.4 - 14KΩ
86°F 6.4 - 7.8KΩ
113°F 3.6 - 4.5KΩ
140°F 2.2 - 2.7KΩ
221°F 0.6 - 0.8KΩ
1
2
1
2
3
CONTROLLER MODEL CONNECTED NOT CONNECTED
MC
__1 __0
BC
_1_ _0_
BSC & BSC2
1__, 2__ (QTY2) 0__
Default display is
100.
_
depends on connecon status of another controller.
06
Controllers Connected
04
Combuson Cycles
20
Pump Cycles
1
2
FF
SETTING
#
SETTING
DESCRIPTION
SELECTION
A
c
E F
01
Maximum Set
Temperature
Residenal:
120°F
Commercial:
140°F
Residenal:
140°F
Commercial:
185°F
02
High Altude
(Installaon
Locaon)
0 - 2,000
(0 - 610 m)
2,001 - 5,400
(610 - 1,646 m)
5,401 - 7,700
(1,646 - 2,347 m)
7,701 - 10,200
(2,347 - 3,109 m)
03
Service Soon1
Disabled 0.5 Year 1 Year 2 Years
04
Recirculaon
Sengs
No
Recirculaon
Recirculaon
(Dedicated)
05
Recirculaon
Mode2
Comfort Economy
06
Control Switch
BMS3
Air Handler
(AH)
07
Units in
Standby
(EZ Connect)
2 1
08
Cascade Secondary Primary
09
Units in
Standby
(Cascade)4
1 2 3 4 5 6
10
Gas Type
(Factory Set)
NG LPG
11
Maximum
Flow Rate5
Standard High
12
Without
Pump
With Pump
Water Heater
Model
(Factory set
values and not
adjustable)
13
199
(3237)
180
(2934)
160
(2530)
130
(2024)
14
Internal
(Indoor)
External
(Outdoor)
1
3
3
2
2
3
Default is A for all sengs below except 10, 12, 13, and 14 which are factory set.
07000012336367
U334-0781(00)
REU-N,NC
100000505
Page 2
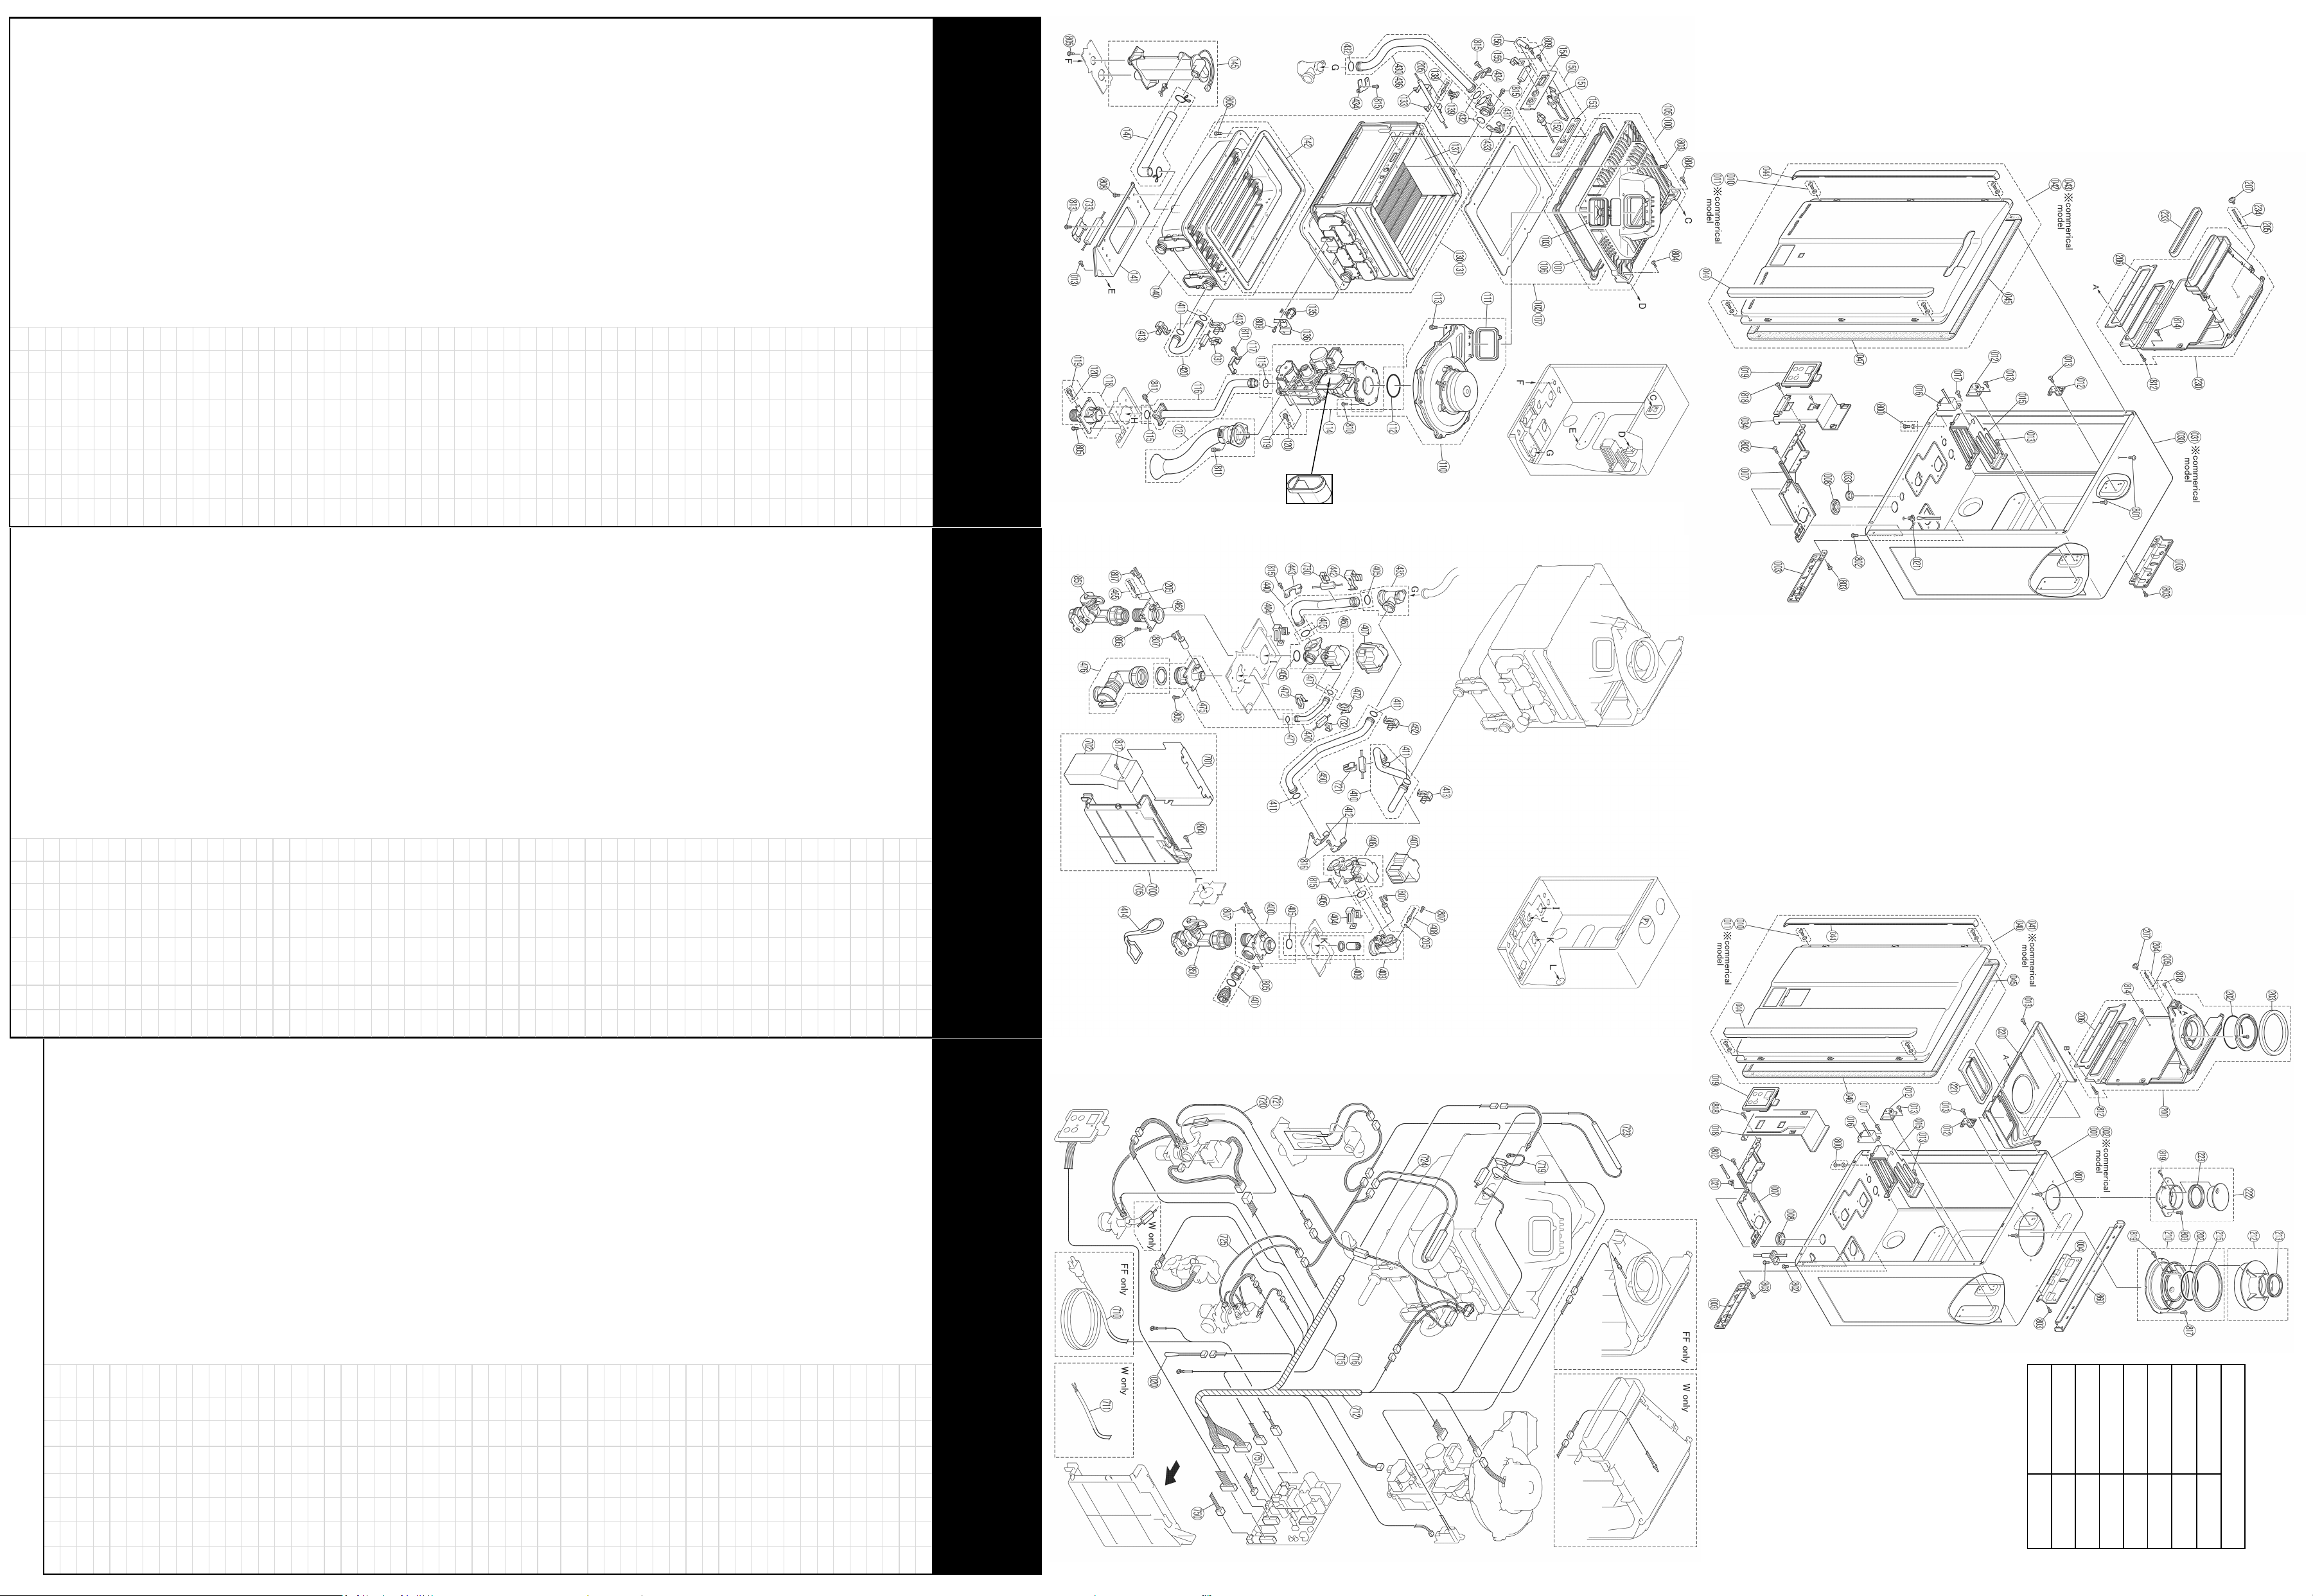
139 Clip 105000090
ITEM
DESCRIPTION
PART NUMBER
001 Residenal Cabinet Body FF 109000592 1 1
002 Commercial Cabinet Body FF 109000593
003 Lower Wall Mount Bracket 109000281
004 Upper Wall Mount Bracket 109000594
007 Connecon Reinforcement Plate 109000595
008 Rubber Bushing 109000634
010 Residenal Screw & Washer-Grey 106000645
011 Commercial Screw & Washer-Black 109000596
012 Combuson Chamber Support Plate 109000597
013 Truss Screw 109000598
015 Igniter Bracket 109000599
016 Igniter Assembly 105000230
017 Grounding Screw CP-80452
018 Controller Bracket FF 109000600
019 Controller 105000260
020 Thermistor Sensor 105000261
021 Thermistor Grommet 109000490
030 Residenal Cabinet Body W 109000601
031 Commercial Cabinet Body W 109000602
033 Rubber Bushing CF79-41020-A
034 Controller Bracket W 109000603
040 Residenal Front Cover Panel FF 109000604
041 Commercial Front Cover Panel FF 109000605
042 Residenal Front Cover Panel W 109000606
043 Commercial Front Cover Panel W 109000607
044 Screw Cover 109000230
045 Front Panel Packing - Top 109000120
046 Front Panel Packing - Side W 109000608
047 Front Panel Packing - Side FF 109000121
100 Burner Assembly - Large 106000113
101 Burner Gasket - Large 109000609
102 Burner Plate Assembly - Large 106000114
103 Combuson Check Valve Assembly 107000262
105 Burner Assembly - Small 106000115
106 Burner Gasket - Small 109000610
107 Burner Plate Assembly - Small 106000116
110 Combuson Fan Assembly 108000081
111 Fan Mounng Packing 109000611
112 O-Ring 109000612
113 Hexagon Head Screw ZQAA0514UK
114 Gas Valve Assembly with Orice 106000117
115 O-Ring 109000252
116 Gas Connecon Pipe 106000118
117 Gas Tube Bracket 109000635
118 Inlet Gas Supply Connecon 106000119
119 Inlet Gas Test Port Screw C10D-5
120 O-Ring M10B-13-4
121 Noise Filter 106000120
130 Heat Exchanger Assembly - Large 107000263
131 Heat Exchanger Assembly - Small 107000264
133 Heater Bracket 109000613
135 Over Heat Sensor (OHS) 105000231
136 OHS Bracket 109000614
137 Heat Exchanger Insulator 107000265
138 Thermistor 105000262
1 1 1 1 1 1 1 1
440 Hot Water Supply Connecon Pipe 107000277
442 Clip 109000638
443 Retenon Clip U211-322X01
450 Bypass Pipe Assembly 107000278
1 1 1 1
409 Flow Turbine Assembly 107000319
410 Water Supply Connecon Pipe 107000271
411 O-Ring M10B-2-14
412 Retenon Clip AH69-310
413 Clip 109000244
414 Plug Band 109000018
420 Secondary Connecng Pipe 107000272
430 Connecon Pipe Assembly - Large 107000273
431 Heat Exchanger Pipe Connecon 107000274
432 O-Ring 107000325
433 Pipe Bracket 109000637
434 Retenon Clip 109000496
435 Hot Water Connecon ng 107000275
436 Connecon Pipe Assembly-Small 107000276
1 1 1 1
406 Bypass Servo Assembly 107000270
407 Cover 107000093
408 Inlet Water Thermistor 107000318
1 1 1 1 1 1 1 1
1 1 1 1 1 1 1 1
1 1 1 1 1 1 1 1
3 3 3 3 3 3 3 3
1 1 1 1 1 1 1 1
2 2 2 2 2 2 2 2
1 1 1 1 1 1 1 1
1 1 1 1 1 1 1 1
1 1 1 1 1 1 1 1
1 1 1 1 1 1 1 1
1 1 1 1 1 1 1 1
1 1 1 1 1 1 1 1
1 1 1 1
2 2 2 2 2 2 2 2
1 1 1 1 1 1 1 1
1 1 1 1 1 1 1 1
1 1 1 1 1 1 1 1
1 1 1 1 1 1 1 1
1 1 1 1 1 1 1 1
1 1 1 1
1 1 1 1
401 Water Supply Filter Plug Assembly 107000317
403 Water Flow Sensor Assembly 107000269
404 Clip 109000636
405 O-Ring 107000324
2 2 2 2
230 Exhaust Duct Assembly W 108000088
233 Front Exhaust Seal W 109000624
234 Thermistor 105000263
400 3/4 Water Supply Connecon 107000316
1 1
221 Air Supply Filter 108000086
222 Air Supply Connecon 108000087
223 Air Supply Gasket - 2 inch 109000624
2 2 2 2
2 2 2 2 2 2 2 2
2 2 2 2
1 1 1 1
1 1 1 1
1 1 1 1
1 1
1 1 1 1
1 1 1 1
1 1
1 1
210 Flue Connecon Assembly 108000083
212 Exhaust Pipe Connecon Port-2” 108000084
213 Exhaust Gasket—2 inch 109000623
215 Air Supply Pipe Seal Ring 108000093
220 Air Supply Box 108000085
1 1 1 1 1 1 1 1
1 1
1 1
153 Electrode Packing 109000617
154 Electrode Plate 109000618
155 Electrode Heater Bracket 109000619
156 Electrode Sleeve 109000620
200 Exhaust Duct Assembly FF 108000082
202 O-Ring 108000018
203 Exhaust Duct Packing 109000621
204 Thermistor 105000235
205 O-Ring 107000323
206 Exhaust Packing 109000646
207 Thermistor Screw 109000622
14 12 14 12 14 12 14 12
2 2 2 2 2 2 2 2
1 1 1 1 1 1 1 1
1 1 1 1 1 1 1 1
1 1 1 1 1 1 1 1
1 1 1 1
1 1 1 1 1 1 1 1
1 1 1 1 1 1 1 1
1 1 1 1 1 1 1 1
4 4 4 4
4 4 4 4
150 Electrode/Flame Rod Assembly 105000232
151 Electrode 105000233
152 Flame Rod 105000234
1 2 1 2 1 2 1 2
1 1 1 1
1 1 1 1 1 1 1 1
147 Condensate Drain Tube 107000268
1 1
RU199i | RU180i
RU199e | RU180e
RU160i | RU130i
RU160e | RU130e
CU199i
CU199e
CU160i
CU160e
140 Secondary Heat Exchanger 107000266 1 1 1 1 1 1 1 1
141 Secondary Heat Exchanger Bracket 109000615
142 Secondary Heat Exchanger Gasket 109000616
145 Condensate Trap 107000267
ITEM
DESCRIPTION
*
PART NUMBER
1 1 1 1 1 1 1 1
1 1 1 1
801 Screw CP-30583
802 Screw ZBA0408UK
803 Screw 109000640
804 Screw 109000648
805 Screw 109000178
806 Screw 109000649
807 Screw U217-449
808 Screw ZFAB0406SZ
809 Screw 109000641
810 Screw 109000642
811 Screw 109000655
812 Screw 109000650
813 Screw ZAD0408UK
814 Screw 109000651
815 Screw ZHAA0412UK
816 Bracket Screw CP-20883-410UK
817 Screw ZFDB0410SZ
818 Screw 109000643
819 Screw 109000652
850 Cold Water Isolaon Valve 107000284
851 Hot Water Isolaon Valve 107000285
860 Wall Bracket 109000628
1 1 1 1
750 Remote Control Harness 105000249
751 External Pump Harness 105000250
800 Screw ZFDB0408UD
1 1 1 1 1 1 1 1
1 1 1 1 1 1 1 1
1 1 1 1 1 1 1 1
2 2 2 2 2 2 2 2
5 5 5 5 5 5 5 5
1 1 1 1 1 1 1 1
1 1 1 1 1 1 1 1
1 1 1 1 1 1 1 1
1 1 1 1 1 1 1 1
1 1 1 1 1 1 1 1
6 6 6 6 6 6 6 6
2 2 2 2 2 2 2 2
3 3 3 3 3 3 3 3
1 1 1 1 1 1 1 1
1 1 1 1 1 1 1 1
1 1 1 1
1 1 1 1 1 1 1 1
3 3 3 3 3 3 3 3
1 1 1 1 1 1 1 1
2 2 2 2 2 2 2 2
1 1 1 1 1 1 1 1
1 1 1 1 1 1 1 1
1 1 1 1 1 1 1 1
1 1 1 1 1 1 1 1
1 1 1 1
1 1 1 1
1 1 1 1
462 Hot water Supply Connecon 107000280
465 Outlet Thermistor 107000320
470 PRV Connecon Pipe 107000281
471 O-Ring 107000326
472 Clip 109000278
475 Pressure Relief Valve Connecon 107000282
476 Pressure Relief Valve Assembly 107000283
700 PC Board Assembly - Residenal 105000236
701 PCB Electrical Cover 109000626
702 PCB EC Cover 109000627
705 PC Board Assembly - Commercial 105000237
710 Power Cord Assembly FF 105000238
711 Power Cord Assembly W 105000239
712 Sensor Harness 105000240
715 Heater Harness 105000241
716 Heater Harness 105000242
719 Igniter Ground Harness 105000243
720 Freeze Protecon Heater FF 105000244
721 Freeze Protecon Heater W 105000245
723
724
725 Freeze Protecon Valve Heater 105000248
730 Heater Clip A AU124-618X01
731 Heater Clip C U250-625
732 Freeze Protecon Heater Clip 109000251
733 Freeze Protecon Heater Bracket 109000647
Heat Exch. Freeze Protecon
Assy
Secondary Heat Exch. Freeze
Protecon Assy
RU199i | RU180i
RU199e | RU180e
RU160i | RU130i
RU160e | RU130e
CU199i
CU199e
CU160i
CU160e
452 Clip 109000639 1 1 1 1 1 1 1 1
460 Hot Water Servo Valve Assembly 107000279
ITEM
1 1 1 1 1 1 1 1
1 1 1 1 1 1 1 1
1 1 1 1 1 1 1 1
1 1 1 1 1 1 1 1
1 1 1 1 1 1 1 1
1 1 1 1 1 1 1 1
1 1 1 1 1 1 1 1
1 1 1 1 1 1 1 1
1 1 1 1 1 1 1 1
1 1 1 1 1 1 1 1
1 1 1 1 1 1 1 1
1 1 1 1
2 2 2 2
1 1 1 1
1 1 1 1
4 4 4 4 4 4 4 4
1 1 1 1 1 1 1 1
1 1 1 1 1 1 1 1
1 1 1 1
1 1 1 1
1 1 1 1
1 1 1 1
1 1 1 1
1 1 1 1
1 1 1 1
DESCRIPTION
105000246
10500247 1 1 1 1 1 1 1 1
PART NUMBER
RU199i, CU199i 103000076
RU199e, CU199e 103000077
RU180i 103000078
RU180e 103000079
RU160i, CU160i 103000080
RU160e, CU160e 103000081
RU130i 103000082
42 42 42 42 42 42 42 42
5 5 5 5 5 5 5 5
4 4 4 4 4 4 4 4
5 5 5 5 5 5 5 5
4 4 4 4 4 4 4 4
4 4 4 4 4 4 4 4
9 9 9 9 9 9 9 9
1 1 1 1 1 1 1 1
4 4 4 4 4 4 4 4
8 8 8 8 8 8 8 8
2 2 2 2 2 2 2 2
5 5 5 5 5 5 5 5
1 2 1 2 1 2 1 2
2 2 2 2
1 1 1 1 1 1 1 1
1 1 1 1 1 1 1 1
1 1 1 1
3 3 3 3 3 3 3 3
4 4 4 4 4 4 4 4
2 2 2 2 2 2 2 2
3 3 3 3 3 3 3 3
1 1 1 1
1 1 1 1 1 1 1 1
1 1 1 1 1 1 1 1
1 1 1 1 1 1 1 1
1 1 1 1 1 1 1 1
1 1 1 1 1 1 1 1
2 2 2 2 2 2 2 2
1 1 1 1
1 1 1 1 1 1 1 1
1 1 1 1
1 1 1 1
1 1 1 1 1 1 1 1
1 1 1 1
1 1 1 1
1 1 1 1 1 1 1 1
1 1 1 1
1 1 1 1 1 1 1 1
1 1 1 1 1 1 1 1
1 1 1 1
1 1 1 1 1 1 1 1
1 1 1 1 1 1 1 1
1 1 1 1
1 1 1 1 1 1 1 1
2 2 2 2 2 2 2 2
2 2 2 2 2 2 2 2
1 1 1 1 1 1 1 1
1 1 1 1 1 1 1 1
1 1 1 1 1 1 1 1
RU199i | RU180i
RU199e | RU180e
RU160i | RU130i
RU160e | RU130e
CU199i
CU199e
CU160i
CU160e
18 13 18 13 18 13 18 13
15 15 15 15 15 15 15 15
RU130e 103000083
Gas Conversion Kits
*
 Loading...