

Rinnai HDC 1600i Low NOX, HDC 1600e Low NOx, REU-VCM2837FFUDHD-E, REU-VCM2837WDHD-E, HD55e Low NOx Installation And User Manual
...
Installation and User
Manual
REU-KBM3237FFUDHD-E
HDC 1600i Low NOx
REU-KBM3237WDHD-E
HDC 1600e Low NOx
Continuous Flow Water Heater
Important.
Read these instructions carefully before attempting installation or use of
this appliance. All work must be carried out by competent persons.
2
The Rinnai condensing water heaters are
CE Marked as allowed by Technigas.
HDC1600 Low NOx
Infinity K26 & HDC1200
Certificate numbers: E1390/5633
ID number: 0461CP1022
Date of Issue: 20/01/2014
Last revision: 02/02/2010
Quality System Standard
ISO 9001 - 2008
The Design, Development, and Manufacture of Gas Water Heating Appliances
done under Rinnai’s Quality Management System is certified under the Quality
Management System Standard ISO 9001.
Registration Number JQ0003D
Registered since: February 1994
Certified by JIA—QA Centre.

3
CONTENTS 3
USERS INSTRUCTIONS 4
FEATURES AND BENEFITS 5
IMPORTANT INFORMATION 6
OPERATION WITHOUT REMOTES 8
STATUS MONITOR 8
TEMPERATURE CONTROLS 9
ERROR MESSAGES 14
RECIRCULATION MODE 16
RESTARTING THE RINNAI WATER HEATER 18
CARING FOR THE HDC 18
INSTALLATION INSTRUCTIONS 19
UK INSTALLATION INSTRUCTIONS 20
UNPACKING RINNAI WATER HEATER 21
OPERATION 22
MAIN COMPONENTS 23
INSTALLATION INSTRUCTIONS 24
FLUE REQUIREMENTS 28
CONDENSATE DISPOSAL 32
TEMPERATURE CONTROLS 34
EZ CONNECT 36
TESTING 37
GAS PRESSURE SETTING 38
DIP SWITCH SETTING 40
DIMENSIONS 43
TECHNICAL DETAILS 45
PRODUCT FICHE 46
FLOW CHART 47
WIRING DIAGRAM 48
DIAGNOSTIC POINTS 49
WATER FLOW CHARACTERISTICS 50
LETTER OF COMPLIANCE 51
CE CERTIFICATE 52
COMMISSIONING CHECK LIST 53
COMMISSIONING SHEET 54
SERVICE RECORD 55
MAINTENANCE 56
UK WARRANTY 59
CONTACT 61
HEATER DETAILS 61
CONTENTS
4
USERS INSTRUCTIONS
The following instructions are designed for the user of the water heater. The user may not install or adjust the
appliance in any way that requires the removal of the front cover of the unit. To remove the front cover of the unit
you must be certified competent to do so.
Information for the Installer is given on page 19.
All work done on this appliance must be done by a qualified gas engineer. A qualified gas engineer must
carry an up to date GAS SAFE Registered Gas Installer photo identification card while working on gas
appliances. If you are unsure do not be afraid to ask the engineer to show you the card. If you are still not
satisfied call GAS SAFE on 0800 408 5500 and verify the engineer’s name with their database. This is for
your own safety.
Responsibilities of the USER
The user must abide by all warnings given in this book. The user must only reference the user section of the
book, and may not carry out any procedure listed in the installer section. This installation manual should be kept
with the appliance for maintenance and user information.
The user must have the unit checked and maintained annually by a gas engineer.
The user must periodically check the water filter on the inlet to the appliance.
The user must not use the appliance in any way that it was not meant to be used. The user may only use the
heater as detailed in the User portion of this manual.
Interference with a sealed component is not permitted. In case of defect parts only use genuine Rinnai
components for replacement.
Conversion to other gas types should only be carried out by a qualified installer or a gas distributor according to
the practice in the country where the unit is installed.
The user must not store or use any flammable vapours or liquids in the vicinity of this or any other appliance.
The user should familiarise themselves with the water heaters gas service valve and the main gas valve to the
premises.
ATTENTION: air surrounding the water heater, venting and vent termination(s) is used for combustion and must
be free of any compounds that cause corrosion of internal components. These include corrosive compounds that
are found in aerosol sprays, detergents, bleaches, cleaning solvents, oil based paints/ varnishes, and
refrigerants. Therefore Rinnai recommends outdoor models be used for these locations where possible.
The water heater, venting and vent termination(s) should not be installed in any areas where the air may contain
these corrosive compounds. If it is necessary for a water heater to be located in areas which may contain
corrosive compounds, Rinnai strongly recommends the following:
Indoor/Internal Water Heaters:
* DO NOT install in areas where contaminated air is present
* Consider before installation where air has the ability to travel within the building
* Where possible, install the water heater in a sealed closet so that it is free of contaminated indoor air
* Chemicals that are corrosive in nature should not be stored or used near the water heater
Outdoor/External Water Heaters and Vent Terminations of Indoor/Internal Water Heaters:
* Install as far away as possible from exhaust vent hoods
* Install as far away as possible from air inlet vents. Corrosive fumes may be released through these vents when
air is not being brought in through them.
* Chemicals that are corrosive in nature should not be stored or used near the water heater or vent termination.
Damage and repair due to corrosive compounds in the air is not covered by warranty.
The exhaust outlet may change colour over time due to the condensate in the exhaust gases. This discoloration
does not damage the part or its form, fit or function.
Benchmark places responsibilities on both manufacturers and installers. The
purpose is to ensure that customers are provided with the correct equipment
for their needs, that it is installed, commissioned and serviced in accordance
with the manufacturer’s instructions by competent persons and that it meets
the requirements of the appropriate Building Regulations. The Benchmark
Checklist can be used to demonstrate compliance with Building Regulations
and should be provided to the customer for future reference.
Installers are required to carry out installation, commissioning and servicing work in accordance with the
Benchmark Code of Practice which is available from the Heating and Hotwater Industry Council who manage and
promote the Scheme. Visit www.centralheating.co.uk for more information.
IF YOU SMELL GAS
Isolate the gas supply and get out of the building. Do not try to light any appliance. Do
not turn any light or other electrical switch on or off. Do not use any telephone in the
building. Call your gas engineer from a safe location and follow their instructions. If
you cannot reach your gas engineer ring the following: National Grid 0800 111 999
5
Congratulations on purchasing the technologically advanced, temperature controlled,
Rinnai Hot Water System.
Rinnai water heaters will NEVER RUN OUT of hot water. As long as electricity,
water, and gas supplies are connected, hot water is available when hot water taps are
open.
Built into the main micro-processor is the facility to LIMIT THE MAXIMUM
TEMPERATURE of the hot water supplied. The water temperature may be set to
various temperatures. This is particularly useful when the hot water unit is installed
where young children or the infirm may be using the hot water. If required, the
temperature can be changed via the dip switches on the PCB or with a localised
controller. For further information, please contact Rinnai.
Rinnai HDC water heaters are powered flue appliances. This makes them
COMPACT, saving both floor and wall space.
The temperature of outgoing hot water is CONSTANTLY MONITORED by a BUILT-
IN SENSOR. If the temperature of the outgoing hot water rises to more than 3°C
above the selected temperature the burner is shut OFF and only turned ON again
when the temperature falls to below the selected temperature.
The burner lights automatically when the hot water tap is opened, and extinguishes
when the tap is closed. IGNITION IS ELECTRONIC, so there is no pilot light. When
the hot water tap is off, no gas is used.
The Rinnai HDC Condensing water heaters have a built in Status Monitor on the
front of the unit to display error codes and run condition. Up to four external
temperature controllers can be mounted remotely from the heater. This offers the
following additional features:
- Localised temperature setting - Diagnostic information
- Error Codes - Clock - Bath fill
Temperature Controllers are an optional extra. These provide functions including Bath
Fill, Voice Prompt, and Clock Setting.
Temperatures selected at the controllers are retained in the SYSTEM MEMORY.
Operating NOISE LEVEL IS VERY LOW.
ERROR MESSAGES ARE DISPLAYED on the Temperature Controllers, assisting
with service or fault diagnosis.
FROST PROTECTION device built in as standard.
The Rinnai HDC Condensing water heaters have the ability to control an external
RECIRCULATION PUMP providing more comfort in case of close loop system.
The Rinnai HDC Condensing water heaters have the possibility to be connected to
the Rinnai S-BMS (Building Management System). For further information, please
contact Rinnai.
FEATURES AND BENEFITS

6
Excessively hot water is dangerous, especially for young children and the infirm. The
water heater allows you to control the temperature of your hot water to safe levels.
Do stay with children whenever
they are in the bathroom.
Do take them out of the bathroom if
you need to answer the phone or
door.
Do test the temperature of the water
with your elbow before placing your
child in the bath.
Do make sure that the tap is turned
off tightly.
Do consider setting your Rinnai
Water Heater at a maximum
temperature of 50°C.
Do install a child proof tap cover
OR,
Do install a child resistant tap.
Do not leave a toddler in the care of
another small child. The older child
may not have safely set the temperature.
IMPORTANT INFORMATION
Water temperature over 50ºC can cause severe
burns instantly or even death from scalding.
Children, disabled and the elderly are at the
highest risk of being scalded by excessively hot
water.
Always test the temperature of the water before
bathing or showering.
Burns from hot water taps can result in very
severe injuries to young children.
Hot water at 65°C can severely burn a child in less
than half a second. At 50°C it takes five minutes.
Burns can occur when children are exposed
directly to hot water or when they are placed into a
bath which is too hot.
Consider child-resistant taps or
inexpensive tap covers, both of
which prevent a child’s hand from
turning on the tap.
Consider reducing the tempera-
ture of the water supplied to
the hot tap to 50°C.
This approach can be extremely
valuable because it requires a
one time action for a long term
reduction in risks of scalds.
This type of automatic protection
is important during times when a
parent or carer has been
distracted.
DO
DO
NOT

7
IMPORTANT INFORMATION
Always check water temperature before
use.
Refer to warning about hot water on
page 6 for important safety information.
Hot water may go cold without warning at
very low water flows (less than 3 l/min).
The delivered water temperature is
controlled automatically. The water from
the hot tap may be reduced after the
temperature shown on the remote control
is raised. The water flow may also vary
with the temperature of the incoming
water supply.
Keep flammable materials, trees, shrubs,
chemicals, etc. away from the flue outlet /
terminal.
Do not spray water into flue terminal
Do not touch the flue outlet. Do not insert
objects into the flue outlet / terminal.
On cold days steam may be discharged
from the flue outlet. This is normal, do
not be alarmed. It does not indicate a
fault.
If freezing temperatures are expected, turn
off the water and gas, and drain the water
heater.
If the power is left on the Automatic Frost Protection
will prevent the unit from Freezing. Frost protection
is standard on all units.
OFF!
Filter
Drain
Gas
Valve
GasColdHot
Turn Water Off
Turn Gas Off
Drain Water
HOT!

8
Rinnai HDC products have no pilot light and operate automatically as soon as water flow is
sensed.
The burner ignites with electronic ignition and the flame extinguishes as soon as water
flowing through the appliance stops.
Turn On by opening the hot water tap
The Rinnai HDC range of water heaters are factory preset to a temperature
of 55°C; the HD range are preset to 65°C. Other limits, lower or higher, are
available on request. Temperature controllers are available to allow precise
digital temperature control. Controllers can be installed at any time after
installation of the hot water unit.
Excessively hot water is dangerous. Rinnai water heaters allow you to
control the temperature of your hot water to a safe level.
Water temperatures above 50°C can cause severe burns instantly, such
scalding may even result in death. Those most at risk are children,
disabled, elderly and the infirm. Hot water at 65°C (a very common water
temperature in the UK) can severely burn a child in less than half a
second. At 50°C it takes five minutes.
Consider using Thermostatic Mixing Valves on the Hot Water Outlets.
OPERATION WITHOUT REMOTES
The new series of Rinnai Water Heaters have a built in status monitor on the front.
The status monitor has three conditions:
1. The water heater is off (no water flowing): the monitor is blank.
2. The water heater is on (heating water): The monitor displays the set
temperature.
3. The water heater should be on, but is not (water is flowing, heater is not
on): The monitor will display a flashing error code.
STATUS MONITOR
CAUTION
NOTE
NEW FEATURE
HOTHOT
COLDCOLD
OFF!OFF!
OFF!OFF!
STATUS MONITOR

9
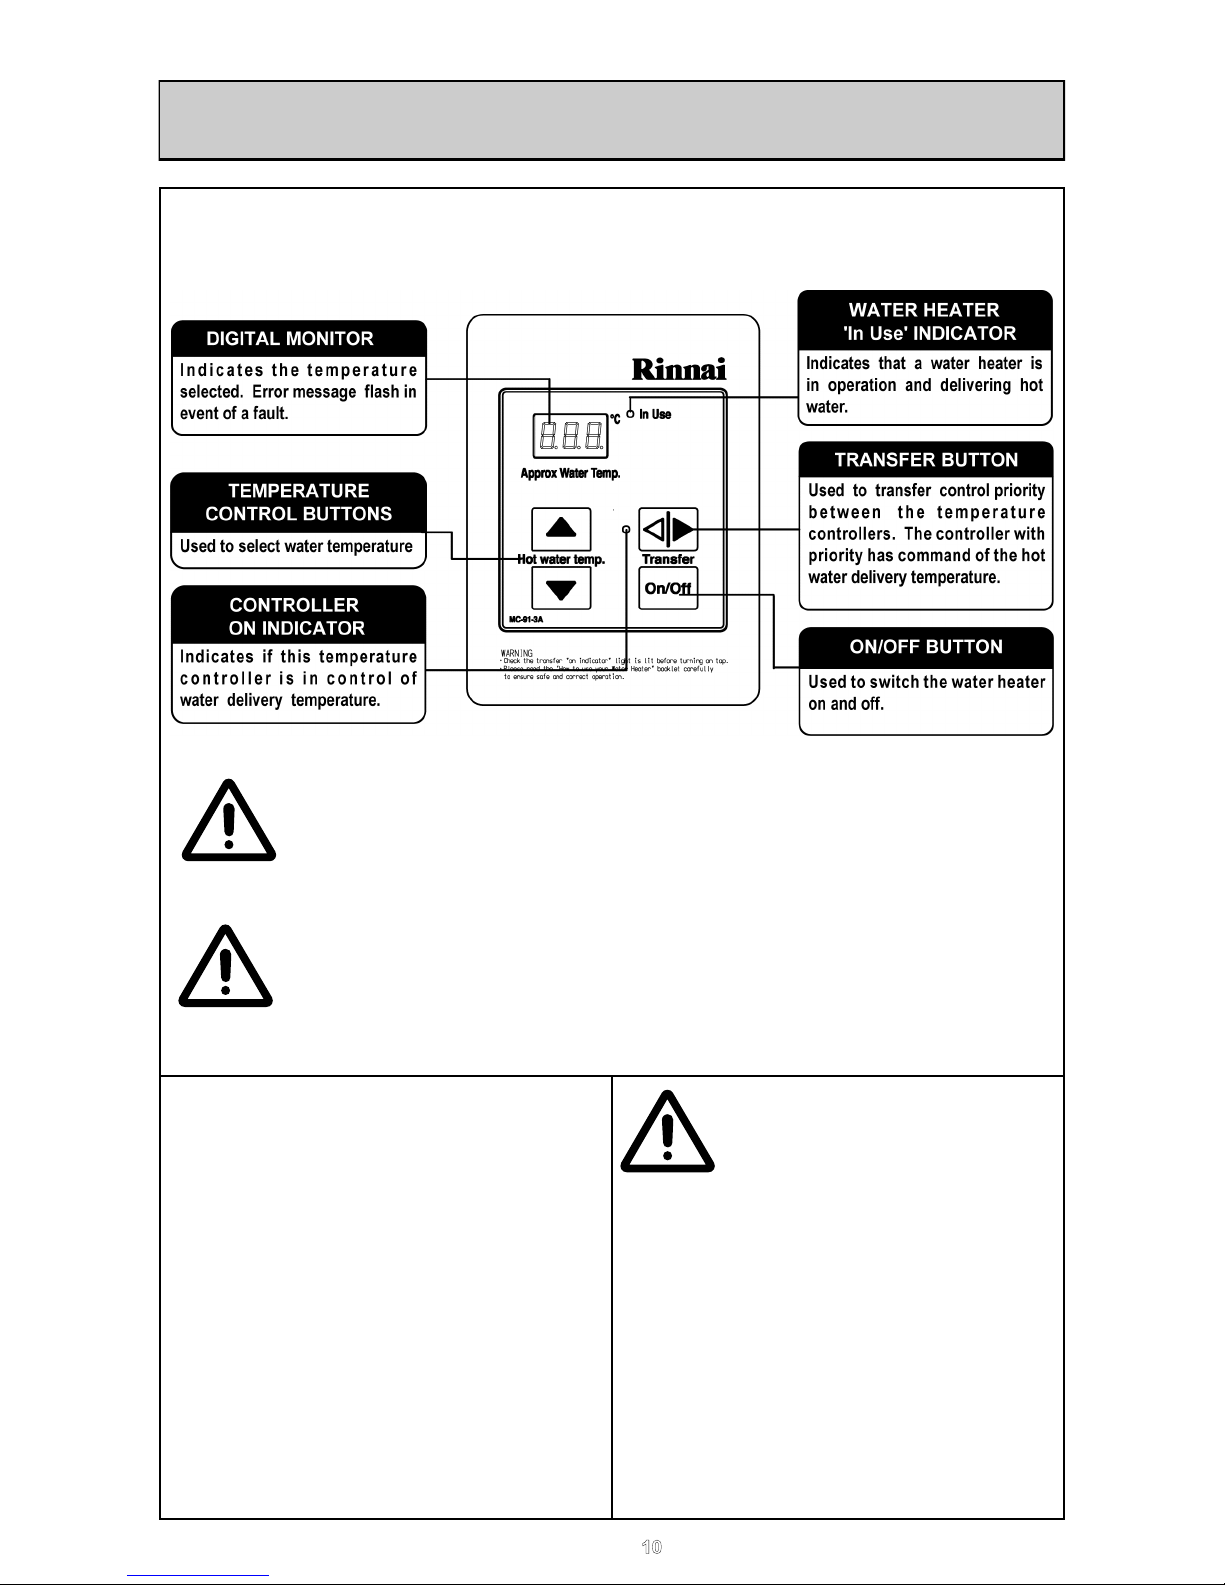
TEMPERATURE CONTROLS
The purpose of a Temperature Controller is to enable the user to have localised control
over the hot water supply. Used correctly, the hot water unit will supply hot water at the
temperature selected, even when the water flow is varied, or when more than one tap is
used. Adjustments to the operation of your hot water unit can be made with any of the
Temperature Controllers. Each Temperature Controller can be individually programmed.
Up to four Universal and/or Deluxe Temperature Controllers can be fitted with Rinnai
water heaters. Universal Controllers allow temperature selection only and one comes as
standard with some of the water heaters, Deluxe Temperature Controllers are always an
optional extra. These controllers have temperature selection, bath fill, voice prompt, and
time clock functions. When more than one Universal Controller is used just one may be
set as the Master Controller to allow temperatures above 50°C.
Various water temperatures (°C) can be selected as follows:
Universal Controller “MC-91”:
37, 38, 39, 40, 41, 42, 43, 44, 45, 46, 48, 50°C
Master Universal Controller “MC-91”:
37, 38, 39, 40, 41, 42, 43, 44, 45, 46, 48, 50, 55°C ( 60, 65°C, 75°C HD )
Deluxe Bathroom Controller “BC-100V”:
Hot Water Delivery: 37, 38, 39, 40, 41, 42, 43, 44, 45, 46, 48, 50°C
Bath fill Delivery: 37, 38, 39, 40, 41, 42, 43, 44, 45, 46, 47, 48°C
Deluxe Kitchen Controller “MC-100V”:
37, 38, 39, 40, 41, 42, 43, 44, 45, 46, 48, 50, 55°C ( 60, 65°C, 75°C HD )
If a temperature of 43°C or higher is selected on any controller and this temperature is
then decreased to below 43°C and increased again whilst the water is running, the
maximum selectable temperature will be 43°C. This provides additional safety for the
user.
Suggested temperatures are:
Kitchen 45°C; Shower 39°C - 43°C; Bath fill 39°C - 45°C
These temperatures are suggested starting points for selection. You may find higher or
lower temperatures are more comfortable. Maintaining lower temperatures helps to save
energy. To obtain water temperatures lower than 37°C simply add cold water.
When multiple temperature controllers are used they allow the temperature to be set
from various locations by pushing the transfer button which gives that controller priority
over the system. The temperature selected by the controller with priority will be available
to all outlets.
10
TEMPERATURE CONTROLS
Remote temperature controllers provide control over the water temperature. Rinnai water
heaters can be operated with 1, 2, 3, 4 or no temperature controllers.
The MC-91-3A controller can be locked by pressing the Transfer button and the
up-button together for 5 seconds. A beep will sound confirming that the controller
is locked. The display will alternately show “LOC”, the temperature setting, and a
diagnostic code if one has been activated. All of the controllers in the system are
also locked.
Each time a button is pressed, a BEEP will sound. The BEEP sound
can be muted by depressing the Temperature Controller Up and
Down buttons simultaneously for more than 5 seconds. This can be
done for each Temperature Controller. To return to original settings,
repeat this step.
Safety features
Whilst the hot water tap is open, the
following safety features apply:
Temperature selection cannot be
transferred.
The temperature setpoint on the
controller with priority can always be
lowered, but the setpoint can only be
raised to 43°C.
Other controllers are unable to take
priority or change the delivery
temperature of the water.
If off, the controller cannot be turned on.
The temperature of the outgoing
water is constantly monitored by
a built in sensor.
If the temperature of the outgoing
hot water rises to more than 3ºC above the
selected temperature shown on the digital
display, or the preset limit if controllers are
not fitted, the burner will automatically go
out.
The red “In Use” indicator will also go out.
The burner will ignite again once the
outgoing hot water temperature falls to that
shown on the digital display (or the pre-set
limit of the Rinnai HDC heater).
NOTE
NOTE
NOTE
11
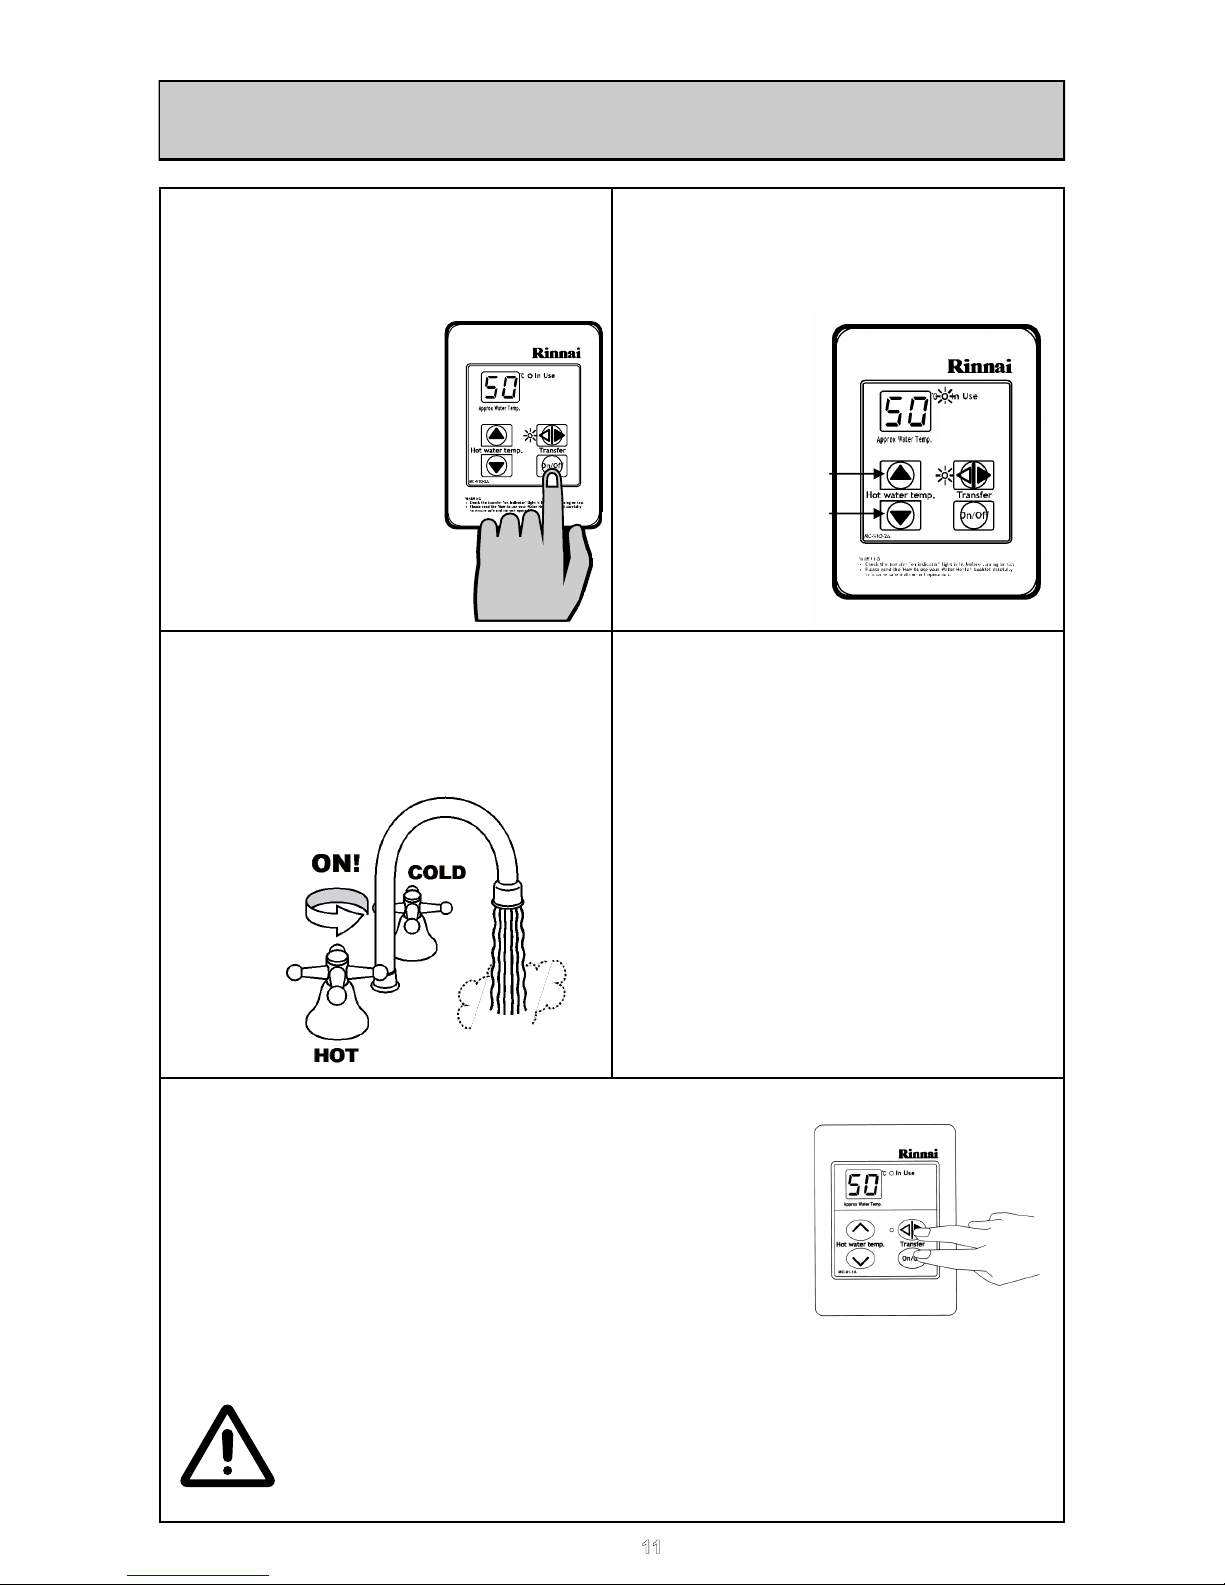
TEMPERATURE CONTROLS
Using the Temperature Controllers
Press the ON/OFF button on a
temperature controller after making sure
that water is not flowing.
The system will become
active, the temperature
will default to 40°C and
the controller that turned
the system on will have
priority.
The temperature setting
on the controller will light
up.
Adjusting Temperature
Simply press the Hot Water Temperature
Up or Down arrow button until the desired
temperature is
displayed on
the digital
display.
Using Hot Water
To operate the heater, simply turn any hot
water tap on. This will automatically light
the burner providing hot water. The red IN
USE indicator will glow on the temperature
controller.
To turn off your hot water system
During normal operation the system is left
on.
To turn the system off simply press the
ON/OFF button on any temperature
controller (where fitted). This will shut the
water heater down completely including
the temperature controller digital display.
The Digital Monitor will go out.
If hot water taps are opened when the
Rinnai HDC is off, cold water will flow from
the taps.
If the system is to be left off over the winter
be sure to drain it down if there is a
possibility of freezing temperatures.
Using High Temperature Display Controllers
You will need to program the Master controller if you want to
display and use temperatures over 50°C. Programming only
needs to be done on Master universal controller; other universal
controllers will not allow this.
Deluxe Kitchen controllers are supplied already programmed to
allow high temperatures.
STEP 1: On the Master controller only press and hold the
Transfer and ON/OFF buttons simultaneously (see Fig. 1) until a
“beep” is heard (approx. 5 seconds).
STEP 2: When the Primary controller is switched on it should be possible to select
temperatures higher than 50ºC. If not repeat STEP 1.
If the master controller is replaced, repeat STEP
1 above for the new controller.
COOLER
HOTTER
Fig. 1
NOTE

12
TEMPERATURE CONTROLS
Using 2 or more Universal Temperature Controllers.
Switching the system ON.
The hot water system and all controllers can be switched ON
and OFF from any controller by pressing the ON/OFF button as
shown. When the system is turned ON the water temperature
display will be lit.
During normal operation the system is left ON. Do not push the
ON/OFF button when water is running.
Using hot water.
Ensure the system is switched On by verifying the temperature
display is lit. Ensure the local controller has priority by verifying
the Transfer LED indicator is lit. If it is not then press the
Transfer button once. This gives the local controller priority of
temperature over the system.
Select the desired temperature using the Hot water temp.
buttons. The selected temperature will be displayed on all
controller displays. This is the water temperature which will be
supplied from the heater.
Bathroom temperatures
should be no more than 50°C.
Open the hot water tap. The
appliance will be activated and
the In Use indicator will be lit.
Using 4 Universal Temperature Controllers.
You will need to activate the fourth controller.
STEP 1: On the Master controller press and hold the
Transfer and ON/OFF buttons simultaneously (see Fig. 2)
until a “beep” is heard (approx. 5 seconds).
STEP 2: Check that the display on all Four controllers is
lit and displaying a temperature when switched on. If any
ONE of the controllers displays two dashes (see Fig. 1) in
the display repeat STEP 1.
If the master controller is replaced, repeat
STEP 1 above for the new controller.
NOTE
Fig. 2
Fig. 1

13
Do not push the ON/OFF button on the
Master controller after transferring priority
of temperature selection to a Secondary
controller as the system will shut down.
Do Not Turn OFF the Master Controller
Temperature priority cannot be switched
to another controller when the water is
flowing through the water heater.
Depending on the weather conditions
and the length of the pipe between the
heater and the tap in use, there may be a
variation between the temperature
displayed at the controller and the
temperature at the tap.
Do not clean the control with solvents or
detergents.
Use only a soft damp cloth.
TEMPERATURE CONTROLS
If a temperature over 50°C
has been selected on a
controller and priority of
temperature selection is
transferred to another
controller, then back again,
the temperature on the
controller will automatically
drop to 50ºC. If the set point is
50°C or less it will not alter.
This is a safety feature.
Controller 1
in use
Controller 2
cannot take
priority
Kitchen
Kitchen
Bathroom
S
O
L
V
E
N
T

14
ERROR MESSAGES
Rinnai water heaters have the ability to check their own operation continuously. If a fault
occurs, an error code will flash on the Digital Display (and on the Status Monitor). This
assists with diagnosing the fault, and may enable you to overcome a problem without a
service call. Please quote the code displayed when enquiring about service.
* In all cases, you may be able to clear the Error code by turning the hot water tap OFF, then ON
again. If this does not clear the error, try pushing the On/Off button OFF then ON again. If the Error
Code still remains contact Rinnai or your nearest service agent for advice.
** Faults caused by insufficient gas/water supply or gas/water quality and installation errors are not
covered by the manufacturer’s warranty.
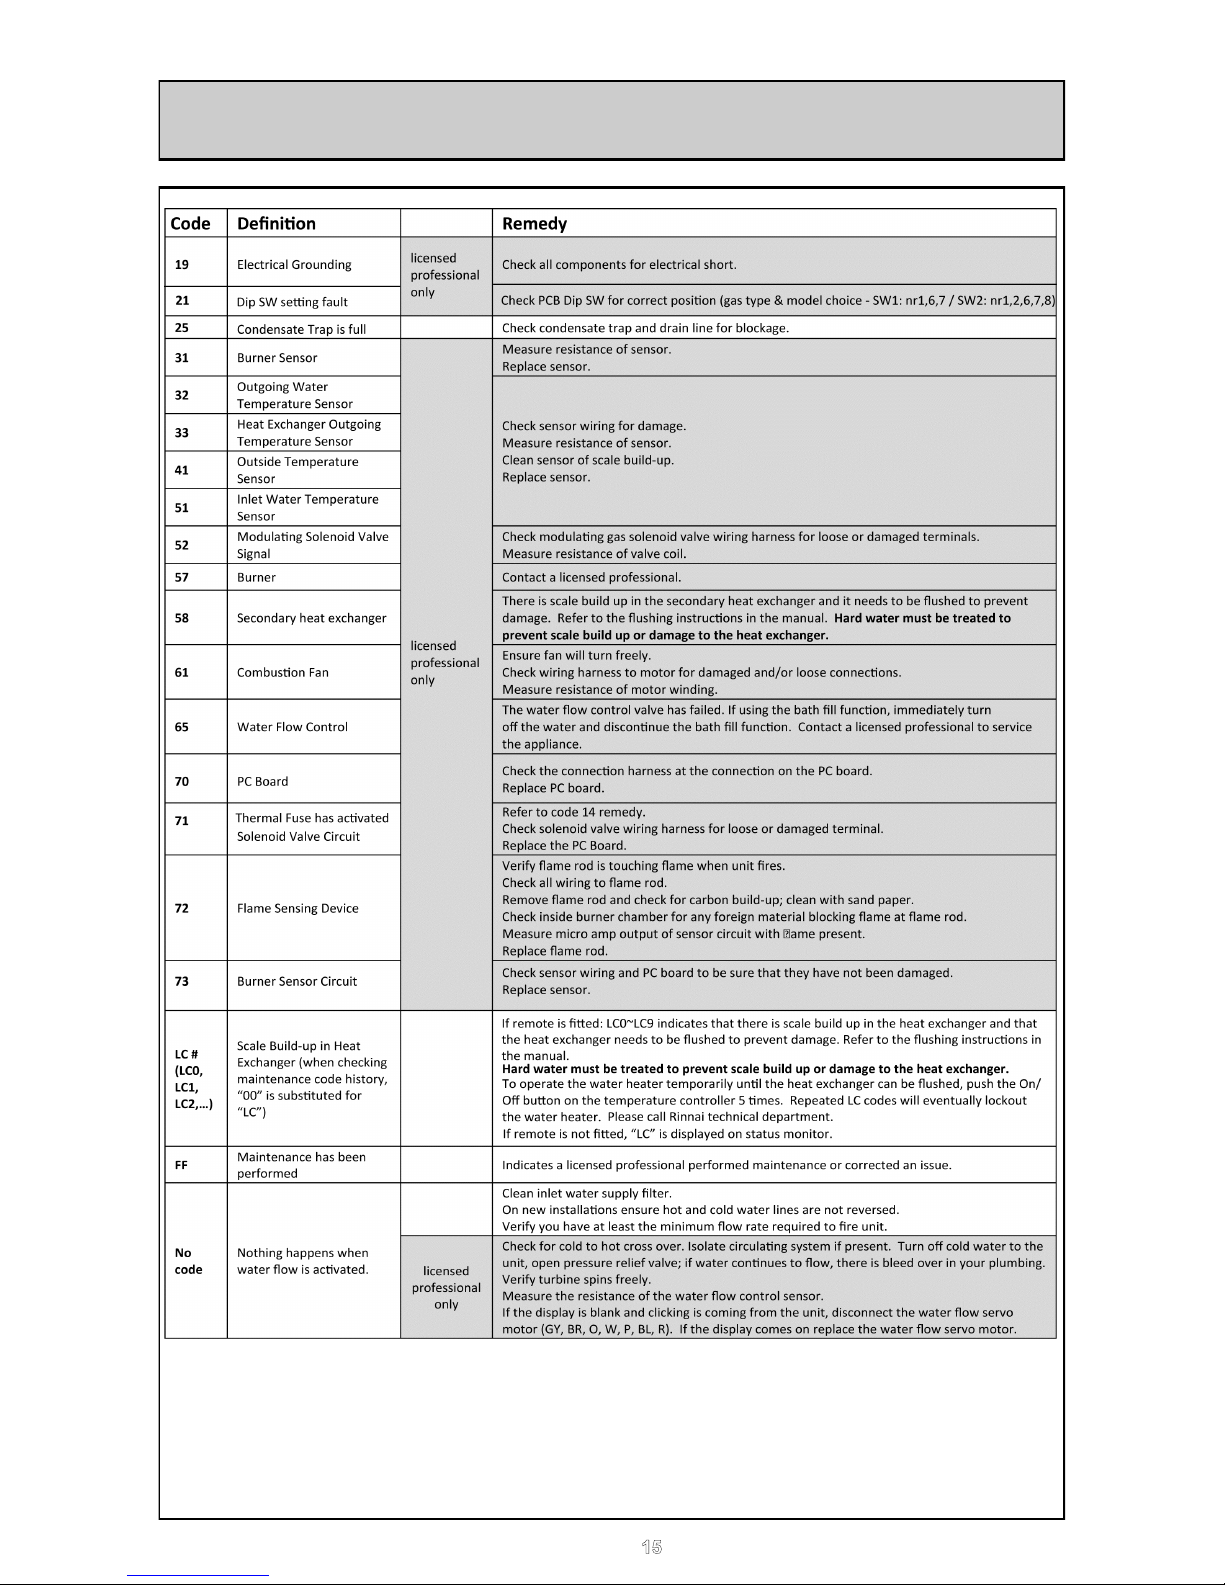
15
ERROR MESSAGES
* In all cases, you may be able to clear the Error code by turning the hot water tap OFF, then ON
again. If this does not clear the error, try pushing the On/Off button OFF then ON again. If the Error
Code still remains contact Rinnai or your nearest service agent for advice.
** Faults caused by insufficient gas/water supply or gas/water quality and installation errors are not
covered by the manufacturer’s warranty.
16
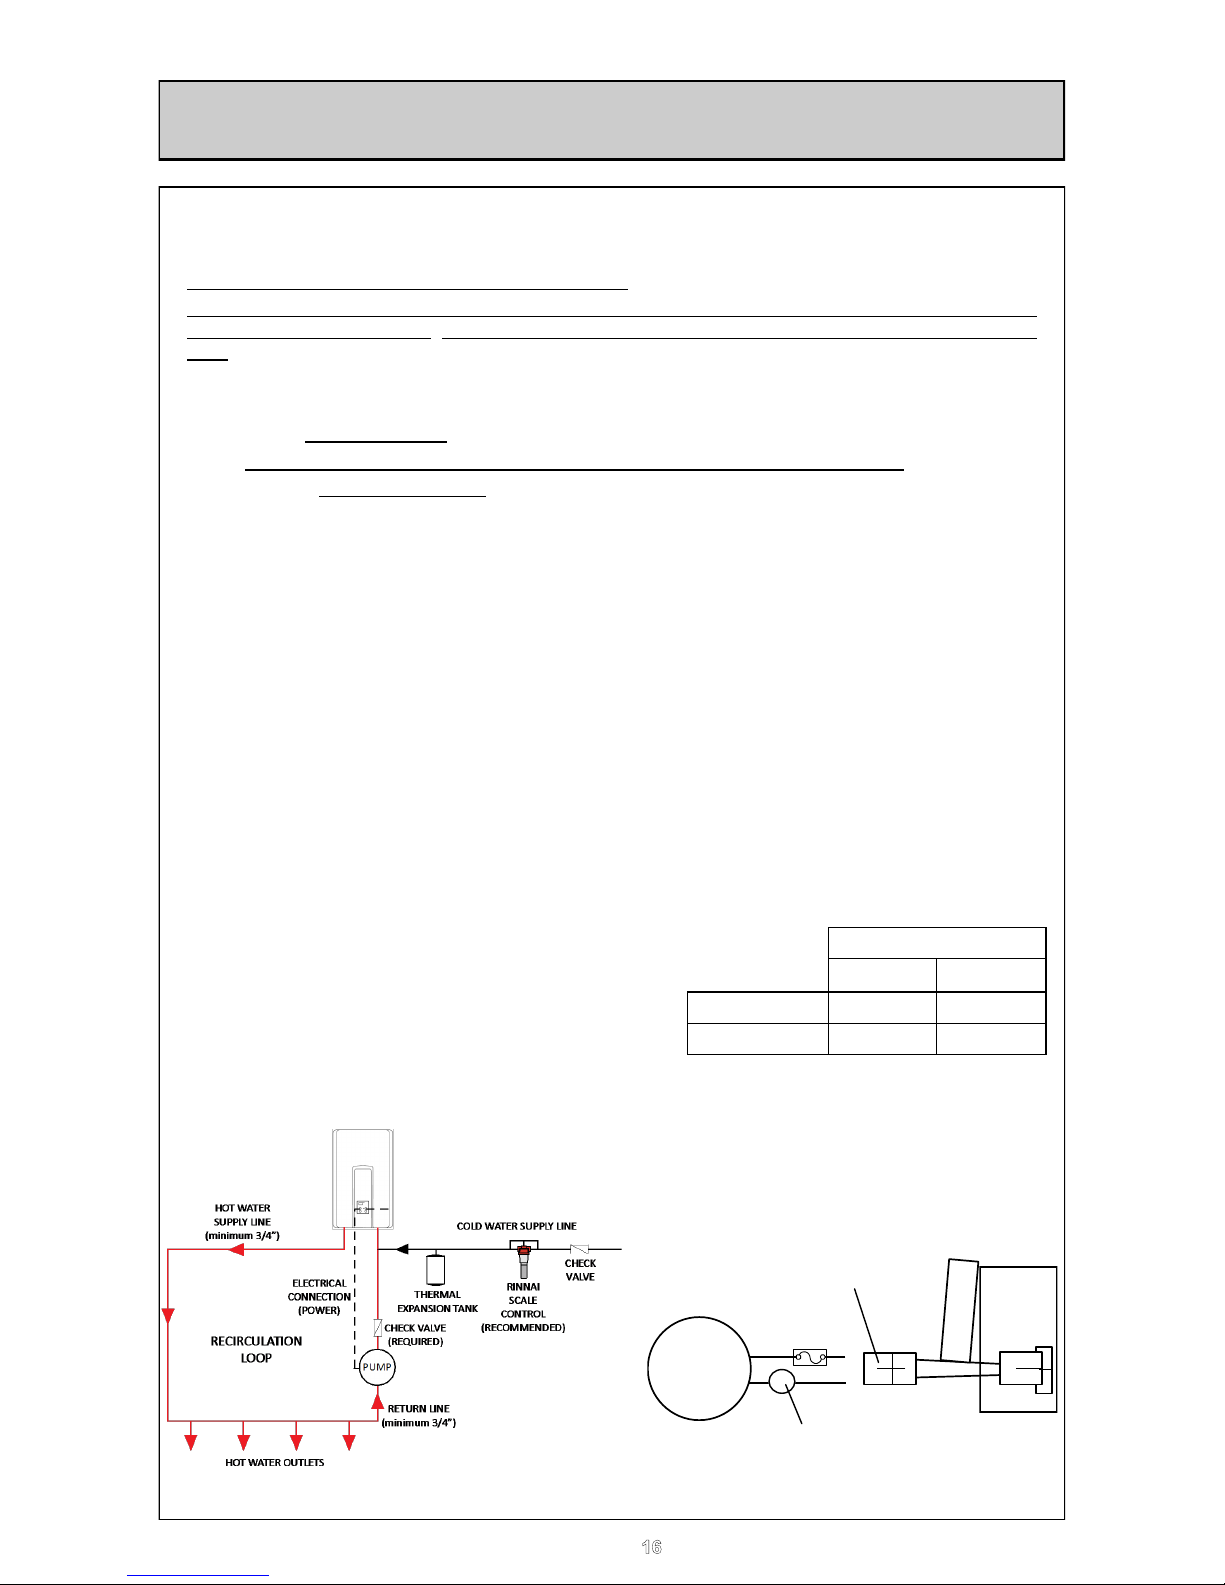
RECIRCULATION MODE
The Rinnai water heater has the ability to control a recirculation pump. Two modes are available,
Economy and Comfort, which recirculate the water in the plumbing system to provide hot water more
quickly when a tap is opened.
Recirculation mode is for residential installations only.
Recirculation mode cannot be used with the Bath Fill controller (BC-100V), an air handler, or with
multiple Rinnai water heaters. The maximum Rinnai temperature setting while in recirculation mode is
65°C.
Pump Requirements
Voltage: 230V AC, 50 Hz
Amperage: less than 2 amps
NOTE: The Rinnai PC board will be damaged if amperage exceeds 2 Amps.
In-rush current: Less than 2.5 Amps.
Check valve: An integral flow check (IFC) valve is required. See plumbing diagram.
Pump Size
The pump should be sized for 10 L/min at the pressure loss through the tankless water heater and the
supply and return plumbing in the recirculation loop.
For more information on sizing the pump refer to Rinnai.
Installation
1 Turn off the electrical power supply by unplugging the power cord or by turning off the electricity at
the circuit breaker.
2 Install the recirculation pump on the return line according to the pump manufacturer installation
instructions. Install a check valve in the return line as shown in the Plumbing Diagram if one is
not integrated into the pump.
3 The wire harness for the recirculation pump is bundled with the wire harness from the PC board.
The connector has a black and white wire with the label “Cut wire to connect to pump”. To
connect to the pump, cut the connector, splice the wires, and add 4 Amp fuse to the hot wire
(black) of the pump. Connect the ground wire from the pump to a screw at the base of the water
cabinet (refer to the Pump Electrical Connection Diagram). Follow Electrical Code and pump
manufacturers recommendations.
4 Adjust the dip switch by moving the 3rd switch of
SW2 to ON position. For Economy mode, set the 4th
switch of SW2 to OFF position (default); for Comfort
mode, set the 4th switch of SW2 to ON position.
5 Connect power to the water heater. Press the
Power button on the controller. The pump and water
heater will turn on to raise the recirculation loop
temperature.
Settings for SW2
Switch 3 Switch 4
Economy Mode
ON OFF
Comfort Mode
ON ON
Plumbing Diagram
Pump Electrical Connection
Timer (recommendation)
PUMP
C
ut wi
r
e
t
o
c
onne
c
t
t
o pump
Cut connector and splice wires
(place a relè here if start current of
pump exceeds 2.5Amp)
PC
Board
4 Amp
Fuse
BL
W
17
RECIRCULATION MODE
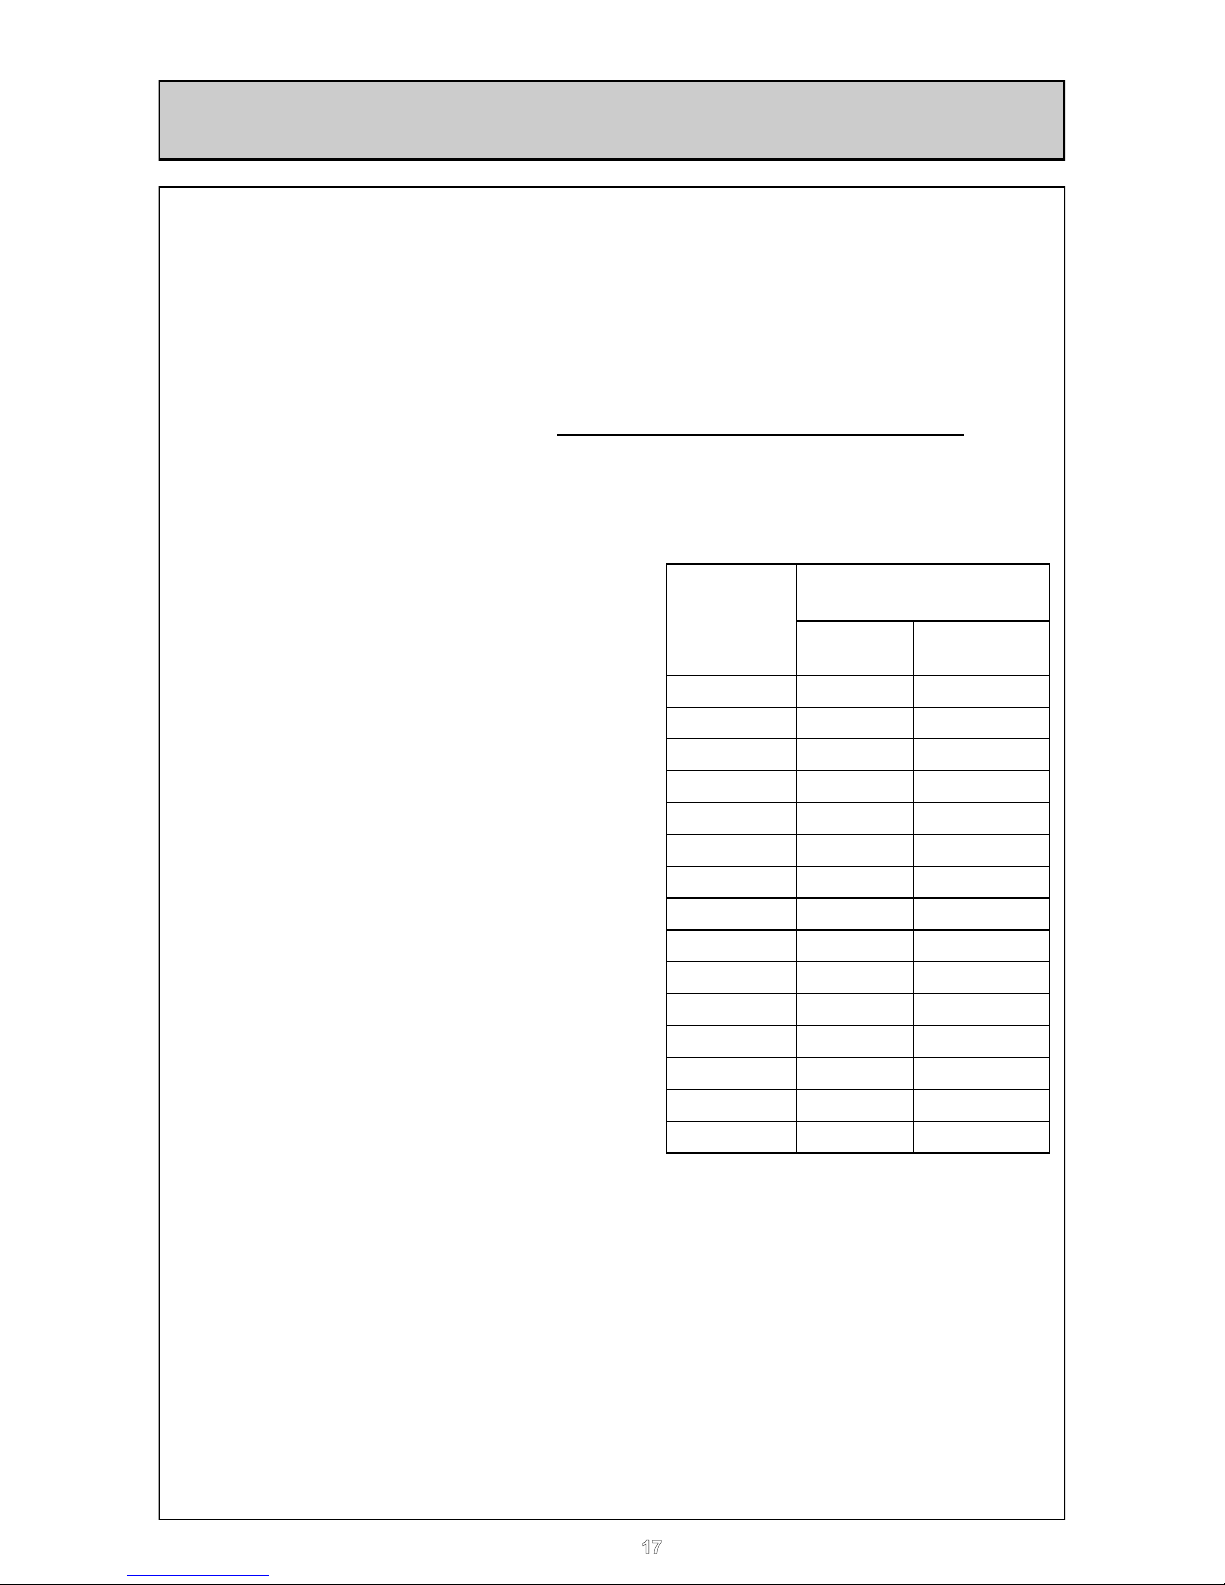
Sequence of Operation
DIP switches (SW2 - #3, #4) should be set correctly for recirculation and mode.
The Rinnai water heater should be turned on.
Pump recirculation begins when the water heater is turned on.
The Rinnai inlet and outlet thermistors measure the water temperature.
The water heater produces hot water at the temperature setting.
If the inlet thermistor detects abnormal temperature then diagnostic code 51 is generated and the
pump will turn off.
When the return water temperature reaches approximately 8°C below the temperature setting, the
water heater and pump will turn off.
The cycle will restart at the approximate time interval in the table based on the temperature thermistor
readings.
Economy Mode
The Economy mode operates as follows:
Less energy consumed due to fewer pump cycles
Assumes plumbing is insulated (minimal pipe heat
loss)
Pump cycles on every 31 to 79 minutes (see
table).
Comfort Mode
The Comfort mode operates as follows:
Higher energy consumption due to more pump
cycles
Assumes plumbing is not insulated resulting in
higher pipe heat loss
Pump cycles on every 15 to 39 minutes (see
table).
* The pump will cycle on at these calculated intervals
which are based on the temperature setting,
insulation, and estimated heat loss in the system.
The values for your installation may vary.
NOTE: the function Recirculation Mode is available only using the remote
MC-91-3A.
Remote MC-91Q-3A is dedicated to recirculation unit REU-CUG1.
Rinnai
Temperature
Setting
°C
Typical Pump ON Intervals *
(minutes)
Economy
Mode
Comfort Mode
65 31 15
60 31 15
55 31 15
50 31 15
48 35 18
46 35 18
45 35 18
44 42 21
43 42 21
42 45 22
41 49 24
40 54 27
39 60 30
38 68 34
37 79 39
18
RESTARTING THE RINNAI WATER HEATER
The heaters should be restarted in this manner.
Standard system.
Single or multiple water heaters without remote controllers.
The heaters will automatically reset without any user involvement.
Single or multiple water heaters with remote controllers.
The heaters will be required to be switched on using the ON/OFF button on a remote
controller. Ensure that all taps/water outlets are closed and no water is flowing through
heaters.
Hot water system incorporating secondary recirculation pump.
Single or multiple water heaters without remote controllers.
The heater(s) will automatically reset without any user involvement.
Single or multiple water heater(s) with remote controller(s).
To reset the heaters follow the steps.
1. Turn off all hot water taps.
2. Turn off supply to secondary circulating pump or alternatively, isolate pump flow.
3. Turn on heater at remote control.
4. Select required temperature.
5. Switch on supply to secondary circulating pump or open valve on pump flow.
The heater will now be ready to supply water at the set temperature.
If following the above procedure does not reset the heater switch it on and off at its main
supply, and then go through these steps again. If heater is still not working call your local
service agent or Rinnai for assistance.
CARING FOR THE HDC
Maintenance
Even if there does not seem to be a problem with the water heater it is required in the UK
that all gas appliances are serviced every year by a certified gas engineer. This is to ensure
continued safety of the gas appliance. If you need a recommended service engineer contact
Rinnai or your supplier. The installer can refer to page 56 for main maintenance of
appliance. For more detailed instructions on maintenance contact Rinnai or your supplier.
Care
When the appliance casing, operation panel, and remote controls surfaces become dirty
gently wipe them clean with a soft, damp cloth. Do not use detergents on these parts.
Filter
The water heater has a filter on the cold water inlet connection. This filter will need to be
cleaned occasionally. How often will be determined by the local water conditions. The water
filter can be located on the diagram on page 22. Isolate the cold water inlet and hot water
outlet with the valves near the heater. Release the pressure in the heater by unscrewing the
drain valve (shown on page 22). Then remove the filter, clean it and replace it.

19
STOP
To go beyond this point in the manual you must be a
registered gas engineer.
Do not attempt to install this appliance if you are not
qualified. This can void the warranty.
If the information in this manual is not followed exactly a
fire or explosion could result.
This manual must be read in its entirety before installing
the appliance.
If you are unsure of any point contact Rinnai or your
supplier.
INSTALLATION INSTRUCTIONS
20
IMPORTANT INFORMATION
This appliance may only be installed by someone certified competent to do so. At
the time of printing the only people deemed competent to install this appliance are
those that are GAS SAFE registered for this type of appliance in this type of location who have a current ACS certificate.
1. Gas safety (Installation & Use) regulations 1998 are the ‘Rules in force’. In your own
interest and that of safety, it is law that all gas appliances are installed by competent
persons in accordance with the above regulations. Failure to install appliances correctly
could lead to prosecution. Other persons should NOT attempt to install this equipment.
2. Building Regulations G3 require installers of unvented systems to be competent to do
so. Competence can be shown by holding a current certificate in Unvented Domestic Hot
Water Systems. If the HDC is installed in a flow and return, or tank system, or any other
closed system then the system is unvented.
3. Installation must be carried out in accordance with the current issue of the following:
Building Regulations issued by the Department of the Environment
Building Standards (Scotland) Regulations.
I.E.E. Wiring regulations for electrical installations.
Gas safety (Installation and Use) Regulations current issue.
BS 5546
BS 5440
BS 6891
BS 5482
BS 6700
BS 6644
Institute of Gas Engineers Publications
Local byelaws
Water regulations
Health and safety at work etc. Act 1974
IGE/UP/10 Part1 Edition 2.
Building Regulation J and G
Such other specifications and regulations that may supersede or complement the above
documents.
It is the installer’s responsibility to ensure that the unit has been installed to all current requirements.
Please be sure that you are fully aware of your obligations and responsibilities under
these regulations.
In case of defective parts only use genuine Rinnai components for replacement failure
to do so will invalidate any warranty.
Disposal Information:
Under the laws and local regulations, this product must be disposed separately from household waste. When this product reaches the end of useful life, it should be taken to a collection point identified by the local authorities. The recycling of the product at the time of disposal will help conserve natural resources and ensure that it is recycled in a manner that protects human health and environment.
UK INSTALLATION INSTRUCTIONS
 Loading...