

Page 1
User information manual
Highefciencycondensinggasboiler
Q85SN/Q130SN/Q175SN/Q205SN/Q175CN
Q85SP/Q130SP/Q175SP/Q205SP/Q175CP
WARNING!
Installation and service must be
performedbyaqualiedinstaller,
service agency or the gas supplier.
Pictured: Q85SN, Q130SN
Q85SP, Q130SP
WARNING!
Ifyoudonotfollowtheseinstructionsexactly,areor
explosion may result causing property damage, personal
injury or loss of life.
- Donotstoreorusegasolineorotherammable
vapors and liquids in the vicinity of this or any other
appliance.
- WHAT TO DO IF YOU SMELL GAS
- Do NOT try to light any appliance.
- Do NOT touch any electrical switch.
- Do NOT use any phone in your building.
- Immediately call your gas supplier from a
neighbor’s phone. Follow the gas supplier’s
instructions.
- Ifyoucannotreachyourgassupplier,callthere
department.
Français: voir page 17
Address: 103 International Drive, Peachtree City, GA, 30269
Toll-free: 1-800-621-9419 • Fax: 678-829-1666 • www.rinnai.us
Notice! This manual must be retained for future reference.
8W.52.4000/11.09 Changes reserved
Page 2

Contents of instructions
These instructions contain important information for the safe use of Rinnai
Q-Series gas boilers.
These user instructions are intended for the owner or responsible tenant of
the premises where the boiler is installed.
Subject to technical changes
Changes may be made to the illustrations, process steps and technical data
as a result of our policy of continuous improvement without prior notice.
Updating of documentation
Please contact us if you have any suggestions for improvements or
corrections.
Find our contact details on the back of this manual.
Operating instructions Rinnai Q-Series
2
Page 3
Safety and general instructions
!
!
Please observe these instructions in the interest
of your own safety.
Designated use
The boiler is designed to heat water for a central
heating system and, if applicable, generating
domestic hot water. The boiler is delivered with
a burner controller pre-installed.The boiler can
be tted with a modulating outdoor reset control
ARV12 (included), a room controller RS100
(optional), a zone controller (optional) or an
On/Off thermostat or relay panel end switch
(accessories).
Hazarddenitions
The following dened terms are used throughout
the documentation to bring attention to the
presence of hazards of various risk levels.
Notices give important information concerning the
operation of the product.
DANGER
WARNING
!
CAUTION
NOTICE
i
DANGER:
Indicates the presence of hazards that
will cause severe personal injury, death or
substantial property damage.
WARNING:
Indicates the presence of hazards that
can cause severe personal injury, death or
substantial property damage.
CAUTION:
Indicates presence of hazards that will or
can cause minor personal injury or property
damage.
NOTICE:
Indicates special instructions on installation,
operation or maintenance that are important
but not related to personal injury or property
damage.
Operating instructions Rinnai Q-Series
3
Page 4

These operating instructions describe the
operation of the Rinnai Q-Series condensing
gas boilers. This manual is for the end user. For
installation and servicing there is a installation &
servicing instructions manual for the installer.
Read this manual fully before operating the boiler.
In case of doubt or errors contact your installer.
The manufacturer reserves the right to change
the specications and dimensions without prior
notice.
Work on the boiler must be carried out by a State
licenced contractor, (Ref: Gas Safety Installation
and Use) using correctly calibrated instruments
with current test certication.
Operating instructions Rinnai Q-Series
4
Page 5
Safety
FOR YOUR SAFETY READ BEFORE OPERATING
WARNING: If you do not follow these instructions
exactly, a fire or explosion may result causing
property damage, personal injury or loss of life.
A. This appliance does not have a pilot. It is equipped with an ignition device which automatically
lights the burner. Do NOT try to light the burner by hand.
B. BEFORE OPERATING smell all around the appliance area for gas. Be sure to smell next to the floor
because some gas is heavier than air and will settle on the floor.
WHAT TO DO IF YOU SMELL GAS
- Do NOT try to light any appliance.
- Do NOT touch any electrical switch.
- Do NOT use any phone in your building.
- Immediately call your gas supplier from a neighbor ’s phone. Follow the gas supplier’s
instructions.
- If you cannot reach your gas supplier, call the fire department.
C. Use only your hand to push in or turn the gas control knob. Never use tools.
If the knob will not push in or turn by hand, don’t try to repair it, call a qualified service technician.
Force or attempted repair may result in a fire or explosion.
D. Do not use this appliance if any parts have been under water. Immediately call a qualified service
technician to inspect the appliance and to replace any part of the control system and any gas
control which has been under water.
OPERATING INSTRUCTIONS
1. STOP! Read the safety information above this label.
2. Turn off al electrical power of the appliance.
3. Set the thermostat or other operating control to the lowest setting.
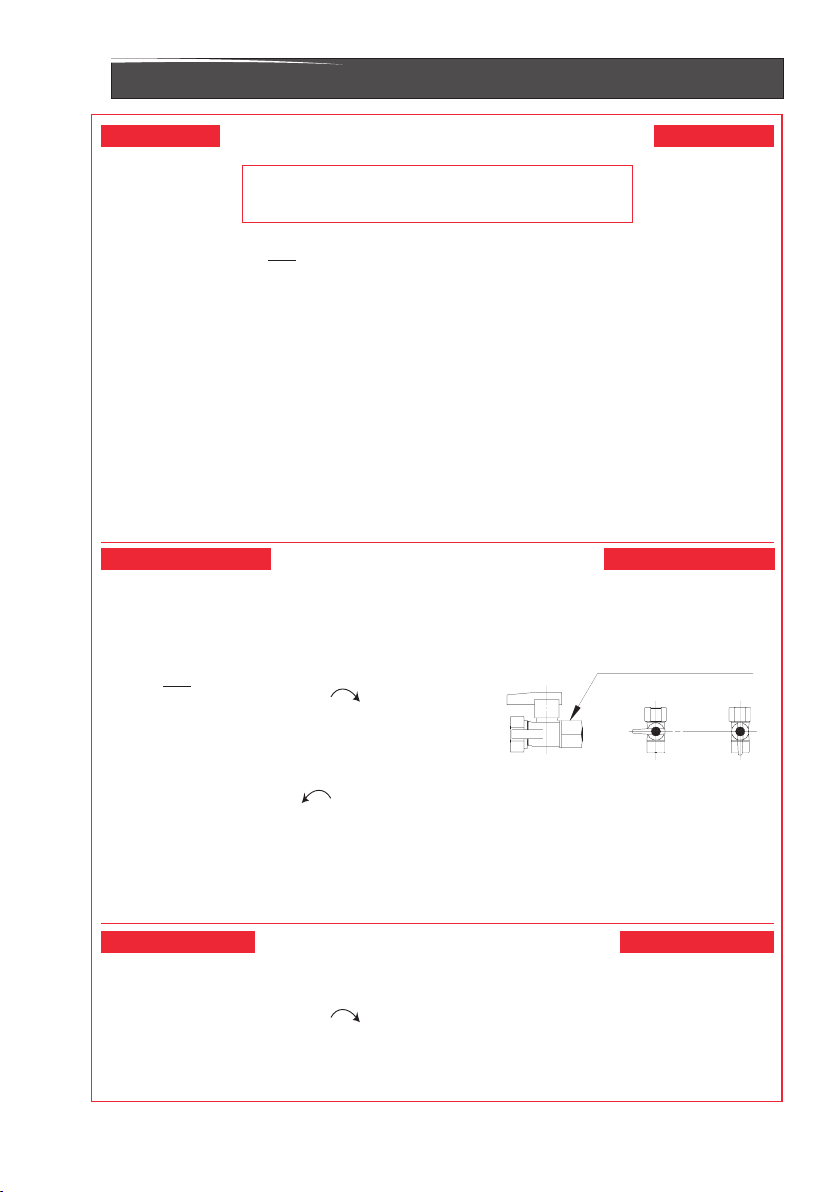
4. This appliance is equipped with an ignition device
which automatically lights the burner.
Do NOT try to light the burner by hand.
5. Close main gas shut off valve.
6. Wait (5) minutes to clear out any gas. Then smell for
gas. Including near the floor.
If you smell gas, STOP! Follow “B” in the safety
information above on this label.
If you don’t smell gas, go to the next step.
7. Open main shut off valve.
8. Set the thermostat or other operation control to desired setting.
9. Turn on all electric power to the appliance.
10. If the appliance will not operate, follow the instructions “To Turn Off Gas To Appliance” and call your
service technician or gas supplier.
Manual Gas Valve (Main valve)
CLOSE
OPEN
TO TURN OFF GAS TO APPLIANCE
1. Turn off all electric power to the appliance if service is to be performed.
2. Set the thermostat or other operating control to the lowest setting.
3. Close main gas shut off valve.
8U.34.01.00 / 05.09
Operating instructions Rinnai Q-Series
5
Page 6

!
DANGER
y
Should overheating occur or the gas supply
fail to shut off, do not turn off or disconnect
the electrical supply to the pump. Instead, shut
off the gas supply at a location external to the
appliance.
WARNING
!
Protection for corrosion
Do not use any sprays, chlorine containing agents,
solvents, paint etc. around the boiler or around
the air intake supply entrance of the boiler. These
substances have negative inuences on the boiler
and can lead to corrosion resulting in failure of
the boiler.
Products to avoid present in boiler room
and/or around combustion air intake
Spray cans containing chloro-/fluorcarbons
Ammonium and/or ammonium solutions
Permanent wave solutions
Chlorinated waxes and/or cleaners
Swimming pool chemicals based on chlorine
Calcium chloride used for thawing
Sodium chloride used for water softening
Refrigerant leaks
Paint or varnish removers
Hydrochloric acid/muriatic acid
Cements and glues
Antistatic fabric softeners used in clothes dryers
Chlorine-type bleaches, detergents, and cleaning solvents
found in household laundry rooms
Adhesives used to fasten building products and
other similar products
Areas likel
Dry cleaning/laundry areas and establishments
Swimming pools
Metal fabrication plants
Beauty shops
Refrigeration repair shops
Photo processing plants
Auto body shops
Plastic manufacturing plants
Furniture refinishing areas and establishments
New building construction
Remodeling areas
Garages with workshops
to have contaminants
NOTICE
i
Operating instructions Rinnai Q-Series
6
Checking the water pressure
Check the water pressure in the central heating
installation regularly.
Use only potable water for lling.
Additives only after clearance by Rinnai.
Contact your installer in case of doubt.
Page 7
Description of the boiler
The Rinnai Q boiler is a room sealed, condensing
and modulating central heating boiler. The Q175C
has an integrated domestic hot water feature.
The boiler is provided with a integrated control
system. Because an outdoor sensor is connected
to the boiler, the boiler works weather dependantly.
This means that the boiler control measures the
outside temperature and ow temperature. With
this data the boiler calculates the optimal ow
temperature for the installation.
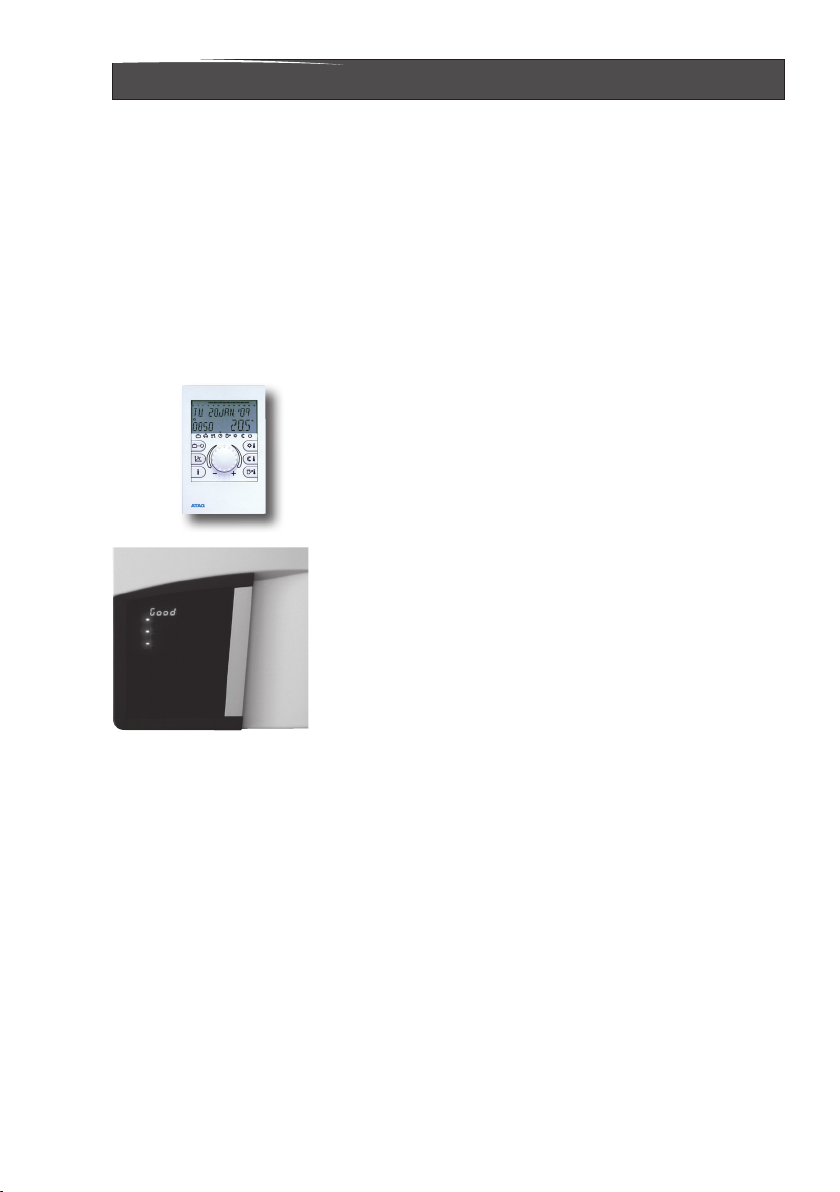
When the boiler is connected to an RS100 room
thermostat information can be retrieved from the
boiler. For more information about the Rinnai
thermostats. Please refer to the user manuals.
RS100
On the bottom left side of the front panel there is a
small door. Through the transparent panel you can
see the boiler status on the display. After opening
this door you will nd the function buttons.
On the following pages you will nd the explanation
of the function buttons and display messages.
Operating instructions Rinnai Q-Series
7
Page 8
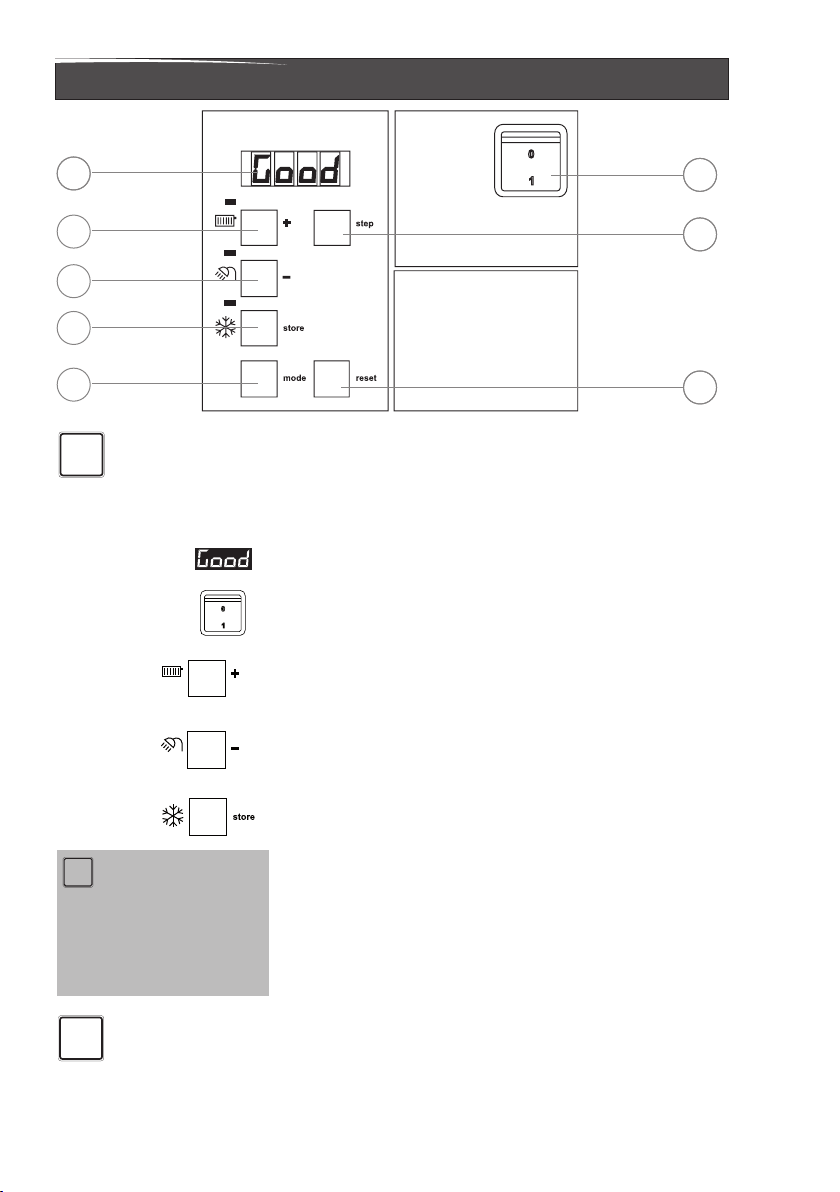
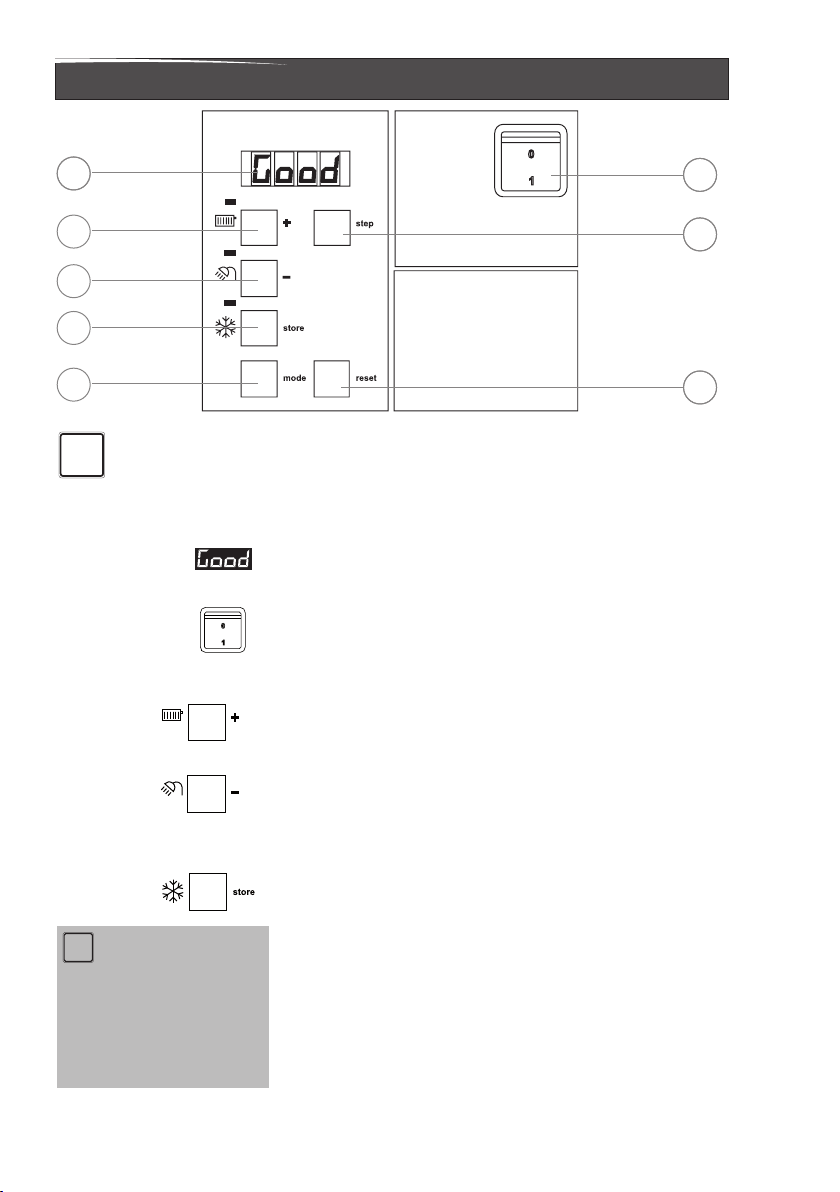
Explanation of the function buttons
1
3
4
5
6
Only qualied personel who are trained for
NOTICE
i
NOTICE
i
When the pump is switched
on continuously it can lead
to undesired heating up of
the central heating system
during the summer.
NOTICE
i
Operating instructions Rinnai Q-Series
8
these boilers are permitted to make alterations
in the controller to chronolize the boiler to the
installation.
1. Display.
See following pages for further information.
2. ON-OFF Switch
This switch turns the power supply to the boiler
3. Central Heating program button.
Switching the Central Heating on or off (Led
4. Hot Water program button.
Switching the Domestic Hot Water (DHW)
5. Pump program button.
When the pump program LED is ON, the pump
During freezing temperatures it is possible (when
there is no outside sensor connected), to manually
place the circulation pump in constant circulation
mode, thus reducing the chance of freezing pipes
(garage, attic or other cold spaces / rooms) which
are sensitive to frost.
2
7
8
on or off.
on/off);
facility on or off (Led on/off);
is switched into a continuous circulation mode.
When the pump mode is switched OFF, LED is
off the pump is control by the boiler processor.
In most situations it is best to leave the pump
mode OFF and let the boiler control cycle the
pump as needed.
Page 9
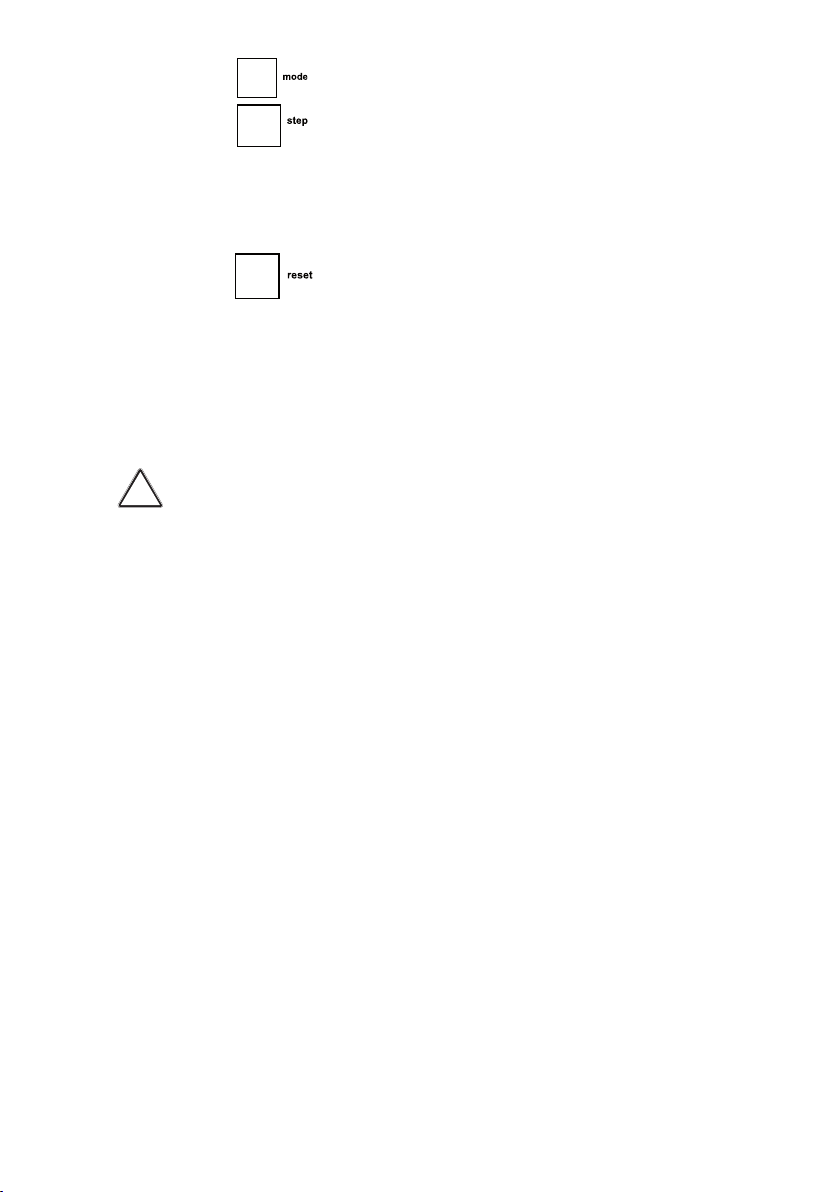
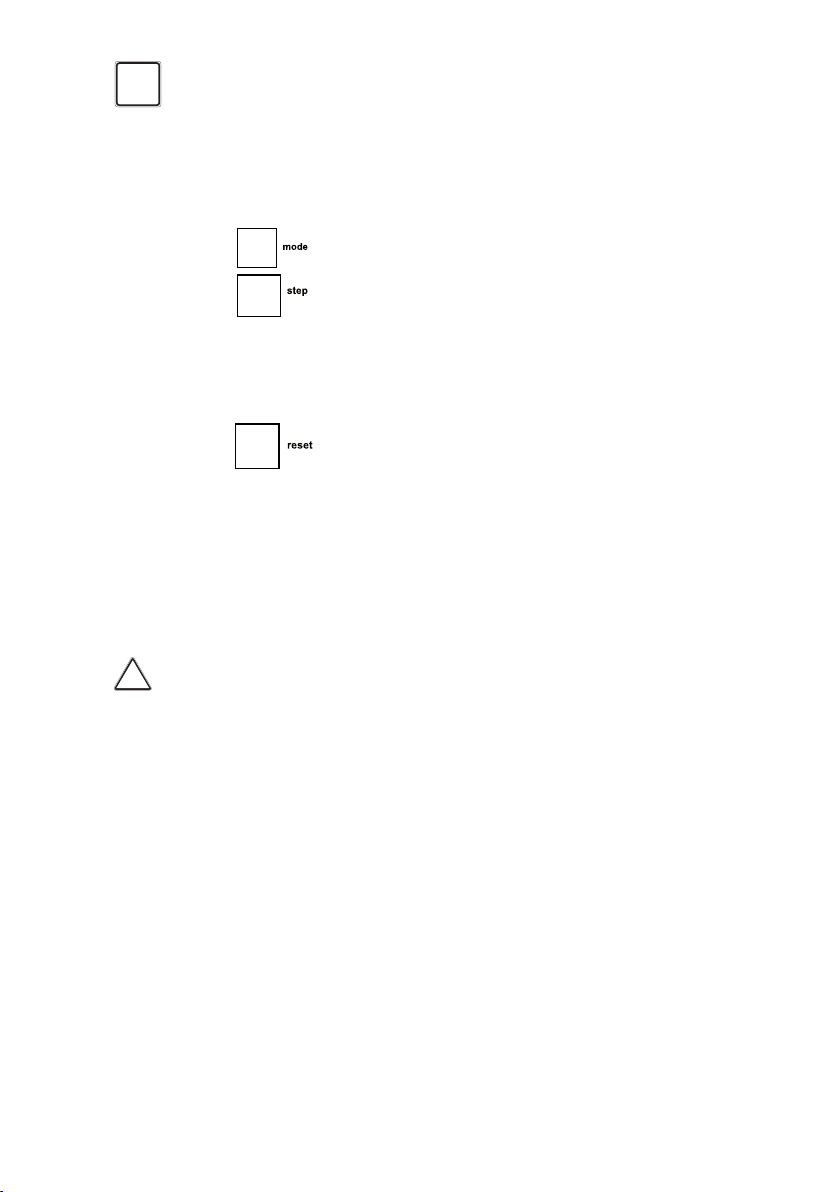
6 Mode-button.
Only for Service personel
7 Step-button.
After briey pressing, the water pressure can
be retrieved.
After pressing for 5 seconds it switches from
the Good-state to technical read out and vice
versa (see following pages);
8 Reset-button.
When a fault occurs it will be shown by the
ashing E (Error) with a number code after
which the boiler is shut down. After pressing
the reset key you can try to start the boiler
again. If the error message keeps occurring
contact your installer.
WARNING
!
DO NOT attempt to make repairs or remove
any of the boilerpanels. Contact a qualied
service agency to make necessary repairs or
adjustments.
Operating instructions Rinnai Q-Series
9
Page 10
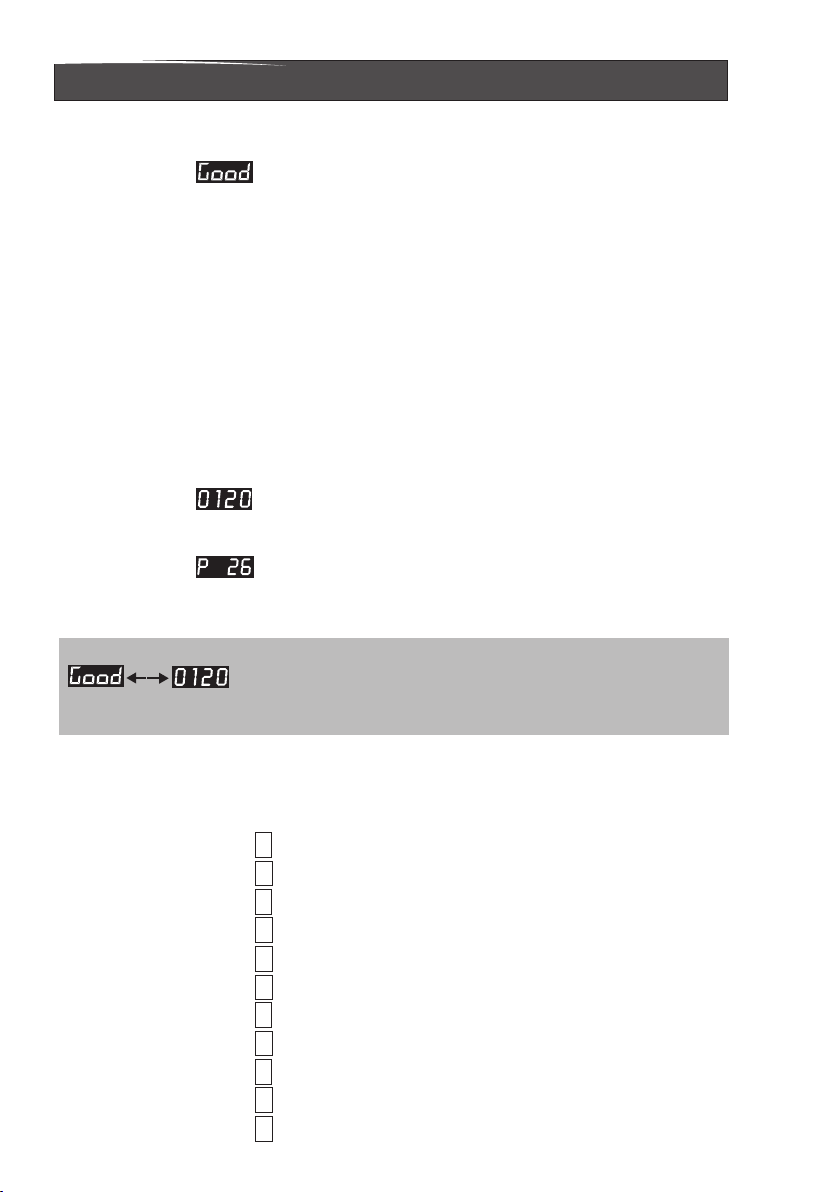
The boiler display
Two boiler displays, “Good or Technical” see below.
Good
or standard read out.
During this reading the display will only show what
is necessary. Under normal circumstances the
display will give a Good reading. In case of a
fault this will be shown with, alternate display of
Good, with an E or BL code. See further "Errors,
maintenance and warranty" .
Technical
The second way is a technical read out. In normal
situations the following will be shown:
• on the left the status in which the boiler is active
(see bottom of this page);
• on the right the supply temperature in °F;
• the water pressure in the installation in PSI.
When a message (E or BL code) is necessary this
will be shown instead of the technical read out.
To switch over from the Good-state to the
Technical read out (and vice versa):
- Press 5 sec. on the STEP-button.
0
1
2
3
4
5
6
7
8
Operating instructions Rinnai Q-Series
10
9
A
Operation indication
(in the first display position by technical read out)
No heat demand
Fan pre/post purge
Ignition phase
Burner active on central heating
Burner active on DHW
Fan check
Burner off when room thermostat is demanding
Pump overrun phase for central heating
Pump overrun phase for hot water
Burner off because of to high ow temperature
Automatic de-aeration program (Press no button for 17 min.)
Page 11

Water pressure in the central heating system
The installation will function optimally with a water
pressure of between 22 and 25 PSI.
If the water pressure drops below 14.5 PSI, the
display will show FILL. During this message the
boiler will remain functioning at a reduced level.
After replenishing the system (see following
chapter) just above 22 PSI the message FILL
will disappear and the boiler will function normally
again.
When the water pressure drops below 10 PSI, the
display will show a ashing FILL text.
The boiler will shut down and will function normally
again after replenishing the system to just above
22 PSI.
Message ' Water pressure
too low' on your RS100
thermostat.
On the display of the RS100
a low water pressure can
be indicated. For further
information see the relevant
user manual.
To retreive the water pressure on the display from
the Good reading:
- Press the Step key once briey.
The water pressure will be shown.
Press the Step key briey to return to the Good
reading.
Water pressure is too high (>52.2 PSI), if HIGH
indication remains continuously visible, the boiler
is taken out of operation. The installation pressure
needs to be decreased by draining water until the
pressure is between 22 and 25 PSI.
Operating instructions Rinnai Q-Series
11
Page 12

Replenishing the central heating system
The central heating installation needs to be lled with potable (drinking)
water. For topping up the installation you use the lling loop according to the
following procedure:
NOTICE
i
1 Switch all functions off (heating, DHW and pump);
2 Briey push the 'STEP'-button: P x.x = water pressure in PSI;
3 Slowly open the lling loop (Indication on display increases);
4 Fill up slowly to between 22 and 25 PSI;
5 STOP appears on the display;
6 Close the lling loop;
7 De-aerate the complete installation , start at the lowest point;
8 Check the water pressure and if necessary top it up;
9 Close the lling loop;
10 Activate functions required (heating , DHW and/or pump );
11 If A xx appears on the display, wait for 17 minutes;
12 Check the waterpressure and if necessary top it up to 22 to 25 PSI
13 Close the lling loop;
Contact your installer if your installation is not
providedwithallingloop.
14 Press the ‘STEP’-button;
15 Be sure that the lling loop is closed.
After the automatic de-aeration programm (A xx) is nished the boiler will
return to the Good reading or Technical reading.
Operating instructions Rinnai Q-Series
12
Page 13

The boiler will not function directly. The automatic de-aeration program of about
17 minutes will start after one of the three program buttons is pressed. The display
will show where A stands for Automatic de-aeration program Active and
the number on the right indicates the actual water temperature of the boiler.
Check the water pressure regularly and top up the installation when
necessary.
The working pressure of the installation should be between 22 and 25 PSI
It can take a while before all air has disappeared from a lled installation.
Especiallyintherstweeknoisescanbe heardwhichindicatethepresenceof
air. The automatic air vent in the boiler will remove the air, which means the water
pressure will reduce during this period and therefore topping up with water will
benecessarytoadjusttheowwatertemperature
Turning the boiler off
Holiday period:
Adjust the thermostat* to the holiday period. See
the user thermostat manual. The hot water facility
can be switched off by means of the program
button on the control panel.
Re-setting the central heating system:
Holiday
* If you have a RS100
thermostat it is provided
with a holiday program.
The holiday period can be
adjusted on the thermostat
itself. The central heating
and DH W su p ply ar e
switched off during that
period. There is also the
option that only the central
heating is switched off. With
all of these possibilities the
frost protection system is
active.
Switch off the three program buttons ,
, when these are activated. Switch off the
power supply. When the boiler is being drained
one should take into account that a part of the
heating water will remain in the boiler. When risk
of frost arises one should take care that the
remaining central heating water in the boiler does
not freeze.
Operating instructions Rinnai Q-Series
13
Page 14

Error, maintenance and warranty
If a fault is detected the boiler will be blocked.
This will be reected, by an alternate display of
Good, with an E of Error or a BL of Blocking and
a number code.
You can try to reset the boiler by pressing the
i
NOTICE
Reset key once. If the problem remains please
contact your installer and inform them about
the fault and give them the number code.
NOTICE
i
NOTICE
i
NOTICE
i
9
10
8
7
Operating instructions Rinnai Q-Series
14
If you discover any leaks from the boiler
contact your installer.
We advise you to obtain a service contract
with your installer for regular maintance and
adjustment to keep your boiler safe and in
good condition.
The casing of the boiler consists of metal
and plastic parts which can be cleaned with a
normal non abrasive cleaning agent.
Periodic cleaning of the condensate collection and
disposal system must be carried out.
Before putting the boiler into operation after
periodic cleaning ll the condensate trap with
1.27 cups / 300 ml of water.
Step 1: Condensate trap
- First remove the condensation cup (7); Check
this for impurities. If there are no impurities it
is not necessary to clean the condensate cup
- Grease the O-rings again with acid free O-ring
grease to make tting easier;
- If there is a leak at the condensation cup (7) or
tray (9) the complete condensate trap unit (10)
has to be replaced by S4451610;
Step 2: Retting is done in reverse order.
Note that all gaskets seal completely.
Page 15

i
NOTICE
Maintenance or changes to the appliance may only
becarriedoutbyaqualiedtechnician.
You can nd the warranty conditions in the warranty card
which is supplied with the boiler.
Operating instructions Rinnai Q-Series
15
Page 16

Operating instructions Rinnai Q-Series
16
Page 17

M o d e d' e m p l o i
Chaudière à gaz à condensation à haut rendement
Q85SN/Q130SN/Q175SN/Q205SN/Q175CN
Q85SP/Q130SP/Q175SP/Q205SP/Q175CP
AVERTISSEMENT!
L'installation et l'entrétien doivent
être assurés par un installateur ou
unserviced'entrétienqualiéou
par le fournisseur de gaz.
Illustré: Q85SN, Q130SN
Q85SP, Q130SP
AVERTISSEMENT! Assurez-vous de bien suivre les
instructions données dans cette notice pour réduire au
minimum le risque d'incendie ou d'explosion ou pour
éviter tout dommage matériel, toute blessure ou la mort.
- Ne pas entreposer ni utiliser d'essence ni d'autres
vapeursouliquidesinammablesdanslevoisinagede
cet appareil ou de tout autre appareil.
- QUE FAIRE SI VOUS SENTEZ UNE ODEUR DE GAZ:
- Ne pas tenter d'allumer d'appareils.
- Ne touchez à aucun interrupteur.
- Ne pas vous servir des téléphone dans le bâtiment où
vous vous trouvez.
- Appelez immédiatement votre fournisseur de gaz
depuis un voisin. Suivez les instructions du fournisseur.
- Si vous ne pouvez rejoindre le fournisseur de gaz,
appelez le service des incendies.
Addresse: 103 International Drive, Peachtree City, GA, 30269
Gratuit: 1-800-621-9419 • Fax: 678-829-1666 • www.rinnai.us
Avis ! Ce manuel doit être conservé pour consultation ultérieure.
Operating instructions Rinnai Q-Series
17
Page 18

Contenu des instructions
Ces instructions contiennent d’importantes informations pour l’utilisation en
toute sécurité des chaudières à gaz de la série Rinnai Q.
Ces instructions d’utilisation sont destinées au propriétaire ou au responsable
locataire des locaux où la chaudière est installée.
Susceptibledemodicationstechniques
Des modications peuvent être effectuées sur les illustrations, les étapes du
processus et les données techniques résultant de notre politique d’amélioration
continue sans avis préalable.
Mise à jour de la documentation
Veuillez nous contacter si vous avez des suggestions d’amélioration ou de
correction.
Vous trouverez nos informations de contact au dos de ce manuel
Operating instructions Rinnai Q-Series
18
Page 19

Sécurité et instructions générales
Veuillez observer ces instructions dans l’intérêt
de votre propre sécurité.
Utilisation prévue
La chaudière est conçue pour chauffer de l’eau pour
un circuit de chauffage central et, le cas échéant,
pour produire de l’eau chaude domestique. La
chaudière est livrée avec un contrôleur de brûleur
pré installé. La chaudière peut être équipée
d’une commande de réinitialisation modulante
extérieure ARV12 (compris), d’un contrôleur de
pièce RS100 (en option), d’un contrôleur de zone
(en option) ou d’un thermostat Marche/Arrêt ou
d’un commutateur nal de panneau de relais
(accessoires).
Dénitionsdesdangers
Les termes dénis suivants sont utilisés dans
toute la documentation pour attirer l’attention sur la
présence de dangers de divers niveaux de risque.
Des avis donnent d’importantes informations sur
le fonctionnement du produit.
DANGER
!
AVERTISSEMENT
!
ATTENTION
!
DANGER :
Indique la présence de dangers qui peuvent
provoquer des blessures corporelles graves,
la mort ou des dégâts matériels importants.
AVERTISSEMENT :
Indique la présence de dangers qui peuvent
provoquer des blessures corporelles graves,
la mort ou des dégâts matériels importants.
ATTENTION :
Indique la présence de dangers qui vont ou
peuvent provoquer des blessures corporelles
mineures ou des dégâts matériels.
Operating instructions Rinnai Q-Series
19
Page 20

REMARQUE
i
REMARQUE :
Indique des instructions particulières
sur l’installation, le fonctionnement ou la
maintenance qui sont importantes mais non
liées à des blessures corporelles ou des
dégâts matériels.
Ces instructions de fonctionnement décrivent
le fonctionnement des chaudières à gaz à
condensation de la série Rinnai Q. Ce manuel
est destiné à l’utilisateur nal. Pour l’installation
et l’entretien, il existe un manuel d’instructions
d’installation et d’entretien pour l’installateur.
Lisez entièrement ce manuel avant de mettre
en marche la chaudière. En cas de doute ou
d’erreurs, contactez votre installateur.
Le fabricant se réserve le droit de modier
les spécications et les dimensions sans avis
préalable.
Le travail sur la chaudière doit être effectuée par
un fournisseur agréé par l’État, (Ref. : Installation
et utilisation sûres du gaz) à l’aide d’instruments
correctement calibrés, avec une certication
d’épreuves en cours de validité.
Operating instructions Rinnai Q-Series
20
Page 21

Sécurité
POUR VOTRE SÉCURITÉ LISEZ AVANT DE METTRE EN MARCHE
AVERTISSEMENT: Quiconque ne respecte pas à la lettre les instructions
dans la présente notice risque de déclencher un incendie ou une explosion
A. Cet appareil ne comporte pas de veilleuse. Il est muni d’un dispositif d’allumage qui allume
automatiquement le brûleur. Ne tentez pas d’allumer le brûleur manuellement.
B. AVANT DE FAIRE FONCTIONNER, reniflez tout autour de l’appareil pour déceler une odeur de gaz.
Reniflez près du plancher, car certains gaz sont plus lourds que l’air et peuvent s’accumuler au
niveau du sol.
QUE FAIRE SI VOUS SENTEZ UNE ODEUR DE GAZ:
- Ne pas tenter d’allumer d’appareil.
Ne touchez à aucun interrupteur; ne pas vous servir des téléphones se trouvant dans le bâtiment.
-
- Appelez immédiatement votre fournisseur de gaz depuis un voisin.
Suivez les instructions du Fournisseur.
- Si vous ne pouvez rejoindre le fournisseur, appelez le service des incendies.
C. Ne poussez ou tournez la manette d’admission du gaz qu’à la main ; ne jamais utiliser d’outil. Si la
manette reste coincée, ne pas tenter de la réparer ; appelez un technicien qualifié. Le fait de forcer
la manette ou de la réparer peut déclencher une explosion ou un incendie.
D. N’utilisez pas cet appareil s’il a été plunge dans l’eau, même partiellement. Faites inspecter
l’appareil par un technicien qualifié et remplacez toute partie du système de contrôle et toute
commande qui ont été plongés dans l’eau.
1. ARRÊTEZ ! Lisez l’information de sûreté au-dessus de cette étiquette.
2. Réglez le thermostat à la température la plus basse.
3. Coupez l’alimentation électrique de l’appareil.
4. Cet appareil ne comporte pas de veilleuse.
Il est muni d’un dispositif d’allumage qui allume
automatiquement le brûleur. Ne tentez pas d’allumer le
brûleur manuellement.
5. Valve coupée de gaz principal étroit.
6. Attendre cinq (5) minutes pour laisser échapper tout le
gaz. Reniflez tout autour de l’appareil, y compris près
du plancher, pour déceler une odeur de gaz. Si vous
sentez une odeur de gaz, ARRÊTEZ ! Passez à l’étape
B des instructions de sécurité sur la portion supérieure (à gauche) de cette étiquette. S’il n’y a pas
d’odeur de gaz, passez à l’étape suivante.
7. Ouvrez la valve coupée principale.
8. Placez le thermostat ou autre de contrôle des opérations à l’arrangement désiré.
9. Mettez l’appareil sous tension.
10. Si l’appareil ne se met pas en marche, suivez les instructions intitulées « Comment couper
l’admission de gaz de l’appareil » et appelez un technicien qualifié ou le fournisseur de gaz.
entraînant des dommages, des blessures ou la mort.
INSTRUCTIONS DE MISE EN MARCHE
Robinet manuel de l’admission du gaz
(Soupape principale)
FERMÉ OUVERT
COMMENT COUPER L’ADMISSION DE GAZ DE L’APPAREIL
1. Arrêtez tout le courant électrique à l’appareil si le service doit être execute.
2. Réglez le thermostat à la température la plus basse.
3. Valve coupée de gaz principal étroit.
8U.34.09.00 / 05.09
Operating instructions Rinnai Q-Series
21
Page 22
!
DANGER
et/ou à proximité de la prise d’air de combustion
Zones susceptibles de contenir des contaminants
En cas de surchauffe ou de panne d’arrêt
de l’alimentation en gaz, ne pas couper ni
débrancher l’alimentation électrique de la
pompe. Fermez plutôt l’alimentation en gaz à
un endroit extérieur à l’appareil.
AVERTISSEMENT
!
REMARQUE
i
Operating instructions Rinnai Q-Series
22
Protection contre la corrosion
N’utilisez pas de vaporisateur, d’agents contenant
du chlore, des solvants, de la peinture, etc. aux
environs de la chaudière ou près de l’arrivée d’air
de la chaudière. Ces substances ont des effets
négatifs sur la chaudière et peuvent entraîner une
corrosion qui provoque une panne de la chaudière.
Produits à éviter présents dans la pièce de la chaudière
Aérosols contenant des chlorofluorocarbures
Ammonium et/ou solutions d’ammonium
Solutions à permanente
Cires et/ou nettoyants chlorés
Produits chimiques pour piscines à base de chlore
Chlorure de calcium utilisé pour la décongélation
Chlorure de sodium utilisé pour l’adoucissement de l’eau
Fuites de fluide frigorigène
Décapants pour peintures ou vernis
Acide chlorhydrique/acide muriatique
Ciments et colles
Assouplisseurs antistatiques pour textiles utilisés
dans les sécheuses à linge
Produits blanchissants de type chlore, détergents et
solvants de nettoyage trouvés dans les buanderies
familiales
Adhésifs utilisés pour fixer des produits de construction et
autres produits similaires
Zones et établissements de nettoyage à sec/buanderie
Piscines
Usines de fabrication de métaux
Salons de beauté
Ateliers de réparation de réfrigération
Usines de traitement de photos
Ateliers de carrosserie
Usines de fabrication de plastiques
Zones et établissements de remise à neuf de mobilier
Construction de bâtiments neufs
Zones de remaniement
Garages avec ateliers
Véricationdelapressiond’eau
Vériez régulièrement la pression d’eau dans
l’installation centrale de chauffage. N’utilisez que
de l’eau potable pour le remplissage. Additifs
uniquement après autorisation de sécurité de
Rinnai. Contactez votre installateur en cas de
doute.
Page 23

Description de la chaudière
La chaudière Rinnai Q est une chaudière de
chauffage central de pièce scellée à condensation
et modulante. La Q175C possède une fonction
eau chaude domestique intégrée.
La chaudière est équipée d'un système de
régulation intégré. Grâce à un capteur extérieur
connecté à la chaudière, celle-ci fonctionne en
fonction des conditions météorologiques. Cela
signie que le régulateur de la chaudière mesure
la température extérieure et la température du
débit. Grâce à ces données la chaudière calcule
la température optimale du débit pour l’installation.
Lorsque la chaudière est connectée à un thermostat
d’ambiance RS100 les informations peuvent être
RS100
récupérées sur la chaudière. Pour obtenir d’autres
informations sur les thermostats Rinnai, Veuillez
consulter les manuels d’utilisation.
Sur le bas du côté gauche du panneau avant
se trouve une petite porte. A travers le panneau
transparent, il est possible de voir l’état de la
chaudière sur l’afchage. En ouvrant cette porte,
vous trouverez les boutons de fonctions.
Dans les pages suivantes, vous trouverez
l’explication des boutons de fonction et l’afchage
des messages.
Operating instructions Rinnai Q-Series
23
Page 24
Explication des boutons de fonctions
1
3
4
5
6
REMARQUE
i
REMARQUE
i
Lorsque la pompe est
allumée en continu,
cela peut provoquer un
chauffage non souhaité du
circuit de chauffage central
pendant l’été
Operating instructions Rinnai Q-Series
24
2
7
8
Seul du personnel qualié formé pour ces
chaudières est autorisé à effectuer des
modicationsdanslerégulateurpouradapter
la chaudière à l’installation.
1. Afchage.
Consulter les pages suivantes pour d’autres
informations.
2. Commutateur MARCHE-ARRÊT
Ce commutateur commande la mise en
marche ou l’arrêt de l’alimentation électrique
de la chaudière.
3. Bouton de programme de chauffage central.
Mise en marche ou arrêt du chauffage central
(DEL marche/arrêt) ;
4. Bouton de programme d’eau chaude.
Mise en marche ou arrêt de l’installation d’eau
chaude domestique (ECD) (DEL marche/
arrêt);
5. Bouton de programme de pompe.
Lorsque la DEL de la pompe est ALLUMÉE, la
pompe est permutée en mode de circulation
continue. Lorsque le mode de la pompe est
sur ARRÊT, la DEL est éteinte et la pompe est
commandée par le processeur de la chaudière.
Dans la plupart des situations, il est préférable
de laisser la pompe en mode ARRÊT et la
commande de la chaudière faire tourner la
pompe autant que nécessaire.
Page 25
REMARQUE
i
En cas de gel, il est possible (lorsqu’il n’existe
pas de capteur extérieur connecté) de placer
manuellement la pompe de circulation en mode de
circulation continue, ce qui réduit le risque de gel
des tuyaux (garage, grenier ou autres espaces/
pièces froids) qui sont sensibles au gel.
6 Bouton de mode.
Uniquement pour le personnel d’entretien
7 Bouton Step.
En appuyant brièvement, la pression de l’eau
peut être retrouvée.
Après avoir appuyé pendant 5 secondes, il
passe de l’afchage Good à technique et vice-
versa (voir les pages suivantes);
8 Bouton de Reset.
Lorsqu’une panne apparaît, elle est indiquée
par un E clignotant (Erreur) avec un code
numérique ce après quoi la chaudière est
arrêtée. Après avoir appuyé sur la touche
de réinitialisation, vous pouvez essayer de
remettre en marche la chaudière. Si le message
d’erreur continue à s’afcher, contactez votre
installateur.
AVERTISSEMENT
!
NE PAS tenter d’effectuer des réparations ou
de retirer l’un des panneaux de la chaudière.
Contactez une agence d’entretien qualiée
pour effectuer les réparations ou les réglages
nécessaires.
Operating instructions Rinnai Q-Series
25
Page 26

L’afchagedelachaudière
Deux afchages sur la chaudière, “Good ou Technique” voir ci-dessous.
Good
ou afchage standard.
Pendant cette lecture l’afchage ne fera apparaître
que ce qui est nécessaire. En conditions normales,
l’afchage donne Good comme résultat. En cas
de panne, l’afchage donne alternativement
Good, avec un code E ou BL. Voir plus loin
"Erreurs, maintenance et garantie" .
Technique
La deuxième façon est un résultat technique. En
conditions normales, s’afchent les messages
suivants :
• sur la gauche, l’état dans lequel la chaudière
est active (voir au bas de cette page);
• sur la droite, la température de départ en °F;
• la pression d’eau dans l’installation en PSI.
Lorsqu’un message (code E ou BL) est nécessaire,
il s’afche à la place du résultat technique.
Pas de demande de chaleur
0
Pré/post purge du ventilateur
1
Phase d’allumage
2
Brûleur actif sur chauffage central
3
Brûleur actif sur ECS
4
Contrôle du ventilateur
5
Brûleur arrêté à la demande du thermostat d’ambiance
6
Phase de dépassement de la pompe pour chauffage central
7
Phase de dépassement de la pompe pour eau chaude
8
Brûleur arrêté à cause d’une température de débit trop élevée
9
Operating instructions Rinnai Q-Series
26
Programme automatique de désaération (n’appuyer sur aucun bouton pendant 17 min.)
A
Pour passer de l’état Good au résultat
Technique (et vice versa) :
- Appuyer pendant 5 sec. sur le bouton STEP.
Indication de marche
(dans la première position d’afchage par résultat technique)
Page 27

Pression d’eau dans le circuit de chauffage central
L’installation fonctionne de façon optimale avec
une pression d’eau comprise entre 22 et 25 PSI
(1.5 et 1.7 bar).
Si la pression de l’eau chute en dessous de 14,5
PSI (1.0 bar), l’afchage indique FILL (REMPLIR).
Pendant ce message, la chaudière continue à
fonctionner à faible régime. Après avoir rempli le
circuit (voir le chapitre suivant) juste au dessus de
22 PSI (1.5 bar), le message FILL disparaît et la
chaudière se remet à fonctionner normalement.
Lorsque la pression de l’eau chute en dessous
de 10 PSI (0.7 bar), l’afchage indique un texte
FILL clignotant.
La chaudière s’arrête alors et se remet à fonctionner
normalement après avoir rempli le circuit juste au
dessus de 22 PSI (1.5 bar).
Pour retrouver la pression d’eau sur l’afchage à
partir du résultat Good :
-
Appuyer une fois brièvement sur la touche Step
La pression d’eau s'afche.
.
Message ' Pression d’eau
trop faible' sur votre
thermostat RS100.
Sur l’afchage du RS100,
une faible pression de l’eau
peut être indiquée. Pour de
plus amples informations,
voir le manuel de l’utilisateur
correspondant
Appuyer brièvement sur la touche Step pour
revenir au résultat Good.
La pression de l’eau est trop élevée (> 52,2 PSI
/ 3.5 bar), si l’indication HIGH reste visible en
continu, la chaudière est mise hors fonctionnement.
La pression de l’installation doit être diminuée
en purgeant l’eau jusqu’à ce que la pression
descende entre 22 et 25 PSI (1.5 et 1.7 bar).
Operating instructions Rinnai Q-Series
27
Page 28

Remplissage du circuit de chauffage central
L’installation de chauffage central doit être remplie d’eau potable (à boire).
Pour remplir l’installation, il vous faut utiliser la boucle de remplissage selon
la procédure suivante :
REMARQUE
i
1 Coupez toutes les fonctions (CC , ECS et pompe );
2 Appuyez brièvement sur le bouton ‘STEP’ : P x.x = pression d’eau en PSI;
3 Ouvrez lentement la boucle de remplissage
(l’indication sur l’afchage augmente);
4 Remplissez lentement entre 22 et 25 PSI (1.5 et 1.7 bar) ;
5 STOP apparaît sur l’afchage ;
6 Fermez la boucle de remplissage ;
7 Désaérez l’installation complète, démarrez au point le plus bas ;
8 Vériez la pression de l’eau et, si nécessaire, refaites le plein ;
9 Fermez la boucle de remplissage ;
10 Activez les fonctions nécessaires (CC , ECS et/ou pompe );
11 Si A xx apparaît sur l’afchage, attendez 17 minutes ;
12 Vériez la pression de l’eau et, si nécessaire, faites le plein jusqu’à 22 à 25 PSI;
Contactez votre installateur si votre installation
n’est pas équipée d’une boucle de remplissage.
13 Fermez la boucle de remplissage ;
14 Appuyez sur le bouton ‘STEP’ ;
15 Assurez-vous que la boucle de remplissage est fermée.
Après la n du programme de désaération automatique (A xx), la chaudière
revient au résultat Good ou Technique.
Operating instructions Rinnai Q-Series
28
Page 29

La chaudière ne fonctionnera pas directement. Le programme de désaération
automatique d’environ 17 minutes démarre après avoir appuyé sur l’un des trois
boutonsdeprogramme. L’afchageindique oùAsignieAutomatique
pour le programme de désaération actif et le numéro sur la droite indique la
température réelle de l’eau dans la chaudière.
Vériez régulièrement la pression de l’eau et, si nécessaire, refaites le plein
de l’installation. La pression de fonctionnement de l’installation doit être entre
22 et 25 PSI (1.5 et 1.7 bar).
L’évacuation de l’air d’une installation pleine peut prendre un moment.
Particulièrement pendant la première semaine, des bruits peuvent indiquer la
présence d’air. L’évacuation automatique de l’air de la chaudière va dégager l’air,
ce qui implique que la pression de l’eau va diminuer pendant cette période et il sera
donc nécessaire de refaire le plein d’eau pour ajuster la température d’eau du débit.
Arrêt de la chaudière
Période de vacances :
Réglez le thermostat* sur la période de vacances.
Consultez le manuel d’utilisation du thermostat.
L’installation d’eau chaude peut être coupée à
l’aide du bouton de programme sur le panneau
de commande.
Vacances
* Si vous avez un thermostat
RS100, il est équipé d’un
programme vacances. La
période de vacances peut
être réglée sur le thermostat
lui-même. Le chauffage
central et l’alimentation en
ECS sont coupés pendant
cette périod e. Il existe
ég alement l ’option q ui
permet de ne couper que
le chauffage central. Grâce
à toutes ces possibilités,
le système de protection
contre le gel est activé.
Réinitialisation du circuit de chauffage
central:
Coupez les trois boutons de programme ,
et , lorsqu’ils sont activés. Coupez l'alimentation
électrique. Lorsque la chaudière est en cours de
vidange, il est nécessaire de prendre en compte
qu’une partie de l’eau chaude va rester dans la
chaudière. Lorsque le risque de gel apparaît, il est
nécessaire de veiller à ce que l’eau du chauffage
central de la chaudière ne gèle pas.
Operating instructions Rinnai Q-Series
29
Page 30

Erreur, maintenance et garantie
Si une panne est détectée, la chaudière est
bloquée. Ceci se reète par l’afchage alterné de
Good, avec un E d’Erreur ou un BL de Blocage
et un code numérique.
Vous pouvez tenter de réinitialiser la chaudière
REMARQUE
i
en appuyant une fois sur la touche Reset. Si
le problème persiste, veuillez contacter votre
installateur, l’informer de la panne et lui donner
le code numérique.
REMARQUE
i
REMARQUE
i
REMARQUE
i
Si vous découvrez des fuites en provenance
de la chaudière, contactez votre installateur.
Nous vous conseillons de passer un contrat
d’entretien avec votre installateur, pour
une maintenance et un réglage réguliers,
nécessaires au maintien de la sécurité et du
bon état de votre chaudière.
L’enceinte de la chaudière est faite de pièces
en métal et en plastique qui peuvent être
nettoyées avec un produit de nettoyage non
abrasif.
Operating instructions Rinnai Q-Series
30
Page 31

Le nettoyage du condensat récupéré et du circuit
de rejet doit être effectué périodiquement.
9
10
8
7
Avant de mettre la chaudière en marche après un
nettoyage périodique, remplissez le purgeur du
condensat avec 1,27 tasse / 300 ml d’eau.
Etape 1 : Purgeur de condensat
- Retirez d’abord la tasse de condensation (7) ;
vériez l’absence d’impuretés. S’il n’existe pas
d’impuretés, il n’est pas nécessaire de nettoyer
la tasse d’eau de condensation
- Graissez à nouveau les joints toriques à la
graisse pour joints toriques sans acide pour
faciliter le raccordement ;
- Si une fuite apparaît sur la tasse (7) ou le
plateau (9) de condensation, l’appareil de purge
du condensat entier (10) doit être remplacé par
un S4451610 ;
Etape 2 : Le remontage s’effectue dans
l’ordre inverse. Notez que tous les joints sont
complètement étanches.
REMARQUE
i
La maintenance ou les modications de
l’appareil ne peuvent être effectuées que par
untechnicienqualié.
Les conditions de garantie se trouvent sur la che
de garantie fournie avec la chaudière.
Operating instructions Rinnai Q-Series
31
Page 32

Details of your installer / Informations sur votre installateur :
Name of installer:
Nom de l’installateur:
Address / Adresse:
Contact:
Phone number:
Numéro de téléphone:
Phone number outside business hours:
Numéro de téléphone en dehors des horaires d’ouverture :
800000022 11/2009
Distributor for the USA and Canada
Distributeur pour l'Etats-Unis et Canada
Ri nnai Ame rica Co rp orate • 103 Inte rn ation al Driv e • Pe achtr ee City, GA 30269
To l l F r e e : ( 8 0 0 ) 6 21 - 9 4 1 9 • T e l : ( 6 7 8 ) 8 2 9 - 1 7 0 0 • F a x : ( 6 7 8 )
8 2 9 - 1 6 6 6 • E - m a i l : i n f o @ r i n n a i . u s • I n t e r n e t : w w w. r i n n a i . u s
E. & O. E.
This renewed publication cancels all previous installation instructions. The company reserves the right to change the specications and dimensions without prior notice.
Cette publication mise à jour annule toutes les instructions d’installation pécédentes. La société se réserve le droit de modier les spécications et les dimensions sans avis préalable
 Loading...