

Rinnai Linear Series, Linear 1000, Linear 1500, Linear 800, Evolve 952 Operation Manual
...Page 1
Operation guide
Linear collection
Gas res, like cars, require regular maintenance and servicing. For reliable operation Rinnai gas
res should be serviced every two years, including inspection of the ue system.
Page 2

Important
Appliance must be installed with a Rinnai approved ue system.
This appliance must be installed in accordance with:
- Manufacturer’s installation instructions
- AS/NZS 5601 Gas Installations
- AS/NZS 5263 Gas appliances standards
For use with Natural Gas or Universal LPG as indicated on the
appliance.
Appliance must be installed, commissioned and serviced by an
authorised person, being in New Zealand a licensed gastter.
Warning
Improper installation, adjustment, alteration, service and
maintenance can cause property damage, personal injury or loss
of life.
For more information about buying, using, and servicing of Rinnai
appliances call: 0800 RINNAI (0800 746 624).
Rinnai New Zealand Limited
105 Pavilion Drive, Mangere, Auckland
PO Box 53177, Auckland Airport, Auckland 2150
Phone: (09) 257-3800
Fax: (09) 257-3899
Email: info@rinnai.co.nz
Web: rinnai.co.nz
youtube.com/rinnainz
facebook.com/rinnainz
Page 3

Contents
Safety ...................................................................4
General information ..............................................5
About your Rinnai Linear gas re .........................6
Operation using your remote ................................8
Operation using the Wi-Fi app ..............................10
Clearances from combustibles .............................11
Mantels and surrounds .........................................12
Abnormal ame pattern ........................................13
Error codes ...........................................................14
Troubleshooting ....................................................16
Installation checklist and installer details ..............18
Limited Warranty ..................................................19
Purchase details ...................................................21
Appendices
Appendix 1: Glass cleaning ..................................22
Page 4
Safety
Important
This appliance is not intended for use by persons (including children) with reduced physical,
sensory or mental capabilities, or lack of experience and knowledge, unless they have been given
supervision or instruction concerning use of the appliance by a person responsible for their safety.
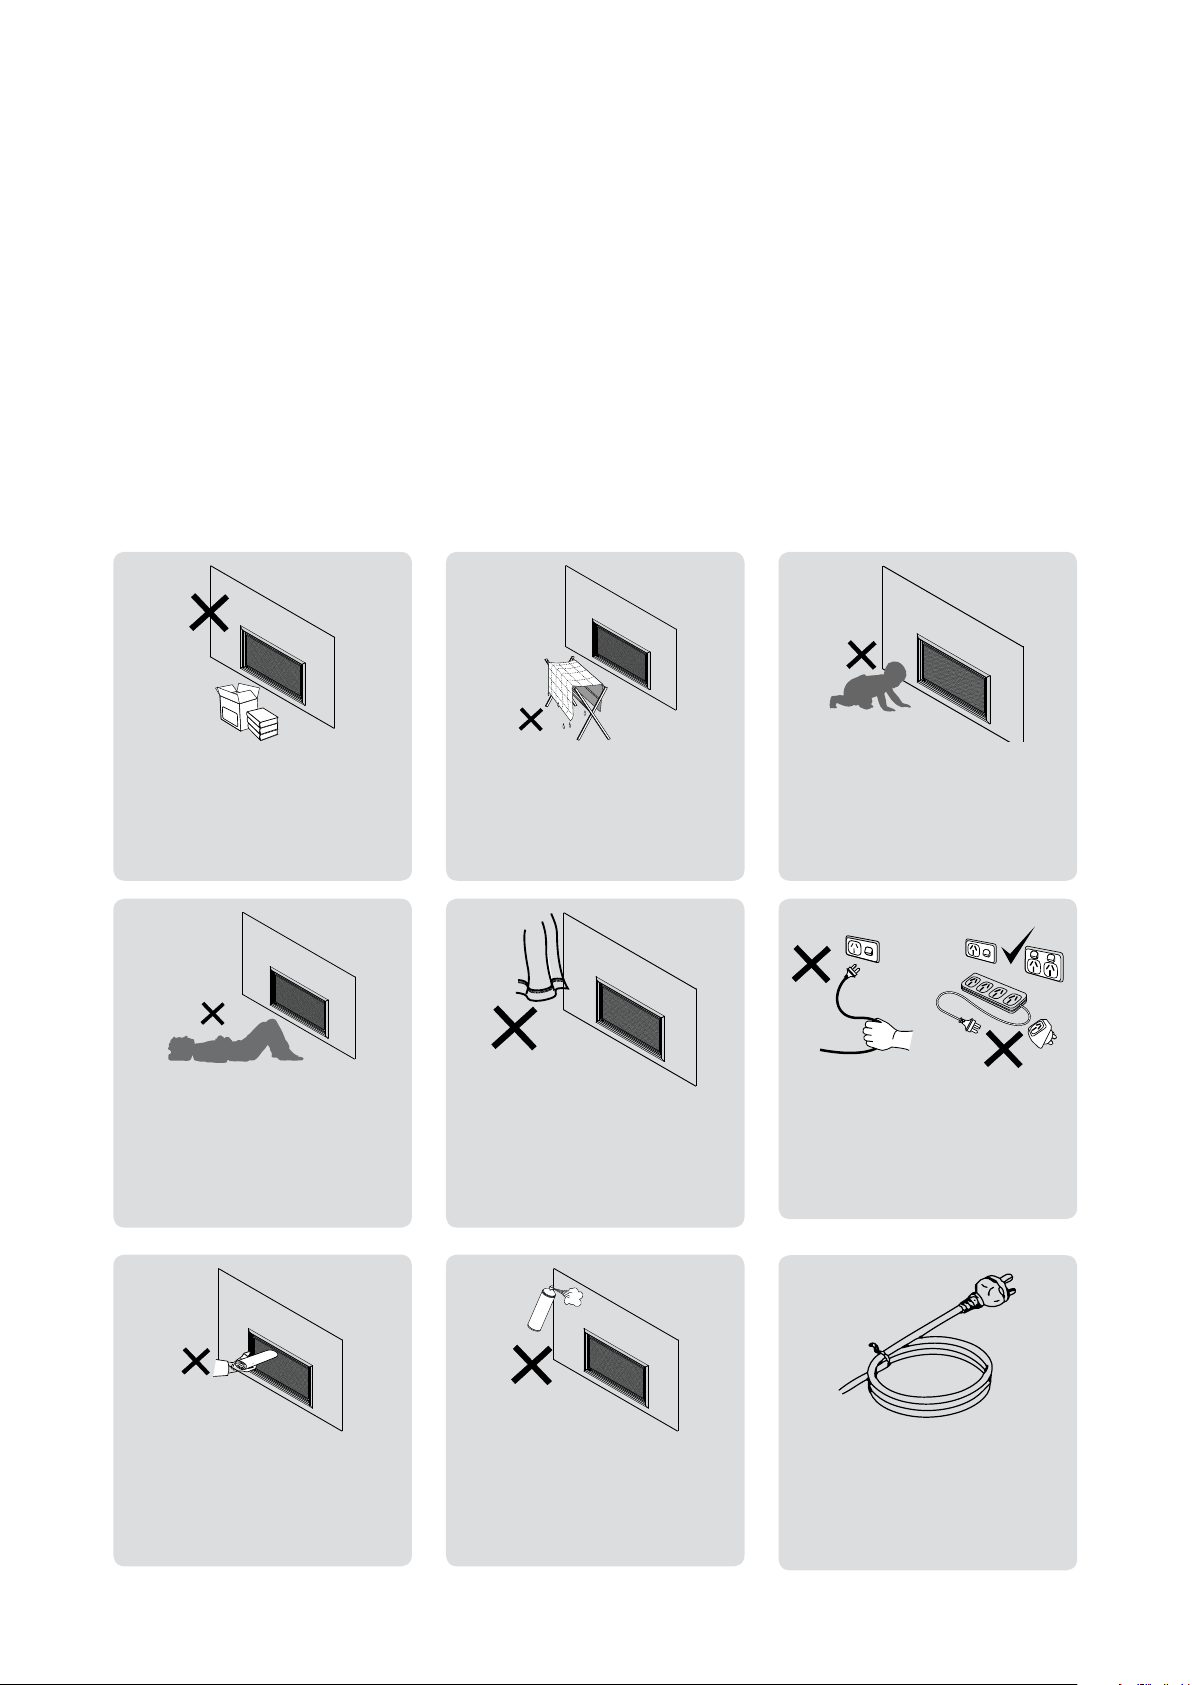
- The heater must not be used or operated if any part of the appliance is damaged
- Do not place articles on or against this appliance
- Do not use or store ammable materials near this appliance
- Do not spray aerosols in the vicinity of this appliance while it is in operation
- Do not modify this appliance
- The re must not be located immediately below a power socket outlet (potential re hazard)
Do not restrict warm air discharge
by placing articles in front of the
appliance.
Do not allow anyone to sit, lean
or sleep directly in front of the
appliance.
This appliance must not be used
for any other purpose other than
heating.
Do not allow curtains or other
combustible materials to come
into contact with the appliance.
Children should be supervised at
all times to ensure they do not play
with the appliance. Hand or body
contact with the appliance should be
avoided.
Do not unplug the appliance while
it is operating. Do not use power
boards or double adaptors to
operate this appliance.
Do not allow anyone to post
articles through into the heater.
4 | Linear operation guide: 13562-B 02-19
Do not spray aerosols while the
appliance is operating. Most
contain butane gas which can
be a re hazard if used near the
appliance.
If the supply cord is damaged it
must be replaced by a licensed
tradesperson. This must be
a genuine replacement part
available from Rinnai.
Page 5

General information
Before operation please read these instructions to get an overview of how to
operate, maintain and service your Rinnai gas re.
Electrical connection
The Linear is tted with a 1.5 m power cord
and 3-pin plug. The power cord passes through
a slot in the back right hand corner of the
appliance.
1
The connection is either direct wired
connected to a power point within the cavity.
This must be connected to a dedicated earthed
power point. The electric isolation switch must
be accessible after the appliance has been
installed.
Installation by a licensed tradesperson
Only a licensed tradesperson can install, adjust,
maintain, and service this gas re. Any work
carried out by a non-licensed tradesperson is
illegal and will void any warranty.
Installer handover
Ensure your installer talks to you about the
use and care of this appliance, and that you
understand these instructions. The installer also
needs to complete the appliance installation
checklist and installer details (p. 18), and leave
this guide with you.
Safety devices
Your Rinnai Linear has the following safety
devices; ame failure sensing system, pressure
relief, overheat safety switch, air temperature
sensor, thermal fuse, overcurrent fuse, and
spark detection.
or
Environmental
The Rinnai Linear is
manufactured from a number of
recyclable materials. At the end
of its useful life please consider
what parts could be recycled, for
example scrap metal, PCB etc.
Care and maintenance
All external surfaces of the Linear can be
cleaned using a soft damp cloth and mild
detergent. Do not use solvents and do not
attempt to clean while the Linear is still
operating or hot.
Servicing
Rinnai has a maintenance, service
and spare parts network with
personnel who are fully trained
and equipped to give the best
advice on your Rinnai appliance.
Servicing and repair should only be carried out
by authorised personnel, please call Rinnai
(0800 746 624).
For reliable operation Rinnai gas replaces
should be serviced every two years, including
inspection of the ue system. If they are in a
particularly dusty environment or subject to
excess lint, for example dog hair, or where
there are newly laid carpets, then annual
servicing would be benecial.
Soot deposits
Small soot deposits inside the heater or glass is
normal. The inside of the glass can be cleaned,
refer instructions on p. 22. Signicant soot
build-up however is not normal and will require
a service call. Refer to the troubleshooting
section for further information.
1
Consult a qualified electrician if direct wiring is required as it must comply with AS/NZS 5601 and AS/NZS 3000 and other
relevant local regulations
Regular maintenance and servicing is not
covered by the Rinnai warranty.
Linear operation guide: 13562-B 02-19 | 5
Page 6
About your Rinnai Linear gas re
Congratulations on the purchase of your Rinnai Linear gas re. We hope you love
this product as much as we do, and on the off chance that something does go
wrong, or if you need help, we’re only a phone call away.
Manual control button
On/Off button—lower left hand side on the INSIDE of the frame.
Control options
Infra-red remote
Internal Wi-Fi reset
A narrow reset tab sits INSIDE the frame
to reset the Wi-Fi module (p. 15).
Infra-red remote receiver window and ignition indicator
Will beep when it receives a signal from the remote and ash green during the ignition process.
and Wi-Fi control
Please note: The receiver window position will vary slightly between models and single and
double-sided variants. If in doubt the window is easy to identify as it will appear as a shiny section
between the lips of the re.
Infra-red remote or Wi-Fi control
Use the remote for basic control options or utilise the fully functional Wi-Fi app that allows for
thermostatic control, and timer operation.
• Infra-red remote
The remote emits an infra-red signal. It must be aimed at the receiver window. Normal
operating range is up to 7 m. Please note; range can be affected by the angle at which you are
aiming the remote. Some uorescent lights may interfere with the transmission of the remote
signal—change your operating position if this occurs.
• Rinnai Wi-Fi app
Available from the Apple App store (iPhone) or Google Play (android devices), refer p. 10.
6 | Linear operation guide: 13562-B 02-19
Page 7
How the Rinnai Linear models start
Ignition sequence:
1. When the On/Off button is pressed, the infra-red receiver window will pulse green.
2. The combustion fan will start several seconds before the re ignites, to purge the combustion
chamber before the gas ows.
3. The ignition sparker will operate, and as soon as a spark is sensed gas will ow to the pilot
burner, and then to the main burner.
4. When the main burner establishes a ame, the heater will automatically modulate between the
1
burner settings to achieve and maintain the default set temperature of 22 °C
.
Do not unplug or turn off the mains power supply to the re as this will stop the convection fan
from cooling down the unit. The convection fan operates for several minutes after the re has been
turned off.
Power cut or power disruption
If the power is disrupted while the Linear is operating, once the
power has been restored, the re will go into power failure mode,
Fault Code and Fix
and 00 (mains power failure) will appear on your smart device.
Probable Cause
00
To reset the re, press the ON/OFF button on the control panel,
remote control, or on the app, twice, to turn the re back on.
Mains power failure.
Description
When power failure is sensed
operation stops.
Action
Reset heater, press the On/Off
button at the fireplace twice.
Position of your Rinnai Linear on a wall
If installing the Linear up the wall in an elevated position, air from the convection fan, depending
on the room conguration, could create draughts. This needs to be factored when determining the
location of the re.
Wall surface above the re
The temperature of the wall surface directly above the appliance may get warm and discolour
paint nishes or distort wall coverings. For durability of surfaces, please contact the manufacturer
for their specication. The nish needs to be able to withstand temperatures of up to 65 °C above
ambient.
1
On initial start-up (no additional buttons pressed), the Linear modulates the ame and heat output to try and maintain
the default temperature setting of 22 °C. If the room temperature starts to climb above 22 °C the Linear will modulate
to its lowest ame and fan setting, but will not turn off. Depending on the size of the room this could mean the room
temperature could steadily rise.
Linear operation guide: 13562-B 02-19 | 7
Page 8
Operation using the remote
For the remote control functions to be available, the appliance On/Off button must
be in the On position.
Signal transmission to the unit
The unit will beep and ash to conrm the
settings have been received from the remote.
Lost or misplaced remote
If you misplace the remote the re can still be
1
used, albeit in a limited capacity
, by using
the power On/Off button on the lower left
hand corner of the outer frame. The re will
automatically modulate between ame settings
to maintain the default set temperature of 22
°C.
Remote - safety
Keep the remote away from young
children. Also ensure they can’t access
WARNING
the batteries—they can become a
choke hazard and potentially lifethreatening if swallowed.
Breakage of the plastic housing could expose
sharp edges—replace the remote if this occurs.
Avoid getting the remote wet as water entry will
damage the remote.
Batteries
The remote uses two Lithium cell CR2450
batteries. Never mix old and new batteries.
The remote will be supplied with the batteries
already inserted, pull the clear tab to activate
(OH, meaning OK, will ash on the display).
This will also occur when the batteries have
been replaced.
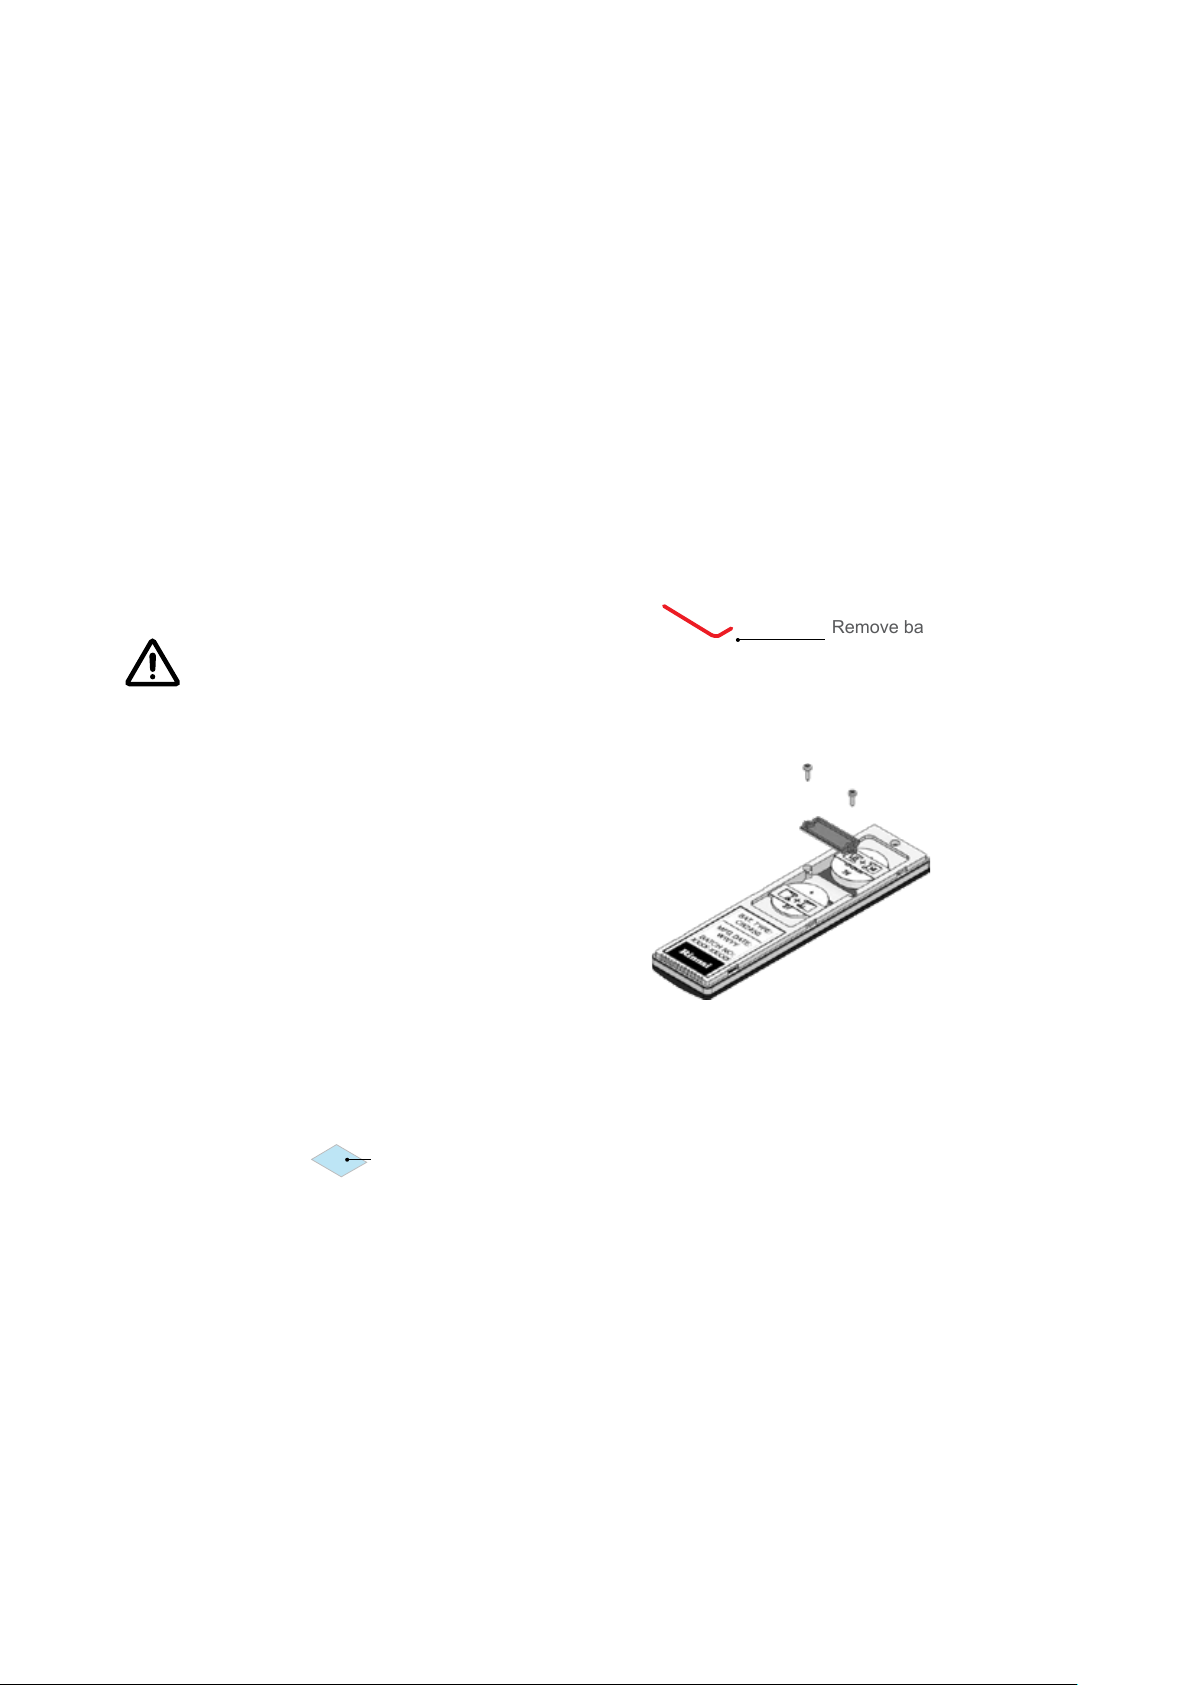
Pull-tab
Changing the batteries
• Remove the back
Slide your ngernail under the bottom
corner and along the base, and gently pry
apart. With some coaxing the cover will
pop off. Patience required, remember it’s
designed so little ngers cannot easily
access the batteries.
Remove back cover by prising
apart from the bottom rst
• Unscrew the black retaining bridge
Undo the two small screws holding the
black retaining bridge between the two
batteries.
• Replace the batteries
The batteries can only be inserted one
way—printed side facing up as shown on
the next page. The battery contact edges
can be sharp, take care when replacing the
batteries.
Remove the batteries if the remote is not going
to be used for a long time. This will help avoid
damage from leaking batteries. If leakage has
occurred the remote will need to be replaced as
leaking chemicals could be a risk if touched or
ingested.
1
Only applies if you do not operate the Linear using the Wi-Fi app.
8 | Linear operation guide: 13562-B 02-19
• Replace the black bridging plate
Ensure you replace the black bridging plate
as this will reduce the risk of young children
getting access to the cell batteries.
Page 9

Flame and heat setting
Once the re is turned on the
ame setting defaults to level ve
(on high). Use the up and down
buttons to control the height of the
ame and heat output.
The relationship between the flame
height and fan speed is preset and
cannot be adjusted. The fire has
five flame and fan settings:
Flame height Fan speed
1 low
2 low
3 low
4 high
5 high
Turning on and off
This button switches the re on and
off. For it to work the power button
on the fire must be ON.
Indicative room temperature
display
Displays the room temperature* (at
the point of the remote) and low
battery symbol if the batteries need
changing.
Black retaining bridge
Safety device that needs to be
removed before replacing the
batteries—DO NOT DISCARD, this
MUST BE put back on.
The back light will stay on for
approximately ve seconds.
Constant activation will shorten
battery life.
* Checks the room temperature every
minute.
N.B: Do not compare the temperature
readings from the remote and the app. The
readings are being taken from different
places and could vary signicantly.
Battery retainer
Pry point for removing the back
cover
Gently pry open the back cover
from the base of the remote
Temperature sensor position
The temperature sensor is located
in the bottom of the remote. Please
be aware the sensor will be affected
by direct sunlight, draughts, and
body temperature (your hand).
Linear operation guide: 13562-B 02-19 | 9
Page 10

Operation using the Wi-Fi app
For the Wi-Fi app to work on your replace, you will need to have downloaded the
app from the Apple App store or Google Play. The phone will then be paired to the
replace and then to your home Wi-Fi connection.
Wi-Fi app features
The Rinnai replace app will quickly and easily enable you
to perform a number of different functions via your mobile
device.
• Turn on the thermostat function
Set a comfortable temperature and let the re do the
rest.
• Switch to ame function
An override of the thermostat function that allows a full-
ame picture regardless of the room temperature.
• Turn on timers
For those that love ultimate control, multiple timers can
be set and changed for every day of the week.
For more information about how to use the Rinnai Wi-Fi app, refer to the ‘Wi-Fi control user guide’
available on the Rinnai website, www.rinnai.co.nz, enter Wi-Fi user guide in the search eld.
10 | Linear operation guide: 13562-B 02-19
Page 11

Clearances from combustibles
The clearances listed below, measured from the edge of the glass, are minimum
clearances unless otherwise stated.
400 mm
400 mm400 mm
1000 mm
While the heater is operating
The appliance must not be installed where curtains or other combustible materials could come into
contact with the re. The 400 mm side clearance includes side walls. The 1000 mm clearance is in
front of the re.
Floor protection
Heat emanating from this re may over time affect the appearance of some materials used for
ooring, such as, carpet, vinyl, cork or timber. This may be amplied if the air contains cooking
vapours or cigarette smoke. To avoid this occurring, it is recommended that a mat be placed in
front of the appliance.
Hearths
A hearth is not necessary but can be used for decorative purposes or protection of sensitive
ooring if required. A hearth must not obscure the front of the re or obstruct the re in any way.
TV installation above the replace
Linear models have a fan that distributes warm air from the top of the appliance out into the room.
As warm air is dispersed outwards and not directly upwards, installation of a TV may be an option.
Generally the bottom of the television recess should be at least 400 mm above the re. Please
check with the television supplier to check clearances. Some television manufacturers have
warranty conditions that state a television is not to be installed above a replace.
For further information, please contact Rinnai or refer to the installation guide, which includes a TV
installation diagram.
Linear operation guide: 13562-B 02-19 | 11
Page 12

Mantels and surrounds
Combustible mantels and surrounds require clearance from the unit to minimise the
risk of re. Mantels and surrounds, made of combustible materials such as wood,
are allowed providing they are outside the minimum clearances shown.
B - mantel depth
A
C
A Mantel needs to be a minimum of 400 mm away from the edge of the glass
B Maximum mantel depth at 400 mm (A) is 250 mm maximum
C Surround needs to be a minimum of 400 mm away from the edge of the glass
For every 50 mm of added mantel depth there must be an additional 100 mm of clearance from the
edge of the glass. For example:
Mantel depth A: clearance required
300 mm 500 mm
350 mm 600 mm
400 mm 700 mm
12 | Linear operation guide: 13562-B 02-19
Page 13

Abnormal ame pattern
Each Rinnai ame re has a distinct ame pattern, refer images below. This should look the same
every time you start your re, after an initial warm up period of approximately 20 minutes.
Abnormal ame performance and/or pattern can indicate a problem with your re, such as blocked
gas injectors, or shifting of burn media. There are some warning signs that could indicate a
problem:
- Unusual smell from the appliance
- Continued difculty or delay in establishing a ame
- Either very short or very long ames
- Flame only burns part way across the burner
- Severe soot building up on the inside of the glass
If any of the above signs occur, please contact Rinnai.
Your ame pattern should look like this (may vary slightly depending on gas type)
Linear 800 Flametech log set Linear 800 standard log set
1
.
Linear 1000 log set
Linear 1000 modern media (glass)
Linear 1500 log set
Linear 1500 modern media not
shown, ame pattern will be the
same as the 1000 model shown
here
1
Appliances incorporating a live fuel effect, and designed to operate with luminous ames, may exhibit slight carbon
deposits—this is normal.
Linear operation guide: 13562-B 02-19 | 13
Page 14

Error codes
The Linear has self diagnostic electronics that monitor the appliance during start up and operation.
Should a fault occur the heater will shut down. The fault that has caused the shut down will be
indicated, via the Wi-Fi app on your smart device.
Error
code
00
11
12
14
16
31
32
33
53
61
Likely cause Suggested solution
Mains power failure
Ignition failure Check the gas supply is turned on. Turn the heater
Incomplete combustion As above.
Overheat safety device Filter may be blocked—service call.
Room overheat Lower room temperature to below 40 °C.
Room temperature sensor faulty Service call.
Overheat temperature 1 sensor faulty Service call.
Overheat temperature 2 sensor faulty Service call.
Spark sensor faulty Service call.
Combustion fan motor faulty Service call.
Reset the re, press the On/Off button on the control
panel, remote control, or app twice, to turn the re
back on.
OFF then ON again. If the problem continues a
service call will be required.
Model error Incorrect PCB for model, service call.
70
Solenoids faulty Service call.
71
Flame detection circuit fault Service call.
72
Communication error Service call.
73
Communication error detected
90
between the main PCB and Wi-Fi
module
Communication error detected
91
between Smart device and Wi-Fi
module
Reset the Wi-Fi module in the re.
Check your Wi-Fi and Rinnai Wi-Fi module are
within range. Check network settings.
14 | Linear operation guide: 13562-B 02-19
Page 15

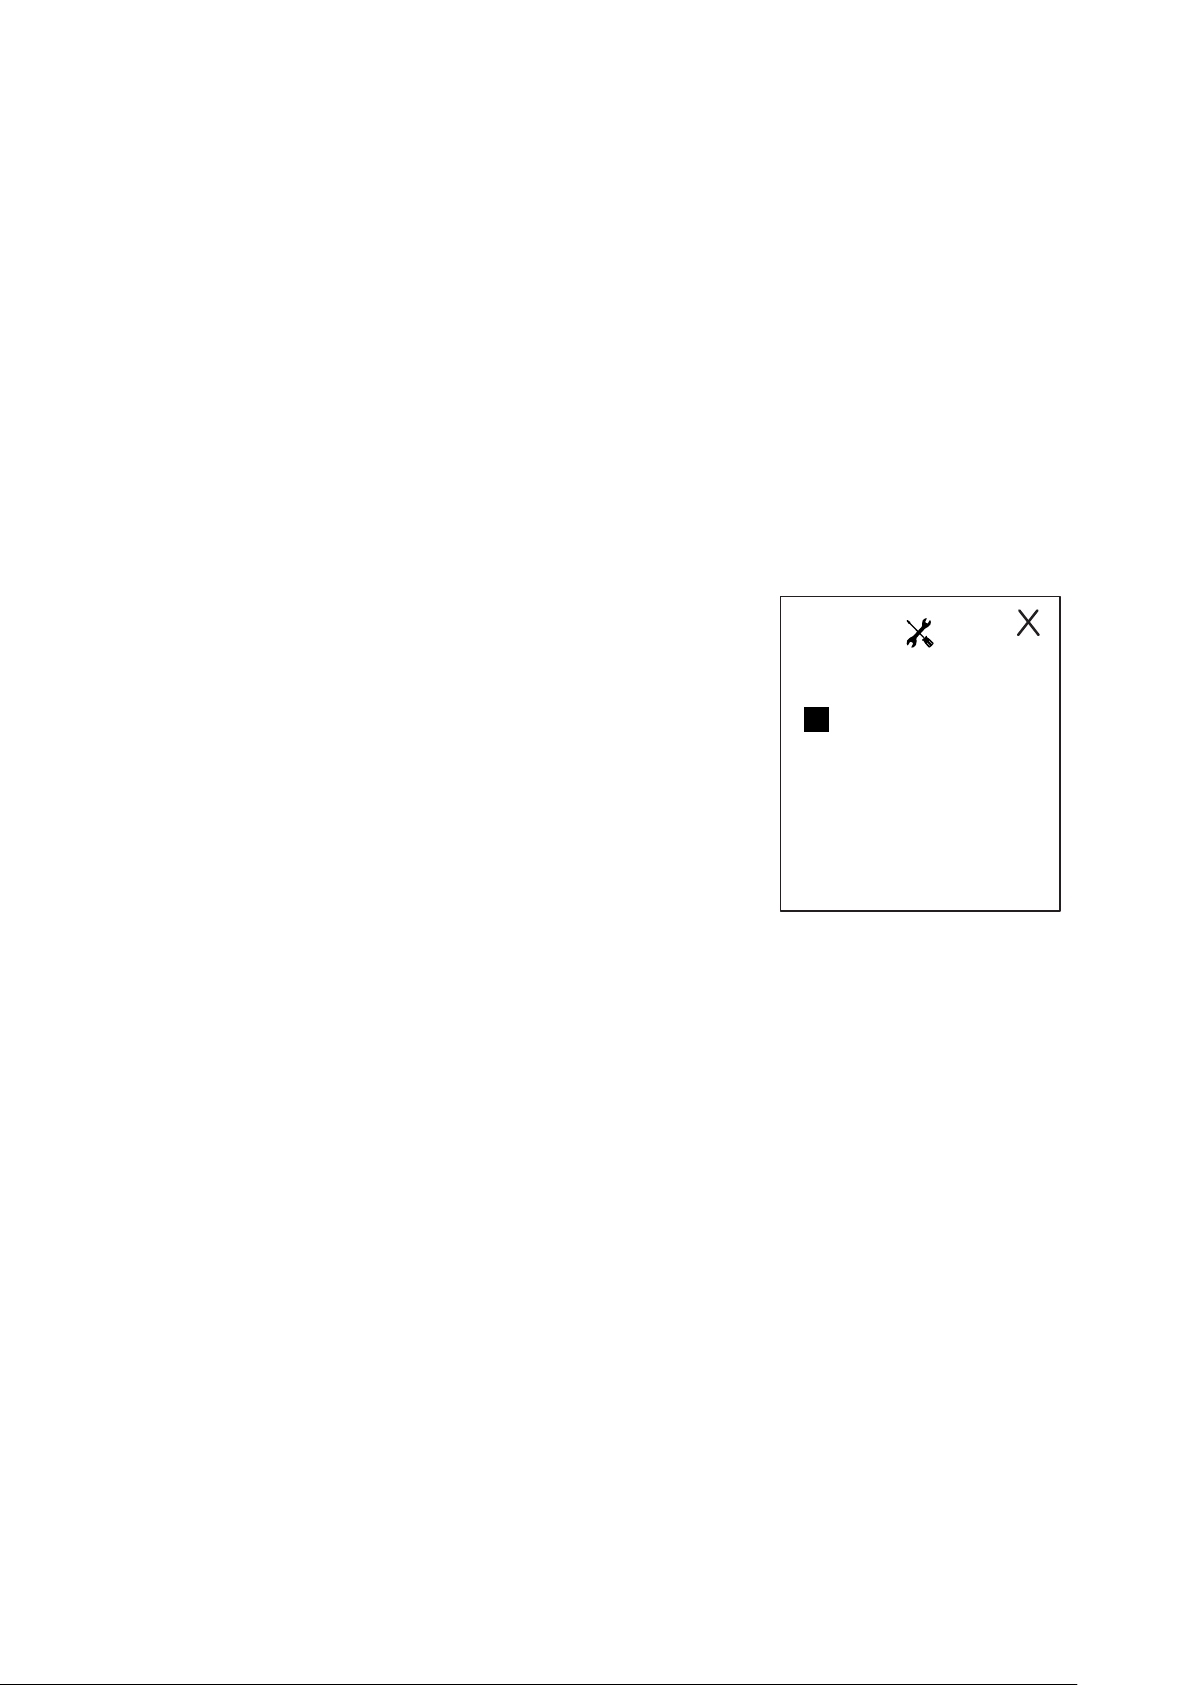
Please note:
If you think your problem is Wi-Fi related, please lookup/download the Wi-Fi user guide available
on the Rinnai website, enter Wi-Fi user guide in the search eld. There may be a requirement for
you to reset the Wi-Fi module in the re. To do this for the Linear make sure the re is on:
1. Grab a credit card, or something similar in thickness (non-metallic), and walk up to the re.
2. Looking left of centre and down into the Linear you will see a narrow gap with a metal sheet.
3. Using your card, gently press down to reset the Wi-Fi module.
4. Restart your app and follow the instructions.
If this doesn’t work, switch the power off (at the wall) and then back on again to reset the re—try a
couple of times if this doesn’t work the rst time.
Using a credit card or something similar
(non-metallic), press down to reset the Wi-Fi
module in the re.
Linear operation guide: 13562-B 02-19 | 15
Page 16

Troubleshooting
Check the following information before making a service call as some performance characteristics
of the re are a normal part of operation. If you are still unsure or concerned after reading this
section, please contact Rinnai on 0800 746 624.
During installation there will be an initial burning in period where some smoke and smell may be
experienced, this could last for a couple of hours— this is a normal part of the operation.
The appliance is tted with an overheat safety switch which will shut off the appliance. If the
appliance shuts off repeatedly servicing may be required.
Using the heater for the rst time, or after a long period of non use
Ignition may not occur the rst time it is operated due to air in the gas pipes. If ignition does not
occur the unit will switch off automatically. Try operating the heater again if this occurs.
The heater may make noises after ignition or switching off. This is due to the expansion and
contraction of the internal components—this is normal. The heater will not ignite if the On/Off
button is pressed straight after the heater has turned off. It will take approximately 20 seconds
before the unit will switch on again.
What’s happening Explanation and/or possible solution
Unusual smells
Smoke or strange smells are produced when
rst operating the appliance after installation.
Smell of gas Have you been painting? Have new carpets
Unusual sounds
Clicking noises when the heater starts or
stops, or changes to a higher or lower setting.
Clunking noise when the thermostat operates. This is the sound of the gas valve opening and
Soot marks and condensation on the glass
Small soot deposit on logs or stones. Normal operation, no action required.
This is caused by grease, oil, or dust within the
appliance. This will stop after a couple of hours.
been laid? Have you been cooking with spices?
If yes to any of the above, then this is normal as
these odours will mix with the warm air to emit an
unusual smell—this will dissipate over time.
There could be a leak. Turn off the gas at the
meter or LPG cylinder and call your installer.
This is expansion and contraction of the heat
exchanger and is a normal part of operation.
closing to regulate the ow of gas.
Severe soot deposits forming on logs, stones,
or glass
Condensation and/or water marks on the
glass
16 | Linear operation guide: 13562-B 02-19
Inadequate ue system, incorrect gas pressure
or incorrect installation of burn media. Contact a
Rinnai Service Centre.
Normal operation. Condensation should
disappear once the re has warmed up. If still a
problem, the glass can be cleaned, refer p. 22.
Page 17

What’s happening Explanation and/or possible solution
Performance problems
Warm air not coming from heater when it
starts
The fan starts automatically after a short delay.
This is to allow the appliance to warm up, helping
avoid cold draughts.
Fan continues to run after the heater is turned
off.
This is to remove residual heat from within the
appliance. This stops once the unit cools down.
Fire will not light when switched on Ensure the power cord is plugged in and turned
on. Ensure gas supply is turned on.
Unit stops during operation Possible power failure, or gas supply may have
been turned off.
Unit is on low and the LED is on Obstruction detected. Something may be to close
to the warm air vent, remove and use the remote/
app to resume normal operation.
Remote problems
Remote control doesn’t work Unit not plugged in properly or has been turned
off—plug in power cord or press On/Off button.
Remote lock-up due to signal being out of range,
incorrectly aimed at unit or obstructed.
No display on remote. Batteries may be at, change batteries.
Possible error codes* on remote when batteries are activated or changed:
F1 displays on remote Assembly fault, remote will not respond to
movement—accelerometer not communicating
with the main processor correctly. Contact Rinnai.
F2 displays on remote Room temperature outside 5-45 °C, or
temperature sensing circuit has failed, which may
indicate an assembly fault. Contact Rinnai.
* Unlikely to occur, but possible if there has been an assembly fault or failure with the remote.
Linear operation guide: 13562-B 02-19 | 17
Page 18

Installation checklist
The installer must complete the installation checklist below and make sure this
guide is left with you. They must also instruct you about the use and care of the
appliance, and ensure you understand the safety instructions.
Checklist
F Appliance positioned in a suitable location (clearances, mantels, surrounds, cavity ventilation).
F Rinnai ue system installed and tested to ensure effective draw.
F Gas pressure checked and set according to the data plate.
F Burn media installed as per instructions.
F Appliance tested for correct operation and to ensure no gas leaks.
F Customer instructed on operating procedure and safety requirements.
F Customer advised to service the heater every two years.
Installer details
Company name:
Installer name:
Address:
Phone: Mobile:
Certicate of compliance number for installation:
Signed: Date:
18 | Linear operation guide: 13562-B 02-19
Page 19

Limited Warranty
Rinnai brings you peace of mind with a:
5-year rebox warranty
This warranty is applicable to all Rinnai Linear collection models. All terms of the warranty, subject
to the conditions below, are effective from the date of rst installation. The attending service
person reserves the right to verify this by requesting a copy of the certicate of compliance prior to
commencement of any warranty work. Proof of purchase and installation date will be required at the
time of any warranty claim. This warranty is only valid within the country of purchase.
FIREBOX* ALL OTHER PARTS
Parts Labour Parts Labour
5 years 2 years 2 years 2 years
* The rebox is the metal outer casing (as shown in the image to the
right) that surrounds the re. All other parts of the re will be covered
by a two year limited warranty.
General warranty terms
All Rinnai appliances meet or exceed the safety standards
required by New Zealand gas and electrical regulations. The company is constantly improving its
products and as such, specications are subject to change or variation without notice.
For the purposes of the Consumer Guarantees Act 1993, Rinnai only guarantees the availability of
repair facilities and spare parts for the express warranty period recorded in the table above.
This warranty does not limit any consumer rights or guarantees that may apply under the
Consumer Guarantees Act 1993. If the product is acquired for the purposes of a business, the
provisions of the Consumer Guarantees Act 1993 do not apply and no other warranties (either
express or implied by law) apart from those stated in the warranty will apply.
Warranty terms and conditions
1. All terms of this warranty are effective from the date of rst installation. The attending service
person reserves the right to verify this by requesting a copy of the certicate of compliance
prior to commencement of any warranty work. The installer must issue a certicate of
compliance by law in New Zealand. Warranty claims may be invalid if not accompanied by
details of the installing or supervising gas tter’s registration number and the gas certication
number.
2. All Rinnai appliances must be installed, commissioned, serviced, repaired and removed in
accordance with the manufacturer’s installation instructions, local regulations, and building
codes by persons authorised by local regulations to do so.
3. All appliances must be operated and maintained in accordance with the manufacturer’s
operating instructions. Rinnai recommends that gas appliances are serviced as per our
servicing statement on p. 5.
Linear operation guide: 13562-B 02-19 | 19
Page 20

Warranty terms and conditions continued
4. Servicing of the product is to be carried out by a Rinnai authorised service centre.
5. The warranty applies only to the components supplied by Rinnai. It does not apply to
components supplied by others, such as electrical switches, electrical cables, fuses and where
applicable ue systems, but is not limited to these.
6. Where a failed component is replaced under warranty, the balance of the original warranty will
remain effective.
7. Rinnai reserves the right to transfer functional components from defective appliances if they
are suitable.
8. Rinnai reserves the right to have installed product returned to the factory for inspection.
9. Where the gas re is installed outside the metropolitan area or further than 40 km from a Rinnai
authorised service centre, travel costs shall be the owner’s responsibility.
Warranty exclusions
The following exclusions may cause the warranty to become void and will result in a service charge
and cost of parts (if required).
1. Accidental damage and acts of God.
2. Failure due to abuse or misuse, improper maintenance or improper storage.
3. Failure due to incorrect or unauthorised installations including but not limited to the use
of products, including ue systems, that are not specied by Rinnai, damage caused by
installation of indoor res outdoors and outdoor res indoors.
4. Failure or damage caused by alterations, service or repair work carried out by persons other
than Rinnai service persons or service centres.
5. Where it is found that there is no fault with the appliance and the issue is related to the
installation or is due to the failure of electric or gas supplies.
6. Noise caused by minor contraction, movement or expansion of certain parts.
7. Cost of building work to access parts that need repair or replacement, or the costs of building
repairs afterwards.
8. Subjective issues such as noise or smell that Rinnai have investigated (or a Rinnai service
agent has investigated) and are established to be within normal operating parameters.
9. Variances in replace appearance from Rinnai promotional images that are due to gas type and
printing connes.
20 | Linear operation guide: 13562-B 02-19
Page 21

Purchase details
Record your purchase details below
Retailer:
Retailer address:
Date of purchase:
Product details:
ATTACH YOUR PROOF OF
PURCHASE HERE:
Please keep these details in a safe place for future reference.
Register your Linear online
Register your Linear online at www.rinnai.co.nz/register/. You’ll need to know the
model, and also the serial number—shown on the sticker on the back page of this
guide.
Warranty claim
To make a warranty claim, contact Rinnai on 0800 RINNAI (0800 746 624) or email
info@rinnai.co.nz.
Linear operation guide: 13562-B 02-19 | 21
Page 22

Appendix 1
Glass cleaning
The inside of the glass, over a period of time, may develop some buildup and condensation marks.
These can be removed using a soft microbre cloth, never use solvents or abrasive chemicals.
Do not attempt to clean the glass while the Linear is operating or is still hot. Before starting
WARNING
If you are attempting to clean the larger Linear units (1000, 1500), make sure you have an extra
pair of hands available to help lift the glass out.
The glass front sits in a narrow channel at the bottom of the re and is held in place by glass latches
positioned at the top, on either side of the unit (the 1500 model has an extra glass latch in the
center).
make sure the power to the re is off and the glass is cool to touch.
Push up the latch and to the
side to release the glass
Glass retainer latch
Louvre
Glass frame tabs
22 | Linear operation guide: 13562-B 02-19
Page 23

To remove the glass:
1. Using a screwdriver, loosen the three screws holding the louvre in place, remove the louvre,
and then remove the screws (so the glass can come out)—put the louvre to one side.
2. Push the top glass retainer latches up and slightly to one side to
release the top section of the glass.
3. Using the frame tabs at the top of the glass frame, lift up and gently
slide to the right and rotate the glass until the left section comes free,
then move the glass panel to the left to remove the right section.
4. Clean the glass, using a soft microbre cloth, and reinstall by following the above steps in
reverse order.
Ensure the glass is on correctly before turning the Linear back on. NEVER operate the
WARNING
Linear without the glass in place.
DO NOT touch or adjust the burn media. Adjustment can only be done by a licensed
gasfitter as burn media positioning is critical to the safe operation of the fire
Linear operation guide: 13562-B 02-19 | 23
Page 24

Rinnai.co.nz 0800 746 624
http://www.youtube.com/rinnainz
http://www.facebook.com/rinnainz
Linear operation guide: 13562-B
 Loading...