

Service Manual
REU - 16 FUA - E
“Infinity 16 i”
“Infinity 16 i”
Continuous Flow Water Heater
Important.
Read these instructions carefully before attempting service of this
appliance. All work must be carried out by competent persons.
The Rinnai Infinity 16i water
heater, when correctly installed,
complies with the requirements
of the United Kingdom Water
Regulations / Byelaws
(Scotland). These Products can
be found listed in the Water Fittings and Materials Directory.
The Rinnai Infinity 16i water heater
is CE Marked as allowed by
Technigas.
Certificate number E0940/5399
ID number 0461BQ0836
Date of Issue 23 Dec 2005
Quality System Standard
ISO 9001 - 1994
The Design, Development, and Manufacture of Gas Water Heating Appliances
done under Rinnai’s Quality Management System is certified under the Quality
Management System Standard ISO 9001.
Registration Number JQ0003D
Registered since: February 1994
Certified by Japan Gas Appliances Inspection Association.
2
UK INSTRUCTIONS
This appliance may only be serviced or repaired by someone certified competent to
do so. At the time of printing the only people deemed competent to install this
appliance are those that are CORGI registered for this type of appliance in this type
of location who have a current ACS certificate.
1. Gas safety (Installation & Use) regulations 1998 are the ‘Rules in force’. In your own
interest and that of safety, it is law that all gas appliances are installed and serviced by
competent persons in accordance with the above regulations. Failure to install appliances
correctly could lead to prosecution. Other persons should NOT attempt to install this
equipment.
2. Installation must be in accordance with the current issue of the following:
Building Regulations issued by the Department of the Environment
Building Standards (Scotland) Regulations.
I.E.E. Wiring regulations for electrical installations.
Gas safety (Installation and Use) Regulations current issue.
BS 5546
BS 5440
BS 6891
BS 5482
BS 6700
BS 6644
Institute of Gas Engineers Publications
Local byelaws
Water regulations
Health and safety at work etc. Act 1974
IGE/UP/10 Part1 Edition 2.
Building Regulation J
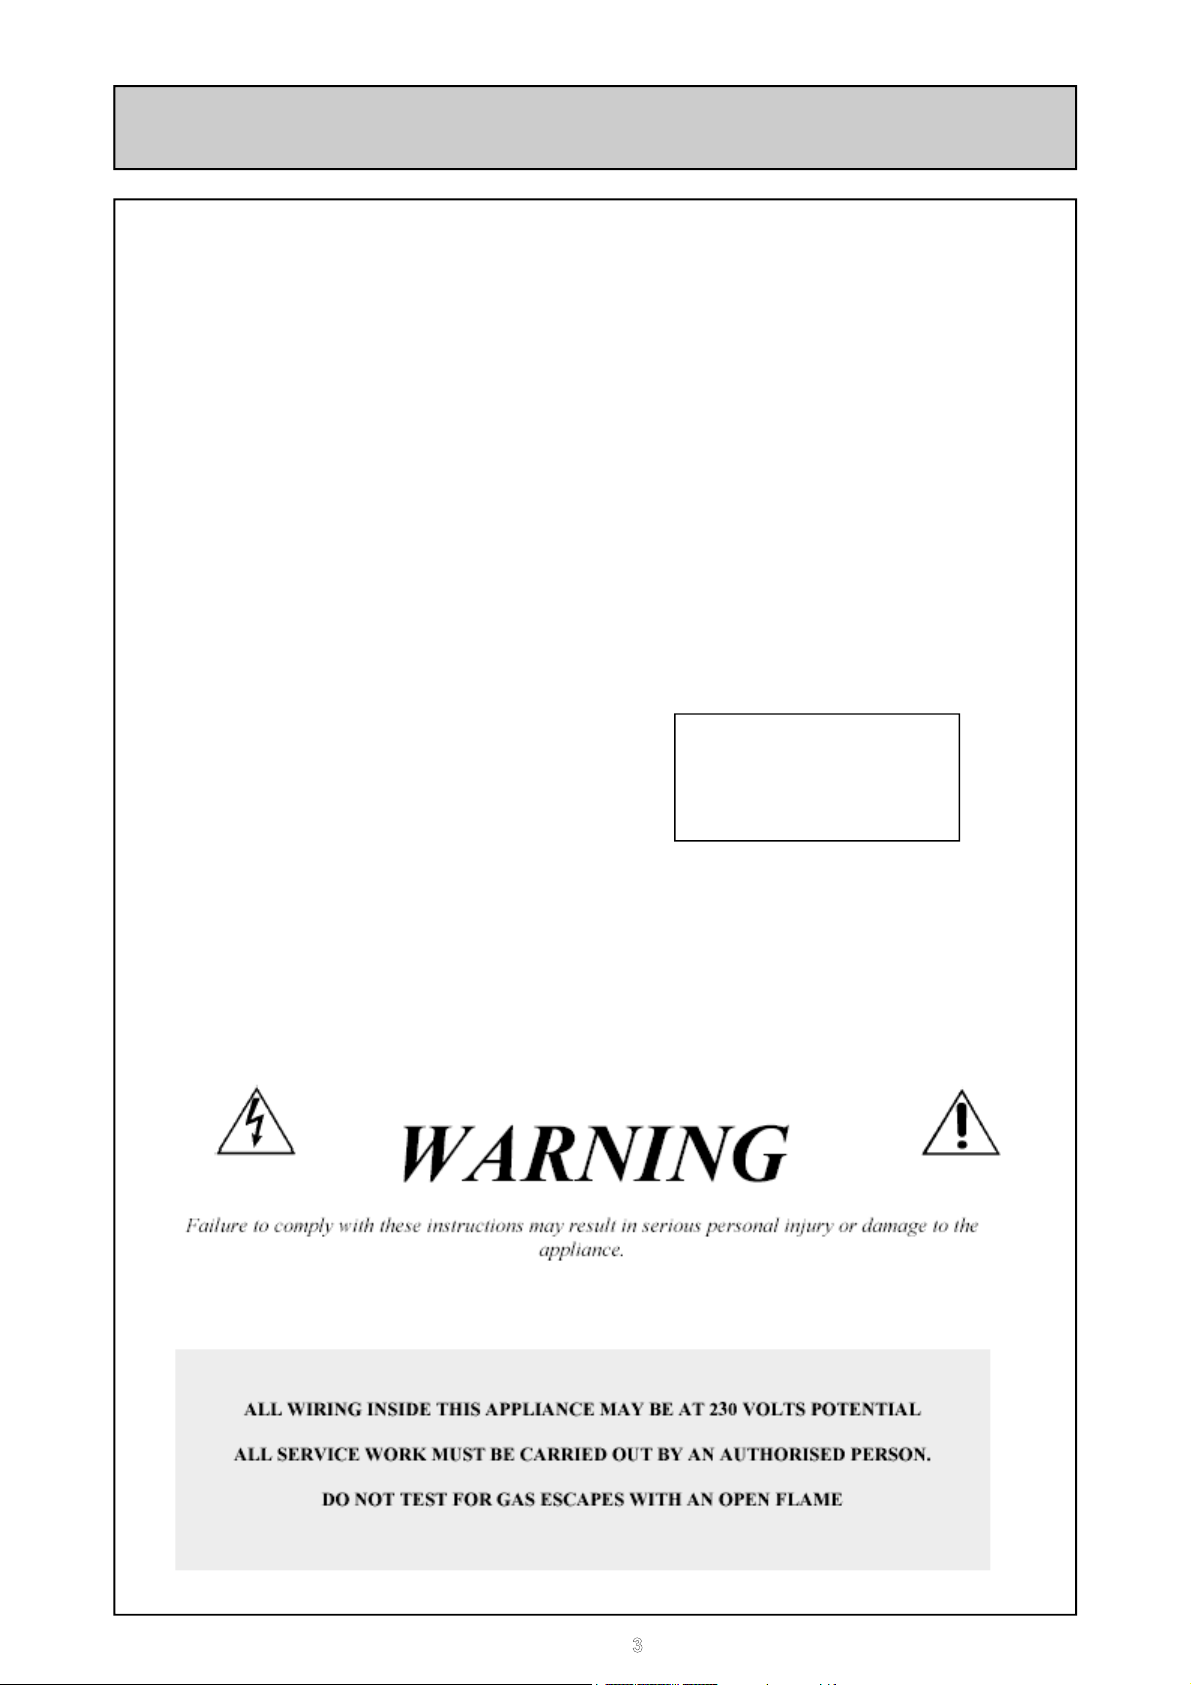
Please be sure that you are fully aware of your obligations and responsibilities under
these regulations.
Such other specifications
and regulations that may
supersede or complement
the above documents.
3

Contents
Contents………………………………………………………………..…………………4
Glossary of Terms and Symbols.............................................................................5
Introduction.............................................................................................................6
Specification of 16i..................................................................................................7
Sensors and Safety Devices..................................................................................8
Combustion Specifications.....................................................................................8
Dimensions.............................................................................................................9
Schematic Diagram..............................................................................................10
Structure Diagram.................................................................................................11
Main Components.................................................................................................12
Water Flow............................................................................................................14
Water Pressure vs. Flow.......................................................................................16
Gas Conversion Procedure..................................................................................17
Testing..................................................................................................................19
Gas Pressure Setting............................................................................................20
Dip Switch Setting.................................................................................................22
Troubleshooting the Infinity 16i.............................................................................23
Remotes...............................................................................................................24
Operational Flow Chart.........................................................................................25
Time Charts..…………………………………………………………………......…….26
Error Codes.........................…………………………………………………….....….27
Diagnostic Checks………............……………………………………………............29
Fault Finding Chart…………………………...........................………………………39
Wiring Diagram..……………………………………............………………...............46
Diagnostic Points….………………………………………………......………..……...47
Servicing Procedure…….……………………………………………………………..48
Dismantling for Service……………………………………………………………......49
Exploded Diagram................................................................................................56
Parts List...............................................................................................................61
Letter of Compliance……………………………………………………....….............65
CE Certificate……………………………..……………………………………............66
Service Contact……………………………….…………………………….........……67
4
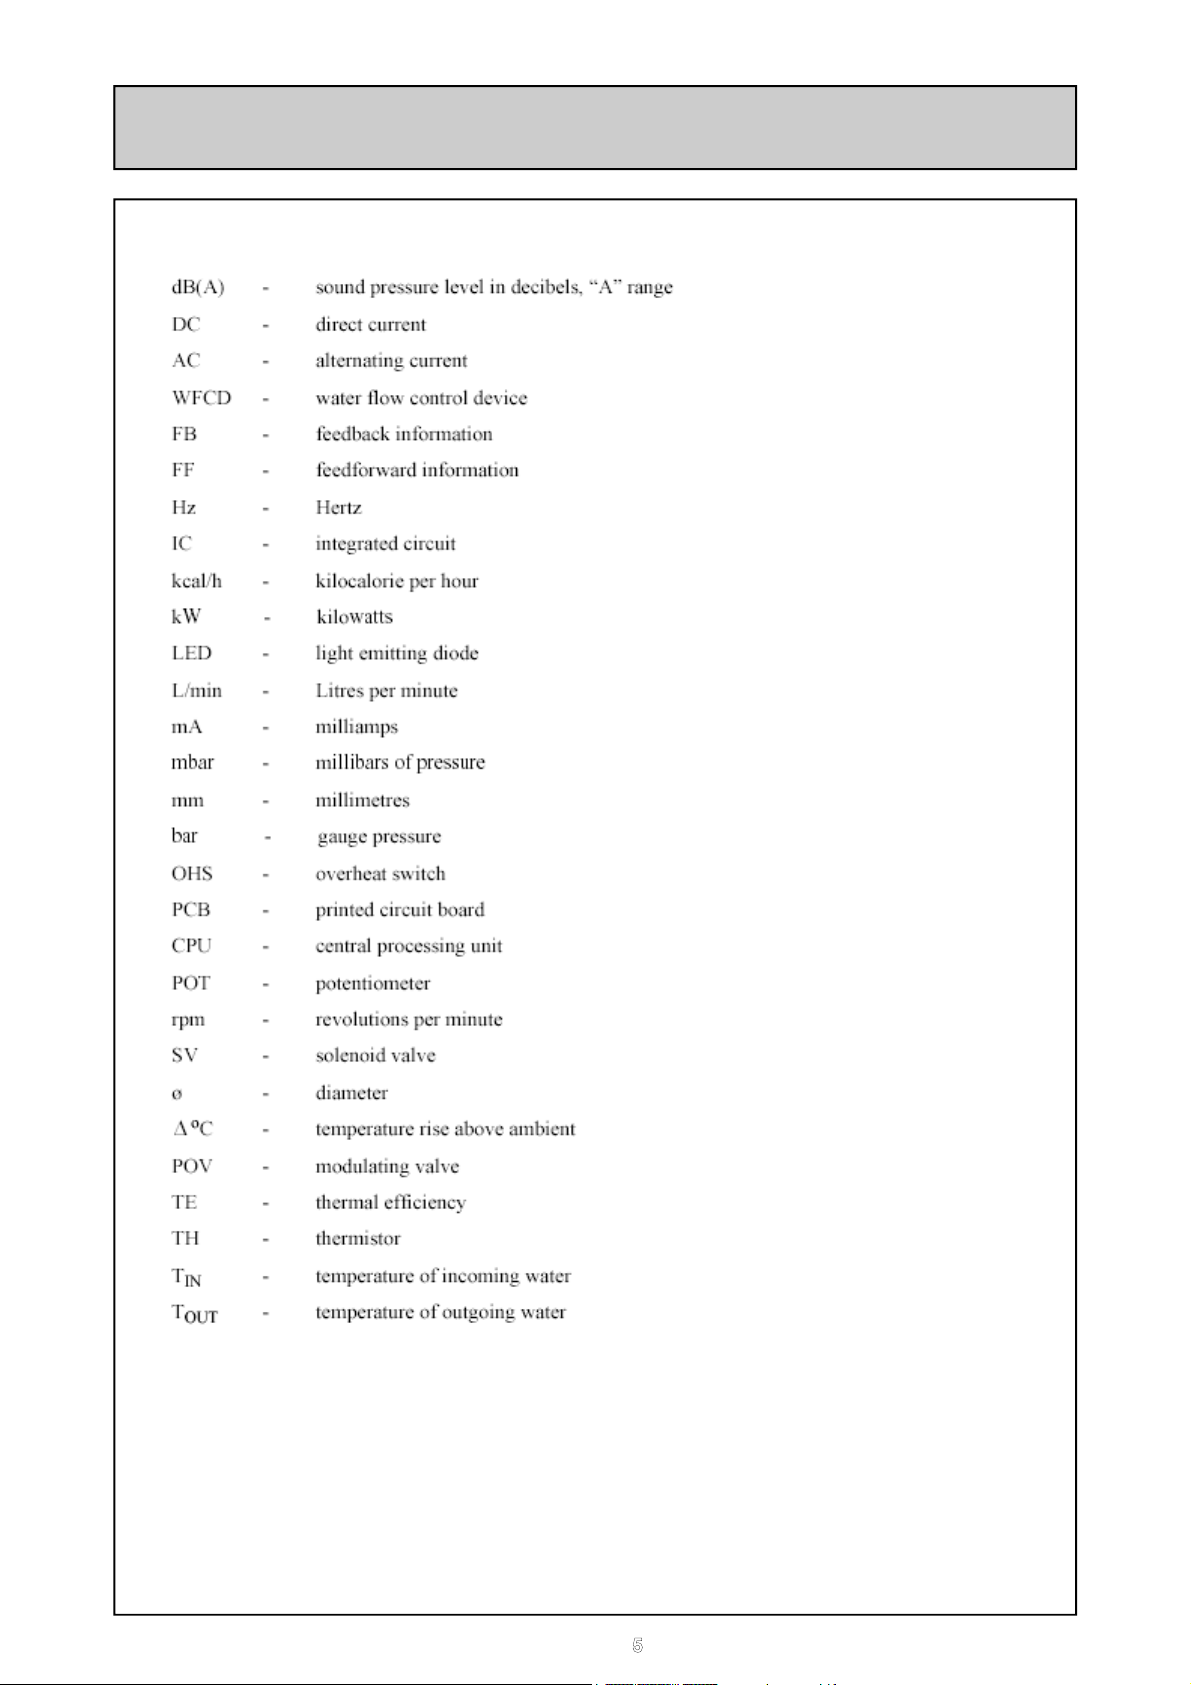
Glossary of Terms and Symbols
5

Introduction
The Rinnai Infinity hot water units represents the latest
technology in continuous flow, temperature controlled hot water.
Features
• The Rinnai Infinity 16i will NEVER RUN OUT of hot water. As long as electricity,
water, and gas supplies are connected, hot water is available when hot water taps
are open.
• Built into the main micro-processor is the facility to LIMIT THE MAXIMUM TEM-
PERATURE of the hot water supplied. The water temperature may be set to vari-
ous temperatures. This is particularly useful when the hot water unit is installed
where young children or the infirm may be using the hot water. If required, the temperature can be changed via the control pad on the front of the unit or with a localised controller. For further information, please contact Rinnai.
• Rinnai Infinity internal units are powered flue appliances. This makes them COM-
PACT, saving both floor and wall space.
• The temperature of outgoing hot water is CONSTANTLY MONITORED by a
BUILT-IN SENSOR. If the temperature of the outgoing hot water rises to more than
55°C the burner is shut OFF and only turned ON again when the temperature falls
to below the selected temperature.
• The burner lights automatically when the hot water tap is opened, and extinguishes
when the tap is closed. IGNITION IS ELECTRONIC, so there is no pilot light. When
the hot water tap is off, no gas is used.
• The 16i has a built in controller on the front of the unit for easy control. Two addi-
tional external temperature controllers can be mounted remotely from the heater.
This offers the following additional features:
Localised temperature setting.
Diagnostic message.
Error Codes.
• Temperatures selected at the controllers are retained in the SYSTEM MEMORY
when the controller gives up priority or the system is turned off. Temperatures over
0
C will revert to 550C when power and/or priority is regained.
55
• Operating NOISE LEVEL IS VERY LOW.
• ERROR MESSAGES ARE DISPLAYED on the Temperature Controllers, assisting
with service.
• FROST PROTECTION device built in as standard.
6
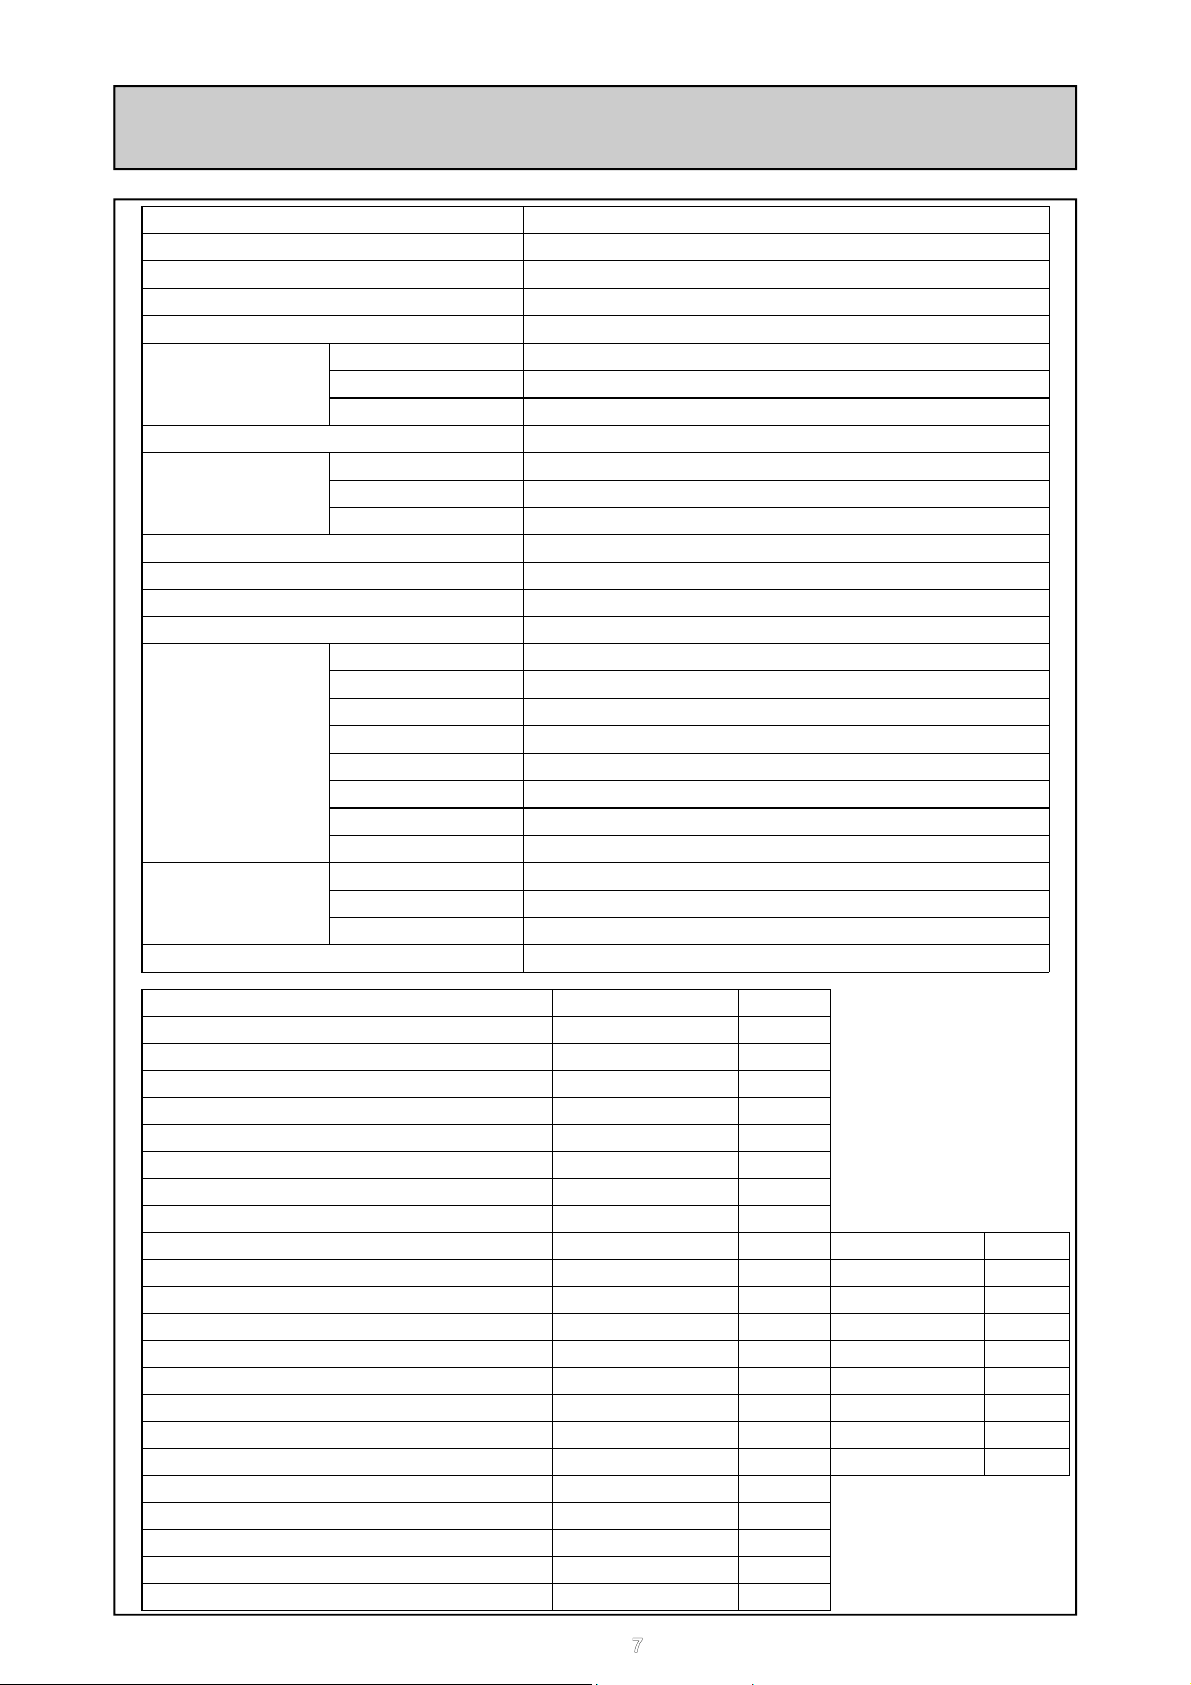
Specification of 16i
Type of Appliance Temp Controlled Continuous Flow Gas Water Heater
Operation With / Without remotes (Kitchen, Bathroom, etc.)
Flue System Room Sealed, Forced Draught Flue
Installation Internally Mounted only
Available Temps 37C - 48C (1 deg Increments) 50, 55, 60
Dimensions Height 675 mm
Weight 15 kg
Connections Cold Water 1/2 in bsp
Ignition System Direct Electronic Ignition
Noise Level 49 dB(A)
Nox 55 ppm Max
Water Temp Control Simulation feed forward and feedback
Boil Dry Water Flow Sensor
Remaining Flame 97 C bimetal switch
Safety Devices Over current Glass Fuse 3 Amp
Combustion Fan Integrated circuit system
Fusible Link 150 C Thermal Fuse
Remote Controls Kitchen BC-45-SR-EU or BSC-45-SR-EU
Remote Cable
Width 370 mm
Depth 130 + 45 mm
Gas 1/2 in bsp
Hot Water 1/2 in bsp
Flame Failure Flame Rod
Over pressure Pressure Relief Valve 15 bar open, 12 bar close
Over temperature Lockout Thermistor 95 C
Heater Mounted MC-45-SR-EU
Bathroom BC-45-SR-EU or BSC-45-SR-EU
Two core sheathed (double insulated) flex with min 0.55 mm
2
G20 Nat Gas Press Low 1.8 mbar
G20 Nat Gas Press High 9.0 mbar
G25 Nat Gas Press Low 1.8 mbar
G25 Nat Gas Press High 9.0 mbar
G30 LPG (Butane) Press Low 2.2 mbar
G30 LPG (Butane) Press High 11.4 mbar
G31 LPG (Propane) Press Low 2.2 mbar
G31 LPG Propane) Press High 14.2 mbar
Gas Consumption Low (Gross)
G20 Nat Gas 4.7 kW 0.4 m3/hr
G25 Nat Gas 4.0 kW 0.4 m3/hr
G30 LPG (Butane) 4.9 kW 0.35 kg/hr
G31 LPG (Propane) 4.9 kW 0.35 kg/hr
Gas Consumption High (Gross)
G20 Nat Gas 34.9 kW 3.26 m3/hr
G25 Nat Gas 29.6 kW 3.26 m3/hr
G30 LPG (Butane) 36.8 kW 2.6 kg/hr
G31 LPG (Propane) 36.5 kW 2.6 kg/hr
Max Flow raised 25C 15.2 L/min
Min Operation Flow 2.4* L/min
Water Pressure Nom. 1.1 - 7.0 bar
Power Supply 230 V / 50 Hz
Electric Consumption 68 Watts
7
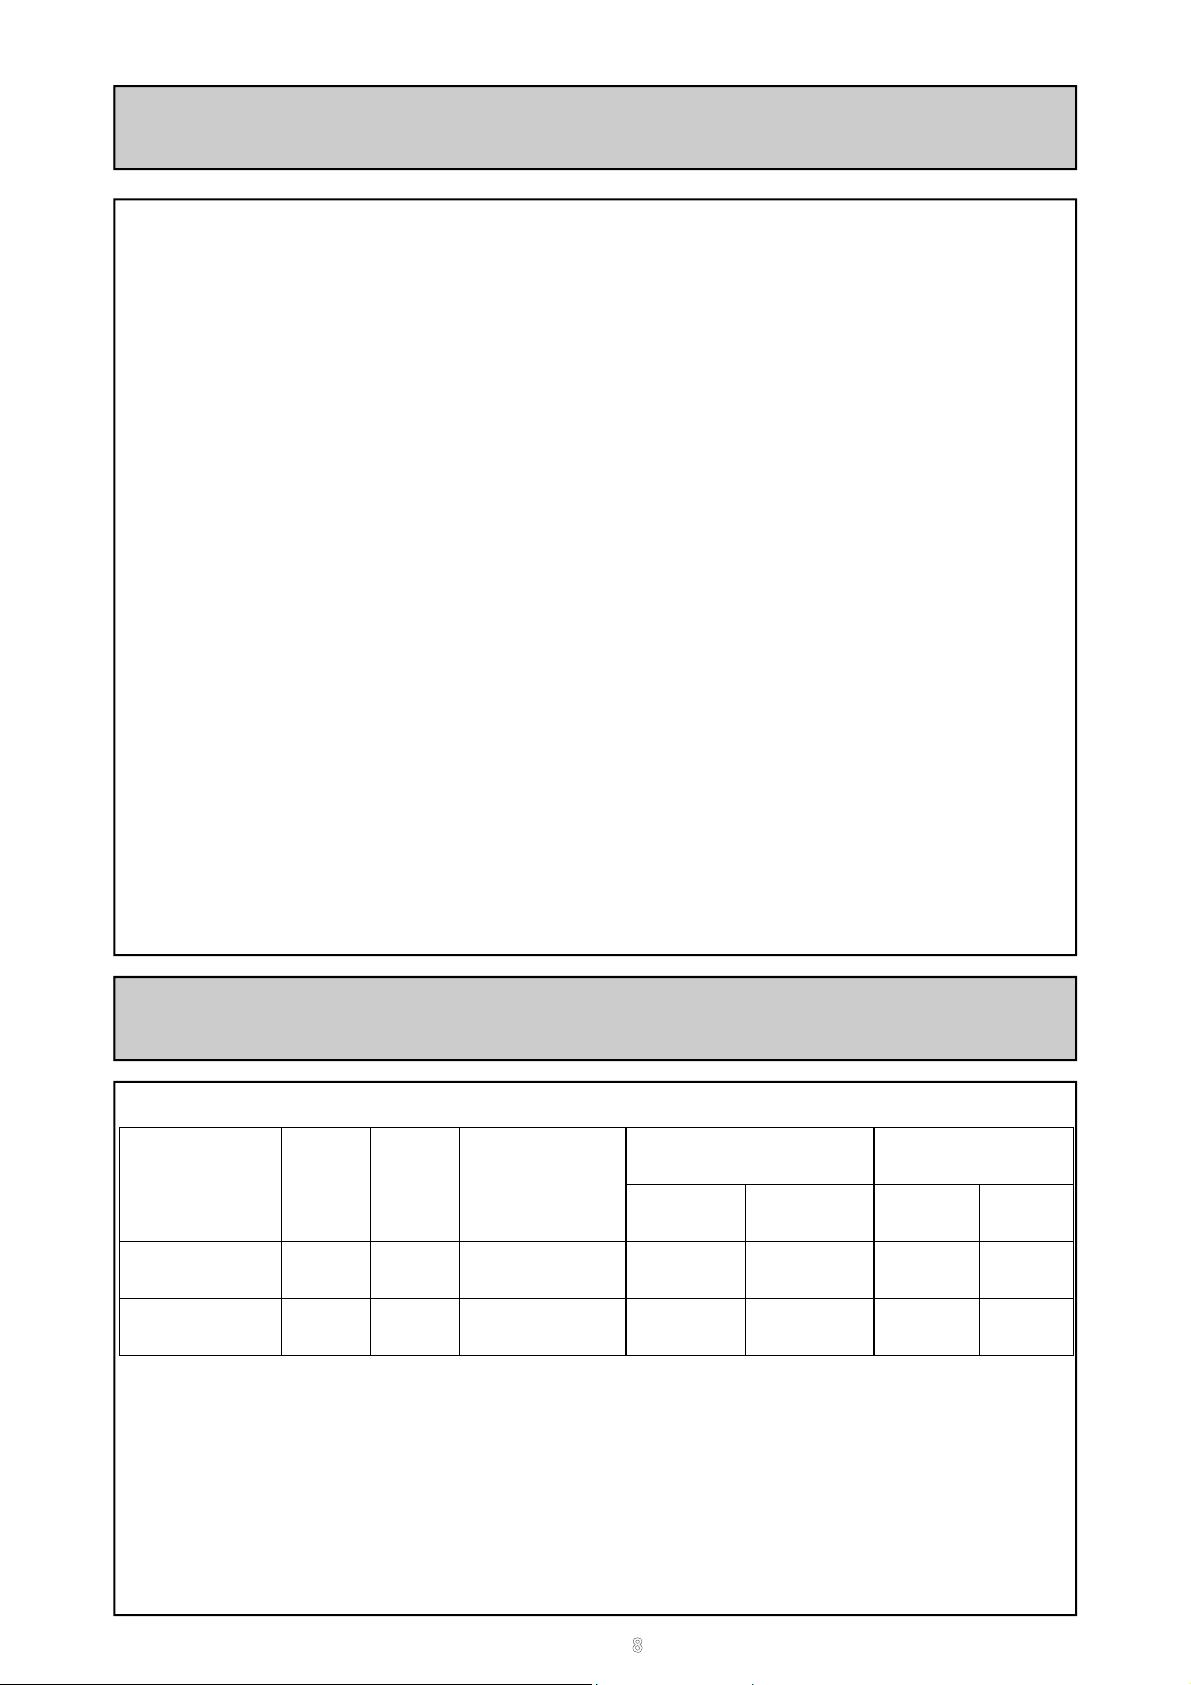
Sensors and Safety Devices
• Heat Exchanger Thermistor: Measures hot water temperature at heat exchanger outlet. If
water temperature reaches a predetermined limit, gas supply is stopped.
• Hot Water Delivery Thermistor: Measures hot water temperature at the outlet valve (i.e. the
‘mixed’ temperature).
• Flame Rod: Monitors combustion characteristics inside the combustion chamber. If the flame
fails, gas supply is stopped.
• Overheat Switch: Situated on the heat exchanger, gas supply is stopped when water
temperature reaches 97ºC for a number of seconds.
• Fusible Link: Situated on the heat exchanger, electrical power supply is stopped if the
temperature exceeds 150ºC.
• Water Pressure Relief Valve: Safeguards the water circuit against excessive inlet pressure.
Opens at 15 bar, closes at 12 bar.
• Electrical Fuse: (3A glass fuse) prevents against over-current. Surge Protector: prevents
against over-current.
• Boil Dry Prevention: If water flow sensor detects no flow, gas supply is stopped.
• Combustion Fan Speed Sensor: In case of combustion fan defect (no rotation of fan) gas
supply is stopped.
• Temperature Cutout: If the delivered hot water temperature rises above the required delivery
temperature for a number of seconds, the gas supply is stopped.
Combustion Specifications
Injector
Gas Type
Natural Gas
(G20)
Propane (G31) 37 2.2 14.2 4.9 36.5
The secondary gas pressure is set with the cover off the unit and a manometer measuring
the pressure from the gas valve (regulator) test point
size
(mm)
1.3 20 1.8 9.0 4.7 34.9
Damper
Nat Gas
LPG
Primary
Pressure (mbar)
Secondary Pressure
(mbar)
Low High Low High
Gas Input [Gross]
(kW)
8
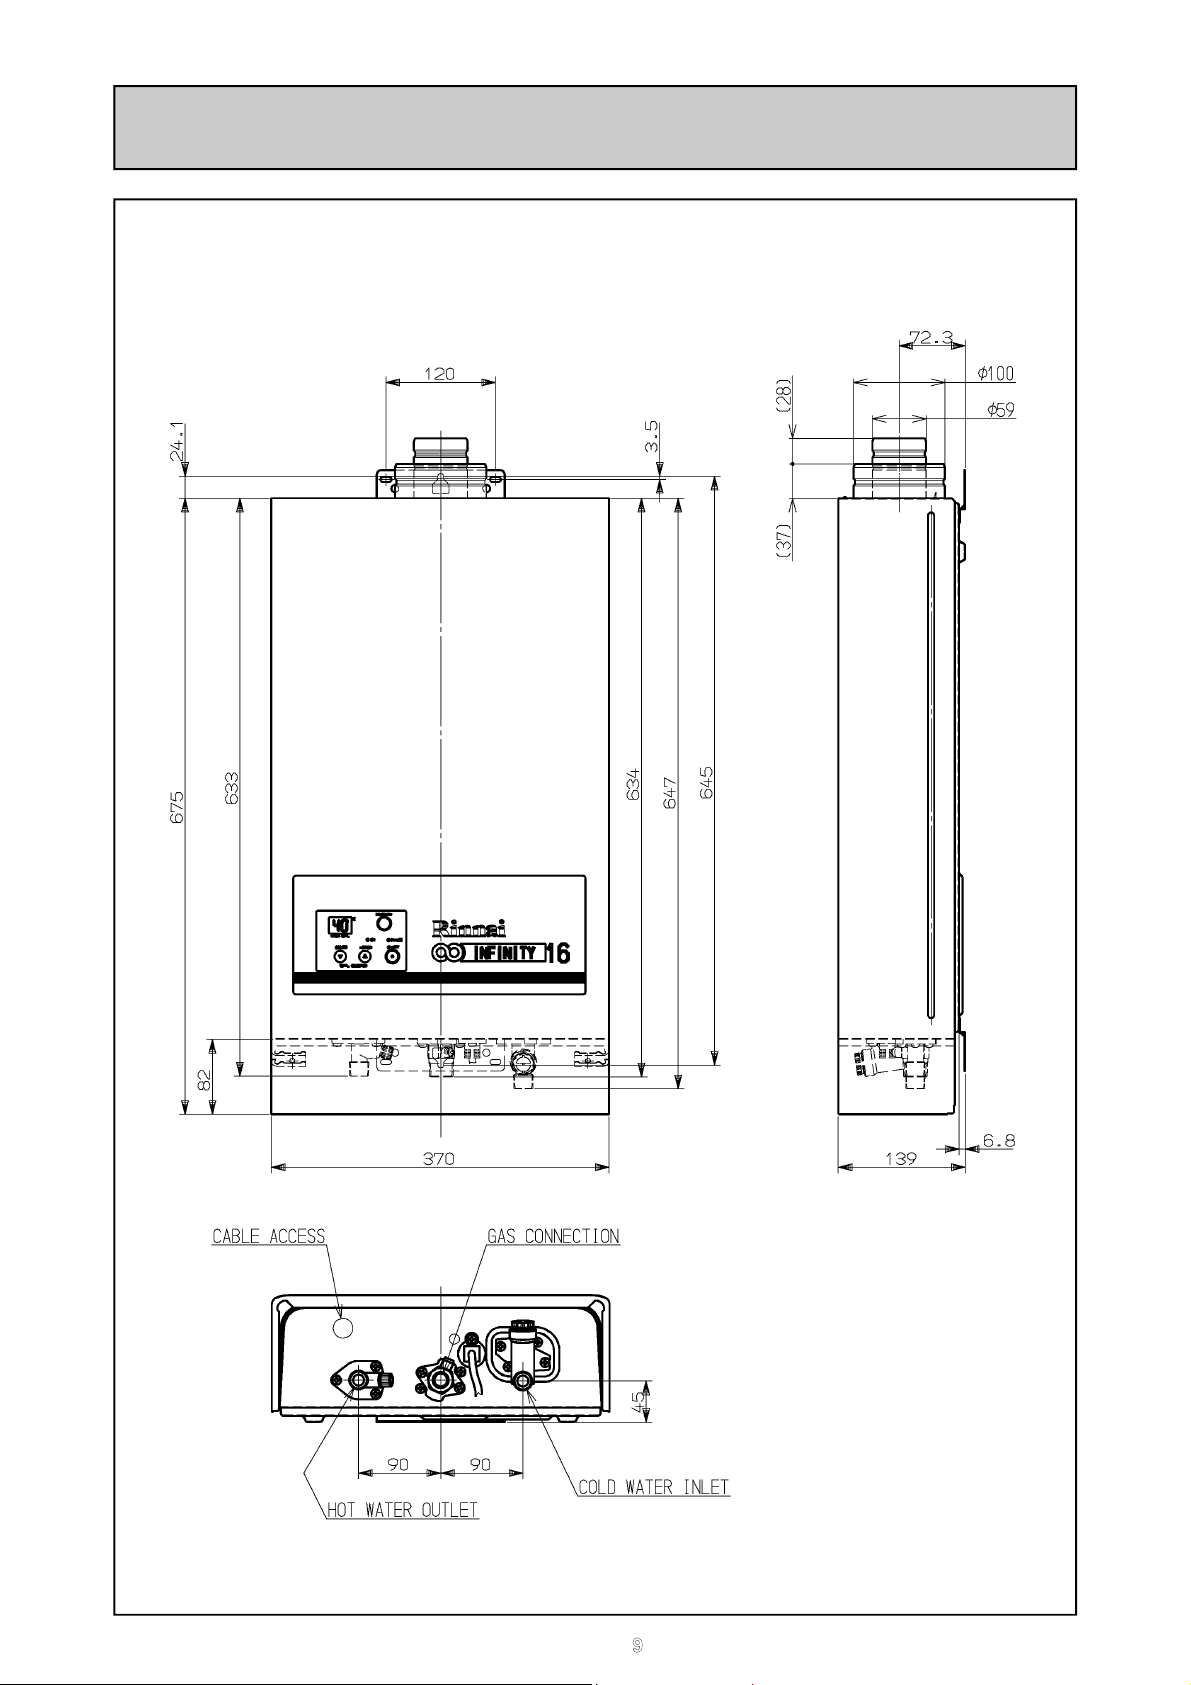
Dimensions
9
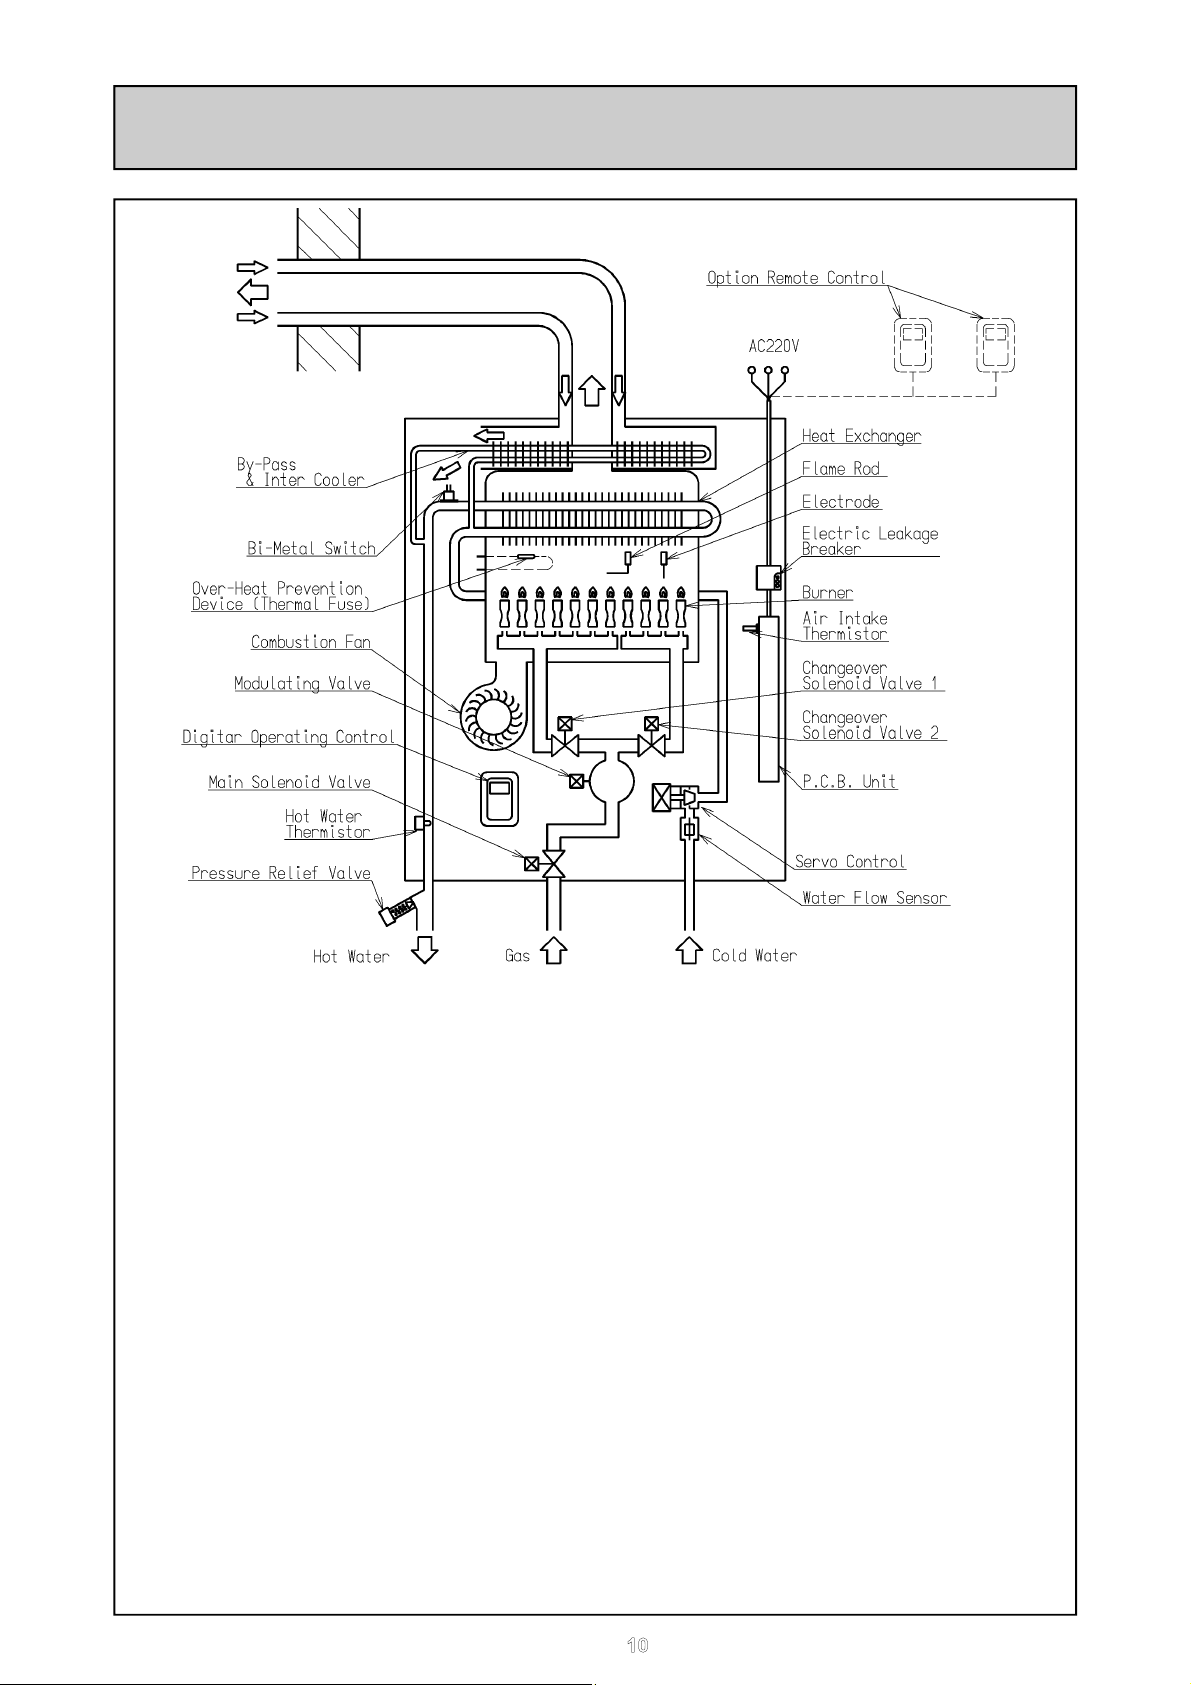
Schematic Diagram
HOT WATER SUPPLY OPERATION
Ignition
Press ON/OFF Button of Optional Remote Control to turn on unit . The remote control display
and priority LED will light up. When a hot water tap is opened the Water Flow Sensor revolves
and sends a pulse signal to the Printed Circuit Board (PCB.) When the PCB detects a water
flow over 2.4 L/min it compares the temperature at the Hot Water Thermistor to the set point
and begins the ignition process; the Combustion Fan starts first. Once the chamber has been
purged and the air proving has made the Electrode begins to spark to Earth. The Main
Solenoid Valve and Changeover Solenoid Valve 2 are opened and the Burner lights. The
Flame Rod will ensure proper burning before Changeover Solenoid Valve 1 will open.
Temperature Setting
With the Temperature Control Buttons on the controller the outlet temperature can be set from
37 - 60℃. When the temperature set point is above 50℃ the High Temperature Indicator
glows. Temperature can not be set above 48℃ while hot water is in use (flowing.) The unit will
continually monitor the outgoing temperature and can fully modulate the performance with the
Modulating Valve and the Servo Control.
Standby
When the hot water tap is closed the PCB no longer receives a pulse signal from the Water Flow
Sensor. The PCB shuts the Main Solenoid Valve and Change-over Solenoid Valves and the
Burner extinguishes. The combustion fan will run on to post purge the chamber.
10
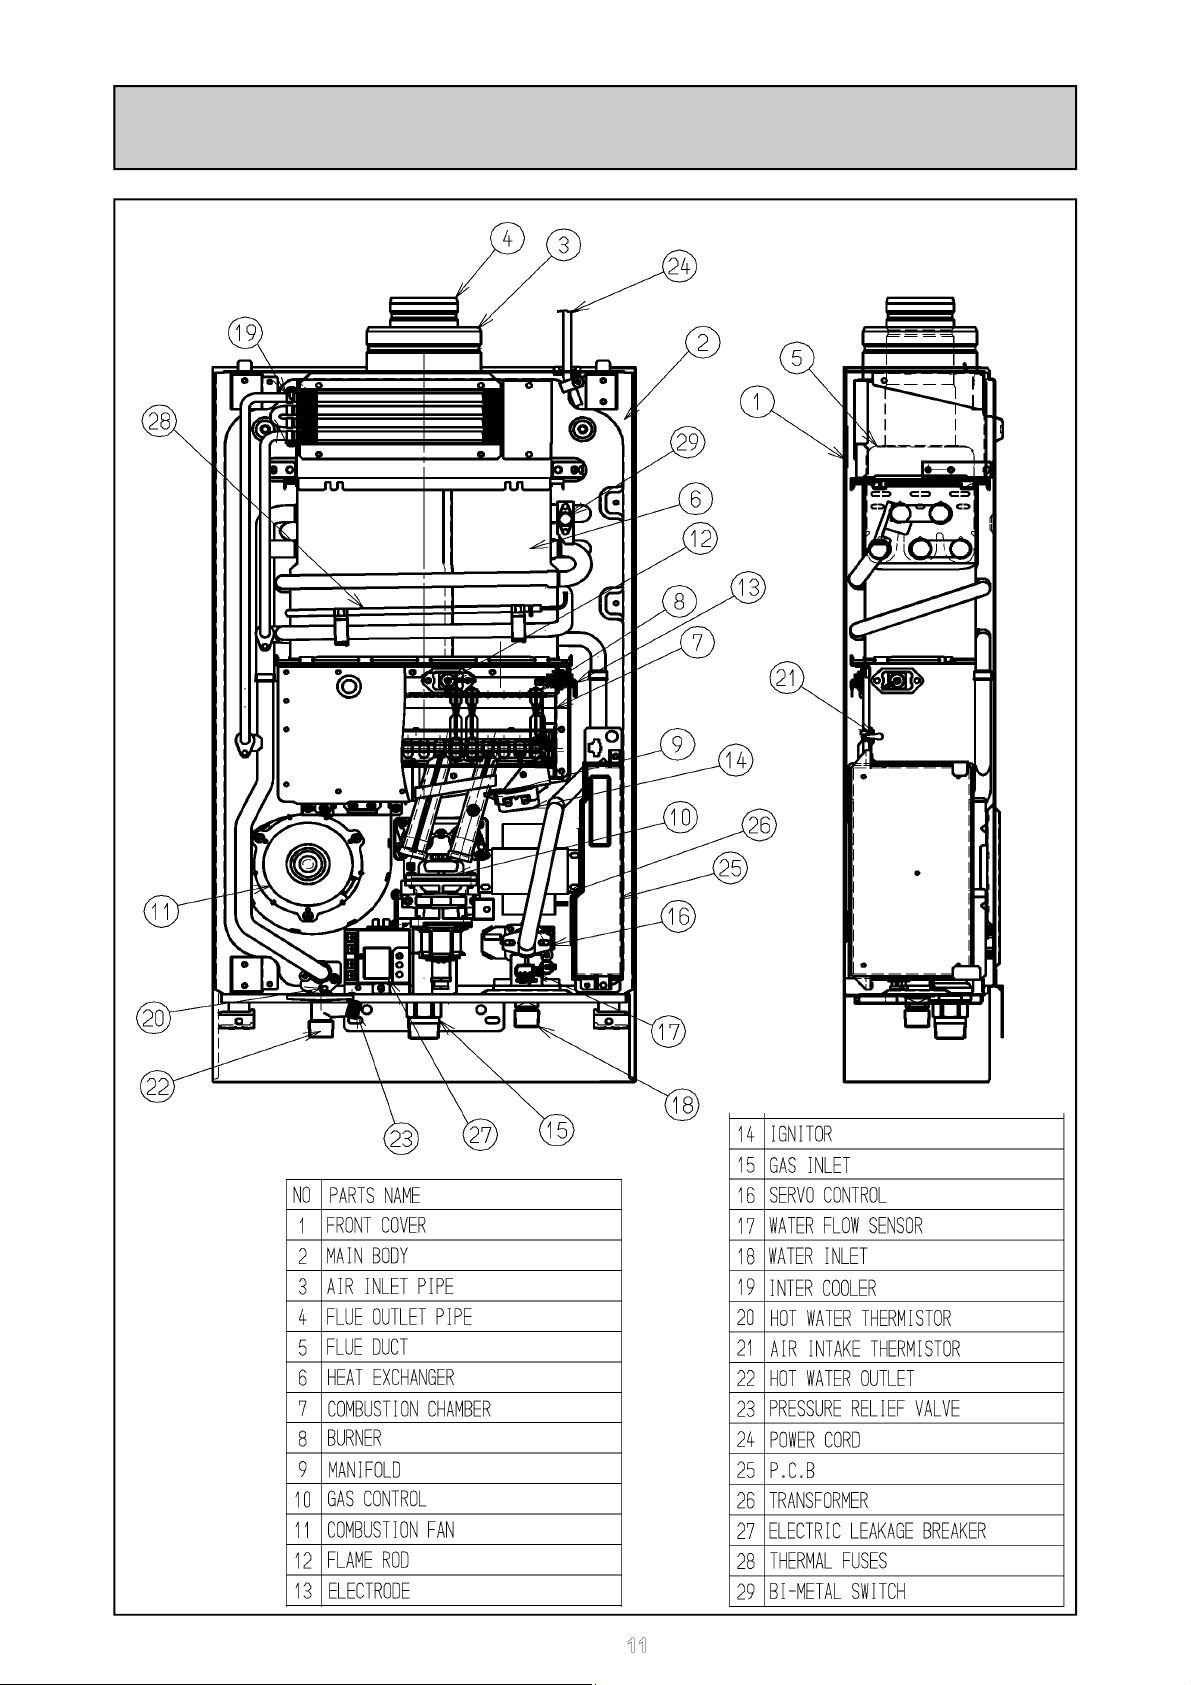
Structure Diagram
11
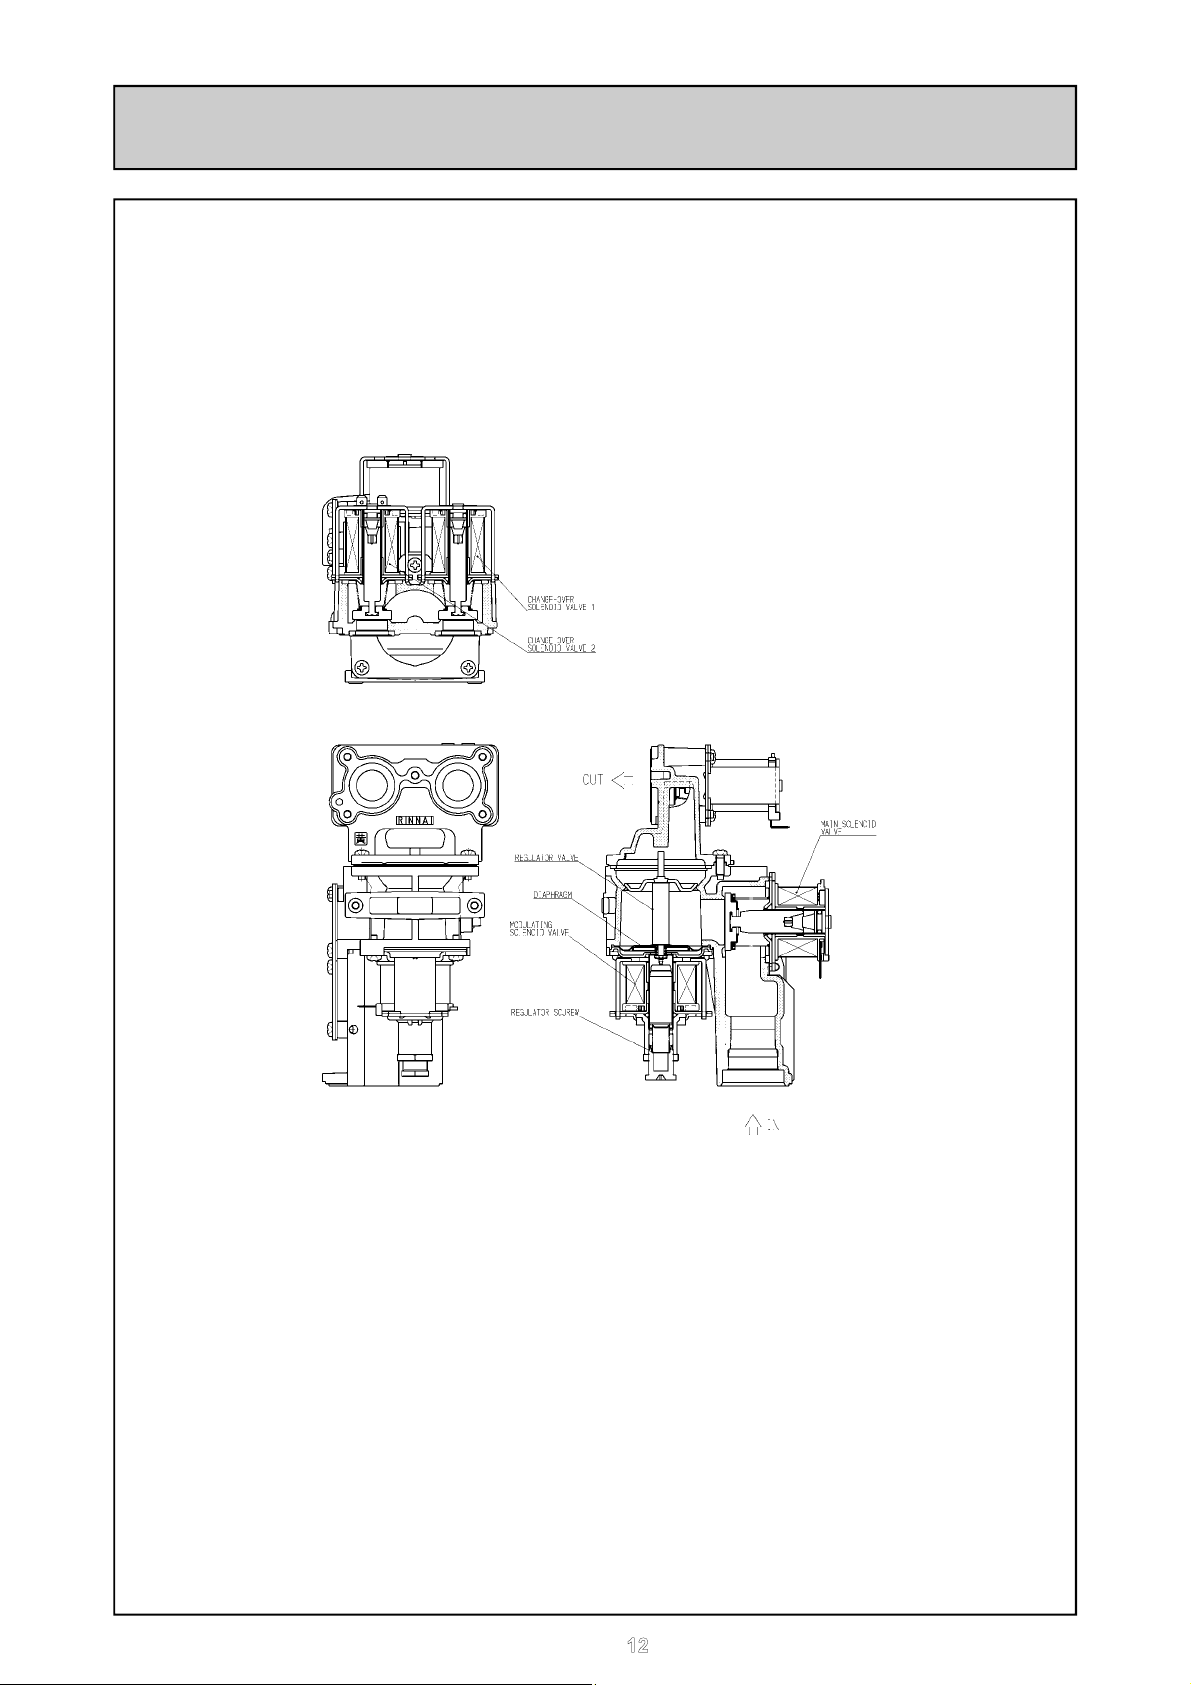
Main Components
1. Gas Control Unit
1.1 Modulating Valve
This device is used by the PCB to adjust the volume of gas to the burner in proportion to the
volumetric flow rate of water in order to maintain a supply of constant temperature hot water
amid changes in water flow rates and incoming temperatures.
1.2 Change-over Solenoid Valves
Additional solenoid valves are included to section the burner and stage the control in 3
steps. This gives the Burner more steady combustion at the required capacity and allows
the water heater to operate at very low flow rates and temperature rises.
2. Flame Rod
Monitors combustion characteristics inside the combustion chamber. If the flame fails, gas
supply is stopped. Works through rectification of the combustion flame. An AC current is
supplied to the flame rod. Electrons can only pass from the rod to the burner, and never
from the burner to the rod, so the resultant DC current is used to prove combustion. When
the DC current is present the burner has normal combustion, if the DC current is not present
(or an AC current is present) the unit shuts the solenoid valve.
12
Main Components
3. Thermal Fuse
The thermal fuse is an electric link which must be intact for the unit to operate. If the
thermal fuse reaches a set temperature it will melt and the unit will shut down. The
thermal fuse must be replaced if it melts. It is to protect against over heating and heat
exchanger splits where water may leak out and be superheated into steam.
4. Overheat Safety (Bi-metal Switch)
This Bi-metal Switch is fixed at the bend of the Heat Exchanger hot water outlet. If the
temperature outlet from the heat exchanger reaches 97
and the solenoid valve circuit is broken. This will cease combustion in case of overheat.
5. Combustion Fan
The combustion fan supplies primary air into the wing burners and secondary air up
through the Bunsen style burners. The fan is DC low voltage and the speed is controlled
by the PCB depending on the hot water flow and temperature. The fan speed is
compared to the current required to attain that speed for air proving. If the fan current is
over or under the parameters for the given speed the unit will shut down on air proving.
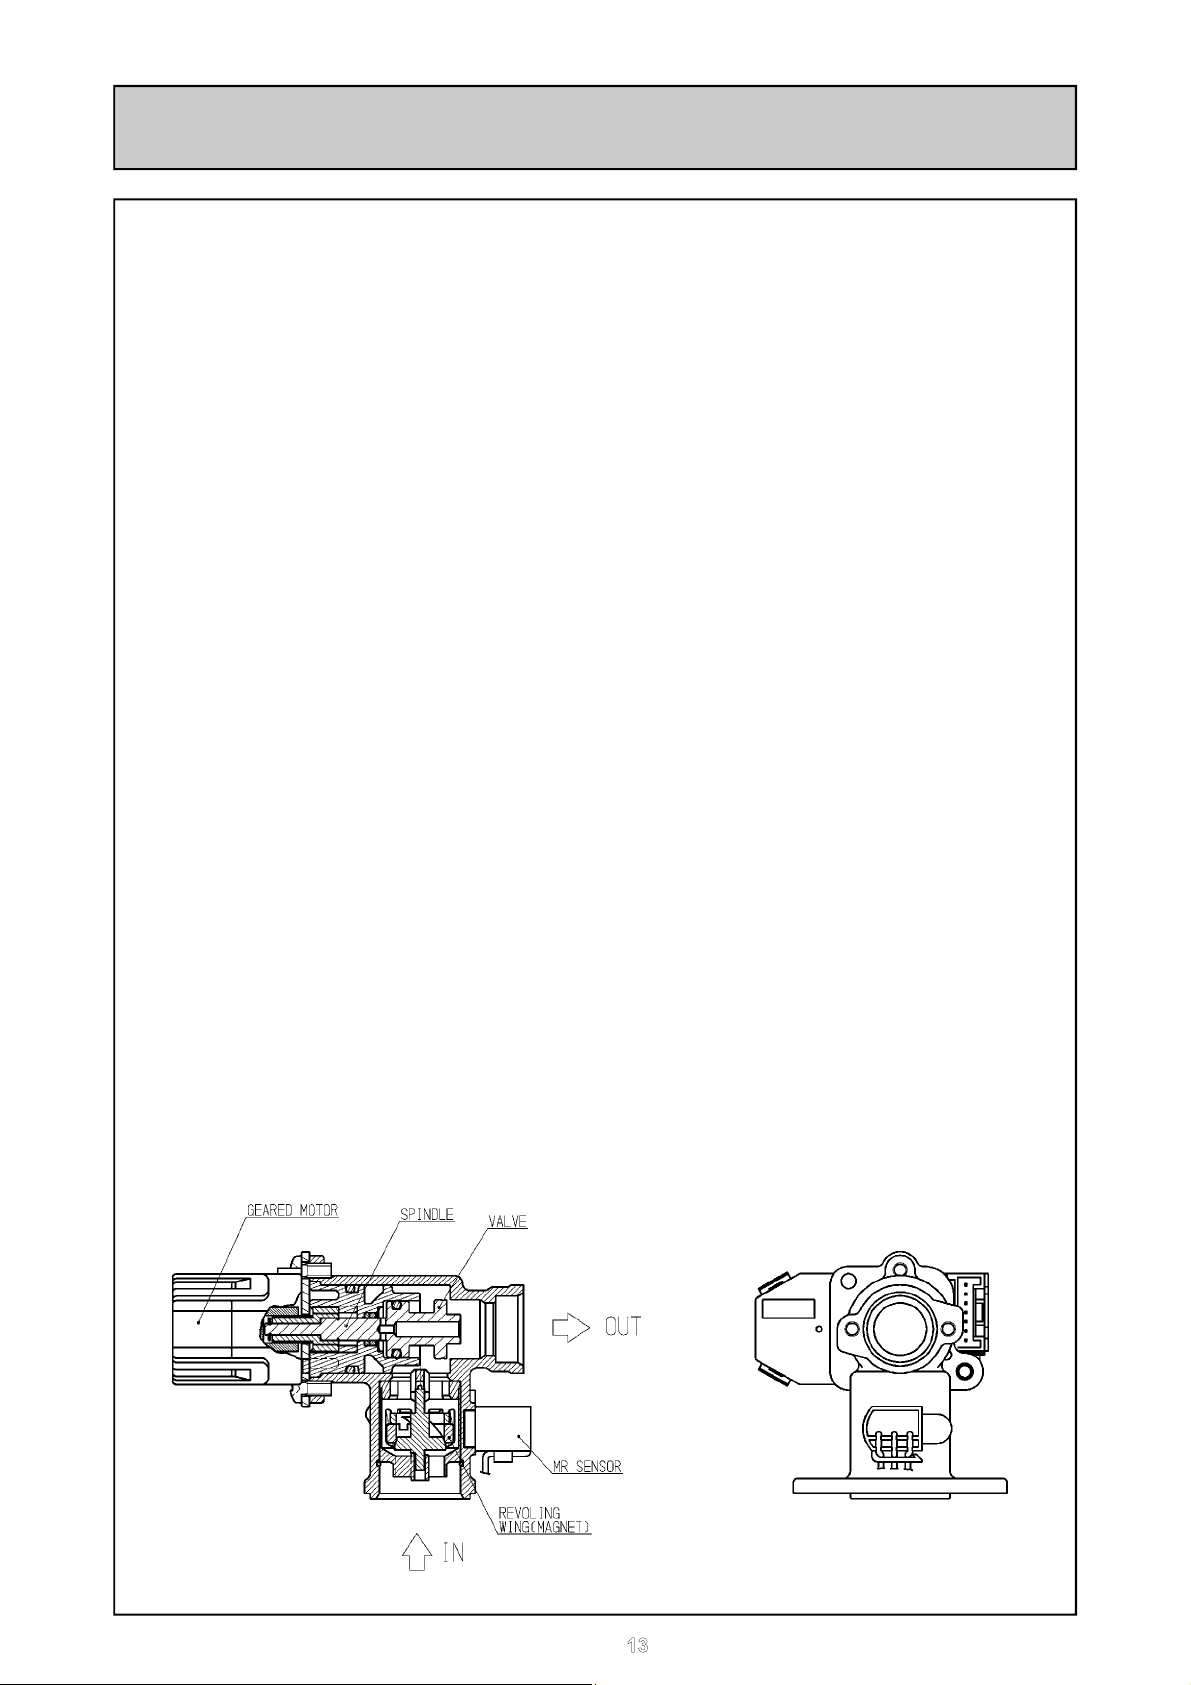
6. Water Volume Servo with Water Flow Sensor
6.1 Water Flow Sensor
Water flow sensing is done with a small turbine that spins when water travels through it
in the correct direction. Each of the four fins on the turbine has a small magnet on it.
Outside of the valve there is a magnetic sensor that detects the speed that the turbine is
revolving. The revolution speed is input to the PCB which relates this speed to the water
flow volume and determines whether it is sufficient for ignition.
6.2 Water Volume Flow Servo
The water volume is adjusted by opening and closing the water flow valve with the servo
motor. This will limit the maximum hot water flow to 20 L/min, and will limit the water
flow further when the burner is at high fire to ensure the temperature setpoint it met.
0
C the bi metal switch will open
13

Water Flow
The figures on the following page show the available water flow rates for different outlet
temperatures based on a range of inlet temperatures. Regardless of the output capacity the maximum
flow rate is limited to 20 litres/minute.
Water Flows can also be calculated by the following formula:
M = 60 x ( Q / C x T )
Where M = Water flow rate in litres/minute. If M is greater than 20, the water must be mixed down at
the point of use as the maximum flow rate of the unit is limited to 20.
Q = Heat energy output in kW = 28 kW for the Infinity 16i (the heat input to the water)
C = Specific heat of water = 4.2KJ/Kg C. Constant for this calculation.
T = Temperature rise required ( C)
Example:
What is the flow rate available with an incoming water temperature of 10 C and a required
temperature of 20 C ?
T = 20 - 10 = 10 C
Q = 28
C = 4.2
M = 60 x ( 28 / (4.2 x 10) ) = 40 l/min. Since 40 is greater than 20 this flow rate must be mixed at the
outlet.
How to read the charts on the following page.
The vertical axis indicates the selected temperature on the remote control and the horizontal axis
indicates the flow of water in litres/ minute. Remote control range is between 37
normal conditions (temperatures up to 75
temperature rise is the difference between the Incoming Water Temp and the Hot Water Outlet Temp
as selected on the controller.
Select the appropriate chart based on incoming water temperature. Draw a horizontal line across the
graph from the selected temperature at the controller until it intersects the curve. From this point
draw a vertical line until it intersects the axis. The value at this point of the axis is the maximum flow
rate available. If the value is over 20 litres/minute a higher temperature will have to be used on the
controller and the water temperature mixed down at the outlet.
0
C may be available if set on the dip switches.) The
0
C and 600 C under
14

Water Flow
Incoming Water Temp 5C
80
70
60
50
40
30
20
10
0
Hot Water Outlet Temp C
0 5 10 15
I
2.4 L/min
min Flow
Hot Water Flowrate L/min
Incoming Water Temp 10C
80
70
60
50
40
30
20
10
Hot Water Outlet Temp C
0
I
2.4 L/min
0 5 10 15 20
min Flow
Hot Water Flowrate L/min
Incoming Water Temp 20C
80
70
60
50
40
30
20
10
0
Hot Water Outlet Temp C
I
2.4 L/min
0 5 10 15 20 25
min Flow
20 L/min
max Flow
Hot Water Flowrate L/min
I
15
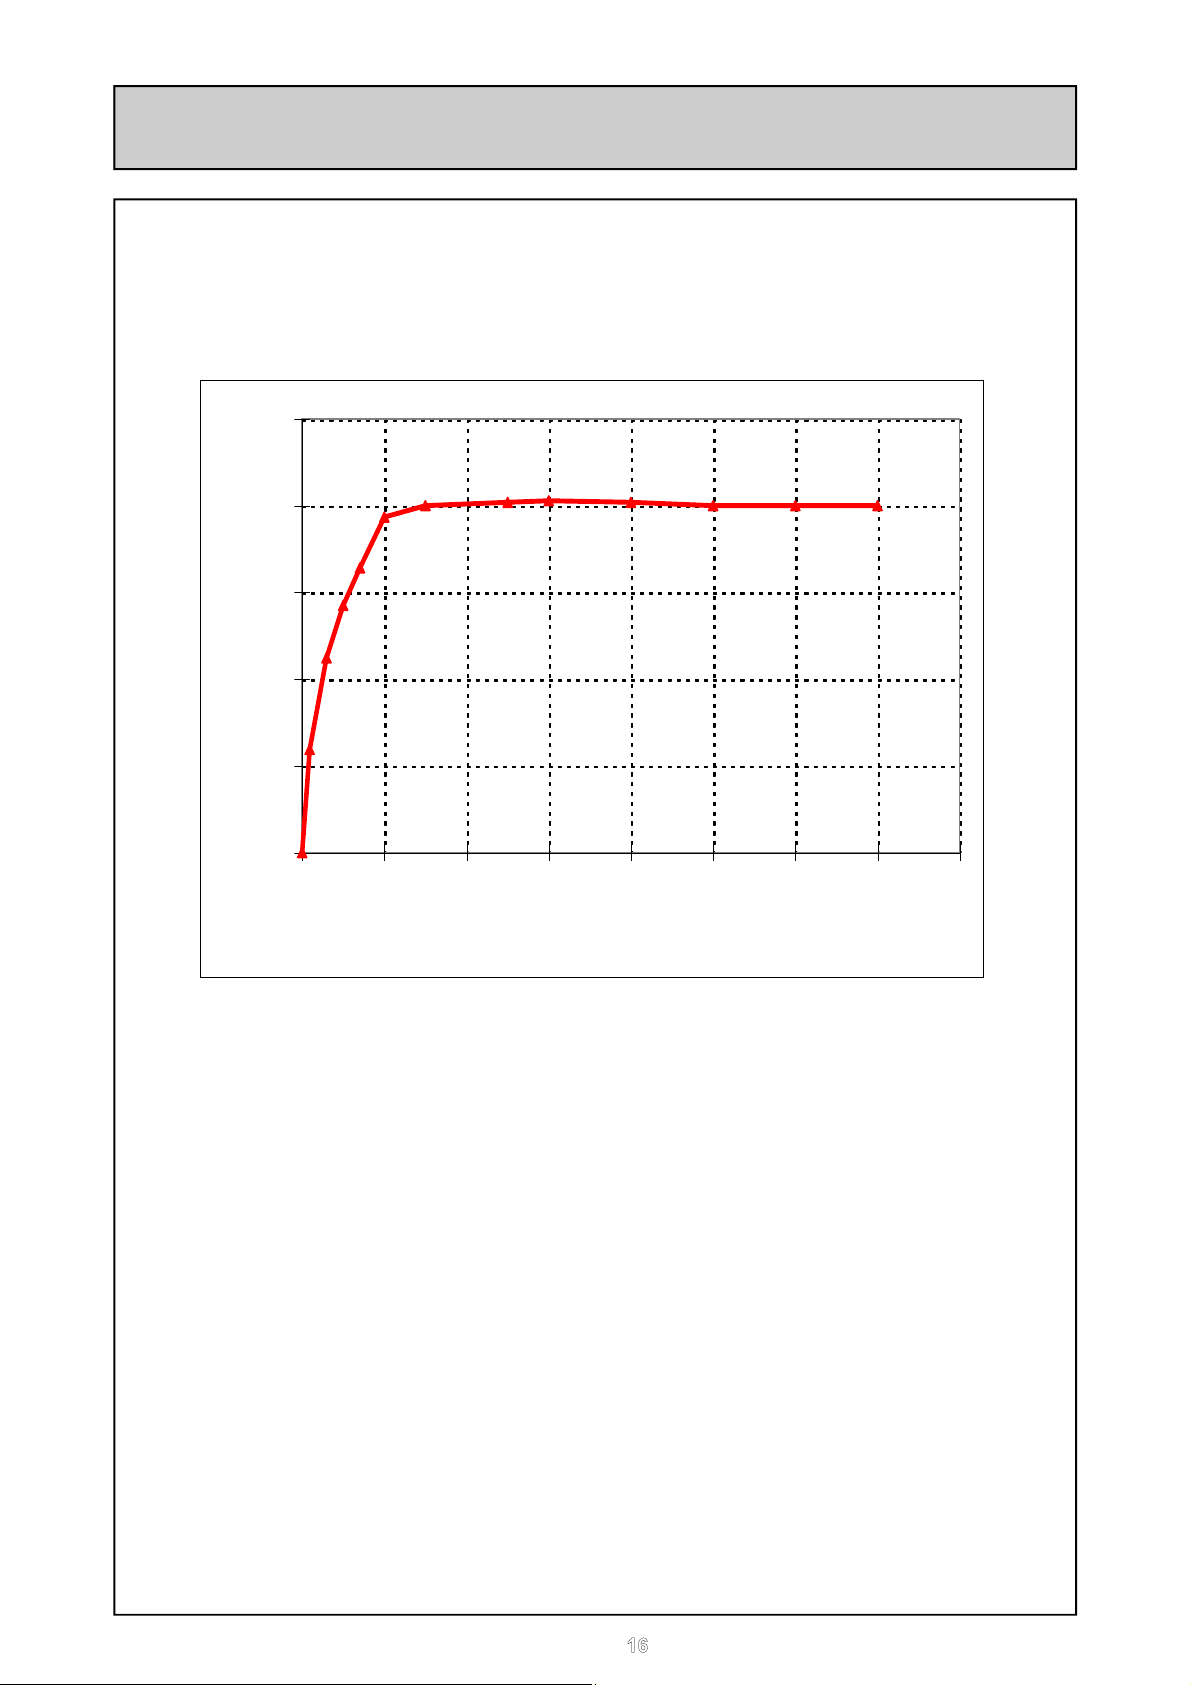
Water Pressure vs. Flow
The water pressure vs. flow characteristics are as follows:
Regardless of how high the incoming water pressure is it is not possible to obtain more than
20 L/min from the Rinnai Infinity 16i. In order to have this much flow the temperature rise
must be low enough that the unit has the capacity to satisfy the temperature setpoint for this
flow rate. For higher temperature rises the flow rate will be lower, regardless of the incoming
pressure.
The water heater has a water flow regulator that will throttle the flow rate back to make sure
that the unit only supplies water at the required temperature. If demand exceeds the
capacity of the unit, the unit will limit the water flow so the temperature does not alter.
The water heater’s heat exchanger has a much higher pressure drop at high flow rates then
at low flow rates. For low pressure installations use higher temperature set points.
In order to achieve maximum flow rate 1.5 bar pressure is required. The unit will operate on
lower pressures. It is advisable to have at least 1.1 bar pressure.
25
)
20
L/min
(
15
VOLUME
10
5
WATER
0
012345678
WATER PRESSURE(bar
)
16
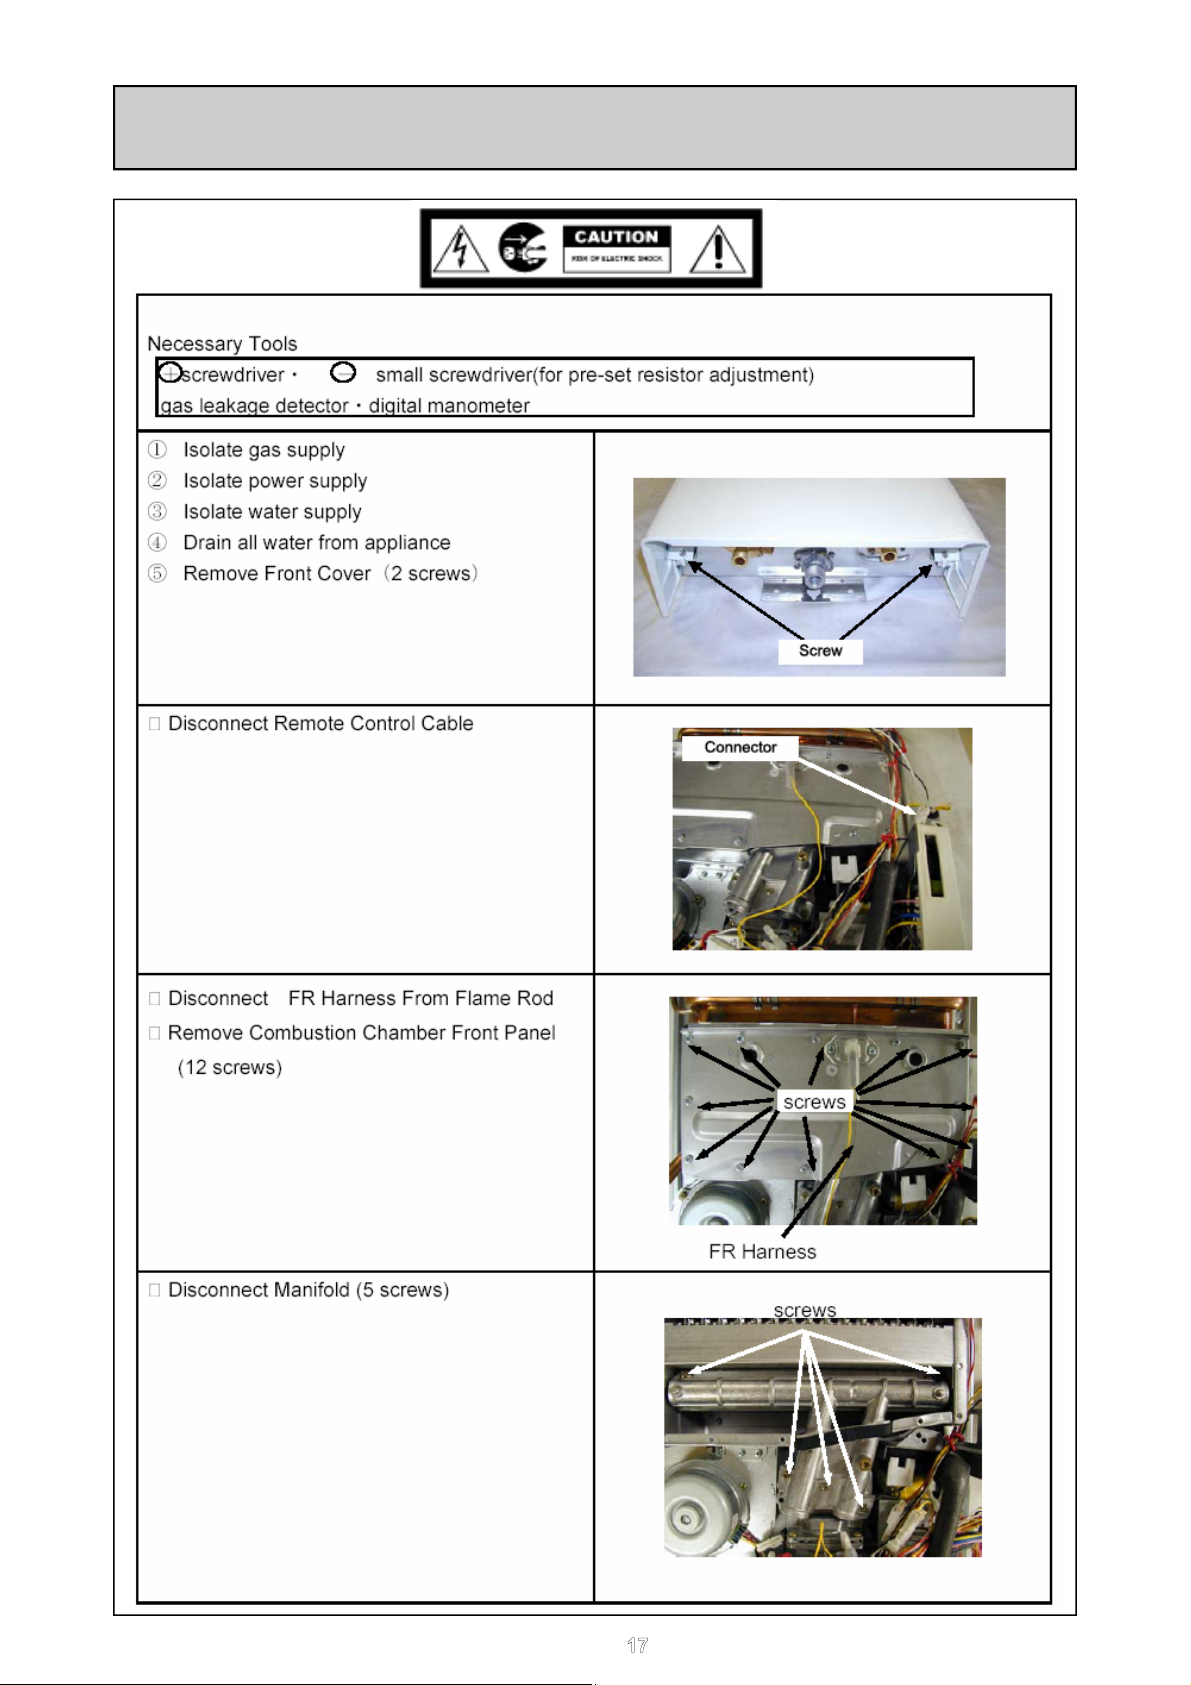
Gas Conversion Procedure
17
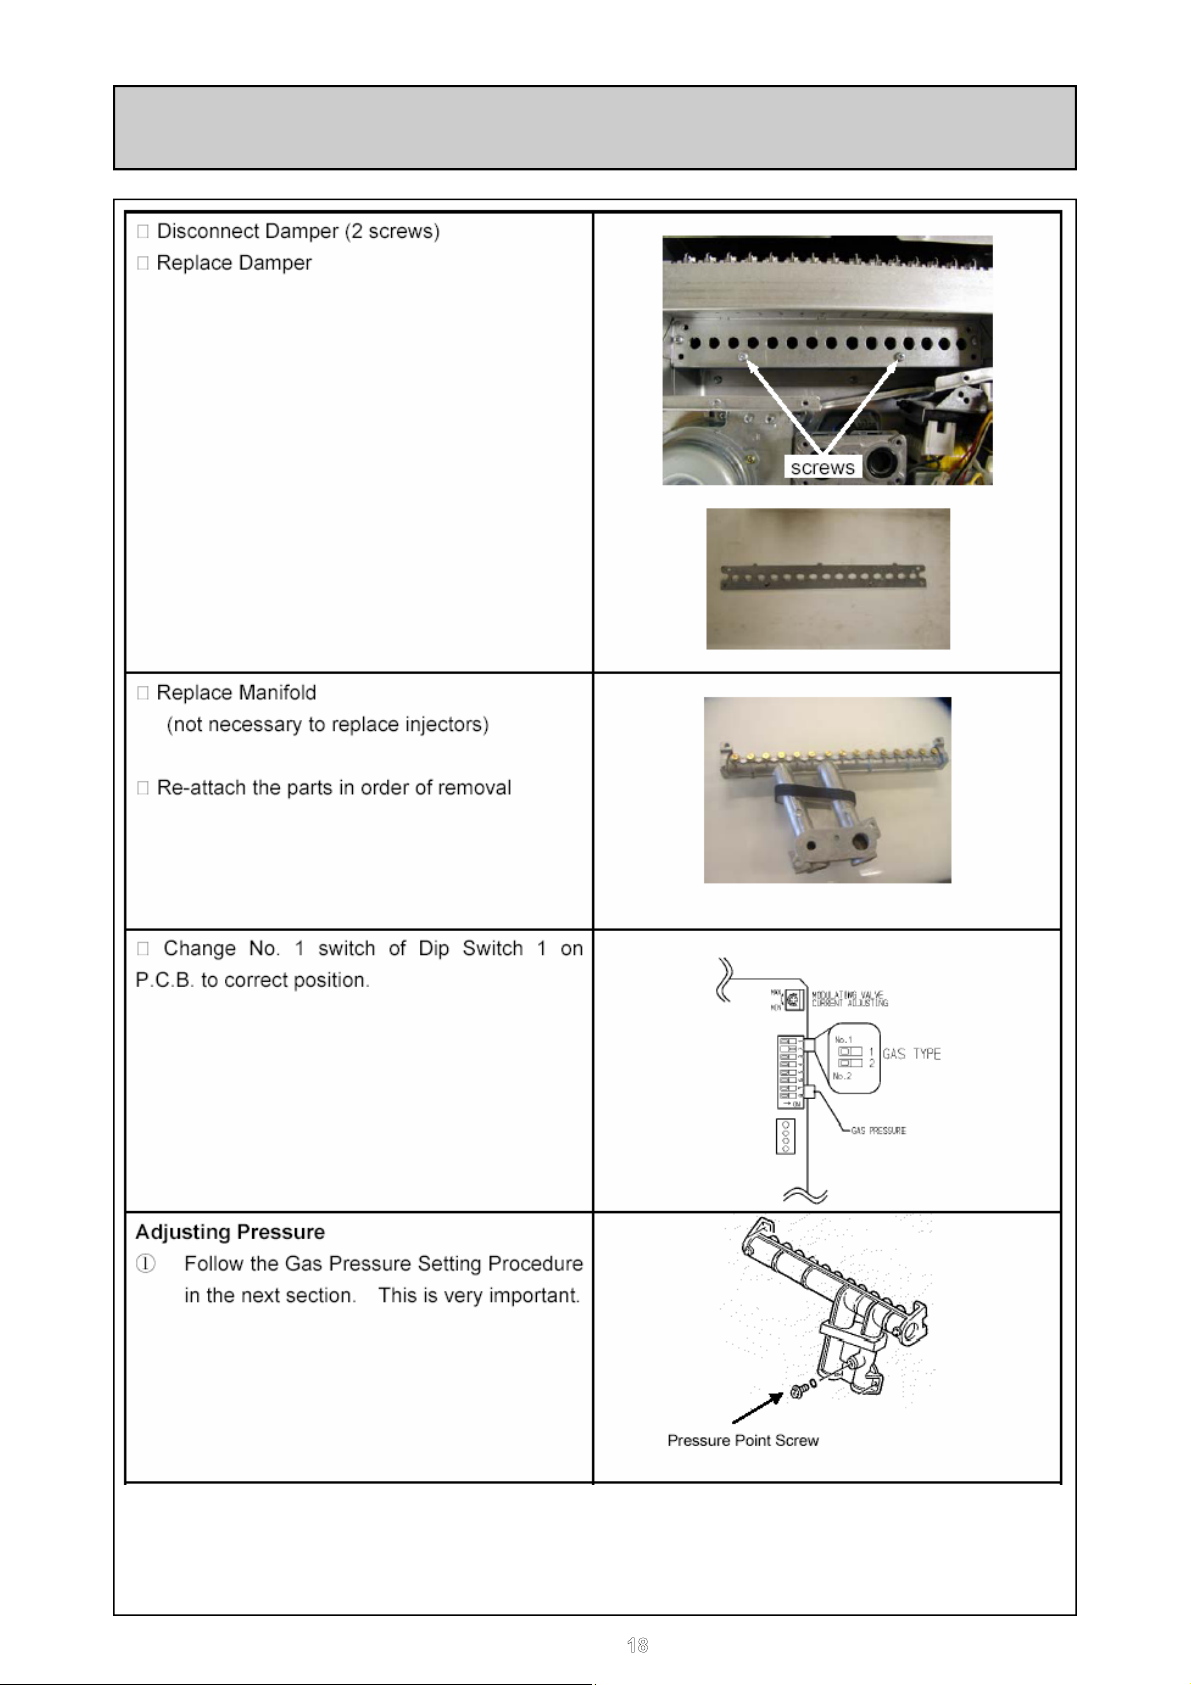
Gas Conversion Procedure
18
Testing
1. Purge gas, hot water and cold water supply lines before making the final connection
of the water heater. Swarf in either the gas or water supplies may cause damage.
2. Turn on gas and cold water supplies.
3. Test for water leaks and gas escapes near the unit.
4. Isolate gas and electric supply. Remove test point screw located on the inlet gas
pipework below the heater and attach pressure gauge.
5. Turn the power on at the switch and turn on gas. Warning: There are 230V AC live
supplies inside the heater.
6. If remote controllers are fitted, turn the controller on, select the maximum delivery
temperature and open ALL available hot water outlets. If remote controllers are not
fitted, simply open all available hot water outlets. (CAUTION: Ensure building
occupants do not have access to hot water outlets during this procedure).
7. The gas pressure check must be carried out with all other appliances on the same
main operating at maximum capacity to ensure that there is sufficient gas pressure.
8. With all appliances on the same main operating at high fire check the pressure at the
test point on the inlet to the gas valve. The pressure must be within the local defined
limits for the type of gas that is being used. If the pressure is lower, the gas supply is
inadequate and the water heater will not operate to specification. Check gas meter,
regulator and pipework for correct operation/sizing and rectify as required. Note that
the gas regulator on the appliance is electronically controlled and factory pre-set.
Under normal circumstances it does not need adjustment during installation.
UK the gas pressure must be at least 20 mbar for G20 Natural Gas as used in
UK. For G31 Propane as used in the UK the pressure must be at least 34.5
mbar.
9. Close hot water outlets.
10.Inspect and clean the strainer and the filter located on the cold water inlet pipe. This
procedure may need to be repeated to ensure the strainer remains clear.
11.If temperature controllers are fitted, it is necessary to test their operation through the
complete range of functions.
12.Confirm the hot water delivery temperature using a thermometer. If controllers are
fitted, compare the measured value to the set point.
13.After testing is completed, explain to the user the functions and operation of the
water heater and temperature controllers.
19
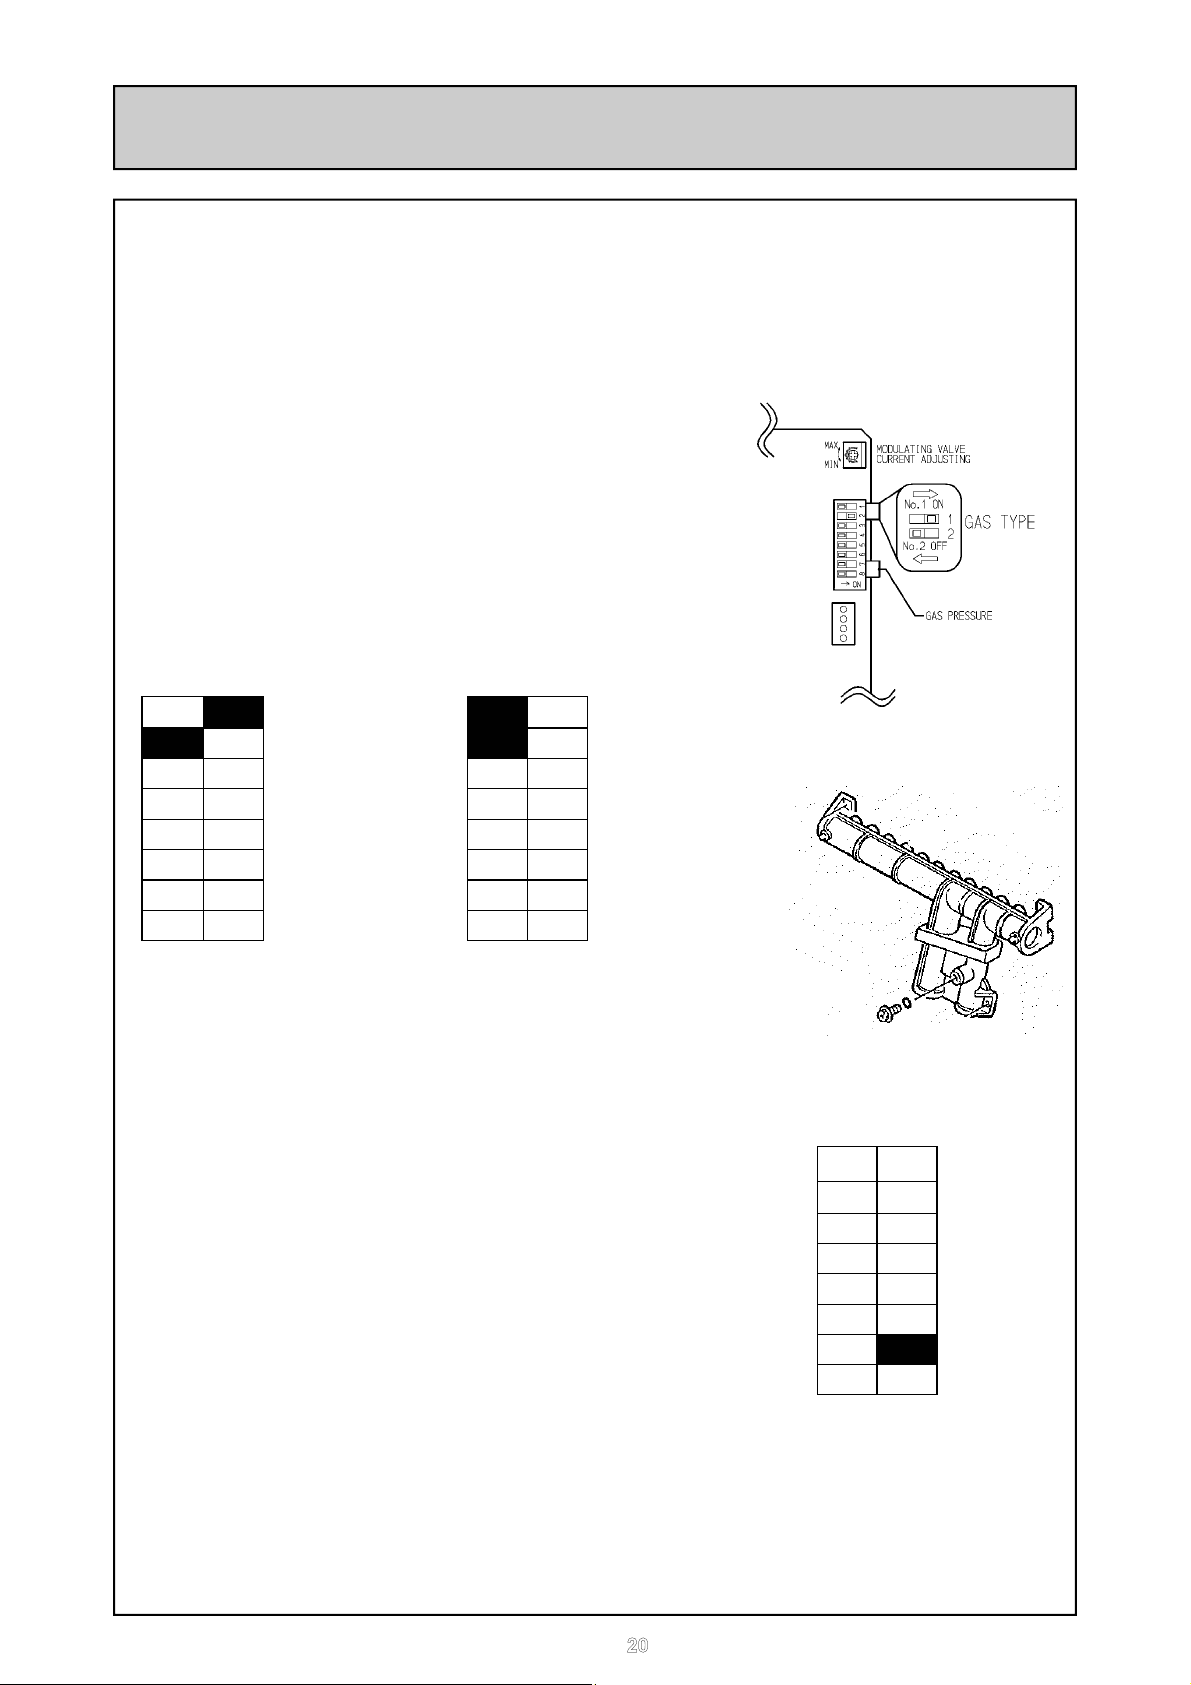
Gas Pressure Setting
The working gas pressure on the water heater is electronically controlled and factory set.
Under normal circumstances it does not require adjustment during installation. Perform
this procedure only if the unit is not operating correctly and all other possible causes for
incorrect operation have been eliminated.
to alter the gas pressure. Failure to do so could void the warranty.
1. Turn 'OFF' the gas supply.
2. Turn 'OFF' 230V power supply.
3. Remove the front cover from the appliance.
4. Check gas type dip switches no.1 and no. 2
are in the correct position for the type of gas
(Nat. or LPG)* you are using. See Fig. 1
Contact Rinnai before attempting
off on
On is in the right hand position, Off is in the
left hand position.
5. Attach pressure gauge to burner test point. (Fig. 2)
6. Turn 'ON' the gas supply.
7. Turn 'ON' 230V power supply.
8. If remote controllers are fitted, turn the unit 'ON' at the
controller and select a maximum delivery temperature.
9. Open a hot water tap fully. (CAUTION: Ensure
building occupants do not have access to hot water
outlets during this procedure.) Wait for the unit to
light.
10.Set the Rinnai Infinity to 'Forced Low' combustion by
setting No. 7 dipswitch to 'ON'. (Fig. 3)
SW
1 -Nat. Gas
2 -Nat. Gas
3
4
5
6
7
8
off on
SW
1 -LPG
2 -LPG
3
4
5
6
7
8
off on
Fig. 3
Fig. 1
Fig. 2
SW
1
2
3
4
5
6
7
8
* Note:
Simply changing the position of the dip switches will not convert the unit from
one gas type to the other. The conversion procedure requires a change of
injector manifold. Contact Rinnai or your supplier.
20
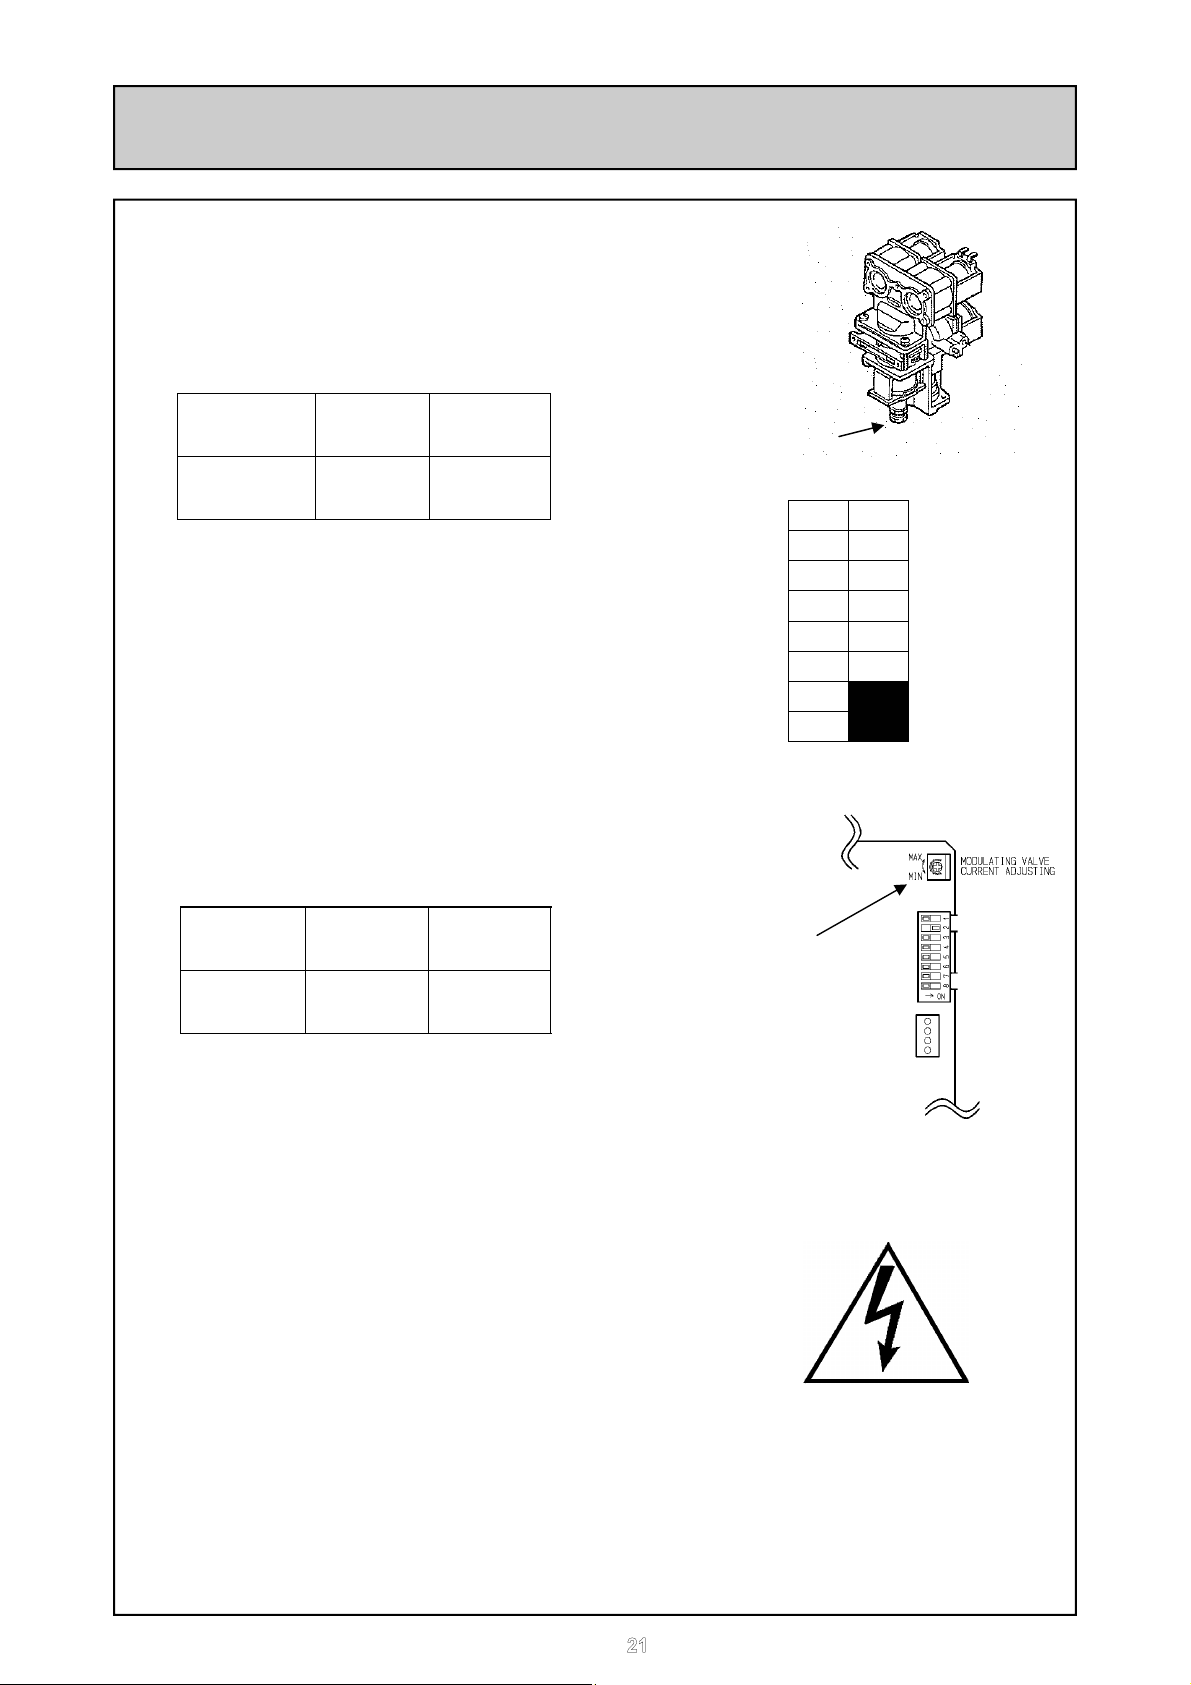
Gas Pressure Setting
11.Check the burner test point operating pressure.
12. Remove rubber access plug and adjust the regulator
screw on the modulating valve (Fig. 4) as required to the
pressure below. Replace rubber access plug.
N.G 1.8 mbar
G20
G25
1.8 mbar
Adjustment Point
Fig. 4
LPG 2.2 mbar
G30
G31
2.2 mbar
13. Set the Rinnai Infinity to 'Forced High'
combustion by setting no. 7 and no. 8
dipswitches to 'ON'. (Fig.5) Ensure maximum
water flow.
14. Check the burner test point pressure.
15. Adjust the high pressure potentiometer on
the Printed Circuit Board above SW1 (Fig. 6)
to the pressure shown below. The potentiometer is very sensitive, turn no more than a few
degrees at a time; then let the pressure settle
down before turning it more.
N.G 9.0 mbar
LPG 14.2 mbar
G20
G25
G30
G31
9.0 mbar
14.2 mbar
16. IMPORTANT: Set dip switch no. 7 and no. 8
to 'OFF' to return the appliance to 'Normal'
combustion.
17. Close hot water tap.
18. Turn OFF the gas supply and 230V power
supply.
19. Remove pressure gauge, and replace sealing
screw.
20. Turn 'ON' the gas supply and 230V power
supply.
21. Operate unit and check for gas leaks at test
point.
22. Replace the front cover of the appliance.
off on
High Press.
Potentiometer
CAUTION
SW
1
2
3
4
5
6
7
8
Fig. 5
Fig. 6
21

Dip Switch Setting
Dip Switch Positions Explained
OFF ON
Dip Switches Explained
GAS TYPE
LPG
OFF ON
SW
1 - Gas Type LEGEND:
2 - Gas Type
3 - Computer Programming
4 - Computer Programming
5 - Computer Programming
6 - Max. Temperature
7 - Combustion
8 - Combustion
NAT GAS
OFF ON
SW
1 off
2 off
COMPUTER PROGRAMMING
OFF ON
MAXIMUM TEMPERATURE
SW
1 Computer programming
2 Switches (3-5) must be left
3 in the factory set position
4 for the Infinity 16i.
5
6
7
8
Black Section indicates
position of dip switch.
OFF ON
OFF
COMBUSTION
SW
1 on
2 off
NORMAL
OFF ON
FORCED LOW
OFF ON
SW
7 off
8 off
SW
7 on
8 off
FORCED HIGH
OFF ON
SW
7 on
8 on
OFF ON
ON
OFF ON
4 Maximum Temperature = 600C
4 Maximum Temperature = 750C
22

Troubleshooting the Infinity 16i
Rinnai water heaters have the ability to check their own operation continuously. If a fault
occurs, an error code will flash on the Digital Display if you have temperature controllers
installed. This assists with diagnosing the fault.
* In all cases, you may be able to clear the Error code by turning the hot water tap OFF,
then ON again. If this does not clear the error, try pushing the On/Off button OFF then
ON again. If the Error Code still remains contact Rinnai or your nearest service agent for
advice.
** Faults caused by insufficient gas/water supply or gas/water quality and installation
errors are not covered by the manufacturer’s warranty.
Following a power cut the heaters should be restarted in this manner.
Standard system.
Single or multiple water heaters without remote controllers.
The heaters will automatically reset without any user involvement.
Single or multiple water heaters with remote controllers.
The heaters will be required to be switched on using the ON/OFF button on a remote
controller. Ensure that all taps/water outlets are closed and no water is flowing through
heaters.
Hot water system incorporating secondary recirculation pump.
Single or multiple water heaters without remote controllers.
The heater(s) will automatically reset without any user involvement.
Single or multiple water heater(s) with remote controller(s).
To reset the heaters follow the steps.
1. Turn off all hot water taps.
2. Turn off supply to secondary circulating pump or alternatively, if heater and pump
are fed from the same electrical supply, isolate pump flow.
3. Turn on heater at remote control.
4. Select required temperature.
5. Switch on supply to secondary circulating pump or open valve on pump flow.
The heater will now be ready to supply water at the set temperature.
If following the above procedure does not reset the heater switch it on and off at its main
supply, and then go through these steps again.
23

Remotes
Remote temperature controllers are a feature that provides control over the water
temperature. The Rinnai Infinity 16i water heater can be operated with 1, 2, or 3
temperature controllers. The controller MC-45-SR-EU comes as standard with this
water heater installed into the front panel.
Digital Monitor
Indicates the tem-
perature selected.
Error message
flashes in the event
of a fault.
Priority Indicator
Indicates that the
controller has com-
mand of the system
(glowing,) or that the
system is free to take
command of (off.)
Priority Button
Used to transfer con-
trol between tem-
perature controllers.
The controller with
priority has command
of the hot water de-
livery temperature.
Temperature
Buttons
Used to select hot
water delivery
temperature.
ON / OFF Button
Used to switch hot
water system on
and off.
Along with temperature control the controllers are useful for servicing and fault finding as
they will show an error code if there is a problem. This will be a flashing number on the
display.
Further to this the flow rate through the unit can be displayed by holding down the Temp
UP Arrow Button and pressing the Power Button. The flow will be displayed in L/min.
Therefore 4 = 4 L/min and 12 = 12 L/min.
The Remote will also display the outgoing hot water thermistor read temperature by
holding down the Temp Down Arrow Button and pressing the Power Button. The
temperature is shown in degrees Centigrade.
24

Operational Flow Chart
25

Time Charts
26

Error Codes
Error Fault Action Step
Combustion fan overcurrent. Unit
10
operates, then stops.
Check Gas Supply is correct S
11
Missed or No Ignition. Unit stops
without flame igniting
Check Gas Supply is correct S
12 Flame Failure / Earth Leakage
Lost Ignition
Thermal Fuse and/or overheat
14
switch activated, unit operates,
then stops
Over temp warning. Unit operates,
16
then stops.
32 Outlet water thermistor faulty Check hot water outlet thermistor K
34 Combustion air thermistor faulty Check Combustion Air Thermistor. K
61 Combustion Fan rotation error Check combustion fan. A
71
Solenoid valve circuit error. Unit
does not operate
72
Flame Rod Circuit Error. Unit
does not operate
No combustion despite remote
control indicating that combustion
is occurring - if remote controllers
are installed
Check flue terminal for blockages visual
Check Flue V
Check combustion fan. A
Check Gas Isolating Valves are open visual
Check Electrode B
Check Flame Rod C
Check Sparker B
Check Solenoids D
Check Gas Filter F
Check Earth Wire H
Check Flue V
Check gas pressure manual
Check injector manifold is correct for gas type manual
Check Gas Type Dip Switches for Nat. Gas or LPG. manual
Check Gas Isolating Valves are open visual
Check Flame Rod C
Check Earth Wire H
Check Flue V
Check Gas Filter F
Check Gas Type Dip Switches for Nat. Gas or LPG. manual
Check gas pressure manual
Check Remote control I
Check Overheat Circuit E
incl. Thermal Fuse (thermal overload wire) E
incl. Overheat switch (black tophat style bi-metal) E
Check Gas Type Dip Switches for Nat. Gas or LPG. manual
Check gas pressure manual
Check combustion dip switch manual
Check Gas Type Dip Switches for Nat. Gas or LPG. manual
Check modulating solenoid valve D
Check gas pressure manual
Check combustion dip switch manual
Check water flow sensor J
Check water flow servo G
Check Heat Ex outlet temperature thermistor K
Check hot water outlet thermistor K
Check Gas Valves are open visual
Check Solenoids D
Check Flame Rod C
Check water flow sensor J
Check Flame Rod C
Check hot water outlet thermistor K
Check combustion fan. A
Check Sparker B
Check Gas Valves are open visual
Check Overheat Circuit E
27

Error Codes
Error Fault Action Step
Make sure that if there is a controller, it is on visual
Ensure there is enough water flow R
Check Filter Q
Check for Air lock M
Check power cord is plugged in (if applicable) visual
Appliance does not operate at all.
No error code on display (if there
is a controller), Acts as though
there is no water going through
the unit and/or it seems electrically dead.
Combustion stops during opera-
tion.
Cannot adjust the hot water tem-
-
perature via the controllers - only
if controllers are installed.
Anti - Frost Heater does not oper-
ate.
Upon commissioning the gas
-
pressure will not achieve correct
high pressure
Unit makes a loud noise while
operating
- fluctuating temperatures.
Check electrical supply is turned on visual
Check Non Return Valves and Mixers in System L
Check Gas Isolating Valves are open visual
Check for short circuits visual
Check Remote control I
Check Power supply voltage N
Check electrical fuses O
Check Sparker B
Check Earth Wire H
Check water flow sensor J
Check transformer P
Reset unit if there was a power cut
Check Filter Q
Check Remote control I
Make sure that if there is a controller, it is on visual
Check Gas Supply is okay S
Check Flame Rod C
Check Flue V
Check Earth Wire H
Check Power supply voltage N
Check hot water outlet thermistor K
Check Heat Ex outlet temperature thermistor K
Check Gas Valves are open visual
Check water flow servo G
Check Non Return Valves and Mixers in System L
check bypass servo G
Check Solenoids D
Check anti frost heater components T
Check frost sensing switch U
Check Gas Supply is correct S
Check Gas Filter F
Check flue terminal for blockages visual
Check Flue V
Check Combusion Fan A
Check Flue V
Check water flow servo and bypass servo G
Check Non Return Valves and Mixers in System L
Check Hot water outlet thermistor K
Ensure there is enough water flow R
Check Solenoids D
Check water flow servo G
Check Filter Q
Check Gas Supply is correct S
28

Diagnostic Checks
A. Combustion Fan Circuit.
The voltages should be checked while the unit has the electric power On. The meter
leads can be inserted into the connection plug at the pcb (Plub B from wiring diagram.)
To test the resistances electrically isolate the water heater, unplug the connector either
at fan motor (B1) or at pcb (B), and measure the resistances through the motor.
Red – Black 6 – 40 Vdc -- fan must be on do not check Resistance
White – Black 2 – 10 Vdc -- fan must be on appx 8.2 kOhms
Yellow – Black 11 – 13 Vdc -- standby or run appx 2.5 kOhms
If Black – Red (Drive Power) voltage incorrect (while the fan should be running) replace
pcb.
If Yellow – Black (Control Power / Speed) voltage is incorrect replace the pcb
If Yellow – Black resistance is incorrect replace the fan motor
If White – Black (Fan proving) voltage or resistance is incorrect replace the fan motor.
If the water heater is very loud and shaking the combustion fan may not be installed
properly. Make sure it is in properly.
To remove the combustion fan assembly first remove the hot water outlet pipe
connection, pull out the pipe and bend it out of the way. Then remove the 4 screws from
the air outlet duct (2 in front, one each side) and take the fan out the left side of the
heater.
B. Ignition System.
The best check for the ignition electrode and sparker is to listen to the unit for the ticking
sound as it sparks. If it is ticking the sparker sub pcb is working. Remove the electrode
and visually inspect for damage. Be sure to check the burner where the electrode should
spark to. The spark will travel to the cleanest place so if the burner is rusty the spark
could travel back to the plate. Give the burner a good clean with wire wool or something
abrasive.
Check the thick black HT lead from the sparker box to the electrode. Be sure that
connections on both ends are tight and the lead has not been damaged. Measure the
resistance through the wire if it looks as though it may be damaged. The resistance
should be very low.
Sparker box / sub pcb
Test to make sure that the sparker is getting a signal from the pcb through the two grey
leads from the sparker to the pcb. The voltage can be measured at the terminals at the
sparker by loosening the connector plug and putting multimeter leads on the terminal
connectors. Put the meter leads on the terminals, power the heater, then turn on the
water. It will only give a quick voltage reading.
Grey – Grey 240 Vac.
If this is not correct replace the pcb.
29

Diagnostic Checks
If it is correct unplug the HT lead and hold it about 3 – 5 mm from a clean, earthed,
screw head. WARNING: ISOLATE THE GAS SUPPLY. KEEP HANDS WELL AWAY
FROM THE END OF THE LEAD – VERY HIGH VOLTAGES. Power the heater and
turn the water on. A spark should jump from the lead to the earthed screw.
If this does not happen replace the sparker box – after you have confirmed voltage
between the grey wires onto the sparker box.
If this does happen, but the electrode will not spark when the HT lead is connected then
visually inspect the electrode, clean it, set the gap, or replace it as described in the first
paragraph under B.
C. Flame Rod.
If the flame rod circuit is faulty the error code will be either 11 or 72.
If 72 is the error disconnect flame rod and cycle unit. If it is 72 again then refer to section
on hot water temperature thermistor. If 72 is not displayed, check for electrical current
leaks, and continue with this section.
First check to make sure all connections are tight. If not, tighten them and adjust the
flame rod.
The next check to be carried out is continuity between the terminal of the flame rod and
various points at the sensor end. Check this while holding the ceramic insulator. As the
flame rod is metal the continuity should be very good throughout the whole length. If the
continuity is not strong then clean the flame rod with steel wool or emery cloth until there
is continuity through the whole length of the flame rod.
With the unit in standby measure the voltage (AC) between the flame rod connection
spade (that is the yellow wire spade connector) to earth. This can be done with the unit
in standby (electric ON) or with the unit on and burning. If it is burning this test will cause
the unit to lockout so the reading will only be brief.
FR – Earth 55 – 150 Vac (running) appx 85 Vac (standby)
If there is no voltage, replace PCB
The next check is the current between the flame rod yellow wire and a clean, earthed
screw with the unit in standby. Current should be at least 1 micro (µ)Amp AC. If it is
less than this replace the pcb.
Next check the current between the flame rod and the pcb. This is measured by placing
the meter in line between the flame rod and the pcb. Unplug the connector at the flame
rod and put one meter lead on the spade, and one in the spade connector.
Current should be at least 1 micro (µ)Amp DC
If current is less than this the flame rod is faulty or needs cleaning.
30

Diagnostic Checks
D. Solenoid Valves.
There are 3 solenoid valves and one modulating valve. Two of the solenoids are burner
sectional solenoids, and the third is the main, safety solenoid.
The easiest way to check the gas valve is by putting the manometer on the test point on
the gas valve and cycling the unit. If the solenoids are working correctly the burner
pressure when it lights should be around 8mbar. If the pressure stays at 0 mbar (or
goes up slightly, to about 1 mbar) the safety solenoid is not opening; this is only a true
test if the sparker is definitely sparking. If the pressure goes up to 21 mbar the sectional
solenoid is not opening. Once the suspect solenoid valve has been determined you can
determine the faulty component (solenoid valve or pcb.)
The solenoids should be tested for voltage and resistance at pcb connector F from the
wiring diagram. The resistance is measured with the unit electrically isolated and the
connector unplugged. Put the meter leads on the connections and measure through the
solenoid. The voltage is tested while the unit is running and the connections are made.
While the unit is lit put the leads into the plug and measure the voltage (DC.) Only the
Main SV and SV1 will open upon ignition. SV2 will not have voltage unless the unit is on
medium to high fire.
Main SV Pink – Black 200 – 240 Vdc appx 6.5 k Ohms
SV1 Black – Blue 200 – 240 Vdc appx 8.0 k Ohms
SV2 Black – Yellow 200 – 240 Vdc appx 8.0 k Ohms
Modu SV Pink – Pink 2 – 15 Vdc 67 – 83 Ohms
If the voltage is incorrect replace the pcb.
If the resistance is incorrect replace the solenoid valve. It should be noted that
sometimes solenoids jam and are faulty even though the resistance is correct. If there is
voltage to it, and there is no gas getting past it, then it is a faulty solenoid, assuming you
have confirmed the incoming pressure. (High gas pressure will prevent a solenoid from
opening, for example, if a second stage LPG regulator has not been used.)
The voltage should be present after the spark ignitor has begun to tick. If the unit does
not begin to do anything check the Thermal Fuse Circuit (E.)
If the resistances and voltages are correct continue.
Check the secondary gas pressure change when the set temperature is changed from
55 to 37°C.
The secondary pressure should change. If it does, go to the water flow servo circuit (G.)
If the pressure does not change replace the modulating valve.
31

Diagnostic Checks
E. Thermal Fuse (Overheat) Circuit.
First locate the Overheat circuit. It is made up of red wires making a loop through the
unit, including a number of thermal fuses, and the overheat bi-metal switch. Along the
right-hand side of the unit the red wires can be seen running down the side of the unit
from the bi metal switch. One of these red wires has a connector approximately in front
of the transformer (Connector A5 from wiring diagram.)
With the unit electrically isolated unplug this connection A5. Unplug connector C from
the PCB. Put multimeter lead into the red wire from connector C and the other lead into
the half of Connector A5 that is attached to the bimetal switch. Measure the resistance
through this overheat circuit.
Resistance should be less than 1 Ohm.
If the resistance is greater than 1 Ohm test each individual sensor to find which one is
faulty and replace it AFTER checking the heater for damage. Check that the gas type
and combustion dip switch settings are correct. Confirm gas pressure when the unit is
operating again.
F. Gas Filter.
There is an inline gas filter in the inlet pipework connection. If the gas pressure will not
achieve the correct level, and the inlet pressure is correct (20mbar) then drop the gas
connection out to see whether there is a blockage in the filter.
32

Diagnostic Checks
G. Water Flow Servo Circuit.
If the heater makes a loud ticking unplug the flow servo (motor behind the internal brass
cold water inlet connection) and run the unit to see if it stops. If so the motor is faulty.
Water Flow Servo Circuit.
From the water flow servo circuit there are 6 wires. They connect to the pcb at
connector A (from the wiring diagram.) Remove the plastic terminal cover so that you
can insert the multimeter leads.
First electrically isolate the unit, disconnect the 6 wire plug at pcb connection A and
measure the resistance between red and blue across the motor (not the pcb)
Resistance should be 10 – 30 Ohms.
If the resistance is incorrect replace the water flow servo and water flow sensor.
If the resistance is correct then power the unit (with the connector (A) plugged in) and
measure the voltage from the pcb by putting the meter leads into the other plug. Do this
with the unit in standby mode (no flow.)
Red – Black 11 – 13 Vdc (control voltage) Incorrect replace the pcb.
Yellow – Black 4 – 6 Vdc Incorrect replace flow servo motor
Brown – Black 4 – 6 Vdc Incorrect replace flow servo motor
Red – Blue 11 – 13 Vdc Voltage only present when servo is (should be) moving
To remove the flow servo first unclip the cold water pipe in the unit (two screws) and pull
out the copper pipe connection. Bend this out of the way gently. Then remove four
screws from underneath. Now remove the flow servo full assembly.
H. Earth Lead.
Check to make sure that all earth leads are connected and there are no breaks or short
circuits. Checks should be made at the earth lead, pcb, power cord, and surge
protector. If there is a loose connection the Ignition electrode and flame rod will not work
because they need to flash to earth. Tighten any loose connections.
I. Remote control.
Check the voltage at the connector on the right hand side of the unit, above the pcb,
where the controller plugs in. Do this with the power on, but no water flowing.
normal voltage: 11 – 13 Vdc.
If this is correct check the remote wire for damage or shorts. If this is all right disconnect
the remote and turn on the water. If the unit operates correctly replace the remote
control.
If the voltage is incorrect check the water flow sensor (J) before replacing the pcb. If the
water flow servo circuit is working correctly replace the pcb.
33

Diagnostic Checks
J. Water Flow Sensor.
The water flow sensor is located inside the water heater immediately as the cold water
enters the unit. From that there are 3 wires (red, yellow, black) running to the pcb, there
is a connector plug in between the sensor and the pcb for testing. Measure the voltage
with the water heater power on and no flow. Following this measure the voltage
between Yellow and Black with water flow on. If there is a remote attached make sure it
was turned on before the water began running through the unit.
Black – Red 11 – 13 Vdc at all times
Yellow – Black appx 8.5 Vdc water off 4 – 7 Vdc water on
*note: This Yellow-Black voltage is not variable with flow rate.
If Black – Red is incorrect replace pcb
If Yellow – Black is incorrect the water flow sensor may be faulty. Before you replace the
water flow sensor be sure you have checked the filter (R) and for air locks (M).
If the voltage is incorrect and you believe the sensor may be faulty remove the water
valve and blow through the rotation turbine to make sure it is free to spin – DO THIS
WITH THE GAS ISOLATED. You will be able to hear/see it spinning when you blow
through it. If it is spinning but the unit does not start the sensor is faulty. If it is not
spinning it may need freeing up. If its spins and the unit starts then there is a water flow
problem – no water is flowing through the unit. Check that the unit is not piped up with
cold flow into the hot outlet.
K. Thermistors.
Check all thermistors by unplugging thermistor lead and inserting meter ends into both
sides of thermistor plug and measuring resistance on the 20 k Ohms scale. Apply heat
to the thermistor bulb and watch the resistance decrease. Apply ice (or cold water) to
the thermistor bulb and ensure the resistance increases.
Thermistor values should read about:
15°C : 11.4 – 14 k Ohm
30°C : 6.4 – 7.8 k Ohm
45°C : 3.6 – 4.5 k Ohm
60°C : 2.2 – 2.7 k Ohm
If there is a break in the circuit the resistance reading will be over 1 M Ohm.
If there is a short circuit in the wire the reading will be less than 1 Ohm
If either of these occur the thermistor should be replaced.
Sometimes water thermistors become coated with scale. If the values obtained are
unexpected, or the outlet temperature is fluctuating remove the thermistor and check it
for scale. Look into the heat exchanger tube to check for a ‘scale pocket’ inside. Beware
when replacing the thermistor, there is an o-ring which usually sticks inside the pocket.
Remove it and put it on the thermistor before replacing.
34

Diagnostic Checks
Hot Water Outgoing Thermistor
This thermistor is located at the bottom left of the water heater where the water exits the
water heater.
Combustion Air Thermistor
This thermistor is located next to the controller connection point on the right hand side of
the unit above the pcb. It is at the end of the two yellow leads.
L. Check Non Return Valves and Mixers in System
Non Return valves and mixing valves occasionally have a tendency to pass cold water,
especially if there is a mismatch of pressures. The easiest way to check for this is to
isolate the valves on the water heater and turn on all the hot taps, one at a time. If there
is a flow of water (besides the initial flow which is the pipework draining down) then there
is a mixer valve or non return valve in the system passing.
There is another way to check non mixers and non return valves, especially in situations
where the temperature varies or is only warm. Isolate the hot water outlet somewhere
between the water heater and the first draw off. If there is a circulating loop (secondary
return) isolate this as well. Now if you open the pressure relief valve of the water heater
or a drain off point somewhere between the hot water outlet and the valve that has been
isolated the only water that will travel through the water heater will be mains water at
fairly constant temperature. Measure the outlet temperature at this drain off point. If the
temperature is constant, and correct for the setpoint, then the water heater is working as
it should and you need to find the mixing valve or non return valve that is faulty.
It is important to make sure that the secondary return has a non return valve installed
after the pump.
M. Air Locks in the Heat Exchanger.
Upon commissioning or cleaning the filters, if the water heater is the highest point of the
system the heat exchanger may experience an air lock.
To clear it, isolate the hot water outlet and open the pressure relief. The incoming mains
should push the air lock out and the unit will fire.
To avoid air locks when cleaning the filter follow the filter replacement steps under
section R.
N. Check Power Supply to the unit.
To make sure there is power to the unit make sure all the electrical isolators are On and
the fuses are okay. With your meter check for 240Vac on the connection plug I of the
pcb. Do this with the connector plugged in, and the unit in standby mode (power on,
water off.) Stick the meter leads in the blue and brown plug.
If there is no power at this point you must find where the connection has been lost up to
the unit.
35

Diagnostic Checks
O. 3 Amp Fuses
The unit has two 3 Amp fuses on the pcb and one in the moulded plug lead. Remove
the fuses and check for continuity through. If there is continuity the fuse is good, if not
replace it.
P. Transformer.
There is one transformer on the 16i located in the back above the cold water connection
with the flow sensor and servo. To access it remove the top and bottom screw holding in
the pcb and pull the pcb out. Let it hang from its wires, but be careful not to damage it or
pull on it.
Test the transformer in standby mode (unit on, water off.)
First check the voltage from the pcb. The white wires from the pcb connection H go
directly to the transformer, so if there is power from the pcb there is power to the
transformer (check for loose connections.) From the transformer come five wires. These
run back to the pcb connection D. Check the voltage from the transformer at this pcb
connection. With your meter check Voltage AC by putting your leads in to the connector
(while connected.)
White – White 200 – 240 Vac. If incorrect confirm power to pcb, then replace pcb.
11 -20 Ohms. If incorrect replace transformer.
Conn D
Brown – Blue 12 – 14 Vac (0.7 – 1.3 Ohms)
Yellow – Blue 200 – 240 Vac
Orange – Orange 50 – 60 Vac
If any of these are incorrect replace the transformer – assuming the White – White
voltage is correct.
Q. Filter.
Below the water heater, on the cold water connection is a brown or black plug. Isolate
the water supply, open the pressure relief valve on the heater, and remove this brown
plug. It holds a small, 30 micron, basket strainer. The strainer becomes clogged easily,
especially after installation. When it is clogged sometimes water will travel through the
unit without triggering the flow sensor. Make sure you check any external Y-strainers as
well.
When finished cleaning the filter replace it and screw it in finger tight. Next open the cold
water valve slowly (do not close pressure relief valve before this.) There will be a bit of
water blown out of the pressure relief valve and then the air will be pushed through.
Once the air stops and water comes out of the valve tighten it up. Now open the hot
water valve and cold water valve fully. This will prevent air locks.
36

Diagnostic Checks
R. Water flow.
To operate there must be at least 2.4 l/min flowing through a Rinnai water heater. If
there is multiple heaters, installed without PAM valves or a MECS system then there
must be 2.4 l/min per heater. A modern wash hand basin could be as low as 3 or 4 l/
min, so if there is no means of staging the heaters they may not operate. Isolate all the
units except one to find out.
This problem could also crop up with a pumped secondary. Make sure the combination
of the pump capacity, and the staging of the units is compatible.
This problem often occurs when a non return valve in a mixing valves sticks in the open
position. Although the water flow at the taps will be good most of the water will be cold
water crossing over and shooting up the hot pipe.
The flow rate from your tap can be determined with a Weir cup, or a deluxe controller.
The deluxe controller manual explains the diagnostics function. If you are not getting
enough flow at an outlet, and you used to, check the filter (R.)
With the standard controller hold in the Temp Up button and push the Power button.
This will display the flow rate in litres per minute.
S. Gas Supply.
If the unit suddenly goes off you will need to check the gas supply. This is easy when
operating on natural gas, and is done by checking the inlet pressure. Other things to
check are the meter size, compared to other appliances total offtakes. If the unit has just
been installed there may be air in the line, be sure it is fully purged.
If the unit is on LPG make sure that you visually examine the tank or bottles to be sure
they are not freezing up. If they are then there is not enough gas. Check the regulators
to be sure they will pass enough gas for the system. Make sure the unit is operating with
a second stage regulator.
For both LPG and natural gas you will need to confirm that the gas pipe size is correct.
You may need to check the gas filter (F.)
T. Check anti frost heater components
The unit has three frost protection heaters mounted on the water pipes to protect them
from freezing. The heaters are white ceramic resistive heaters, and come on around 5°
C. The voltage through the heaters, when active, is 240Vac. The heaters are located as
follows. There is a valve heater in the mains incoming (where the flow sensor is) and
another valve heater in the outgoing hot water valve (next to the hot water thermistor.)
The third one is located on the front of the unit, at the top on the heat exchanger inlet
pipe.
Each heater element can be tested by measuring the resistance through them one at a
time.
The top heater resistance should be 50 – 60 k Ohms
37

Diagnostic Checks
Diagnostic Checks
The rest of the circuit, including the valve heaters should be about 270 Ohms. Measure
it by unconnecting the connector to the top heater and the connector to the hot water
outlet valve heater and measure resistance through the sides of the connectors that lead
to the valve heaters. Through one side there will be no resistance, through the other side
there will be about 270 Ohms.
The entire anti frost heater system is done as a kit, so the easiest check is to see if they
heat up when the sensor is closed. If not, replace the system. There will be 240 Vac
through the heaters if the system is working so take care.
U. Frost Sensing Switch
The frost sensing switch is located at the top left of the heat exchanger. It is a black, top
hat style bi-metal switch. It is a normally open contact so to prove it is working it must be
cooled to about 5°C. At this temperature the resistance in the switch can be tested, it
should be less than 1 Ohm.
V. Check Flue
If there are combustion problems they could be due to the flue. Is the flue too long? The
maximum flue run is 6.5m, less 0.5m per bend, to a maximum of 3 bends. For flue
extensions a condensate trap is required If there is a condensate trap installed, be sure
it is the right way up.
If the flue gases recirculate back into the combustion air the unit will shake like it is going
to come off the wall, and makes a similar noise to the rumble strips on the side of
motorways. This can be due to the terminal being in a sheltered place or a corner, or the
flue not being put together right..
38

Diagnostic Checks
Fault Finding Chart
39

Fault Finding Chart
40

Fault Finding Chart
41

Fault Finding Chart
42

Fault Finding Chart
43

Fault Finding Chart
44

Fault Finding Chart
45

Wiring Diagram
46

Diagnostic Points
Flow
Chart
No.
①
②
③
④
⑤
Component
GEARED
MORTOR
REMOTE CON
TROLS
WATER FLOW
SENSOR
FAN MOTOR B
FLAME ROD C
Measurement point
CN Wire Color
I B-Br
A
R-B
1
E
Bk-W
1
A
R-Bk
2
R-Bk
1
Y-earth
2
Determination (normal figure)
Upper : Voltage
Lower : Resistance, Current
AC200~AC240V
DC11~13V
10~30Ω
R-Bk
DC11~13V
Y-Bk Below DC1V(limiter ON)
Below DC4~6V(limiter OFF)
Br-Bk Below DC1V(limiter ON)
Below DC4~6V(limiter OFF)
DC11~13V
DC11~13V
Y-Bk
DC4~7V(pulse 17~400Hz)
DC6~40V (fan on)
Y-Bk
W-Bk
DC11~13V (standby or on)
DC2~10V(pulse 20~400Hz)
More than DC1μA
Remark
AC power
Drive power
Control power
Full open limiter
Full close limiter
ON2.4L/min
(35Hz) over 2100
pulse/min.
OFF1.7L/min
(24Hz) below 1440
pulse/min
More than 1200
pulse/min
fan on
At ignition
⑥
HOT WATER
THERMISTOR
A
W-W
4
15 ℃…11.4~14.0kΩ
30 ℃… 6.4~ 7.8kΩ
45 ℃… 3.6~ 4.5kΩ
60 ℃… 2.2~ 2.7kΩ
105℃… 0.6~ 0.8kΩ
⑦
AIR INTAKE
THERMISTOR
A
Y/Bk-Y
3
15 ℃…20.1~17.9kΩ
30 ℃…10.2~ 8.9kΩ
45 ℃… 5.5~ 4.7kΩ
60 ℃… 3.1~ 2.6kΩ
105℃… 0.7~ 0.5kΩ
⑧
THERMAL
FUSE
⑨
⑩
IGNITOR G
MAIN SOLENOID VALVE
⑪
SOLENOID
VALVE 1
⑫
SOLENOID
VALVE 2
⑬
MODULATING
VALVE
TRANSFORMER VOLTAGES AND RESISTANCES
C
R-switch
3
A
5
Gy-Gy
1
F
P-Bk
1
F
B-Bk
2
F
Y-Bk
3
C
P-P
1
Less than 1Ω
AC200~240V
DC200~240V
6.0~7.8KΩ
DC200~240V
7.8~10.8KΩ
DC200~240V
7.8~10.8KΩ
DC2~15V
67~83Ω
Connector Wire Color Normal Value
H
W-W
D Or-Or
AC200~240V 11~20Ω
AC49~55V 1.3~1.7Ω
Measure Thermistor side (small wire)
Measure Thermistor side (small wire)
D B-Br
D Br-Y
AC12~14V 0.7~1.3Ω
AC195~216V 175~215Ω
47

Servicing Procedure
Servicing Infinity Water Heaters
Isolate electrics and valve off hot, cold, and gas to unit.
Check the water filter and strainer to be sure there are no blockages.
Remove the combustion fan and clean the impeller.
Check the burner for wear or water damage. Vacuum out any debris. Wipe out
chamber.
Check the heat exchanger for soot or hot spots that could be caused by poor
combustion.
Clean carbon build up from ionisation and ignition probes.
Check flue terminal for blockages or potential blockages, check that flue is in good
condition.
Check all electrical connections are reconnected
The gas pressures should then be re-set. The procedure is detailed in the manual.
Verify temperature control by checking temperature at outlet, bear in mind that there
will be pipework losses.
Check all gas joints inside the unit with an electronic gas detection device when
starting unit.
Leak check all joints back to the service valve (commercial installations) or tightness
test the installation for domestic installations.
48

Dismantling for Service
49

Dismantling for Service
50

Dismantling for Service
51

Dismantling for Service
52

Dismantling for Service
53

Dismantling for Service
54

Dismantling for Service
55

Exploded Diagram
56

Exploded Diagram
57

Exploded Diagram
58

Exploded Diagram
59

Exploded Diagram
60
Parts List
61

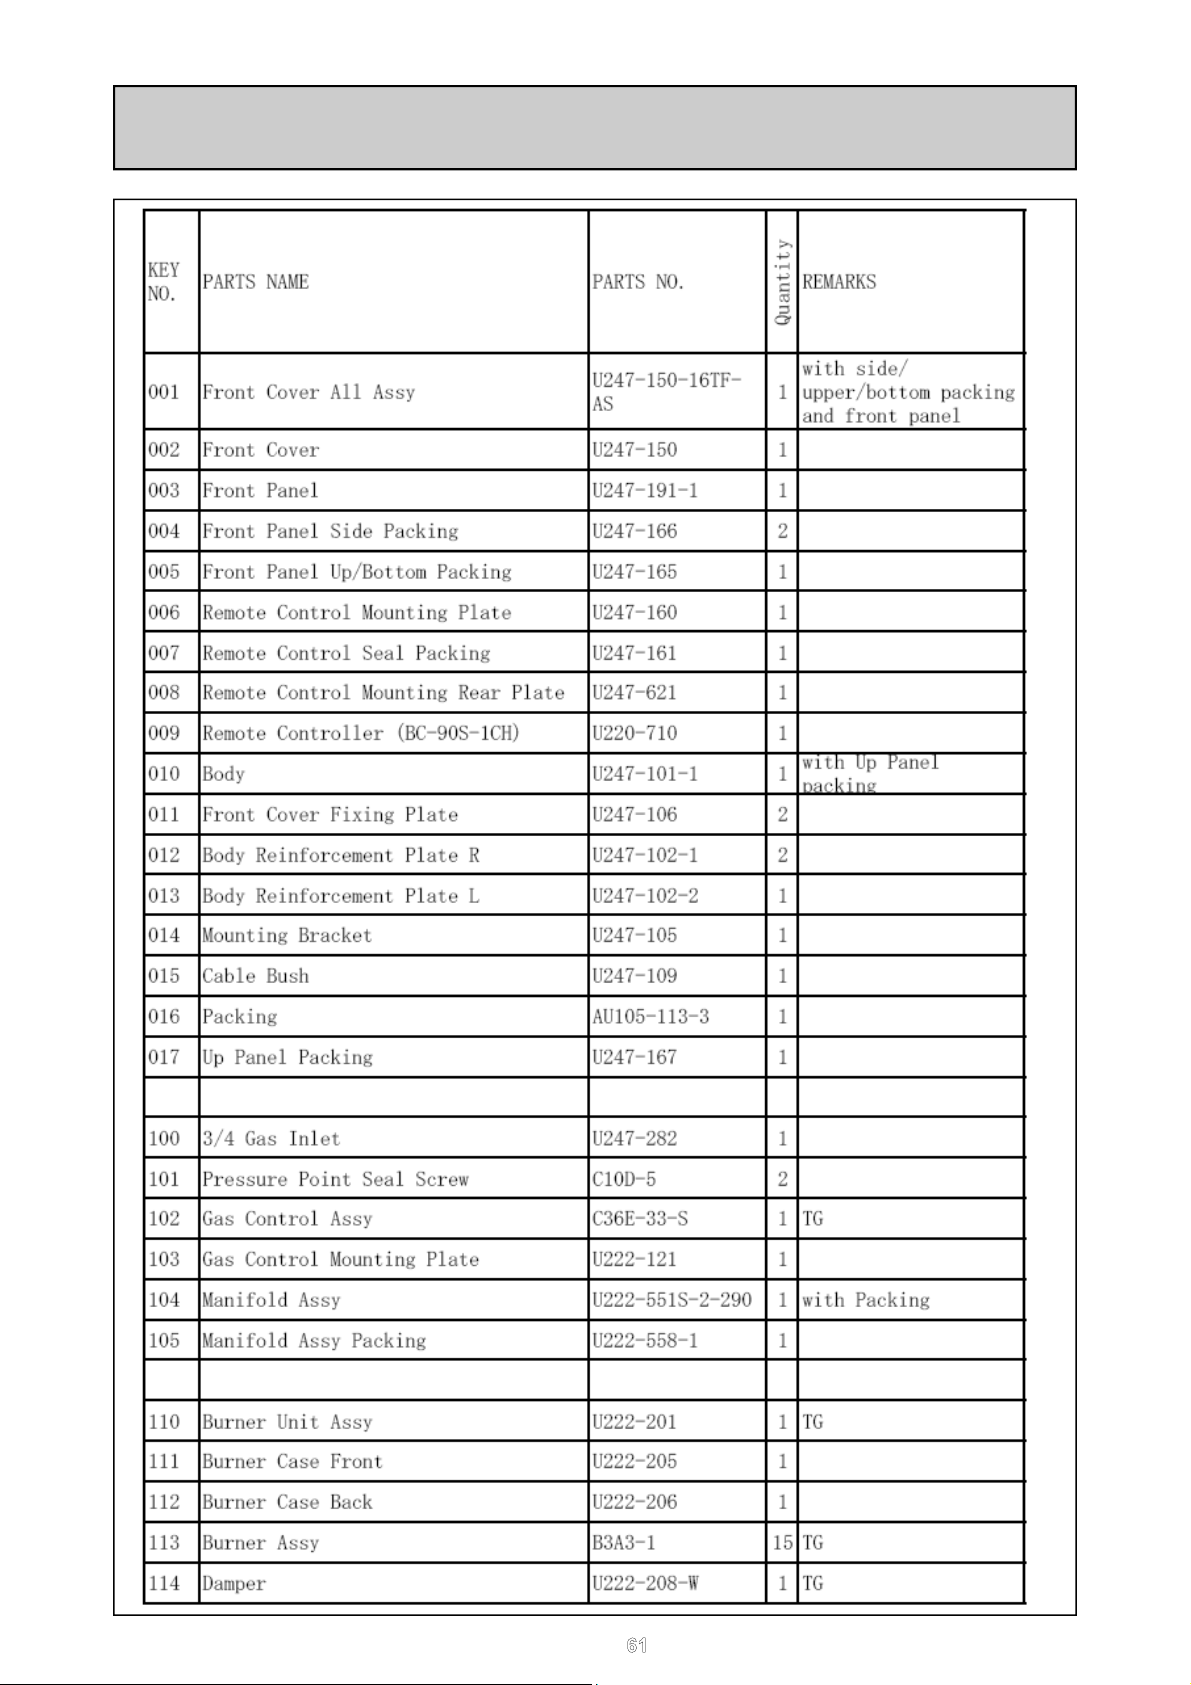
Parts List
62

Parts List
63

Parts List
64

Letter of Compliance
65

CE Certificate
66

Contact
Rinnai
Rinnai
9 Christleton Court
Manor Park
Runcorn
Cheshire
WA7 1ST
Tel. 01928 531870
Fax. 01928 531880
E-mail. info@rinnaiuk.com
Web. www.rinnaiuk.com
UK LTD.
67
 Loading...