

Rinnai iHeat Operation Manual

iHeat
Operation guide
Combined water and central heating system

This appliance shall be installed in accordance with:
- Manufacturer’s installation instructions
- AS/NZS 3500
- Local regulations and municipal building codes
Installation, servicing and repair shall be carried out only by
authorised personnel.
Please retain this manual for future reference.
Warning
Improper installation, adjustment, alteration, service or
maintenance can cause property damage, personal injury or loss
of life.
For more information about buying, living and servicing of
Rinnai appliances call: 0800 RINNAI (0800 746 624)
Rinnai New Zealand Limited
105 Pavilion Drive, Mangere, Auckland
PO Box 53177, Auckland Airport, Auckland 2150
Phone: (09) 257 3800, Fax: (09) 257 3899
Email: info@rinnai.co.nz
Web: rinnai.co.nz, youtube.com/rinnainz
Important:

cnt:
About your Rinnai iHeat .................................. 4
About the iHeat thermostat ............................ 5
Operating in manual mode ............................. 6
Operating in timer mode ................................ 7
Fan settings ..................................................... 9
Care of your iHeat ........................................... 10
Advanced settings ........................................... 11
Safety ............................................................... 12
Troubleshooting .............................................. 13
General information ........................................ 15
Installation checklist ........................................ 16
Installer details ................................................ 16
Limited warranty ............................................. 18
4 | iHeat operation guide: 12063-A 01-13
About your Rinnai iHeat
Congratulations on the purchase of your Rinnai iHeat combined water and heating system.
The Rinnai iHeat is a ducted home heating system that uses hot water from your Rinnai Infinity
continuous flow water heater to warm air and circulate it around your home.
Suitability
The Rinnai iHeat may be retrofitted to any home with an existing Rinnai Infinity continuous flow water heater, or
both units can be installed simultaneously.
The Rinnai iHeat can be installed in the ceiling space or under the floor. It must not be mounted in areas subject
to direct splashing—this is relevant to underfloor installations that could be exposed to water.
Specification summary
- Power output = nominal 20 kW, maximum 25 kW (dependent on installation)
- No. outlets = up to 12 (each outlet provides approximately 1.8 kW)
- Heating area = up to 250 m² (depending on where you live and how well insulated your house is)
- Efficiency = delivers heat at the same efficiency as the Rinnai Infinity
- Noise level of fan = sounds like an air conditioning unit
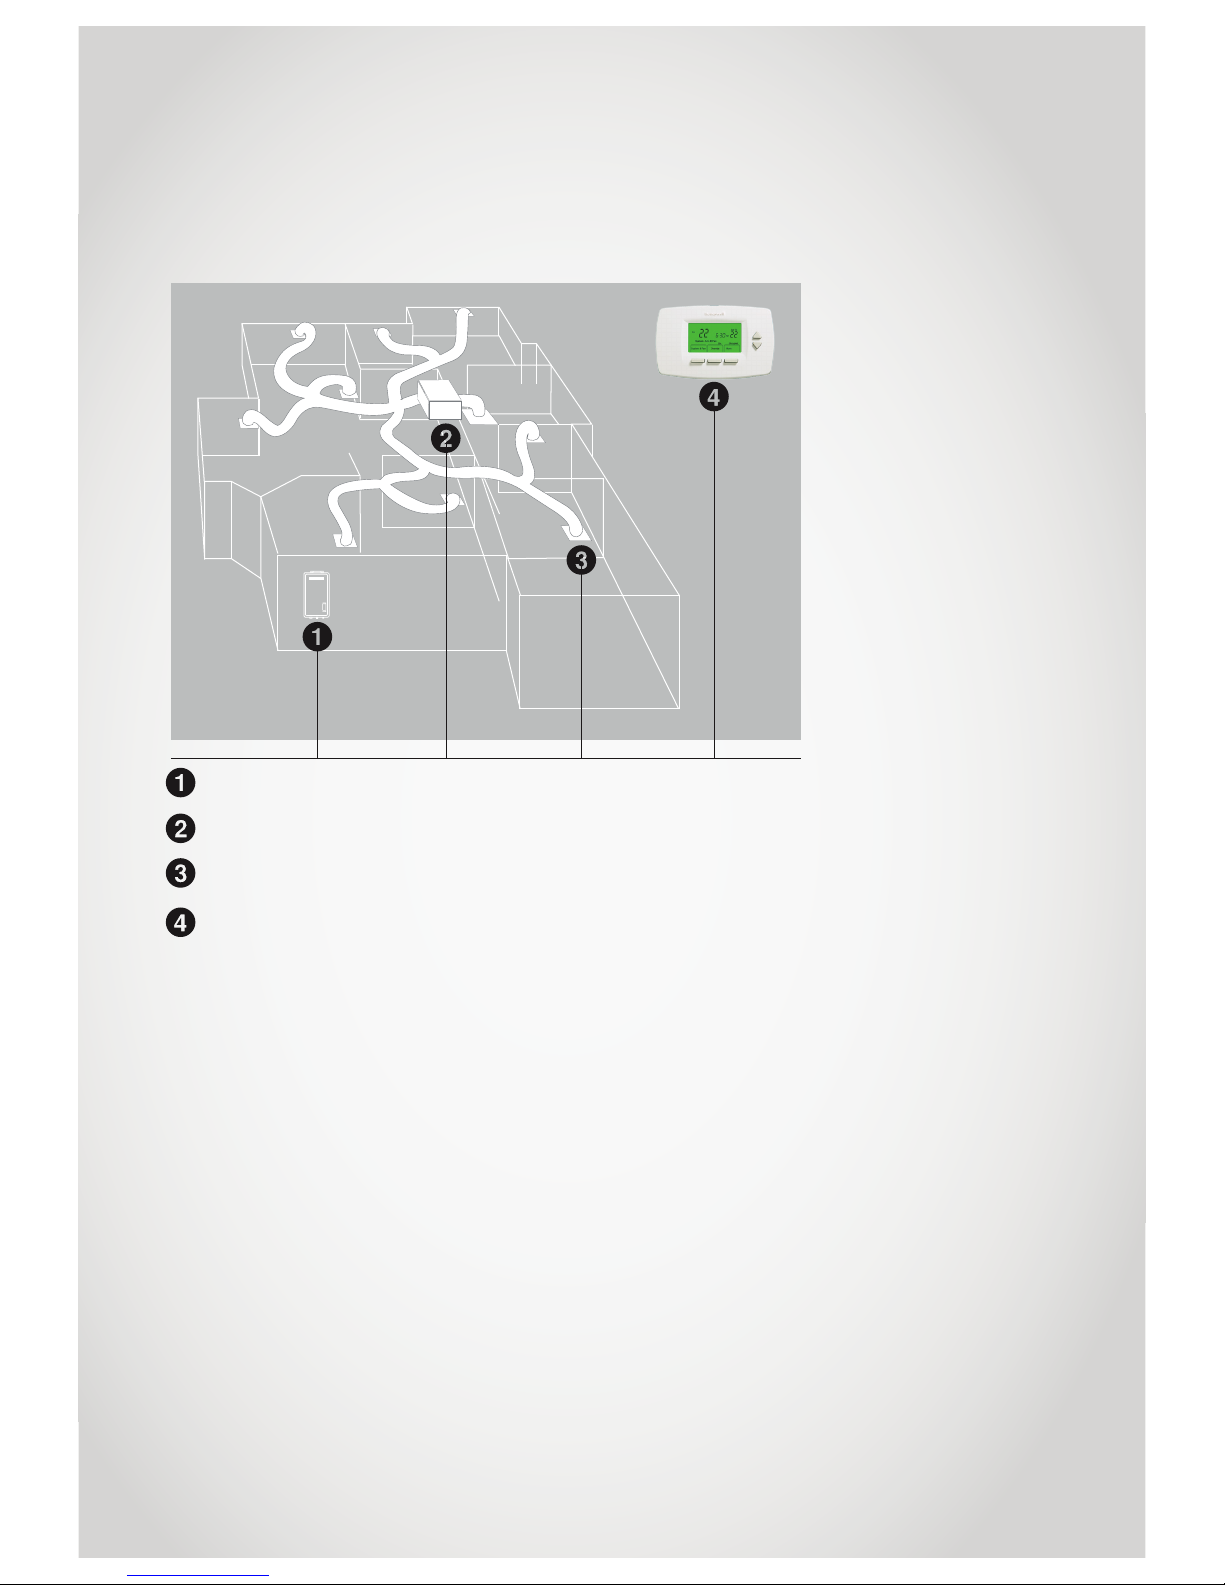
The Rinnai Infinity provides hot water to the iHeat air handler unit (heat exchanger). The heat exchanger extracts
the heat from the hot water and transfers it to a steady stream of air. This air is fed into the ducting system and is
distributed into each room. Water is returned to the Infinity for reheating.
The Rinnai iHeat is controlled via a wall thermostat which has three fan speed settings and can control up to four
different schedule periods per day.
* Ensure the Rinnai Infinity is positioned where overnight operation will not disturb occupants or neighbours.
Rinnai Infinity continuous flow installed—external or internal* models available
Rinnai iHeat installed in the ceiling space or under the floor
Ducting outlets—up to 12, each outlet provides approximately 1.8 kW
Rinnai thermostat controller provides multiple control options
iHeat Operation Guide: 12063-A 01-13 | 5
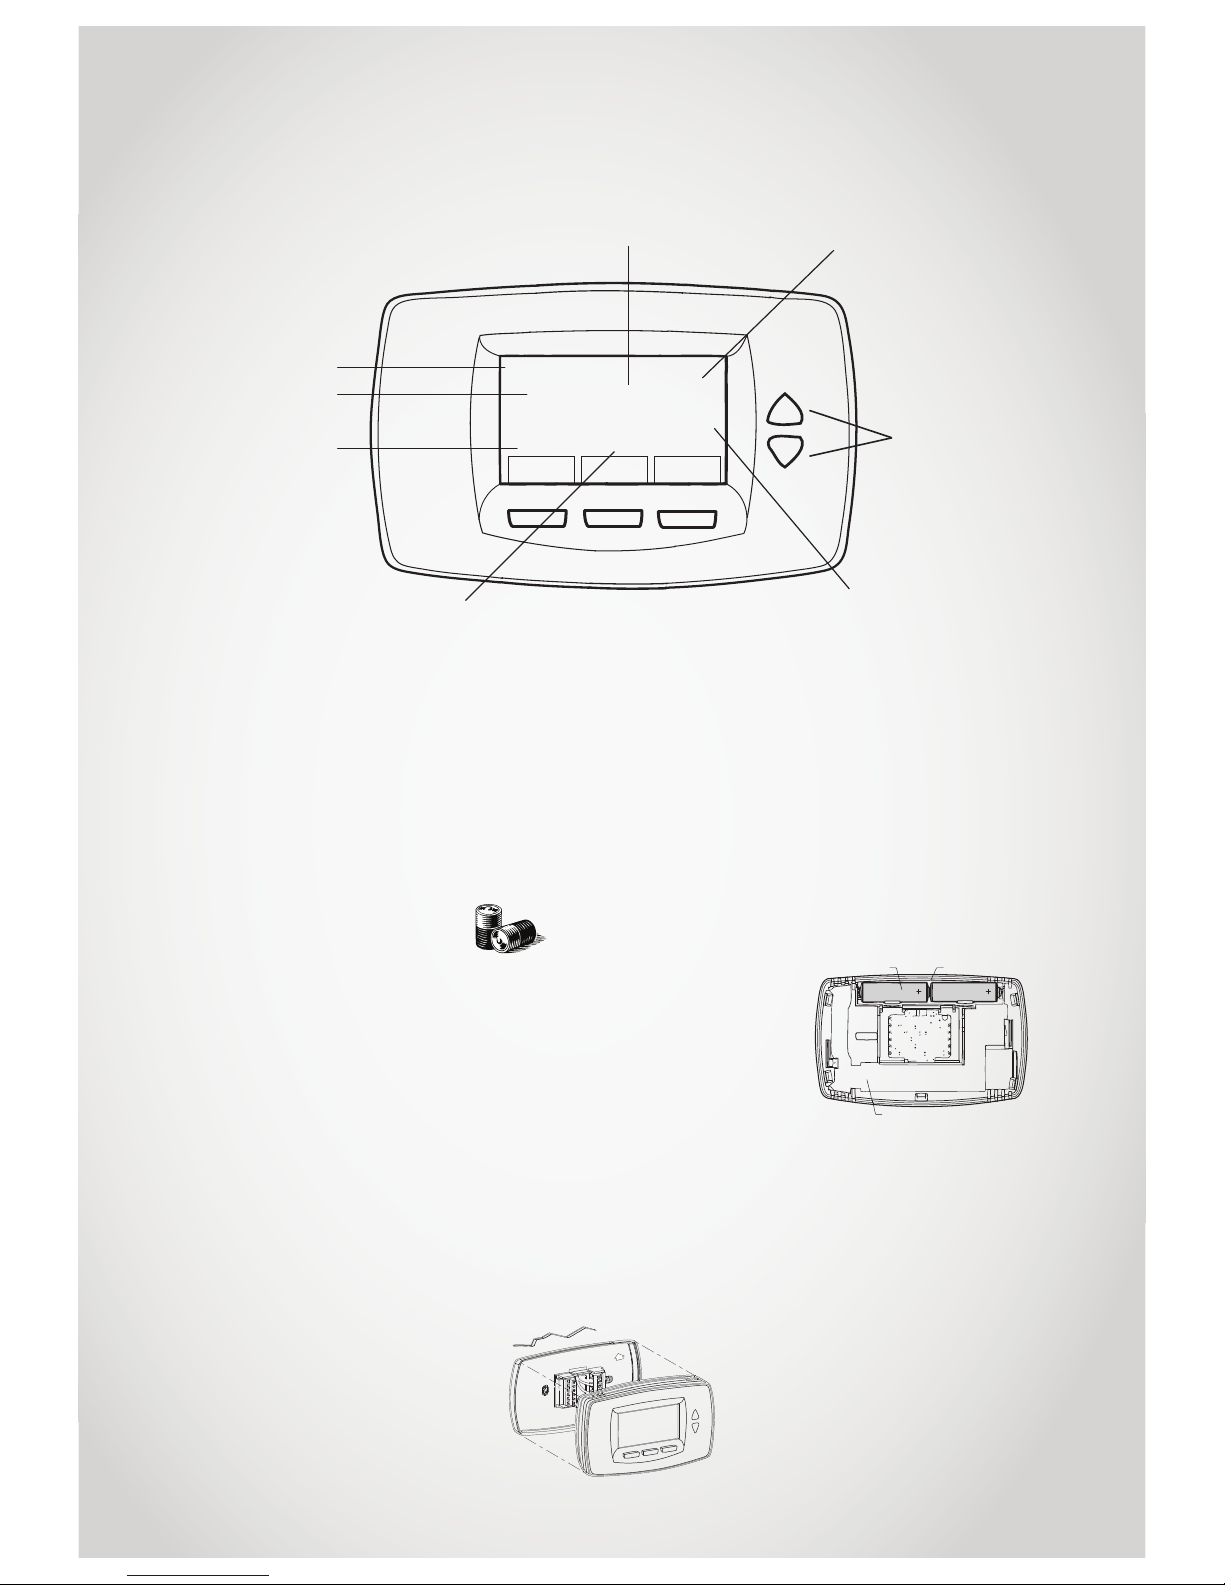
About the iHeat thermostat
Mon
System & Fan Override More
System Auto Fan Auto Occupied
18
6:05
20
Heat on
Current day week
Current time
Temp. setting
Current system
setting
Current fan setting
Indicates thermostat is
‘calling for heat’
Current room temp.
Up and down
keys
Modes of operation
Ideally your installer will have
discussed your needs and
configured the thermostat to your
requirements, and spent some
time with you setting it up for the
first time.
During the cooler months there
will be two main modes of
operation.
1. System is in manual mode
(non-programmable mode)—
no timers are set and the
system is manually turned on
and off via the thermostat.
2. System is on heat with the
fan on auto—system runs on
timers, and is on all the time.
Location of the thermostat
The thermostat must be installed
approximately 1.5 m above the
floor on an internal wall and in the
location that requires heating. Do
not place in areas subject to:
- draughts (hallways, regular
accessed doorways etc.)
- hot spots (direct sunlight,
above fireplaces/heaters etc.)
- dead spots where the air does
not circulate freely (alcoves,
corners, behind doors etc.)
LCD screen: Important
The thermostat has an LCD screen.
Sharp instruments like a pen or
pencil can damage the thermostat.
Batteries
The thermostat comes
with two AA alkaline
batteries installed.
When the batteries are running
low a warning will display on the
main screen for approximately 30
days. It is recommended that you
replace the batteries once a year
to prevent leakage, and to prevent
the thermostat from shutting
down. Replace the batteries as
follows:
1. Remove the front of the
thermostat from the base
by pulling it straight out. All
programming is retained
during battery replacement.
2. Install two new AA alkaline
batteries.
3. Replace the thermostat back
on its base making sure the
terminal screw blocks align
with the pins on the back
of the thermostat. After
two minutes the device will
automatically return to the
main screen.
Thermostat temperature range
The thermostat temperature range
is 4.5 °C to 32 °C.
Main screen selections and display
Batteries (2)
Battery holder
Back of thermostat
UP
Wall
6 | iHeat operation guide: 12063-A 01-13
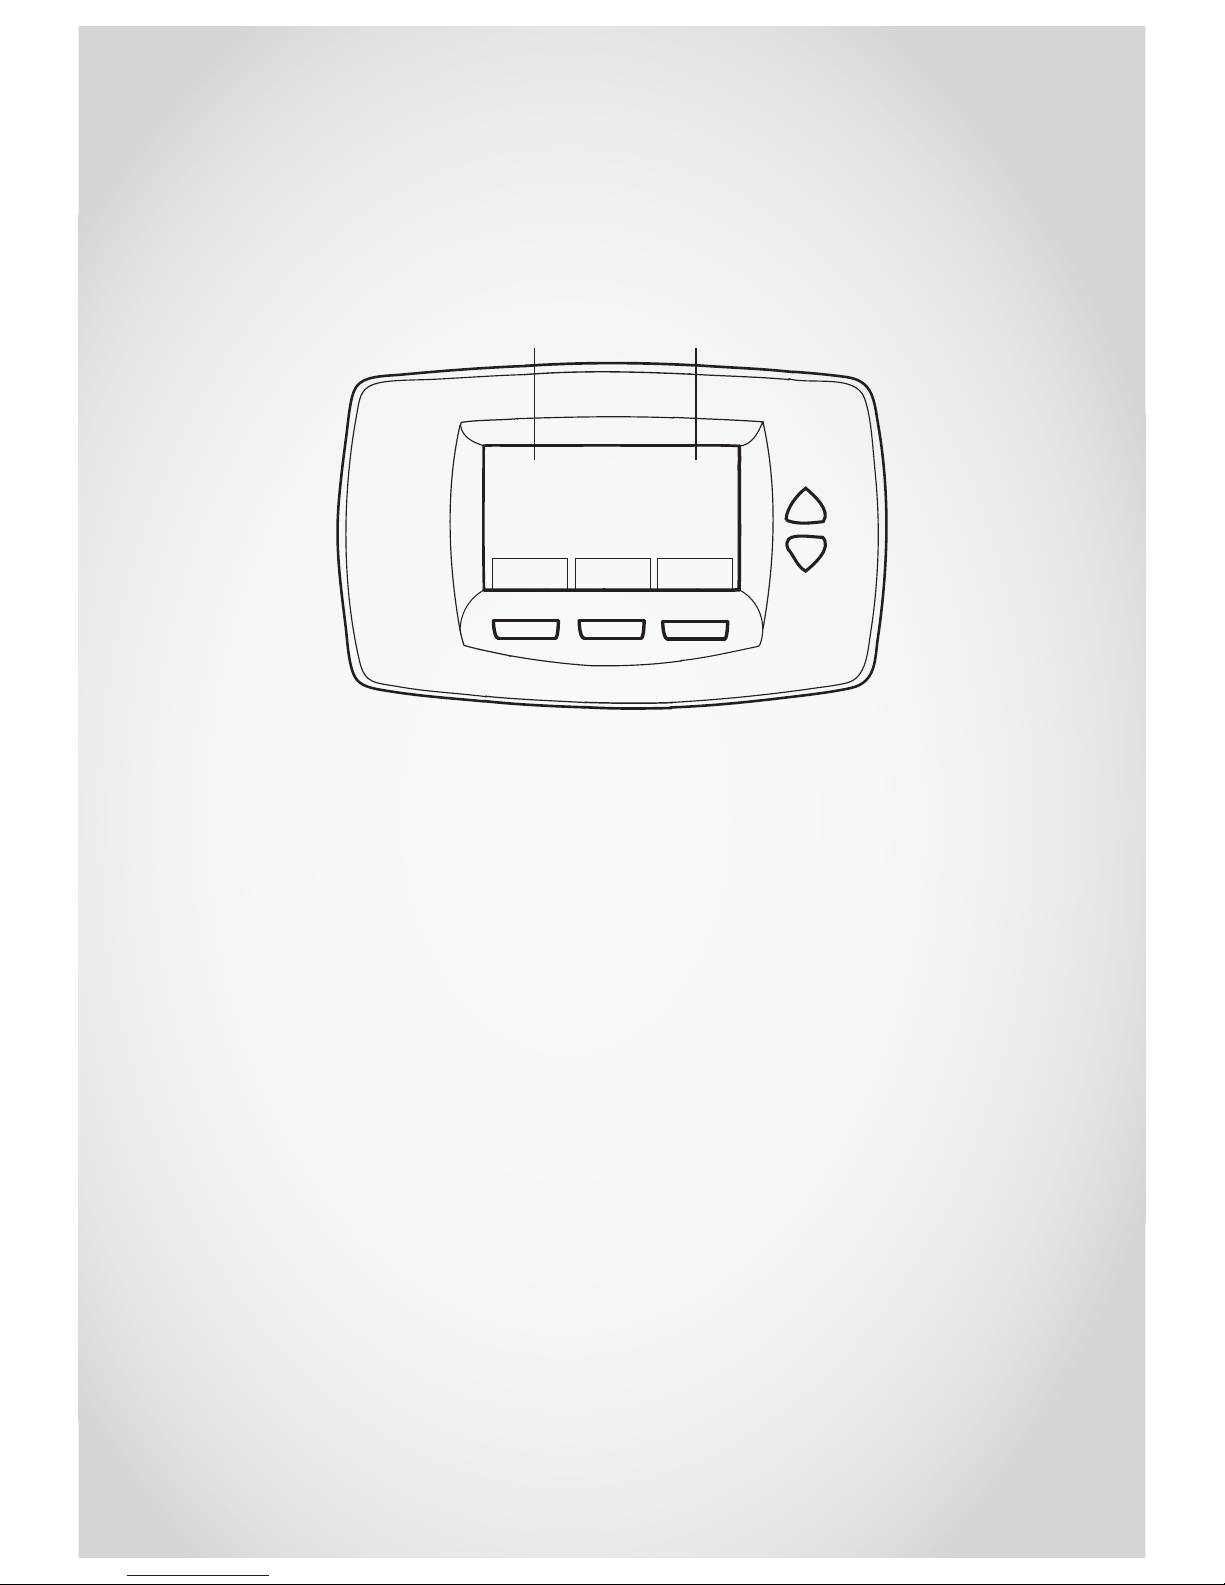
Operating in manual mode
Manual mode (non-programmable)—no timers are set and the system is manually turned on
and off via the thermostat. Setup number 160 = 0 (refer to p. 11).
System
Fan
More
6:05
Actual temp.
Set temp.
20.0
Set To
Heat
22.0
Sat
Lo
System
Heat
Fan Auto
PM
Main screen selections and display
When in manual mode the only
settings that can be changed on
the thermostat are:
- System—turning the heating
on and off.
- Fan—adjusting the fan to lo,
med, hi, or auto.
- Set temperature—adjusting
the set temperature up or
down.
- Clock—adjusting the time.
Turning the system on
1. Press ‘System’ and use the up
and down arrows until ‘Heat’ is
flashing.
2. Press ‘Done’ to save.
Turning the system off
1. Press ‘System’ and use the up
and down arrows until ‘Off’ is
flashing.
2. Press ‘Done’ to save.
Changing the fan setting
Refer to page 9.
Adjusting the temperature
The set temperature can be
adjusted by using the up and down
keys, and selecting ‘Done’ when
completed.
Adjusting the clock
1. Press ‘More’ then ‘Clock’.
2. Use the up and down keys
to adjust the time and press
‘Done’ to save.
 Loading...