

Page 1
This appliance shall be installed in accordance with:
• Manufacturer’s Installation Instructions
• Current AS/NZS 3000
• Local Regulations and Municipal Building Codes including local OH&S requirements
This appliance must be installed, maintained and removed by an Authorised Person.
For continued safety of this appliance it must be installed and maintained in
accordance with the manufacturers instructions.
Operation Manual
I Series Evaporative Air Coolers
Page 2

Rinnai 2 I Series Evap AC OM
TABLE OF CONTENTS
Warnings and Important Information 3
Regulatory / Installation / Safety �������������������������������������������������������������������������������������������������������������������������������������������� 3
Electrical Supply Cord ����������������������������������������������������������������������������������������������������������������������������������������������������������� 3
Models Covered In This Manual �������������������������������������������������������������������������������������������������������������������������������������������� 3
Evaporative Cooler Operation 4
Introduction ���������������������������������������������������������������������������������������������������������������������������������������������������������������������������� 4
How Does Your Evaporative Cooling Work? ������������������������������������������������������������������������������������������������������������������������� 4
Before Operating Your Evaporative Cooler ���������������������������������������������������������������������������������������������������������������������������� 4
The Air Smells A Little Different, Why? ���������������������������������������������������������������������������������������������������������������������������������� 5
Electrical Supply Cord ����������������������������������������������������������������������������������������������������������������������������������������������������������� 5
Start Up ���������������������������������������������������������������������������������������������������������������������������������������������������������������������������������� 5
Shut Down ����������������������������������������������������������������������������������������������������������������������������������������������������������������������������� 5
On Humid Days ��������������������������������������������������������������������������������������������������������������������������������������������������������������������� 5
Ceiling Exhaust Vent(s) ��������������������������������������������������������������������������������������������������������������������������������������������������������� 5
Wall Control Operation 6
About Your Rinnai Programmable Wall Controller ����������������������������������������������������������������������������������������������������������������� 6
Automatic Pre-Wet ����������������������������������������������������������������������������������������������������������������������������������������������������������������� 6
Operating Modes ������������������������������������������������������������������������������������������������������������������������������������������������������������������� 6
AUTO COOL Operation Mode ������������������������������������������������������������������������������������������������������������������������������������������ 6
MANUAL Operation Mode ������������������������������������������������������������������������������������������������������������������������������������������������� 7
FAN ONLY Operation Mode ���������������������������������������������������������������������������������������������������������������������������������������������� 7
Using The Timer �������������������������������������������������������������������������������������������������������������������������������������������������������������������� 7
Setting The Cooler To Turn Itself ON ������������������������������������������������������������������������������������������������������������������������������������� 7
Setting The Cooler To Turn Itself OFF ����������������������������������������������������������������������������������������������������������������������������������� 7
Zoned Systems ���������������������������������������������������������������������������������������������������������������������������������������������������������������������� 8
Batteries ��������������������������������������������������������������������������������������������������������������������������������������������������������������������������������� 8
Care & Maintenance 9
Cooler Service & Maintenance ���������������������������������������������������������������������������������������������������������������������������������������������� 9
Save A Service Call ��������������������������������������������������������������������������������������������������������������������������������������������������������������� 9
Installation Record ��������������������������������������������������������������������������������������������������������������������������������������������������������������� 10
Service Schedule / Record �������������������������������������������������������������������������������������������������������������������������������������������������� 10
FAQ 11
Warranty 13
Contacts 16
Page 3
Rinnai 3 I Series Evap AC OM
READ ALL INSTRUCTIONS BEFORE USING THE APPLIANCE.
Failure to carefully read and follow all instructions in this manual can result in equipment malfunction,
property damage, personal injury and/or death�
WARNINGS: WHEN IGNORED, CAN RESULT IN SERIOUS INJURY OR DEATH.
CAUTIONS: WHEN IGNORED, CAN RESULT IN MINOR INJURY OR PRODUCT DAMAGE.
SHALL / MUST /
IMPORTANT:
INDICATES A MANDATORY REQUIREMENT OF THIS MANUAL.
SHOULD: INDICATES A RECOMMENDED REQUIREMENT OF THIS MANUAL.
Any deviations from these instructions may, at the discretion of Rinnai, void
the warranty. As a result, the customer and/or installer may be charged a fee
for product non-warranty related call outs. Also, note that failure to comply
with these instructions may preclude Rinnai from being able to service the
unit.
DISCLAIMER: This document is a guide only. Laws, regulations and industry standards can
vary between States and Territories.
Accordingly, this guide MUST BE read in conjunction with, and subject to, all
laws, regulations and industry standards applicable in the State or Territory in
which the products are installed. You MUST ensure that the installation of the
products will comply with those laws, regulations and standards, and that the
products recommended to customers are t for the purpose for which they
are intended.
WARNING
REGULATORY / INSTALLATION / SAFETY
This appliance SHALL BE installed in accordance with:
Manufacturer’s Installation Instructions�
Current AS/NZS 3000 (electrical codes)�
Local Regulations and Municipal Building Codes including local OH&S requirements�
Local water authority regulations
Duct xing regulations, EPA guidelines and AS HB276-2004 “A Guide to Good Practice”
ALWAYS comply with the following precautions to avoid dangerous situations and to ensure optimum
performance�
This appliance MUST BE installed, maintained and removed by an Authorised Person�
DO NOT place any articles on or against this appliance
DO NOT use or store ammable materials near this appliance
DO NOT spray aerosols in the vicinity of this appliance while it is in operation
DO NOT modify this appliance
This appliance is NOT intended for use by persons (including children) with reduced physical, sensory
or mental capabilities, or lack of experience and knowledge, unless they have been given supervision or
instruction concerning use of the appliance by a person responsible for their safety�
Children should be supervised to ensure that they DO NOT play with the appliance�
ELECTRICAL SUPPLY CORD
If the electrical supply cord is damaged, it must be replaced by Rinnai, an authorised service agent or
similar qualied persons in order to avoid a hazard.
IMPORTANT
MODELS COVERED IN THIS MANUAL
Rinnai I Series I20 I10
IMPORTANT
WARNINGS AND IMPORTANT INFORMATION
Page 4
Rinnai 4 I Series Evap AC OM
INTRODUCTION
Congratulations on your purchase of a Rinnai Cooling system. For you to achieve the performance and efciency
expected from your new cooler, please ensure the installer is a qualied trades person, that the installer has
commissioned the unit before you commence operating, and you take the time to read the contents of this manual�
In some Australian States it is mandatory that your cooler installation is issued with a certicate of compliance
to guarantee the installation workmanship� Please check with your installer or the local plumbing authority or
association� The Rinnai cooler is covered by the product warranty as outlined in this manual�
HOW DOES YOUR EVAPORATIVE COOLING WORK?
The amount of cooling available from any type of cooling system is dependent on the outside weather conditions�
Your evaporative cooler works best on hot, dry days� It is essential to provide the required amount of ventilation (for
your evaporative cooling system to function properly) by opening windows/doors whenever the cooler is operating�
Air is drawn in through the lter pads resulting in 100% fresh cool air entering the home. The movement of this
cooled air through your home will draw the heat out of the house, so be sure that doors or windows are open to
expel this heat to outside�
Whenever possible start the cooler early to prevent the build up of heat within the house, and on sultry or humid
days your cooler may work better with the fan ONLY running and the pump turned OFF� Stale air, cigarette smoke
and fumes can be quickly cleared and replaced with fresh air by turning the fan to manual mode�
BEFORE OPERATING YOUR EVAPORATIVE COOLER
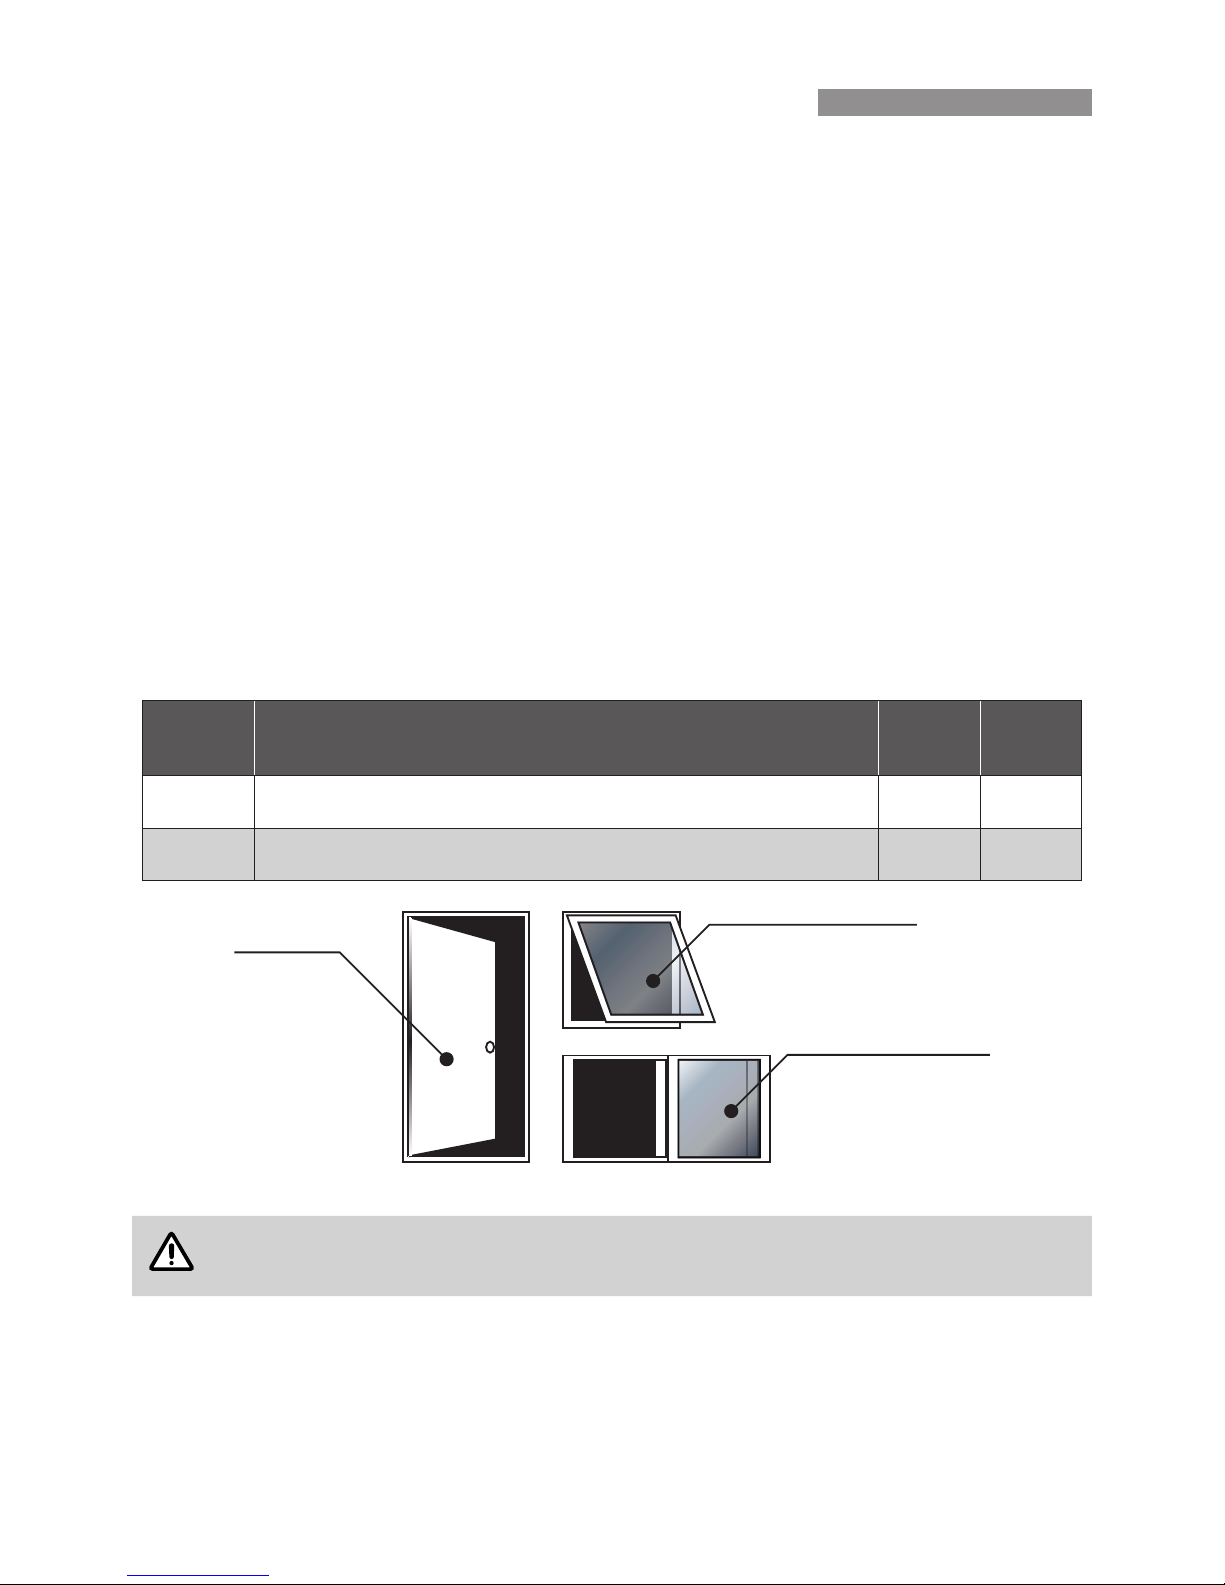
Make sure enough window and/or door area is open for the unit to work correctly� The following table gives a guide
to the amount of open area required for each model in m2, and also gives suggestions on how to provide this�
Model
Number of average size windows & doors
(suggestive only)
Highest
Fan
Setting
Lowest
Fan
Setting
I20 Three sliding windows or one door & two hinged windows
2�3 m
2
1�4 m
2
I10 Six hinged windows or four hinged windows and one sliding window 1�8 m
2
0�8 m
2
Door = 1.6m²
Hinged Window = 0.3m²
Sliding Window = 0.7m²
Average ventilation area provided by various openings when fully opened�
NOTE
You can also choose to have these openings only halfway open, however note that the opening
will only provide half the amount of ventilation shown above and additional ventilation openings
would be required.
To cool your whole house, you need windows and / or doors open throughout the house�
If you wish to concentrate your cooling to a select area, simply concentrate all the required ventilation in the
targeted area (see the following diagram on page 5)�
EVAPORATIVE COOLER OPERATION
Page 5
Rinnai 5 I Series Evap AC OM
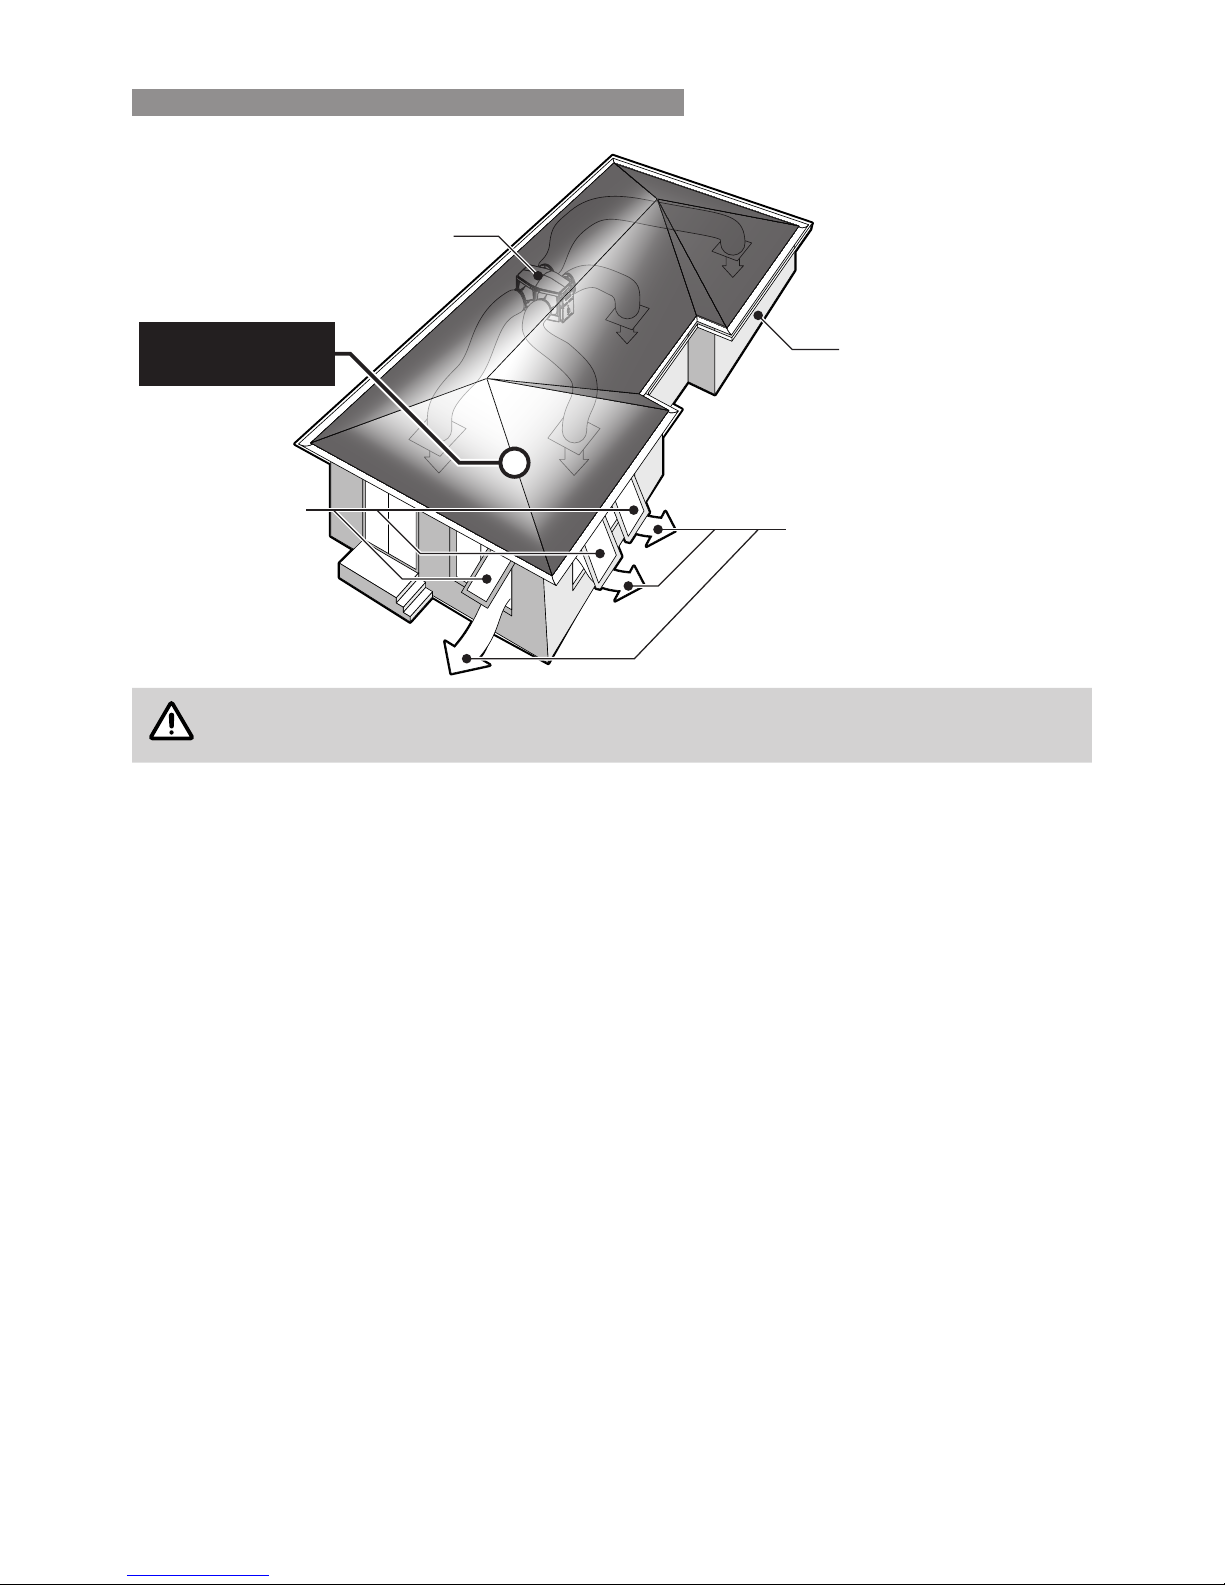
This iIllustration shows the method of getting
effective cooling in desired areas of the home
Evaporative air conditioner in roof
Closed Windows
Open Windows
The cooled air flows towards the
points of ventilation, cooling as it
moves through rooms
Concentrated
cooling in this area
NOTE
On hot, windy days, ensure that the windows and /or doors open for ventilation are on the
sheltered side of the house.
THE AIR SMELLS A LITTLE DIFFERENT, WHY?
New Cooling pads can give off a mild odour while they are settling in� This is quite normal, it will dissipate quickly
as the new pad is constantly ushed during use.
ELECTRICAL SUPPLY CORD
If the electrical supply cord is damaged, it must be replaced by Rinnai, an authorised service agent or similar
qualied persons in order to avoid a hazard.
START UP
When the cooling is rst turned ON, there will normally be a delay before the cool air is delivered from the duct
outlets. The delay time allows water to ll the Cooler’s tank and/or Pre-wet the lter pads.
The entire process can take up to 4 minutes before cool air is expected from the duct outlets�
SHUT DOWN
There is a delay of up to 6 minutes after the system is turned off, during which time the Rinnai I Series Cooler
performs a self clean and dry function�
All water will be drained from the unit 45 minutes after the unit has been turned off�
ON HUMID DAYS
On days of high humidity your evaporative cooler works best with the fan on high and perhaps the pump switch
turned off�
If moisture is building up on tiled or hard surface areas, ensure that airow from the outlets is directed across the
ceiling rather than down towards the oor. Also ensure that you have enough windows and/or doors open.
CEILING EXHAUST VENT(S)
(Security Relief Vents)
Ceiling exhaust vents (security relief vents) are not recommended as recirculating air will impair performance of
the cooler�
EVAPORATIVE COOLER OPERATION
Page 6

Rinnai 6 I Series Evap AC OM
ABOUT YOUR RINNAI PROGRAMMABLE WALL CONTROLLER
The Rinnai I series Programmable Wall Controller gives the choice
of either Automatic or Manual operational modes with the additional
option of using ON or OFF delay timers�
1� Power Indicator
The Blue Power Indicator LED Indicates the cooler system is ON
or OFF�
2� ON/OFF Button
This button turns the Cooler ON or OFF�
3� MODE Button
Selects cooling modes: AUTO COOL, MANUAL, FAN ONLY�
4� TIMER Button
This button is used to set/change On and OFF timers�
5� UP Button
This button is used to increase settings�
6� DOWN Button
This button is used to decrease settings�
7� Digital Display (LCD screen)
Provides visual indication of MODE, Comfort & fan settings�
AUTOMATIC PRE-WET
When the Cooler is turned ON, with both the fan and the pump in either Auto or Manual mode, the Cooler will
start a Pre-Wet automatically� The Pre-Wet stage ensures the pads are thoroughly wet before the fan starts� This
prevents warm air being initially blown into your home and contributes to the effective operation and performance
of the Cooler� The Pre-Wet time will vary depending on how long the Cooler has been OFF, and whether it needs
to ll the tank prior to operation.
OPERATING MODES
The cooler has several operating modes, which are as follows:
NOTE
The wall control will remember previously selected settings in Auto and Manual Modes.
AUTO COOL Operation Mode
In AUTO COOL mode the Programmable Wall Control automatically operates the cooler (fan speed and pump) to
maintain the selected ‘comfort level’� The cooler may even turn OFF if the conditions meet the comfort level setting�
Begin by pressing the ON/OFF button (2) to turn the Cooler on. If “AUTO COOL” is displayed, the system is set
for automatic operation, otherwise:
1� Press the MODE button (3) to cycle through the Cooler’s operating modes, until “AUTO COOL” is displayed
in the Digital Display (7)�
2� Press the UP (5) and DOWN (6) buttons to select the comfort level you require� The longer the column shown
in the Digital Display (7) the cooler the setting; the shorter the column, the warmer the setting�
Benets of using Rinnai coolers in AUTO COOL mode in preference to Manual mode
•
Power and water consumption varies in relation to the chosen comfort level� This comfort level cannot be as
easily maintained in Manual mode�
•
In AUTO COOL mode the unit operates only when it is required�
•
Enables a set comfort level to be maintained automatically as the outside / inside temperature conditions
change�
•
It allows you to pre-set the cooler to turn ON early and not let the house build up heat�
MODE TIMER
AUTO COOL
2 3 4
7
5 6
1
WALL CONTROL OPERATION
Page 7

Rinnai 7 I Series Evap AC OM
•
The outlet airow noise is kept to a minimum, as the fan speed is only as fast as required to maintain the set
comfort level. This slower speed also results in more efcient saturation of the Cooler lter pads, and a cooler
outlet air temperature�
MANUAL Operation Mode
Manual operation enables you to control the fan, its speed, the pump is always on�
Begin by pressing the ON/OFF button (2) to turn the Cooler on. If “MANUAL” is displayed, the system is set for
manual operation, otherwise:
1� Press the MODE button (3) to cycle through the Cooler’s operating modes, until “MANUAL” is displayed in
the Digital Display (7)�
2� Press the UP (5) and DOWN (6) buttons to select the fan speed level you require� The longer the column
shown in the Digital Display (7) the faster the fan speed, the shorter the column, the slower the fan speed�
FAN ONLY Operation Mode
Fan only operation allows you to manually operate fan speed only�
1� Begin by pressing the ON/OFF button (2) to turn the Cooler on�
2� Press the MODE button (3) to cycle through the Cooler’s operating modes, until “FAN ONLY” is displayed in
the Digital Display (7)�
3� Press the UP (5) and DOWN (6) buttons to select the fan speed level you require� The longer the column
shown in the Digital Display (7) the faster the fan speed, the shorter the column, the slower the fan speed�
USING THE TIMER
When the Cooler is operating, you can pre-set a time for the Timer to turn the Cooler OFF� Also, when the Cooler
is turned OFF, you can select a time for the Timer to turn it ON automatically� So if you are out for the day you can
set the Cooler to come on and cool the house before you return� The timer is set in 1-hour increments, ranging
from 1 to 17 hours�
CAUTION
If the pump is going to be used, adequate ventilation (openings) need to be provided to prevent
condensation build up.
SETTING THE COOLER TO TURN ITSELF ON
NOTE
The system must be in the OFF state. Press the ON/OFF button (2) until the Blue Power Indicator
LED (1) is off and OFF is displayed on the Digital Display (7).
1� Push TIMER button (4) to enter timer setting mode�
2� Press the UP (5) and DOWN (6) buttons to set the desired ON time (e�g� 4 hours)�
3� Press the TIMER button (4) to save timer setting�
4� The controller will return to the OFF screen, and the time remaining until the ON timer activates will be
displayed (e�g� ON IN 4:00)�
SETTING THE COOLER TO TURN ITSELF OFF
NOTE
The system must be running in the desired operating mode, i.e. “AUTO COOL”, “MANUAL”, or
“FAN ONLY”.
1� Push TIMER button (4) to enter timer setting mode�
2� Press the UP (5) and DOWN (6) buttons to set the desired OFF time (e�g� 4 hours)�
3� Press the TIMER button (4) to save timer setting�
4� The controller will return to the current operational screen, and the time remaining until the OFF timer activates
will be displayed (e�g� OFF IN 4:00)�
WALL CONTROL OPERATION
Page 8

Rinnai 8 I Series Evap AC OM
ZONED SYSTEMS
An option for the I Series cooler system is to divide the home into different zones, up to a maximum of four, e.g.
sleeping and living zones, allowing the living zone(s) to be OFF at night time while the sleeping zone(s) is ON.
Zoning can be achieved using multiple wall controls, with each wall control assigned to their own independent zone.
The number of zones installed will equal the number of wall controls and each zone can be in either “MANUAL”
mode, “AUTO COOL” mode, or “OFF”. To operate any zone in ”FAN ONLY” mode all the other wall controls must
be in either “FAN ONLY” mode or “OFF”.
Changing the mode or to turn the zone OFF can be achieved at the respective wall control.
BATTERIES
The Rinnai Programmable Wall Controller requires no batteries� If the digital display on the wall controller is blank,
check your 240 volt power supply (at the Cooler) or check the thermostat cable�
WALL CONTROL OPERATION
Page 9

Rinnai 9 I Series Evap AC OM
COOLER SERVICE & MAINTENANCE
To ensure that your Rinnai cooler continues to operate at peak efciency, it should be serviced at two year intervals
by an authorised person trained in the service of Rinnai coolers - please contact our National Care Centre, for
authorised Rinnai Service Technicians� Refer to the back of this manual for contact details�
The I Series coolers are tted with a mesh over
the inlet to the unit� To maintain the cooler’s
performance the mesh must be inspected &
cleaned at regular intervals, depending on the
amount of use of the unit & the environment in
which it operates� The same applies to the Rinnai
roof-cap mesh (where tted), refer to below right.
This service of the cooler unit will include all
maintenance and adjustments required to the
following components to ensure your cooler runs
at its peak efciency:
•
Trough
•
Electronic Controls e�g� Sensors
•
Fan and Pump Assembly
•
Pads and Water Distribution
•
Module Inlet Mesh
•
Air Intake Vents (e�g� roof-cap mesh)
IMPORTANT
Please note that to maintain your warranty, the above servicing needs to be conducted by an
authorised person trained in the service of Rinnai Coolers. Please contact our Rinnai Service
Department for an authorised Rinnai Service Technician.
NOTE
Service maintenance is not covered under warranty and is a chargeable service. All coolers must
have safe and reasonable access and be installed in compliance with the installation instructions
supplied with the unit. Some installations may require two service personnel to attend, in
accordance with Health & Safety requirements.
SAVE A SERVICE CALL
Service calls can often be avoided! If you feel your cooler is not operating property, please check these possible
causes rst:
General Troubleshooting
•
Check the water supply to the unit is turned ON�
•
Ensure the pump is operating and visually check the pads for even water distribution�
•
Check that the number of doors and windows open is sufcient within the targeted cooling area. Too many or
not enough doors and windows opened in the targeted area could result in inadequate ventilation� This could
result in poor cooling performance�
•
Check that the fan operates and air is coming out from the duct outlet�
•
Check that the lter pads are not damaged and/or the material hasn’t deteriorated.
•
If external weather conditions are excessively humid, the cooler may not perform at its optimal cooling level�
•
Check that the module inlet mesh and all air intakes e�g� Rinnai Roof-Cap mesh are clean and free of obstruction
If the fan will not start.
•
Check if the power is ON�
•
Check if the Wall Control is turned ON, and set the comfort level that requires the Cooler fan to operate�
•
Check that the system is not in Time Delay or Start Up mode�
•
Check the safety-switch / fuse in the meter box�
NOTE
The usual time delay can be up to 4 Minutes.
The unit will not turn on
•
Check the circuit breaker has not been tripped - if so reset it� Reset the Cooler at the power supply�
Rinnai Roof-Cap Mesh
Rinnai Roof-Cap
CARE & MAINTENANCE
Page 10

Rinnai 10 I Series Evap AC OM
The unit is blowing warm air
•
Check the water supply tap is turned on at the unit. Check the system is not in “FAN ONLY” mode.
The wall control display is blank
•
Check there is power to the power point with another appliance� Check the circuit breaker has not been tripped
- if so reset it�
The unit is not cooling very well
•
Check the water supply tap is turned on at the Cooler
•
Check sufcient door and/or windows have been opened. Refer to exhaust requirements covered in "Before
Operating Your Evaporative Cooler" on page 4�
•
Check air intakes are clean and free of any obstruction�
There is no air coming out of some vents
•
It is highly probable that this is an installation issue. Please contact your installer in the rst instance or contact
our service department to place a service call�
There is moisture on my tiles
•
Check the vents are directing air ow across the ceiling and not towards the oor. If it is humid run the system in
“FAN ONLY” mode. Check that sufcient door and/or windows have been opened. Refer to exhaust requirements
covered in "Before Operating Your Evaporative Cooler" on page 4�
INSTALLATION RECORD
Installer Details
Installers Name: ________________________________________________________________________
Company Name: ________________________________________________________________________
Company Address: ________________________________________________________________________
________________________________________________________________________
Company Contact Details
Telephone: ________________________________________________________________________
Mobile Phone: ________________________________________________________________________
Certicate of Compliance / Certication Number: _____________________________________________
Authorised Persons - Licence Number: _____________________________________________
Installers Signature: _______________________________________________________________________
Installation Date: _______________________________________________________________________
System Details
Model Number : ________________________________________________________________________
Serial Number: ________________________________________________________________________
SERVICE SCHEDULE / RECORD
Service Year Service Date Service Provider Contact No.
2 ___/___/___
4 ___/___/___
6 ___/___/___
8 ___/___/___
10 ___/___/___
CARE & MAINTENANCE
Page 11

Rinnai 11 I Series Evap AC OM
Q. How often should the cooler be serviced?
A. Rinnai recommend the cooler is serviced every 2 years at a minimum to ensure it operates at peak efciency.
IMPORTANT
Please Note: Due to environmental conditions the cooler may need to be serviced every year.
Q. What is done in a service?
A. Our comprehensive service plan designed to maintain your cooler includes�
•
Check lter pad material for holes or deterioration. The pads will deteriorate over time and lose their water
absorption ability� Replace pads as required�
•
Clean the tank and internal surfaces�
•
Clean the lter pads and ush water.
•
With the lter pads in position, switch ON the power supply isolating switch and operate the unit.
•
Ensure the pump is operating, and visually check the pads for even water distribution�
•
Ensure the water inlet is operating correctly�
•
Ensure the water system is operating to the minimum and maximum water levels�
•
Check that the water supply pressure is sufcient to ll the tank within the allotted time.
•
Check the fan operates, and varies speed between the minimum and maximum setting on the Wall Control�
•
Check and lubricate all moving parts�
•
Clean Module Inlet Mesh and Roof-cap Mesh if installed�
IMPORTANT
Please note that to maintain your warranty, the above servicing needs to be conducted by an
authorised person trained in the service of Rinnai Coolers.
Q. Why does the unit dump water periodically during operation?
A. Rinnai I Series coolers use the “Running Refresh” method for tank water quality control. This “Running
Refresh” ensures that the salt or sediments accumulating in the cooler do not exceed an acceptable level by
periodically ushing the tank while the cooler is operating.
Q. The air smells a little different� Why?
A. New Cooling pads can give off a mild odour while they are settling in� This is quite normal, it will dissipate
quickly as the new pad is constantly ushed during use. It may also be indicating that the unit requires a
service�
Q. How much water does my evaporative cooler use?
A. The amount of water an evaporative cooler uses is dependant on the evaporation rate of the coolers pads�
The more water the cooler can evaporate for a given condition and airow, the more cooling potential the
cooler has�
The evaporation rate varies depending on the current weather conditions, the size of the cooler, the speed of
the coolers fan or the velocity of the air through the pads, and the condition and type of the lter pad material.
In addition to the cooler evaporating water, water is also displaced to maintain the water quality within the
cooler so that the coolers pads and other components do not deteriorate prematurely�
Q. How much water does the tank of my cooler hold?
Model Tank Capacity (litres)
Rinnai I Series I20 12
Rinnai I Series I10 12
FAQ
Page 12

Rinnai 12 I Series Evap AC OM
Q. Can I run the system when I am not home?
A. Evaporative cooling relies on doors and/or windows being open so you can run it when you are not home,
provided you have the required ventilation openings�
Q. How many doors and windows should I have open?
A. Refer to the section on openings required� The table gives a guide to the amount of opening area required for
each model in m2, and also gives suggestions on how to provide this�
Q. Why is there condensation and moisture on my tiles?
A. Make sure the vents are directed across the room and not towards the oor. Make sure sufcient doors and
windows are open. Refer to the section on openings required. If it is a humid day operate the system in “FAN
ONLY” mode.
Q. There is no air coming out of some of the vents�
A. It is highly probable that this is an installation issue. Please contact your installer in the rst instance.
Q. What does duct cleaning entail?
A. Like any other part of your home dirt, dust and other foreign particles can accumulate and breed in the
ductwork and on system diffusers�
•
Remove dust from your cooling system
•
Kill any potential dust mites living & breeding throughout your cooling system
•
Remove odours from your cooling system
•
Helps improve indoor air quality
•
Allergy sufferers may benet from clean ducts
•
Clean the Cooler fan and assembly
•
Clean the Supply air diffusers
Q. Can I run heating through the same ductwork as my evaporative cooler?
A. No, the differing technology between ducted heating and evaporative cooling doesn’t allow the units to share
the same ductwork. Also, evaporative cooling requires larger ductwork for airow.
Q. How far should my cooler be away from sanitary vents?
A. The unit should be at least a 5 metre radius away from a sanitary outlet�
Q. How cool is cool?
A. The degree of cooling available from any type of air conditioning, is dependent on the outside weather
conditions� Your Evaporative Cooler works best on hot, dry days� After all, that’s when you require the most
relief�
Q. Should the unit have its own circuit in the meter box?
A. Yes, we recommend the power socket is wired back to the meter box on a dedicated power circuit�
Q. Should water be coming out of my evaporative cooler during operation?
A. Rinnai I Series cooler will complete a ush service once every eight hours of operation maximum. This means
you may hear and/or see the unit discharge water from the primary drain pipe�
Q. There is water coming out of the secondary drain?
A. There is a secondary drain (Ø40 mm) which is terminated to provide you with clear visibility of water
discharging� If you see water discharging from this drain call Rinnai�
Q. I have turned the unit off and it continues to run for a short period?
A. This is normal operation; the water is turned off and a dry cycle is commenced on shut down�
Q. What will happen to the unit if it loses power during operation?
A. The unit will stop working and when power returns water will discharge and the wall control will remain in the
“OFF” state.
FAQ
Page 13

Rinnai 13 I Series Evap AC OM
TERMS OF WARRANTY – AUSTRALIA
Rinnai Australia Pty� Ltd� ABN 74 005 138 769, 100 Atlantic Drive, Keysborough VIC 3173�
1. DEFINITIONS
The terms listed below shall have the following meanings:
1�1 Authorised Service Representative” means an independent service contractor authorised by Rinnai or Rinnai
service personnel�
1�2 “Rinnai” means Rinnai Australia Pty. Ltd. ABN 74 005 138 769 and any related company.
1�3 Certicate(s) of Compliance” means certicate(s) issued by licensed personnel including plumbers,
refrigeration mechanics, electricians or other relevant trades people to certify that any prescribed works
comply with applicable regulatory requirements�
1�4 Certicate(s) of Occupancy” means certicate(s) issued by the local council which certies that a home can
be occupied�
1�5 “Installation Site” means the site at which the Product is originally installed.
1�6 “Normal Business Hours” means 8:30am to 5:00pm week days excluding public holidays.
1�7 “Operating Instructions” means the user manual or other documentation which provides detailed instructions
on the proper operation and maintenance of the Product�
1�8 “Other Applications” means any Product used for non-Residential and Light Commercial Applications. Other
Applications may include but are not limited to factory, IT/Server room, telephone exchange, processing area
(e�g� bakery, kitchen, warehouse, swimming pool, agricultural facilities such as a nursery) and any Product
which has been installed, for whatever purpose as a retrot component to an existing system.
1�9 “Purchaser” means the end user of the Product, the person named as owner in the Warranty certicate, the
holder of the Proof of Purchase or the holder of a property transfer document where the Product is included
as part of the chattels�
1�10 “Product” means the equipment purchased by the Purchaser and described in Section 2 of this document.
1�11 “Proof of Purchase” means a Tax Invoice or Receipt in respect of the Product. In the case of new constructions,
a Certicate of Occupancy or a Certicate of Compliance that details the date of installation or commissioning
will sufce.
1�12 “Qualied Installer” means the qualied installation contractor who is responsible for performing the installation
work in the manner prescribed by local and statutory regulations, including compliance with any relevant
Australian Standards, and to Rinnai specication.
1�13 “Residential & Light Commercial Applications” means any Product for use in both residential and light
commercial applications. For example, homes, ofces, hotels, apartments, nursing homes, hospitals, health
care premises, shopping centres, retail stores where the Product is solely used for purpose of human comfort
under standard operating conditions�
2. TERMS OF WARRANTY
2�1 Subject to the Terms of Warranty set out in this document, effective from the date of purchase by the Purchaser,
the Product is warranted to be free from defects in materials and factory workmanship for the period set out
in the table below:
Usage Product Parts Labour
Residential &Light Commercial Rinnai I series Evaporative Coolers 5 Years 5 Years
2�2 Rinnai will determine in its sole discretion, which classication the Product ts into and the corresponding
Warranty that shall apply�
2�3 An Authorised Service Representative will repair or replace, at its option, the Product or any part of the
Product that its examination shows to be defective� The repair or replacement shall be performed during
Normal Business Hours by an Authorised Service Representative� Repair by persons other than an Authorised
Service Representative may void the Warranty�
2�4 The Warranty of the Product requires that, in addition to all other conditions, the Purchaser conducts regular
and/or preventative maintenance as may be specied by Rinnai (e.g. Operating Instructions) and required by
the level of usage and the usage environment, including the use of correct and uncontaminated refrigerants
and lubricants�
WARRANTY
Page 14

Rinnai 14 I Series Evap AC OM
3. CONDITIONS OF WARRANTY
3�1 The Purchaser may only obtain the benet of the Warranty if the Purchaser:
a) maintains and services the Product in accordance with the instructions set out in the service section
of the relevant Service or Owner’s Manual; b) complies with clause 7 below (titled "Purchaser's
Responsibilities");
b) noties Rinnai within 30 days of a defect developing, that a claim is being made under this Warranty; and
c) provides, in support of the claim made under this Warranty, a Proof of Purchase�
3�2 This document represents the only Warranty given by Rinnai and no other person or organisation is authorised
by Rinnai to offer any alternative�
4. EXCLUSIONS
4�1 This Warranty does NOT cover:
a) damage, problems or failure resulting from improper operation and/or inadequate maintenance by the
Purchaser (refer Purchaser’s Responsibilities section below);
b) damage, problems or failure resulting from improper or faulty installation� The Product must be installed
by a Qualied Installer in accordance with applicable regulations. Where applicable, Certicate(s) of
Compliance must be obtained by the purchaser from Qualied Installer and present it to the Authorised
Service Representative;
c) damage, problems or failure caused by factors external to the Product including, but not limited to, faulty
or poor external electrical wiring, incorrect or faulty power supply, voltage uctuations, over voltage
transients or electromagnetic interference,inadequate or faulty gas, drainage services, or water services,
including water pressure, and non potable water;
d) damage, problems or failure caused by acts of God, re, wind, lightning, ood, storm, vandalism,
earthquake, war, civil insurrection, misuse, abuse, negligence, accident, pests, animals, pets, vermin,
insects, spiders or entry of foreign objects or matter into the Product such as dirt, debris, soot or moisture;
e) damage, problems or failure caused by weather including, but not limited to, hail, salt or other corrosive
substances;
f) Product which has been installed in a portable or mobile building, structure or application including, but
not limited to, a caravan or boat;
g) Product which is being re-installed at a location other than the original site;
h) any consumable item supplied with the Product including, but not limited to, an air lter, battery, fan belt,
igniter or cooler pad;
i) installation of third-party components that may be attached to the Product� These include, but are
not limited to, control wiring, ducting, return air lter(s) grille, register, diffuser, zone motors, controls/
thermostats, pipe work and fabricated or added components� These items remain solely the responsibility
of the Qualied Installer;
j) installations where electrics/electronics may be subjected to moisture/chemicals (e�g� swimming pools
or nurseries);
k) any repair, which is needed as a result of an accident, misuse, abuse or negligence;
l) Product that is utilised in an environment (indoor and outdoor) outside its specied operating range; and
m) fair wear and tear to the Product�
5. LIMITATIONS
5�1 Product tness for purpose and overall system design, sizing and application are not the responsibility of
Rinnai. This includes but is not limited to the heat load calculations, airow and system balancing.
5�2 This Warranty does not apply to any Product installed at an Installation Site which is outside Australia or New
Zealand�
5�3 Except where inconsistent with the purchaser’s statutory rights and the rights given by this Warranty, all of
the warranties and all liabilities of Rinnai for any direct, special, indirect or consequential loss or damage, any
damage or expense for personal injury or any loss or destruction of property arising directly or indirectly from
the use or inability to use the Product or any of its parts and servicing the Product, are expressly excluded�
WARRANTY
Page 15

Rinnai 15 I Series Evap AC OM
6. TRAVEL, TRANSPORT & ACCESS COSTS
6�1 The Purchaser must pay freight charges, in-transit insurance expenses and travelling costs for repairs/
replacements under this Warranty, that are required to be performed 100km or more from the nearest Rinnai
branch or Authorised Service Representative�
6�2 Subject to clause 6�3, Rinnai will pay freight charges, in-transit insurance expenses and travelling costs for
repairs/replacements that are required to be performed less than 100km from the nearest Rinnai branch or
Authorised Service Representative� In this circumstance:
a) Rinnai will arrange for such repairs/replacements and make any payment directly to the third party to
provide the freight, in-transit insurance or travel services; or
b) if Rinnai considers appropriate, it will authorise the Purchaser in writing to pay for the relevant freight
charges, in-transit insurance expenses or travelling costs and then, upon provision by the Purchaser to
Rinnai of a tax invoice showing those costs have been incurred, reimburse the Purchaser for such costs
which are within the terms of the authorisation� If the Purchaser pays for the relevant freight charges,
in-transit insurance expenses or travelling costs without written authorisation from Rinnai, Rinnai will not
reimburse the Purchaser for such costs�
6�3 The Purchaser must pay all costs and expenses in respect of:
a) making the Product accessible for service� For example, restricted access or working at heights, or the
labour cost for an additional person due to OHS requirements;
b) providing a safe working environment for installation, service, maintenance or repair of the product;
c) any surcharge applicable in respect of supplying replacement parts outside Normal Business Hours; and
d) any other costs and expenses in relation to claiming the Warranty that is not covered by clause 6�2�
7. PURCHASER’S RESPONSIBILITIES
7�1 The Purchaser must operate and maintain the Product in accordance with the Operating Instructions and
service maintenance schedule, including conducting an appropriate number of services to the unit during the
Warranty period, based on usage and the usage environment including but not limited to;
a) regularly cleaning the air lter(s) and replacing them where necessary;
b) replacing expired batteries or other consumables as required;
c) ensuring that the condensate drain is kept clean and clear of obstructions;
d) ensuring that outdoor units have unrestricted airow and adequate clearances; e) ensuring that additional
corrosion protection is applied to the Product if it is installed in a corrosive environment, for example,close
to the sea�
8. STATUTORY RIGHTS
8�1 The benets given by this Warranty are in addition to other rights and remedies of the consumer under a law
in relation to the goods or services to which the Warranty relates�
8�2 Australian purchasers have their benet of statutory rights and nothing in these terms of Warranty has the
effect of excluding,restricting or modifying those rights� Our goods come with guarantees that cannot be
excluded under the Australian Consumer Law� You are entitled to a replacement or refund for a major failure
and compensation for any other reasonably foreseeable loss or damage� You are also entitled to have the
goods repaired or replaced if the goods fail to be of acceptable quality and the failure does not amount to a
major failure�
8�3 For New Zealand purchasers nothing in these terms of Warranty is intended to limit the rights you may
have under the Consumer Guarantees Act 1993. The Consumer Guarantees Act 1993 does not apply if the
Product is acquired for the purpose of a “business”(as dened in the Act).
WARRANTY
Page 16

B063160_A 16 I Series Evap AC OM Issue 1 - 20/11/15
CONTACTS
Australia Pty. Ltd.
ABN 74 005 138 769
Rinnai has a Service and Spare Parts network with personnel who are fully trained
and equipped to give the best service on your Rinnai appliance. If your appliance
requires service, please call our National Help Line. Rinnai recommends that this
appliance be serviced every 2 years.
Head Office
100 Atlantic Drive,
Keysborough VIC 3173
P.O. Box 460
Braeside, Victoria 3195
Product Sales and Service - National
Phone: 1300 555 545* Fax: 1300 555 655*
Technical Helpline and Spare Parts
National (Mon-Fri 8am - 5.30pm EST)
Phone: 1300 555 545* Fax: 1300 300 141*
*Cost of a local call higher from mobile or public phones.
E-mail: enquiry@rinnai.com.au
For further information visit: www.rinnai.com.au
 Loading...