

Rinnai FS35 ETR, Timberflame FS35 ETR, Freestanding Royale ETR Accessory Installation Manual
Flame Fire ETR
Electronic Timer and Remote
Operating and Installation Instructions
Freestanding Royale ETR (Australia)
Timberflame FS35 ETR (New Zealand)
Table of Contents
Customer Instructions
Control Panel Layout 2
Operation 3
Setting the Clock 5
Operating the Timers 6
Error Codes 7
Safety Points 8
Troubleshooting 9
Installation Instructions
Location 10
Flueing 11
Gas Connection 11
Log Installation 12
Testing & Commissioning 13
Technical Data 14
Service Contact Points 14
Wiring Diagram 15
Installation Checklist 16
Installer Details 16
IMPORTANT
This appliance shall be installed in accordance with:
•
Manufacturers Installation Instructions.
• Local Gas fitting regulations.
• Municipal Building codes.
• Gas Installation Code AG5601 / AG601 - NZ 5261.
• Any other relevant statutory regulation.
• This appliance must only be installed, serviced and removed by an
authorised person.
• For Australian installation, this appliance must be installed with
the supplied wire dressguard.
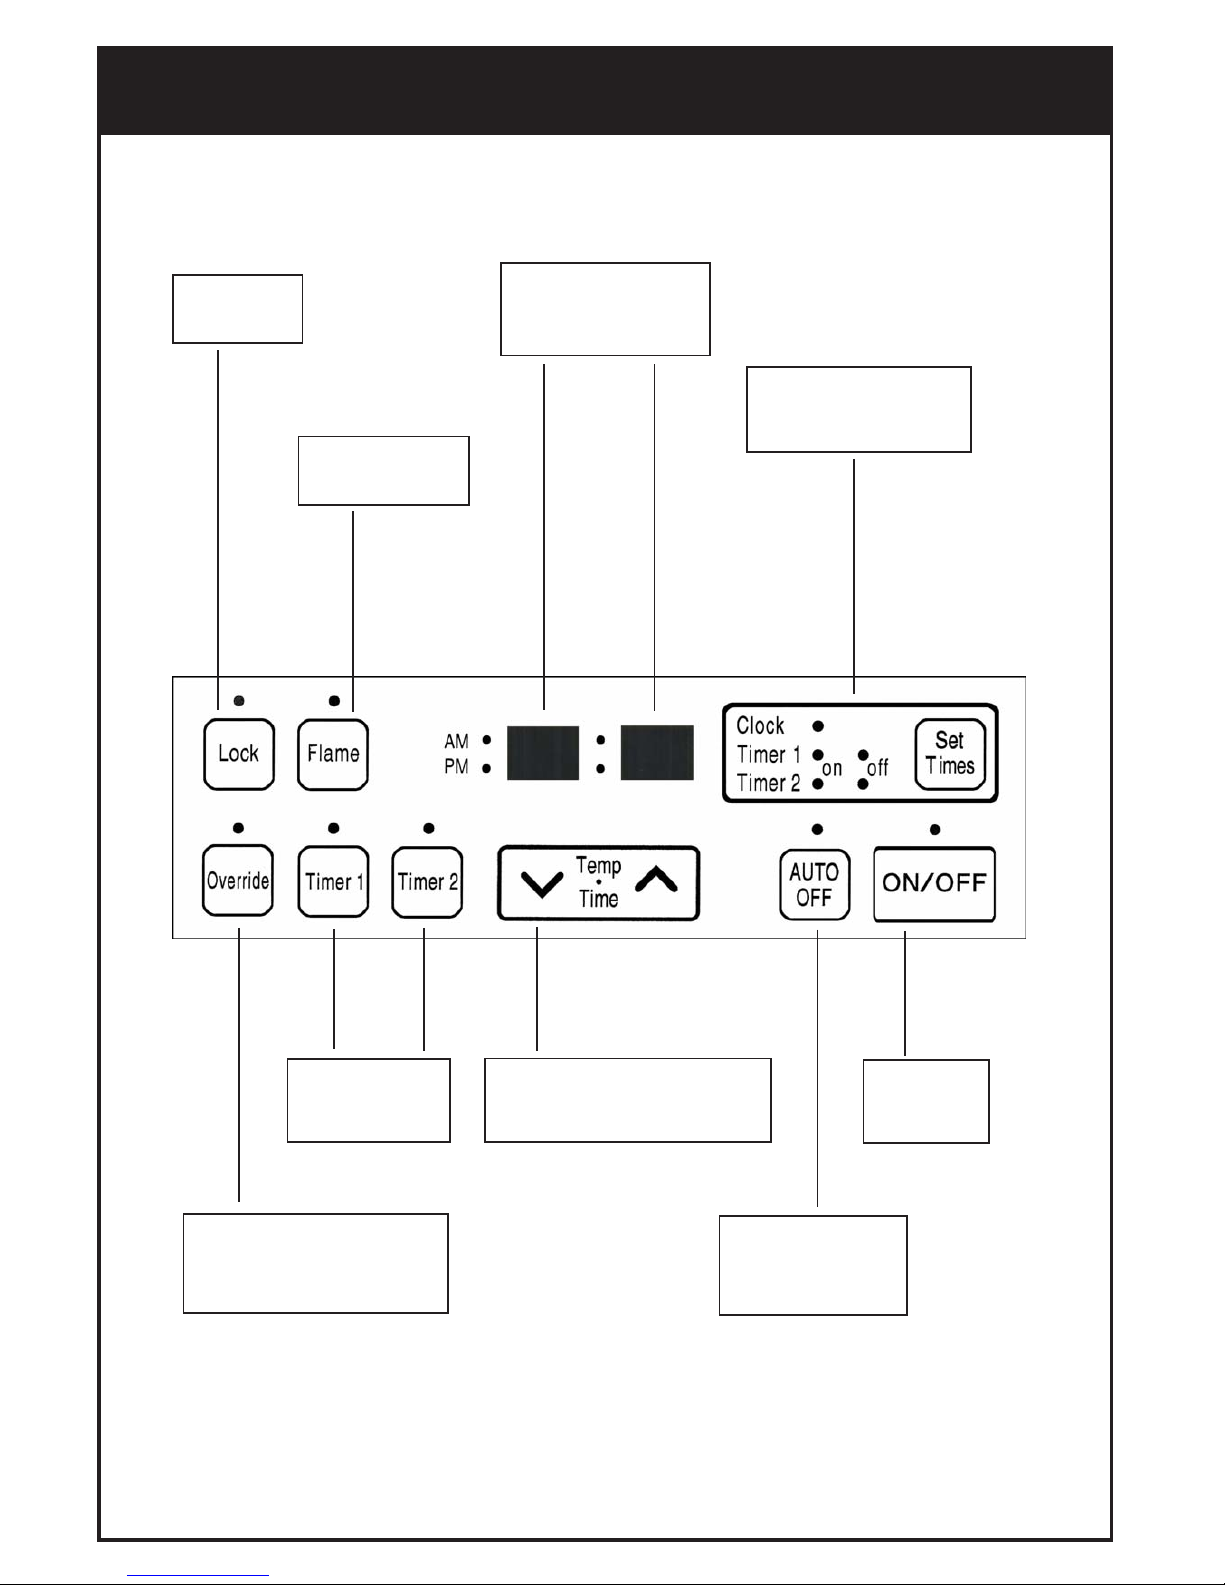
LOCK Button
Indicates lock
function
TIMER Indicator
Indicates that TIMER 1
or TIMER 2 has been
selected to operate.
TIME / TEMP. Adjustment
Increases or decreases the temperature
setting as well as changing
hours or minutes.
ON/OFF Button
Main Switch for
turning ON/OFF.
TIME/TEMP. Display
Shows either the time of day,
temperatures or coded error
messages.
CLOCK ADJUSTMENT AND
TIMER INDICATORS
Indicates that clock or dual timer
programme is being set.
OVERRIDE
Temporarily changes operation from
ON to OFF or OFF to ON, until next
programmed setting is reached.
AUTO OFF
When ON, Thermostat
turns heat down to OFF.
When OFF, Thermostat
turns heat down to LOW.
Flame Function
Med. High heat setting
and overides thermostat
CONTROL PANEL LAYOUT
2

• TO OPEN THE CONTROL PANEL
Lift lightly in the centre of the lid where there is a catch. The control panel lid will then open backward to
an angle.
• TURNING ON
Press the ON/OFF button to operate the heater. The ON indicator will glow green. The spark generator will
be heard before the burner ignites and the ON indicator glows red, indicating that the heater is alight.
When the heater warms up, the fan will automatically start.
• TURNING OFF
Simply press the ON/OFF button to switch off the heater. The ON indicator light will go out. The fan will
continue to operate for several minutes after the burner has gone out in order to cool the appliance. Do not
unplug the appliance while the fan is running.
• ROOM TEMPERATURE ADJUSTMENT
Press the “▲“ button to increase the temperature setting or “▼“ button to decrease the temperature setting.
The temperatures can be preset to: a) [L] low (about 10°C)
b) [16°C] to [26°C] in 1°C steps
c) [H] (continuously high)
• LOCK
To operate the lock simply press the LOCK button. The function is activated immediately and the LOCK
indicator will glow. To deactivate the LOCK simply press the LOCK button for 3 seconds and the LOCK
indicator will go out. The LOCK can be deactivated at any time in this way.
If the heater does not ignite on initial use, this may be due to air remaining in the gas supply line. The
spark generator will only continue for 15 seconds. After this it will be necessary to press the ON/OFF
button OFF, then ON again.
DO NOT turn off by unplugging at the power point. The fan will continue to run until the appliance
cools.
The room temperature and pre-set temperatures can only be displayed and adjusted when the
heater is running.
If the heater does not ignite then the pre-set temperature may not be set to a setting which is higher
than the room temperature. The ON indicator will change colour from red to green when the heater
reaches the pre-set temperature and stops running.
The LOCK function will help to prevent accidental operation as well as small children from altering
the controls.
During normal operation the LOCK may be activated and all controls, other than the OFF switch, will
be locked. Deactivating the LOCK releases the controls. If the LOCK is activated whilst the heater is
turned OFF, then all functions will be locked. If the heater is turned OFF while the LOCK is activated,
it cannot be turned ON again until the LOCK is deactivated.
• FLAME
To operate the Flame function, simply press the FLAME button. This function will automatically override
the thermostat and set the heater to a default Medium High heat setting for full visual flame effect.
• AUTO OFF
To operate the Auto Off function, simply press the Auto Off button.
When the Auto Off function is ON, the indicator light will flash and the thermostat will turn the burners
down to the OFF heat setting when the selected temperature is reached.
When the Auto Off function is OFF, the indicator light will go Off and the thermostat will turn the burners
down to the LOW heat setting when the selected temperature is needed.
OPERATION
3
To operate the OVERRIDE simply press the OVERRIDE button. The OVERRIDE indicator will flash.
To manually deactivate the OVERRIDE simply press the OVERRIDE button again. The OVERRIDE indicator
will go out, and the heater will return to standby mode.
This function is intended to be used to manually override the current operation of the heater. For
example; If the heater is in standby mode (ie. between finishing time and starting time of a Timer),
and the OVERRIDE button is selected, then the heater will begin to operate and heat the room.
The heater will continue to operate on OVERRIDE until the OVERRIDE button is pressed again, or
one of the Timers takes over the operation of the appliance. This means that the OVERRIDE mode
will automatically drop out if a programmed starting time is reached. The appliance will then return to
operating at times programmed into the Timer(s).
• OVERRIDE
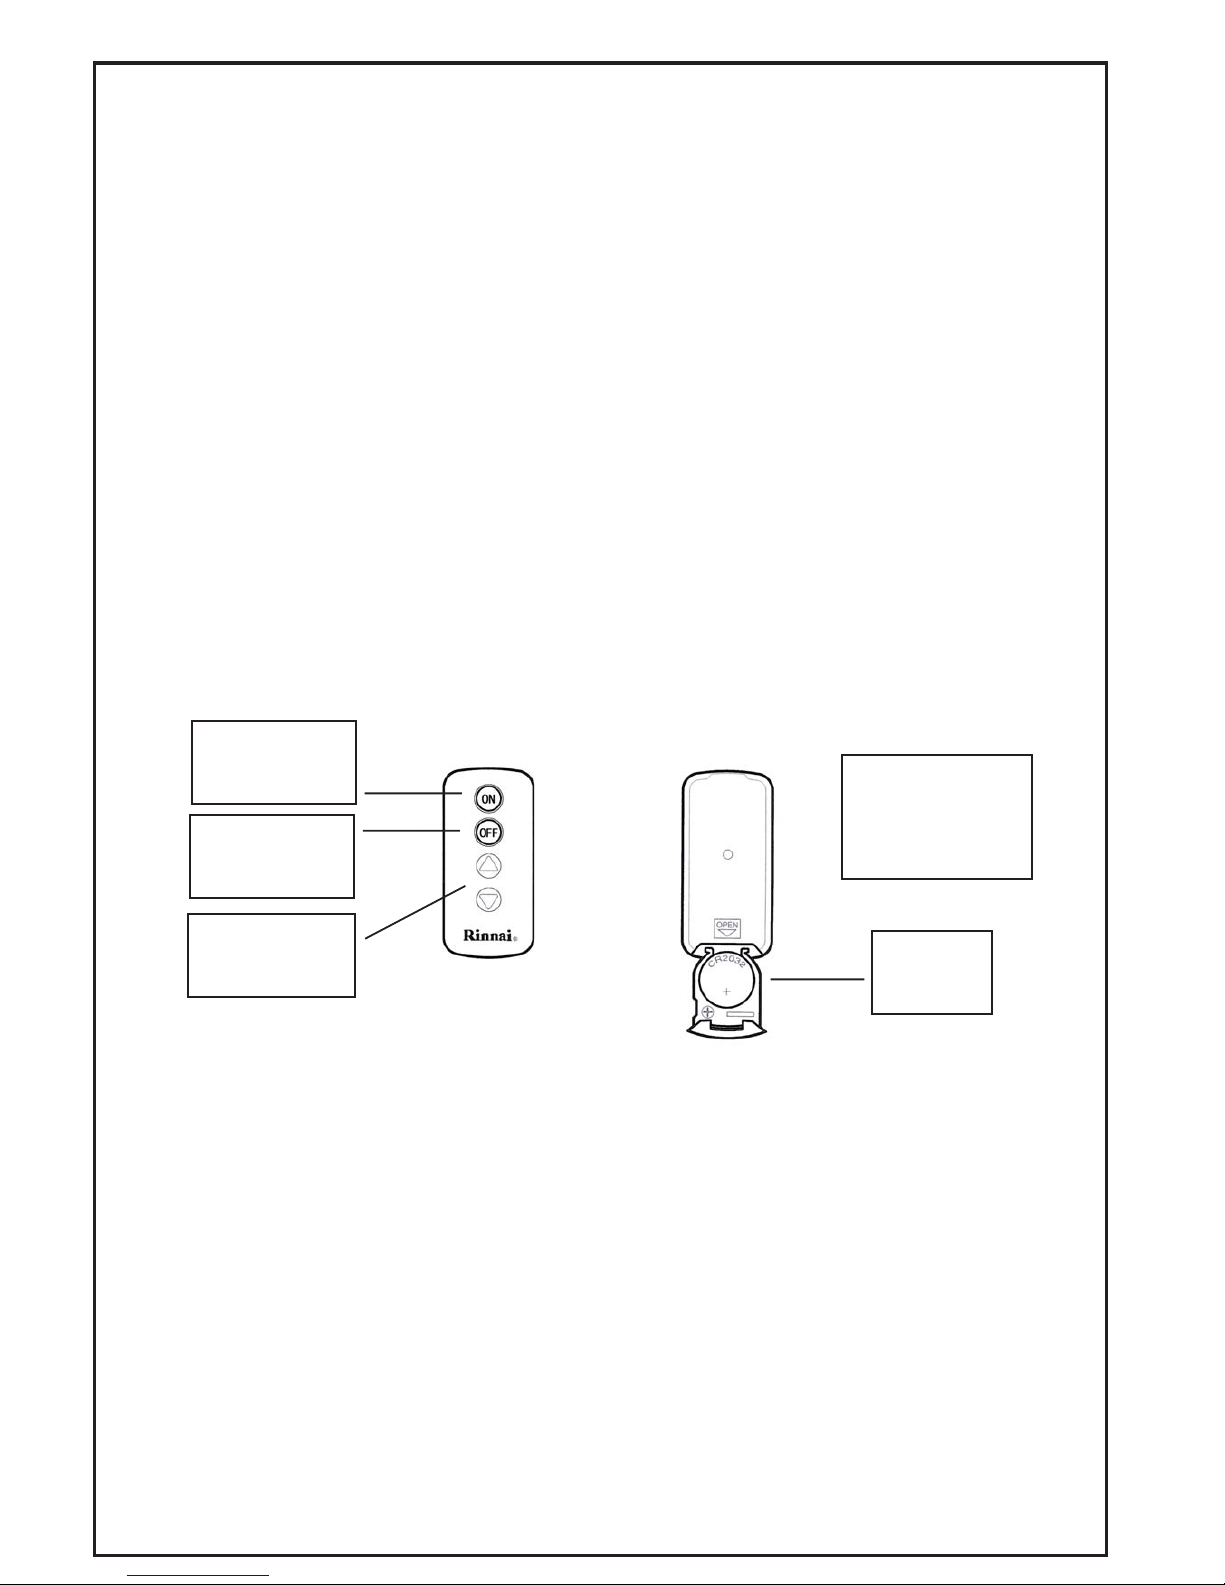
• REMOTE CONTROL
To manually operate when Timer(s) are not selected, simply press the ON or OFF button.
To alter the temperature at anytime while the heater is operating, simply press the “▲“ or “▼“ buttons.
Remote Control will not turn heater ON if Timer(s) have been selected.
ON BUTTON
Operates the heater
manually.
OFF BUTTON
Stops heater
manually.
TEMPERATURE
ADJUSTMENT
Increases or decreases
the temperature setting.
TO REPLACE
BATTERY
Simply open the back of
the remote control and
replace Lithium battery.
TYPE: CR 2032
BATTERY
Power source
for operating
remote control
Some fluorescent lights may interfere with the transmission of remote control signals, in this case changing
the position from which you are operating the remote control may help.
Avoid getting the remote control wet, or dropping it.
The remote control works within 5 metres and an angle of 40° to the receiver on the heater.
Only use the battery type specified. (CR2032).
Remove battery if control is not going to be used for a long period. This will help avoid damage from
leaking batteries.
If the Timer(s) have been selected, and the heater is in standby mode, and the OFF button on the
Remote Control is pressed, the Timer(s) will be deactivated.
4

pTR
Press and hold the “▲“ button; the minutes will begin to change first, then the time will change by whole
hours.
Release the button when AM 10:00 shows on the Digital Display. Confirm that you have selected AM, a small
indicator on the left hand side of the Digital Display indicates the AM setting.
Press and hold the “▲“ button again, release the button when AM 10:35 shows. If you go past AM 10:35, then
the “▼“ button can be used to change the time settings in reverse.
Press the Timer Set button five times to lock in and complete setting the time. The Clock and Timer indicators
will go out. A small indicator on the Digital Display will flash to show that the clock is operating.
• SETTING THE CLOCK
When the appliance is first plugged in or after a power failure, the Digital Display will show --:--
As an example, let’s set the clock to 10:35 am:
Press the SET TIMES button once, the Clock indicator will flash.
As an example, let’s program Timer 1 to heat the room by 7:10am and finish at 9:00am.
Press the Set Times button twice. The Digital Display will show AM 6:00. Timer 1 indicator will flash.
Press the “▲“ button until AM 7:00 appears, release the button, then press it again until AM 7:10 appears.
(Press the “▼“ button if you go past AM 7:10.)
Press the Set Times button again, the Timer 1 OFF indicator will flash. Press the “▲“ button until AM 9:00
appears. (Press the “▼“ button if you go past AM 9:00.)
Press the Set Times button three times to lock in the program time. The Digital Display will show the current
time. A small indicator on the Digital Display will flash to show that the Display has returned to the clock.
Before programming the Timers you must ensure that the clock has been set to the correct time.
Timer 2 is programmed in the same way, remember to ensure that the Timer 2 indicator is flashing
when you program in the desired setting. The Timers can be programmed to operate for any two
periods in any 24 hours.
Turn to the next page to operate the dual timer. The programmed time must be selected and
locked-in within one minute of the On Timer indicators flashing otherwise the programmed times will
not be retained in the system memory.
• PROGRAMMING THE ON / OFF TIMERS
SETTING THE CLOCK
5
 Loading...