


Dear Customer,
Thank you for purchasing this Digital Piano,
a high-quality electronic keyboard with 88 weighted standard touch
sensitivity keys and advanced PCM tone generation.
To ensure trouble-free enjoyment, please read this manual carefully and
use the instrument as directed. This will also enable you to make full use
of all the various functions of your Piano.

Content
Overview
Functions
1. Turning on/off the piano
2. Adjusting speaker volume
3. Adjusting the sound
4. Connecting headphones
5. LINE OUT Output
6. LINE IN Input
7. Pedal functions
8. Voice selection
9. Voice combinations
10. Split function
11. Transposing
12. Reverb effect
13. Chorus effect
.......................................................................
.......................................................................
....................................................
........................................................
....................................................
..........................................................
..............................................................
.............................................................
..............................................................
........................................................
..............................................................
...............................................................
..............................................................
..............................................................
..................................................
3
5
5
5
5
6
6
6
6
7
7
8
8
8
8
14. Memory function
15. Touch sensitivity
16. Metronome and tempo
17. Record and playback
18. Demo songs
19. MIDI
20. USB jack
Safety instructions
FCC warning statement
MIDI Implementation Chart
Technical specifications
Assembly Instructions
-2-
.......................................................................
...................................................................
..........................................................
..........................................................
.....................................................
......................................................
................................................................
.............................................................
.......................................................
.......................................................
..........................................................
..................................................
9
9
9
10
10
11
11
12
13
14
15
16
Overview
PLAY
14
CLEAR
SPLIT
13
CAUTION
20
LINE IN
19
LINE OUT
17 18
PEDAL USBMIDI IN
16
MIDI OUT
AC POWER
Backside Panel
12
11
MULTI DISPLAY
T
E
P
Up Panel
M
10
T
N
A
R
9
8
7
6
5
4
ORGAN RECORD MELODY1 MELODY2
STRINGS
HARPSI VIBES
E-PIANO 1 E-PIANO 2
PIANO
STUDIO
PIANO
GRAND
O
S
LAYER VOLUME
METRONOME TOUCH CHORUS DEMO
REVERB
PLAY
CLEAR
SPLIT
ORGAN RECORD MELODY1 MELODY2
STRINGS
HARPSI VIBES
E-PIANO 1 E-PIANO 2
PIANO
STUDIO
PIANO
GRAND
MULTI DISPLAY
T
E
P
O
M
T
S
N
A
R
LAYER VOLUME
METRONOME TOUCH CHORUS DEMO
REVERB
TREBLE
BASS
LOW HIGH
MASTER VOLUME
MIN MAX
TREBLE
BASS
3
LOW HIGH
2
MASTER VOLUME
MIN MAX
1
PHONES2 PHONES2
PHONES1PHONES1
15
-3-

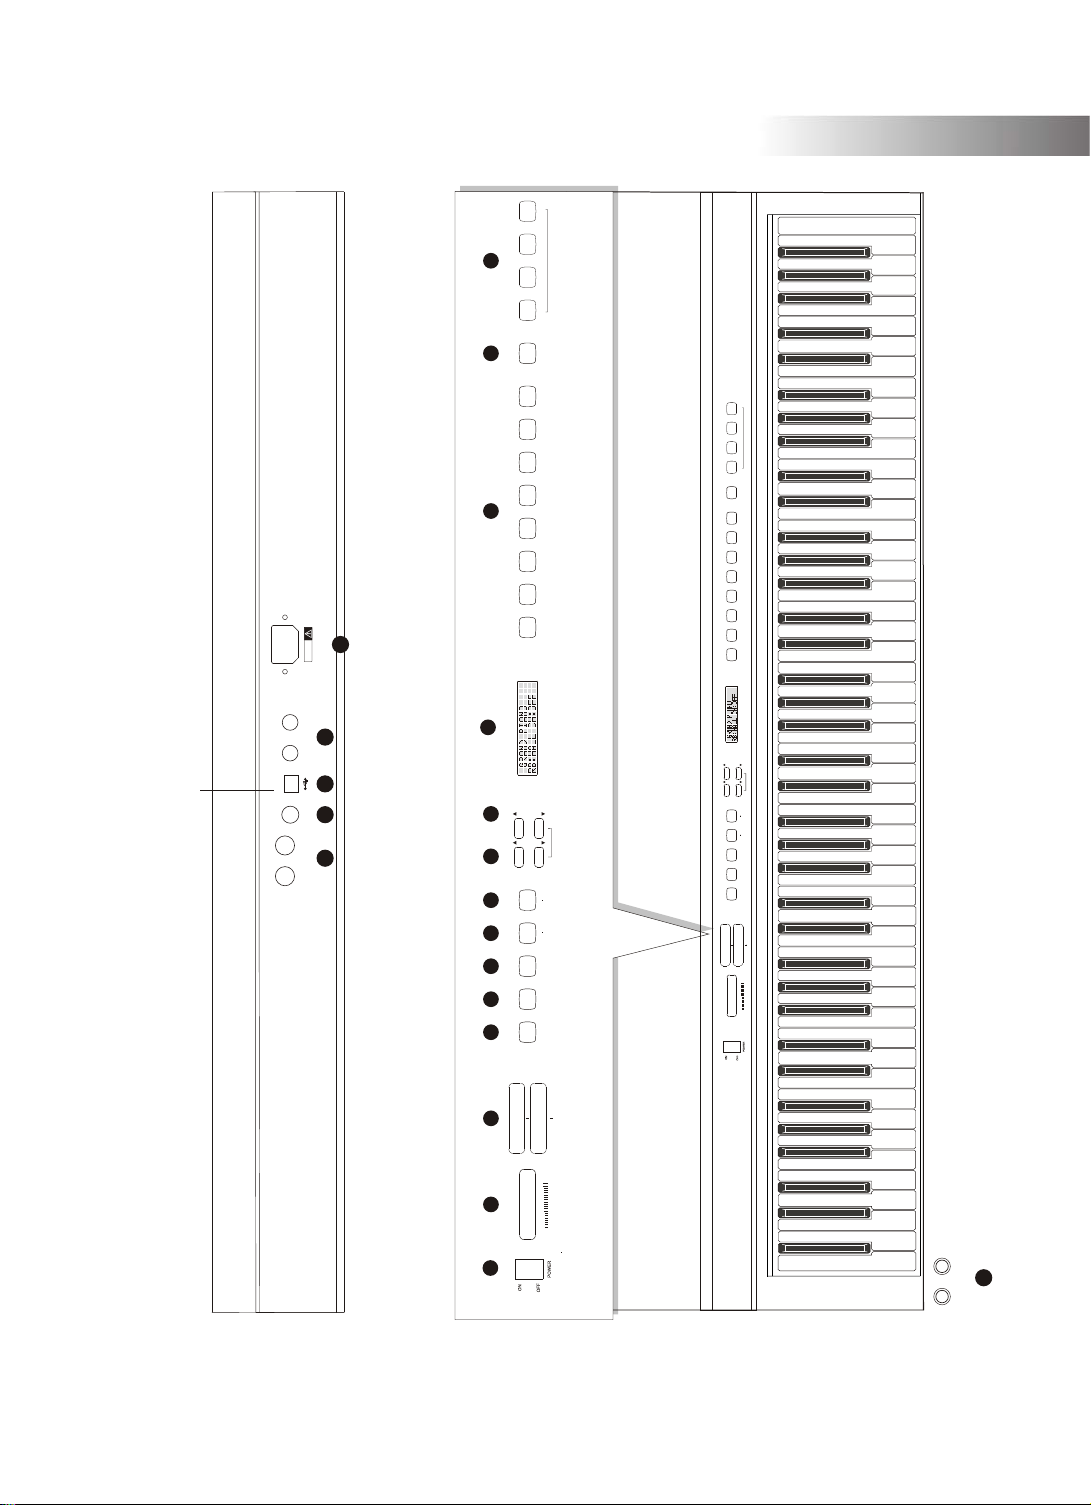
Overview
Top Panel
1 POWER switch Turns the instrument on and off
2 MASTER VOLUME fader Controls volume for speakers and
headphones (when connected)
3 BRIGHTNESS fader Control the sound of the piano
4 REVERB button Sets on the room ambience of the sound
5 CHORUS button Turns on the sound modulation
6 TOUCH button Sets the touch sensitivity
7 DEMO button Activates/deactivates demo song mode
8 METRONOME button Turns the metronome on and off
9 TRANSPOSE buttons Activate/deactivate transpose mode
10 TEMPO buttons Adjusts metronome tempo
11 LCD-Display Shows various informations
12 VOICE SELECTION buttons Selects voice presets; also used for
demo song settings
13 SPLIT button Splits the keyboard into two voice-sections
14 SEQUENCER Activates/deactivates record and
playback functions
15 HEADPHONE jacks Connects to two pairs of headphones
Rear panel:
16 MIDI In/Out jacks Connects the piano to other MIDI
compatible instruments
17 PEDAL jack Connects to cable from pedal unit
18 USB jack Connects the piano to a PC
19 LINE IN/OUT jack Connects external sound equipment
20 POWER jack Connects to power cable
-4-

1. Turning on/off the piano
To turn the digital piano on and off, use the
POWER switch located in the panel above
the keyboard.
When the piano is turned on, the text GRAND
PIANO will appear in the LCD display.
Connect the piano to a power socket carrying
the correct voltage (indicated on the rear
panel). Use the enclosed power cord.
Never connect the piano to a power socket
that is also supplying power to electric
engines or big domestic appliances. Always
avoid connecting too many electric devices
to the same power socket.
2. Adjusting speaker volume
Use the MASTER VOLUME fader to adjust
the speaker volume. When the fader is
pushed to the far left, the volume will be
turned off.
For maximum volume, push the fader to
the far right.
Start playing at low volume and then increase
the volume to desired level. Do not set the
speaker volume level too high.
Functions
MULTI DISPLAY
MINMIN MAX MAX
MASTER VOLUME MASTER VOLUME
3. Adjusting the sound
The BRIGHTNESS fader can be used to
adjust the sound of the piano. If th e TREBLE
fader is pushed to the far left the high
frequency of the sound will be decreased,
if it is pushed to the right, the high frequency
will be increased. Pushing the BASS fader
to the left will decrease the bass frequency
while turning it to the right will increase the
bass frequency.
TREBLETREBLE
BASS BASS
LOWLOW HIGH HIGH
-5-

Functions
4. Connecting headphones
Two pairs of headphones can be connected
to the Digital Piano. The headphone jacks
are located to the left on the front panel.
The internal loudspeaker system will switch
off automatically when headphones are
connected. Use the MASTER VOLUME
fader to adjust the headphone volume level.
5. LINE OUT Output
The Line Out jack can be used to deliver
the output of the piano to a keyboard amplifier, stereo sound system, mixing console
or recording device.
The Line Out level is not affected by the
MASTER VOLUME fader setting.
6. LINE IN Input
PHONES 2PHONES 1
LINE OUT
Stereo
System
Through the LINE IN In put jack an ext ernal
sound source, for example a CD-Player,
LINE IN
may be connected to the piano. This makes
it possible to play along to the music played
by the CD-Player.
7. Pedal functions
Stereo
System
By using the pedals on the Digital Piano
you can produce the same tonal effects as
on an acoustic piano. Please connect the
pedal unit cable to the PEDAL jack on the
rear panel of the piano.
The sustain pedal (right) functions as a
damper pedal controlling sustain. Press
the pedal to sustain notes after the keys
are released.
SOFT
SOSTENUTO
SUSTAIN
The sostenuto pedal (middle) will sustain
notes played when the pedal is pressed
down. Notes played afterwards will not be
sustained (This is also known as “selective sustain”).
The soft pedal (left) controls tone volume. Press down the pedal to decrease the
volume. Release the pedal to return to normal volume.
-6-

8. Voice selection
This Digital Piano features
eight different voice presets.
Choose the desired preset
using the VOICE SELECTION
buttons on the top panel.
The chosen preset will be
indicated by a blue light the
button and shown in the LCD
Display.
The following eight presets are
available: Grand Piano, Studio
Piano, E-Piano 1, E-Piano 2,
Harpsi, Vibes, Strings and
Organ.
9. Voice combinations
To further increase the sound
options, the Piano features
the possibility of combining
two different voice presets.
GRAND
PIANO
GRAND
PIANO
STUDIO
PIANO
STUDIO
PIANO
E-PIANO 1 E-PIANO 2
E-PIANO 1 E-PIANO 2
Functions
HARPSI VIBES STRINGS
HARPSI VIBES STRINGS
ORGAN
ORGAN
By pressing down two VOICE
SELECTION buttons at the
same time, both presets will be
selected, enabling you to use
two voices simultaneously.
In this case, both presets will
be indicated by blue lights the
corresponding buttons.
The balance between the two
selected voices may be
adjusted with the LAYER
VOLUME-buttons. When two
CHORUS
T
R
A
N
S
LAYER VOLUME
T
E
M
P
O
MULTI DISPLAY
voices are chosen and the
CHORUS-button is pressed
for a longer time, the balance
between the two voices will be
displayed in the LCD-display. Now this balance may be adjusted by using the two
LAYER VOLUME-buttons.
-7-

Functions
10. Split function
The keyboard of your piano may be divided into two sections. In each section you may
choose a different voice, so you may play different voices with your left hand and your
right hand.
First you should choose the voice to be
played in the right section of the keyboard.
Then press the SPLIT button to enter the
Split mode. Now you may choose th e voice
you intend to play in the left section of the
keyboard.
It is even possible to select voice combinations for each section of the keyboard.
When you press the SPLIT button again
you will leave the Split mode.
SPLIT
MULTI DISPLAY
MULTI DISPLAY
The key where t he keyboard is divided may
SPLIT
be set by pressing the SPLIT button for a
long time while you are in the Split mode.
Now the display will show the Split po int that
is set. By playing the key where you would
like to set the Split point, the new Split point will be set.
11. Transposing
By using the TRANSPOSE buttons you can transpose the keyboard up or down by
12 semitones (in semitone steps, indicated by the LCD-display). To reset, press
down both TRANSPOSE buttons simultaneously.
12. Reverb effect
With the Reverb-effect the sound reverberation of the room is simulated. Three
different kinds of rooms (Off, Hall,Room
REVERB
MULTI DISPLAY
Theatre) may be chosen by using the
REVERB button.
13. Chorus effect
The Chorus reproduces an electronically
obtained modulating effect, which may be
activated or deactivated by pressing the
CHORUS button.
-8-
MULTI DISPLAY
CHORUS

Functions
14. Memory function
The settings you choose for the Reverb and the Chorus effect will be memorized by the
piano. When you turn on the piano your preferred setting for both effects will be set.
You have two options to reset both effects to the factory setting.
When you press one VOICE button for a long time, this single voice will be set back to
factory setting.
When you hold both TEMPO buttons down simultaneously and then turn on your piano,
all voices will be set back to factory setting.
15. Touch sensitivity
The touch sensitivity of the keyboard can be adjusted using the TOUCH button.
The piano features three different settings (Hard, Normal, Soft, Off) as well as the option
to turn off the touch sensitivity.
When the touch sensitivity is turned off the
Volume of the tone can be adjusted by
pressing the TOUCH button a long time.
As soon as Touch: 100 is shown i n the
LCD-display, the Volume can be adjusted
using the two TEMPO buttons.
Pressing the TOUCH button and the two
TEMPO buttons simultaneously will reset
the Volume to 100.
TOUCH
T
E
M
P
O
16. Metronome and tempo
The metronome function keeps a rhythm
going while you are playing. Press the
METRONOME button to turn the function
on and off.
The chosen tempo will be shown in the
T
E
M
P
O
MULTI DISPLAY
LCD-display.
By using the TEMPO buttons the metronome speed can be adjusted from 20 to 280
bpm (beats per minute). By pressing both
TEMPO buttons simultaneously the tempo will be reset to 120 bpm (default).
By pressing METRONOME and using the TEMPO-buttons different beats maybe chosen
(1/4; 2/4; 3/4;4/4; 6/4; 6/8 and 12/8).
-9-

Functions
17. Record and playback
This Digital Piano allows you to record and playback your performance on the instrument.
The recording will include pedal operations and can contain upto 3000 notes.
Record: Activate Recording by pressing
the RECORD button and simultaneously
the MELODY button of the track (M elody1
or Melody2) on which you would like to
record your performance. The Metronome
will count to 4 till the recording starts.
Your performance will be recorded.
RECORD MELODY1 MELODY2
CLEAR
Press the MELODY button again to stop
recording.
Playback: Press the MELODY button of the track you would like to playback. Then press
the PLAY button to start the playback. Press the PLAY button again to end the playback.
It is even possible to playback both tracks at the same time.
Furthermore one track can be played while recording the other track. By activating one
track before starting the recording of the other track as described the passive track
will be played back while recording the other.
PLAY
Clear recording: Press the
RECORD and PLAY button
simultaneously to enter
clearing record status and
you can also press the two
RECORD MELODY1 MELODY2
CLEAR
PLAY
MULTI DISPLAY
buttons again at the same
time to exit the status. Now
you are able to delete the
track(s) by pressing the
corresponding MELODY
button(s).
RECORD MELODY1 MELODY2
CLEAR
PLAY
MULTI DISPLAY
18. Demo songs
The Digital Piano features eight demo songs. The demo mode is entered by pressing
the DEMO button. This will activate the lights above the VOICE SELECTION buttons.
The different demo songs can now be selected by pressing the VOICE SELECTION
buttons. If no song is selected after entering demo mode, the first song will automatically
start playing after five seconds. Exit demo mode by pressing the DEMO button again.
MULTI DISPLAY
GRAND
DEMO
PIANO
STUDIO
PIANO
E-PIANO 1 E-PIANO 2
HARPSI VIBES STRINGS
ORGAN
-10-

Functions
19. MIDI
MIDI (Musical Instrument Digital Interface) is a
world-standard communication interface that
allows MIDI compatible musical instruments
and equipment to share musical information
MIDI
IN
and control one another.
This makes it possible to create systems
of MIDI instruments and equipment that offer
far greater versatility and control than is
available with isolated instruments.
The MIDI IN jack on the Piano can receive MIDI data from an external MIDI device that
can be used to control your digital piano. The MIDI OUT jack transmits MIDI data
generated by the Digital Piano (e. g. note and velocity data produced by playing the
instrument). When connecting MIDI compatible instruments, always connect the MIDI
OUT jack of one instrument to the MIDI IN of the other.
Never connect the two MIDI jacks of
the same instrument. This Digital Piano
MIDI KEYBOARD
transmits note and velocity (touch
response) information via the MIDI
OUT connector whenever a note is
played on the keyboard. If the MIDI
OUT connector of the Piano is
connected to the MIDI IN connector
Local instrument
of a second instrument (synthesizer
etc), that instrument will respond
precisely to the notes played on the Piano.
The result is that you can play two (or more) instruments at once, creating multiinstrumental sounds. The Digital Piano also transmits “program change” data when one
of its voices is selected. Depending on how the receiving MIDI device is set up, the
corresponding voice of that device will be automatically selected whenever a voice is
selected on this Piano.
MIDI
OUT
MIDI OUT
MIDI IN
The Piano is, of course, also capable of receiving MIDI data. A second MIDI keyboard
connected to the MIDI IN jack of the piano can be used to remotely play and select
voices as required on the Piano.
20. USB jack
The USB jack of your piano may be connected to a computer. The required operation
system would be Microsoft Windows XP or later only. By using an appropriate software
®
you may edit the data from your piano with your computer.
-11-

Safety instructions
-12-

FCC warning statement
-13-

MIDI Implementation Chart
-14-

Technical Specifications
-15-

Assembly Instructions
F
A
C
B
D
A
C
E
G
G
A:
B:
C:
D:
E:
F:
G:
X4X4
X4X4
X2X2
X4 X4
X6X6
X4X4
X4X4
M6X16M6X16
M6X25M6X25
M4X16M4X16
ST3.9X20ST3.9X20
d=4d=4
M6X55M6X55
B
Before moving the piano to a new
location, always remember to raise
the level of the Pedal Board support
so that it is not touching the floor.
Once the piano is in place, you can
adjust it so it is in firm contact with
the floor again.
-16-

10505451V1.0

 Loading...