

OWNER’S MANUAL
New feel, new look and new sound
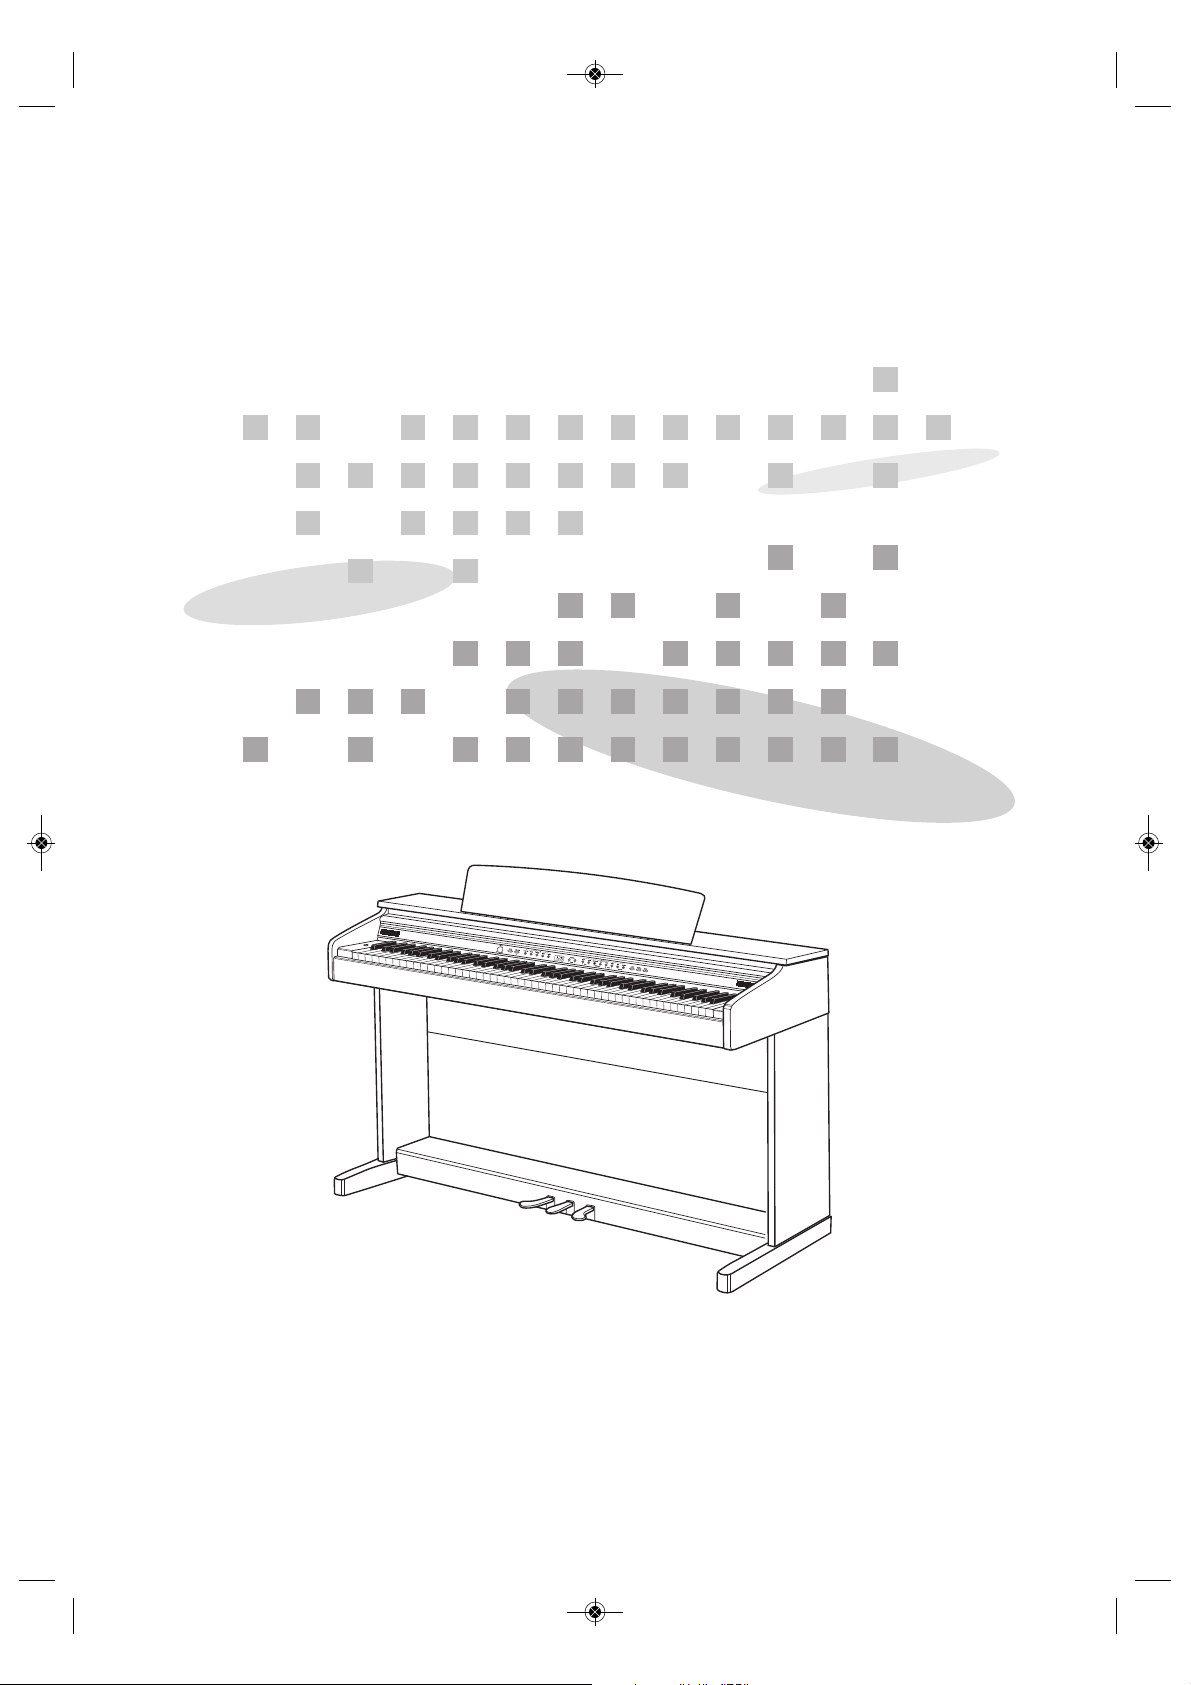
High Performance USB Digital Piano

PRECAUTIONS WARNING
1
PRECAUTIONS
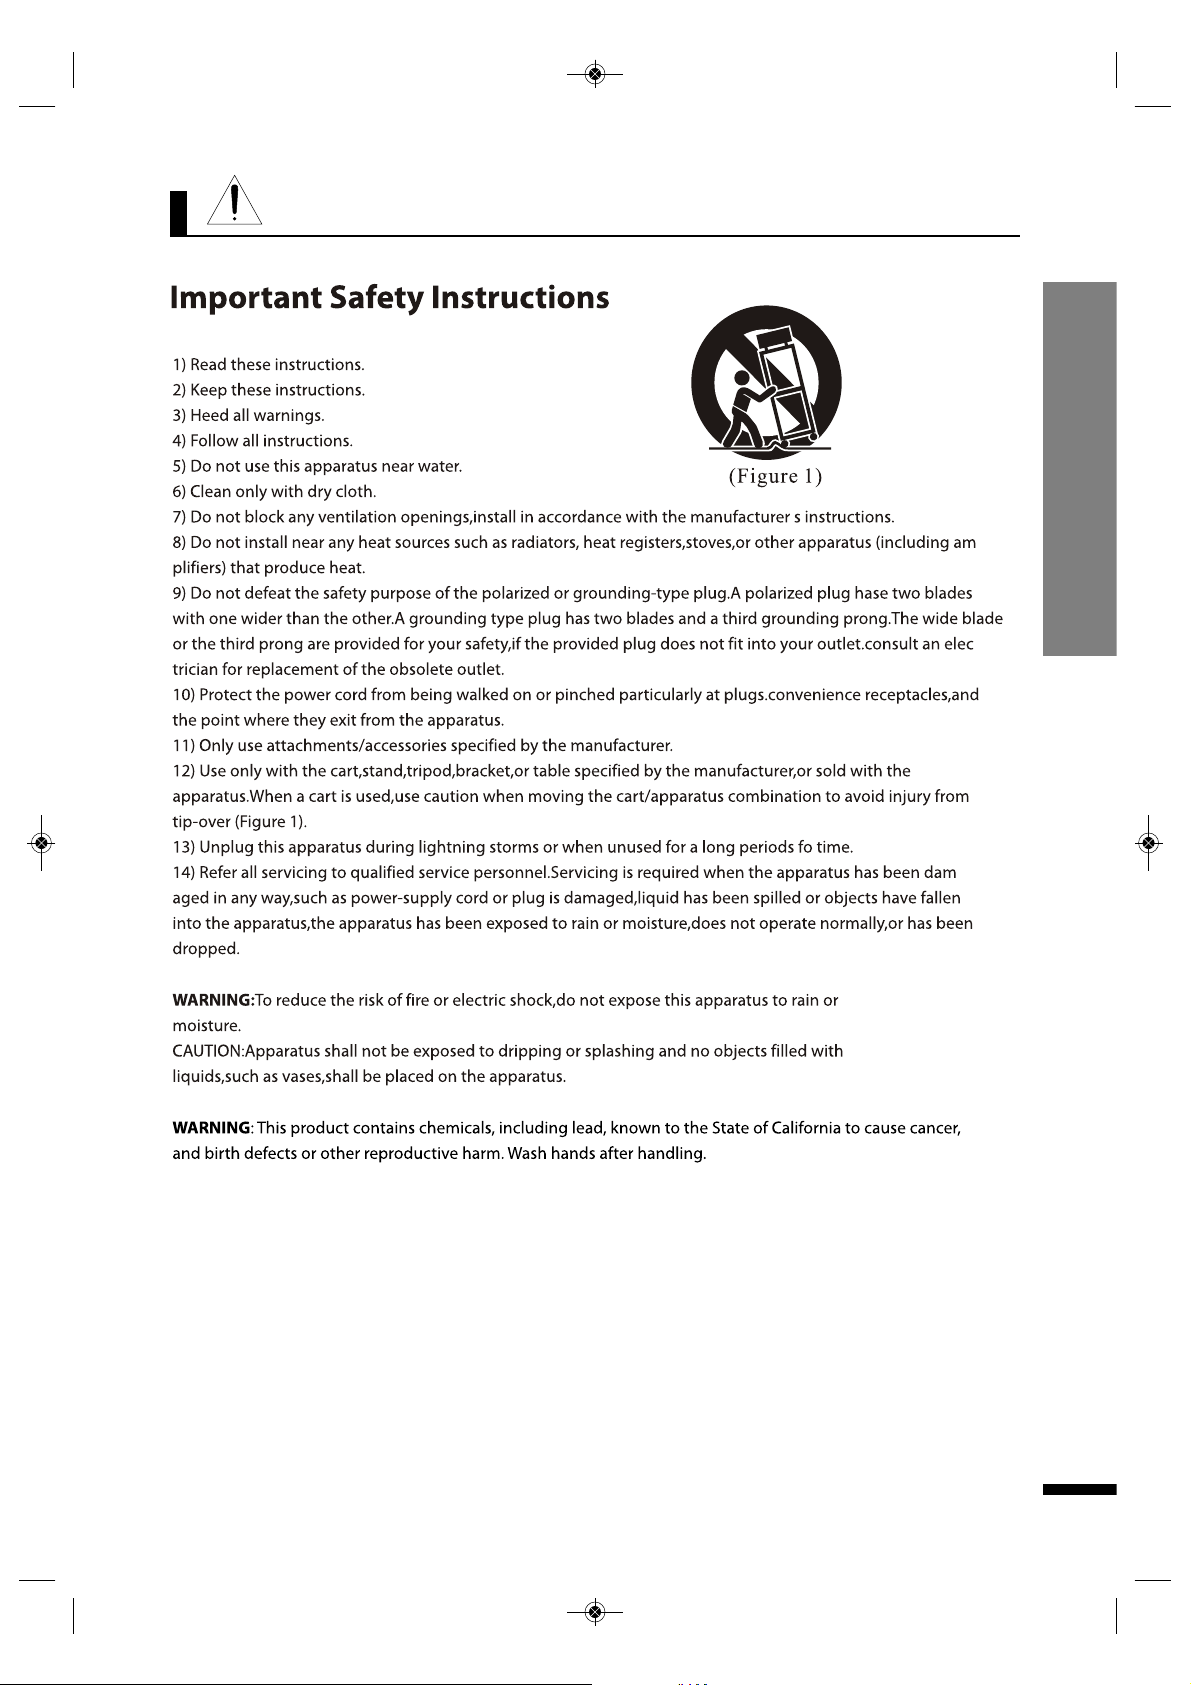
2
PRECAUTIONS CAUTION
CAUTION

3
Welcome
PRECAUTIONS Welcome / Main Features
Thank you and congratulations on your purchase of high performance USB digital piano.
Your new digital piano is a state-of-the-art musical instrument which incorporates the latest electronics
technology to make its operation as easy as possible.
In addition to the many features usually found on digital pianos, this product contains a variety of
educational resources that can be used for the learning of musical concepts and piano skills.
Your versatile digital piano is ideal for both beginners and experienced musicians alike.
The piano's compact size will allow it to fit into many places where a traditional or large-sized digital piano
can't.
Its slim stylish design will match most home interiors.
In order to enjoy and utilize the features and functions of this unit to their fullest, be sure to carefully read
this manual and follow the instructions contained herein.
Main Features
16 Instruments
Grand Piano 1/2, Harpsichord, Vibraphone, Elec. Piano 1/2, Organ 1/2, Elec. Organ 1/2, Strings 1/2, Bass 1/2,
Drum set, Sound effect set
50 Demo Music
50 pieces of classical music are enlisted in the piano as demo. You can listen to them for either your
pleasure or purpose of practicing.
2 -Track Recording and Playback
The digital piano features comprehensive song recording function that allows you to record your own
performance.
USB port
The digital piano can be connected to a PC via USB device port and MIDI and Audio data can be exchanged
between them.
Useful Functions
There are many useful functions in your digital piano such as metronome, twin piano, audio in/out, 2
headphones, tuning, transpose, layer and split.
Auto-Power-Off
Following 30 minutes of inactivity, the piano will be turned off automatically to preserve energy.
Recording
Recording and Playback
Demo Music
Playback of the Music
Demo Music List
Drum and SFX Table
MIDI Implementation
Troubleshooting
Specifications
Table of Contents
Table of Contents
4
PRECAUTIONS
WARNING
CAUTION
Welcome
Main Features
Table of Contents
Unpacking
Setting Up Your Piano
Controls and Terminals
Turning ON the Power
Headphone
Connecting to Audio Devices
Connecting to a Computer
Connecting to the Pedal
Control Panel
Basic Operation
Adjusting the Volume
Selecting Voices
Layer
Split
Changing the Split Point
Reverb
Using the Metronome
Twin Piano
Function
Tune
Transpose
Touch
MIDI Local control
Sound Setting and
Initializing Digital Piano
1
1
2
3
3
4
5
6
8
8
8
9
9
10
11
13
13
13
14
14
15
15
16
16
17
17
17
18
18
19
20
20
21
21
22
23
24
25
26
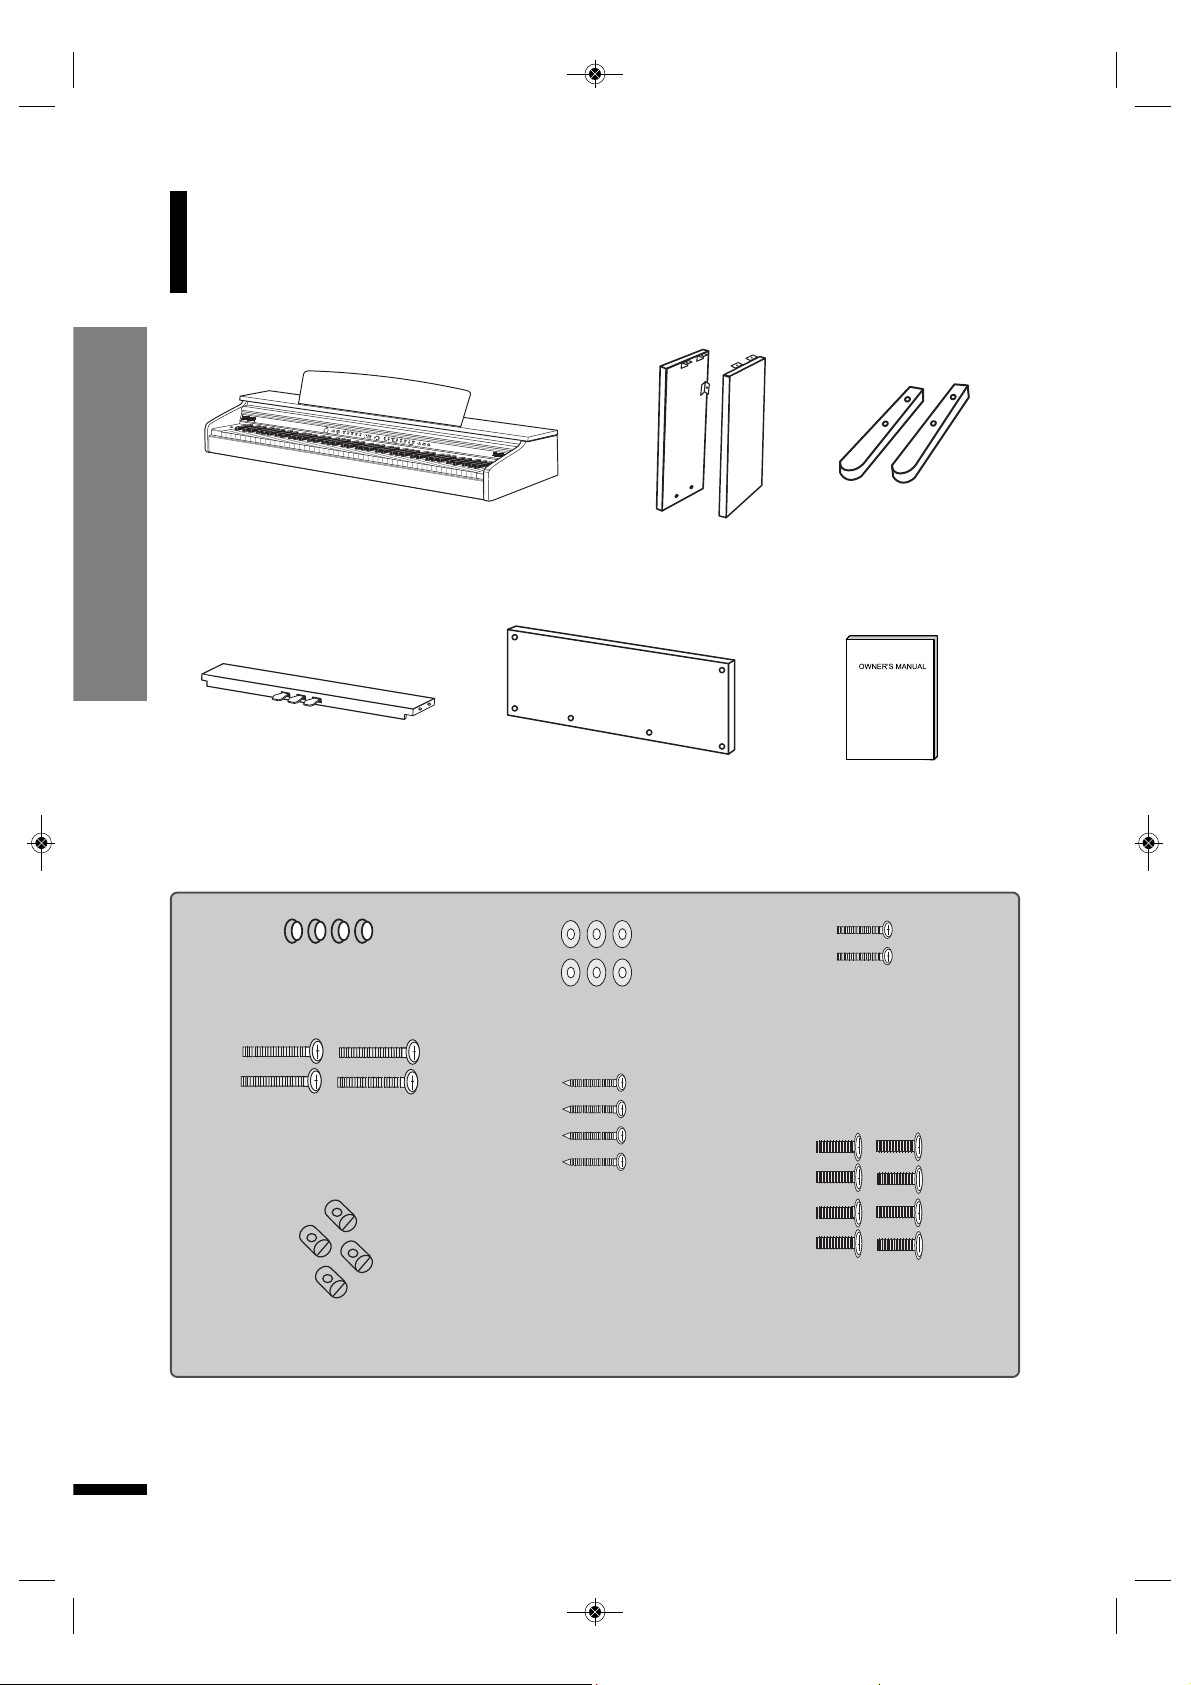
Unpacking
Carefully take out the digital piano and its accessories
from the packing box. The digital piano set consists of
the following items.
Unpacking
5
Owner's Manual
Back Panel (e)
4 Bolt Caps (f)
6 Washers (i)
4 Screws for back panel -
pedal board (j)
4 X 15 mm
8 Bolts for main unit and
pedal board (l)
M6 X 25 mm
2 Bolts for back panel - leg (k)
M4 X 12 mm
4 Bolts for foot-leg (g)
M6 X 30 mm
4 nuts for foot-leg (h)
Main Unit (a)
Right, Left Legs (b)
Pedal Board (d)
☞ Inspect each item carefully to make sure that it is in a good condition. If you find any item
missing or damaged, immediately contact the place of purchase for replacement.
Right, Left Foots (c)

Setting Up Your Piano
6
1
Attaching both legs to the pedal board
Assembling the stand
1 Place the legs (b) onto the feet (c) and
fix them using bolts (g) and nuts (h). Put
the Bolt Cap into the bolt hole as shown on
the illustration below.
2 Attach both legs to the Pedal Board (d) using
four Bolts (l) .
2
1 Insert the Back Board(e) in between the
legs and pedal board using 2 Bolts (k) and 4
Screws (j) with 6 Washers (i).
2 After fixing the back panel to the legs,
set the stand upright and make sure the
stand is set up straight.
Setting Up Your Piano
Setting Up Your Piano
7
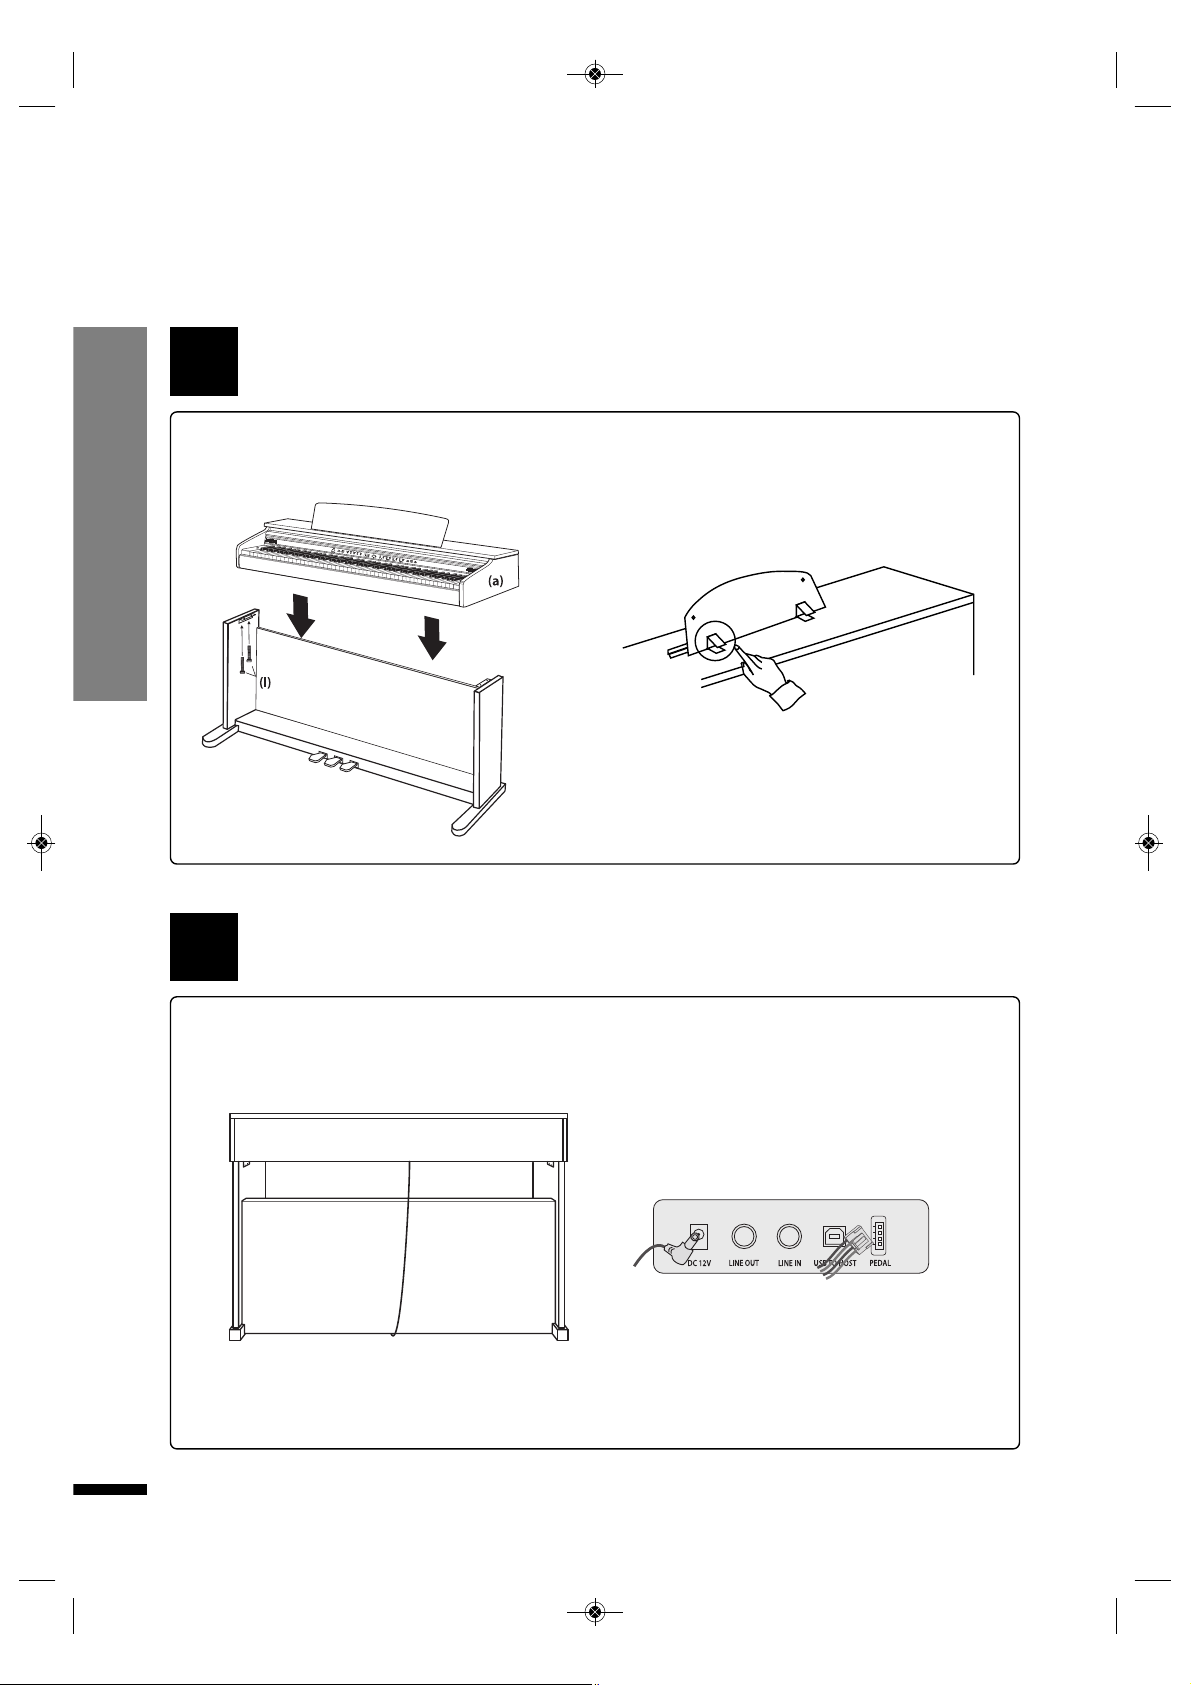
Connecting the pedal cord and AC adapter
4
Plug the Pedal Cord, AC adapter and Speaker
Cord into the corresponding ports on the
bottom of the main unit as shown in the
illustration.
3
1 Set the stand upright and gently lower
the main unit on to the stand, then fix their
connection with four Bolts (l) for Main
Unit(a) as shown in the illustration.
2 Raise and hold the music stand using two
metal supports on the rear of music stand.
Attaching the main unit to the stand
The pedal connector is on the
bottom of the main unit.
☞
Names of each connector are printed on the rear of the main
unit.
Turning ON the Power
Controls and Terminals Turning ON the Power / Headphone
8
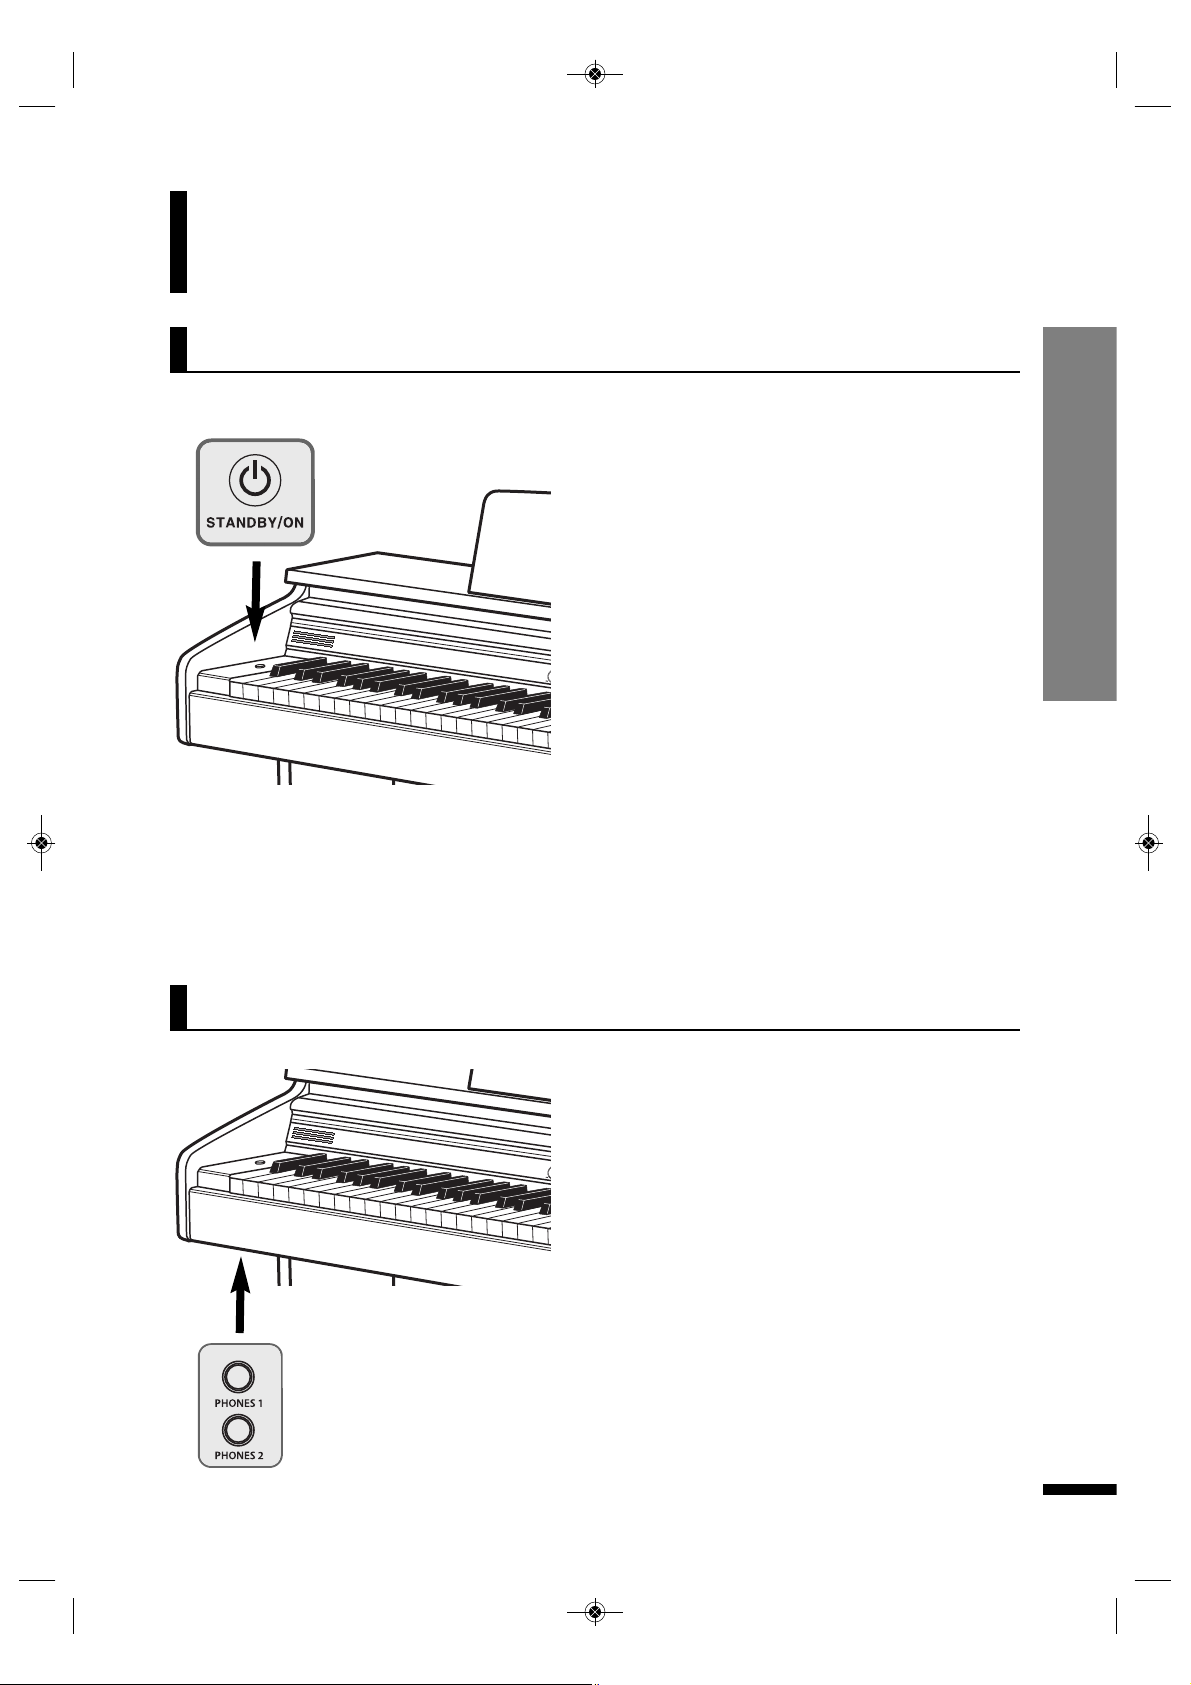
Connect a set of stereo headphones(optional) to
the HEADPHONE jack (standard 1/4" phone jacks).
Insert the headphone plug into the HEADPHONE
jack on the left bottom of the main unit.
When headphones are connected, the internal
speaker system is automatically shut off.
Since the piano has two HEADPHONE jacks, two
sets of headphones can be used simultaneously,
allowing two people to enjoy listening to the
performance at once.
1 Connect the AC POWER ADAPTER.
Insert the DC plug of the AC adapter into the piano
and the AC plug into a household AC power outlet.
☞
See 'Connecting the pedal cord and AC adapter'onpage7.
2 Turn on POWER
Press the STANDBY/ON switch to turn on the piano.
The multi-function display will show the initial
screen.
☞
The voice is initially set to Grand Piano.
☞
Adjust the volume by using MASTER VOLUME.
Auto Power Off
Following 30 minutes of inactivity, the piano will be turned off
automatically to preserve energy.
Disable Auto Power Off
To disable the auto power-off system, hold down the lowest black
and white keys and then press the STANDBY/ON button when
turning on the piano.
3 Turn off POWER
Press and hold the STANDBY/ON switch for 3
seconds.
All lights and the LED screen will be turned off.
☞
Backing Up the recorded song
The recorded music will be preserved even if the power is
turned off and then on again.
Controls and Terminals
Headphone connectors are on
the bottom of the main unit.
Headphone

Controls and Terminals Connecting Audio Devices / Connecting Other Devices
9
qLINE OUT jack (Stereo Phone jack)
Connect the instrument's LINE OUT jack and the input jacks of a pair of powered speakers using
appropriate stereo audio cable.
wLINE IN jack (Stereo Phone jack)
Connect the output jack (LINE OUT etc.) of an external synthesizer or the tone generator module and
the instrument's LINE IN jack using appropriate stereo audio cable.
The stereo outputs from another instrument can be connected to this jack, allowing the sound of an
external instrument to be reproduced via the instrument's speakers.
When this is connected, you can use the instrument's MASTER VOLUME control to adjust the
volume of the sound output to the external device.
☞
CAUTION
When the sound of an external device is output to the instrument, first turn on the power of the external device, then that of
the instrument. Reverse this order when you turn the power off.
q
w
By connecting a computer to the USB, you can transfer MIDI and audio data between the instrument
and the computer and take advantage of sophisticated computer music programs.
When connecting to a computer, the digital piano can be used as an audio device of your computer.
When you connect the digital piano to a computer, the device driver required to send and receive
data will be installed on the computer.
The below instructions explain how to connect and use the terminals.
☞ CAUTION - Precautions when using the USB terminal.
When connecting the computer to the USB terminal, make sure to observe the following points. Failing to do so risks freezing
the computer and corrupting or losing data. If the computer or the instrument freezes, turn the power of the instrument off
and restart the computer.
Connectors are on the bottom of the main unit
q
Connectors are on the bottom of the main unit
Connecting to Audio Devices
Connecting to a Computer

Controls and Terminals Connecting to the Pedal
10
Connecting the Pedal
☞
RIGHT PEDAL (Damper Pedal )
When the voice is set to any of the piano variants, the right pedal performs the same role as the
damper pedal of acoustic pianos. With organ voices, the pedal causes notes to be sustained
indefinitely until its release.
☞ CENTER PEDAL (Sostenuto Pedal)
The sostenuto pedal, like the damper pedal, causes the affected notes to be sustained until the
release of the pedal, but only the notes that are being played at the moment the pedal is depressed
are affected. All subsequent notes played while the pedal is being held down are not affected.
☞ LEFT PEDAL (Soft Pedal)
Depressing the pedal softens the sound of the notes being played.
Damper Pedal
Sostenuto Pedal
Soft Pedal
Pedal Cable
Plug Pedal cord which is protruding from the top of the pedal assembly into the corresponding
port on underside of the main unit.
Insert the pedal plug into the pedal connector on the bottom of the main unit.

Control Panel
Controls and Terminals Control Panel
11
VOLUME SECTION
1 MASTER VOLUME
VOICE SECTION
2 VOICE buttons
3 SPLIT
4 TWIN PIANO
5 REVERB
SETUP SECTION
6 SETUP
7 LED Display
8 DATA UP/DOWN
9 TUNE
0 TRANSPOSE
! TOUCH
@ LOCAL CONTROL
# ENTER
Page 13
Page 13
Page 14
Page 16
Page 15
Page 17
Page 17
Page 18
Page 18
Page 19
1
6
7
$%^&*(
ABCDEF
G

Controls and Terminals Control Panel
12
POWER
A POWER SWITCH
B DC IN
CONNECTOR
C HEADPHONE
D LINE OUT
E LINE IN
F USB
G PEDAL
PEDAL
H SOFT PEDAL
I SOSTENUTO PEDAL
J DAMPER PEDAL
Page 8
Page 7
Page 8
Page 9
Page 9
Page 9
Page 10
Page 10
Page 10
Page 10
PLAYER SECTION
$ DEMO
% RECORD
^ PLAY/STOP
& TRACK 1
* TRACK 2
( METRONOME
Page 21
Page 20
Page 20, 21
Page 20, 21
Page 20, 21
Page 16
2
345
8
90!@#
H
I
J

Adjusting the Volume
Basic Operation
Basic Operation Adjusting the Volume /Selecting Voices
13
Selecting Voices
qSelect a Voice.
Select the desired voice by pressing the appropriate VOICE button.
☞
The digital piano has 8 voice buttons and each voice button has two assigned voices.
☞
When a voice button is pressed, the number of the assigned voice will be shown on the display.
☞
To select the other voice assigned to the current button, press the button again.
☞
Backing Up the Selected Voice
The lastly choiced voice on each button will be retained in memory.
The piano has one volume knob on the panel for adjusting the volume.
MASTER VOLUME
This determines the entire volume of the piano.
☞ This also determines the volume level of the HEADPHONE(s).
The piano features a wealth of rich, authentic voices, including piano, organ, elec. piano, strings and other
instruments. It also features a keyboard percussion function that lets you play realistic drum, percussion
sounds, and various effect sounds directly from the keyboard.
Voice Types
☞
14 Sounds
☞
1 Drum kit
☞
1 Sound Effect set

Basic Operation Layer / Split
14
Voice List
w Play the selected voice.
Adjust the volume by using MASTER VOLUME and play the piano with the selected voice.
Grand
Piano
E.Piano Harpsichord Organ E.Organ Strings Bass Percussion
Button 1 Button 2 Button 3 Button 4 Button 5 Button 6 Button 7 Button 8
G. Piano 1
G. Piano 2
E.Piano 1
E.Piano 2
Harpsichord
Vibraphone
Organ
1
Organ
2
E. Organ 1
E. Organ 2
Strings
Slow Strings
Acoust. Bass
E. Bass
Drum Set
Sound Effects
Layer
The Layer mode of the piano allows you to select and play two different voices simultaneously in a
layer. This makes it easy to create exceptionally rich and thick tonal textures. The volume balance can
be set individually for each of the two voices.
q Press and hold down the button corresponding to your desired main voice,
then press the button of your desired layer voice.
Select a voice in the normal way. (See the SELECTING VOICE section on page 13.)
☞ With the Layer mode active, playing keys will result in both main and layered voice sounding.
☞ Volume of the layered voice can be adjusted independently in the setup mode. (See the SETUP section on page 19.)
Split
The split mode allows you to assign different voices of each of the left and right parts of the keyboard.
For example, you may play the bass on the left while still playing in piano voice on the right.
PLAYING WITH SPLIT VOICE
qSelect a main voice.
Select a voice in the normal way. (See the SELECTING VOICE section on page 13.)
+
w Press a voice button to deactivate the layer.

You can set the point dividing the right and left parts of the keyboard at any desired key position.
Hold down the SPLIT button and press the desired key to assign it as the new split point.
The LED screen will display the corresponding number of the chosen key.
▼
SPLIT (DEFAULT F#3 , KEY 33)
Basic Operation Changing the Split point / Reverb
15
Changing the Split Point
Reverb
Reverb is an effect that recreates the decaying reflections of a sound in a performance space, and
reproduces the special ambience of a concert hall.
REVERB ON/OFF
To turn on the reverb, press the REVERB button. The lamp will be
lighted to indicate that the reverb is now active.
To turn off the reverb, press the REVERB button again. The lamp will be off, indicating that the reverb is no
more active.
☞ Reverb is set ON by default.
☞ The type and volume of reverb may be adjusted in the setup mode. (See the SETUP section on page 19.)
w Call up the Split mode.
To call up the split mode, press the SPLIT button. The lamp will begin flashing; the LED screen will
display the number of current split voice.
e Select the split voice.
Select the voice while the split button is flashing.
☞
Volume of the split voice can be adjusted independently in the setup mode. (See the SETUP section on page 19.)
☞
Key number of the lowest note is
'
00
'
.
☞
The default voice is '7-1' ACOUSTIC BASS in the split mode.

Basic Operation Using the Metronome / Twin Piano
16
SELECTING THE BEAT
The metronome may be set for a specific meter, causing it to make a distinguished beep sound to
indicate every first beat of each measure.
Press and hold the METRONOME button for 2 seconds while the metronome is active.
The LED screen will display the current meter of the metronome. Use DATA UP or DOWN
button to set the
metronome to your desired meter.
☞
Pressing both DATA UP and DOWN buttons simultaneously will instantly restore the default metronome meter (4).
☞
The available range of metronome meter is from 1 to 12.
Using the Metronome
START/STOP THE METRONOME
To start the metronome, simply press the
METRONOME
button. Press the METRONOME
button
again to stop the metronome sound.
The piano features a convenient metronome that is ideal for practice.
+
Twin Piano
The twin piano is a tool that divides the piano into two smaller pianos with identical octave range.
This feature allows two people to play the piano in the same octave range simultaneously.
qSelect a Voice.
Select a voice in the normal way. (See the SELECTING VOICE section on page 13.)
w Press the TWIN PIANO button.
The keyboard is split into two sections with identical octave range.
ADJUSTING THE TEMPO OF THE METRONOME
You can set the tempo to a range of 20 ~ 280 beats per minute by using the DATA/TEMPO buttons.
☞
Hold the button for continuous decrementing or incrementing.
☞
Pressing the UP and DOWN buttons simultaneously will instantly restore the default tempo (120).
☞
Metronome volume can be adjusted in the setup mode. (See the SETUP section on page 19.)
SECTION 1 SECTION 2
ePress the TWIN PIANO button again to deactivate the twin piano.
The lamp will be off, indicating that the twin piano is no more active.

Tune
Function
Transpose
Function Tune / Transpose
17
+
+
The Tune function lets you make fine adjustments to the pitch, allowing you to accurately match the
tuning with that of other instruments.
Press and hold down the SETUP button and press the TUNE UP or DOWN button.
☞
The LED screen will display the current value of the tune option.
☞
Use TUNE UP and DOWN buttons to change the value.
☞
Pressing both UP and DOWN buttons simultaneously will instantly restore the default value (0).
☞
The available range of tuning is from -64 Hz to +63 Hz. (Default 0)
☞
Hz(Hertz)
The pitch is measured in units of Hertz (abbreviated Hz), which represents the number of times the sound wave vibrates
in a second.
☞
The cent is a unit of pitch, equal to 1/100 of a semitone.
☞
Backing Up adjusted value
Your last set value for each function will be retained in memory.
The TRANSPOSE function makes it possible to shift the pitch of the keyboard in semitone units,
allowing you to match the pitch of the keyboard to the range of other instruments or singers, or
letting you easily play in a different key without having to change your fingering. For example, if the
TRANSPOSE is set F key, playing C results in a pitch of F, or in other words, you can play in the key of C
major on the keyboard and automatically have the pitch transposed to F major.
Press and hold down the SETUP button and press the TRANSPOSE UP or DOWN button.
☞
The LED screen will display the current value of the transpose option.
☞
Use TRANSPOSE UP and DOWN buttons to change the value.
☞
Pressing both UP and DOWN buttons simultaneously will instantly restore the default value (0).
☞
Range: -12 semitone ~ 0 ~ 12 semitone (default 00)
☞
Backing Up adjusted value
Your last set value for each function will be retained in memory.

+
+
Function Touch / MIDI Local Control
18
To uc h
☞
The LED screen will display the current value of the Touch option.
☞
Use TOUCH UP and DOWN buttons to adjust the value.
☞
Pressing both UP and DOWN buttons simultaneously will instantly restore the default value (Normal).
☞
Backing Up adjusted value
Your last set value for each function will be retained in memory.
DISPLAY TOUCH DESCRIPTION
SoF
Soft
This setting lets you produce a relatively loud sound even when the keys are
played softly.
nor
Normal
This setting represents the standard degree of response of an ordinary keyboard,
and is used as default.
hrd
Hard
This setting requires you to play the keys quite strongly to produce maximum
loudness.
oFF
Off
These settings produce the same degree of loudness, no matter how strongly or
softly you play the keys.
Local Control refers to the control that the piano keyboard has on its internal sound system. When
Local Control is set ON, the sound system belongs to the piano keyboard and what is played on the
keyboard is reproduced via the piano speakers.
By turning this OFF, you can separate the connection between the keyboard and the sound system.
When it is turned off, playing the keyboard does not trigger the speakers of the piano to make sound.
The playing data is still transmitted to any external MIDI device connected to the piano, allowing you
to control the external MIDI device with the piano keyboard without sounding the internal speakers
of the piano.
To turn off the MIDI local control, press and hold the SETUP button and press the LOCAL CTRL
button.
The LED screen will display 'oFF' to indicate that the local control has been turned off.
MIDI Local control
The touch option determines the extent to which the volume of the piano responds to your playing
strength (velocity).
4 different types are available for tailoring the keyboard response to the selected voice, type of song,
or your own playing preference.
Press and hold down the SETUP button and press the TOUCH UP or DOWN button.

Function Sound Setting and Initializing Digital Piano
19
Setup mode and re-initializing Digital Piano
The set values for each of the 10 functions can be adjusted in the setup menu. The setup menu also
gives you the option of re-initializing the piano, restoring the values of all functions to their default
and bringing the piano to its initial status.
qCall up the setup mode.
Press SETUP button to call up setup mode . The LED screen will display '---'
w Select a desired function.
To select a function, press the DATA/TEMPO UP or DOWN button while holding down the SETUP button.
The numbers assigned to each of the functions will be displayed on the LED.
Function List
DISPLAY FUNCTION DESCRIPTION RANGE / (DEFAULT)
F01 Main Voice Vol. Adjust the volume of the main voice. 00 ~ 127 / (127)
F02 Split Voice Vol. Adjust the volume of the split voice. 00 ~ 127 / (127)
F03 Layered Voice Vol. Adjust the volume of the layered voice. 00 ~ 127 / (100)
F04
Metronome
/Demo Vol.
Adjust volume of metronome & demo music. 00 ~ 127 / (100)
F05 Reverb Type
Select a reverb type.
r-0 (Off), r-1 (Room 1), r-2 (Room 2), r-3 (Room 3),
r-4 (Hall 1), r-5 (Hall 2), r-6 (Plate), r-7 (Shot Delay), r-8 (Long Delay)
r-0 ~ r-8 / (r-5)
F06 Reverb Vol. Adjust reverb volume. 00 ~ 127 / (80)
F07 Effect Type
Select a effect type.
00 (Off), 01 (Chorus 1), 02 (Chorus 2), 03 (Chorus 3), 04 (Chorus 4),
05 (Chorus 5), 06 (Delay 1), 07 (Delay 2), 08 (Delay 3), 09 (Flanger),
10 (Feedback 1), 11 (Feedback 2), 12 (Feedback 3), 13 (Feedback 4)
00 ~ 13 / (00)
F08 Effect Vol. Adjust effect volume. 00 ~ 127 / (36)
F09 Low EQ Level Low frequency EQ gain - 06 ~ 00 ~ + 06 (06)
F10 High EQ Level High frequency EQ gain - 06 ~ 00 ~ + 06 (00)
F11 Initialize The digital piano will be brought back to its initial status. -
e Adjust value of the selected function.
Press the ENTER/PERCUSSION button while holding down the SETUP button.
The LED screen will display the current value of the chosen function. Use the DATA/TEMPO UP and DOWN buttons to
adjust the value.
☞
Pressing both DATA/TEMPO UP and DOWN buttons will instantly restore the default value for the chosen function.
☞
Hold the button for continuous decrementing or incrementing.

Recording Recoding and Playback
20
Recording and Playback
Recording
The piano features comprehensive song recording
functions that allow you to record your own performance.
A song records 2 tracks and approx. 9,000 notes can be
recorded into one track.
w Start recording to the Track1.
Play the keyboard or press the RECORD button to begin the recording. Both buttons will be flashing.
☞
Any previously recorded music in the track will be deleted.
eStop recording to the Track1.
Press the PLAY/STOP button to stop the recording. The record button will be turned off, and the
track 1 button will be lighted.
If you want to hear what is recorded in the Track1, press the PLAY/STOP button. The play button will
be flashing throughout the playback.
qPrepare recording to the Track 1
Select the desired voice and press both the RECORD and the TRACK 1 buttons. The record button will
be lighted, and the track 1 button will begin flashing.
r Start recording to the Track2.
Press both the RECORD and the TRACK 2 button. The record button will be lighted, and the track 2
button will begin flashing.
Play the keyboard or press the RECORD button to begin the recording.
☞
If you wish not to hear what is recorded in track 1 while recording to track 2, press the track 1 button to turn it off.
Otherwise, leave it turned on (lighted).
☞
Each track can be played individually.
yPlayback the recorded song.
Press the PLAY/STOP button.
☞
A lighted track button means that there is previously recorded material saved in that track.
☞
If you wish not to hear a track, turn off the button corresponding to that track.
uStop playback of the recorded song.
Press the PLAY button again.
CLEARING RECORDED MEMORY
To clear the recorded memory, Press both the RECORD and the PLAY/STOP buttons simultaneously.
☞
Recording new material will remove the pre-existing material in the track.
☞
Backing Up the recorded song
The recorded material will be preserved even if the power is turned off and then on again.
tStop recording to the Track2.
Press either the TRACK 2 button or the RECORD button to stop the recording. The record button will
be turned off, and the track 2 button will be lighted.
If you want to hear what is recorded in the track2, press the PLAY/STOP button. The play button will
be flashing throughout the playback.

Playback of the Music
50 pieces of piano music are enlisted in the piano as
demo. You can playback the demo music for your own
listening pleasure, or use them for practice.
Demo Music Playback of the music
21
Demo Music
qEnter the demo music mode.
Press the DEMO MUSIC button. The LED screen will display the number of the music: 'd01'.
w Select the desired music.
Change the number of the music by using DATA UP or DOWN button.
r Stop music.
Press the PLAY/STOP again.
ePlayback of the selected music.
Press the PLAY/STOP button.
☞
50 pieces of music is available as demo.
☞
Refer to the MUSIC LIST.

Demo Music Demo Music List
22
Demo Music List
Chopin, Fryderyk
Franciszek
Mozart, Wolfgang
Amadeus
Beethoven, Ludwig
van
Debussy, Claude
Achille
Schumann, Robert
Alexander
Liszt, Franz
Rimsky, Korsakov
Satie, Erik
Telemann, Georq
Philipp
Tchaikovsky, Pyotr
llyich
Bach, Johann
Sebastian
Display Title Composer
d01
d02
d03
d04
d05
d06
d07
d08
d09
d10
d11
d12
d13
d14
d15
d16
d17
d18
d19
d20
d21
d22
d23
d24
d25
d26
d27
d28
d29
d30
d31
d32
d33
d34
d35
d36
d37
d38
d39
d40
d41
d42
d43
d44
d45
d46
d47
d48
d49
d50
Etude op.10 no.1
Etude op.10 no.4
Etude op.10 no.5
Etude op.25 no.9
Nocturne op.9 no.1
Nocturne op.9 no.2
Nocturne op.27 no.2
Nocturne op.32 no.1
Nocturne op.72 no.1
Sonata op.3 no.4
Mazurka op.7 no.1
Mazurka op.30 no.2
Mazurka op.67 no.3
Polonaise op.40 no.1
Waltz op.34 no.1
Waltz op.64 no.1
Waltz op.64 no.2
Waltz op.69 no.2
Impromptu No. 4 c sharp minor (Fantasie-Impromptu) Op.66
Ballade op.23 no.1 in g minor
Ballade op.47 no.3 in A flat Major
Prelude op.28 no.1 in C Major- Agitato
Prelude op.28 no.16 in b-flat minor- Presto con fuoco
Piano Sonata no.10 in C major, KV330 I. Allegro moderato
Piano Sonata no.11 in A major, KV331 I. Alla turca : Allegretto
Piano Sonata no.14 in c minor, KV457 II. Adagio
Piano Sonata no.14 in c minor, KV457 III. Assai allegro
Variations "Ah! Vous dirai-je, Maman"
Rondo in D major, KV485
Sonate no.8 in c minor, op.13 'Pathetique' Grave - Allegro molto e con brio
Sonate no.8 in c minor, op.13 'Pathetique' II. Adagio cantabile
Sonate no.8 in c minor, op.13 'Pathetique' III. Allegro
Arabesque No.1 in E major
Suite bergamesque 1. Prelude
Suite bergamesque 3. Clair de lune
Petite Suite, for piano 4-hands 2. Cortege
Scenes from Childhood op.15 From foreign lands and peoples in G major
"12 Etudes d'execution transcendante (Transcendental Etudes), S 139
Etude Transcendante in d minor, Mazeppa
The flight of the bumble bee (by S. Rachmaninov)
Trois Gymnopedies 1. Lent et douloureaux
12 Fantasie per clavicembalo (TWV 33) - Harpsichord music - 1. Fantasia
12 Fantasie per clavicembalo (TWV 33) - Harpsichord music - 3. Fantasia
12 Fantasie per clavicembalo (TWV 33) - Harpsichord music - 5. Fantasia
12 Fantasie per clavicembalo (TWV 33) - Harpsichord music - 6. Fantasia
12 Fantasie per clavicembalo (TWV 33) - Harpsichord music - 12. Fantasia
Children's Album, Op.39 No.4 Mama
Prelude in C major, BWV933
Praludium und Fuge in B BWV560 -Pipe Organ music Wohltemperriertes Klavier-Pledudio 1
Wohltemperriertes Klavier-Fuga 1

Drum and SFX Table
23
Prog 1
Standard Drum (8-1)
Prog 57
SFX 2 (8-2)
27 - D#1 High Q
28 - E1 Slap
29 - F1 Scratch Push
30 - F#1 Scratch Pull
31 - G1 Sticks
32 - G#1 Square Click
33 - A1 Metronome Click
34 - A#1 Metronome Bell
35 - B1 Kick drum2/Jazz BD2
36 - C1 Kick drum1/Jazz BD1
37 - C#2 Side Stick
38 - D2 Snare Drum1
39 - D#2 Hand Clap High Q
40 - E2 Snare Drum 2 Slap
41 - F2 Low Floor Tom Scratch Push
42 - F#2 Closed Hi Hat [EXC1] Scratch Pull
43 - G2 High Floor Tom Sticks
44 - G#2 Pedal Hi-Hat [EXC1] Square Click
45 - A2 Low Tom Metronome Click
46 - A#2 Open Hi-Hat [EXC1] Metronome Bell
47 - B2 Low-Mid Tom Guitar Slide
48 - C2 Hi Mid Tom Gt Cut Noise 1
49 - C#3 Crash Cymbal 1 Gt Cut Noise 2
50 - D3 High Tom Double Bass Slap
51 - D#3 Ride Cymbal 1 Key Click
52 - E3 Chinese Cymbal Laughing
53 - F3 Ride Bell Screaming
54 - F#3 Tambourine Punch
55 - G3 Splash Cymbal Heart Beat
56 - G#3 Cowbell Footsteps 1
57 - A3 Crash Cymbal2 Footsteps 2
58 - A#3 Vibraslap Applause
59 - B3 Ride Cymbal2 Door Creaking
60 - C4 Hi Bongo Door Closing
61 - C#4 Low Bongo Scratch
62 - D4 Mute Hi Conga Wind Chime
63 - D#4 Open Hi Conga Car Engine Start
64 - E4 Low Conga Car Breaking
65 - F4 High Timbale Car Pass
66 - F#4 Low Timbale Car Crash
67 - G4 High Timbale Police Siren
68 - G#4 Low Agogo Train
69 - A4 Cabasa Jet Take-off
70 - A#4 Maracas Helicopter
71 - B4 Short Whistle[EXC2] Starship
72 - C5 Long Whistle[EXC2] Gun Shot
73 - C#5 Short Guiro[EXC3] Machinegun
74 - D5 Long Guiro[EXC3] Lasergun
75 - D#5 Claves Explosion
76 - E5 Hi Wood Block Dog
77 - F5 Low Wood Block Horse Gallop
78 - F#5 Mute Cuica[EXC4] Birds
79 - G5 Open Cuica[EXC4] Rain
80 - G#5 Mute Triangle[EXC5] Thunder
81 - A5 Open Triangle[EXC5] Wind
82 - A#5 Shaker Sea Shore
83 - B5 Jingle Bell Stream
84 - C6 Belltree Bubble
85 - C#6 Castanets
86 - D6 Mute Surdo[EXC6]
87 - D#6 Open Surdo[EXC6]
88 - E6
Drum and SFX Table

MIDI Implementation
24
MIDI Implementation
Function Recognized Transmitted Remark
Basic Channel Default ALL 1 -3
Mode Default OMNI OFF, POLY OMNI OFF, POLY
Note ON/OFF 9nH kk vv O O #kk:note ON (0-127)
#vv:velocity (1-127)
Pitch Bender EnH bi bh O O Maximum swing +/- 1 tone
00 BnH 00H cc O X Bank Select
01 BnH 01H cc O X Modulation Wheel
05 BnH 05H cc O X Portamento Time
06 BnH 06H cc O X Data Entry
07 BnH 07H cc O X Volume
10 BnH 0AH cc O X Pan Out
11 BnH 0BH cc O X Expression
64 BnH 40H cc O O Sustain (Damper) Pedal
65 BnH 41H cc O X Portamento ON/OFF
66 BnH 42H cc O O Sostenuto Pedal
Control 67 BnH 43H cc O O Soft Pedal
Change 80 BnH 80H vv O X Reverb Prog.(vv=00H-70H)
81 BnH 51H vv O X Chorus Prog.
91 BnH 5BH vv O X Reverb Send Level
93 BnH 5DH vv O X Chorus Send Level
120 BnH 78H 00H O X All Sound Off
121 BnH 79H 00H O X Reset All Controller
123 BnH 7BH 00H O X All Notes Off
126 BnH 7EH 00H O X Mono On
127 BnH 7FH 00H O X Poly On
Program Change CnH PP O O Sounds/Drum Set List
System Exclusive General MIDI X X
Reset
O : Yes, X : No

Troubleshooting
25
Troubleshooting
PROBLEM CAUSE SOLUTION
No sound
Occasional interference
No sound when connected to
external amplifier.
1. Power supply problem.
2. Volume setting is too low.
3. Headphone is plugged in.
1. Refrigerators, washing
machines and similar
electric appliances are
interfering.
1. Volume setting is too low.
2. Defective connection cord.
1. Check the power cord
whether it's properly in AC
outlet.
2. Adjust the volume.
3. Unplug the headphone.
1. Use outlet as far away as
possible from appliance
thought to be the cause.
1. Adjust the volume.
2. Replace connection cord.
※
Be sure to check to following table whenever you encounter problems with the DIGITAL PIANO
operation.

Specifications
26
Specifications
Section Contents
PRODUCT DIGITAL PIANO
KEYBOARD 88 KEYS (STANDARD) - 7 1/4 OCTAVES
TOUCH RESPONSE OFF, SOFT, NORMAL, HARD
MAX. POLYPHONY 64 NOTES
SOUND 14 VOICES
1 DRUM KIT
1 SOUND EFFECT SET
FUNCTIONS LAYER, SPLIT, TUNE, TRANSPOSE, MIDI LOCAL CONTROL, PEDAL
DIGITAL SIGNAL PROCESSING EFFECT(13), REVERB(8)
METRONOME YES
DISPLAY LED MULTI FUNCTION DISPLAY
DEMO MUSIC 50 TUNES
RECORD REAL-TIME-RECORDING
2 TRACKS
APPROX. 18,000 NOTES (9,000 NOTES/TR)
VOLUME CONTROLS MAIN, LAYER, SPLIT, DEMO, METRONOME
LOW EQ GAIN, HIGH EQ GAIN, REVERB, EFFECT
I/O TERMINALS USB IN, PEDAL IN
STEREO LINE IN
STEREO LINE OUT
2 HEADPHONE JACKS
SPEAKER 6.5 INCHES × 2 (STEREO 15W + 15W)
POWER DC IN (12V)


New feel, new look and new sound
High Performance USB Digital Piano
 Loading...