

Page 1

OWNER’S MANUAL
OWNER’S MANUAL
SimmonsDrums.net
18274587 Simmons SD600 Manual.indd 1 12/19/18 8:51 AM
www.simmonsdrums.net
Page 2
OWNER’S MANUAL
SAFETY INSTRUCTIONS
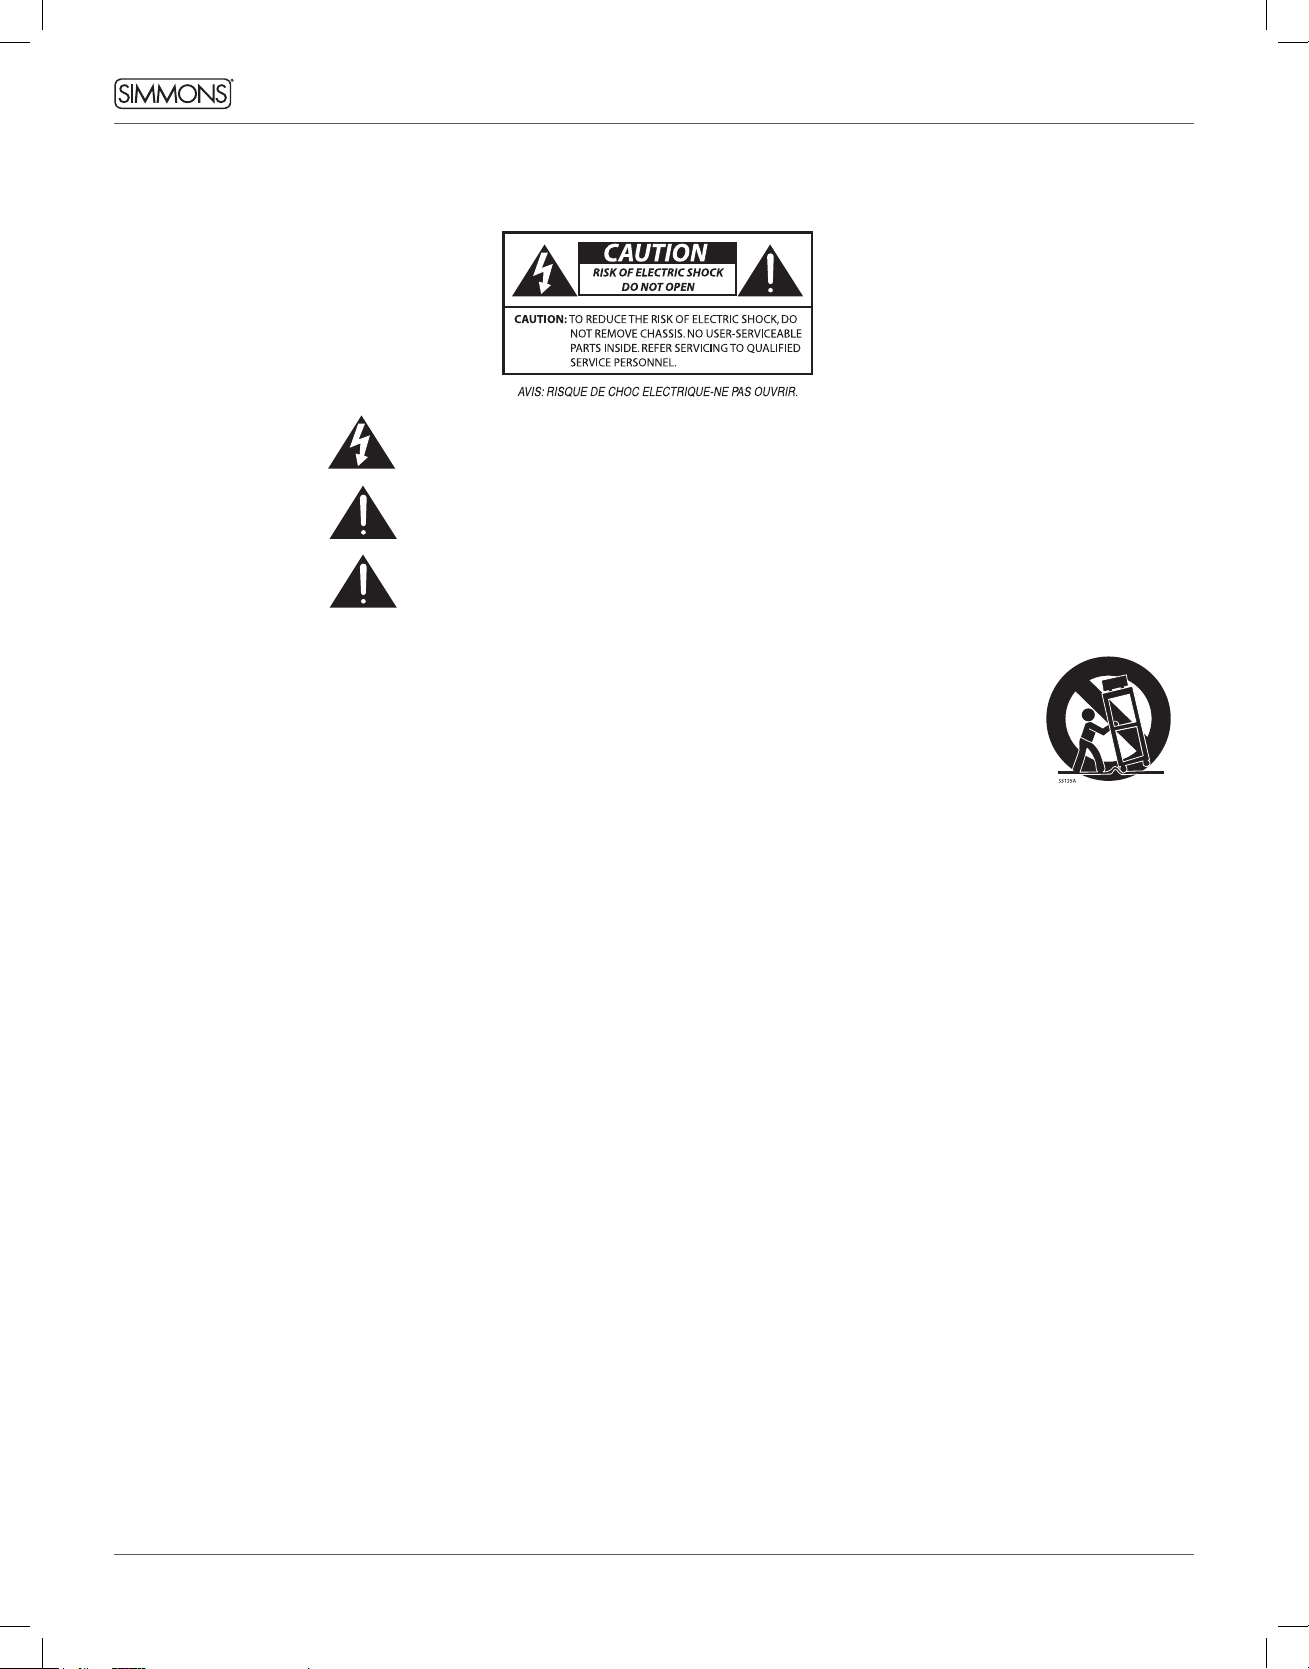
THELIGHTNINGFLASHWITHARROWHEADSYMBOLWITHINANEQUILATERALTRIANGLEIS
INTENDEDTOALERTTHEUSERTOTHEPRESENCEOFUNINSULATEDDANGEROUSVOLTAGE
WITHINTHEPRODUCT’SENCLOSURETHATMAYBEOFSUFFICIENTMAGNITUDETOCONSTITUTE
ARISKOFELECTRICSHOCKTOPERSONS.
THEEXCLAMATIONPOINTWITHINANEQUILATERALTRIANGLEISINTENDEDTOALERT
THEUSERTOTHEPRESENCEOFIMPORTANTOPERATINGANDMAINTENANCE(SERVICING)
INSTRUCTIONSINTHELITERATUREACCOMPANYINGTHEPRODUCT.
APPARATUSSHALLNOTBEEXPOSEDTODRIPPINGORSPLASHINGANDTHATNOOBJECTS
FILLEDWITHLIQUIDS,SUCHASVASES,SHALLBEPLACEDONTHEAPPARATUS.
1. Read these instructions.
2. Keep these instructions.
3. Heed all warnings.
4. Follow all instructions.
5. Do not use this apparatus near water.
6. Clean only with dry cloth.
7. Do not block any ventilation openings. Install in accordance with the manufacturer’s instructions.
8. Do not install near the heat sources such as radiators,
heat registers, stoves, or other apparatus (including
ampliers) that produce heat.
9. Do not defeat the safety purpose of the polarized or
grounding-type plug. A polarized plug has two blades
with one wider than the other. A grounding type plug
has two blades and a third grounding prong. The wide
blade or the third prong are provided for your safety, if
the provided plug does not t into your outlet, consult
an electrician for replacement of the obsolete outlet.
10. Protect the power cord from being walked on or
pinched particularly at plugs convenience receptacles,
and the point where they exit from the apparatus.
11. Only use attachments/accessories specied by
the manufacturer.
12. Use only with the cart, stand, tripod,
bracket, or table specied by the
manufacturer, or sold with the
apparatus. When a cart is used,
use caution when moving the cart/
apparatus combination to avoid injury
from tip-over (Figure1).
Figure 1
13. Unplug this apparatus during lightning storms or
when unused for a long periods of time.
14. Refer all servicing to qualied service personnel. Servicing is required when the apparatus has been damaged in any way, such as power-supply cord or plug
is damaged, liquid has been spilled or objects have
fallen into the apparatus, the apparatus has been exposed to rain or moisture, does not operate normally,
or has been dropped.
WARNING: To reduce the risk of re or electric shock, do
not expose this apparatus to rain or moisture.
CAUTION: Apparatus shall not be exposed to dripping or
splashing and no objects lled with liquids, such as vases,
shall be placed on the apparatus.
CAUTION: Apparatus shall not be exposed to dripping or
splashing and no objects lled with liquids, such as vases,
shall be placed on the apparatus.
2
18274587 Simmons SD600 Manual.indd 2 12/19/18 8:51 AM
Page 3

CONGRATULATIONS!
…on your purchase of this Simmons SD600 Electronic Drum Kit.
To get the most enjoyment from this kit, we recommend that
you skim through this manual at least once, then refer back to it
to learn more about specic functions.
CARING FOR YOUR SD600
ELECTRONIC DRUM SET
LOCATION
• Keep the drum kit away from direct sunlight, high
temperature sources, and excessive humidity to prevent
deformation, discoloration, or more serious damage
POWER SUPPLY
• Turn the power switch OFF when the SD600 is not in use.
• The AC adapter should be unplugged from the AC outlet if the
SD600 is not to be used for an extended period of time.
• Avoid plugging the AC adapter into an AC outlet that is also
powering high-consumption appliances such as electric
heaters or televisions. Also avoid using multi-plug adapters,
since these can reduce sound quality, cause operation errors,
and result in possible damage.
• To avoid damaging the unit, turn the SD600 and all related
devices OFF prior to connecting or disconnecting cables.
HANDLING AND TRANSPORT
• Never apply excessive force to controls, connectors, and
other parts.
• Unplug cables by gripping the plug rmly. Do not pull on
the cable.
• Disconnect all cables before moving the module.
• Physical shocks caused by dropping, bumping, or placing
heavy objects on the module can result in scratches and more
serious damage.
CLEANING
• Clean the module with a dry, soft cloth.
• A slightly damp cloth may be used to remove stubborn grime
and dirt.
• Never use cleaners such as alcohol or thinner.
• To avoid discoloration, do not place vinyl objects on top
of module.
ELECTRICAL INTERFERENCE
• The module contains digital circuitry and may cause
interference if placed too close to radio or television receivers.
If this occurs, move the SD600 further away from the affected
equipment.
SERVICE AND MODIFICATION
• There are no user serviceable parts in the drum module.
• Do not attempt to open the sound module or make any
change in the circuits or parts of the unit. This would void
the warranty.
3
18274587 Simmons SD600 Manual.indd 3 12/19/18 8:51 AM
Page 4

OWNER’S MANUAL
TABLE OF CONTENTS
SAFETY INSTRUCTIONS ...................................2
CONGRATULATIONS ......................................3
ASSEMBLED KIT ..........................................5
FEATURES ................................................6
ASSEMBLING YOUR KIT ...................................7
CONNECTIONS
Connecting the Module and Pads .....................11
AC Adapter ............................................12
Connecting Audio Equipment ........................13
Connecting MIDI Devices and Computers. . . . . . . . . . . . . 14
SD600 DRUM MODULE OPERATION
Top Panel .............................................15
Bottom Panel .........................................16
Back Panel ............................................16
Side Panel .............................................16
QUICK START OPERATIONS
Turning the Power On .................................17
Basic Operations ......................................17
Listening to the Demo Songs .........................18
Selecting a Kit .........................................18
Playing a Song ........................................18
Muting the Drum Part ................................18
KIT MODE - ADVANCED
Editing a Kit ...........................................19
Rename a Kit ........................................20
Saving a Kit .......................................... 20
Kit Reset ............................................. 20
SONG MODE
Playing a Song ........................................21
Muting the Drum Part ................................21
Editing a Song ........................................21
RECORDING A SONG
Recording Settings ....................................22
Clicking Settings ......................................22
UTILITY MODE
Utility Mode Settings ..................................23
Trigger Settings .......................................23
MIDI Note Settings ....................................23
Pad MIDI Note Assignments ..........................23
MIDI Local Settings ....................................24
Auto Power Mode .....................................25
Factory Reset .........................................25
Tempo ................................................25
APPENDIX
Voice List ..............................................26
Kit List .................................................31
Song List ..............................................31
MIDI Implementation Charts ..........................32
Warranty ..............................................36
Customer Service .....................................36
4
18274587 Simmons SD600 Manual.indd 4 12/19/18 8:51 AM
Page 5
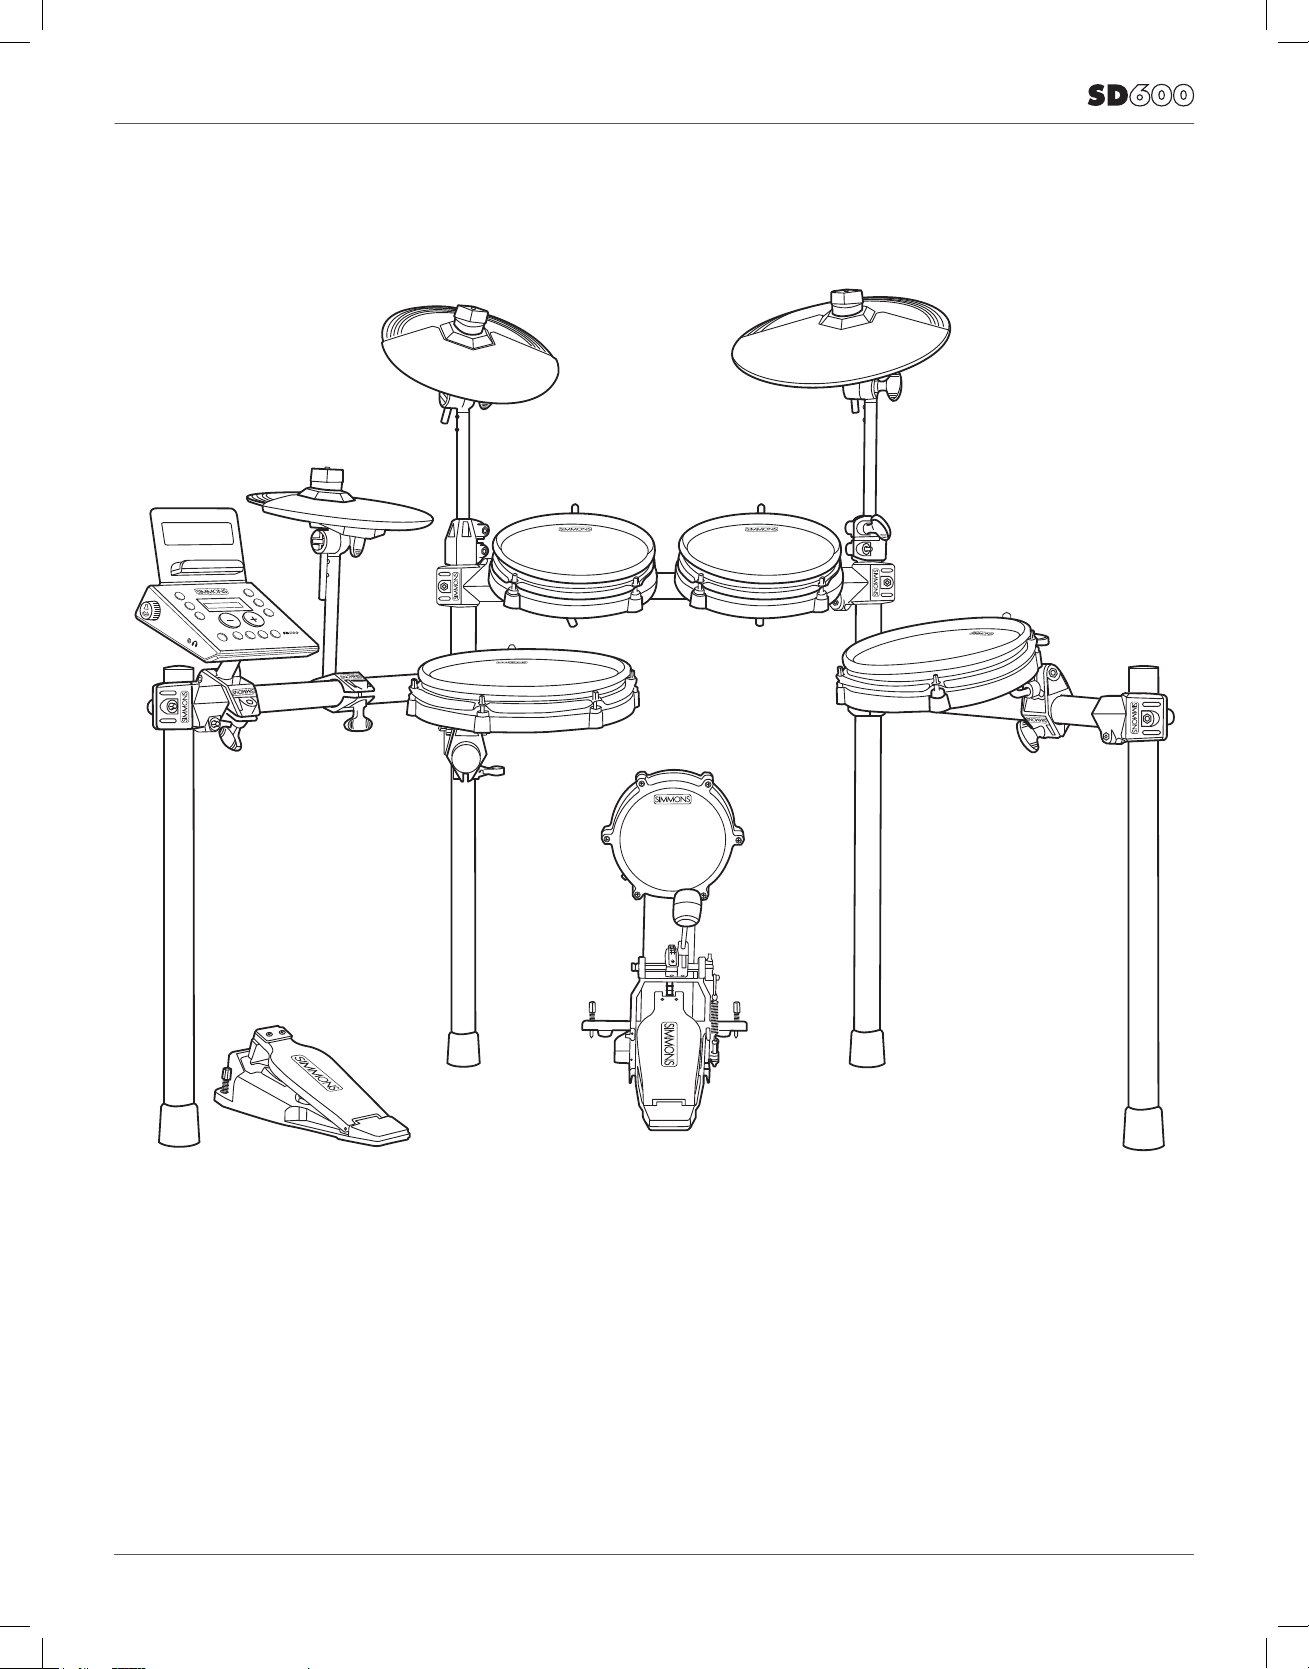
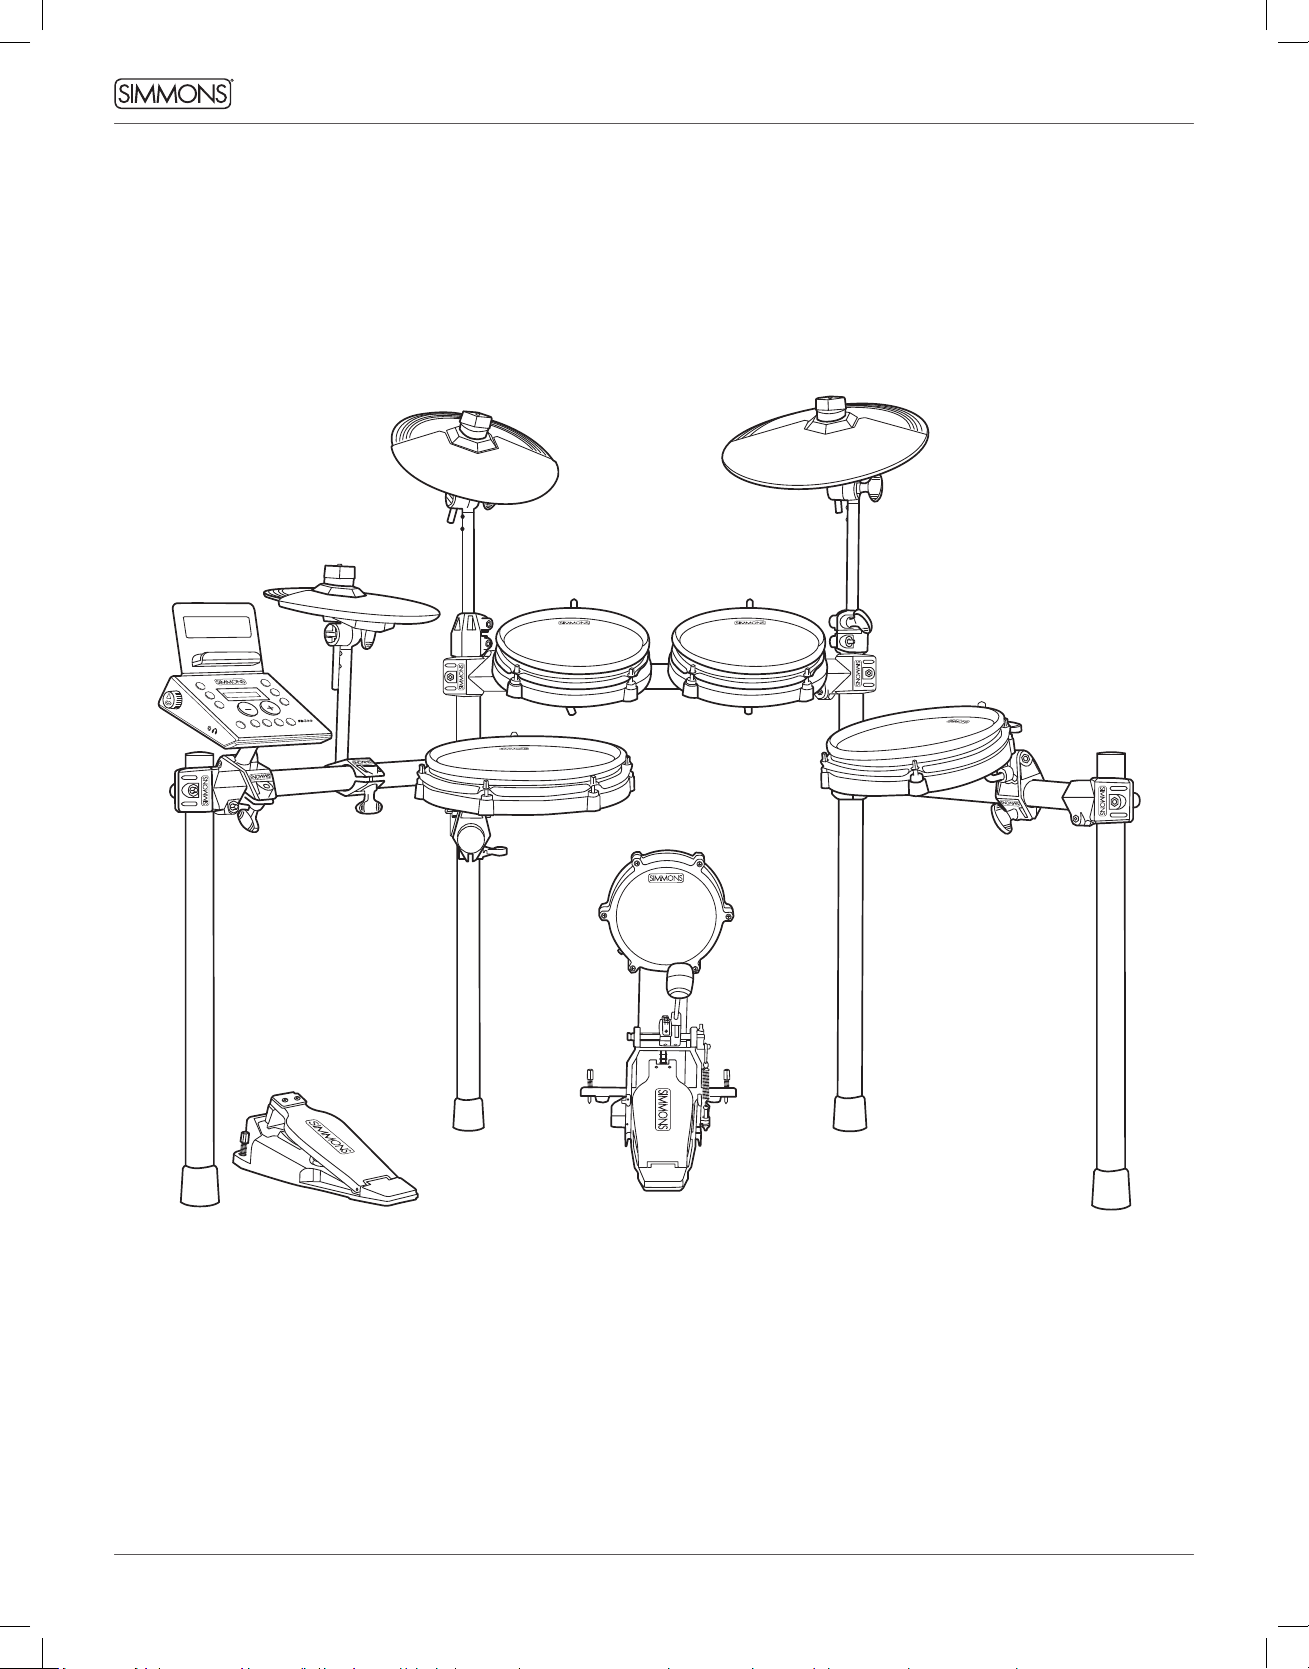
FINAL ASSEMBLED KIT
5
18274587 Simmons SD600 Manual.indd 5 12/19/18 8:51 AM
Page 6

OWNER’S MANUAL
FEATURES
SD600 SOUND MODULE GENERAL FEATURES
POLYPHONY
• Voices - 64
SOUND
• Drum Voices - 336
• Drum Kits - 35 Preset / 10 User
• Songs - 3 Preset / 10 User
EFFECTS
• Reverb - Hall1, Hall2, Room1, Room2, Room3, Stage1, Stage2,
Plate, Delay, Echo, Off.
• Chorus - Chorus1, Chorus2, Chorus3, Chorus4, Feedback,
Flanger, Short Delay, Flanger2, Flanger3, Celeste1, Celeste2,
Celeste3, Off.
TRIGGER INPUTS
• 25-Pin Multi Trigger Input
• ¼” Tom 4 Input
• ¼” Crash 2 Input
HARDWARE
• Drum Rack and mounts
• Kick Drum pad
• 10” Dual zone Snare mesh drum
• 8” Dual zone Tom mesh drums (x3)
• 10” Single zone Hi Hat pad
• 10” Single zone Crash Cymbal pad with Choke
• 12” Single zone Ride Cymbal pad
• Hi-Hat pedal (x1)
• Kick Beater pedal (x1)
EXTERNAL CONNECTIONS
• 1/8” Headphone Output
• ¼” Master Outputs (x2)
• ¼” Pad Inputs (x2)
• 1/8” TRS Aux Input
• USB Connection for MIDI via computer
• Bluetooth Wireless MIDI
SEQUENCER
• Preset Songs - 3
• User Songs - 10
• Tempo- 20-280 BPM
• Click/Metronome- Click voice, Time Signature, Tempo, Interval,
Volume
POWER
• 9v, 600ma
6
18274587 Simmons SD600 Manual.indd 6 12/19/18 8:51 AM
Page 7

ASSEMBLING YOUR KIT
INSIDE THIS PACKAGE
Before assembly, please make sure that all the items listed below are present.
Cymbals
Single Zone
12” Ride Cymbal Pad
SD600CYM12S
Drum Pads
Dual Zone 10” Snare
Mesh Drum
Kick Pad
Bass Drum Pedal / Trigger
module
Single Zone with Choke
10” Crash Cymbal Pad
SD600CYM10SC
Dual Zone 8” Tom Mesh Drums
Hi-Hat Pedal
Foot Controller
Accessories
Single Zone
10” Hi-Hat Cymbal Pad
SD600CYM10S
SD600PAD8SD600SN10
AC Adaptor
1 Pair
Drumsticks
Multi-pin Cable Harness
Drum Key
Hi-Hat Arm (Short)
2 Cymbal Arms (Long)
4 L–Rods for Pads
10–Velcro
Cable Strips
Drum Rack
SD600KICK /
SD600BEATER
SD600HHC
Drum Module
SD600RK
SD600M
7
18274587 Simmons SD600 Manual.indd 7 12/19/18 8:51 AM
Page 8
OWNER’S MANUAL
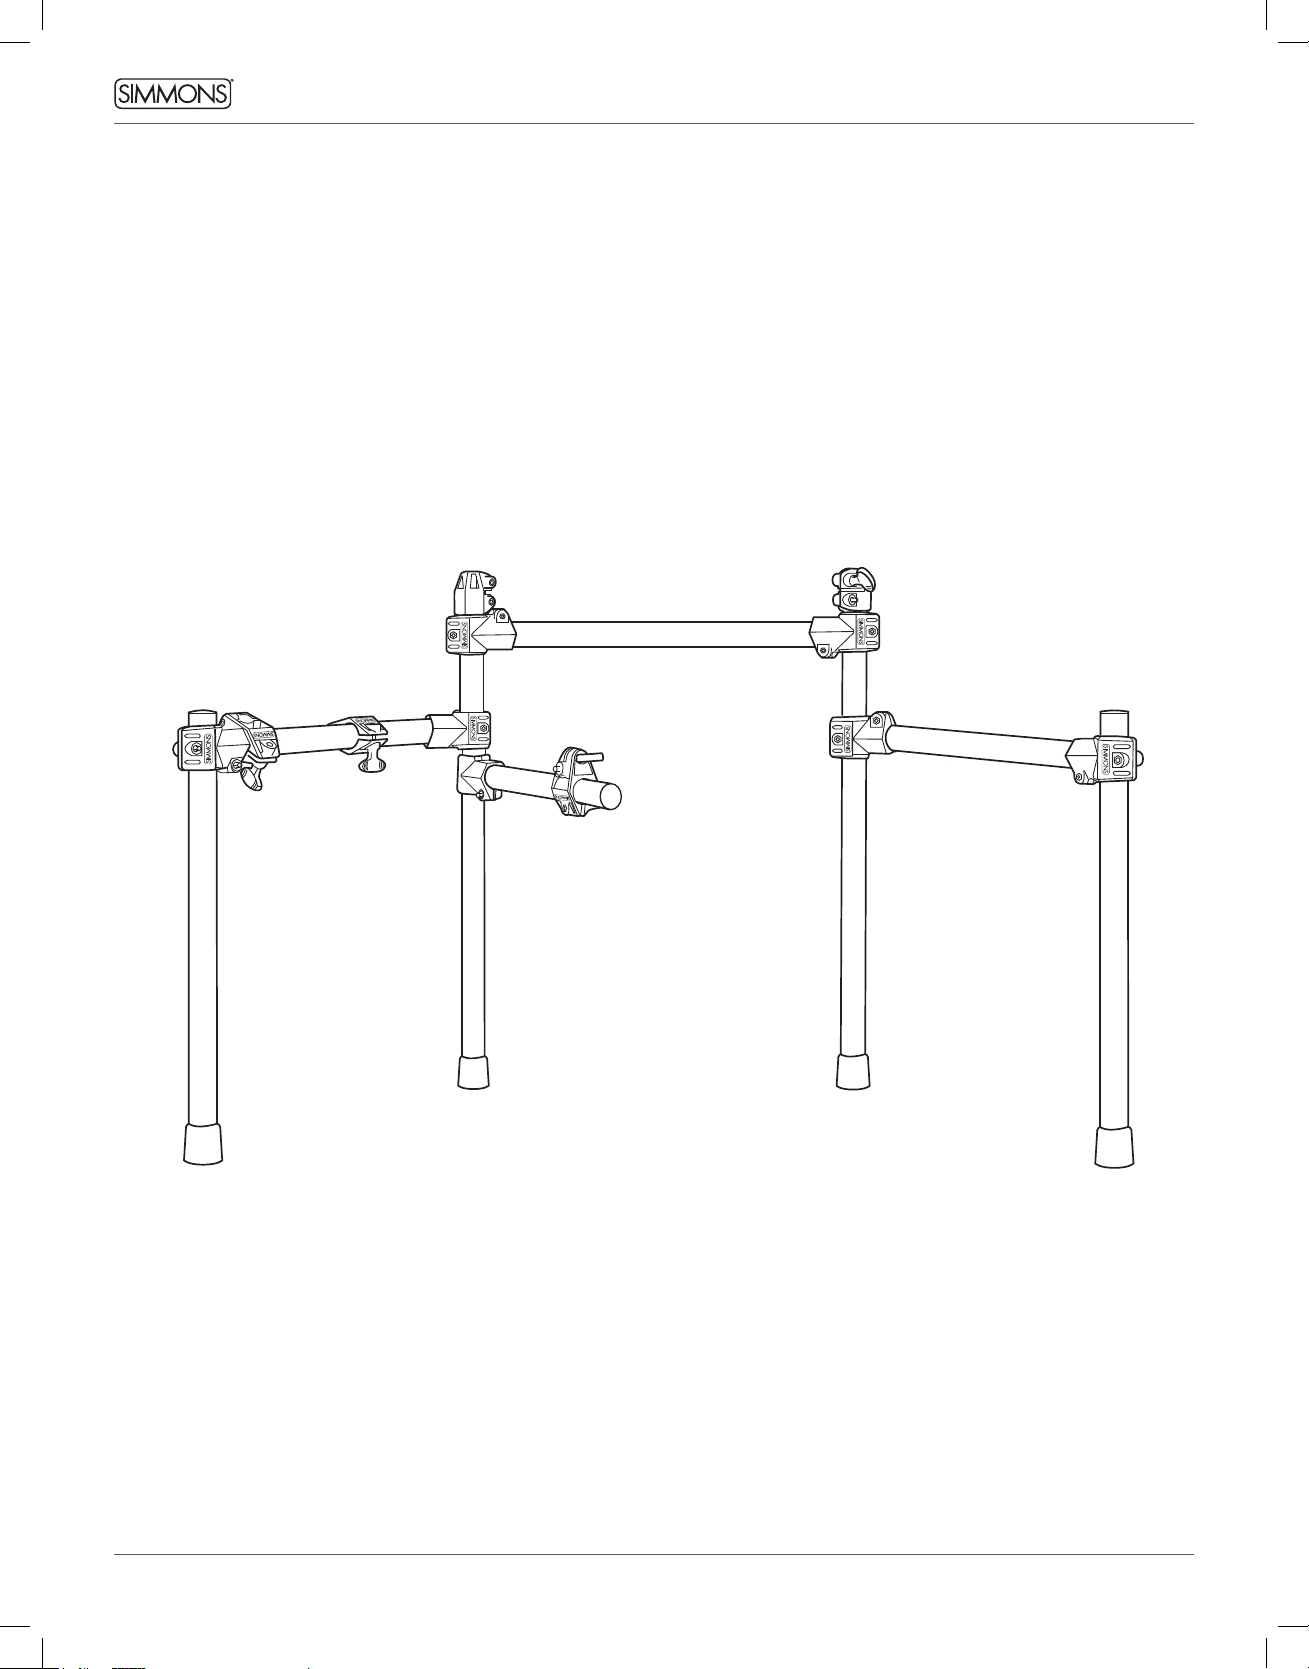
ASSEMBLING YOUR KIT
THE SD600 DRUM RACK COMES PREASSEMBLED
WITH ALL CLAMPS ALREADY IN PLACE.
1. Pull rack out of box.
2. Loosen nuts on side arms and snare clamps so you can rotate bars.
3. Pull the side arms and snare arm out into their playing positions.
4. Tighten nuts on side arm clamps.
5. Loosen L-rod wing nuts on tom clamps. Insert textured plastic of L-rod into tom clamps
and tighten wing nuts.
6. Loosen wing nuts on pads.
7. Attach pads to L-rods and tighten wing nut on Tom Pads.
NOTE: We recommend putting the SD600 on a drum rug to keep the components together.
8
18274587 Simmons SD600 Manual.indd 8 12/19/18 8:51 AM
Page 9
ASSEMBLING YOUR KIT
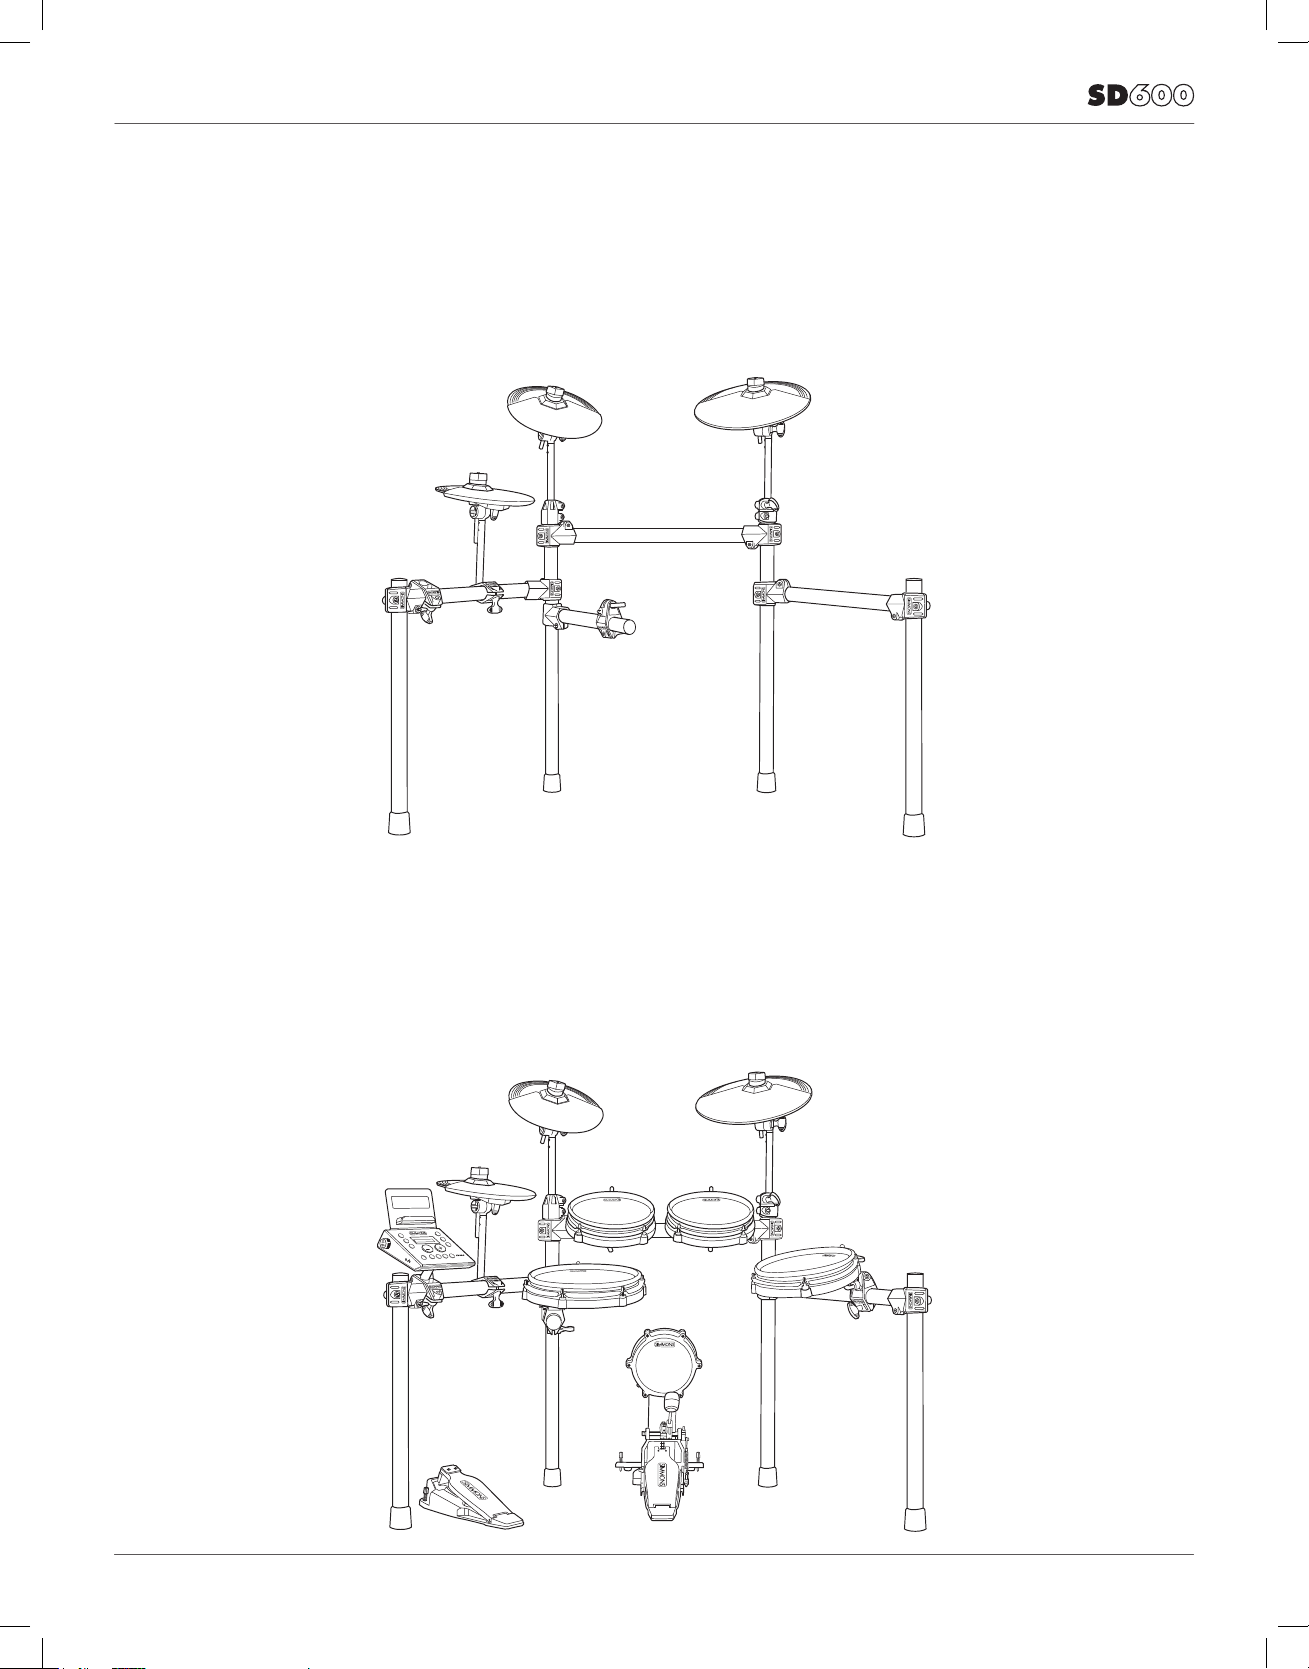
ATTACHING THE CYMBAL PADS
1. Insert each cymbal arm into the rack clamp.
2. Insert short hi-hat arm on the left-side arm’s cymbal clamp.
3. Remove wing nut from cymbal tilter. Place cymbal pad on tilter assembly.
4. Re-attach washer and wing nut. Tighten wing nut.
ATTACHING THE DRUM MODULE AND DRUMS
1. Loosen wing screws on drum rack.
2. Place drum module into drum clamp.
3. Tighten wing screw to secure module.
4. Place drums into mounting rods and tighten with wing screws.
9
18274587 Simmons SD600 Manual.indd 9 12/19/18 8:51 AM
Page 10
OWNER’S MANUAL
ASSEMBLING YOUR KIT
BASS DRUM AND HI-HAT PEDAL
1. Place the hi-hat pedal on the oor and to the left, as illustrated below.
2. Connect the kick drum beater pedal to the front of the kick drum pad.
3. Place the bass pad and beater pedal on the oor in the center of the
rack as illustrated.
10
18274587 Simmons SD600 Manual.indd 10 12/19/18 8:51 AM
Page 11
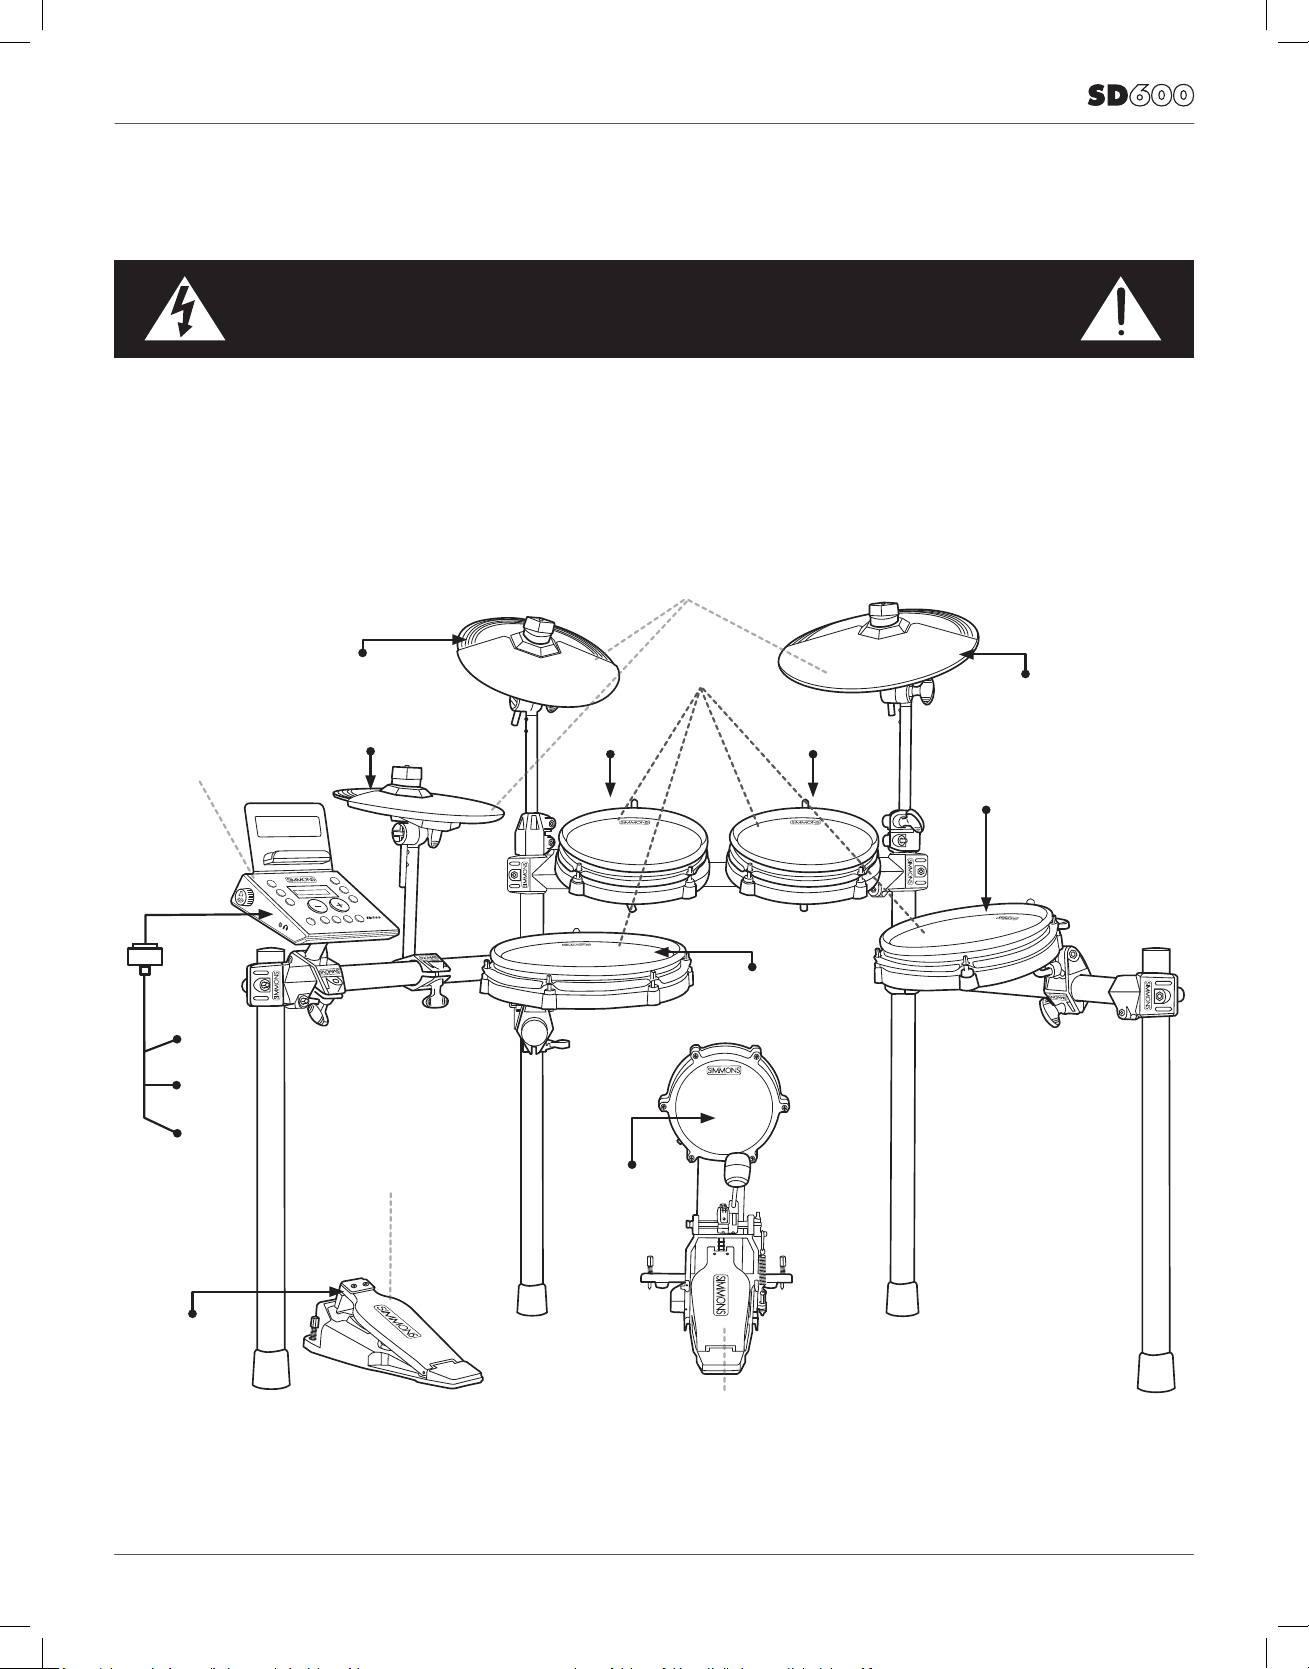
CONNECTIONS
CONNECTING THE SOUND MODULE AND PADS
To prevent electric shock and damage to the device, make sure the power is switched
OFF on the sound module and all related devices before making any connection.
CAUTION!
Using the provided cables, connect the 1/4” jacks to the
corresponding drum pads, cymbal pads and kick pad. The
pin connection will attach to the multi-pin connector serial
port on the bottom of the sound module. (See illustration
below.)
To Crash
To Hi-Hat
Sound Module
From
Sound
Module
to 7 Pads
To Tom 1 To Tom 2
The voice of the hi-hat pad is controlled by the hi-hat pedal.
Plug into the Hi-Hat pedal the plug that is labelled “HHC”.
Similar to a real drum kit, the hi-hat pad functions as an ‘open
hi-hat’ when the pedal is released. When the pedal is
pressed down, it functions as a ‘closed hi-hat’.
Cymbal Pads
Drum Pads
To Ride
To Tom 3
Hi-Hat Pedal
To Hi-Hat
Control
*See Appendix for Pad, Triggers, Name and MIDI chart.
To Snare
To Kick
Kick Beater Pedal
11
18274587 Simmons SD600 Manual.indd 11 12/19/18 8:51 AM
Page 12

OWNER’S MANUAL
CONNECTIONS
CONNECTING THE MODULE AND PADS
Using the provided cables, connect the 1/4” jacks to the corresponding
drum pads, cymbal pads and kick pad. The pin connection will attach
to the serial port of the sound module. (See illustration.)
NOTE: The voice of the hi-hat pad is controlled by the hi-hat pedal.
Similar to a real drum kit, the hi-hat pad functions as an ‘open hihat’ when the pedal is released. When the pedal is pressed down, it
functions as a ‘closed hi-hat’. When it is in-between, it is “semi-open
hi-hat.” Use the included hook-and-loop strips to retain cable to rack.
AC ADAPTER
The SD600 module uses an external power supply
called an AC Adapter. This plugs into the back of the
module.
Make sure the power is switched OFF on the module
and connect the power adaptor with the DC IN jack on
the rear panel.
NOTE: To protect the speakers, amplier and the
drum module from damage, lower the volume to the
minimum level before switching the power ON.
Make sure the power is switched OFF when connecting
the drum module with external devices.
12
18274587 Simmons SD600 Manual.indd 12 12/19/18 8:51 AM
Page 13

CONNECTIONS
CONNECTING AUDIO EQUIPMENT
Mixers and Ampliers
1. To listen to the module, send the outputs to a
mixer or amplier. Connect the Output
L/MONO and R jacks on the rear panel to your
amp. (For monaural playback, use the L/MONO
jack; for stereo playback, connect both L/MONO
and R jacks.)
2. The volume from the module is adjusted with the
VOLUME knob.
3. You can connect a standard pair of headphones the
SD600 module to listen to your electronic drum set
without disturbing others. Connect the headphones to
the 1/8” headphone jack located on the side panel of
the drum module. Adjust the volume to a comfortable
level to avoid damaging your hearing..
13
18274587 Simmons SD600 Manual.indd 13 12/19/18 8:51 AM
Page 14

OWNER’S MANUAL
CONNECTIONS
AUX INPUT
This input allows you to mix the input from external
audio sources with the SD600 module’s internal
sounds.
1. Plug the audio output of your smartphone, MP3
player, or other audio source into the AUX IN jack on
the back panel.
CONNECTING MIDI DEVICES AND COMPUTERS
MIDI stands for Musical Instrument Digital Interface,
which is a world-wide standard communication
interface that enables electronic musical instruments
and computers (of all brands) to communicate with
each other. MIDI sends note and other communication
between devices. This exchange of information makes
it possible to create a system of MIDI instruments and
devices that offer greater versatility and control than
is available with isolated instruments. Whether you
interface with computers, sequencers, expanders or
other controllers, your musical horizons will be greatly
enhanced.
BLUETOOTH WIRELESS MIDI
The SD600 includes Bluetooth wireless MIDI for
connection to apps like the Simmons Drums App for iOS.
See page 25 for connection instructions.
USB MIDI CONNECTION
The USB connector allows you to connect the module
directly to your computer. It can be connected without
driver installation under the Windows & macOS
environment. The module will be recognized to receive
and transmit MIDI messages through a single USB cable,
USB is used only for MIDI messages (MIDI via USB). The
SD600 module will appear as “SD600” in the USB device
options of your software.
NOTE: When the USB is connected to a computer, all
MIDI messages will be received and transmitted via USB.
14
18274587 Simmons SD600 Manual.indd 14 12/19/18 8:51 AM
Page 15

SD600 DRUM MODULE OPERATION
TOP PANEL
1
14
2
3
4
5
6 9
7 8
1
Kit Button
2
Volume Knob
3
Song Button
Access Song Mode
4
Utility Button
Access Utility Functions
5
Power
This is a soft switch. To turn
on or off, press and hold the
button for 5 secs.
6
Play Button
Starts or stops the playback
of a song
7
Record Button
Used to enter the Record
mode
8
Click Button
Turns the Click/Metronome
function on/off
9
Tempo Button
Adjusts tempo
10
+/- Buttons
Changes the kit or adjusts
the current parameter on the
screen
11
Bluetooth
Enables Bluetooth MIDI
pairing
13
12
11
10
12
Save Button
Enters the Save menu when
it is available
13
Edit Button
Enters Edit Mode on kits and
Songs. When in Edit or Utility
mode, pages through the
available settings.
14
Accessory Shelf
Attach the shelf to the top of
the module to hold tablet,
smartphone, drumsticks,
or other accessories. Make
sure your devices are secure
before playing the kit.
15
18274587 Simmons SD600 Manual.indd 15 12/19/18 8:51 AM
Page 16

OWNER’S MANUAL
SD600 DRUM MODULE OPERATION
BOTTOM PANEL
1
Serial Connection Jack for
the pad trigger cables
1
BACK PANEL
1
Crash 2 / Tom 4
¼” pad inputs for expanding your kits by
connecting extra pads or triggers
2
USB Port
Used for connecting the SD600 module to
a computer
3
AUX Input
Stereo 1/8” jack to connect CD or MP3
players to the module.
4
Output
Mono or stereo audio outputs to connect to
external audio sources
5
AC Adapter Input
Connection for the 9V DC power adapter
SIDE PANEL
2 3 4 51
1
Volume Knob
2
1/8” TRS headphone jack
1 2
16
18274587 Simmons SD600 Manual.indd 16 12/19/18 8:51 AM
Page 17

QUICK START OPERATIONS
TURNING THE POWER ON THE MODULE
1. Connect the AC Adapter to the drum module.
2. Press the power switch on the top panel to turn on the module.
NOTE: There is an automatic power off function that turns off
the module when the kit is not being used for a certain period of
time. The default setting is off. If this gets changed you can reset
this in the Utility mode.
BASIC OPERATION AND NAVIGATION
There are 3 main modes for the module: KIT, SONG and UTILITY.
To enter these modes press the corresponding buttons on the
top panel of the module.
ADJUSTING VALUES
1. Select the parameter to be adjusted.
2. Adjust the value using + / - buttons.
17
18274587 Simmons SD600 Manual.indd 17 12/19/18 8:51 AM
Page 18

OWNER’S MANUAL
QUICK START OPERATIONS
LISTENING TO THE DEMO SONGS
The demo songs help to show you the capabilities and sounds of
the SD600 module. There are three demos in the module. You
can also access these by pressing the SONG button and selecting
one of the rst three songs.
1. Press KIT and SONG button simultaneously to enter Demo
Mode. The rst song demo will start playing.
2. Press the PLAY button to stop the demo.
3. Press the + or - buttons to select a Demo to play; use the PLAY
button to play the demos
4. After pressing PLAY, press any of the Mode buttons (KIT, SONG
or UTILITY) to exit the Demo Mode
SELECTING A KIT
1. Press the KIT button. The LCD displays the current Kit number
and Kit name.
2. Press the – /+ buttons (Preset or User Kits).
PLAYING A SONG
1. Press the SONG button and the SONG screen appears with the
Song Number and Name.
2. Press the –/+ buttons to select the song you want to play.
NOTE: You can temporarily change the tempo of a song while
playback is in progress. The song returns to its preset tempo
when a different song is selected.
MUTING THE DRUM PART
1. While a Song is playing press the PLAY and CLICK Button at
the same time. This will mute the drum sound. The screen will
show the mute status “Mute On” or “Mute Off”
2. To unmute the Drums press the PLAY and CLICK Buttons at the
same time again.
18
18274587 Simmons SD600 Manual.indd 18 12/19/18 8:51 AM
Page 19

KIT MODE - ADVANCED
EDITING A KIT
1. Press the KIT button.
2. Press the EDIT button to see the screen for the current sound
3. Strike a drum pad to view the Voice currently assigned
4. Press the EDIT button to move to the rst parameter to
be changed on the current sound. Press the EDIT button
repeatedly to step through all the available parameters that
can be changed on the voice.
5. Press the -/+ buttons to change the parameter
6. Press the SAVE button to save the assignment to a User Kit.
(See Saving a kit)
Parameter Denition Notes
EditSnd Drum assignment Press +/- to select a bank of
sounds, then press EDIT again to
cursor to the sound list.
Volume Drum volume Range is 0-32
Pitch Drum Pitch Range is -8 to +8
V-Pitch Velocity to pitch Range is 0, 0.25, 0.5, 0.75, 1 to 12.
Fractional amounts can reduce a
machine-gunning effect.
Decay Drum Decay time Range is 0 to -5. Reducing the
decay time makes the drum ring
out for a shorter time.
Pan Drum Pan Pan each drum from Left8 to
Center to Right8.
R.LVL Reverb Level The reverb send for each drum.
Range is 0 to 32.
C.LVL Chorus Level The chorus amount for each
Reverb Reverb Type The reverb type for this kit.
Chorus Chorus Type The chorus type for this kit.
drum. Range is 0 to 32.
Options are: Hall 1/2, Room 1/2/3,
Stage 1/2, Plate, Delay, Echo, Off
Options are: Chorus 1/2/3/4,
Feedback Echo, Flanger 1/2/3,
Short Delay, Delay Feedback,
Celeste 1/2/3
Factory Reset Factory Reset Resets this kit to the default
settings. See page 20, “Kit Reset”
19
18274587 Simmons SD600 Manual.indd 19 12/19/18 8:51 AM
Page 20

OWNER’S MANUAL
KIT MODE - ADVANCED
RENAMING A KIT
1. Select a User Kit.( Preset Kits cannot not be renamed)
2. Press the -/+ buttons to choose the User kit for save.
3. Press the SAVE button to rename the User Kit.
4. Press the EDIT button to move the cursor
5. Press [+/-] to change the character
6. Press the SAVE conrmation
SAVING A KIT
1. Press the SAVE button to save the assignment to a User Kit.
2. Press the -/+ buttons to choose the User kit for save.
3. Press the SAVE button to rename the User Kit.
4. Press the EDIT button to move the cursor to name your Kit.
5. Press [+/-] to change the character
6. Press the SAVE/ENTER conrmation
KIT RESET
1. Select a Kit
2. Press the EDIT Button until you see Factory Reset.
3. Press the Save Button. The screen will show “Current Kit”
4. Press Save to reset just the one kit. If you want to reset all the
kits go to the next step.
5. Press the + button. The screen will show “All Kits”.
6. Press Save.
20
18274587 Simmons SD600 Manual.indd 20 12/19/18 8:51 AM
Page 21

SONG MODE
PLAYING A SONG
1. Press SONG, select a song number, then PLAY to play a song.
2. Press the PLAY button to stop playback of the song.
NOTE: You can temporarily change the tempo of a song while
playback is in progress. The song returns to its preset tempo
when a different song is selected.
MUTING THE DRUM PART
1. While a Song is playing press the PLAY and CLICK Button at
the same time. This will mute the drum sound. The screen will
show the mute status “Mute On” or “Mute Off”
2. To unmute the Drums press the PLAY and CLICK Buttons at the
same time again.
3. The default setting is to mute the drum sound. It also mutes the
accompaniments track. See P.21 “Mute Select”
EDITING A SONG
1. Press the SONG Button. The current song will be displayed.
2. If you wish to change to another song press the -/+ buttons until
you get to the Song you want to edit.
3. From the Song you have selected press the EDIT button. The
rst selection is the song’s Tempo.
4. Press the -/+ buttons to set the value for the tempo. To move to
the next parameter press the EDIT button. Each time you press
the EDIT button you will come to the next parameter. See the
list below of the parameters for Songs.
• Tempo
• Loop
• Pre Count
• Balance
• Time Sig
COPY SONG
You can copy a Preset song to a user song, then erase the Drums
or Accompaniment track.
1. Select a Song.
2. Press the SAVE button to save the to a User song
3. Press the -/+ buttons to choose the User song to save to
4. Press the SAVE button to rename the User song.
5. Press the EDIT button to move the cursor
6. Press [+/-] to change the character
7. Press the SAVE button one more time to save the song to a user
location.
If you want to rename a user song, save the song to the same
position, then use the rename instructions.
21
18274587 Simmons SD600 Manual.indd 21 12/19/18 8:51 AM
Page 22

OWNER’S MANUAL
RECORDING A SONG
TO RECORD
1. Press the Song Button
2. Select a User Song
3. Press the Record button. You will hear the Click metronome
sound count in. Begin playing the song after the count off.
4. After you record your song you can also rename the song,
Press SAVE button to save and rename.
CLICK SETTINGS
The CLICK is the metronome sound that is played when you are
listening to beat to play along with.
Press CLICK button on/off metronome.
1. To edit the Click settings press and hold the CLICK button for 2
seconds, then press the EDIT button.
2. The rst parameter is the time signature- “Time Sig”.
3. Press the -/+ buttons to select the time signature that you want.
4. To get to the next parameter press the EDIT button. See the list
below of the parameters for the Click.
Denitions
Time Signature
Time Signature - For the preset songs, this parameter shows the current song’s default value. For the user
songs that have material already recording on them the default value is 4/4
Interval
This refers to the note value interval for the click. Ex. quarter note, eighth note etc.
Click Voice
This refers to the sound for the Click. There are three options.
Click Vol
Click Volume from 0 to 32.
Reset
Resets the Click to the factory setup. Press Save to reset the click settings.
22
18274587 Simmons SD600 Manual.indd 22 12/19/18 8:51 AM
Page 23

UTILITY MODE
The Utility mode is for the main functions of the module such as
trigger setup for the pads, MIDI setup, and saving global settings.
Trigger Settings
You can set the parameters of each drum and cymbals pad in
the Trigger menu. While editing the settings, you can select each
trigger by hitting the corresponding trigger pad.
1. Press the UTILITY button.
2. The display will show the setting for the current trigger pad. The
default is the Snare pad center Sensitivity.
3. Strike the drum pad you want to edit to view the setting
currently assigned
4. Press the -/+ buttons to change the parameter setting.
5. To get to the next parameter press the EDIT button. See the list
below for the other parameters and explanations.
Parameter Denitions:
Sensitivity
This adjusts the sensitivity of the pad response. Higher settings result in higher sensitivity, so that the pad
will produce a loud volume even when struck softly. Having the sensitivity set too high can affect the
dynamics of the pad.
Retrig-C (Retrigger cancel)
Retrigger Cancel prevents retriggering from occurring. Although setting this to a high value prevents
retriggering, it then becomes easy for sounds to be omitted when the drums played fast (roll etc.). Set this
to the lowest value possible while still ensuring that there is no retriggering.
Threshold
This setting allows a trigger signal to be received only when the pad is struck harder than a specied force.
This can be used to prevent a pad from sounding in response to peripheral vibrations from another pad.
Curve (Trigger curve)
This setting allows you to control the relation between the velocity (striking force) and changes in volume
(the dynamic curve.) Adjust this curve until the response feels as natural as possible.
X- Talk (Pad Crosstalk)
When two pads are mounted on the same stand, the vibration produced by hitting one pad may trigger the
sound from another pad unintentionally (This is called crosstalk.) You can avoid this problem by adjusting
Crosstalk Cancel on the pad that is sounding inadvertently. If the value is set too high, then when two pads
are played simultaneously, the one that is struck less forcefully will not sound. Be careful when setting this
parameter to the minimum value required to prevent crosstalk.
23
18274587 Simmons SD600 Manual.indd 23 12/19/18 8:51 AM
Page 24

OWNER’S MANUAL
UTILITY MODE
MIDI NOTE
The SD600 module can send pad strikes as MIDI notes to your
computer or tablet. This screen allows you to customize the MIDI
note number sent when each pad is struck.
1. Press the UTILITY button. The rst parameter is for the trigger
settings.
2. Press the EDIT button until you see the screen for MIDI Note
3. Hit the pad that you want to change
4. Press the -/+ buttons to change the note number setting
Consult your software documentation for a list of MIDI note
numbers for each drum. The SD600 defaults are shown below:
MIDI Note Pad
36 Kick
38 Snare – Center
40 Snare – Rim
48 Tom 1
50 Tom 1 Rim
45 Tom 2
47 Tom 2 Rim
43 Tom 3
58 Tom 3 Rim
41 Tom 4
39 Tom 4 Rim
46 Hi Hat- Open
42 Hi Hat – Closed
44 Hi Hat - Pedal
85 Hi Hat - Splash
49 Crash
57 Crash 2
51 Ride
MIDI LOCAL SETTINGS
The SD600 module is a USB MIDI compatible device. There are no
special drivers required to use the module with your computer.
MIDI Local Control allows the module to only produce sounds
coming from the USB MIDI In. The pads will only send MIDI note
commands, which can be useful when connected to a Computer
DAW. In this case set the Local to Off. The default setting is set to
ON.
To change the Local On/Off.
1. Press the UTILITY button.
2. Press the EDIT button until you see the screen for MIDI “Local Sw”
3. Press the -/+ buttons to change the parameter setting.
24
18274587 Simmons SD600 Manual.indd 24 12/19/18 8:51 AM
Page 25

UTILITY MODE
AUTO POWER MODE
Enable: If you don’t use the SD600 for 30 min, the module
will automatically shut down.
Disable: The module will not shut down automatically.
(Default setting)
FACTORY RESET
There may be occasions where you want the module to return
to the factory settings. This function will return the module
back to factory setup.
1. Press the UTILITY button.
2. Press the EDIT button until you see the screen for “Util
Reset”*
3. Press the SAVE button to reset the module. The module will
go through the reset procedure and afterwards return to
the Kit mode screen.
* There are two types of resets. Utility reset just resets the
module settings. Reset All will reset all the sounds as well as
the module settings. (Press EDIT button again to Reset All.)
* You can also reset the module to factory settings by holding
+ and – while turning the power on.
TEMPO
To adjust tempo press the TEMPO button. The current tempo will
be displayed.
You can adjust the tempo with the -/+ buttons. You can also
change the tempo by tapping on the drum pads. To do this press
the SAVE/ENTER button. The screen will show “Tap...” to indicate
the module can accept your tempo input from the drum pads.
BLUETOOTH WIRELESS MIDI
The SD600 includes Bluetooth wireless MIDI for connection
to apps like the Simmons Drums App for iOS. To connect the
drum module to your tablet, smartphone, or computer:
1. Press the Bluetooth button. If you have not yet paired a
device, the LED will ash.
2. Open the Bluetooth MIDI settings in your app and select
the SD600.
NOTE: The SD600 will not show up in the “Bluetooth” device
list on your phone. Your app needs to support Bluetooth
MIDI to work with the SD600. If the app doesn’t support
Bluetooth MIDI, you can still use it with a USB adapter
3. The Bluetooth button LED should stop ashing once it is
paired with a device. To disable Bluetooth, press the button
again so that the LED switches off. Bluetooth MIDI allows
you to connect with drum sound apps on a variety of
devices.
25
18274587 Simmons SD600 Manual.indd 25 12/19/18 8:51 AM
Page 26

OWNER’S MANUAL
APPENDIX
Voice List
Bank Screen Name
Kick 22x18 Map
Kick 20x14 Vntg
Kick 20x14 VnLo
Kick 24x16 '60s
Kick 26x14Acylc
Kick 20x20Bubga
Kick 24x16 KT
Kick 24x16 Nash
Kick 22x18LAFnk
Kick Hip Hop
Kick 22x14Gated
Snare 14x5 Maple
Snare 13x7 Maple
Snare 14x5 VntMp
Snare 14x5 LAL
Snare 14x5 AlMt
Snare 14x6 Maple
Snare 14x6 Metal
Snare 14x6.5 BB
Snare 14x6.5 BBD
Snare 14x6.5 BM
Snare PiccUrban
Snare 14x5 Gated
Snare 14x5 GtdHi
Snare 14x5 Mp RS
Snare 13x7 Mp RS
Snare 14x5 VM RS
Snare 14.6 BB RS
Snare 14x5 AM RS
Snare 14x5 AL RS
Snare 14x6 Mp RS
Snare 14x8 AM RS
Snare 14x6 BM RS
Snare PiccUrb RS
Voice List
Bank Screen Name
Snare 14x5 GtdRS
Snare 14x5GtRSHi
Snare 14x5 AL CS
Snare PiccUrb CS
Toms 10" Maple
Toms 10" Bubnga
Toms 10" BubDmp
Toms 10" BubHi
Toms 10" Gated
Toms 10" SnglHd
Toms 12"Acrylic
Toms 12" Maple
Toms 12" Bubnga
Toms 12" BubDmp
Toms 12" SnglHd
Toms 12" Gated
Toms 13" LMplHi
Toms 13" NashHi
Toms 13" VntMpH
Toms TomRimHi
Toms 13" Nash
Toms 13" Vnt Mp
Toms 13" L Mapl
Toms TomRimLo
Toms 14" 90sRk H
Toms 14"Acrylic
Toms 14" 90sRk L
Toms 14" Maple
Toms 14" Bubnga
Toms 14" BubDmp
Toms 14" MplLo
Toms 16" VntMpl
Toms 16" L Mpl
Toms 16" Acrylic
26
18274587 Simmons SD600 Manual.indd 26 12/19/18 8:51 AM
Page 27

APPENDIX
Voice List
Bank Screen Name
Toms 16" Gated
Toms 16" VnMpLo
Toms 16" Bubgna
Toms 16" BubDmp
Toms 18" Bubnga
Toms 16" SnglHd
Toms 16" Nash
Toms 18" 90sRk H
Toms 18" 90sRk L
Toms 18"Acrylic
Toms 18" L Mapl
Toms 18" Gated
Toms 18" Nash
Toms 18" SnglHd
Crash 16" P Bow
Crash 16" P Edge
Crash 18" P Chna
Crash 16" P Chna
Crash 16" S Edge
Crash 18" S Bow
Crash 18" S Edge
Voice List
Bank Screen Name
HiHat 14" P Opn
HiHat 14" P sOpn
HiHat 14" S Clsd
HiHat 14" S Ped
HiHat 14" S Opn
HiHat 14" S S Opn
HiHat 14" S spls
HiHat 14" Z Clsd
HiHat 14" Z Ped
HiHat 14" Z sOpn
HiHat 14" Z Opn
HiHat 14" Z spls
Ride 20" SzBrBell
Ride 24" P Bell
Ride 24" P Bow
Ride 20" P Bow
Ride 20" S Bell
Ride 20" S Bow
Ride 20" Z Bell
Ride 20" Z Bow
Crash 18" Z Bow
Crash 18" Z Edge
Crash 10" Z Splh
Crash 8" S Splsh
Crash 16" P MltB
Crash 16" PDk B
Crash 16" PDk E
Crash 16" ZDkE
HiHat 14" S Spls
HiHat 14" M Ped+
HiHat 14" P Clsd
HiHat 14" P Ped
Perc Cajon BD
Perc Cajon DgSl
Perc Cajon DgSl
Perc Conga Opn
Perc Conga Slp
Perc MaracaShk
Perc MetalShk
Perc Cowbell
Perc Shaker
Perc Tmbl Hi RS
Perc TimbaleHi
Perc Tmbl LoSd
Perc TimbaleLo
27
18274587 Simmons SD600 Manual.indd 27 12/19/18 8:51 AM
Page 28

OWNER’S MANUAL
APPENDIX
Voice List
Bank Screen Name
Perc TmbLo Dyn
Perc Tumba Dyn
Perc Clave
Perc Afr Shkr 1
Perc Bata Ly Lo
Perc Bata LyDum
Perc Djembe Dn
Perc Djembe OS
Perc Gana Drum
Perc TDrm Boom
Perc TDrm SlpBM
Perc Tdrum Tap
Perc Udu DumSO
Perc Udu Dum
Perc Udu Fngers
Voice List
Bank Screen Name
Perc Beer Can 2
Perc Boat Horn
Perc Chainlink
Perc Chair 1
Perc Chair 2
Perc Group Clap
Perc Clown Horn
Perc Dumpster 1
Perc Dumpster 2
Perc Dumpster 3
Perc Bottle 1
Perc Bottle 2
Perc Bottle 3
Perc Metal 1
Perc Bucket 1
Perc Usu Top
Perc Apa Kalai 1
Perc Apa Kalai 2
Perc IndiaCnt 1
Perc IndiaCnt 2
Perc Gadasing 1
Perc CadasingDb
Perc India Loop
Perc Tabla DGC
Perc Tabla_DGEE
Perc Tabla_DGMK
Perc Tabla_DINM
Perc Tabla_NAH
Perc Tabla_NAL
Perc Tabla_THMM
Perc Finger Cym
Perc ABS Pipe1
Perc Bucket 2
Perc Bucket 3
Perc Pipes 1
Perc Pipes 2
Perc Pipes 3
Perc Bench 1
Perc Bench 2
Perc TrashCan 1
Perc P Bucket 1
Perc P Bucket 2
Perc P Bucket 3
Perc ShppingCrt
Perc Dumpster
Perc DrumSticks
Perc Go Bell
Perc Gong
Perc Tamb Slap
Perc ABS Pipe 2
Perc CymbalStak
Perc Beer Can 1
Perc Timpani
Perc WoodBlock
Perc LongZhouGu
28
18274587 Simmons SD600 Manual.indd 28 12/19/18 8:51 AM
Page 29

APPENDIX
Voice List
Bank Screen Name
Perc BangZi
Perc MuYu-1
Perc MuYu-2
Perc BangZi2
Perc XiangBan1
Perc PaiGu-Low
Perc PaiGu-Med
Perc PaiGu-Hi
Perc XiaoGu2
Perc XiaoGu3
Perc PaiGu1
Perc PaiGu2
Perc PaiGu3
Perc PaiGu4
Perc XiangJiao1
Voice List
Bank Screen Name
E Kick 808 Kick 1
E Kick 808 Kick 2
E Kick Tekno Kick
E Kick Fuzzy Bass
E Snare SDS7Snare1
E Snare SDS7Snare2
E Snare 808 Snare
E Snare SDSVSnare1
E Snare SDSVSnare2
E Snare SDSVSnare3
E Snare SDSVSnare4
E Snare 78 Snare
E Snare Tek Snare
E Snare 909 Snare
Perc XiangJiao2
Perc XiaoTangGu
Perc Daluo-Med
Perc ZG DaBo-Lo
Perc ZG DaBo-Hi
Perc ZG XiaoBo
Perc KaiCha2
Perc DaBo
Perc DaLuo2
Perc XiaoCha1
Perc XiaoCha2
Perc JingJuDaLu
Perc Bo2
Perc MeiLanFang
Perc JingJuM
Perc Huh_Group
E Snare UniVox Sn
E Snare Hip Hop 1
E Snare Hip Hop 2
E Snare 909 Sn RS
E Tom 78 Tom Hi
E Tom 78 Tom Mid
E Tom 78 Tom Lo-
E Tom 78 Tom Lo
E Tom SDS7 Tom 1
E Tom SDS7 Tom 2
E Tom SDS7 Tom 3
E Tom SDS7 Tom 4
E Tom SDS7 Tom 5
E Tom SDS7 Tom 6
E Tom SDS7 Tom 7
E Tom SDSV Tom 1
E Kick SDSV Kick
E Kick SDS7 Kick
E Kick 909 Kick
E Tom SDSV Tom 2
E Tom SDSV Tom 3
E Tom SDSV Tom 4
29
18274587 Simmons SD600 Manual.indd 29 12/19/18 8:51 AM
Page 30

OWNER’S MANUAL
APPENDIX
Voice List
Bank Screen Name
E Tom SDSV Tom 5
E Tom SDSV Tom 6
E Tom SDSV Tom 7
E Tom SDSV Tom 8
E Tom SDSV Tom 9
E Tom SDSV Tom 10
E Tom SDSV Tom 11
E Tom Tekno Tom1
E Tom Tekno Tom2
E Tom Tekno Tom3
E Tom 808 Tom Hi
E Tom 808 Tom Mid
E Tom 808 Tom Lo
E Tom 909 Tom Mid
E Tom 909 Tom Hi
Voice List
Bank Screen Name
E Perc 808 Crash
E Perc SDS7 Cymb
E Perc SDSV Cym 1
E Perc SDSV Cym 2
E Perc SDSV Cym 3
E Perc E Cymbal 1
E Perc E Cymbal 2
E Perc 909 Ride
E Perc 808 Cymb
E Perc 909 Crash
E Perc SDSV Clap
E Perc 78 Tamb
E Perc 909 Clap
E Perc HumanGltz
E Perc SteelPkr
E Tom 909 Tom Lo
E Tom Tek Tom Hi
E Perc 808 HHCld
E Perc 808 HHOpn
E Perc SDSV HHPed
E Perc SDSV HHOpn
E Perc SDSV HHCld
E Perc HipHop Cl
E Perc HipHop Op
E Perc R'nB Clsd
E Perc E Hi Hat
E Perc SDS7 HHCld
E Perc SDS7 HHOpn
E Perc SDS7 HHPd1
E Perc SDS7 HHPd2
E Perc Tek HH Cld
E Perc SteelSwarm
E Perc TerrorStke
E Perc NastyKick
E Perc EatBrain
E Perc GravelBub
E Perc Pic Animal
E Perc HH Bubb
E Perc DstortRngr
E Perc BassRatle
E Perc BassRatMid
E Perc BassRatLo
E Perc SSRattle
E Perc Club Stab
E Perc KnarlBass
E Perc Trumble
E Perc MatrixGens
E Perc Tek HH Opn
E Perc SDS7 Crash
E Perc 78 Crash
30
18274587 Simmons SD600 Manual.indd 30 12/19/18 8:51 AM
Page 31

APPENDIX
Kit List
# Kit Name
1 Modern Maple
2 Acrylic
3 Fusion
4 Classic Rock
5 Funk Rock
6 70's Rock
7 Gated Dreams
8 Jazz
9 Grunge Kit
10 Bubinga
11 SDSV
12 Bubinga Africa
13 Nashville
14 West Africa
15 Nails
16 India
17 Blues
18 Tekno
19 Junkyard
20 Modern Pop
21 SDS7 Analog
22 Salsa
23 Heavy Rock
24 Rock Fusion
25 Hip Hop
26 Street Beat
27 80s Rocker
28 Funk City
29 Tribal
30 Punk Kit
Kit List
# Kit Name
35 Pop Life
36 User Kit 1
37 User Kit 2
38 User Kit 3
39 User Kit 4
40 User Kit 5
41 User Kit 6
42 User Kit 7
43 User Kit 8
44 User Kit 9
45 User Kit 10
Songs
Display Name
Song 01 Rock
Song 02 Funk
Song 03 Fusion
Song 04 User Sng 1
Song 05 User Sng 2
Song 06 User Sng 3
Song 07 User Sng 4
Song 08 User Sng 5
Song 09 User Sng 6
Song 10 User Sng 7
Song 11 User Sng 8
Song 12 User Sng 9
Song 13 User Sng 10
31 Dance Kit
32 Chinese Dawn
33 Alternative Rock
34 Heart of China
31
18274587 Simmons SD600 Manual.indd 31 12/19/18 8:51 AM
Page 32

OWNER’S MANUAL
APPENDIX
MIDI Implementation Chart
Function Transmitted Recognized Remarks
Basic Default
Channel Changed
Mode Default
Messages
Altered
Note
Number: True voice
Velocity Note ON
Note OFF
Affter Key’s X X
Pitch Bender X O
Control Change 0, 32
1
6
7
10
11
64
66
67
80, 81
84
91, 93
100, 101
121
10 CH Only
X
Mode 3
X
**********
0~127
**********
O 9nH,v=1-127
O 8nH,v=0
X
X
X
X
X
X
X
X
X
X
X
X
X
X
1-16 CH
1-16 CH
Mode 3
X
X
0~127
0~127
O 9nH,v=1-127
O 9nH,v=0 or 8nh
O
O
O
O
O
O
O
O
O
O
O
O
O (*1)
O
Bank Select
Modulation
Data Entry
Volume
Pan
Expression
Sustain
Sostenuto
Soft pedal
DSP TYPE
Portamento
DSP DEPTH
RPN LSB,MSB
Reset all Controllers
Program Change: True O 0-127
0-127
System Exclusive X O
System: Song Position
Song Select
Common: Tune
Aux: Local on/off
All Notes Off
Messages: Active Sense
Reset
Mode 1: OMNI ON, POLY
Mode 2: OMNI ON, MONO
Mode 3: OMNI OFF, POLY
Mode 4: OMNI OFF, MONO
X
X
X
X
X
X
X
*1: Registered parameter number:
#0: Pitch sensivity
#1: Fine tuning in cents
#2: Coarse tuning in half-tones
32
10506479-V1.0
O 0-127
0-127
X
X
X
O
O
X
X
O: Yes
X: NO
18274587 Simmons SD600 Manual.indd 32 12/19/18 8:51 AM
Page 33

33
18274587 Simmons SD600 Manual.indd 33 12/19/18 8:51 AM
Page 34

OWNER’S MANUAL
34
18274587 Simmons SD600 Manual.indd 34 12/19/18 8:51 AM
Page 35

35
18274587 Simmons SD600 Manual.indd 35 12/19/18 8:51 AM
Page 36

WARRANTY
Two (2) Years limited warranty
Subject to the limitations set forth below, Simmons® hereby represents
and warrants that the components of this product shall be free from
defects in workmanship and materials, including implied warranties of
merchantability or tness for a particular purpose, subject to normal
use and service, for two (2) years to the original owner from the date of
purchase.
Retailer and manufacturer shall not be liable for damages based
upon inconvenience, loss of use of product, loss of time, interrupted
operation or commercial loss or any other incidental or consequential
damages including but not limited to lost prots, downtime, goodwill,
damage to or replacement of equipment and property, and any costs of
recovering, reprogramming, or reproducing any program or data stored
in equipment that is used with Simmons® products. This guarantee
gives you specic legal rights. You may have other legal rights which vary
from state to state. Some states do not allow limitations on how long an
implied warranty lasts, so the above limitation may not apply to you.
Simmons
P.O. Box 5111 Thousand Oaks, CA 91359-5111
All trademarks and registered trademarks mentioned herein are
recognized as the property of their respective holders.
OWNER’S MANUAL
FCC STATEMENT
1. Caution: Changes or modications to this unit not expressly approved
by the party responsible for compliance could void the user’s authority to
operate the equipment.
2. Note: This equipment has been tested and found to comply with the
limits for a Class B digital device, pursuant to Part 15 of the FCC Rules.
These limits are designed to provide reasonable protection against
harmful interference in a residential installation. This equipment
generates, uses, and can radiate radio frequency energy and, if not
installed and used in accordance with the instructions, may cause
harmful interference to radio communications. However, there is no
guarantee that interference will not occur in a particular installation. If
this equipment does cause harmful interference to radio or television
reception, which can be determined by turning the equipment off and
on, the user is encouraged to try to correct the interference by one or
more of the following measures:
• Reorient or relocate the receiving antenna.
• Increase the separation between the equipment and receiver.
•
Connect the equipment into an outlet on a circuit different from
that to which the receiver is connected.
•
Consult the dealer or an experienced radio/TV technician for help.
This equipment complies with FCCradiation exposure limits set forth
for an uncontrolled environment. This equipment should be installed and
operated with minimum distance 20cm between the radiator and your body.
MISSING
CALL
888-621-4008
damaged
assembly
TOLL FREE
parts?
OR VISIT OUR WEBSITE AT: simmonsdrums.net
36
18274587 Simmons SD600 Manual.indd 36 12/19/18 8:51 AM
questions?
 Loading...