

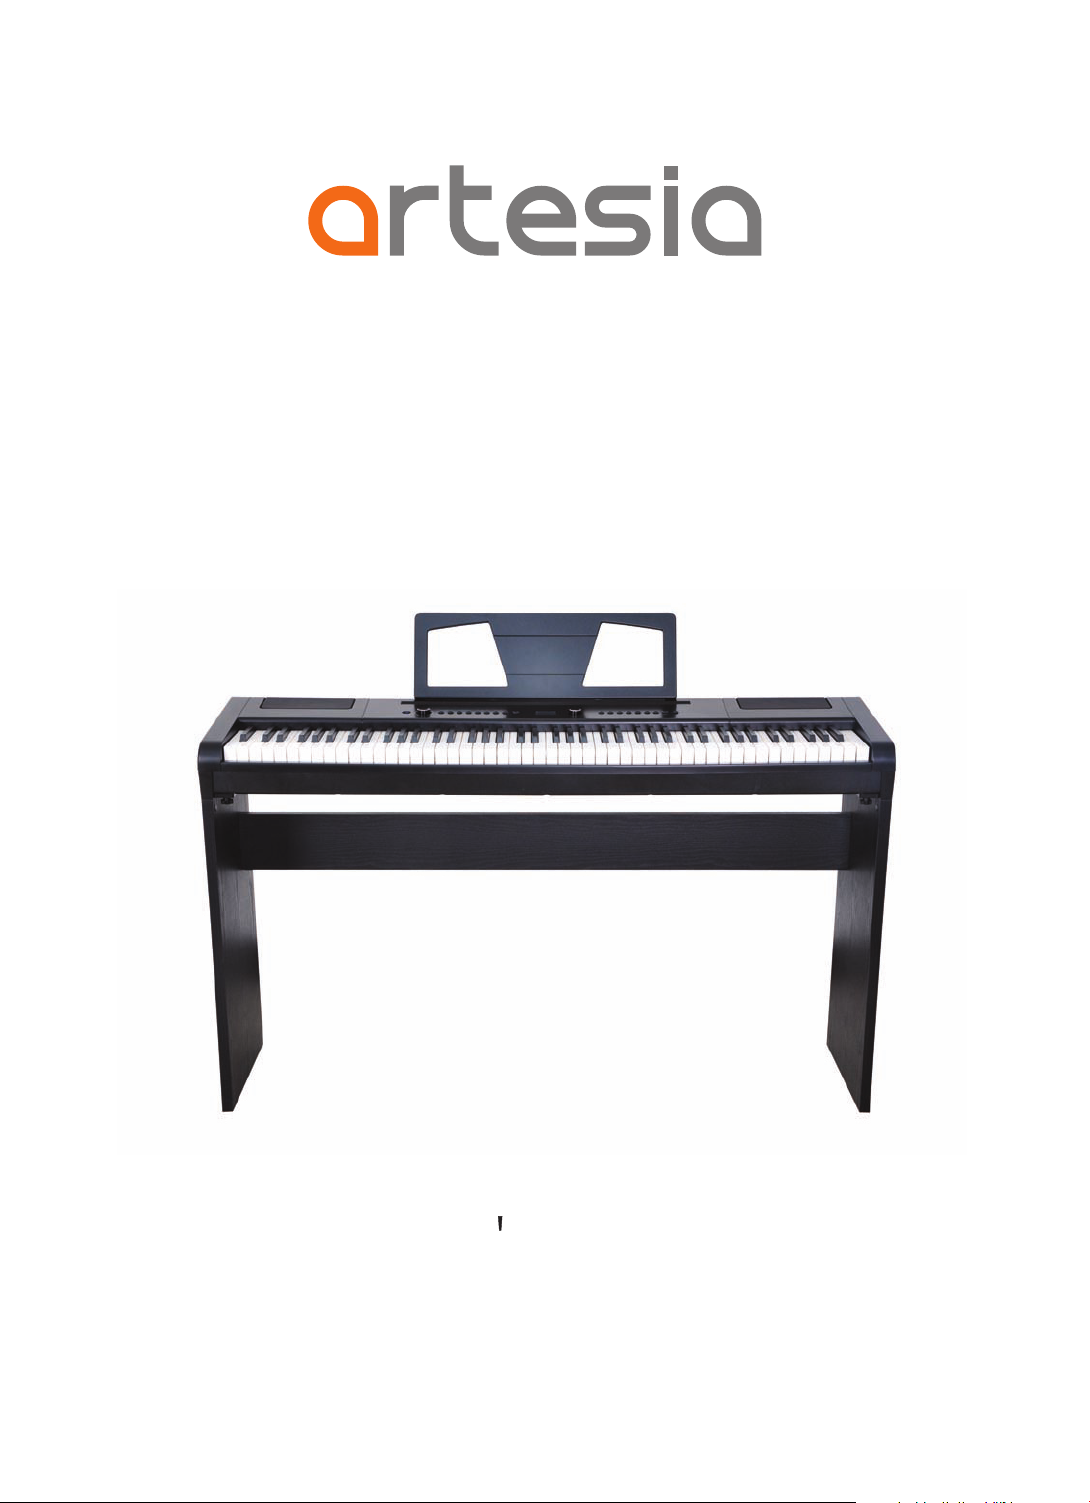
AM-3
Digital Piano
Owner s Manual
Virgin Musical Instruments
Precaution
Thank you fo r pur chasi ng this digi tal instru ment. Fo r corre ct op era tion an d saf ety, plea se
read th e man ual carefu lly and keep i t for f uture r efe rence .
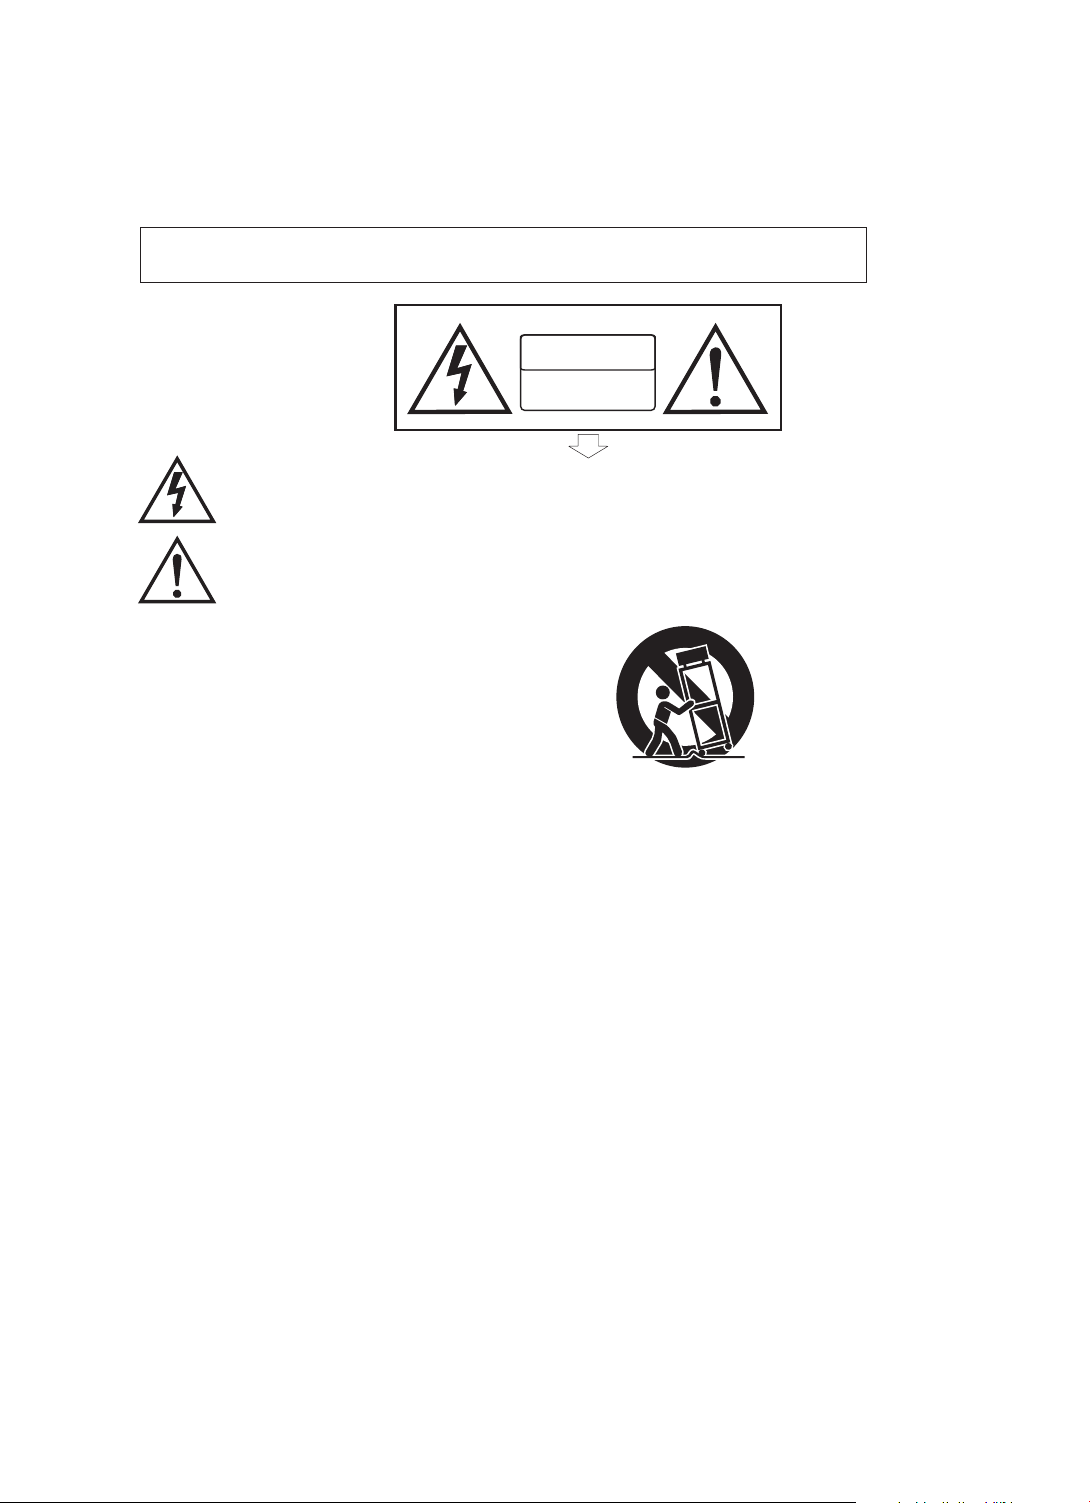
Safety Precautions
CA UTI ON
RISK OF ELECTRIC SHOCK
DO NOT OPEN
The lig htn ing fla sh wi th arro whe ad symb ol wi thin an e qui lateral tr ian gle is
inten ded t o alert t he us er to the pres ence of unin sulated “da ngerous vo lta ge”
withi n the p roduc t's e nclos ure t hat may be of su ffi cient m agnitude t o constitu te
a risk of elec tric sh ock .
The exclam ati on poin t within an eq uilateral tri angle is int ended to ale rt the user
to the pr ese nce of impor tant operatin g and mainte nance (ser vicin g) in struc tio ns in
the lit era tur e accom pan ying the pro duct.
Important Safety Instructions
1) Read these instructions.
2) Keep these instructions.
3) Heed all warnings.
4) Follow all instructions.
5) Do not use this apparatus near water.
6) Clean only with dry cloth.
7) Do not block any ventilation openings; install in accordance with the manufacturer's instructions.
8) Do not install near any heat sources such as radiators, heat registers, stoves, or other apparatus (including
amplifiers) that produce heat.
9) Do not defeat the safety purpose of the polarized or grounding-type plug. A polarized plug has two blades with
one wider than the other. A grounding-type plug has two blades and a third grounding prong. The wide blade
or the third prong is provided for your safety. If the provided plug does not fit into your outlet, consult an
electrician for replacement of the obsolete outlet.
10) Protect the power cord from being walked on or pinched, particularly at plugs, convenience receptacles, and
the point where they exit from the apparatus.
11) Only use attachments/accessories specified by the manufacturer.
12) Use only with the cart, stand, tripod, bracket, or table specified by the manufacturer, or sold with the apparatus.
When a cart is used, use caution when moving the cart/apparatus combination to avoid injury from tip-over (Figure 1).
13) Unplug this apparatus during lightning storms or when unused for a long periods of time.
14) Refer all servicing to qualified service personnel. Servicing is required when the apparatus has been damaged
in any way, such as the power-supply cord or plug is damaged, liquid has been spilled or objects have fallen
into the apparatus, the apparatus has been exposed to rain or moisture, does not operate normally, or has been
dropped.
(Figure 1)
WARNING: To reduce the risk of fire or electric shock, do not expose this apparatus to rain or moisture.
CAUTION: Apparatus shall not be exposed to dripping or splashing, and no objects filled with liquids, such as
vases, shall be placed on the apparatus.
Always make sure all batteries are .
Always replace at the same time.
types, as this can cause overheating, or fire, or battery fluid leakage.
Remove the batteries from the instrument if it is not to be used for a long time.
WARNING: This product contains chemicals, including lead, known to the State of California to cause cancer
and birth defects or other reproductive harm. Wash hands after handling.
all of the batteries Do not combine old and new batteries, also do not mix battery
inserted the correct way around to match the +/- polarity markings

Thank you for choosing the Piano!
Your portable 88 note piano not only contains leading and innovative technology
but it also is developed by and for musicians of all playing levels. Featuring a
natural balanced, weighted hammer action keyboard action and an advanced
three layer acoustic range tone generation sound technology
you with a rich performing and playing experience.
This piano offers many features and connection possibilities. To get the most
out of your instrument, please read this manual and try out the various functions
that can compliment your playing style.
Whether it is on stage, studio or home, your new portable piano is designed to
give you years of musical enjoyment.
Features Include:
. 88 key weighted hammer action keyboard
. 16 Voices
. DSP functions for additional realism
. USB to Host and USB Audio Connection
. MIDI, Stereo and Mono Line Outs
. Battery Operated (6 D Cell Batteries are not included)
. Includes DC Adaptor, Sustain Pedal, Music Rack and more
, that will provide
FCC STATEMENT
1. This device complies with Part 15 of the FCC Rules. Operation is subject to the
following two conditions:
(1) This device may not cause harmful interference.
(2) This device must accept any interference received, including interference that
may cause undesired operation.
2. Changes or modifications not expressly approved by the party responsible for
compliance could void the user's authority to operate the equipment.
NOTE: This equipment has been tested and found to comply with the limits for a
Class B digital device, pursuant to Part 15 of the FCC Rules. These limits are
designed to provide reasonable protection against harmful interference in a
residential installation. This equipment generates uses and can radiate radio
frequency energy and, if not installed and used in accordance with the
instructions, may cause harmful interference to radio communications. However,
there is no guarantee that interference will not occur in a particular installation.
If this equipment does cause harmful interference to radio or television reception,
which can be determined by turning the equipment off and on, the user is
encouraged to try to correct the interference by one or more of the following
measures:
. Reorient or relocate the receiving antenna.
. Increase the separation between the equipment and receiver.
. Connect the equipment into an outlet on a circuit different from
that to which the receiver is connected.
. Consult the dealer or an experienced radio/TV technician for help.
RoHS

Contents
Panel Control
Getting Started
Demo Songs
Select the Demo song
Stop the Demo song
Select a Voice
Layer Mode
Split Mode
Effect
Reverb
Chorus
Metronome
Tempo
Duet Mode
EQ Mode
Function
Recording
Recording
Playing
Clearing
Factory Reset
Appendix
............................................................................................................
.......................................................................................................
.......................................................................................................
MIDI Implementation Chart
Troubleshooting Hints
Specifications
............................................................................................
............................................................................................
.............................................................................................
..............................................................................................
...........................................................................................
..........................................................................................
......................................................................................................
.....................................................................................................
.............................................................................................
...............................................................................................
....................................................................................................
..................................................................................................
.................................................................................................
.....................................................................................................
....................................................................................................
..............................................................................................
.....................................................................................................
............................................................................................
...........................................................................
............................................................................
......................................................................
...............................................................................
3
4
7
7
7
8
9
10
11
11
12
13
13
14
14
16
25
25
27
27
28
29
29
30
31
1
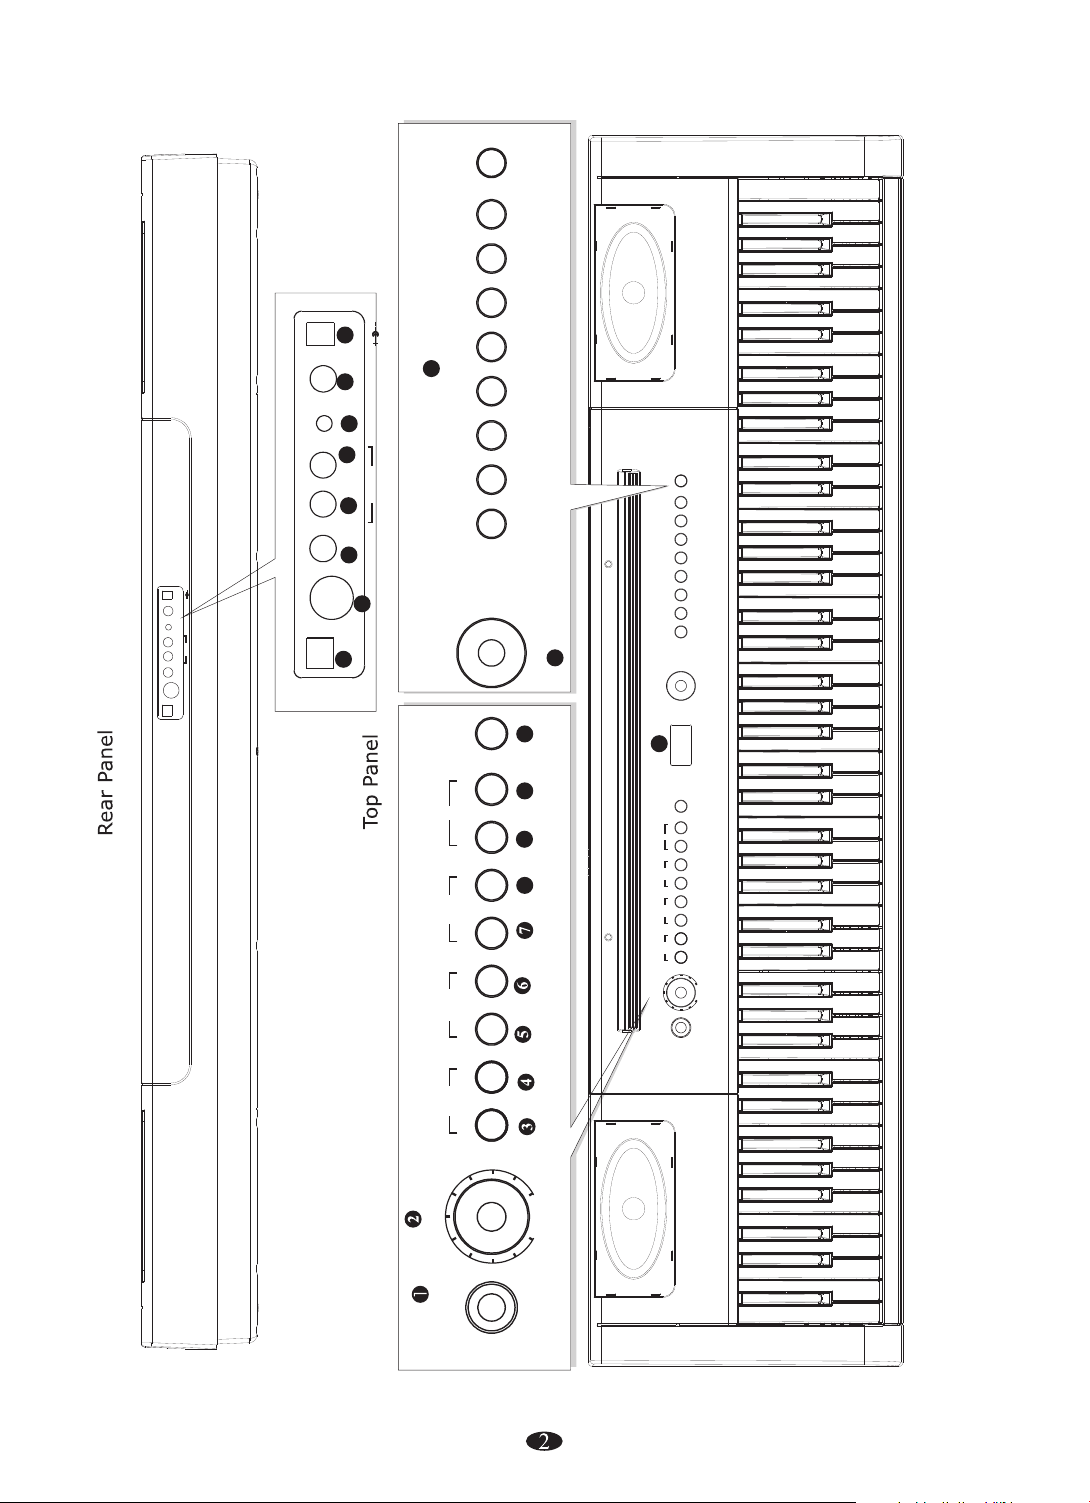
BANK
E.BASS
FANTASIA
CHOIR
POWERSUSTAIN
PHONES
AUX IN
L (MONO)
R
22
DC12V 1A
21
13
20
19
LINE OUT
18
E.PIANO 2 C.ORGAN HARPSI. HARP STEEL GTR
PIANO 1 E.PIANO 1 ORGAN CLAVINET VIBES NYLON GTR STRINGS
PIANO 2
BANK
E.BASS
FANTASIA
CHOIR
17
POWERSUSTAIN
DC12V 1A
PHONES
AUX IN
L (MONO)
LINE OUT
R
BH:5452V 1.0(2 016.4 .11)
USB TO HOST MIDI OUT
USB TO HOST MIDI OUT
16
15
FUNCTION
CHORUS
REVERB
12
DATA CONTROL
10 11
9
8
E.PIANO 2 C.ORGAN HARPSI. HARP STEEL GTR
PIANO 1 E.PIANO 1 ORGAN CLAVINET VIBES NYLON GTR STRINGS
PIANO 2
DATA CONTROL
14
FUNCTION
CHORUS
REVERB
PLAYTRACK
RECORD
TEMPOMETRONOME SPLITLAYER
DEMO EQDUET
RECORD
DEMO EQDUET
MASTER VOLUME
PLAYTRACK
MASTER VOLUME
MIN MAX
POWER
TEMPOMETRONOME SPLITLAYER
MIN MAX
POWER
Panel Control
POWER
1
12
DATA CONTROL
MASTER VOLUME
2
3 METRONOME
TEMPO 4
5
RECORD/TRACK
RECORD/PLAY
6
7 LAYER
13
14
15
16
17
18
VOICES SELECT
LC D DISPLAY
USB TO HOST
MIDI OUT
SUSTAIN
LINE OUT(R)
9
10
11
SPLIT 8
REVERB
CHORUS
FUNCTION
LINE OUT(L)(MONO)
19
20
AUX IN
21
PHONES
22
POWER
3
Getting Started
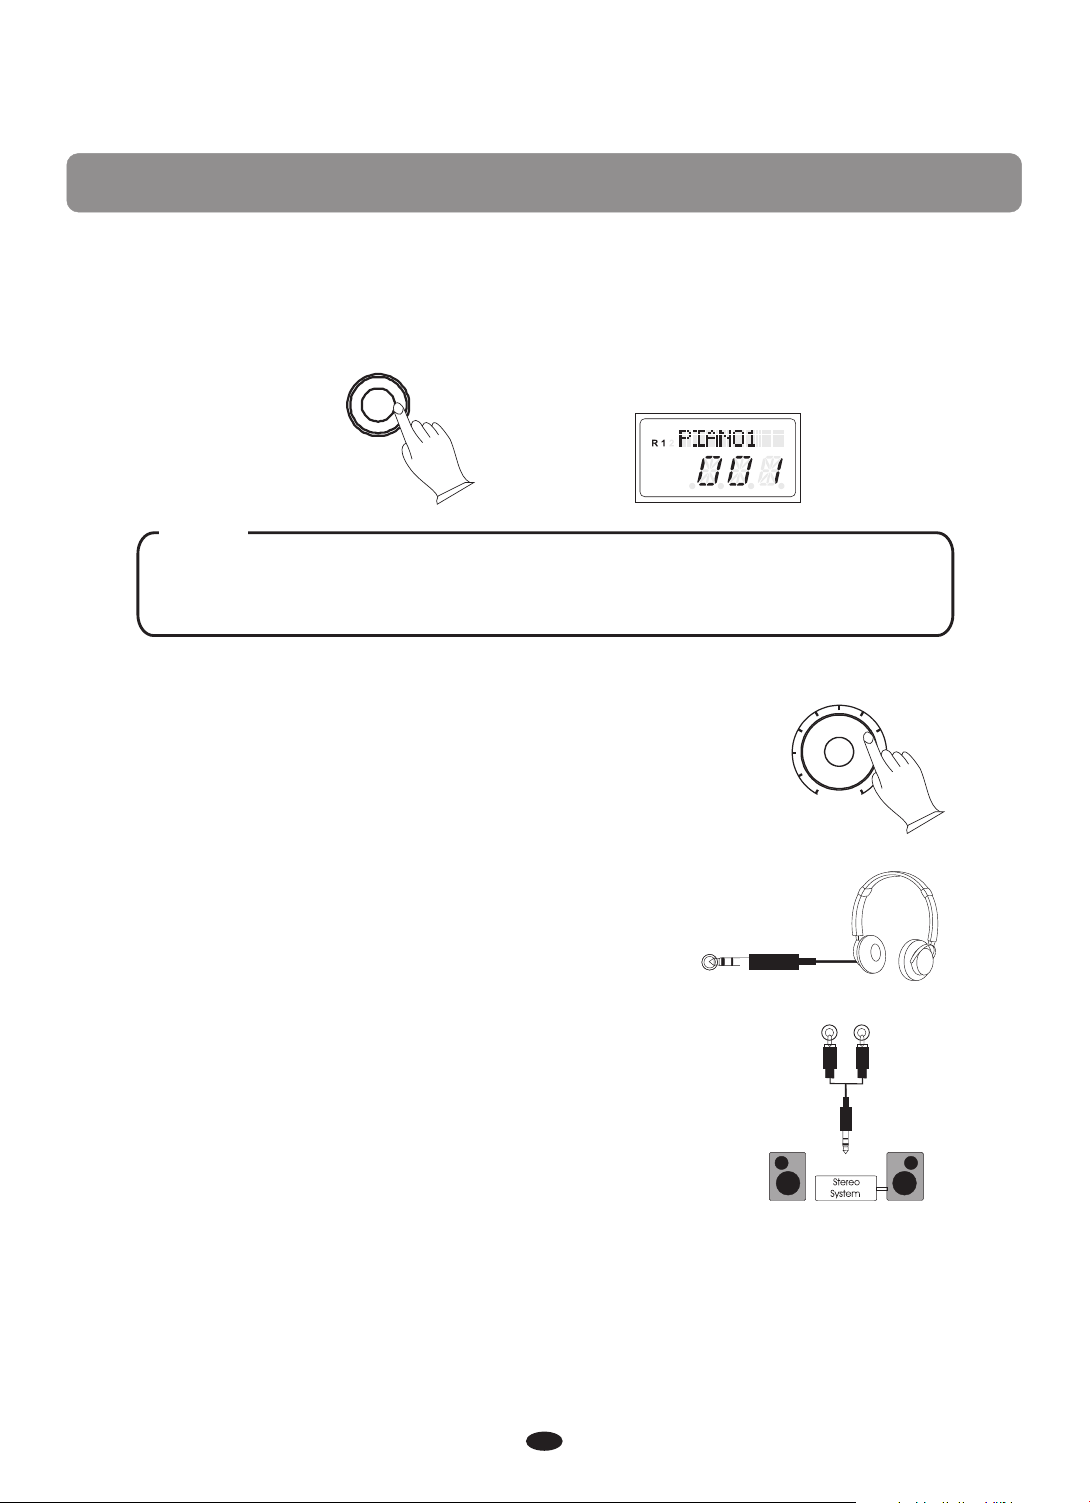
Turn on the power
Before playing turn the power on by pressing the POWER switch, the panel LCD
will turn on.
POWER
L
USB DISK
SONG
NOTE
This piano has an auto off function. If you don't engage in any operations,
the piano will turn off after 30 minutes.
MASTER VOLUME
Set the Volume
Initially set the [MASTER VOLUME] about half way
between the "MIN" and "MAX" settings. You can
adjust the volume to accommodate your playing style.
MIN MAX
Using Headphones
One standard stereo headphones can be plugged in
here for private practice or late-night playing. The
internal speaker system is automatically shut off
when a pair of headphones is plugged into PHONES
jacks.
PHONES
R
L(MONO)
Using External Sound System
The Line Out jack(R) and can
be used to deliver the output of the piano to a keyboard
amplifier, stereo sound system, mixing console or tape
recorder.
Line Out jack(L)(MONO)
4
LINE OUT

Aux In
The Aux In stereo RCA connectors allow you to mix an external sound source
(such as a CD player, MP3 player or computer output) with the piano's internal
sounds, for playback through the piano's built-in speakers or headphones outputs.
MIDI OUT Jack
MIDI (Musical Instrument Digital Interface) is a world-standard communication interface which allows electronic musical instruments to communicate
with each other, by sending and receiving compatible note, program change
and other types of MIDI data.
This terminal transmits data from this instrument to other MIDI devices. The
transmitted data includes the note and touch velocity produced while playing
on the keyboard, as well as voice changes. Demo songs are not transmitted.
Using USB-MIDI
This piano allows the transfer of MIDI over USB. There is a specific
way in which the MIDI signals are routed for maximum flexibility.
In a standard Digital Piano, the built-in keyboard sends MIDI signals
to the internal sound bank as well as the 5-pin MIDI output. In this
digital piano, the keyboard not only sends MIDI signals to the internal
sound bank (just like normal) but also sends MIDI signals simultaneously to the
internal MIDI connection which hooks up inside the device to the Audio Interface.
It is the Audio Interface that is used to control the USB-MIDI.
USB TO HOST
USB Audio
The piano has USB Audio.
This means that you can plug in via a USB Cable to your Laptop, Tablet, iPad,
and SmartPhone and be able to hear you device's audio through the pianos
speaker system. This is very useful for example when you are recording your
piano with your laptop and want to listen back through the pianos speakers. Or
if you are using some of the instrument voices on the Garage Band app from
your iPad, now you can hear it through the pianos' sound delivery system
instead of just the iPad's speakers or headphones.
5
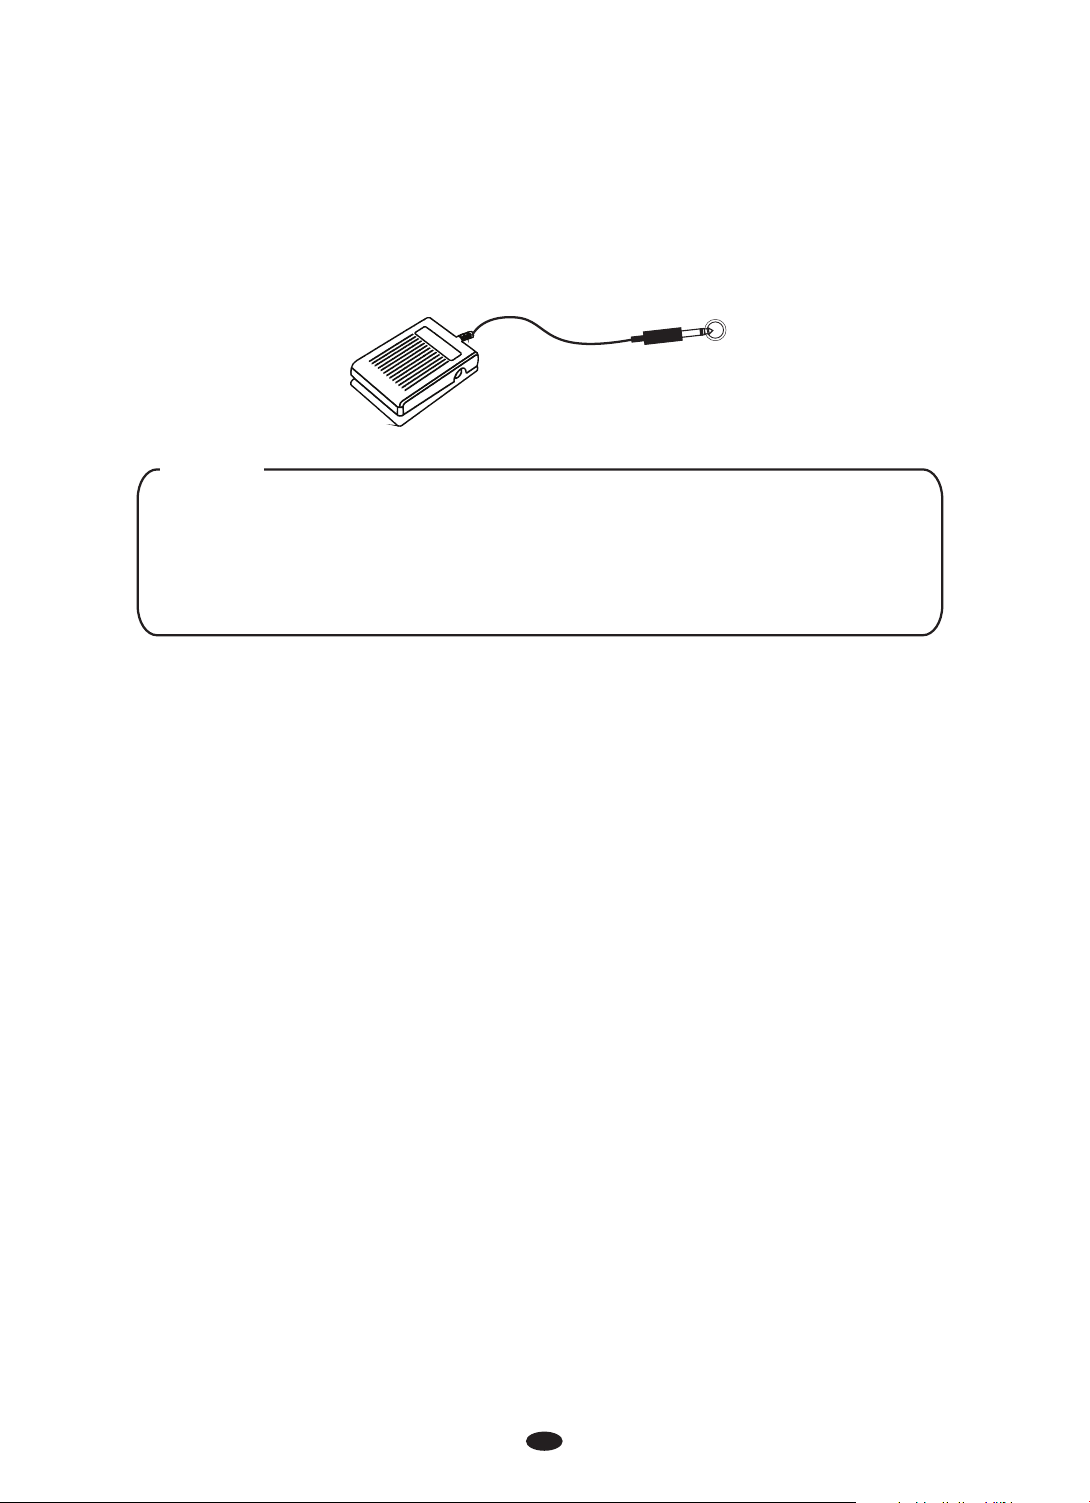
Sustain Pedal
The sustain pedal included with the piano will cause piano key sounds to slowly
decay as if they were being held down.
SUS TAIN
NOTE
Please make sure that the piano is turned off before connecting the pedal.
Otherwise, it may not be read by the piano correctly.
If you use different sustain pedal and you need to change the polarity for
proper operation, you will need to turn off the piano and then hold down
the foot pedal during power up.
Using the DC Power Jack
Connect the included DC power adapter to the Power Supply Jack.
Please use only the provided power adapter.
Usi ng Battery Power
Always make sure all batteries are
+/- polarity markings
Always replace all of the batteries at the same time.
batteries, also do not mix battery types, as this can cause overheating, or fire, or
battery fluid leakage.
Remove the batteries from the instrument if it is not to be used for a long time.
.
inserted the correct way around to match the
Do not combine old and new
6

Demo Songs
There are 16 Demo songs in the piano. Each demo song will demonstrate a
different voice. Here's how you can select and play the Demo songs.
Select the Demo song
The Demo songs may be selected by pressing the [METRONOME] and [TEMPO]
buttons together simultaneously. The [METRONOME] button and the [TEMPO]
buttons will flash . The first Demo song will play.
DEMO
TEMPOMETRONOME
L
USB DISK
SONG
PIANO 1 E.PIANO 1 ORGAN CLAVINET VIBES NYLON GTR STRINGS
PIANO 2
E.PIANO 2 C.ORGAN HARPSI. HARP STEEL GTR
CHOIR
FANTASIA
E.BASS
BANK
During playback, another song may be chosen by pressing a different voice select
button. You can also press the [BANK] button then press a voice button to select
a Demo song in the bottom line. You can turn the Data Control to select the desired
song.
Stop the Demo song
To stop the Demo song. Press the
together
again.
To replay the current song from the beginning, press the lighting voice select
button.
[METRONOME] and [TEMPO] buttons
DEMO
TEMPOMETRONOME
7

Selecting a Voice
The piano has 16 built-in voices, which include several pianos as well as other
instruments. These digitally-sampled musical instrument sounds may be selected
one at a time, layered to produce two voices at once.
To select an instrument voice (Main voice), press the appropriate Voice Select
button on the front panel.
PIANO 1 E.PIANO 1 ORGAN CLAVINET VIBES NYLON GTR STRINGS
FANTASIA
BANK
PIANO 2
E.PIANO 2 C.ORGAN HARPSI. HARP STEEL GTR
L
USB DISK
SONG
L
USB DISK
SONG
CHOIR
E.BASS
NOTE
Press the [BANK] button and it's indicator will turn on, then when you
press an instrument select button the instrument that you hear is the
instrument listed on the bottom of the voice button.
You also can turn the Data Control knob to select the desired voice.
8

Layer Mode
Press the [LAYER] button to select layer voice mode, two voices will sound
simultaneously when you play keyboards.
1. Se lect Lay er Voice
Press the [LAYER] button , the Layer indicator is flashing, turn the Data Control knob
to select the second voice.
DUET
SPLITLAYER
NOTE
To change the layer voice Pan、 Octave, please see the details in
[FUNCTION] section (P.22、P.23).
To change the layer voice volume, hold down the [LAYER] button and
turn the Data Control knob to set the value or please see the details in
[FUNCTION] section (P.18).
L
USB DISK
SONG
2. Ex it the Layer Mode
Press the [LAYER] again, the Layer turns off and the Layer mode is no
longer active.
DUET
SPLITLAYER
indicator
9

Spl it Mode
Press the [SPLIT] button to select split mode, your keyboard will be split into two
sections which means different voices can be played with the left and right hands
at the same time.
1. Se lect Split Voice
Press [SPLIT] button, the Split indicator is flashing, turn the Data control to
select the left voice.
DUET
SPLITLAYER
L
USB DISK
SONG
2. Ch anging the Split Point
Hold down the [SPLIT] button for about 2 seconds, then play any of the keys on
the keyboard to select the split point.
L
USB DISK
SONG
NOTE
To change the split voice Pan Octave, please see the details in
[FUNCTION] section (P.23、P21).
To change the split voice volume, hold down the [SPLIT] button and
turn the Data Control knob to set the value or please see the details in
[FUNCTION] section (P.17).
、
3. Ex it the Split Mode
Press [SPLIT] again, the Split turns off and the Split mode is no
longer active.
DUET
indicator
SPLITLAYER
10

Effect
This function allows you to perform the overall sound in a realistic style.
Reverb
The [REVERB] button selects a number of digital reverb effects that you can
use for extra depth and expressive power.
Press [REVERB] button can turn off or turn on the reverb effect.
Press [REVERB] button, turn the DATA control knob to select reverb type.
REVERB
EQ
CHORUS
L
USB DISK
SONG
The reverb types in the list below can be selected from the reverb display.
1 2 3 4 5 6 7 8
Hall1 Hall2 Room1 Room2 Room3 Stage1 Stage2 Plate
NOTE
Press [REVERB] button repeatedly turn on or turn off the
to
reverb effect.
Adj usting Reverb Depth
Hold dow n the [REVE RB] butto n and turn th e Data Cont rol knob to s et the
value .
You also ca n referen ce: Reverb Le vel (P.19). " "
11

Chorus
Shimmering, broadening effect. Press [CHORUS] button,
Control knob
to select chorus type.
EQ
REVERB
CHORUS
L
USB DISK
SONG
turn the Data
The chorus types in the list below can be selected from the chorus display.
1 2 3 4 5 6 7 8
Chorus1 Chorus2 Chorus3 Chorus4 Feedback Flanger1 ShrtDely ShrtDlFb
9 10 1 1 12 13
Flanger2 Celeste 1 Flanger3 Celeste 2 Celeste 3
NOTE
Press [CHORUS] button to turn on or turn off
repeatedly
the chorus effect.
Adjusting Chorus Depth
Hold dow n the [CHOR US] butto n and turn th e Data Cont rol knob to s et
the val ue.
You also ca n Ref ere nce: Chorus L eve l ( P.19). " "
12

Metronome
Metronome is a convenient feature for practice, and it can also provide a
solid rhythmic guide when recording.
Press th e metrono me button t o turn the me tronome o n.
DEMO
TEMPOMETRONOME
The time signature of the metronome can be set by turning the Data Control
knob while turning on the metronome function.
Time signature: 2/2,1/4, 2/4, 3/4, 4/4,5/4, 6/4, 3/8, 6/8,7/8, 9/8,12/8.
L
USB DISK
SONG
NOTE
To change the Metronome volume, hold down the [METRONOME] button
and turn the Data Control knob to set the value or please see the details
in [FUNCTION] section (P.18).
Tem po
Press the [TEMPO] button to turn on the function.
Turn the Data Control knob, you can adjust the speed from 20 to 280.
DEMO
TEMPOMETRONOME
L
USB DISK
SONG
13

Duet Mode
With the d uet featu re engage d the keyboard i s divided i nto two sec tions
that play the s ame notes . The two sec tions, le ft A1-C3 an d right C#3 -C7
have the exac t sam e note s and s hare the sa me voice, o ctaves and volume .
This is a gr eat featu re for teac hing or whe n two peopl e wan t the play th e
piano si multane ously.
When the d uet featu re is engag ed, the ped als will au tomatic ally chan ge
config ura tion so the re are two su stain ped als, one fo r each port ion of the
ke yboards .
Press the [LAYER] and [SPLIT] buttons together repeatedly to turn on or turn
off Duet mode.
DUET
SPLITLAYER
L
USB DISK
SONG
Press the [LAYER] and [SPLIT] buttons together again to exit the Duet mode.
NOTE
Engaging the DUET feature will disable the Layer and Split modes.
14

EQ Mode
Press the [REVERB] and [CHORUS] buttons together to enter the EQ mode.
You can turn the Data Control to select the EQ Bass or EQ Treble.
EQ
REVERB
CHORUS
EQ Bass Level S ett ing
Press th e [REVERB ] and [CHOR US] butto ns togeth er to enter t he EQ mode.
You can tur n the Data Co ntrol to se lect the EQ B ass.
Press th e [REVERB ] and [CHOR US] butto ns togeth er and the in dicator s
will fla sh, turn th e Data cont rol to set th e val ue: -12- 012.
L
USB DISK
SONG
REVERB
EQ
CHORUS
L
USB DISK
SONG
EQ Treble Lev el Se tting
Press th e [REVERB ] and [CHOR US] butto ns togeth er to enter t he EQ mode.
You can tur n the Data Co ntrol to se lect the EQ Treble.
Press th e [REVERB ] and [CHOR US] butto ns togeth er and the in dicator s
will fla sh, turn th e Data cont rol to set th e val ue: -12- 012.
REVERB
EQ
CHORUS
L
USB DISK
SONG
15

Edit Functions
Function
Press [FUNCTION] button to enter the function menu. Turn the [ ]
knob to select the function . Press the [FUNCTION] button again into the option,
turn the [DATA CONTROL] to set the parameter. The option and the parameters
are as the follows:
Display Content Range Default
-64~06 3
-64~06 3
DATA CONTROL
-64~06 3
16
100
036
036

Tra nspose
Press [FUNCTION] button to enter the function menu.
Turn the Data Control knob to select
RECORD
PLAYTRACK
FUNCTION
Press the [FUNCTION] button to confirm and the button will flash.
Turn the Data Control knob to set the transpose value: -12~012 (Default: 000).
L
L
R 1 2
R 1 2
USB DISK
USB DISK
SONG
SONG
"Transp".
L
L
R 1 2
R 1 2
USB DISK
USB DISK
SONG
SONG
Tun e
L
L
R 1 2
R 1 2
USB DISK
USB DISK
SONG
SONG
Press [FUNCTION] button to enter the function menu.
Turn the Data Control knob to select
RECORD
PLAYTRACK
FUNCTION
"Tune".
Press the [FUNCTION] button to confirm and the button will flash.
Turn the Data Control knob to set the tune value: -64~063 (Default: 000).
L
L
R 1 2
R 1 2
USB DISK
USB DISK
SONG
SONG
17

Mai n Voice Octave
Press [FUNCTION] button to enter the function menu.
Turn the Data Control knob to select
"M.Oct".
RECORD
L
PLAYTRACK
FUNCTION
L
R 1 2
R 1 2
USB DISK
USB DISK
SONG
SONG
Press the [FUNCTION] button to confirm and the button will flash.
Turn the Data Control knob to set the main voice octave value: -02~002
(Default: 000).
L
L
R 1 2
R 1 2
USB DISK
USB DISK
SONG
SONG
Spl it Voice O ctave
Press [FUNCTION] button to enter the function menu.
Turn the Data Control knob to select
"S.Oct".
RECORD
L
PLAYTRACK
FUNCTION
L
R 1 2
R 1 2
USB DISK
USB DISK
SONG
SONG
Press the [FUNCTION] button to confirm and the button will flash.
Turn the Data Control knob to set the split voice octave value: -02~002
(Default: 000).
L
L
R 1 2
R 1 2
USB DISK
USB DISK
SONG
SONG
18

Lay er Voice Octave
Press [FUNCTION] button to enter the function menu.
Turn the Data Control knob to select
"L.Oct".
RECORD
PLAYTRACK
FUNCTION
L
L
R 1 2
R 1 2
USB DISK
USB DISK
SONG
SONG
Press the [FUNCTION] button to confirm and the button will flash.
Turn the Data Control knob to set the layer voice octave value: -02~002
(Default: 000).
L
L
R 1 2
R 1 2
USB DISK
USB DISK
SONG
SONG
Mai n Voice Pan
Press [FUNCTION] button to enter the function menu.
Turn the Data Control knob to select
"M.Pan".
RECORD
PLAYTRACK
FUNCTION
L
L
R 1 2
R 1 2
USB DISK
USB DISK
SONG
SONG
Press the [FUNCTION] button to confirm and the button will flash.
Turn the Data Control knob to set the main voice pan value:-64~063
(Default: 000).
L
L
R 1 2
R 1 2
USB DISK
USB DISK
SONG
SONG
19

Spl it Voice P an
Press [FUNCTION] button to enter the function menu.
Turn the Data Control knob to select
RECORD
PLAYTRACK
FUNCTION
Press the [FUNCTION] button to confirm and the button will flash.
Turn the Data Control knob to set the split voice pan value: -064~063
(Default: 000).
L
L
R 1 2
R 1 2
USB DISK
USB DISK
SONG
SONG
"S.Pan".
L
L
R 1 2
R 1 2
USB DISK
USB DISK
SONG
SONG
Lay er Voice Pan
Press [FUNCTION] button to enter the function menu.
Turn the Data Control knob to select
RECORD
PLAYTRACK
FUNCTION
Press the [FUNCTION] button to confirm and the button will flash.
Turn the Data Control knob to set the layer voice pan value: -64~063
(Default: 000).
L
L
R 1 2
R 1 2
USB DISK
USB DISK
SONG
SONG
"L.Pan".
L
L
R 1 2
R 1 2
USB DISK
USB DISK
SONG
SONG
20

Loc al
Press [FUNCTION] button to enter the function menu.
Turn the Data Control knob to select
"LocalOn".
RECORD
L
PLAYTRACK
FUNCTION
L
R 1 2
R 1 2
USB DISK
USB DISK
SONG
SONG
Press the [FUNCTION] button to confirm and the button will flash.
Turn the Data Control knob to set local on or off.
L
L
R 1 2
R 1 2
USB DISK
USB DISK
SONG
SONG
Tou ch
Press [FUNCTION] button to enter the function menu.
Turn the Data Control knob to select
"T Normal".
RECORD
L
PLAYTRACK
FUNCTION
L
R 1 2
R 1 2
USB DISK
USB DISK
SONG
SONG
Press the [FUNCTION] button to confirm and the button will flash.
Turn the Data Control knob to set the touch types: Normal,Low,High.
(Default: Normal).
L
L
R 1 2
R 1 2
USB DISK
USB DISK
SONG
SONG
21

Mai n Voice Vo lume
Press [FUNCTION] button to enter the function menu.
Turn the Data Control knob to select
"M.Vol".
RECORD
L
PLAYTRACK
FUNCTION
L
R 1 2
R 1 2
USB DISK
USB DISK
SONG
SONG
Press th e [FUNCTI ON] butto n to confir m and the but ton will fl ash.
Turn the D ata Contr ol knob to se t the main voice v olume va lue: 000~ 127
(Defau lt: 127).
L
L
R 1 2
R 1 2
USB DISK
USB DISK
SONG
SONG
Spl it Voice V olume
Press [FUNCTION] button to enter the function menu.
Turn the Data Control knob to select
"S.Vol".
L
RECORD
PLAYTRACK
FUNCTION
L
R 1 2
R 1 2
USB DISK
USB DISK
SONG
SONG
Press the [FUNCTION] button to confirm and the button will flash.
Turn the Data Control knob to set the split voice volume value: 000~127
(Default: 127).
L
L
R 1 2
R 1 2
USB DISK
USB DISK
SONG
SONG
22

Lay er Voice Volume
Press [FUNCTION] button to enter the function menu.
Turn the Data Control knob to select
"L.Vol".
RECORD
PLAYTRACK
FUNCTION
L
L
R 1 2
R 1 2
USB DISK
USB DISK
SONG
SONG
Press the [FUNCTION] button to confirm and the button will flash.
Turn the Data Control knob to set the Layer voice volume value: 000~127
(Default: 075).
L
L
R 1 2
R 1 2
USB DISK
USB DISK
SONG
SONG
Met ronome Volume
Press [FUNCTION] button to enter the function menu.
Turn the Data Control knob to select
RECORD
PLAYTRACK
FUNCTION
"MetroVol".
L
L
R 1 2
R 1 2
USB DISK
USB DISK
SONG
SONG
Press the [FUNCTION] button to confirm and the button will flash.
Turn the Data Control knob to set the metronome volume value: 000~127
(Default: 100).
L
L
R 1 2
R 1 2
USB DISK
USB DISK
SONG
SONG
23

Rev erb Level
L
L
R 1 2
R 1 2
USB DISK
USB DISK
SONG
SONG
Press [FUNCTION] button to enter the function menu.
Turn the Data Control knob to select
RECORD
PLAYTRACK
FUNCTION
"R Lvl".
Press the [FUNCTION] button to confirm and the button will flash.
Turn the Data Control knob to set the reverb value: 000~127 (Default: 036).
L
L
R 1 2
R 1 2
USB DISK
USB DISK
SONG
SONG
Cho rus Level
Press [FUNCTION] button to enter the function menu.
Turn the Data Control knob to select
"C Lvl".
RECORD
PLAYTRACK
FUNCTION
L
L
R 1 2
R 1 2
USB DISK
USB DISK
SONG
SONG
Press the [FUNCTION] button to confirm and the button will flash.
Turn the Data Control knob to set the Chorus value: 000~127 (Default: 036).
L
L
R 1 2
R 1 2
USB DISK
USB DISK
SONG
SONG
24

Recording
The recording function features a two track recorder that lets you record what you
play on the keyboard and then play it back. Two tracks mean that you can
“overdub”one part on top of another, using a different voice if you like.
RECORD
PLAYTRACK
The recorder feature is a useful addition to any keyboard study program
since it lets you hear exactly how you sound from the listener's perspective.
It can also be just plain fun. This recorded information is nonvolatile and
therefore will not be lost when the power is turned off. The record function
records all settings exactly as you selected and performed them.
Rec ording
1). Prepare to record by setting the voice, tempo, reverb level, or other
parameters as desired.
FUNCTION
2). Select a track: There are two tracks available for recording. Press the [TRACK]
repeatedly to select track 1 or track 2.
RECORD
PLAYTRACK
FUNCTION
L
USB DISK
SONG
Select the desired voice and press the [TRACK] and the [PLAY] buttons together to
enter the recording mode and the track button indicator will flash.
NOTE
If you already have recorded on the other track, the recorded music
will play as a reference for you while you record the new track.
25

3). Metronome: Press the [METRONOME] button to enable the metronome as a
reference, if so desired. The metronome sounds without any beat pattern, just
giving the tempo. You can adjust the metronome's beat pattern and tempo as
usual before recording.
DEMO
TEMPOMETRONOME
NOTE
The metronome sound will not be recorded. If one track has been
recorded, when recording another track, its tempo and beat pattern
will be the same as the first track recorded. If you change the tempo
on the second track, the new tempo will be applied for both tracks.
4). Record: If the track 1or track 2 are selected and the [TRACK] button blinking,
the recording will begin as soon as you play the keyboard . While recording,
the recording track indicator will be flashing.
5).Sto p recordi ng to the track.
Recor ding stop s when pres sing t he .[TRACK ] button
NOTE
If the track 1 or track 2 has data recorded, the TRACK indicator will light and it
will play when the record is started.
[ ]
26

Pla ying
1). Press the [PLAY] button to hear the recorded track(s).
the track, the LCD will display .
RECORD
PLAYTRACK
"None"
FUNCTION
If there is no data in
L
USB DISK
SONG
You can change the tempo of your recorded track by pressing the [TEMPO]
button while the recording is being played back. You may also accompany
the recorded tracks on the keyboard while the recording is playing back.
2). Press the [PLAY] button to stop the playback. Playback will also stop
automatically when the recording reaches its end.
In step 2, you can change the tempo of the track that is playing back temporarily.
You could also change the tempo for the recorded tracks (Reference: Tempo P.13)
Tracks will playback at the new tempo and this tempo will be set for the tracks.
Beat pattern cannot be changed.
Cle aring
To erase the music recorded on the tracks, just record over the track you want to
erase. Hold the the current
[TRACK] button and the recorded data is deleted
recorded track.
When you recorded a new song into a track, old data is deleted in the track.
Backing Up the recorded song. Even if the power turns off, the recorded song
memory is not deleted.
RECORD
PLAYTRACK
FUNCTION
L
USB DISK
SONG
27

Factory Reset
Performing a Factory Reset will clear all battery backed memory and restore
all functions to their factory default settings, just like they were when you used
this piano for the first time.
1. Turn the Power Off.
2. Hold down the [PIANO1] and the [E.PIANO1] buttons while powering on the piano.
It can restore function to the factory defaults.
PIANO 1 E.PIANO 1
PIANO 2
E.PIANO 2
L
USB DISK
SONG
28

Appendix
MIDI Implementation Chart
F u n c t i o n T r a n s m i t t e d R e c o g n i z e d R e m a r k s
Basic
Channel
Mode
Note
Number
Velocity
Note
After
Touch
Pitch Bend
Control Change
Program
Change
System Exclusive
System
Common
System
Real Time
Aux Messages
Notes
Default
Changed
Default
Messages
Altered
True voice
Note ON
Note OFF
Key's
Channels
True #
Song Position Pointer
Song Select
Tune Request
Clock
Commands
All Sounds Off*
Reset All Controllers
Local ON/OFF*
ALL Notes OFF
Active Sensing
System Reset
1-16
1-16
Mode 3
Yes
********
0~127
********
Yes
Yes
No
No
No
0-127
0-127
********
Yes*
No
No
No
No
No
Yes
Yes
Yes
Yes
No
No
1-16
1-16
Mode 3
No
No
0~127
Yes
Yes
No
No
No
0,1,5,6,7,10,11,
32,64,65,66,67,
80,81,91,93,100,
101,121
0-15
Yes*
No
No
No
No
No
Yes
Yes
Yes
Yes
Yes
Yes
*U p to 3 c ha nn el s
si mu lt an eo us ly
16
*The controller will recognize
and respond to GM Device
inquiries.
Master Tune supported.
Master Volume supported.
* Th e co nt ro ll er
wi ll r es po nd
to G M, b ut n ot
pi an o vo ic es .
OMNI ON
OMNI OFF
MIDI Chan nel Mo des
POLY OFF
Mode1
Mode2
29
MONO ON
Mode3
Mode4

Tro ubleshooting Hints
When the instrument is turned on or off, a
Popping sound is temporarily produced.
When using a mobile phone, noise is produced.
Using a mobile phone in close proximity to the
instrument may produce interference.
Not all of the voices seem to sound, or the
sound seems to cut off.
The Auto Accompaniment does not sound
properly.
No sound produced by the keyboard, but the
lights and screen work.
The sound of the voice changes from note to
note.
This is normal and indicates that the instrument
is receiving electrical power.
To prevent this, turn off the mobile phone or use
it further away from the instrument.
The instrument is polyphonic up to a maximum
of 64 notes — including Dual voice, Split Voice,
auto accompaniment, song, and Metronome.
Notes exceeding this limit will not sound.
Make sure that the Auto Accomp Volume
Function is set to an appropriate level.
Is the Split Point set to an appropriate key for the
chords you are playing? Set the Split Point to an
appropriate position on the keyboard.
Is the chord indicator showing in the LCD
display? If it is not showing, press the CHORD
button so that it does show.
Check that the master volume control is not set
to minimum.
Check that nothing is plugged into the
headphone socket.
This is normal. The digital tone generation uses
multiple recordings (samples) of an instrument
across the range of the keyboard; The actual
sound of the voice may be slightly different
from note to note.
The volume is too soft.
The sound quality is poor.
The rhythm stops unexpectedly or will not play.
The recorded data of the song, etc. does not
play correctly.
The LCD display suddenly goes dark, and all
panel settings are reset.
To completely restore all settings as per factory
settings
Power suddenly and unexpectedly turns off,
after a period of not touching the keys.
The sustain pedal or footswitch seems to
produce the opposite effect. Example pressing
the footswitch deactivates the sustain, and
releasing the footswitch triggers the sustain.
30
The batteries are low or dead. Replace all six
batteries with completely new ones, or use the
supplied AC adaptor.
If you have lost or damaged your AC adaptor,
please contact your nearest store for a correct
replacement adaptor.
An incorrect AC mains adaptor which is not rated
sufficiently can cause malfunction or damage.
Perform a factory reset, Please refer to content in
this owner's manual. All of the user setting will
be erased and the default factory settings will be
applied to the instrument.
This is normal and the Auto Power Off function
may have been activated. If you need to disable
the Auto Power Off function, please see how to
do this in the owner's manual.
The polarity of the footswitch needs to be
correctly detected. Make sure the jack plug for
the footswitch is connected. Switch the
instrument on whilst not touching the pedal.

Specifications
Keyboard:
Voice:
Polyphony:
Voice Control:
Metronome:
Pedal Response:
Effect:
Demo Songs:
MIDI & Audio:
88 standard-size hammer keys with touch response
16
64
Layer, Layer level, Split, Duet, Tuning, Transpose
On/off, Level, Time signature
Sustain
Reverb, Chorus, Bass EQ, Treble EQ
16
Local On/Off; USB Audio
Connectors:
Speakers:
Dimensions(W x D x H):
Weight:
Supplied Accessories:
USB TO HOST, MIDI OUT, SUSTAIN, LINE OUT(R),
LINE OUT(L)(MONO), AUX IN,PHONES, DC Power
15W/4ohm x 2
51.8x 13.3 x 5.1(inches),1315 x 337 x 130(mm)
13.5Kg
Owner's Manual, Music Rest, Power Supply
10506226-V1.0
31

Virgin Musical Instrument Company Inc
P O Box 2908
La Mesa, CA 91943
PH: 619 244-0006
E-mail: info@virginmusicalinstruments.com
www.virginmusicalinstruments.com
 Loading...