


1” X 30” Belt / 5” Disc Sander
Model: 50-150
Record the serial number and date of purchase
in your manual for future reference.
Serial number:
Date of purchase:
www.rikontools.com or info@rikontools.com
techsupport@rikontools.com or 877-884-5167
Part # 50-150M1
Owner’s Manual
For more information:
For Parts or Questions:

Operator Safety: Required Reading
IMPORTANT! Safety is the single most important consideration in the operation of this equipment.
The following instructions must be followed at all times.
There are certain applications for which this tool was designed. We strongly recommend that this tool
not be modied and/or used for any other application other than that for which it was designed. If you
have any questions about its application, do not use the tool until you have contacted us and we have
advised you.
General Safety Warnings
KNOW YOUR POWER TOOL. Read the owner’s manual carefully. Learn the tool’s
applications, work capabilities, and its specic potential hazards.
ALWAYS GROUND ALL TOOLS.
If your tool is equipped with a three-pronged plug, you must plug it into a three-hole electric receptacle.
If you use an adapter to accommodate a two-pronged receptacle, you must attach the adapter plug to a
known ground. Never remove the third prong of the plug.
ALWAYS AVOID DANGEROUS ENVIRONMENTS.
Never use power tools in damp or wet locations. Keep your work area well lighted and clear of clutter.
ALWAYS REMOVE THE ADJUSTING KEYS AND WRENCHES FROM TOOLS AFTER USE.
Form the habit of checking to see that keys and adjusting wrenches are removed from the tool before
turning it on.
ALWAYS KEEP YOUR WORK AREA CLEAN. Cluttered areas and benches invite accidents.
ALWAYS KEEP VISITORS AWAY FROM RUNNING MACHINES.
All visitors should be kept a safe distance from the work area.
ALWAYS MAKE THE WORKSHOP CHILDPROOF.
Childproof with padlocks, master switches, or by removing starter keys.
NEVER OPERATE A TOOL WHILE UNDER THE INFLUENCE OF DRUGS,
MEDICATION, OR ALCOHOL.
ALWAYS WEAR PROPER APPAREL.
Never wear loose clothing or jewelry that might get caught in moving parts. Rubber-soled footwear is
recommended for the best footing.
ALWAYS USE SAFETY GLASSES AND WEAR HEARING PROTECTION.
Also use a face or dust mask if the cutting operation is dusty.
NEVER OVERREACH.
Keep your proper footing and balance at all times.
NEVER STAND ON TOOLS.
Serious injury could occur if the tool is tipped or if the cutting tool is accidentally contacted.
2

ALWAYS DISCONNECT TOOLS.
Disconnect tools before servicing and when changing accessories such as blades, bits, and cutters.
ALWAYS AVOID ACCIDENTAL STARTING.
Make sure switch is in “OFF” position before plugging in cord.
NEVER LEAVE TOOLS RUNNING UNATTENDED.
ALWAYS CHECK FOR DAMAGED PARTS.
Before initial or continual use of the tool, a guard or other part that is damaged should be checked to
assure that it will operate properly and perform its intended function. Check for alignment of moving
parts, binding of moving parts, breakage of parts, mounting, and any other conditions that may affect its
operation. A guard or other damaged parts should immediately be properly repaired or replaced.
Special Safety Rules For Belt & Disc Sanders
1. Do not operate this machine until you have read all of the following instructions.
2. Do not attempt to operate this machine until it is completely assembled.
3. Do not turn ON this machine if any pieces are missing.
4. If you are not familiar with the operation of the machine, obtain assistance from a qualied
person.
5. It is highly recommended that this machine be rmly mounted to a at and secure work
surface or stand.
6. Always wear protective eyewear prior to operating this machine.
7. Do not operate this machine if you are under the inuence of drugs and/or alcohol.
8. Remove all jewelry prior to operating this machine.
9. Do not wear any gloves while operating this machine.
10. Always make sure the power switch is in the OFF position prior to plugging in the machine.
11. Always make sure the power switch is in the OFF position when doing any assembly or setup
operation.
12. Always wear a dust mask and use adequate dust collection and proper ventilation. Use of
sanders can produce harmful particles while sanding certain types of woods.
13. The use of any accessories or attachments not recommended may cause injury to you and
damage your machine.
14. This machine must be properly grounded.
15. Abrasive discs and belts should be the recommended width and length of the manufacturer.
16. Always keep your face and hands clear of moving parts such as belts and pulleys.
17. Keep power supply cords free of moving parts of the sander. Damaged cords can result in
electric shock.
18. Maintain a 1/16” clearance between the sanding disc, sanding belt and tables.
19. Always support the workpiece with the table or backstop.
20. Remove material or debris from the work area. Keep work area neat and clean.
21.Keep these instructions for future reference.
SAVE THESE INSTRUCTIONS.
Refer to them often.
3

Table of Contents
Safety Warnings..................................................................................................................................2-3
Sander Safety Rules ..........................................................................................................................3
Specications ........................................................................................................................................4
Contents of Package ............................................................................................................................................5
Assembly ...........................................................................................................................6-9
Electrical Requirements .........................................................................................................................10
Gener al Use. ............. .................. ............. .................. ............................... ..............11
Maintenance ...................................................................................................................................11
Trouble Shooting...............................................................................................................................................12-13
Wiring Diagram.................................................................................................................................13
Parts List .....................................................................................................................................14
Parts Explosion................................................................................................................................15
Notes .............................................................................................................................................16
Warranty .............................................................................................................................................17
Specications
Belt Size
Belt Speed
Belt Grit
Disc Size
Motor
Amps
Volts
Net Weight
1” x 30”
3340 SFPM
A100
5”
1/3 HP
2.3 A, 60 Hz
120 V
15 lbs 6 oz
4

Contents of Package
When unpacking, check to make sure the following parts are included. If any parts are missing
or broken, please call RIKON Power Tools at the number on the cover of this manual as soon as
possible.
Carton Contents
Item Description Qty
A Belt & disc sander assembly 1
B Rubber Foot 4
C Miter Gauge 1
D Sanding Disc Cover 1
E Dust Nozzie Adapter 1
F Disc Work Table 1
G Locking knob for table 2
H Belt Work Table 1
I Locking Knob Assembly 1
J Owner’s manual 1
List of loose parts in bag
Description Qty Description Qty
Washer 5 mm 4
Washer 6mm 4
Philips Screw M5x10 4
Washer 8 mm 1
Hex “L” wrench 3mm 1
Hex “L” wrench 4mm 1
5
Assembly
Before You Start – Assembly and Installation
WARNING! Always ensure the sander is unplugged
prior to attempting any assembly, installation or
changing of parts and accessories.
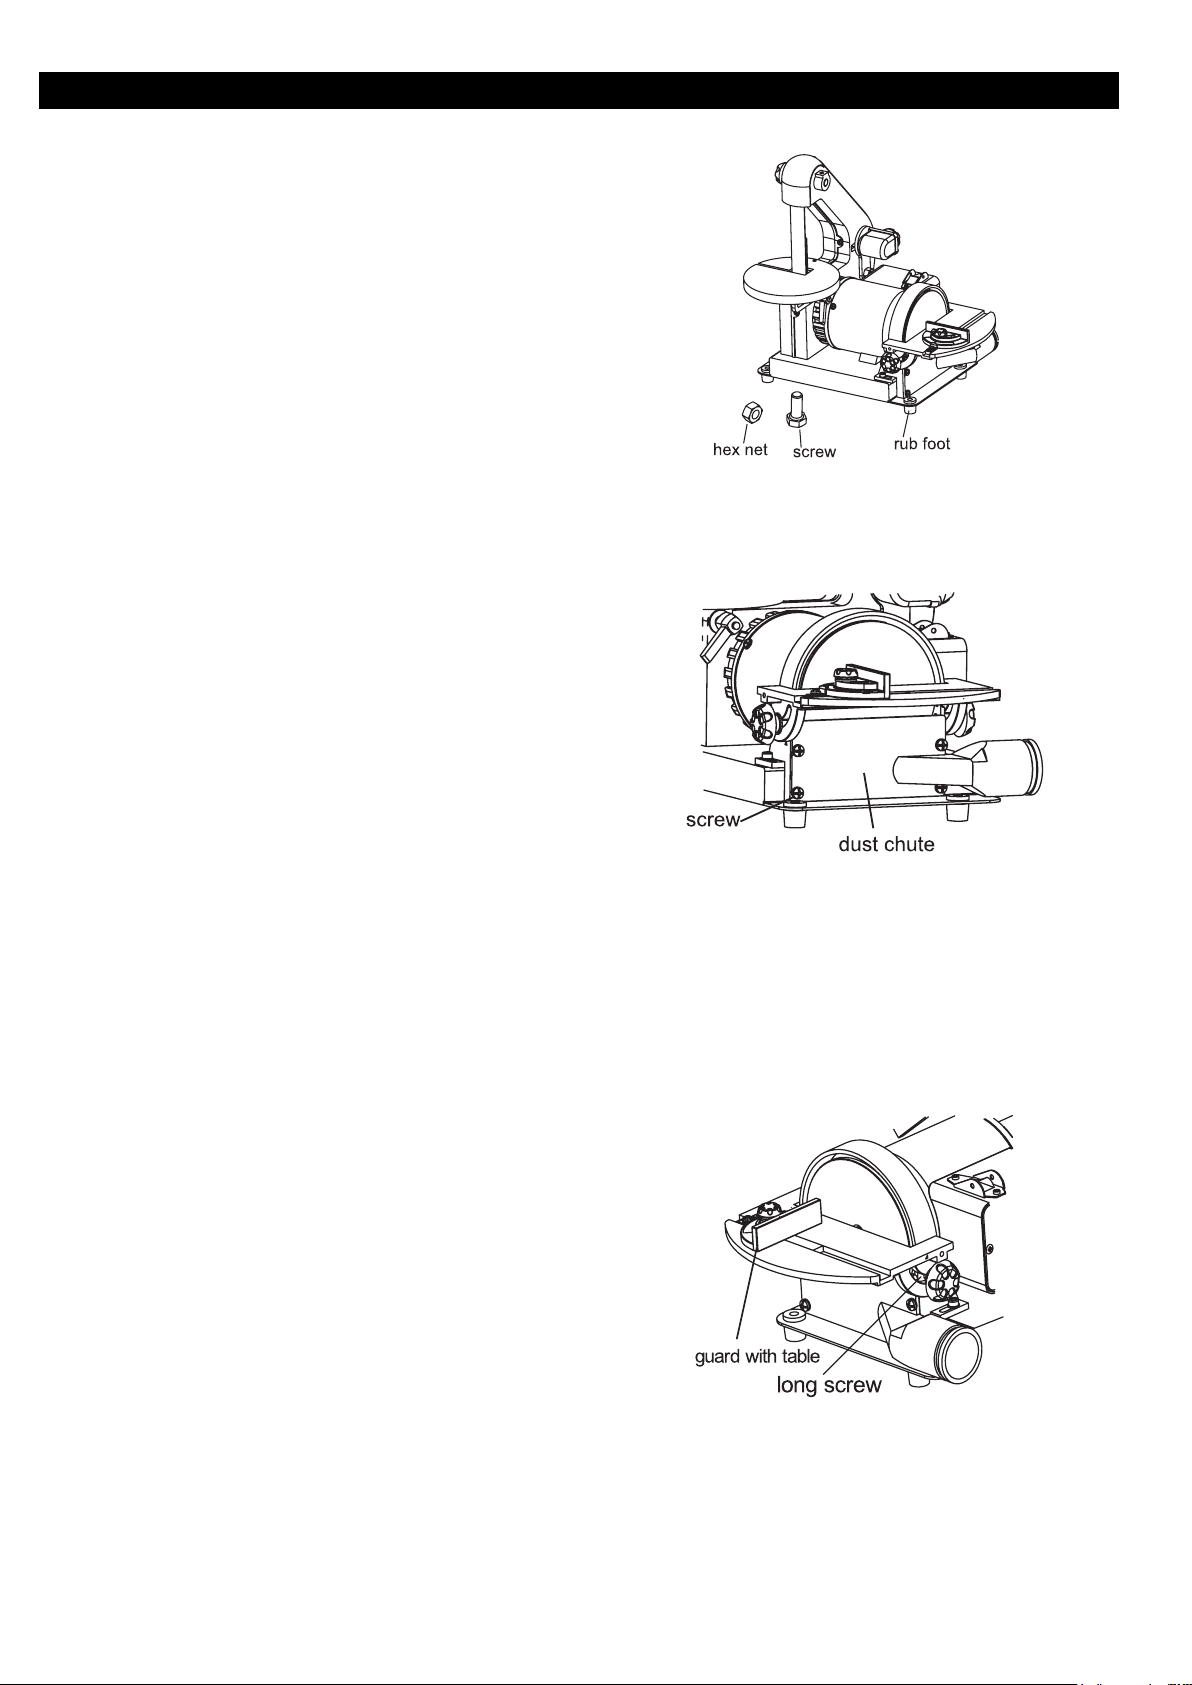
Mounting the Sander to the Workbench
CAUTION: If during operation there is any tendency
for the sander to tip over, slide or walk on the
supporting surface, the sander should be properly
mounted to a workbench or stand.
1. Rubber feet were not fastened to this sander prior
to shipping. Do not install rubber feet when attaching
sander to a bench or stand.
2. Position the sander on the workbench.
3. Mark the workbench through the four mounting
holes located in the sander base (holes for rubber
feet).
4. Drill holes in the workbench at the marks.
5. Using long bolts, washers, lock-washers and nuts,
as shown (not supplied), secure the sander to the
workbench.
Fig. 01
Dust Chute Installation – Disc Sander
1. Fasten the sanding disc dust-chute to the
machine using the four Phillips M5 long screws
Assembling the Belt Sander Table
WARNING! When assembling the belt & disc sander,
ensure the machine is disconnected from any power
source.
1. Locate the belt-sanding table. (Part # 41 on Parts
Schematic)
2. Position the table by threading the belt and plate
through opening in table.
3. Fasten the table by using the table-adjustment
knob .
4. Bring the adjustment knob screw through the
opening on the underside of the table, then through
the mounting bracket into the nut.
5. Fasten by using the adjustment handle to turn the
integral screw into the nut.
Fig. 02
Assembling the Sanding Disc Table and Mitre
Gauge
Ensure sander is disconnected from the power supply
prior to commencing work.
Fig. 03
6

1. Position the disc-sanding table by tipping it up and
threading the small nipples on the back side of the
‘angle-gauge’ onto the mounting area of the discsander.
2. Align the screw holes so that the screw will travel
through the angle-gauge openings on either side of
the disc into the mounting holes on the disc sander.
3. Using the disc-table adjustment handles, fasten the
table to the sander.
4. When required, install the mitre-gauge into the slot
on the disc-sanding table.
Belt-Table Adjustments
Ensure sander is disconnected from the power supply
prior to commencing work.
For most sanding operations, the table will likely
remain at a 90º angle to the belt. A positive stop is
provided with your sander to ensure fast positioning
of the table at 90 degrees to the belt. To ensure and
check the positive-stop 90º angle, proceed as follows:
1. Loosen the table-locking lever.
2. Tilt the table to the rear as far as possible.
3. Using a square, protractor or other tool shown
verify or adjust the table angle to ensure a 90º angle.
4. To set the sanding angle to a different angle, tilt
table to the front until it is at the required angle.
5. Tighten the table-locking lever.
Disc Table Adjustments
Ensure sander is disconnected from the power supply
prior to commencing work.
Fig. 04
Fig. 05
1. To check the trueness of the 90º angle of the
disc-sanding table, place a square or other measuring device on the table with the other end against the
sanding disc.
2. Loosen disc-table adjustment handles, and
adjust table angle to 90º.
3. Retighten disc-table adjustment handles.
4. To adjust disc table to another angle, loosen
disc-table adjustment handles;
5. Set table at desired angle.
6. Retighten disc-table adjustment handles.
Installing or Changing Accessories – Sanding
Discs
WARNING! Turn the power off and remove the plug
from the outlet before changing the accessories.
Note: Hook & Loop sanding discs cannot be used with
this type of sander!
Fig. 06
Fig. 07
7

Removal:
1. Remove and set aside mitre gauge.
2. Completely remove the disc-table adjustment
handles.
3. Tip table up and remove.
4. Sanding discs are adhered to the plate using a
“pressure-sensitive adhesive”. Remove sanding disc
from disc plate.
Installation:
5. Ensure disc-plate is clean.
6. Peel backing from new sanding disc.
7. Press new sanding disc rmly onto disc-plate.
Note: Hook & Loop sanding discs cannot be used with
this type of sander!
8. Replace the sanding table and handles that were
removed in step 2 (above).
Fig. 08
Installing or Changing Accessories – Sanding
Belts
WARNING! Turn the power off and remove the plug
from the outlet before changing the accessories.
Removal:
1. Remove lock-knob and two Phillips screws;
2. Remove side cover.
3. Loosen tracking knob to release belt tension.
4. Remove belt from three wheels.
Installation:
5. Install new belt.
6. Replace side cover.
7. Before using, check belt tracking as described in
“Belt Tracking” section, and adjust as necessary.
Fig. 09
Fig. 10
8

Belt Tracking
DUST CHUTES
ADAPTE
R
The belt-tracking adjustment is set at the factory so
that the abrasive belt will run true on the pulleys. If,
however, the belt should track to one side or the other,
an adjustment can be made by turning the tracking
knob, which is located on the back side of the machine. Turning the knob clockwise will cause the belt
to track to the right (towards the disc sander mechanism). Turning the knob counter-clockwise will cause
the belt to track to the left side of the machine.
Dust Chutes/Ports – Operation
Sanding operations are inherently dusty. To help
minimize the amount of dust that escapes into the
surrounding air, this Mastercraft sander is equipped
with two 1 1/2” (38 mm) dust chutes (aka: ports) that
can be easily connected to a dust-collection system.
There is one dust chute for the belt-sanding system
and another for the disc-sanding system. It is strongly
recommended that users employ a dust-collection
system when using this belt & disc sander.
Fig. 11
Use of a mask or respirator is still recommended even
when a dust-collection system is in use.
Fig. 12
9

Electrical Requirements
In the event of a malfunction or breakdown, grounding provides a path of least resistance for electric
current to reduce the risk of electric shock. This tool is equipped with an electric cord having an
equipment-grounding conductor and a grounding plug. The plug must be plugged into a matching
outlet that is properly installed and grounded in accordance with all local codes and ordinances.
Do not modify the plug provided. If it will not t the outlet, have the proper outlet installed by a
qualied electrician.
Improper connection of the equipment-grounding conductor can result in a risk of electric shock. The
conductor, with insulation having an outer surface that is green with or without yellow stripes, is the
equipment-grounding conductor. If repair or replacement of the electric cord or plug is necessary, do
not connect the equipment-grounding conductor to a live terminal.
Check with a qualied electrician or service personnel if the grounding instructions are not completely
understood, or if in doubt as to whether the tool is properly grounded.
Use only three wire extension cords that have three-prong grounding plugs and three-pole
receptacles that accept the tool’s plug.*
Repair or replace a damaged or worn cord immediately.
This tool is intended for use on a circuit that has an outlet that looks the one illustrated in Figure
A below. The tool has a grounding plug that looks like the grounding plug as illustrated in Figure A
below. A temporary adapter, which locks like the adapter as illustrated in Figure B below, may be
used to connect this plug to a two-pole receptacle, as shown in Figure B if a properly grounded outlet
is not available.** The temporary adapter should only be used until a properly grounded outlet can
be installed by a qualied electrician. The green colored rigid ear or tab, extending from the adapter,
must be connected to a permanent ground such as a properly grounded outlet box.
* Canadian electrical codes require extension cords to be certied SJT type or better.
** Use of an adapter in Canada is not acceptable.
GROUNDED OUT LET BOX
CURRENT
CARRYING
PRONGS
GROUNDED OUTLET BOX
GROUNDING
MEANS
ADAPTER
GROUNDING BLADE
IS LONGEST OF THE 3 BLADES
Fig. A
Fig. B
10

General Usage and Maintenance
General Usage and Operating Instructions
ON/OFF
The rocker ON/OFF power switch is located on the
top of the sander.
1. Press the side marked ON to turn the sander on.
2. Press the side marked OFF to turn the sander off.
Operating Instructions – Belt Sander Platen
The platen is a heavy steel support plate that is
positioned behind the sanding belt, rising from
the table level to a point several inches above the
table level. Its purpose is to support the work when
sanding. The platen should be adjusted so that it is
almost touching the back of the sanding belt. This can
be done by loosening the two hex screws that fasten
the bottom of the platen to the sander frame. If the
platen is out of alignment for some reason, loosen
these two screws, adjust the platen, and retighten the
two screws.
To remove the platen for operations such as
strapping, polishing or other special operations,
remove the two screws that fasten the bottom of the
platen to the frame, and remove the platen.
belt support
On/Off Switch
Mitre Gauge – Disc Sander
A mitre gauge is supplied with your sander, and can
be used on the disc table, as shown. The mitre gauge
head can be set anywhere up to 45º (right or left) by
loosening the lock-knob, setting the mitre gauge head
to the desired angle and retightening the lock-knob.
Maintenance
WARNING! Turn the power switch “OFF” and
Mitre Gauge
disconnect the plug from the outlet prior to adjusting
or maintaining the sander. DO NOT attempt to repair
or maintain the electrical components of the motor.
Take the sander to a qualied service technician for
this type of maintenance.
Maintenance Required Frequency
1. Check power cord Before each use.
2. Check sanding belts and discs for damage Before each use.
3. Check moving parts for alignment and binding issues Before each use.
4. Dress sanding surfaces As needed
5. Replace sanding belts or discs (see manual section for specics) As needed.
6. Clean and vacuum dust from the motor housing and other sander parts As needed.
Service beyond recommended maintenance on these tools should only be performed by an authorized,
qualied technician.
11

Troubleshooting
Service on these tools should only be performed by an authorized, qualied technician.
SYMPTOM PROBABLE CAUSE CORRECTIVE ACTION
Sanding grains easily rub
off belt or discs.
Deep sanding grooves or
scars in work piece.
Sanding surface clogs
quickly.
Burns on workpiece. 1. Using a sanding grit that is too
Motor will not start. 4. Low voltage
Motor will not start – fuses
or circuit breakers tripping
or blowing.
Motor overheats. 4. Motor overloaded.
1. Sanding belt/disc has been
stored in an incorrect environment.
2. Sanding belt/disc has been
damaged or folded.
1. Sanding belt/disc grit is too
coarse for the desired nish.
2. Work piece sanded across the
grain.
3. Too much sanding force on the
work piece.
4. Work piece held still against the
belt-disc for too long.
1. Too much pressure against belt/
disc.
2. Sanding softwood.
ne.
2. Using too much pressure.
3. Work held still for too long.
5. Open circuit in motor or loose
connections.
6. Blown fuse or breaker.
1. Short circuit in line, cord or
plug.
2. Short circuit in motor or loose
connections.
3. Incorrect fuses or circuit breakers in power line.
5. Extension cord too long and of
insufcient gauge (weight).
1. Ensure sanding accessories are
stored away from extremely hot
or dry temperatures.
2. Store sanding accessories at –
not bent or folded.
1. Use a ner-grit sanding accessory.
2. Sand with the grain of the wood.
3. Reduce pressure on workpiece
while sanding.
4. Keep workpiece moving while
sanding on the sanding accessory.
1. Reduce pressure on workpiece
while sanding.
2. Use different stock, different
sanding accessories, or accept
that this will happen and plan on
cleaning or replacing belts/discs
frequently.
1. Use a coarser-grit sanding accessory.
2. Reduce pressure on workpiece
while sanding.
3. Do not keep workpiece in one
place for too long.
4. Check power source for proper
voltage.
5. Inspect all lead connections on
motor for loose or open connections. (Send for Servicing.)
6. Short circuit. (Send for Servic-
ing.)
7. Improper match between tool
and circuit, fuse or breaker.
1. Inspect cord or plug for damaged
insulation and shorted wires.
2. Inspect all connections on motor
for loose or shorted terminals
and/or worn insulation.
3. Install correct fuses or circuit
breakers or switch tool to an ap-
propriately sized circuit.
4. Reduce load on motor (pressure
on object being sanded.)
5. Utilize an extension cord of appropriate gauge and length or
plug tool directly into outlet.
12

SYMPTOM PROBABLE CAUSE CORRECTIVE ACTION
Motor
Motor stalls (resulting in
blown fuses or tripped
circuit).
Machine slows when operating.
Machine vibrates excessively.
Workpiece frequently gets
pulled out of operator’s
hands.
Workpiece lifts up from the
sanding disc/table.
1. Short circuit in motor or loose
connections.
2. Low voltage.
3. Incorrect fuses or circuit breakers in power line.
4. Motor overload.
1. Feed rate too great.
2. Undersized circuit or use
of undersized extension
cord.
1. Incorrect motor mounting.
2. Incorrect sanding-belt tension.
3. Weak or broken tension spring.
4. Idler roller is too loose.
5. Broken/defective sanding accessories.
1. Not supporting the workpiece
against the stop.
2. Attempting to sand (unaided) a
workpiece that is too small.
1. Sanding on the “up” side of the
wheel.
1. Inspect connections on motor
for loose or shorted terminals
or worn insulation. (Send for
Servicing.)
2. Correct low voltage conditions
(for example: improper extension
cord length and/or gauge).
3. Install CORRECT fuses or circuit
breakers or plug tool into an appropriate circuit, matched to an
appropriate fuse or breaker.
4. Reduce the load on the motor.
1. Reduce the rate at which the
workpiece is fed into the working
area of the tool.
2. Ensure circuit wires or extension
cords are proper gauge, or elimi-
nate use of extension cords.
1. Have motor mountings inspected
by service technician.
2. Adjust tension-adjustment knob.
Follow belt tensioning/tracking
instructions in this manual.
3. Have tension spring replaced by
service technician.
4. Have service technician adjust
idler roller.
5. Replace sanding belt/disc.
1. Use the platen (backstop) or
mitre gauge to support the workpiece.
2. Use another hand tool or jig to
grasp or hold the workpiece.
1. Sand on right side of sanding
disc (as operator faces the disc).
Wiring Diagram
Running Capacitor
Blue
Main Winding
White
Auxi Winding
Black
Switch
N
L
Black
Power cord
13

Parts List
Key
Number
1
2
3
4
5
6
7
8
9
10
11
12
13
14
15
16
17
18
19
20
21
22
23
24
25
26
27
28
29
30
31
32
33
34
35
36
37
Descriptions Descriptions
Hex Bolt M8X20 2
Spring Washer D8 2
Flat Washer D8 2
Rubber Foot 4
Base 1
Rubber Motor Pad 1
Philips Screw M5X10 9
Philips Screw ST4.2X9.5 4
Switch Box Cover 1
Capacitor 1
Spring Washer D5 1
Flat Washer D5 10
Star Washer D5 1
Cord Clip 1
Cord & Plug 1
Switch Box 1
Motor safeguard 1
Motor 1
Switch cover 1
Philips Screw ST2.9X6 2
Switch 1
Sanding Belt Board 1
Flat Washer D4 5
Hex Socket Screw M4X10 2
Cover Locking Knob 1
Sanding Belt Safeguard 1
Sanding Belt Bracket Cover 1
Sanding Belt 1”x30” 1
Idler Wheel 2
Clip Spring Washer D15 2
Bearing 6202 2
Idler Shaft 1
Hex Socket Screw M6X6 1
Philips Screw M5X16 LEFT 1
Special Locking Pad 1
Driven Wheel 1
Philips Screw M6X12 3
QTY
Key
Number
38
39
40
41
42
43
44
45
46
47
48
49
50
51
52
53
54
55
56
57
58
59
60
61
62
63
64
65
66
67
68
69
70
71
72
73
74
75
QTY
Hex Bolt M10X25 1
Sanding Belt Support 1
Hex Socket Screw M6X20 1
Belt Sanding Table
Large Flat Washer D8 1
Locking Knob Assy 1
Adjusting Shaft Guard 1
Adjusting Spring 1
Non-Metal Nut M10 1
Adjusting Fixing Board 1
Adjusting Spring 1
Adjusting Knob 1
Philips Screw ST4.2X16 4
Spring Column Pin 3x20 1
Adjusting Shaft 1
Adjusting Spring 1
Large Flat Washer D5 1
C-Clip 3.5 1
Sanding Disc Cover 1
Indication Arrow
Star Washer D4 1
Philips Screw M4X6 1
Scale Knob 1
Large Flat Washer D6 1
Mitre Gauge
Rod 1
Sanding Disc Table 1
Flat washer D6 2
Table Locking Knob 2
Sander Paper Disc 5" 1
Hex Socket Screw M6X16 1
Star Washer D6 1
Sanding Backer Disc 1
Sanding Disc Guard 1
Hex Socket Screw M5X10 2
Philips Screw M4X8 3
Belt Guard Plate 1
Hex Nut M8 1
1
1
1
14

Parts Explosion
15

Notes
16

Warranty
5-Year Limited Warranty
RIKON Power Tools, Inc. (“Seller”) warrants to only the original retail consumer/purchaser of our
products that each product be free from defects in materials and workmanship for a period of five
(5) years from the date the product was purchased at retail. This warranty may not be transferred.
This warranty does not apply to defects due directly or indirectly to misuse, abuse, negligence,
accidents, repairs, alterations, lack of maintenance or normal wear and tear. Under no
circumstances will Seller be liable for incidental or consequential damages resulting from
defective products. All other warranties, expressed or implied, whether of merchantability,
. This warranty does not cover
products used for commercial, industrial or educational purposes.
This limited warranty does not apply to accessory items such as blades, drill bits, sanding discs or
belts and other related items.
Seller shall in no event be liable for death, injuries to persons or property, or for incidental,
contingent, special, or consequential damages arising from the use of our products.
To take advantage of this warranty proof of purchase documentation, which includes date of
purchase and an explanation of the complaint, must be provided.
The Seller reserves the right to effect at any time, without prior notice, those alterations to parts,
RIKON Warranty
16 Progress Road
Billerica, MA 01821
.
The card must be entirely completed in order for it to be valid. If you have any questions
please contact us at 877-884-5167 or warranty@rikontools.com.
17

For more information:
16 Progress Road
Billerica, MA 01821
877-884-5167 / 978-528-5380
techsupport@rikontools.com
www.rikontools.com
Copyright RIKON Power Tools, Inc. 2009
 Loading...