


6” Jointer with Micro-Adjustable Fence
Model: 20-110
Part #20-110M3
Owner’s Manual
Record the serial number and date of purchase
in your manual for future reference.
Serial number:
Date of purchase:
For more information:
www.rikontools.com or info@rikontools.com
For Parts or Questions:
techsupport@rikontools.com or 877-884-5167

Operator Safety: Required Reading
IMPORTANT! Safety is the single most important consideration in the operation of this equipment. The following
instructions must be followed at all times.
There are certain applications for which this tool was designed. We strongly recommend that this tool not be modified
and/or used for any other application other than that for which it was designed. If you have any questions about its
application, do not use the tool until you have contacted us and we have advised you.
General Safety Warnings
KNOW YOUR POWER TOOL. Read the owner’s manual carefully. Learn the tool’s applications, work
capabilities, and its specific potential hazards.
ALWAYS GROUND ALL TOOLS.
If your tool is equipped with a three-pronged plug, you must plug it into a three-hole electric
receptacle. If you use an adapter to accommodate a two-pronged receptacle, you must attach the
adapter plug to a known ground. Never remove the third prong of the plug.
ALWAYS AVOID DANGEROUS ENVIRONMENTS.
Never use power tools in damp or wet locations. Keep your work area well lighted and clear of clutter.
ALWAYS REMOVE THE ADJUSTING KEYS AND WRENCHES FROM TOOLS AFTER USE.
Form the habit of checking to see that keys and adjusting wrenches are removed from the tool before
turning it on.
ALWAYS KEEP YOUR WORK AREA CLEAN. Cluttered areas and benches invite accidents.
ALWAYS KEEP VISITORS AWAY FROM RUNNING MACHINES.
All visitors should be kept a safe distance from the work area.
ALWAYS MAKE THE WORKSHOP CHILDPROOF.
Childproof with padlocks, master switches, or by removing starter keys.
NEVER OPERATE A TOOL WHILE UNDER THE INFLUENCE OF DRUGS,
MEDICATION, OR ALCOHOL.
ALWAYS WEAR PROPER APPAREL.
Never wear loose clothing or jewelry that might get caught in moving parts. Rubber-soled footwear is
recommended for the best footing.
ALWAYS USE SAFETY GLASSES AND WEAR HEARING PROTECTION.
Also use a face or dust mask if the cutting operation is dusty.
NEVER OVERREACH.
Keep your proper footing and balance at all times.
NEVER STAND ON TOOLS.
Serious injury could occur if the tool is tipped or if the cutting tool is accidentally contacted.
2

ALWAYS DISCONNECT TOOLS.
Disconnect tools before servicing and when changing accessories such as blades, bits, and cutters.
ALWAYS AVOID ACCIDENTAL STARTING.
Make sure switch is in “OFF” position before plugging in cord.
NEVER LEAVE TOOLS RUNNING UNATTENDED.
ALWAYS CHECK FOR DAMAGED PARTS.
Before initial or continual use of the tool, a guard or other part that is damaged should be checked to
assure that it will operate properly and perform its intended function. Check for alignment of moving
parts, binding of moving parts, breakage of parts, mounting, and any other conditions that may affect
its operation. A guard or other damaged parts should immediately be properly repaired or replaced.
Special Safety Rules For Jointers
Always keep cutter head and drive guards in place and in proper operating
condition.
NEVER make a jointing, planning, or rabbeting cut deeper than 1/8"
Do not perform jointing operations on material shorter than 10", narrower than 3/4", or
less than 1/2" thick.
Support the work piece adequately at all times during operation; maintain control
of the work at all times.
Do not back the work toward the in-feed table.
Do not attempt to perform an abnormal or little-used operation without study
and the use of adequate hold downs/push blocks jigs, fixtures, stops, and the
like.
SAVE THESE INSTRUCTIONS.
Refer to them often.
3

Table of Contents
Safety Warnings....................................................................................................................................2
Jointer Safety Rules ..........................................................................................................................3
Specifications ........................................................................................................................................4
Contents of Package ............................................................................................................................5
Unpacking and Setup ...........................................................................................................................5
Loose Parts ...........................................................................................................................................6
Getting To Know Your Jointer ............................................................................................................7
Assembly ..............................................................................................................................................8
Installing Bed to Stand .....................................................................................................................................8
Installing Polly “V” Belt .............................................................................................................................8
Belt Guard.................................................................................................................................................9
Install Fence Bed Casting ...........................................................................................................................9
Installing Fence to Bed .....................................................................................................................................9
Mounting On/Off Switch ......................................................................................................................................10
Installing Handwheels .......................................................................................................................10
90 Degree Fence Adjustment......................................................................................................................10
45 Degree Fence Adjustment.........................................................................................................................11
Installing Depth Lock Handle ............................................................................................................11
Installing Depth Limiting Stop ............................................................................................................11
Setting Outfeed Table....................... ..................................................................................................................12
Installing Cutterhead Guard .......................................................................................................................13
Installing Access Cover ................................................................................................................................14
Installing Dust Chute ............................................................................................................................................14
Operation / Maintenance............................................................................................................15
Wiring Diagram ...................................................................................................................................15
Troubleshooting ..................................................................................................................................16
Parts Diagram ................................................................................................................................17-23
Parts List ........................................................................................................................................17-23
Notes ..................................................................................................................................................24
Warranty .............................................................................................................................................25
Cutting Capacity
Cutterhead Speed
Number of Knives
Cuts per Minute
Rabbeting Capacity
Rabbet Ledge
Infeed Table Length
Outfeed Table Length
Table Surface
Fence
Blade Size
Fence Tilts Right & Left
Positive Stops
Motor
1-1/2HP,1Ph, 115/230V, Prewired 115V
Net Weight
Specifications
4,500 & 5,500 RPM
13,500 & 16,500 CPM
7”W x 45-3/4”L x 31-1/2”H
4-3/4”H x 29-1/8”L
6”L x 5/8”H x 1/8”D
4
6” x 1/2”
1/2”
3-1/8” x 8-3/4”
22”
22-1/2”
45
45o, 90
258 lbs
3
o
o

Unpacking and Checking Contents
The RIKON 6” Jointer is shipped in two cartons.
Stand Carton
1 Stand with Motor
1 Stand Door
1 Dust Chute
1 Multi “V-Belt”
1 Belt Guard
Main Unit Carton
1 Bed Assembly
1 Fence Assembly
1 Switch Assembly w/support
1 Cutter Guard
2 Push Blocks
1 Owner’s Manual w/ Warranty Card
1 Fence Base Casting
2 Hand Wheels
2 Fence Handles
2 Loose Bags
Loose Parts in Loose Bag 1
1 Fence Lock Handle Assembly
1 Depth Limiting Stop
1 Lock Handle
5
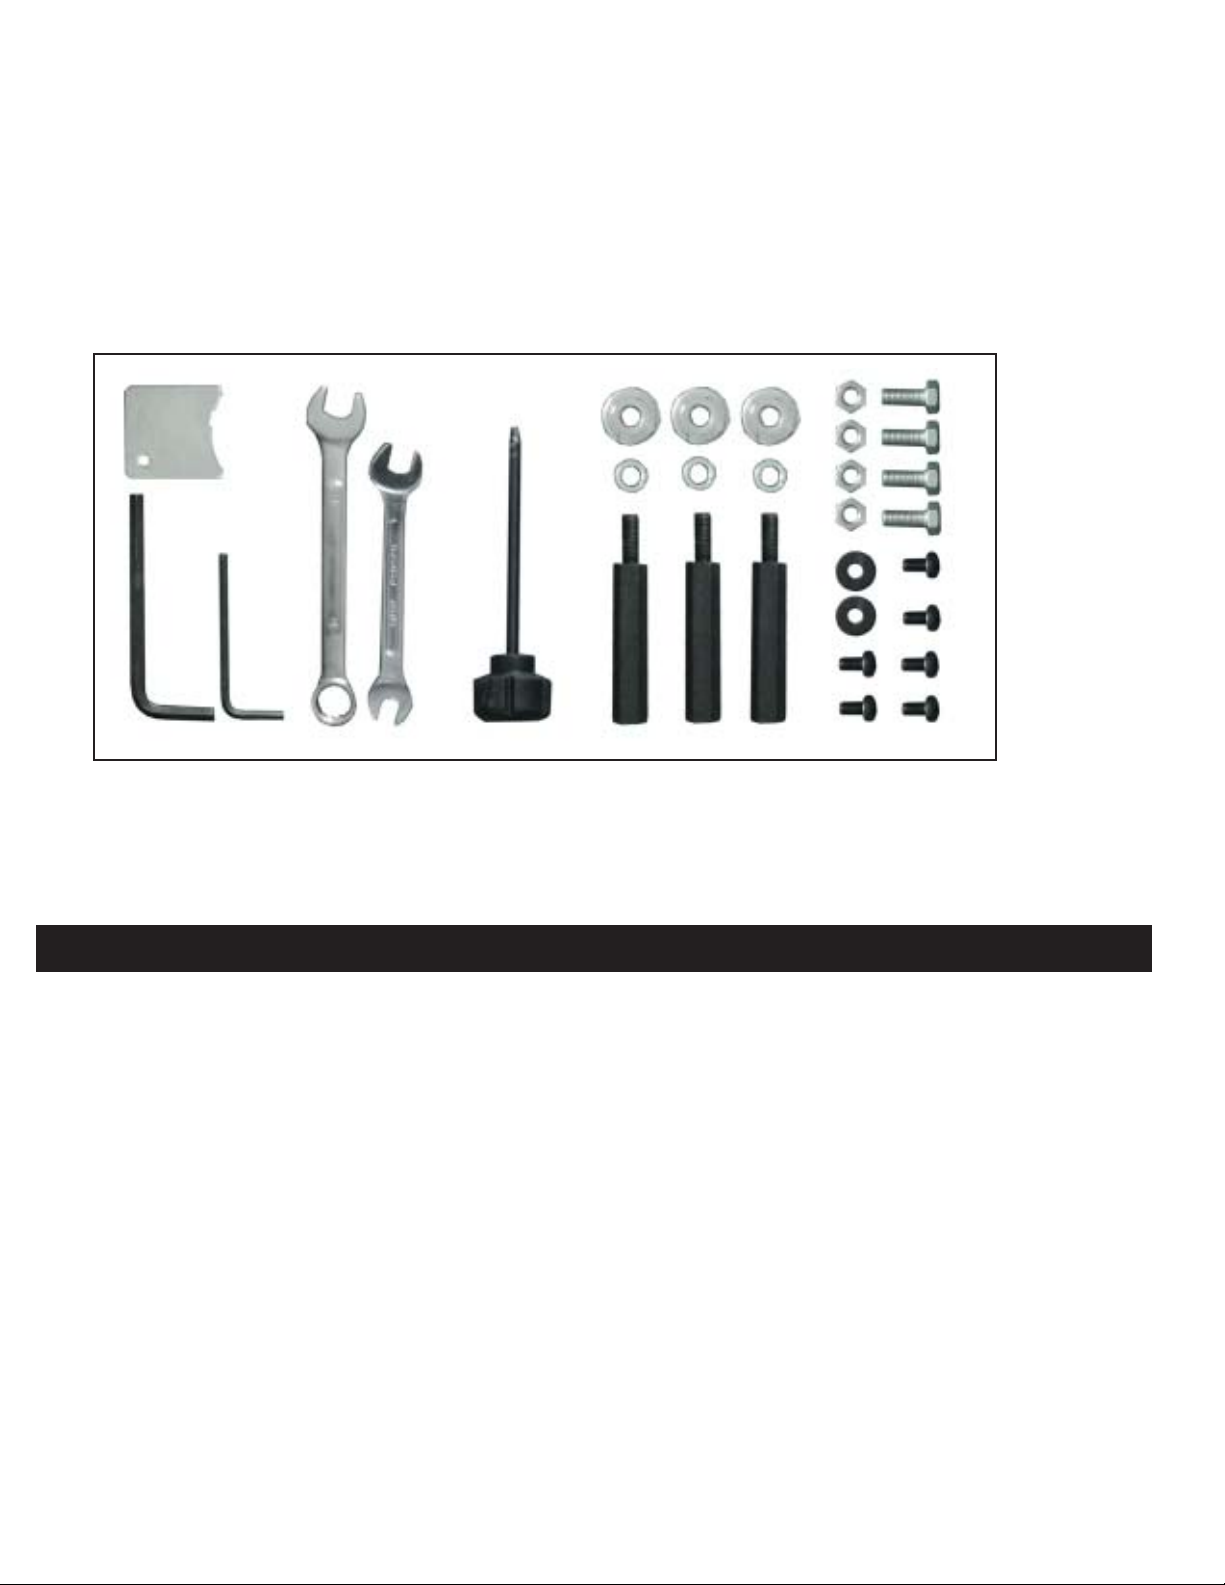
Loose Parts in Loose Bag 2
3 3/8” Flat Washers
3 3/8” Lock Washers
3 Mounting Bolts
1 3mm Hex Wrench
1 5mm Hex Wrench
1 8/10mm Open End Wrench
1 12/14mm Open End Wrench
4 Hex Head Screw M8
4 Hex Nut M8
2 1/8” Flat Washers
6 1/8”x3/8” Pan Head Screws
1 Blade Lock Tool
1 Blade Adjust Tool
Tools Required for Assembly
Philips Head Screwdriver, Adjustable Wrench, 14mm Open End Wrench and a metric socket set.
Unpacking Carton and Cleaning
1. Carefully remove all contents from both shipping cartons. Compare contents of the shipping
cartons with the list of contents in this manual. Place parts on a protected surface.
2. Report any shipping damage to your local distributor.
3. Clean all rust protected surfaces (bed, fence, etc.) with a parts cleaning solvent or WD40.
Do not use; gasoline, paint thinner, mineral spirits, etc. as these may damage painted surfaces.
Caution: Cutterhead blades are extremely sharp! Use care when cleaning!
4. Apply a thin layer of paste wax to the milled surfaces of the fence and tables to prevent rust.
5. Set packing material and shipping cartons to the side. Do not discard until machine has been
set up and is running properly.
6
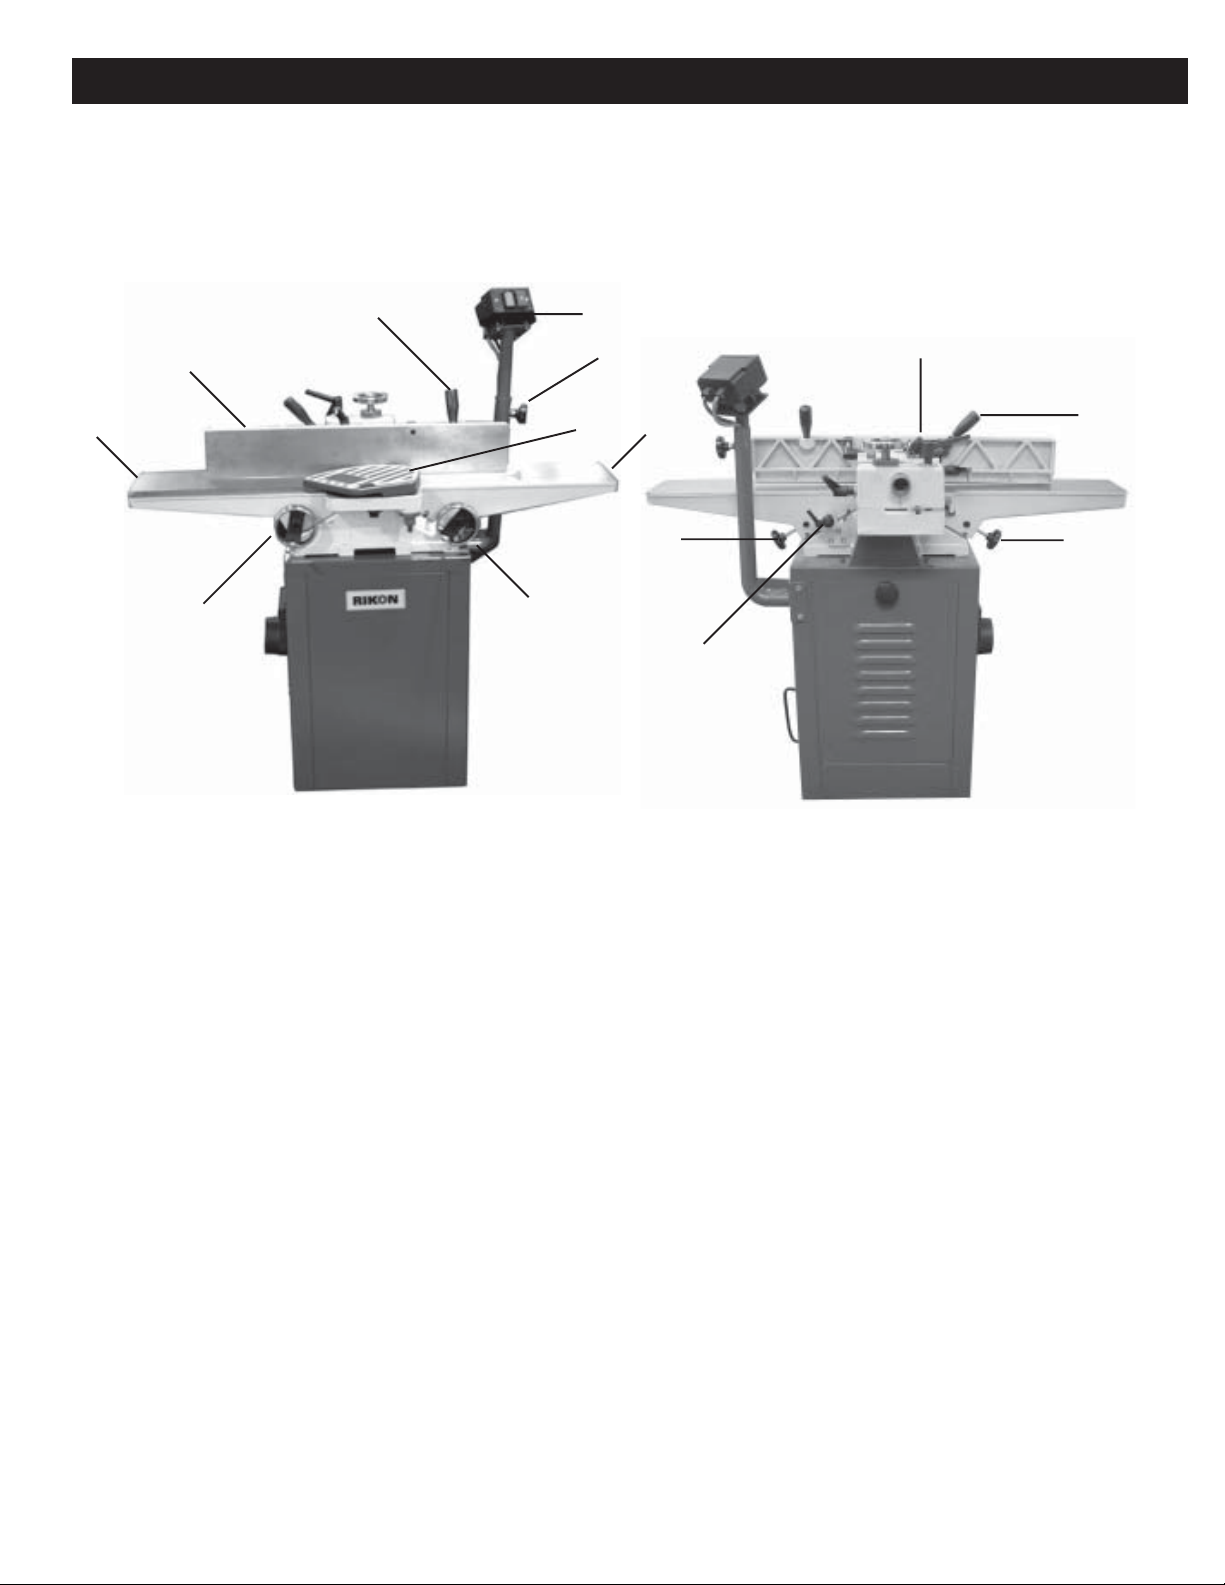
Getting to Know Your Jointer
Note: Jointer top shown in white for clarity.
2
3
1
4
7
8
5
15
6
14
13
10
12
9
11
1. Hand Wheel for Out-feed Table
2. Out-feed Table
3. Fence
4. Fence Adjustment Handle
5. Cutterhead Guard
6. In-feed Table
7. Hand Wheel for In-feed Table
8. On/Off Switch
9. Out-feed Table Lock Knob
10. Fence Tilt Lock Handle
11. Belt Guard
12. Fence Adjustment Lock Handle
13. Depth Limiter
14. In-feed Table Lock Knob
15. Telescoping Height Knob
7
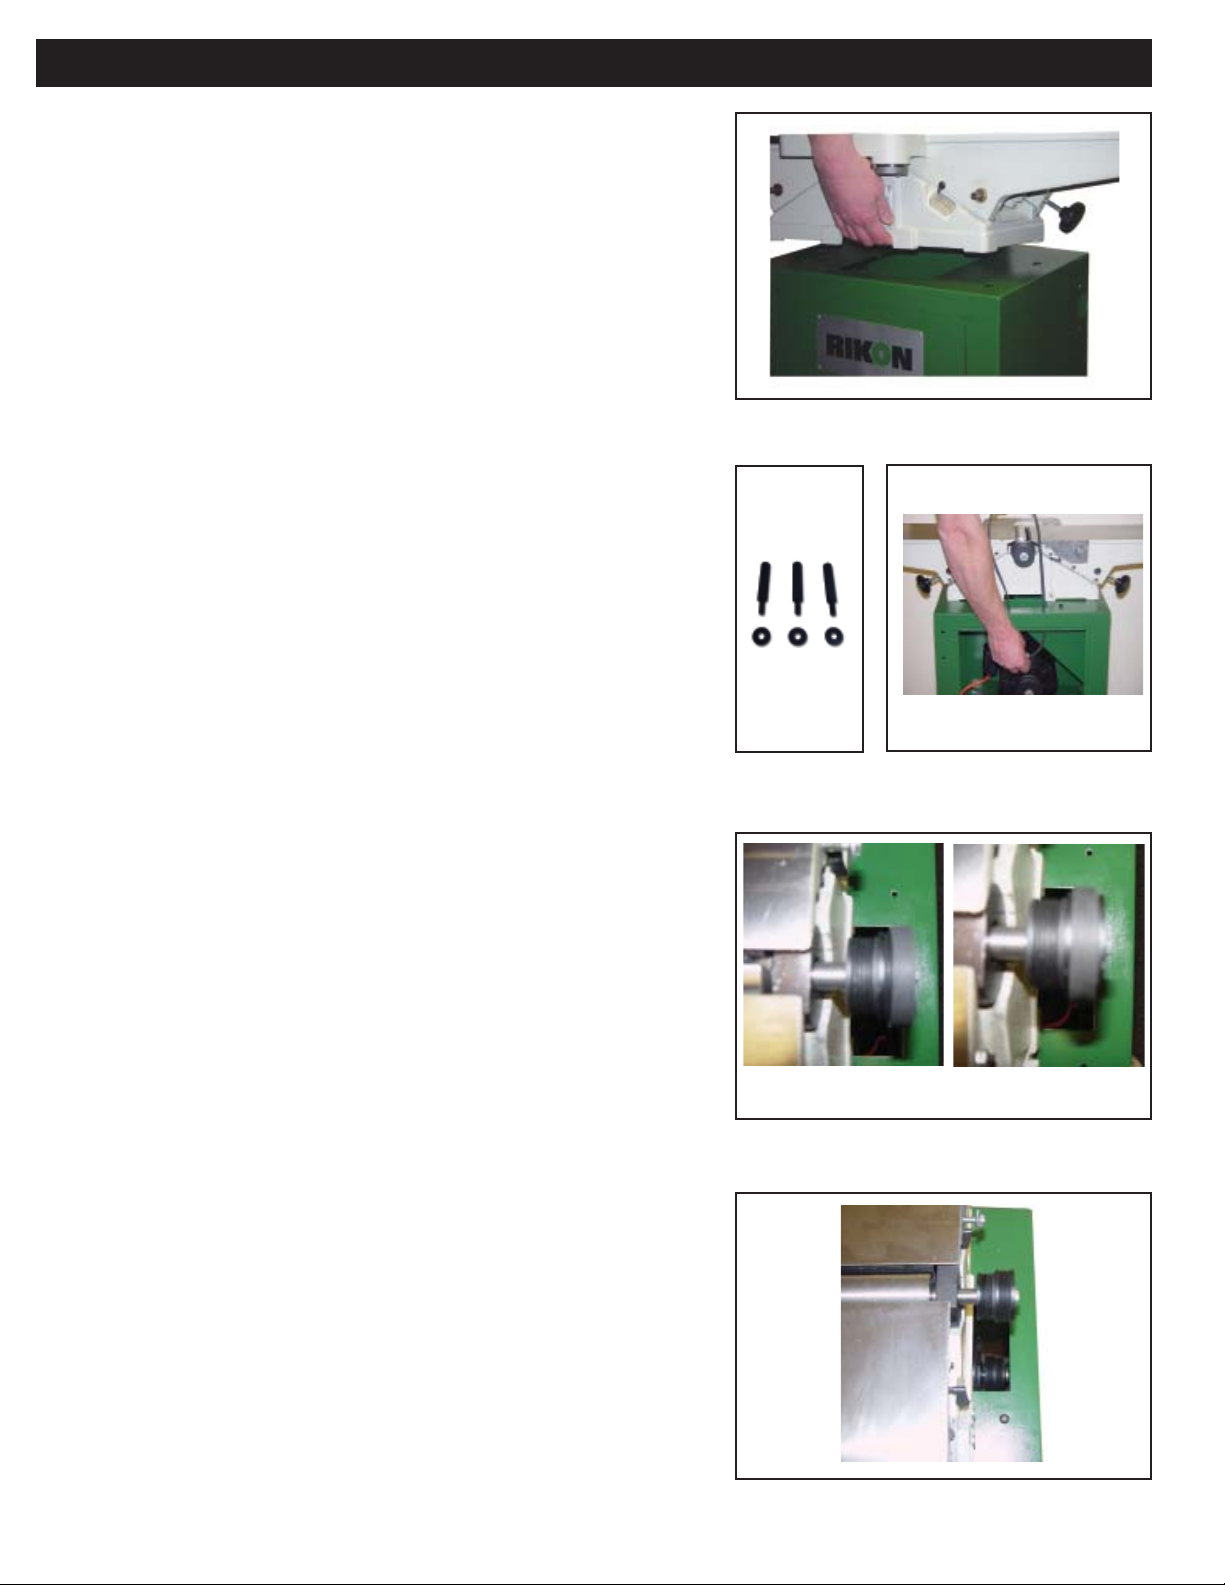
Assembly
Installing Bed to Stand
1. Remove rear door on cabinet.
2. Place bed assembly on top of stand, making sure the
pulleys face the rear of the cabinet. Ask a friend for
assistance with this step. (DO NOT LIFT BY TABLE
ENDS, LIFT FROM CENTER OF CASTING) (Fig. 1)
3. Line up the two holes in stand top with holes in the
bed assembly by viewing through rear access door in
stand.
4. Attach stand to bed assembly by using two 3/8" lock
bolts and washers. (See Fig. 2) Hand tighten only at
this time.
5. Line up third hole in stand with hole in bed assembly
by viewing through dust chute.
Figure 1
6. Install third 3/8" lock bolt and washer through dust
chute to secure bed to stand. DO NOT tighten at this
time.
Installing the Poly V-Belt
1. Place the Multi “V-Belt” on the cutter-head pulley and
through the opening in the cabinet and onto the
motor pulley. (Fig. 3)
2. If necessary loosen the motor turn-buckle to raise the
motor. Verify that the Multi “V-Belt” is positioned
properly in the center of the pulleys. (Fig. 4)
3. Check to verify the motor pulley and the cutter-head
pulley are aligned vertically, and the Multi “V-Belt” does
not touch the cabinet. To adjust the pulleys, loosen the
motor mounts and slide the motor in or out or loosen
the three 3/8” lock bolts and move the jointer top.
(Fig. 5)
4. Tighten all three lock bolts (from Assembly Section #4
& #6 above) using 14mm or 9/16” wrench.
Figure 2
INCORRECT
Figure 3
CORRECT
Figure 4
5. Tension the Multi “V-Belt” using the motor plate turnbuckle. A properly tensioned belt should have 1/2"
deflection when finger pressure is applied half way
between the two pulleys.
6. Re-check the Mult “V-Belt” tension after 2 hours
of use. Re-tension as needed.
8
Figure 5

Installing Belt Guard
1. Place the belt guard (A, Figure 6) over the belt
opening in the stand.
2. Line up the holes in the stand with the holes in the
guard.
3. Attach the guard to the stand using two 1/4-20x1/2"
pan head screws and two 1/4" lock washers.
(B, Figure 6)
Install Fence Bed Casting
1. Use two 3/8" x 1-1/2" hex socket bolts and
washers (A, Fig. 7) to attach the fence bed casting
(B, Fig. 7) to the outfeed table bed using 13mm
socket/wrench.
2. Align top of the fence base casting flush with the
table surface and tighten.
A
B
Figure 6
A
B
Figure 7
Installing Fence to Bed
1. Remove the lock handle (A, Figure 8), flat washer,
and lock nut from the fence assembly.
2. Place the fence assembly onto the table. Be sure
key stock (B, Figure 8) on the bed lines up with
channel in the fence casting.
3. Place the flat washer and insert the lock handle
through the fence casting and the table casting.
4. Thread the special nut onto the lock handle. Make
sure the tab on the nut faces up and engages the
slot in the table casting. (Fig. 9)
A
B
Figure 8
Figure 9
9

Mounting the On / Off Switch
1. Decide where you want to mount the on / off
switch. It can be mounted on the in-feed side of
the cabinet or the out-feed side.
2. Feed the two power cords through the cabinet
(Fig. 10).
Mounting
Hardware
3. Mount the power switch column to the cabinet using
(4) 3/8” x 3/4” bolts, (4) washers and (4) 3/8” nuts
using a 14mm socket/wrench and tighten.
4. Plug the motor cords together (Green cords).
5. Plug the power cords together (Black cords).
6. Adjust the height of the switch to your desired
height by loosening the adjustment knob
(A, Fig. 11) on the power switch column.
7. Adjust the switch (B, Fig. 11) to the desired angle.
8. Re-tighten the adjustment knob (A, Fig. 11) on the
power switch column.
Installing Handwheels
1. Press handwheels (A, Fig. 12) onto shaft, aligning
the slot in the handle with the pin on the shaft. If
necessary, use a hammer with a block of wood to
tap the handwheel completely onto the shaft.
Power Cords
Figure 10
B
A
Figure 11
B
A
2. Tighten set screw, (B, Fig. 12).
Adjustments and Operation
90º Fence Adjustment
1. Set in-feed table to the same height as the out-feed
table.
2. Move the fence by releasing lock handle (A,
Figure 13) and pushing the fence assembly until it
overlaps the tables.
3. Adjust the fence to a 90º angle by releasing lock
handle (B, Figure 13).
Figure 12
B
A
Figure 13
10

4. Place a combination square on the in-feed table to check
that the fence is 90º to the table.
5. If fence is not square to table, release lock handle (D,
Figure 14) and turn handle (C, Figure 14) until the fence is
90º.
6. Now that the fence is 90º to the table, adjust the positive
stop screw assembly (E, Figure 14) to maintain the 90º
position.
7. Retighten lock handle (D, Figure 14).
45º Fence Adjustment
1. Loosen lock handle (B, Figure 14). Move the stop plate
(F, Figure 14) out of the way and position the fence at the
45º angle. Make sure the fence sits against the stop bolt
(G, Figure 14).
Figure 14
2. Place a combination square on the fence and table to
confirm a 45º angle setting.
3. To adjust, loosen lock nut and bolt (G, Figure 14), until a
45º angle is obtained, and tighten lock nut (G, Figure 14).
4. Tighten lock handle (B, Figure 14).
Depth Lock Handle
1. Install the depth lock handle. (A, Figure 15). The depth
lock handle helps lock the infeed bed in place for
rabbeting cuts.This should be attached before Depth
Limiting Stop (B, Figure 15) for easier installation.
Depth Limiting Stop
A
B
D
C
Figure 15
1. Attach depth limiting stop. (B, Figure 15).
11

Setting Out-feed Table to Cutter-head
Knives
WARNING
DO NOT connect machine to power source
at this time!
Cutter-head blades are extremely sharp!
Use Caution when hands are near the cutter-head!
Failure to comply may cause serious injury!
1. Unplug the Jointer from the power source.
2. Remove the blade guard by turning knob. (Figure
16) clockwise while lift up on the blade guard.
Caution: Blades are sharp! Use care while
working around the blades.
3. Open the rear door and move the motor belt until
the blade lock hole is lined up (Figure 17).
Figure 16
4. Insert blade lock tool. This locks the head in the
proper position for replacing the first blade.
5. Loosen table lock screw (C, Figure 15) and gib
lock screw (D, Figure 15) and raise the out-feed
table to the height of blade number one by turning
hand wheel. Counter-clockwise will cause the outfeed table to rise. Clockwise will cause the outfeed table to lower. Set a straight edge on the outfeed table (Figure 18). Position of the table and
Straight edge should look like Figure 19. Use care
when handling the straight edge near the blades
so as not to damage them.
6. When the out-feed table and blade number one
are the same height, tighten gib and table lock
screws.
Do not change the setting for the out-feed table
again. This will only change if the blades
are replaced or sharpened.
Figure 17
Figure 18
7. Bring the straight edge toward the left of the jointer
and confirm that blade number one is at the same
height at the left of the table as it is at the right
side of the table.
12
Figure 19

8. If blade is higher or lower at the right of the table
than it is at the left, slightly loosen four screws
(Figure 20) by turning clockwise as viewed from
the in-feed table. To lower, turn the screw
clockwise. To raise, turn the screw counterclockwise. Blades are set at the proper height
when the top of the blades are1/16" above the
cutter-head. Alternately tighten four screws to
hold each blade in place.
9. Repeat this process with blades two and three.
The out-feed table and cutter-head knives are
correctly adjusted when all three blades are
parallel to the out-feed table and all three
blades are set at the same height in the cutterhead.
If the out-feed table is set too high, a curved finished
surface results.
Figure 20
If the out-feed table is set too low, gouging will result at
the end of the cut.
Installing Cutter-Head Guard
1. Turn spring knob (A, Figure 21) approximately one
and one half revolutions counter-clockwise and
hold.
2. Insert guard post into hole in table. Make sure
spring engages slot in guard post.
3. Check for proper operation. Guard must return
fully to fence when released. If guard does not
return fully, remove pull guard, apply more tension
to spring knob by turning it another half turn
counter-clockwise, and re-insert guard. If guard
closes too quickly and strikes fence too hard,
release some tension on the spring.
A
Figure 21
13

Installing Access Cover
1. Install access cover by placing bottom of panel
into access in stand and fasten by turning latch
knob. (Figure 22)
Installing Dust Chute
Figure 22
1. Attach the dust chute (See Figure 23) to the base
with four 1/4"-10x1/2"pan head screws and four
washers.
Figure 23
14

Operation
Maintenance
CA CA
UTION!UTION!
CA
UTION! BEFORE CLEANING OR CARRYING OUT MAINTENANCE WORK, DISCONNECT
CA CA
UTION!UTION!
THE MACHINE FROM THE POWER SOURCE (WALL SOCKET). NEVER USE WATER OR OTHER
LIQUIDS TO CLEAN THE MACHINE. USE A BRUSH. REGULAR MAINTENANCE OF THE
MACHINE WILL PREVENT UNNECESSARY PROBLEMS.
Keep the table clean to ensure accurate cutting.
Keep the outside of the machine clean to ensure accurate operation of all moving parts and prevent
excessive wear.
Keep the ventilation slots of the motor clean to prevent it from overheating.
Keep the inside (near the saw blade, etc.) clean to prevent accumulation of dust.
Wiring Diagram
This machine must be grounded.
Replacement of the power supply cable should only be done by a qualified electrician.
15

A
y
A
djust belt tension
A
g
p
y
y
j
y
Have a licensed electrician install proper size breakers
Low Voltage Check for proper voltage
ir flow restricted on motor Clean out motor to obtain normal air flow
Loose connection or open circuit in motor Inspect motor for loose connections
Pulley set screw loose Tighten set screw
Circuit too long or undersized wires Reduce the length of the wire or Increase the wire size
Voltage too low Have the voltage checked by an electrician
Circuit breakers do not have sufficient capacit
Use of extension cord Use heavier gauge extension cord or no extension cord
Drive belt tension too high
djust outfeed table level with the knives
Feed rate too high Feed workpiece slower
Knives dull Replace knives or sharpen
Knives are set higher than the outfeed table or not
level with the table Readjust the knives
Knives are dull Sharpen or replace knives
*********Warning*********
ur
Broken tension spring Install new tension spring
Troubleshooting
WARNING!
FOR YOUR OWN SAFETY, ALWAYS TURN OFF AND UNPLUG THE MACHINE BEFORE CARRYING OUT ANY
TROUBLESHOOTING.
Symptom Possible Cause Solution
Motor will not start Machine not plugged in Plug the machine in
Motor Overheats Motor overloaded Reduce load on motor. Feed work slower
Excessive motor noise Bad motor Have motor checked
Motor will not develop full power or stalls Circuit overloaded with lights or other tools Decrease the load on the circuit
Loose in feed or outfeed tables Loose gibs Tighten the gibs
Finish stock is concave on the end Knives are set higher than the outfeed table Raise outfeed table level with knives
Back side of finish stock is thicker than the front Outfeed table set too high
16
Stock is concave in the middle Table out of level Raise the table ends
Ripples on planed surface One blade set higher than the others Readjust blades
Kickback
Workpiece strikes the outfeed table Outfeed table set too high or blades to low Readjust knives level with outfeed table
Fence not accurate at 90 or 45 degrees Fence stop not properly adjusted Readjust the fence stops
Machine bogs down in the cut Excessive depth of cut Decrease depth of cut
Safety guard won't return to the fence No tension on the spring Retension saftey guard spring
result in serious in
ma
l
. Failure to com
Do not make adjustments while the Jointer is running. Ensure the switch is off, power is disconected and all moving parts have stopped before
servicin

Cutterhead Assembly
Index
No.
1
2
3
4
5
6
7
8
9
10
11
12
13
14
15
16
17
18
Part
No.
1A
2A
3A
4A
5A
6A
7A
8A
9A
10A
11A
12A
13A
14A
15A
16A
17A
18A
Description
Cutterhead
Knife
Knife Lock Bar
Bearing Housing
Bearing Housing
Cutterhead Pulley
Hex Screw/Cutterhead Locking
Flat Washer 6mm
Key
Stud Bolt 10mm
Lock Washer 10mm
Screw/Cutterhead Set
Ball Bearing 62032
Ball Bearing 62022
Pin Stop
Spring
Flat Washer 10mm
Hex Bolt M6x12
Q’ty
1
3
3
1
1
1
12
1
1
2
2
6
1
1
1
6
2
1
17

Fence Assembly
18

Fence Assembly
Index
No.
1
2
3
4
5
6
7
8
9
10
11
12
13
14
15
16
17
18
19
20
21
22
23
24
25
26
27
28
29
30
31
32
33
34
35
36
37
38
39
40
41
42
43
44
45
46
47
48
49
50
51
52
53
54
55
56
57
Part
No.
1B
2B
3B
4B
5B
6B
7B
8B
9B
10B
11B
12B
13B
14B
15B
16B
17B
18B
19B
20B
21B
22B
23B
24B
25B
26B
27B
28B
29B
30B
31B
32B
33B
34B
35B
36B
37B
38B
39B
40B
41B
42B
43B
44B
45B
46B
47B
48B
49B
50B
51B
52B
53B
54B
55B
56B
57B
Description
Fence Body
Handle
Hex Nut 10mm
Hex Socket Bolt M8-1.25x33
Pin Roll
Block
Hex Nut M8-1.25
Hex Bolt M8-1.25x25
Plastic Bar
Handle
Pin Roll
Cam Wheel
Hex Socket Bolt M8-1.25x25
Hex Socket Bolt M8-1.25x25
Tilt Shaft
Worm Gear
Hex Bolt M8-1.25x20
Tube
Pin Roll
Tilt Plate
Hex Bolt M6-1.0x12
Hex Nut
Flat Washer 13mm
Handle Hex Nut/Small
Spring
Handle
Screw Handle
Nut Quill
Casting
Quill
Bracket
Bolt M8-1.25x10
Pin Roll
Pin Roll
Gear
Plate
Screw/Phip M6-1.0x15
Handle
Screw Handle
Screw Adjusting
Casting
Set Screw
Shaft
Thread Shaft
Flange
Hex Socket
Gear Shaft
Key
Lock Tube
Tube
Thread Rod
Flat Washer 11mm
Handle Hex Nut/Large
Handle Wheel
Flat Washer 6mm
Hex Bolt M6-1.0x12
Special Lock Nut
Q’ty
1
2
2
1
1
1
4
1
1
1
4
1
1
1
1
1
2
2
1
1
1
2
2
2
3
3
3
1
1
1
1
1
2
1
1
1
3
1
1
1
1
1
1
1
1
3
1
1
1
1
1
1
1
1
1
1
1
19

Stand and Motor Assembly
20

Stand and Motor Assembly
Index
No.
1
2
3
4
5
6
7
8
9
10
11
12
13
14
15
16
17
18
19
20
21
22
23
24
25
26
27
28
29
30
31
32
33
34
35
36
37
38
39
40
41
42
43
44
45
46
47
48
49
50
51
52
Part
No.
1C
2C
3C
4C
5C
6C
7C
8C
9C
10C
11C
12C
13C
14C
15C
16C
17C
18C
19C
20C
21C
22C
23C
24C
25C
26C
27C
28C
29C
30C
31C
32C
33C
34C
35C
36C
37C
38C
39C
40C
41C
42C
43C
44C
45C
46C
47C
48C
49C
50C
51C
52C
Description
Tapping Screw
Switch
Switch Box
Stain Relief Bushing
Cable
Cable
Switch Support (Upper)
Lock Knob
Switch Support (Lower)
Hex Bolt M8-1.25x12
Flat Washer 8mm
Pan Head Screw M5-0.08x16
J-Belt 5940
Hex Bolt M6-1.0x12
Flat Washer 6mm
Motor Pulley
Key
Motor
Carriage Bolt M8-1.25x16
Hex Nut M5-0.08
Pan Head Screw
Motor Mounting Plate
Pin Roll
Shaft
Bracket
Rubber Tube
Lock Washer 8mm
Hex Nut M8-1.25
Pan Head Screw
Screw Shaft
Nut
Screw Shaft
Bracket
Cable
Knob Screw
Washer
Door Latch
Lock Nut
Rubber Feet
Door
Lock Bolt
Stand Body
Belt Cover
Plastic Cap
Plate
Pan Head Screw
Relief
Plug Cable
Bracket
Dust Chute
Pan Head Screw
Tool Holder
Q’ty
4
1
1
1
1
1
1
1
1
5
12
4
1
7
7
1
1
1
4
4
6
1
4
4
2
1
7
5
1
1
1
1
1
1
1
1
1
1
4
1
3
1
1
1
1
2
2
1
1
1
2
1
21

Bed Assembly
22

Bed Assembly
Index
No.
1
2
3
4
5
6
7
8
9
10
12
13
14
15
16
17
18
19
20
21
22
23
24
25
26
27
28
29
30
31
32
33
34
35
36
37
38
39
40
41
43
44
45
46
47
48
49
50
Part
No.
1D
2D
3D
4D
5D
6D
7D
8D
9D
10D
12D
13D
14D
15D
16D
17D
18D
19D
20D
21D
22D
23D
24D
25D
26D
27D
28D
29D
30D
31D
32D
33D
34D
35D
36D
37D
38D
39D
40D
41D
43D
44D
45D
46D
47D
48D
49D
50D
Description
Rear Table
Lock Knob
Adjust Nut
Flat Washer 10mm
Bushing
Adjusting Screw
Ball Crank
Pivot Pin
Set Screw
Lock Screw
Hand Wheel
Handle
Handle Shaft Bolt
Front Table
Retaining Washer
Spring
Spring Knob
Retainer
Pointer
Ball Crank
Base
Gib
Depth Scale
Shoudler Pin
Brass Washer 10mm
Set Screw
Set Screw
Hen Nut
Screw
Rivet
Washer
Hex Nut
Rivet
Fence Base Casting
Key
Flat Washer 8mm
Hex Bolt M8-1.25x35
Spring Pin
1/8" Set Block
Hex Socket Bolt M8-1.25x16
Stud
Spring
Stud
Knob
Lock Handle
Cutterhead Guard
Guard Post
Manual
Q’ty
1
2
2
4
2
2
1
2
6
2
2
2
2
1
1
1
1
1
1
1
1
2
1
2
2
2
2
6
3
1
2
2
2
1
1
2
2
1
1
3
1
1
1
1
1
1
1
1
23

NOTES:
24

WARRANTY
RIKON Power Tools/Richen Enterprise, Inc. (“Seller”) warrants to only the original retail consumer/
purchaser of our products that each product be free from defects in materials and workmanship for a
period of two (2) years from the date the product was purchased at retail. This warranty may not be
transferred.
This warranty does not apply to defects due directly or indirectly to misuse, abuse, negligence,
accidents, repairs, alterations, lack of maintenance or normal wear and tear. Under no
circumstances will Seller be liable for incidental or consequential damages resulting from defective
products. All other warranties, expressed or implied, whether of merchantability, fitness for
purpose, or otherwise are expressly disclaimed by Seller. This warranty does not cover products
used for commercial, industrial or educational purposes.
2-Year Limited Warranty
This limited warranty does not apply to accessory items such as blades, drill bits, sanding discs or
belts and other related items.
Seller shall in no event be liable for death, injuries to persons or property, or for incidental,
contingent, special, or consequential damages arising from the use of our products.
To take advantage of this warranty proof of purchase documentation, which includes date of
purchase and an explanation of the complaint, must be provided.
The Seller reserves the right to effect at any time, without prior notice, those alterations to parts,
fittings, and accessory equipment which they may deem necessary for any reason whatsoever.
To take advantage of this warranty, please fill out the enclosed warranty card and send it to:
RIKON Warranty
110Cummings Park
Woburn, MA 01801
The card must be entirely completed in order for it to be valid. If you have any questions
please contact us at 877-884-5167 or warranty@rikontools.com.
25

For more information:
110 Cummings Park
Woburn, MA 01801
877-884-5167 / 781-933-8400
techsupport@rikontools.com
www.rikontools.com
Copyright Richen Enterprise, Inc. 2006
Printed in China 5/06
 Loading...