

Page 1
1
Page 2

2
Page 3
3
3
Page 4
4
Page 5
5
Page 6
6
Page 7
7
CONTENTS
Drawing explanation 7
Technical Specification 8
Packaging 8
Parts overview 8
1. IMPORTANT INFORMATION
General warning and safety instructions 9
Before setting up 9 – 10
2. BRIEF HEATING INFORMATION
Suitable fuels and fuel quantities 11
Maximum fuel quantity 11
Fuel quantities 11
Clean burning 12
Burning wood 12
3. INSTALLING THE FIRE
Connecting the fire 13
4. OPERATION
Starting the fire 14
Ash drawer 15
Operating the shaker grate 15
Slide setting at rated heating capacity 15
5. FITTING OPTIONS
Making an external combustion air feed 16
6. MAINTENANCE AND CLEANING
General maintenance 17
Finish – condition and cleaning 17
Convection air openings 17
Cleaning the flue gas channels 17
7. PROBLEM SOLVING
What to do if? 18
8. CERAMIC HOB ASSEMBLY INSTRUCTIONS
Scope of delivery/Assembly 19
9. GUARANTEE
We guarantee 20
Warranty card 23–24
DRAWING EXPLANATION
Important information
Practical advice
Use the plan
Page 8
8
TECHNICAL SPECIFICATION
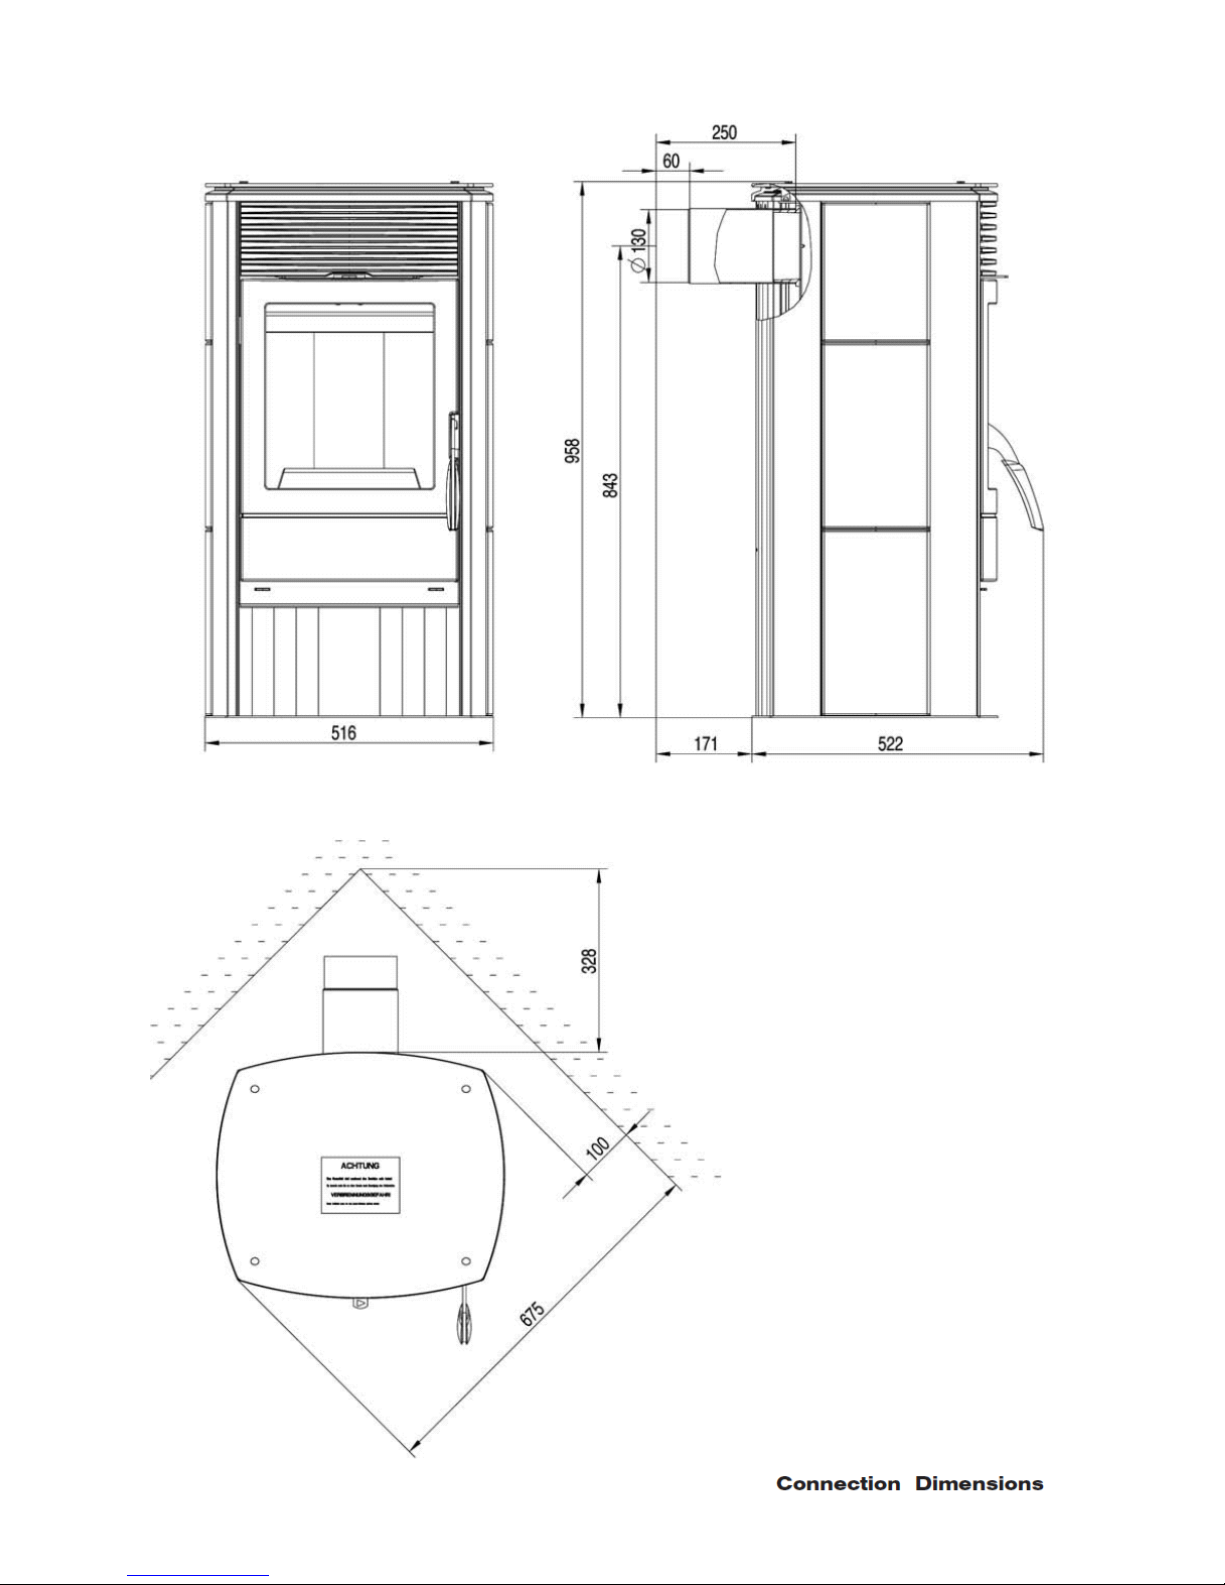
(Illustrated: Fitting dimensions)
This is a Design 1 fire and has a connection for
fitting to a chimney that is equipped for other fires
and boilers for solid and liquid fuels, insofar as the
chimney dimensions are in accordance with DIN
4705, Part 3
Flue gas values for multiple connection to a chimney as
per DIN 4705,Part 3 or for measuring the chimney as per
DIN 4705, Part 2
Flue gas mass flow g/s 6,2
Flue gas temperature / °C 217,8°
Minimum flow pressure at rated heating
capacity
12
The owner of the small heating system or the authorised
person for the small heating system must keep the
technical documentation in a safe place and present it to
the local authority or the chimney sweep.
PACKAGING
Your first impression is important to us!
- The packaging for your new fire provides excellent
protection from damage. However damage to the
fire and accessories can occur during transport.
Therefore please check your fire for damage and that all
parts are there on receipt! Report any defects to your fire
dealer immediately! When unpacking please ensure that
the soap stone panels are intact. The material scratches
easily. Soap stones are not covered by the warranty
-The packaging for your new fire in the main has no
effect on the environment.
The wood in the packaging has not been surface treated
and can therefore be burned in your fire. The box and the
film (PE) can be recycled without any problem.
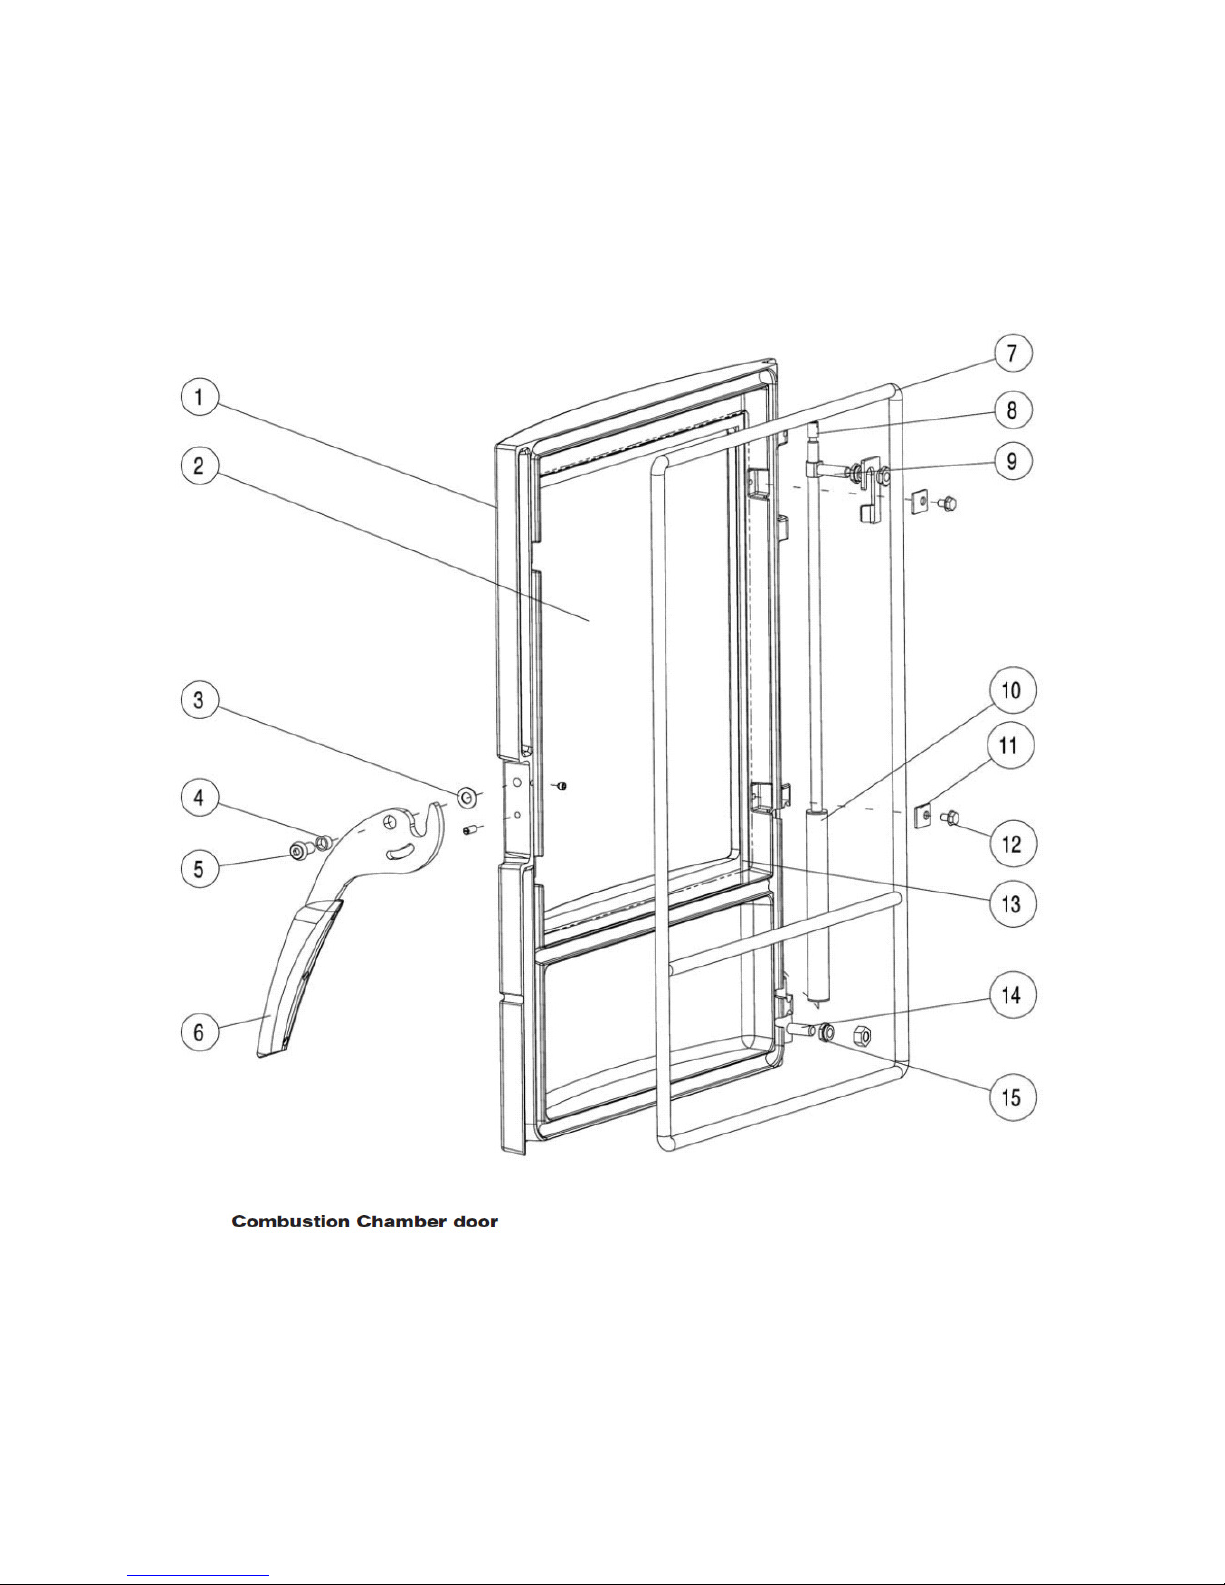
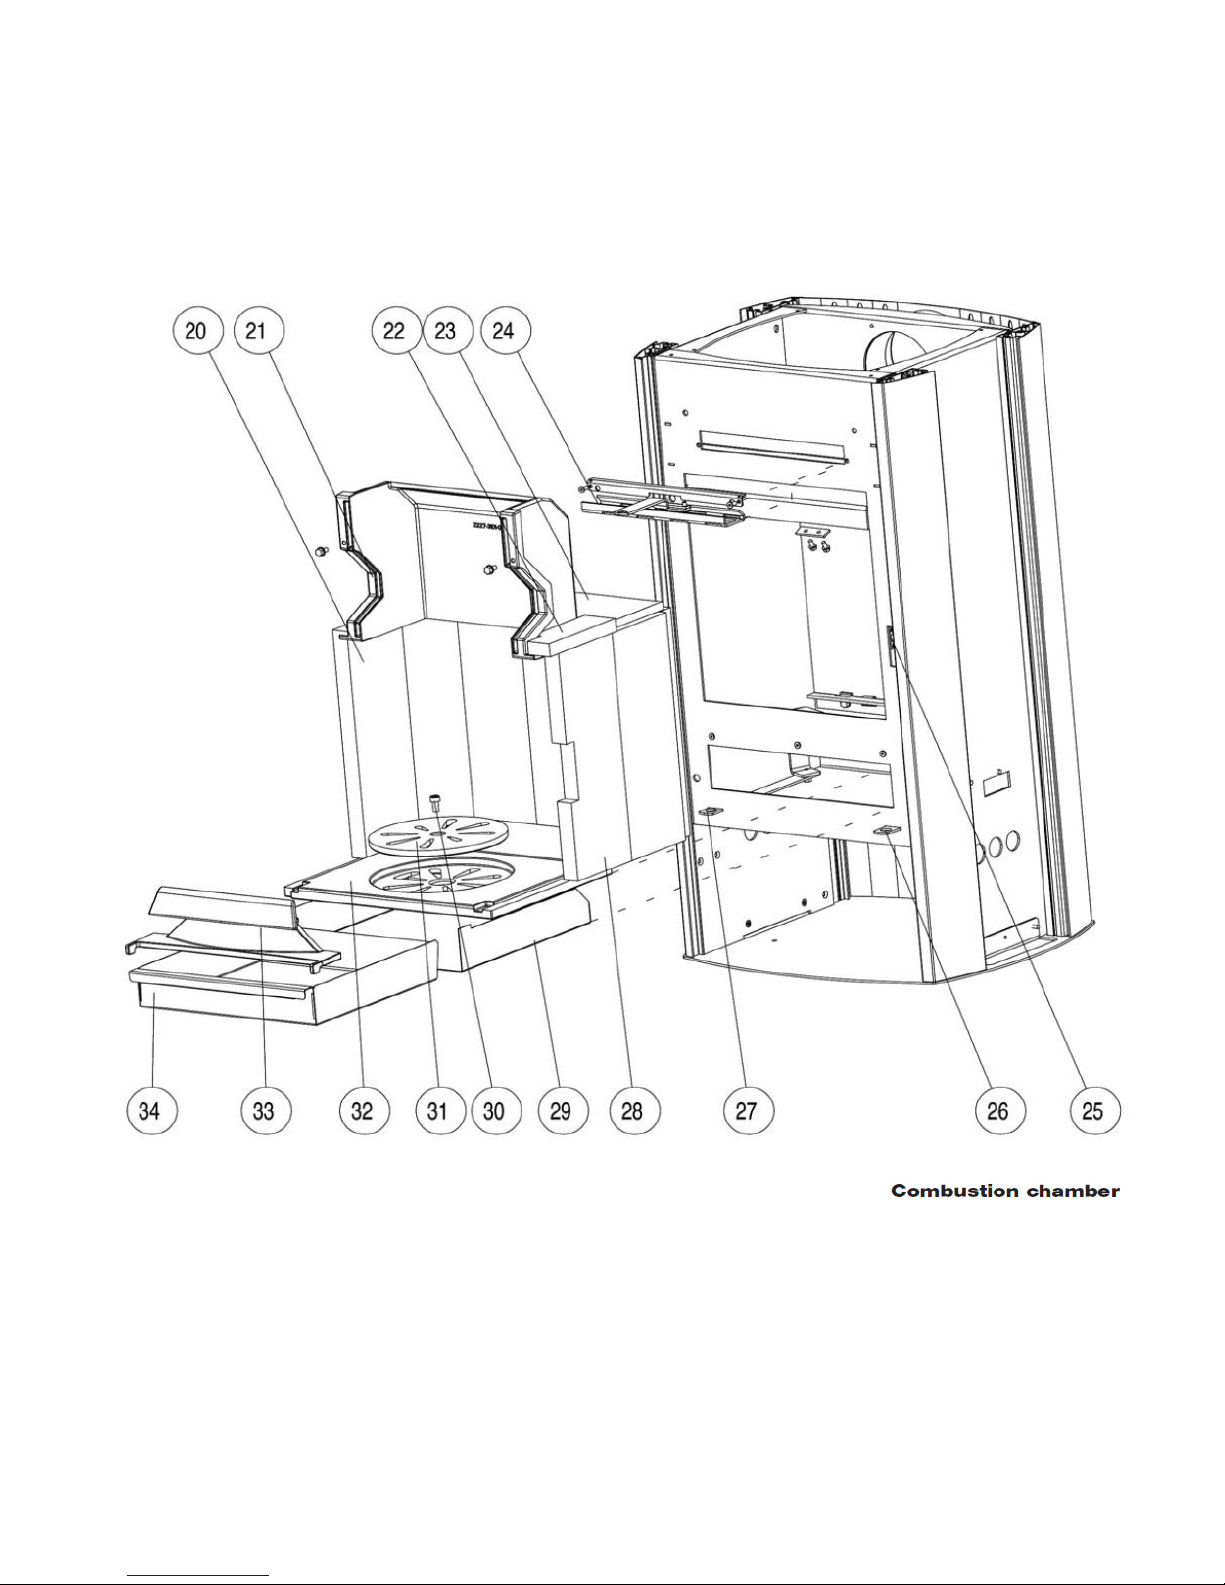
PARTS - OVERVIEW
Description
1 Furnace door
2 Door glass
3 Disk spring for handle
4 Handle
5 Hexagon socket screw
6 Fire door handle
7 Toroidal sealing ring
8 Tightening stud
9 Top fire strip
10 Spacer
11 Glass holder
12 Hexagon bolt
13 Culimeta
14 Suspension part
15 Hinge nut
20 Insulation plate
21 Jetfire
22 Flue plate
23 Flue plate
24 Secondary air slide guide
25 Closing plate
26 Primary air valve
27 Shaker grate handle
28 Insulation plate
29 Ash pan tray
30 Socket head cap screw hexagon
31 Shaker plate
32 Shaker grate
33 Wood catcher
34 Ash drawer
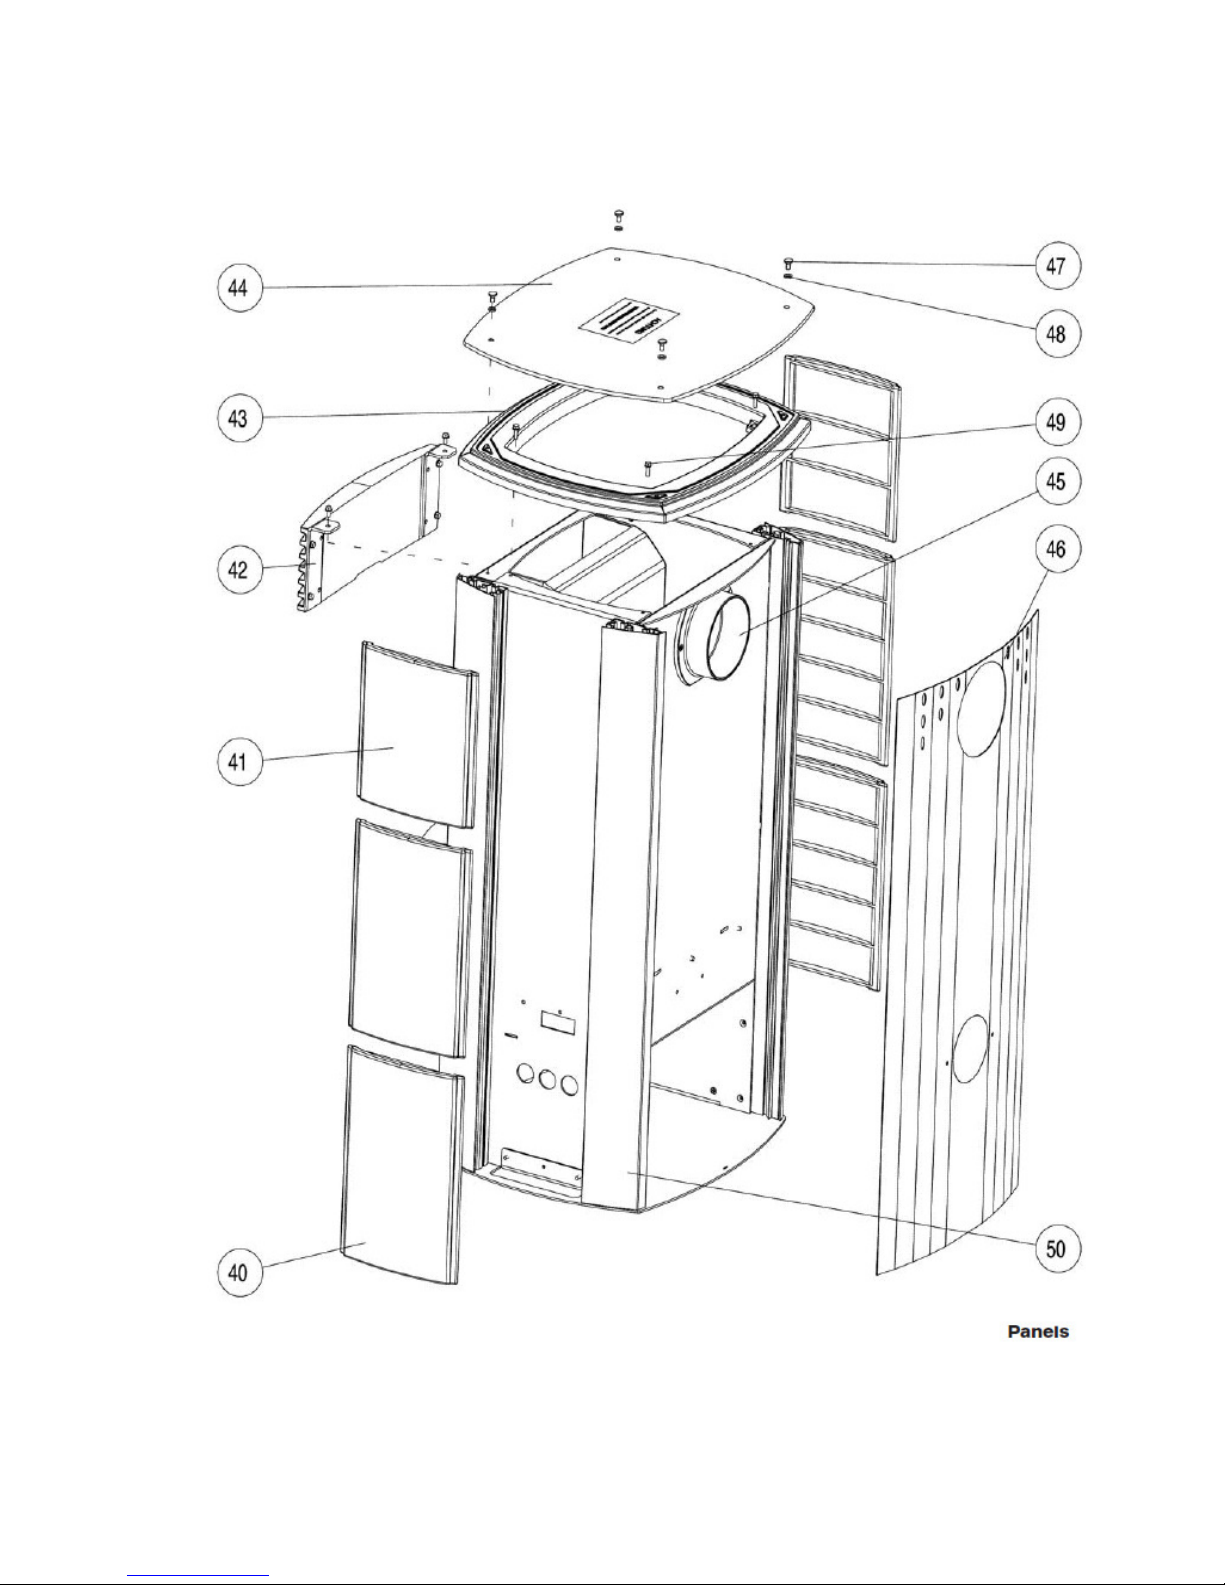
40 Side cladding ceramic
41 Side cladding ceramic
42 Screen
43 Lid
44 Ceran area
45 Flue gas connection
46 Rear wall
47 Decorative screw
48 Silicon disk
49 Hexagon bolt
50 Aluminium profile
Technical Specification
Dimensions (mm) and weights (kg)
Height 958
Width 516
Depth of the corpus 441
Weight without casing 97
Weight with ceramic panel 115
Flue pipe outlet diameter 130
Rated heating capacity as per EN13240 7 kW
Lowest thermal output 3,5 kW
Room heating capacity (m3) dependent
on the house insulation
70 - 190
Fuel flow 1,2 kg/h
Efficiency 81,2 %
CO2 content 10,3 %
CO emission rel. 13% O 434 mg/Nm³
Dust emissions 25 mg/Nm³
Page 9
9
1. IMPORTANT INFORMATION
Please read these instructions before installation and
operation. Observe the national provisions and laws
as well as the regulations and rules applicable locally.
GENERAL WARNING AND SAFETY
INSTRUCTIONS
The general introductory warning information
must be followed.
-> Read the whole of the manual thoroughly before
commissioning the fire.
-> Only approved transport aids with adequate load
bearing capacity must be used for transporting your
fire.
-> Your fire is not suitable for use as a ladder or
scaffold
-> Thermal energy is produced by burning fuel; this
leads to the surface of the fire, the doors, the door
and operating handles, the door glasses, the flue
pipes and possibly the front wall of the fire
becoming very hot. Avoid touching these parts
without wearing the relevant protective clothing or
using the relevant means (cold hand).
-> Make children aware of the danger and keep
them away from the fire when in use.
-> Only burn the approved fuel listed in the chapter
“Clean Burning”.
-> Burning or inserting easily combustible or
explosive materials, such as empty spray cans and
suchlike in the fire, as well as storage of the same
close to the fire is prohibited due to risk of
explosion.
-> When reheating , no wide or easily combustible
clothing should be worn.
-> Setting down of non heat resistant objects on the
fire or nearby is prohibited.
-> Do not lay washing on the fire to dry.
-> Stands for drying items of clothing or suchlike
must be set up at an adequate distance from the fire
– fire hazard!.
-> Working with easily combustible and explosive
materials in the same or adjoining room to the fire is
prohibited when the fire is on.
BEFORE SETTING UP
1 .1 Ground load bearing capacity:
Before setting up, ensure that the supporting
construction has a load bearing capacity that will
support the weight of the fire. Commissioning details
are shown on the sticker on the Ceran area.
SAFETY CLEARANCES (Minimum clearances)
1. From non-combustible items
a > 400 mm b > 100 mm
2. From combustible items and supporting walls made
from reinforced concrete construction
a > 800 mm b > 200 mm
Page 10
10
1.2 flue pipe connection
Flue pipes are a particular hazard source in respect
of escape of poisonous gas and fire hazard. Obtain
the advice of an appointed specialist company in
respect of laying and fitting the pipes. When
connecting the flue pipe to the chimney, in the area
of walls cladded using wood, please follow the
relevant fitting directives.
1 . 3
You must follow the flue gas formation in the event
of unfavourable weather (atmospheric inversion)
and the draught conditions. If too little combustion
air is added smoke can enter your house or flue
gases can escape. Additionally harmful deposits
can arise in the fire and in the chimney.
In the event that flue gas escapes let the fire go out
and check if all air inlet openings are free and the
flue gas feeds and the fire pipe are clean. In cases
of doubt you must inform the master chimney
sweep, as a fault in the draught could be due to the
chimney.
1 . 4
Before adding new fuel, push the embers together.
1 . 5
Only use a suitable tool from our accessory range
for pushing the embers together, and ensure that no
combustible material falls out of the fire.
1 . 6
Use the devices supplied with your fire, such as the
protective gloves or the cold hand to open the
doors, as well as for operating the control elements.
1 . 7
Design 1 fires (BA 1):
These fires must only be operated with the fire door
closed.
1 . 8
The fire door must only be opened for adding fuel
and must then be closed again, as this could
otherwise lead to a danger to other fires that are
also connected to the chimney.
1 . 8.1
When the fire is not in operation, the fire door must
be kept closed.
1 . 9
When using wet fuel and if operation is throttled too
much, the chimney can soot up, i.e. easily
combustible materials such as soot and tar can be
deposited and this can lead to a chimney fire.
Should this happen, close all air inlet slides and
flaps. Call the fire brigade and get yourself and all
other occupants to safety.
ATTENTION: The size of the fire door means
that, particularly when reheating blazing flames,
the door must not be opened abruptly, in order
to prevent the flames from springing out.
1 .10
The primary and/or secondary air supply must be
open before you open the combustion chamber
door.
Important information on ROOM-AIR
DEPENDENT and
ROOM-AIR INDEPENDENT OPERATION:
Your stove has been tested as a room-air
dependent stove according to EN 13240 and
does not conform in Germany to the
requirements for room-air independent
operation. In combination with room-air
installations (e.g. controlled ventilation systems,
extractor systems etc.) it must be ensured that
the stove and the room-air system are monitored
and safeguarded mutually (e.g. via a differential
pressure regulator etc.). The combustion air
infeed of approx. 40 m³/h must be ensured.
Please observe the respective local regulations
and rules in consultation with your master
chimney sweep.
Page 11
11
2. BRIEF HEATING INFORMATION
SUITABLE FUELS AND FUEL
QUANTITIES
In principle your fire is suitable for burning dry
billets. You can also burn fuels such as wood
brickets.
Only use dry fuel. The burning of waste of any kind,
in particular plastics, damages your fire and the
chimney, and is prohibited by the Emissions
Protection Ruling.
FUEL QUANTITIES
The fire is equipped with flat firing due to the
design. This means that only one layer of fuel
may be placed on the existing basic embers.
Please note that when a larger quantity of fuel is
added, your fire will emit
a larger quantity of heat or will heat up more
strongly than is intended for the design. This
can lead to damage to your fire.
MAXIMUM FUEL QUANTITIES
Wood:
2 billets á approx. 0.9 kg
Wood brickets (broken):
2 off á approx. 0.9 kg
Your fire output is regulated via the air inlet slide. As
your fire output is also dependent on the chimney
draught, you must get used to the use of this slide
according to your own experience.
The secondary air regulator, the primary air regulator
and the shaker grate handle may only be used with the
shaker hook enclosed.
Page 12
12
The challenges of the present day and age mean
that everyone must act responsibly. One of most
important matters of concern is retaining our natural
world. Our products are developments that comply
with the most recent state of the art technology. This
is an essential prerequisite for a clean, efficient and
perfect functioning of our fires
CLEAN BURNING
The following is important for clean burning:
1. THE FIREWOOD MUST BE DRY
AND UNTREATED.
Recommended value < 15% rel. wood humidity.
Dry and well ventilated stored wood that has been
stored for 2-3 years.
A fire is not a „waste incineration plant". The warranty
will become null and void if rubbish or non-approved
material, such as plastic, treated wood etc. is burned.
Further consequences are damage or soiling of the
fire and chimney as well as the environment
2. CORRECT FIREWOOD
QUANTITY AND FIREWOOD SIZE
-> Too much firewood causes overheating. This
causes the material to burn too heavily and your fire
will produce poor flue gas values.
-> Too little firewood or too large billets have the
effect that the fire does not reach the optimum
temperature. The flue gas values are poor here.
-> The correct firewood quantity means:
for wood _ 1.8 kg (2 billet - 25 cm long) per layer
(recommended value) at rated thermal output 6 kW.
At the smallest thermal output (3 kW) = 0.9 kg (2
billets - 25 cm long)
Note: Only wood and wood brickets must be burned in
your fire. Plastic, treated wood materials (e.g.
chipboard), hard coal or textiles must not be burned.
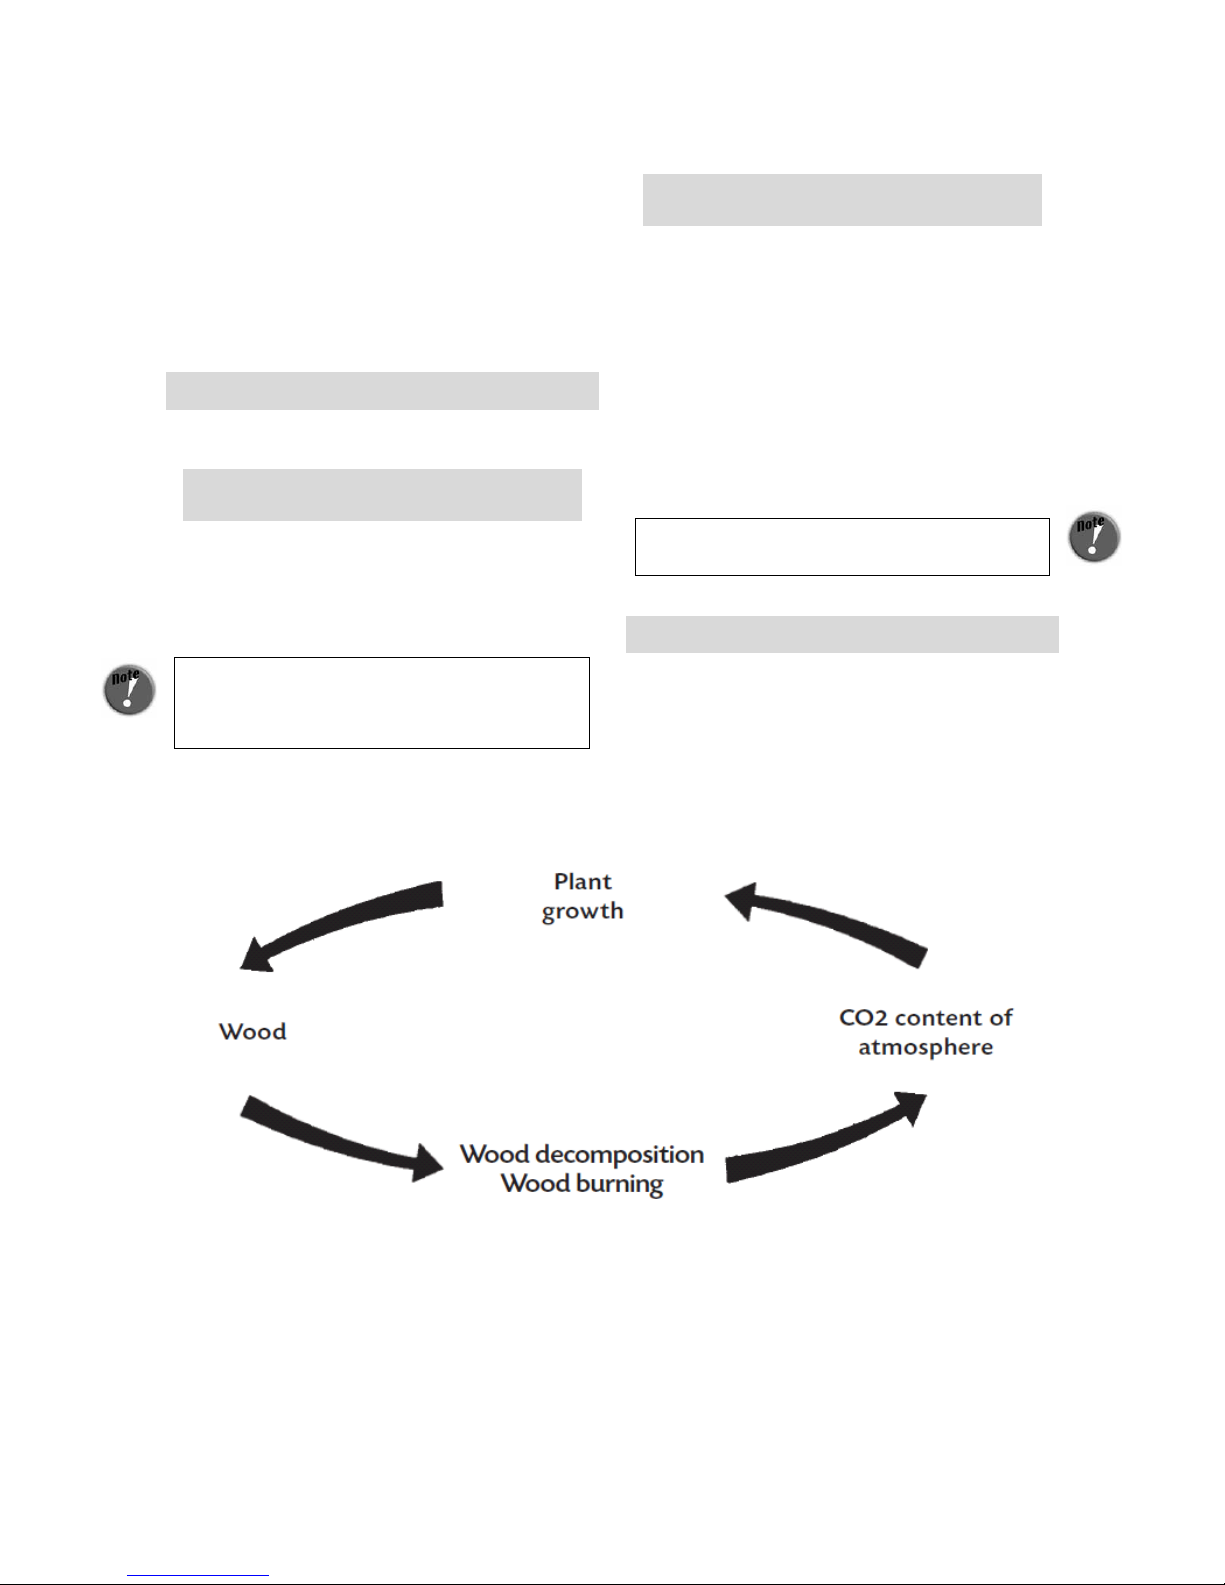
BURNING WOOD
Clean burning of wood corresponds to the same
chemical process as natural decay, i.e. that the CO2
(carbon dioxide) released does not increase or
contaminate the original CO2 content – household
of the atmosphere.
Page 13
13
3. INSTALLING THE FIRE
Before first commissioning or after changing the
location of the fire, cleaning and service work, ensure
that the flue plate, as well as the wood stop (Fig.
Combustion chamber, Part 22 and 23) is in the correct
position. When usinga flue pipe with throttle valve, the
throttle valve must be open.
Care must be taken with this fire that the flue draught
reaches at least the prescribed value (> 0.8 mbar).
Should problems arise here, please contact your
master chimney sweep
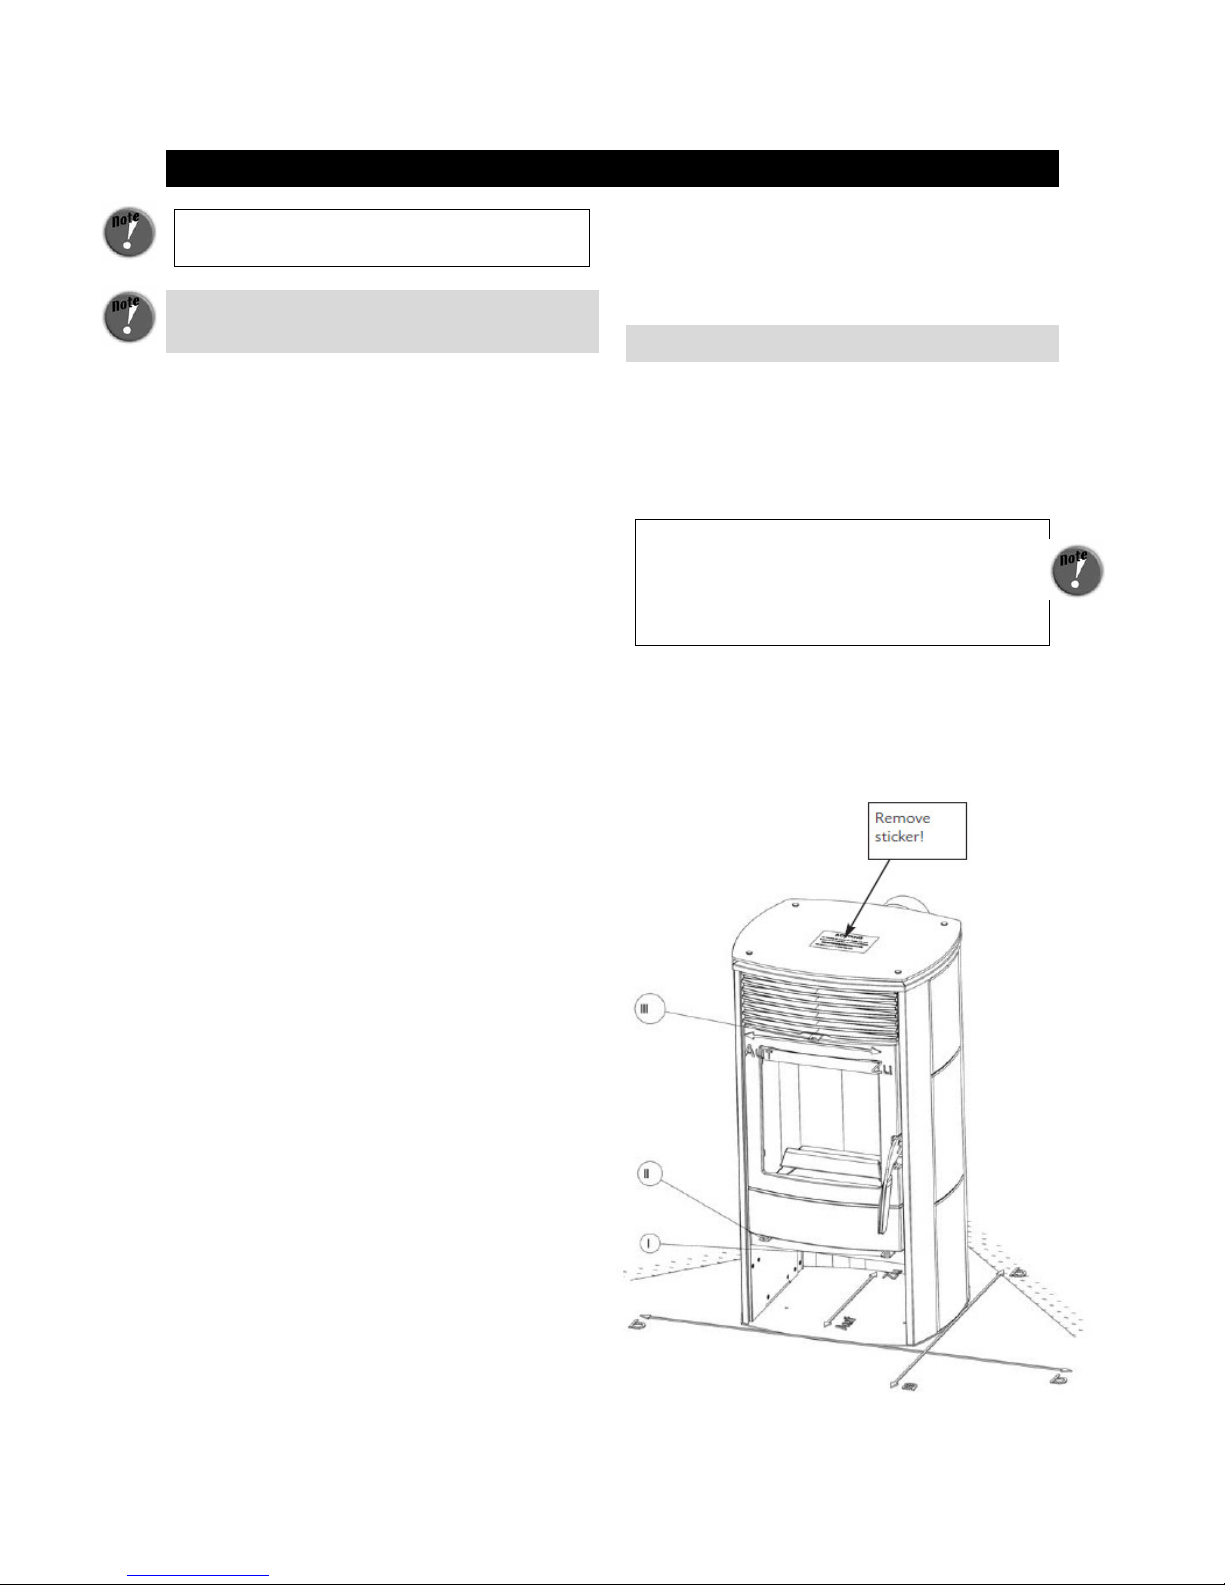
Caution! Remove the sticker from the Ceran area
before using your fire for the first time.
Important: The Ceran area becomes very hot during
use and only cools down very slowly. There is an
acute danger of burning up to one hour after fire has
gone out!
CONNECTING THE FIRE
Proceed as follows when fitting a connection to a
bricked chimney:
1. Measure and draw in the chimney connection
(taking a possible floor plate thickness into account)
as per the natural dimension
2. Chisel out (drill) the holes in the wall
3. Brick in wall lining
First seal the wall lining using mineral wool insulation.
Afterwards plaster using heat resistant cement mortar
or equivalent.
4. After the mortar has hardened, and after
plastering and painting , position the floor plate
including the floor protection (carton).
5. The fire can now be lifted onto the floor plate
carefully.
The fire must not be pushed along an unprotected
floor.
Strong corrugated cardboard, carton, or an old
carpet are excellently suited as an installation
aid and an underlay. The fire can also be pushed
on this underlay.
We recommend original flue pipes from the RIKA
flue pipe range for professional connection. The
connecting piece must not project into the chimney
shaft! Seal the gap between the flue pipe and wall
lining using a ceramic seal.
The installation must comply with the respective
safety and construction regulations. Please contact
your master chimney sweep in this respect – he will be
happy to give you information
If you use a system chimney (e.g. glazed fireclay), we
would ask you to follow the manufacturer’s
connection regulations exactly.
Page 14
14
4. OPERATION
STARTING THE FIRE
In order to keep exhaust emissions as low as
possible, we would ask you to keep to the following
starting instructions.
1.
If the fire and chimney are still cold or if there is
atmospheric low pressure, then burning some paper
at the start is recommended, in order to “drive” the
cold out of the fire and chimney. To start heating
first lay untreated paper on the floor of the
combustion chamber, on top of that 0.5 kg soft
wood chip and 1 kg wood (3 small billets). Pull the
shaker grate handle (Part II) out completely and
open the primary (Part I) and secondary air slide
(Part III)
Please do not use glossy paper or paper from
magazines. It does not burn well and the print colours
produce very poisonous substances in the flue gas.
2.
Now light the paper. Wait until the soft wood chips
are burning well. Close the shaker grate handle and
the primary air slide a few minutes later. Set the
secondary air slide to the ideal setting a few minutes
later.
3.
After this has burned, lay approx 1.6 kg wood (3
billets) on the fire. Open the shaker grate handle
and the primary air slide until the wood is burning
well (approx. 2 mins). The secondary sir slide
remains in the ideal setting. Proceed in the same
manner for each further layer.
4.
The mineral parts of the wood (approx. 1%) remain
on the bottom of the combustion chamber as
combustion residue.
5.
This ash is – because it is a natural product
- an excellent fertiliser for all plants in the garden.
However the ash should be left to settle beforehand
and doused with water.
Page 15
15
THE FIRE PAINT ONLY HARDENS PROPERLY AFTER
HEATING UP DURING USE.
Do not touch the surface during heating. It is still soft.
Our paints are completely harmless in accordance
with the TÜV-certificate; there is no danger to health.
In spite of that we recommend that the house is well
ventilated several times after first heating.
Heat the fire up well – this will reduce the hardening
time.
Hardening of the surface is complete after several
proper periods of heating.
All details on the nature of the fire wood and correct
heating can be found in Chapter 2.
ASH DRAWER
(Illustrated in Fire, Part 34)
The ash drawer must be emptied regularly
to prevent excessive heating of the fire grid
Never heat the fire with the ash drawer open → danger of
overheating → loss of warranty
Caution: Embers could remain in the ash. Only
fill the ash into non-flammable containers and
do not put the ash onto flammable surfaces.
OPERATING THE SHAKER GRATE
(Illustrated: Fire)
The ash is moved from the fire into the ash drawer
(part 34) by moving the shaker grate handle (Part
27) to and fro. This frees up room for the primary
feed air that is required for the heating phase in the
fire.
It is not necessary to operate the shaker grate
during heating.
SLIDE SETTING AT RATED
THERMAL OUTPUT
Fuel Wood/Wood Brickets
Primary air closed
Secondary air 1/3 open
Shaker grate closed
The position „Primary air completely open“ may only
be used as a starting position.
As your fire output is also dependent on the
chimney draught and the weather conditions, you
must get used to the use of this secondary control
slide according to your own experience.
Page 16
16
5. FITTING OPTIONS
MAKING AN EXTERNAL
COMBUSTION AIR FEED
(Optional: Fig: Panel)
-> Dismantle the rear wall as follows: Remove the 4
decorative screws and silicone disks (Item 47, 48)
and lift the Ceran area off (Item 44). Then slacken
the 4 hexagon bolts (Item 49) and remove the lid
(Item 43). No simply pull the rear wall upward out of
the aluminium profiles (Item 50).
-> Cut out the pre-stamped, round section in the
rear wall (Item 46) [metal cutting saw blade].
Fasten the fresh air nozzle (must be ordered as an
option) using the screws supplied and refit it to the
rear wall.
-> Connect a non-flammable pipe to the fresh air
nozzle (e.g.: Steel spiral pipe) and fix this using a
hose clip (not included in delivery!)
-> The line should not be longer than 4 m and have
no bends in order to guarantee adequate air feed.
-> Should the pipe lead into the open air it must end
with a vertical 90°-downward or with a cowl.
Take strictly care on sufficient air intake! It is
not permitted to close the air intake opening!
Page 17
17
6.MAINTENANCE AND CLEANING
GENERAL MAINTENANCE
Your X-Cook has been designed by our
development team with minimal maintenance in
mind and for a very long service life. Certain
cleaning activities and checkin the seals are
however necessary from time to time. The time
periods between the inspection intervals are above
all dependent on the fire wood quantity used and
the frequency of use.
All maintenance and cleaning work must only be
carried out when the fire is completely cooled
down.
ONCE MORE
Only use wood that has been stored properly
and is dry and untreated. Feed the correct
quantity of wood into the fire.
Poor quality fuel may more than double the
amount of maintenance work necessary.
FINISH - CONDITION AND
CLEANING
Note:
The glass in the door can be cleaned by using a
special glass cleaner (free from corrosive acids
and solvents - otherwise there is a risk of
damage to the glass surface and/or inscription).
RIKA glass cleaner is available from stove dealers.
Moist firewood may be the cause of excessive
sooting of the glass.
The stove surface is heat resistant and may only be
cleaned with a cloth (possibly moist).
Only use original coating for repairs; this is available
from your specialist dealer. Do not clean the
coating prior to the first heating!
CONVECTION AIR OPENINGS
Regularly clean dust deposit from the convection air
openings. The fire should be cleaned thoroughly
before the start of the new heating season, in order
to prevent strong odours.
CLEANING THE FLUE GAS
CHANNELS
(1 x annually)
-> Removing the flue pipes
-> Brush off any soot and dust deposits in the fire
and in the flue pipes and vacuum.
-> Check the seals on the fire door or the ash
drawer before the beginning and end of the heating
period. Should they be damaged or excessively
worn, then please order the relevant replacement.
Only intact seals guarantee the perfect function of
your fire.
Page 18
18
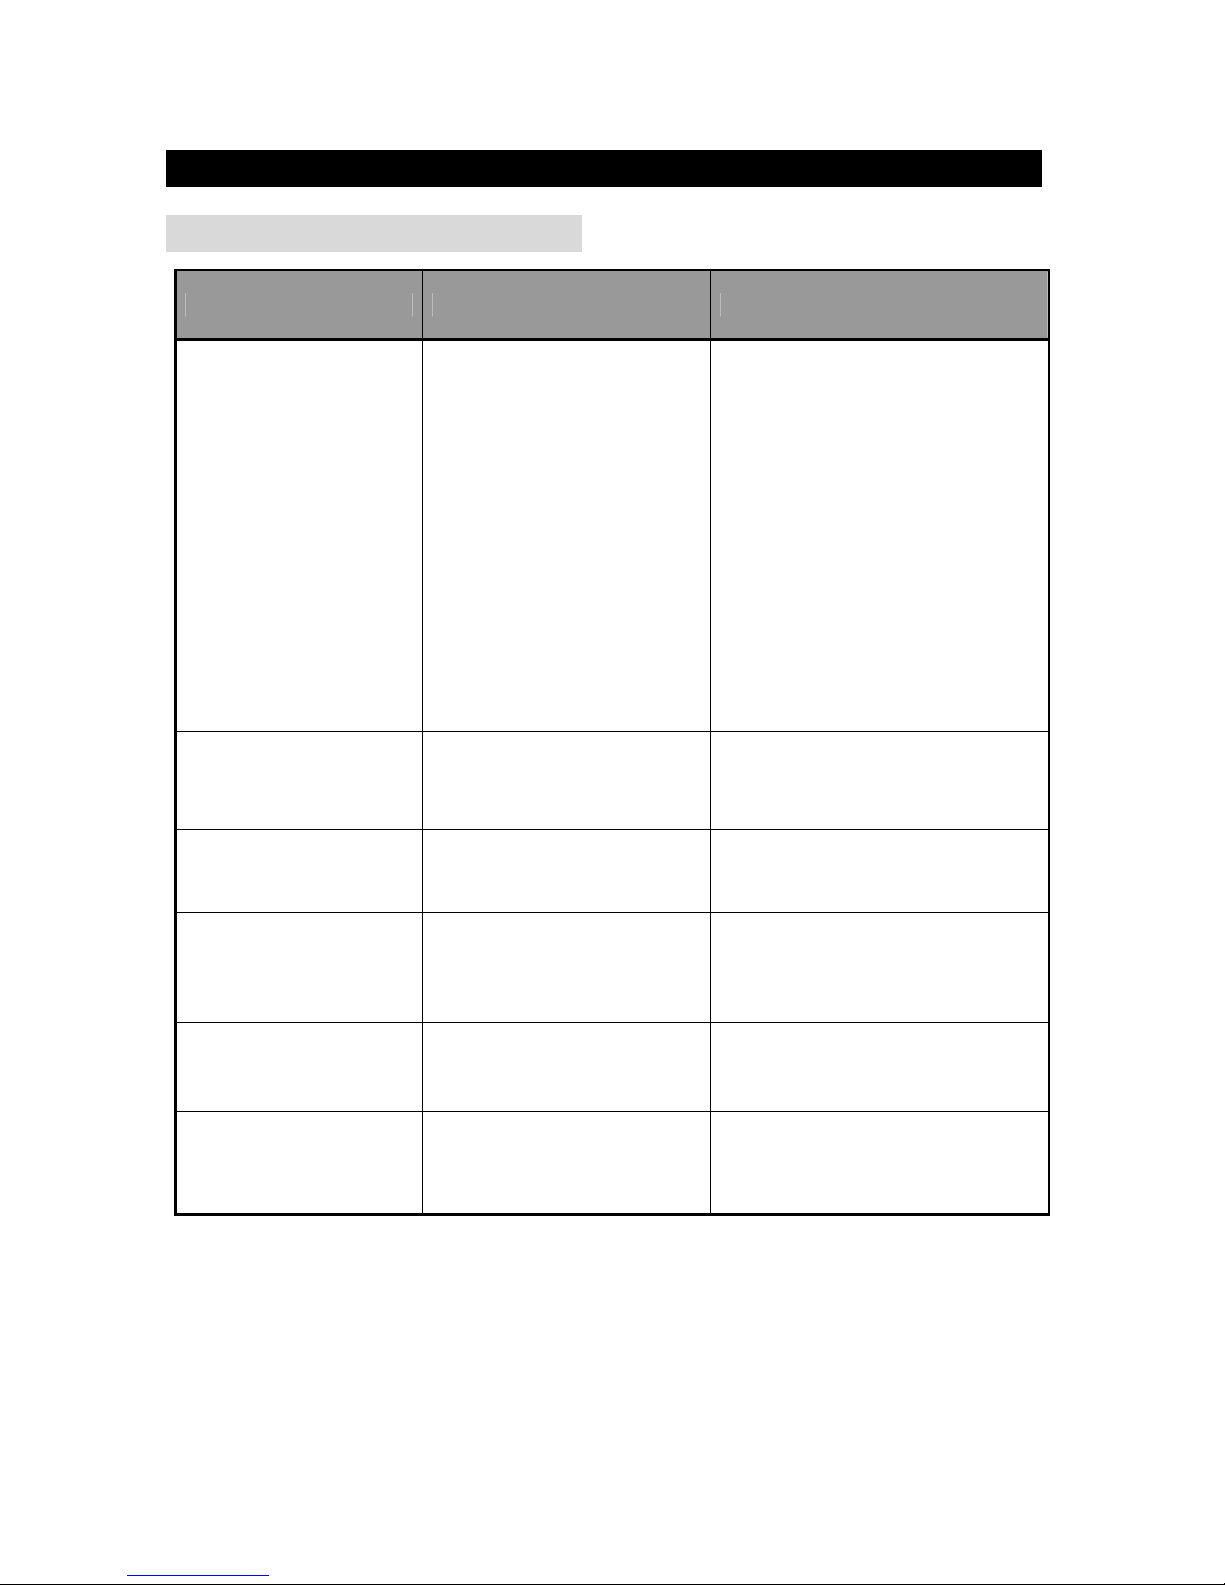
7. PROBLEM SOLVING
What to do if?
Should you not be able to find the correct solution to your problem, then please contact your specialist
dealer or your chimney sweep
Problem Reason Solution
1. Ceramic glass
pane soots up too
quickly
Poor draught
Incorrect regulation
Too much fuel
Damp wood
In principle: From time to time
(dependent on use), each glass pane
must be cleaned with a glass cleaner
Clarify this with the chimney sweep (if
necessary increase height of chimney)
Regulation must be carried out as per
the operating instructions using the
rotary control knob (if secondary air is
closed, the glass pane will soot up
very quickly, but this can be burnt off
again by correct use)
See item: „Max. Fuel quantities
See item: „Clean burning“, if necessary
use wood brickets (these dry evenly)
2. Fire not pulling
correctly
-> Chimney draught inadequate
-> Fire is sooted up on the inside
See item: “Brief Heating Information”
See item: “Maintenance and Cleaning”
3. Fire does not start
correctly
-> Weather influences
-> Incorrect starting
See item: “Lighting the fire“
See item: “Lighting the fire“
4. Fire smells strongly
and is smoking outside
-> Burning in phase
-> Fire is dusty / sooted up
See item: “Operation“ (hardening of
the paint)
See item: “Convection air openings”
5. Paint not drying
out
-> Burning in phase not completed
properly
See item: “Operation“ (hardening of
the paint)
6. Flue gas escapes
when fuel is added and
during the heating
phase
-> Chimney draught too low, flue
gas connection leaking
Check the connection points and
reseal if necessary
Page 19
19
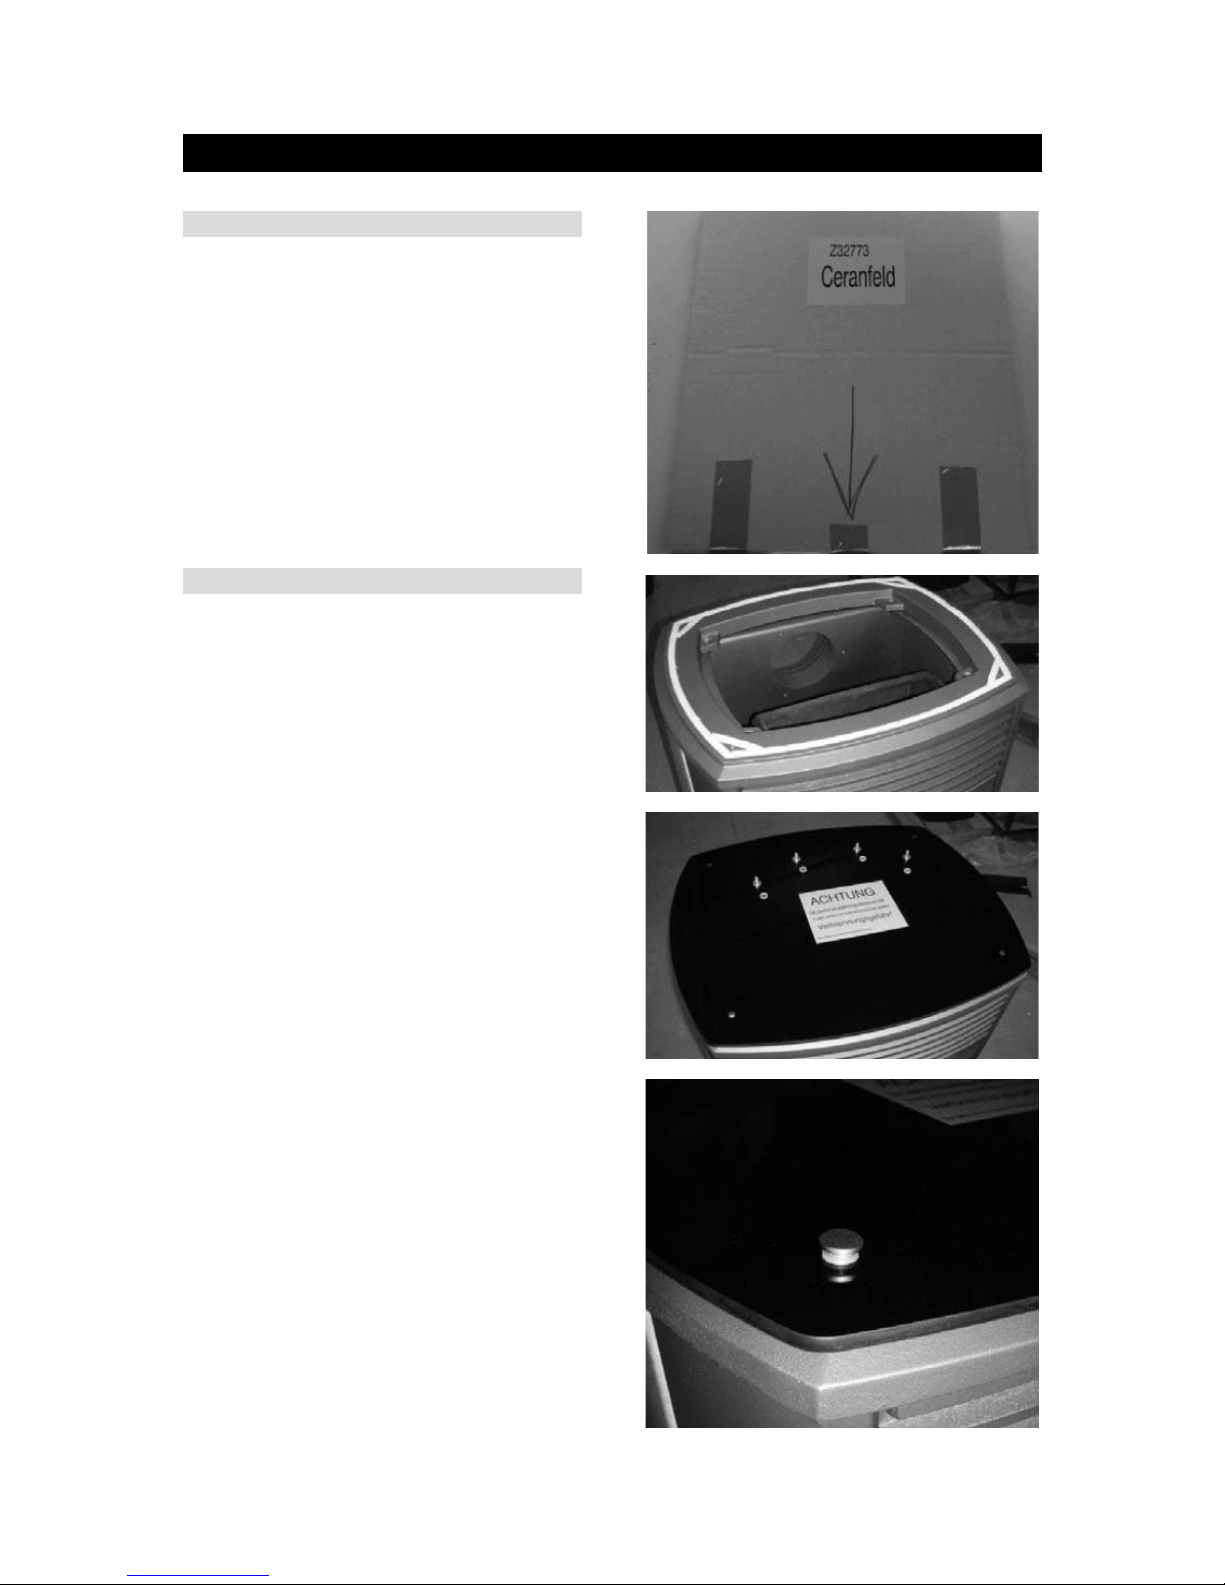
8. X-COOK CERAMIC HOB ASSEMBLY INSTRUCTIONS
SCOPE OF DELIVERY:
-> X-COOK stove
-> Ceramic hob
-> 4 Decorative screws
-> 4 Silicon washers
ASSEMBLY:
1) Carefully take out the ceramic hob from
the enclosed cardboard box and remove the
protective film.
2) The box also contains the decorative screws
and silicon washers (small Minigrip bags).
3) Lay the ceramic hob on the X-COOK stove
and check the hole positions (Ceramic hob
holes should be aligned exactly with the cast
cover).
4) Hand-tighten the four decorative screws
with silicon washers.
5) Remove sticker from the ceramic hob.
Page 20

20
9 . W A R R A N T Y
WE GUARANTEE
These warranty conditions are only valid for the
following countries: Austria, Germany and
Switzerland. Separate conditions imposed by the
importer apply for all other countries
For the purpose of timely damage limitation, the
warranty claim on the part of the claimant is to be
enforced at the RIKA dealer in writing using the
invoice and stating the purchase date, model name,
serial number and reason for complaint.
WARRANTY
5 years on the welded stove body. This exclusively
applies to defects in materials and workmanship as
well as free replacement. Labour and travel times
are not included in the manufacturer’s warranty.
Only original parts supplied by the manufacturer
should be used. Loss of warranty on nonobservance!
The precondition for the warranty is that the stove
has been installed and commissioned properly
according to the User and installation manuals valid
at the time of purchase. Connection must be
performed by a specialist for such stoves.
Any costs incurred by the manufacturer due to
unjustified warranty claims are to be charged to the
claimant.
W e a r p a rt s and parts affected by fire are
excluded, such as glass, coating, surface coatings
(e.g. handles, panels), seals, fire trough, grates,
draught plates, deflector plates, combustion
chamber liners (e.g. fireclay), ceramics, natural
stone, thermo stone, ignition elements, sensors,
combustion chamber sensors and temperature
controller.
Damage arising from non-observance of the
manufacturer’s instructions for operation of the unit
or any damage that is caused by action such as
overheating, use of non-approved fuels, tampering
with the device or the flue gas pipe, electrical
excess voltage, an incorrect, insufficient or
excessive flue draught, condensation, nonperformance or deficient maintenance and cleaning,
non-observance of the relevant and applicable
building regulations, incorrect operation by the user
or third parties, transport and handling damage is
also excluded.
THE WARRANTY DOES NOT AFFECT THE
STATUTORY WARRANTY PROVISIONS.
Page 21

21
Page 22
22
Page 23

23
Page 24
24
G U A R A N /
G A R A
N
T I E
Purchase day: / Date d’achat:
Model designation: / Nom du modèle:
Numbers of the vehicle identification plate on the fur
nace
back: /
Numéros de la plaque signalétique à l’arrière du poêle:
Trader stamp / Cachet du revendeur
Attached by / Raccordé par
G A R A N T I E
/ G U A R A N T E E
Kaufdatum: / Purchase day:
Modellname: / Model designation:
Nummern des Typenschildes auf der Ofenrückseite: /
Numbers of the vehicle identification plate on the fur
nace
back:
Händlerstempel: / Trader stamp:
Angeschlossen von: / Attached by:
G U A R A N T E E
/
G A R A
N
T I E
Purchase day: / Date d’achat:
Model designation: / Nom du modèle:
Numbers of the vehicle identification plate on the fur
nace
back: /
Numéros de la plaque signalétique à l’arrière du poêle:
Serial no.: N° de série:
Trader stamp / Cachet du revendeur
Attached by / Raccordé par
G A R A
N
T I E
/ G A R A N Z I A
Date d’achat: / Data d’aquisto:
Nom du modèle: / Nome modello:
Numéros de la plaque signalétique à l’arrière du poêle:
Numeri della targa modello sul retro della stufa:
N° de série: / Nr. serie:
Cachet du revendeur: / Timbro del rivenditore:
Raccordé par / Allacciato da:
Page 25
25
Z32796 – 2012/05/09
G U A R A
N
T E E
/ G A R A N Z I A
Marque
Marca
Client: / Cliente:
A:
G A R A N T I E /
G U A R A
N
T E E
Marke
Stamp
Kunde: / Customer:
An: / To:
 Loading...