

Page 1

RIGOL
User’s Guide
RP5600A Passive Probe
RIGOL Technologies, Inc.
Jan. 2014
Page 2

Page 3

RIGOL
Guaranty and Declaration
Copyright
© 2011 RIGOL Technologies, Inc. All Rights Reserved.
Trademark Information
RIGOL is a registered trademark of RIGOL Technologies, Inc.
Publication Number
UGE11101-1110
Notices
RIGOL products are protected by patent law in an d out si de of
P.R.C.
RIGOL reserves the right to modify or change parts of or all
the specifications and pricing policies at company’s sole
decision.
Information in this publication replaces all previously
corresponding material.
RIGOL shall not be liable f or losses caused by either incidental
or consequential in connection with the furnishing, use or
performance of this manual as well as any information
contained.
Any part of this document is forbidden to copied or photocopied
or rearranged without prior written approval of RIGOL.
Product Certification
RIGOL guarantees this product conforms to the national and
industrial standards in China. International standard conformance
certific ation is in progress, e.g. ISO.
User’s Guide for RP5600A
I
Page 4

RIGOL
Hazardous
Voltage
!
Safety
Protective
Chassis
Test
Ground
!
!
Safety Terms and Symbols
Terms in This Guide. These terms may appear in this manual:
WARNING
Warning statements indicate the conditions or practices
that could result in injury or loss of life.
CAUTION
Caution statements indicate the conditions or pr actices that
could result in damage to this product or other property.
Terms on the Product. These terms may appear on the product:
DANGER indicates an injury or hazard may immediately
happen.
WARNING indicates an injury or hazard may be accessible
potentially.
CAUTION indicates a potential damage to the instrument or
other property might occur.
Symbols on the Product. These symbols may appear on the
product:
Warning
Earth
Terminal
Ground
II
User’s Guide for RP5600A
Page 5

RIGOL
To avoid injury resulting from short circuit, make sure the
General Care and Cleaning
General Care:
Do not store or leave the probe in places where it will be exposed to
direct sunlight for long period of time.
Cleaning:
Clean the probe regularly according to its operating conditions. To
clean the exterior surface, perform the following steps:
1. Disconnect the probe from al l pow e r s ou rces.
2. Clean the loose dust on the outside of the probe with a lintfree cloth (with mil d de tergent or water).
CAUTION
To avoid damages to the probe, do no t exp o s e it to
corrosive liquids.
WARNING
probe is completely dry before reconnecting into a power
source.
User’s Guide for RP5600A
III
Page 6

RIGOL
Contents
Guaranty and Declaration ......................................................... I
General Care and Cleaning ...................................................... III
RP5600A Probe at a Glance ....................................................... 1
General Inspection ................................................................... 2
Accessories ............................................................................. 3
To Connect to the Oscilloscope .................................................. 6
To Use the Probe ..................................................................... 8
Compensation Adjustments ..................................................... 11
Characteristics ....................................................................... 14
Warranty ............................................................................... 15
Contact Us ............................................................................ 16
IV
User’s Guide for RP5600A
Page 7

RIGOL
RP5600A Probe at a Glance
The RIGOL RP5600A passive probe provides up to 600 MHz
bandwidth a nd uses modular structure allo wing users to replace the
probe tips . The probe has compa ct structu re and use s snap -on BNC
connector for easy connection with the oscilloscope.
Features:
Up to 600 MHz analog bandwidth.
Precise and tenuous probe tip.
Auto identification of the probe attenuation ratio (when
supported by the oscilloscope).
Firm, durable and retractable normal probe hook.
Equipped with many kinds of ground lines to connect to
different earth terminals.
User’s Guide for RP5600A
1
Page 8

RIGOL
General Inspection
When you get a new RP5600A probe, you are suggested to take the
following steps to inspect the probe.
1. Inspect the shipping container for damage.
Keep the damaged shipping container or cushioning material
until the contents of the shipment have been checked for
completeness and the instrument has passed both electrical
and mechanical tests.
The consigner or carrier shall be liable for the damage to the
probe resulting from shipment. RIGOL would not be
responsible f or free maintenance/rework or replacement of the
unit.
2. Inspect the probe.
In case of any damage, or defect, or failure, notify your
RIGOL sales representative.
3. Check the accessories.
Accessories supplied with the probe are listed in the
“Accessories" section. If the contents are incomplete or
damaged, please contact the local sales representative of
RIGOL.
2
User’s Guide for RP5600A
Page 9

RIGOL
CAUTION
5
10
13
Accessories
The figure and table below list the standard accessories for
RP5600A. All the accessories can be ordered and purchased from
RIGOL.
8
14
6
7
4
3
9
2
12
1
11
Figure 1 RP5600A Accessories
The measurement cat e gory of the combination of the
probe and the accessories (used to assist the
measurement) is the lower one in the combination.
User’s Guide for RP5600A
3
Page 10

RIGOL
Item#
Name
Part No.
Qty
General pu rp os e
Table 1 RP5600A Accessories
1 Probe
RP5600A-0200101
2 Probe tip RP5600A-0200201 2
3 Barrel insulator (long) RP5600A-0200301 1
4 Barrel insulator (short) RP5600A-0200401 1
5
RP5600A-0200501 1
retract able hook tip
6 Dual-lead adapte r RP5600A-0200601 1
7 Probe bracket RP5600A-0200701 1
8 SMD clip RP5600A-0200801 2
9 Spring ground
10 Alligator ground lead
RP5600A-0200901
RP5600A-0201001
11 Socketed groun d lead RP5600A-0201101
12 Screwdriver RP5600A-0201201 1
13 Sign loop RP5600A-0201301 8
14 BNC adapter RP5600A-0201401 1
1. Probe
Main body of the probe.
2. Probe Tip
Front Component of the pro be .
3,4 Barrel Insulator (long, short)
When using the short one, the ground terminal is exposed in
favor of using the ground spring. When using the lo ng one, the
ground terminal is covered completely to avoid short circuit
between the probe and the circuit under test.
5. General Purpose Retractable Hook Tip
Directly connect the probe head to the circuit under test to
spare your hands.
1
2
1
1
4
User’s Guide for RP5600A
Page 11

6. Dual-lead Adapter
Lead out a plug from the signal terminal and the ground
terminal of the probe respectively.
7. Probe Bracket
Lay and fix the probe during the measurement.
8. SMD Clip
Lead out the pin signal of the circui t under tes t.
9. Spring Ground
Connect to the probe tip for grounding to improve the
high-frequency response.
10. Alligator Ground Lead
Ground the probe reliably for safe operation and accurate
signal reading.
11. Socketed Ground Lead
The usage is the same as the alligator ground lead but it uses
different joint (refer to the figure of standard accessories).
12. Screwdriver
Used in probe compensation adjustment.
13. Sign Loop
Fix sign loops of diff erent colors on the probes to distinguish
the probes connected to diff e rent channels.
14. BNC Adapter
Use this adapter to connect the probe to a BNC connector.
RIGOL
User’s Guide for RP5600A
5
Page 12

RIGOL
To Connect to the Oscilloscope
1. Connect the BNC connector of probe to the desired channel or
the external trigger input terminal of the oscilloscope. Push it
straight on until it latches into place.
Figure 2 To Connect the Oscilloscope
2. Connect the probe to the circuit under test.
Figure 3 To Connect the Circuit under Test
6
User’s Guide for RP5600A
Page 13

RIGOL
CAUTION
!
3. To disconnect the probe from the oscilloscope, push the small
buttons on the top and bottom of the probe conne ctor, and then
pull the probe connector out from the BNC connector of the
oscilloscope in the arrow direction as shown in the Figure 4 (b).
(a)
(b)
Figure 4 To Disconnect the Oscilloscope
Do not attempt to twist the probes on or off the
oscilloscope 's BNC connector, otherwise the probe might
be damaged.
User’s Guide for RP5600A
7
Page 14

RIGOL
2
1
! ! !
To Use the Probe
CAUTION
To avoid any damage or loss, please use the probe
according to the User’s Guide.
CAUTION
Do not solder the probe tip to any surface, or else the
probe tip would be damaged.
CAUTION
If using the probe without any accessories, short circuit
might occur when the probe is connected to the circuit.
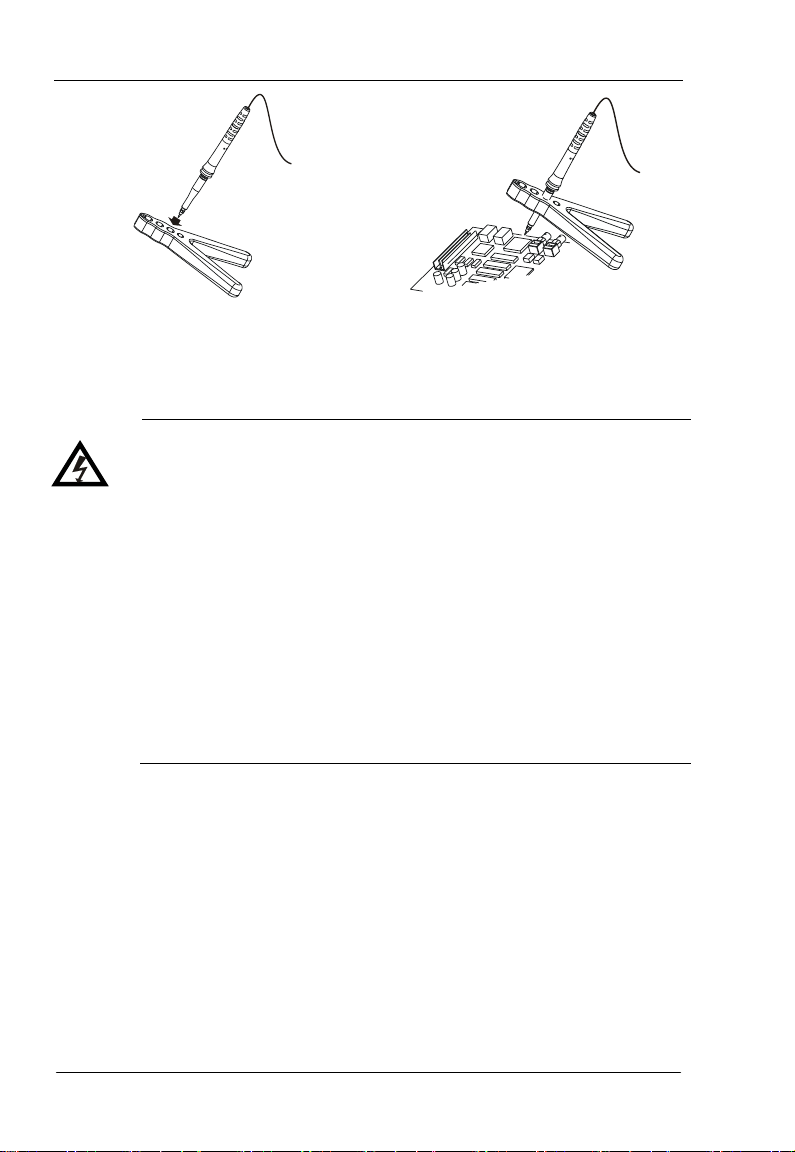
To connect the probe to the circuit under test
When using the probe to measure some hard-to-reach positions,
you can spare the probe accessories.
RP5600A has two kinds of barrel insulators: long and short. The
insulator shown in the figure above is the long one. You can screw
the barrel insulator in the direction of arrow 1 and take it off in the
8
User’s Guide for RP5600A
Page 15

RIGOL
direction of ar row 2.
The barrel insulator can be screwed to various positions:
With the barrel insulator screwed all the way on, a spring
ground may be added to the probe tip to provide ground
contact.
With the barrel insulator screwed most of the way out, the
barrel insulator covers the front component of the probe.
To use the ground accessories
Ground the probe by connecting the alligator ground, the socketed
ground lead or the spring ground which all provide reference for a
ground point. It is necessary to use the barrel insulator in
conjunction with any of the ground accessories so as t o avoid
possible short circuit.
To use the general purpose retractable hook tip
Insert the probe hook tip into the ba rrel insulator to connect it to the
prob e tip. Then, con nect the hook tip to the point to be tested by
pressing the retractable hook tip body towards the probe body.
To use the probe bracket
The probe bracket can fa cilitate your circuit testing. Users can place
the probe on the bracket to spare their hands. As shown in the
figures on t he next page, insert the probe into the proper hole on
the bracket and connect the probe tip to the point to be tested, then
place the whole equipment to a proper position.
User’s Guide for RP5600A
9
Page 16
RIGOL
Exposed metal surfaces of the probe an d the os cilloscope
battery, might expose the operator to an electrical shock
hazard that could be lethal (de pending on the voltage and
Using Method
Placement Method
WARNING
RP5600A must be used with oscilloscopes that have a
common terminal at ground potential (complying with
OSHA requirements and the National Electric Code).
must be grounded. Failure to ground the common
terminal during certain applications, such as those
requiring the oscilloscope to be powered from e xter nal
current conditions).
10
User’s Guide for RP5600A
Page 17

RIGOL
Compensation Adju st men t s
You are suggested to compensate the p robe to m atch with the
oscilloscope. The probes can be adjusted for both low-frequency
compensation and high-frequency compensation. You should make
low-frequency compensation of the probe when it is connected to
the oscilloscope for the first time (or adjust it at any time), while
high-frequency compensation can be made regularly.
Low-frequency compensation
Follow the steps below to make low-frequen cy comp ens ati on:
1. Connect the probe to a channel BNC connector and the probe
compensation signal output terminal at the front-panel of the
oscilloscope. Connect the ground alligator lead of the probe to
the “Ground Terminal” under the probe compensation signal
output terminal.
2. Press Auto at the front panel of the oscilloscope.
3. Set the low-freq uency compensation adjustment on the probe
using screwdriver provided via the l ow -frequency compensation
adjustment hole on the probe to get the flattest pulse possible
(as show n i n figures on the next page).
User’s Guide for RP5600A
11
Page 18

RIGOL
Over compensated
Low-frequency
Compensation Adjustment
Table 2 Option (for high-frequency compensation adjustment)
Item# Name Part No.
1 50 Ω feedthrough adaptor RP5600A-0300101
High-frequency compensation
Perfectly compensated
Under compensated
Low-frequency compensation must be performed before executing
High-frequency compensation.
Follow the steps below to make high-frequency compensation:
1. Connect the 50 Ω feedthrough adaptor (option) to a generator
with fast edg e s ignal.
2. Connect the BNC adapter to the 50 Ω feedthrough adaptor.
3. Remove the accessories (the spring ground or the hook tip) at
the pro be head and the barrel insulator.
4. Connect the probe head to the BNC adapter (so as to connect it
to the generator with fast edge sign al) and connect t he probe to
12
User’s Guide for RP5600A
Page 19

RIGOL
High-frequency
the oscilloscope.
5. Output a fast edge signal lower than 500 ps fr om th e gene rat or.
6. Press Auto at the front panel of the oscilloscope to view the
waveform.
7. Use the screwdriver to adjust the resistors R1 and R2 of the
high-frequency compensation.
8. Adjust the high frequency adjustment hole in small increments
until the displayed waveform has flat tops and steep rising
edges.
R1
R1
Compensation
R2
R2
Adjustment
CAUTION
It is recommended that the hig h-fre quency compensation
should be done by professionals.
User’s Guide for RP5600A
13
Page 20

RIGOL
[1]
General Specification
Characteristics
Performance Specification
Bandwidth DC to 600 MHz
Attenuation Ratio Fixed at 10:1
Input Impedance 10 MΩ±2%
Input Capacitance 12 pF±1 pF
Maximum Input CAT II 300VAC
Compensation Range 6 pF to 26 pF
Operation Environment Temperature: 0 °C to 50 °C
Humidity: 0 RH to 80% RH
Storage Environment Temperature: -20 °C to 60 °C
Humidity: 0 RH to 90% RH
Size 142±2 cm
Weight Approximately 48±2 g
Note:
[1] CAT I and CAT II Definitions
Installation Category (Overvoltage Category) I: signal level, special equipment
or parts of equipment, telecommunication, electronic, etc., with smaller
transient voltages than installation category (Overvoltage Category) II.
Installation Category (Overvoltage Category) II: local level, appliance, portable
equipment etc., with smaller transient voltages than installation category
(Overvoltage Category) III.
14
User’s Guide for RP5600A
Page 21

RIGOL
Warranty
RIGOL warrants that its products m ainframe and accessories will
be free from defects in materials and workmanship within the
warranty period.
If a product is proven to be defective within the respective period,
RIGOL guarantees the free replacement or repair of products
which are approved defective. To get repair service, please contact
with your nearest RIGOL sales and service office.
RIGOL does not provide any other warranty items except the one
being provided by this summary and the warranty statement. The
warranty items include but not being subjected to the hint
guarantee items related to tra dable chara cteristic and an y pa rticular
purpose. RIGOL will not take any responsibility in cases regarding
to indirect, particular and ensuing damage.
User’s Guide for RP5600A
15
Page 22

RIGOL
Contact Us
If you hav e any problem or requi reme nt when using our products or
this manual, please contact RIGOL.
E-mail: service@rigol.com
Websites: www.rigol.com
16
User’s Guide for RP5600A
 Loading...