


AA-650 ZOOM
Antenna and cable analyzers
RigExpert
®
User’s manual

For latest manuals and software updates,
.
please visit
http://rigexpert.com

Table of contents
Introduction
Operating the AA-650 ZOOM
First time use
Main menu
Multifunctional keys
Connecting to your antenna
SWR chart
Chart ZOOM
Data screen
Frequency and range entry
Return loss chart
R,X chart
Smith chart
Memory operation
SWR mode
Display all parameters
MultiSWR mode
Applications
Antennas
Coaxial lines
Measurement of other elements
Annexes
Annex 1: Specifications
Annex 2: Precautions
Annex 3: Tools menu
Annex 4: Setup menu
Annex 5: TDR mode
Annex 6: Calibration
Annex 7: Dummy loads
4
5
5
5
6
6
7
7
8
8
8
9
9
10
10
11
12
13
13
14
21
24
24
25
26
31
32
36
38
Introduction
Thank you for purchasing a RigExpert
AA-650 ZOOM Antenna and Cable Analyzer! We
did our best to make it powerful yet easy to use.
The analyzer is designed for measuring SWR
(standing wave ratio), return loss, cable loss,
as well a s other parameters of cable and
antenna systems in the range of 100 kHz to
650 MHz. A built-in ZOOM capability makes
graphical measurements especially effective.
An integrated Time Domain Reflectometer
mode can be used to locate a fault within the
feedline system. The analyzer is equipped
Bluetooth Low Energy
with a
wireless connection with your laptop, tablet or
smartphone.
The following tasks are easily accomplished by
using this analyzer:
• Rapid check-out of an antenna
• Tuning an antenna to resonance
• Comparing characteristics of an antenna
before and after specific event (rain, hurricane,
etc.)
• Making coaxial stubs or measuring their
parameters
• Cable testing and fault location, measuring
cable loss and characteristic impedance
• Measuring c apacitance or inductance of
reactive loads
module for a
1
2
3
4
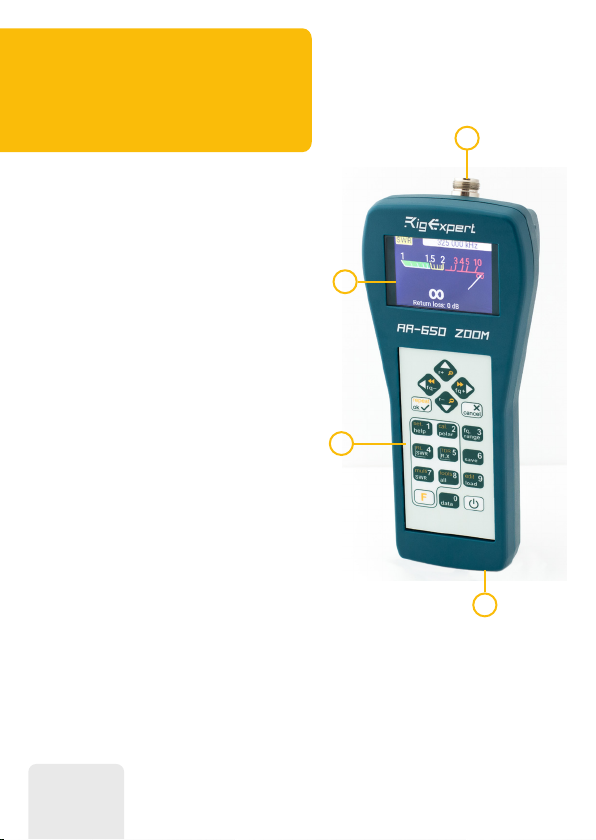
1. Antenna connector
2. Color display
3. Keypad
4. USB connector
4
User’s manual
First time use
Operating the
AA-650 ZOOM
Please inser t three AA batteries
(either alkaline or Ni-MH ones)
into the battery compartment
of the analy zer, watching the
polarity. Instead, you may power it from a spare USB por t of your computer by using a
conventional USB cable.
Press the
the analyzer. After displaying the initial message (showing a firmware version and a
serial number of the instrument), a Main menu appears on the screen.
(Power) key located at the bottom-right cor ner of the keypad to turn on
The analyzer will be turned off automatically if not in use for too long.
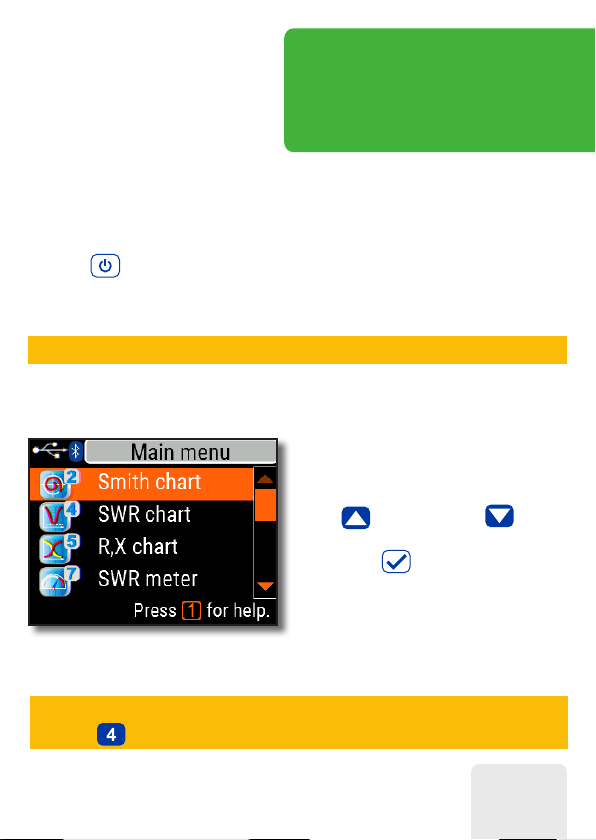
Main menu
The Main menu acts as a star ting point
from where different tasks may be
launched.
(Cursor up) and (Cursor
Use
down) keys to scroll through the menu,
then press (OK) to select an item.
For your convenience, a battery
indicator is shown at the top-left corner
of th e scre e n. Th is ind icat or is re p lac ed
with a USB icon when the analyzer is
connected to your computer.
You may use hot keys for the quick access to certain tasks. For instance, press
the
(SWR chart) button to open the SWR chart screen immediately.
RigExpert AA-650 ZOOM
5

Multifunctional keys
Most keys on the analyzer’s keypad perform
several functions.
For instance, numbers (1) are used to enter
frequency and other numerical parameters.
Ma in fun ction s (2) pro vide quick acce ss to most
common tasks. Alternative functions (3) are
executed if the user holds the
key. For the convenience, alternative functions
are marked with yellow.
You may press the (Help) key to open a help screen listing all active hot keys.
(Functional)
3
2
1
Connecting to your antenna
Plug the cable to your analyzer’s antenna connector, and then tighten the rotating
sleeve. The rest of the connector, as well as the cable, should remain stationary.
If you twist other parts of the connector when tightening or loosening, damage may
easily occur. Twisting is not allowed by design of the N-connector.
6
User’s manual
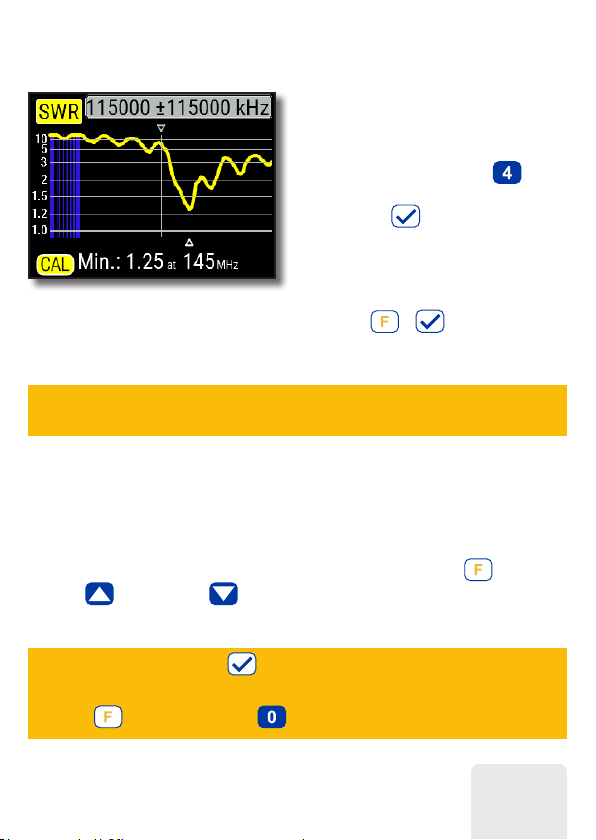
SWR chart
Once your antenna is connected to
the analyzer, it is time to measure its
characteristics. Press the (SWR
chart) key to open the SWR chart screen,
then press (OK) to star t a new
measurement.
A few moments later, the result will be
displayed on the analyzer’s screen.
Press the
run a continuous sweep.
+ key combination to
A small triangle at the bottom of the chart corresponds to a point at which the SWR
reaches its minimum.
Chart ZOOM
Use the arrow keys to increase or decrease the center frequency or the scanning range.
Watch the chart zooming in or out, or changing its position. Use the (Functional
key) and (Cursor up) or (Cursor down) key combination to zoom the ver tical
scale of the chart.
Do not forget to press the (OK) key for the new measurement to start.
Press
RigExpert AA-650 ZOOM
(Functional key) and to quickly choose a radio amateur band.
7
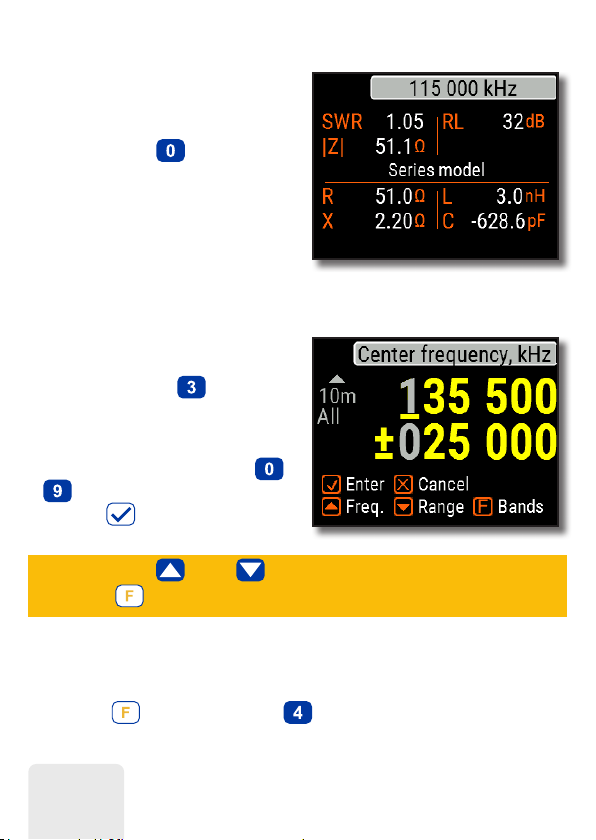
Data screen
The data screen is available in all char t
modes. Press the
display various parameters of a load at
cursor.
(Data) key to
Frequency
and range entry
To enter the center frequency or the
sweep range, press the (Frequency,
Range) key.
Use cursor keys to navigate, or the
to ke y s to en ter va l ues. Do not fo rget
to press the (OK) key to apply.
Press (Up) or (Down) cursor keys while holding
the (Functional) key to quickly choose a radio amateur band.
Return loss chart
The return loss (RL) chart, which is very similar to the SWR chart, is activated by
pressing the (Functional key) and (RL chart) key combination in the Main
menu.
8
User’s manual

R,X chart
Press the (R,X chart) key in the Main
menu to access the R, X char t mode.
Positive values of reactance (X)
correspond to inductive load, while
negative values correspond to capacitive
load.
The chart will display R and X for series
or parallel models of a load. Press
(Functional key) and to switch
between these models.
The marker at the bottom of the screen shows a resonant
frequency closest to the center of the scan.
Smith chart
The (Smith char t) key opens a
screen where the reflection coefficient is
plotted on the Smith chart.
A small marker is used to indicate the center frequency.
RigExpert AA-650 ZOOM
For a list of hot keys, press the
(Help) key, as usual.
9
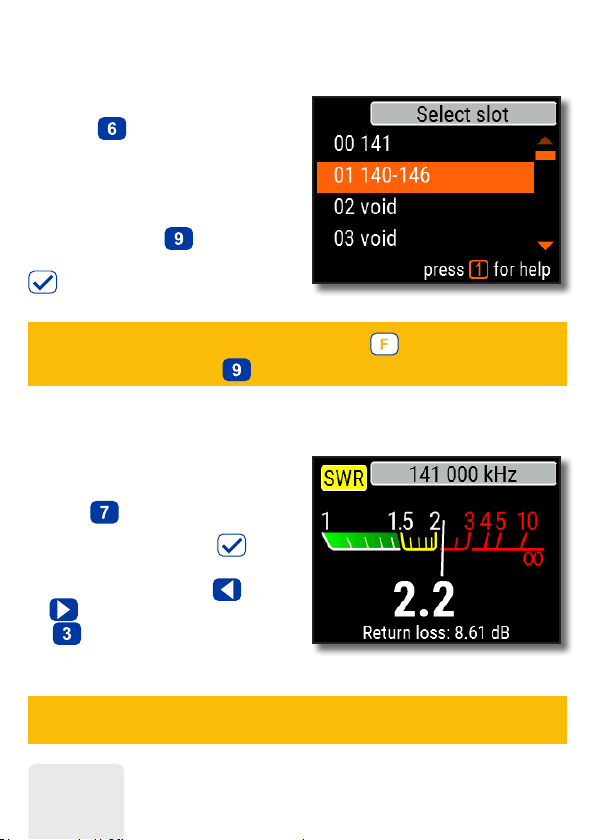
Memory operation
Press the (Save) key to save the
chart into one of 100 available memory
slots.
To retrieve your readings from the
memor y, press then (Load) key,
select a memory slot number and press
(OK).
To rename any existing memory slot, press (Functional key)
and
(Edit) key combination.
SWR mode
To watch the SWR at a single frequency,
press the (SWR) key.
Do not forget to press the
key to start or stop the measurement.
Change the frequency with (Left)
or (Right) cursor keys, or press
the (Frequency) key to enter a new
frequency.
(OK)
The SWR icon in the top-lef t corner flashes
when the measurement is performed.
10
User’s manual
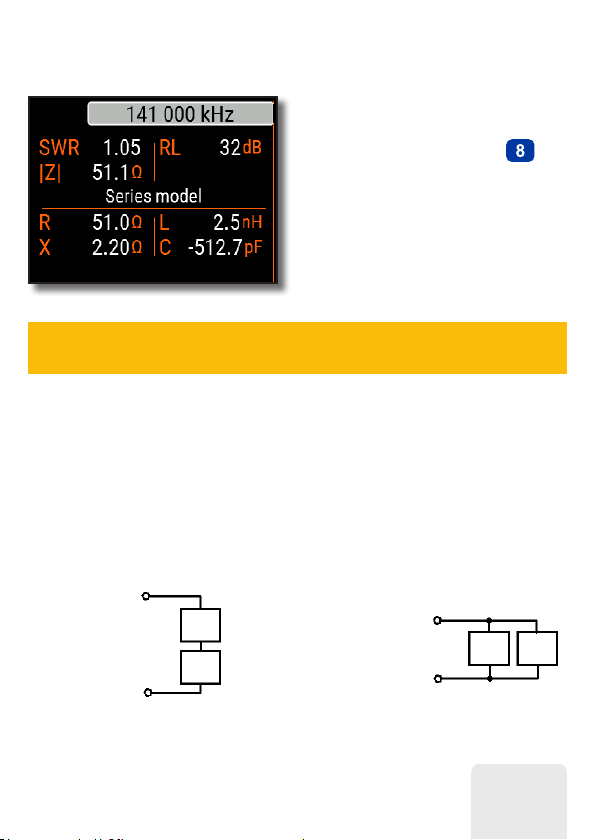
Display all parameters
To display various parameters of a load
on a single screen, press the (All)
key.
Do not be confused by negative values of L or C. This can be useful for
This screen displays values for
experienced users.
series
as well as
parallel
of impedance of a load.
series
• In the
expressed as resistance and reactance
connected in series:
model, impedance is
• In the
parallel
expressed as resistance and reactance
connected in parallel:
model, impedance is
R
Z = R + jX
Z = R ||+ jX
X
RigExpert AA-650 ZOOM
models
R X
11
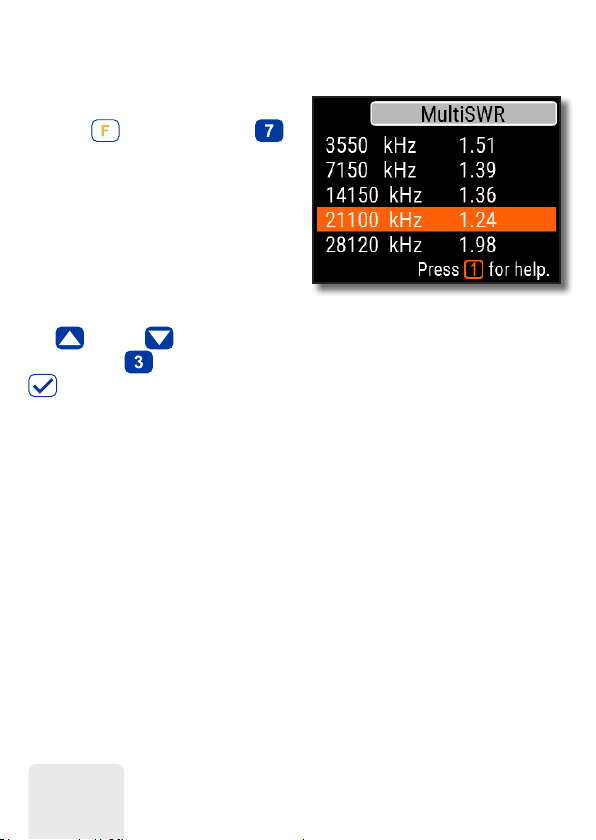
MultiSWR mode
Press the (Functional key) and
(Multi) key combination to see the SWR
at up to five different frequencies. This
mode may be useful for tuning multiband antennas.
Use
(Up) and (Down) cursor keys to select a frequency to be set or changed,
then press the (Frequency) key to enter a new value. Do not forget to press the
(OK) key to start the measurement.
12
User’s manual
 Loading...