

Riello Burners GAS 4/2, GAS 6/2, GAS 5/2, GAS 3/2, GAS 7/2 Installation, Use And Maintenance Instructions
Montage und Bedienungs Anleitung
Installation, use and maintenance instructions
Manuel d’entretien
D
GB
F
Gebläse - Gasbrenner
Forced draught gas burners
Brûleurs gaz à air soufflé
Zweistufig gleitender Betrieb
Progressive two-stage operation
Fonctionnement à 2 allures progressives
CODE
3752117
3752217 GAS 4/2 522 T1
3752317 GAS 5/2 523 T1
3752417 GAS 6/2 524 T1
3752517 GAS 7/2 525 T1
MODELL
MODEL - MODELE
GAS 3/2 521 T1
TYP - TYPE
2915656 (3)

2
INHALT
I
TECHNISCHE ANGABEN . . . . . . . . . . . . . . . . . . . . . . . . . Seite 3
Zubehör . . . . . . . . . . . . . . . . . . . . . . . . . . . . . . . . . . . . . . . . . . . . 6
Brennerbeschreibung. . . . . . . . . . . . . . . . . . . . . . . . . . . . . . . . . . 8
Verpackung - Gewicht . . . . . . . . . . . . . . . . . . . . . . . . . . . . . . . . . 8
Abmessungen . . . . . . . . . . . . . . . . . . . . . . . . . . . . . . . . . . . . . . . 8
Ausstattung . . . . . . . . . . . . . . . . . . . . . . . . . . . . . . . . . . . . . . . . . 8
Regelbereiche . . . . . . . . . . . . . . . . . . . . . . . . . . . . . . . . . . . . . . 10
Handelsübliche Kessel. . . . . . . . . . . . . . . . . . . . . . . . . . . . . . . . 10
Prüfkessel. . . . . . . . . . . . . . . . . . . . . . . . . . . . . . . . . . . . . . . . . . 12
Gasdruck . . . . . . . . . . . . . . . . . . . . . . . . . . . . . . . . . . . . . . . . . . 12
INSTALLATION . . . . . . . . . . . . . . . . . . . . . . . . . . . . . . . . . . . . . 14
Kesselplatte . . . . . . . . . . . . . . . . . . . . . . . . . . . . . . . . . . . . . . . . 14
Flammrohrlänge. . . . . . . . . . . . . . . . . . . . . . . . . . . . . . . . . . . . . 14
Befestigung des Brenners am Heizkessel . . . . . . . . . . . . . . . . . 14
Einstellung des Flammkopfs . . . . . . . . . . . . . . . . . . . . . . . . . . . 16
Gaszuleitung . . . . . . . . . . . . . . . . . . . . . . . . . . . . . . . . . . . . . . . 18
Elektroanlage . . . . . . . . . . . . . . . . . . . . . . . . . . . . . . . . . . . . . . . 20
Einstellungen vor der Zündung . . . . . . . . . . . . . . . . . . . . . . . . . 26
Stellantrieb . . . . . . . . . . . . . . . . . . . . . . . . . . . . . . . . . . . . . . . . . 26
Anfahren des Brenners . . . . . . . . . . . . . . . . . . . . . . . . . . . . . . . 28
Zündung des Brenners. . . . . . . . . . . . . . . . . . . . . . . . . . . . . . . . 28
Brennereinstellung: . . . . . . . . . . . . . . . . . . . . . . . . . . . . . . . . . . 30
1 - Zündleistung . . . . . . . . . . . . . . . . . . . . . . . . . . . . . . . . . . . . . 30
2 - Leistung auf 1. Stufe . . . . . . . . . . . . . . . . . . . . . . . . . . . . . . . 30
3 - Leistung auf 2. Stufe . . . . . . . . . . . . . . . . . . . . . . . . . . . . . . . 32
4 - Luft-Druckwächter. . . . . . . . . . . . . . . . . . . . . . . . . . . . . . . . . 32
5 - Gas-Minimaldruckwächter. . . . . . . . . . . . . . . . . . . . . . . . . . . 32
Flammenüberwachung. . . . . . . . . . . . . . . . . . . . . . . . . . . . . . . . 32
Brennerbetrieb . . . . . . . . . . . . . . . . . . . . . . . . . . . . . . . . . . . . . . 34
Endkontrollen . . . . . . . . . . . . . . . . . . . . . . . . . . . . . . . . . . . . . . . 36
Wartung . . . . . . . . . . . . . . . . . . . . . . . . . . . . . . . . . . . . . . . . . . . 36
Störungen - Ursachen - Abhilfen . . . . . . . . . . . . . . . . . . . . . . . . 38
Anmerkung
Die Zeichnungen, auf die im Text Bezug genommen wird, werden
folgendermaßen bezeichnet:
1)(A) =Detail 1 der Zeichnung A auf der gleichen Textseite;
1)(A)S.6 =Detail 1 der Zeichnung A auf Seite 6.
In Konformität mit der Wirkungsgradrichtlinie 92/42/EWG müs-
sen die Anbringung des Brenners am Heizkessel, die Einstellung
und die Inbetriebnahme unter Beachtung der Betriebsanleitung
der Heizkessels ausgeführt werden, einschließlich Kontrolle der
Konzentration von CO und CO
tur und der mittlenen Kesseltemperatur.
in den Abgasen, ihrer Tempera-
2
GB
CONTENTS
TECHNICAL DATA . . . . . . . . . . . . . . . . . . . . . . . . . . . . . . . page 4
Accessories. . . . . . . . . . . . . . . . . . . . . . . . . . . . . . . . . . . . . . . . . . 7
Burner description. . . . . . . . . . . . . . . . . . . . . . . . . . . . . . . . . . . . . 9
Packaging - Weight . . . . . . . . . . . . . . . . . . . . . . . . . . . . . . . . . . . . 9
Max. dimensions. . . . . . . . . . . . . . . . . . . . . . . . . . . . . . . . . . . . . . 9
Standard equipment . . . . . . . . . . . . . . . . . . . . . . . . . . . . . . . . . . . 9
Firing rates . . . . . . . . . . . . . . . . . . . . . . . . . . . . . . . . . . . . . . . . . 11
Commercial boiler. . . . . . . . . . . . . . . . . . . . . . . . . . . . . . . . . . . . 11
Test boilers . . . . . . . . . . . . . . . . . . . . . . . . . . . . . . . . . . . . . . . . . 13
Gas pressure. . . . . . . . . . . . . . . . . . . . . . . . . . . . . . . . . . . . . . . . 13
INSTALLATION. . . . . . . . . . . . . . . . . . . . . . . . . . . . . . . . . . . . . . 15
Boiler plate . . . . . . . . . . . . . . . . . . . . . . . . . . . . . . . . . . . . . . . . . 15
Blast tube length . . . . . . . . . . . . . . . . . . . . . . . . . . . . . . . . . . . . 15
Securing the burner to the boiler. . . . . . . . . . . . . . . . . . . . . . . . . 15
Setting the combustion head . . . . . . . . . . . . . . . . . . . . . . . . . . . 17
Gas line. . . . . . . . . . . . . . . . . . . . . . . . . . . . . . . . . . . . . . . . . . . . 19
Electrical system. . . . . . . . . . . . . . . . . . . . . . . . . . . . . . . . . . . . . 21
Adjustments before firing . . . . . . . . . . . . . . . . . . . . . . . . . . . . . . 27
Servomotor . . . . . . . . . . . . . . . . . . . . . . . . . . . . . . . . . . . . . . . . . 27
Burner starting . . . . . . . . . . . . . . . . . . . . . . . . . . . . . . . . . . . . . . 29
Burner firing . . . . . . . . . . . . . . . . . . . . . . . . . . . . . . . . . . . . . . . . 29
Burner calibration:. . . . . . . . . . . . . . . . . . . . . . . . . . . . . . . . . . . . 31
1 - Firing output. . . . . . . . . . . . . . . . . . . . . . . . . . . . . . . . . . . . . . 31
2 - 1st stage output . . . . . . . . . . . . . . . . . . . . . . . . . . . . . . . . . . . 31
3 - 2nd stage output . . . . . . . . . . . . . . . . . . . . . . . . . . . . . . . . . . 33
4 - Air pressure switch. . . . . . . . . . . . . . . . . . . . . . . . . . . . . . . . . 33
5 - Minimum gas pressure switch . . . . . . . . . . . . . . . . . . . . . . . . 33
Flame present check. . . . . . . . . . . . . . . . . . . . . . . . . . . . . . . . . . 33
Burner operation . . . . . . . . . . . . . . . . . . . . . . . . . . . . . . . . . . . . . 35
Final checks . . . . . . . . . . . . . . . . . . . . . . . . . . . . . . . . . . . . . . . . 37
Maintenance . . . . . . . . . . . . . . . . . . . . . . . . . . . . . . . . . . . . . . . . 37
Fault - Probable cause - Suggested remedy. . . . . . . . . . . . . . . . 39
N.B.
Figures mentioned in the text are identified as follows:
1)(A) =part 1 of figure A, same page as text;
1)(A)p.6 =part 1 of figure A, page number 6.
In conformity with Efficiency Directive 92/42/EEC the application
of the burner on the boiler, adjustment and testing must be carried out observing the instruction manual of the boiler, including
verification of the CO and CO
their temperatures and the average temperature of the water in
concentration in the flue gases,
2
the boiler.
F
INDEX
DONNÉES TECHNIQUES . . . . . . . . . . . . . . . . . . . . . . . . . page 5
Accesoires . . . . . . . . . . . . . . . . . . . . . . . . . . . . . . . . . . . . . . . . . . 7
Description brûleur. . . . . . . . . . . . . . . . . . . . . . . . . . . . . . . . . . . . 9
Emballage - Poids . . . . . . . . . . . . . . . . . . . . . . . . . . . . . . . . . . . . 9
Encombrement. . . . . . . . . . . . . . . . . . . . . . . . . . . . . . . . . . . . . . . 9
Equipement standard. . . . . . . . . . . . . . . . . . . . . . . . . . . . . . . . . . 9
Plages de puissance . . . . . . . . . . . . . . . . . . . . . . . . . . . . . . . . . 11
Chaudières commerciales . . . . . . . . . . . . . . . . . . . . . . . . . . . . . 11
Chaudière d’essai. . . . . . . . . . . . . . . . . . . . . . . . . . . . . . . . . . . . 13
Pression du gaz . . . . . . . . . . . . . . . . . . . . . . . . . . . . . . . . . . . . . 13
INSTALLATION . . . . . . . . . . . . . . . . . . . . . . . . . . . . . . . . . . . . . 15
Plaque chaudière . . . . . . . . . . . . . . . . . . . . . . . . . . . . . . . . . . . . 15
Longueur buse . . . . . . . . . . . . . . . . . . . . . . . . . . . . . . . . . . . . . 15
Fixation du brûleur à la chaudière . . . . . . . . . . . . . . . . . . . . . . . 15
Réglage tête de combustion. . . . . . . . . . . . . . . . . . . . . . . . . . . . 17
Ligne alimentation gaz . . . . . . . . . . . . . . . . . . . . . . . . . . . . . . . . 19
Installation électrique . . . . . . . . . . . . . . . . . . . . . . . . . . . . . . . . . 21
Réglages avant l’allumage. . . . . . . . . . . . . . . . . . . . . . . . . . . . . 27
Servomoteur. . . . . . . . . . . . . . . . . . . . . . . . . . . . . . . . . . . . . . . . 27
Démarrage brûleur. . . . . . . . . . . . . . . . . . . . . . . . . . . . . . . . . . . 29
Allumage brûleur . . . . . . . . . . . . . . . . . . . . . . . . . . . . . . . . . . . . 29
Réglage brûleur:. . . . . . . . . . . . . . . . . . . . . . . . . . . . . . . . . . . . . 31
1 - Puissance à l’allumage . . . . . . . . . . . . . . . . . . . . . . . . . . . . . 31
2 - Puissance en 1ère allure. . . . . . . . . . . . . . . . . . . . . . . . . . . . 31
3 - Puissance en 2ème allure. . . . . . . . . . . . . . . . . . . . . . . . . . . 33
4 - Pressostat de l’air . . . . . . . . . . . . . . . . . . . . . . . . . . . . . . . . . 33
5 - Pressostat gaz seuil minimum . . . . . . . . . . . . . . . . . . . . . . . 33
Contrôle présence flamme. . . . . . . . . . . . . . . . . . . . . . . . . . . . . 33
Fonctionnement brûleur . . . . . . . . . . . . . . . . . . . . . . . . . . . . . . . 35
Contrôles finaux . . . . . . . . . . . . . . . . . . . . . . . . . . . . . . . . . . . . . 37
Entretien. . . . . . . . . . . . . . . . . . . . . . . . . . . . . . . . . . . . . . . . . . . 37
Inconvénients - Causes - Remèdes. . . . . . . . . . . . . . . . . . . . . . 40
Attention
Les figures rappelées dans le texte sont ainsi indiquées:
1)(A) =Détail 1 de la figure A dans la même page du texte;
1)(A)p.6 =Détail 1 de la figure A page 6.
Conformément à la Directive rendement 92/42/CEE, suivre les
indications du manuel de la chaudière pour monter le brûleur,
effectuer le réglage et l’essai, contrôler la concentration de CO et
CO
, dans les fumées, leur température et celle moyenne de
2
l’eau de la chaudière.

D
TECHNISCHE ANGABEN
µ
MODELL
GAS 3/2 GAS 4/2 GAS 5/2 GAS 6/2 GAS 7/2
TYP 521 T1 522 T1 523 T1 524 T1 525 T1
LEISTUNG
(1)
2. Stufe kW 130 - 350
Mcal/h
1. Stufe kW
Mcal/h
112 - 301
80 - 175
69 - 150
180 - 470
155 - 404
120 - 235
104 - 202
320 - 660
275 - 568
155 - 330
133 - 284
520 - 1050
447 - 903
300 - 520
258 - 447
800 - 1760
688 - 1514
400 - 880
344 - 757
BRENNSTOFF ERDGAS: G20 - G21 - G22 - G23 - G25
G20 G25 G20 G25 G20 G25 G20 G25 G20 G25
- Unterer Heizwert Hu
- Reindichte
- Höchstdruchsatz
- Druck bei Höchstdruchsatz
(2)
3
kWh/Nm
Mcal/Nm
kg/Nm
3
Nm
/h
10
3
8,6
3
0,71 0,78 0,71 0,78 0,71 0,78 0,71 0,78 0,71 0,78
35 41 47 54 66 77 105 122 176 205
8,6
7,4
10
8,6
8,6
7,4
10
8,6
8,6
7,4
10
8,6
8,6
7,4
10
8,6
mbar 11,1 16,4 9,8 14,5 9,8 14,5 12,3 18,2 14,5 21,4
BETRIEB • Aussetzend (min. 1 Halt in 24 Stunden)
• Zweistufig (hohe und niedrige Flamme) - einsufig (alles - nichts)
STANDARDEINSATZ Heizkessel: mit Wasser, Dampf, diathermischem Öl
RAUMTEMPERATUR °C 0 - 40
TEMPERA TUR VERBRENNUNGSLUFT °C max 60
ELEKTRISCHE SPEISUNG V
ELEKTROMOTOR rpm
MOTORKONDENSATOR
ZÜNDTRANSFORMATOR V1 - V2
I1 - I2
Hz
W
V
A
F
V
230 ~ +/-10%
50 - einphasing
2750
250
220 - 240
1,8
8
450/500
2810
370
220 - 240
2,9
12,5
400/450
230 - 400 mit Nulleiter ~ +/-10%
50 - dreiphasing
2870
750
220/240-380/415
2,85 - 1,65
2840
1500
220/240-380/415
5,9 - 3,4
230 V - 1 x 8 kV
1,8 A - 30 mA
2840
3000
220/240-380/415
10,9 - 6,3
ELEKTRISCHE LEISTUNGSAUFNAHME W max 400 540 850 1700 3400
SCHUTZART IP 40
CE - NORMGERECHT 90/396 - 89/336 - 73/23 - 92/42
TYPPRÜFUNG CE 0085AQ0707
8,6
7,4
(1) Bezugsbedingungen: Raumtemperatur 20°C - Barometrischer Druck 1000 mbar - Höhe 100 m ü.d.M.
(2) Druck am Anschluß 12)(A)S.8 bei druckloser Brennkammer, geöffneter Gasscheibe 2)(B)S.16 und bei Höchstleistung des Brenners.
LAND
IT - AT - GR - DK - FI - SE
ES - GB - IE - PT
NL
FR
DE
BE I
LU
GERÄTEKATEGORIE
II
2H3B / P
II
2H3P
II
2L3B / P
II
2Er3P
II
2ELL3B /P
I
2E(R)B,
3P
II
2E3B /P
3

TECHNICAL DATA
GB
µ
MODEL
GAS 3/2 GAS 4/2 GAS 5/2 GAS 6/2 GAS 7/2
TYPE 521 T1 522 T1 523 T1 524 T1 525 T1
OUTPUT
(1)
2nd stage kW 130 - 350
Mcal/h
1st stage kW
Mcal/h
112 - 301
80 - 175
69 - 150
180 - 470
155 - 404
120 - 235
104 - 202
320 - 660
275 - 568
155 - 330
133 - 284
520 - 1050
447 - 903
300 - 520
258 - 447
800 - 1760
688 - 1514
400 - 880
344 - 757
FUEL NATURAL GAS: G20 - G21 - G22 - G23 - G25
G20 G25 G20 G25 G20 G25 G20 G25 G20 G25
- Net calorific value
- Absolute density
- Max delivery
- Pressure at maximum delivery
(2)
3
kWh/Nm
Mcal/Nm
kg/Nm
3
Nm
/h
10
3
8,6
3
0,71 0,78 0,71 0,78 0,71 0,78 0,71 0,78 0,71 0,78
35 41 47 54 66 77 105 122 176 205
8,6
7,4
10
8,6
8,6
7,4
10
8,6
8,6
7,4
10
8,6
8,6
7,4
10
8,6
mbar 11,1 16,4 9,8 14,5 9,8 14,5 12,3 18,2 14,5 21,4
OPERATION • Intermittent (min. 1 stop in 24 hours)
• Two-stage (high and low flame) and single-stage (all - nothing)
STANDARD APPLICATIONS Boilers: water, steam, diathermic oil
AMBIENT TEMPERATURE °C 0 - 40
COMBUSTION AIR TEMPERATURE °C max 60
ELECTRICAL SUPPLY V
ELECTRIC MOTOR rpm
MOTOR CAPACITOR
IGNITION TRANSFORMER V1 - V2
I1 - I2
Hz
W
V
A
F
V
230 ~ +/-10%
50 - single-phase
2750
250
220 - 240
1,8
8
450/500
2810
370
220 - 240
2,9
12,5
400/450
230 - 400 with neutral ~ +/-10%
50 - three-phase
2870
750
220/240-380/415
2,85 - 1,65
2840
1500
220/240-380/415
5,9 - 3,4
230 V - 1 x 8 kV
1,8 A - 30 mA
2840
3000
220/240-380/415
10,9 - 6,3
ELECTRICAL POWER CONSUMPTION W max 400 540 850 1700 3400
ELECTRICAL PROTECTION IP 40
IN CONFORMITY WITH EEC DIRECTIVES 90/396 - 89/336 - 73/23 - 92/42
APPROVAL CE 0085AQ0707
8,6
7,4
(1) Reference conditions: Ambient temperature 20 ¯C - Barometric pressure 1000 mbar - Altitude 100 m a.s.l.
(2) Pressure at test point 12)(A)p.8, with zero pressure in the combustion chamber, with open gas ring 2)(B)p.16 and maximum burner output.
COUNTRY
IT - AT - GR - DK - FI - SE
ES - GB - IE - PT
NL
FR
DE
BE I
LU
CATEGORY
II
2H3B / P
II
2H3P
II
2L3B / P
II
2Er3P
II
2ELL3B /P
I
2E(R)B,
3P
II
2E3B /P
4

DONNEES TECHNIQUES
F
µ
MODELE
GAS 3/2 GAS 4/2 GAS 5/2 GAS 6/2 GAS 7/2
TYPE 521 T1 522 T1 523 T1 524 T1 525 T1
PUISSANCE
(1)
2ème
allure
1ère
allure
kW 130 - 350
Mcal/h
kW
Mcal/h
112 - 301
80 - 175
69 - 150
180 - 470
155 - 404
120 - 235
104 - 202
320 - 660
275 - 568
155 - 330
133 - 284
520 - 1050
447 - 903
300 - 520
258 - 447
800 - 1760
688 - 1514
400 - 880
344 - 757
COMBUSTIBLE GAZ NATUREL: G20 - G21 - G22 - G23 - G25
G20 G25 G20 G25 G20 G25 G20 G25 G20 G25
- pouvoir calorifique inférieur
- densité absolue
- débit maximum
- pression au débit max.
(2)
3
kWh/Nm
Mcal/Nm
kg/Nm
3
Nm
/h
10
3
8,6
3
0,71 0,78 0,71 0,78 0,71 0,78 0,71 0,78 0,71 0,78
35 41 47 54 66 77 105 122 176 205
8,6
7,4
10
8,6
8,6
7,4
10
8,6
8,6
7,4
10
8,6
8,6
7,4
10
8,6
mbar 11,1 16,4 9,8 14,5 9,8 14,5 12,3 18,2 14,5 21,4
FONCTIONNEMENT • Intermittent (1 arrêt min en 24 heures)
• 2 allures (flamme haute rt basse) et une allure (tout - rien)
EMPLOI STANDARD Chaudières à eau, à vapeur, à huile diathermique
TEMPERATURE AMBIANTE °C 0 - 40
TEMPERATURE AIR COMBURANT °C max 60
ALIMENTATION ELECTRIQUE V
MOTEUR ELECTRIQUE rpm
CONDENSATEUR MOTEUR
TRASFORMATEUR D’ALLUMAGE V1 - V2
I1 - I2
Hz
W
V
A
F
V
230 ~ +/-10%
50 - monophasée
2750
250
220 - 240
1,8
8
450/500
2810
370
220 - 240
2,9
12,5
400/450
230 - 400 mit Nulleiter ~ +/-10%
50 - triphasée
2870
750
220/240-380/415
2,85 - 1,65
2840
1500
220/240-380/415
5,9 - 3,4
230 V - 1 x 8 kV
1,8 A - 30 mA
2840
3000
220/240-380/415
10,9 - 6,3
PUISSANCE ELECTRIQUE ASSORBEE W max 400 540 850 1700 3400
DEGRE DE PROTECTION IP 40
CONFORMEMENT AUX DIRECTIVES CEE 90/396 - 89/336 - 73/23 - 92/42
HOMOLOGATION CE 0085AQ0707
8,6
7,4
(1) Conditions de référence: Température ambiante 20°C - Pression barométrique 1000 mbar - Altitude 100 m au-dessus du niveau de la mer.
(2) Pression à la prise 12)(A)p.8, avec une pression nulle dans la chambre de combustion, avec la bague du gaz 2)(B)p.16 ouverte et à la puis-
sance maximum du brûleur.
PAYS
IT - AT - GR - DK - FI - SE
ES - GB - IE - PT
NL
FR
DE
BE I
LU
CATEGORIE
II
2H3B / P
II
2H3P
II
2L3B / P
II
2Er3P
II
2ELL3B /P
I
2E(R)B,
3P
II
2E3B /P
5
6
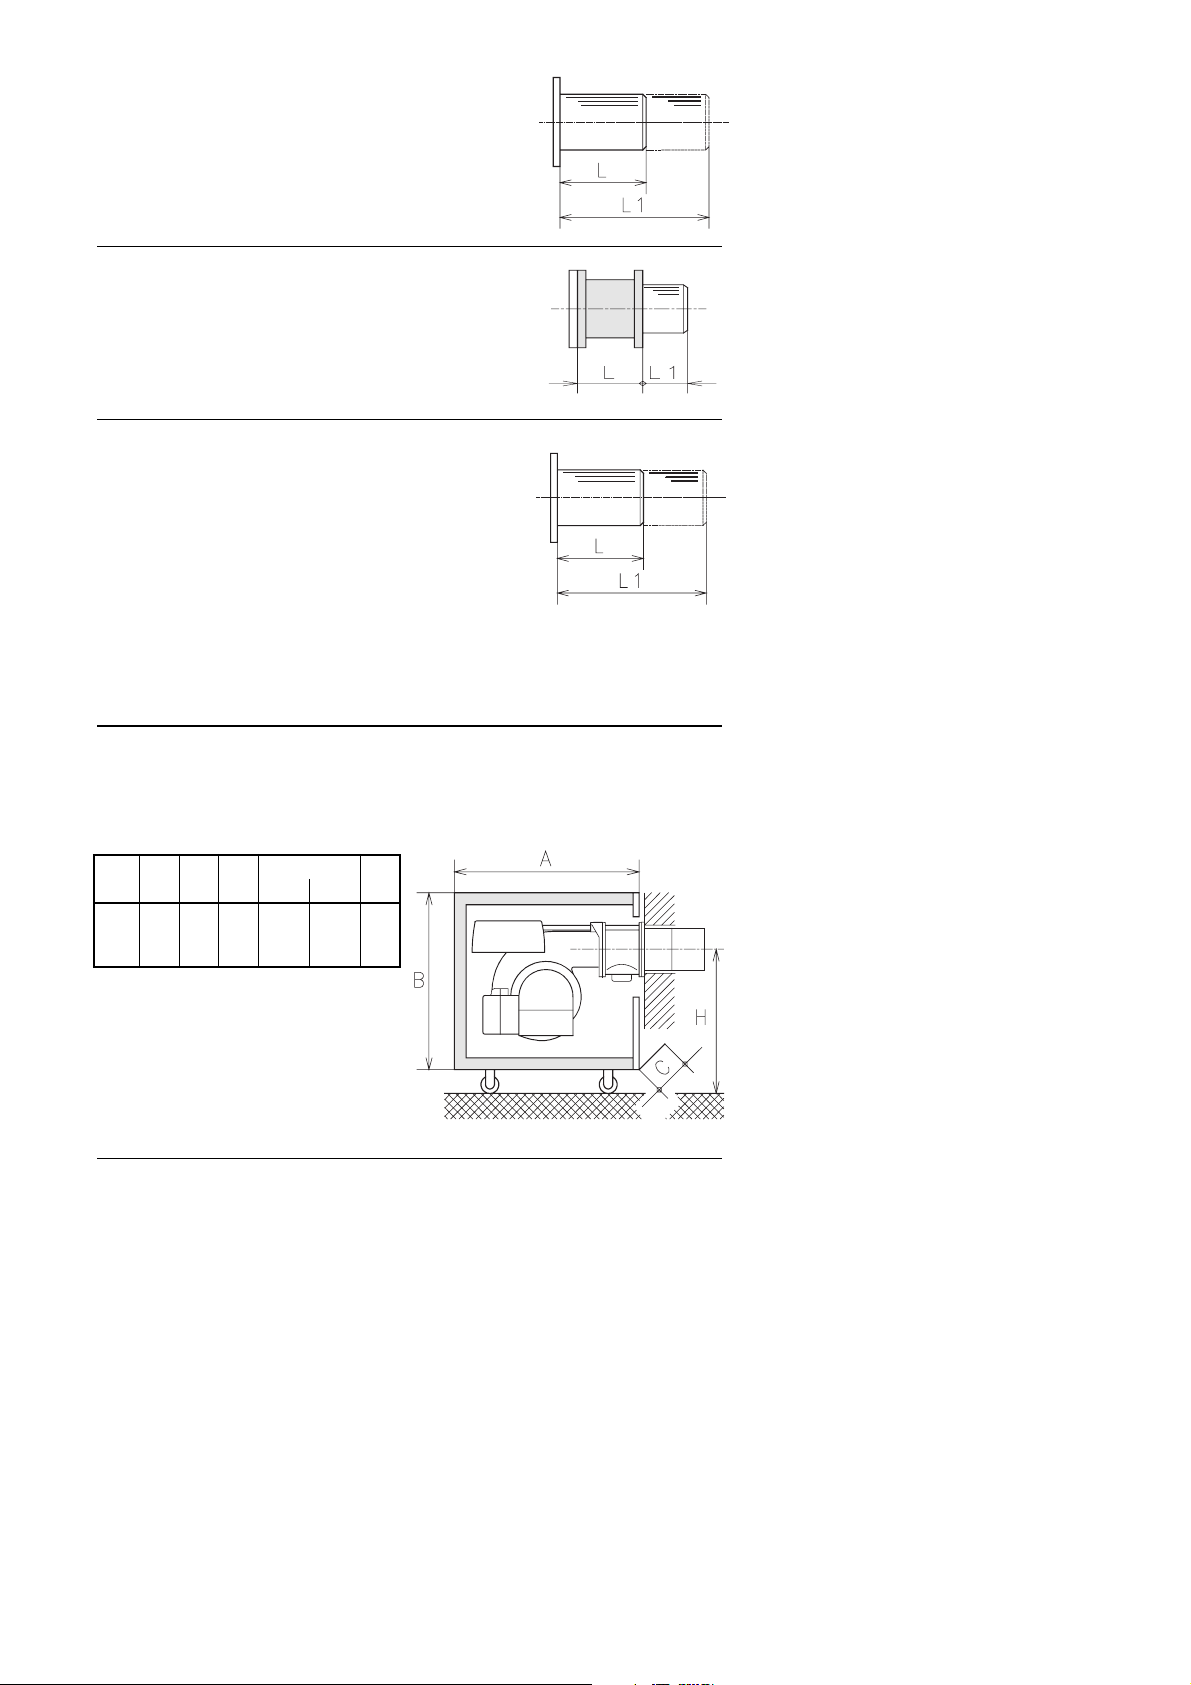
A1 COD. 3000605 L= 185 L = 320 mm • GAS 3/2
A2 COD. 3000606 L=187 L = 320 mm • GAS 4/2
A3 COD. 3000607 L=207 L = 365 mm • GAS 5/2
A4 COD. 3000608 L=227 L = 360 mm • GAS 6/2
A5 COD. 3000609 L=240 L = 400 mm • GAS 7/2
(A)
COD. 3000845 L=142 L1 = 43 mm • GAS 3/2
L1 = 45 mm • GAS 4/2
L1 = 65 mm • GAS 5/2
L1 = 85 mm • GAS 6/2
(B)
C1 COD. 3000657 L = 185 mm • GAS 3/2
C2 COD. 3000807 L1 = 320 mm • GAS 3/2
C3 COD. 3000658 L = 187 mm • GAS 4/2
C4 COD. 3000808 L1 = 320 mm • GAS 4/2
C5 COD. 3000659 L= 207 mm • GAS 5/2
C6 COD. 3000809 L1 = 365 mm • GAS 5/2
C7 COD. 3000753 L = 227 mm • GAS 6/2
C8 COD. 3000810 L1 = 360mm • GAS 6/2
C9 COD. 3000806 L = 240mm • GAS 7/2
C10 COD. 3000811 L1 = 400mm • GAS 7/2
(C)
D90
D90
D91
ZUBEHÖR
(auf Wunsch)
(A) KIT ZUR VERLÄNGERUNG DES FLAMM-
KOPFES
L = Standardlänge
L1 = Mit Kit erreichbare Länge
(B) DISTANZSTÜCK ZUR VERKÜRZUNG
DES FLAMMKOPFES
L = Stärke Distanzstück
L1 = Länge des resultierenden Flammrohrs
(C) KIT FÜR FLÜSSIGGAS-BETRIEB
Unbedingt erforderlich zum Betrieb des
Brenners mit Flüssiggas.
L = Kit für Flammkopf Standardlänge
L1 = Kit für verlängerten Flammkopf (A)
(D) LÄRMSCHUTZHAUBE
Die Lärmschutzhaube aus Stahl und geräuschdämmenden Materialien, die den
Brenner völlig einkapselt, verringert die Betriebsgeräusche erheblich (-14/18 dBA). Sie
ist auf Rollen montiert und kann bei einer
Brennerinspektion leicht verschoben werden.
(E) KIT FÜR DAUERKÜHLUNG DES BREN-
NERS
Es besteht aus einem kleinen DreiwegeMagnetventil, das zwischen dem Luftdruckwächter 4)(A)S.8 und dem Gebläse eingebaut wird.
Es bezweckt das Wiederanfahren des Brenners, der sich nach dem Abschalten der
Flamme unter Dauerkühlung befindet.
D1 COD. 3000777 • GAS 3-4-5/2
D2 COD. 3000778 • GAS 6/2
D3 COD. 3000779 • GAS 7/2
mmABC
D1
710
620
745
D2
835
680
790
D3
985
820
920
H
MIN MAX
540
1160
600
1220
730
1350
kg
60
70
101
COD. 3010030 • GAS 3-4-5-6-7/2
(E)
D158

7
ACCESSORIES
(A) KIT FOR LENGTHENING THE COMBUS-
TION HEAD
L = Standard length
L1 = Length obtainable with the kit
(B) SPACER FOR SHORTENING THE COM-
BUSTION HEAD
L = Spacer thickness
L1 = Resulting blast tube length
(C) KIT FOR LPG OPERATION
This kit must be fitted whenever the burner is
to be operated on LPG.
L = kit for standard length head
L1 = kit for head lengthened with (A)
(D) SOUNDPROOFING
The sound damping casing significantly reduces the noise generated by the burner
(-14/18 dBA). The casing is in steel and
sound-damping material and fully encloses
the burner.
The casing is wheel-mounted so that it can
be easily removed for burner inspection.
(E) KIT FOR CONTINUOUS VENTILATION
The kit comprises a small three-way solenoid to be installed between the air pressure
switch 4)(A)p.8 and the fan.
It allows the burner to fire again after it has
remained under continuous ventilation following flame cut-out.
(optional)
ACCESSOIRES
(A) KIT POUR ALLONGER LA TETE DE COM-
BUSTION
L = Longueur standard
L1 = Longueur pouvant être obtenue avec le
kit
(B) ENTRETOISE POUR RACCOURCIR LA
TETE DE COMBUSTION
L = Epaisseur entretoise
L1 = Longueur de la buse résultante
(C) KIT POUR FONCTIONNEMENT AU GPL
Il est indispensable pour faire fonctionner le
brûleur au GPL.
L = kit pour tête longueur standard
L1 = kit pour tête allongée avec (A)
(D) SYSTEME D'INSONORISATION
Il sert à réduire de façon très appréciable le
bruit provoqué par le brûleur (- 14/18 dBA).
Construit en acier et en matériau insonorisant, il renferme complètement le brûleur.
Le système est monté sur roues et peut être
facilement déplacé pour le contrôle du brûleur.
(E) KIT VENTILATION CONTINUE
Il se compose d'une petite électrovanne à
trois voies à installer entre le pressostat air
4)(A)p.8 et le ventilateur.
Il permet au brûleur, resté en ventilation continue après l'extinction de la flamme, de s'allumer à nouveau.
(sur demande)
(A)
mm A B C kg
GAS 3/2
GAS 4/2
GAS 5/2
GAS 6/2
GAS 7/2
850
850
895
1045
1245
473
473
520
555
665
545
545
543
543
727
(B)
34
40
43
60
98
D88
D216
D967
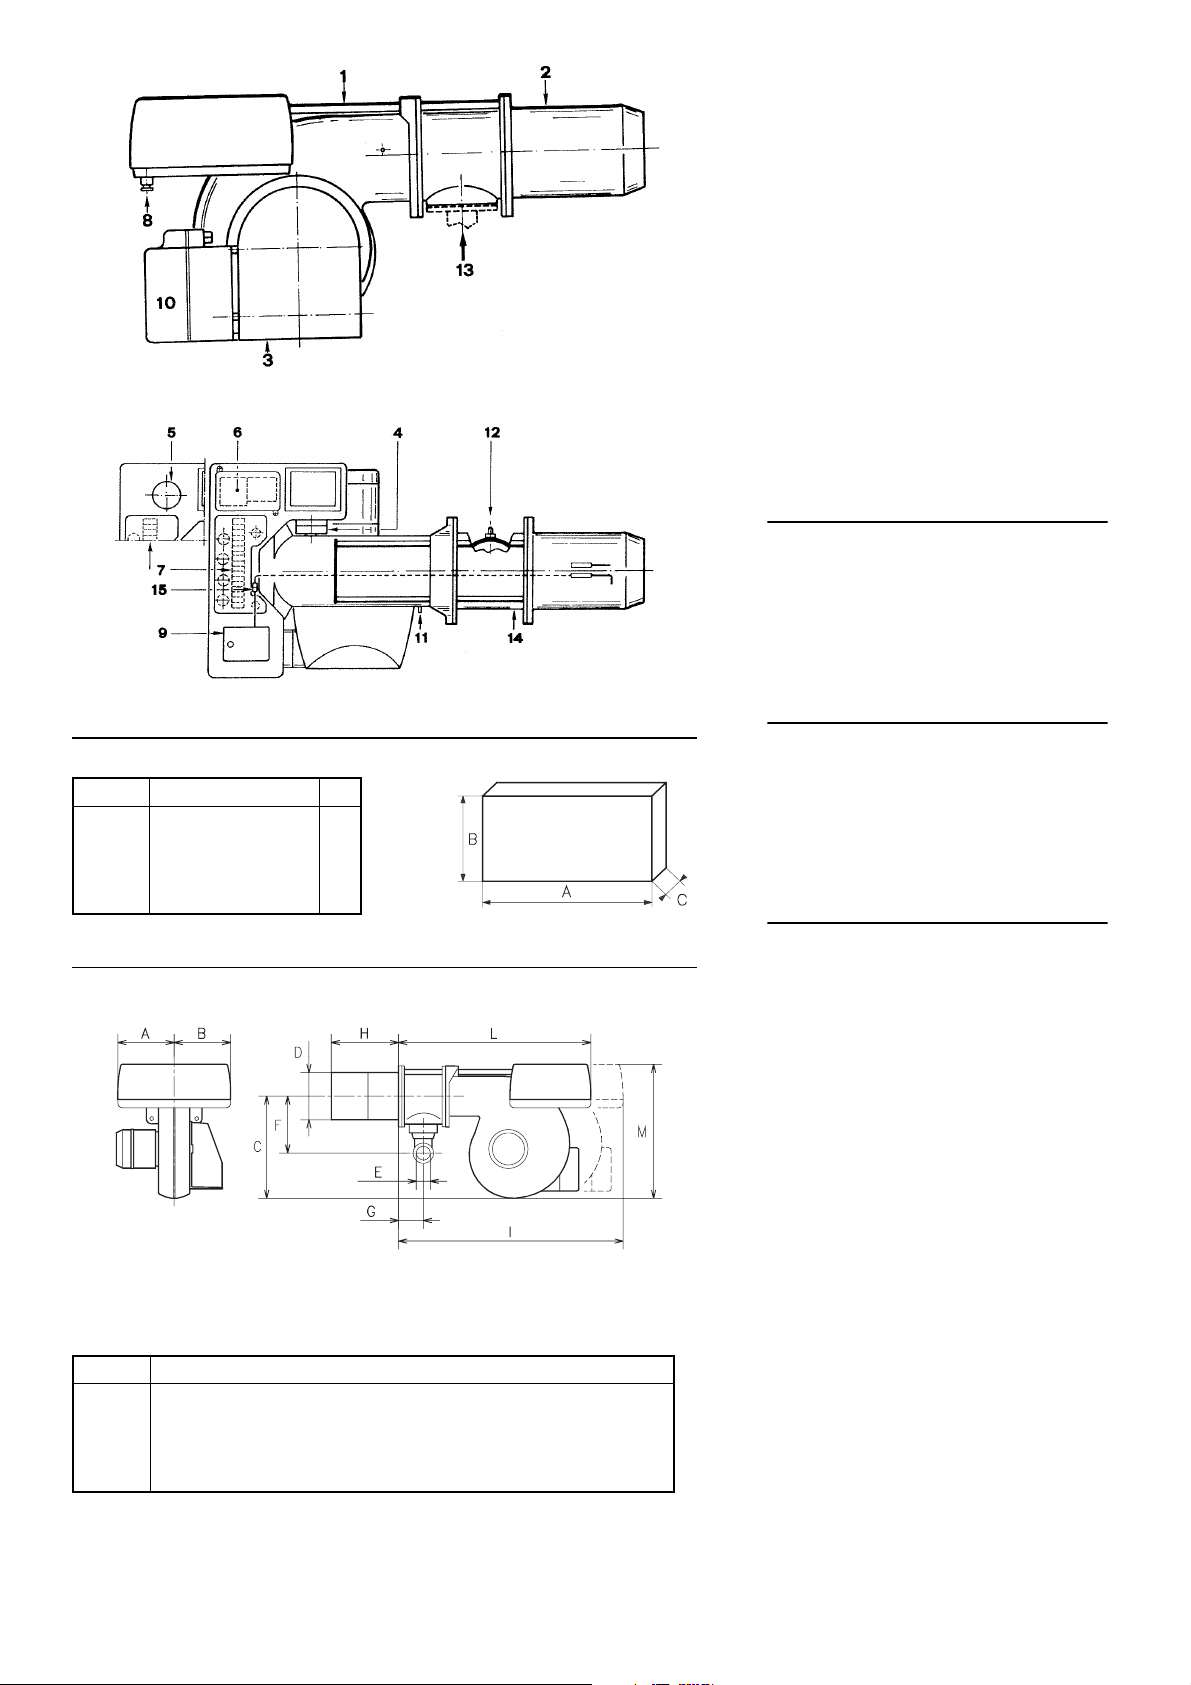
BRENNERBESCHREIBUNG (A)
1 Gleitschienen zur Öffnung des Brenners und
für die Kontrolle des Flammkopfs
2 Flammkopf
3 Luftklappe (in Ruhestellung geschlossen zur
Verminderung von Wärmeverlusten)
4 Luftdruckwächter
5 Kondensator
(Modell GAS 3/2 - 4/2)
6 Motorkontaktgeber und Wärmerelais
(Modell GAS 5/2 - 6/2 - 7/2)
7 Klemmenbrett
8 Kabeldurchgänge für Elektroanschluß
(vom Installateur auszuführen)
9 Feuerungsautomat mit Kontrollampe für Stör-
abschaltung und Druckknopf zum Entriegeln.
10 Stellmotor-Luftklappensteuerung
11 Gebläsedruck-Anschluß
12 Gasdruck-Meßanschluß/Brennerdruck
13 Gaszuleitung
14 Gasanschluß-Muffe
15 Steckanschluß am Kabel der Ionisationsson-
de
VERPACKUNG - GEWICHT (B)
(Richtwerte)
• Die Brenner werden in Kartonverpackungen
geliefert, Abmessungen gemäß Tabelle (B).
Das Modell GAS 7/2 wird auf einem Holzrahmen geliefert, der für die Handhabung mit Hubwagen geeignet ist.
• Das Gesamtgewicht des Brenners einschließ-
lich Verpackung ist aus (B) zu ersehen.
ABMESSUNGEN (C)
(Richtwerte)
Die Brennerabmessungen sind in (C) angeführt.
Beachten Sie, daß der Brenner für die Flammkopfinspektion geöffnet werden muß, indem sein
rückwärtiger Teil auf den Gleitschienen nach
hinten geschoben wird.
Die Abmessungen des offenen Brenners sind
unter I aufgeführt.
AUSSTATTUNG
• 1 Flansch für Gasarmaturen
• 1 Dichtung für Flansch
• 8 Schrauben
• 1 Wärmeschild
• 1 Anleitung
• 1 Ersatzteile Katalog
8
D161
(C)
mm ABCD E FGH I LM
GAS 3/2
GAS 4/2
GAS 5/2
GAS 6/2
GAS 7/2
205
205
226
258
358
205
205
205
205
248
292
292
332
370
445
140
150
155
175
220
Rp11/2
Rp11/2
Rp11/2
Rp2
Rp2
165
165
165
195
245
97
97
97
131
140
185
187
207
227
240
775
775
810
966
1142
610
610
645
770
920
397
397
437
485
590

BURNER DESCRIPTION (A)
1 Slide bars for opening the burner and inspect-
ing the combustion head
2 Combustion head
3 Air gate valve closed until the loss of heat is
reduced.
4 Air pressure switch
5 Capacitor
(Models GAS 3/2 - 4/2)
6 Motor contact-maker and thermal relay
(Models GAS 5/2 - 6/2 - 7/2)
7 Terminal strip
8 Fair lead
(for electrical connections by installer)
9 Control box with lock out pilot light and lock
out reset button
10 Air gate valve control servomotor
11 Fan pressure test point
12 Gas pressure test point to sleeve
13 Gas input pipework
14 Sleeve
15 Plug-socket on ionisation probe cable.
DESCRIPTION BRULEUR (A)
1 Guides pour ouverture brûleur et inspection
de la tête de combustion
2 Tête de combustion
3 Volet d'air fermé à l'arrêt pour réduire les dis-
persions thermiques
4 Pressostat air
5 Condensateur
(GAS 3/2 - 4/2)
6 Contacteur moteur et relais thermique
(GAS 5/2 - 6/2 - 7/2)
7 Porte-bornes
8 Passe-câbles (pour les connexions électri-
ques à la charge de l'installateur)
9 Boîtier de contrôle avec signal lumineux de
blocage et bouton de déblocage
10 Servomoteur commande volet d'air
11 Prise de pression ventilateur
12 Prise de pression gaz au manchon
13 Canalisation d'arrivée du gaz
14 Manchon
15 Fiche-prise sur câble sonde d'ionisation
PACKAGING-WEIGHT (B)
(Approximate measurements)
• The burners are shipped in cardboard boxes
with the maximum dimensions shown in Table
(B).
The GAS 7/2 model stands on a wooden base
which may be lifted by fork-lifts.
• The weight of the burner complete with pack-
aging is indicated in Table (B).
MAX. DIMENSIONS (C)
(Approximate measurements)
The maximum dimensions of the burner are given in (C).
Bear in mind that inspection of the combustion
head requires the burner to be opened by withdrawing the rear part on the slide bars.
The maximum dimensions of the burner when
open are given by measurement I.
STANDARD EQUIPMENT
• 1 Gas train flange
• 1 Flange gasket
• 8 Screws
• 1 Heat shield
• 1 Instruction booklet
• 1 Spare parts list
EMBALLAGE - POIDS (B)
Mesures indicatives.
• Les brûleurs sont expédiés dans des emballa-
ges en carton avec les dimensions d'encombrement indiquées dans le tab. (B).
Le modèle GAS 7/2 repose sur une estrade en
bois qui peut être soulevée par les chariots élévateurs courants.
• Le poids du brûleur avec l'emballage est indi-
qué dans le tab. (B).
ENCOMBREMENT (C)
(Mesures indicatives.)
L'encombrement du brûleur est reporté dans le
tab. (C).
Il faut tenir compte du fait que pour inspecter la
tête de combustion, le brûleur doit être ouvert et
la partie arrière doit être reculée sur les guides.
L'encombrement du brûleur ouvert est indiqué
par la cote I.
EQUIPEMENT STANDARD
• 1 Bride pour rampe gaz
• 1 Joint pour bride
• 8 Vis
• 1 Ecran thermique
• 1 Instructions
• 1 Catalogue pièces détachées
9

CAM. COMB. / FEUERRAUM
CAM. COMB. / FEUERRAUM
CAM. COMB. / FEUERRAUM
.
mbar
COMB. CHAM. / CHAMB. COMB
kW
Mcal/h
.
mbar
COMB. CHAM. / CHAMB. COMB
kW
Mcal/h
.
mbar
COMB. CHAM. / CHAMB. COMB
kW
Mcal/h
.
GAS 3/2
GAS 4/2
MAX
GAS 5/2
MAX
GAS 6/2
MAX
D143
D144
D145
D146
REGELBEREICH
(Diagramme nebenstehend)
Während des Betriebs schwankt die Brennerleistung zwischen:
• einer MINDESTLEISTUNG in der 1. Stufe
• einer HÖCHSTLEISTUNG in der 2. Stufe.
• Die MINDESTLEISTUNG (MIN) ist aus den
über dem Diagramm aufgeführten Werten zu
wählen.
Beispiel:
bei GAS 3/2 zwischen 80 und 175 kW (entsprechend 69 und 150 Mcal/h) einstellbar.
Dabei ist es nicht erforderlich, den Brennkammerdruck in der 1. Stufe zu kennen.
• Die HÖCHSTLEISTUNG (MAX) ist aus dem
Bereich der nebenstehenden Diagramme zu
wählen.
Es handelt sich hierbei um den REGELBEREICH, der die Höchstleistung des Brenners in
Abhängigkeit vom Brennkammerdruck angibt.
Den Arbeitswert findet man, indem man von
der gewünschten Leistung eine vertikale Linie
und vom entsprechenden Brennkammerdruck
eine horizontale Linie zieht. Der Schnittpunkt
der beiden Geraden ist der Arbeitswert, der
sich innerhalb des REGELBEREICHES befinden muß.
Beispiel:
bei GAS 3/2 wird der Bereich begrenzt von:
• der Achse der Leistungen 130 - 350 kW
• der Achse des Brennkammerdruckes 0 + 7
mbar
• der Brennkammer-Höchstdruck-Kurve
Wenn der Brenner bei einem Brennkammer-
druck von 5 mbar eine Leistung von 250 kW entwickelt, befindet sich der Arbeitswert auf der
Höchstdruck-Kurve. Bei der Definition dieser
Kurve wurde ein Sicherheitsspielraum belassen,
daher kann der gesamte REGELBEREICH genutzt werden.
Achtung:
der REGELBEREICH wurde bei 20°C Raumtemperatur und 1000 mbar Luftdruck festgelegt.
• Die dem Kessel zuzuordnende Brennerlei-
stung ist im Bereich MAX, d.h. im REGELBEREICH zu wählen.
• Der Brenner ist auch in Brennkammern mit Un-
terdruck betriebsfähig.
CAM. COMB. / FEUERRAUM
CAM. COMB. / FEUERRAUM
mbar
COMB. CHAM. / CHAMB. COMB
kW
Mcal/h
.
mbar
COMB. CHAM. / CHAMB. COMB
kW
Mcal/h
MAX
GAS 7/2
MAX
10
D147
HANDELSÜBLICHE KESSEL
Die Brenner-Kessel Kombination gibt keine Probleme, falls der Kessel "CE" - typgeprüft ist und
die Abmessungen seiner Brennkammer sich den
im Diagramm (A)S.12 angegebenen nähern.
Falls der Brenner dagegen an einem handelsüblichen Kessel angebracht werden muß, der nicht
"CE"-typgeprüft ist und/oder mit Abmessungen
der Brennkammer, die entschieden kleiner als
jene in Diagramm (A)S.12 angegebenen sind,
sollte der Hersteller zu Rate gezogen werden.

FIRING RATES
During operation, burner output varies between:
(graphs to side)
• MINIMUM OUTPUT in stage 1 and
• MAXIMUM OUTPUT in stage 2.
• MINIMUM OUTPUT (MIN) is selected from the
range of values given above the graphs.
Example:
an output of between 80 and 175 kW (equivalent to 69 and 150 Mcal/h) may be selected for
GAS 3/2.
The pressure in the combustion chamber need
not be known in stage 1.
• MAXIMUM OUTPUT (MAX) is selected from
the range given in the graphs to the side.
This range is referred to as the FIRING RATES
and provides maximum burner output as a
function of combustion chamber pressure.
The operating point is given by plotting a vertical from the required output and a horizontal
from the corresponding combustion chamber
pressure. The meeting point between the two
lines gives the operating point, which must lie
within the FIRING RATES.
Example:
for GAS 3/2 the range is defined by:
• the 130 - 350 kW output axis
• the 0 + 7 mbar comb. chamber pressure axis
• the maximum pressure in comb. chamber
curve.
If the burner generates an output of 250 kW at
a combustion chamber pressure of 5 mbar, the
operating point is found on the maximum pressure curve. This curve incorporates margins of
safety and therefore the entire FIRING RATE
range may be used.
Important:
the FIRING RATES have been obtained at an
ambient temperature of 20°C and a barometric
pressure of 1000 mbar.
• Burner output should be adapted to boiler
output in the MAX set range, i.e. within the
FIRING RATES.
• The burner can also operate when there is a
negative pressure in the combustion chamber.
COMMERCIAL BOILERS
The burner/boiler combination does not pose
any problems if the boiler is CE type-approved
and its combustion chamber dimensions are
similar to those indicated in the diagram (A)p.12.
If the burner must be combined with a commercial boiler that has not been CE type-approved
and/or its combustion chamber dimensions are
clearly smaller than those indicated in the diagram (A)p.12, consult the manufacturer.
PLAGES DE PUISSANCE (diagrammes ci-
contre)
En fonctionnement la puissance du brûleur varie
entre:
• une PUISSANCE MINIMUM en 1ère allure et
• une PUISSANCE MAXIMUM en 2ème allure.
• La PUISSANCE MINIMUM (MIN) doit être
choisie dans la gamme des valeurs figurant audessus des diagrammes.
Exemple:
pour le GAS 3/2 on peut la choisir entre 80 et 175
kW (ce qui équivaut à 69 et 150 Mcal/h).
Il n'est pas nécessaire de connaître la pression
dans la chambre de combustion en 1ère allure.
• La PUISSANCE MAXIMUM (MAX) doit être
choisie dans l'aire des diagrammes figurant cicontre. Cette aire est appelée PLAGE DE
PUISSANCE et fournit la puissance maximum
du brûleur en fonction de la pression dans la
chambre de combustion.
On trouve le point de travail en traçant une verticale à partir de la puissance désirée et une
horizontale au niveau de la pression correspondante dans la chambre de combustion. Le
point de rencontre des deux droites est le point
de travail qui doit rester dans les limites de la
PLAGE DE PUISSANCE.
Exemple:
pour le GAS 3/2 l'aire est délimitée par:
• l'axe des puissances 130 - 350 kW
• l'axe des pressions dans la chambre de comb.
0 + 7 mbar
• la courbe de pression max. dans la chambre de
combustion.
Si le brûleur développe une puissance de 250
kW à une pression de 5 mbar dans la chambre
de combustion, le point de travail se trouve sur la
courbe de pression maximum. Cette courbe a
été définie avec des marges de sécurité, on peut
utiliser par conséquent toute l'aire de la PLAGE
DE PUISSANCE.
Attention:
la PLAGE DE PUISSANCE a été calculée à la
température ambiante de 20°C et à la pression
barométrique de 1000 mbar.
• La puissance du brûleur à associer à la chau-
dière doit être choisie dans l'aire MAX, c'est-àdire dans la PLAGE DE PUISSANCE.
• Le brûleur peut également fonctionner avec
une chambre de combustion en dépression.
CHAUDIERES COMMERCIALES
L'accouplement brûleur-chaudière ne pose
aucun problème si la chaudière est homologuée
CE et si les dimensions de sa chambre de combustion sont proches de celles indiquées dans le
diagramme (A)p.12.
Par contre, si le brûleur doit être accouplé à une
chaudière commerciale non homologuée CE, et/
ou avec des dimensions de chambre de combustion plus petites que celles indiquées dans le
diagramme (A)p.12, consulter le constructeur.
11

.
Cam. comb ./F euerraum
Comb. cham./Chamb . comb
(A)
mbar
Pressione gas/Gasdruk
Gas pressure/Pression gaz
mbar
Pressione gas/Gasdruk
Gas pressure/Pression gaz
mbar
Pressione gas/Gasdruk
Gas pressure/Pression gaz
PRÜFKESSEL (A)
Die Regelbereiche wurden an speziellen Prüfkesseln entsprechend Norm EN 676 ermittelt.
In (A) sind Durchmesser und Länge der PrüfBrennkammer angegeben.
Beispiel: Leistung 1500 Mcal/h:
Durchmesser = 80cm, Länge = 2,5 m.
GASDRUCK
Der Gasdruck in Abhängigkeit von der Brennerleistung in der 2. Stufe kann nebenstehenden
Diagrammen entnommen werden.
Die Kurven stellen den Strömungsverlust des
Gases am Flammkopfes dar.
Kurven:
D44
1= Erdgas Hu 10 kWh/Nm3- 8,60 Mcal/Nm
Reindichte - 0,71 kg/Nm
2= Erdgas Hu 8,1 kWh/Nm3- 7,40 Mcal/Nm
Reindichte - 0,78 kg/Nm
Die Kurven wurden unter folgenden Bedingungen ermittelt:
• An der Entnahmestelle 12)(A)S.8 ermittelter
Druck
• Feuerraum-Druck = 0 mbar
• Flammkopfregulierung wie auf Seite 16 aufge-
führt
• Brennerbetrieb in der 2. Stufe
Will man die annähernde Leistung des auf 2.
Stufe arbeitenden Brenners bei Kenntnis des
verwendeten Gases, des Gasdrucks an der Entnahmestelle 12)(A)S.8 und des Brennkammerdrucks ermitteln, wie folgt vorgehen: vom
Gasdruck den Brennkammer-Druck abziehen
und im Diagramm des entsprechenden Brenners
ablesen.
Beispiel:
• Brenner GAS 3/2
• Erdgas Hu 10 kWh/Nm
• Gasdruck an der Entnahmestelle 12)(A)S.8=10 mbar
3
(Kurve 1)
• Brennkammerdruck =2 mbar
10 - 2=8 mbar
Dies entspricht im Diagramm des Brennermodells GAS 3/2 einer Leistung von 270 kW in der
2.Stufe.
Dieser Wert dient als erste Näherung; der tatsächliche Durchsatz wird am Zähler abgelesen.
Will man hingegen den an der Entnahmestelle
12)(A)S.8 erforderlichen Gasdruck bei Kenntnis
der gewünschten Leistung des Brenners in der
2. Stufe, mit welcher der Brenner betrieben werden soll, der Gasart und des Brennkammerdrucks ermitteln, wie folgt vorgehen: den im
nebenstehenden Diagramm aufgeführten Druck
mit dem Brennkammerdruck addieren. Beide
Druckwerte beziehen sich auf die Leistung des
Brenners in der 2. Stufe.
Beispiel:
• Brenner GAS 3/2
• Gewünschte Leistung in der 2. Stufe: 270 kW
• Erdgas Hu 10 kWh/Nm3 (Kurve 1)
• Gasdruck bei Leistung von 270 kW,
aus dem Diagramm von GAS 3/2 = 8 mbar
• Brennkammerdruck = 2 mbar
8 + 2 = 10 mbar
ist der an der Entnahmestelle 12)(A)S.8 erforderliche Druck
Merke :
Wenn die Gaszuleitung es nicht gestattet, den in
den Diagrammen angegebenen Gasdruck zu erhalten, so ist der Stellring 2)(B)S.16 um weitere
1-2 Kerben zu öffnen.
Beispiel:
GAS 3/2, Leistung 270 kW, Gas Hu 10 kWh/
Nm3: das Diagramm (C)S.16 gibt als optimalen
Einstellwert des Flammkopfes 4,5 Kerben an
und aus dem nebenstehenden Diagramm geht
hervor, daß an der Gasentnahmestelle
12)(A)S.8 8 mbar Druck benötigt wird. Ist dieser
Druck nicht verfügbar, so ist der Stellring
D968
2)(B)S.16 auf 5,5-6,5 Kerben zu öffnen.
Die Verbrennung muß zufriedenstellend und
ohne Verpuffungen erfolgen.
3
3
3
3
12

TEST BOILER (A)
The firing rates on page 6 were set in relation to
special test boilers, according to regulation EN
676.
Figure (A) indicates the diameter and length of
the test combustion chamber.
Example: output 1500 Mcal/hour:
diameter = 80 cm; length = 2.5 m.
GAS PRESSURE
Curves (to side) show gas pressure as a function
of the output generated by the burner in stage 2.
They represent the drop in pressure of the combustion head.
The curve:
1= Natural gas PCI 10 kWh/Nm3- 8,60 Mcal/Nm
2= Natural gas PCI 8,1 kWh/Nm3- 7,40 Mcal/Nm
absolute density - 0,71 kg/Nm
absolute density - 0,78 kg/Nm
Curves were calculated under the following conditions:
- Pressure measured at test point 12)(A)p.8
- Combustion chamber at 0 mbar
- Combustion head set as on page 17.
- Burner operating in stage 2
If the approximate output at which the burner is
operating in stage 2 must be known, record the
type of gas which was used, its pressure at test
point 12)(A)p.8 and the pressure in the combustion chamber and then proceed as follows:
subtract combustion chamber pressure from gas
pressure and then refer to the graph corresponding to the burner being considered.
Example:
• Burner GAS 3/2
• Natural gas PCI 10 kWh/Nm
3
(curve 1)
• Gas pressure at test point 12)(A)p.8=10 mbar
• Pressure in combustion chamber = 2 mbar
10 - 2= 8 mbar
in the GAS 3/2 graph, this corresponds to an output in stage 2 of 270 kW.
This reading is an initial approximation.
The effective delivery is be read at the meter.
If instead the gas pressure required at test point
12)(A)p.8 must be known, set the output at which
the burner is to operate in stage 2, record the
type of gas used and the chamber pressure and
then proceed as follows:
add the pressure in the combustion chamber to
the pressure indicated in graph (to side); both
pressures correspond to burner output in stage
2.
Example:
• Burner GAS 3/2
• Output required in stage 2: 270 kW
• Natural gas PCI 10 kWh/Nm3 (curve 1).
• Gas pressure at output of 270 kW,
• GAS 3/2 graph = 8 mbar
• Pressure in combustion chamber = 2 mbar
8 + 2 = 10 mbar
is the pressure required at test point 12)(A)p.8.
N.B. :
If the gas mains does not permit the pressure indicated in the graphs, open ring nut 2)(B)p.16 by
a further 1-2 notches.
Example:
GAS 3/2, output 270 kW, gas PCI 10 kWh/Nm
the graph (C)p.9 indicates that the optimum
head setting is 4,5 notches and the graph to the
side indicates that 8 mbar of pressure are required at the test point 12)(A)p.8. If this pressure
is not available, open the ring nut 2)(B)p.16 to
5,5-6,5 notches. Check that combustion is satisfactory and free of pulsations.
3
3
CHAUDIERE D'ESSAI (A)
Les plages de puissance de la page 6 ont été
établies sur des chaudières d'essai spéciales,
selon la norme EN 676.
Nous reportons sur fig (A) le diamètre et la longueur de la chambre de combustion d'essai.
Exemple: Puissance 1500 Mcal/heure:
diamètre = 80 cm; longueur = 2,5 m.
PRESSION GAZ
La pression du gaz en fonction de la puissance
développée par le brûleur en 2ème allure est
donnée par les courbes ci-contre.
Elles représentent la perte de charge de la tête
de combustion:
Courbe:
3
1= Gaz naturel PCI 10 kWh/Nm3- 8,60Mcal/Nm
densité absolue - 0,71 kg/Nm
3
2= Gaz naturel PCI 8,1 kWh/Nm3- 7,40Mcal/Nm
densité absolue - 0,78 kg/Nm
Les courbes sont établies d'après les conditions
suivantes :
• Pression mesurée à la prise 12)(A)p.8
• Chambre de combustion à 0 mbar
• Tête de comb. réglée comme à la page 17
• Brûleur fonctionnant en 2ème allure
Si l'on veut connaître la puissance approximati-
ve à laquelle fonctionne le brûleur en 2ème allure, connaissant le type de gaz employé, sa
pression à la prise 12)(A)p.8 et la pression dans
la chambre de combustion, procéder comme
suit:
soustraire la pression dans la chambre de combustion de la pression du gaz et consulter le diagramme relatif au modèle du brûleur considéré.
Exemple:
• Brûleur GAS 3/2
• Gaz naturel PCI 10 kWh/Nm3 (courbe 1)
• Pression du gaz à la prise 12)(A)p.8 =10 mbar
• Pression chambre de combustion =2 mbar
10 - 2 =8 mbar
auxquels correspond, dans le cas d'un GAS 3/2,
une puissance en 2ème allure de 270 kW.
Cette valeur est une première valeur approximative. Le débit effectif doit être mesuré au compteur.
En revanche, si on désire connaître la pression
du gaz nécessaire à la prise 12)(A)p. 8 lorsque
l'on connaît la puissance à laquelle fonctionnera
le brûleur en 2ème allure, le type de gaz utilisé
et la pression dans la chambre de combustion, il
suffit d'additionner la pression dans la chambre
de combustion à la pression indiquée par le diagramme ci-contre (ces deux pressions correspondent à la puissance du brûleur en 2ème
allure).
Exemple:
• Brûleur GAS 3/2
• Puissance en 2ème allure = 270 kW
• Gaz naturel PCI 10 kWh/Nm
3
(courbe 1)
• Pression du gaz à la puissance de 270 kW,
diagramme du GAS 3/2 = 8 mbar
• Pression chambre de combustion = 2 mbar
8 + 2 =10 mbar
est la pression nécessaire à la prise 12)(A)p.8.
Note
Si le réseau d'alimentation du gaz ne permet pas
d'avoir la pression indiquée par les diagrammes,
ouvrir encore la bride 2)(B)p.16 de 1 ou 2 encoches.
3
:
Exemple:
GAS 3/2, puissance 270 kW, gaz PCI 10 kWh/
3
:
Nm
Le diagramme (C)p.9 indique un réglage idéal
de la tête à 4,5 encoches et le diagramme sur le
côté indique qu'il faut 8 mbar de pression à la prise 12)(A)p.8. Si cette pression n'est pas disponible, ouvrir la bride 2)(B)p.16 à 5,5-6,5
encoches). Contrôler que la combustion soit satisfaisante et sans à-coups.
3
3
3
3
13

mm ABCD
GAS 3/2
GAS 4/2
GAS 5/2
GAS 6/2
GAS 7/2
155
165
165
185
230
160
160
160
195
230
160
160
160
195
230
M10
M10
M10
M12
M12
(A)
(B)
FÜHLER
PROBE
SONDE
(C)
D46
ELEKTRODE
ELECTRODE
D101
D164
INSTALLATION
KESSELPLATTE (A)
Die Abdeckplatte des Brennkammer wie in (A)
gezeigt vorbohren. Die Position der Gewindebohrungen kann mit der zur Grundausstattung
gehörenden Wärmeschild ermittelt werden.
FLAMMROHRLÄNGE (B)
Die Länge des Flammrohrs wird entsprechend
der Angaben des Kesselherstellers gewählt und
muß in jedem Fall größer als die Stärke der Kesseltür einschließlich feuerfestes Material sein.
Die verfügbaren Längen, L (mm), sind
Flammrohr L mm 3/2 4/2 5/2 6/2 7/2
Kurz 43 45 65 85 Standard 185 187 207 227 240
Lang 320 320 365 360 400
- Für Heizkessel mit vorderem Abgasumlauf
9)(B) oder mit Flammenumkehrkammer muß
eine Schutzschicht aus feuerfestem Material 7)
zwischen feuerfestem Material des Kessels 8)
und Flammrohr 6) ausgefüht werden.
Diese Schutzschicht muß so angelegt sein,
daß das Flammrohr ausbaubar ist.
BEFESTIGUNG DES BRENNERS AM HEIZKESSEL (B)
- Vor der Befestigung des Brenners am Heizkessel ist von der Öffnung des Flammrohrs aus zu
überprüfen, ob der Fühler und die Elektrode
gemäß (C) in der richtigen Stellung sind.
- Dann den Flammkopf vom übrigen Brenner abtrennen, indem man die Schrauben 1)(B) und
2) löst und das Gebläse 4) aus den Gleitschienen 3) zieht.
- Das Flammrohr 6) an der Kesselplatte (A) befestigen, dabei den zur Grundausstattung gehörenden Wärmeschild 5)(B)
dazuwischenlegen.
Die 4 ebenfalls beigepackten Schrauben nach
Auftragung von Freßschutzmitteln verwenden.
Es muß die Dichtheit von Brenner-Kessel gewährleistet sein.
Falls bei der vorhergehenden Prüfung die Positionierung des Fühlers oder der Elektrode
sich als nicht richtig erweist, die zwei Schrauben 6)(B)S.16 lösen, das Winkelstück
1)(B)S.16 abnehmen und eine neue Einstellung vornehmen.
Wichtig: den Fühler nicht drehen, sondern wie
in (C) lassen: seine Positionierung in der Nähe
der Zündelektrode könnte den Geräteverstärker beschädigen.
- Schließlich das Gebläse 4)(B) wieder in die
Gleitschienen 3) einführen, Schrauben 2) wieder anbringen und bei geöffnetem Brenner die
Einstellung des Flammkopfes vornehmen.
14

INSTALLATION
INSTALLATION
BOILER PLATE (A)
Drill the combustion chamber locking plate as
shown in (A). The position of the threaded holes
can be marked using the thermal screen supplied with the burner
BLAST TUBE LENGTH (B)
The length of the blast tube should be selected
in relation to indications provided by the boiler
manufacturer and, in any case, should be greater than the thickness of the boiler door complete
with refractory material.
Three different blast tube lengths are available:
Blast tube L mm 3/2 4/2 5/2 6/2 7/2
Shortened 43 45 65 85 Standard 185 187 207 227 240
Lengthened 320 320 365 360 400
For boilers with front flue passes as shown in
9)(B) or a flame inversion chamber, the space
between the front plate quarl 8) and the burner
blast tube 6) must be properly sealed with appropriate refractory material 7).
Afterwards, it must still be possible to pull out the
blast tube.
SECURING THE BURNER TO THE BOILER
(B)
- Before securing the burner to the boiler, look in
the blast tube opening to see whether the
probe and electrode are correctly positioned as
in (C).
- Then separate the combustion head from the
rest of the burner by unscrewing screws 1)(B)
and 2) and drawing out the fan 4) on the slide
bars 3).
- Secure the blast tube 6) to the boiler plate (A),
installing the burner heat shield 5)(B) supplied
as standard equipment.
To do this, use the four standard-issue screws,
having first protected the thread with an antigrip product.
The burner-boiler installation must be hermetically sealed.
If the probe and electrode were not in the correct position in the above control, unscrew the
two screws 6)(B)p.16, remove the elbow
1)(B)p.16 and calibrate them.
Attention: do not rotate the probe but leave it
in position as shown in (C); positioning the
probe near the firing electrode could damage
the control box amplifier.
- Lastly, reassemble the fan 4)(B) on the slide
bars 3), replace the screws 2) and, with the
burner open, set the combustion head.
PLAQUE CHAUDIERE (A)
Percer la plaque de fermeture de la chambre de
combustion comme sur la fig.(A). La position des
trous filetés peut être tracée en utilisant l'écran
thermique fourni avec le brûleur.
LONGUEUR BUSE (B)
La longueur de la buse est choisie selon les indications du constructeur de la chaudière et doit,
de toutes façons, toujours être plus grande que
l'épaisseur de la porte de la chaudière réfractaire
compris.
Rappelons que les longueurs disponibles sont:
Buse L mm 3/2 4/2 5/2 6/2 7/2
Courte 43 45 65 85 Standard 185 187 207 227 240
Longue 320 320 365 360 400
Pour les chaudières avec circulation des fumées
sur l'avant 9)(B), ou avec chambre à inversion de
flamme, réaliser une protection en matériau réfractaire 7), entre réfractaire chaudière 8) et
buse 6).
La protection doit permettre l'extraction de la buse.
FIXATION DU BRULEUR A LA CHAUDIERE
(B)
- Avant de fixer le brûleur à la chaudière, vérifier
par l'ouverture de la buse que la sonde et
l'électrode soient correctement placés comme
indiqué sur la figure (C).
- Séparer ensuite la tête de combustion du reste
du brûleur en dévissant les vis 1)(B) et 2) et en
retirant le ventilateur 4) des guides 3).
- Fixer la buse 6) à la plaque (A) de la chaudière
en intercalant le panneau isolant 5)(B) fourni
avec le brûleur. Utiliser les 4 vis fournies après
en avoir protégé le filetage avec des produits
anti-grippants.
Le joint brûleur-chaudière doit être hermétique.
Si lors du contrôle précédent, le positionnement de la sonde de l'électrode s'avère incorrect, enlever les deux vis 6)(B)p.16, démonter
le coude 1)(B)p.16 et effectuer le réglage.
Important: ne pas tourner la sonde mais la
laisser comme sur la fig. (C); le fait d'être placée à proximité de l'électrode d'allumage pourrait endommager l'amplificateur du boîtier de
contrôle.
- Pour finir, remonter le ventilateur 4)(B) sur les
guides 3), remettre les vis 2) et, avec le brûleur
ouvert, passer au réglage de la tête de combustion.
15

GEÖFFNETER BRENNER
BURNER OPEN
BRULEUR OUVERT
(A)
EINSTELLUNG DES FLAMMKOPFES
SETTING THE COMBUSTION HEAD
REGLAGE TETE DE COMBUSTION
(B)
GAS 3-4-5-6 /2 GAS 7 /2
D176
D118
EINSTELLUNG DES FLAMMKOPFS
Die Einstellung des Flammkopfs ist einzig von
der vom Brenner in der 2. Stufe entwickelten
Höchstleistung abhängig.
Daher muß vor der Einstellung des Flammkopfs
dieser Wert festgelegt werden.
Am Flammkopf sind zwei Einstellungen vorzunehmen:
Gas und Luft. Dies erfolgt bei geöffnetem Brenner (Abb. A), wenn der Brenner am Kessel angebracht wird.
Gas-Einstellung
- Schraube 3)(B) lockern.
- Stellring 2) so drehen, bis die gefundene Kerbe
4) mit dem Indexstift 5) zusammenfällt.
- Schraube 3) festziehen.
Luft-Einstellung
- Die zwei Schrauben 6)(B) lockern
- Das Kniestück 1) nach vorne oder hinten verschieben, so daß seine Hinterfläche 7) mit dem
gewünschten Einstellwert auf der Skala 8)
übereinstimmt.
- Schrauben 6) festziehen.
Achtung:
die Kerbnummer für Gas und Luft sind gleich
und kann aus dem Diagramm (C) abgelesen
werden, je nach der Leistung, auf die der Brenner in der 2. Stufe eingestellt wird.
Beispiel:
der Brenner GAS 3/2 ist an einem 240 kW-Kessel angebracht. Bei einem Wirkungsgrad von
90% muß der Brenner ca. 270 kW in der 2. Stufe
abgeben.
Aus dem Diagramm (C) geht hervor, daß zu dieser Leistung Gas und Luft auf Markierung 4,5
eingestellt werden müssen.
Merke
Das Diagramm gibt die optimale Einstellung des
Flammkopfes 2)(B) an. Falls der Gaszuleitungsdruck sehr niedrig ist und dadurch der gewünschte Druck (und folglich der gewünschte
Durchsatz) nicht erreicht werden kann, kann der
Stellring um weitere 1-2 Kerben geöffnet werden. Siehe auch Anmerkung auf S. 12.
Nun den Brenner schließen:
- die Einheit A auf den beiden Gleitschienen
2)(A) verschieben;
- Schrauben 1) wieder anbringen.
Wichtiger Hinweis:
beim Schließen des Brenners ist es ratsam, das
Hochspannungskabel und das Kabel des Flammenfühlers vorsichtig nach außen zu ziehen, bis
sie leicht gespannt sind.
(C)
D1113
16

SETTING THE COMBUSTION HEAD
Combustion head adjustment depends exclusively on MAX output generated by the burner in
stage 2.
This value must therefore be set before adjusting
the combustion head.
Two head settings are available, i.e. the gas setting and the air setting. These are made with the
burner open (fig. A), when securing the burner to
the boiler.
Gas adjustment
- Loosen screw 3)(B).
- Rotate the ring nut 2) so that indicator 5) coincides with the required notch 4).
- Fasten screw 3).
Air adjustment
- Loosen the two screws 6)(B).
- Move the elbow 1) forwards or backwards so
that its rear surface 7) coincides with the required notch on the plate 8).
- Fasten the screws 6).
Important:
the notch number is the same for gas and air and
is taken from graph (C) according to the output
at which the burner is set in stage 2.
Example:
a GAS 3/2 burner is installed on a 240 kW boiler.
If a 90 % efficiency rate is considered, the burner
should deliver approximately 270 kW in stage 2.
Graph (C) indicates that for this capacity, the gas
and air should be set on notch 4.5.
N.B.
The graph indicates the optimum ring nut 2)(B)
setting. If mains pressure is very low and does
not permit the required pressure (and so the required output), the ring nut may be opened by a
further 1-2 notches. See also the note on page
13.
Lastly, close the burner as follows:
- Slide unit A along the two slide bars 2)(A)
- Replace the screws 1)
Important:
when fitting the burner on the two slide bars, it is
advisable to gently draw out the high tension cable and flame detection probe cable until they
are slightly stretched.
REGLAGE TETE DE COMBUSTION
Le réglage de la tête de combustion dépend uniquement de la puissance MAX développée par
le brûleur en 2ème allure.
Par conséquent, avant de régler la tête de combustion, il faut déterminer cette valeur.
On a prévu deux réglages de la tête:
celui du gaz et celui de l'air. Ils s'effectuent avec
le brûleur ouvert, fig. (A), au moment de la fixation du brûleur à la chaudière.
Réglage gaz
- Desserrer la vis 3)(B).
- Tourner la bague 2) de façon à ce que l'index
5) coïncide avec l'encoche désirée 4).
- Bloquer la vis 3).
Réglage air
- Desserrer les deux vis 6)(B).
- Déplacer le coude 1) en avant ou en arrière de
façon à ce que son plan arrière 7) coïncide
avec l'encoche désirée sur la plaquette 8).
- Bloquer les vis 6).
Attention:
le numéro de l'encoche pour le gaz et l'air est le
même et est déduit du diagramme (C) selon la
puissance à laquelle le brûleur est réglé en
2ème allure.
Exemple:
le brûleur GAS 3/2, installé sur une chaudière de
240 kW avec un rendement de 90 %, devra produire environ 270 kW en 2ème allure.
Du diagramme (C) on déduit que pour cette puissance les réglages du gaz et de l'air doivent être
effectués sur l'encoche 4,5 environ.
Note
Le diagramme indique le réglage idéal de la tête
2)(B). Si la pression dans le réseau d'alimenta-
tion du gaz est très basse et ne permet pas d'atteindre la pression (et donc la puissance) désiré,
il est possible d'ouvrir ultérieurement la bride de
1 ou 2 encoches.
Voir également la note page 13.
Pour finir, fermer le brûleur:
- Faire glisser le groupe A sur les deux guides
2)(A).
- Remettre les vis 1).
Attention:
au moment de la fermeture du brûleur sur les
deux guides, il faut tirer délicatement vers l'extérieur le câble de haute tension et le petit câble de
la sonde de détection flamme, jusqu'à ce qu'ils
soient légèrement tendus.
17
D969
A
Gasarmaturen
Gas train - Rampe gaz
Ø C.T. Cod. 3/2 4/2 5/2 Cod. 6/2 7/2 Cod. Cod.
3/4” − 3970046 • - - 3000824 - - - 3010123
1” − 3970079 • • • 3000824 - - - 3010123
1”1/4 − 3970152 • • • 3010124 • - 3010125 3010123
1”1/2 − 3970153 • • • - • • 3000843 3010125
2” − 3970154 - • • 3000822 • • - 3010125
2” ♦ 3970166 - • • 3000822 • • - -
DN 65 − 3970155 - - - - • • 3000825 3010125
DN 65 ♦ 3970167 - - - - • • 3000825 DN 80 − 3970156 - - - - - • 3000826 3010125
DN 80 ♦ 3970168 - - - - - • 3000826 -
Ø
3/4” Multiblock MB ZRDLE 407 BO1
1” Multiblock MB ZRDLE 410 BO1
1”1/4 Multiblock MB ZRDLE 412 BO1
1”1/2 GF 515/1 FRS 515 MVD 515/5+ZRDLE 415/5
2” GF 520/1 FRS 520 MVD 520/5+ZRDLE 420/5
DN 65 GF 4065/3 FRS 5065 MVD 5065/5+VGF+SKP10
DN 80 GF 4080/3 FRS 5080 MVD 5080/5+VGF+SKP10
GAS 13 GAS 13 12
B
BESTANDTEILE - COMPONENTS - COMPOSANTS
5 6 8 - 9
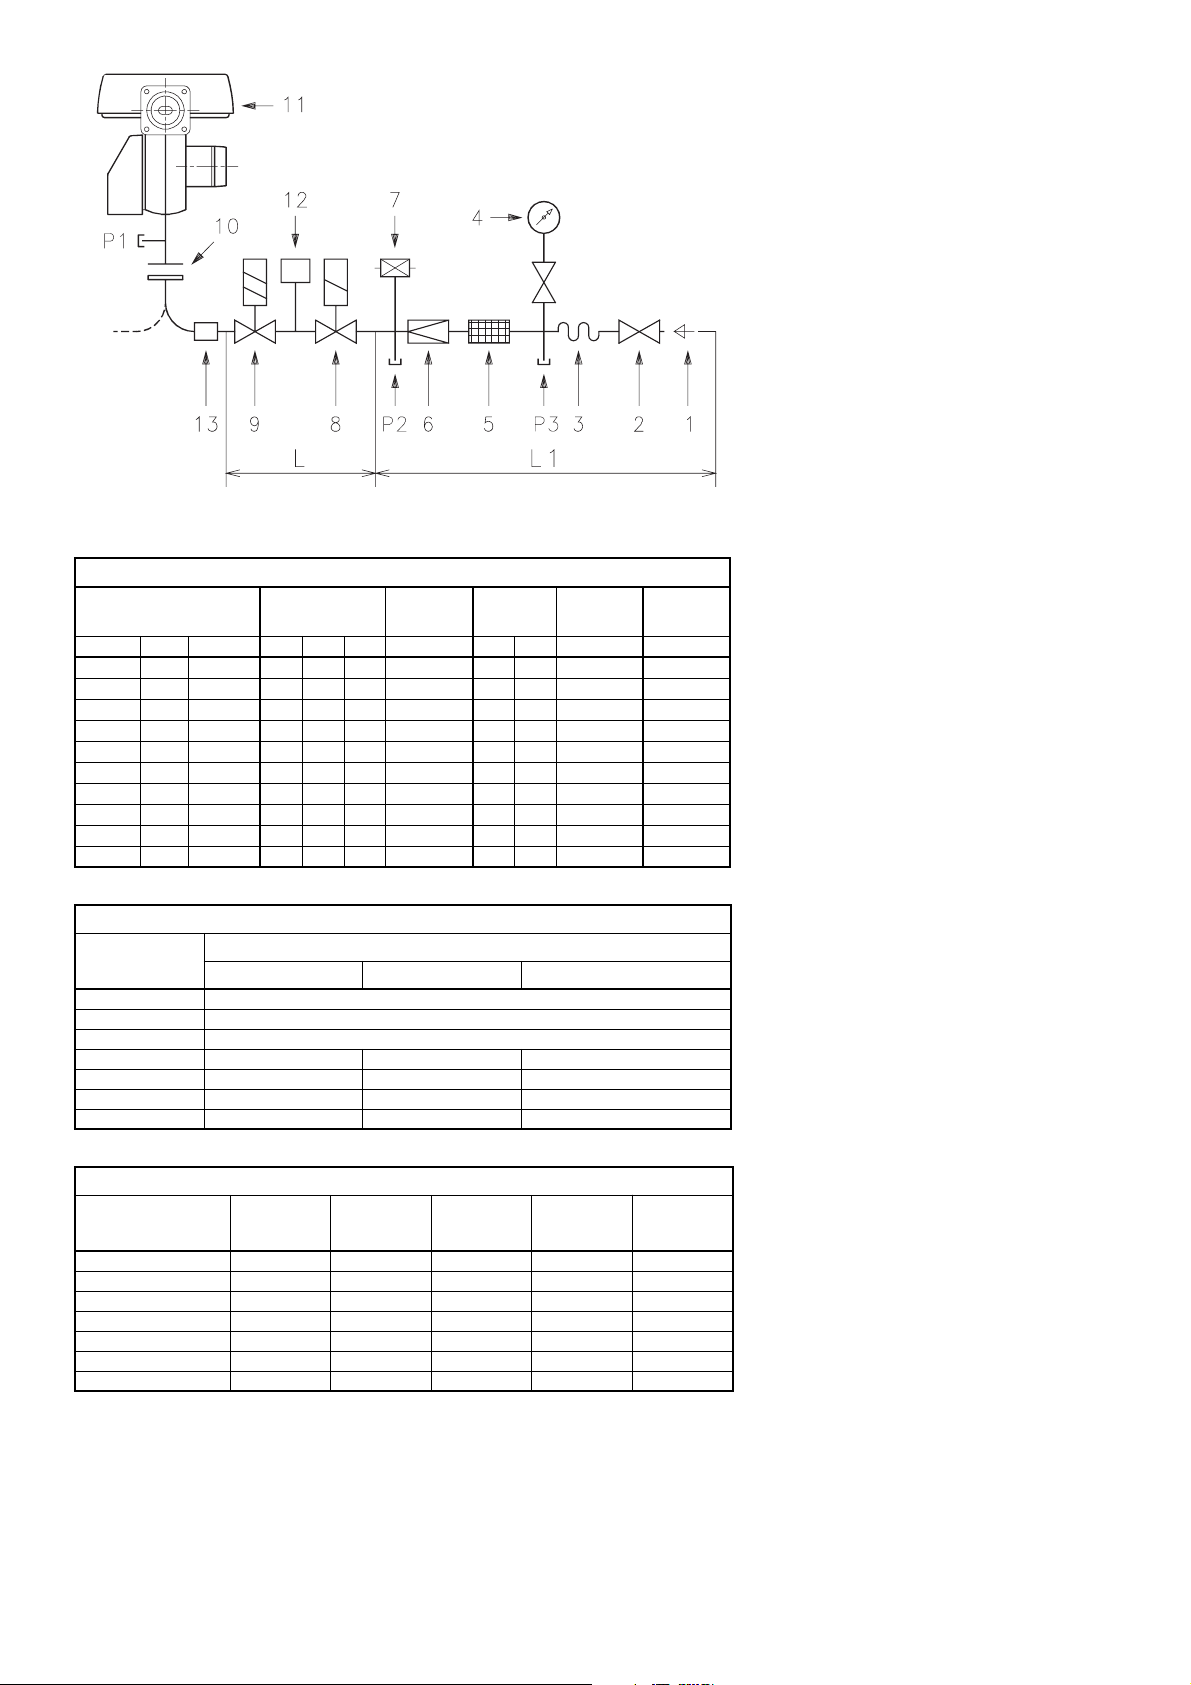
GASZULEITUNG
Die Armatur kann je nach Bedarf von rechts
•
bzw. links zugeführt werden.
• Die Gasmagnetventile 8)-9) sollen so nah wie
möglich am Brenner liegen, damit die Gaszufuhr zum Flammkopf innerhalb 3 Sekunden sichergestellt ist.
• Überprüfen, ob der Einstellbereich des Druck-
reglers (Farbe der Feder) die für den Brenner
erforderlichen Druckwerte vorsieht.
GASARMATUREN
Nach Norm EN 676 typgeprüft, wird gesondert
mit dem in Tab. (A) angegebenen Code geliefert.
KEY TO LAYOUT
1 - Gaszuleitung
2 - Handbetätigtes Ventil
3 - Kompensator
4 - Manometer mit Druckknopfhahn
5 - Filter
6 - Druckregler (senkrecht)
7 - Gas-Minimaldruckwächter
8 - Sicherheitsmagnetventil VS (senkrecht)
9 - Regelmagnetventil VR (senkrecht)
Drei Einstellungen:
• Zünddurchsatz (schnellöffnend)
• Durchsatz 1° Stufe VR1(langsamöffnend)
• 2ndDurchsatz 2° Stufe VR2(langsamöffnend)
10 - Dichtung und Flansch Brennergrundaus-
stattung
11 - Brenner
12 - Dichtheitskontrolleinrichtung der Gasventile
8)-9).
Laut Norm EN 676 ist die Dichtheitskontrol-
le für Brenner mit Höchstleistung über 1200
kW Pflicht.
13 - Passtück Armatur-Brenner.
P1- Druck am Flammkopf
P2- Druck nach dem Regler
P3- Druck vor dem Filter
L - Gasarmatur gesondert mit dem in Tab. (A)
angegebenen Code geliefert
L1 - Vom Installateur auszuführen
TABELLEN :
A = GASBRENNER UND ZUGEHÖRIGE
NACH EN 676 TYPGEPRÜFTE GASAR-
MATUREN
B = BESTANDTEILE GASARMATUREN
C = STRÖMUNGSVERLUST GASARMATUR L
bei Brennerhöchstleistung
C mbar
Ø
3/4” 39 58
1” 17 25 29 43 51 75
1”1/4 10 15 16 24 29 43 64 95
1”1/2 8 11 12 18 21 31 49 69 116 172
2” 6 8 9 13 19 28 46 68
DN 65 8 11 16 24
DN 80 9 12
GAS 3/2 GAS 4/2 GAS 5/2 GAS 6/2 GAS 7/2
G20 G25 G20 G25 G20 G25 G20 G25 G20 G25
18
ZEICHENERKLÄRUNG TABELLE (A)
C.T. = Dichtheitskontrolleinrichtung der Gas-
ventile 8)-9):
- = Gasarmatur ohne Dichtheitskontrolleinrichtung; die Einrichtung kann gesondert bestellt, siehe Spalte 12, und
später eingebaut werden
♦ =Gasarmatur mit der eingebauten
Dichtheitskontrolleinrichtung VPS.
12 = Dichtheitskontrolleinrichtung VPS der
Gasventile.
Auf Anfrage gesondert von der Gasarmatur lieferbar.
13 = Passtück Armatur-Brenner.
Auf Anfrage gesondert von der Gasarmatur lieferbar.
Merke
Zur Einstellung der Gasarmaturen siehe die beigelegten Anleitungen.

GAS LINE
The gas train can enter the burner from the
•
right or left side, depending on which is the
most convenient.
• The gas solenoids 8)-9) must be as close as
possible to the burner to ensure gas reaches
the combustion head within the safety time
range of 3 s.
• Make sure that the pressure governor calibra-
tion range (spring colour) comprises the pressure required by the burner.
GAS TRAIN
It is type-approved according to EN 676 Standards and is supplied separately from the burner
with the code indicated in Table (A).
KEY TO LAYOUT
1 - Gas input pipe
2 - Manual valve
3 - Vibration damping joint
4 - Pressure gauge with pushbutton cock
5 - Filter
6 - Pressure governor (vertical)
7 - Minimum gas pressure switch
8 - Safety solenoid VS (vertical)
9 - Adjustment solenoid VR (vertical)
Three adjustments:
• ignition delivery (rapid opening)
• 1st stage delivery VR1 (slow opening)
• 2nd stage delivery VR2 (slow opening)
10 - Standard issue burner gasket with flange
11 - Burner
12 - Gas valve 8)-9) leak detection control de-
vice.
In accordance with EN 676 Standards, gas
valve leak detection control devices are
compulsory for burners with maximum outputs of more than 1200 kW.
13 - Gas train/burner adaptor.
P1- Pressure at combustion head
P2- Pressure down-line from the filter
P3- Pressure up-line from the filter
L - Gas train supplied separately with the code
indicated in Table (A)
L1 - The responsibility of the installer
TABLE :
A = GAS BURNERS AND RELEVANT GAS
TRAINS APPROVED ACCORDING TO EN
676
B = GAS TRAIN COMPONENTS
C = GAS TRAIN PRESSURE LOSS L
at maximum burner output
KEY TO TABLE (A)
C.T. = Gas valves 8) - 9) leak detection control
devices:
- = Gas train without gas valve leak detection control device; device that
can be ordered separately and assembled subsequently (see Column
12).
♦ =Gas train with assembled VPS valve
leak detection control device.
12 = VPS valve leak detection control device.
Supplied separately from gas train on request.
13 = Gas train/burner adaptor.
Supplied separately from gas train on request.
Note
See the accompanying instructions for the adjustment of the gas train.
LIGNE ALIMENTATION GAZ
• La rampe peut arriver par la droite ou par la
gauche selon les cas.
• Les électrovannes 8)-9) du gaz doivent être le
plus près possible du brûleur de façon à assurer l'arrivée du gaz à la tête de combustion en
un temps de sécurité de 3 s.
• Contrôler que la plage de réglage du régulateur de pression (couleur du ressort) recouvre
la pression nécessaire au brûleur.
RAMPE GAZ
Elle est homologuée suivant la norme EN 676 et
elle est fournie séparément du brûleur avec le
code indiqué dans le tableau (A).
LEGENDE SCHEMA
1 - Canalisation d'arrivée du gaz
2 - Vanne manuelle
3 - Joint anti-vibrations
4 - Manomètre avec robinet à bouton poussoir
5 - Filtre
6 - Régulateur de pression (vertical)
7 - Pressostat gaz de seuil minimum
8 - Electrovanne de sécurité VS (verticale)
9 - Electrovanne de régulation VR (verticale)
Trois réglages:
• débit d'allumage (ouverture rapide)
• débit 1ère allure VR1 (ouverture lente)
• débit 2ème allure VR2 (ouverture lente)
10 - Joint et bride fournis avec le brûleur
11 - Brûleur
12 - Dispositif de contrôle d'étanchéité vannes
8)-9)
Selon la norme EN 676, le contrôle d'étanchéité est obligatoire pour les brûleurs
ayant une puissance maximale supérieure
à 1200 kW; donc uniquement pour le modèle GAS 7/2.
13 - Adaptateur rampe-brûleur.
P1- Pression à la tête de combustion
P2- Pression en aval du régulateur
P3- Pression en amont du filtre
L - La rampe gaz est fournie à part avec le
code indiqué dans le tab. (A).
L1 - A la charge de l'installateur
TABLEAU :
A = BRULEURS ET RELATIVES RAMPES
GAZ HOMOLOGUÉES SELON LA NORME EN 676
B = COMPOSANTS RAMPE GAZ
C = PERTE DE CHARGE RAMPE GAZ L
à la puissance maximum du brûleur
LEGENDE TABLEAU (A)
C.T. = Dispositif de contrôle d'étanchéité van-
nes 8)-9):
- = Rampe sans dispositif de contrôle
d'étanchéité; dispositif qui peut être
commandé à part et monté par la
suite, voir colonne 12.
♦= Rampe avec dispositif de contrôle
d'étanchéité VPS monté.
12 = Dispositif VPS de contrôle d'étanchéité
de la vanne .
Fourni sur demande séparément de la
rampe gaz.
13 = Adaptateur rampe-brûleur.
Fourni sur demande séparément de la
rampe gaz.
Note
Pour le réglage de la rampe gaz voir les instructions qui l'accompagnent.
19

GAS 3/2 - 4/2
WERKSEITIG AUSGEFÜRTE ELEKTROANLAGE
ELECTRICAL EQUIPMENT FACTORY SET
INSTALLATION ELLECTRIQUE REALISEE EN USINE
ELEKTROANLAGE
werkseitig ausgeführt
SCHEMA (A)
Brenner GAS 3/2 - 4/2 (einphasig)
SCHEMA (B)
Brenner GAS 5/2 - 6/2 - 7/2 (dreiphasig)
- Diese Modelle werden werkseitig für 400 V
Stromversorgung vorbereitet.
- Falls die Stromversorgung 230 V beträgt, den
Motoranschluß (von Stern- auf Dreieck-schaltung) und die Einstellung des Überstromauslösers verändern.
ZEICHENERKLÄRUNG SCHEMEN (A) - (B)
C - Kondensator
CMV - Motorkontaktgeber
F1 - Funkentstörer
MMI 813 - Steuergerät
MB - Klemmenbrett Brenner
MV - Gebläsemotor
PA - Luftdruckwächter
RT - Überstromauslöser
SM - Stellantrieb
SO - Ionisationssonde
SP - Steckanschluß
TA - Zündtransformator
TB - Brennererdung
(A)
GAS 5/2 - 6/2 - 7/2
WERKSEITIG AUSGEFÜRTE ELEKTROANLAGE
ELECTRICAL EQUIPMENT FACTORY SET
INSTALLATION ELLECTRIQUE REALISEE EN USINE
D981
(B)
D971
20

ELECTRICAL SYSTEM
as set up by the manufacturer
INSTALLATION ELECTRIQUE
réalisée en usine
LAYOUT (A)
Burners GAS 3/2 - 4/2 (single-phase)
LAYOUT (B)
Burners GAS 5/2 - 6/2 - 7/2 (single-phase)
- These models leave the factory preset for 400
V power supply.
- If 230 V power supply is used, change the mo-
tor connection from star to delta and change
the setting of the thermal cut-out as well.
KEY TO LAYOUTS (A) - (B)
C - Capacitor
CMV - Motor contactor
F1 - Protection against radio interference
MMI 813 - Control box
MB - Burner terminal strip
MV - Fan motor
PA - Air pressure switch
RT - Thermal cut-out
SM - Servomotor
SO - Ionisation probe
SP - Plug-socket
TA - Ignition transformer
TB - Burner ground
SCHEMA (A)
Brûleurs GAS 3/2 - 4/2 (monophasés)
SCHEMA (B)
Brûleurs GAS 5/2 - 6/2 - 7/2 (triphasés)
- Les modèles GAS 5/2 - 6/2 - 7/2 triphasés quittent l'usine prévus pour une alimentation électrique à 400 V.
- Si l'alimentation est à 230 V, modifier le branchement du moteur (d'étoile à triangle) et le réglage du relais thermique.
LEGENDE SCHEMAS (A) - (B)
C - Condensateur
CMV - Contacteur moteur
F1 - Protection contre parasites radio
MMI 813 - Coffret de sécurité
MB - Porte-bornes brûleur
MV - Moteur ventilateur
PA - Pressostat air
RT - Relais thermique
SM - Servomoteur
SO - Sonde d'ionisation
SP - Fiche-prise
TA - Transformateur d'allumage
TB - Mise à la terre brûleur
21

KABELBEFESTIGUNG - CABLE SECURING - FIXATION CABLES
GAS 3/2 - 4/2 GAS 5/2 - 6/2 - 7/2
D151
(A)
(B)
GAS 3/2 - 4/2 without leak detection control device
VOM INSTALLATEUR AUSZUFÜHRENDE ELEKTROINSTALLATION
ELECTRICAL CONNECTION OF BURNER BY INSTALLER
RACCORDEMENT BRULEUR EFFECTUE PAR L’INSTALLATEUR
D972
Kabelquerschnitt - Cable selection - Section câbles
GAS 3/2
230V
F
A
mm
2
1,5
L
Nicht aufgeführte Kebelquerschnitte - Section when not indicated - Section câbles non indiquée: 1,5 mm
GAS 4/2
230V
5
6
1,5
(C)
GAS 3/2 - 4/2 with VPS leak detection control device
VOM INSTALLATEUR AUSZUFÜHRENDE ELEKTROINSTALLATION
ELECTRICAL CONNECTION OF BURNER BY INSTALLER
RACCORDEMENT BRULEUR EFFECTUE PAR L’INSTALLATEUR
ELEKTROANLAGE
vom Installateur auszuführen
Gemäß Norm EN 60 335-1 biegsame Kabel ver-
wenden:
- falls unter PVC-Mantel mindestens den Typ
H05 VV-F verwenden.
- falls unter Gummimantel mindestens den Typ
H05 RR-F verwenden.
KABELBEFESTIGUNG (A) - (B)
Alle mit dem Klemmenbrett 7)(A)S.8 des Brenners zu verbindenden Kabel sind durch die entsprechenden Kabeldurchgänge 8)(A)S.8 zu
führen. Die Kabeldurchgänge und die Vorbohrungen können auf verschiedene Arten genutzt
werden. Als Beispiel:
GAS 3/2 - 4/2
1 - Einphasenspeisung . . . . . . . . . . . . . Pg 13,5
2 - Fernsteuerung TR . . . . . . . . . . . . . . Pg 13,5
3 - Fernsteuerung TL . . . . . . . . . . . . . . Pg 13,5
4 - Gasventile . . . . . . . . . . . . . . . . . . . . Pg 13,5
(wenn die Dichtheitskontrolleinrichtung
RG1/CT oder LDU 11 nicht eingebaut ist)
5 - Gasdruckwächter oder. . . . . . . . . . . Pg 13,5
Dichtheitskontrolle der Gasventile
6 - Loch für eventuellen Stutzen . . . . . . Pg 13,5
7 - Loch für eventuellen Stutzen . . . . . . . .Pg 21
GAS 5/2 - 6/2 - 7/2
1 - Drehstromspeisung . . . . . . . . . . . . . . . Pg 21
2 - Einphasenspeisung . . . . . . . . . . . . . Pg 13,5
3 - Fernsteuerung TR . . . . . . . . . . . . . . Pg 13,5
4 - Fernsteuerung TL . . . . . . . . . . . . . . Pg 13,5
5 - Gasventile . . . . . . . . . . . . . . . . . . . . Pg 13,5
(wenn die Dichtheitskontrolleinrichtung
RG1/CT oder LDU 11 nicht eingebaut ist)
6 - Gasdruckwächter oder. . . . . . . . . . . Pg 13,5
Dichtheitskontrolle der Gasventile
7 - Loch für eventuellen Stutzen . . . . . . Pg 13,5
8 - Loch für eventuellen Stutzen . . . . . . . .Pg 11
2
Um dem von IP 40 vorgeschriebenen Schutzgrad zu gewährleisten, die Öffnungen der nicht
verwendeten Stutzen abdecken
SCHEMA (C) - Einphasenspeisung
Elektroanschluß der Brenner GAS 3/2 - 4/2
ohne Dichtheitskontrolle der Gasventile.
(C)
D973
GAS 3/2 - 4/2 with RG1/CT RIELLO or LDU 11 LANDIS leak detection control device
VOM INSTALLATEUR AUSZUFÜHRENDE ELEKTROINSTALLATION
ELECTRICAL CONNECTION OF BURNER BY INSTALLER
RACCORDEMENT BRULEUR EFFECTUE PAR L’INSTALLATEUR
(D)
D974
D975
SCHEMA (D) - Einphasenspeisung
Elektroanschluß der Brenner GAS 3/2 - 4/2
mit Dichtheitskontrolle VPS der Gasventile.
Die Dichtheitskontrolle der Gasventile 8)-9)S.18
erfolgt umgehend vor jedem Brennerstart
SCHEMA (E) - Einphasenspeisung
Elektroanschluß der Brenner GAS 3/2 - 4/2
mit Dichtheitskontrolle der Gasventile RG1/
CT RIELLO oder LDU 11 LANDIS.
Die Dichtheitskontrolle der Gasventile 8)-9)S.18
erfolgt umgehend vor jedem Brennerstart
ZEICHENERKLÄRUNG SCHEMEN (C) - (D) - (E)
IN - Schalter für das manuelle Ausschalten
des Brenners
MB - Klemmenbrett Brenner
PC - Gasdruckwächter für Dichtheitskontrolle
PG - Gas-Mindestdruckwächter
S - Störabschaltung-Fernmeldung
S1 - Fernmeldung Störabschaltung
Dichtheitskontrolle
TR - Einstell-Fernsteuerung:
steuert 1. und 2. Betriebsstufe.
Wird ein Einstufenbetrieb des Brenners
gewünscht, so ist TR zu überbrücken.
TL - Begrenzungsfernsteuerung:
schaltet den Brenner aus, wenn die Tem-
peratur oder der Kesseldruck den festge-
legten Höchstwert erreichen.
TS - Sicherheitsfernsteuerung:
tritt bei Defekt an TL in Aktion.
VR1 - Gasventil 1. Stufe
VR2 - Gasventil 2. Stufe
VS - Sicherheitsventil
XP - Stecker für die Dichtheitskontrolleinrich-
tung
22

ELECTRICAL SYSTEM
installer-set
Use flexible cables according to regulation EN
60 335-1:
- if in PVC boot, use at least HO5 VV-F
- if in rubber boot, use at least H05 RR-F.
CABLE SECURING (A) - (B)
All cables to be connected to the burner terminal
strip 7)(A)p.8 should pass through fair leads
8)(A)p.8. The fair leads and precut holes can be
used in various ways. One example is given below:
GAS 3/2 - 4/2
1 - Single-phase power supply . . . . . . Pg 13,5
2 - Remote control device TR . . . . . . . Pg 13,5
3 - Remote control device TL . . . . . . . Pg 13,5
4 - Gas valves . . . . . . . . . . . . . . . . . . . Pg 13,5
(when RG1/CT or LDU 11 leak detection
control device is not assembled)
5 - Gas pressure switch or. . . . . . . . . . Pg 13,5
gas valve leak detection control device
6 - Fair lead fitting hole, if required . . . Pg 13,5
7 - Fair lead fitting hole, if required . . . Pg 21
GAS 5/2 - 6/2 - 7/2
1 - Three-phase power supply. . . . . . . Pg 21
2 - Single-phase power supply . . . . . . Pg 13,5
3 - Remote control device TR . . . . . . . Pg 13,5
4 - Remote control device TL . . . . . . . Pg 13,5
5 - Gas valves . . . . . . . . . . . . . . . . . . . Pg 13,5
(when RG1/CT or LDU 11 leak detection
control device is not assembled)
6 - Gas pressure switch or. . . . . . . . . . Pg 13,5
gas valve leak detection control device
7 - Fair lead fitting hole, if required . . . Pg 13,5
8 - Fair lead fitting hole, if required . . . Pg 11
To ensure that the IP 40 protection classification
is maintained, close all unused fair lead fitting
holes.
LAYOUT (C) - The GAS 3/2 - 4/2 Models electrical connection single-phase power supply without leak detection control device.
LAYOUT (D) - The GAS 3/2 - 4/2 Models electrical connection single-phase power supply with VPS leak detection control device.
Gas valve 8)-9)p. 18 leak detection control takes
place immediately before every burner starting.
LAYOUT (E) - The GAS 3/2 - 4/2 Models electrical connection single-phase power supply with RG1/CT RIELLO or LDU LANDIS
leak detection control device.
Gas valve 8)-9)p. 18 leak detection control takes
place immediately before every burner starting.
KEY TO LAYOUTS (C) - (D) - (E)
IN - Manual burner stop switch
MB - Burner terminal strip
PC - Gas pressure switch for leak detection
control device
PG - Min. gas pressure switch
S - Remote lock-out signal
S1 - Remote lock-out signal of leak detection
control device
TR - High-low mode load control system:
controls operating stages 1 and 2.
If the burner is to be set up for single
stage operation, replace of remote con-
trol device TR with a jumper.
TL - Load limit remote control system:
shuts down the burner when the boiler
temperature or pressure reaches the
preset value.
TS - Safety load control system:
operates when TL is faulty
VR1 - Gas valve, stage 1
VR2 - Gas valve, stage 2
VS - Safety valve
XP - Plug for leak detection control device
RACCORDEMENT ELECTRIQUE
effectué par l'installateur
Utiliser des câbles flexibles selon la norme EN
60 335-1:
- si en gaine PVC, au moins type H05 VV-F
- si en gaine caoutchouc, au moins type H05
RR-F.
FIXATION CABLES (A) - (B)
Tous les câbles à raccorder au porte-bornes
7)(A)p.8 du brûleur doivent passer dans les pas-
se-câbles 8)(A)p.8. L'utilisation des passe-câble
et des trous prédécoupés peut se faire de différentes manières: à titre d'exemple nous indiquons le mode suivant:
GAS 3/2 - 4/2
1 - Alimentation monophasée. . . . . . . . Pg 13,5
2 - Télécommande TR . . . . . . . . . . . . . Pg 13,5
3 - Télécommande TL. . . . . . . . . . . . . . Pg 13,5
4 - Vannes gaz . . . . . . . . . . . . . . . . . . . Pg 13,5
(lorsque le contrôle d'étanchéité RG1/CT
ou LDU 11 n'est pas monté)
5 - Pressostat gaz ou dispositif de . . . . Pg 13,5
contrôle d'étanchéité vannes gaz
6 - Trou pour éventuel presse-étoupe. . Pg 13,5
7 - Trou pour éventuel presse-étoupe. . . . Pg 21
GAS 5/2 - 6/2 - 7/2
1 - Alimentation triphasée. . . . . . . . . . . . . Pg 21
2 - Alimentation monophasée. . . . . . . . Pg 13,5
3 - Télécommande TR . . . . . . . . . . . . . Pg 13,5
4 - Télécommande TL. . . . . . . . . . . . . . Pg 13,5
5 - Vannes gaz . . . . . . . . . . . . . . . . . . . Pg 13,5
(lorsque le contrôle d'étanchéité RG1/CT
ou LDU 11 n'est pas monté)
6 - Pressostat gaz ou dispositif de . . . . Pg 13,5
contrôle d'étanchéité vannes gaz
7 - Trou pour éventuel presse-étoupe. . Pg 13,5
8 - Trou pour éventuel presse-étoupe. . . . Pg 11
Pour garantir le degré de protection IP 40, boucher les trous des presse-étoupe inutilisés.
SCHEMA (C) - Alimentation monophasée
Branchement électrique brûleurs GAS 3/2 - 4/2
sans dispositif de contrôle d'étanchéité.
SCHEMA (D) - Alimentation monophasée
Branchement électrique brûleurs GAS 3/2 - 4/2
avec dispositif de contrôle d'étanchéité VPS.
Le contrôle d'étanchéité des vannes 8)-9)p.18
se fait juste avant chaque mise en marche du
brûleur.
SCHEMA (E) - Alimentation monophasée
Branchement électrique brûleurs GAS 3/2 - 4/2
avec dispositif de contrôle d'étanchéité RG1/
CT RIELLO ou LDU 11 LANDIS.
Le contrôle d'étanchéité des vannes 8)-9)p.18
se fait juste avant chaque mise en marche du
brûleur.
LEGENDE SCHEMAS (C) - (D) - (E)
IN - Interrupteur électrique pour arrêt manuel
brûleur
MB - Porte-bornes brûleur
PC - Pressostat gaz pour contrôle d'étanchéi-
té
PG - Pressostat gaz seuil minimum
S - Signalisation blocage brûleur à distance
S1 - Signalisation blocage contrôle d'étan-
chéité à distance
TR - Télécommande de réglage:
commande 1ère et 2ème allure de fonc-
tionnement.
Si l'on désire un brûleur à fonctionne-
ment à une seule allure, remplacer TR
par un pontet.
TL - Télécommande de limite:
arrête le brûleur quand la température
ou la pression dans la chaudière a at-
teint la valeur fixée.
TS - Télécommande de sécurité:
intervient quand le TL tombe en panne
VR1 - Vanne gaz, 1ère allure
VR2 - Vanne gaz, 2ème allure
VS - Vanne de sécurité
XP - Fiche pour le contrôle d'étanchéité
23

GAS 5/2 - 6/2 - 7/2 without leak detection control device
VOM INSTALLATEUR AUSZUFÜHRENDE ELEKTROINSTALLATION
ELECTRICAL CONNECTION OF BURNER BY INSTALLER
RACCORDEMENT BRULEUR EFFECTUE PAR L’INSTALLATEUR
D976
Kabelquerschnitt - Cable selection - Section câbles
GAS 5/2 GAS 6/2 GAS 7/2
230V 400V 230V 400V 230V 400V
FLA
mm
Nicht aufgeführte Kebelquerschnitte - Section when not indicated - Section câbles non indiquée: 1,5 mm
6
2
1,561,5161,5101,5252,5161,5
(A)
GAS 5/2 - 6/2 - 7/2 with VPS leak detection control device
VOM INSTALLATEUR AUSZUFÜHRENDE ELEKTROINSTALLATION
ELECTRICAL CONNECTION OF BURNER BY INSTALLER
RACCORDEMENT BRULEUR EFFECTUE PAR L’INSTALLATEUR
SCHEMA (A) - Dreiphasenspeisung
Elektroanschluß der Brenner GAS 5/2 - 6/2 - 7/2
ohne Dichtheitskontrolle der Gasventile.
SCHEMA (B) - Dreiphasenspeisung
Elektroanschluß der Brenner GAS 5/2 - 6/2 - 7/2
mit Dichtheitskontrolle VPS der Gasventile.
Die Dichtheitskontrolle der Gasventile 8)-9)S.18
erfolgt umgehend vor jedem Brennerstart.
SCHEMA (C) - Dreiphasenspeisung
Elektroanschluß der Brenner GAS 5/2 - 6/2 - 7/2
mit Dichtheitskontrolle der Gasventile RG1/CT
RIELLO oder LDU 11 LANDIS.
Die Dichtheitskontrolle der Gasventile 8)-9)S.18
erfolgt umgehend vor jedem Brennerstart.
ZEICHENERKLÄRUNG SCHEMEN (A) - (B) - (C)
IN - Schalter für das manuelle Ausschalten
des Brenners
MB - Klemmleiste Brenner
PC - Gasdruckwächter für Dichtheitskontrolle
PG - Gas-Mindestdruckwächter
S - Störabschaltung-Fernmeldung
S1 - Fernmeldung Störabschaltung
Dichtheitskontrolle
TR - Einstell-Fernsteuerung:
steuert 1. und 2. Betriebsstufe.
Wird ein Einstufenbetrieb des Brenners
2
gewünscht, so ist TR zu überbrücken.
TL - Begrenzungsfernsteuerung:
schaltet den Brenner aus, wenn die Tem-
peratur oder der Kesseldruck den festge-
legten Höchstwert erreichen.
TS - Sicherheitsfernsteuerung:
tritt bei Defekt an TL in Aktion.
VR1 - Gasventil 1. Stufe
VR2 - Gasventil 2. Stufe
VS - Sicherheitsventil
XP - Stecker für die Dichtheitskontrolleinrich-
tung
D977
(C)
GAS 5/2 - 6/2 - 7/2 with RG1/CT RIELLO or LDU 11 LANDIS leak detection control device
VOM INSTALLATEUR AUSZUFÜHRENDE ELEKTROINSTALLATION
ELECTRICAL CONNECTION OF BURNER BY INSTALLER
RACCORDEMENT BRULEUR EFFECTUE PAR L’INSTALLATEUR
D974
D975
(D)
GAS 5/2 - 6/2 - 7/2
EINSTELLUNG WÄRMERELAIS
CALIBRATION OF THERMAL RELAY
REGLAGE RELAIS THERMIQUE
D867
SCHEMA (D)
Einstellung Überstromauslöser 6)(A) S.8
Dieses schützt den Motor vor dem Durchbrennen wegen erhöhter Stromaufnahme infolge des
Ausfallens einer Phase.
- Wenn der Motor über eine Sternschaltung mit
400 V- gespeist wird, muß der Zeiger auf
"MIN"- Stellung positioniert werden.
- Bei Dreieck-Schaltung mit 230 V- Spannung,
muß der Zeiger auf "MAX" gestellt werden.
Obwohl die Skala des Überstromauslösers nicht
die Entnahmewerte vorsieht, die auf dem Typenschild des 400 V-Motors angegeben sind, wird
der Schutz trotzdem gewährleistet.
Merke
• Die Modelle GAS 5/2 - 6/2 - 7/2 dreiphasig wer-
den werkseitig für 400 V Stromversorgung vor-
bereitet. Falls die Stromversorgung 230 V
beträgt, den Motoranschluß (Stern- oder Drei-
eck-schaltung) und die Einstellung des Über-
stromauslösers verändern.
• Die Brenner GAS 3/2 - 4/2 - 5/2 - 6/2 - 7/2 sind
für intermittierenden Betrieb typgeprüft. Das
bedeutet, daß sie - laut Vorschrift - wenigstens
einmal pro 24 Stunden ausgeschaltet werden
müssen, damit die Steuergeräte eine Prüfung
ihrer Funktionstüchtigkeit bei Anfahren durch-
führen können Das Ausschalten erfolgt ge-
wöhnlich über die Fernsteuerung des Kessels.
Sollte dies nicht der Fall sein, muß an IN ein
Zeitschalter reihengeschaltet werden, der ein
Brennerausschalten einmal in 24 Stunden ge-
währleistet.
• Die Brenner GAS 5/2 - 6/2 - 7/2 werden werk-
seitig auf den Zweistufen-Betrieb voreingestellt
und sind daher an die Fernsteuerung TR anzu-
schließen. Wird dagegen ein Einstufen-Betrieb
erwünscht, so ist anstelle der Fernsteuerung
TR eine Brückenschaltung zwischen Klemmen
6 und 7 des Klemmenbretts legen.
ACHTUNG: den Nulleiter nicht mit dem
Phasenleiter in der Leitung der Stromversorgung vertauschen. Die Folge einer solchen Vertauschung wäre eine
Störabschaltung wegen nicht erfolgter
Zündung.
24

LAYOUT (A) - The GAS 5/2 - 6/2 - 7/2 Models
electrical connection three-phase power
supply without leak detection control device.
SCHEMA (A) - Alimentation triphasée
Branchement électrique brûleurs GAS 5/2 - 6/
2 - 7/2 sans dispositif de contrôle d'étanchéité.
LAYOUT (B) - The GAS 5/2 - 6/2 - 7/2 Models
electrical connection three-phase power
supply with VPS leak detection control
device.
Gas valve 8)-9)p. 18 leak detection control takes
place immediately before every burner starting.
LAYOUT (C) - The GAS 5/2 - 6/2 - 7/2 Models
electrical connection three-phase power
supply with RG1/CT RIELLO or LDU LANDIS
leak detection control device.
Gas valve 8)-9)p. 18 leak detection control takes
place immediately before every burner starting.
KEY TO LAYOUTS (A) - (B) - (C)
IN - Manual burner stop switch
MB - Burner terminal strip
PC - Gas pressure switch for leak detection
control device
PG - Min. gas pressure switch
S - Remote lock-out signal
S1 - Remote lock-out signal of leak detection
control device
TR - High-low mode load control system:
controls operating stages 1 and 2.
If the burner is to be set up for single
stage operation, replace of remote con-
trol device TR with a jumper.
TL - Load limit remote control system:
shuts down the burner when the boiler
temperature or pressure reaches the pre-
set value.
TS - Safety load control system:
operates when TL is faulty
VR1 - Gas valve, stage 1
VR2 - Gas valve, stage 2
VS - Safety valve
XP - Plug for leak detection control device
LAYOUT (D)
Calibration of thermal cut-out 6)(A) p. 8
This is required to avoid motor burn-out in the
event of a significant increase in power absorption caused by a missing phase.
- If the motor is star-powered, 400 V, the cursor
should be positioned to "MIN".
- If the motor is delta-powered, 230 V, the cursor
should be positioned to "MAX".
Even if the scale of the thermal cut-out does not
include rated motor absorption at 400 V, protection is still ensured in any case.
N.B.
• Models GAS 5/2 - 6/2 - 7/2 three-phase leave
the factory preset for 400 V power supply. If
230 V power supply is used, change the motor
connection from star to delta and change the
setting of the thermal cut-out as well.
• The GAS 3/2 - 4/2 - 5/2 - 6/2 - 7/2 burners have
been type- approved for intermittent operation.
This means they should compulsorily be
stopped at least once every 24 hours to enable
the control box to check its own efficiency at
start-up. Burner halts are normally provided for
automatically by the boiler load control system.
If this is not the case, a time switch should be
fitted in series to IN to provide for burner shut-
down at least once every 24 hours.
• The GAS 3/2 - 4/2 - 5/2 - 6/2 - 7/2 burners are
factory set for two-stage operation and must
therefore be connected to control device TR.
Alternatively, if single stage operation is re-
quired, instead of control device TR install a
jumper lead between terminals 6 and 7 of the
terminal strip.
WARNING: do not invert the neutral with
the phase wire in the electricity supply
line. Inverting the wires will make the
burner go into lock-out because of firing
failure.
SCHEMA (B) - Alimentation triphasée
Branchement électrique brûleurs GAS 5/2 - 6/
2 - 7/2 avec dispositif de contrôle d'étanchéité VPS.
Le contrôle d'étanchéité des vannes 8)-9)p.18
se fait juste avant chaque mise en marche du
brûleur.
SCHEMA (C) - Alimentation triphasée
Branchement électrique brûleurs GAS 5/2 - 6/
2 - 7/2 avec dispositif de contrôle d'étanchéité RG1/CT RIELLO ou LDU 11 LANDIS.
Le contrôle d'étanchéité des vannes 8)-9)p.18
se fait juste avant chaque mise en marche du
brûleur.
LEGENDE SCHEMAS (A) - (B) - (C)
IN - Interrupteur électrique pour arrêt manuel
brûleur
MB - Porte-bornes brûleur
PC - Pressostat gaz pour contrôle d'étanchéi-
té
PG - Pressostat gaz seuil minimum
S - Signalisation blocage brûleur à distance
S1 - Signalisation blocage contrôle d'étan-
chéité à distance
TR - Télécommande de réglage:
commande 1ère et 2ème allure de fonc-
tionnement.
Si l'on désire un brûleur à fonctionnement
à une seule allure, remplacer TR par un
pontet.
TL - Télécommande de limite:
arrête le brûleur quand la température ou
la pression dans la chaudière a atteint la
valeur fixée.
TS - Télécommande de sécurité:
intervient quand le TL tombe en panne
VR1 - Vanne gaz, 1ère allure
VR2 - Vanne gaz, 2ème allure
VS - Vanne gaz de sécurité
XP - Fiche pour le contrôle d'étanchéité
SCHEMA (D)
Réglage relais thermique 6)(A) p. 8
Sert à éviter que le moteur brûle a cause d'une
forte augmentation de l'absorption due à l'absence d'une phase.
- Si le moteur est alimenté en étoile, 400 V, le
curseur doit être placé sur "MIN".
- S'il est alimenté en triangle, 230 V, le curseur
doit être placé sur "MAX".
Si l'échelle du relais thermique ne comprend pas
l'absorption indiquée sur la plaque du moteur à
400 V, la protection est quand même assurée.
Note
• Les modèles GAS 5/2 - 6/2 - 7/2 triphasés quit-
tent l'usine prévus pour l'alimentation électri-
que à 400 V. Si l'alimentation est à 230 V,
changer la connexion du moteur (d'étoile à
triangle) et le réglage du relais thermique.
• Les modèles GAS 3/2 - 4/2 - 5/2 - 6/2 - 7/2 ont
été homologués pour fonctionner de façon in-
termittente. Cela veut dire qu'ils doivent s'arrê-
ter selon les normes au moins 1 fois toutes les
24 heures pour permettre au boîtier d'effectuer
un contrôle de son efficacité au moment du dé-
marrage. Normalement l'arrêt du brûleur est
assuré par le thermostat de la chaudière. S'il
n'en était pas ainsi, il faudrait appliquer en sé-
rie au IN un interrupteur horaire qui comman-
derait l'arrêt du brûleur au moins 1 fois toutes
les 24 heures.
• Les modèles GAS 3/2 - 4/2 - 5/2 - 6/2 - 7/2 quit-
tent l'usine déjà prévus pour le fonctionnement
à 2 allures, et la télécommande TR doit être re-
liée.
Par contre, si l'on désire un fonctionnement à 1
allure, remplacer la télécommande TR par un
pontet entre les bornes 6 et 7 du porte-bornes.
ATTENTION: dans la ligne d'alimentation
électrique, ne pas inverser le neutre avec la
phase. L'inversion éventuelle provoquerait
un blocage dû à l'absence d'allumage.
25

LUFT-DRUCKWÄCHTER
AIR PRESSURE SWITCH
PRESSOSTAT AIR
D68
(A)
GAS MINDESTDRUCKWÄCHTER
MIN GAS PRESSURE SWITCH
PRESSOSTAT GAZ MINIMUM
EINSTELLUNGEN VOR DER ZÜNDUNG
Die Einstellung des Flammkopfs, von Luft und
Gas, ist bereits auf Seite 16 beschrieben worden.
Weitere Einstellungen sind:
- Handbetätigte Ventile vor der Gasarmatur öffnen.
- Den Luft-Druckwächter auf den Skalenanfangswert (A) einstellen
- Den Gas-Mindestdruckwächter auf den Skalenanfangswert (B) einstellen.
- Die Luft aus der Gasleitung entlüften.
Es wird empfohlen, die abgelassene Luft über
einen Kunststoffschlauch ins Freie abzuführen,
bis der Gasgeruch wahrnehmbar ist.
- Ein U Manometer (C) auf den Gasanschluß der
Muffe einbauen.
Hiermit wird die ungefähre Brennerleistung auf
2. Stufe anhand des Diagramms auf Seite 12
ermittelt.
- Parallel zu den beiden Gas-Magnetventilen VR
und VS zwei Glühbirnen oder einen Tester anschließen, um den Zeitpunkt der Spannungszufuhr zu überprüfen.
Dieses Verfahren ist nicht notwendig, falls die
beiden Magnetventile mit einer Kontrollampe
ausgestattet sind, die die Elektrospannung anzeigt.
Vor dem Zünden des Brenners sind die Gasarmaturen so einzustellen, daß die Zündung unter
Bedingungen höchster Sicherheit bei einem geringen Gasdurchsatz erfolgt.
(B)
U-ROHR-MANOMETER
U-TYPE MANOMETER
MANOMETRE EN U
D251
D896
STELLANTRIEB
Der Stellantrieb reguliert automatisch die Lufklappe, er gestattet die Öffnung der Gasventile
nur, falls sich die Luftklappe in der richtigen Position befindet und entscheidet den Moment der
Erregung des Gasventils der 2. Stufe.
Er führt eine Höchstdrehung von 90° in 5 s aus.
Er ist mit 7 Nocken ausgerüstet, die mit 4 farbigen Hebeln regulierbar sind. Ein Skalenschild
mit 4 farbigen Sektoren verdeutlicht den Eingriffspunkt der Hebel.
Blauer Hebel
Legt die Position der Luftklappe 3)(A)S.8 während der Brennerbetriebspause fest. Wird werkseitig wie in Abbildung (A)S.28 eingestellt: Hebel
auf Achse 1. So bleibt die Luftklappe während
der Pausen total geschlossen, um den Wärmeverlust durch den Zug des Kamins so gering als
möglich zu halten.
Wünscht man hingegen, daß die Klappe während der Betriebspause des Brenners (zum Beispiel, um den Flammkopf zu kühlen) teilweise
offen bleibt, blauen Hebel nach links drehen
(Zeichen + auf dem Schild). Die neue Position
der Klappe kann nach dem Anfahren und Ausschalten des Brenners überprüft werden. In keinem Fall darf über die Position des orangenen
Hebels, welcher die Position der Klappe in der
ersten Stufe festlegt, hinausgegangen werden.
Falls man wieder zur totalen Schließung der
Klappe während der Pause zurückkehren will,
blauen Hebel nach rechts drehen (Zeichen - am
Schild), bis zur in der Abbildung (A)S.28 angegebenen Position: Hebel auf der Achse 1.
In diesem Fall folgt die Klappe der Bewegung
des Hebels.
(C)
26

ADJUSTMENTS BEFORE FIRST FIRING
Adjustment of the combustion head, and air and
gas deliveries has been illustrated on page 16.
In addition, the following adjustments must also
be made:
- Open manual valves up-line from the gas train.
- Adjust the air pressure switch to the zero position of the scale (A).
- Adjust the minimum gas pressure switch to the
start of the scale (B).
- Purge the air from the gas line.
Continue to purge the air (we recommend using a plastic tube routed outside the building)
until gas is smelt.
- Fit a U-type manometer (C) to the gas pressure
test point on the sleeve.
The manometer readings are used to calculate
the 2nd stage operation burner power using
the graphs on page 12.
- Connect two lamps or testers to the two gas
line solenoid valves VR and VS to check the
exact moment at which voltage is supplied.
This operation is unnecessary if each of the
two solenoid valves is equipped with a pilot
light that signals voltage passing through.
Before starting up the burner it is good practice
to adjust the gas train so that ignition takes place
in conditions of maximum safety, i.e. with gas
delivery at the minimum.
SERVOMOTOR
The servomotor automatically adjusts the air
gate valve, enables the gas valves to open only
if the air gate valve is in the correct position and
establishes when the stage 2 gas valve will be
energized.
It makes a maximum rotation of 90° in 5s.
It is equipped with 7 cams, which can be adjusted by 4 coloured levers. A graduated plate with
4 coloured sectors marks the lever operation
point.
Blue lever
This lever sets the position of the air gate valve
3)(A)p.8 while the burner is at rest. It is factory-
set as shown in figure (A)p.28: lever on axis 1.
The air gate valve is therefore kept fully closed
when the burner is at rest, to minimize heat loss
caused by flue draught.
If instead the air gate valve is to be kept partly
open while the burner is at rest (e.g. to cool the
combustion head), turn the blue lever to the left
(+ sign on the plate). The new air gate position
may be checked after starting and stopping the
burner. Do not, however, go beyond the position
of the orange lever, which sets the position of the
air gate valve in stage 1.
To return the air gate valve to the fully closed position with the burner at rest, turn the blue lever
to the right (- sign on the plate) to the position indicated in figure (A)p.28: lever on axis 1. In this
case the air gate valve follows lever movement.
REGLAGES AVANT L'ALLUMAGE
Le réglage de la tête de combustion, air et gaz,
a déjà été décrit page 16.
Les autres réglages à effectuer sont les suivants:
- Ouvrir les vannes manuelles situées en amont
de la rampe du gaz.
- Régler le pressostat air en début d'échelle (A).
- Régler le pressostat de seuil minimum gaz en
début d'échelle (B).
- Purger le conduit gaz de l'air.
Il est conseillé d'évacuer l'air purgé en dehors
des locaux par un tuyau en plastique jusqu'à ce
que l'on sente l'odeur caractéristique du gaz.
- Monter un manomètre en U (C) sur la prise de
pression du gaz du manchon.
Celui-ci servira à mesurer approximativement
la puissance du brûleur en 2ème allure à l'aide
des diagrammes de la page 12.
- Raccorder en parallèle aux deux électrovannes du gaz VR et VS deux lampes ou testeurs
pour contrôler le moment de la mise sous tension.
Cette opération n'est pas nécessaire si chacune des deux electrovannes est munie d'un
voyant lumineux signalant la tension électrique.
Avant d'allumer le brûleur, régler la rampe du
gaz afin que l'allumage se fasse dans les conditions de sécurité maximum, c'est à dire avec un
débit de gaz très faible.
SERVOMOTEUR
Le servomoteur règle automatiquement le volet
d'air, il permet l'ouverture des vannes gaz seulement si le volet d'air est correctement positionné
et détermine le moment d'excitation de la vanne
gaz de 2ème allure.
Il accomplit une rotation maximum de 90° en 5 s.
Il est muni de 7 cames réglables au moyen de 4
leviers colorés. Une plaquette graduée avec 4
secteurs colorés met en évidence le point d'intervention des leviers.
Levier bleu
Détermine la position du volet d'air 3)(A)p.8 durant l'arrêt du brûleur. Il est positionné en usine
comme sur le schéma (A)p.28: levier sur l'axe 1.
De cette manière, le volet d'air est complètement
fermé lors de l'arrêt du brûleur afin de réduire au
maximum les déspersions thermiques dues au
tirage de la cheminée.
Au contraire, si on désire une ouverture partielle
du volet durant l'arrêt du brûleur (par ex. pour refroidir la tête de combustion), tourner le levier
bleu vers la gauche (signe + sur la plaque). La
nouvelle position du volet pourra être vérifiée
après la mise en marche et l'arrêt du brûleur. En
tous cas, ne pas dépasser la position du levier
orange qui détermine la position du volet en 1ère
allure.
Si on désire revenir à la position de fermeture totale du volet à l'arrêt, tourner le levier bleu vers la
droite (signe - sur la plaque) jusqu'à la position indiquée sur le schéma (A)p.28: levier sur l'axe 1.
Dans ce cas, le volet suit le mouvement du levier.
27

STELLANTRIEB
SERVOMOTOR
SERVOMOTEUR
HEBEL - LEVER - LEVIER
SCHWARZER - BLACK - NOIR
ROTER - RED - ROUGE
ORANGENER - ORANGE - ORANGE
BLAUER - BLUE - BLEU
(A)
D177
Orangener Hebel.
Legt die Position der Luftklappe 3)(A)S.8 während des Brennerbetriebs in der 1. Stufe fest.
Zum Öffnen der Klappe orangenen Hebel nach
links verschieben (Zeichen + am Schild), zum
Schließen der Klappe Hebel nach rechts verschieben (Zeichen - am Schild).
Die Einstellung des Hebels kann während des
Brennerbetriebs erfolgen und die Bewegung der
Klappe in beiden Richtungen folgt der Bewegung des Hebels.
Roter Hebel.
Legt die Position der Luftklappe 3)(A)S.8 während des Brennerbetriebs in der 2. Stufe fest.
Zum Öffnen der Klappe roten Hebel nach links
verschieben (Zeichen + am Schild), zum Schließen der Klappe Hebel nach rechts verschieben
(Zeichen - am Schild).
Die Einstellung des Hebels kann während des
Brennerbetriebs erfolgen und die Bewegung der
Klappe in beiden Richtungen folgt der Bewegung des Hebels.
Schwarzer Hebel.
Legt den Zeitpunkt des Öffnens des Gasventils
während des Brennerbetriebs in der 2. Stufe
fest. Muß immer (kurz) vor dem roten Hebel und
nach dem orangenen Hebel in Aktion treten.
Darf nicht gleichzeitig mit dem roten Hebel in Aktion treten, um der Gefahr entgegenzutreten,
daß sich das Gasventil überhaupt nicht öffnet.
Darf nicht unmittelbar nach dem orangenen Hebel in Aktion treten, um Verbrennung unter Luftmangel zu verhindern. Darf niemals
gleichzeitig mit dem orangenen Hebel in Aktion treten: sonst hat man den Luftdurchsatz
1. Stufe und den Gasdurchsatz 2. Stufe.
Um den Zeitpunkt der Öffnung des Gasventils
der Position der Klappe in der 2. Stufe anzunähern, schwarzen Hebel nach links drehen; um
den Zeitpunkt der Öffnung zu distanzieren, Hebel nach rechts drehen.
Zusammenfassend kann man also sagen, daß
die Aktion der Hebel in folgender Sequenz zu erfolgen hat:
1. blauer Hebel
2. orangener Hebel
3. schwarzer Hebel
4. roter Hebel
Die Gerade 2(A) veranschaulicht die Sequenz
der Hebel.
ANFAHREN DES BRENNERS
Die Fernsteuerungen schließen.
In den Brennern mit Zweistufenbetrieb die Fernsteuerung TR offen halten oder die Brückenschaltung, die TR in den Einstufenbrennern
ersetzt, entfernen
Sobald der Brenner anfährt, den Drehsinn des
Motors kontrollieren.
Kontrollieren, daß an den an die Magnetventile
angeschlossenen Kontrollampen und Spannungsmessern, oder an den Kontrollampen auf
den Magnetventilen, keine Spannung anliegt.
Wenn Spannung vorhanden ist, sofort den
Brenner ausschalten und die Elektroanschlüsse
überprüfen.
ZÜNDUNG DES BRENNERS
Wenn alle vorab angeführten Anleitungen beachtet worden sind, müßte der Brenner anfahren. Wenn hingegen der Motor läuft, aber die
Flamme nicht erscheint und eine Geräte-Störabschaltung erfolgt, entriegeln und das Anfahren
wiederholen.
Sollte die Zündung immer noch nicht stattfinden,
könnte dies davon abhängen, daß das Gas nicht
innerhalb der vorbestimmten Sicherheitszeit von
3 s den Flammkopf erreicht. In diesem Fall den
Gasdurchsatz bei Zündung erhöhen. Das URohr-Manometer (C)S.26 zeigt den Gaseintritt
an der Muffe an.
Nach erfolgter Zündung den Brenner vollständig
einstellen.
28

Orange lever.
This lever sets the position of the air gate valve
3)(A)p.8 during stage 1 operation.
Open the air gate valve by moving the orange lever to the left (+ sign on the plate) and close it by
moving the lever to the right (- sign on the plate).
The lever may be adjusted while the burner is
operating and air gate movement follows lever
movement in both directions.
Red lever.
This lever sets the position of the air gate valve
3)(A)p.8 during stage 2 operation.
Open the air gate valve by moving the red lever
to the left (+ sign on the plate) and close it by
moving the lever to the right (- sign on the plate).
The lever may be adjusted while the burner is
operating and air gate valve movement follows
lever movement in both directions.
Black lever.
This lever establishes the opening time of the
2nd stage gas valve. It must always operate
(just) before the red lever and after the orange lever. It must not operate with the red lever as this
may prevent the gas valve from opening at all. It
must not operate straight after the orange lever
to avoid combustion in the absence of air. It
must never operate at the same time as the
orange lever as this would result in stage 1
air delivery and stage 2 gas delivery.
For gas valve opening to approach that of 2nd
stage air gate valve position, rotate the black lever to the left; to delay opening time, rotate the
lever to the right.
In brief, the levers must be operated in the following sequence:
1. Blue lever
2. Orange lever
3. Black lever
4. Red lever
The straight line 2(A) marks the lever sequence.
BURNER STARTING
Close the remote control devices.
With two stage operation burners keep the remote control TR open, or remove the jumper in
the case of single-stage operation burners.
As soon as the burner starts check the direction
of rotation of the motor.
Make sure that the lamps or testers connected to
the solenoids, or pilot lights on the solenoids
themselves, indicate that no voltage is present. If
voltage is present, then immediately stop the
burner and check electrical connections.
BURNER FIRING
Having completed the checks indicated in the
previous heading, the burner should fire. If the
motor starts but the flame does not appear and
the control box goes into lock-out, reset and wait
for a new firing attempt.
If firing is still not achieved, it may be that gas is
not reaching the combustion head within the
safety time period of 3 seconds.
In this case increase gas firing delivery.
The arrival of gas at the sleeve is indicated by
the U-type manometer (C)p.26.
Once the burner has fired, you can now proceed
with global calibration operations.
Levier orange.
Détermine la position du volet d'air 3)(A)p.8
quand le brûleur fonctionne en 1ère allure.
Pour ouvrir le volet, déplacer le levier orange
vers la gauche (signe + sur la plaque), pour fermer le volet déplacer le levier vers la droite (signe - sur la plaque).
Le réglage du levier peut être effectué avec le
brûleur en marche et le mouvement du volet
dans les deux sens suit celui du levier.
Levier rouge.
Détermine la position du volet d'air 3)(A)p.8
quand le brûleur fonctionne en 2ème allure.
Pour ouvrir le volet déplacer le levier rouge vers
la gauche (signe + sur la plaque), pour fermer le
volet déplacer le levier vers la droite (signe - sur
la plaque).
Le réglage du levier peut être effectué avec le
brûleur en marche et le mouvement du volet
dans les deux sens suit celui du levier.
Levier noir.
Détermine le moment d'ouverture de la vanne
gaz en 2ème allure. Il doit toujours intervenir (un
peu) avant le levier rouge et après le levier orange. Il ne doit pas intervenir avec le levier rouge,
pour ne pas courir le risque que la vanne gaz
s'ouvre pour rien. Il ne doit pas intervenir tout de
suite après le levier orange, pour éviter la combustion sans air. Il ne doit jamais intervenir
avec le levier orange: on aurait le débit d'air
de la 1ère allure et le débit du gaz de la 2ème
allure.
Pour rapprocher le moment de l'ouverture de la
vanne gaz à la position du volet en 2ème allure,
tourner le levier noir vers la gauche; pour éloigner le moment de l'ouverture, tourner le levier
vers la droite.
Pour récapituler, l'intervention des leviers doit
donc se faire dans l'ordre suivant:
1. Levier bleu
2. Levier orange
3. Levier noir
4. Levier rouge
La droite 2 (A) met en évidence la succession
des leviers.
DEMARRAGE BRULEUR
Fermer les télécommandes.
Tenir la télécommande TR ouverte dans les brûleurs avec fonctionnement à deux allures ou enlever le pontet qui remplace TR dans les
brûleurs avec fonctionnement à une seule allure.
Dès que le brûleur démarre, contrôler le sens de
rotation du moteur.
Vérifier que les ampoules ou les testeurs raccordés aux électrovannes, ou les voyants sur les
électrovannes, indiquent une absence de tension. S'ils signalent une tension, arrêter immé-
diatement le brûleur et contrôler les
raccordements électriques.
ALLUMAGE BRULEUR
Après avoir effectué les opérations décrites au
point précédent, le brûleur devrait s'allumer. Si le
moteur démarre mais la flamme n'apparaît pas
et le boîtier de contrôle se bloque, réarmer et faire une nouvelle tentative de démarrage.
Si l'allumage ne se fait toujours pas, il se peut
que le gaz n'arrive pas à la tête de combustion
dans le temps de sécurité de 3 s. Dans ce cas,
augmenter le débit du gaz à l'allumage. L'arrivée
du gaz au manchon est mise en évidence par le
manomètre en U (C)p.26.
Quand l'allumage est fait, passer au réglage
complet du brûleur.
29

BRENNEREINSTELLUNG
Für die optimale Einstellung des Brenners sollten die Abgase am Kesselausgang analysiert
werden.
Nacheinander einstellen:
1 - Zündleistung
2 - Brennerleistung 1. Stufe
3 - Brennerleistung 2. Stufe
4 - Luft-Druckwächter
5 - Gas-Mindestdruckwächter
1 - ZÜNDLEISTUNG
Nach Norm EN 676:
Brenner mit Höchstleistung bis 120 kW
Die Zündung kann bei der höchsten Betriebsleistung erfolgen. Beispiel:
• höchste Betriebsleistung : 120 kW
• höchste Zündleistung : 120 kW
Brenner mit Höchstleistung über 120 kW
Die Zündung hat bei einer verringerten Leistung
im Vergleich zur höchsten Betriebsleistung zu
erfolgen. Falls die Zündleistung 120 kW nicht
überschreitet, ist keine Berechnung erforderlich.
Falls die Zündleistung dagegen 120 kW überschreitet, legt die Norm fest, daß ihr Wert in Abhängigkeit von der Sicherheitszeit "ts" des
Steuergerätes definiert wird:
• für ts = 2s muß die Zündleistung gleich oder
unter 1/2 der höchsten Betriebsleistung liegen.
• für ts = 3s muß die Zündleistung gleich oder
unter 1/3 der höchsten Betriebsleistung liegen.
Beispiel: höchste Betriebsleistung 600 kW.
Die Zündleistung muß gleich oder unter sein:
• 300 kW bei "ts" = 2s
• 200 kW bei "ts" = 3s
Zur Messung der Zündleistung:
- Den Steckkontakt 15)(A)S.8 vom Kabel der Io-
nisationssonde abtrennen (der Brenner schaltet ein und geht nach der Sicherheitszeit in
Störabschaltung).
- 10 Zündungen mit darauffolgenden Störab-
schaltungen durchführen.
- Am Zähler die verbrennte Gasmenge ablesen.
Diese Menge muß gleich oder unter jener sein,
die durch die Formel gegeben wird:
3
/h (Höchstleistung des Brenners)
Nm
360
3
sein.
3
):
Beispiel für Gas G 20 (10 kWh/Nm
Höchste Betriebsleistung 600 kW gleich 60
3
/h.
Nm
Nach 10 Zündungen mit Störabschaltung muß
der am Zähler abgelesene Durchsatz gleich
oder unter: 60 : 360 = 0,166 Nm
30
2 - BRENNERLEISTUNG 1. STUFE
Gaseinstellung auf Mindestwert
Gasdurchsatz am Zähler ablesen.
- Falls er vermindert werden muß, das Gasventil
1. Stufe etwas schließen.
- Falls er erhöht werden muß, zuerst das Gas-
ventil 1. Stufe ganz öffnen, dann, falls das nicht
genügt, den Gasdruck am Austritt des Druckreglers erhöhen.
Lufteinstellung auf Mindestwert
Orangenen Hebel des Stellmotors so verstellen,
daß ein optimales Gas-Luft Verhältnis entsteht.
Dieser Vorgang ist besonders wichtig, wenn der
Brenner für Zweistufenbetrieb vorgesehen ist.
Anschließend die Fernsteuerung TR schließen,
oder überbrücken.
Der Stellantrieb vollendet die Rotation, indem er
die Luftklappe und das Gasventil der 2. Stufe öffnet. Der Übergang von der 1. zur 2. Stufe muß
fließend und ohne Verpuffungen erfolgen.

BURNER CALIBRATION
The optimum calibration of the burner requires
an analysis of the flue gases at the boiler outlet.
Adjust successively:
1 - First firing output
2 - 1st stage burner output
3 - 2nd stage burner output
4 - Air pressure switch
5 - Minimum gas pressure switch
1 - FIRING OUTPUT
According to EN 676 Regulations:
Burners with max. output up to 120 kW
Firing can be performed at the maximum operation output level. Example:
• Max. operation output : 120 kW
• Max. firing output : 120 kW
Burners with max. output above 120 kW
Firing must be performed at a lower output than
the max. operation output. If the firing output
does not exceed 120 kW, no calculations are
required. If firing output exceeds 120 kW, the
regulations prescribe that the value be defined
according to the control box safety time "ts":
• for "ts" = 2s, firing output must be equal to or
lower than 1/2 of max. operation output.
• For "ts" = 3s, firing output must be equal to or
lower than 1/3 of max. operation output.
Example: MAX operation output of 600 kW.
Firing output must be equal to or lower than:
• 300 kW with "ts" = 2s
• 200 kW with "ts" = 3s
In order to measure the firing output:
- Disconnect the plug-socket 15)(A)p.8 on the
ionization probe cable (the burner will fire and
then go into lock-out after the safety time has
elapsed).
- Perform 10 firings with consecutive lock-outs.
- On the meter read the quantity of gas burned.
This quantity must be equal to or lower than the
quantity given by the formula:
3
/h (max. burner delivery )
Nm
360
Example for G 20 gas (10 kWh/Nm
Max. operation output: 600 kW corresponding to
3
/h.
60 Nm
After 10 firings with lock-outs, the delivery read
on the meter must be equal to or lower than:
3
60 : 360 = 0,166 Nm
.
2 - 2ND STAGE OUTPUT
MIN gas setting
Measure gas delivery at the meter.
- If it is to be reduced, close the 1st stage gas
valve a little.
- If it is to be increased, first open the 1st stage
gas valve all the way and then, if it is not
enough, increase the gas pressure coming
from the pressure governor.
MIN air setting
Operate the orange lever of the servomotor to
optimize the ratio between the quantity of air and
gas.
This is particularly important when the burner is
set for two stage operation.
Then close load control TR, or insert the jumper.
The servomotor will complete the rotation by
opening the air gate valve and the stage 2 gas
valve.
There must be no jerks or pulsations in the passage from stage 1 to stage 2.
3
):
REGLAGE BRULEUR
Pour obtenir un réglage optimal du brûleur, il faut
effectuer l'analyse des gaz d'échappement de la
combustion à la sortie de la chaudière.
Régler en succession:
1 - Puissance à l'allumage:
2 - Puissance brûleur en 1ère allure
3 - Puissance brûleur en 2ème allure
4 - Pressostat air
5 - Pressostat seuil minimum du gaz
1 - PUISSANCE A L'ALLUMAGE
Selon la norme EN 676 :
Brûleurs avec puissance MAX jusqu'à 120 kW
L'allumage peut se faire à la puissance maximum de fonctionnement. Exemple:
• Puissance maximum de fonctionnement : 120 kW
• Puissance maximum à l'allumage : 120 kW
Brûleurs a
L'allumage doit se faire à une puissance réduite
par rapport à la puissance maximum de fonctionnement.
Si la puissance à l'allumage ne dépasse pas 120
kW, aucun calcul n'est nécessaire. Au contraire,
si la puissance à l'allumage dépasse 120 kW, la
norme établit que sa valeur soit définie en fonction du temps de sécurité "ts" du coffret de sécurité:
vec puissance MAX supérieure à 120 kW
• pour "ts" = 2s la puissance à l'allumage doit
être égale ou inférieure à 1/2 de la puissance
maximum de fonctionnement.
• pour "ts" = 3s la puissance à l'allumage doit
être égale ou inférieure à 1/3 de la puissance
maximum de fonctionnement.
Exemple: puissance MAX de fonctionnement
600 kW.
La puissance à l'allumage doit être égale ou inférieure à:
• 300 kW avec "ts" = 2s
• 200 kW avec "ts" = 3s
Pour mesurer la puissance à l'allumage:
- Débrancher la fiche-prise 15)(A)p.8 sur le câble de la sonde d'ionisation (le brûleur s'allume
et se bloque après le temps de sécurité).
- Exécuter 10 allumages avec blocages consécutifs.
- Lire au compteur la quantité de gaz brûlée.
Cette quantité doit être égale ou inférieure à
celle donnée par la formule:
3
/h (débit max. brûleur)
Nm
360
Exemple pour du gaz G 20 (10 kWh/Nm
Puissance maximum de fonctionnement, 600 kW
correspondants à 60 Nm3/h.
Après 10 allumages avec blocage le débit lu au
compteur doit être égal ou inférieur à:
60 : 360 = 0,166 Nm3.
2 - PUISSANCE BRULEUR EN 1ERE ALLURE
Réglage gaz MIN
Mesurer le débit du gaz au compteur.
- S'il faut la réduire, fermer un peu la vanne du
gaz de 1ère allure.
- S'il faut l'augmenter ouvrir d'abord entièrement
la vanne du gaz de 1ère allure et ensuite, si ça
ne suffit pas, augmenter la pression du gaz à la
sortie du régulateur de pression.
Réglage air MIN
Intervenir sur le levier orange du servomoteur
pour proportionner le mieux possible la quantité
d'air avec celle du gaz.
Cette opération est très importante quand le brûleur est prévu pour fonctionner à deux allures.
Fermer ensuite la télécommande TR, ou placer
un ponter.
Le servomoteur complètera la rotation en
ouvrant le volet d'air et la vanne gaz de 2ème allure.
Le passage entre la 1ère et la 2ème allure doit
se faire sans à-coups ou pulsations.
3
):
31
LUFT-DRUCKWÄCHTER
AIR PRESSURE SWITCH
PRESSOSTAT AIR
D68
(A)
GAS MINDESTDRUCKWÄCHTER
MIN GAS PRESSURE SWITCH
PRESSOSTAT GAZ MINIMUM
D896
(B)
(C)
D978
3 - BRENNERLEISTUNG 2. STUFE
Gaseinstellung auf Höchstwert
Gasdurchsatz messen.
- Falls er vermindert werden muß, das Gasventil
der 2. Stufe etwas schließen.
- Falls er erhöht werden muß, zuerst das Gasventil der 2. Stufe ganz öffnen, dann, falls das
nicht genügt, den Gasdruck am Austritt des
Druckreglers erhöhen.
Lufteinstellung auf Höchstwert
Die Stellung des roten Hebels des Stellmotors
so verändern, daß ein optimales Gas-Luft Verhältnis erzielt wird.
Nachdem man die Position des roten Hebels bestimmt hat, ist zu bedenken, daß die Position
des schwarzen Hebels geringfügig vor dem roten Hebel liegen muß.
Merke
• Wenn die Einstellung des Druckreglers zur Er-
zielung des in der 1. Stufe gewünschten
Durchsatzes vorgenommen wird, muß die Zündung von neuem überprüft werden; wenn die
Einstellung des Druckreglers zur Erzielung des
in der 2. Stufe gewünschten Durchsatzes vorgenommen wird, müssen die Zündung und die
1. Stufe von neuem überprüft werden.
• Der Höchstdurchsatz in der 2. Stufe kann an-
näherungsweise aus den Diagrammen auf S.
12 entnommen werden, indem man den Gasdruck an der Muffe 12)(A)S.8 am U-Manometer (C)S.26 abliest und die Anweisungen auf
Seite 12 befolgt.
4 - LUFTDRUCKWÄCHTER (A)
Die Einstellung des Luftdruckwächters erfolgt
nach allen anderen Brennereinstellungen; der
Druckwächter wird auf Skalenbeginn (A) eingestellt.
Bei Brennerbetrieb auf 1° Stufe den Einstelldruck durch Drehen des dafür bestimmten Drehknopfs im Uhrzeigersinn langsam erhöhen bis
eine Störabschaltung erfolgt.
Dann den Drehknopf gegen den Uhrzeigersinn
um etwa 20% des eingestellten Druckwertes zurückdrehen und den Brenner wieder anfahren,
um zu überprüfen, ob dieser ordnungsgemäß arbeitet.
Sollte eine Störabschaltung eintreten, den Drehknopf ein bißchen wieder noch zurückdrehen.
Achtung: als Regel gilt, daß der Luftdruckwächter verhindern muß, daß das CO im Abgas 1%
(10.000 ppm) überschreitet. Um das sicherzustellen, einen Verbrennungsanalysator in den
Kamin einfügen, die Ansaugöffnung des Gebläses langsam schließen (zum Beispiel mit Pappe)
und prüfen, daß die Störabschaltung des Brenners erfolgt, bevor das CO in den Abgasen 1%
überschreitet.
5 - GAS-MINDESTDRUCKWÄCHTER (B)
Die Einstellung des Gas-Mindestdruckwächters
erfolgt nach allen anderen Brennereinstellungen, wobei der Wächter auf Skalenbeginn (B)
eingestellt wird.
Bei Brennerbetrieb auf 2° Stufe den Einstelldruck durch Drehen des dafür bestimmten Drehknopfs im Uhrzeigersinn langsam erhöhen, bis
der Brenner ausschaltet.
Dann den Drehknopf gegen den Uhrzeigersinn
um 2 mbar zurückdrehen und den Brenner wieder anfahren, um zu überprüfen, ob dieser ordnungsgemäß arbeitet. Sollte der Brenner wieder
ausschalten, den Drehknopf noch einmal gegen
den Uhrzeigersinn um 1 mbar drehen.
32
FLAMMENÜBERWACHUNG (C)
Der Brenner ist mit einem Ionisationsgerät zur
Flammenüberwachung ausgerüstet. Der erforderliche Mindeststrom beträgt 5 µA. Da der
Brenner einen weitaus höheren Strom erreicht,
sind normalerweise keine Kontrollen nötig. Will
man den Ionisationsstrom messen, muß der
Steckanschluß 15)(A)S.8 am Kabel der Ionisationssonde ausgeschaltet und ein GleichstromMikroamperemeter, Meßbereich 100 mA, eingeschaltet werden. Auf richtige Polung achten!

3 - 2ND STAGE BURNER OUTPUT
MAX gas setting
Measure gas delivery.
- If it is to be reduced, close the 2nd stage gas
valve a little.
- If it is to be increased, first open the 2nd stage
gas valve all the way and then, if it is not
enough, increase the gas pressure coming
from the pressure governor.
MAX air setting
Operate the red lever of the servomotor to optimize the ratio between the quantity of air and
gas.
After setting the red lever in the correct position,
bear in mind that the black lever of the servomotor must be operated only just before the red lever.
N.B.
• When the pressure governor calibration is to
be modified to obtain the first stage required
delivery, firing must be checked again. When
the governor calibration is to be modified to obtain the second stage required delivery, both
firing and stage 1 must be checked again.
• By way of example, maximum gas delivery in
stage 2 may be taken from the graphs on page
12. Simply read the gas pressure at sleeve
12)(A)p.8 on the U-type manometer (C)p.26
and follow the indications given on page 13.
4 - AIR PRESSURE SWITCH (A)
Adjust the air pressure switch after having performed all other burner adjustments with the air
pressure switch set to the start of the scale (A).
With the burner operating in 1st stage, increase
adjustment pressure by slowly turning the relative knob clockwise until the burner locks out.
Then turn the knob anti-clockwise by about 20%
of the set point and repeat burner starting to ensure it is correct.
If the burner locks out again, turn the knob anticlockwise a little bit more.
Attention : as a rule, the air pressure switch
must limit the CO in the fumes to less than 1%
(10,000 ppm).
To check this, insert a combustion analyser into
the chimney, slowly close the fan suction inlet
(for example with cardboard) and check that the
burner locks out, before the CO in the fumes exceeds 1%.
5 - MINIMUM GAS PRESSURE SWITCH (B)
Adjust the minimum gas pressure switch after
having performed all the other burner adjustments with the pressure switch set at the start of
the scale (B).
With the burner operating in 2nd stage, increase
adjustment pressure by slowly turning the relative knob clockwise until the burner locks out.
Then turn the knob anti-clockwise by 2 mbar and
repeat burner starting to ensure it is uniform.
If the burner locks out again, turn the knob anticlockwise again by 1 mbar.
FLAME PRESENT CHECK (C)
The burner is fitted with an ionisation system
which ensures that a flame is present. The minimum current for plant operation is 5 µA. The
burner provides a much higher current, so that
controls are not normally required. However, if it
is necessary to measure the ionisation current,
disconnect the plug-socket 15)(A)p.8 on the ionisation probe cable and insert a direct current
microamperometer with a base scale of 100 mA.
Carefully check polarities.
3 - PUISSANCE BRULEUR EN 2EME ALLURE
Réglage gaz MAX
Mesurer le débit du gaz.
- S'il faut la réduire, fermer un peu la vanne du
gaz de 2ème allure.
- S'il faut l'augmenter ouvrir d'abord entièrement
la vanne du gaz de 2ème allure et ensuite, si ça
ne suffit pas, augmenter la pression du gaz à la
sortie du régulateur de pression.
Réglage air MAX
Intervenir sur le levier rouge du servomoteur
pour proportionner le mieux possible la quantité
d'air avec celle du gaz.
Après avoir défini la bonne position du levier rouge, se rappeler que le levier noir du servomoteur
doit anticiper de très peu le levier rouge.
NOTES
• Quand on modifie le réglage du régulateur de
pression pour obtenir le débit désiré en 1ère allure, il faut contrôler à nouveau l'allumage;
quand on modifie le réglage du régulateur pour
obtenir le débit désiré à la 2ème allure, il faut
contrôler à nouveau l'allumage et la 1ère allure.
• A titre indicatif, le débit maximum en 2ème allure peut être déduit des diagrammes de la
page 12, il suffit de lire la pression du gaz au
manchon 12)(A)p.8 sur le manomètre en U
(C)p.26 et de suivre les indications données à
la page 13.
4 - PRESSOSTAT DE L'AIR (A)
Effectuer le réglage du pressostat de l'air après
avoir effectué tous les autres réglages du brûleur
avec le pressostat de l'air réglé en début d'échelle (A).
Lorsque le brûleur fonctionne en 1ère allure,
augmenter la pression de réglage en tournant
lentement dans le sens des aiguilles d'une montre la petite molette prévue à cet effet jusqu'au
blocage du brûleur.
Tourner ensuite dans le sens contraire la petite
molette du 20% du valeur reglé et répéter le démarrage du brûleur pour en vérifier la régularité.
Si le brûleur se bloque à nouveau, tourner encore un peu la petite molette dans le sens contraire
aux aiguilles d'une montre.
Attention : comme le veut la norme, le pressostat de l'air doit empêcher que le CO dans les fumées dépasse 1% (10.000 ppm).
Pour s'en rendre compte, insérer un analyseur
de combustion dans le conduit, fermer lentement
la bouche d'aspiration du ventilateur (par exemple avec un carton) et vérifier qu'il y ait blocage
du brûleur, avant que le CO dans les fumées ne
dépasse 1%.
5 - PRESSOSTAT GAZ SEUIL MINIMUM (B)
Effectuer le réglage du pressostat gaz seuil min.
après avoir effectué tous les autres réglages du
brûleur avec le pressostat réglé en début
d'échelle (B).
Lorsque le brûleur fonctionne en 2ème allure,
augmenter la pression de réglage en tournant
lentement dans le sens des aiguilles d'une montre la petite molette prévue à cet effet jusqu'à l'arrêt du brûleur.
Tourner ensuite dans le sens contraire la petite
molette de 2 mbar et répéter le démarrage du
brûleur pour en vérifier la régularité.
Si le brûleur s' arrête à nouveau, tourner encore
dans le sens inverse aux aiguilles d'une montre
de 1 mbar.
CONTROLE PRESENCE FLAMME (C)
Le brûleur est muni d'un système à ionisation
pour contrôler la présence de la flamme. Pour
faire fonctionner le boîtier de contrôle le courant
minimum est de 5 µA. Le brûleur produit un courant nettement supérieur qui ne nécessite normalement d'aucun contrôle. Toutefois, si on veut
mesurer le courant d'ionisation, il faut déconnecter la fiche-prise 15)(A)p.8 placée sur le câble de
la sonde d'ionisation et connecter un microampèremètre pour courant continu de 100 mA bas
d'échelle. Attention à la polarité.
33

(B)
ORDNUNGSGEMÄSSEN ZÜNDEN
(n° = Sekunden ab Zeitpunkt 0)
NORMAL FIRING
(n° = seconds from instant 0)
ALLUMAGE REGULIER
(n° = secondes à partir de l’istant 0)
(A)
NICHTZÜNDEN / NO FIRING / LE BRULEUR S’ALLUME PAS
D980
D979
BRENNERBETRIEB
ANFAHREN DES BRENNERS (A)
• 0s: Fernsteuerung TL schließen.
Das Programm des Steuergeräts beginnt.
• 9s: Anfahren Gebläsemotor.
Anfahren Stellantrieb: dreht nach
rechts bis zum Eingriff des Schaltstücks
am Nocken St2 (roter Hebel). Die Luftklappe positioniert sich auf Höchstleistung, 2. Stufe.
• 14s: Vorbelüftungsphase bei Luftdurchsatz
wie bei 2. Stufe Leistung.
Dauer 32 Sekunden.
• 46s: Anfahren Stellantrieb: dreht nach links
bis zum am Nocken St1 eingestellten
Winkel (orangener Hebel).
• 50s: Die Luftklappe positioniert sich auf Min-
destleistung, 1. Stufe.
• 56s: Funkenbildung an der Zündungselek-
trode.
• 59s: Das Sicherheitsmagnetventil VS und
das Regelventil VR der 1. Stufe öffnen
sich (schnellöffnend). Flammenbildung
mit niedriger Leistung, Punkt A.
Es erfolgt eine progressive Steigerung
der Leistung, mit langsamer Öffnung
des Ventils bis zur Mindestleistung (1.
Stufe), Punkt B.
• 61,5s: Der Funke erlischt.
• 65s: Ist die Fernsteuerung TR geschlossen
bzw. überbrückt, dreht der Stellantrieb
weiter, bis der Nocken St2 mit dem roten Hebel in Aktion tritt. Die Luftklappe
positioniert sich auf Höchstleistung (2.
Stufe). Bevor der Endanschlag erreicht
wird, öffnet der Nocken mit dem
schwarzen Hebel das Regelventil VR
der 2. Stufe, Punkt K. Die Leistung geht
von der 1. auf die 2. Stufe über, Strecke
C-D.
• 80s: Das Programm des Steuergeräts ist be-
endet, Punkt E.
DAUERBETRIEB (A)
Anlage mit TR-Fernsteuerung
Nach dem Anfahrzyklus geht die Steuerung des
Stellmotors zur TR-Fern-steuerung über, die
Temperatur oder den Druck im Kessel überwacht, Punkt E.
(Das Steuergerät überwacht weiterhin das Vorhandensein der Flamme sowie die richtige Stellung des Luftdruckwächters).
• Wenn die Temperatur oder der Druck bis zur
Öffnung von TR zunimmt, geht der Brenner
von der 2° zur 1° Funktionsstufe über, Strecke
F-G.
• Wenn Temperatur oder Druck bis zum Ver-
schluß von TR abnimmt, geht der Brenner von
der 1° zur 2° Funktionsstufe über, und so weiter.
• Das Ausschalten des Brenners erfolgt, wenn
der Bedarf an Wärme kleiner als die vom Brenner in der 1° Stufe gelieferte Menge ist, Strecke
H-I. Die Fernsteuerung TL öffnet sich, der Stellantrieb kehrt auf den durch Nocken St0 (blauer Hebel) begrenzten Winkel 0° zurück. Die
Klappe schließt sich vollständig zwecks Reduzierung des Wärmeverlusts.
Anlage ohne TR, mit Überbrückung.
Das Anfahren des Brenners erfolgt wie oben beschrieben. Wenn danach die Tempera-tur oder
der Druck bis zum Öffnen von TL zu-nimmt, geht
der Brenner aus (Linie A-A des Diagramms).
MANGELNDE ZÜNDUNG (B)
Wenn der Brenner nicht zündet, erfolgt eine
Störabschaltung innerhalb von 3 s ab dem Öffnen des Gasventils und 62 s nach dem Verschluß von TL. Die Kontrollampe des Geräts
leuchet auf.
ABSCHALTUNG WÄHREND DES BRENNERBETRIEBS
Erlischt die Flamme zufällig während des Brennerbetriebs, erfolgt nach 1 s die Störabschaltung
des Brenners.
34

BURNER OPERATION
BURNER STARTING (A)
• 0s: Remote control device TL closes.
The control box starting cycle begins.
• 9s: Fan motor starts.
Servomotor starts: it rotates to right, until contact is made on cam St2 (red lever). The air gate valve moves to MAX
output position (stage 2).
• 14s: Pre-purge stage with air delivery at 2nd
stage output.
Duration 32 seconds.
• 46s: Servomotor starts: it rotates to left up to
the angle set on cam St1 (orange lever).
• 50s: The air gate valve moves to MIN output
position (stage 1).
• 56s: Ignition electrode strikes a spark.
• 59s: Safety valve VS and adjustment valve
VR, 1st stage (fast opening) open. The
flame is ignited at a low output level
(point A).
Delivery is then progressively increased, with the valve opening slowly
up to MIN output, 1st stage, point B.
• 61,5s: The spark goes out.
• 65s: If remote control device TR is closed or
if it has been replaced by a jumper, the
servomotor will continue to turn until
cam St2 (red lever) operates. The air
gate valve moves to the MAX output position, (stage 2). Before reaching the
closed position, the cam with the black
lever controls the opening of the adjustment valve VR, 2nd stage, point K.
Output gradually increases from stage
1 to 2, section C-D.
• 80s: The control box starting cycle ends,
point E.
STEADY STATE OPERATION (A)
System equipped with one control device TR.
Once the starting cycle has come to an end, control of the servomotor passes on to the remote
control device TR that controls boiler temperature or pressure, point E.
(The control box will continue, however, to monitor flame presence and the correct position of
the air pressure switch).
• When the temperature or the pressure increas-
es until the control device TR opens, the burner
passes from the 2nd to the 1st stage of operation, section F-G.
• When the temperature or pressure decreases
until the control device TR closes, the burner
passes from the 1st to the 2nd stage of operation, and so on.
•The burner stops when the demand for heat is
less than the amount of heat delivered by the
burner in the 1st stage, section H-I. Remote
control device TL now opens, the servomotor
returns toward the 0¯ position, limited in this
movement by cam St0 (blue lever). The air
gate valve closes completely to reduce heat
losses to a minimum.
Systems not equipped with remote control
device TR
(jumper wire installed)
The burner is fired as described in the case
above. If the temperature or pressure increase
until remote control device TL opens, the burner
shuts down (Section A-A in the diagram).
FIRING FAILURE (B)
If the burner does not fire, it goes into lock-out
within 3 s of the opening of the gas solenoid
valve and 62 s after the closing of remote control
device TL. The control box pilot light will light up.
BURNER FLAME GOES OUT DURING OPERATION
If the flame should accidentally go out during operation, the burner will lock out within 1s.
FONCTIONNEMENT BRULEUR
DEMARRAGE BRULEUR (A)
• 0s: Fermeture télécommande TL.
Le cycle de démarrage du coffret de sécurité est commencé.
• 9s: Démarrage moteur ventilateur.
Démarrage servomoteur: il tourne vers
la droite jusqu'à l'intervention du contact sur la came St2 (levier rouge). Le
volet d'air se place sur la puissance
MAX, 2ème allure.
• 14s: Phase de préventilation avec le débit
d'air de la puissance de 2ème allure.
Durée 32 secondes.
• 46s: Démarrage servomoteur: il tourne vers
la gauche jusqu'à l'angle fixé sur la
came St1 (levier orange).
• 50s: Le volet d'air se place sur la puissance
MIN, 1ère allure.
• 56s: Une étincelle jaillit de l'électrode d'allu-
mage.
• 59s: La vanne de sécurité VS et la vanne de
réglage VR, 1ère allure, ouverture rapide, s'ouvrent. La flamme s'allume à une
petite puissance, point A.
On a ensuite une augmentation progressive du puissance, ouverture lente
de la vanne, jusqu'à la puissance MIN.,
1ère allure, point B.
• 61,5s: L'étincelle s'éteint.
• 65s: Si la télécommande TR est fermée ou
remplacée par un pontet, le servomoteur tourne encore jusqu'à l'intervention
de la came St2 (levier rouge). Le volet
d'air se place sur la puissance MAX,
2ème allure. Avant d'arriver en fin de
course, la came avec le levier noir commande l'ouverture de la vanne VR,
2ème allure, point K.
La puissance passe de la 1ère à la
2ème allure, segment C-D.
• 80s: Le cycle de démarrage du coffret de sé-
curité, point E, s'achève.
FONCTIONNEMENT DE REGIME (A)
Installation munie d'une télécommande TR
Une fois le cycle de démarrage terminé, la commande du servomoteur passe à la télécommande TR qui contrôle la température ou la pression
dans la chaudière, point E.
(Le coffret de sécurité continue néanmoins à vérifier la présence de la flamme et la position correcte du pressostat de l'air).
• Quand la température ou la pression augmen-
te jusqu'à l'ouverture de TR, le brûleur passe
de la 2ème à la 1ère allure de fonctionnement,
segment F-G.
• Quand la température ou la pression diminuent
jusqu'à la fermeture de TR, le brûleur passe de
la 1ère à la 2ème allure de fonctionnement.
Et ainsi de suite.
• L'arrêt du brûleur a lieu quand la demande de
chaleur est inférieure à celle fournie par le brûleur en 1ère allure, segment H-I. La télécommande TL s'ouvre, le servomoteur revient à
l'angle 0° limité par la came St0 (levier bleu).
Le volet se ferme complètement pour réduire
au minimum les dispersions thermiques.
Installation sans TR, remplacée par un pontet.
Le démarrage du brûleur se fait comme dans le
cas précédent. Par la suite, si la température, ou
la pression, augmente jusqu'à l'ouverture de TL,
le brûleur s'éteint (segment A-A dans le diagramme).
ABSENCE D'ALLUMAGE (B)
Si le brûleur ne s'allume pas, on a le blocage
dans un délai de 3 s à partir de l'ouverture de
l'électrovanne gaz et de 62 s après la fermeture
de TL. Le voyant du coffret de sécurité s'allume.
EXTINCTION BRULEUR EN FONCTIONNEMENT
Si la flamme s'éteint accidentellement en cours
de fonctionnement, le brûleur se bloque en 1 seconde.
35
BRENNERÖFFNUNG
OPENING THE BURNER
OUVERTURE BRULEUR
D176
ENDKONTROLLEN
(bei Brenner in Betrieb)
• Einen Draht des Gas-Mindestdruckwächters
abtrennen:
• Fernsteuerung TL öffnen:
• Fernsteuerung TS öffnen:
der Brenner muß anhalten
• Gemeinsamen Draht P des Luft-Druckwäch-
ters abtrennen:
• Draht der Ionisationssonde abtrennen:
der Brenner muß in Störabschaltung anhalten
• Überprüfen, ob die mechanischen Sperren der
Einstellvorrichtungen richtig klemmen.
WARTUNG
Verbrennung
Die Abgase der Verbrennung analysieren. Bemerkenswerte Abweichungen im Vergleich zur
vorherigen Überprüfung zeigen die Stelle an, wo
die Wartung aufmerksamer ausgeführt werden
soll.
Gasundichtigkeiten
Die Zähler-Brenner-Leitung auf Gasundichtigkeiten kontrollieren.
Gasfilter
Verschmutzten Gasfilter austauschen.
Flammkopf
Den Brenner öffnen und überprüfen, ob alle
Flammkopfteile unversehrt, nicht durch hohe
Temperatur verformt, ohne Schmutzteile aus der
Umgebung und richtig positioniert sind.. Im
Zweifelsfall den Schlitten 1)(B)S. 16 ausbauen.
Gebläse
Überprüfen, ob sich im Gebläse oder auf den
Laufradschaufeln Staub angehäuft hat: das hat
eine Minderung des Luftdurchsatzes zur Folge
und verursacht eine umweltbelastende Verbrennung.
Brenner
Überprüfen, ob die Schrauben, die Kabel im
Klemmenbrett des Brenners befestigen, richtig
angezogen sind.
Den Brenner außen reinigen.
Verbrennung
Falls die anfänglich festgestellten Verbrennungswerte nicht mit den geltenden Vorschriften
übereinstimmen, oder jedenfalls nicht einer korrekten Verbrennung entsprechen, muß der
Brenner neu eingestellt werden.
Tragen Sie auf einem geeigneten Formular die
neuen Verbrennungswerte ein, die für spätere
Kontrollen nützlich sind.
ÖFFNUNG DES BRENNERS:
- Befestigungsschrauben 1) des Gebläses 3) an
der Muffe 4) entfernen.
- Brenner öffnen, indem man die Einheit A auf
den beiden Gleitschienen 2) zurückschiebt.
Die Einheit B bleibt am Kessel befestigt.
WICHTIGER HINWEIS
Beim Schließen des Brenners ist es ratsam, das
Hochspannungskabel und das Kabel des Flammenfühlers vorsichtig nach außen zu ziehen, bis
sie leicht gespannt sind.
36

FINAL CHECKS
• Disconnect one of the wires on the minimum
gas pressure switch:
• Open remote control device TL:
• Open remote control device TS:
urner must stop
the b
• Disconnect the common wire P from the air
pressure switch:
• Disconnect the ionisation probe lead:
the burner must lock out
• Make sure that the mechanical locking systems on the various adjustment devices are
fully tightened.
(with burner running)
CONTROLES FINAUX (brûleur en fonction-
nement)
• Débrancher un fil du pressostat de seuil minimum gaz.:
• Ouvrir la télécommande TL:
• Ouvrir la télécommande TS:
Le brûleur doit s'arrêter
• Débrancher le fil commun P du pressostat de
l'air:
• Débrancher le fil de la sonde d'ionisation:
Le brûleur doit se bloquer
• Contrôler que les blocages mécaniques des
dispositifs de réglage soient bien serrés.
MAINTENANCE
Combustion
The optimum calibration of the burner requires
an analysis of the flue gases. Significant differences with respect to the previous measurements indicate the points where more care
should be exercised during maintenance.
Gas leaks
Make sure that there are no gas leaks on the
pipework between the gas meter and the burner.
Gas filter
Change the gas filter when it is dirty.
Combustion head
Open the burner and make sure that all components of the combustion head are in good condition, not deformed by the high temperatures,
free of impurities from the surroundings and correctly positioned. If in doubt, disassemble the
elbow fitting 1)(B)p. 9
Fan
Check that dust has not accumulated inside the
fan and on the impeller blades: this will reduce
air delivery and, as a result, give rise to dirty
combustion.
Burner
Check that the screws that secure the cables in
the terminal strip of the burner are tight.
Clean the outside of the burner.
Combustion
Adjust the burner if the combustion values found
at the beginning of the operation do not comply
with the regulations in force, or at any rate, do
not correspond to good combustion. Use the
appropriate card to record the new combustion
values; they will be useful for subsequent controls.
OPENING THE BURNER:
- Remove the screws 1) which secure the fan 3)
to the sleeve 4).
- Open the burner by moving unit A backwards
on the two slide bars 2). Unit B remains secured to the boiler.
Important
When fitting the burner on the two slide bars, it is
advisable to gently draw out the high tension cable and flame detection probe cable until they
are slightly stretched.
ENTRETIEN
Combustion
Pour obtenir un réglage optimal du brûleur, il faut
effectuer l'analyse des gaz d'échappement de la
combustion à la sortie de la chaudière. Les différences significatives par rapport au contrôle précédent indiqueront les points où l'opération
d'entretien devra être plus approfondie.
Fuites de gaz
Contrôler l'absence de fuites de gaz sur le conduit compteur-brûleur.
Filtre du gaz
Remplacer le filtre du gaz lorsqu'il est encrassé.
Tête de combustion
Ouvrir le brûleur et contrôler que toutes les parties de la tête de combustion soient intactes, ne
soient pas déformées par les températures élevées, qu'elles soient exemptes d'impuretés provenant du milieu ambiant et positionnées
correctement.
En cas de doute, démonter le coude 1)(B)p. 16.
Ventilateur
Vérifier qu'il n'y ait pas d'accumulation de poussière à l'intérieur du ventilateur et sur les ailettes
de la turbine : elle réduirait le débit de l'air et provoquerait par conséquent une combustion polluante.
Brûleur
Contrôler que les vis qui fixent les câbles dans
la boîte à bornes du brûleur soient bloquées convenablement.
Nettoyer extérieurement le brûleur.
Combustion
Régler le brûleur si les valeurs de la combustion
trouvées au début de l'intervention ne satisfont
pas les normes en vigueur ou ne correspondent
pas à une bonne combustion.
Reporter sur une fiche spéciale les nouvelles valeurs de la combustion; elles seront utiles pour
les contrôles successifs.
POUR OUVRIR LE BRULEUR PROCEDER
COMME SUIT :
- Enlever les vis 1) qui fixent le ventilateur 3) au
manchon 4).
- Ouvrir le brûleur en reculant le groupe A sur les
deux guides 2). Le groupe B reste fixé à la
chaudière.
Attention
Au moment de la fermeture du brûleur sur les
deux guides il faut tirer délicatement vers l'extérieur le câble de haute tension et le petit câble de
la sonde de détection flamme, jusqu'à ce qu'ils
soient légèrement tendus.
37

FARBE
D912
(1)
BLAU Der Brenner fährt an und es
GELB Störabschaltung des Brenners
GELB Störabschaltung des Brenners
ROT
GRÜN
(1) Das Steuergerät 1) ist mit einer aus seinem unteren T eil sichtbaren Scheibe 2) ausgestattet, die während der Anfahrphase dreht. W enn der Brenner nicht anfährt
oder er wegen einer Störung anhält, gibt die Farbe neben dem Zeiger 3) die Art von Störung an.
STÖRUNGEN MÖGLICHE URSACHEN EMPFOHLENE ABHILFEN
Brenner geht nicht an 1 - Kein Storm. . . . . . . . . . . . . . . . . . . . . . . . . . . . . . . . . . . . . .Schalter schließen - Anschlüsse kontrollieren
Die Scheibe 2) dreht weiter 14 - Luftdruckwächter in Betribsstellung . . . . . . . . . . . . . . . . . .Einstellen oder auswechseln
erfolgt eine Störabschaltung
nach der Vorbelüftung,
und der Sicherheitszeit
ohne Flammenbildung
sofort nach Bildung der Flamme
Der Brenner wiederholt pausenlos
die Anfahrphase, ohne daß
eine Störabschaltung eintritt
Zündung mit Verpuffungen 45 - Kopf schlecht eingestellt . . . . . . . . . . . . . . . . . . . . . . . . . . .Einstellen, s.S.16
Der Brenner bleibt auf der 1. Stufe 49 - Fernbedienung TR schaltet nicht ab . . . . . . . . . . . . . . . . . .Einstellen oder auswechseln
Der Brenner funktioniert in der 1.
Stufe mit Gas und in der 2. Stufe
mit Luft
Störabschaltung des Brenners bei
Übergang von 1. und 2. Stufe
bzw. von 2. und 1. Stufe
Die Störabschaltung erfolgt während des Brennerbetriebs
Störabschaltung bei Brennerstillstand
Bei Brennerstillstand
Luftklappe geöffnet
2 - Eine Grenz-oder Sicherheitsfernsteuerung offen . . . . . . . .Einstellen oder auswechseln
3 - Geräteblock . . . . . . . . . . . . . . . . . . . . . . . . . . . . . . . . . . . . .Gerät Entriegeln
4 - Leitungssicherung unterbrochen . . . . . . . . . . . . . . . . . . . . .Auswechseln
5 - Falsche Elektroanschlüsse . . . . . . . . . . . . . . . . . . . . . . . . .Kontrollieren
6 - Defectes Steuergerät. . . . . . . . . . . . . . . . . . . . . . . . . . . . . .Auswechseln
7 - Kein Gas . . . . . . . . . . . . . . . . . . . . . . . . . . . . . . . . . . . . . . .Die handbetätigten Ventile zwischen
Zähler und Armaturen öffnen
8 - Netz-Gasdruck nicht ausreichend . . . . . . . . . . . . . . . . . . . .Beim Gaswerk nachfragen
9 - Gas-Mindestdruckwächter schließt nicht. . . . . . . . . . . . . . .Einstellen oder ersetzen
10 - Defekter Kondensator (GAS 3/2 - 4/2). . . . . . . . . . . . . . . . .Auswechseln
11 - Defekte Motor-Fernsteuerung (GAS 5/2 - 6/2 - 7/2) . . . . . . .Auswechseln
12 - Defecter Elektro-Motor . . . . . . . . . . . . . . . . . . . . . . . . . . . .Auswechseln
13 - Motorblock (GAS 5/2 - 6/2 - 7/2). . . . . . . . . . . . . . . . . . . . . . . . . . .Überstromauslöser bei Drehstromrückkehr entriegeln
15 - Flammensimulation . . . . . . . . . . . . . . . . . . . . . . . . . . . . . . .Gerät auswechseln
Luft-Druckwächter schaltet nicht um,
weil Luftdruck nicht ausreichend:
16 - Luft-Druckwächter schlecht eingestellt . . . . . . . . . . . . . . . .Einstellen oder auswechseln
17 - Druckentnahmerohr des Druckwächters verstopft. . . . . . . .Reinigen
18 - Flammkopft schlecht eingestellt . . . . . . . . . . . . . . . . . . . . .Einstellen
19 - Hoher Unterdruck im Feuerraum. . . . . . . . . . . . . . . . . . . . .Sich an unser technisches Büro wenden
20 - Störung Flammenüberwachung . . . . . . . . . . . . . . . . . . . . .Gerät auswechseln
21 - Der stellantrieb öffnen die Luftklappe in der 2. Stufe nicht. . . . . .Auswechseln
22 - Ventile VS-VR nicht verb unden oder mit unterbrochener Spule Anschlüsse überprüfen oder Spule auswechseln
23 - Ungenüngender Gasfluß durch das Magnetventil VR. . . . .Steigern
24 - Magnetventil VR bzw. VS öffnet nicht . . . . . . . . . . . . . . . . .Spule oder Gleichrichterplatte auswechseln
25 - Gasdruck zu gering . . . . . . . . . . . . . . . . . . . . . . . . . . . . . . .Am Regler erhöhen
26 - Zundelektrode schlecht eingestellt . . . . . . . . . . . . . . . . . . .Einstellen, s.Abb. (C)S.14
27 - Erdungs elektrode für Isolator kaputt. . . . . . . . . . . . . . . . . .Auswechseln
28 - Hochspannungskabel defekt. . . . . . . . . . . . . . . . . . . . . . . .Auswechseln
29 - Hochspannungskabel durch hohe Temperatur verformt . . .Auswechseln und schützen
30 - Defekter Zündtrafo. . . . . . . . . . . . . . . . . . . . . . . . . . . . . . . .Auswechseln
31 - Falsche Elektroanschlüsse Ventile oder Trafo . . . . . . . . . . .Kontrollieren
32 - Defektes Steuergerät. . . . . . . . . . . . . . . . . . . . . . . . . . . . . .Auswechseln
33 - Ein Ventil vor den Gasarmaturen geschlossen . . . . . . . . . .Öffnen
34 - Luft in den Leitungen. . . . . . . . . . . . . . . . . . . . . . . . . . . . . .Entlüften
35 - Ungenügender Gasfluß durch das Magnetventil VR. . . . . .Steigern
36 - Ionisationssonde schlecht eingestellt . . . . . . . . . . . . . . . . .Einstellen, s.Abb. (C)S.14
37 - Elektroanschluß der Sonde nicht in Ordnung . . . . . . . . . . .Neu ausführen
38 - Ungenügende Ionisation (unter 5 µA) . . . . . . . . . . . . . . . . .Sondenposition überprüfen
39 - Sonde geerdet. . . . . . . . . . . . . . . . . . . . . . . . . . . . . . . . . . .Beseitigen oder Kabel auswechseln
40 - Ungenügende Brennererdung. . . . . . . . . . . . . . . . . . . . . . .Erdung überprüfen
41 - Phasen- und Nulleiteranschlüsse umgekehrt . . . . . . . . . . .Umkehren
42 - Der Stellsntrieb schießt die Luftklappe in der 1. Stufe nicht.Auswechseln
43 - Defektes Steuergerät. . . . . . . . . . . . . . . . . . . . . . . . . . . . . .Auswechseln
44 - Der Netz-gasdruck stimmt beinahe dem. . . . . . . . . . . . . . .Den Eingriffsdruckwert des Gas-Mindest-
Einstellwert des Gas-Mindestdruckwächter überein. druckwächters herabsetzen.
Der plötzliche Druckabfall nach Ventilöffnung Gasfiltereinsatz auswechseln.
verursacht eine zeitlich beschränkte Öffnung des
Druckwächters, das Ventil schließt sofort und der
Brenner schaltet sich aus. der Druck steight an, der
Druckwächter schließt und setzt eine neue Anfahrphase
in Gang. Diese Vorgänge wiederholen sich.
46 - Zündelektrode schlecht eingestellt . . . . . . . . . . . . . . . . . . .Einstellen, s.Abb. (C)S.14
47 - Gebläseluftklappe falsch eingestellt, zuviel Luft . . . . . . . . .Einstellen
48 - Zu hohe Zündleistung . . . . . . . . . . . . . . . . . . . . . . . . . . . . .Verringern
50 - Roter Hebel des Stellantriebs befindet sich vor orangenem Hebel Einstellen
51 - Stellanbetrieb öffnet die Luftklappe in der 2. Dtufe nicht. . .Ersetzen
52 - Roter Hebel befindest sich vor schwarzem Hebel. . . . . . . .Einstellen
53 - Stellantrieb defekt . . . . . . . . . . . . . . . . . . . . . . . . . . . . . . . .Ersetzen
54 - Zuviel Luft oder wenig Gas . . . . . . . . . . . . . . . . . . . . . . . . .Luft und Gas einstellen
55 - Fühler oder Ionisationskabel geerdet . . . . . . . . . . . . . . . . .Defekte Teile auswechseln
56 - Störung am Luft-Druckwächter . . . . . . . . . . . . . . . . . . . . . .Ersetzen
57 - Nicht erloschene Flamme im Flammkopf oder . . . . . . . . . .Flamme beseitigen oder
Flammensimulation . . . . . . . . . . . . . . . . . . . . . . . . . . . . . . .Gerät ersetzen
58 - Defekter Stellantrieb . . . . . . . . . . . . . . . . . . . . . . . . . . . . . .Auswechseln
38
COLOUR
D912
BLUE The burner starts and
YELLOW After pre-purge and
YELLOW The burner goes to lock-out
RED
GREEN
(1) The control box 1) is equipped with a disk 2) that rotates during the starting phase and is visible from the low er side of control bo x. When the burner does not start,
(1)
The burner does not start 1 - No electrical power supply . . . . . . . . . . . . . . . . . . . . . . . . .Close all switches - Check connections
The disk 2) keeps on rotating 14 - Air pressure switch in operating position Adjust or replace
then locks out
safety time,
the burner goes tolock-out
and the flame does not appear
right after flame appearance
The burner repeats
the starting cycle
without lock out
Ignition with pulsation 45 - Poorly adjusted head. . . . . . . . . . . . . . . . . . . . . . . . . . . . . .Adjust, see p.17
Burner remain in stage 1 49 - Remote control device TR does not close. . . . . . . . . . . . . .Adjust oe replace
Burner operates in stage 1 with
gas and in stage 2 with air
Burner locks out at transition
between 1st and 2nd stage or
between 2nd and 1st stage
During operation, the burner stops
in lock out
Lock out when burner stops 57 - Flame remains in combustion head . . . . . . . . . . . . . . . . . . Eliminate persistence of flame
Burner stops with air gate valve
open
or locks out, because of a fault, the color which appears in correspondance with index 3) signals the kind of inconvenience.
FAULT PROBABLE CAUSE SUGGESTED REMEDY
2 - A limiter or safety control device is open. . . . . . . . . . . . . . .Adjust or replace
3 - Control box lock-out . . . . . . . . . . . . . . . . . . . . . . . . . . . . . .Reset control box
4 - Control box fuses blown . . . . . . . . . . . . . . . . . . . . . . . . . . .Replace
5 - Erroneous electrical connections . . . . . . . . . . . . . . . . . . . .Check connections
6 - Defective control box. . . . . . . . . . . . . . . . . . . . . . . . . . . . . .Replace
7 - No gas supply. . . . . . . . . . . . . . . . . . . . . . . . . . . . . . . . . . . . . . . Open the manual valves between meter and tr ain
8 - Mains gas pressure insufficient. . . . . . . . . . . . . . . . . . . . . .Contact your GAS COMPANY
9 - Minimum gas pressure switch fails to close . . . . . . . . . . . .Adjust or replace
10 - Defective capacitor (GAS 3/2 - 4/2). . . . . . . . . . . . . . . . . . .Replace
11 - Defective motor remote control switch (GAS 5/2 - 6/2 - 7/2) . . .Replace
12 - Defective electrical motor . . . . . . . . . . . . . . . . . . . . . . . . . .Replace
13 - Motor protection tripped (GAS 5/2 - 6/2 - 7/2) . . . . . . . . . . .Reset thermal cut-out when third phase
is re-connected
15 - Flame simulation. . . . . . . . . . . . . . . . . . . . . . . . . . . . . . . . .Replace control box
Air pressure switch inoperative due to
insufficient air pressure:
16 - Air pressure switch adjusted badly . . . . . . . . . . . . . . . . . . .Adjust or replace
17 - Pressure switch pressure point pipe blocked . . . . . . . . . . .Clean
18 - Head wrongly adjusted . . . . . . . . . . . . . . . . . . . . . . . . . . . .Adjust
19 - High negative draft in chamber . . . . . . . . . . . . . . . . . . . . . . . . . Ask our technical office
20 - Fault in flame detection circuit. . . . . . . . . . . . . . . . . . . . . . .Replace control box
21 - Servomotor does not open the air gate valve in stage 2. . . Replace
22 - VS and VR gas valves unconnected or with interrupted coil . . Check connections or replace coil
23 - The solenoid VR allows little gas through . . . . . . . . . . . . . .Increase
24 - Solenoid valves VR or VS fail to open. . . . . . . . . . . . . . . . .Renew the coil or rectifier panel
25 - Gas pressure too low . . . . . . . . . . . . . . . . . . . . . . . . . . . . .Increase pressure at governor
26 - Ignition electrode wrongly adjusted. . . . . . . . . . . . . . . . . . . Adjust, see fig. (C)p.14
27 - Electrode grounded due to brocken insulation . . . . . . . . . . Replace
28 - High voltage cable defective . . . . . . . . . . . . . . . . . . . . . . . .Replace
29 - High voltage cable deformed by high temperature . . . . . . .Replace and protect
30 - Ignition trasformer defective . . . . . . . . . . . . . . . . . . . . . . . .Replace
31 - Erroneous valve or trasformer electrical connections . . . . .Check
32 - Control box defective. . . . . . . . . . . . . . . . . . . . . . . . . . . . . .Replace
33 - A cock down-line of the gas train is closed. . . . . . . . . . . . .Open
34 - Air in pipework. . . . . . . . . . . . . . . . . . . . . . . . . . . . . . . . . . .Bleed air
35 - The solenoid VR allows little gas through . . . . . . . . . . . . . .Increase
36 - Ionisation probe wrongly adjusted. . . . . . . . . . . . . . . . . . . .Adjust, see fig. (C)p.14
37 - Faulty electrical connections for probe . . . . . . . . . . . . . . . .Repeat connection
38 - Insufficient ionisation (less than 5 µA). . . . . . . . . . . . . . . . .Check probe position
39 - Probe grounded . . . . . . . . . . . . . . . . . . . . . . . . . . . . . . . . .Withdraw or replace cable
40 - Burner poorly grounded . . . . . . . . . . . . . . . . . . . . . . . . . . .Check grounding
41 - Phase and neutral wires inverted . . . . . . . . . . . . . . . . . . . .Correct by interventing
42 - Servomotor does not open the air gate valve in stage 1. . . Replace
43 - Defective control box. . . . . . . . . . . . . . . . . . . . . . . . . . . . . .Replace
44 - Mains gas pressure is near the value to which the. . . . . . .Reduce operating pressure
min. gas pressure switch gas is adjusted. The of minimum gas pressure switch.
repeated drop in pressure which follows valve Replace gas filter
opening causes temporary opening of the pressure
switch itself, the valve immediately closes and the
burner comes to a halt. Pressure increases again, the
pressure switch closes again and the firing cycle is
repeated. The sequence repeats endlessly.
46 - Ignition electrode wrongly adjusted. . . . . . . . . . . . . . . . . . . Adjust, see fig. (C)p.14
47 - Poorly adjusted fan air gate: too much air . . . . . . . . . . . . . .Adjust
48 - Output during ignition phase is too high . . . . . . . . . . . . . . . Reduce
50 - Servomotor red lever precedes orange lever . . . . . . . . . . .Adjust
51 - Servomotor does not open the air gate valve in stage 2. . . Replace
52 - Red lever precedes black lever . . . . . . . . . . . . . . . . . . . . . .Adjust
53 - Defective servomotor. . . . . . . . . . . . . . . . . . . . . . . . . . . . . .Replace
54 - Too much air or too little gas . . . . . . . . . . . . . . . . . . . . . . . .Adjust air and gas
55 - Probe or ionisation cable earthed . . . . . . . . . . . . . . . . . . .Replace worn parts
56 - Fault on air pressure switch. . . . . . . . . . . . . . . . . . . . . . . . .Replace
or flame simulation or replace control box
58 - Sevomotor faulty . . . . . . . . . . . . . . . . . . . . . . . . . . . . . . . . .Replace
39

COULEUR
D912
(1)
BLEU
JAUNE
JAUNE
ROUGE
VERT
(1) Le coffret de sécurité 1) a un disque 2) qui tourne pendant le programme de démarrage, visib le du côté inférieur du coffret. Lorsque le brûleur ne démarre pas ou
s'arrête, à cause d'une panne, la couleur qui apparaît en correspondance de l'index 3) signale le type de panne.
INCONVENIENT CAUSE PROBABLE REMEDE CONSEILLE
Le brûleur ne démarre pas 1 - Absence de courant électrique . . . . . . . . . . . . . . . . . . . . . .Fermer interrupteurs - Contrôler fusibles
Le disque 2) continue à tourner 14 - Pressostat air en position de fonctionnement . . . . . . . . . .Le régler ou le remplacer
Le brûleur démarre et se bloque 15 - Simulation de flamme . . . . . . . . . . . . . . . . . . . . . . . . . . . . .Remplacer le coffret de sécurité
Après la préventilation
et le temps de sécurité,
le brûleur se bloque
sans apparition de flamme
Le brûleur se bloque
tout de suite après
l'apparition de la flamme
Le brûleur continue
à répéter le cycle
de démarrage sans blocage
Allumage par saccades 45 - Tête mal réglée. . . . . . . . . . . . . . . . . . . . . . . . . . . . . . . . . .La régler, voir page 17
Le brûleur reste en 1ère allure 49 - Télécommande TR ne ferme pas . . . . . . . . . . . . . . . . . . . .La régler ou la remplacer
Le brûleur fonctionne en 1ère
allure avec le gaz et en 2ème
allure avec l’air
Blocage du brûleur lors du passage
entre 1ère et 2ème allure
ou entre 2ème et 1ère allure
Au cours du fonctionnement le
brûleur se bloque
Blocage à l'arrêt du brûleur 57 - Permanence de flamme dans la tête de combustion . . . . .Eliminer la permanence de flamme
Brûleur arrêté volet d'air ouvert 58 - Servomoteur défectueux. . . . . . . . . . . . . . . . . . . . . . . . . . .Remplacer
2 - Une télécommande de limite ou de sécurité est ouverte . .La régler ou la changer
3 - Blocage coffret de sécurité . . . . . . . . . . . . . . . . . . . . . . . . .Débloquer le coffret
4 - Fusible coffret interrompu . . . . . . . . . . . . . . . . . . . . . . . . . .Le remplacer
5 - Branchements électriques mal faits . . . . . . . . . . . . . . . . . .Les contrôler
6 - Coffret de sécurité défectueux . . . . . . . . . . . . . . . . . . . . . .Le remplacer
7 - Le gaz manque. . . . . . . . . . . . . . . . . . . . . . . . . . . . . . . . . . . . . . . . . . . .Ouvrir les vannes manuelles entre compteur et rampe
8 - Pression gaz réseau insuffisante . . . . . . . . . . . . . . . . . . . .Contacter la SOCIETE DU GAZ
9 - Pressostat gaz seuil minimum ne ferme pas . . . . . . . . . . .Le régler ou le remplacer
10 - Condensateur défectueux (GAS 3/2 - 4/2). . . . . . . . . . . . . Le remplacer
11 - Télérupteur commande moteur défectueux (GAS 5/2 -6/2-7/2).Le remplacer
12 - Moteur électrique défectueux . . . . . . . . . . . . . . . . . . . . . . .Le remplacer
13 - Blocage moteur (GAS 3/2 - 4/2) . . . . . . . . . . . . . . . . . . . . .Débloquer le relais thermique au retour des
trois phases
Pressostat air ne commute pas parce que pression air
insuffisante:
16 - Pressostat air mal réglé. . . . . . . . . . . . . . . . . . . . . . . . . . . .Le régler ou le remplacer
17 - Tube prise pression du pressostat obstrué . . . . . . . . . . . . .Le nettoyer
18 - Tête mal réglée. . . . . . . . . . . . . . . . . . . . . . . . . . . . . . . . . .La régler
19 - Forte dépression dans le foyer . . . . . . . . . . . . . . . . . . . . . . . . . Demander à notre bureau technique
20 - Panne du circuit révélation flamme. . . . . . . . . . . . . . . . . . .Remplacer le cofferet de sécurité
21 - Le servomoteur n’ouvre pas le volet en 2éme allure. . . . . .Le remplacer
22 - Vannes gaz VS et VR non branchées ou bobine interrompue.Contrôler les branchements ou remplacer la bobine
23 - Electrovanne VR fait passer peu de gaz. . . . . . . . . . . . . . .Augmenter
24 - L'électrovanne VR ou VS ne s'ouvre pas . . . . . . . . . . . . . .Remplacer bobinage ou panneau redresseur
25 - Pression gaz trop faible. . . . . . . . . . . . . . . . . . . . . . . . . . . .L'augmenter au régulateur
26 - Electrode d'allumage mal réglée. . . . . . . . . . . . . . . . . . . . .La régler, voir fig. (C)p.12
27 - Electrode à la masse suite à rupture de l'isolant. . . . . . . . .La remplacer
28 - Câble haute tension défectueux . . . . . . . . . . . . . . . . . . . . .Le remplacer
29 - Câble haute tension déformé par haute température . . . . .Le remplacer et le protéger
30 - Transformateur d'allumage défectueux . . . . . . . . . . . . . . . .Le remplacer
31 - Branchements électriques vannes ou transformateur mal faits Les contrôler
32 - Coffret de sécurité défectueux . . . . . . . . . . . . . . . . . . . . . .Le remplacer
33 - Une vanne en amont de la rampe de gaz est fermée. . . . .Ouvrir
34 - Air dans les conduites. . . . . . . . . . . . . . . . . . . . . . . . . . . . .Purger
35 - Electrovanne VR fait passer peu de gaz. . . . . . . . . . . . . . .Augmenter
36 - Sonde d'ionisation mal réglée. . . . . . . . . . . . . . . . . . . . . . .La régler, voir fig. (C)p.12
37 - Raccordement électrique sonde défectueux. . . . . . . . . . . . Effectuer à nouveau le raccordement
38 - Ionisation insuffisante (inférieure 5 µA). . . . . . . . . . . . . . . .Contrôler la position de la sonde
39 - Sonde à la masse . . . . . . . . . . . . . . . . . . . . . . . . . . . . . . . .L'éloigner ou remplacer le câble
40 - La mise à la terre du brûleur n'est pas suffisamment efficace Revoir la mise à la terre
41 - Les branchements de phase et neutre sont inversés . . . . .Inverser
42 - Le servomoteur ne ferme pas le volet en 1ère allure . . . . . Le remplacer
43 - Coffret de sécurité défectueux . . . . . . . . . . . . . . . . . . . . . .Le remplacer
44 - La pression du gaz de réseau est proche de la valeur . . . .Réduire la pression
sur laquelle le pressostat gaz seuil minimum est réglé. d'intervention du
La chute de pression répétée qui suit l'ouverture de la pressostat gaz min.
vanne provoque l'ouverture temporaire du pressostat, Remplacer cartouche filtre gaz.
la vanne se ferme aussitìt et le brûleur s'arrête.
La pression augmente à nouveau, le pressostat se
ferme et fait répéter le cycle de démarrage.
Et ainsi de suite.
46 - Electrode d'allumage mal réglée. . . . . . . . . . . . . . . . . . . . .La régler, voir fig. (C)p.14
47 - Volet ventilateur mal réglé, trop d'air. . . . . . . . . . . . . . . . . .Le régler
48 - Puissance à l'allumage trop élevée. . . . . . . . . . . . . . . . . . .La réduire
50 - Levier rouge servomoteur précède levier orange . . . . . . . .Le régler
51 - Le servomoteur n’ouvre pas le volet en 2éme allure. . . . . .Le remplacer
52 - Levier rouge précèdelevier noir. . . . . . . . . . . . . . . . . . . . . .Le régler
53 - Servomoteur défecteueux. . . . . . . . . . . . . . . . . . . . . . . . . .Le remplacer
54 - Trop d'air ou peu de gaz . . . . . . . . . . . . . . . . . . . . . . . . . . .Régler air et gaz
55 - Sonde ou câble d'ionisation à la masse . . . . . . . . . . . . . . .Remplacer pièces endommagées
56 - Défectueux pressostat d'air. . . . . . . . . . . . . . . . . . . . . . . . .Le remplacer
ou simulation de flamme ou remplacer le coffret de sécurité
40


RIELLO S.p.A.
Via degli Alpini 1
I - 37045 Legnago (VR)
Tel.: +39.0442.630111 Fax: +39.0442.630375
http:// www.rielloburners.com
Änderungen vorbehalten! - Subject modifications - Sous réserve de modifications
 Loading...