

Riedel Bolero User Manual
Bolero
Next Generation Wireless
User Manual
A20
03-000HB01EG
This device complies with Part 15 of the FCC Rules and with Industry Canada licence-exempt RSS standard(s). Operation is subject to the following
two conditions: (1) this device may not cause harmful interference, and (2) this device must accept any interference received, including interference
that may cause undesired operation.
Le présent appareil est conforme aux CNR d'Industrie Canada applicables aux appareils radio exempts de licence. L'exploitation est autorisée aux
deux conditions suivantes: (1) l'appareil ne doit pas produire de brouillage, et (2) l'utilisateur de l'appareil doit accepter tout brouillage
radioélectrique subi, même si le brouillage est susceptible d'en compromettre le fonctionnement.
This equipment has been tested and found to comply with the limits for a Class A digital device, pursuant to Part 15 of the FCC Rules. These limits
are designed to provide reasonable protection against harmful interference when the equipment is operated in a commercial environment. This
equipment generates, uses, and can radiate radio frequency energy and, if not installed and used in accordance with the instruction manual, may
cause harmful interference to radio communications. Operation of this equipment in a residential area is likely to cause harmful interference in
which case the user will be required to correct the interference at his own expense.
Changes or modifications made to this equipment not expressly approved by Riedel may void the FCC authorization to operate this equipment.
Radiofrequency radiation exposure Information (for the Beltpack):
For body worn operation, this equipment has been tested and meets the FCC RF exposure guidelines when used with the Riedel accessories
supplied or designated for this product. Use of other accessories may not ensure compliance with FCC RF exposure guidelines.
Radiofrequency radiation exposure Information (for the Antenna):
This equipment complies with FCC radiation exposure limits set forth for an uncontrolled environment. This equipment should be installed and
operated with minimum distance of 20 cm between the radiator and your body. This transmitter must not be co-located or operating in conjunction
with any other antenna or transmitter.
Beltpack: Este produto está homologado pela Anatel, de acordo com os procedimentos regulamentados pela Resolução n°. 242/2000 e atende aos
requisitos técnicos aplicados, incluindo os limites de exposição da Taxa de Absorção Específica referente a campos elétricos, magnéticos e
eletromagnéticos de radiofreqüência de acordo com as Resoluções n°. 303/2002 e 533/2009.
This device is granted pursuant to the Japanese Radio Law ( ) and the Japanese Telecommunications Business Law ( ). This device
should not be modified (otherwise the granted designation number will become invalid).
The devices conform to the following EU guidelines as attested by the CE mark.
·
EMV (EMC) 2014/30/EU
·
NSR (LVD) 2014/35/EU
·
RTTE (RED) 2014/53/EU
·
YFJANT101019 (Bolero DECT Antenna / BL-ANT-1010-19)
·
YFJBPK100619 (Bolero Wireless Beltpack / BL-BPK-1006-19)
Industry Canada
·
8706A-ANT101019 (Bolero DECT Antenna / BL-ANT-1010-19)
·
8706A-BPK100619 (Bolero Wireless Beltpack / BL-BPK-1006-19)
Standards
·
EN 300 328 V1.9.1 / ETSI EN 300 328 V2.0.20
·
EN 300 330 V1.8.1 / ETSI EN 300 330 V2.1.0
·
EN 301 406 V2.2.1
·
EN 301 489-1/-3/-6/-17, EN 55022, EN 55024
·
IEC/EN 60950-1
·
ARIB STD-T66
·
ARIB STD-T101
Singapore
Complies with
IMDA Standards
DB105184
Australia
Any device that connects to the
data ports must comply with the
clause 4.7 of AS/NZS 60950.1
03-000HB01EG-A20
Bolero User Manual
© November 2017 Riedel Communications GmbH & Co. KG. ALL RIGHTS RESERVED.
UNDER THE COPYRIGHT LAWS, THIS MANUAL MAY NOT BE COPIED, IN WHOLE OR IN PART, WITHOUT THE WRITTEN CONSENT OF RIEDEL. EVERY
EFFORT HAS BEEN MADE TO ENSURE THAT THE INFORMATION IN THIS MANUAL IS ACCURATE. RIEDEL IS NOT RESPONSIBLE FOR PRINTING OR
CLERICAL ERRORS. ALL TRADEMARKS ARE THE PROPERTY OF THEIR RESPECTIVE OWNERS.

Bolero User Manual A20
CONTENT
Preface 5
1
Bolero Beltpack 10
2
Information ........................................................................................................................................................ 61.1
About Bolero ...................................................................................................................................................... 91.2
Operating Elements ........................................................................................................................................ 112.1
Status LEDs ...................................................................................................................................................... 132.2
Basic Operation ............................................................................................................................................... 142.3
2.3.1 StartUp ...................................................................................................................................................... 14
2.3.2 Key Functions ............................................................................................................................................ 15
2.3.3 Headset Type ............................................................................................................................................ 15
2.3.4 Volume Adjustment .................................................................................................................................. 16
2.3.5 Quick Menu ............................................................................................................................................... 17
2.3.6 Main Menu ................................................................................................................................................ 18
Features in Detail ............................................................................................................................................ 222.4
2.4.1 Speaker ..................................................................................................................................................... 22
2.4.2 Brightness Mode ...................................................................................................................................... 22
2.4.3 Profiles ...................................................................................................................................................... 23
2.4.4 Signalization ............................................................................................................................................. 23
2.4.5 Silent Mode ............................................................................................................................................... 24
2.4.6 Display Mode ............................................................................................................................................ 24
2.4.7 Lock Keys ................................................................................................................................................... 24
2.4.8 Bluetooth .................................................................................................................................................. 25
2.4.8.1 Bluetooth State .................................................................................................................... 26
2.4.8.2 Pair ....................................................................................................................................... 27
2.4.8.3 Share To Net ........................................................................................................................ 28
2.4.9 Registration ............................................................................................................................................... 28
2.4.9.1 Antenna OTA ........................................................................................................................ 29
2.4.9.2 Antenna NFC ........................................................................................................................ 30
2.4.9.3 Beltpack NFC ........................................................................................................................ 30
2.4.10 De-Registration ......................................................................................................................................... 31
2.4.11 Walk-Test ................................................................................................................................................... 31
2.4.12 Reset .......................................................................................................................................................... 32
2.4.13 Opening the Rubber Cover ...................................................................................................................... 32
2.4.14 Battery ....................................................................................................................................................... 33
2.4.14.1 Charging via USB in the Beltpack ...................................................................................... 33
2.4.14.2 Charging in the Charger ..................................................................................................... 34
2.4.14.3 Replacing the Battery .......................................................................................................... 35
2.4.14.4 Removing the Belt Clip ........................................................................................................ 35
2.4.15 Firmware Update ..................................................................................................................................... 36
Technical Specifications .................................................................................................................................. 382.5
Bolero Antenna 39
3
Operating Elements ........................................................................................................................................ 393.1
Status LEDs ...................................................................................................................................................... 413.2
Basic Operation ............................................................................................................................................... 423.3
3.3.1 StartUp ...................................................................................................................................................... 42
3.3.2 Key Functions ............................................................................................................................................ 42
3.3.3 Main Menu ................................................................................................................................................ 43
Web Interface .................................................................................................................................................. 443.4
3.4.1 Net / Antenna ............................................................................................................................................ 45
3.4.1.1 Edit ........................................................................................................................................ 46
3.4.1.2 Menu ..................................................................................................................................... 47
3.4.2 Beltpack Profiles ....................................................................................................................................... 48
3.4.2.1 Edit ........................................................................................................................................ 49
3.4.2.2 Menu ..................................................................................................................................... 50
3.4.3 Registered Beltpacks ................................................................................................................................ 51
3.4.3.1 Edit ........................................................................................................................................ 52
3.4.3.2 Menu ..................................................................................................................................... 53

3.4.4 System Logs .............................................................................................................................................. 54
3.4.5 Settings ...................................................................................................................................................... 55
3.4.5.1 Firmware Manager ............................................................................................................. 55
3.4.5.2 Network Service ................................................................................................................... 55
3.4.5.3 Save Net Config ................................................................................................................... 55
3.4.5.4 Upload Net Config ............................................................................................................... 56
3.4.5.5 Login/Logout ........................................................................................................................ 56
Features in Detail ............................................................................................................................................ 573.5
3.5.1 Bolero-Artist Setup ................................................................................................................................... 57
3.5.2 Switch Recommendations ....................................................................................................................... 60
3.5.3 Registration ............................................................................................................................................... 63
3.5.4 De-Registration ......................................................................................................................................... 65
3.5.4.1 Antennas .............................................................................................................................. 65
3.5.4.2 Beltpacks .............................................................................................................................. 66
3.5.5 Firmware Update ..................................................................................................................................... 67
Mechanical Drawings ...................................................................................................................................... 703.6
Technical Specifications .................................................................................................................................. 713.7
Bolero Charger 72
4
Operating Elements ........................................................................................................................................ 724.1
Status LEDs ...................................................................................................................................................... 744.2
Charging Batteries ........................................................................................................................................... 754.3
Technical Specifications .................................................................................................................................. 764.4
Bolero User Manual A20
Appendix 77
5
Glossary ............................................................................................................................................................ 775.1
Maintenance Recommendations ................................................................................................................... 785.2
Service .............................................................................................................................................................. 795.3
Notes ................................................................................................................................................................ 805.4
Index .............................................................................................................................................................................. 82

Bolero User Manual A20
CHM
"Compiled HTML Help" is the standard format for Windows online help and .Net applications
EPUB
"Electronic Publishing format" is a cross-platform e-book standard
1 Preface
Thank you for choosing a Riedel product.
This PDF document provides detailed information about the Bolero system, pin outs, mechanical and electrical data.
This manual is available in additional formats:
For further information, please refer to the Riedel Website or contact your local distributor or the Riedel headquarters
in Wuppertal.
NOTICE
This manual, as well as the software and any examples contained herein are provided “as is” and are subject to change
without notice. The content of this manual is for informational purpose only and should not be construed as a
commitment by Riedel Communications GmbH & Co. KG or its suppliers. Riedel Communications GmbH & Co. KG gives
no warranty of any kind with regard to this manual or the software including, but not limited to the implied warranties
of merchantability and fitness for a particular purpose. Riedel Communications GmbH & Co. KG shall not be liable for
any errors, inaccuracies or for incidental or consequential damages in connection with the furnishing, performance or
use of this manual, the software or the examples herein. Riedel Communications GmbH & Co. KG reserves all patent,
proprietary design, title and intellectual property rights contained herein, including, but not limited to, any images, text,
photographs incorporated into the manual or software.
All title and intellectual property rights in and to the content that is accessed through use of the products is the
property of the respective owner and may be protected by applicable copyright or other intellectual property laws and
treaties.
5
1.1 Information
The following tables are used to indicate hazards and provide cautionary information in relation to the handling
and use of the equipment.
Danger
!
Indicates an imminently hazardous situation which, if not avoided, will result in death or serious
injury.
The highlighted line indicates the activity to prevent the danger.
Warning
!
Indicates a potentially hazardous situation which, if not avoided, could result in death or serious
injury.
The highlighted line indicates the activity to prevent the danger.
Caution
!
Indicates a potentially hazardous situation which, if not avoided, may result in minor or moderate
injury. It may also be used to alert against unsafe practices.
The highlighted line indicates the activity to prevent the danger.
This text is for generally information. It indicates the activity for ease of work or for better
understanding.
·
All service has to be undertaken ONLY by qualified service personnel.
·
Do not plug in, turn on or attempt to operate an obviously damaged device.
·
Never attempt to modify the equipment components for any reason.
Caution
!
All adjustments have been done at the factory before the shipment of the devices.
No maintenance is required and no user serviceable parts are inside the module.
Symbols
Bolero User Manual A20
Service
6

Bolero User Manual A20
·
The power cable should only be connected to a properly grounded source.
·
Do not use any adapters.
·
Never bypass a ground contact.
Danger
!
To reduce the risk of electric shock do not remove cover or expose the products to rain or
moisture.
Warning
!
Laite on liitettävä suojakoskettimilla varustettuun pistorasiaan.
Apparatet må tilkoples jordet stikkontakt.
Apparaten skall anslutas till jordat uttag.
The Bolero-Beltpacks are operated with the following battery type: Lithium-Ion, 3.6V, 4.8Ah, 17.3Wh, 1ICP7/39/65-2,
with integrated electronics. For best performance charge the battery fully before initial use or reusing it after being
stored for a long period.
In order to ensure air transport safety, the Bolero Battery Pack is tested according to UN 38.3 – Transport of
dangerous goods.
Warning
!
There is a risk of fire and burns if the battery pack is handled improperly.
·
Do not short-circuit.
·
Do not dismantle, open, crush, heat above 60°C (140°F) or incinerate.
·
Recycle or Dispose of property.
·
Charge before initial use.
·
Use the specified Riedel Bolero Charger only or charge the battery via the Beltpack.
·
Do not charge using any other equipment from either side.
·
Do not connect the contacts to any other equipment.
Further recommendations:
·
Avoid storage in direct sunlight.
·
Do not subject batteries to mechanical shock.
·
In the event of a cell leaking, do not allow the liquid to come into contact with the skin or eyes.
If contact has been made, wash the affected area with copious amounts of water and seek
medical advice.
·
Do not use batteries which are not designed for use with the Beltpack.
·
Keep batteries out of the reach of children.
·
Keep batteries clean and dry.
·
Wipe the battery terminals with a clean dry cloth if they become dirty.
·
Use the battery only in the application for which it was intended.
·
When possible, remove the battery from the Beltpack when not in use.
Voltage
Battery Safety
7
Environment
·
Never place the devices in an area of high dust particles or humidity.
·
Never expose the device to any liquids.
·
If the devices have been exposed to a cold environment and transferred to a warm environment,
condensation may form inside the housing. Wait at least 2 hours before applying any power to the
devices.
Disposal of old Electrical & Electric Equipment (Applicable throughout the European Union and other European
countries with separate collection programs)
This symbol, found on your product or on its packaging, indicates that this product should not be
treated as household waste when you wish to dispose of it. Instead, it should be handed over to
an applicable collection point for the recycling of electrical and electronic equipment. By ensuring
this product is disposed of correctly, you will help prevent potential negative consequences to the
environment and human health, which could otherwise be caused by inappropriate disposal of
this product. The recycling of materials will help to conserve natural resources. For more detailed
information about the recycling of this product please contact your local city office.
Disposal
Bolero User Manual A20
8

Bolero User Manual A20
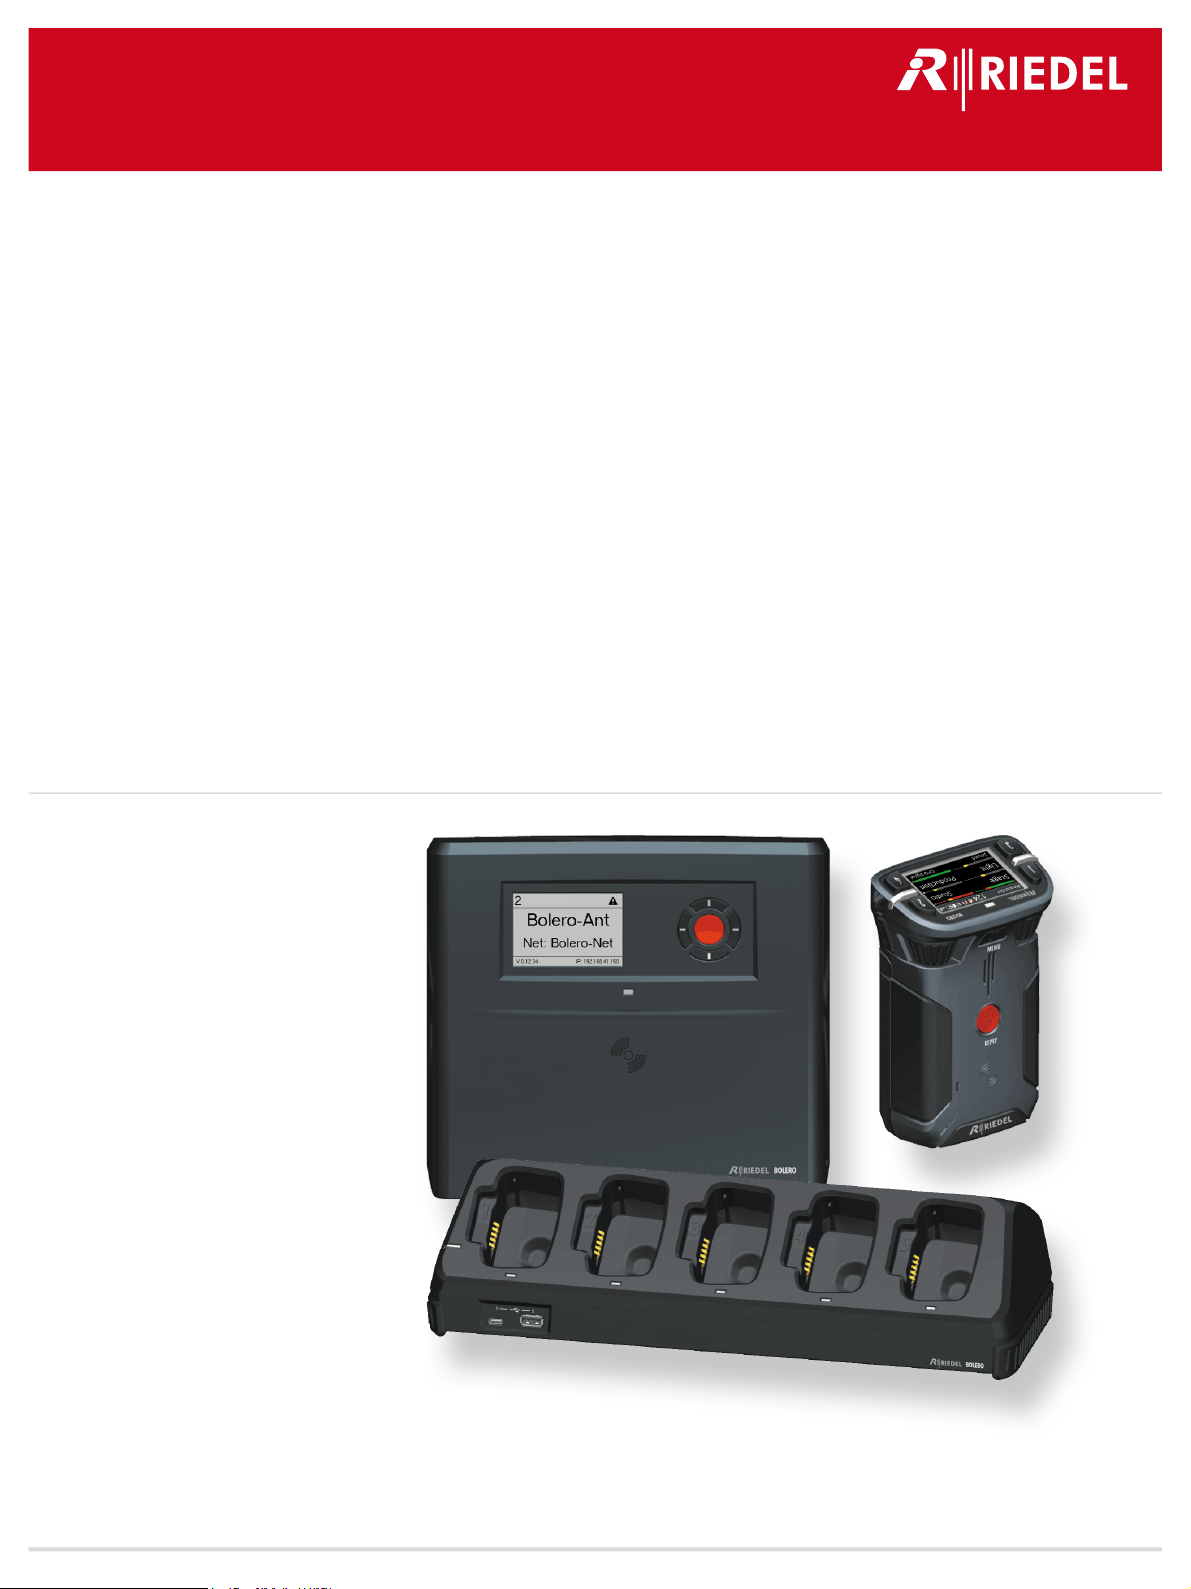
1.2 About Bolero
Bolero Wireless Intercom
The Riedel Bolero Wireless Intercom system is a digital, easy to use full-duplex communications solution for broadcast,
security, industrial and theater applications as well as for sports and cultural events. It is an all-new wireless intercom
system capable of supporting 10 Beltpacks per antenna and up to 100 antennas in a single deployment. Bolero
redefines the wireless intercom category with features such as ADR (Advanced DECT Receiver) with multiple-diversity
and RF anti-reflection technology for greater RF robustness.
Bolero utilizes the benefits of the Digital Enhanced Cordless Telecommunications (DECT) standard’s base layer. This
provides a license-free, cellular architecture with seamless hand-over between cells, allowing each Bolero Wireless
Beltpack to continuously monitor and automatically select the best connection to the Antenna.
Bolero is fully integrated in Riedel’s Artist Matrix. Features like “Touch&Go” Beltpack registration, versatile operation as
a wireless Beltpack, a wireless keypanel, and – in an industry first – a walkie-talkie pushing it beyond the limits of
existing wireless intercom solutions.
Bolero runs over a standards-based AES67 IP network with decentralized antennas connected to AES67 switches and to
Artist frames equipped with AES67 client cards, providing a fully integrated point-to-point roaming intercom
ecosystem. The more decentralized antennas added, the more robust the network becomes. The Bolero high-clarity
voice codec provides both higher speech intelligibility and more efficient use of RF spectrum supporting a higher
number of Beltpacks per antenna in the same audio bandwidth.
The Riedel-exclusive ADR technology, combines a unique receiver design with multiple diversity elements specifically
designed to reduce sensitivity to multipath RF reflections, making Bolero useable in challenging RF environments
where other systems have great difficulty.
The Beltpack features 6 buttons for 6 intercom channels or point to point communications, plus a separate “Reply”
button that easily facilitates a reply to the last person that called. Bolero’s sunlight readable and dimmable display can
be inverted so that it is readable in any orientation. The Beltpack can be used without a headset like a walkie-talkie
radio utilizing an integrated mic and speaker. Bolero Beltpacks support Bluetooth 4.1, allowing a Smartphone to be
connected.
The Beltpack design with a combination of premium materials, including high-impact plastics and rubber overmolds
make it both tough and comfortable to use in any situation.
Light and powerful high performance lithium rechargeable battery packs are used for the Beltpack. Battery packs are
able to charge inside the Beltpack as well as separately in the 5-bay charger.
9
Bolero User Manual A20
What is Bolero?
·
A next generation high performance digital wireless intercom system
·
License-free, cellular architecture with seamless hand-over
·
Riedel exclusive advanced next generation DECT receiver with multiple-diversity and RF anti-reflection
technology for greater RF robustness
·
Efficient use of RF spectrum for a hassle-free operation even with high channel count
Riedel Bolero – Key Features
·
10 Beltpacks per Antenna
·
100 Antennas per system
·
100 Beltpack capacity per system
·
Cellular architecture with seamless hand-over
·
Standards-based, decentralized, AES67 IPnetworked Antennas
·
Fully integrated with Artist for point-to-point
comms
·
License free
·
No registration headaches! Touch the Beltpack
to the antenna and GO!
·
Riedel-exclusive ADR receiver technology
·
Up to six full-duplex keys plus convenient
REPLY button
·
Modern, high-clarity voice codec
·
Integrated mic and speaker for headset-free
operation
·
Can be used as a Beltpack, a portable desktop
keypanel, or Walkie-Talkie
·
Tough & ergonomic – Beltpack built to survive
·
Bluetooth 4.1
·
Weatherproof
·
Bottle opener – just in case!
2 Bolero Beltpack
The Bolero Wireless Beltpack is a light and compact, digital station with six individually configurable keys for intercom,
IFB or GPO triggering use. Two rotary level controls on the front of the Beltpack allow volume-control for each key and
menu navigation. Pushing the Talk key toggles talk on/off with momentary or latching operation as well as an Auto
mode that combines both functions in one. Activation is indicated in the display and a button backlit LED. Optional
super bright call LEDs and a vibration motor are able to indicate an incoming call or warnings. The Beltpack features a
sunlight readable color display which by default shows the labels for the six function keys. In addition, the display gives
the user access to the Quick menu and the intuitive configuration menu.
With the new "Touch&Go" beltpack registration a quick and user friendly registration is implemented. Just touch the
Beltpack to the antenna and GO.
The Bolero Wireless Beltpack has a user replaceable XLR connector for headset, a 3.5mm jack for a line-in signal and a
USB port for firmware updates. Bolero Beltpacks support Bluetooth 4.1, allowing a Smartphone to be connected. When
a Smartphone is connected, the Beltpack can act like a car's "hands free" setup so the user can receive calls on their
phone and talk and listen via their Beltpack headset. Users can also inject phone calls directly into the intercom
channels, providing new levels of workflow flexibility. A fully charged Bolero rechargeable Battery allows more than 17
hours of operation. The rugged housing with rubber protectors houses the internal antennas.
10
Bolero User Manual A20
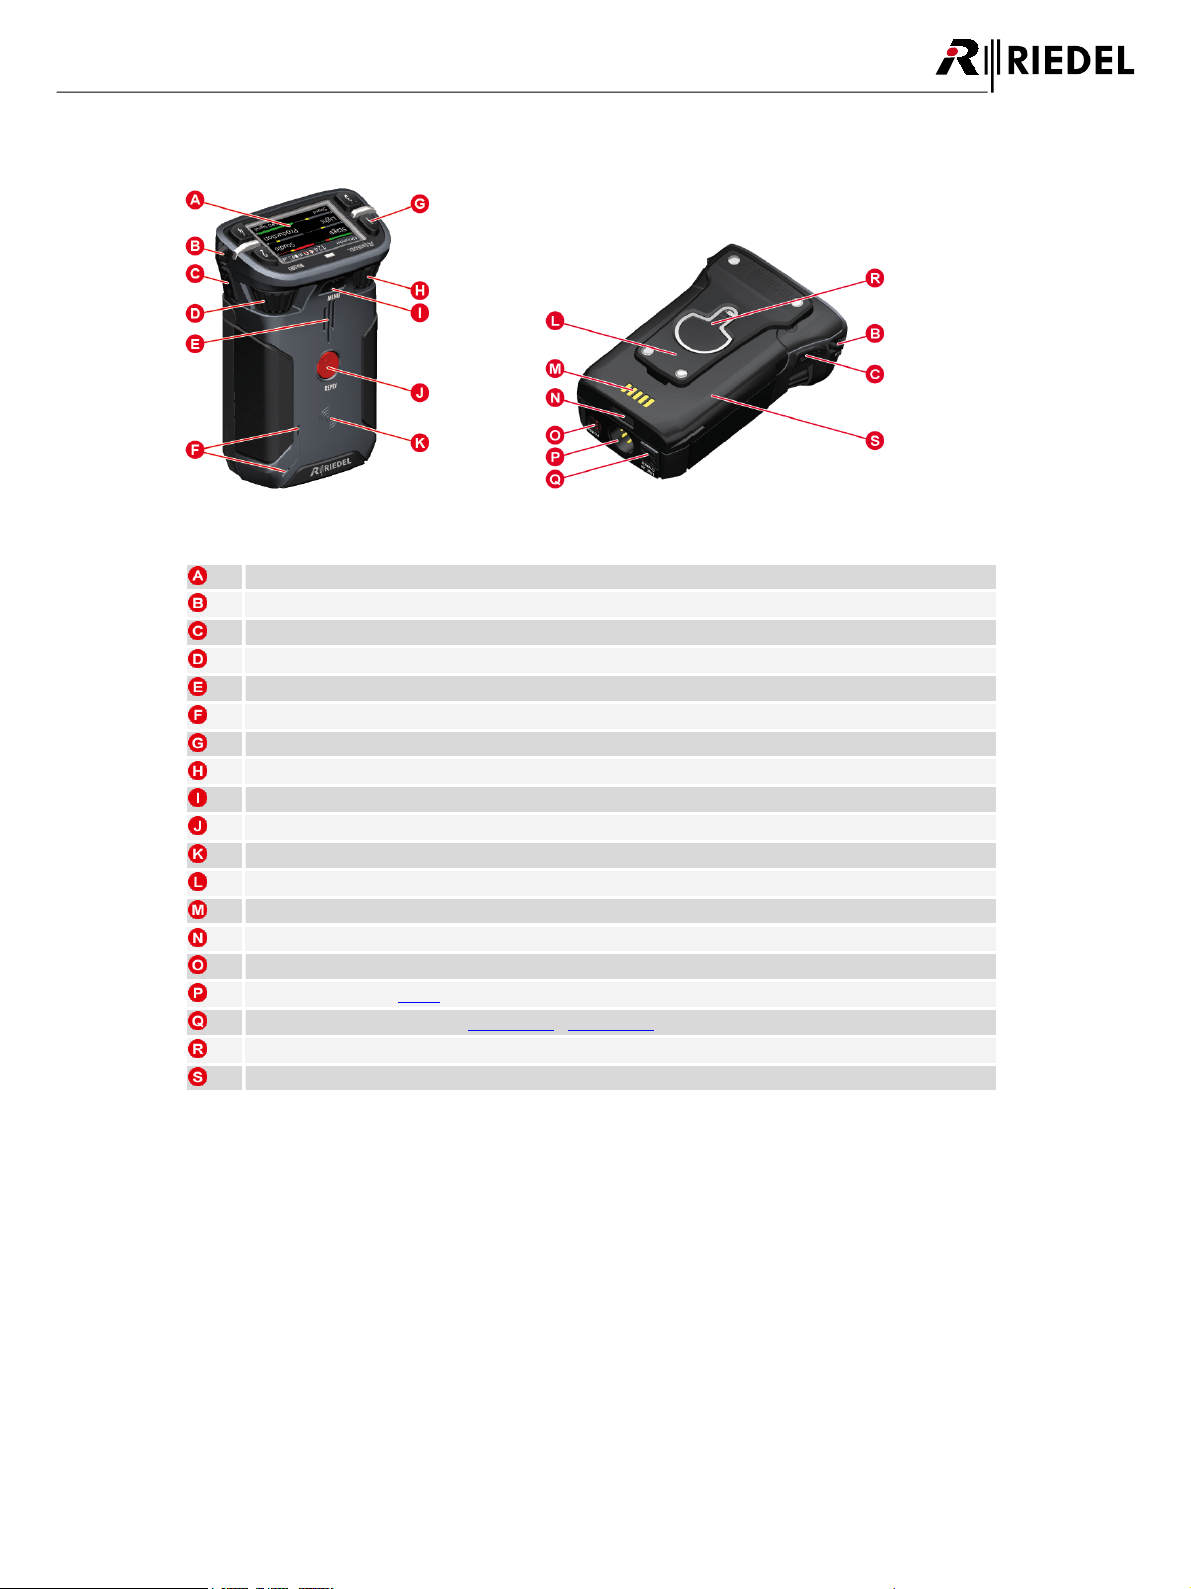
Figure 1: Beltpack – Operating Elements (front/top, rear/bottom)
Full color sunlight readable display
Lanyard or safety cord mounting holes
Walkie-Talkie keys 5+6 (side)
Rotary encoder (2)
Speaker
Microphones
Keys 1...4 (top)
Rotary encoder (1)
Menu key
Reply key
NFC contact point
Belt clip
Charging contacts
Battery release button
Power button
Headset connector (XLR-4)
Line-In and charging sockets (3.5mm jack / USB Type-C) underneath a rubber cover
Screw head mount and bottle opener
Removable battery pack
2.1 Operating Elements
11
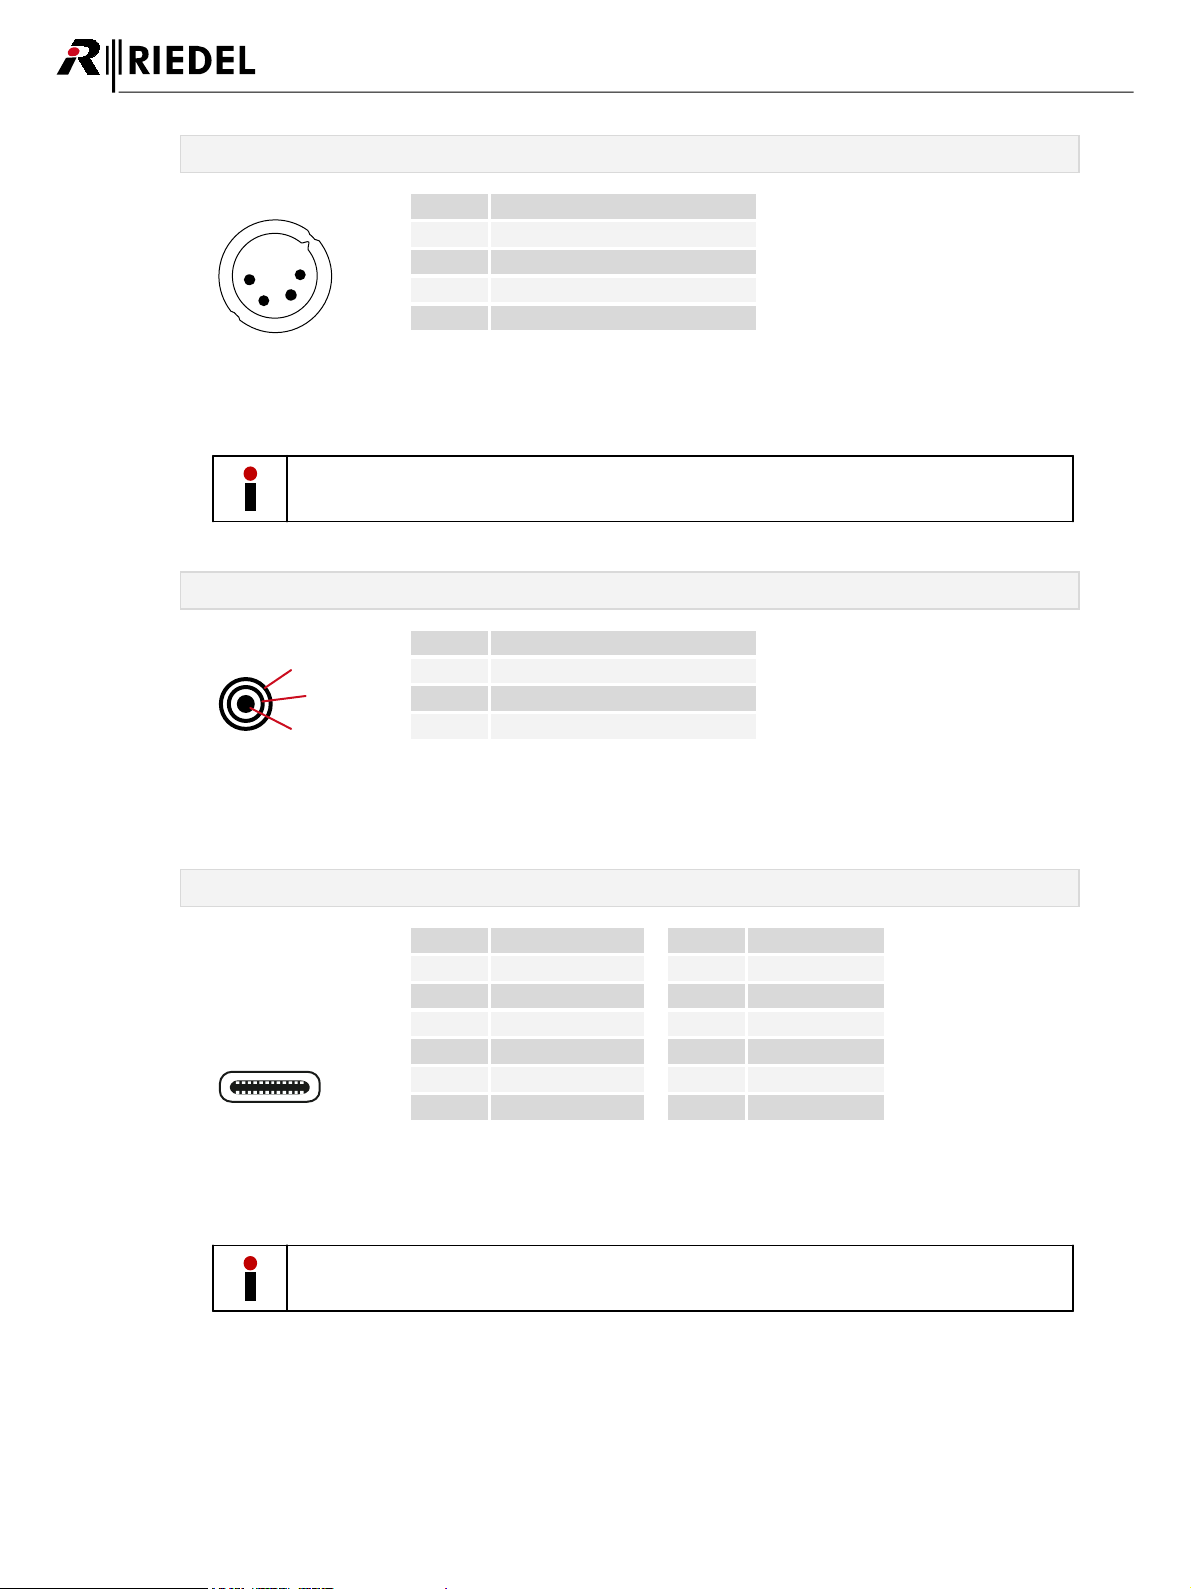
XLR-4 (male)
1
2
3
4
Pin
Description
1
Microphone -
2
Microphone + (+5 VDC)
3
Earphones -
4
Earphones +
Figure 2: XLR 4 male
The headset connector is a 4-pole male XLR connector and supports mono headsets with electret or dynamic
microphones, depending on the menu setting.
The microphone power (+5 VDC) will be switched on if the menu setting 'Audio > Headset Type' is set to
Electret or Auto and an electret microphone is attached.
2
3
1
Pin
Description
1 (Tip)
Left
2 (Ring)
Right
3 (Sleeve)
GND
Figure 3: 3.5mm jack female
The 3.5 mm jack is a line input connector. The maximum input level is +12 dBu.
A1
A12
B12 B1
Pin
Description
Pin
Description
1
GND7Dn12SSTXp1
8
SBU1
3
SSTXn1
9
VBUS
4
VBUS
10
SSRXn2
5
CC111SSRXp2
6
Dp112GND
Figure 4: USB Type-C
The USB connector is used to charge the Beltpack.
Furthermore the connector is used for firmware updates. By default the Beltpack is updated in the Bolero Charger.
Charging is only possible with >500 mA USB ports. 100 mA are not supported.
The charge current is limited to 500 mA by the Beltpack.
3.5mm jack (female)
Bolero User Manual A20
USB Type-C
12
Bolero User Manual A20
Figure 5: Beltpack – Status LEDs (top)
Status
off
Beltpack is turned off
green·Beltpack ready (System ok)
·
USB charging, battery full
green blinking
USB charging, battery level 90–99%
red·booting
·
Beltpack not registered/not connected
·
low battery level
·
outside the Antenna coverage area
red blinking
critical battery level (<30 minutes of operation)
red fast blinking
critical error (no function)
orange blinking
USB charging, battery level 0–89%
,
Call
off
no active call
green
incoming call
orange blinking
incoming notification/beep call
2.2 Status LEDs
13
2.3 Basic Operation
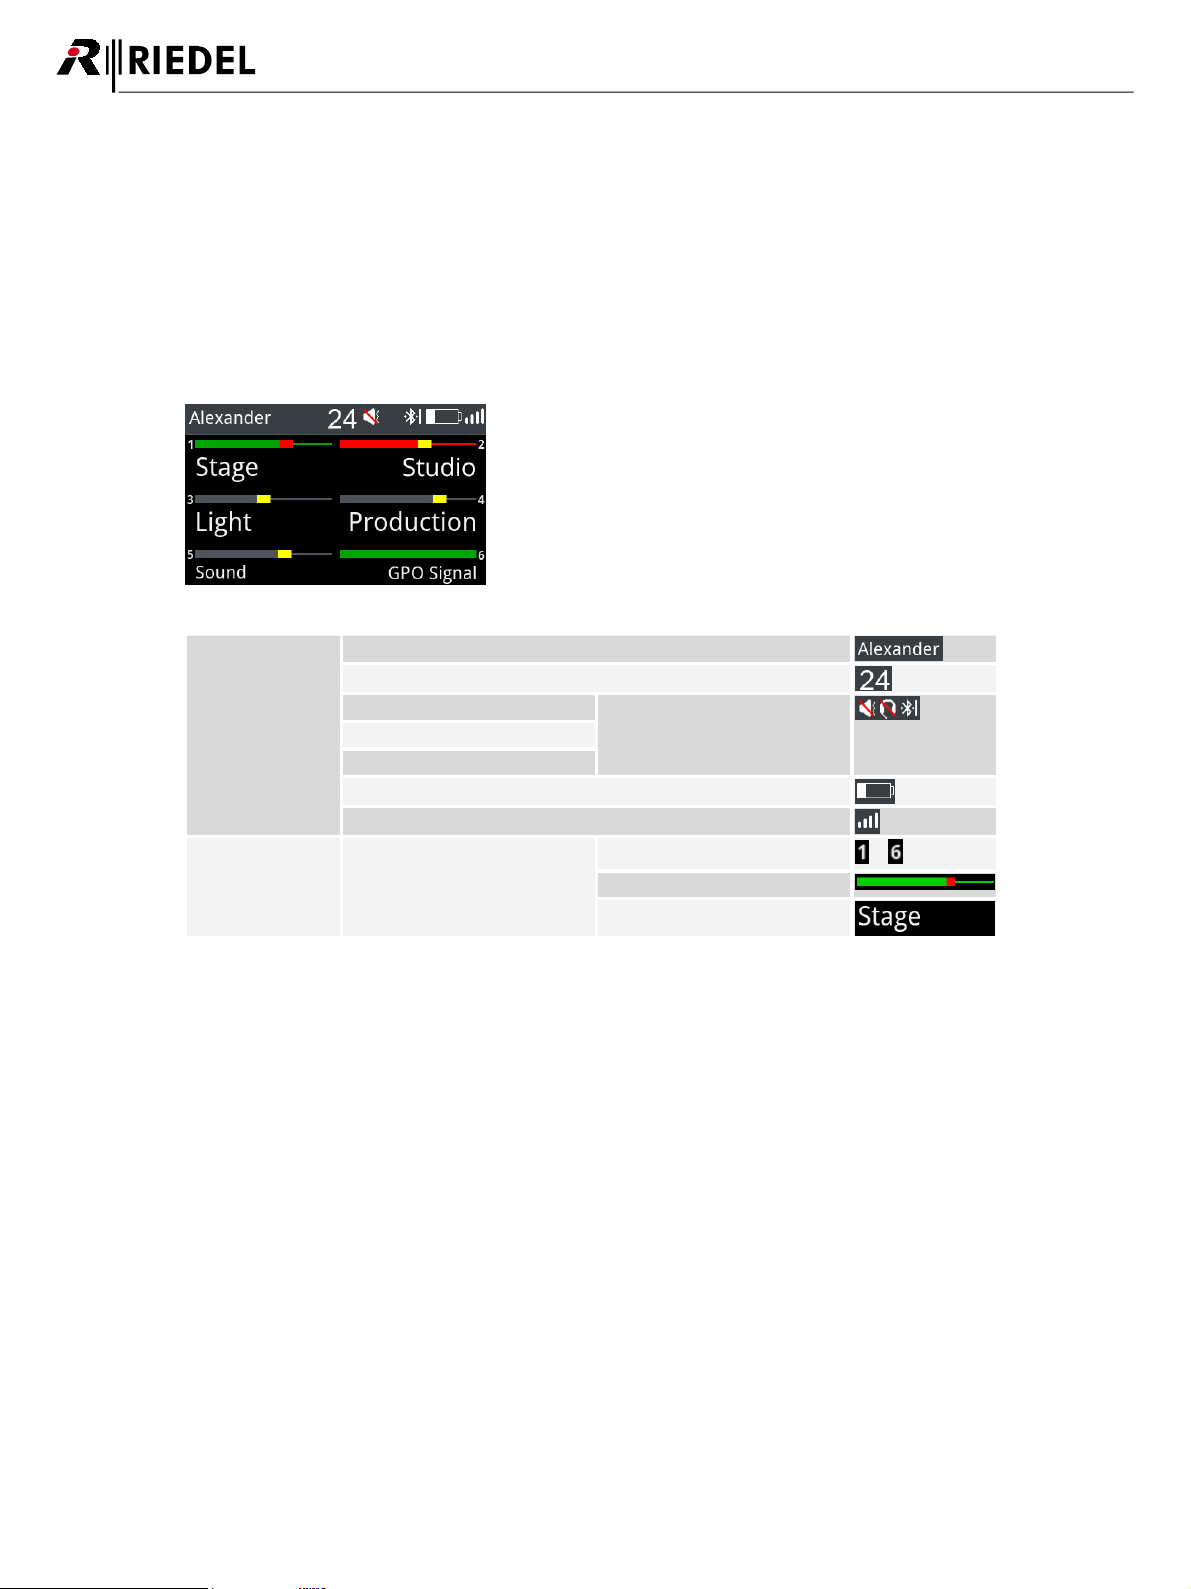
Figure 6: Main-View
Status bar
Beltpack name
Beltpack ID
Speaker switched off
optional
Headset switched off
Bluetooth icon
Battery icon
Radio icon
Main area
6 keys
key number
...
Level meter
Channel name
2.3.1 StartUp
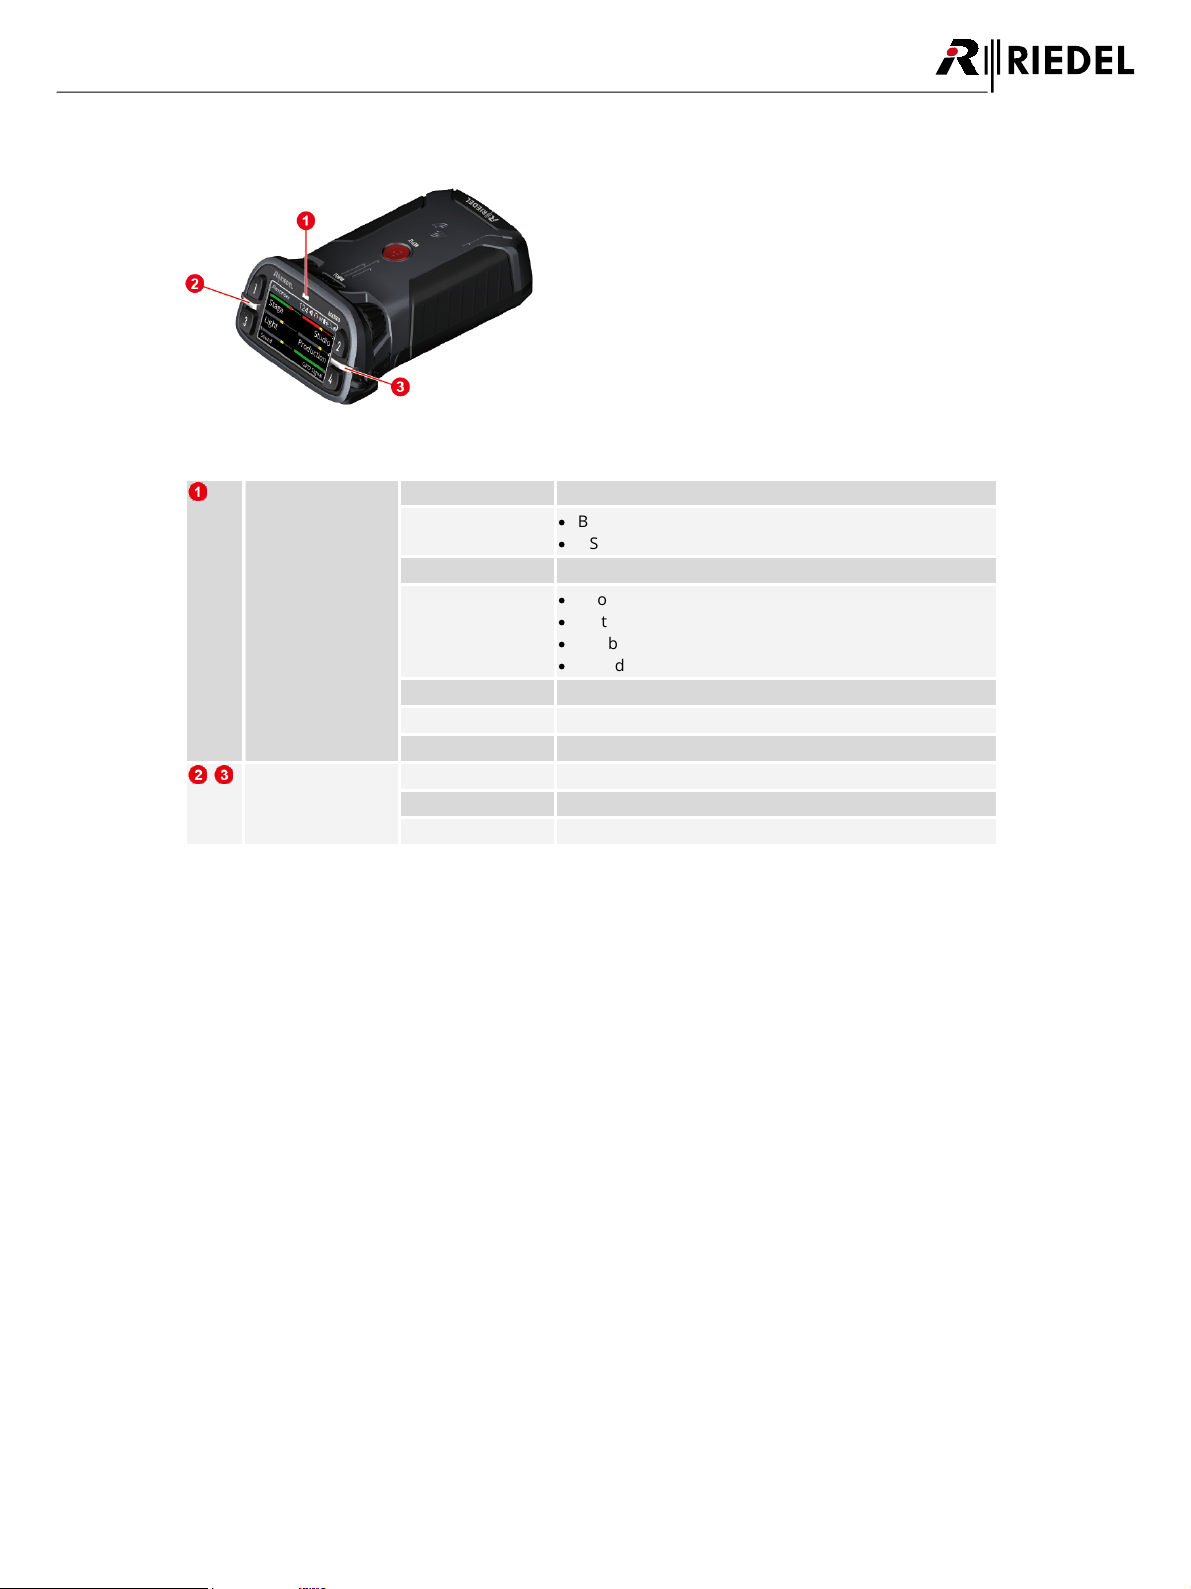
Press the 'Power' key firmly to power-up the device.
If the Beltpack is already registered to a Net, the Beltpack will try to establish a connection to it.
An unregistered Beltpack shows "Not registered!" on the splash screen. Pushing the 'Reply' key for a second opens the
Registration menu to register the Beltpack in a Bolero-Net.
The Main-View appears after successful registration and establishing a connection to a Net:
Bolero User Manual A20
14

Bolero User Manual A20
Latching / PTT are set up in Director. For a new configuration in Director, all 6 keys are PTT.
Three different functions can be triggered by pressing and holding the Menu key for a certain time.
Hold time of the Menu key
Function
Description
short key press
(<0.5 sec.)
Channel
Volume adjustment
Menu to adjust the individual volume level of
the channels.
middle key press
(>0.5 sec. / <3 sec.)
Quick-Menu
The Quick-Menu offers shortcuts to
frequently used menu commands.
long key press
(>3 sec.)
Main-Menu
More in-depth information is displayed and
settings can be modified in the Main-Menu.
Following keys can be used to navigate in the menu:
Rotary Encoder 1
·
Select the next/previous menu item
·
Change values/settings
Rotary Encoder 2
Key 4
Enter selected menu item
Menu Key
Key 3
Back to parent menu item
Reply Key
For Headset MAX D2, the "Auto Detect" function is only available for headset revisions equal or higher
than 10.01.
2.3.2 Key Functions
While the display is showing the Main View, users may talk individually or at the same time to all channels.
Pushing one of the six keys allows talking in the respective channel.
The Call LED is indicating if one channel is active at least. Each active channel has a colored indication in the display.
The keys 5 and 6 are none latching by default. That means releasing this key will stop talking to this channel (WalkieTalkie mode, PTT – push to talk). The keys 1 to 4 are latching. Push again the key to deactivate the respective channel.
The inactive channel is displayed in inactive color and the Call LED is off.
Both rotary encoders allow adjusting the master volume of the channels.
Menu Key
Navigation
2.3.3 Headset Type
Open the Beltpack Menu by pressing and holding (>2.5 sec.) the Menu key. Select the microphone type of the headset:
Audio > Headset Type: Auto Detect, Dynamic, Electret
15
2.3.4 Volume Adjustment
Figure 7: Master Volume
Figure 8: Channel Volume
The signal level is normalized and limited in the matrix. In the Beltpack the signal level can be manually leveled and
limited.
Rotating either rotary encoder adjusts the master volume of the speaker or headset if the display shows the Main-View.
The header shows a level meter of the current master volume.
Press briefly the Menu key (<0.5 sec.) to change the volume level of a single channel.
Now the volume level of the channels (1+2) can be adjusted by the rotary encoders (A+B). The bars above the key labels
indicate the individual adjusted volume level of the respective channel.
A second brief key press on the Menu key switches to the next channels 3+4, and a third short key press switches to
5+6 and finally to the Reply key. An additional key press switches back to the first channels.
After 3 seconds (factory default setting) with no rotary encoder change, the Beltpack switches back to the Main-View.
Bolero User Manual A20
16
Bolero User Manual A20
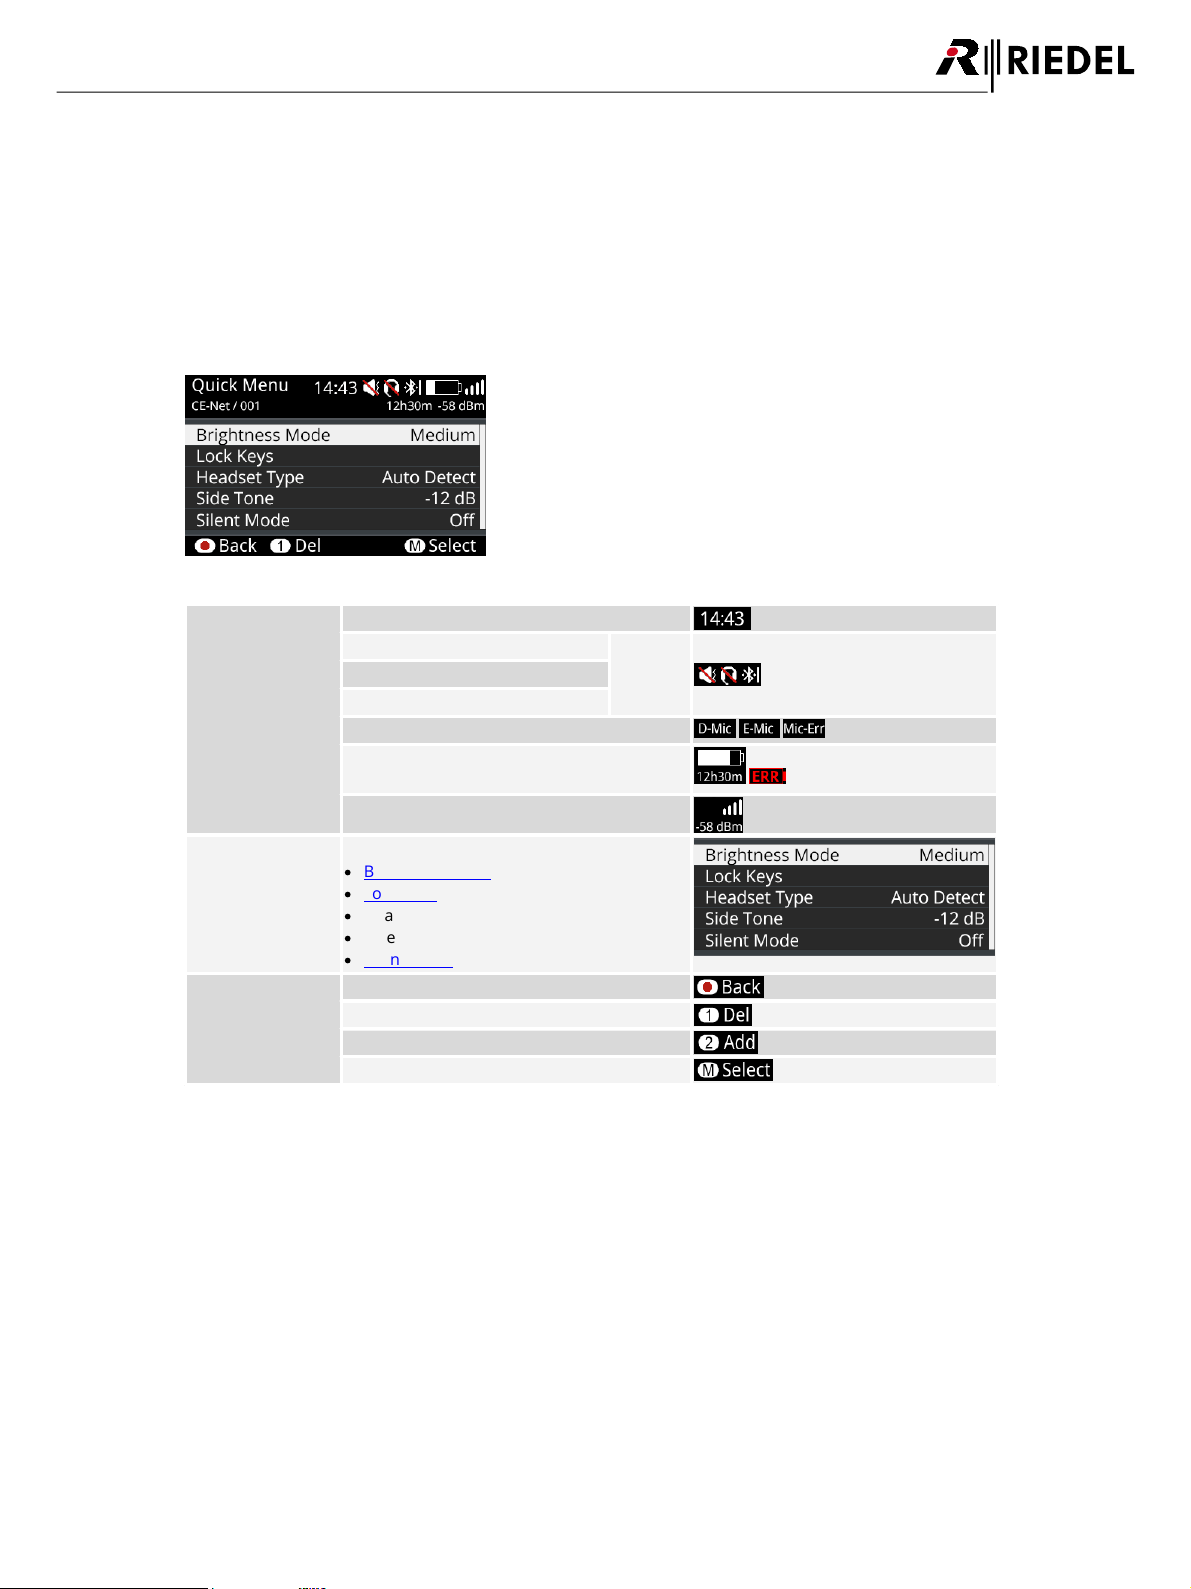
Figure 9: Quick-Menu
Header
Time
Speaker switched off
optional
Headset switched off
Bluetooth icon
Microphone type (dynamic, electret, error)
Battery icon with remaining operation time,
error icon
Radio icon with level indication
Main area
User definable rows with menu shortcuts:
·
Brightness Mode
·
Lock Keys
·
Headset Type
·
Side Tone
·
Silent Mode
Footer
Reply key – one layer back
Key 1 – delete the selected entry
Key 2 – add an entry
Menu key – trigger selection
2.3.5 Quick Menu
The Quick-Menu is opened by pressing and holding (>0.5 sec. / <3 sec.) the Menu key.
The Quick-Menu allows using user defined shortcuts to frequently used menu commands.
Navigate with one of the rotary encoders to the desired menu item and press the menu key to open the respective
menu.
The selected menu item can be deleted in the Quick Menu by pressing the Key-1.
A user defined menu item can be assigned to the Quick-Menu by pressing the Key-2 and selecting the desired menu
item.
17
2.3.6 Main Menu
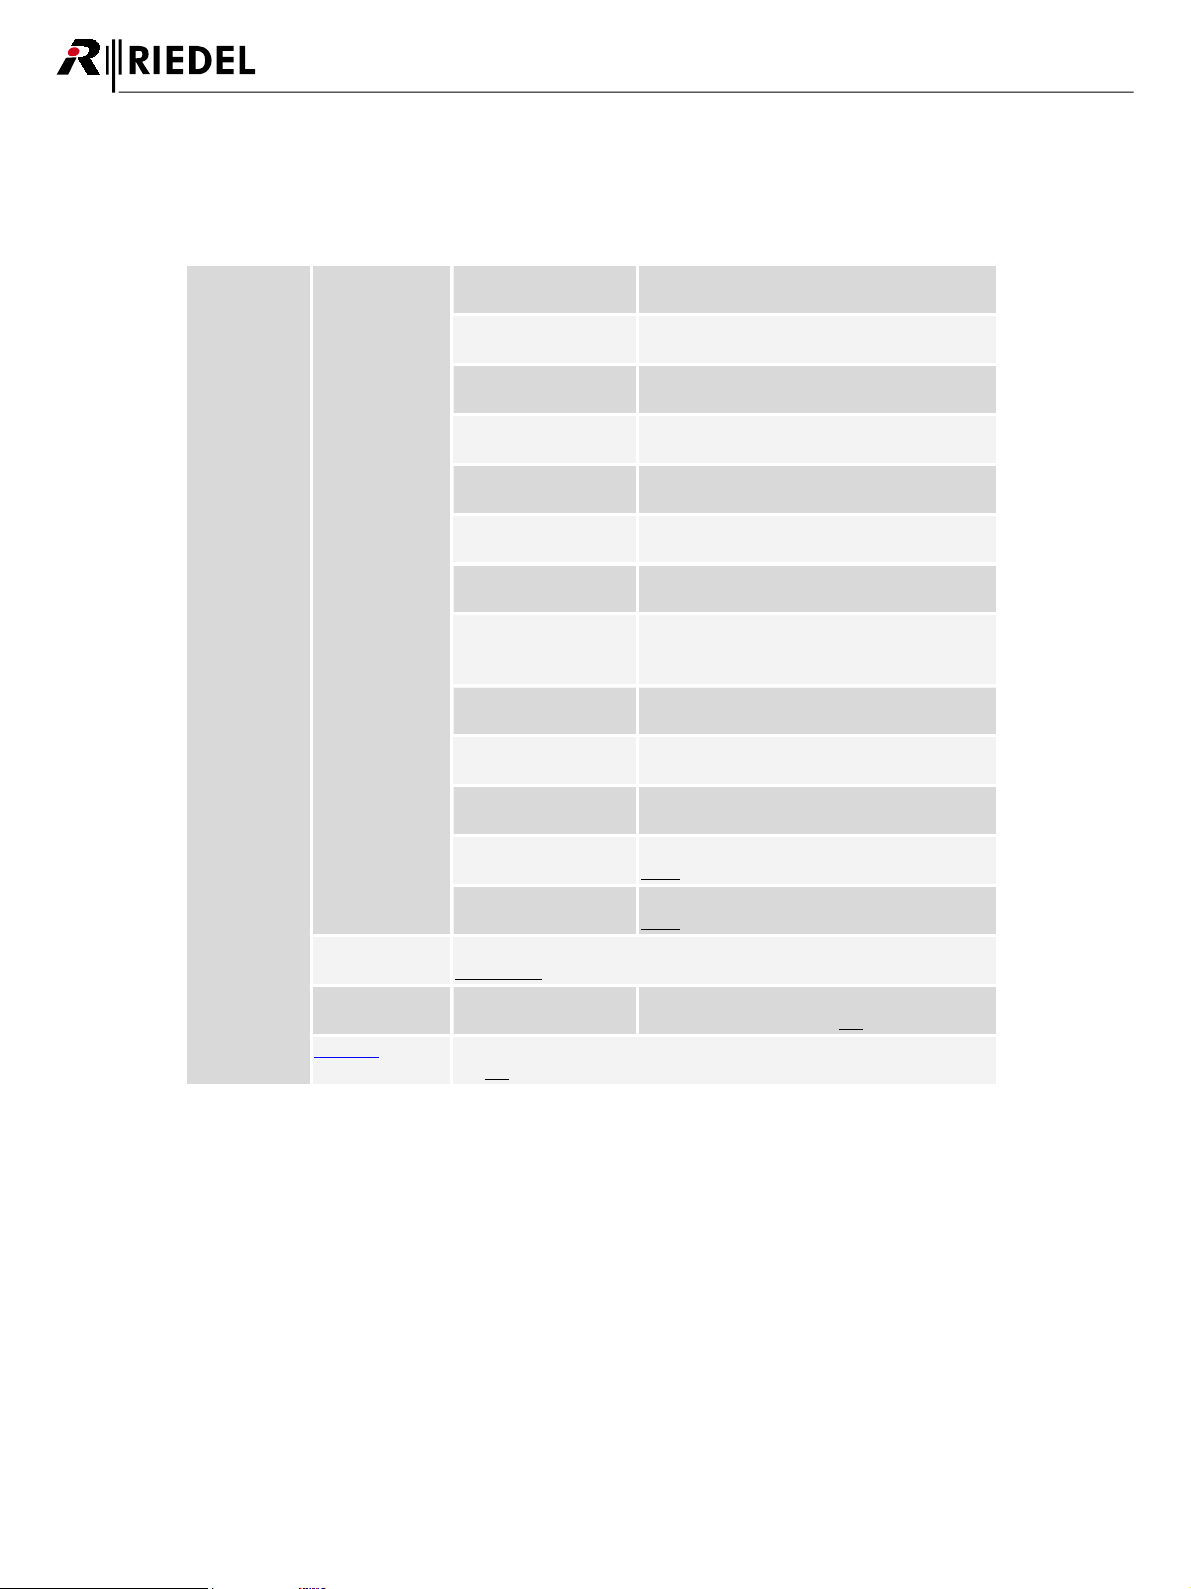
Audio
Gain Settings
Headset Volume
Volume level of the headset:
Mute, -60 ... +12 dB [-12]
Speaker Volume
Volume level of the speaker:
Mute, -60 ... +12 dB [-18]
Side Tone
Volume level of the Sidetone:
Mute, -60 ... +12 dB [-12]
Headset Mic Gain
Gain level of the headsets microphone:
0 ... +30 dB [+6]
Internal Mic Gain
Gain level of the internal microphone:
0 ... +30 dB [+6]
Aux Input Gain
Gain level of the Aux input:
Mute, -60 ... +12 dB [-12]
Beep Signalization
Volume level of the beep tones:
-24 ... +12 dB [-12]
Voice Signalization
Volume level of the voice signalizations
(relative to Headset/Speaker volume):
-24 ... +12 dB [-6]
Limiter Threshold
Threshold level of the limiter:
Off, -24 ... +12 dB [+8]
Vox Threshold
Threshold level of the Vox:
Off, -24 ... +12 dB [-18]
Bluetooth Volume
Volume level of the Bluetooth audio signals:
Mute, -60 ... +12 dB [0]
Headset Lower Limit
Lower volume level of the headset:
Mute, -60 ... +12 dB
Speaker Lower Limit
Lower volume level of the speaker:
Mute, -60 ... +12 dB
Headset Type
Selection of the microphone type in the headset:
Auto detect, Dynamic, Electret
Enhancements
Headset Echo
Cancellation
Prevents/reduces acoustic echo distortions to
improve voice quality: On, Off
Speaker
Enables the internal speaker and microphone (walkie-talkie mode):
On, Off
The Main-Menu is opened by pressing and holding (>3 sec.) the Menu key.
Basic information is displayed and settings can be modified in the Main-Menu.
The Main-Menu contains following entries:
Bolero User Manual A20
18
Bolero User Manual A20
Brightness
Brightness Mode
Selection between one user defined and three pre-defined brightness
definitions: Custom, Low, Medium, High
Custom Settings
Display
Normal brightness level of the display:
10 ... 100% [50]
Display Dim
Dimmed brightness level of the display:
10 ... 100% [10]
Display Dim Timer
After this time of inactivity, the display
illumination is dimmed: Off, 1 ... 300 sec. [10]
Display Off Timer
After this time of inactivity, the display
illumination is switched off: Off, 1 ... 60 min.
Keys
Normal brightness level of the keys:
10 ... 100% [50]
Keys Dim
Dimmed brightness level of the keys:
10 ... 100% [10]
Keys Dim Timer
After this time of inactivity, the key illumination
is dimmed: Off, 1 ... 300 sec. [10]
Keys Off Timer
After this time of inactivity, the key illumination
is switched off: Off, 1 ... 60 min.
Call LED
Brightness level of the Call LED:
10 ... 100% [40]
Status LED
Brightness level of the Status LED:
10 ... 100% [70]
General
Settings
Profile
Profile = User rights + parameter settings
Profile Change only via PC (Director SW or Webserver)
Change Profile
Changes the profile of the Beltpack. A list of
available profiles is displayed.
Signalization
Call
Defines the signalization mode of a call:
Light, Vibrate, Beep
Notification/Beep
Defines the signalization mode of a beep-call:
Light, Vibrate, Beep
Info/Low Battery
Defines the signalization mode if the battery
power is low: Light, Vibrate, Beep, Voice
Out of Range
Defines the signalization mode if the Beltpack
looses the connection to the antenna:
Light, Vibrate, Beep, Voice
Silent Mode
Disables the speaker and acoustic signalizations: On, Off
Display Mode
Selection between three pre-defined display modes:
Standard, Big Text, Flip Screen (upside down)
Timeout
Menu
After this time of inactivity, the menu will be
closed and the display shows the Main-View:
Off, 1 ... 240 sec. [120]
Volume Change
After this time of inactivity, the volume
adjustment is terminated: Off, 1 ... 240 sec. [3]
Lock Keys
Lock the keys to prevent accidental key actions:
locked, unlocked
Bluetooth
Bluetooth State
Enable the Bluetooth functionality:
Connect to Mobile/PC, Off
Connect /
Disconnect
·
Disconnect: If connected to a device
·
Connect: if paired but not connect to a device
Pair
The Beltpack will be visible for Mobiles/PCs.
Share to net
Shares a connected audio signal via intercom:
Local, Public
Dim Level
Dimmed Bluetooth audio level if Beltpack has an active intercom
conference: Mute, -24 ... +12 dB
19
Bolero User Manual A20
Registration
Register to net
*1
Registers the Beltpack to an existing net. A list of available nets are
displayed:
·
Over The Air (OTA)
Connect to preregistered net
Registers the Beltpack to previous registered nets. A list of available preregistered nets are displayed:
·
Select one to connect
·
Currently connected net is shown with radio select icon
Delete preregistered net
Deletes previous registered nets in the Beltpack. A list of pre-registered
nets are displayed:
·
Select one to delete
Admin
*2
Registration
Mode
Local Beltpack NFC
Registers a Beltpack at an already registered
Beltpack via NFC:
·
NFC (local BP) active as long as you exit
Over The Air (OTA)
Registers a Beltpack at an already registered
Antenna via DECT:
On, Off (all Antennas)
Antenna NFC
Allows registering a Beltpack at an already
registered Antenna via NFC:
On, Off (all Antennas NFC)
Timeout
After elapsing this time, the registration mode
is disabled: Off, 1 ... 60 min. [2] (for OTA,
System wide NFC, Charger)
OTA Pin
Defines the legitimation during OTA registration
Disable PIN
No PIN entry is required for OTA registration.
Set new Pin
Insert a new 4 digit PIN that is required for the
OTA registration.
Set to Admin Pin
Defines to use the Admin PIN for OTA
registration.
Admin Pin
Defines the legitimation to open the Admin menu in the Beltpack or to
log into the web interface of the Antenna.
Disable PIN
No PIN entry is required for administration.
Set new PIN
Insert a new 4 digit PIN that is required for
administration purposes.
Time Source
Selects the synchronization source of the Beltpacks time setting:
PTP, NTP, Internal
System Time
Allows entering the system time if the time source is set to Internal.
System Date
Allows entering the system date if the time source is set to Internal.
Time Format
Define the time format:
12h, 24h
Date Format
Defines the date format:
(dd/mm/yyyy, mm/dd/yyyy, yyyy/mm/dd)
20
Bolero User Manual A20
Service
Test
Walk Test
Analyzes the signal quality to the visible
antennas. Following values are shown:
·
Antenna ID
·
Antenna RPN
·
current Signal Strength
·
current Signal Quality
Walk Test Pro
Lists all Antennas that are visible at the current
position. Following values are displayed:
·
Antenna ID
·
Antenna RPN
·
Signal strength
·
Busy: available Antenna capacity (ok, full)
·
CRC Errors downlink/uplink
Reset
Profile Defaults
Resets the profile to default values.
All individual changes will be reset.
All registration data stays in memory.
Factory Reset
Resets the Beltpack to factory default settings.
All data (Net lists, Profiles, Registrations) will be
lost! A new registration is required.
Information
Radio
Displays a table with radio information.
Following values are displayed:
·
Visible Antennas
·
Actual Radio Level
·
Radio Quality
·
Antenna Name
·
Antenna Number
Beltpack
Displays a table with Beltpack information.
Following values are displayed:
·
Firmware Version: Vxx.xx
·
Hardware-Revision: xx.xx
·
Main Version: xxx
·
Display Version: xxx
·
Serial number: (13 digits)
Battery
Displays a table with Battery information.
Following values are displayed:
·
Charge Status: xx %, xxxx mAh
·
Charge Mode:(not charging, xxxx mA
·
Temperature: (too cold!, cold, normal, warm,
too hot!)
·
Battery Health: xxx % of max. capacity
·
Capacity Max.: xxxx mAh
·
Hardware: xx.xx
·
Serial Number: (13 digits)
Area
*3
Protected menu – for Riedel service purpose only
default values are underlined or displayed in [square brackets]
*1
OTA registration PIN necessary (Admin PIN by default)
*2
Admin PIN necessary
*3
Service PIN necessary
21
2.4 Features in Detail
Speaker Mode: On
Speaker Mode: Off
Headset connected
Beltpack microphone
Headset microphone
no Headset connected
Beltpack microphone
no microphone active
In the speaker mode the echo cancellation is always active.
Element
Description
High
Medium
Low
Display
normal display brightness
100%
60%
20%
Display Dim
dimmed display brightness
50%
20%
10%
Display Dim Timer
inactivity timer to dim the display
Off
20 sec.
5 sec.
Display Off Timer
inactivity timer to turn off the display
Off
Off
1 min.
Keys
normal key brightness
100%
60%
20%
Keys Dim
dimmed key brightness
50%
20%
10%
Keys Dim Timer
inactivity timer to dim the keys
Off
20 sec.
20 sec.
Keys Off Timer
inactivity timer to turn off the keys
Off
Off
5 min.
Call LED Dim
dimmed Call LED brightness
100%
40%
10%
Status LED Dim
dimmed Status LED brightness
100%
60%
10%
2.4.1 Speaker
In the menu 'Audio > Speaker' is defined, if the audio signal is routed to the internal speaker or to an attached headset.
Connecting a headset will switch the speaker off. Removing a headset won't change the current setting.
The following table shows the usage of the internal and headset microphone:
2.4.2 Brightness Mode
The menu 'Brightness > Brightness-Mode' allows switching between different predefined and one user specified display
settings. Under Brightness > Custom Settings the single parameters can be modified.
Bolero User Manual A20
The predefined modes have following values:
22
Bolero User Manual A20
Figure 10: Signalization
Events
Signalizations
Call
Light
orange flashing Call LED
Notification/Beep
Vibrate
Vibration
Info/Low Battery
Beep
Signal sound
Out of Range
Voice
Voice announcement
2.4.3 Profiles
A Profile is assigned to every Beltpack when it is registered. The profile contains default settings for the whole BeltpackConfig and user rights indicating which settings of the Beltpack-Config the Beltpacks user is allowed to see and/or to
change.
Using the Admin or Registration Pin, a Profile to be assigned to all newly registered Beltpacks can be chosen in the
Antennas Web Interface or in the Beltpack-Menu.
The Beltpack stays associated to its Profile as long as it is registered. Changes to the Profile will result in changes of the
Beltpack-Config of every Beltpack using this Profile. There are some rules regarding these changes:
·
Changes to the "user rights" are immediately applied to all Beltpacks using this Profile.
·
Changes to settings the "Beltpack user is not allowed to change" are immediately applied to all Beltpacks using this
Profile.
·
Changes to settings the "Beltpack user is allowed to change" are only applied where the old Beltpack setting
matches the setting in the Profile before the change (e.g. if the user already changed it, the new value is not applied;
if it was still on default it is applied).
The Profile of a Beltpack can be changed by the Beltpack-User in the Beltpack-Menu ("Load Profile"; if he has the right),
by the Admin using the Web Interface or by (re-)registering the Beltpack while a different Profile is selected to be used
on all newly registered Beltpacks. A Profile change means that a complete reset to the new Profile defaults regarding
the whole Beltpack-Config.
When a user chooses to load the same Profile that the Beltpack already has, the Beltpack-Config is reset back to Profile
defaults. Should a Beltpack be (re-)registered using the same Profile that it already has, nothing is changed (e.g. no
changes in the Beltpack-Config).
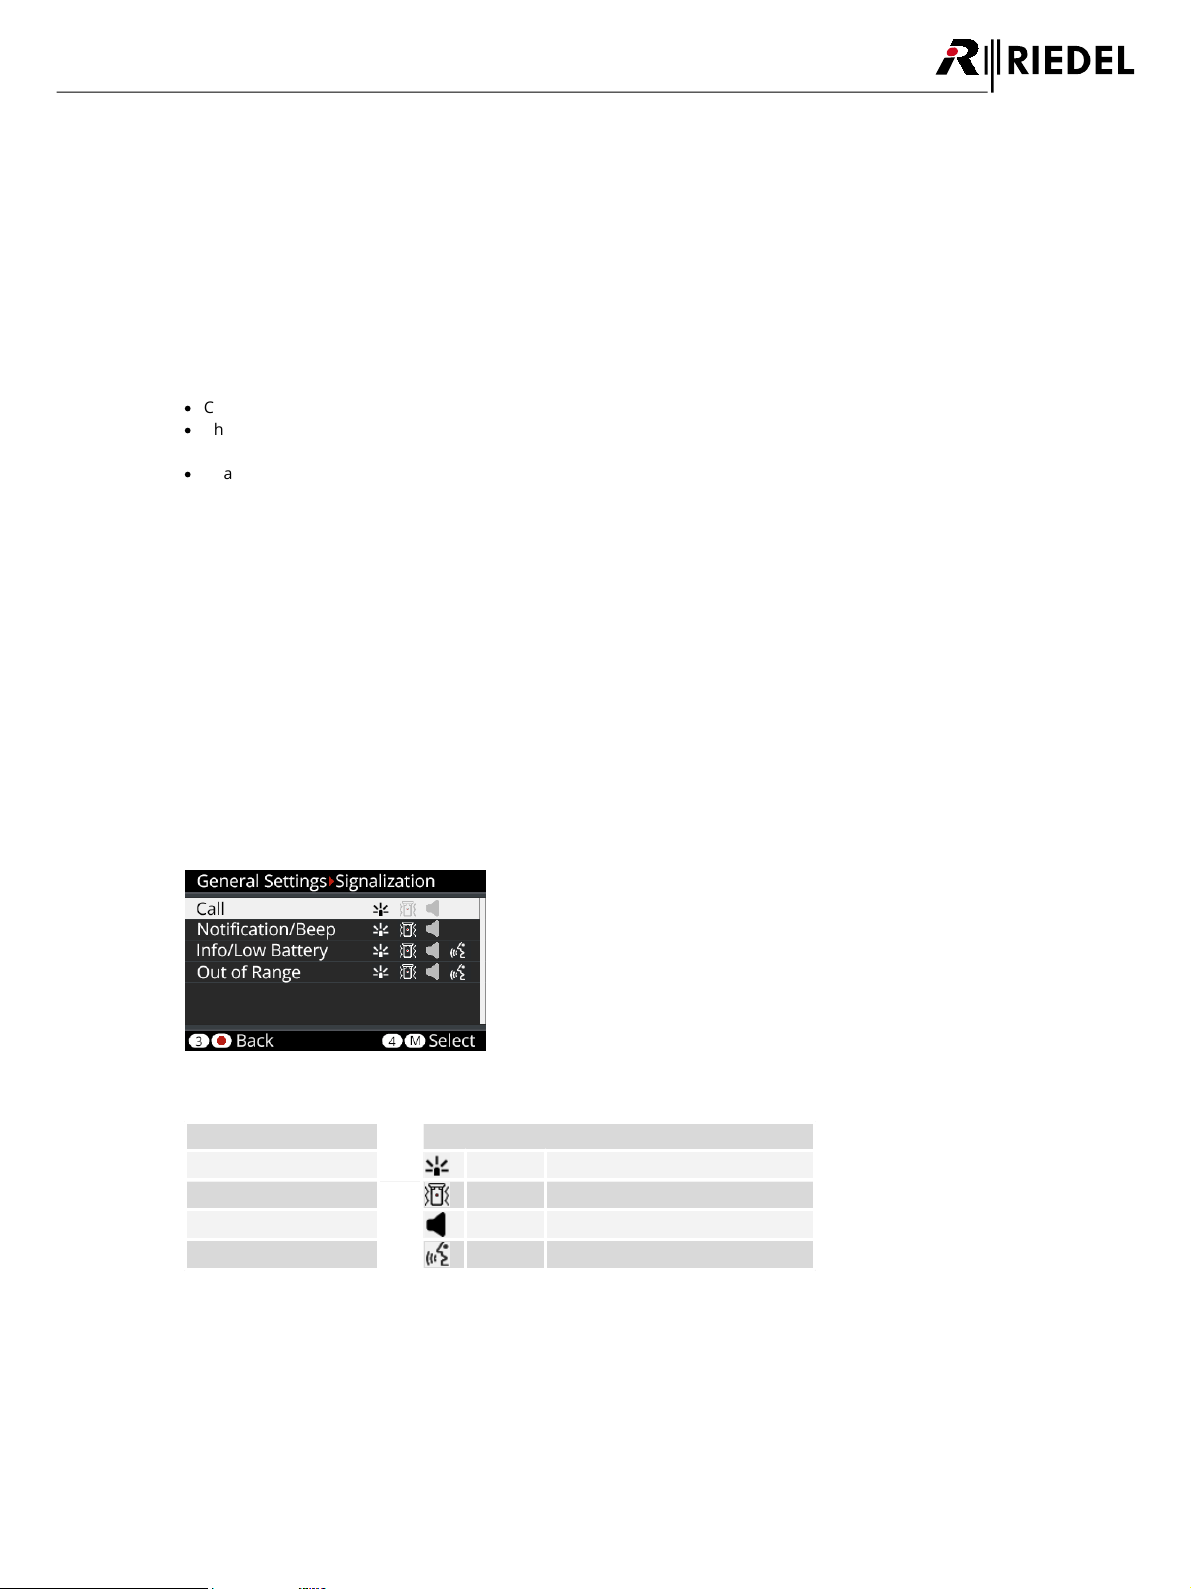
2.4.4 Signalization
In the menu 'General Settings > Signalization' is defined, how different events are signalized. It is possible to combine
multiple signalization types.
23
2.4.5 Silent Mode
Figure 11: Flip Screen
If the Silent Mode is activated, the speaker and vibration are disabled.
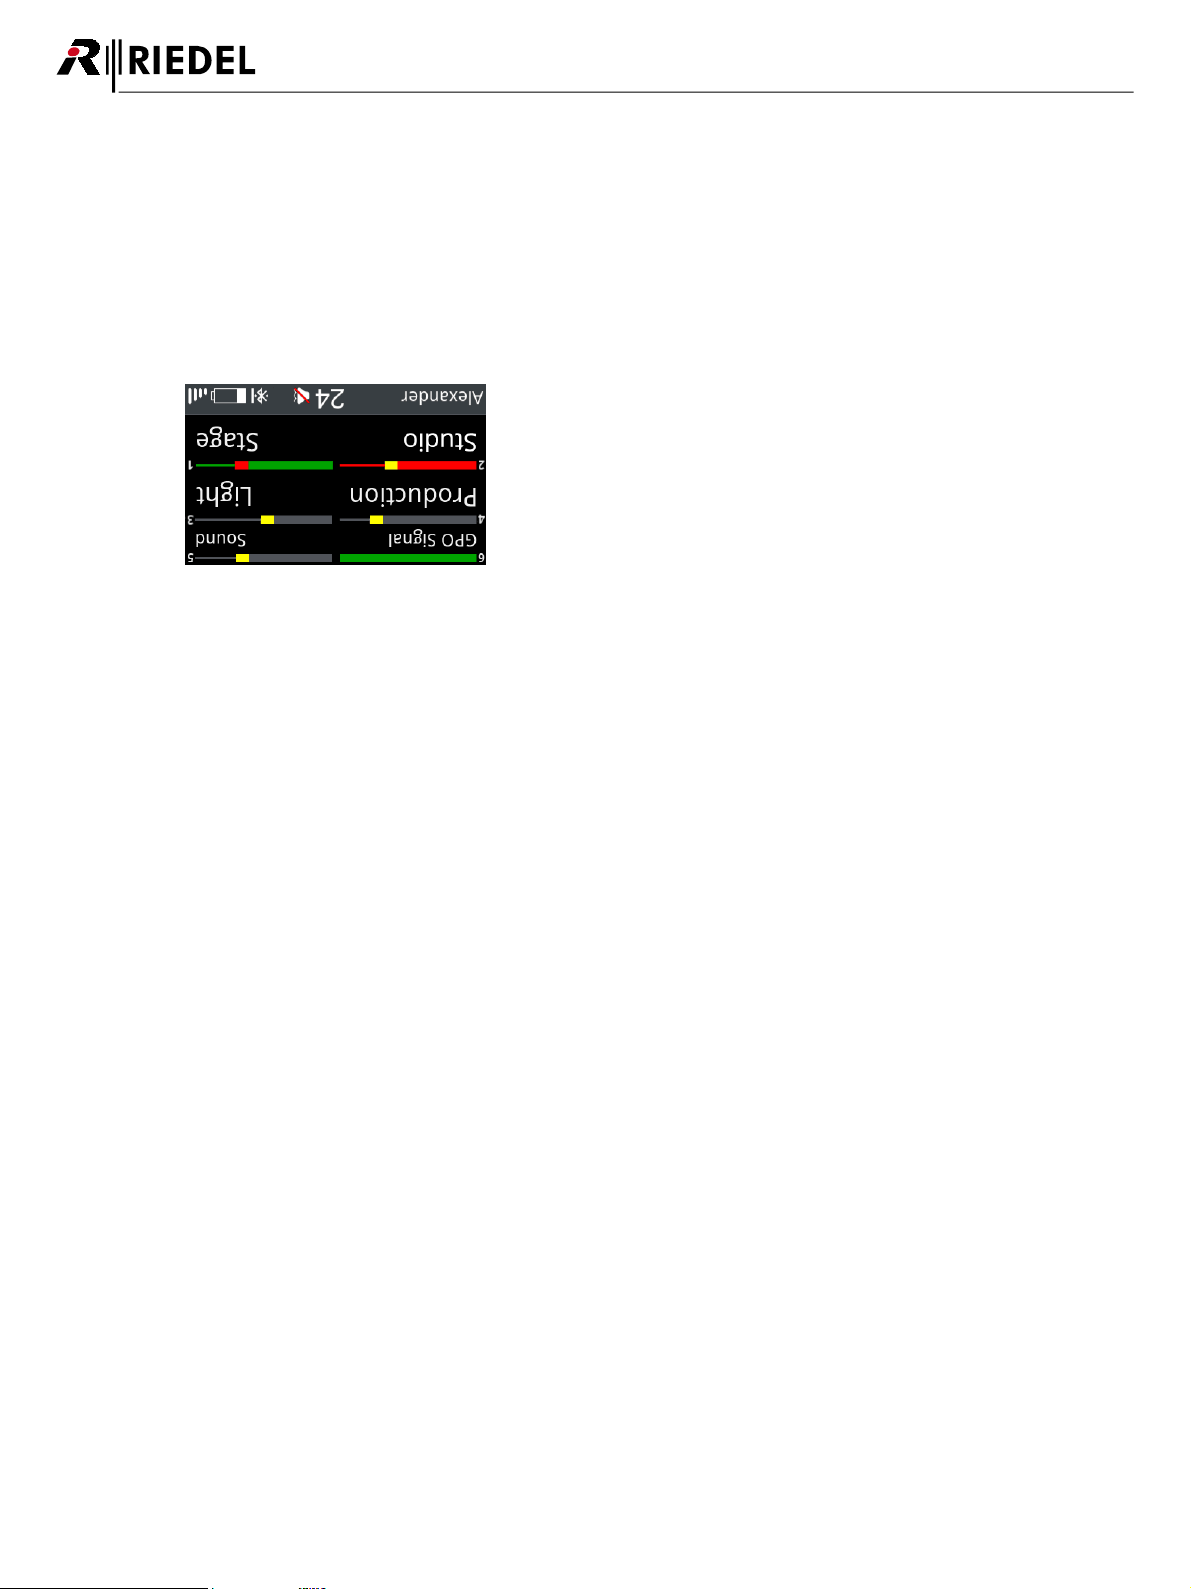
2.4.6 Display Mode
The menu 'General Settings > Display-Mode' allows selecting between the standard view, a view with bigger text and a
Flip Screen mode.
The Flip Screen Mode flips the single rows in the display horizontally:
2.4.7 Lock Keys
The menu 'General Settings > Lock-Keys' allows locking the keys to prevent accidental key actions.
Bolero User Manual A20
To unlock the keys:
1. If any key is pressed, the display shows “keys/rotaries locked. To start the unlock sequence, press the Menu key”.
2. Once the menu key is pressed, the display shows “press key4 to unlock”. This screen stays until volume change
timeout or key 4 is pressed.
3. If key 4 is pressed during that time, keys are unlocked. Otherwise keys remain locked.
24
Bolero User Manual A20
Figure 12: Bluetooth
Bluetooth State: Mobile/PC
Connection loss
(out of range)
The connection is not reestablished.
Reboot of the
Bluetooth device
The connection is not reestablished.
Reboot of the
Beltpack
The last connection is reestablished.
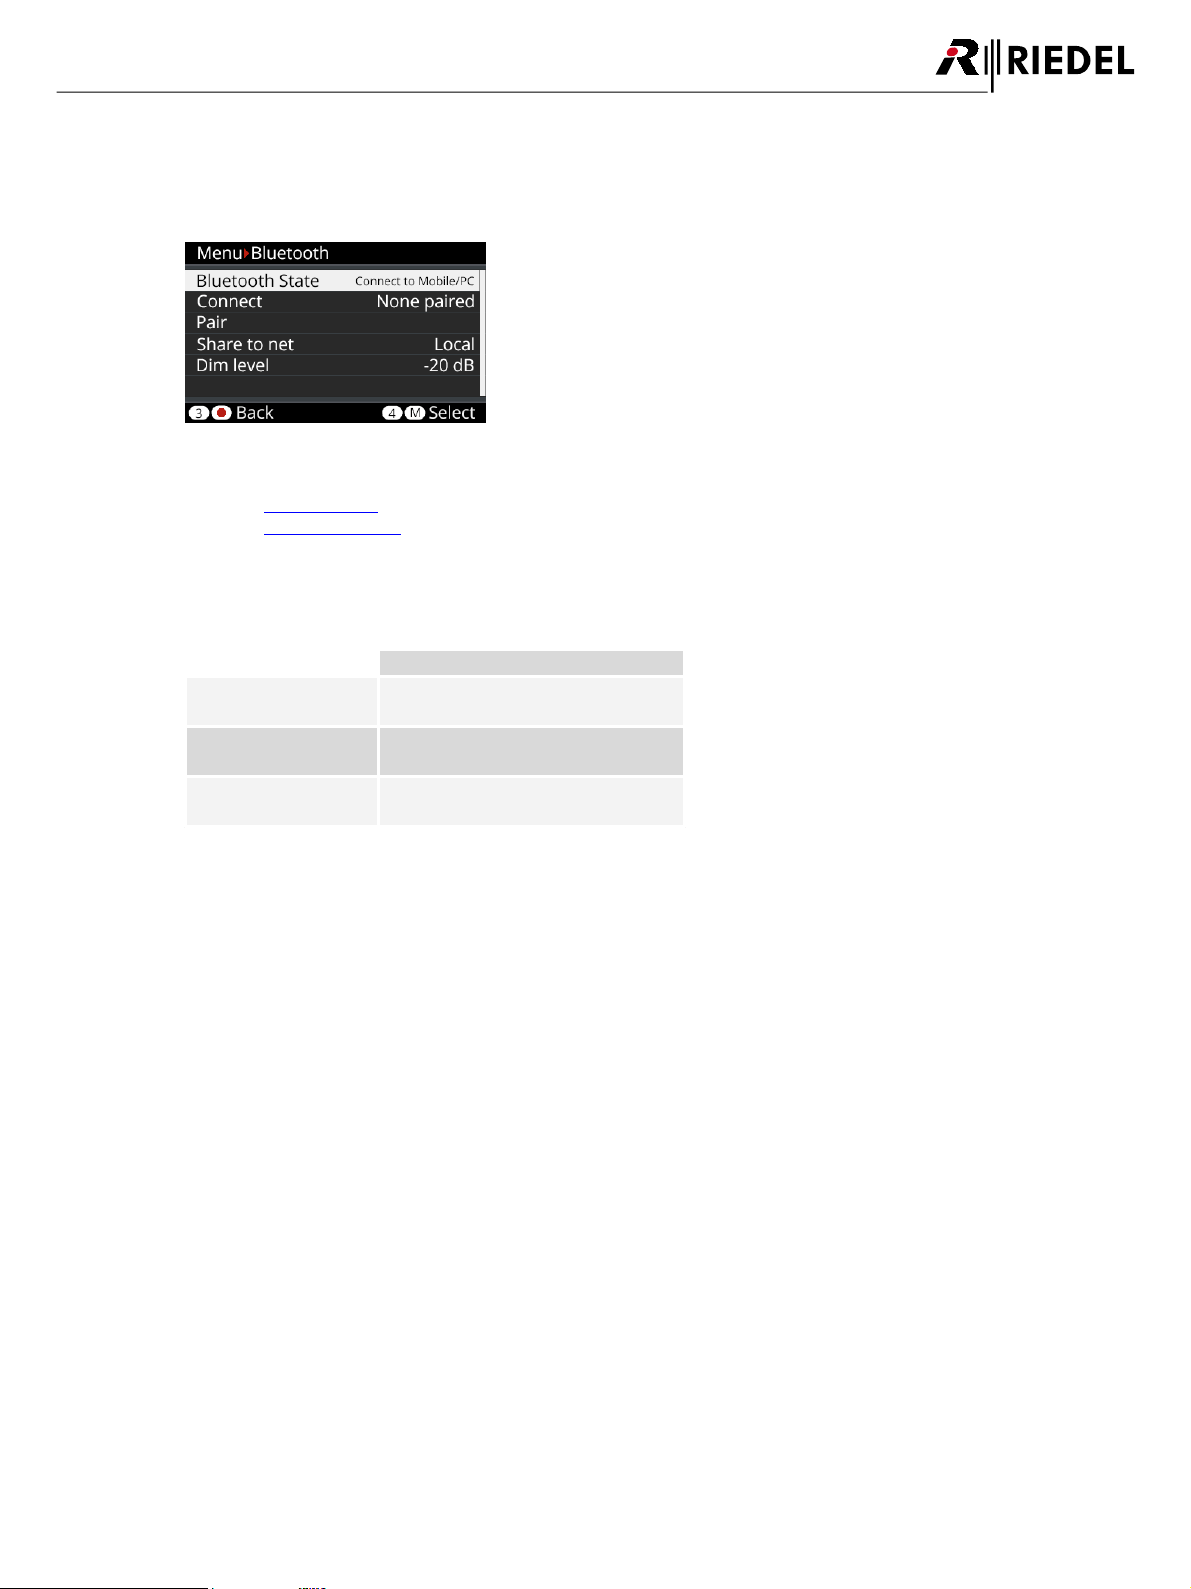
2.4.8 Bluetooth
The Beltpack provides a Bluetooth 4.1 wireless connection, which is available even when no antenna connection is
available or the Beltpack is not registered.
The menu Bluetooth State allows defining the device to be paired as the source of an audio signal.
The menu Pair / Discoverable allows pairing the desired device.
If the Beltpack is not connected to any device, the command Connect is displayed and allows establishing the
connection to the paired device. If a connection is established, the command Disconnect is displayed.
After loosing the Bluetooth connection...
The Mobile/PC is able to force re-establishment via button press.
During Music or Telephone call, the title or Name or number is visible in Status line.
25

2.4.8.1 Bluetooth State
Figure 13: Bluetooth – Bluetooth State
Mobile/PC
A mobile device (mobile phone, tablet) or PC is able to connect to the Beltpack. In this
mode the Beltpack (including the wired headset) acts like a Bluetooth headset. The
user is able to pick up a telephone call or skip forward to the next music track via the
Beltpack user interface. A telephone call or music of the connected mobile phone is
able to add to one or more channels of the Beltpack (Public) or is only hearable on the
connected Beltpack (Local).
·
The pairing is triggered in the Beltpack menu or optionally by NFC.
·
Telephone call audio quality (bidirectional): Standard (20 Hz ... 4 kHz)
·
Music audio quality (unidirectional): HQ (20 Hz ... 20 kHz)
Off
The Bluetooth functionality of the Beltpack is switched off.
This setting enables the Line input
If a Bluetooth connection is activated, the Line-Input is disabled.
In the menu 'Bluetooth > Bluetooth State' is selected, if the Beltpack should be connected to a Mobile/PC.
Bolero User Manual A20
26
 Loading...